

Page 1
Quick Start Guide
Page 2
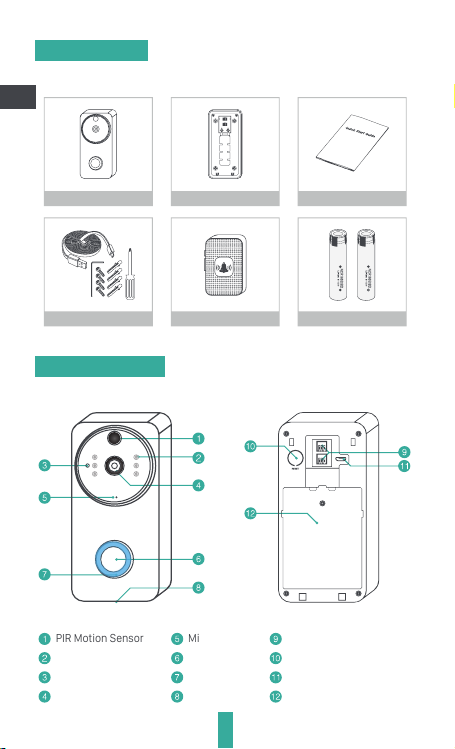
1. Packing List
Please consult below checklist for all the components.
EN
Video Doorbell User GuideBracket Panel
Accessories Chime (Optional) Batteries (Optional)
2. Product Drawing
BackFront
PIR Motion Sensor
Infrared LED × 6
Light Sensor
166° HD Camera
Microphone
Doorbell Button
Indicator
Speaker
1
8V~24VAC Power Port
Reset Button
Micro USB Port
Battery compartment cover
Page 3
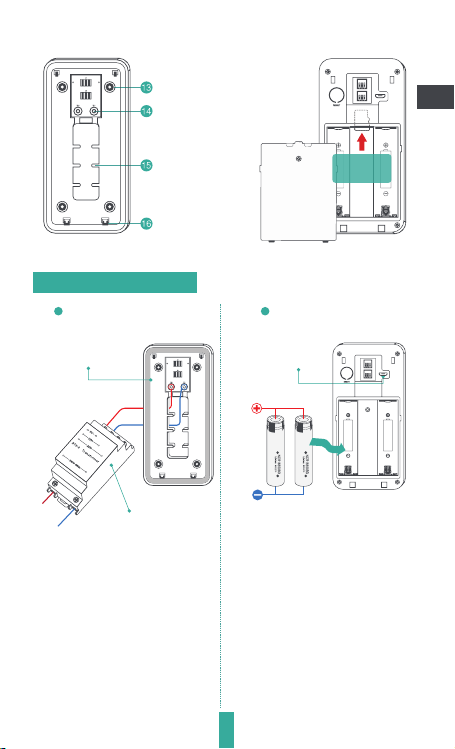
Bracket
Card Slot
Mounting Screw Holes × 4
Hardwire Terminals × 2
Wire Management
Hooks × 6
Doorbell Mounting
Hooks × 4
3. Power Supply Solution
Hardwire Power Source Powered By Batteries
Mounting
Bracket
8V~24V AC
Bell Transformer
(Optional)
Warning
:
• Bell transformer is not included.
• Simple replacing old mechanical
doorbell with legacy power source.
• Please operate under the direction
of the professional.
Micro USB Port
For Battery
Charging
(DC5V)
Rechargeable
18650 Batteries
Warning
:
• Please charge the batteries (8~10h)
prior to configuration or installation.
• Please mind the battery electrodes!
Insert the 2 batteries with positive-ends
upwards. Inappropriate battery install
can damage device and may cause fire!!!
Micro-SD
Card Slot
EN
2
Page 4

4. APP Download
Make sure that your smartphone has connected to a 2.4 GHz Wi-Fi
network, so as to configure the video doorbell (The device does not
EN
support 5GHz Wi-Fi network). Seach and download the APP ‘ToSee’
from APP Store or Google Play. The App is also available by scanning
below Q-R code with your smartphone.
Launch the app after installation, and start setting up your device,
following the in-app instructions or the following guiding steps.
5. Start Configuration
Please note that the batteries are not fully charged
in accordance with the transportation safety regulations. Please charge the batteries with a DC 5V
1A~2A charger (Micro USB port) for 8~10 hours prior
to configuration and installation.
Q1. Indicator OFF:
A1. Please check if the batteries are properly installed; remove the
insulating films on the battery electrodes(if there are any); or the
batteries may have run out of power, please charge the batteries.
Q2. Indicator flashes red and blue:
A2. Press and hold the reset button for 5 seconds till your hear a
ringtone, and the indicator flashes red. And the device is ready for
network configuration.
Q3. How to charge the batteries:
A3. Use a DC5V 1A~2A power adapter with Micro USB interface, and
plug to the port at the back pannel of the doorbell.
FAQ:
3
Page 5

6. Adding Device
Users can add device to APP either by AP mode or by QR Code Bridging.
6.1 Adding Device by Doorbell AP
ADD Device
QRCode Bridging
Scan QR Code
EN
Tap to add device
1
Go to WiFi Setting
3
Check the indicator
2
Home wi
Connect to “TOSEE-xxx”
4
4
Page 6

EN
Home wi
Home wi
Back to ‘ToSee’
5
Set admin P/W
7
Adding device complete
9
Select Wi-Fi & input P/W
6
Name your device
8
5
Page 7

6.2 Adding Device by QR Code Bridging
ADD Device
QRCode Bridging
Scan QR Code
EN
Tap QRCode Bridging
1
This feature is only supported in new software
versions. Please confirm the network prompt
tone and then use the QR code distribution
function.
Wi-Fi: Home wifi
Only 2.4G Wi-Fi network is supported
abc123456
Input any eight digit password if there is no set password.
Confirm your network
3
Replace network
Next
Check the indicator
2
Please use the device to scan the QR code
Please click the button after the device starts to flash blue
Generate QR-code
4
6
Next
Page 8

EN
15~20cm
5~8 in
Please use the device to scan the QR code
Please peel off the protective film
pasted on the lens, and let your
doorbell scan the QR code. Keep
your phone 5~8 inches away from
the doorbell lens. It beeps if the
scanning process is accomplished.
Scan the QR code to config Wi-Fi
5
Set admin P/W
7
Adding device complete
9
Please click the button after the device starts to flash blue
6
Name your device
8
7
27%
In the distribution network, please
be patient
Next
Waiting for connection
Page 9

7. Live View Interface
. Volume -- scene volume on/off
Live
. Playback -- Playback recordings
. Scene -- config image effects
. Full Screen -- full screen view
. Snapshot -- Snapshot button
. Speak -- Speak to visitor
. Record -- Tap to record on cell phone
. < -- Back to device list
. -- Share device
. -- Setting menu
. -- Charging icon
--Low Battery Alert
8. Device Sharing
The administrator can share the device with 5 other users, and max
3 users can view the doorbell live video simultaneously.
Live
Tap the icon , and input admin password
to log in the device-sharing page. Create a
new user account, and a one-time authorization QR code with 24-hour validity will be
generated and can be sent to another user
via social media, e-mail or SMS.
The receiver can save the QR-code to her/his
smartphone photo album after receival. Run
the ToSee App, tap on Scan QR Code to scan
ADD Device
QRCode Bridging
the QR-code in the phone’s photo album.
Scan QR Code
And the new user can add the device to her/
his device list.
8
EN
Page 10

9. Installation
Positioning the bracket. Install the mounting bracket.
EN
Place the device on the bracket.
Tighten the security screws.
9
Page 11

10. Specification
Video & Audio
Image Sensor
Resolution
Effective Pixels
Frame Rate
Infrared LED
Lens
Scene Angle
Min. Illuminance
Image Setting
Audio
Storage
Storage Type
Video Length
Recording
Network
Wifi Frequency
Standards
Live View Speed
APP
App Name
OS
Remote View
Notification
Others
Working Temp.
& Humidity
Power
Standby Current
Working Current
Standby Time
Working Time
Battery
Ingress Protection
Size (mm)
Weight (g)
1/4” CMOS OV9732 1/2.9” CMOS F23
720P 1080P
1280×720px 1920×1080px
1~25 FPS 1~25 FPS
Ø5 × 6pcs, 6M IR range
1.7mm/F2.0
166° wide angle
Color: 0.01 Lux; B&W: 0.001Lux
BLC, Infrared, HLC, Motion Compensation, WDR
Two-way audio intercomm with noise cancellation
Micro SD Card (Max 64G)
15s / 30s / 45s Settable
Trigered by push button, or PIR motion sensor
2.4GHz
IEEE 802.11 b/g/n
within 3 ~ 4 Sec
ToSee
iOS, Android
Within 2 sec
Notification push within 2 sec
-20℃ ~ 50℃; <90% (No condensation )
18650 Battery × 2, or by hardwre power 8V~24V AC
3 Months (10 times wake up per day)
170μA
200mA
6 ~ 8 Months
Rechargeable 18650 Battery
IP 54
75 × 40 × 143
300
EN
10
 Loading...