


smanos K2 Smart Hub
The DUT (K2 hub) is a security enabled Z-Wave Plus product that is able to use
encrypted Z-Wave Plus messages to communicat e to other security enabled Z-Wave
Plus products.
Please refer to K2 Smart Hub User manual for details to configure the Wi-Fi
connection before using the K2 Hub.
Contents
1. Install the DUT (smanos K2 Smart Hub) .................................................................. 2
1.1. Download the “smanos home” App ................................................................. 2
1.2. Sign Up/In ........................................................................................................ 2
1.3. Setup the K2 Smart Hub .................................................................................. 2
2. Certification Product Documentation ........................................................................ 3
D.2 Controllers - Inclusion / Exclusion ......................................................................... 3
I. Inclusion: ............................................................................................................. 3
II. Exclusion: ........................................................................................................... 4
From Z-Wave network:........................................................................................... 4
From controller’s memory ...................................................................................... 5
D.3 Controllers – Replication ........................................................................................ 5
D.4 Controllers – Learn Mode ....................................................................................... 5
D.5 Controllers - Including the DUT ............................................................................. 5
D.6 Controllers - Basic Documentation ......................................................................... 6
D.12 Documentation related to BASIC commands ....................................................... 6
D.13 Documentation for Factory Default Reset ............................................................ 6
D.17 Documentation for S2 Security CC ...................................................................... 7
1.1.2 to remove the failed node:..................................................................................... 7
1.2 to replace the failed node: ........................................................................................ 8
II. Device Attribute ........................................................................................................ 9

1. Install the DUT (smanos K2 Smart Hub)
1.1. Download the “smanos home” App
You can search “smanos home” in App Store or scan the QR codes as below.
1.2. Sign Up/In
If you have not registered an account with smanos, please press “Sign up” just below
the “Sign in” icon on the app, and follow the instructions to create your account first.
If you do not receive an account verification code in your email inbox during the
registration process, please remember to check your spam/junk folder and make sure
the notice has not been blocked by your service provider.
Once you have an account with us, please select the “Sign in” icon and enter your
email address and password to log in.
Press the “+” button on the Device List. Tap on [K2 Smart Hub], then follow the
configuration steps to set up your K2 Hub with your home Wi-Fi.
1.3. Setup the K2 Smart Hub
1. Plug the power adapter into a wall socket and into the K2 Hub, slide the Power
Switch from OFF to ON, wait until the white light flashes blue.
2. Connect the K2 to Your Smartphone
Use the Pin to press the Wi-Fi Configuration Button 3 seconds, the light flash red and
blue alternately.
3. Go to your phone’s Wi-Fi settings, look for and select "smanos K2" hotspot to
connect your mobile to the Hub. When connected, return to your “smanos home” app.
4. Enter Wi-Fi Details for Your K2 Smart Hub Select your 2.4GHz Wi-Fi network
from the display list, and enter the Wi-Fi network password. The Hub will connect to
the selected Wi-Fi network. This binding process should take about one minute.
5. When a successful connection is established, the indicator will stop blinking. Now,
your smanos K2 Hub is successfully set, enjoy a smart and secure life!
2. Certification Product Documentation
D.2 Controllers - Inclusion / Exclusion
I. Inclusion:
1. Click [ ] icon on the up-right corner and select [ ] icon to enter th e interface

of the accessories list.
Click “+” icon on the up-right corn er (of the acc essories list page) to ent er the d evice
selection page.
2. Press the “Z-Wave Products” and “START INCLUSION” to add the Z-Wave
device.
* The list (from Keypad to Glass Break Detector) is for adding the proprietary RF
devices.
3. Press the "INCLUSION " button to enter the add mode.
① The DUT is waiting for adding the device. LED flashing in red, green and blue.
② Set the Z-Wave device into the adding mode according to its manual.
③ The DUT will start the inclusion process and device configuration. Successful
inclusion and configuration will b e confirmed by “User def ined name and location”
message. The device LED lights stop blinking.
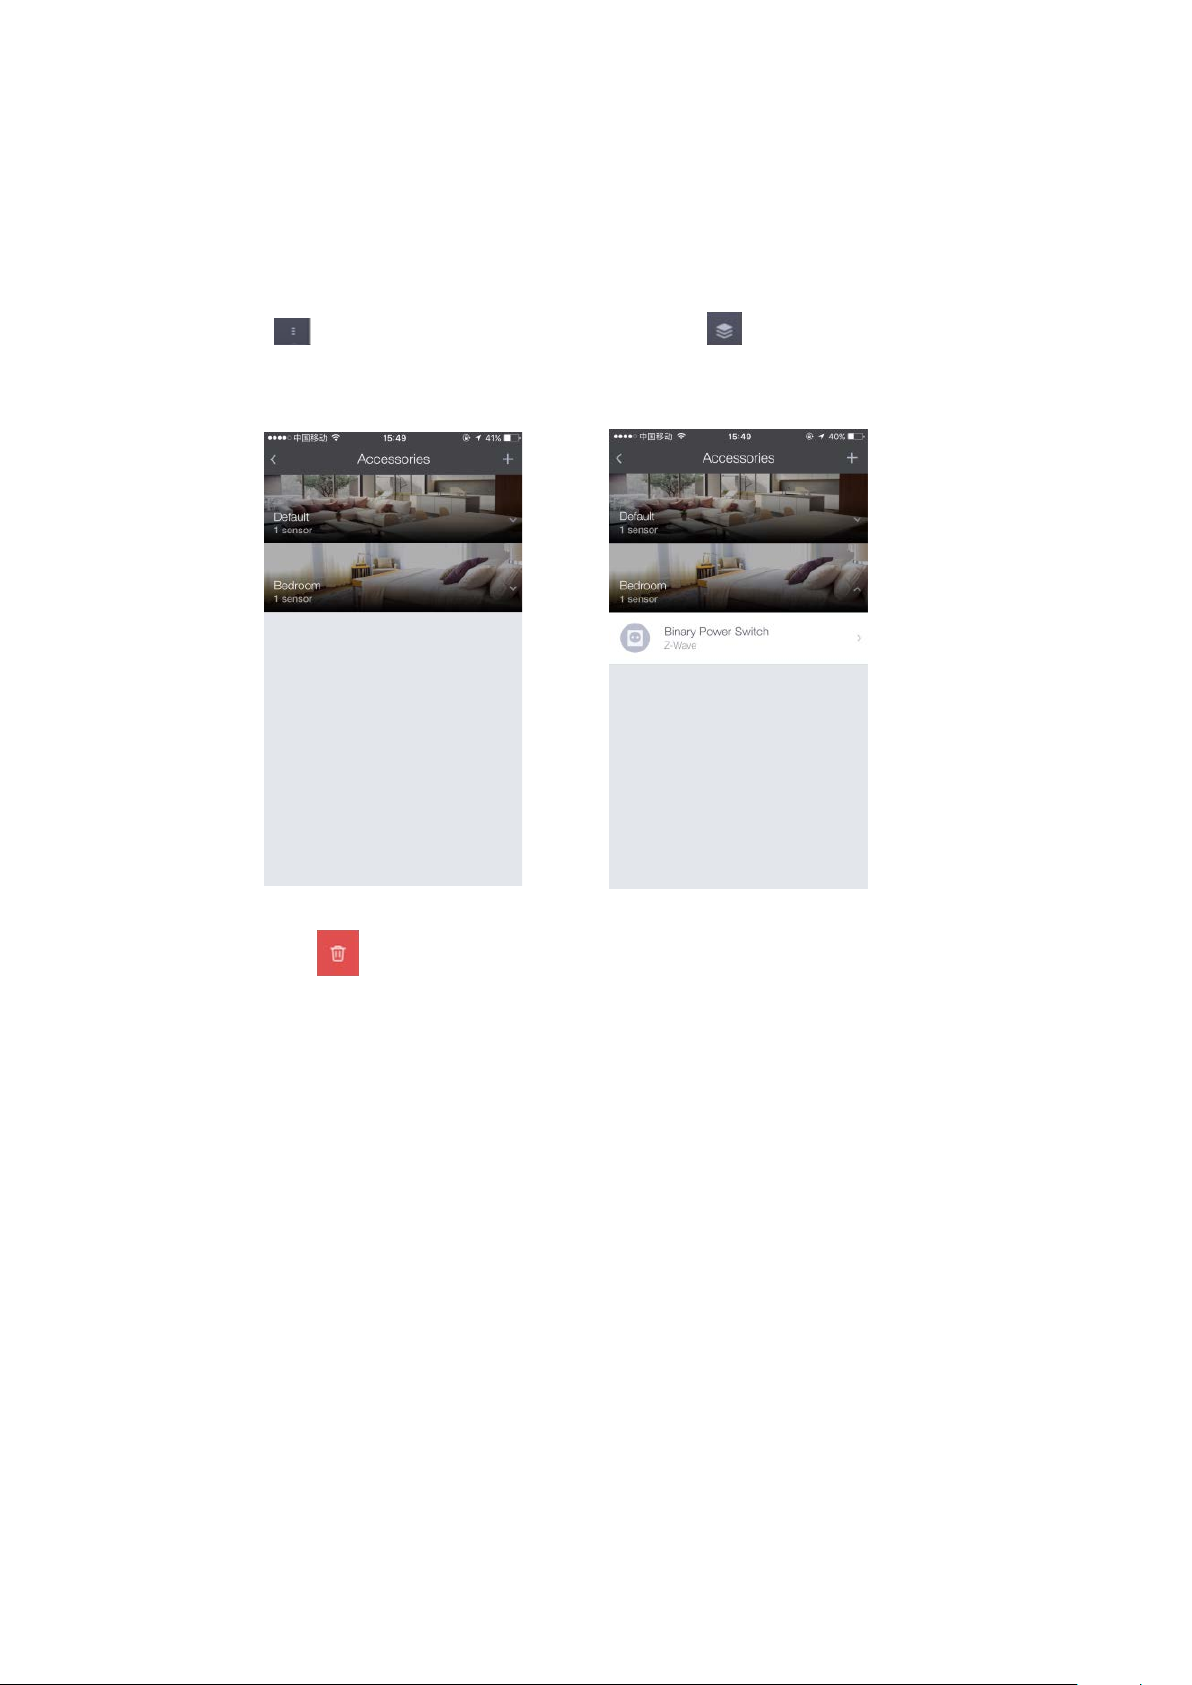
II. Exclusion:
Deleting the dev ice will remove it from both the Z-Wave network an d t he con trol ler’s
memory.
From Z-Wave network:
1. Click [ ] icon on the up-right corner and select [ ] icon to enter the interface
of the accessories list.
2. Click on the room (Location) where the device is installed.
3. Click "door 1" and slide to the left, then the delete button appear.
4. Click the " " button, and then click the "YES" button in the pop-up box, the
DUT enters the delete mode, waiting to delete the accessory.
① Set the Z-Wave device into the learn mode according to its user’s manual.
② The DUT will start the process of exclusion and removing from controller’s
memory.
③ If the device is deleted successfully, then the "Reminder" message box will be
closed.

From controller ’s memory
1. Click [ ] icon on the up-right corner and click on the [ ] icon into the "Setting"
interface.
2. Click "Delete Z-Wave" Device into the delete mode, and the device can be
removed from the learning mode.
D.3 Controllers – Replication
When the DUT adds a controller to the network, the replication of the network
information from the DUT to another controller is initiated.
D.4 Controllers – Learn Mode
1. Click [ ] icon on the up-right corner and click on the [ ] icon into the "Setting"
interface.
2. Click the "Connect the DUT to Other Controller", and the DUT enters the "Learn
mode" mode.
The DUT will terminate the learning mode if the connections are not completed in
certain time.
D.5 Controllers - Including the DUT
1. Click [ ] icon on the up-right corner and click on the [ ] icon into the "Setting"
interface. (ref. D.4)
2. Click the "Connect the DUT to Other Controller" button, and the DUT enters the

"Learn mode" mode.
The DUT will wait for other controllers to add for inclusion.
D.6 Controllers - Basic Documentation
If the DUT receives a basic command, it will not do anything.
D.8 Devices from multiple manufacturers in one network
The DUT can be operated in any Z-Wave network with other Z-Wave certified
devices from other vendors.
All non-battery operated nodes within the netw ork will act as repeat ers regardless of
vendor to increase reliability of the network.
D.9 Documentation for Association CC
1. Grouping identifier:1 ;
2. Maximum number of devices that can be added to the group:1
3. Description of how the association group is used and / or triggered by the
product: ① W hen the DU T is added to the network, it’s group 1 needs to be set
"lifeline".
② When the DUT is added to the network by a controller,
"COMMAND_CLASS_DEVICE_RESET_LOCALLY" is sent to the controller via
"lifeline" when the DUT returns to factory settings.
D.12 Documentation related to BASIC commands
The DUT will control the added “unknown’ devices via Basic Set on/off.
The value of basic set on is “0” while the basic set off is “0xff”.
D.13 Documentation for F actory Default Reset
Note: If this controller is the primary controller for your network, resetting it will
result in the nodes in your network being orphaned and it will be necessary after the
reset to exclude and re-include all of the nodes in the network. If this controller is
being used as a secondary controller in the network, use this procedure to reset this
controller only in the event that the network primary controller is missing or
otherwise inoperable.
1. Click [ ] icon on the up-right corner and click on the [ ] icon into the
"Setting" interface. (ref. D.4)
2. Click the "Reset Z-Wave Module" button and a pop-up box will be displayed.

3. Click "Reset" and the DUT will start restoring factory settings of the Z-Wave
module.
4. Click "Cancel" and the DUT will cancel the restoring factory settings.
D.17 Documentation for S2 Se curity CC
D.19.1 How to activate any functionality available in the device
related to Z -Wave behavior.
I. Click [ ] icon on the up-right corner and click on the [ ] icon into the
"Setting" interface. (ref. D.4)
To delete Z-Wave Device:
Click "Delete Z-Wave Device", the DUT enters to th e delete mode and is waiting fo r
the selected device enters to the learning mode.
To remove the failed node:
Click "Aborted Device Management", and the DUT enters the failed node
management page.
1. Click " " and then "Delete" in the pop-up box to remove the failed node.

2. Click " " and then "Cancel" in the pop-up box to cancel removing the failed
node.
To replace the failed node:
Click "Aborted Device Management", and the DUT enters the failed node
management page.
1. Click " " and then "Continue" in the pop-up box to replace the failed node.
After the DUT enters the Add mode, set the accessory to be added to the learning
mode.
2. Click " " and then "Cancel" in the pop-up box to cancel replacing the failed
node.
Click "Send NIF” to broadcast NIF.
Click “Network Management Password” for password modification and acquisition.

1. The initial password of DUT’s network management is ‘111111’, the effective time
is 5 minutes each time. After 5 minutes, it needs to re-enter the password.
2. Click 'Change Z-Wave Password', the password can be modified to enter the old
password once and new password two times.
3. Click 'Forgot Z-Wave Password' to enter the password acquisition interface. Enter
the main account and password to get the current network management password.
II. Device Attribute
1. Click [ ] icon on the up-right corner and select [ ] icon t o enter the int erface
of the accessories list. (ref. D.2)

2. Select the Z-Wave device and enter the attribute page.

3. On attribute page, user can do the followings:
to edit the device name
to locate the device (ex. installed in the Living Room)
to control the device
a. to control the plug (ex. turn on/off the light)
b. to control the dimmer (ex. moving the control bar to adjust the brightness.)
c. to control an unknown sensor via on/off button.
d. to control an added controller
e. to read the data of sensors (ex. temperature, humidity)

f. to control a thermostat
Mode: to setup the thermostat function mode.
Set Point: to setup values (ex. temperatures that the thermostat should work on).
Fan Mode: to setup the fan mode.
3. to setup the advanced features of the device
Association
a. Click "Advanced" and then “Association"
b. Click "Association Set", enter the group number you want to set, and then select the
device that you want to link.
c. Click “Association Remove”, enter the group number you want to remove, and then
select the device that is linked to it.
Configuration

a. Click "Advanced" and then "Configuration"
b. Enter the desired parameter number (it can be found on the device menu)
c. Select "Default" or “Customize"
Default: the device is to be configured as factory settings.
Customize: user is able to configure the device.
d. Enter the desired size (the size is defined on the device menu)
e. Enter the desired value (the value is described on the device menu)
D.19.3 How to send controlled c ommand from the controller
COMMAND_CLASS_ASSOCIATION:
When a device is added to the network and it supports this command, the DUT will
use this command to set “Lifeline” of the device.
Association Group Information Command Class:
When a device is added to the network and it supports this command, the DUT will
use this command to query group names for the newly added device.
COMMAND_CLASS_BATTERY:
When a device is added to the network and it supports this command, the DUT will
use this command to obtain the battery power level of the device.
COMMAND_CLASS_BASIC:
The device that is not recognized by the device will enter into the "Unknown"
attribute interface, the DUT will use this command to control the device through the
ON/OFF buttons.

COMMAND_CLASS_SWITCH_BINARY:
If a switch is added and it supports this command, then access the d evice's attribute
interface, the DUT will use this command to control the device through the ON/OFF
buttons.
COMMAND_CLASS_CONFIGURATION:
When a device is added to the network and it supports this command, th en enter the
advanced settings in the device's attribute interface, the DUT will use this command
to set the configuration of the device.
DEVICE_RESET_LOCALLY_NOTIFICATION:
The DUT will send this command through “lifeline” when it is reset.
OMMAND_CLASS_DOOR_LOCK:
When a door lock is added, then ente r the device's attribute interf ace, the DUT will
use this command to control the door lock through the ON/OFF buttons.
COMMAND_CLASS_INCLUSION_CONTROLLER:
1. When the DUT is added to the network by a controller that supports Inclusion
Controller Command Class, the DUT will use this command to add device.
2. When the DUT adds a controller that supports Inclusion Controller Command Class,
this command is used when the controller adds device.
COMMAND_CLASS_MANUFACTURER_SPECIFIC:
When a device is added to the network and it supports this command, the DUT will
use this command to obtain manufacturer ID of the device.
COMMAND_CLASS_METER:
When a meter is added to the network and it supports this command, the DUT will
use this command to obtain the scales of this meter.
COMMAND_CLASS_MULTI_CHANNEL:
When a device is added to the network and it supports this command, the DUT will
use this command to obtain the end point functions of the device.
COMMAND_CLASS_MULTI_CHANNEL_ASSOCIATION:
When a device is added to the network and it supports this command, the DUT will
use this command to get the command class that is supported by the end point of the
device.
COMMAND_CLASS_SENSOR_MULTILEVEL:
When a device is added to the network and it supports this command, the DUT will
use this command to obtain the notification type that is supported by the device.

COMMAND_CLASS_SWITCH_MULTILEVEL:
When a dimmer is added and it supports this command, then access the device's
attribute interface, the DUT will use this command to control the dimmer by moving
the control bar.
COMMAND_CLASS_NO_OPERATION:
The DUT will use this command to check if a node is reachable or not.
COMMAND_CLASS_NOTIFICATION:
When a device is added to the network and it supports this command, the DUT will
use this command to obtain the notification type that is supported by the device.
COMMAND_CLASS_SECURITY:
When a device is added to the network and it supports this command, the DUT will
use this command to add the device.
COMMAND_CLASS_SECURITY_2:
When a device is added to the network and it supports this command, the DUT will
use this command to add the device.
COMMAND_CLASS_THERMOSTAT_MODE:
When a thermostat is added to the network and it supports this command, then access
the device's attribute interface, the DUT will use this command to set “Mode” of the
thermostat.
COMMAND_CLASS_THERMOSTAT_FAN_MODE:
When a thermostat is added to the network and it supports this command, then access
the device's attribute interface, the DUT will use this command to set “Fan Mode” of
the thermostat.
COMMAND_CLASS_THERMOSTAT_FAN_STATE:
When a thermostat is added to the network and it supports this command, then access
the device's attribute interface, the DUT will use this command to obtain the status of
the fan.
COMMAND_CLASS_THERMOSTAT_SETPOINT:
When a thermostat is added to the network and it supports this command, then access
the device's attribute interface, the DUT will use this command to set “Set Point” of
the thermostat.
COMMAND_CLASS_THERMOSTAT_OPERATING_STATE:
When a thermostat is added to the network and it supports this command, then access
the device's attribute interface, the DUT will use this command to obtain the operating

status of the thermostat.
COMMAND_CLASS_VERSION:
When a device is added to the network and it supports this command, the DUT will
use this command to obtain the version information of the device.
COMMAND_CLASS_WAKE_UP:
When a device is added to the network and it supports this command, the DUT will
use this command to obtain the wake-up interval of the device.
COMMAND_CLASS_ZWAVEPLUS_INFO:
When a device is added to the network and it supports this command, the DUT will
use this command to get additional information of the device.
 Loading...