

Instruction Manual for SM-800A
COUNTER TOP MIXER
Installation, Operation and
Maintenance Instructions
SMAKY AB
Regulatorvägen 21, S-141 49 Huddinge, Sweden
Tel+ 46 8 657 9490
Fax+ 46 8 657 8980
http://www.smakymixers.com
e-mail: info@smaky.com
Revised in December, 2009
1
SM-800A
SPECIFICATION
Model
SM-800A
Bowl Size
8 Quarts (7.6 Liters)
Motor
1/4HP (0.20KW)
Electrics
110V/60HZ,
220V/50HZ
Single phase
Speeds
1st gear 132 rpm
2nd gear 235 rpm
3rd gear 421 rpm
Dimensions (cm)
(L x W x H)
40 x 30 x 58
47 x 36 x 66 carton
Weight
Gross 27kg
Net 25kg
Standard
Equipment
Pastry Knife, Stainless
steel bowl with Beater,
Whisk and Spiral
Dough hook.
Because of continual improvements, strict accuracy
of description cannot be guaranteed.
GUARANTEE
SMAKY provides one year guarantee, either
the date of dispatch from our factory, or the date of
purchase from one of our approved distributor.
SMAKY will replace any defected parts
resulted from faulty design, material or
workmanship. In addition to this, any repair must
be carried out by our authorized service agent.
All defective parts without any alteration or
repair can be returned to SMAKY or the nearest
authorized representative, postage paid within one
year warranty.
SM-800A is a desk top planetary mixer
designed for commercial use by the professional
caterer. It has a total bowl capacity of 8 Quarts,
combined with 3 speed gearbox to ensure that all
mixing requirements can be met.
CONTENTS
Specification.............................................. 1-2
Installation....................................................3
Electrical Connection.................................... 3
Safety............................................................3
Correct Use of the Mixer................................4
Tool Selection................................................4
Fitting the bowl.............................................4
Fitting the Mixing Tool..................................5
Speed selection...............................................5
Mixing Capacities...........................................5
Controls.........................................................6
Care of Your Mixer.........................................6
Fault Finding Chart........................................7
Maintenance...................................................7
Electrical Wiring Diagram............................8-9
Exploded View Drawing...........................10-16
2
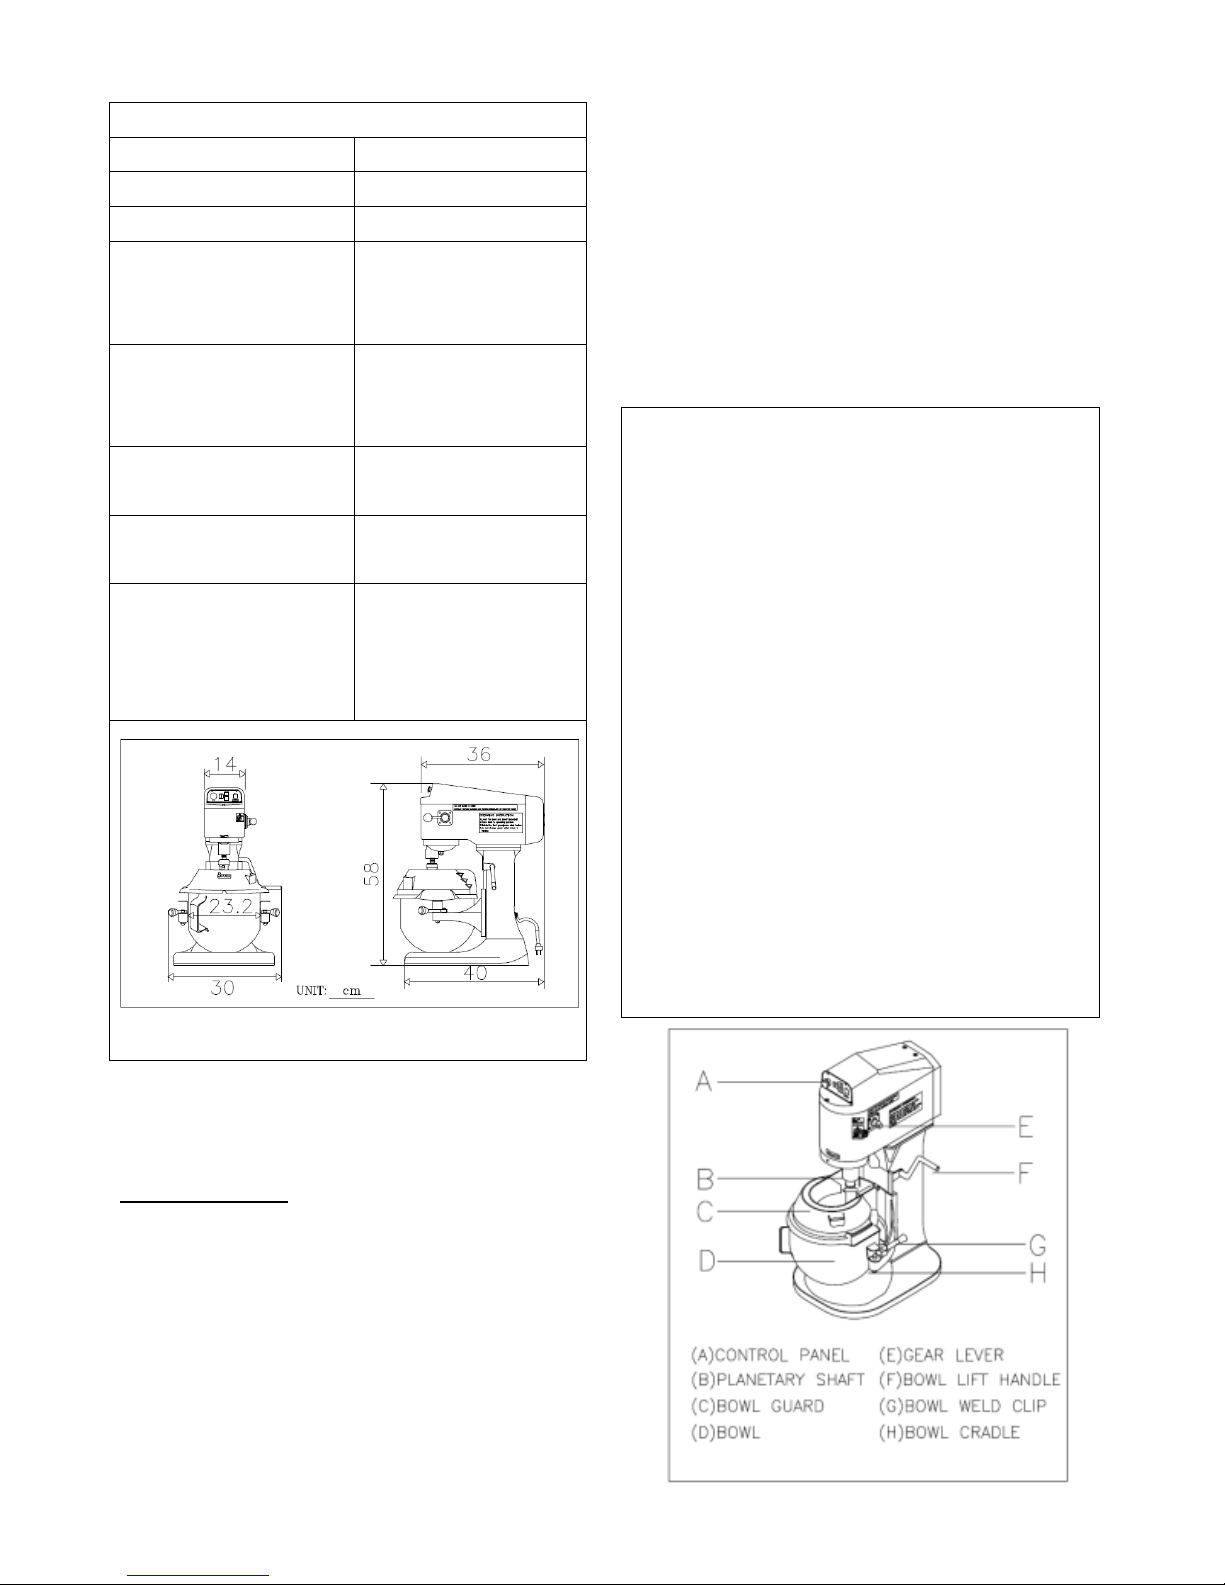
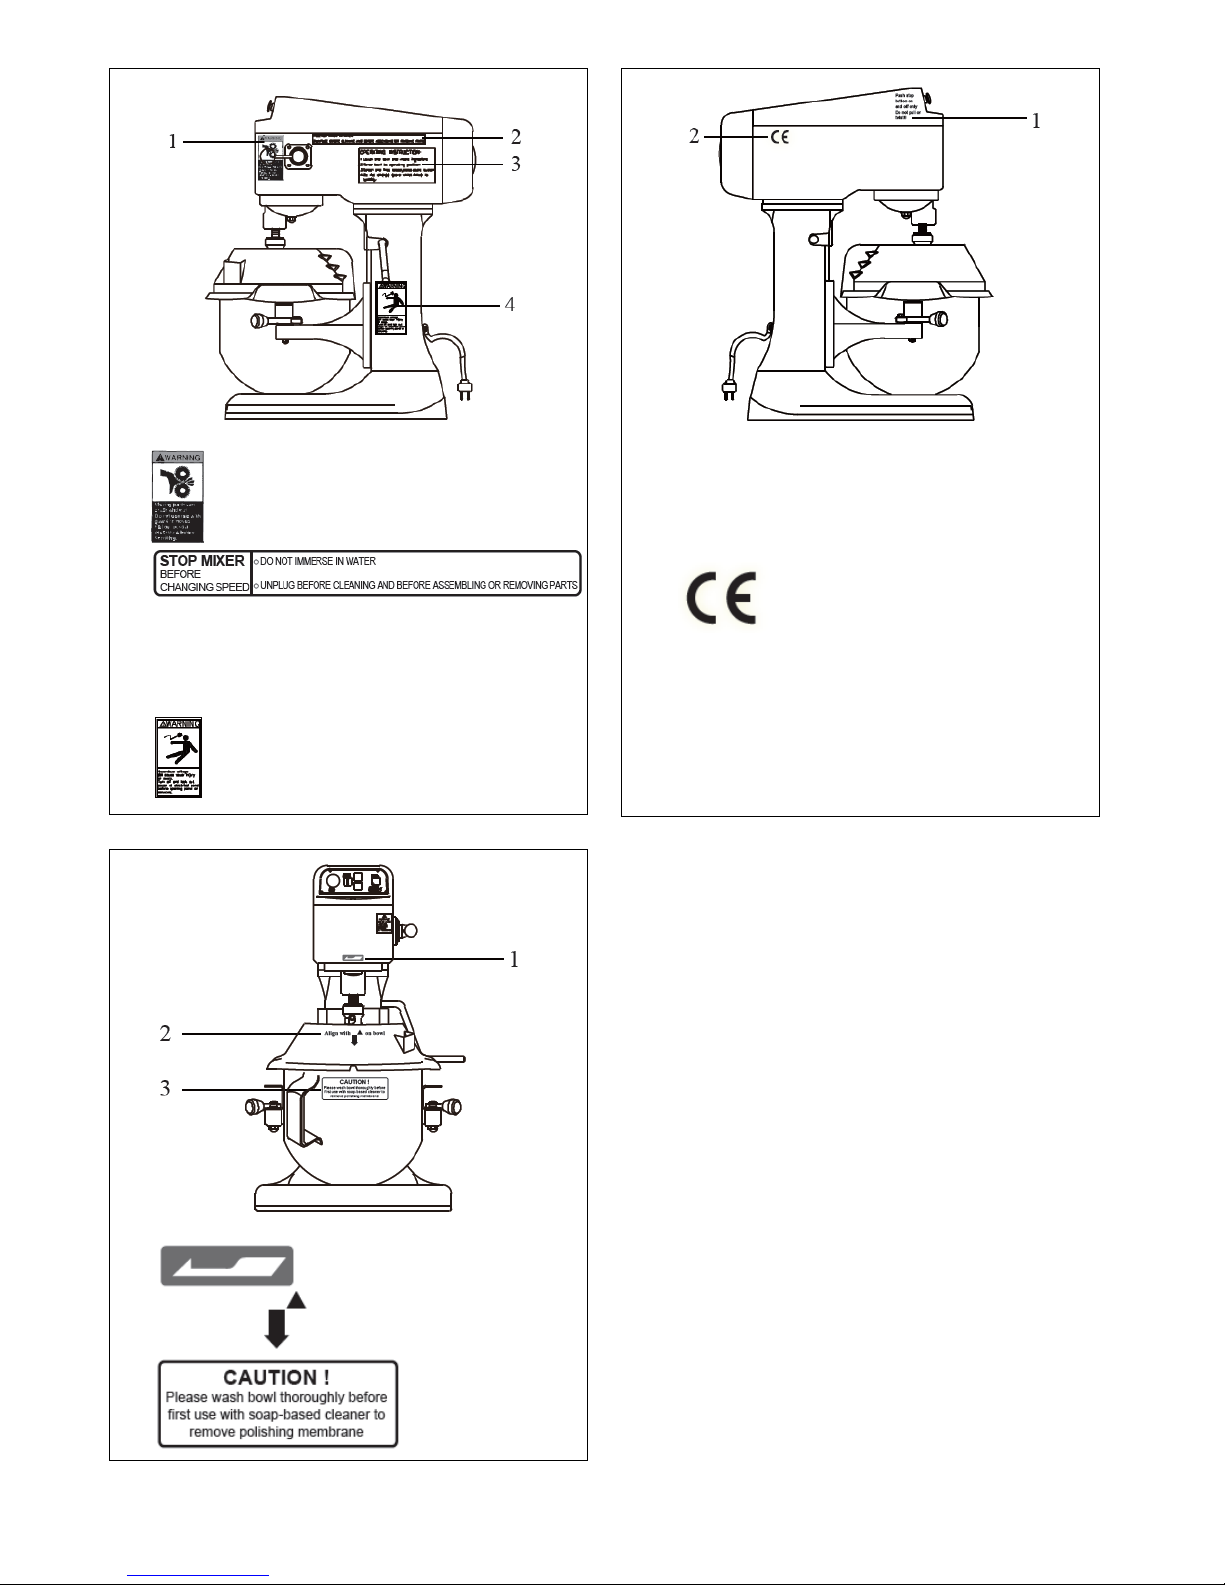
(1)
(2)
(3)
(4)
(1)
(2) Align with on bowl
(3)
(1) Push STOP button ON and OFF only
Do not pull or twist!!
(2)
Moving parts can crush and cut.
Do not operate with guard removed.
Follow lockout procedure before servicing.
OPERATING INSTRUCTION:
1. Lower the bowl and insert ingredient
2. Raise bowl to operating position
3. Select the first speed, press start button
4. Do not change gears whilst mixer is turning
Hazardous voltage will cause severe injury or
death. Turn off and lock out power at electrical
panel before opening panel or servicing.

3
INSTALLATION
The machine is supplied factory lubricated and
ready to run. It can be positioned on any substantial
work surface or bench which is capable of
supporting a load of 30kg. The transportation
should require two people. Please see Figure 1.
ELECTRICAL CONNECTION
Before connecting this machine to the
electrical supply, please check the details on the
rating plate (located on the rear of the machine)
corresponding to the details of your electrical
connection. The mixer is supplied with a trailing
lead fitted with a molded plug. If the style of plug is
unsuitable for the socket you plan to use, the plug
must be cut off and replaced with an appropriate
plug.
The mixer should be plugged into a switched
socket which isolates all poles and has a minimum
contact clearance of 3mm and located close to the
mixer for use in an emergency and to facilitate
servicing. (max.2 meters of cable) The machine
must be incorporated into a potential equalization
system. The leakage current for this appliance is no
greater than 1mA/KW. If the electrical supply cable
to the machine becomes damaged, it must be
replaced by a qualified electrician using cable
which is 0.75 or higher and suitable for a 1/4HP
motor load. The ground wire is fixed to the machine
and this connection must be kept intact. The mixer
MUST be grounded.
- The minimum requirement for all electrical
equipment is correct operation between air
temperature of +5°C and +4°C.
- Electrical equipment is capable of operating
correctly when the relative humidity does not
exceeding 95% at a maximum temperature of
+40°C.
- Electrical equipment is capable of operating
correctly at altitude up to 1000m.
- Electrical equipment is designed to withstand to
protected against the effects of transportation, and
storage temperature within a range of -25°C to
+55°C and for short periods not exceeding 24h at
up to +70°C.
BEFORE USING THE MIXER
Before using the mixer, please ensure that all
users are familiar with the correct operation of the
machine. In particular, care should be taken to
ensure that the bowl and mixing tools are correctly
fitted and the bowl cradle is in the raised position
prior to starting the machine.
SAFETY AT WORK
Never place your hand or any kitchen utensil
into the bowl when the mixer is in operation.
Please isolate the machine from the electrical
supply by removing the plug from the socket before
cleaning or dismantling.
A notice advising operators of the safe use of
this mixer is attached to the machine.
OFFICE, SHOPS AND RAILWAY
PREMISES ACT, 1963
The above Act requires that this machine and
attachments shall be operated only by a properly
instructed person or by an employee who is under
the supervision of a properly instructed person. The
instruction shall include indication of the possible
dangers arising and the precautions to be observed.
The Act also requires that no person under the age
of 18 shall clean a machine if this exposes him to
risk of injury from a moving part of that machine or
any adjacent machine.

4
CORRECT USE OF THE MIXER
It is the responsibility of the users to use the
mixer correctly within the recommended limitations.
Always follow the instructions on the side of the
machine when changing speed.
If the motor labors, stop the machine and
reduce the size of the mix immediately.
Damage resulting from improper use is not
covered by the SMAKY warranty.
For operator safety, the machines is fitted with
a bowl guard which is electrically interlocked to
ensure that the mixer cannot operate unless the
guard is correctly positioned and the bowl is
raised.
For additional safety the mixer has a no volt
release feature which means that in the event of a
power failure, the machine will only restart after the
control arrangement ensures that when the supply is
restored, the machine cannot restart on its own.
- Careful handling of bagged products by
minimizing the height above the bowl base from
which they are poured.
- Careful slitting of bags in the lower part of the
bowl to allow dust free discharge of flour as far as
possible.
- Use of Temporary bowl covers to minimize
openings through which flour may escape.
BOWL LIFT & BOWL GUARD
The bowl cradle and guard are electrically
interlocked so that the machine will only operate
with the bowl cradle in the raised position. In
addition to this, the bowl guard must be placed into
position by aligning the upside-down V cut into the
safety guard with the small raised portion on the lip
of the bowl.
Only once the bowl is raised and the guard
locked will the machine operate, thus ensuring total
user safety at all times.
Once the guard has been opened or the bowl
lowered, the machine can only be restarted by
pressing the start button. During the mixing process
additional ingredients can be added by means of the
chute located on the right hand side of the bowl
guard.
TOOL SELECTION
The beater, whisk and spiral dough hook are
meant for the work implied by their names.
Do not use the beater for dough making or the
whisk for anything other than whisking, aerating or
mixing light mixtures.
Table 1 shows the typical uses for each tool.
Beater: Firm mixes such as light
pastry, cakes biscuits, icings
fillings and mashed vegetables.
Spiral Dough Hook: Heavy mixes
such as dough, pie pastry and
sausage meat.
Whisk: Light mixes such as
whipped cream, mayonnaise, egg
whites, pancakes and soufflés.
Pastry knife
FITTING THE BOWL
With the bowl
cradle lowered, place
the chosen mixing tool
in the bowl and
position the bowl on
the cradle. There are
three location points
for the bowl:
(a) The locking pin at the rear of the bowl should
locate in the hole of the cradle.
(b) The two weld clips in the bowl handles must
engage on the locating pins located on
the cradle.
(c) Latching the bowl locking. Ensure that the bowl
is seated correctly on the cradle before securing the
bowl locking latches prior to use.
Table 1
5
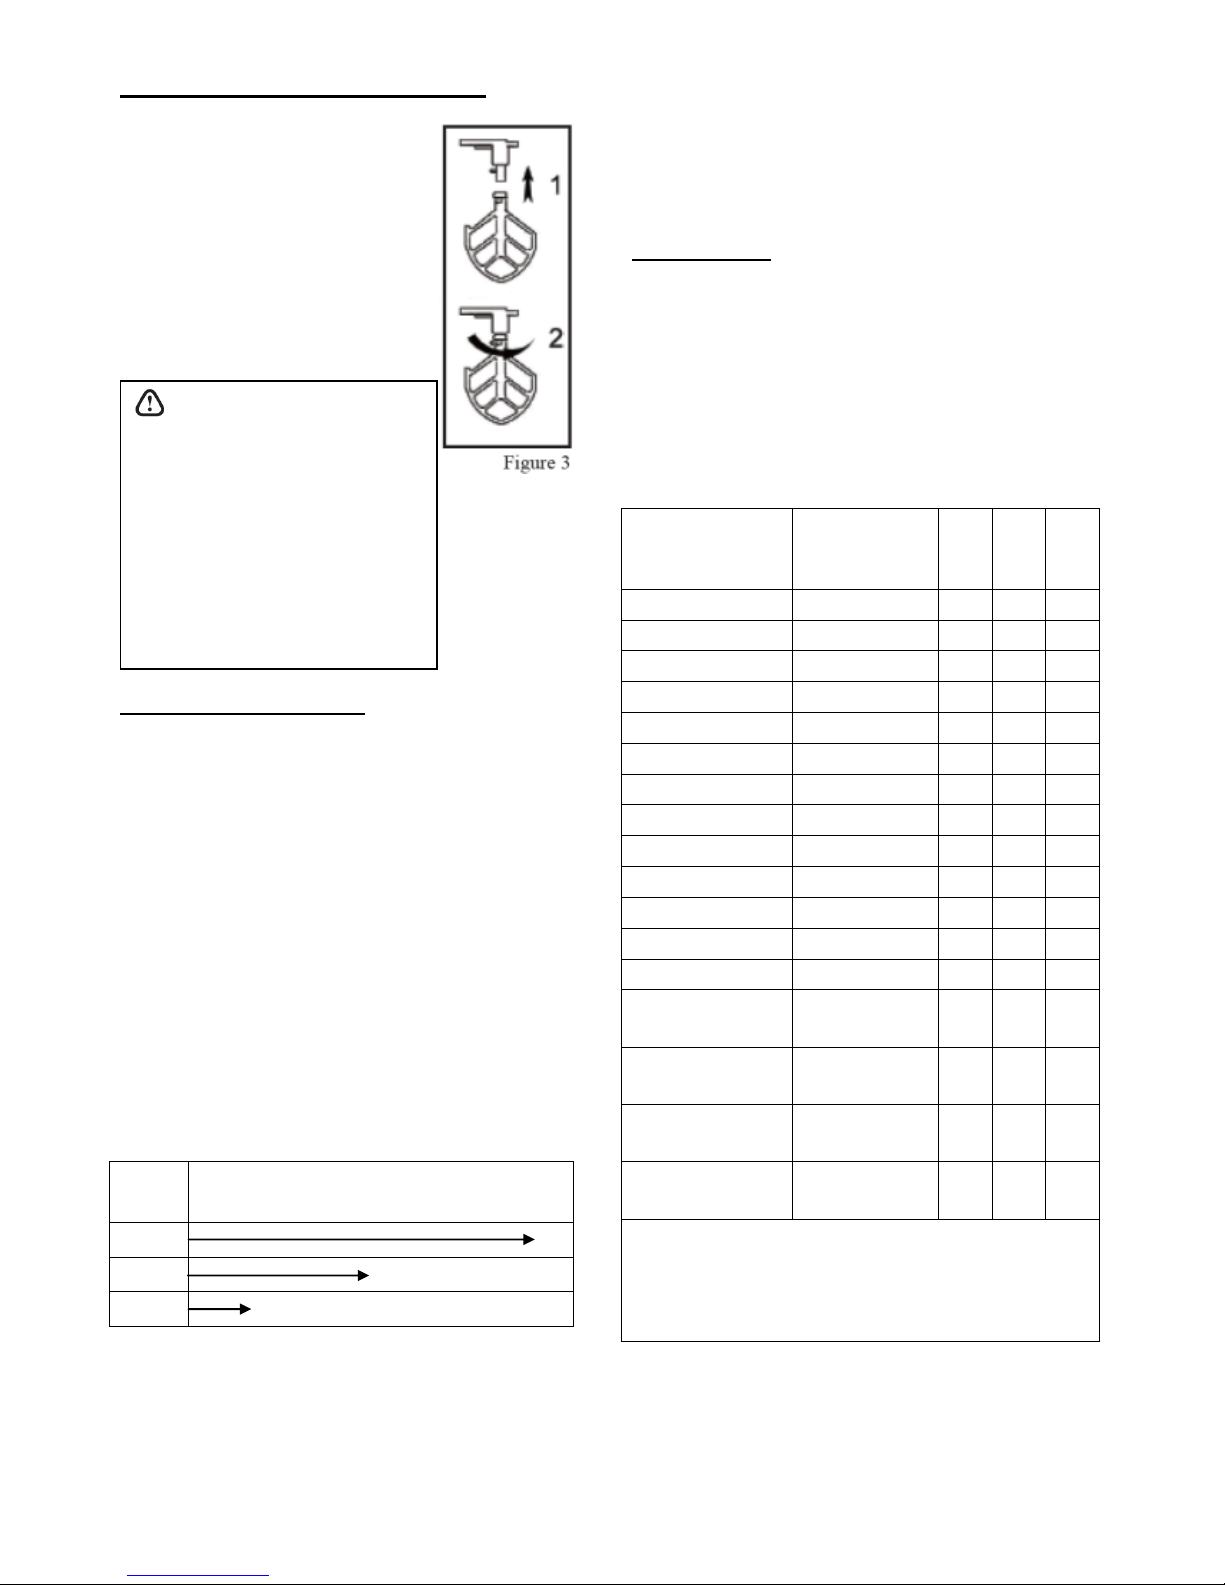
FITTING THE MIXING TOOL
Slide the bayonet fitting of
the tool onto the drive shaft and
twist clockwise to secure it in
position.
To remove the mixing tool,
slide the tool up the shaft slightly
and twist counter clockwise.
Please see figure 3.
SPEED SELECTION
Before changing speeds, the mixer must
always be stopped. The necessary speed can then be
selected before restarting the machine by pressing
the red start button.
The speed selected depends largely on the
quantity and consistency of the product. It is
recommended that mixing is always started at the
lowest speed and progressively increased to the
desired speed. In an emergency situation always use
the red emergency stop button to stop the machine.
Table 2 shows the recommended speeds for the
range of tools.
Recommended Speed
1st gear 2nd gear 3rd gear
Whisk
Beater
Hook
CAPACITY
The following table lists the recommended
capacities of finished weights of regular mixes.
Although the machine may be capable of mixing
larger quantities, it will lead to excessive and
premature wear and possible failure. Overloading
also results in lengthy processes and unsatisfactory
results.
Product
Maximum
Regular Mix
Whip
Beater
Spiral
Hook
Mashed potato
1,8 Kg
* *
Pie pastry
1,8 Kg
*
Cookies
-
*
Sponge cake
-
* *
Pound cake
-
*
Marshmallow
-
*
Fondant icing
1.3 Kg
*
Whipping cream
2 lit.
*
Egg whites
0.35 lit.
*
Mayonnaise
-
*
Batter
-
* *
Pasta, Egg noodle
900 g
*
Brioche (kg flour)
-
*
Raised Donut dough
(65% moisture content)
1 Kg
*
Heavy bread dough
(55% moisture content)
1.25 Kg
*
Pizza dough
(50% moisture content)
1.25 Kg
*
Pizza dough
(40% moisture content)
1 Kg
*
1. Recommended weight for a finished mix unless
otherwise stated.
2. Water content e.g. 25# flour / 12.5# water = 50%
moisture.
3. For pizza dough with lower moisture content, please
consult SMAKY
4. For higher gluten flour reduce dough batch by 25%.
Note: After cleaning,
please wipe the shaft with
Vaseline or oil for better
lubrication and preventing
rust.
Table 2
Table 3
6
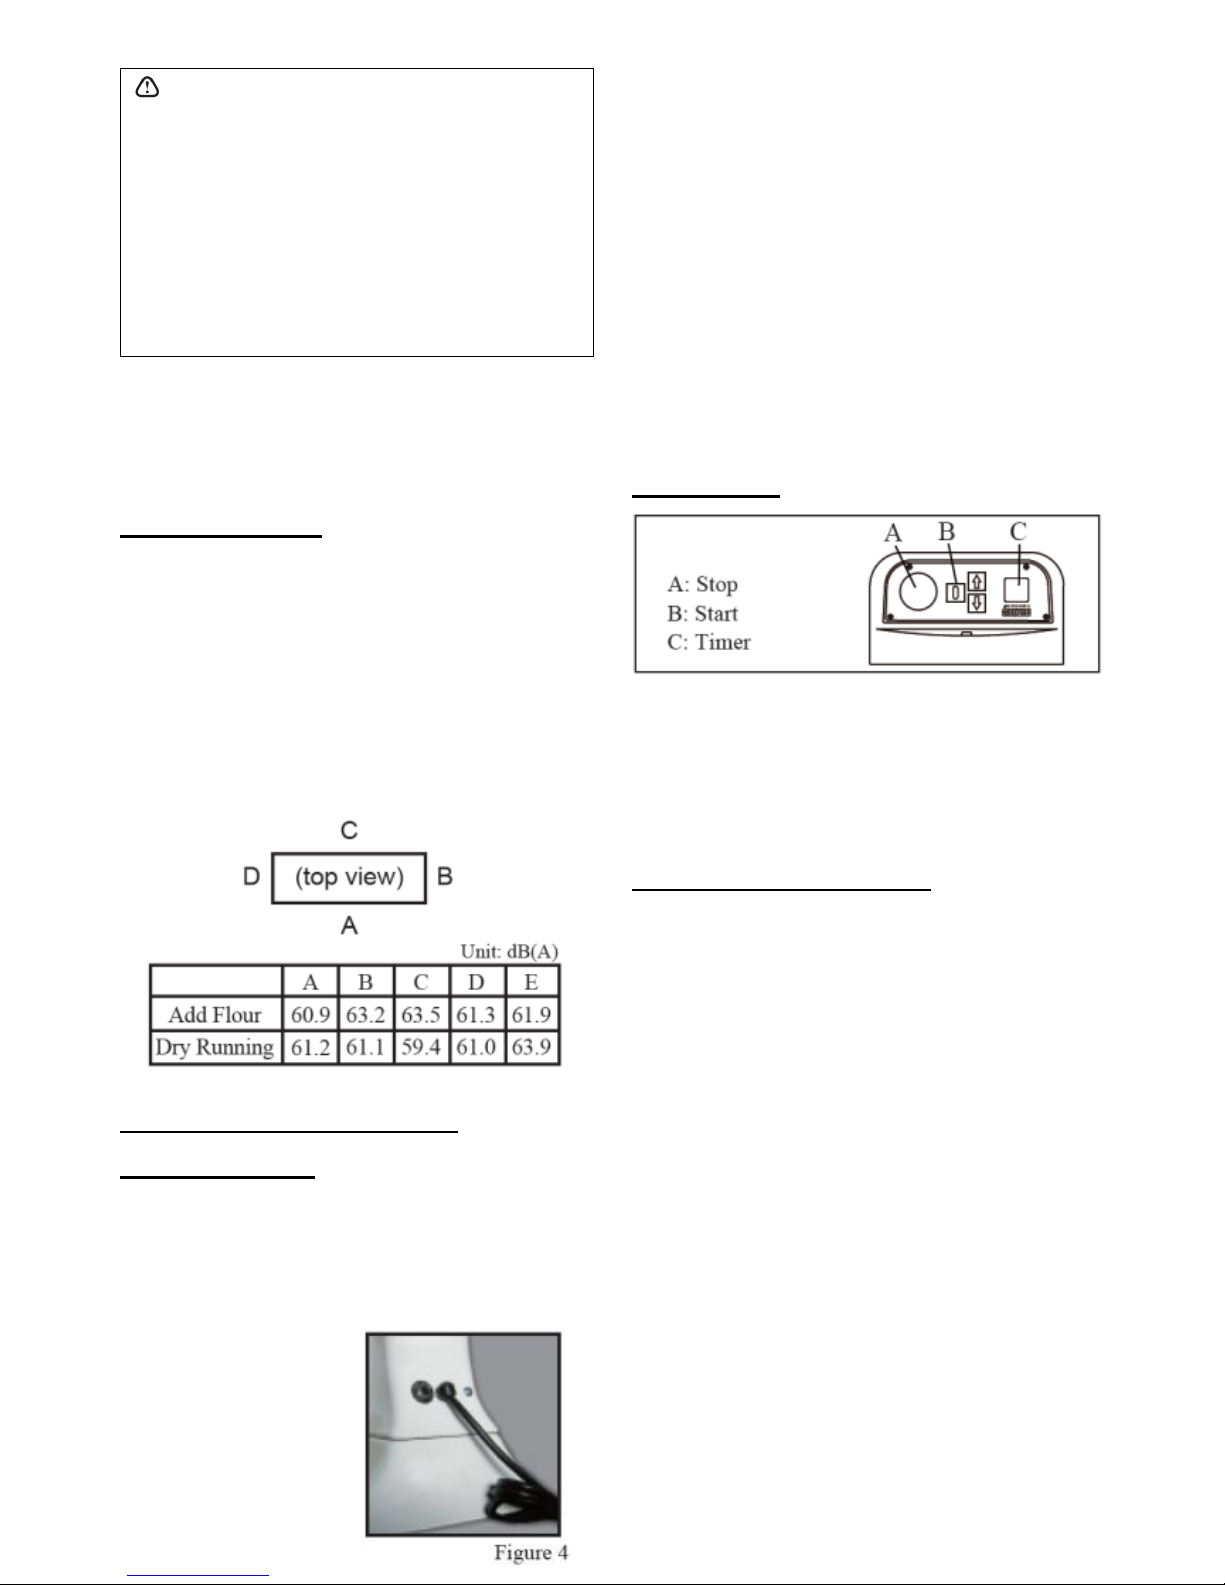
Noise Test Report
(1) Model No.: SM-800A
(2) Background noise:
Add Flour: background noise level is
54.0dB(A).
Dry running: background noise level is
52.6dB(A).
(3) Distance: 1m from the surface.
(4) Height: 1.6m from the floor.
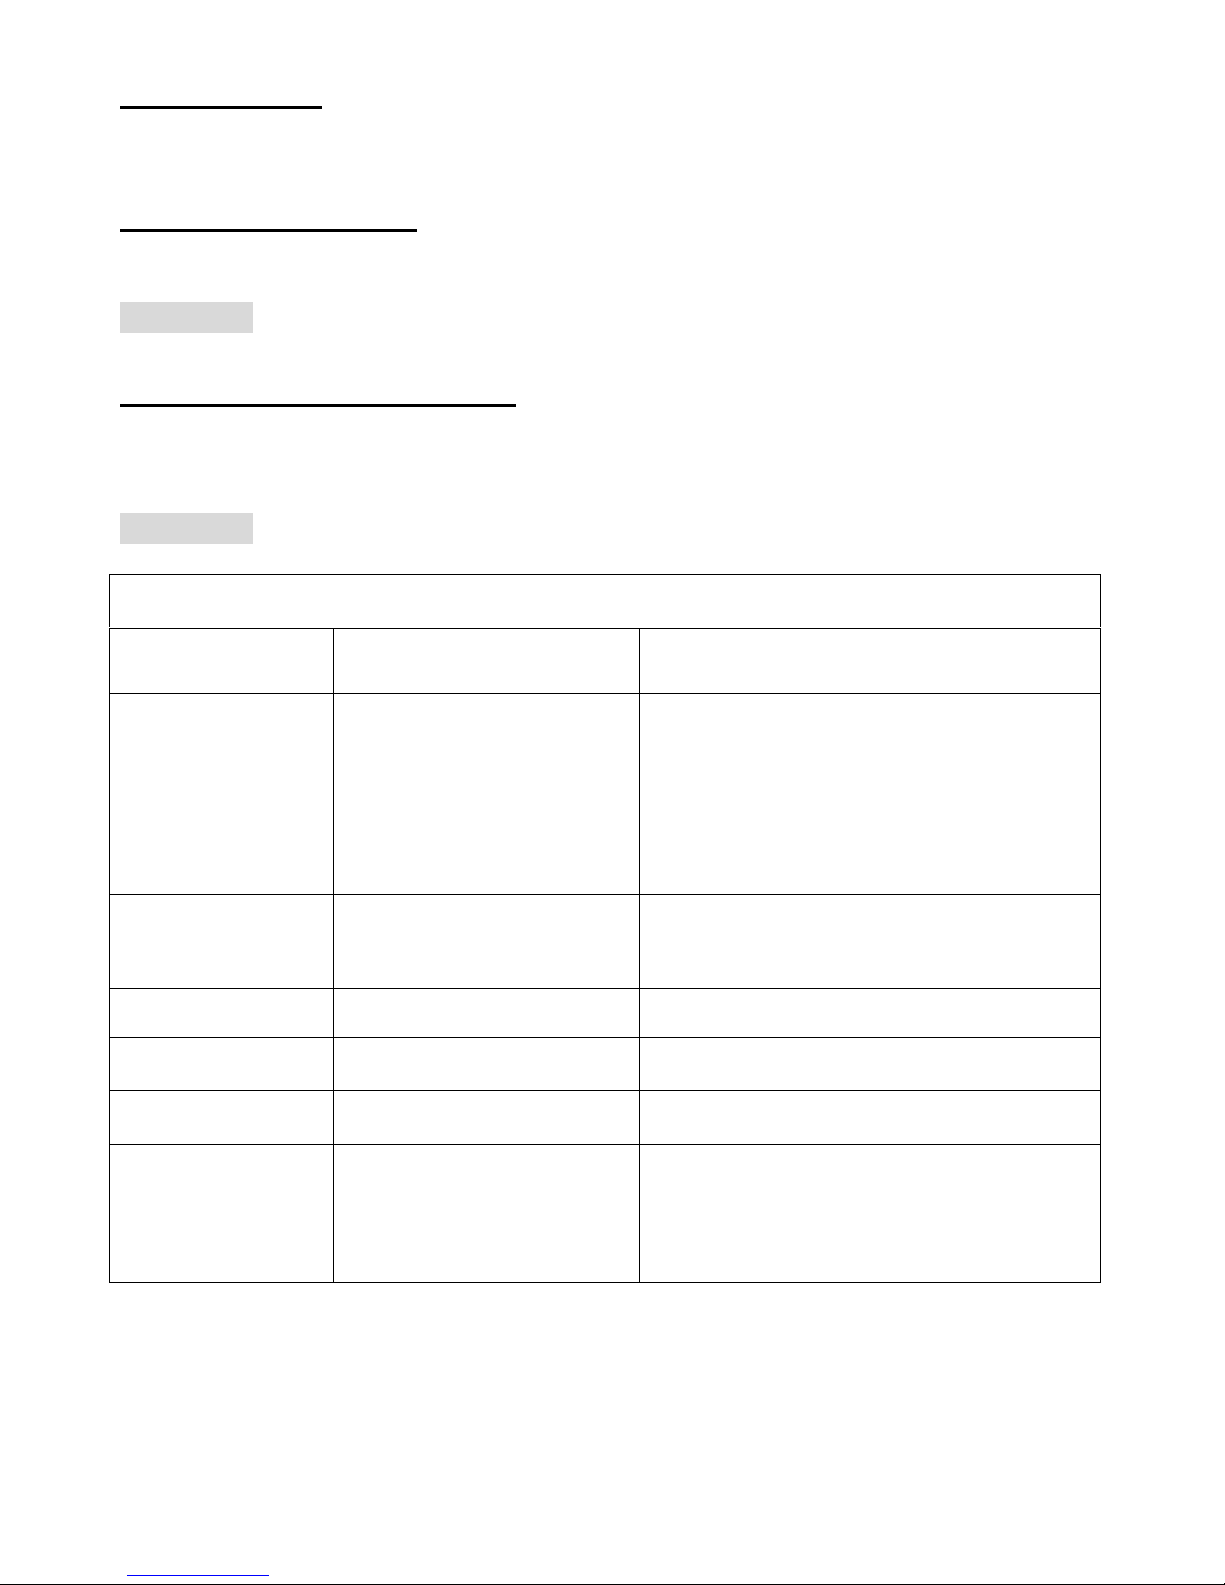
Thermal overload protection
(circuit breaker):
The thermal overload protection (circuit
breaker) will shout off and stop the machine
automatically. If this occurs, please turn off the
mixer and reduce the size of the batch.
After waiting one
minute, reset the circuit
breaker (push in) and
turn on the mixer. If
mixers stop again,
reduce the batch further.
If this happens with an extremely small/light batch,
contact your nearest authorized service agent for
further information.
CONTROLS
The control panel is shown above, start the
mixer by pressing the “start” button. Always start
mixer at the first speed. Red button is for
emergency stop. Set timer at “99” for manual
operation. Set timer at 1-55 for automatic operation
CARE OF YOUR MIXER
The mixer is designed for minimum user
maintenance. It may be necessary from time to time
to apply a little oil to the rods on which the bowl
cradle slides. If so, use a little food quality lubricant,
ensuring that there is no excess oil that could
contaminate the food mix.
Water jet cleaning is not allowed. Clean the
mixer thoroughly after use. The body should be
wiped down with a damp cloth after first isolating
the machine from the electricity supply. Do not
spray the machine with or immerse it in water. Do
not forget to clean the rear of the machine and do
not allow the rear vents to become blocked as this
may result in overheating.
Pay particular attention to the bowl pins and
any surrounding areas of the cradle to prevent a
buildup of mix as this could prevent incorrect
location of the bowl. For the same reason, ensure
that the beater shaft and each of the sockets on the
tools are cleaned thoroughly. The bowl and tools
Note: To large a quantity is always
detrimental to the quality of the work and the
life of the mechanical parts of the beater and
may lead to abrupt stoppage.

7
should be washed in hot soapy water, rinsed and
dried before being put into storage. Do not wash the
tools in a dishwasher as the polished finish will be
adversely affected by the dishwashing chemicals.
- Steady state voltage: 0.9-1.1 of nominal voltage.
- Frequency: 0.99-1.01 of nominal frequency
continuously.
- Avoid exposing to vibration environment.
- Avoid exposing to direct sunlight or heat rays.
The overcurrent protection device should be rated
2A in supply side by user at least.
8
MAINTENANCE
Regular maintenance is necessary on all machines if they are to remain in good working order. It is
strongly recommended that this be carried out by trained technicians from a SMAKY appointed distributor.
GEARBOX LUBRICANT
Please refill the lubricant inside the gearbox every 5 years. We recommended that this servicing or
maintenance work must be carried out by trained technicians from a SMAKY appointed distributor.
CAUTION: Please use either Mobil lubricant “XHP 222” or Brugarolas “GRASA AGUILA PLEX
2-BOLSA” to refill the gearbox.
PLANETARY UNIT LUBRICANT
In case there is a strange noise coming from the planetary unit, please reapply grease to the planetary
unit. We recommended that this servicing or maintenance work must be carried out by trained technicians
from a SMAKY appointed distributor.
CAUTION: Please use TACBECON grease “DGK-100” to lubricate the planetary unit.
FAULT FINDING
FAULT
CHECK
POSSIBLE REASON AND ACTION
REQUIRED
No power to mixer
Check plug socket
Check wiring in plug
Check fuse in plug
Check or change cable
Check microswitch
Check motor carbon brush
Check circuit breaker over load or
short
Mixer not plugged into a live socket or not switched on
Plug incorrectly wired – rewire correctly
Possible faulty fuse – replace fuse
Cable damaged or split – replace cable
Limit switch damaged or faulty – replace switch
Motor carbon brush worn – replace carbon brush
Circuit breaker shut off or constantly short – reset or
replace the circuit breaker (automatically reset).
Mixer becomes noisy
Check bowl and tools
Check work surface
Check the wear of bearing
Ensure that bowl and tool are correctly seated.
Uneven surfaces create excessive resonance.
Worn bearings – replace bearings
Mixer loses power
Check capacity
Overloading of bowl – reduce load
Motor overheating
Check supply voltage
Voltage should correspond to rating plate
Oil on planetary shaft
Check oil seal
Worn oil seal – change oil seal
Mixing tools stuck on
planetary shaft
Check planetary shaft bent,
unclean or rusted.
Planetary shaft twisted or bent – please change planetary
shaft.
Planetary shaft rusted – please use descaler for derusting.
Turn planetary shaft anti-clockwise to meet square
groove, gently knock down mixing tools.
▲ It is recommended that any servicing or maintenance work must be carried out by a trained technician or
electrician.
▲ Isolate the mixer from the electricity supply by removing the plug from the socket before cleaning or
servicing.
▲ Isolate the mixer from the electricity supply by removing the plug from the socket after long
period of no use.

9
Item
Description
Aker
Part number
Qty
F1
Overload Protection
SANG MAO
110V/5A 220V/4A
1
F2
Microswitch of Safety Guard
ROUZET
125V/250V 5A
1
F3
Microswitch of Height Adjuster
Omron
V-212-1C6
1
FR1
Terminal Block
GEM
300V/12V
1
IC
IC Board
ZEON
2-MH 29009
1
S1
Emergency Stop Button
Switchlab
DC/6A 24V AC/5A 250V
1
S2
Start Button, Timer IC Control
Microchip
PAC 16C57-C/P
1
M1
Motor 1/4HP, 1PH, 120V, 50/60Hz
Shiun Jiann
1/4HP 120V/220V
1

10

11

12
ITEM
QTY.
DESCRIPTION
REMARK
1 2 screw:M5x20
2 1 screw:M4x30
3 1 transmission case cover
3_2
1
gasket
4 1 digital control panel
5 4
screw:M3x6
6 1 emergency stop button
7 4
hex screw:M6x16
8 4
spring washer:M6
9 2
pin:M6x15
10 1 transmission case
11 1 label, cleaning instructions
12 1 warning label
13 1 warning label
14 1 label, agitator direction
15 1 nut:M6
16 1 washer:M6x16x1
17 1 pinion beater:17T
18 1 ball bearing:#6001Z
19 1 planetary gear:56T
20 1 planetary holder
21 1 planetary holder cover
22 1 ball bearing:#6002Z
23 1 oil seal:32x17x7
24 1 planetary shaft
25
1
aluminum flat beater
1 stainless steel flat beater
Optional Accessory
26
1
aluminum dough hook
1 stainless steel dough hook
Optional Accessory
27 1 wire whip
Include item#28 & #29
28 3 hex screw:M4x10
29 1 stainless whip top
30 1 bowl
Bowl Assembly
31 1 bowl handles
32 1 bowl knob
33 2 bowl weld clip
34 4 screw:M6x13
35 3 screw:M2.6x4
36 1 key-way:4x8x8
37 1 planetary pin

13
ITEM
QTY.
DESCRIPTION
REMARK
38 1 spring, for planetary shaft
39 1 planetary washer:13.1x1
40 1 gear arm gasket
Gear Arm Assembly
41 1 o-ring:3x18
42 1 ball socket
43 2 spring
44 2 spring
45 1 gear arm plate
46 1 black plastic gear knob
47 1 gear arm plate
48 1 gear arm shaft
49 1 screw
50 4 nut:M4x10
51 4 nut:M10
52 1 pin:3x10
53 1 worm gear
Parts Configuration may vary. Please specify
frequency when ordering.
54 1 oil seal
55 1 ball bearing:#6203Z
56 1 motor shaft and core
Motor Assembly
57 1 motor coil
58 1 pin spring:6x12
Rear Cover of Motor Assembly
59 1 ball bearing:#6202Z
60 1 ***
61 1 ***
62 1 rear cover
63 4 screw:M5x50
64 4 spring washer:M5
65 1 bowl raise handle
66 1 pin spring
Bowl Lift Handle Assembly
67 1 bowl lift rod
68 1 pin spring:5x24
69 1 bowl lift connection
70 1 pin spring:3x18
71 2 washer:M8x16x15
72 1 spring washer:M5
73 1 washer:M8x16x1.5
74 1 nut:M8
75 1 mixer column

14
ITEM
QTY.
DESCRIPTION
REMARK
76 4 spring washer:M8
77 4 hex screw:M8x25
78 1 strain reliever
79 1 cord and plug
80 1 screw:M5x20
81 1 screw:M5x21
82 1 circuit breaker
83 1 motor capacitor
84 1 capacitor attachment
85 2 hex screw:M5x45
86 1 bowl cradle
87 2 screw:M4x4
88 1 clip
89 2 bolw locking latches
Bowl Clamp Assembly
90 2 plastic knobs
91 2 spring
92 2 washer:M5
93 4 nut-stop:M5
94 2 screw:M5x10
95 1 bowl lift bracket
96 2 bowl lock pins
97 2 spring washer:M8
98 2 nut-stop:M8
99 1 base
100
4
bottom rubber knobs
101
4
washer:M8x16
102
4
spring washer:M8
103
4
hex screw:M8x16
104
1
ball bearing:#6202
105
1
lead-in oil pad
106
1
bushing
107
1
first speed gear:46T
Parts Configuration may vary.
108
1
bushing
109
1
gear clutch:25T
110
1
third speed bushing
111
1
second speed bushing
112
1
second speed gear
Parts Configuration may vary.
113
1
bearing pad
114
1
ball bearing:#6203Z
115
1
oil sea:35x28x7

15
ITEM
QTY.
DESCRIPTION
REMARK
116
1
o-ring:S15
Parts Configuration may vary.
117
1
oil bushing- 28mm
118
1
o-ring:S15
Parts Configuration may vary.
119
1
s/s flat wahser:M8x22x2
120
1
screw and nut:M8
121
5
rollers:6.5x12.9
122
5
slice spring
123
1
clutch sleeve
124
1
drive shaft
125
1
key-way:5x5x18
126
2
key-way:4x4x28
127
1
key-way:5x5x26
128
1
ball bearing:#6200Z
129
1
transmission shaft
Parts Configuration may vary.
130
1
key-way:5x5x12
131
1
key-way:5x5x14
132
1
third speed gear:36T
133
1
bronze bushing
134
1
second speed gear
Parts Configuration may vary.
135
1
c-ring:S15
136
1
ball bearing:#6200Z
137
1
shifter yoke
Shifter Yoke Assembly
138
2
shifter yoke plunger
139
2
shifter yoke spirng
140
2
nut:M3
141
1
shifter guide rod
142
1
ball bearing:#6200Z
143
1
master shaft:18T
144
1
key-way:5x5x14
145
1
bronze worm gear
Parts Configuration may vary.
146
1
c-ring:S15
147
1
ball bearing:#6200Z
148
1
transmission case top
148_1
1
gasket
149
2
clip
Safety Guard Assembly (include Chute)
150
1
washer
151
1
screw
154
1
safety guard
154_1
1
chute of safety guard
152
1
microswitch

16
ITEM
QTY.
DESCRIPTION
REMARK
152_1
1
sleeve, for microswitch
152_2
1
nut
153
***
***
155
4
nut:M3
156
2
screw:M5
157
1
microswitch fixture
158
1
microswitch for bowl lifting
159
2
screw:M3
160
1
digital control board
161
4
washer:M6x1
162
4
screw:M3x10
163
1
fan-cooling
 Loading...