

Page 1
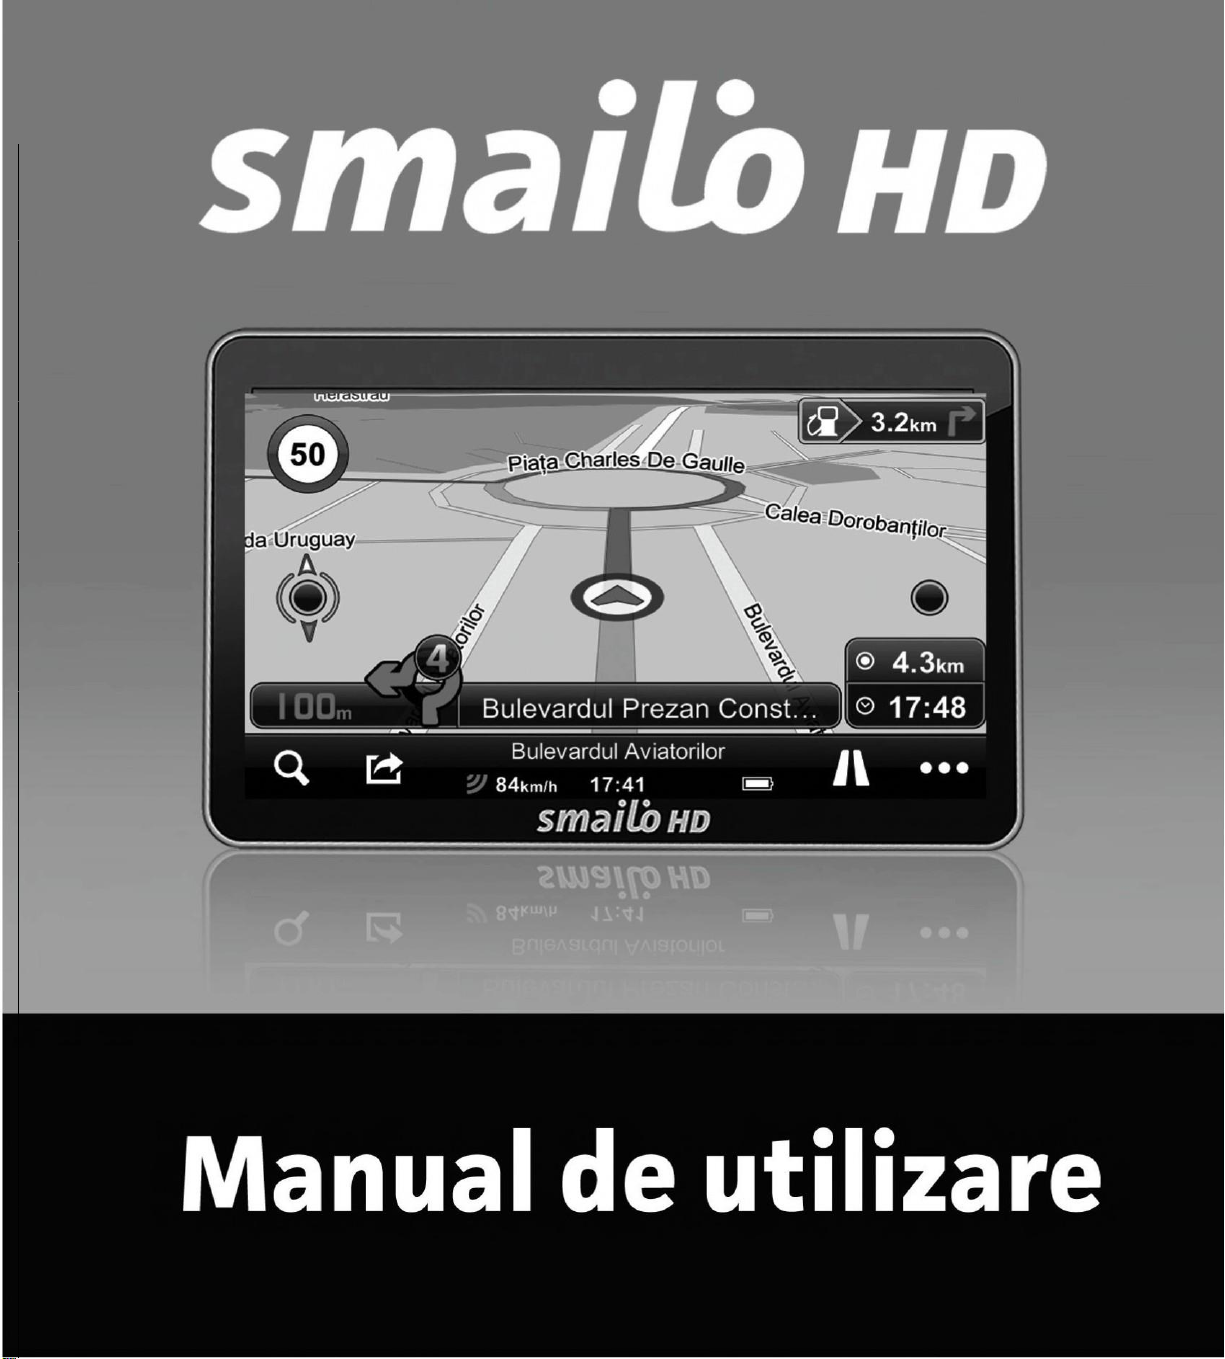
SMAILO HD 7.0
Page 2

este un brand al
Importator şi distribuitor AROBS Transilvania
400409 Cluj-Napoca, Str. Săpătorilor Nr. 5
T: 0364 730 907, F: 0264 598
www.arobs.ro -
www.gps-auto.ro
426
Software
Page 3

DISCLAIMER SOFTWARE DE NAVIGAŢIE MIREO DON’T PANIC
Stimate utilizator,
Software-ul instalat în produsul dvs. Smailo este proprietatea companiei Mireo.
Datele pentru hărţi de la terţi, care sunt integrate sau care însoţesc produsul dvs.
sunt proprietatea companiei TeleAtlas şi sunt licenţiate companiei Mireo. Atat
Software-ul cât şi Datele sunt protejate de legile şi tratatele internaţionale privind
drepturile de autor.
Avertisment
Datele incluse in hărţi pot conţine unele inexactităţi sau informaţii incomplete
datorită unor motive diverse precum limitările tehnice, timpul, circumstanţele
deosebite de schimbare a surselor sau felul în care sunt colectate datele
furnizate/prelucrate şi care pot fi cauza unor rezultate incorecte.
Răspundere limitată
Datele pentru hărţi/produsul software vor fi utilizate aşa cum au fost furnizate cu
acordul Beneficiarului Licenţei. Mireo, Licenţiatorii şi Furnizorii acesteia (în acest
caz AROBS Transilvania Software) nu oferă nici o garanţie decât cele prevazute de
lege, cu privire la conţinut, calitate, acurateţe, imagine, complexitate, eficienţă,
utilitatea pentru un anumit scop, utilizarea sau rezultatele obţinute din utilizarea
datelor/produsului software ori aceea că utilizarea datelor/produsului software vor
fi continue şi fără erori.
Posesorul Licenţei (Mireo), Producatorul hărţilor (TeleAtlas) şi Furnizorul (AROBS
Transilvania Software) neagă orice responsabilitate pentru Baza de date din cadrul
Produsului Software şi pentru orice conţinut sau serviciu furnizat de o terţă parte prin
utilizarea Bazei de date. Aceştia nu garantează calitatea, adecvarea, precizia,
corectitudinea într-un anumit scop sau pentru acoperirea teritorială.
Informaţiile relevante şi datele pentru hărţi furnizate de către terţe părți sunt
disponibile la adresa www.smailo.ro, secţiunea Hărţi - Acoperire Europa, în funcţie
de modelul sistemului de navigaţie.
Page 4

DISCLAIMER SOFTWARE DE NAVIGAŢIE MIREO DON’T PANIC*
Stimate utilizator,
Software-ul integrat în produsul dvs. Smailo este proprietatea companiei
Mireo. Aplicația folosește date pentru hărţi din cadrul proiectului
OpenStreetMap (www.osm.org).
OpenStreetMap (prescurtat OSM) este un proiect colectiv, în regim open
source, care are ca scop construirea unei baze de date geografice globale,
cum ar fi atlasele rutiere, folosind atât date introduse manual având ca fundal
imagini spațiale, cât și date colectate de pe dispozitive GPS.
OSM sunt hărţi în continuă actualizare, bazate pe informaţiile introduse de
utilizatori din întreaga lume. Practic harta poate fi editată de orice utilizator.
Puteţi contribui activ la actualizarea hărţilor prin introducerea de rute noi,
puncte de interes, restricţii sau alte date accesând www.osm.org. Odată
verificate aceste date, ele vor fi introduse în versiunile noi ale hărţilor.
Acestea vor fi puse la dispoziţie prin intermediul site-ului www.smailo.ro.
Ai parte de până la 2 actualizari gratuite ale hărţilor pe an atâta timp cât o
hartă cu conţinut nou va fi pusă la dispoziţie de către producător. Vei
beneficia de Lifetime Map Updates pe întreaga durată de viaţă a produsului
sau până când vor exista date de la producătorul software-ului de navigaţie
Mireo. (www.mireo.ro)
Avertisment
Datele incluse in hărţi pot conţine unele inexactităţi sau informaţii
incomplete datorită unor cauze variate precum limitările tehnice, timpul,
circumstanţele deosebite de schimbare a surselor sau felul în care sunt
colectate datele furnizate/prelucrate şi care pot fi cauza unor rezultate
incorecte.
Parcursul străzii şi semnele de circulaţie au prioritate faţă de indicaţiile
sistemului de navigaţie. Urmaţi indicaţiile sistemului de navigaţie doar dacă
circumstanţele şi regulile de circulaţie permit aceasta.
*pentru dispozitivele cu hărţi OSM şi actualizare pe viaţă a hărţilor
Page 5

Instructiuni de siguranta
Cititi cu atentie aceasta sectiune si urmati instructiunile, pentru a putea prelungi durata de
utilizare a dispozitivului. Pastrati ambalajul si instructiunile de utilizare pentru consultari
ulterioare, si transmiteti-le mai departe in cazul in care dati dispozitivul altei persoane.
Nu desfaceti niciodata dispozitivul sau adaptorul. Componentele acestora va pot
pune viata in pericol, prin electrocutare.
Nu plasati obiecte pe dispozitiv si nu exercitati presiune pe ecranul de afisare, pentru a
evita spargerea acestuia.
Nu atingeti ecranul cu obiecte ascutite. Folositi doar stylus-ul din dotare.
Va puteti accidenta in cazul in care ecranul se sparge. Daca acest lucru se intampla, folositi
manusi pentru a strange cioburile si contactati serviciul de asistenta clienti. Spalati-va
pe maini cu sapun, deoarece exista riscul ca anumite substante chimice sa se scurga.
Nu lasati copiii sa se joace nesupravegheati cu echipamentul. Ei nu sunt intotdeauna
constienti de pericol.
Indepartati adaptorul, inchideti dispozitivul imediat si contactati serviciul de
asistenta clienti in cazul in care cablul de alimentare se rupe sau dispozitivul sau
adaptorul se strica si curg fluide in el. Partile componente trebuie sa fie verificate
de serviciul de asistenta clienti pentru a preveni daunele.
Siguranta datelor
Faceti copii de rezerva pe o sursa externa ori de cate ori actualizati datele. Furnizorul nu
isi asuma responsabilitatea pentru pierderea datelor sau pentru daune provocate unitatii de
stocare a datelor, prin urmare nu se accepta plangeri cauzate de daune de aceasta natura.
Mediul de operare
Tineti sistemul de navigatie si alte dispozitive conexe departe de umezeala, praf,
caldura si raze solare, mai ales in masina.
Aveti grija ca dispozitivul sa nu se ude. Umezeala se poate acumula chiar si intr-o
punga de protectie, prin condens.
Evitati vibratiile puternice si socurile.
Aveti grija ca navigatorul sa nu cada din dispozitivul de sustinere. Instalati-l cat mai
vertical posibil.
In cazul in care nu urmati aceste instructiuni, dispozitivul dvs. poate suferi diverse
daune. Temperatura
Dispozitivul trebuie folosit la o temperatura de 5°C -40°C (41°F -104°F) si umiditate
intre 10% - 90%.
Page 6

Cand este oprit, dispozitivul poate fi pastrat la o temperatura de 0°C -60°C (332°F -140°F).
Evitati expunerea aparatului la soare, la temperaturi foarte inalte.
Compatibilitatea electromagnetica
Cand conectati alte componente, trebuie sa respectati ‘Directiva Compatibilitatii Electro-
magnetice’, si sa folositi doar cablu ecranat (max 3 metri).
Pentru o performanta maxima si pentru a evita pierderea datelor, pastrati o distanta de cel putin
3 metri fata de sursele de inalta frecventa si interferenta magnetica (televizoare, telefoane
mobile).
Bateria
Dispozitivul dvs. foloseste o baterie ce poate fi inlocuita. Pentru a prelungi viata bateriei, urmati
instructiunile de mai jos:
ATENTIE: Exista pericol de explozie daca bateriile reincarcabile nu sunt incarcate
corespunzator. Inlocuiti bateria cu acelasi tip de baterie sau una similara recomandata de
producator. Nu deschideti bateria reincarcabila, si nu o aruncati in foc. Renuntati la bateria
folosita urmand instructiunile producatorului.
Bateriile nu suporta caldura. Evitati supraincalzirea bateriei, pentru a evita riscul de
explozie.
Folositi doar incarcatorul auto din pachet sau orice incarcator auto compatibil.
Bateriile constituie o categorie aparte de deseuri. Cand renuntati la dispozitiv, faceti acest
lucru corect, si contactati serviciul de asistenta clienti pentru mai multe detalii.
Ecranul
Nu zgariati suprafata ecranului deoarece este foarte sensibila. Va recomandam sa folositi o
folie de protectie pentru a evita zgarieturile. Folia de pe ecran serveste doar ca protectie in
timpul transportului.
Folositi o carpa moale pentru a sterge ecranul.
Nu expuneti ecranul la soare sau la radiatii ultraviolete.
Transportul
Daca doriti sa transportati dispozitivul, urmati instructiunile de mai jos:
Dupa transport, asteptati pana cand dispozitivul ajunge la temperatura mediului ambiant
inainte de a-l folosi.
In cazul fluctuatiilor de temperatura sau umiditate se poate forma condens in aparat, ceea
ce poate produce scurt circuit.
Pentru a proteja aparatul de murdarie, lovituri sau zgarieturi, folositi husa de protectie.
Page 7
Inainte de a calatori informati-va asupra prevederilor de comunicare si alimentare de la
destinatie, si intrati in posesia unui adaptor.
Cand livrati aparatul, folositi pachetul original si informati curierul in legatura cu
transportul.
La controlul in aeroport, se recomanda sa treceti aparatul si toate dispozitivele de stocare
media prin sistemul de raze X. Evitati detectorul magnetic sau banda magnetica, pentru ca
se pot pierde datele.
Alimentarea dispozitivului prin intermediul incarcatorului auto
Incarcatorul trebuie sa fie conectat la bricheta din masina. (baterie de masina =DC12V, nu
24vDC cum exista la camioane)
Cablajul
Aranjati cablurile astfel incat sa nu poata fi calcate sau rupte.
Nu asezati nimic pe cabluri.
ATENTIE: Cand nu folositi aparatul, inchideti-l de la butonul On/Off si incarcati bateria din
cand in cand, pentru a prelungi durata de viata a acesteia.
Instalarea
Acest capitol va ghideaza pas cu pas prin setarile initiale ale sistemului de navigare. Mai intai,
indepartati folia de protectie de pe ecran.
Cum sa accesati sistemul de navigatie
Apasati butonul Standby/Închidere timp de 2 secunde pentru a porni aparatul (Nota: Uneori
dispozitivul nu se va porni din cauza bateriei descarcate, va sfatuim sa incarcati . Atunci cand
se incarca, indicatorul bateriei este rosu.
ATENTIE:
Inainte de a efectua setarile initiale, dispozitivul trebuie incarcat.
Incarcarea bateriei
In timpul incarcarii, indicatorul bateriei este rosu.
Exista doua posibilitati de a incarca bateria sistemului de navigatie: prin cablul USB sau prin
adaptorul de la masina.
Indicatorul de incarcare al bateriei va avea culoarea rosie pana cand sistemul s-a incarcat. Nu
intrerupeti procesul de incarcare inainte ca bateria sa fie incarcata in totalitate. Sistemul de
navigatie se va incarca complet in cateva ore iar indicatorul bateriei va deveni verde.
Nota:
Puteti folosi sistemul de navigatie in timpul incarcarii, dar nu trebuie sa intrerupeti
procesul de incarcare a bateriei.
Page 8

Cardurile de memorie
Sistemul de navigatie suporta microUSB.
Introducerea cardurilor de memorie
Va recomandam sa formatati cardurile inainte de introducerea lor in dispozitiv, mai ales daca
au fost folosite anterior in alte aparate (telefoane mobile, aparate foto sau alte sisteme de
navigatie). Scoateti cardul de memorie din pachet (daca este inclus). Nu atingeti si nu murdariti
contactele.
Introduceti cardul de memorie in aparat. Partea care contine eticheta trebuie sa fie dispusa in
sus. Cardul de memorie trebuie sa intre usor in aparat.
Inlaturarea cardurilor de memorie
Nu scoateti cardul de memorie in timp ce este accesat, deoarece exista posibilitatea pierderii datelor
1. Pentru a inlatura cardul, apasati usor pe marginea de sus, pana cand acesta iese.
2. Scoateti cardul fara a atinge contactele.
3. Pastrati cardul in pachetul sau.
Cardurile de memorie sunt foarte fragile. Nu fortati si nu murdariti cardul.
Accesarea cardurilor de memorie
Aparatul suporta carduri de memorie in format FAT16/32. Daca folositi carduri in alt format,
sistemul de navigare nu le va recunoaste si va trebui sa le formatati din nou.
Atentie: Formatarea cardurilor de memorie sterge toate datele.
Schimb de date prin cititorul de carduri
Puteti transfera sau sincroniza datele prin ActiveSync. Aceasta este modalitatea corecta de
transfer si convertire in formatul pe care il citeste sistemul de navigatie. Daca doriti sa copiati
cantitati mari de date (harti) pe cardul de memorie, acestea pot fi stocate direct pe cardul de
memorie.
Multe computere au deja dispozitive de citire a cardurilor de memorie. Introduceti cardul in
dispozitiv si copiati datele direct pe card. Datorita accesului direct, transferul va fi mai rapid.
Resetarea sistemului de navigatie
Aceasta optiune reporneste sistemul de navigatie, fara a fi necesara reinstalarea. Resetarea
software-ului se utilizeaza pentru a reorganiza memoria. Astfel, toate programele care ruleaza
sunt oprite si memoria este reinitializata. Alegeti aceasta varianta daca sistemul de navigatie nu
raspunde sau nu functioneaza corespunzator.
Resetarea software-ului se efectueaza astfel: Apasati cu grija butonul Reset folosind stylusul
din dotare. Butonul Reset se afla pe partea din spate a dispozitivului, in dreapta jos
Page 9
Instructiuni de siguranta pentru navigatie
Sugestii pentru navigare
Nu manipulati sistemul de navigatie in timp ce conduceti!
In cazul in care nu intelegeti instructiunile vocale sau nu stiti sigur ce sa faceti la
urmatoarea intersectie, harta sau sageata indicatoare va vor oferi o orientare rapida.
Uitati-va pe ecran doar cand sunteti in siguranta!
Atentie: Drumul si regulile de circulatie sunt mai importante decat instructiunile sistemului de
navigatie. Urmati instructiunile numai atunci cand regulile de circulatie permit acest lucru.
Sistemul de navigatie vă va ghida chiar daca schimbati ruta.
Stabiliti traseul inainte de a pleca. Daca doriti sa modificati traseul in timp ce va aflati pe
sosea, opriti masina.
Pentru a receptiona corect semnalul GPS, niciun obiect metalic nu trebuie sa obstructioneze
receptia. Prindeti sistemul de navigatie pe parbriz, incercand diferite pozitii pana cand
se realizeaza cea mai buna receptie.
Observatii
Cablurile nu trebuie sa impiedice in nici un fel prin pozitionarea lor.
Ecranul sistemului de navigatie poate prezenta mici reflexii. Asigurati-va ca aceste reflexii
nu sunt deranjante in timpul manevrarii sistemului de navigatie.
Nu montati componentele in preajma airbag-urilor.
Verificati aderenta ventuzei pe parbriz la intervale regulate.
Adaptorul va consuma curent chiar daca nu este conectat la dispozitiv. Scoateti-l din priza
cand nu il folositi.
Verificati toate echipamentele dupa instalarea in masina.
Note suplimentare pentru utilizare:
Bicicleta sau motocicleta
● Acordați atenție în timpul instalării pentru ca abilitatea de a conduce să nu fie afectată.
● Nu acoperiți niciun instrument în timpul instalării.
Montarea sistemului de navigatie in masina
Atentie! Fixati dispozitivul de sustinere pe parbriz, astfel incat sa nu obstructioneze
vizibilitatea. Daca acest lucru nu este posibil, montati dispozitivul de sustinere cu
ventuza astfel incat sa permita operarea in siguranta.
Instalarea dispozitivului de sustinere
Sfat: Daca doriti sa montati dispozitivul de sustinere pe parbriz, treceti peste pasul
1 si 2.
1. Indepartati folia de protectie de pe ventuza.
2. Fixati ventuza prin apasare pe bord, care trebuie sa fie curat.
Page 10
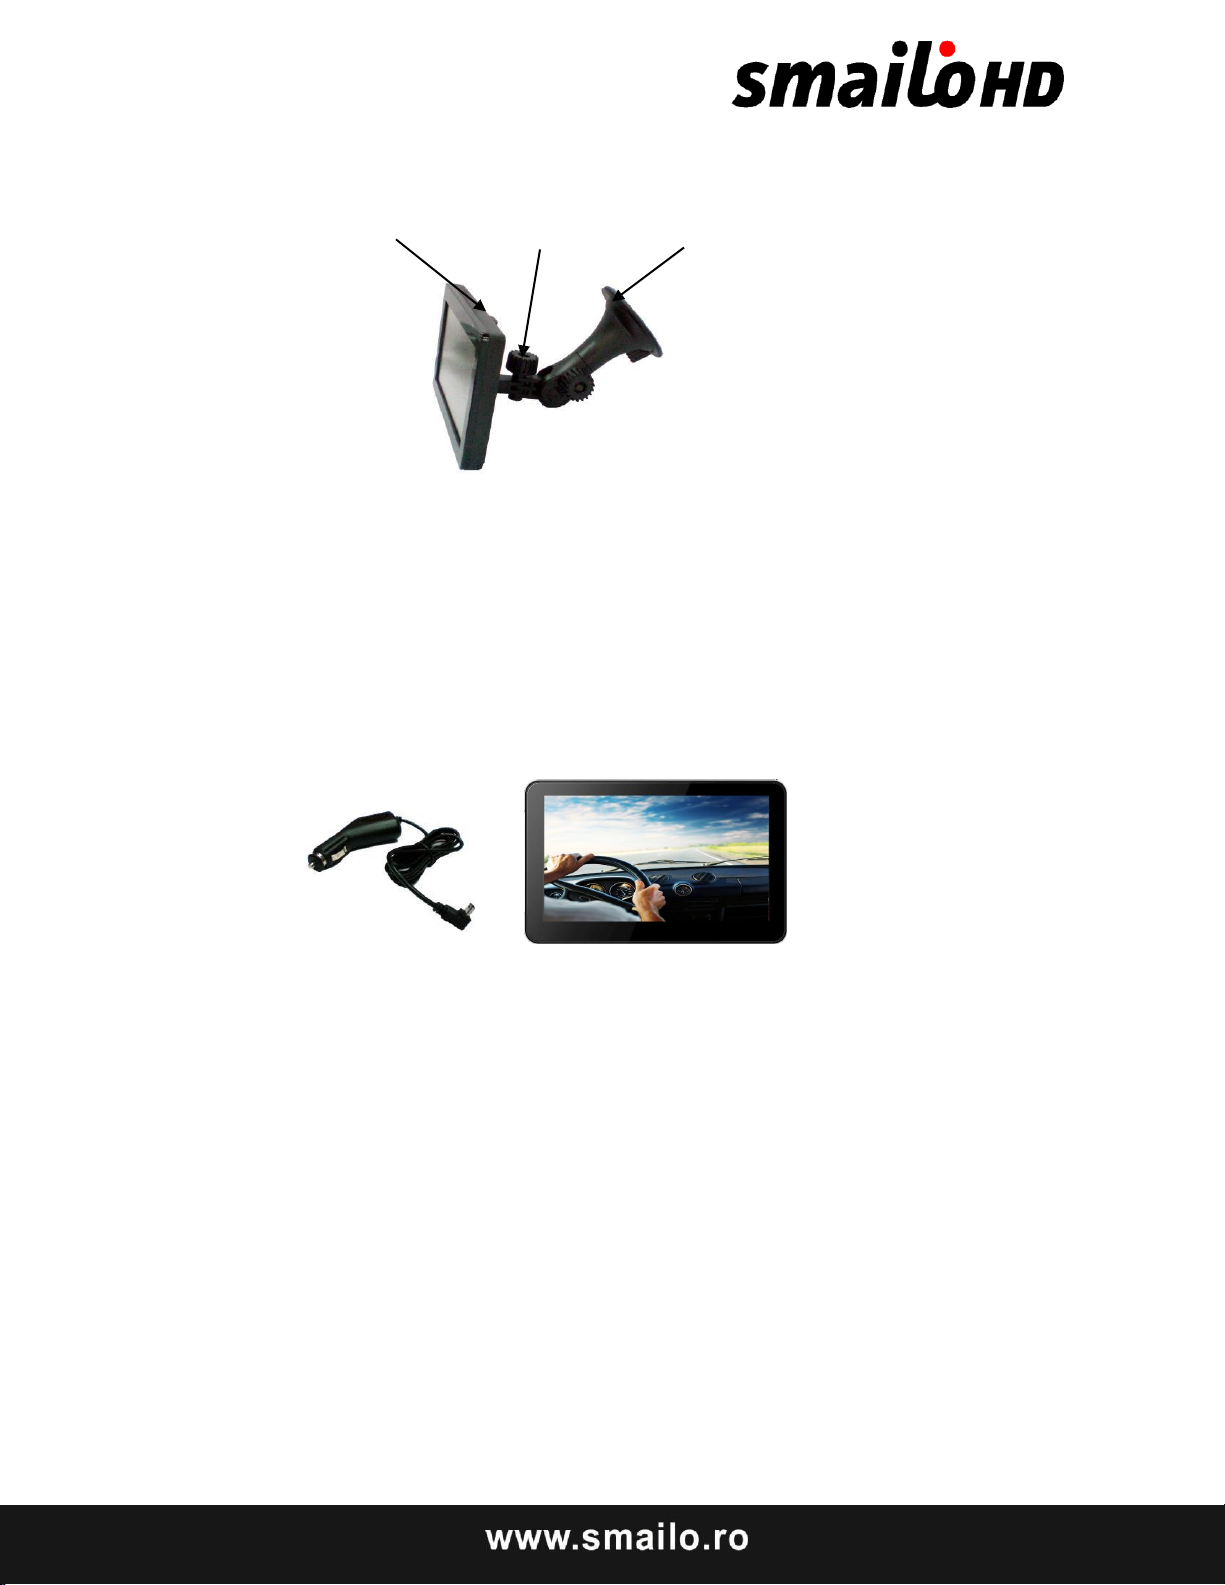
Dispozitiv de sustinere Suport Ventuza
3. Montati dispozitivul de sustinere pe gatul flexibil. Sageata pe care scrie CLOSE
trebuie pozitionata in directia in care se fixeaza. La fixarea dispozitivului, se va
auzi un click.
4. Montati dispozitivul de fixare cu capul ventuzei pe parbriz si apasati manerul in
jos. Ventuza se va lipi ferm pe parbriz.
5. Montati sistemul de navigatie in dispozitivul de sustinere, incepand din partea
de jos a acestuia, apoi apasati-l usor pana cand se va fixa.
Conectarea sistemului de navigatie in masina
Puteti incarca bateria in masina, astfel:
1. Introduceti adaptorul in mufa incarcatorului bricheta si asigurati-va ca nu
pierde contactul in timp ce sofati.
2. Introduceti mufa cablului de conectare in sistemul de navigatie.
Sfat: Inlaturati adaptorul cand parcati masina pe o perioada mai lunga de timp
sau cand ati ajuns la destinatie.
Page 11
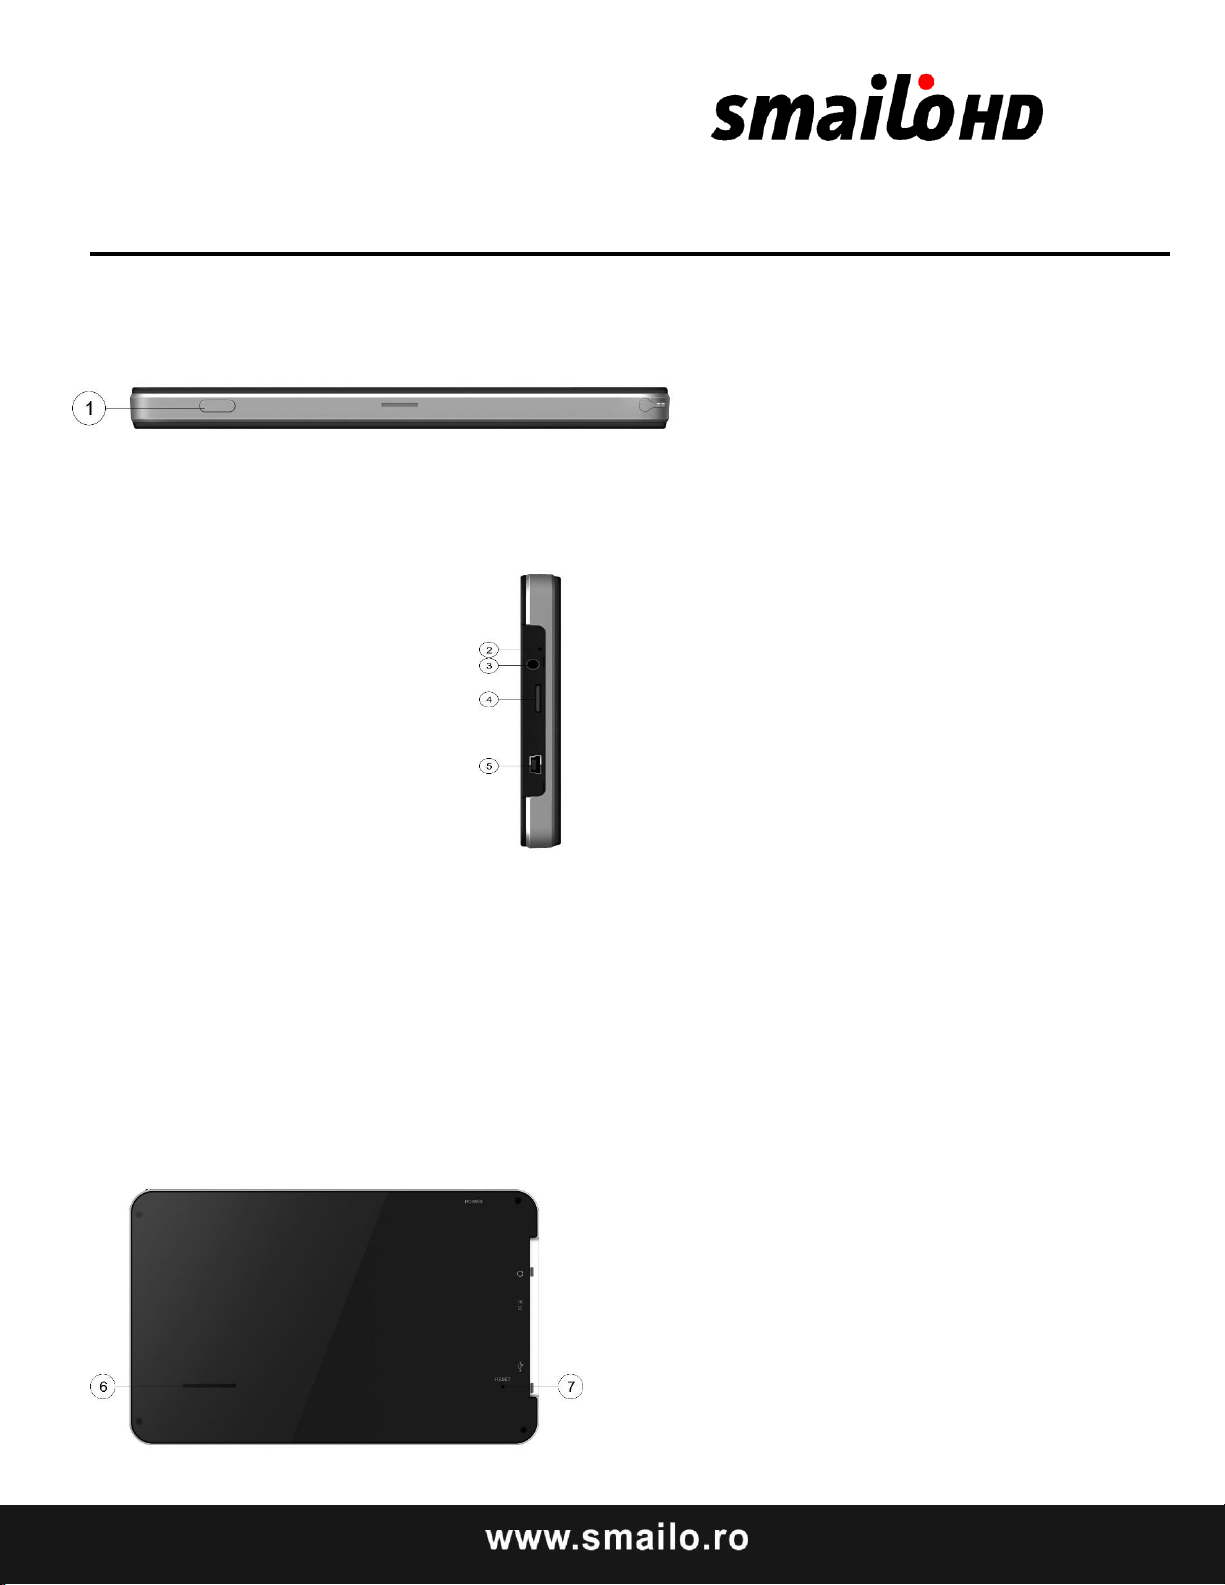
Partile dispozitivului
(1) Buton oprire
Vedere partea stanga
(2) Indicator incarcare baterie
(3) Mufă pentru caşti
(4) Slot TF
(5) Interfata USB
Vedere din spate
(8) Buton de resetare
(9) Difuzor
Page 12

GPS (Sistemul de Pozitionare Globala)
GPS este un sistem prin satelit care va determina locatia. Cu ajutorul a
24 de sateliti care se rotesc in jurul Pamantului, locatia dvs. poate fi determinata
cu o precizie de cativa metri. Semnalele prin satelit sunt receptionate de antena
receptorului GPS incorporat, care este obligatoriu sa aiba “vizibilitate” pentru cel
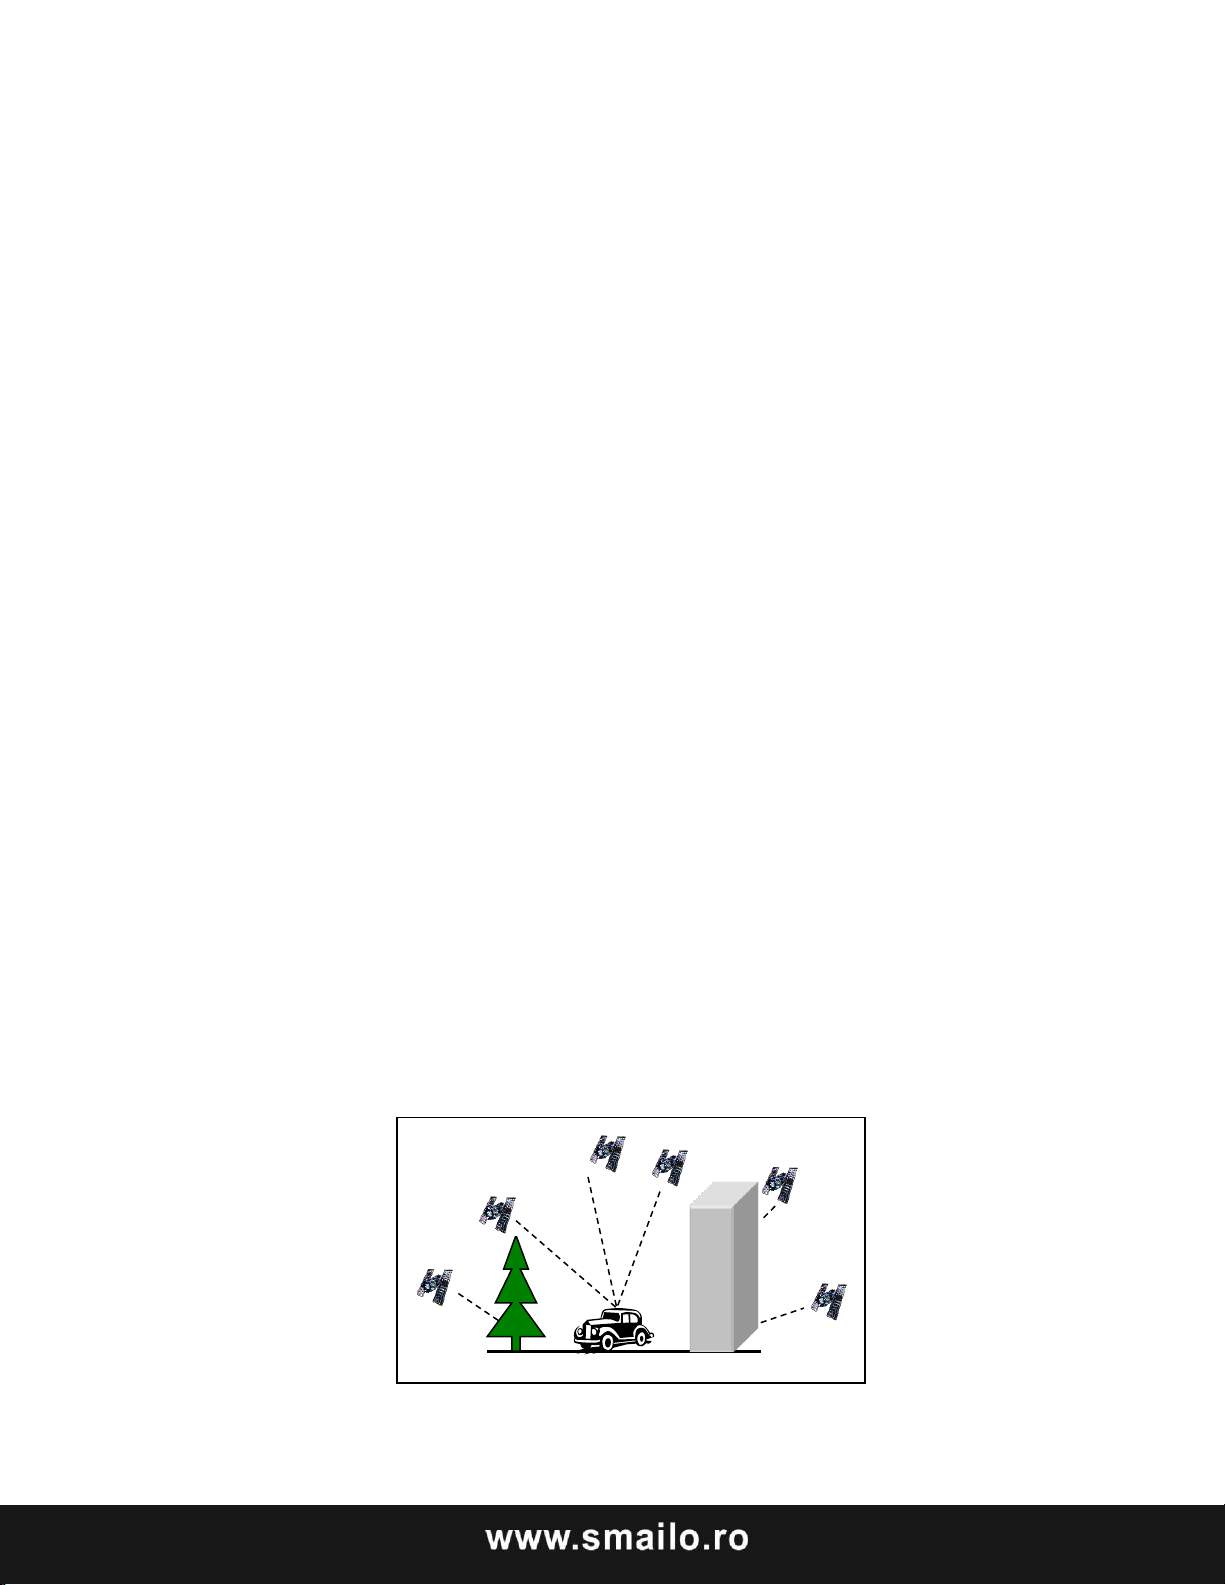
putin 4 dintre acestia.
Observatie:
In cazul vizibilitatii reduse (ex. in tuneluri, intre case, in paduri sau in vehicule
blindate), pozitia dvs. nu poate fi stabilita. Totusi, receptia prin satelit se
restabileste automat, imediat ce obstacolul a fost depasit si vizibilitatea revine
la normal.
Va informam ca dispozitivul dumneavoastra este reglat astfel incat sa nu se
inchida automat dupa cateva minute de inactivitate. Puteti schimba acest lucru
din Setari.
In cazul in care receptorul GPS a fost inactiv timp de cateva ore, acesta se va
reorienta din nou. Acest proces va dura insa o scurta perioada de timp.
Instalarea rapida a Cardului de Memorie
Aceasta optiune este valabila daca sistemul dumneavoastra de navigatie este
echipat cun un card de memorie. In acest caz, veti putea folosi imediat functia de
Navigare a dispozitivului, fara o instalare anterioara pe un PC.
Setarea initiala trebuie efectuata asa cum va este prezentat la pagina 13.
Instalarea ce urmeaza limiteaza Navigarea la zona care este pre-instalata pe
cardul de memorie.
Trebuie sa urmati acesti pasi pentru a face functional sistemul de navigatie in
masina dumneavoastra:
1. Cititi si respectati instructiunile de siguranta de la paginile 2, 3 si 4.
2. Instalati componentele ramase ale sistemului de navigatie.
3. Apasati butonul Standby/Inchidere pentru a porni sistemul de navigatie.
Daca instructiunile de la Pasul 1 nu au fost urmate va rugam sa o faceti acum.
Bateria trebuie sa fie incarcata. Acumulatorul va fi incarcat de la masina daca
este necesar.
Introduceti cardul de memorie pre-instalat in sistemul de navigatie.
Instalarea softului de navigatie va incepe automat. Urmati instructiunile de
pe ecran.
Page 13

OBSERVATII:
Cardul de memorie trebuie sa ramana introdus in dispozitiv in timpul
utilizarii sistemului de navigatie. Este necesara o resetare a softului pentru a
reporni sistemul de navigatie, in cazul in care cardul de memorie este
indepartat in timpul utilizarii, chiar daca numai pentru o perioada scurta de
timp.
Setati data si ora cu ajutorul butonului Setari si a butonului data/ora, daca
acest lucru nu s-a realizat. Setati fusul orar adecvat, daca este disponibil.
Navigarea
1. Tineti apasat butonul Standby/Inchidere timp de 2 secunde pentru a
porni sistemul de navigatie.
2. Softul de navigatie va porni automat sau numai dupa apasarea
butonului de control al navigatiei, in functie de versiunea folosita.
3. Apasati iconita Meniu pentru a seta destinatia si adresa spre care va
indreptati. Porniti apoi navigatia printr-o simpla apasare pe butonul
Navigare. Veti primi informatii despre ruta direct pe ecran, insotite de
indicatii vocale, dupa o scurta perioada de timp, si daca receptia prin satelit
este adecvata. In plus, veti dispune de ajutor si de la sistemul dumneavoastra
de navigatie cu ajutorul iconitei Introducere Optiuni/Destinatie si selectand
butonul Ajutor.
Observatie: Receptorul GPS va avea nevoie de cateva minute pentru
initializare atunci cand este utilizat pentru prima data. Chiar si atunci cand
semnalul GPS este afisat, navigarea poate fi inexacta. In toate cazurile
viitoare, vor fi intre 30-150 secunde pana cand un semnal GPS exact va fi
disponibil, vizibilitatea fata de satelit fiind obligatorie.
Page 14
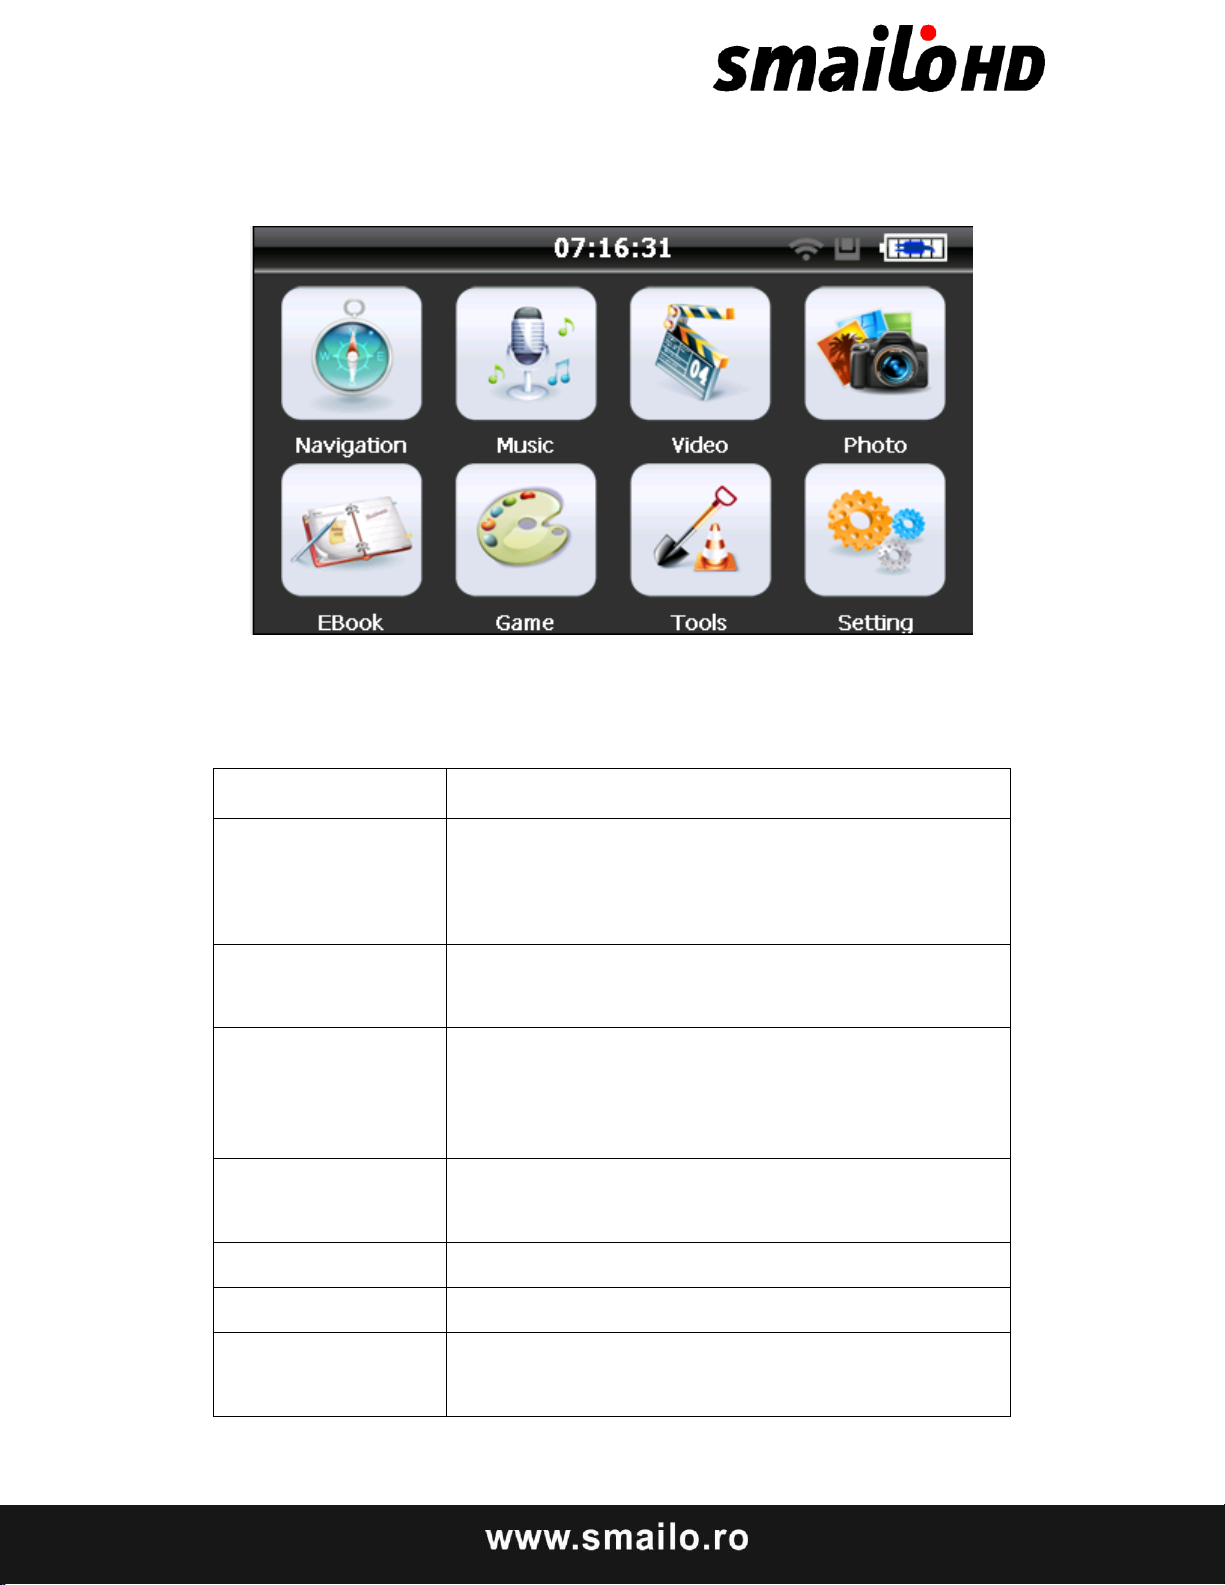
Navigaţie
Lanseaza aplicatia de navigatie
Muzică
Format audio: WMA, MP3.
Redare aleatorie, redare secvenţială, repetare,
pauză, înapoi/înainte, volum.
Player Video
Formate: ASF, AVI, WMV, 3GP, MP4 şi FLV.
Ajustare progres, pauză şi ecran complet.
Vizualizare
fotografii
Formate: JPG、BMP şi PNG. Suportă rotirea
fotografiilor, mărire-micşorare fotografii, redare
automată etc.
E-book
Format text: txt.
Suportă selecţia paginilor
Jocuri
Jocuri
Instrumente
Instrumente
Setări
Luminozitate, Volum, Limbă, Oră, Sistem, Setări
implicite, Info GPS, Navipath.
Operare meniu
Caracteristici
Page 15
Funcţii şi funcţionalităţi de navigare
În funcție de sistemul de navigaţie ales, navigatorul GPS poate găsi poziții
prin recepţia de semnal prin satelit şi afişare pe harta de navigaţie. Sistemul
calculează cea mai bună rută după setarea destinației, şi ajuta utilizatorii să
ajungă la destinație în condiții de siguranță și rapid.
Sistemul permite utilizatorului să se bucure de călătorie prin mai multe
moduri diferite, cum ar fi hartă, animație, indicații de voce și indicarea prin
cuvinte. Funcțiile de navigație specifice depind de alegerea software-ului de
navigație. Vă rugăm să consultați manualul de instrucțiuni ale softului de
navigare.
Notă:
1. Informaţii despre hartă
Este posibil ca datele de navigație electronică să nu fie în concordanță cu
indicaţiile reale din trafic, din cauza unor posibile construcții din trafic. Vă
rugăm să respectaţi condițiile de drum și regulile de trafic reale.
2. Navigație
Programul de navigare oferă un traseu de referință. Conducătorul auto poate
fi mai familiarizat cu ruta decât navigatorul GPS.
3. Primirea semnalului
Mai mulți factori, cum ar fi clădirile înalte, dense (în tunel, parcare
subterană, sub estacadă), diverse condiții meteorologice și închiderea
satelitului, pot afecta capacitatea de a receptiona semnal, astfel încât să
rezulte o poziție incorectă, ineficiența funcționării navigației și
nefuncţionarea sistemului.
Page 16
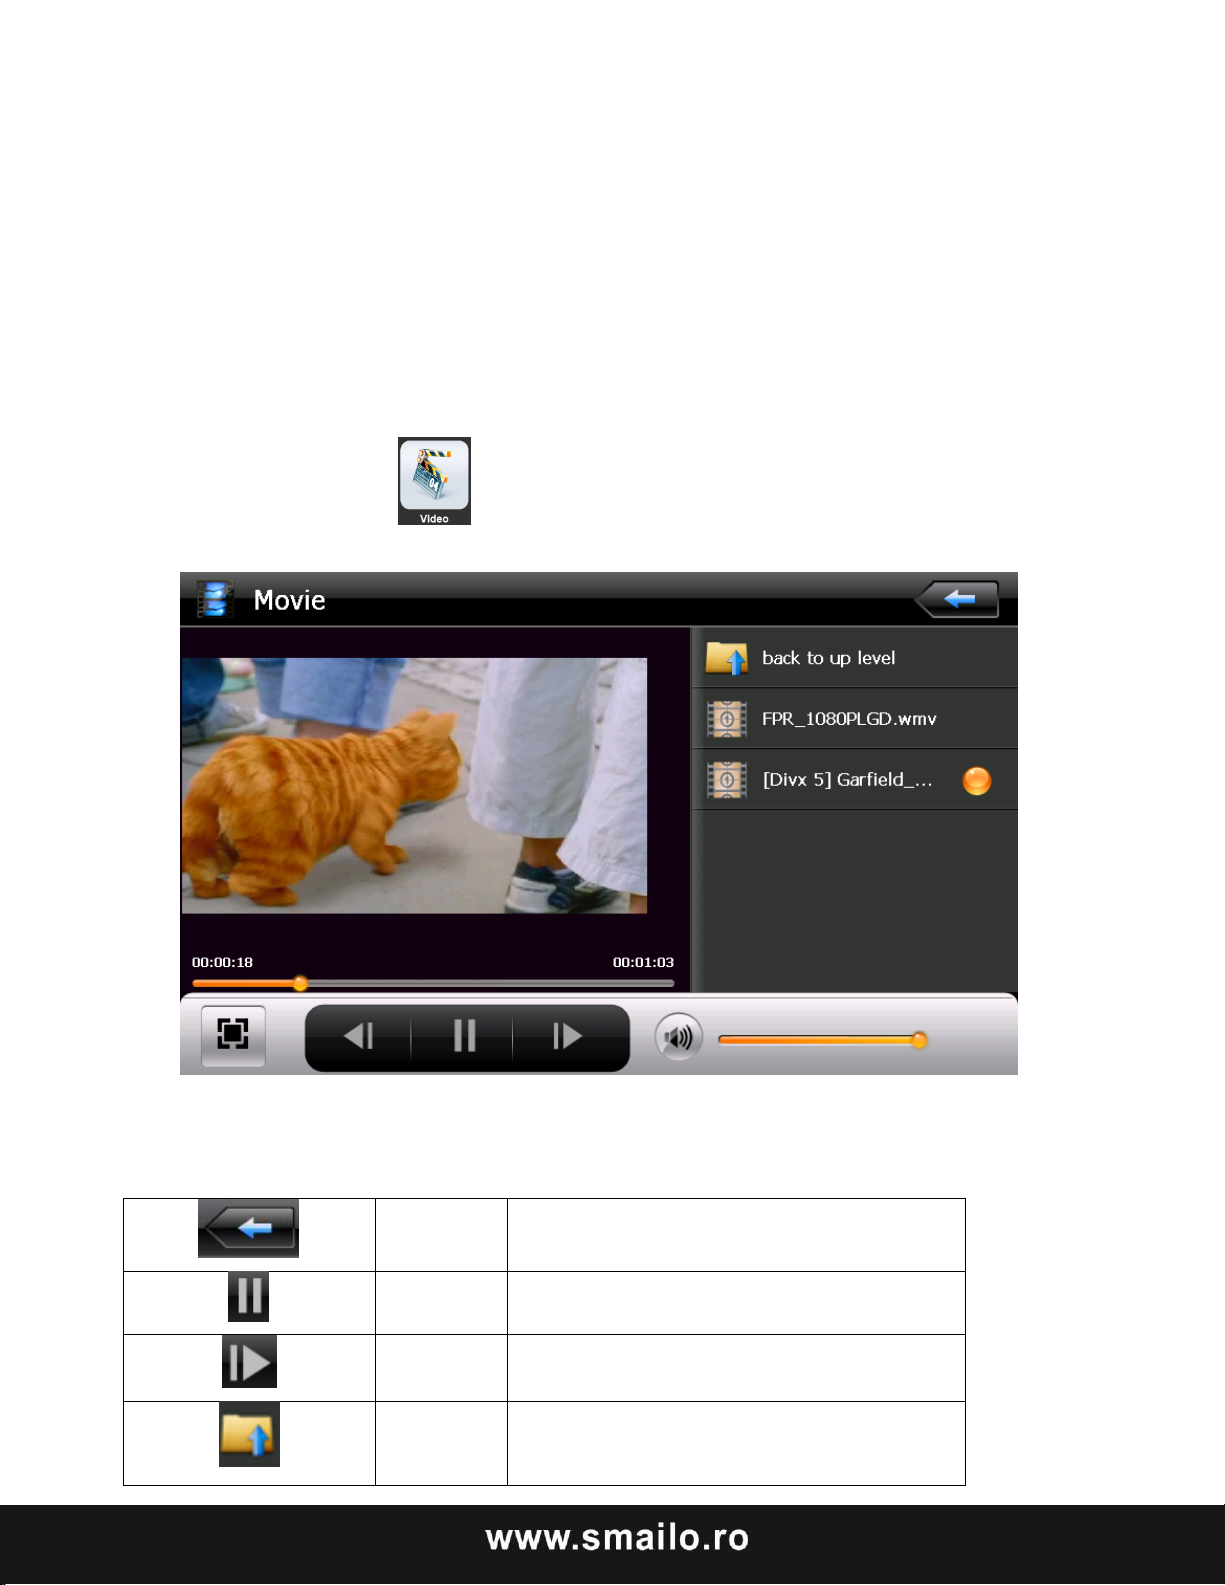
Închide
Apăsaţi pentru a închide lista video.
Play
Apăsaţi pentru a continua redarea.
Următorul
Redă următorul video.
Lista
fişiere
Apăsaţi pentru comutare la lista de
fişiere video şi alege video-ul favorit.
3 Interfaţa de operare video
Funcţii şi funcţionalităţi
1) Suportă formatele ASF, AVI, WMV, 3GP, MP4 și FLV.
2) Suportă redare full-screen, alegerea și selectarea fișierelor;
Înainte de a utiliza player-ul video, vă rugăm să copiați fișierul video
(ASF, AVI, WMV, 3GP, MP4 și FLV) în orice folder.
Operaţiuni
Apăsaţi pe butonul pentru a intra în interfaţa playerului:
Page 17
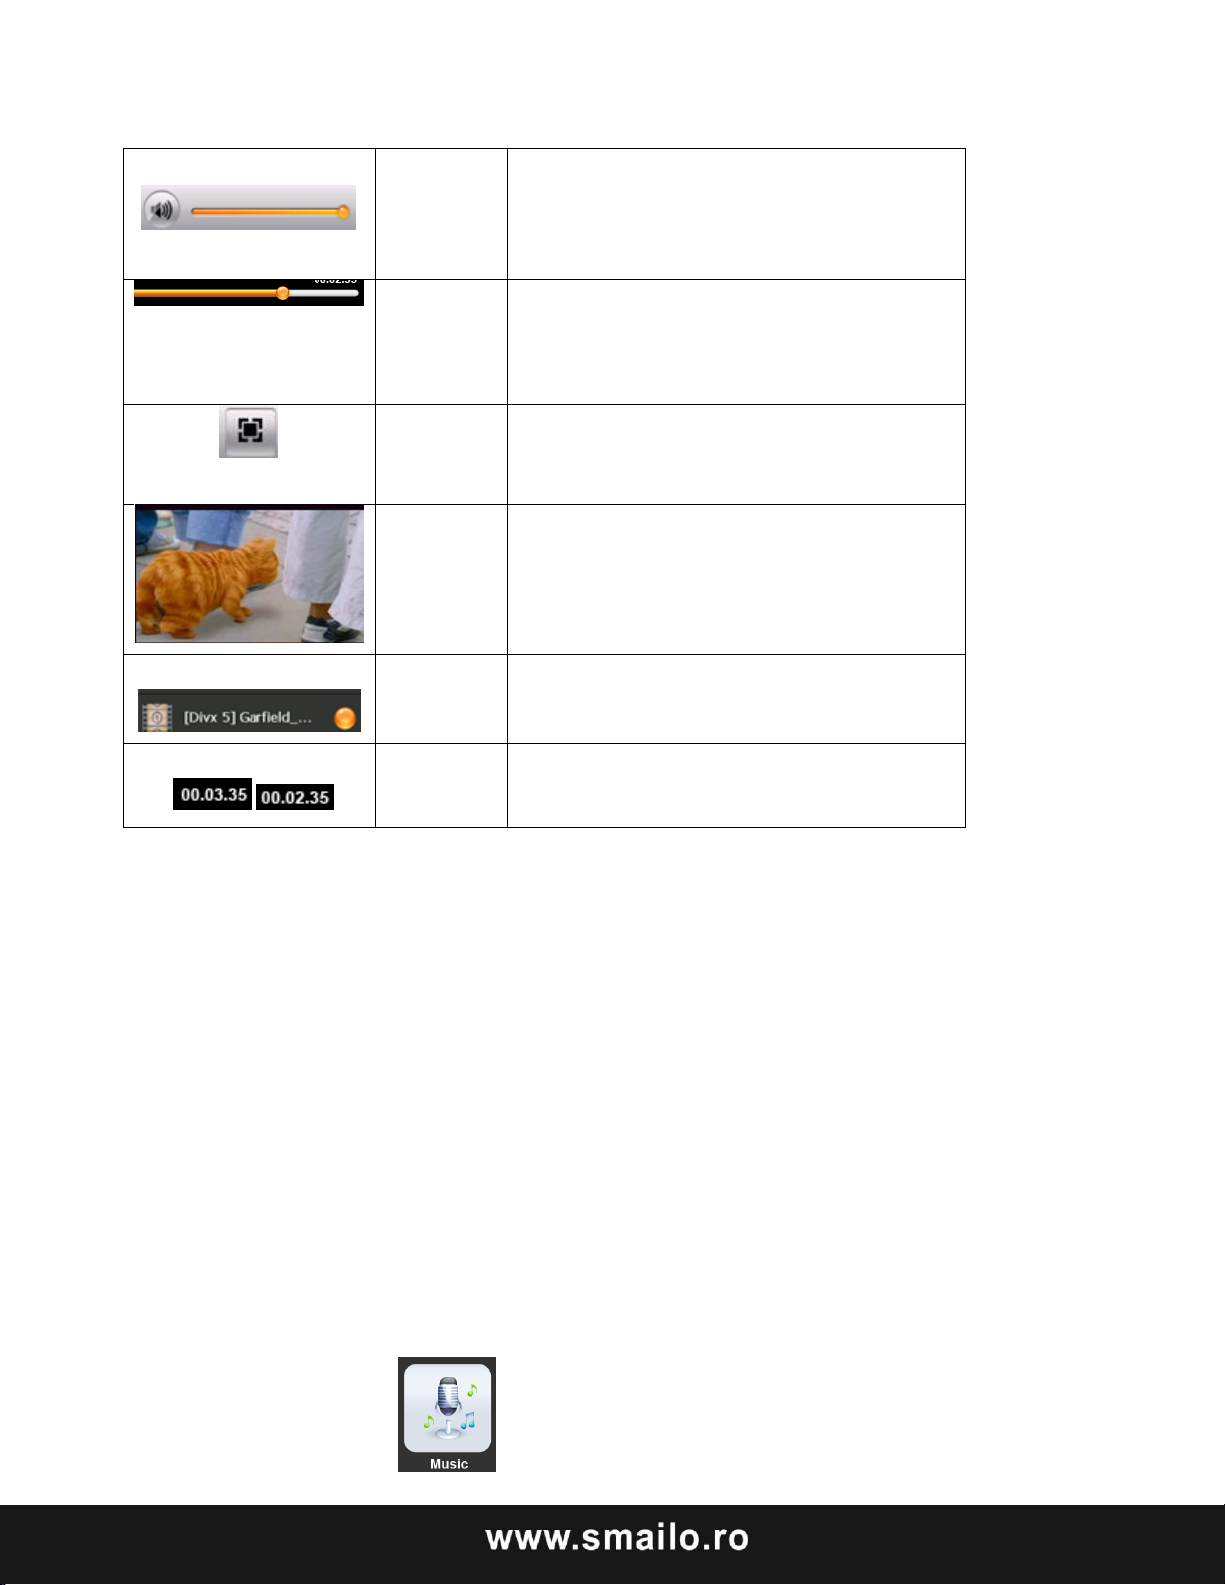
Volum
Apăsaţi pe volum. Volum scăzut când se
comută la stânga şi comutare spre
dreapta pentru creşterea volumului.
Redare în
progres
Ajustă progresul prin glisare spre stânga
pentru înapoi şi glisare dreapta spre
înainte.
Ecran
complet
Redă în ecran complet.
Interfaţă
de redare
Redare în ecran complet. Apăsaţi de
două ori pentru întoarcerea la redare
normal.
Nume
video
Arată numele curent al videoclipului.
/
Timp
Arată timpul de redare al videoclipului/
Timpul total al videoclipului
Interfaţa audio
Acest capitol prezintă modul de utilizare a GPS-ului pentru a reda muzica
preferată.
Funcţii şi funcţionalităţi
Playerul audio suportă formate MP3 şi WAV, puteţi seta secvenţa de redare
după cum doriţi.
Înainte de a folosi playerul audio, vă rugăm să copiaţi fişierele în orice director.
Operaţiuni
Apăsaţi pe butonul pentru a intra în interfaţa audio:
Page 18
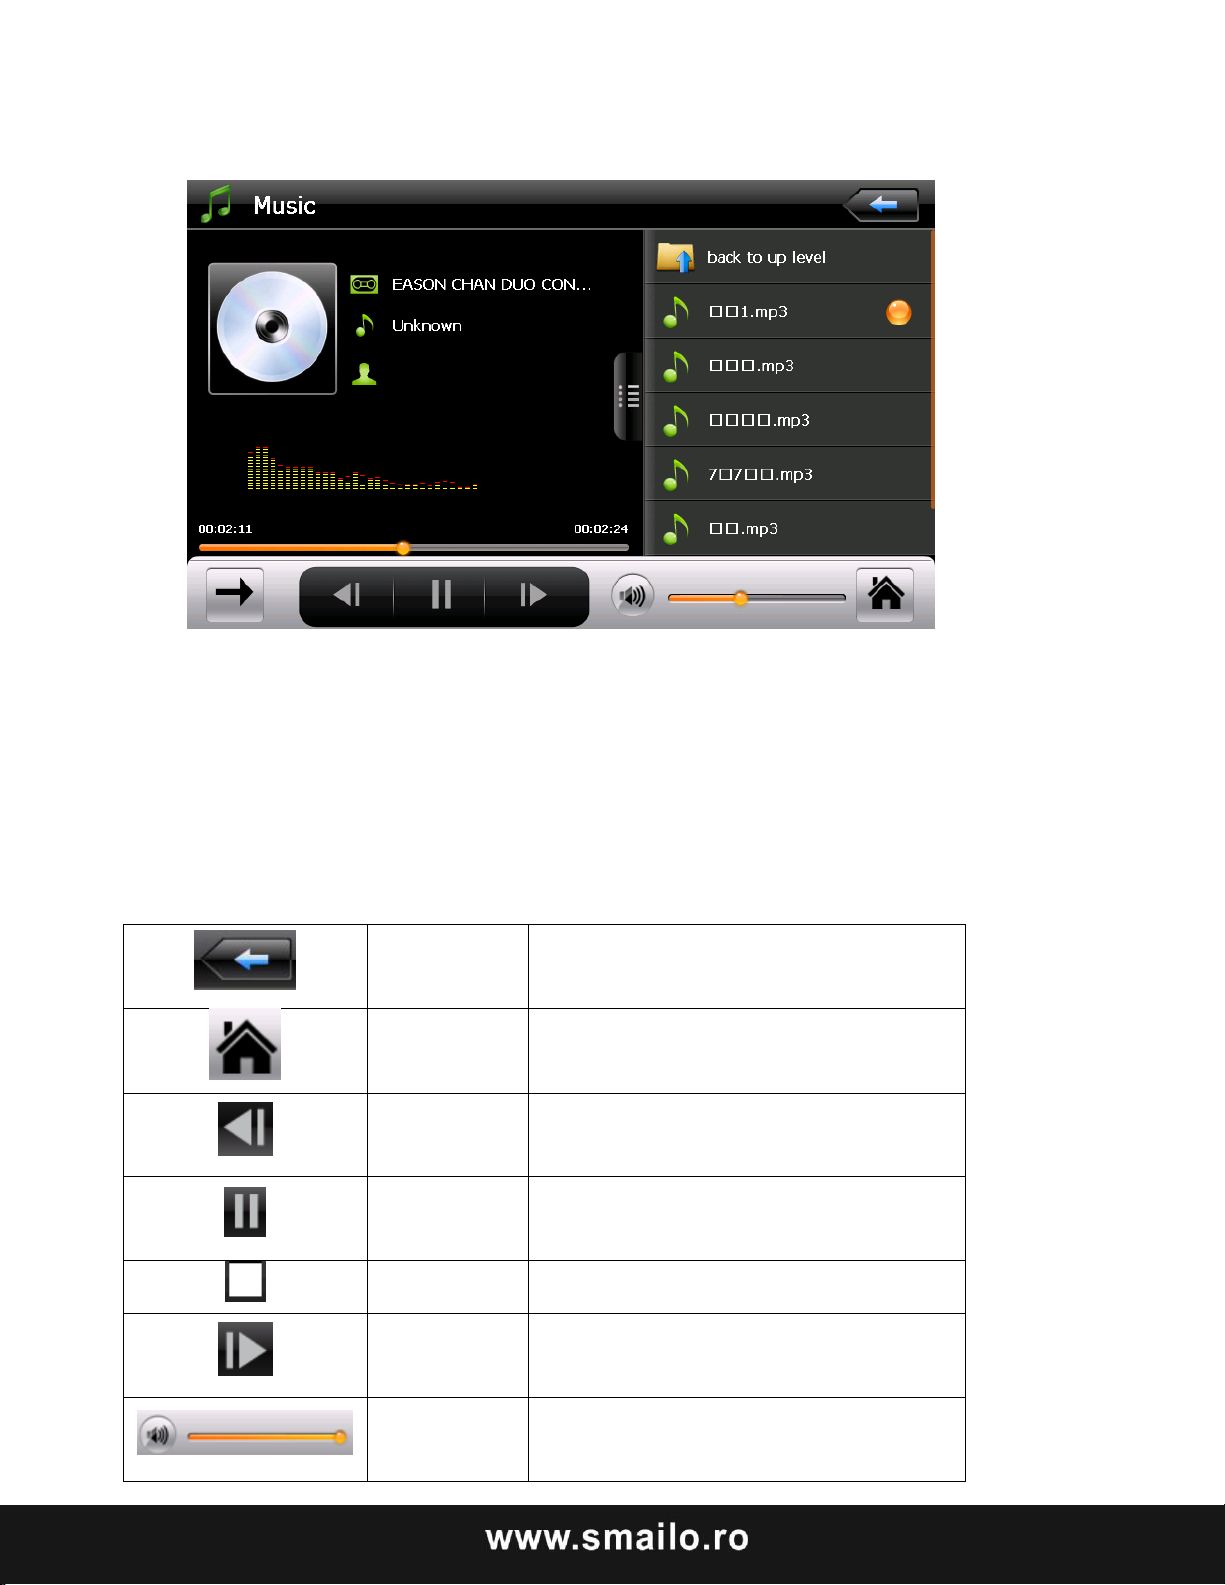
Închide
Apăsaţi o singură data pentru ieşire
din player-ul audio.
Acasă
Piesa
anterioară
Redă piesa anterioară
Redă/pauză
Apăsaţi pentru a reda sau întrerupe o
piesă;
Stop
Apăsaţi pentru a opri redarea;
Următoarea
piesă
Redă următoarea piesă;
Volum
Apăsaţi pe volum. Volum scăzut când
se comută la stânga şi comutare spre
dreapta pentru creşterea volumului.
Page 19
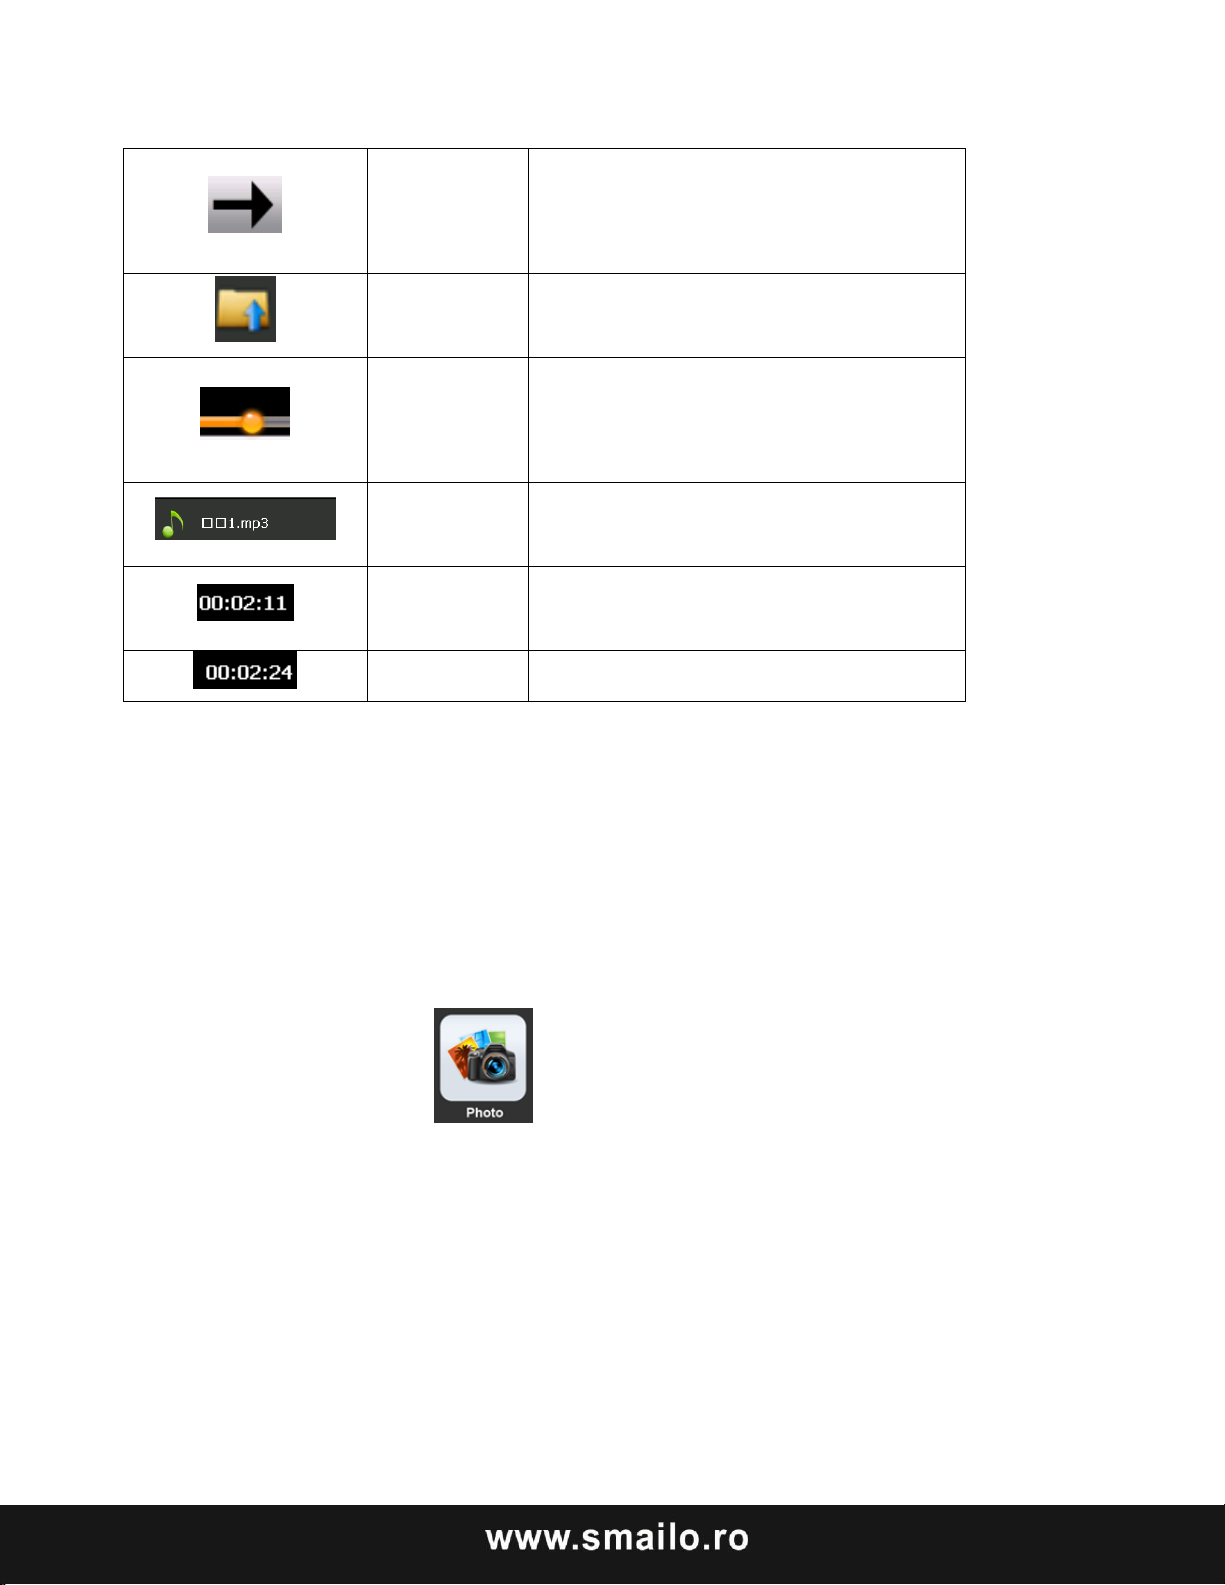
Setare
modul
redare
Suportă redare secvenţială, redare în
buclă, repetarea redării sau redare
aleatoare.
Deschide
lista de
redare
Apăsaţi pentru a afişa lista de redare,
de unde puteţi alege piesa favorită.
Redare în
progres
Ajustă progresul prin glisare spre
stânga pentru înapoi şi glisare dreapta
spre înainte.
Numele
piesei
Arată numele piesei
Timp
consumat
Arată progresul piesei;
Timp total
Arată durată totală a piesei.
Interfata vizualizare fotografii
Functionalităţi:
1) Suportă formatele JPG, BMP şi PNG
2) Suportă rotaţia fotografiei, mărire/micşorare fotografie şi redare automată.
Operaţiuni
Apăsaţi pe butonul pentru a intra in interfaţă
Page 20
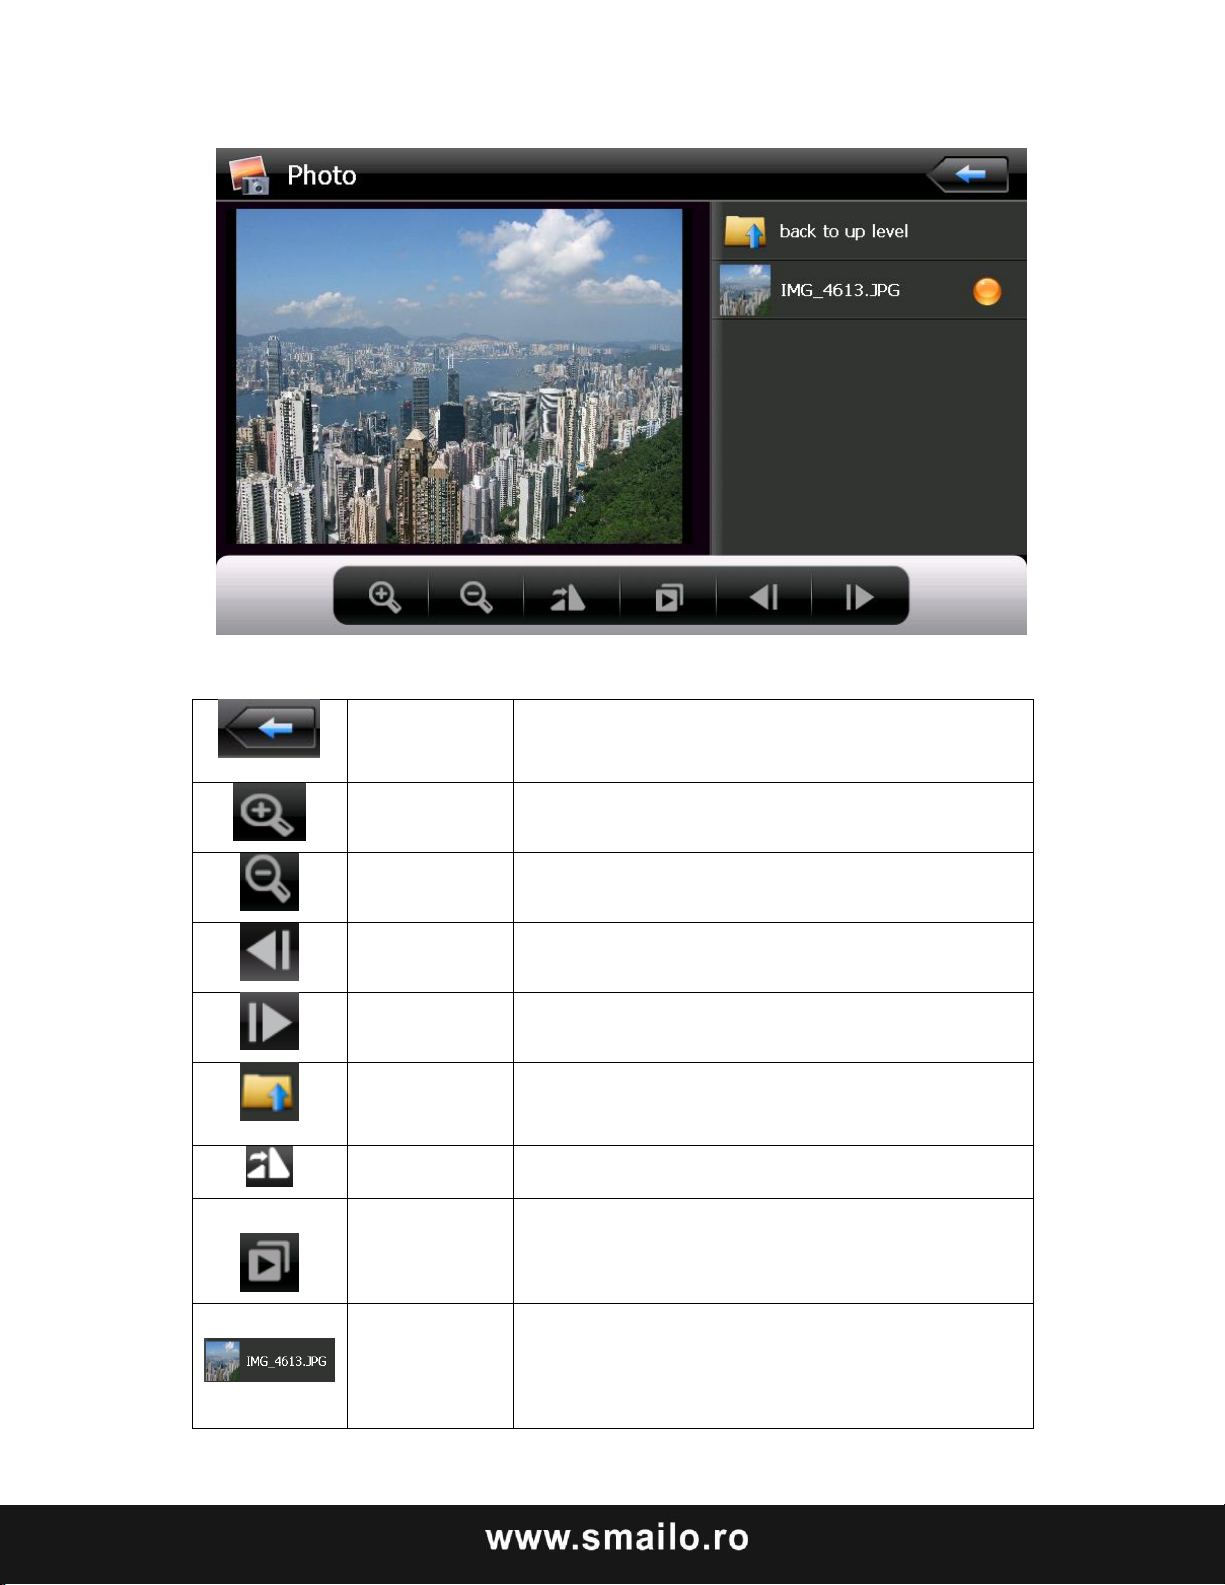
Închide
Apăsaţi o singură data pentru a închide
interfaţa.
Mări
Măreşte proporţiile fotografiei curente.
Micşora
Micşorează proporţiile fotografiei curente.
Anterior
Arată fotografia anterioară
Următoare
Arată fotografia următoare.
Lista fişiere
Apăsaţi pentru a comuta la lista de fişiere
fotografii şi apoi selectaţifotografia.
Rotire
Apăsaţi pentru a roti fotografia la 90 de grade.
Redare
automata
De la fotografia curentă se poate răsfoi pe
întreg ecranul directorul cu toate fotografiile;
Nume si
formatul
fotografiei
Arată numele şi formatul fotografiei.
Page 21
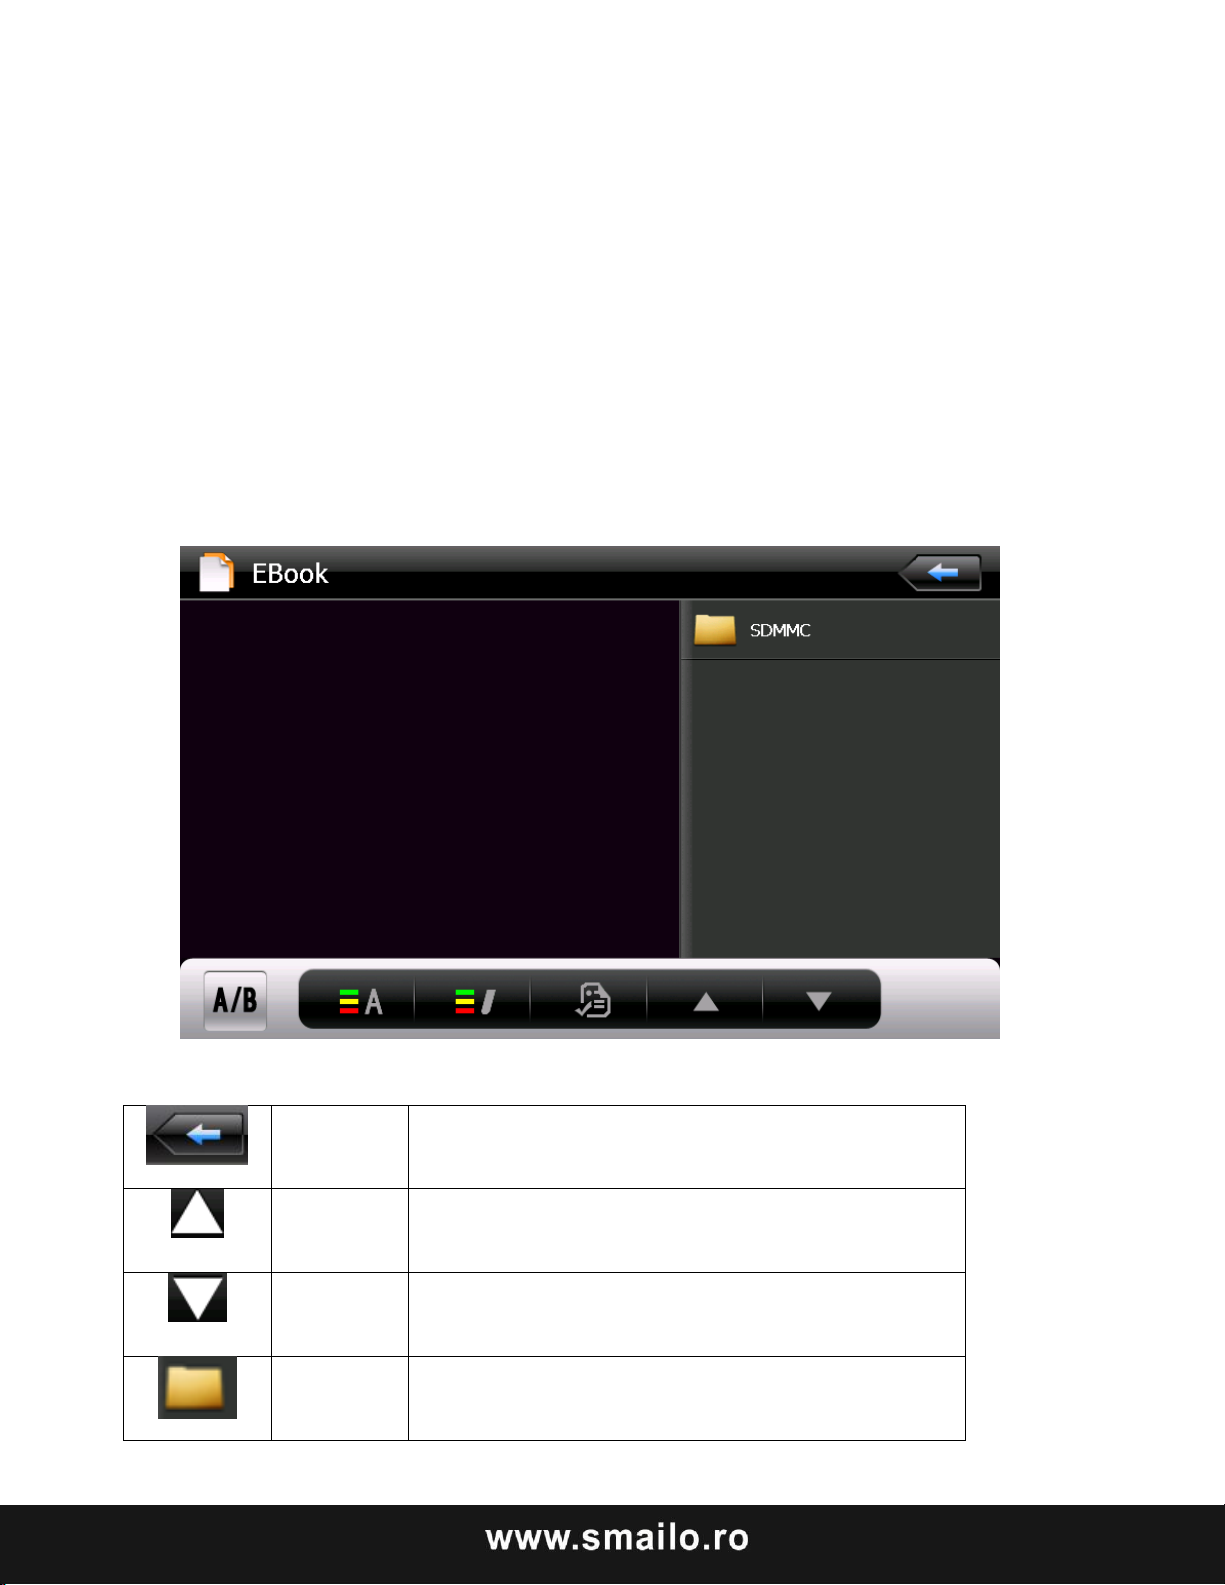
Închide
Apăsaţi o singură dată pentru a închide e-book
reader-ul.
Ultima
pagină
Citeşte ultima pagină
Următoare
a pagină
Citeşte următoarea pagină-
Fişier
Apăsaţi pentru a intra în lista Ebook-ului pentru a
alege cartea favorită.
Interfaţa -book reader
Funcţii
Suportă răsfoirea paginilor şi alegerea fişierelor.
Înainte de folosirea funcţiei e-book, vă rugăm să copiaţi fişierul TXT pe
dispozitiv şi
salvaţi-l în orice director.
Operaţiuni
Apăsaţi pe butonul de “E-book” pentru a intra în interfaţa de e-reader
Page 22
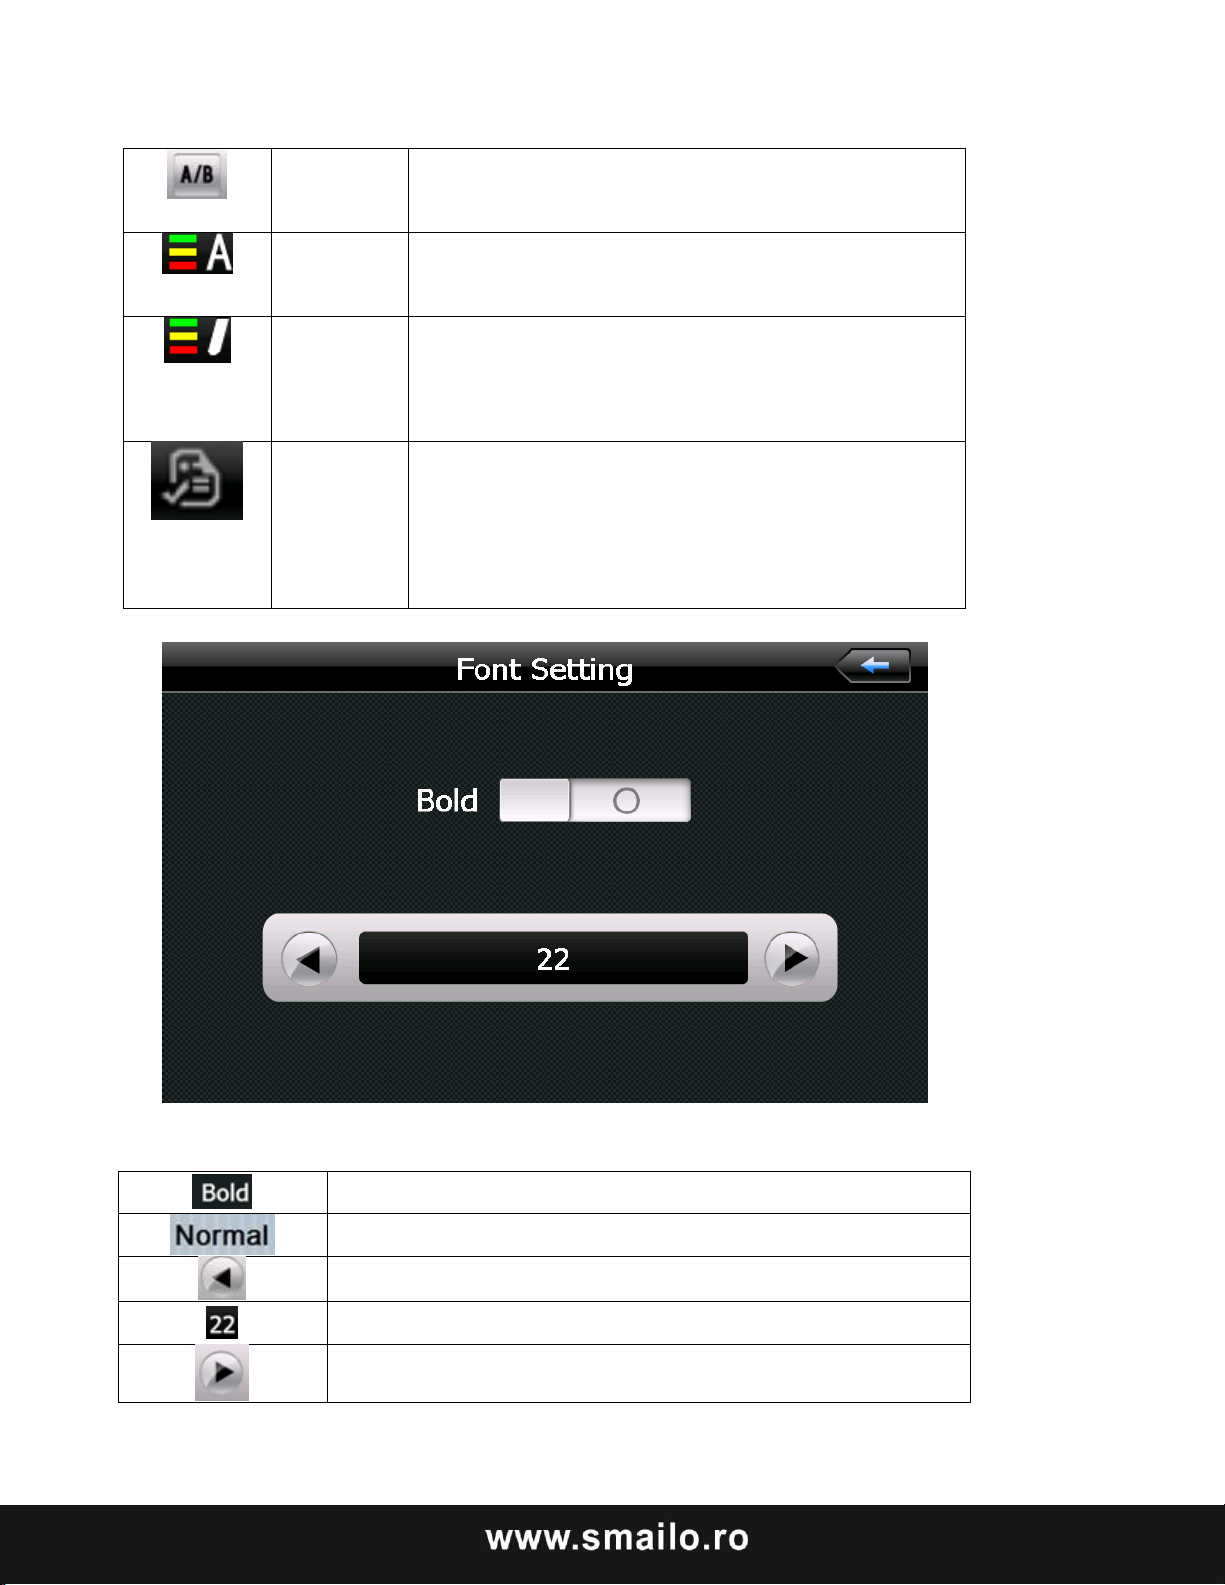
Setare
font
Setare de fonturi
Set de
culori
Setarea culorilor
Adaugă
semn de
carte
Deschide
lista cu
semne de
carte
Setare font bold
Setare font normal
Scade mărimea fontului
Indicator mărime font
Creşte mărime font
Page 23
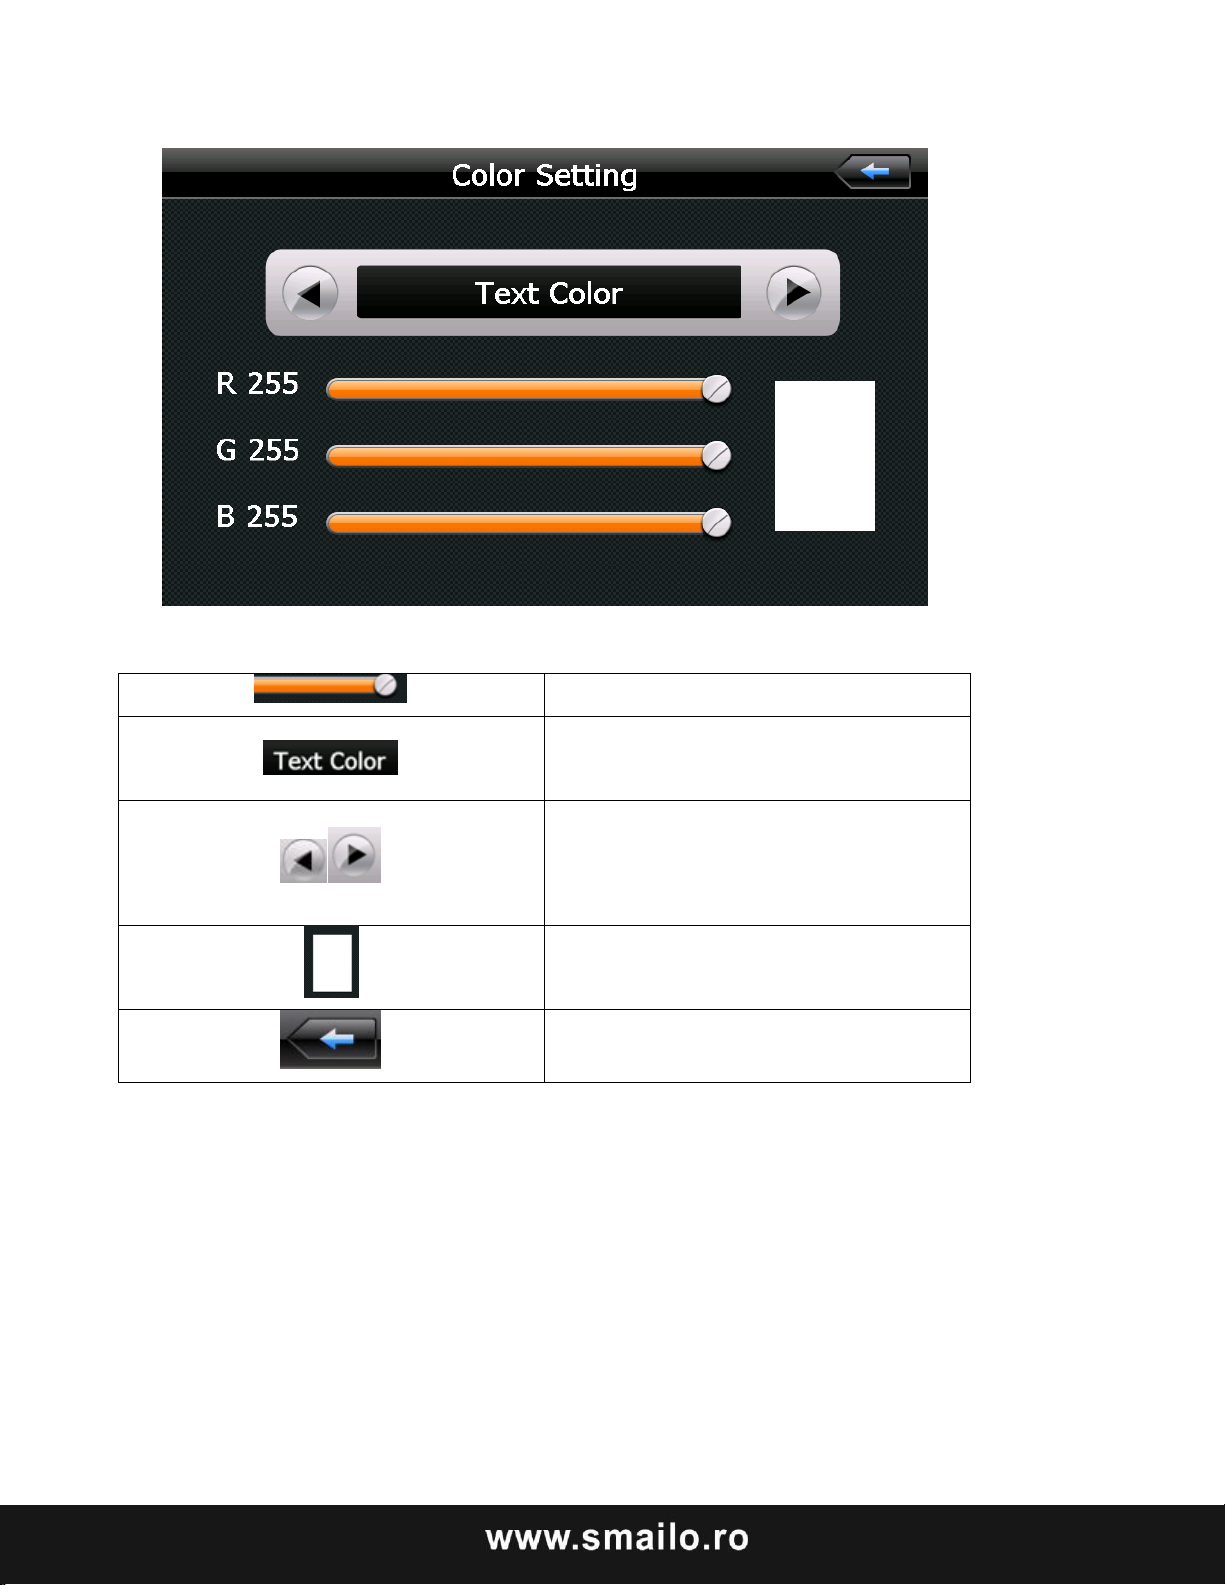
Setare culoare RGB
Alege culoarea de fundal sau
culoarea fontului
Alege culoarea de fundal sau
culoarea fontului in ordine inversă sau
secvenţială.
Recenzie culoare.
Întoarcere acasă.
Page 24
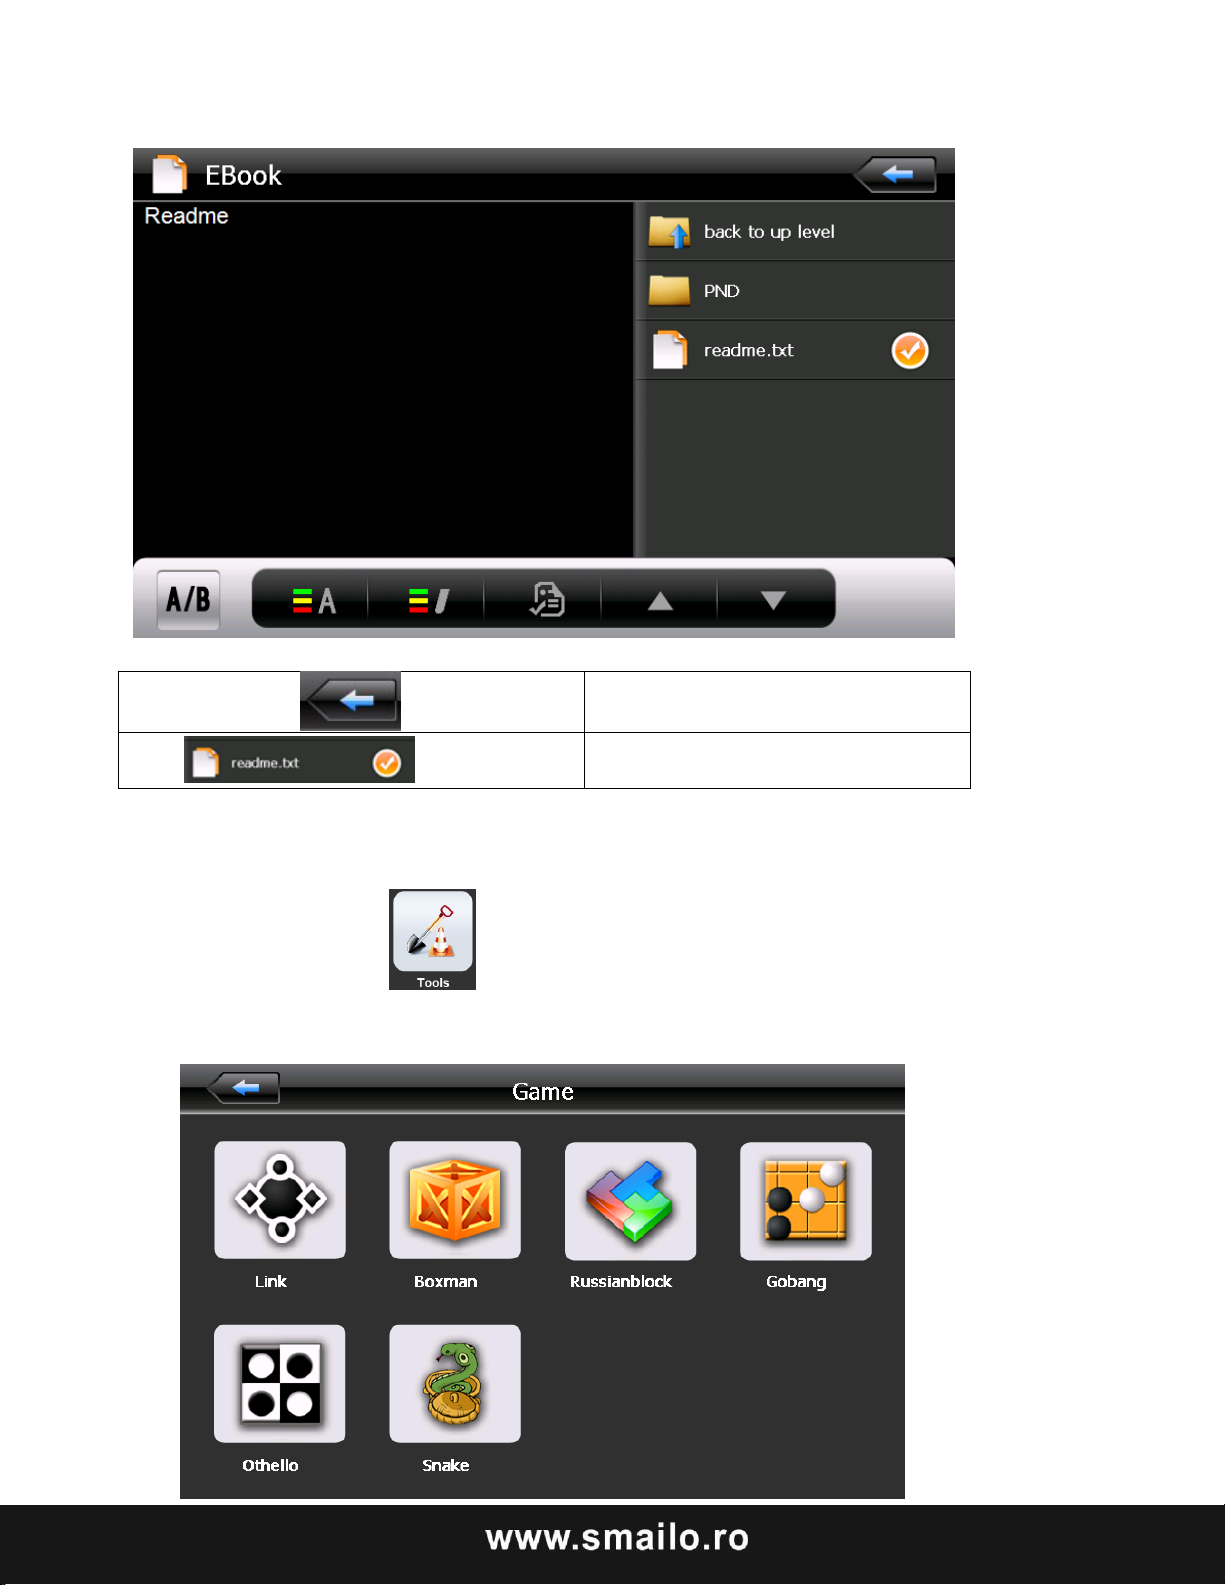
Întoarcere spre interfaţa e-book-
ului
Apăsaţi pentru a alege semnul de
carte.
8 Interfata de jocuri
Apăsaţi pe iconiţa pentru a alege diferite jocuri.
Page 25
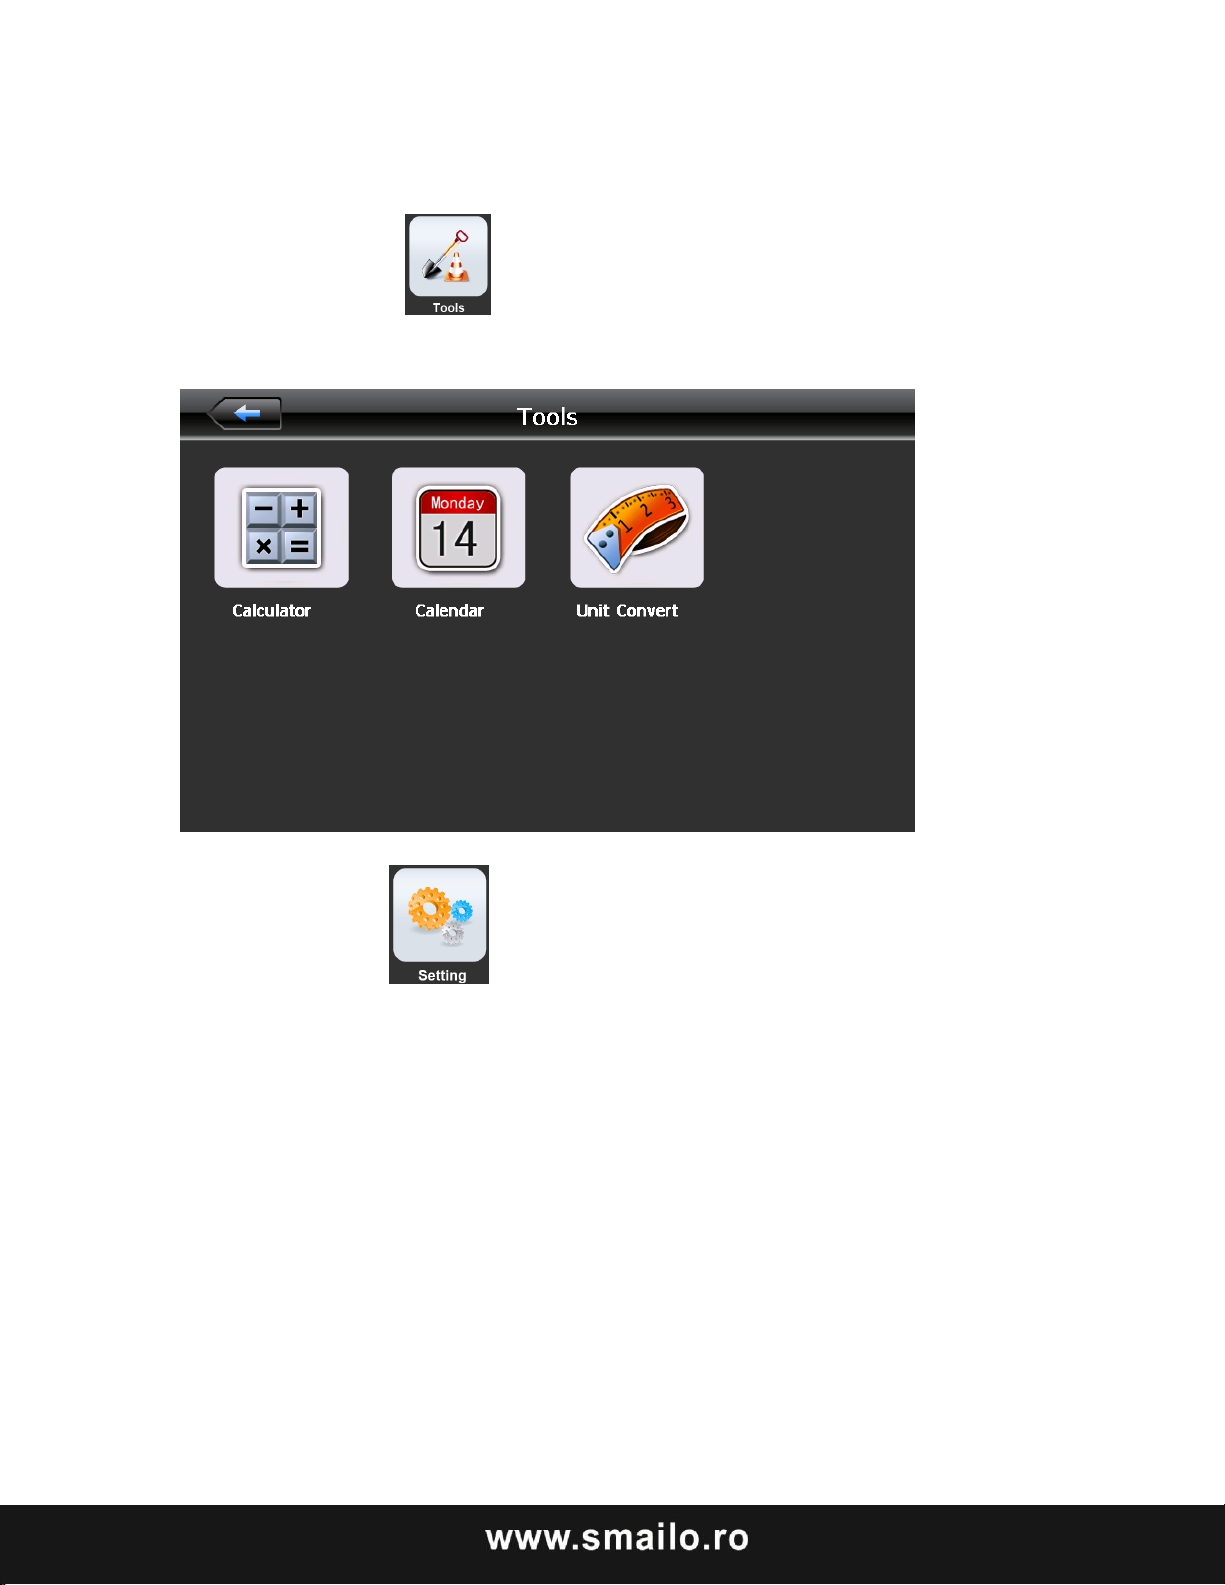
Instrumente
Apăsaţi pe butonul pentru a alege instrumentele:
Apăsaţi pe iconita pentru a intra în meniul setărilor pentru a alege
funcţiile relevante, ca luminozitate, volum, limbă, oră, calibrare, informaţiile
sistemului.
Page 26
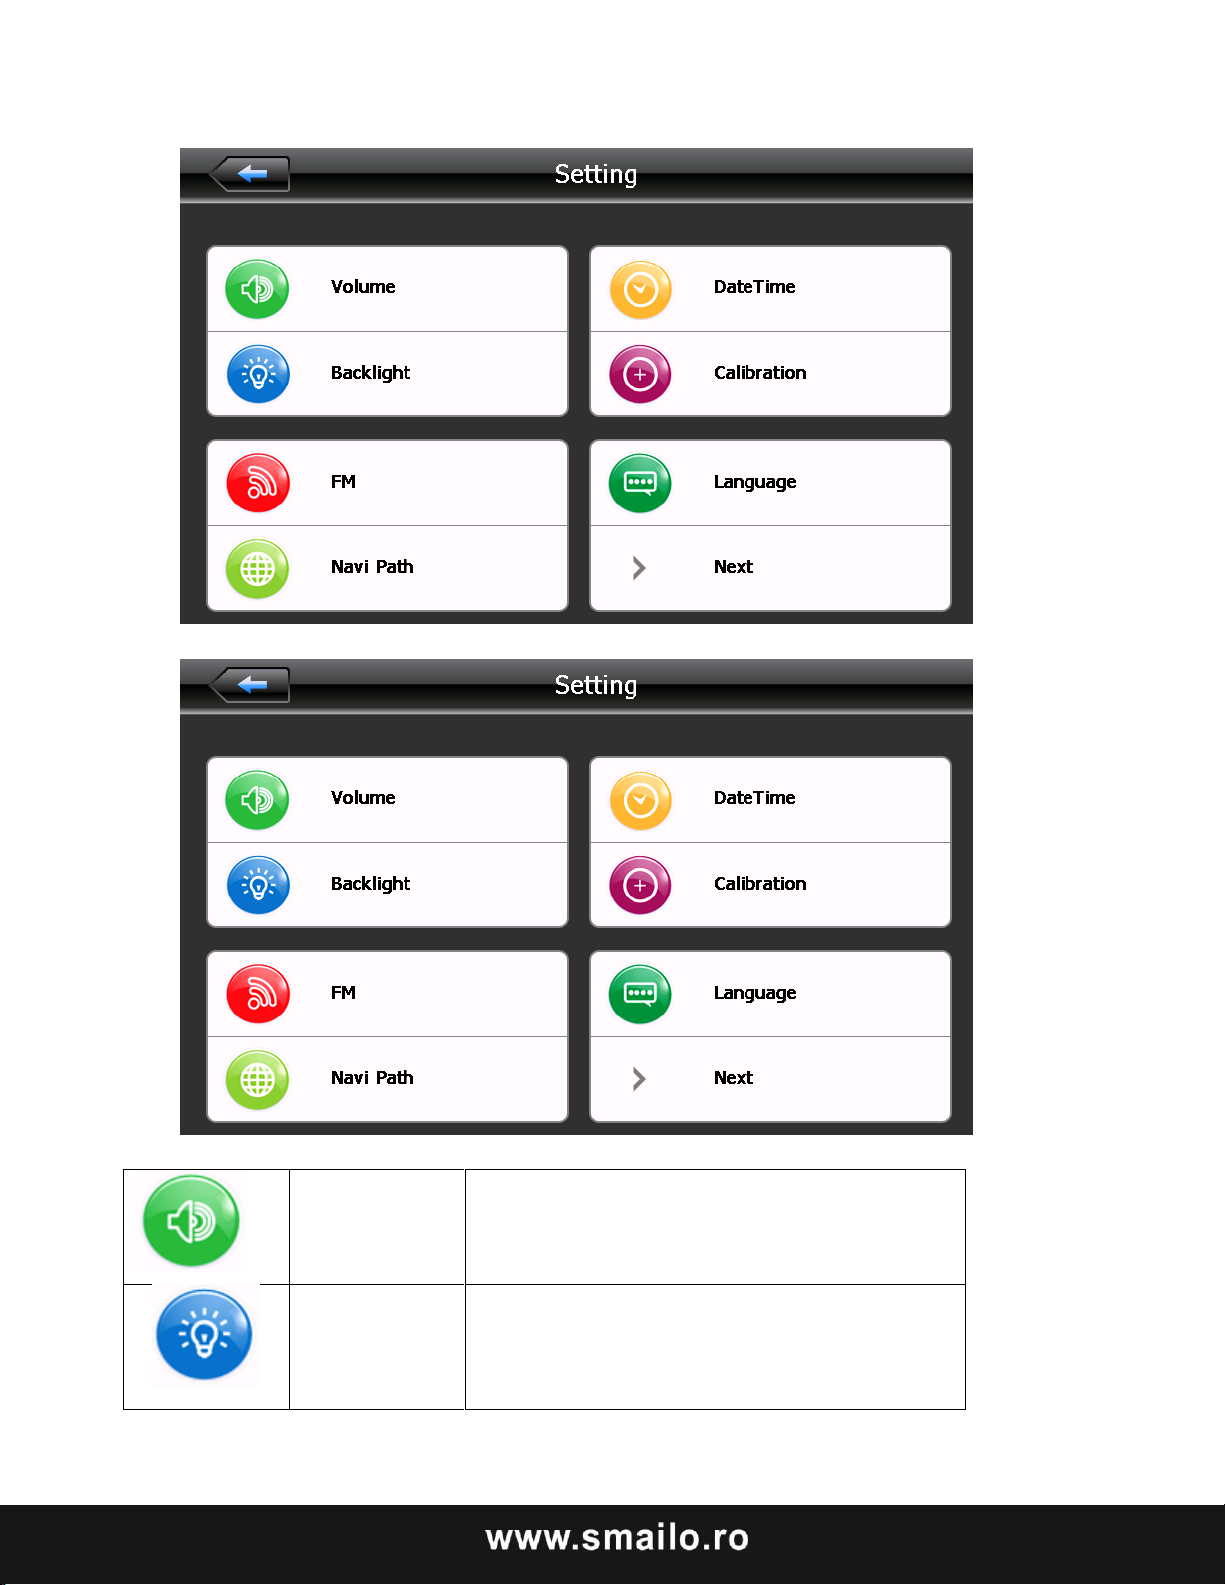
Volum
Ajustare volum;
Pornire/oprire sunet.
Luminozitate
Ajustare lumină ecran;
Dezactivare luminozitate când dispozitivul
este la încărcat
Page 27
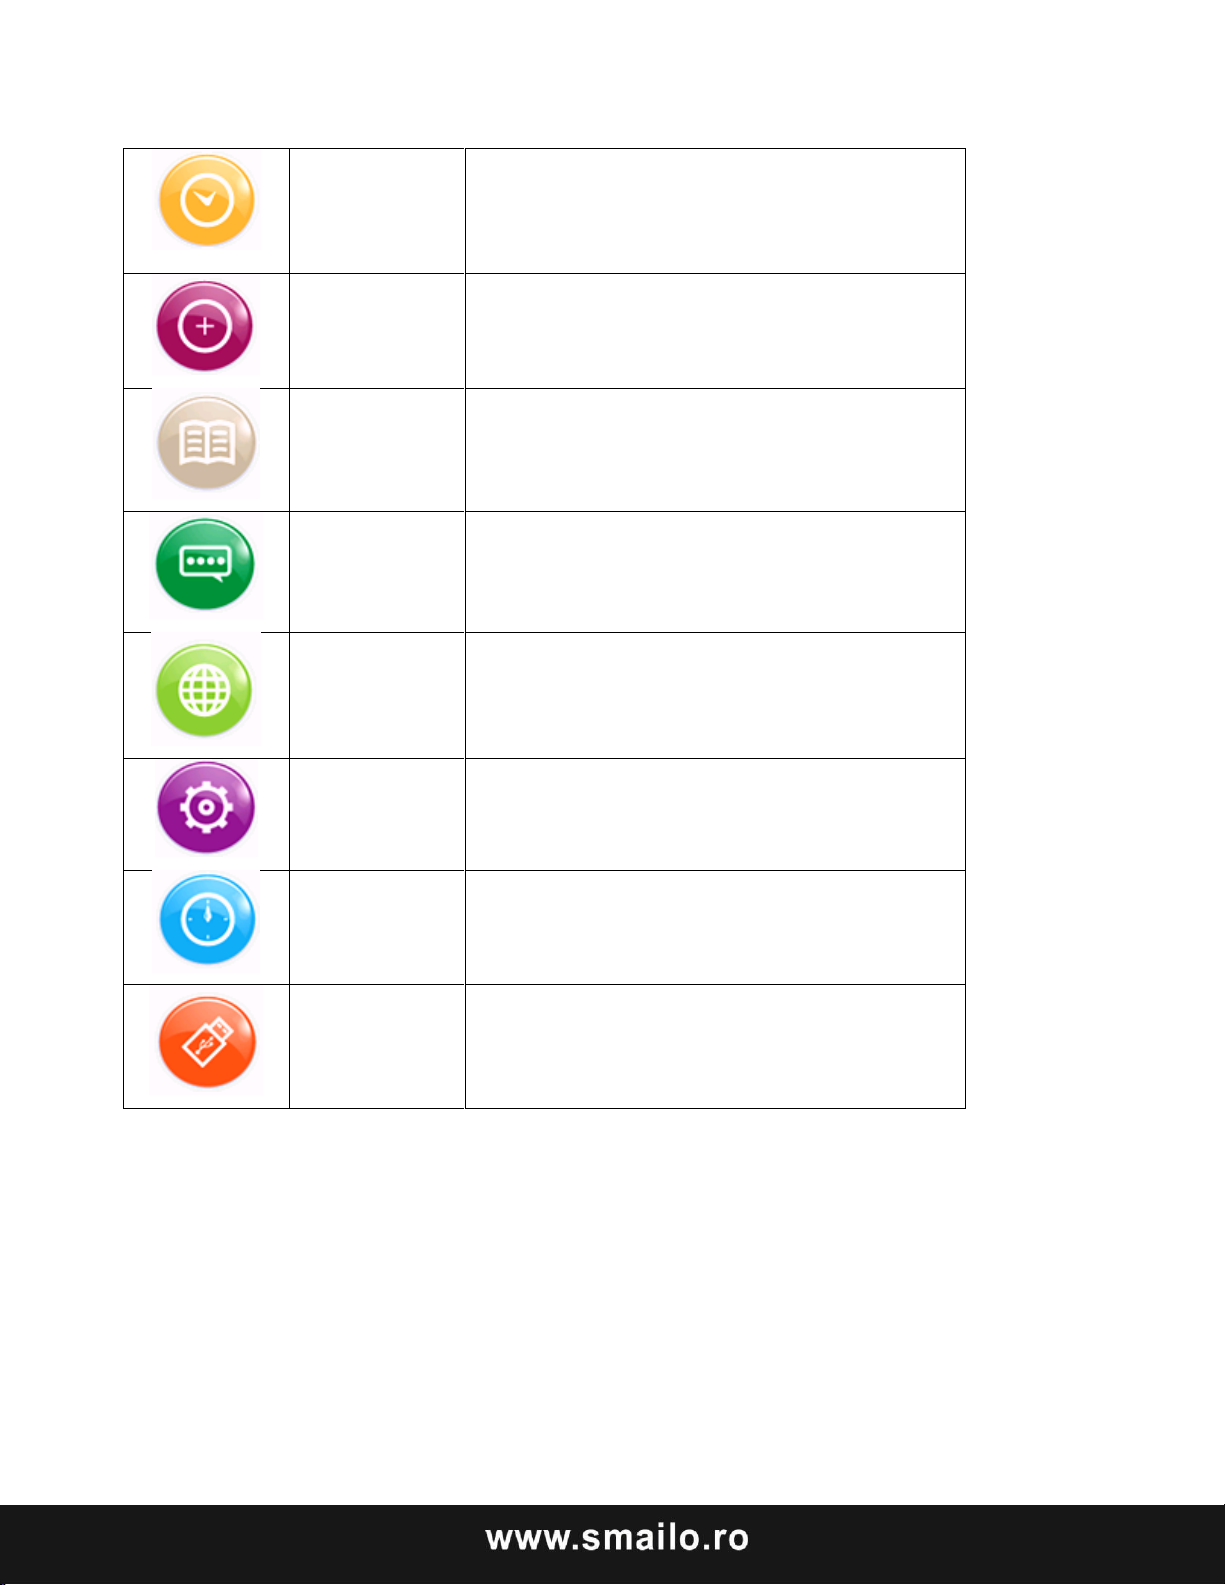
Oră şi dată
Setare oră
Setare dată
Setare fus orar
Calibrare
ecran
Calibrarea ecranului
Info sistem
Arată versiunea sistemului şi numărul de
serie.
Limbă
Selectaţi limba sistemului
Cale navigare
Setare calea de navigare
Resetare
Revenire la setările iniţiale
GPS info
Arată datele primate de semnalul GPS.
USB
Ajustarea volumului
Ajustarea volumului include:
1. Regalare volum difuzor
2. Setare ton click ecran
Page 28
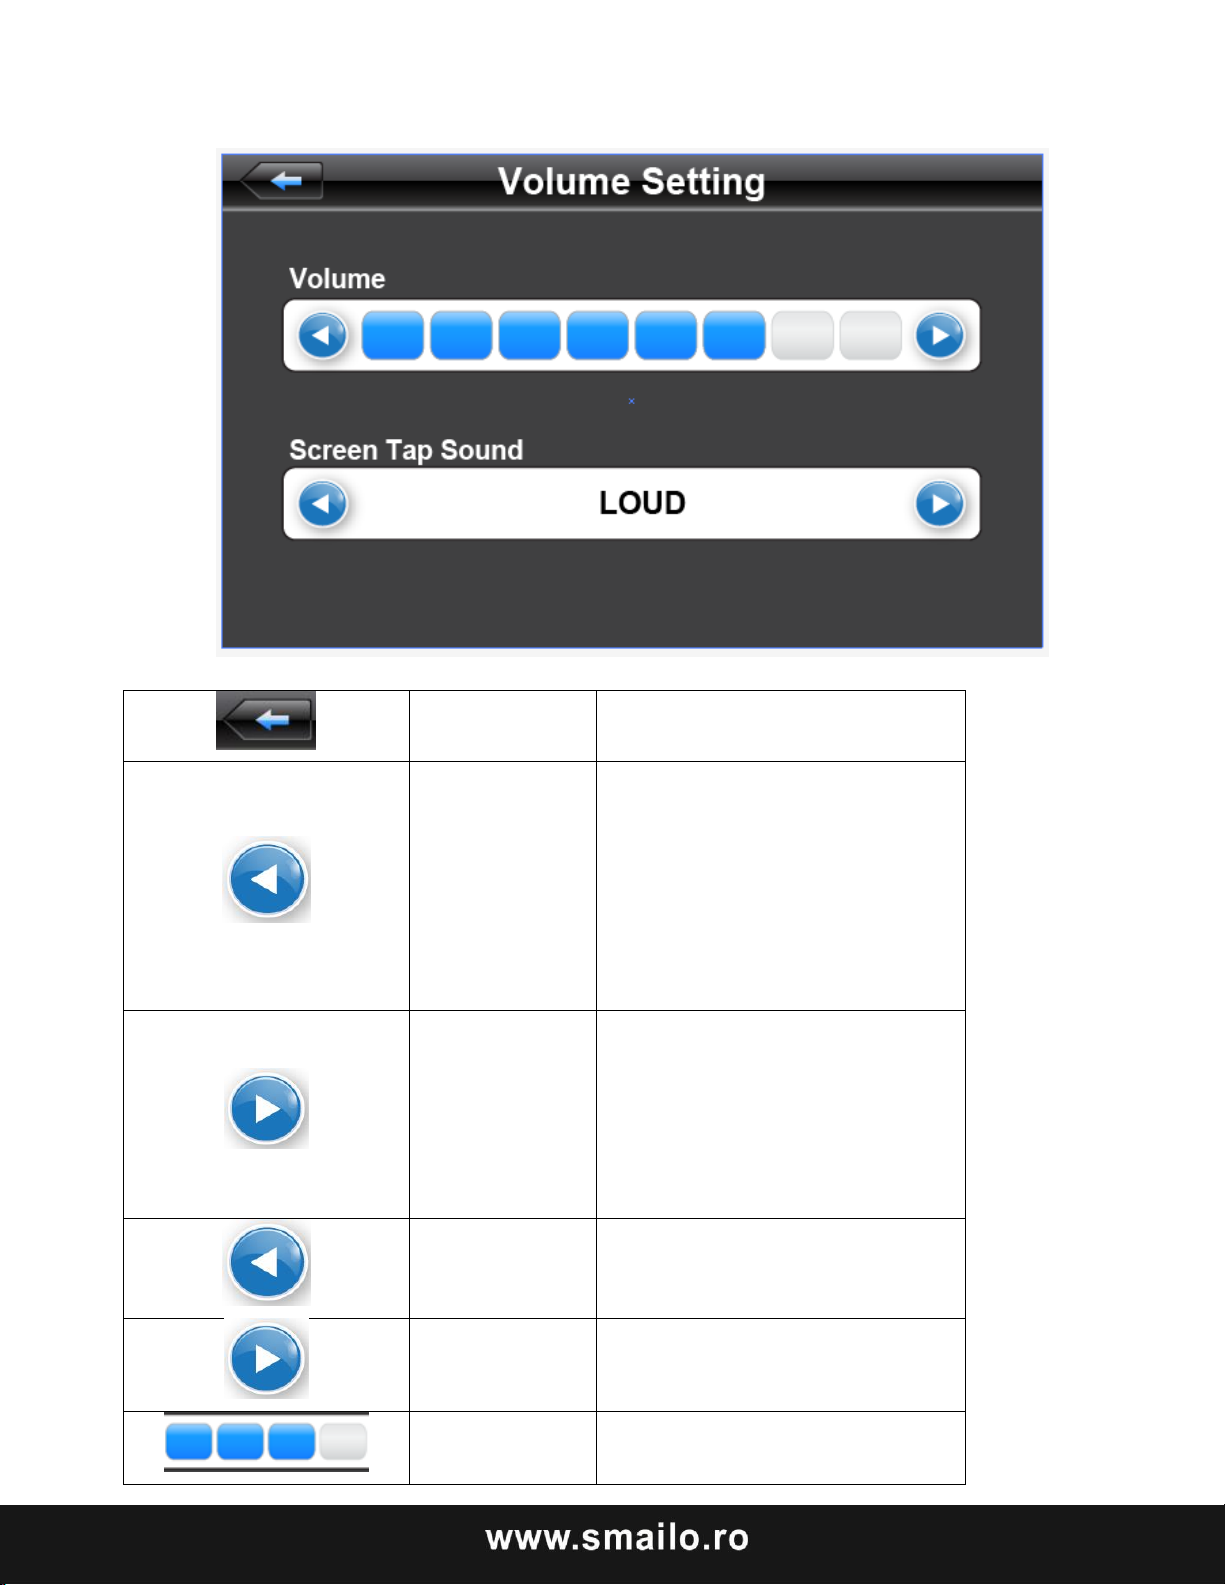
Închide
Ieşire din interfaţa reglare volum
Volum -
Apăsaţi pentru a scădea
volumul gradual. Sunt 10 nivele
ale volumului, de la mut la
maxim. Apăsaţi o singură dată
pentru a scădea volumul cu un
nivel.
Volum +
Apăsaţi pentru a creşte volumul
gradual. Sunt 10 nivele ale
volumului, de la mut la maxim.
Apăsaţi o singură dată pentru a
creşte volumul cu un nivel.
Buton stânga
Pornire/oprire ton pentru click
ecran.
Buton dreapta
Pornire/oprire ton pentru click
ecran.
Indicator volum
Arată volumul actual
Page 29
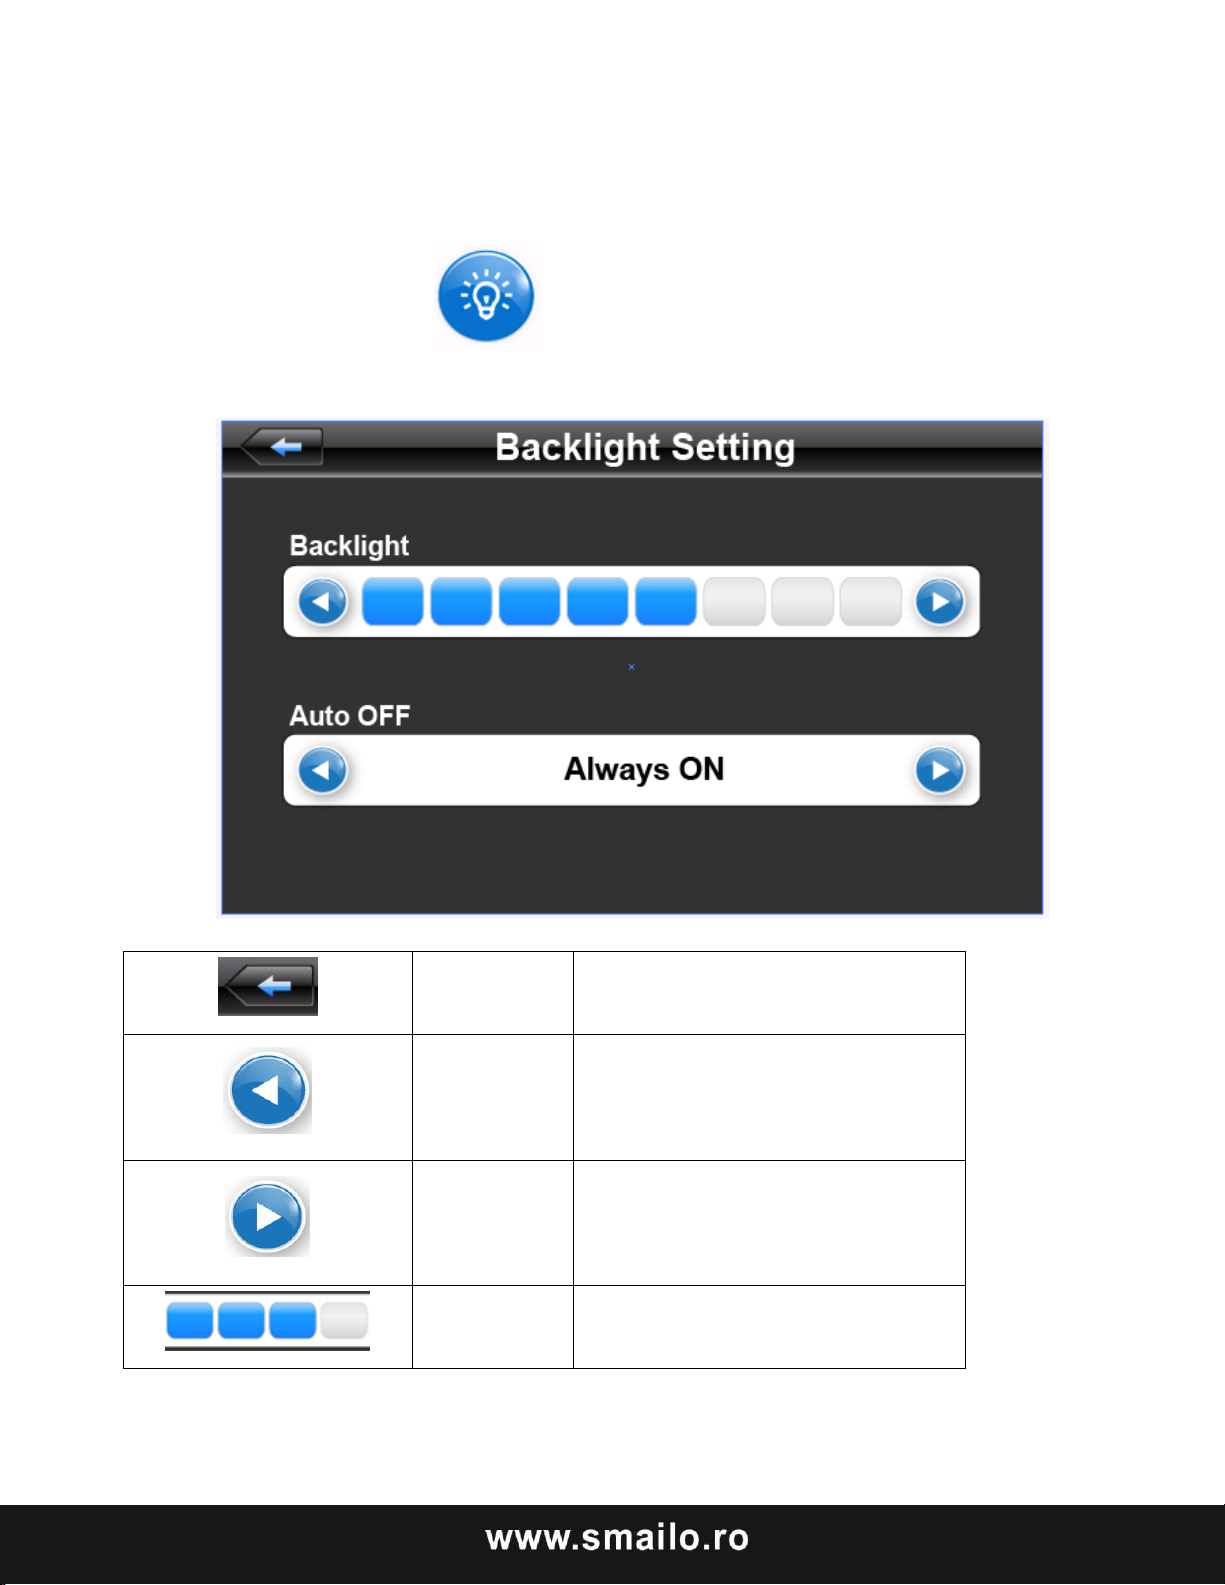
Închide
Ieşire din interfaţa “setări
luminozitate”.
Scăderea
luminozităţii
Apăsaţi pentru a scădea
luminozitatea gradual până la cel
mai scăzut nivel.
Creşterea
luminozităţii
Apăsaţi pentru a creşte
luminozitatea gradual până la cel
mai ridicat nivel.
Nivel
luminozitate
Arată nivelul actual al luminozităţii.
Setări luminozitate
Apăsaţi pe butonul pentru a intra în setările pentru luminozitate.
Page 30
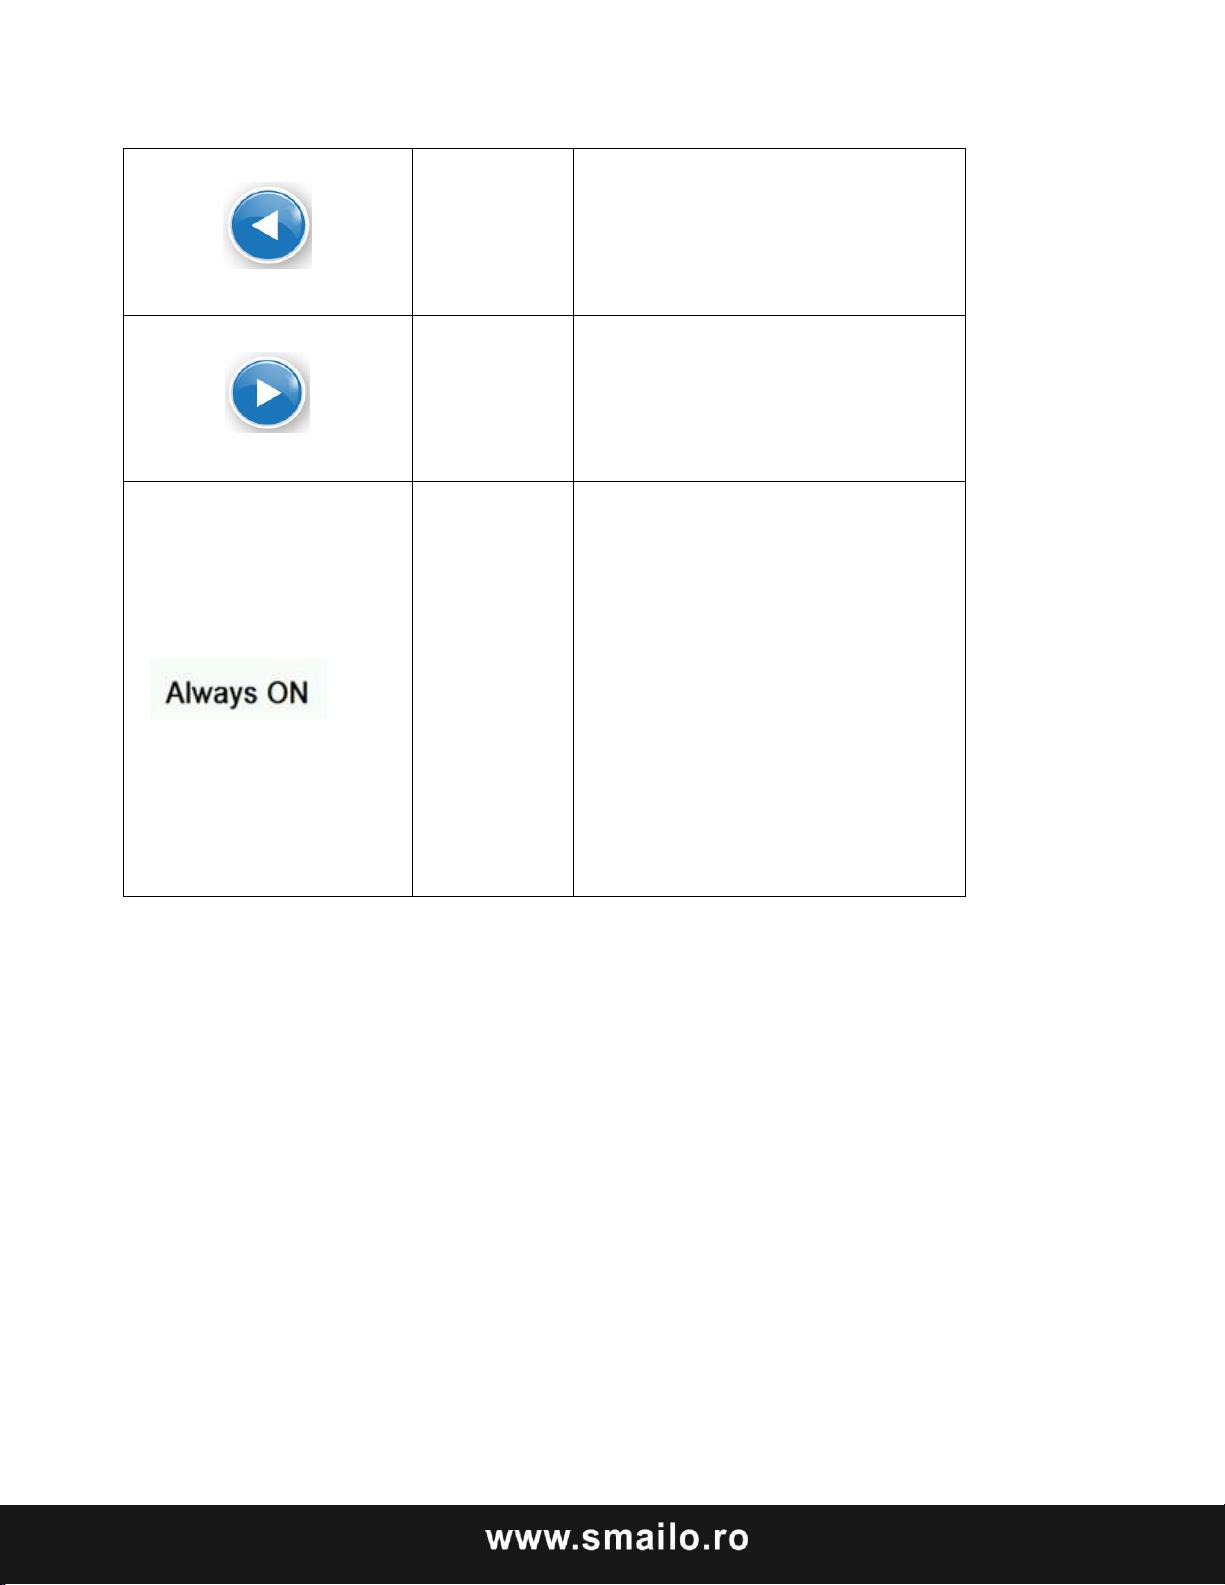
Deplasare
stânga
Apăsaţi o singură dată pentru
deplasare la stanga şi se va afisa
ultima coloană. Acest ecran este
în cerc.
Deplasare
dreapta
Apăsaţi o singură dată pentru
deplasare la dreapta şi se va afişa
ultima coloană. Acest ecran este
în cerc.
Interval de
timp
Sistemul de luminozitate va fi
închis automat când nu se va
efectua nicio operaţiune pentru
o anumită perioadă de timp,
pentru a se economisi baterie.
Există diferite interval de timp
din care puteţi alege: niciodată,
3 minute, 2 minute, 1 minut, 30
secunde, 10 secunde.
Setare dată şi oră
1. Setare dată
2. Setare oră
3. Setare fus orar
Page 31
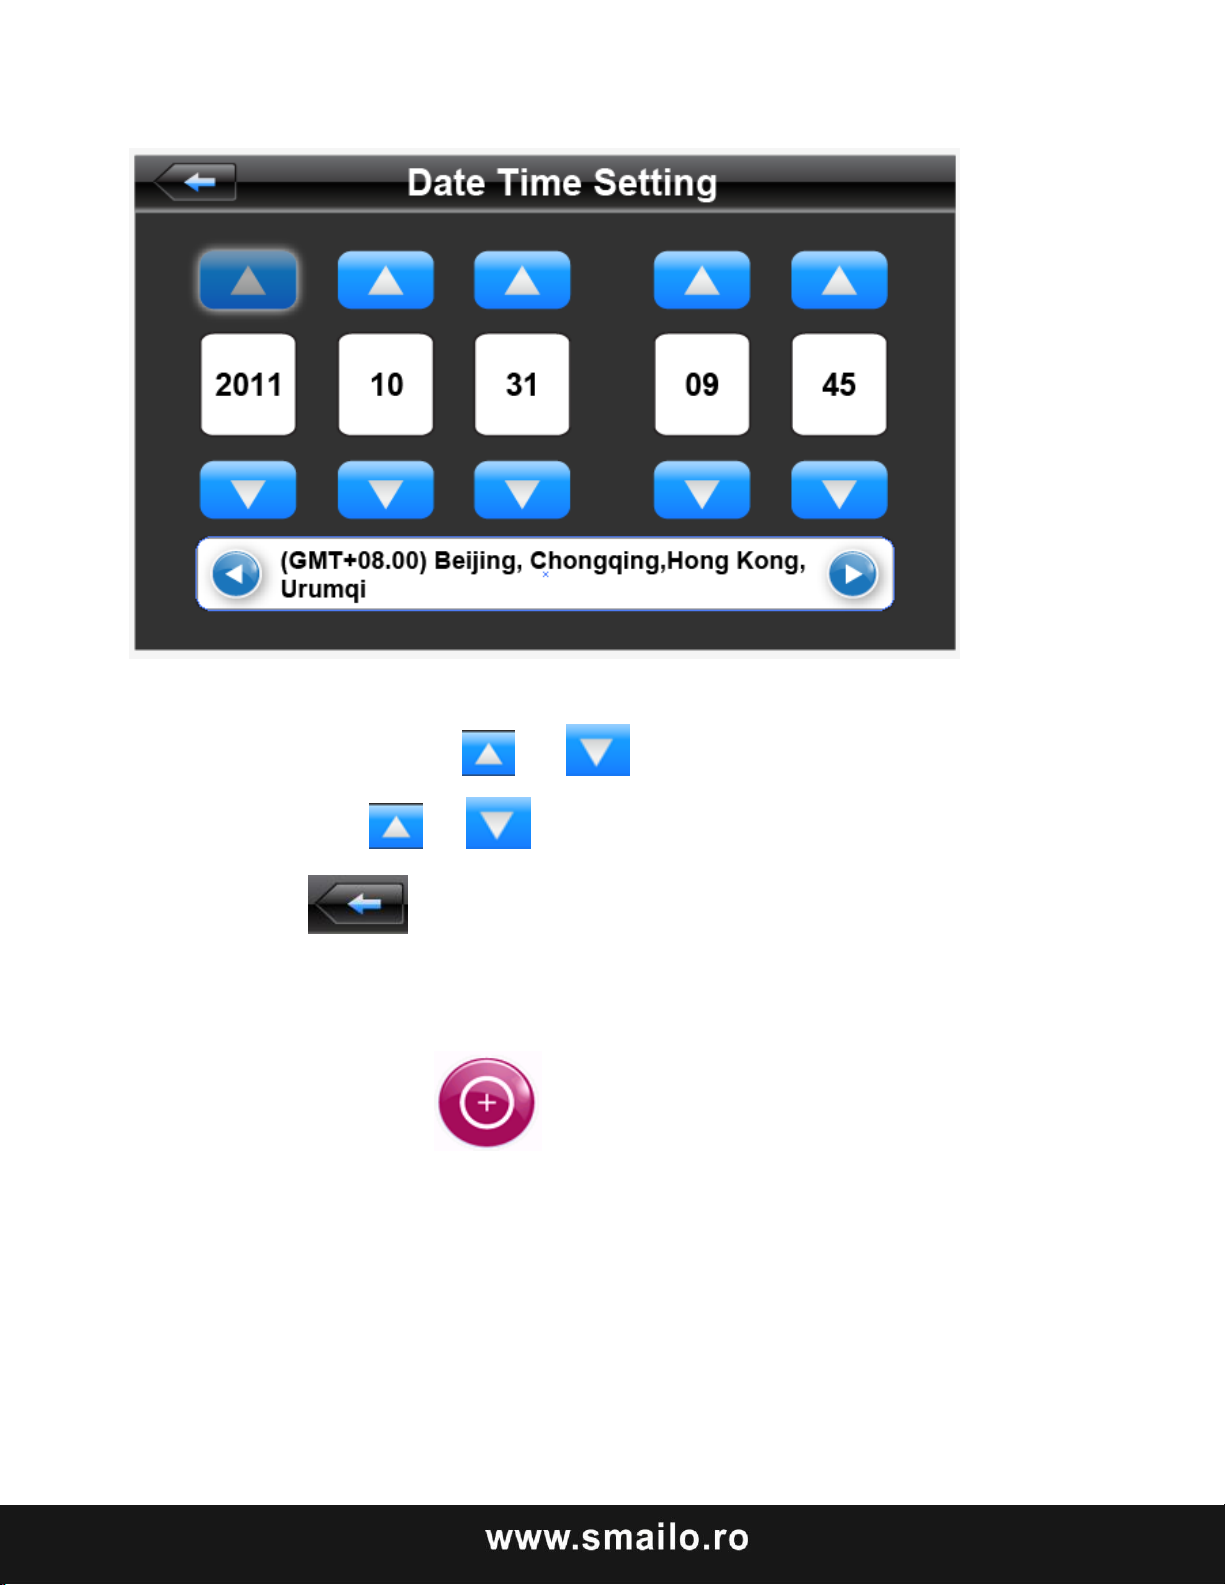
1. Apăsaţi pe butonul sau pentru a seta ora şi data.
2. Apăsaţi pe sau pentru a alege fusul orar.
Apăsaţi pentru a ieşi din interfaţa curentă după setări.
Calibrare ecran
Apăsaţi pe butonul pentru a intra în ecranul de calibrare.
Page 32
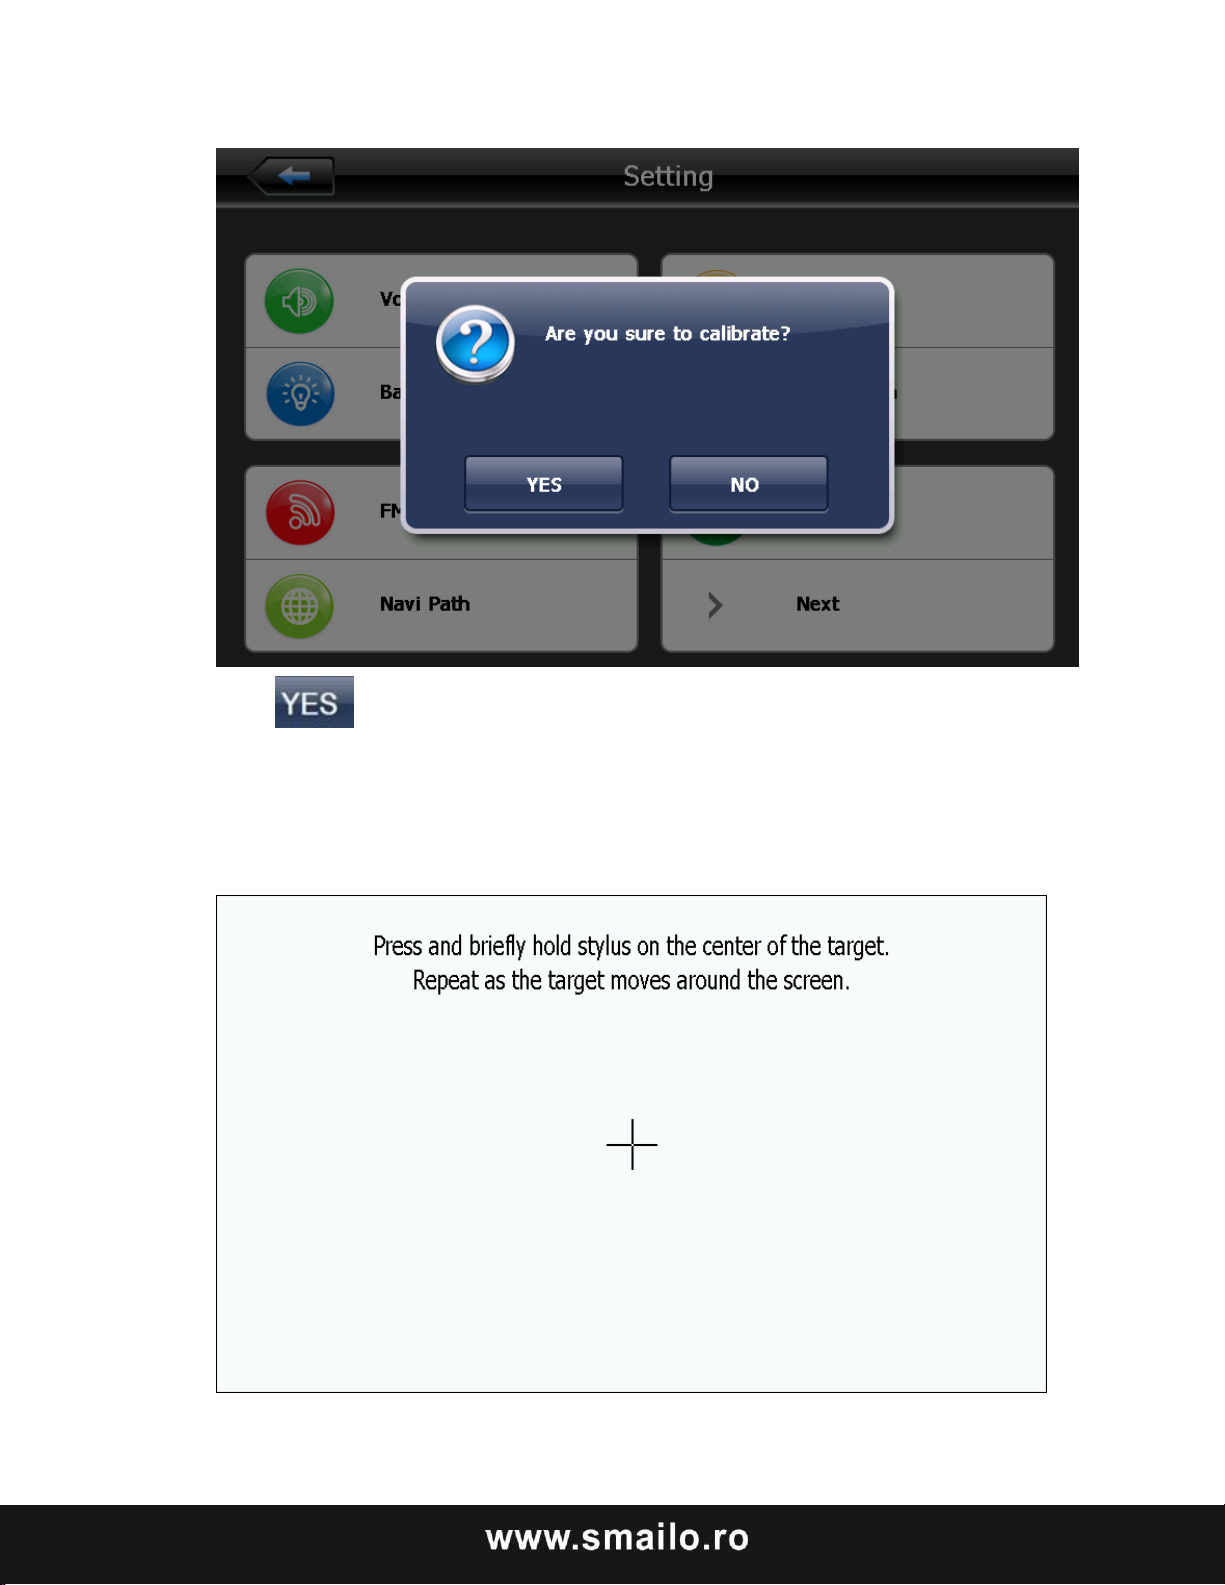
Apăsaţi pentru a se trece de la secvența din centru, mişcaţi stânga sus,
stânga jos, dreapta jos și dreapta sus, până la reuşirea calibrării, apoi apăsaţi
oriunde pe ecran pentru a salva calibrarea și pentru a ieşi în interfața principală
în mod automat. În cazul în care nu salvați informațiile, vă rugăm să așteptați 30
de secunde și va ieși din interfața curentă în mod automat.
Page 33
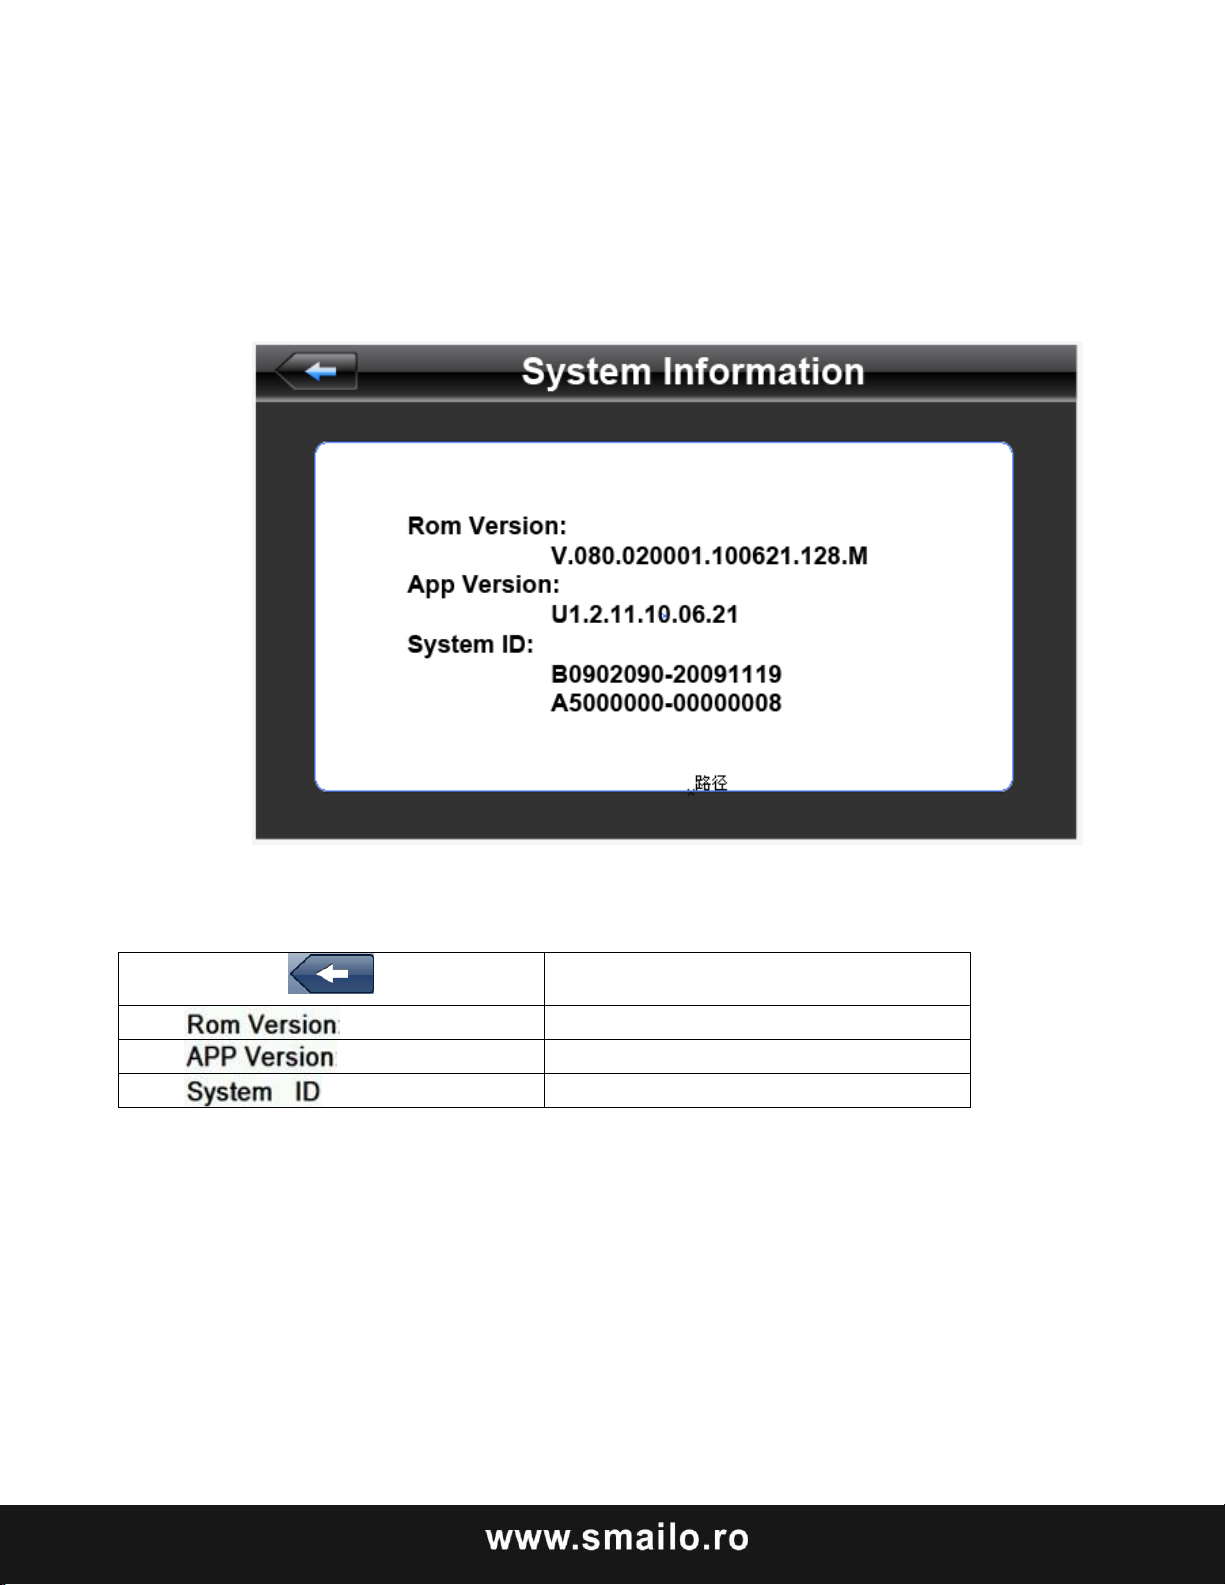
Ieşire din informaţiile sistemului
Arată versiunea ROM
Arată versiune APP
Arată ID sistem
Informaţiile sistemului
1. Versiune firmware
2. Versiune APP
3. ID sistem
Page 34
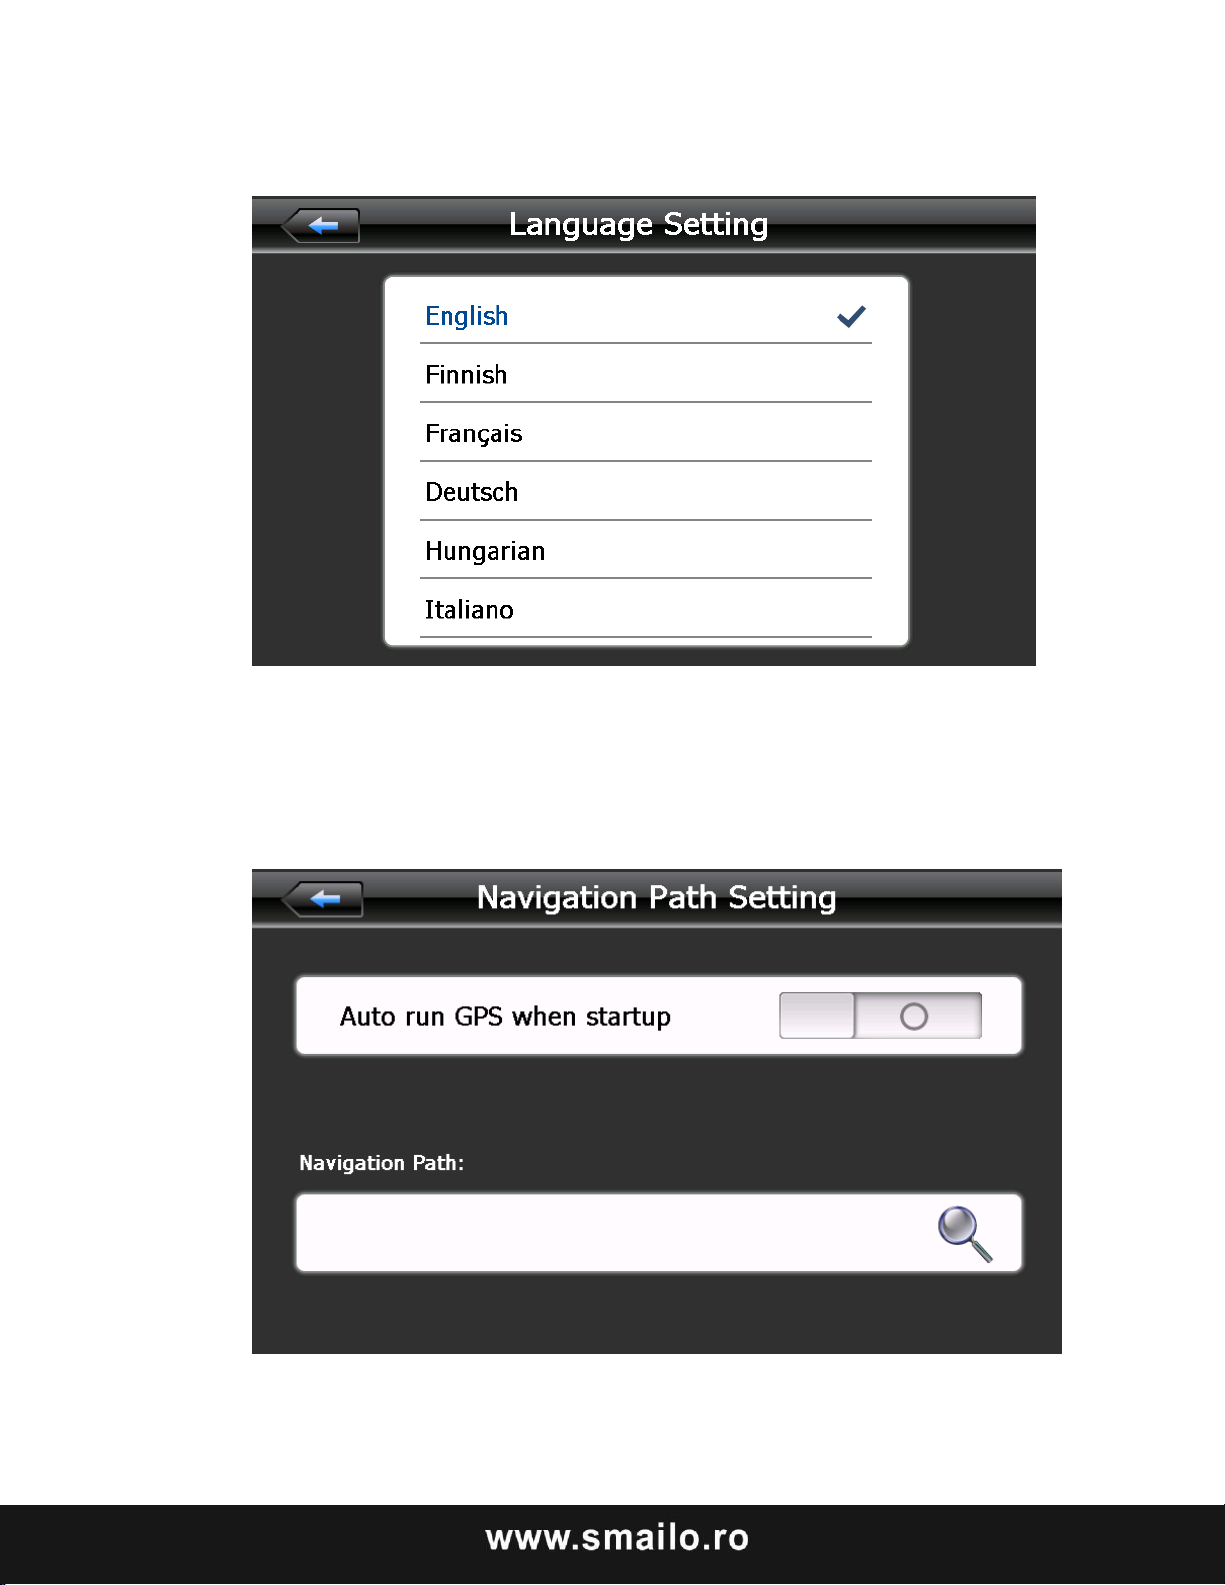
Setări limbă
Apăsaţi pe limba favorită şi apoi ieşiţi.
Cale de navigare
Setare cale de navigare
Page 35
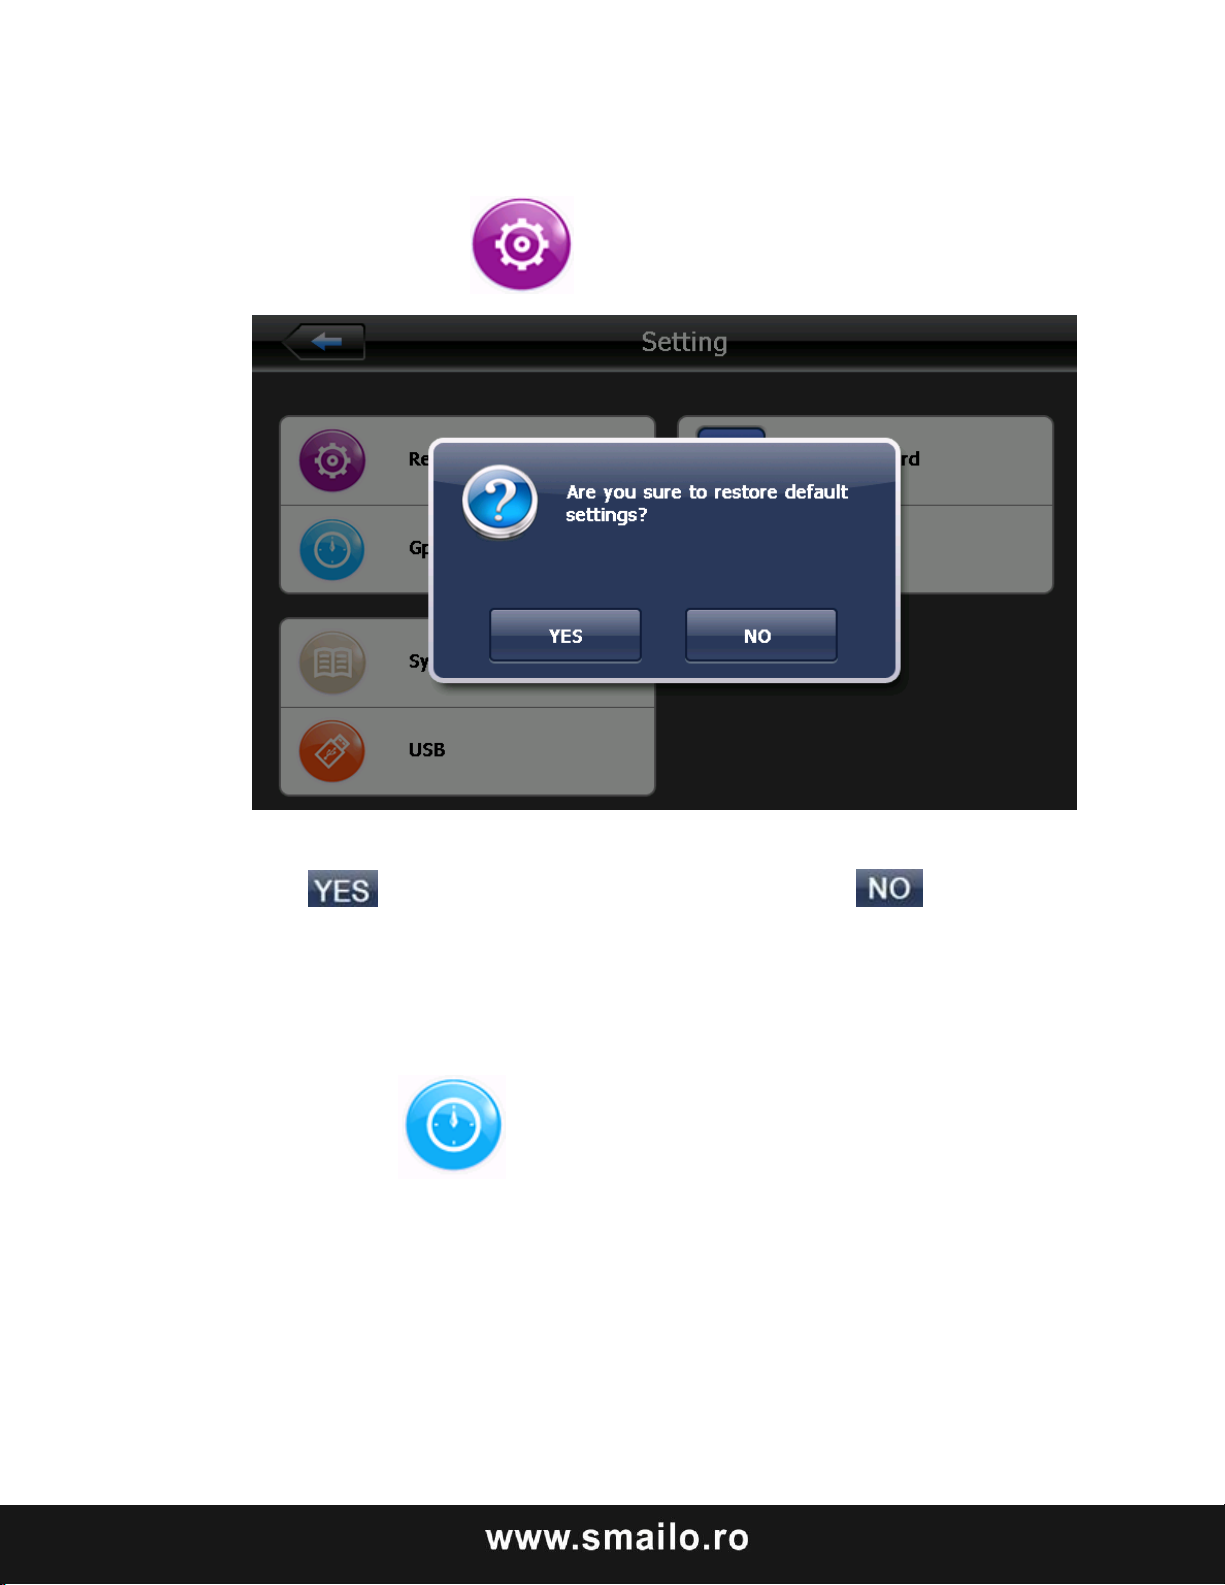
Setări implicite
Apăsaţi pe butonul pentru a intra în setările implicite.
Apăsaţi pentru a restaura setările iniţiale, apăsaţi pentru a ieşi
din setările iniţiale.
Informaţii GPS
Apăsaţi pe butonul pentru a intra în interfaţa GPS.
Page 36
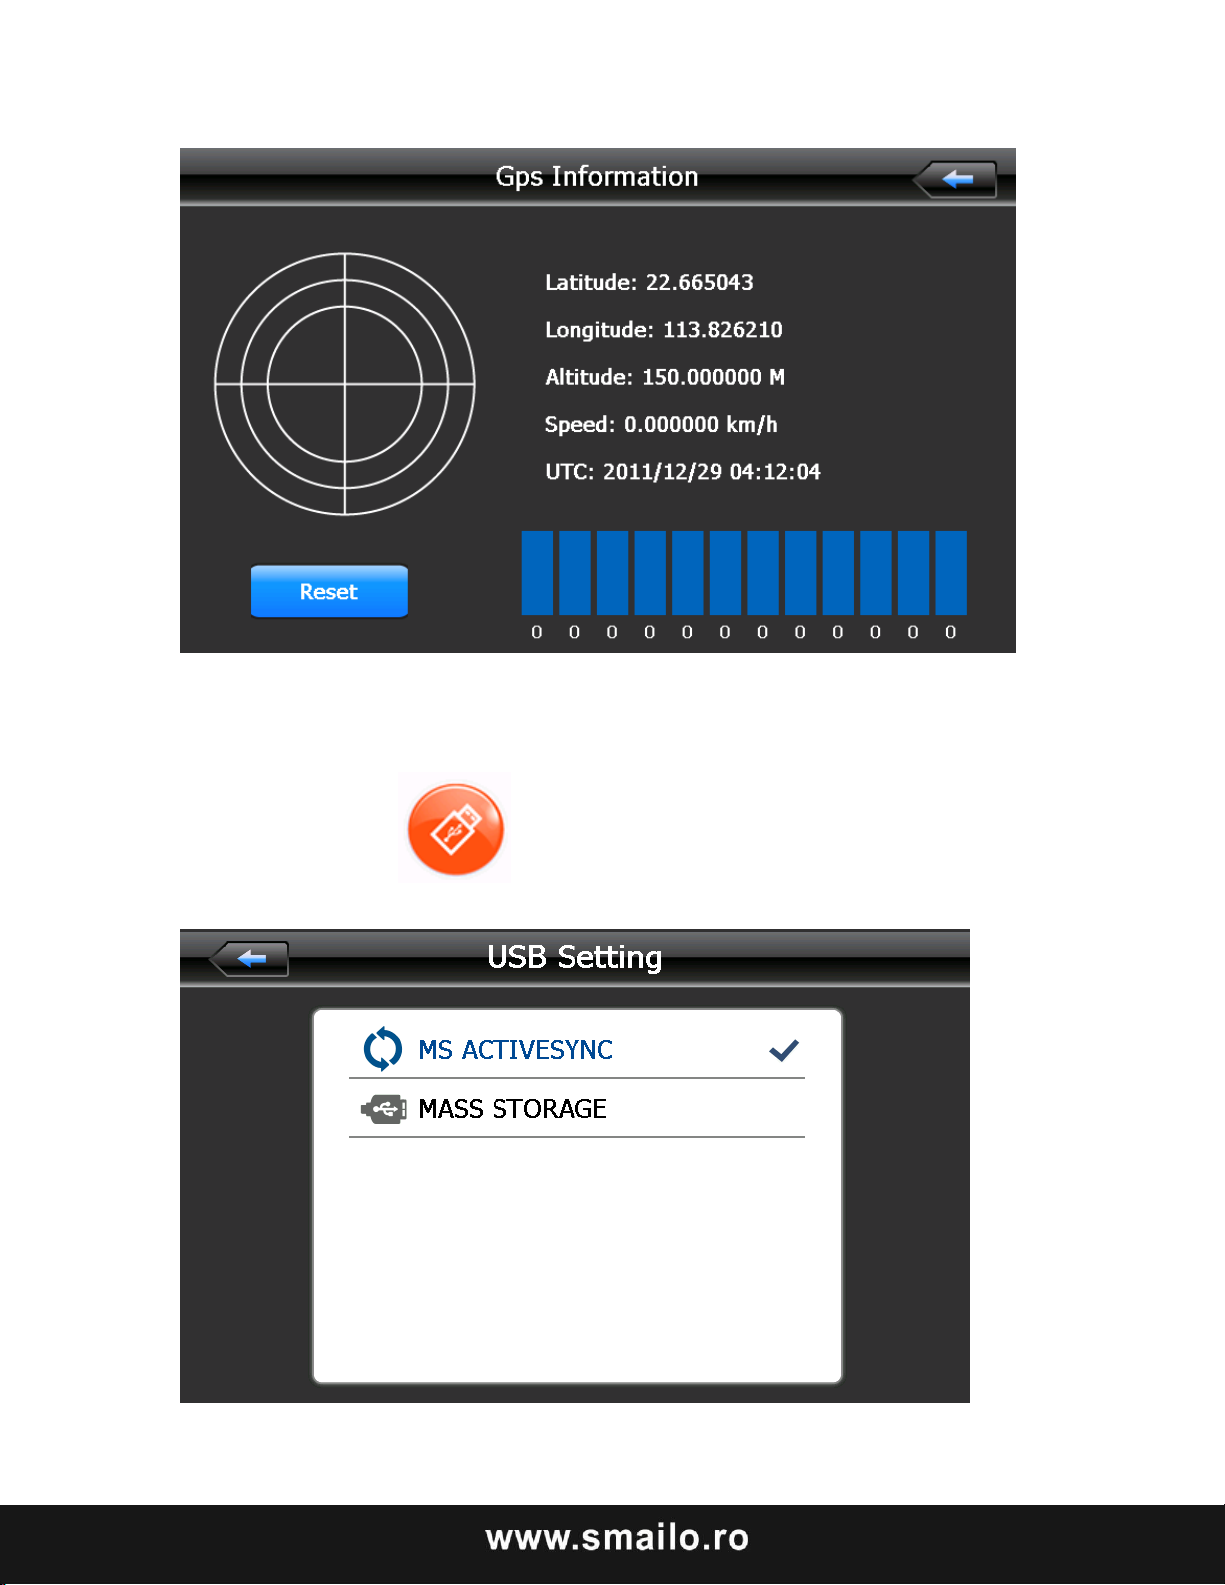
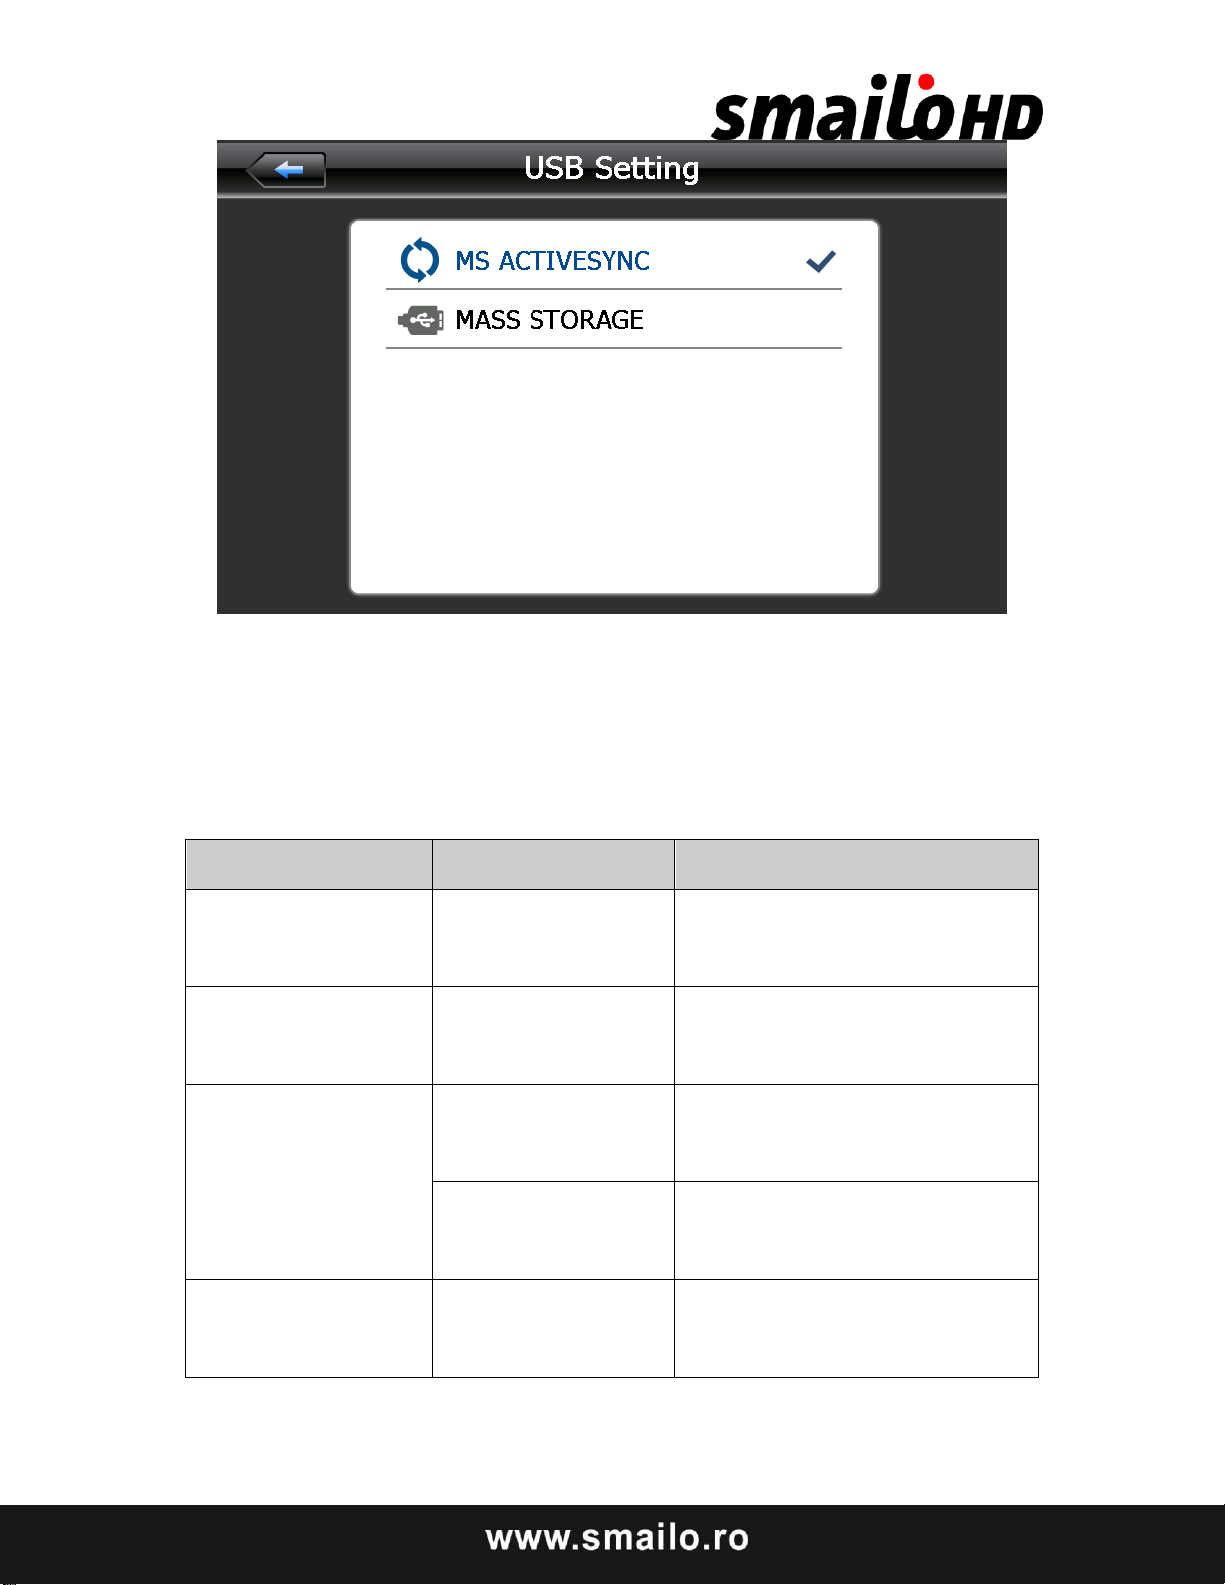
USB
Apăsaţi pe butonul pentru a intra în interfaţa USB.
Page 37
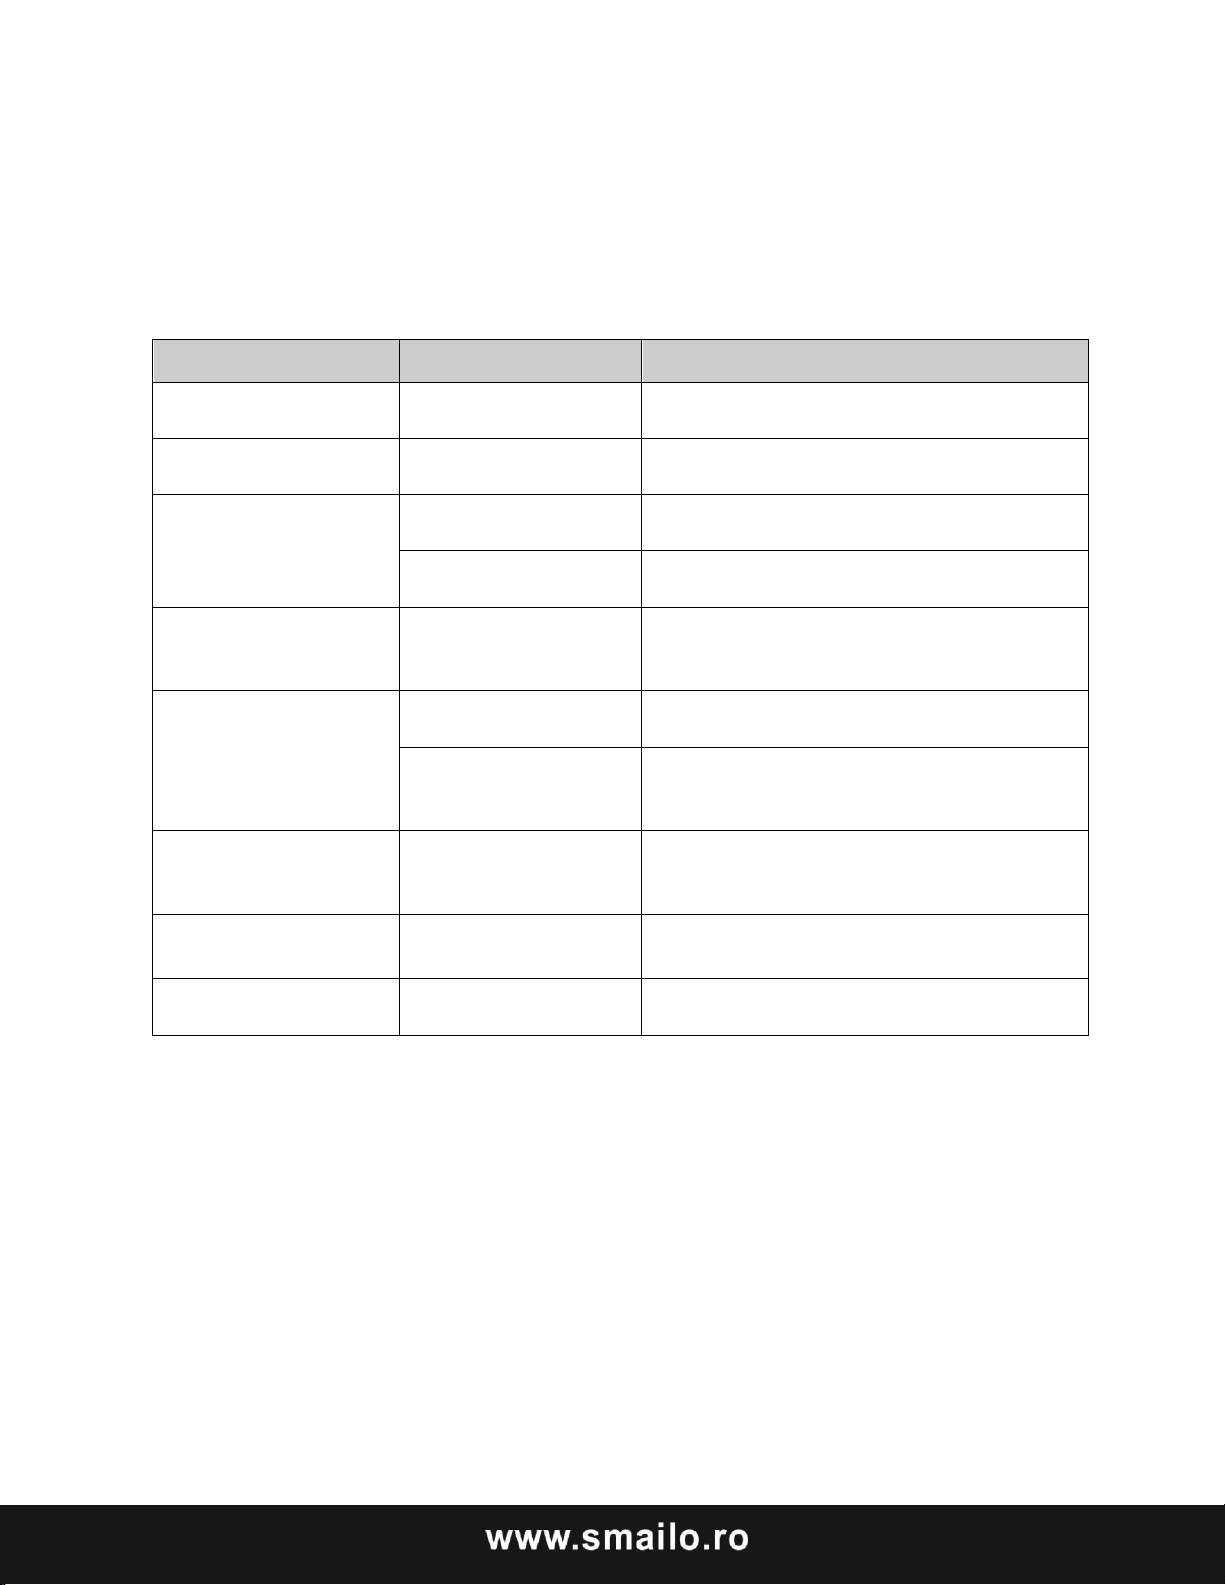
Motiv
Motiv
Soluţie
Navigatorul nu
porneşte
Lipsă de putere
Încărcaţi bateria
Dispozitivul se
opreşte brusc
Baterie scăzută
Încărcaţi bateria
Nu se poate afişa
clar
Ecranul nu
luminează suficient.
Ajustaţi lumina din spate.
Iluminarea ecranului
a fost dezactivat.
Apăsaţi pe LCD, iar ecranul va fi
luminat din nou.
Niciun răspuns în
urma apăsării
butoanelor
Ecranul tactil nu
este calibrat
Calibraţi ecranul.
Fără sunet
Nivelul volumului
este scăzut
Creşteţi volumul
Casca nu este
conectată
corespunzător
Conectaţi casca
GPS-ul nu poate
comunica cu
computerul
Cablul USB nu este
conectat
corespunzător
Conectaţi cablul USB
Lipsă semnal
Dacă semnalul e slab, e nevoie de 3
minute pentru primire semnal GPS.
Datele hărţilor au
dispărut
Contactaţi agentul sau distribuitorul.
Depanare şi întreţinere
Dacă GPS-ul dumneavoastră nu funcţionează normal, vă rugăm să verificaţi
următoarele: Dacă nu reuşiţi să rezolvaţi problema, vă rugăm să sesizati service-ul
nostru.
Întreţinerea navigatorului GPS
Navigatorul GPS poate să fie un partener de navigare şi divertisment de nădejde
dacă este protejat prin metodele corecte. Vă rugăm să urmați instrucțiunile de mai
jos pentru a vă asigura că GPS-ul rulează fără probleme pentru o perioadă lungă de
timp.
Protejaţi ecranul: Nu apăsați ecranul cu putere pentru că există riscul de distrugere.
Vă rugăm să folosiți stylusul pentru a opera cu navigatorul, iar pentru curăţarea
ecranului folosiţi o solutie dedicata pentru ecrane pe o cârpă moale, nu pulverizați pe
ecran direct.
Page 38

Notă】: Asigurați-vă că navigatorul este oprit înainte de curățare.
√ Scăparea dispozitivului poate cauza deteriorarea componentelor de înaltă precizie.
Notă】 Daunele accidentale nu sunt responsabilitatea noastră.
√ Nu utilizați în cadrul unui astfel de mediu: mediu cu schimbări bruşte de
temperatură (temperatură ridicată peste 60 °, temperatură scăzută, sub 10 °), zonă cu
înaltă tensiune, interferență cu mult praf, electrostatice, evitaţi orice lichid coroziv.
√ Evitați interferența radiată: Interferența radiată de alte produse electronice va
afecta ecranul si va reveni la normal după suprimarea sursei de interferență.
Notă】 Dacă transportați aparatul pe calea aerului, vă rugăm să puneți GPS-ul
împreună cu bagajele pentru a trece de sistemul de detecție cu raze X. Evitaţi
scanarea de către detectorul magnetic (la pasajul utilizat pentru trecere) sau bara
magnetică (deținute de către verificatorul de securitate). Nu ne vom asuma
responsabilitate.
Evitați lumina directă, intensă: Nu utilizați navigatorul GPS în lumină ridicată și
radiații ultraviolete, pentru a creşte durata de utilizare.
Page 39

CONȚINUTUL PACHETULUI
Verificați conținutul pachetului cu această listă. Dacă ceva lipsește sau
este defect, vă rugăm să nu utilizați dispozitivul și să informați furnizorul
cât mai curând posibil.
1. Dispozitiv Smailo HD ecran 7”
2. Suport auto
3. Cablu USB
4. Ȋncărcător auto
5. Husă de protecţie
6. Certificat de garanţie
7. Manual de utilizare
Page 40

Safety Instructions
Please read this section carefully and follow all the instructions given.
This will help ensure reliable operation and extend the service life for
your appliance.
Keep the packaging and the user instructions for future reference or
inquiries at a later date. If you pass the article on to another person, you
must pass on these instructions.
● Never open up the housing of the appliance or the power adapter. These
contain no user-serviceable parts. If the housing is opened there is a
danger to life from electric shock.
● Do not place any objects on the appliance and do not exert any pressure
on the display. Otherwise there is a danger that the screen will break.
● To avoid damage, do not touch the screen with sharp objects. Use only
the stylus provided.
● There is a risk of injury if the display breaks. If this should occur, use
protective gloves to pack the broken parts and contact customer support
to arrange for disposal. Then wash your hands with soap, since there is
a possibility that chemicals may have escaped.
● Never allow children to play with electrical equipment unsupervised.
Children not always correctly recognize possible danger.
Remove the power adapter from the outlet, switch the appliance off
immediately, or do not actually switch it on, and contact Customer
Page 41

Service if the power adapter or the attached plug become scorched or
damaged.
If the housing of the appliance or the power pack becomes damaged or
fluids leak into it. Components must be checked by Customer Service in
order to avoid damage!
Data Security
●Every time you update your data make backup copies on an external
storage mediums. The supplier does not assume liability for data loss or
damage to data storage units, and no claims can be accepted for damages
resulting from the loss of data or for consequential damages.
Operating Environment
● Keep your navigation system and all connected devices away from
moisture and avoid dust, heat and direct sunlight, especially in the car.
● Make sure you protect your appliance from getting wet. (e.g. from rain
and hail, at all times.)
Please pay attention that moisture can even build up in a protective pouch
because of condensation.
● Avoid heavy vibrations and shaking.
● Avoid the device from releasing itself from its holder, for example
when braking. In stall the device as vertically as possible.
Failure to follow these instructions may lead to damage to your appliance.
Page 42

Ambient Temperature
● The appliance if most reliably operated at an ambient temperature of
between 41°F to 104°F (5℃ to 40℃) and at a relative humidity of
between 10% to 90%.
● In the powered down state the appliance can be stored at between 32°F
to 140°F (0℃ to 60℃).
● Store the appliance in a safe location to avoid high temperatures (e.g.
when parking or from direct sunlight).
Electromagnetic Compatibility
When connecting additional or other components the “Electromagnetic
Compatibility Directive”(EMC) must be adhered to. Please also note that
only screened cable (maximum 10ft) should be used with this appliance.
For optimal performance, maintain a distance of at least 10ft. from sources
of high-frequency and magnetic interference (televisions, loudspeaker
systems, mobile telephones and so on.) This will help avoid malfunctions
and loss of data.
Battery Operation
Your appliance is operated with a removable battery. In order to prolong
the life and efficiency of your battery and to ensure safe operation,
follow the instructions below:
● Warning: Danger of explosion if rechargeable batteries are not charged
properly. Only replace with the same type of battery or a similar type
Page 43

recommended by the manufacturer. Never open the rechargeable
battery. Do not throw the rechargeable battery into fire. Dispose of the
used batteries following the manufacturer’s instructions.
● Batteries cannot withstand heat. Avoid the appliance and the integrated
battery becoming overheated. Failure to comply with this instruction
may lead to damage to and even explosion of the battery.
● Use only the original power pack to charge the battery or the car adapter
from the optional navigation kit.
● The batteries are special category waste. When disposing of the
appliance ensure that this is done correctly. Contact Customer Service
for more
details.
Care of the Display
● Avoid scratching the display surface as this is easily damaged. It is
strongly recommended to use a display protection mylar to avoid
scratches. Please ask your nearest dealer for these accessories. The foil
on the display at delivery is purely for protection during transportation!
● Ensure that no traces of water remain on the screen. Water can cause
irreversible discoloration.
● Use only a soft , lint-free cloth to clean the screen.
● Do not expose the screen to either strong sunlight or ultraviolet
radiation.
Page 44

● Transport
● If you wish to transport the appliance follow the instructions below:
● Following transport of the appliance wait until the unit has acclimatized
before using it.
● In the case of wide fluctuations in temperature or humidity
condensation or moisture may form inside the appliance and this
● can cause and electrical short-circuit.
● In order to protect the appliance from dirt, knocks and scratching, use
either the protective case.
● Before traveling insure that you are aware of the power and
communications provision at your destination. Before traveling obtain
any power or communications adapters(modem, LAN, etc.) That may
be needed.
● When shipping your appliance use only the original packaging and
advise the carrier accordingly.
● When shipping your appliance use only the original packaging and
advise the carrier accordingly.
● When passing through the hand luggage control at airports, it is
recommended that you pass the appliance and all magnetic storage
media (external hard drives) through the X-ray system
● (the machine on which you place your bags). Avoid the magnetic
detector (the structure through
Page 45

● which you pass) or the magnetic wand (the hand device that the security
staff use), since this may corrupt your data.
● Connection
● When connection your appliance be sure to correctly observe the
following instructions:
● The outlet must be in the vicinity of the appliance and must be easily
accessible.
● Only use the mains adapter on grounded sockets at 100-240V~AC,
50/60Hz. If you are unsure about the power supply to the place of use,
ask the relevant energy supplier.
● Use only the power adapter provided with your appliance.
● For additional safety, we recommend the use of a surge protector in
order to protect your appliance from damage of spikes or lighting strikes
on the power network.
● Power Through Car Adapter
● The car adapter should only be connected to the lighter socket of a car
(car battery =DV12V, no trucks!). If you are in any doubt about the
power source in your car, contact your car manufacturer.
● Cabling
● Arrange cables so that no-one can tread on them or trip over them.
● Do not place any items on the cable.
Page 46

WARNING
When the unit is not in use for a long time, please recharge the battery
every other time, otherwise the battery’s lifetime would be shortened.
INSTALLATION
The following guides you step by step through the initial set up of the
navigation system.
Firstly, remove the foil for protecting the device during transportation
from the display.
How to access to the navigation system
Press Sleep/Wake up button on the unit for about two seconds to wake
up the unit (Note: Sometimes the unit will not be woken up by reason of
low battery, please charge the battery. When in charging the indicator is
red). The brand logo will appear and your device will display the
application screen after a few seconds.
Attention: According to the charging status of the accumulator installed.
It is necessary for the device to be charged before the initial setting up
can run through.
Charging Battery of the Navigation system
In causing of charging, the Battery Charge Indicator is red.
You have different possibilities to charge the battery of your navigation
system:
Page 47
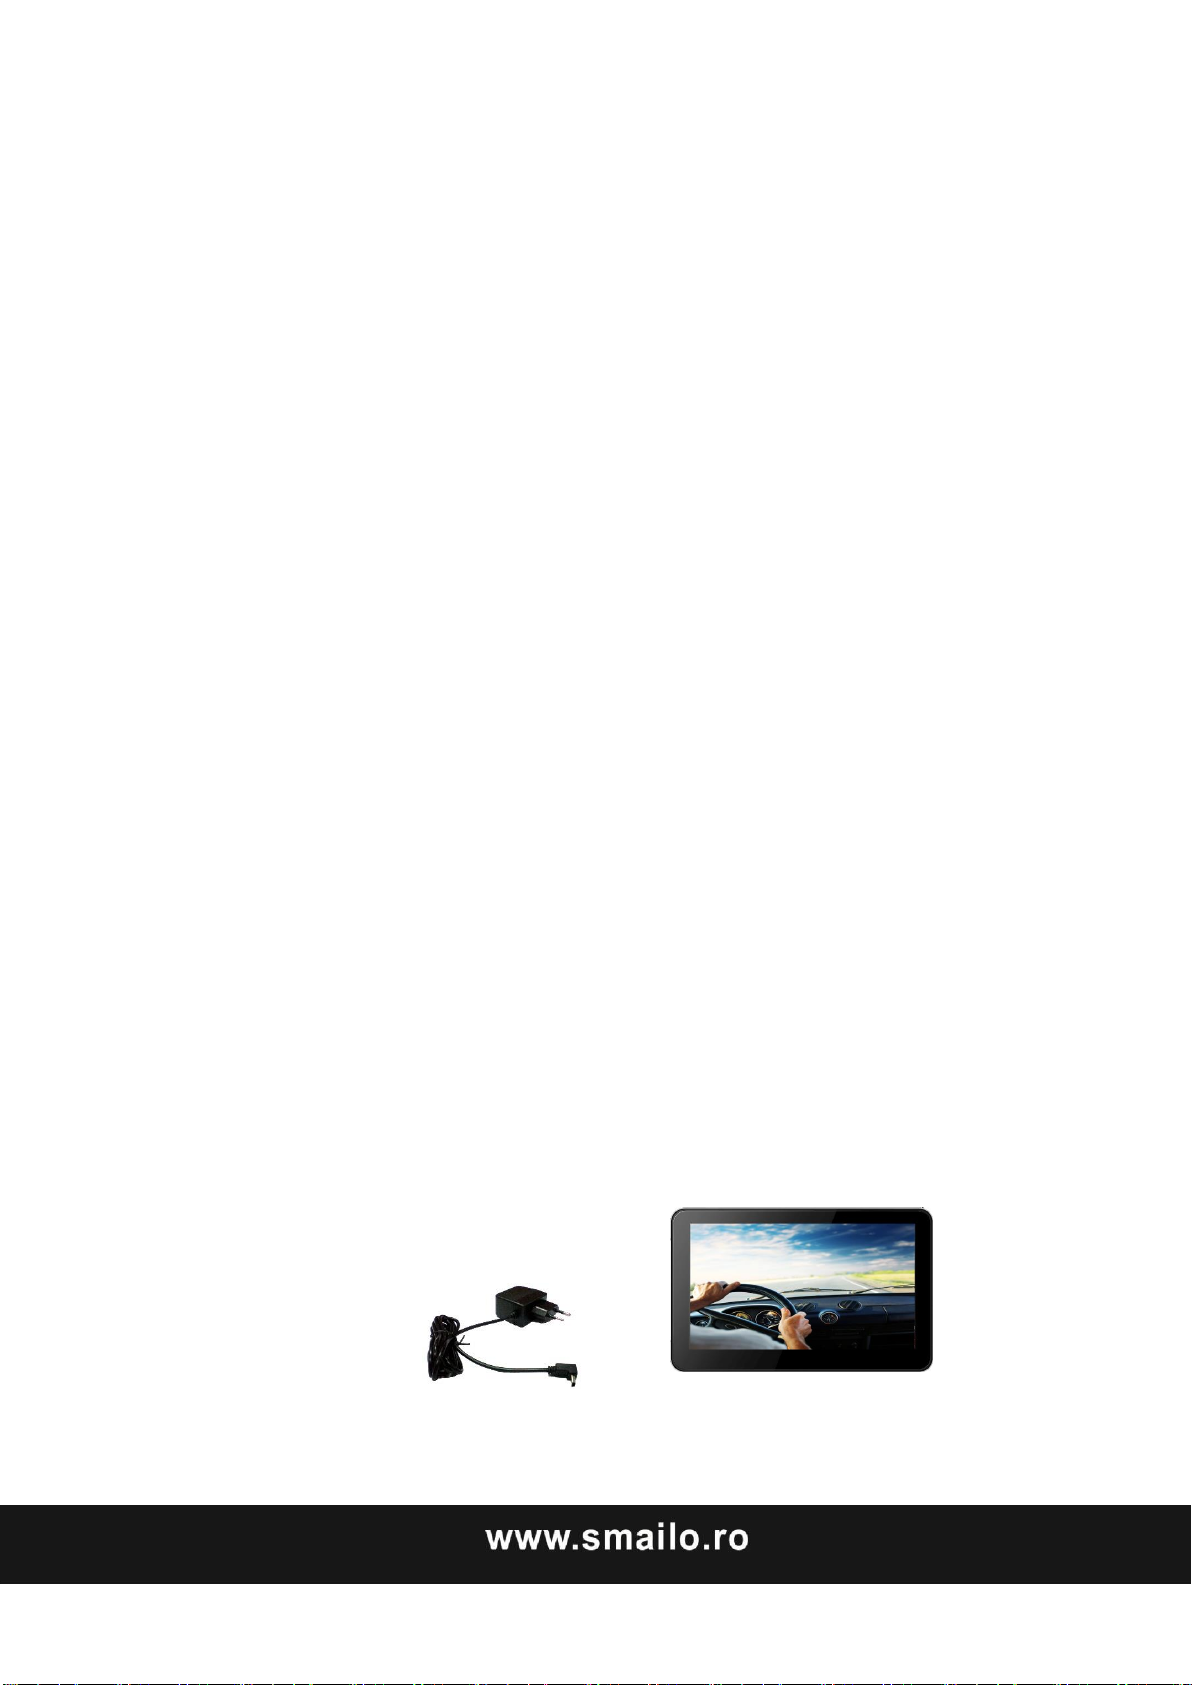
With the help of the network adapter.
By means of the car adapter.
The battery charge indicator lights red until the navigation system is
charged. Don not interrupt the charging process before the battery is
fully charged. It will take a few hours for the navigation system is
fully charged.When the battery is fully charged the battery indicator
will turn to green.
Note: You can use the navigation system during the charging
process, but the power supply must not be interrupted during initial
set-up.
Leave the mains adapter connected to the navigation system for
around 24 hours, so that the backup battery can be fully charged.
You can leave the main adapter connected, and this is very handy
for continuous operation. However, the mains adapter also requires
power even when it is not charging up the battery of the navigation
system.
Page 48

Push the adapter connector into the guide on the right of the network
adapter. Push the Network Adapter (2) into a power point that is easily
accessible.
Push the cable of the Network Adapter (1) into the network adapter
connection of the navigation system.
Working with memory cards
Your navigation system supports MMC and SD memory cards.
Inserting memory cards
1. Carefully take the memory card out of its packing (if included). Take
care not to touch or dirty the contacts.
2. Push the memory card carefully into the card bay. The side of the
memory card wearing the label must point upwards. The memory card
should slightly lock in place.
Removing memory cards
● Do not remove the memory card while it is accessed. This could result
in loss of data.
1. To remove the card press lightly onto the upper edge until it ejects.
2. Pull the card out without touching the contacts.
3. Store the memory card in the packing or in another safe location.
● Memory cards are very fragile. Take care not to dirty the contacts and
not to force the card.
Page 49

Accessing Memory Cards
● The appliance only supports memory cards in the FAT16/32 file format.
If you insert a card prepared with a different format (e.g. in cameras,
), your navigation system may not recognize it and will ask you to
format it again.
Warning: Formatting the memory card irretrievably wipes out all
data.
● Likewise you cannot just copy files onto the memory card. In some
cases they must be converted by the Microsoft ActiveSync program.
Data Exchange VIA Card Reader
You can transfer or synchronise data via ActiveSync. This is also the
correct method, in particular, if files are to be transferred that must be
converted into a navigation system-readable format.
However, if you wish to copy large quantities of data (navigation maps)
to the memory card, these can also be stored directly to the memory card.
Many computers already have memory card devices. Insert the card in
this and copy the data directly to the card.
Because of the direct access significantly faster transfer will be achieved.
Resetting The Navigation System
There are two options for resetting the navigation system.
Page 50

Soft Reset
This option restarts the navigation system, without reinstallation being
necessary. A soft-reset is often used in order to reorganize the memory. In
doing so all programs that are running are interrupted and the working
memory is reinitialized.
Choose this option if your navigation system is not responding or
working properly.
Perform the soft-reset as follows:
Screw off the end cap of the pointer and carefully press the point of the
end cap into the reset opening on the left side of your device.
Safety Instructions for Navigation
The bundled product CD contains a comprehensive instruction manual.
Tips for Navigation
● Do not manipulate the navigation system while driving to protect
yourself and others from accidents!
● In the event that you do not understand the voice instruction or if you
are in any doubt about
what to do at the next intersection, then the map or arrow display will
provide you with a quick orientation. Only look at the display when
you are in a safe driving situation!
● Attention: The road layout and driving rules take precedence over the
instructions of the navigation system. Only follow the instructions when
Page 51

circumstances and driving rules permit it! The navigation system will
guide you to your destination even when you have to deviate from your
planned route.
● The direction statements of the navigation system given do not release
the driver of the vehicle from his or her duty of care or personal
responsibility.
● Plan routes before you leave. If you want to play a new route whilst on
the road stop driving.
● In order to receive the GPS signal correctly, metal objects may not
hinder reception. Attach the navigation system onto the inside of the
windscreen or near the windscreen with the sucker. Try out different
positions in your vehicle in order to find the best reception.
Notes for Use In A Vehicle
● Take care that the holder does not present any risk to safety, even in the
case of an accident, when installing it.
● Take care that the cable does not impede any safety components.
● The display of your navigation system may show “light re-flexions”.
Please take care of not being “blinded” during operation.
● Take care that the cable does not impede any safety components.
● Do not mount the components within the operating range of any airbags.
● Check the secure adherence of the suction cup at regular intervals.
● The power plug will consume power, even if no device is connected.
Page 52

Remove it when not in use to avoid draining the battery.
● Check all safety equipment in your car after installation.
Additional Notes for Use on A
Bicycle Or A Motorcycle
● Pay attention during installation that the ability to steer is not impaired.
● Do not cover any instruments during installation.
Mounting The Navigation Set In A Car
Attention! Only fix the holder for the navigation system to the windscreen,
if it does not impede the view. Should this not be possible, then mount the
holder with the enclosed suction plate in any way that will allow peril-free
and safe operation.
Installation Of The Holder Of The Navigation System
Hint: If you want to fix the holder to the wind screen, then you can skip
steps 1 and 2.
Remove the protective foil from the sticky side of the suction plate.
Fix the suction plate to a suitable location on the dashboard. Take care,
that the surface of the dashboard is clean and press the suction plate
strongly onto the surface.
To obtain a strong and secure hold the suction plate should not be used
for 24 hours.
Page 53
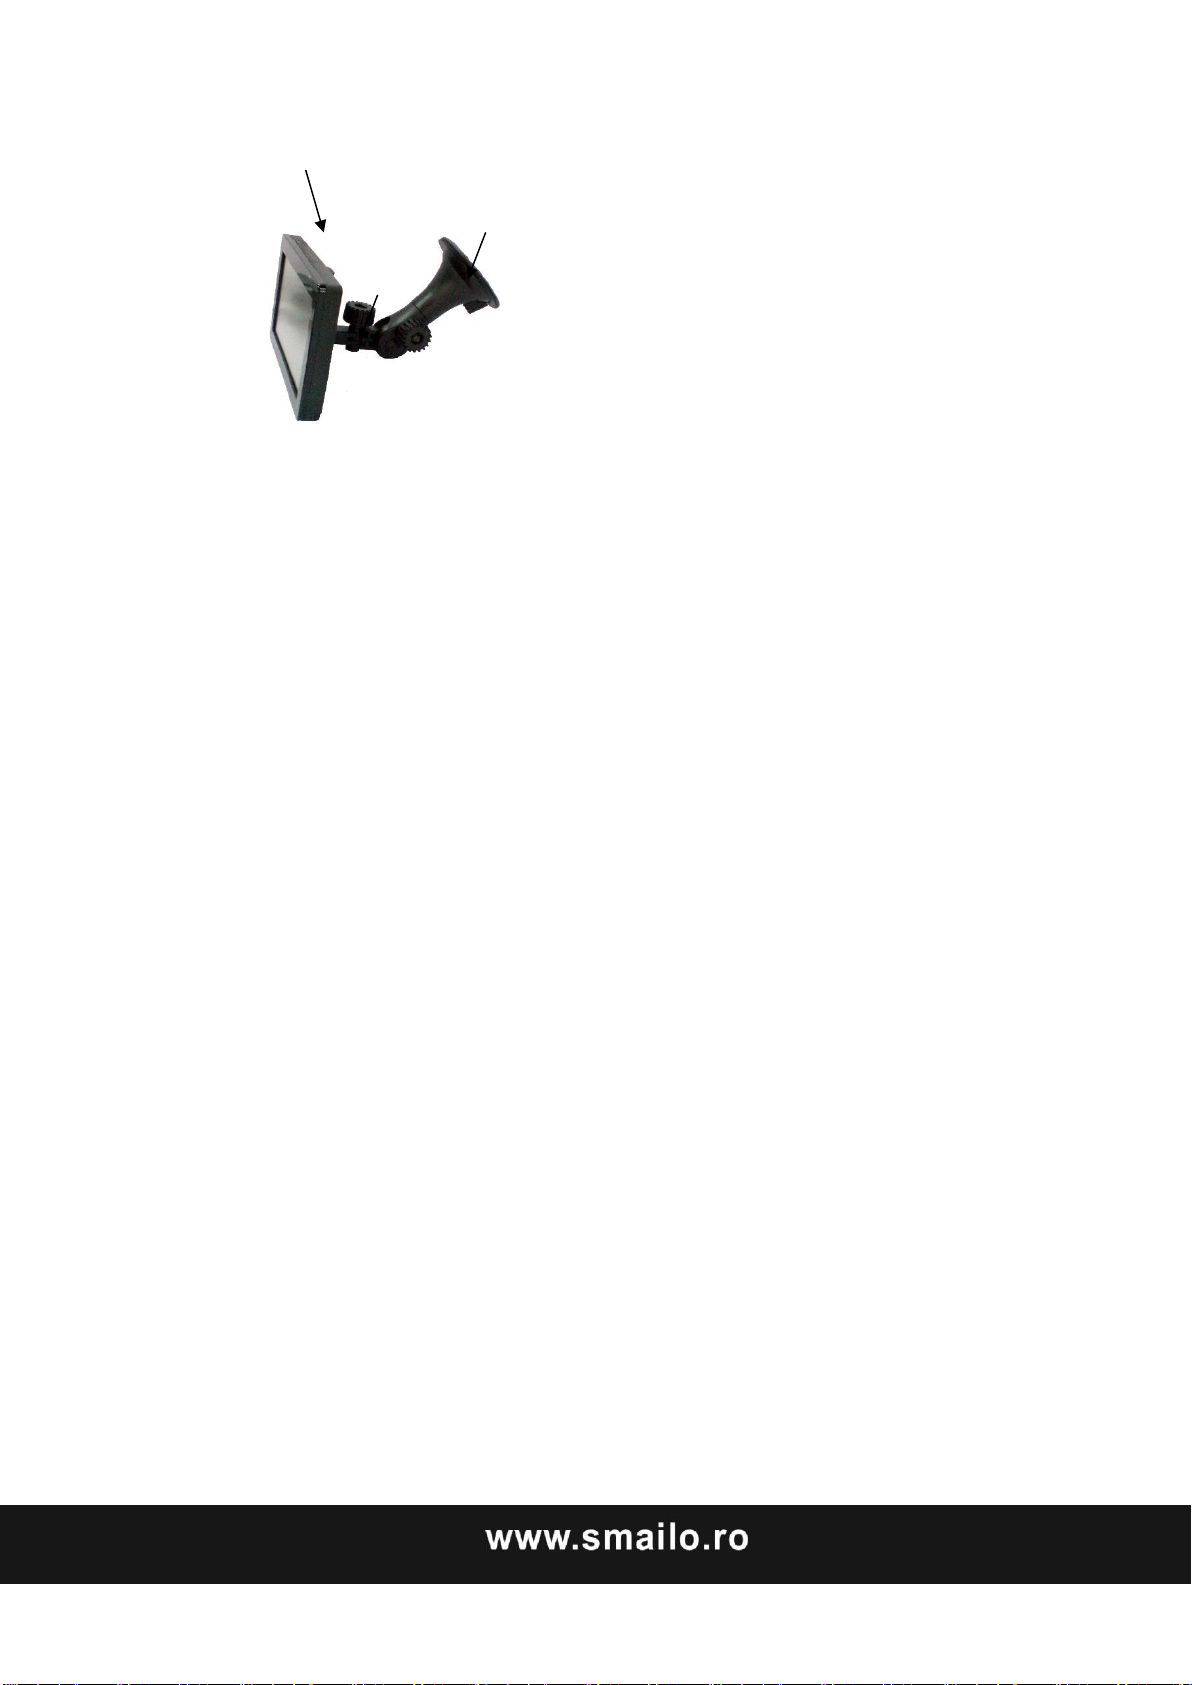
Holder
Suction Cup
Cradle
1. Mount the car holder to the flexible neck. Note the labels on the
flexible neck. The arrow labeled CLOSE must point in the direction
of the fixture. The
connection closes with a noticeable clicking sound.
2. Place the holder with the suction
head onto the suction plate (or
directly onto the wind screen) and press the lever on the suction head
downwards. The suction head will stick itself
firmly to the suction plate.
3. Place the navigation system into the car holder by placing it initially in
the lower noses and
then pressing it down gently until the holder clicks in.
Page 54
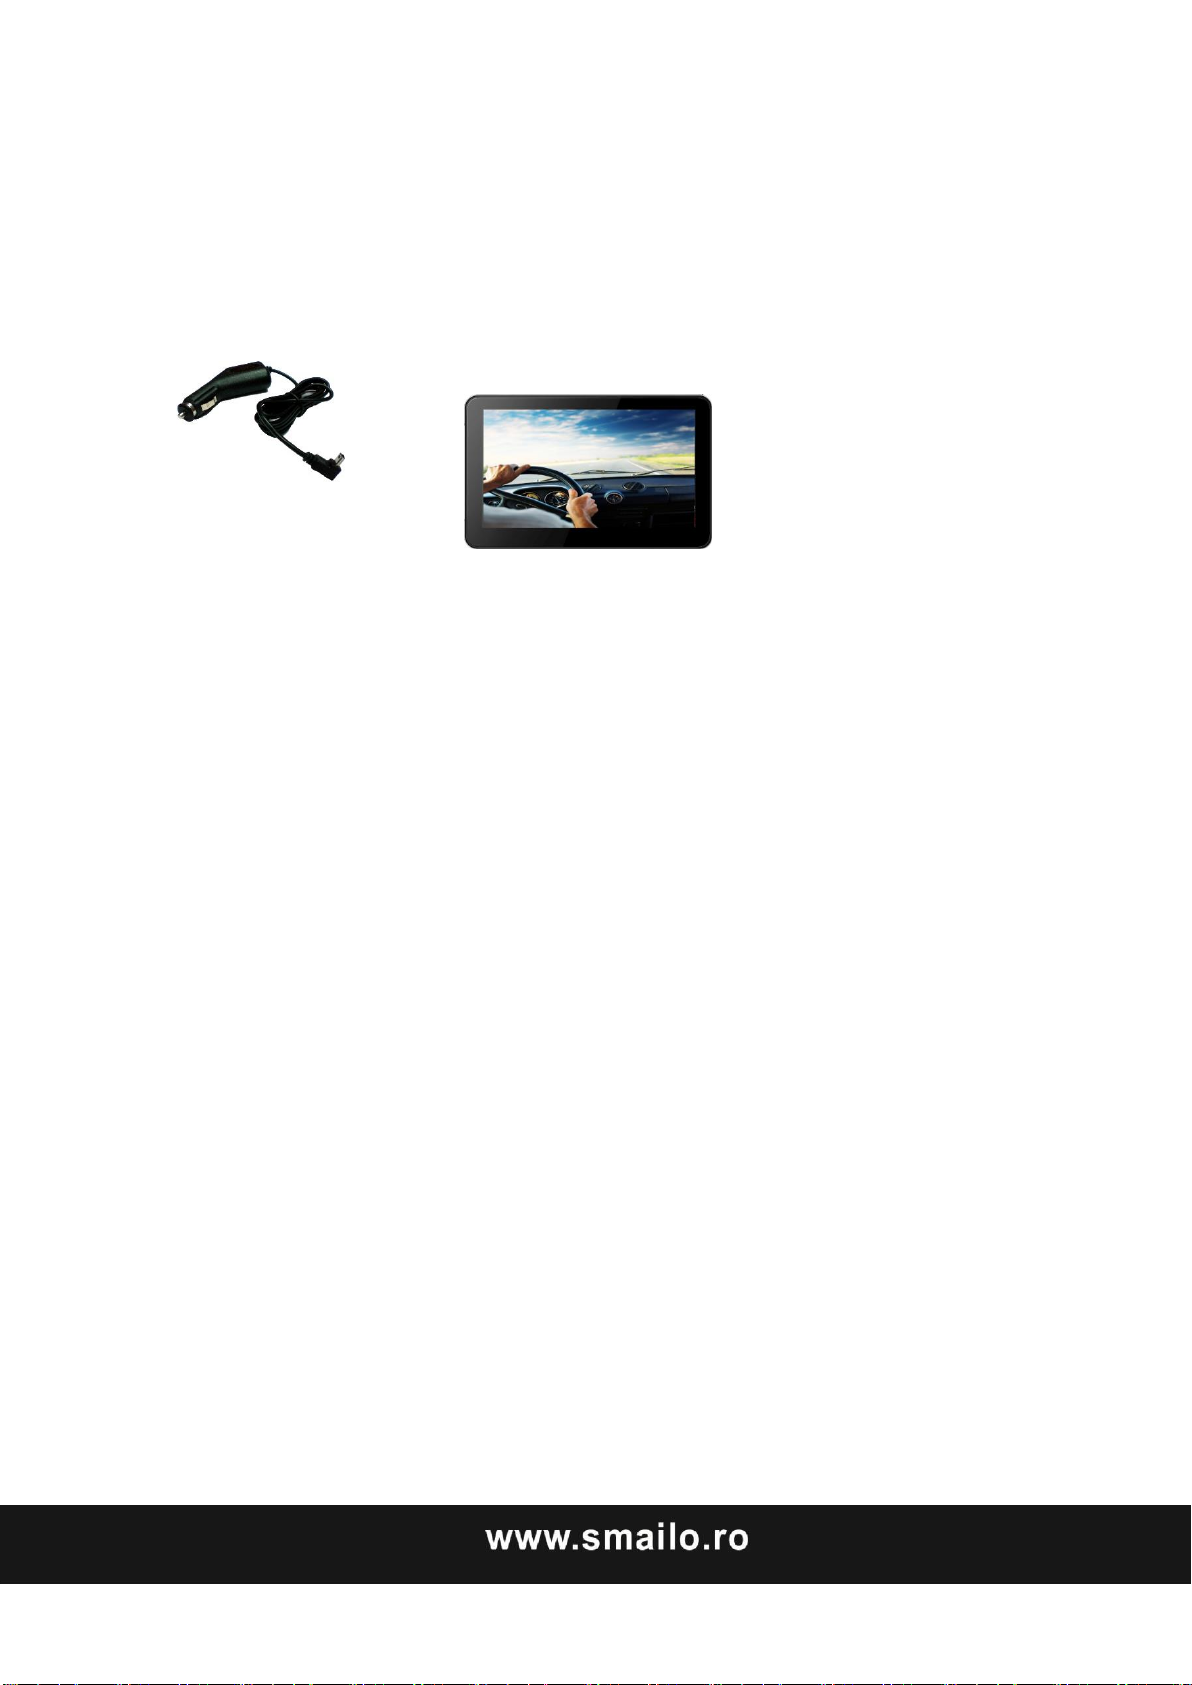
Connecting the Navigation System In The Car
When the battery is in a low voltage, you can recharge it in the car:
1. Plug the jack (1) of the connection cable into the corresponding
receptor at the bottom of your navigation system.
2. Insert the power adapter (2) now into the cigarette lighter socket and
ensure, that it will not lose contact while driving. This could cause
a malfunction.
● Hint: Remove the power adapter from the cigarette lighter socket when
ending a trip or when parking the car for a extended period of time.
Page 55
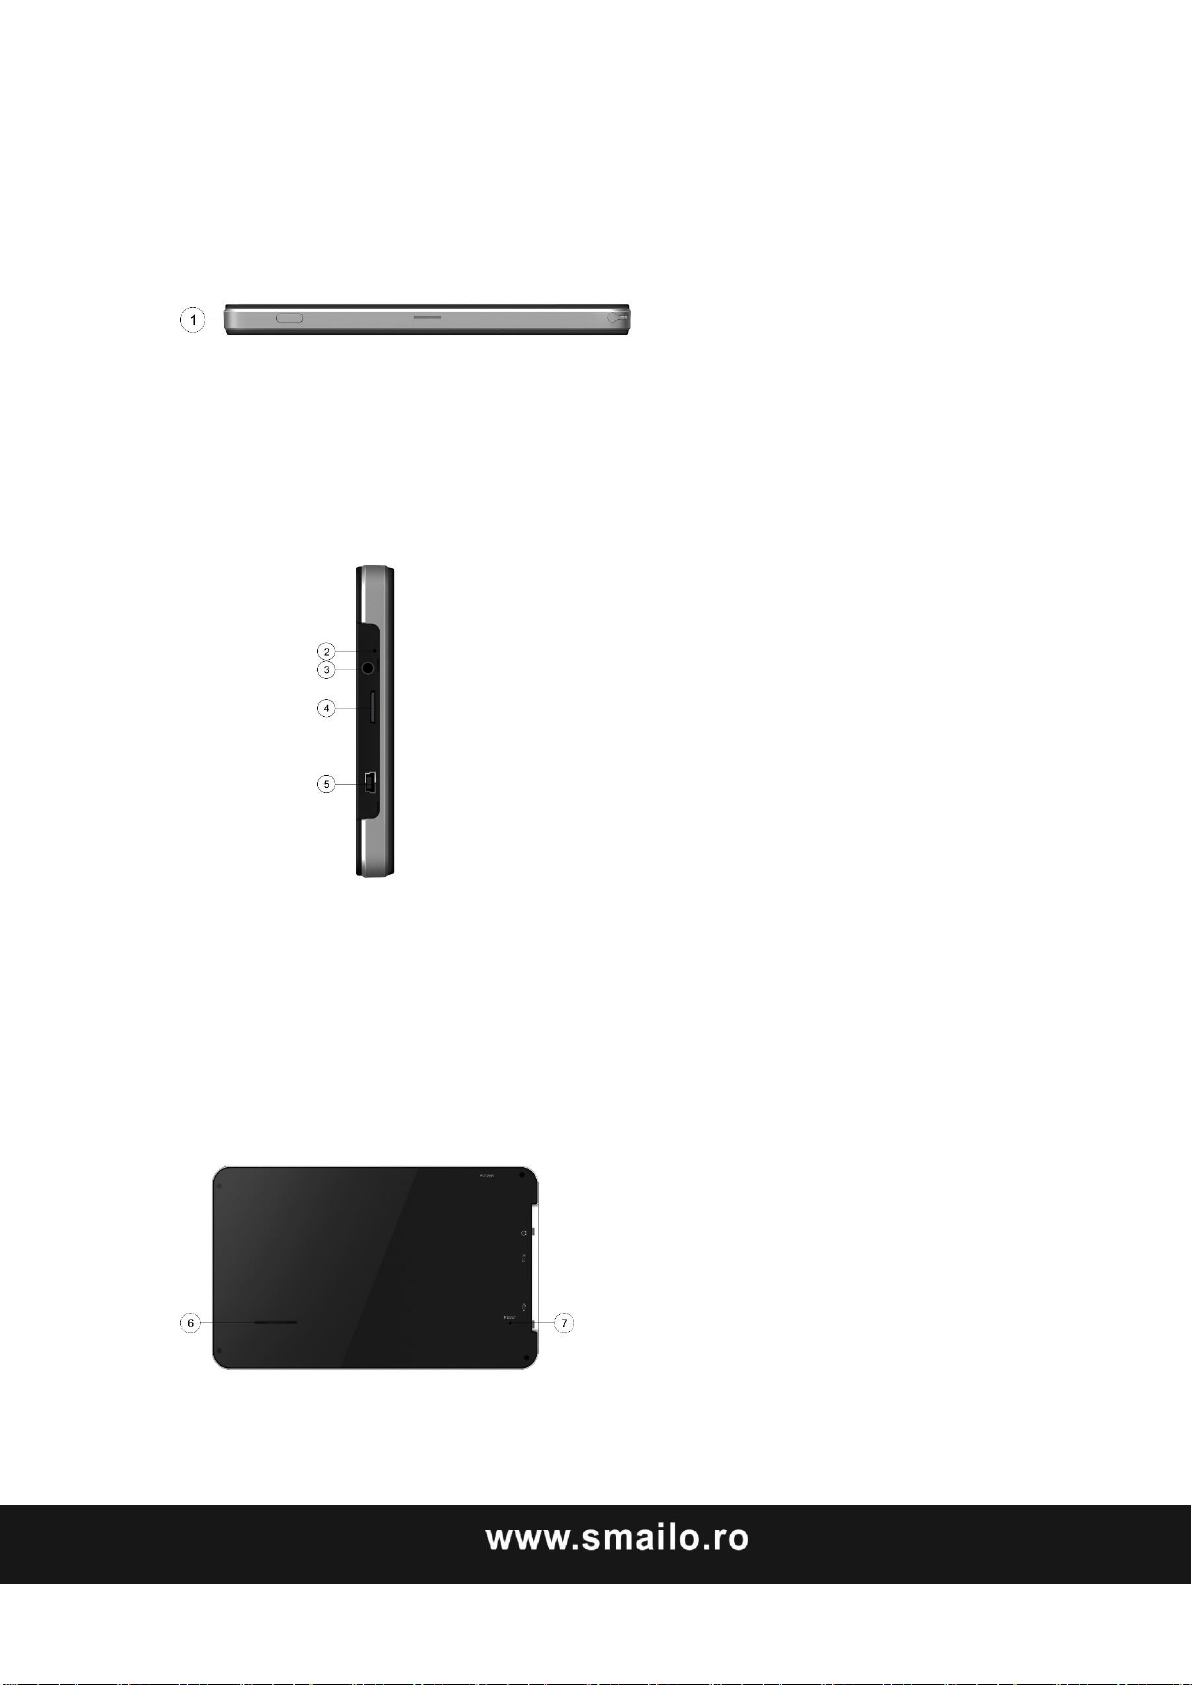
VIEWS
Top View
(1) Power
Left View
(6) Loudspeaker
(7) Reset
(2)Battery Charge Indicator
(3) Headphone Interface
(4) TF slot
(5) USB Interface
Back View
Page 56

GPS (Global Positioning System)
GPS is a satellite-backed system for determining your position. With the
help of 24 satellites revolving around the earth, it is possible to determine
your position on earth with the accuracy of a few meters. The satellite
signals are received by the antenna of the built-in GPS receiver, which
must have a “line of sight” to at least 4 of these.
Note:
By limited line of sight (e.g. in tunnels, between houses, in woods or
also in vehicles with metal-coated windows) it is not possible to
determine the position. The satellite reception however automatically
picks up again as soon as the obstacle has been passed and there line of
sight is reestablished again.
Please note that your appliance is preset to not shut down automatically
after a few minutes without activity. You can Change this preset in the
Settings mode.
If the GPS receiver has not been active for some hours, it must orientate
itself again. This process may take a while.
Memory Card Quick Installation
This option is only available to you if your navigation system is equipped
with a prepared memory card. In this
case, you will ready be able to use the Navigation function of your device
after a short time, without carrying out the pre-installation on a PC.
● The initial setting up must be carried out as described on page 15 in any
Page 57

case.
● The following installation limits
the Navigation to the area which is pre-installed on your memory card.
You must carry out these steps to put the navigation into operation in
your car:
1. Read and adhere to the safety instructions on p.2 and following and
p.23 and following.
2.Install the remaining components of the navigation system.
3.Press the Sleep/Wake up button to start your navigation system. If
the instructions of Step1 have not yet been executed, then do it now.
The battery should be charged. The accumulator will be charged by
means of the car power supply if necessary.
● Insert the pre-installed memory card in the navigation system. The
installation of the navigation software will start automatically.
Follow the instructions on the screen.
NOTES:
● The memory card must always be inserted into the device during the
● use of the navigation system. A Soft Reset will have to be carried out to
restart the navigation system, if the memory card is removed during its
use, even for a short time.
Page 58

Set the date and time by means of the Settings button and the date/time
control button, if this has not yet taken place. Set the applicable time
zone, if available.
Staring Navigation
1. Press the Sleep/Wake up button for about two seconds to wake up
your navigation system.
2. The navigation software will start automatically or after clicking on the
navigation control button, according to the version.
3. Press the menu icon to enter the destination and the address of your
navigation destination. Then start the navigation by clicking on Navigate.
YOU will receive the rout information on the screen, augmented by
language statements, after a short time, if the satellite reception is
adequate.
Please take information about the further operation of the Navigation
software from the comprehensive User Handbook on the Navigation CD.
In addition, brief help is available to
you on your navigation system. You will reach it by means of the
Options/Destination Entry icon and by selecting the help function.
Note: The GPS-receiver will require some minutes for initialization when
deployed for the first time. Even when GPs signal reception is indicated
the navigation could be imprecise. In all future instances it will take about
Page 59

30-150 seconds until a correct GPS-signal is available, sufficient “sight”
of the satellite is a prerequisite.
Software Installation On Your PC
In order to be able to deploy self-defined cards on your navigation system
you must install the corresponding navigation software on your PC.
1. Before installing the navigation
software ensure that ActiveSync is installed and your navigation system
is connected with your PC via the
ActiveSync-cable.
2. Place the CD 1 with the navigation software in your CD drive. The
installation will start automatically.
3. Follow the program instructions.
Contents of The Navigation CDs
It is possible for several CDs to be contained in the scope of the delivery
according to the version. Content of the CDs:
CD 1 contains the PC application, digitalized card material and the data
material for restoring the content of the memory card fast. Additional
material on the card will be located on the optional CD2. The PC
application will be installed on the computer and used to set up your
own card details. Apart from this, it will support the recreation of data on
the memory card.
Page 60

Installing Microsoft ActiveSync
In order to transfer your data between your PC and your navigation
system you need the Microsoft ActiveSync program.
The cost of the navigation system includes a license for this program
which can be found on the Support CD.
Attention: Important files can be overwritten or changed during the
installation of software. You should create a hard disk backup, in order to
be able to have access to the original files in the case of possible
problems following the installation.
You must have administrator rights to install the software under Windows
2000/XP.
Attention: You should not connect the navigation system to your
computer yet.
1. Insert the Support CD and wait until the program starts automatically.
Note: The Auto Run function is probably deactivated if it does not
function. The Setup program on the CD must be started, to start
installation manually.
2. Choose the language, click then Install ActiveSync and follows the
instructions on the screen
3. Connect the navigation system to your computer with the assistance of
the ActiveSync Cable, while the connection options are checked. To do
this, push the USB connector into a free USB port on your computer.
Page 61

The hardware installation assistant recognizes now a new appliance and
installs a suitable driver which can take some minutes. Repeat the die
connection search if it fails the first time.
4. Follow the instructions on the screen. The program will now set up a
partnership between your PC and the device.
Page 62
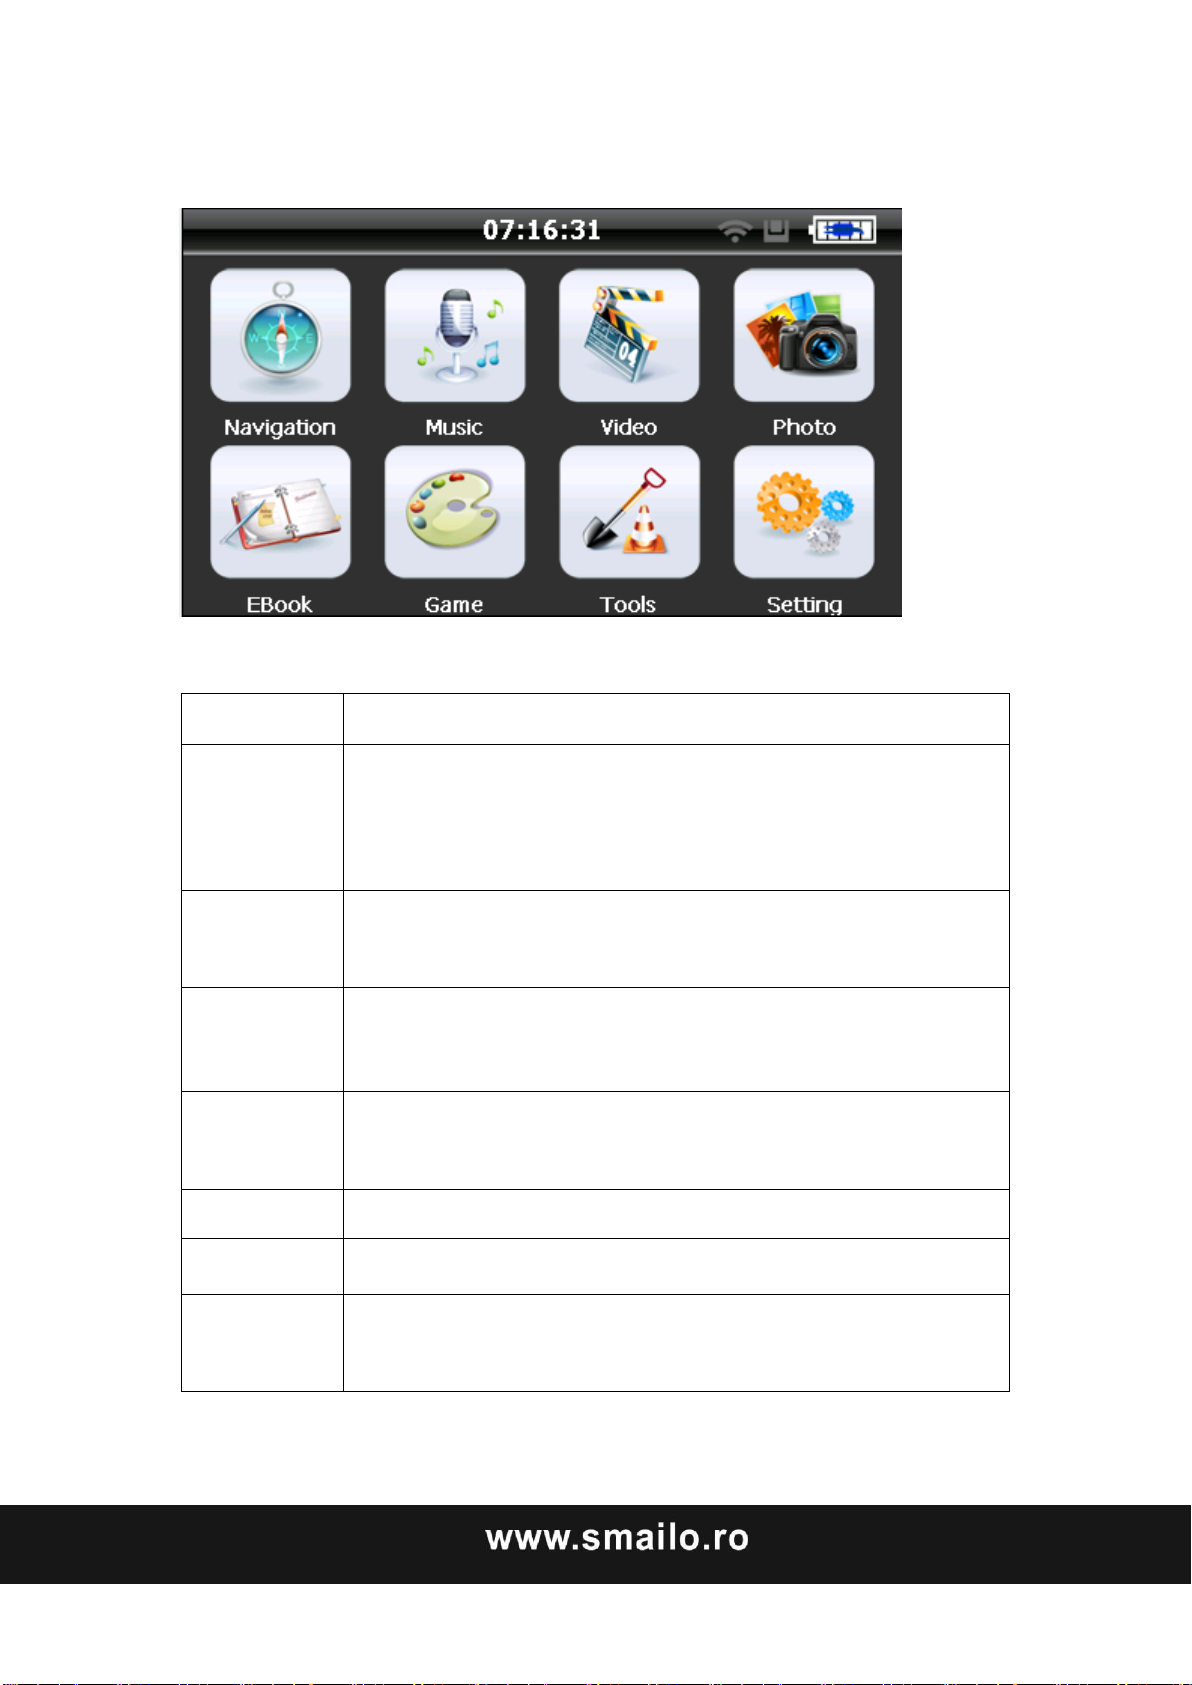
MENU OPERATION
Navigation
Provide navigation service
Music
Audio playing format: WMA, MP3.
Support random playing, sequential playing, repeat
playing, pause, previous/next, volume
Video
player
Support ASF, AVI, WMV, 3GP, MP4 and FLV format.
Support progress adjust, pause and full screen play
Photo
viewer
Support JPG、BMP and PNG format. Support photo
rotate, enlarge/shrink pictures, automatic play and so on
E-book
Text format: txt.
Support page selection
Game
Support game
Tools
Support tools;
Setting
Brightness, Volume, Languages, Power, Time, System,
Default, GPS Info, Navipath.
1. Features:
Page 63

This chapter will introduce the navigation function and notes.
2 Navigation functions and features
According to your choice of navigation system, the GPS navigator can
make position by GPS satellite signal receiver and display on the
navigation map. The system can calculate a best route after setting the
destination, which can help users to arrive the destination safely and
rapidly.
The system can let you enjoy the individual charm and enjoy your trip
by many different ways such as vision map, vivid animation, voice
indication, and words indication.
The specific navigation functions are depended on your choice of
navigating software. Please refer to the Navigation Software Instruction.
Notes
1. Map information
It is probably that the electronic navigation data is not consistent with the
real traffic instructions because of the traffic construction development.
Please do comply with the highway condition and the actual traffic rules.
2. Navigation
The navigator offers the route for the reference; determine the route
by yourself, the driver may be more familiar with the route than GPS
navigator.
Page 64
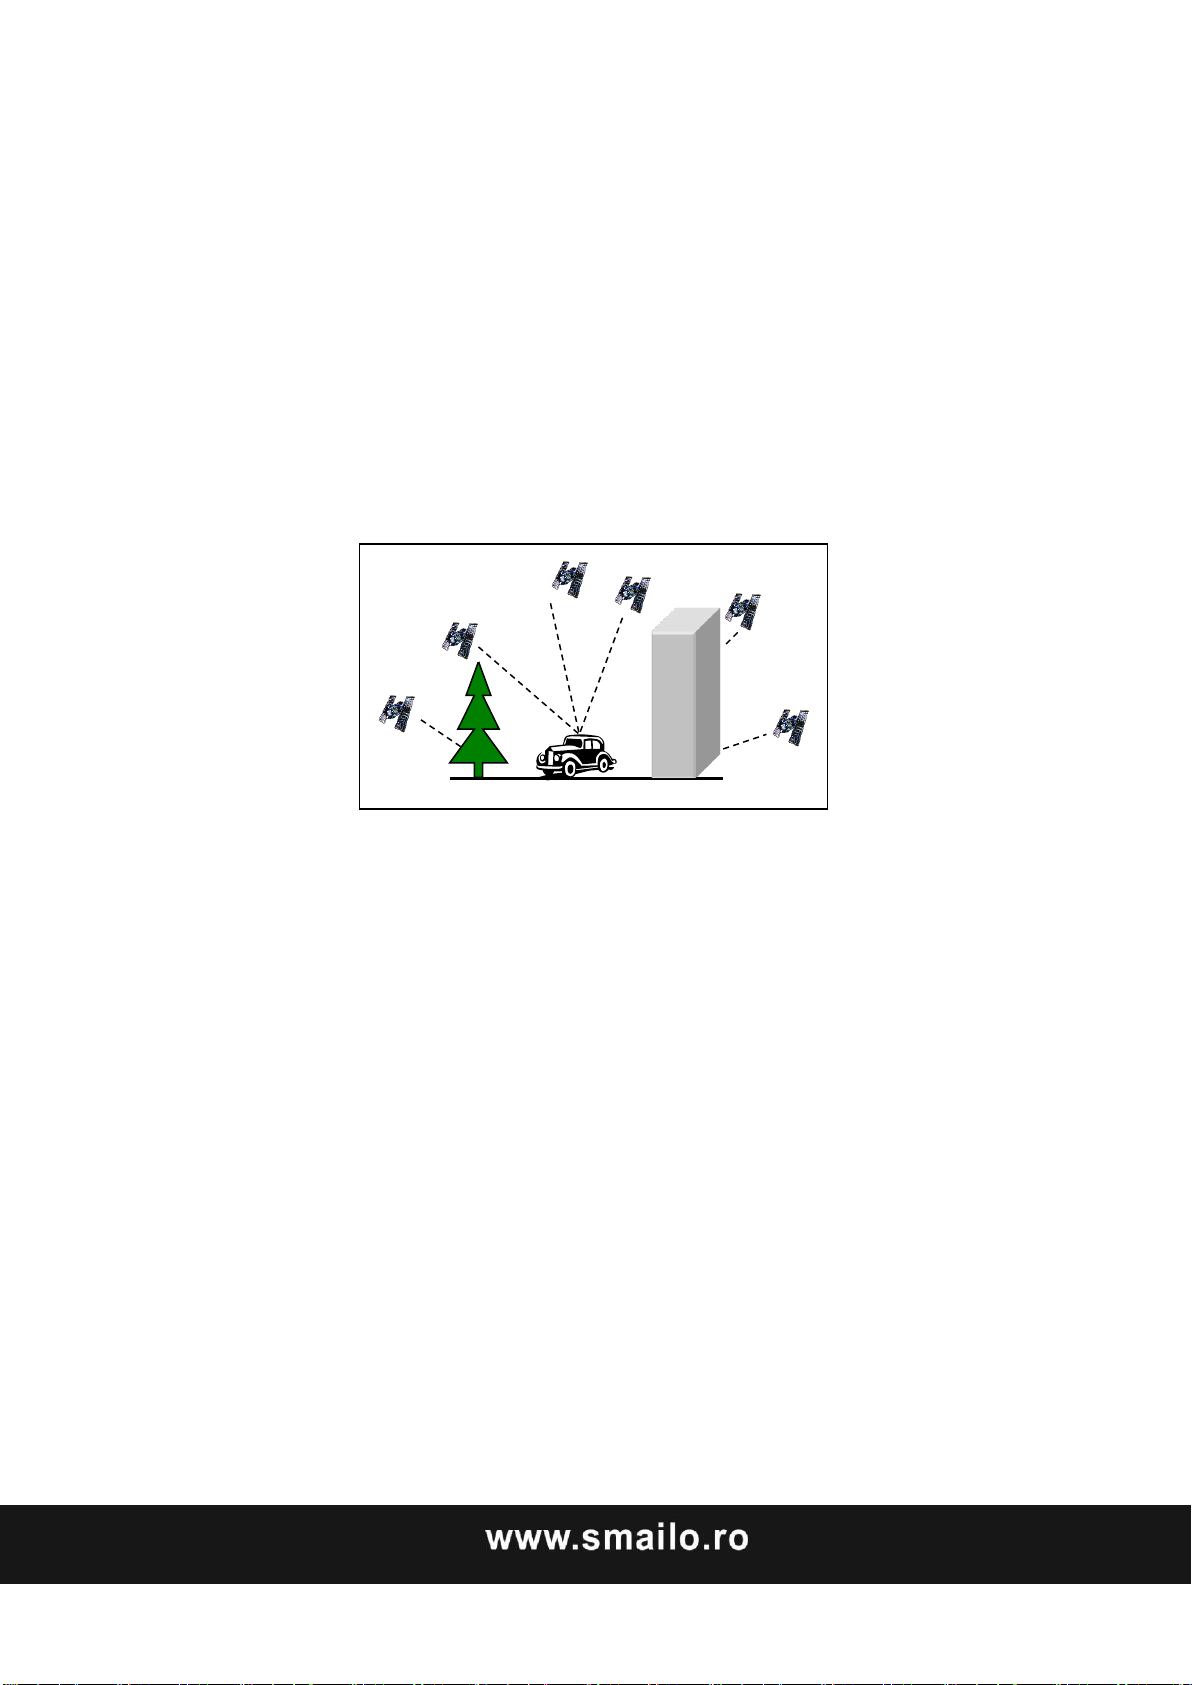
3. Receiving signal
Many factors such as high, dense buildings (in the tunnel, between
the high building, underground parking, under the trestle), various
weather condition, and closure of the satellite will affect the ability to
receive signal so as to result in inaccurate position, inefficiency of
navigation operation and system function.
Page 65
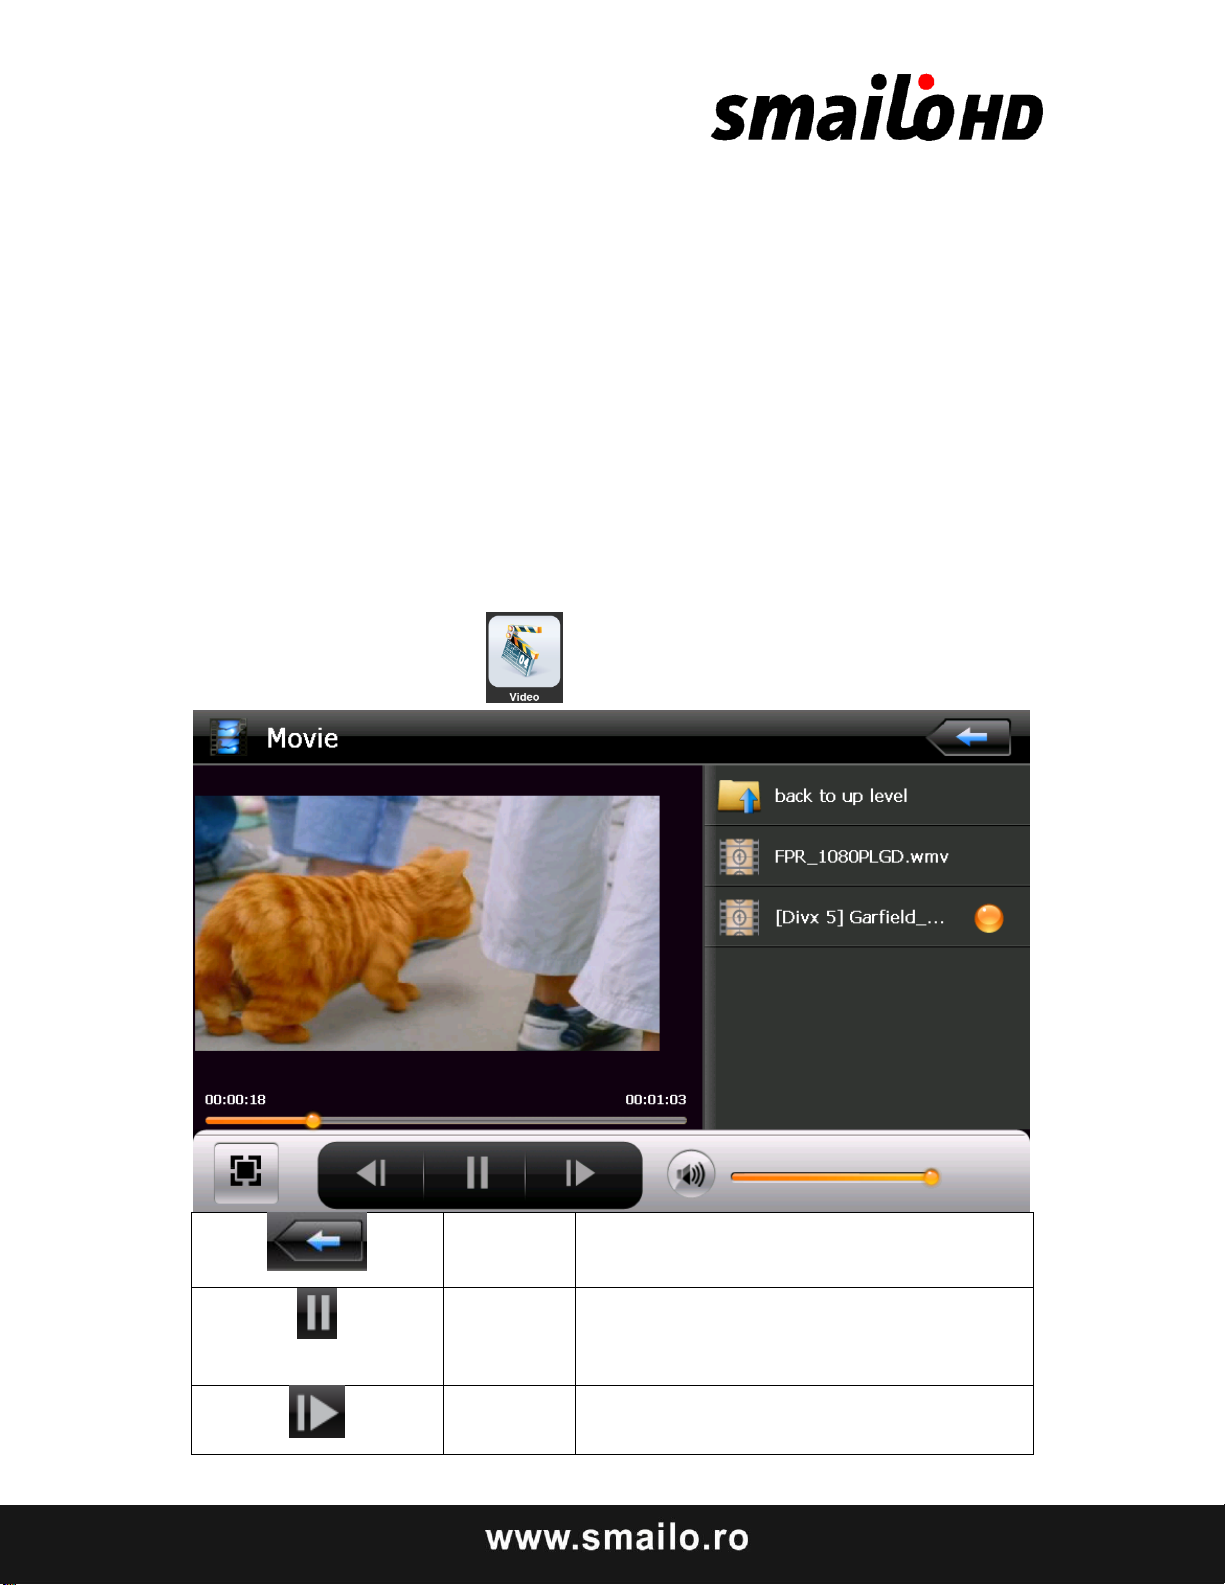
Close
Click to close the video list;
Play
It shows stop playing. Single click
will continue to play.
Next
Play next video.
3 Video operation Interface
This chapter introduced how to use the GPS video player.
Functions and features
1)Support ASF, AVI, WMV, 3GP, MP4 and FLV
2)Support full-screen playing, progress choosing and file selection;
Before using the Video player, please copy your video file(ASF, AVI, WMV, 3GP, MP4 and
FLV)to any folder.
Operation
Single click the Video button to enter the playing interface as :
Page 66
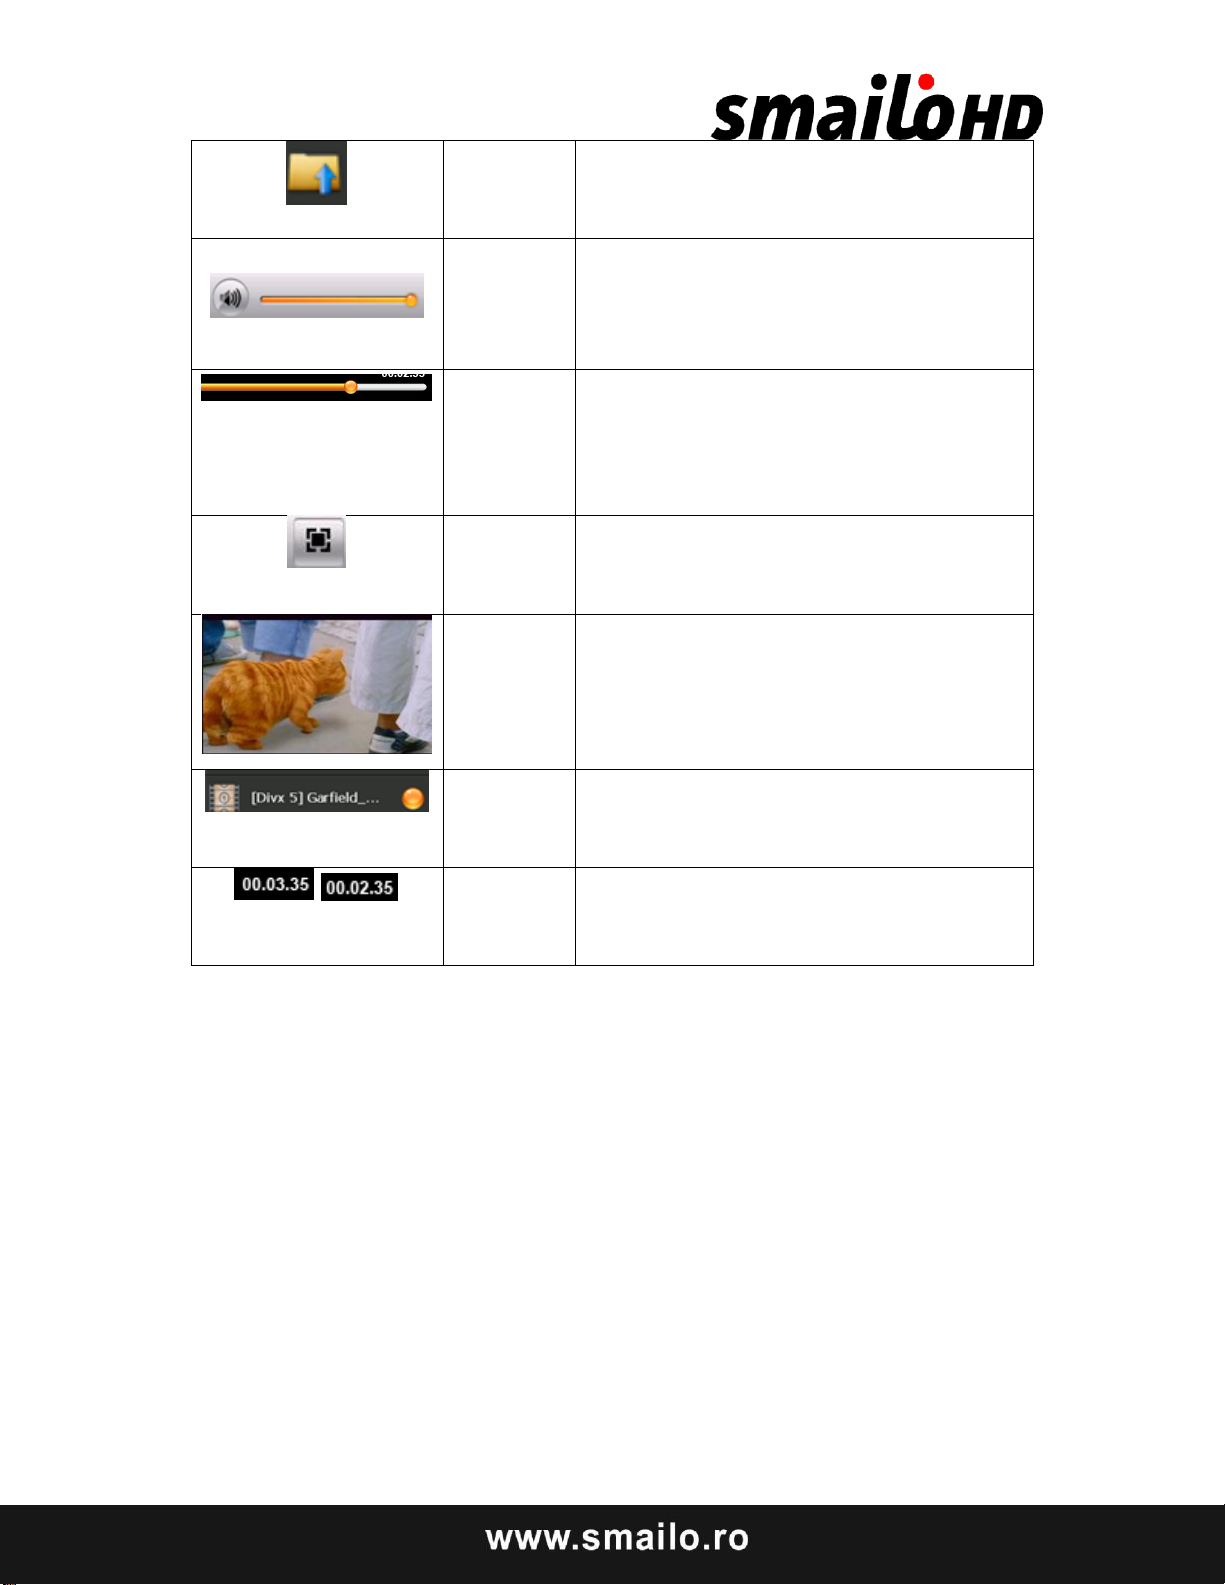
File list
Single click and shift to video file list,
and then choose your favorite video.
Volume
Single click volume. It shows volume
is decreased when it shift toward left.
While volume is increase when it is
shifted toward right.
Playing
progress
Adjust the progress by slide the
progress-displaying bar; go left for
backwards, go right for forwards;
full
screen
full screen Play.
Play
interface
Full screen play. Double click to
return normal play status.
Video
name
Show current Video name
/
Time
Show the time consumed / The total
time of the video
5. Audio player operation interface
This chapter introduces how to use the GPS video player to play your favorite music, and let it
be your personal MP3.
Functions and features
The audio player supports MP3 and WAV format, you could set the playing sequence as you
wish.
Before using the audio player, please copy the files to any folder.
Page 67
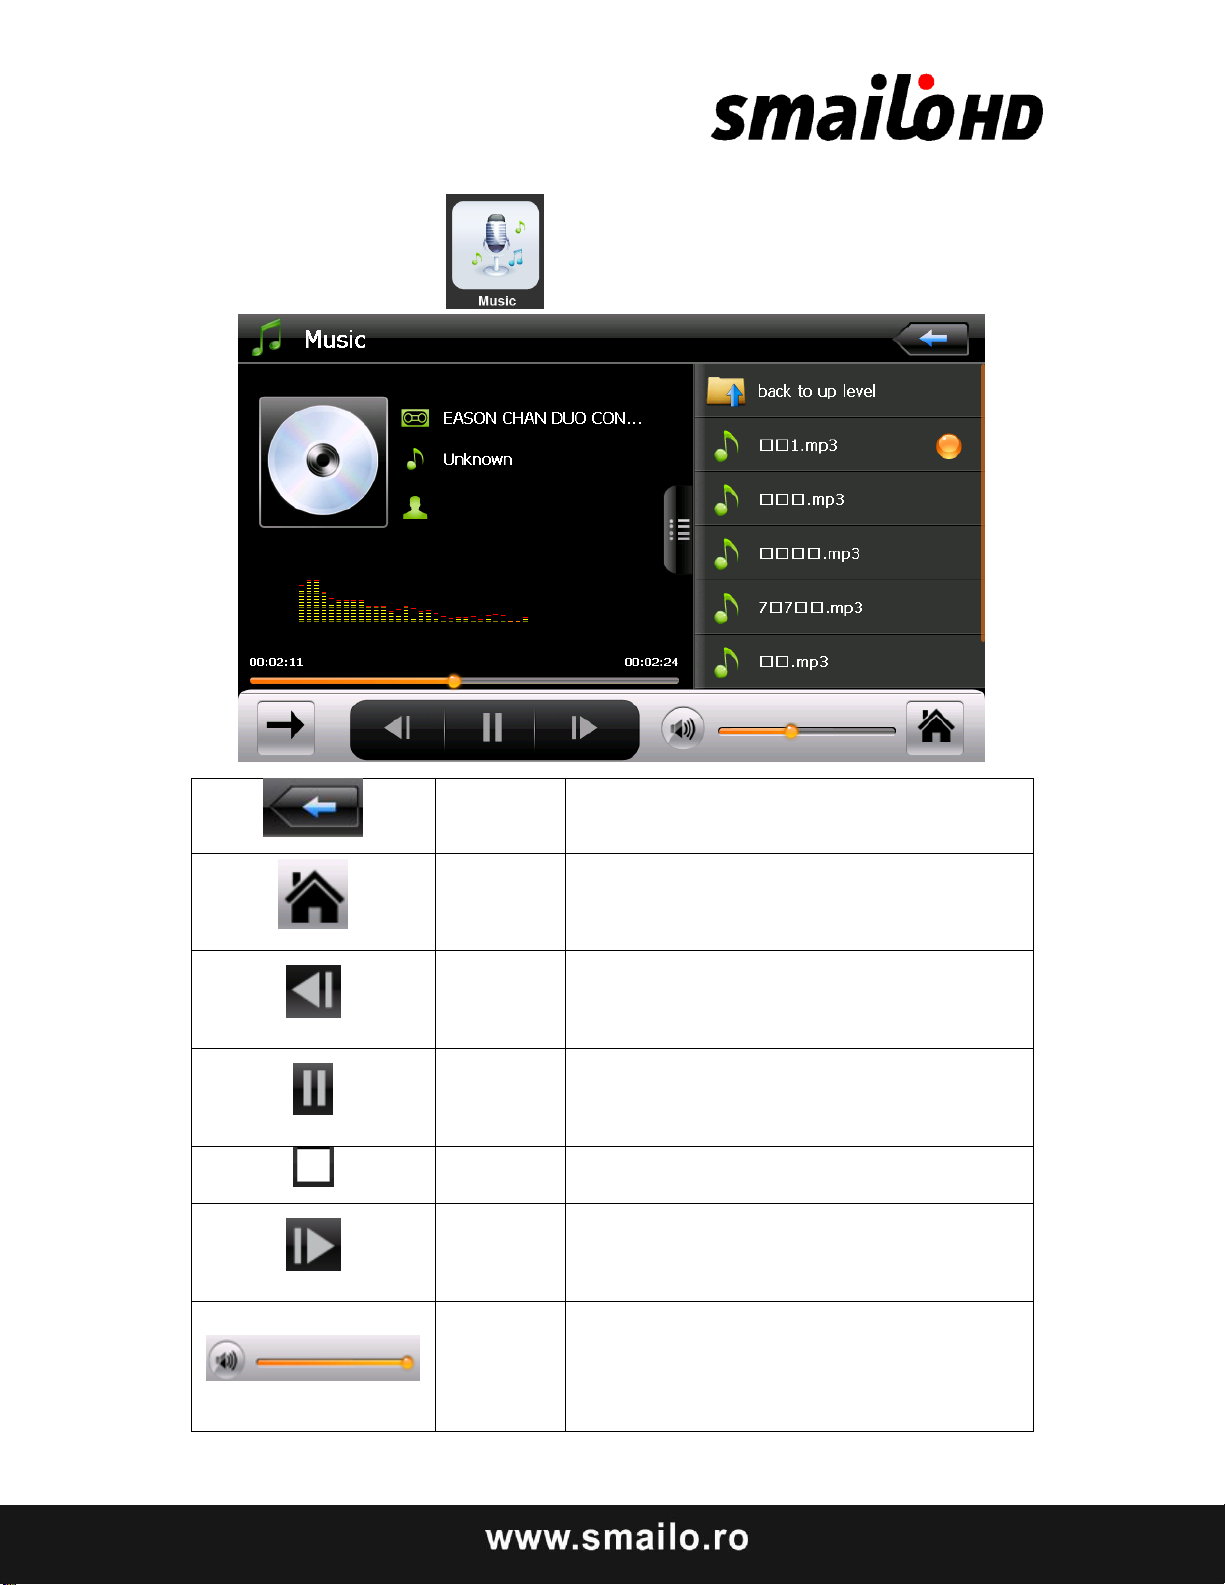
Close
Single click to close the audio player;
Homepa
ge
Previous
song
Play the previous song;
Play/pau
se
To play and pause, single click to
pause, click again to play continuously;
Stop
Single click to stop playing;
Next
song
Play the next song;
Volume
Adjust volume. It shows volume is
decreased when it shift toward left.
While volume is increase when it is
shifted toward right.
Operation method
1) Single click the button to the playing interface as
Page 68
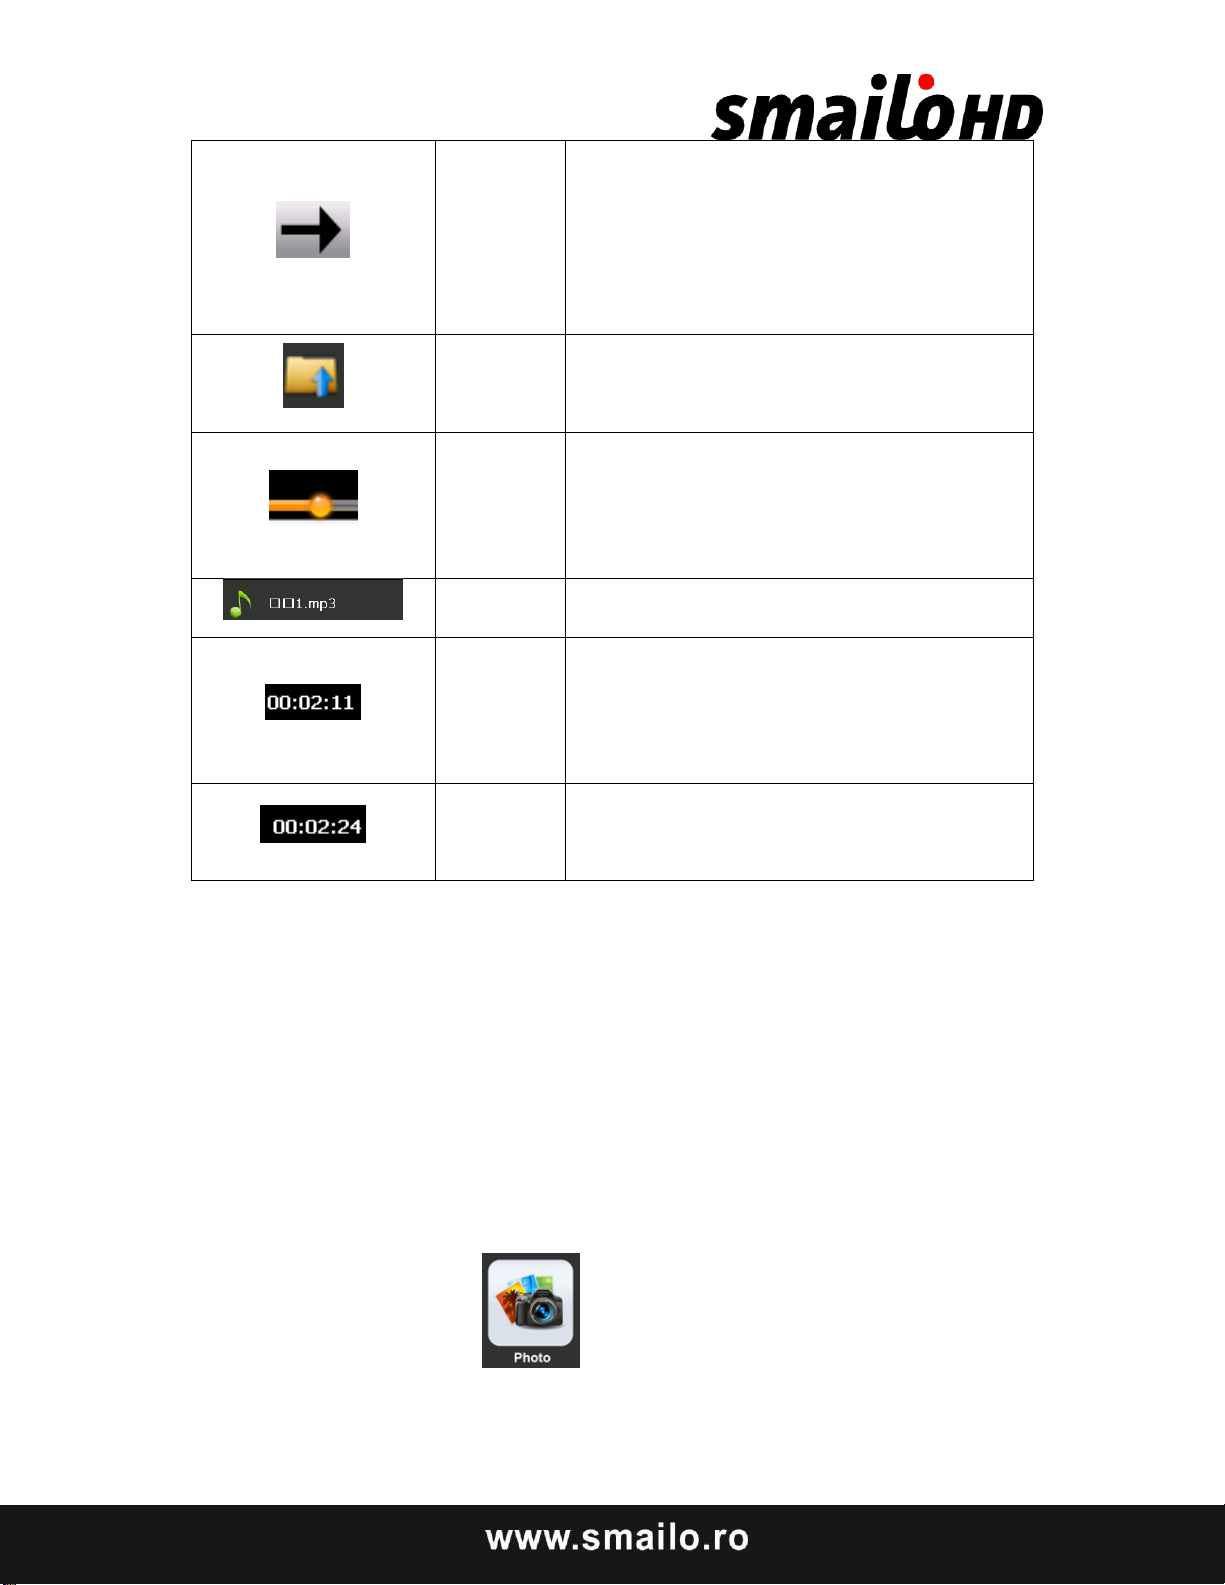
Setting
the
playing
mode
Support sequencial playing, loop
playing, repeat playing and random
playing.
Open the
play list
Single click to display the play list, and
choose your favorite
Playing
progress
Adjust the progress by slide the
progress-displaying bar; go left for
backwards, go right for forwards;
Song title
Show the song title
Time
consump
tion
Show the time progress;
Total
time
Show the total time for playing the
song;
6. Photo viewer operation interface
This chapter introduces how to use the photo viewer to browse pictures.
Function features:
1)Supports JPG、BMP and PNG
2)Support picture rotate, picture enlarge/shrink and automatic play.
Before using the photo viewer, please copy your photos to any folder.
Operation method
Single click the button to enter play interface as
Page 69
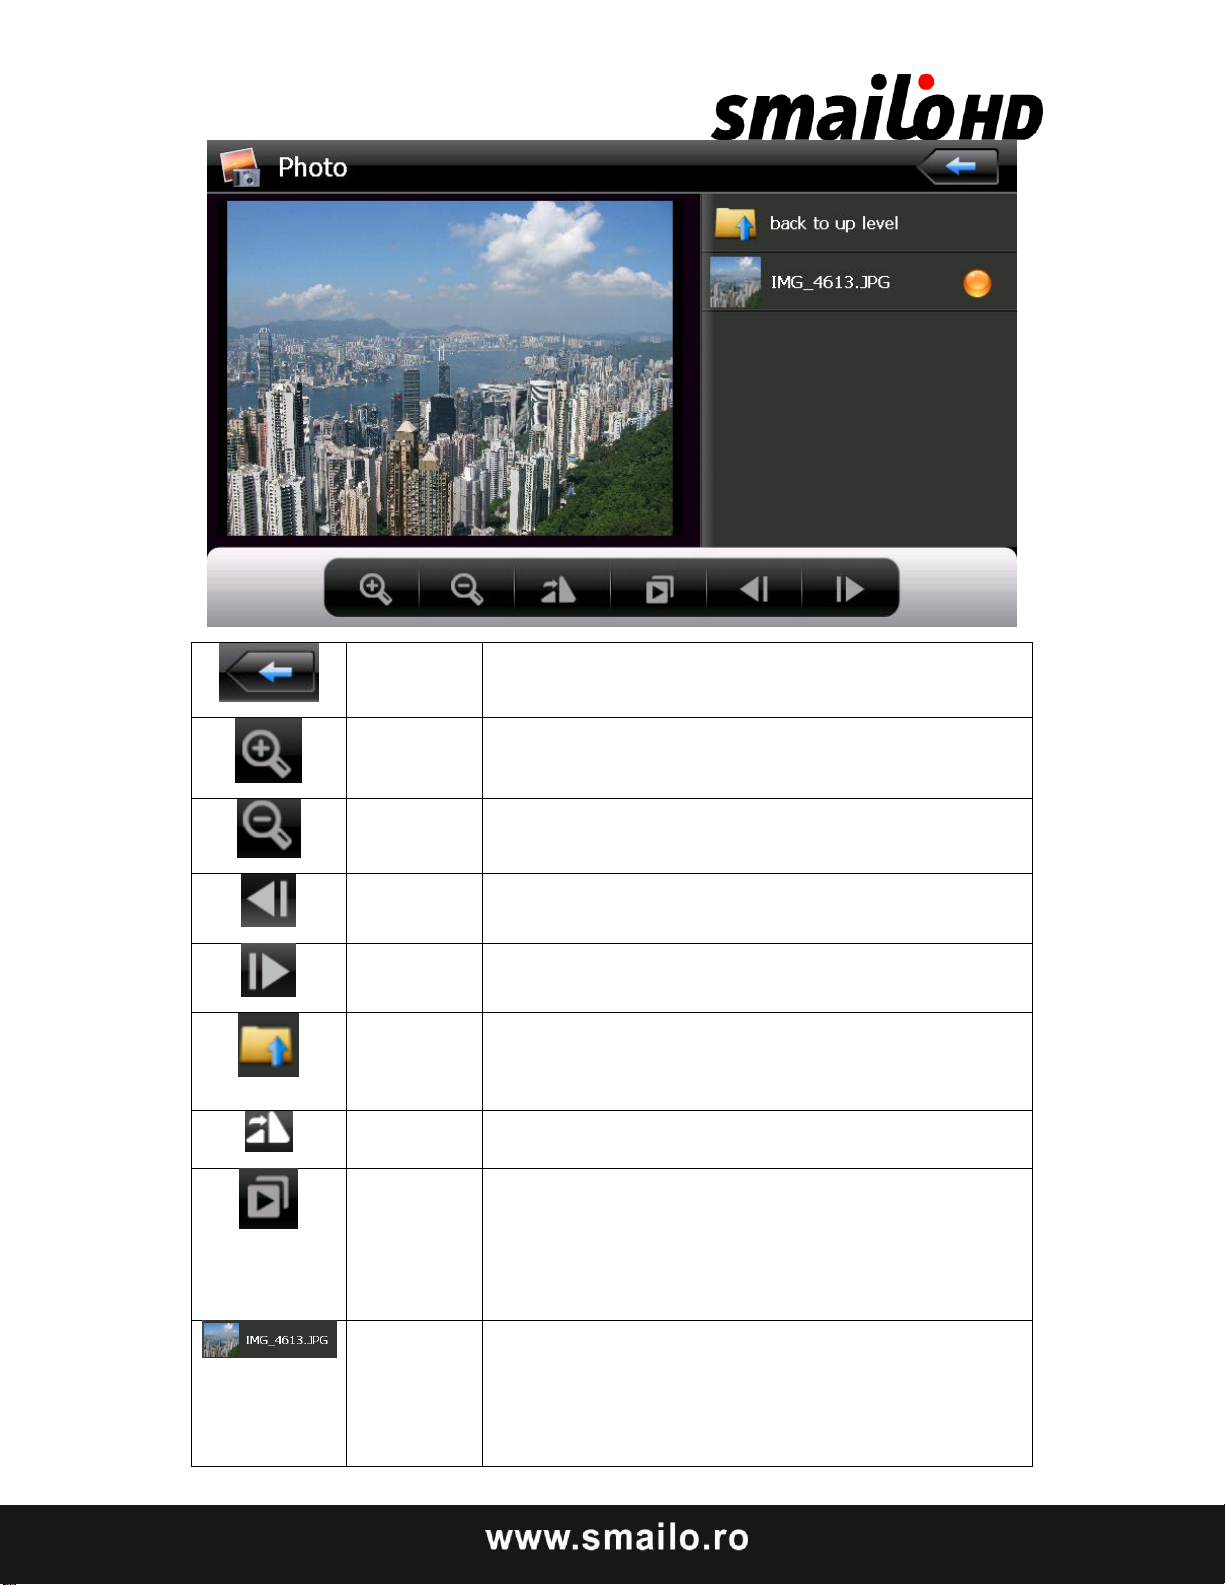
Close
Click to close the viewer
Enlarge
Enlarge current picture in proportion
Shrink
Shrink current picture in proportion
Previous
Show the previous picture
Next
Show the next picture
File list
Single click and shift to video file list, and
then choose your favorite picture
Rotate
Click to rotate the picture by 90 degree
Automati
sm Play
Gets up from the current picture, circulates the
entire screen to broadcast in this folder's all
pictures ;
Photo
name and
format
Show the photo name and format
Close
Page 70
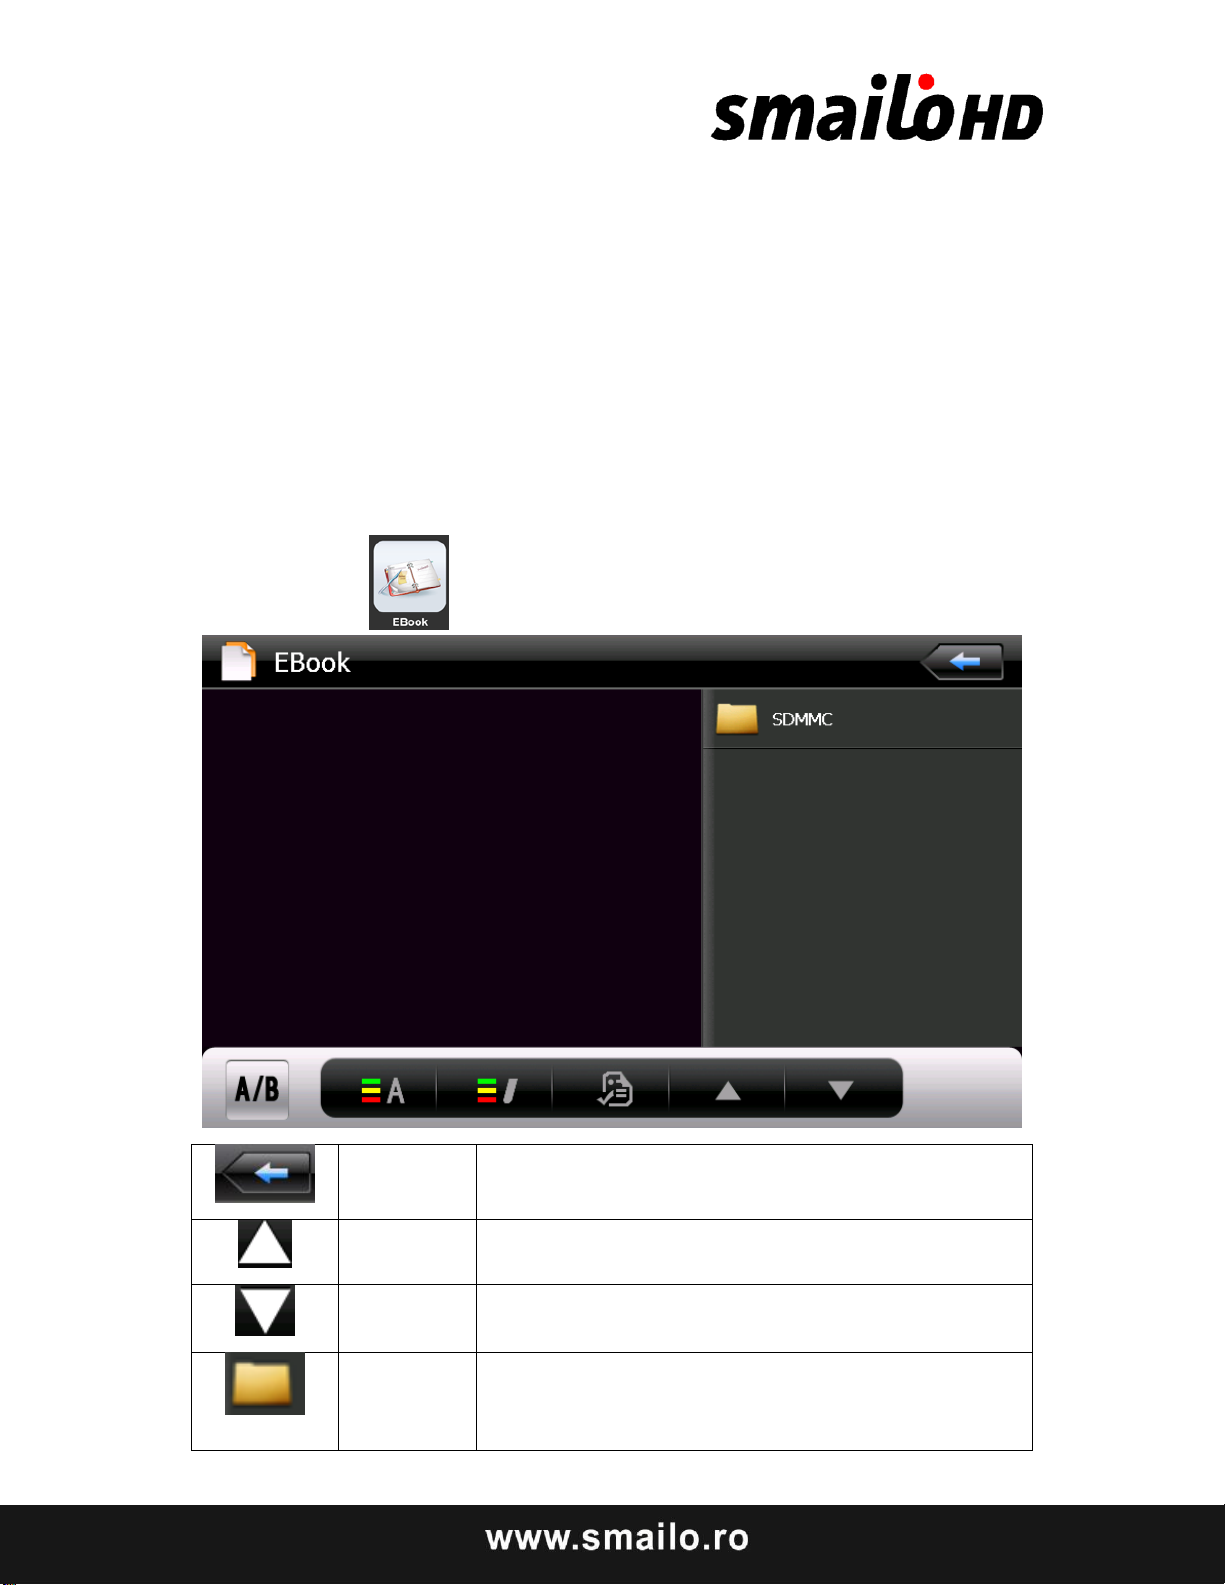
Single click and close e-book reader
Last page
Read last page
Next page
Read next page
File
Single click to enter Ebook list to choose
favorite book
7 E-book reader interface and operation
This chapter introduces how to use GPS to read e-book.
Function
1) Support TXT
2) Support turning over page, page browse, and file choosing.
Before using e-book function, please copy your TXT file and save it to any folder.
Operation
Single click button to to enter e-book reader as
Page 71
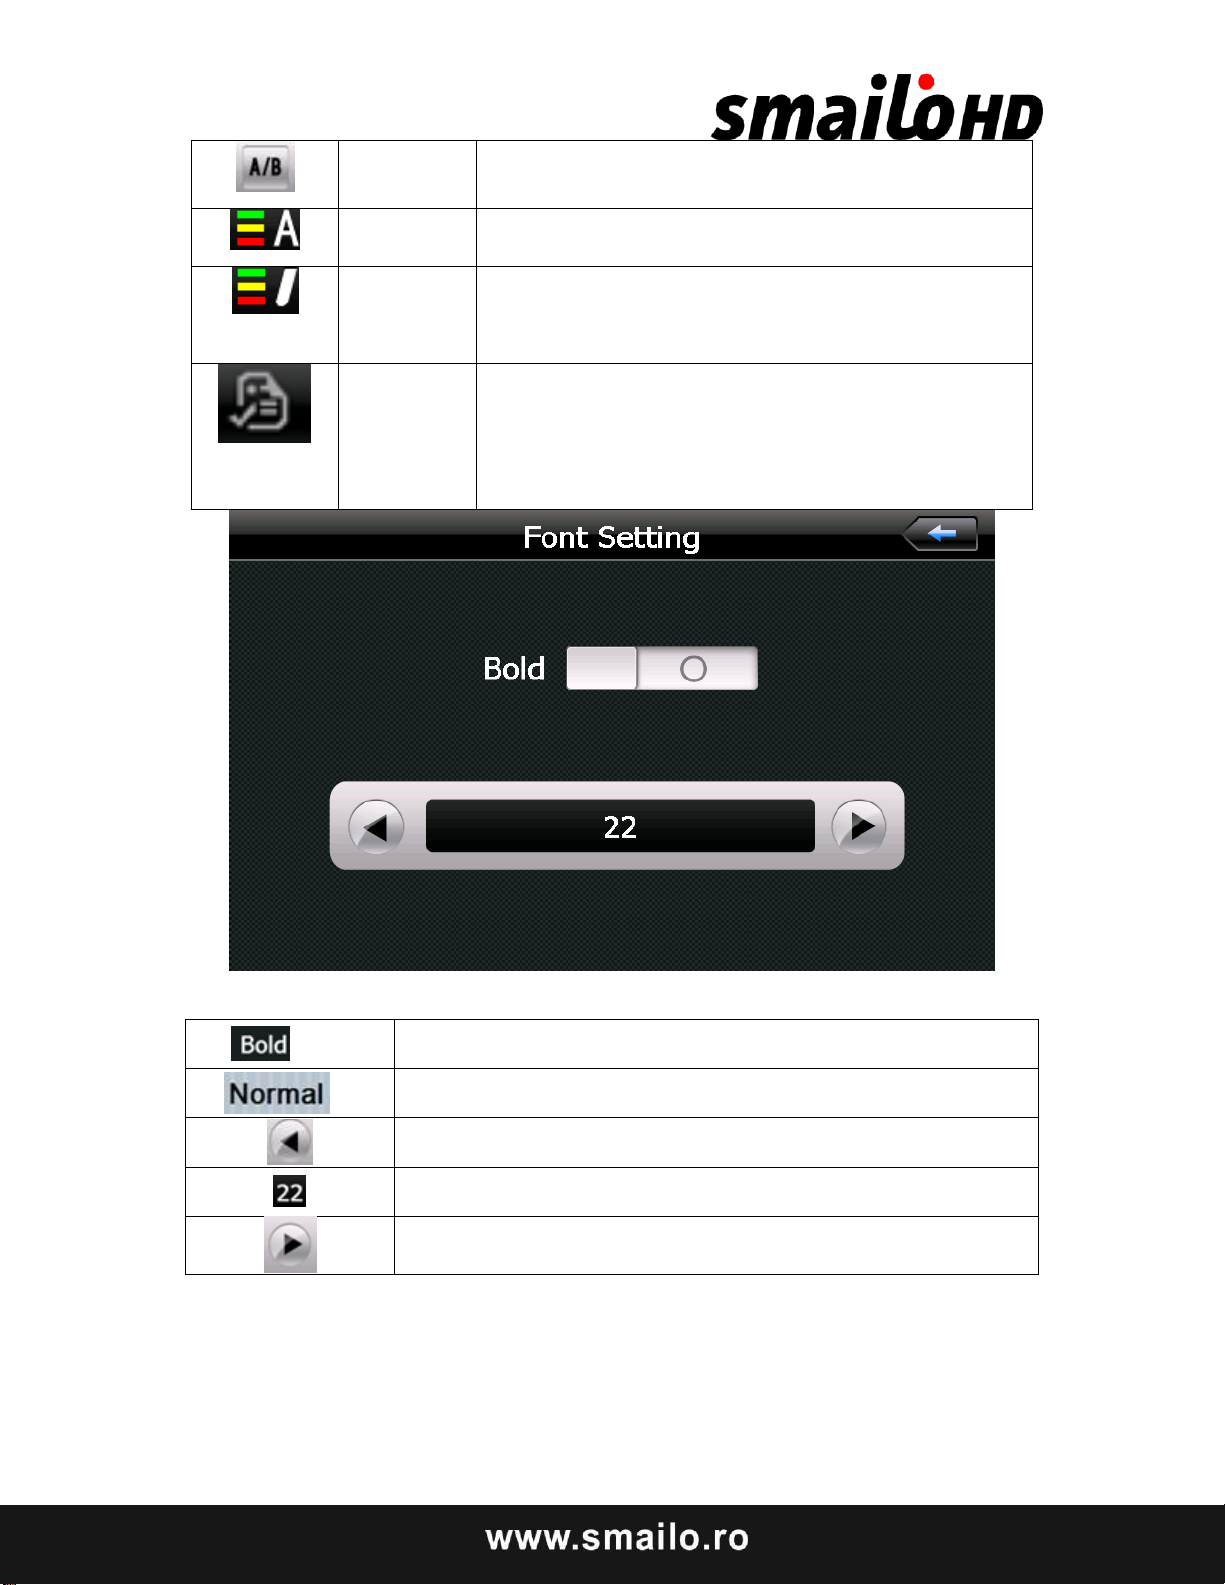
Font set
As Font setting
Color set
As Color setting
Add book
mark
It needs open e-book and choose TXT.
Open
book
mark list
Set font as bold
Set font as normal
Decrease font size
Font size indicator
Increase font size
Font set interface
Page 72
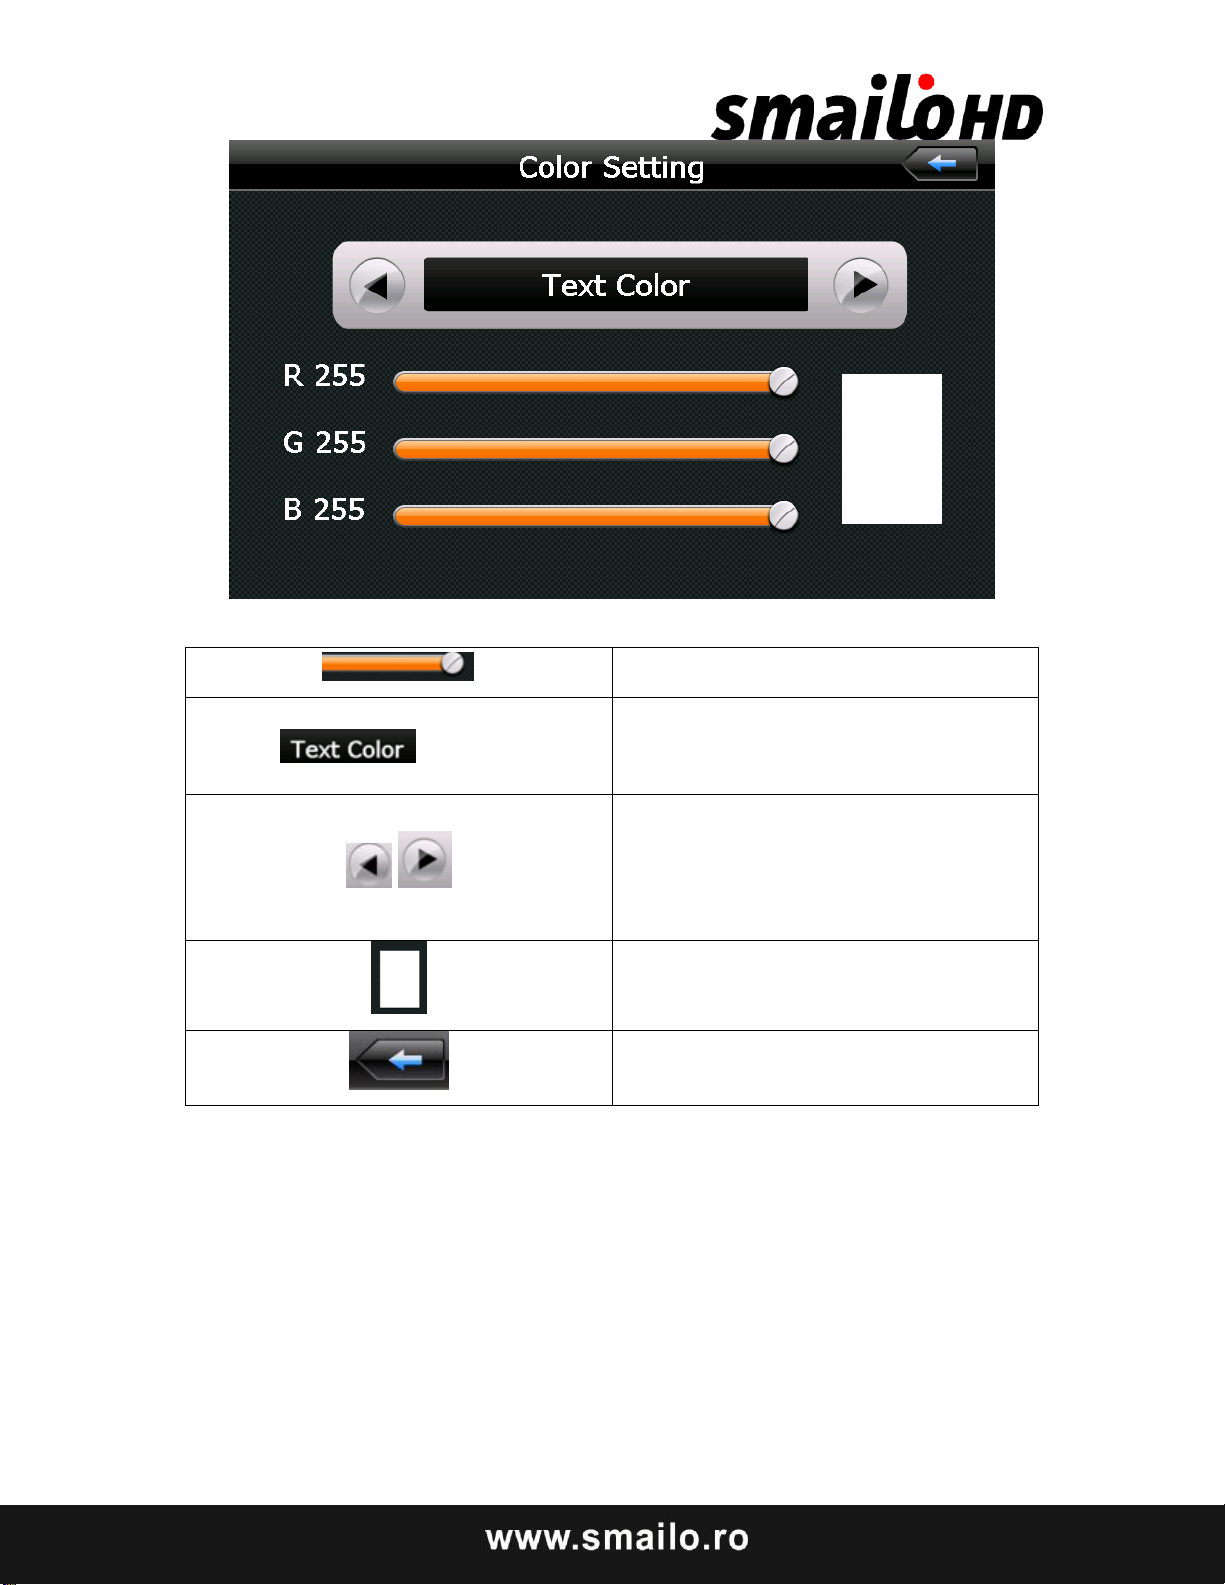
Set color RGB
Choose background color, font
color or set background color
Choose background color, font
color or set background color with
reverse order or sequential order
Color review
Return to e-book homepage
Page 73
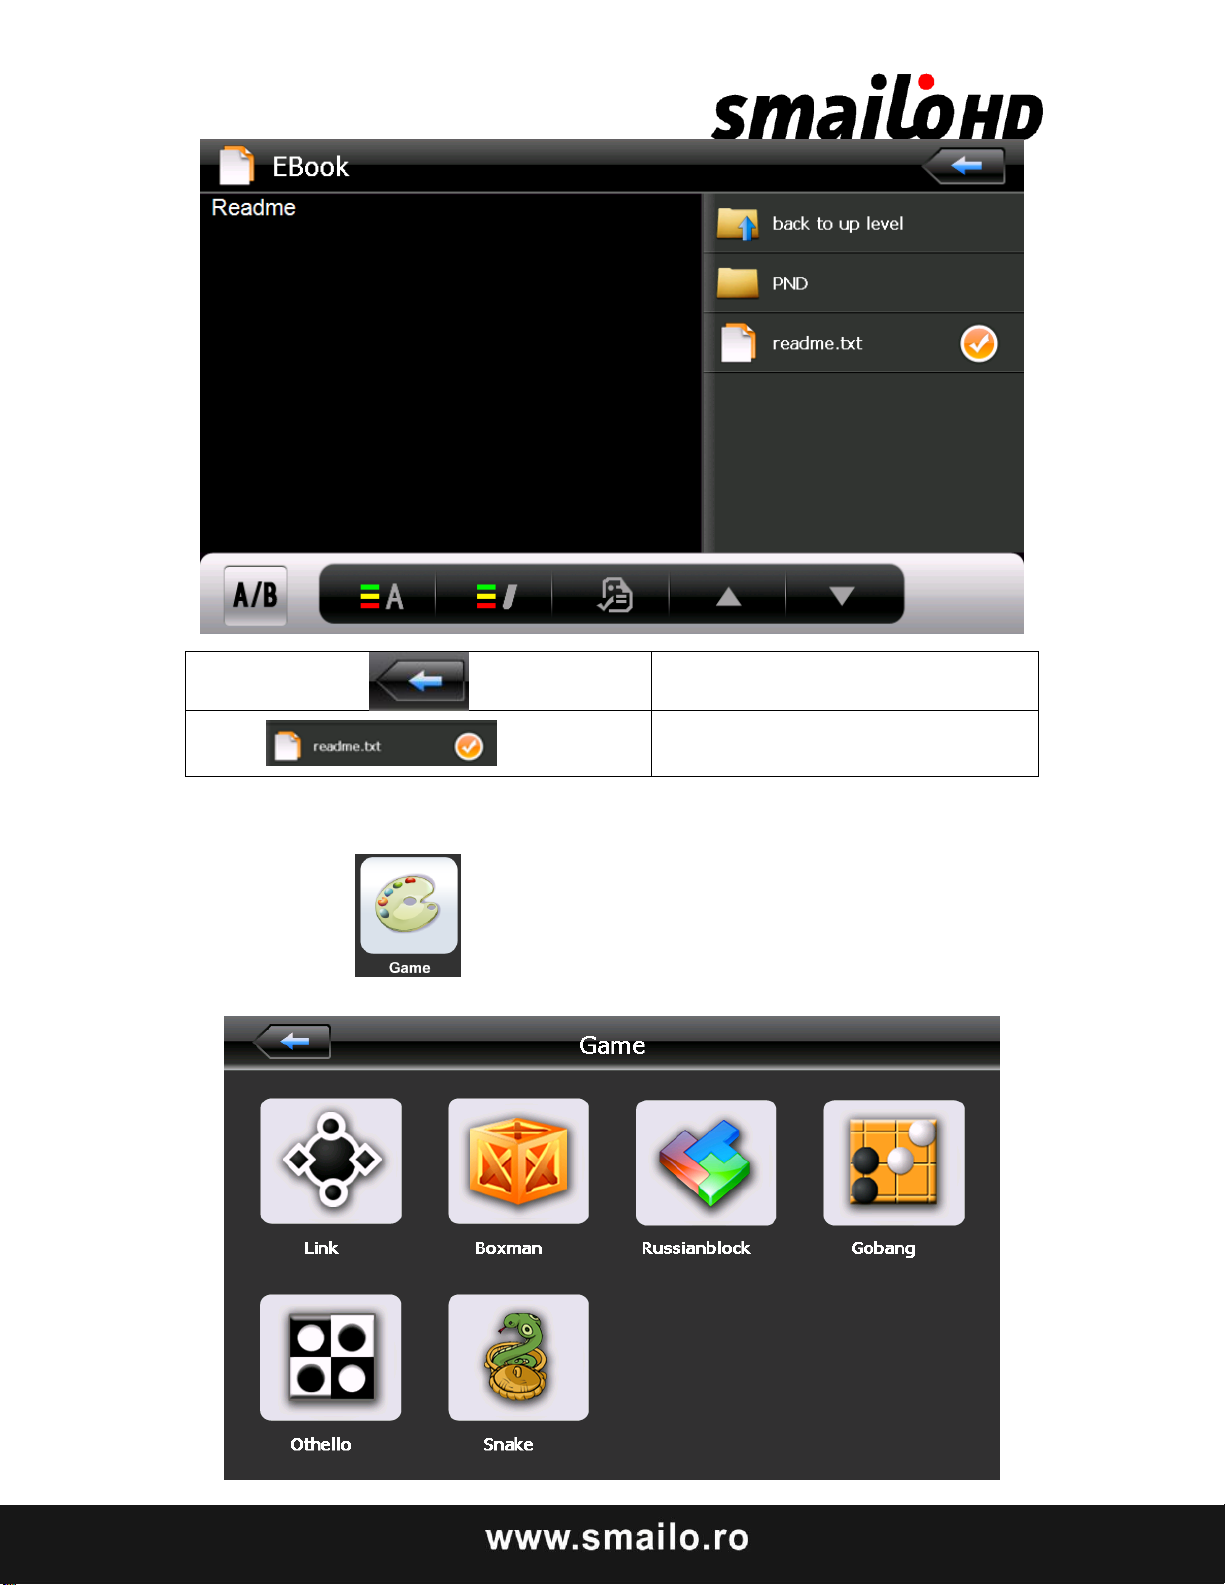
Return e-book interface
Single click and choose book
mark
Game interface and operation
Single click to choose different games as
Page 74
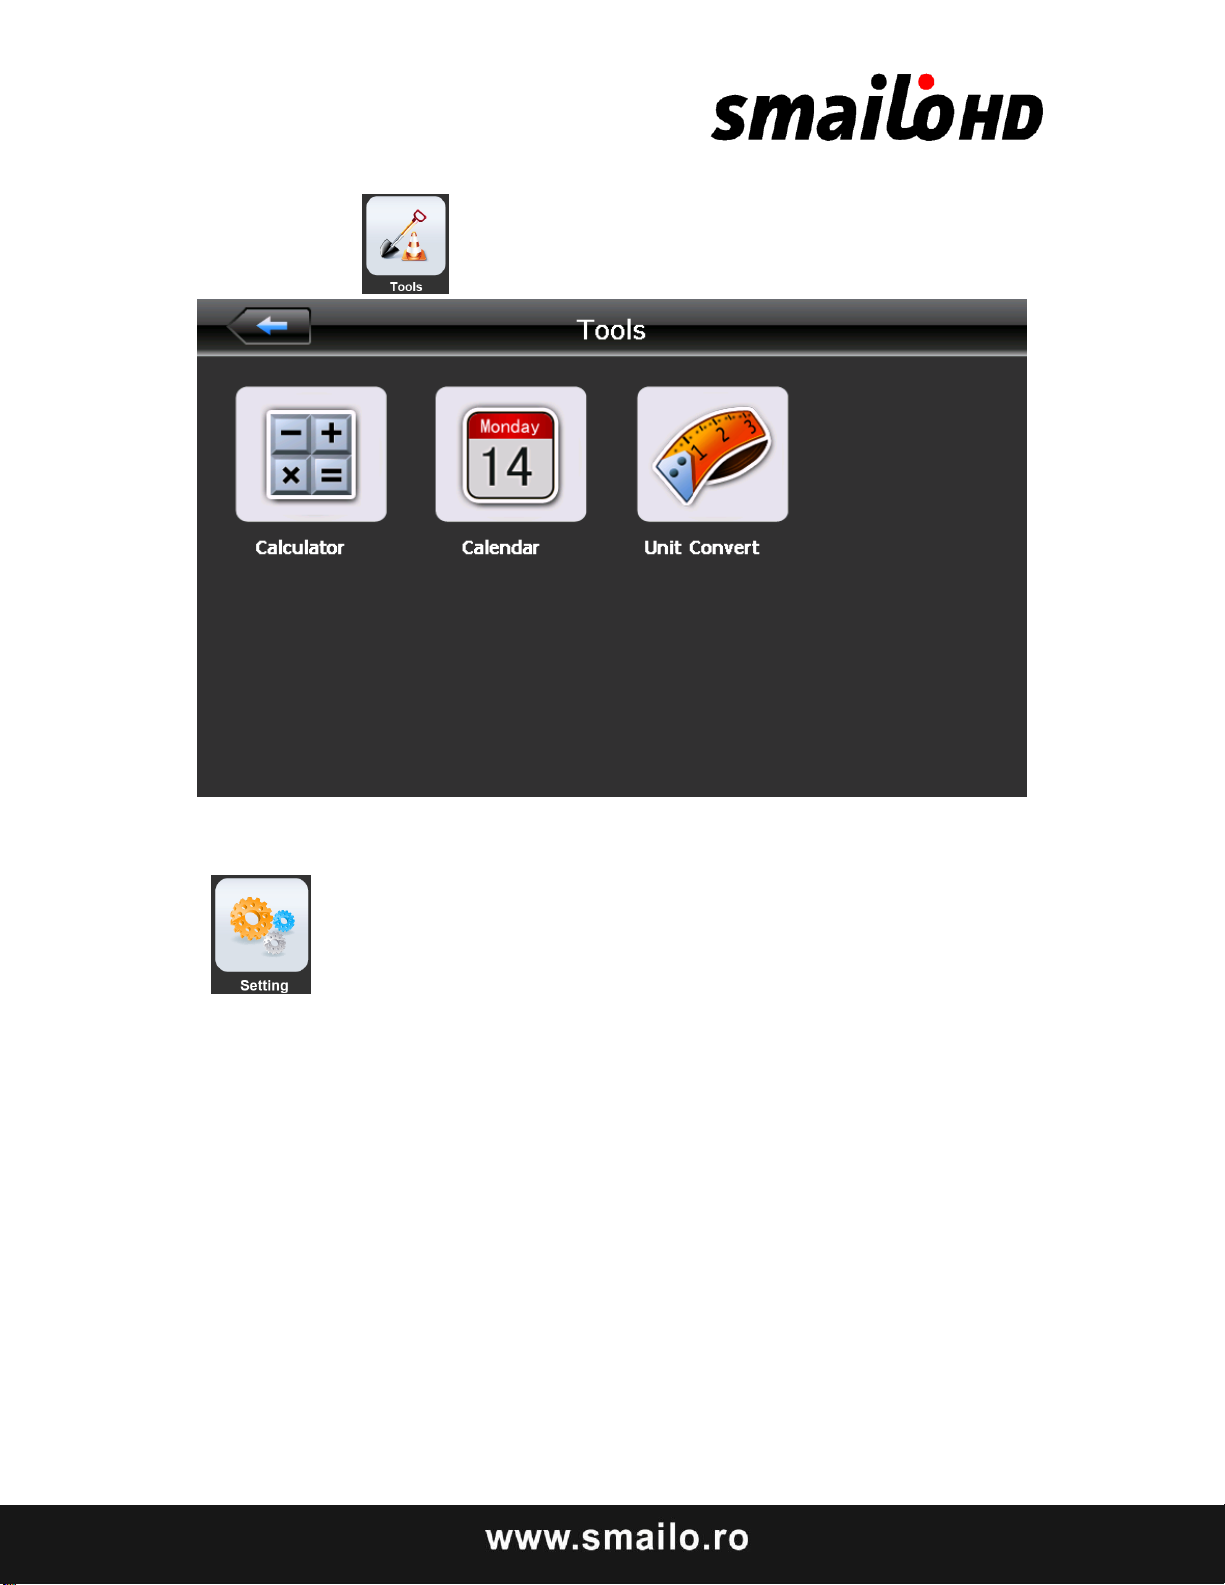
Tool
Single click to choose different tools as
System setting Interface and operation
Click to enter “Setting” menu, then you can set the relevant functions. There are
backlights, volume, languages, time, calibration, system info and default etc.
Page 75
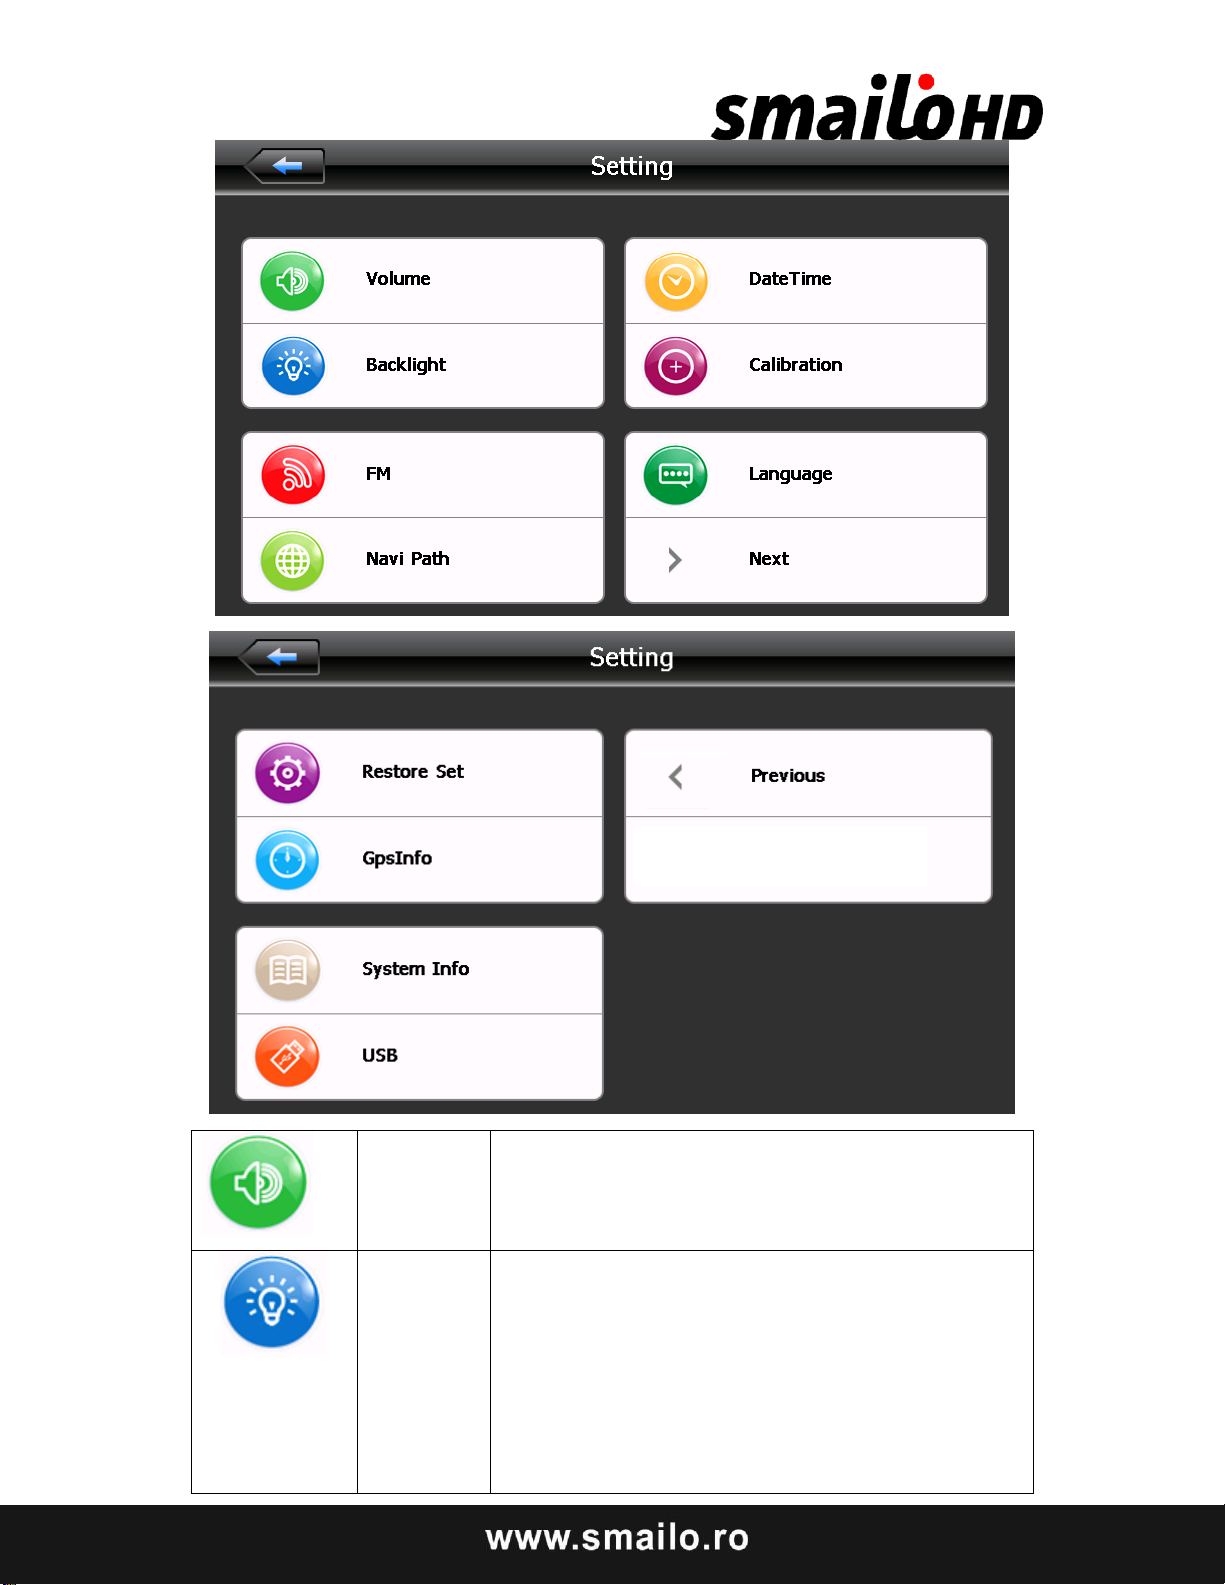
Volume
Adjust the volume;
Turn on / off “screen click tone”
Backlight
Adjust the screen backlight;
Backlight turn off time interval under battery
power supply
Backlight turn off time interval under external
power supply
Page 76
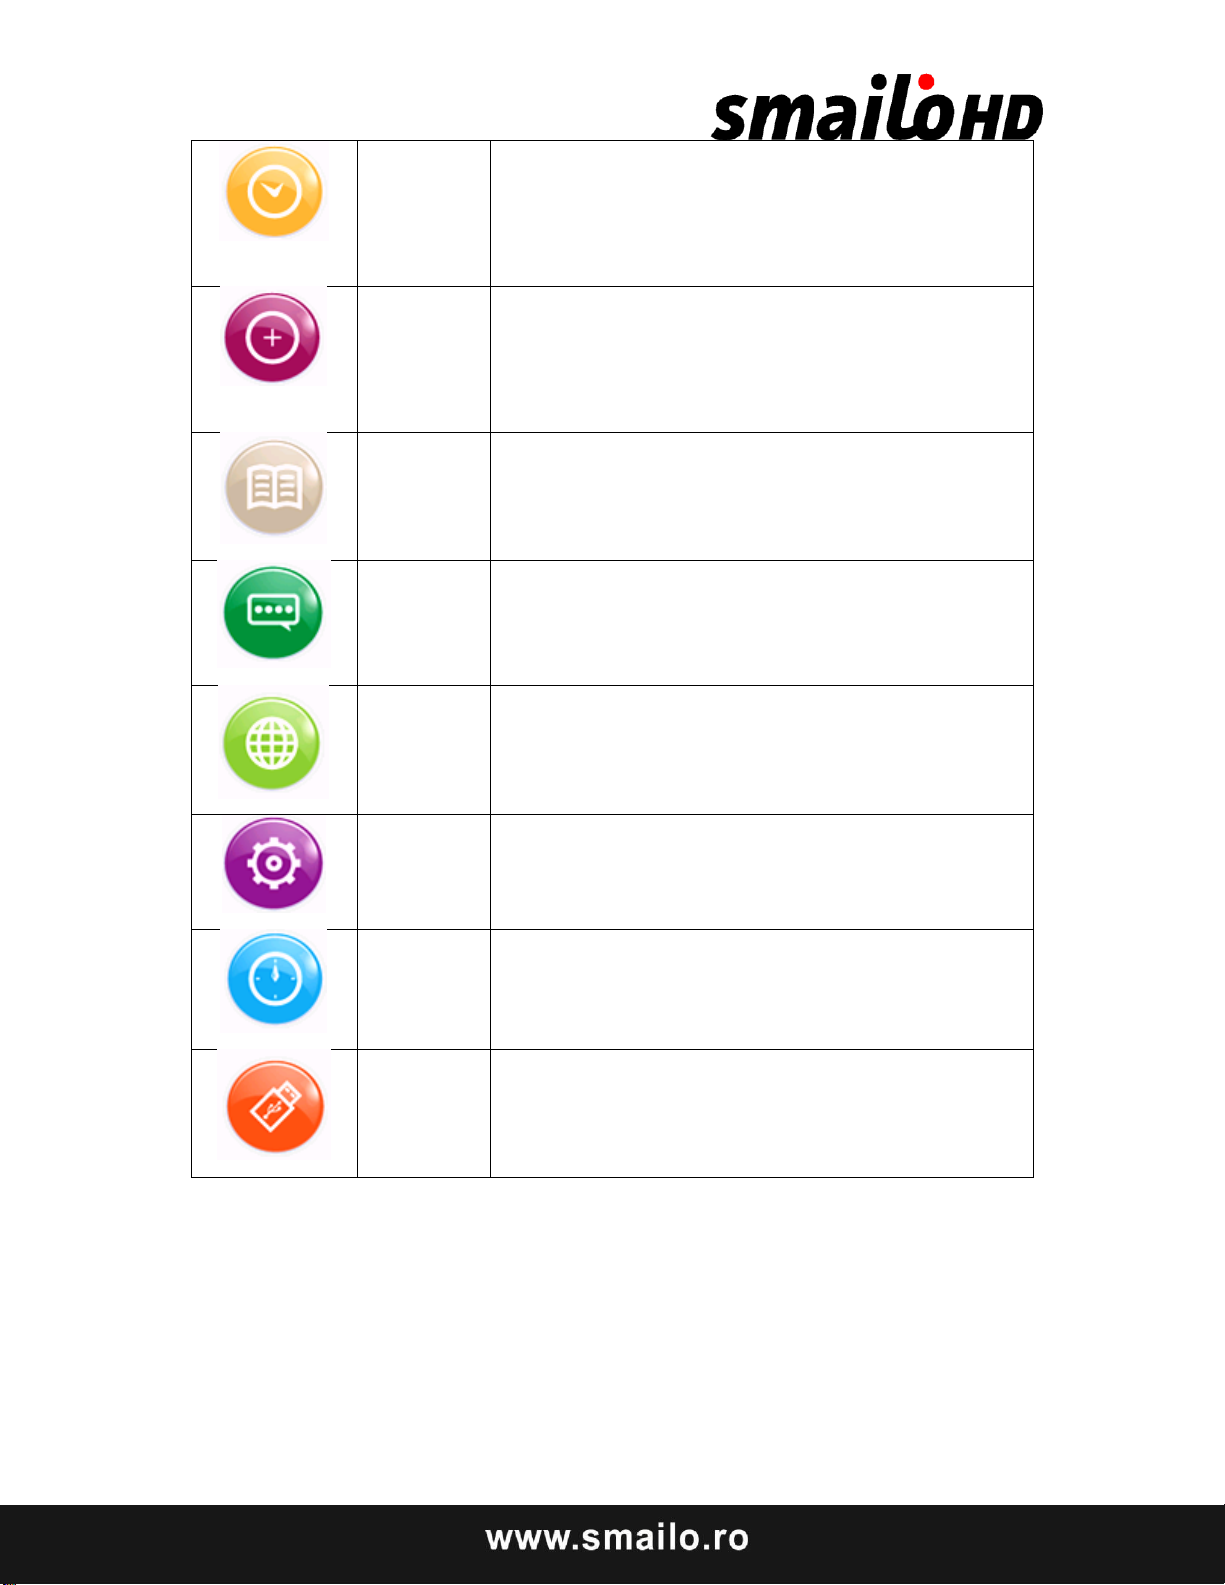
Time and
date
Time set
Date set
Time zone set
Calibrate
the
screen
Calibrate the screen
System
info
Show the system version and serial number
etc.
Language
Select the language for the system
Navigatio
n path
Set navigation path
Restore
set
Return the default settings
GPS info
Display GPS receiving signals data
USB
Volume adjust
“Volume adjustment” includes:
1. Speaker volume adjustment
2. “Screen click tone” setting
Page 77
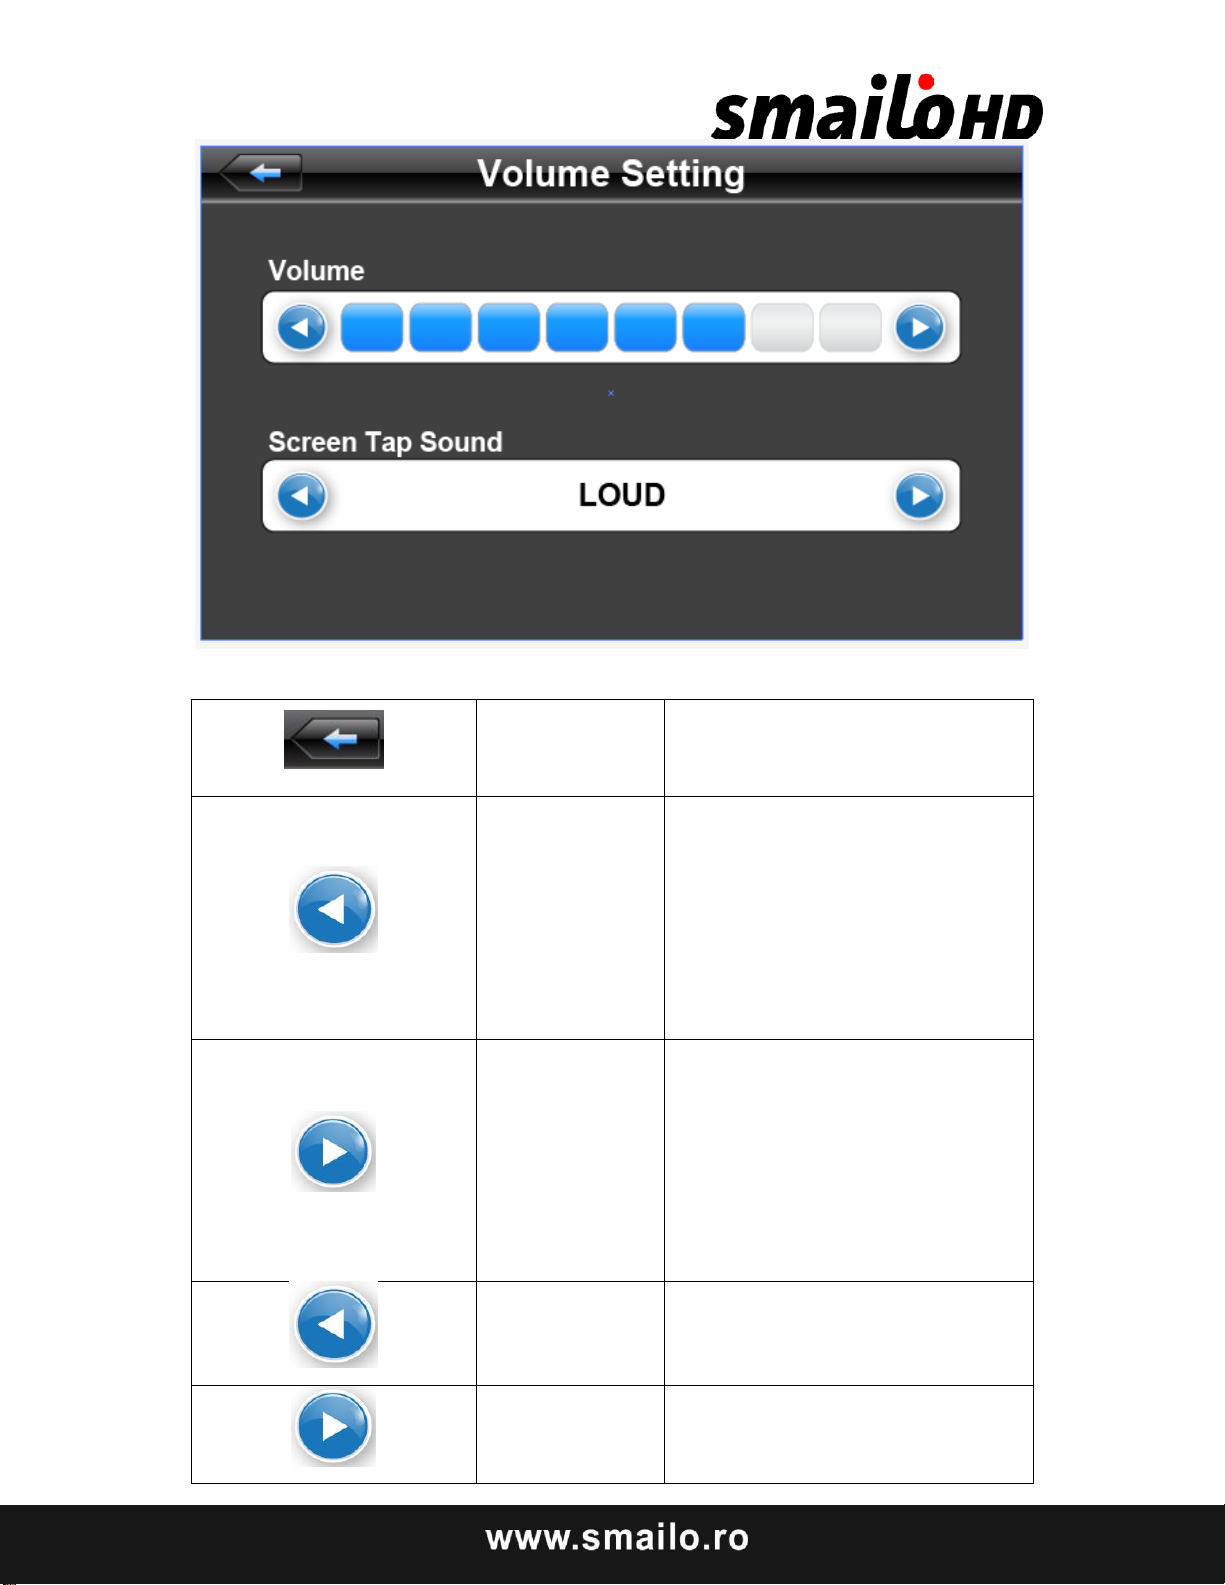
Close
Exit “volume setting”
interface;
Volume -
Single click to decrease the
volume gradually; there are 10
ranks for volume from mute to
maximum. Single click will
decrease one rank.
Volume +
Single click to increase the
volume gradually; there are 10
ranks for volume from mute to
maximum. Single click will
increase one rank.
Turn left
Turn on/ off screen click tone;
Turn right
Turn on/ off the screen click
tone;
Page 78
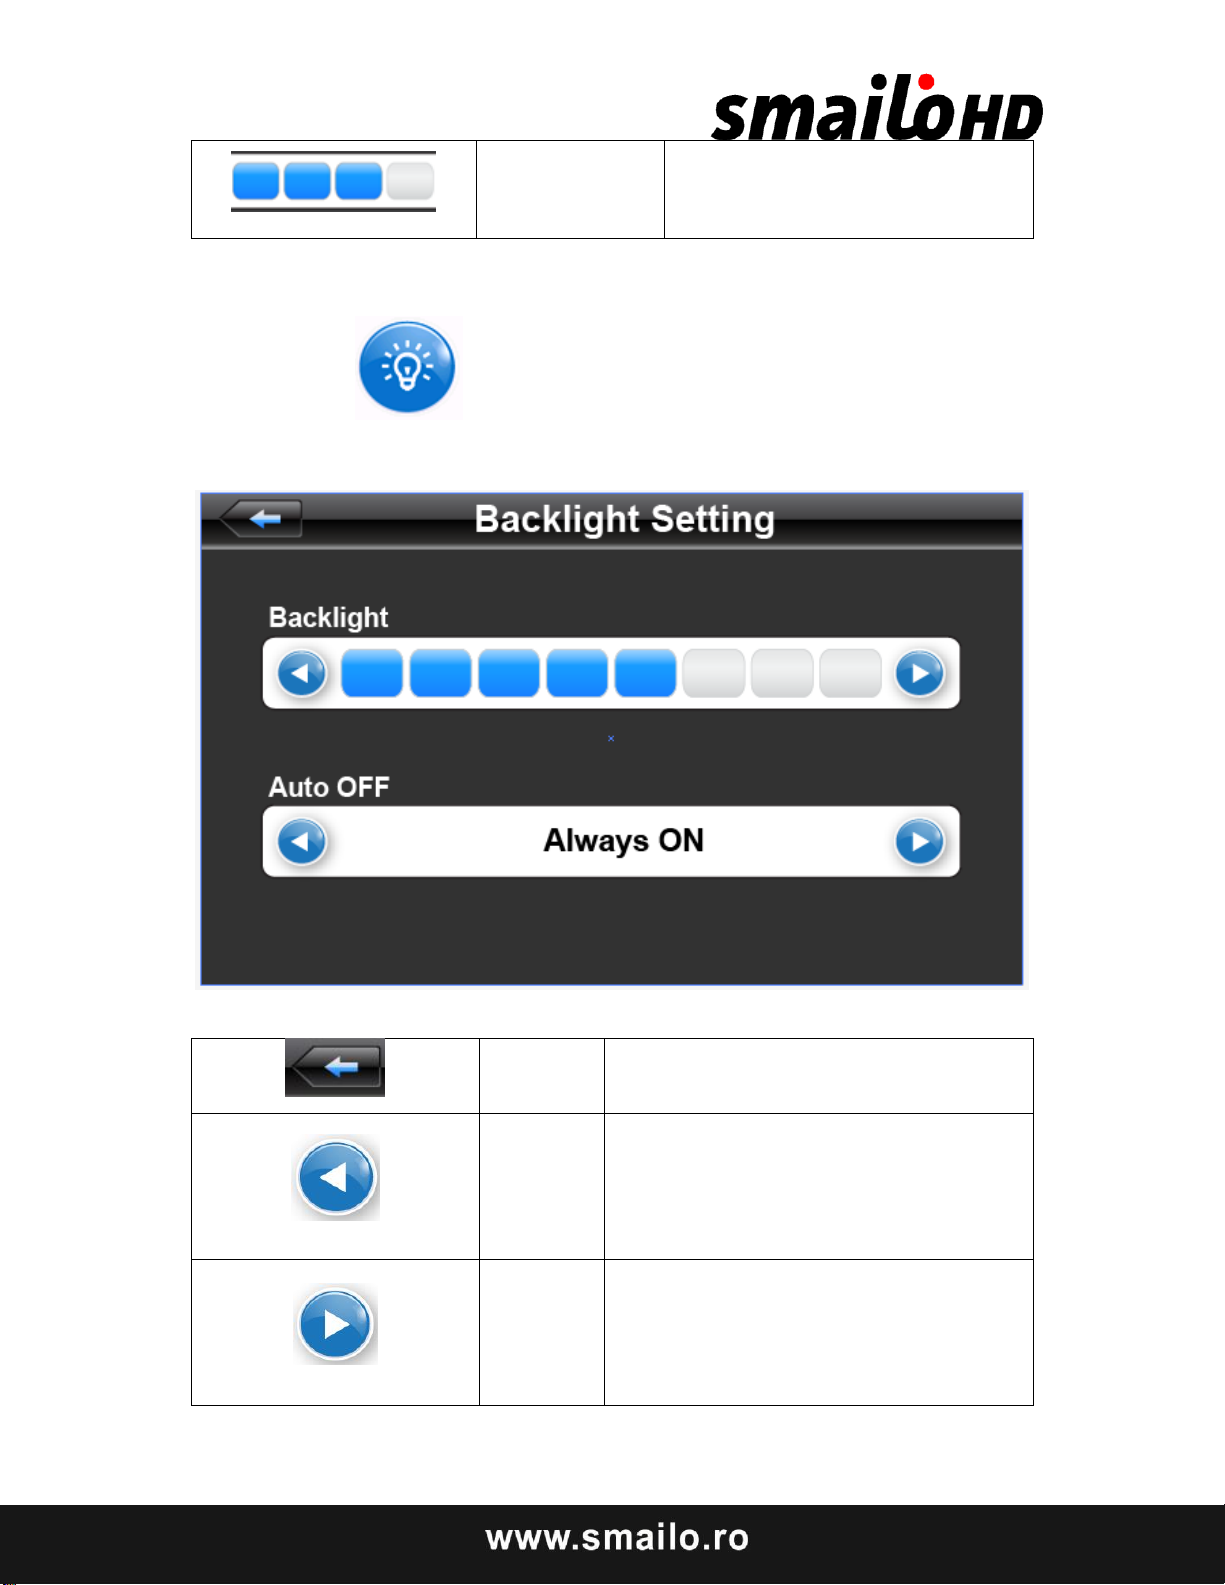
Present
volume
Yellow blanks shows the
present volume level;
Close
Exit “backlight setting” interface;
Brightne
ss
decrease
Click to decrease backlight
gradually to the lowest level;
Brightne
ss
increase
Click to increase backlight
gradually to the highest level
Backlight setting
Single click to enter backlight setting interface as
Page 79
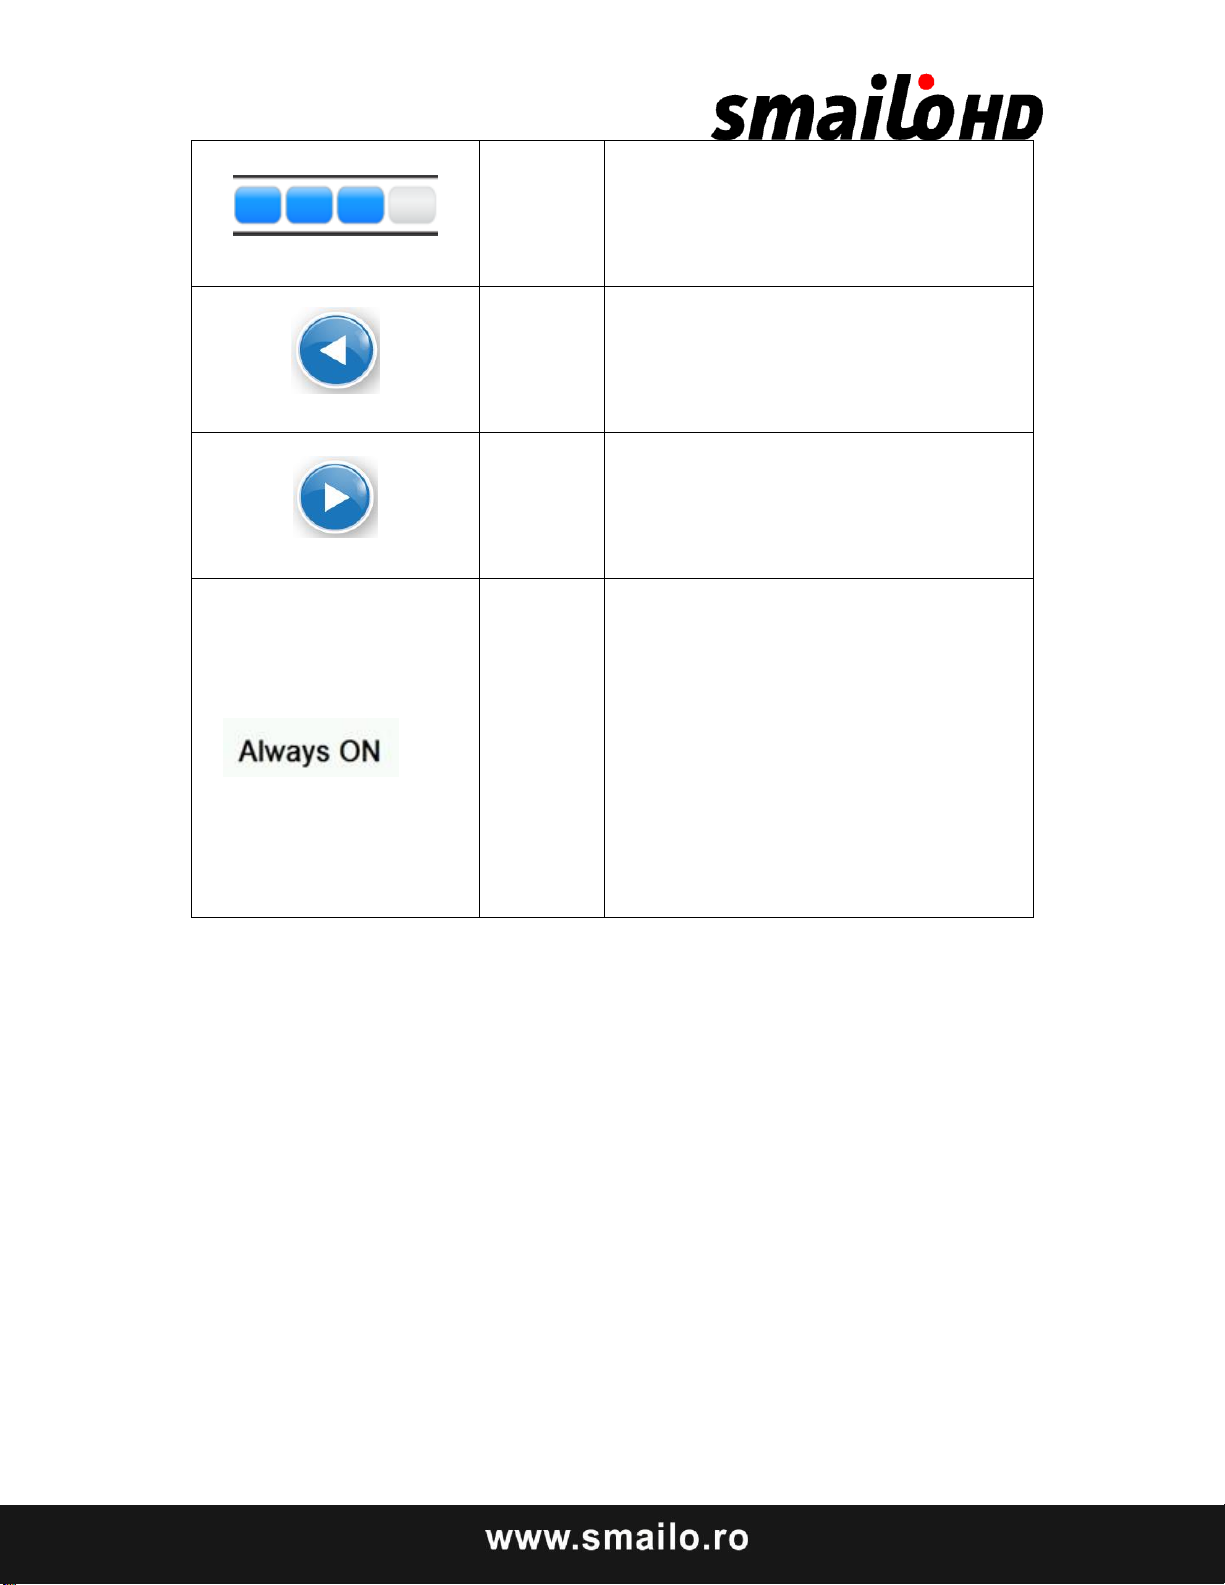
Present
Brightne
ss
Red blank shows the present
brightness
Shift left
Single click and it will shift left,
and it will show last column. This
display is in circle.
Shift
right
Single click and it will shift right
and it will show last column. This
display is in circle.
Time
interval
System backlight will be closed
automatically when no operation
for a period time to save power.
There are several time interval
choice for you: never, 3 min,
2min, 1min, 30second later,
10second later.
Date and time setting:
Date and time include:
1. System time set;
2. System date set;
3. System time zone set.
Page 80
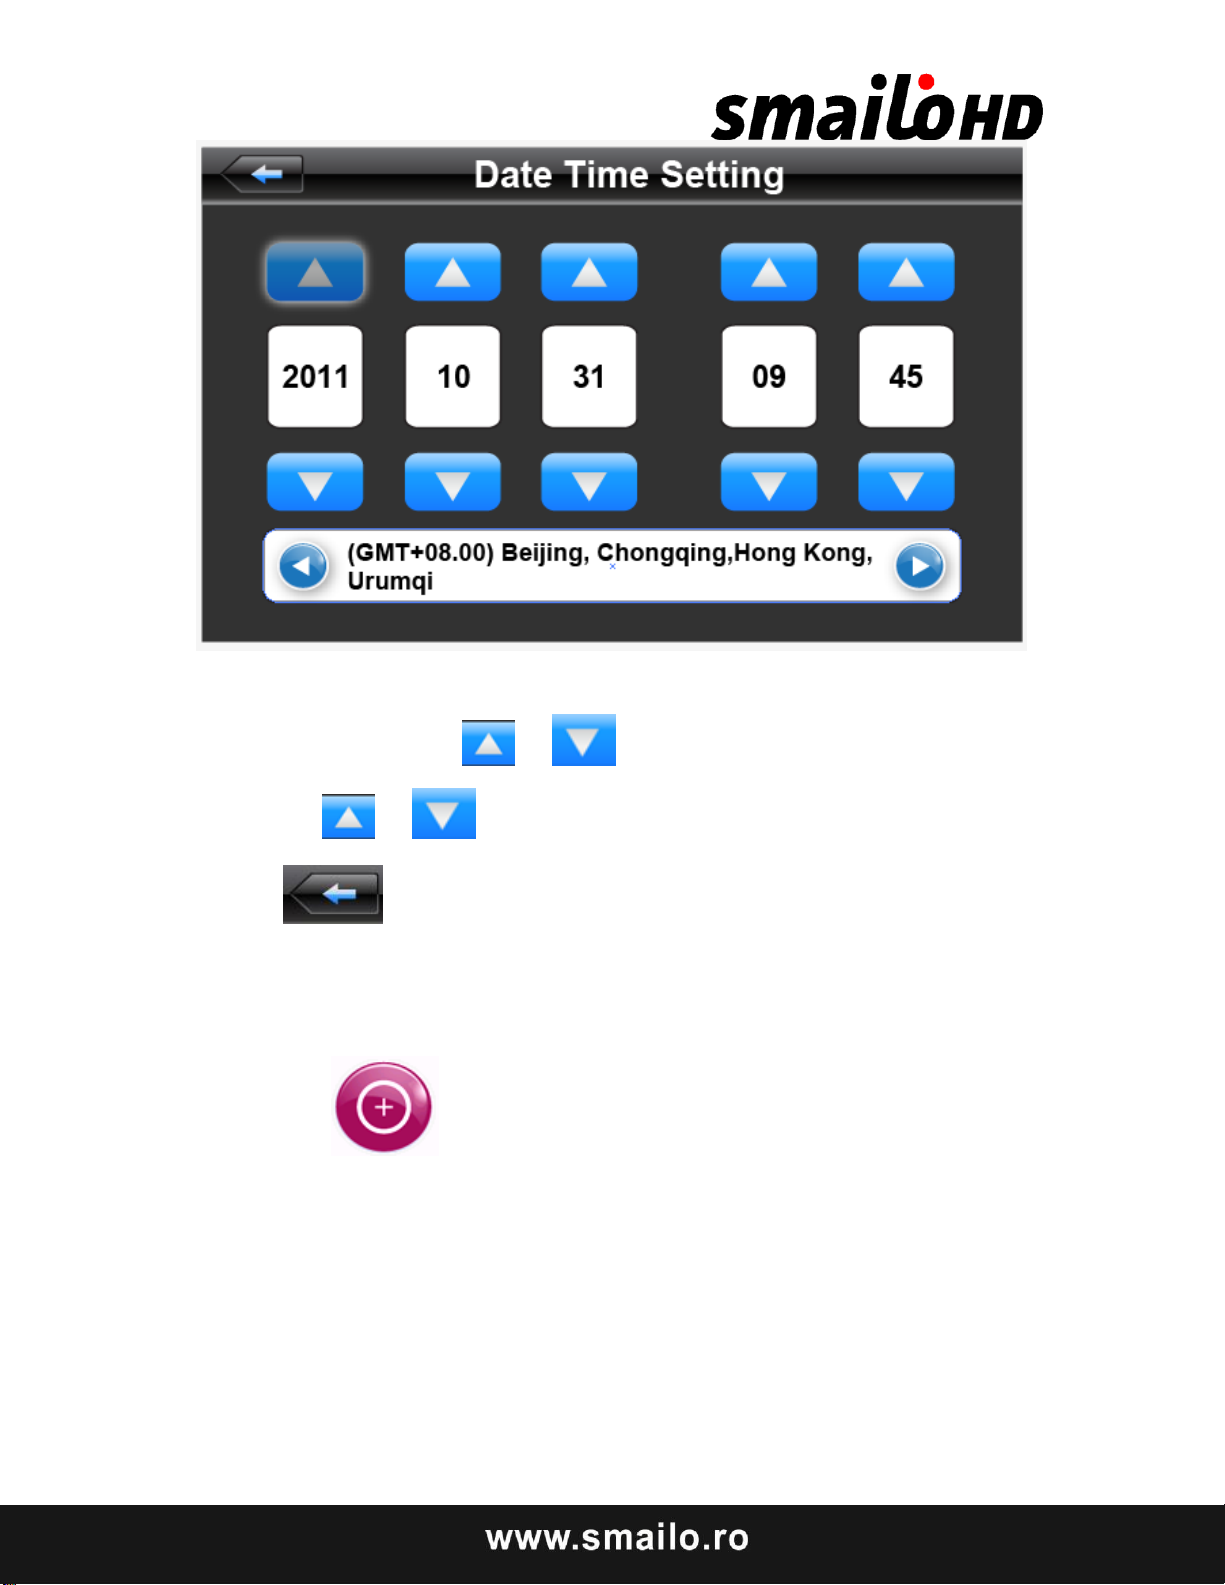
4-46
1. Single click button or o set time and date.
2. Single or to choose time area。
Click to exit current interface after setting
Screen Calibration
Click the to enter the screen calibration as 4-48
Page 81
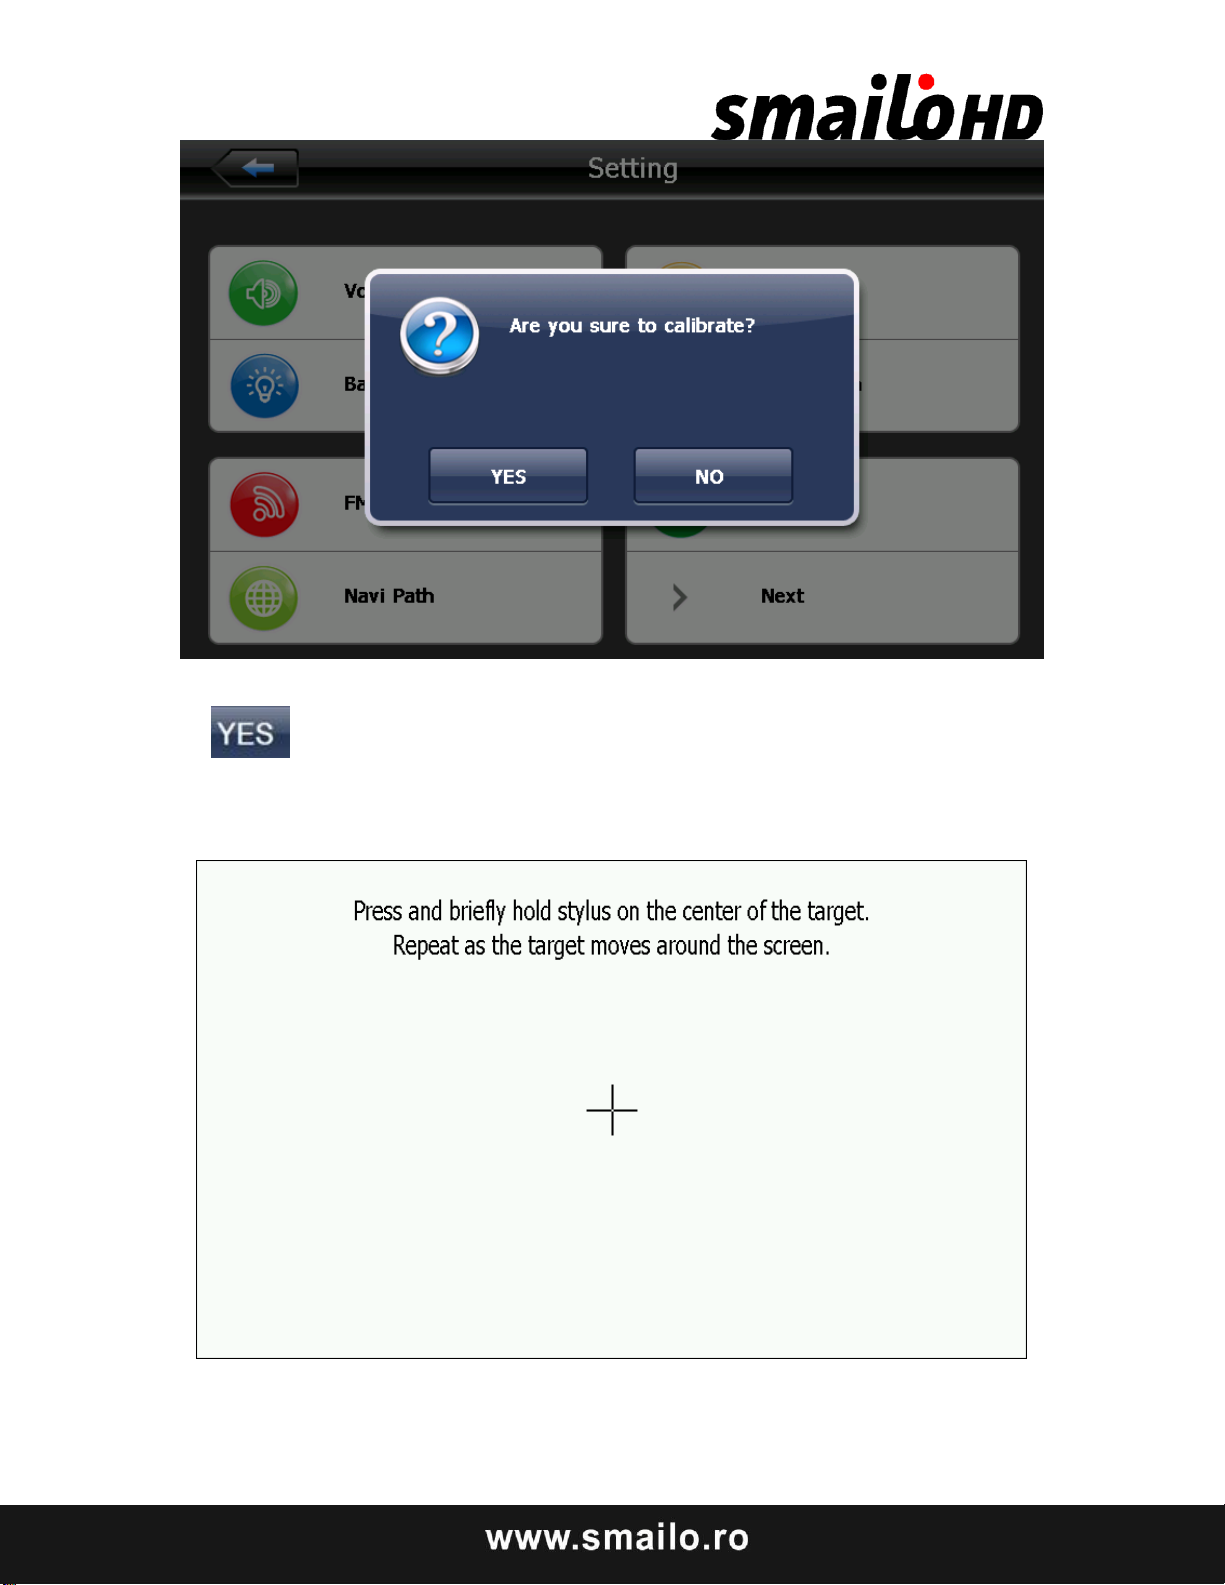
4-48
Click it will move from in the sequence of the center, left up, left down, right down and
right up till the calibration succeed, then click any where on the screen to save the calibration
and exit to the main interface automatically. If not save the information, please wait 30 seconds
and it will exit from current interface automatically.
4-49
Page 82
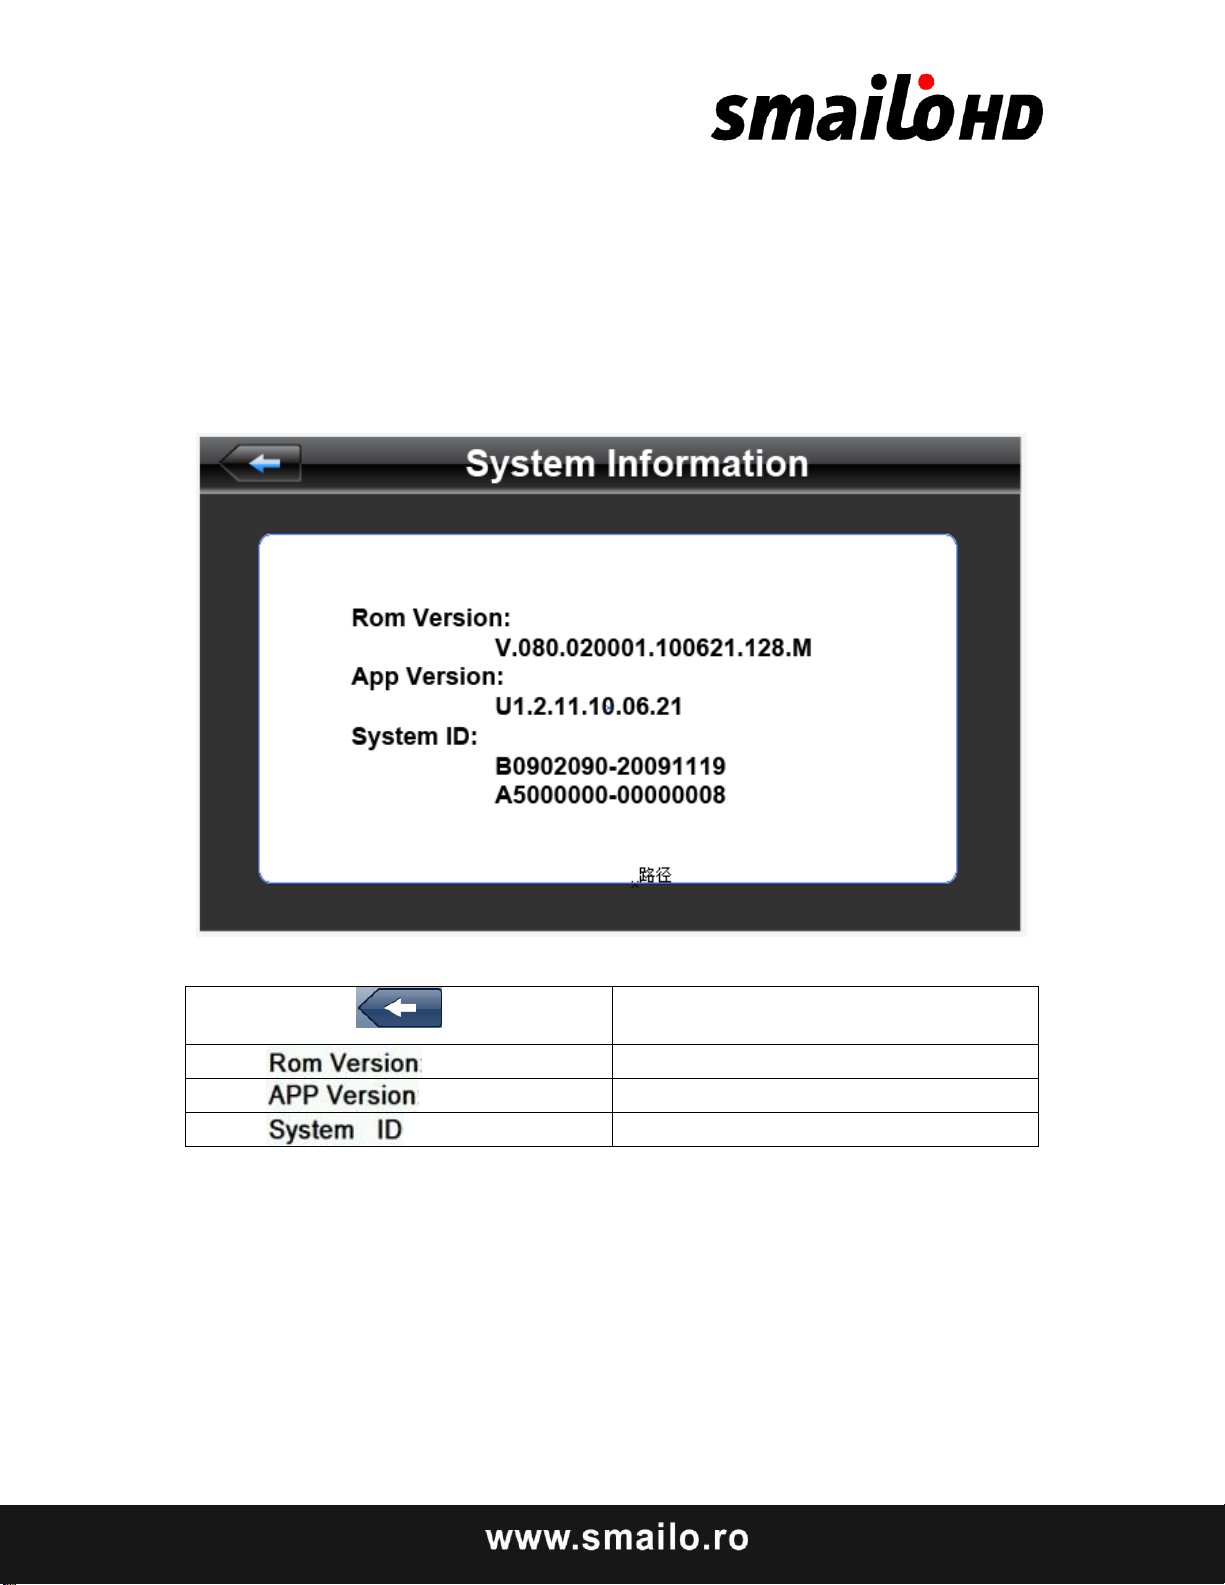
Exit system information
Show ROM version
Show the APP version;
Show the system ID.
System information
System information includes:
1. Firmware version;
2. APP version;
3. System ID.
Page 83
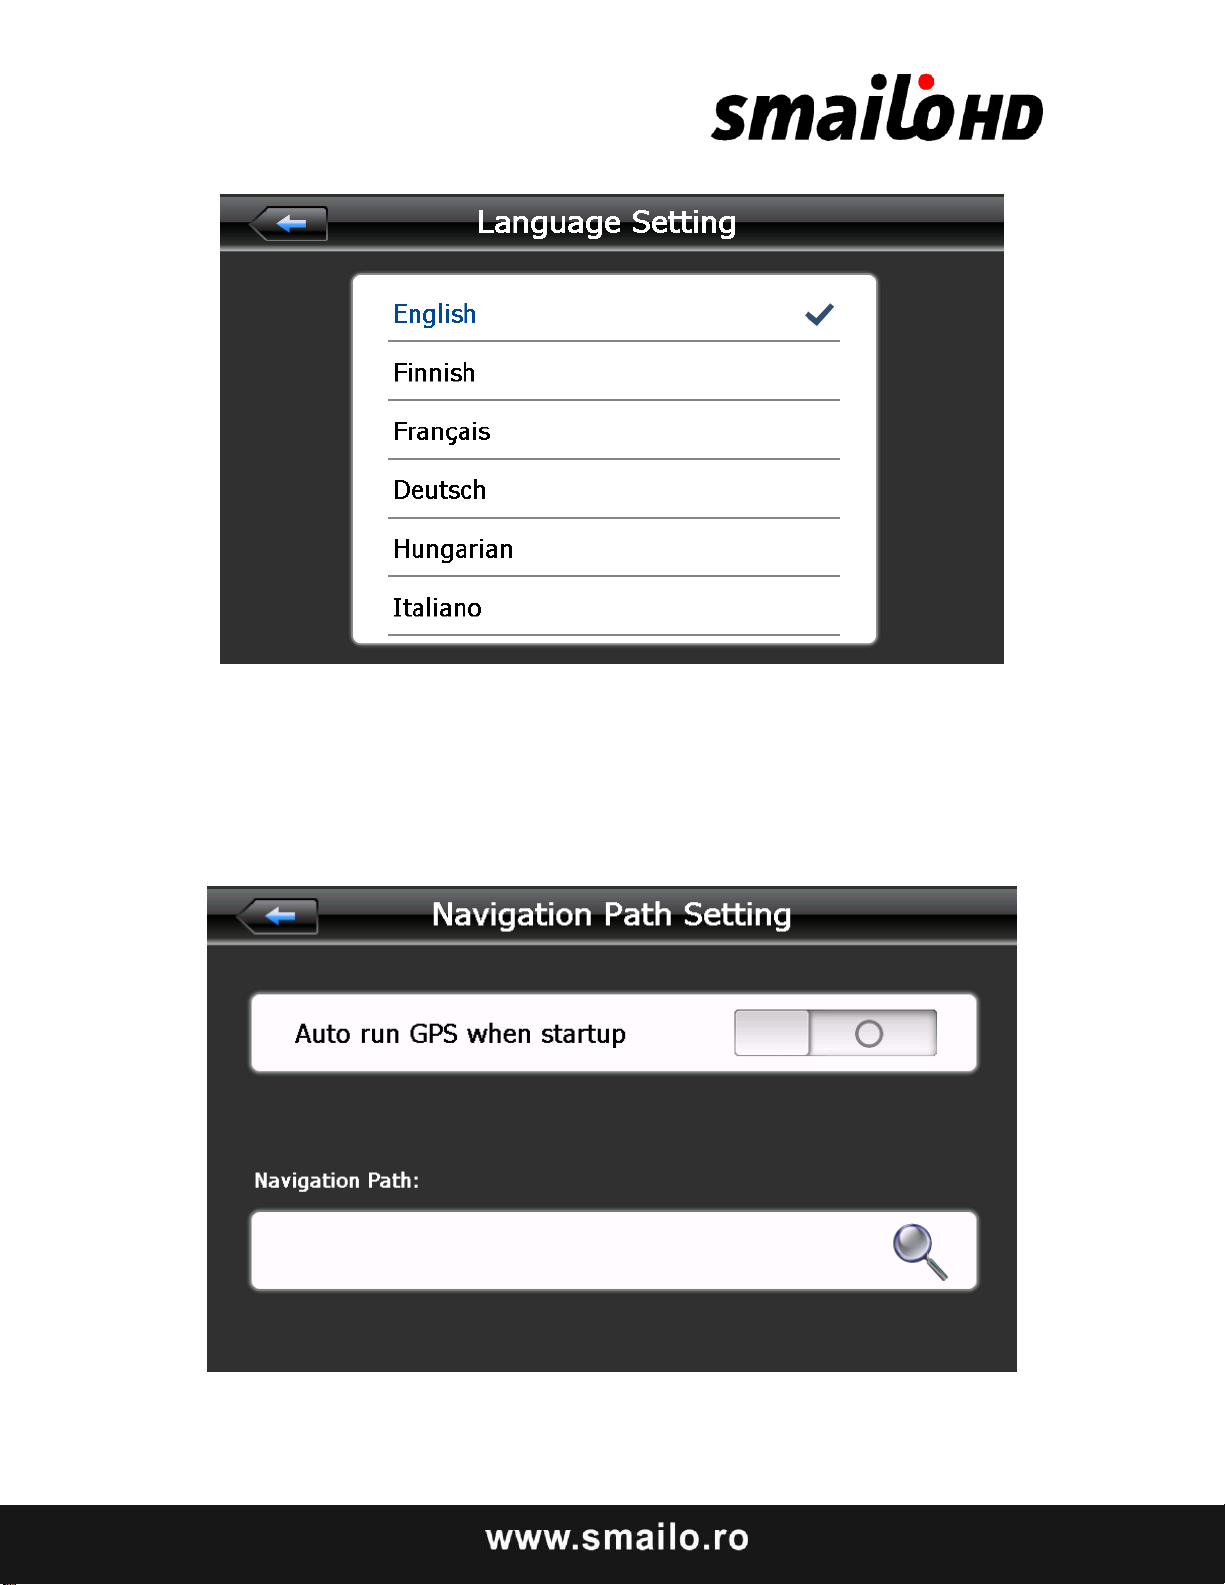
Language setting
Single click your favorite language and then exit.
Navigation path
Set navigation path as
Page 84
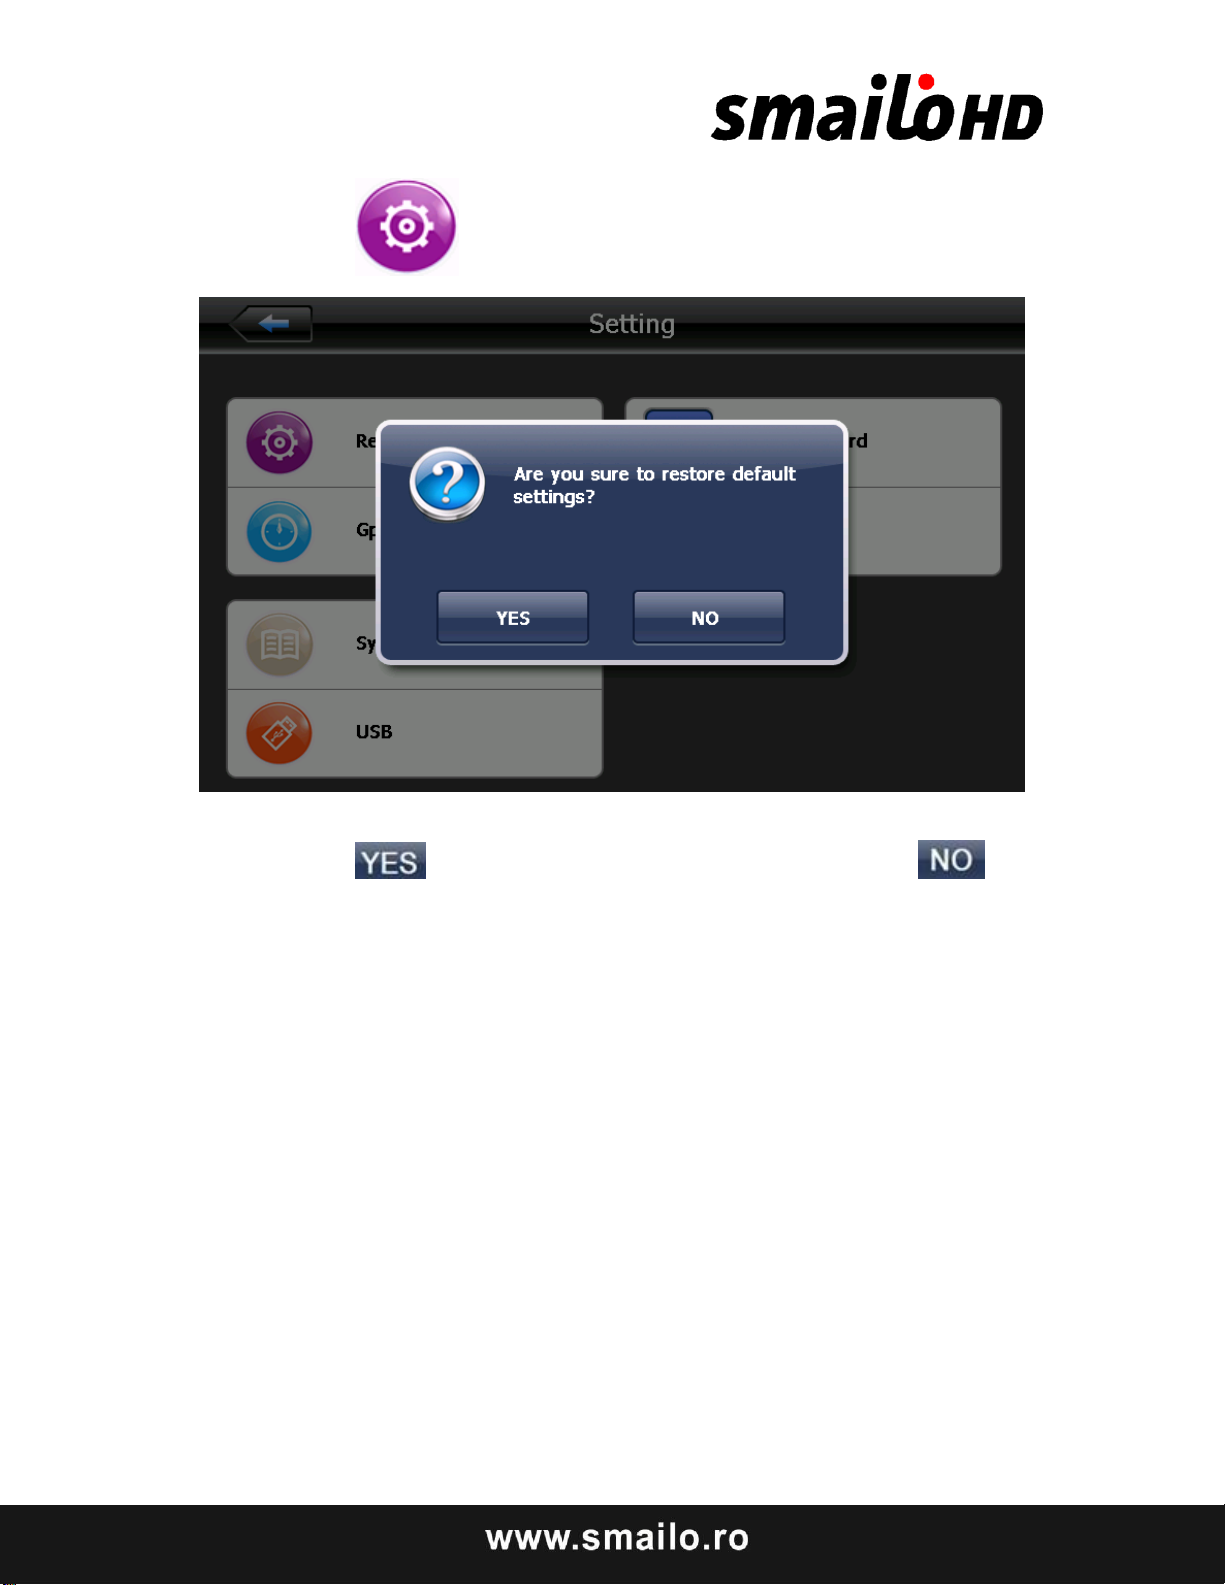
Default set
Single click to enter the default setting as4-53
Single click to restore the default settings,single click to exit the default
settings.
Page 85
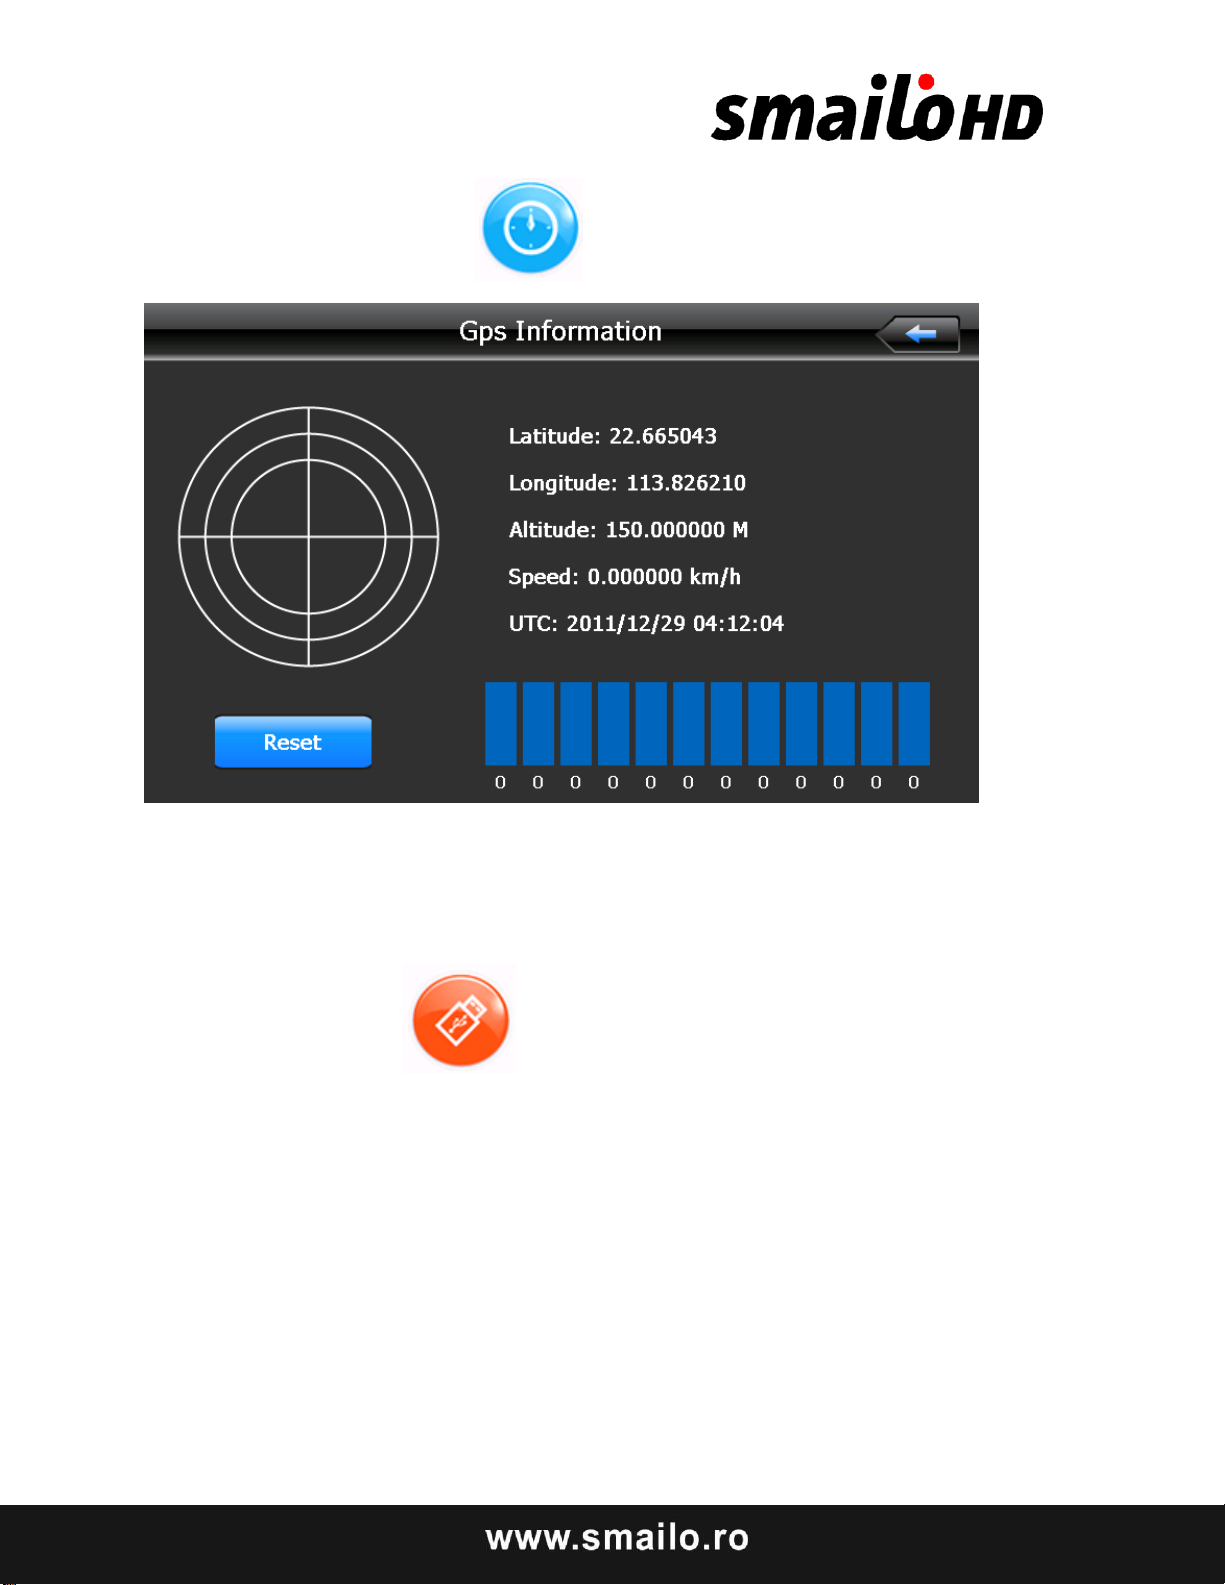
GPS Information
Single click the button and enter GPS information interface as
USB
Single click the button and enter USB information interface as
Page 86
Reason
Reason
Solution
Can not turn on the
navigator
Lack of power
Charge the battery
The device turn off
suddenly
Low battery
Charge the battery
Can not display
clearly
The back light is
not bright enough
Adjust the backlight
The back light has
been turned off
Click the LCD; the screen
will turn bright again.
No response when
clicking the button
The touch-screen is
not calibrated
Calibrate the touch-screen
Chapter Five Simple Problem shooting and maintenance
IF your GPS navigator cannot work normally, please check it as follows. If you cannot
solve the problem, please contact our service center.
Page 87
Without sound
The volume is at
the lowest
condition
Increase the volume
The earphone is
not connected well
Connect the earphone
Can not
communicate with
computer
The USB cable is
not connected well
Connect USB cable
No signal
The signal is weak, it need
more than 3 minutes to
receive the signal
The map data is
lost
Contact your agent or
distributor
Maintenance of GPS navigator
GPS navigator will be a reliable navigation and entertainment companion if protected by right
methods. Please follow the instructions below to ensure your GPS run smoothly for a long time.
Protect screen: Don’t press the screen with strength or you will destroy it. Please use the stylus
to operate the navigator and spray a little glass cleaner on the soft cloth to clean the screen,
don’t spray on the screen directly.
【Note】 Be sure to turn off the GPS navigator before cleaning.
√ Drop or strike will cause damage to high-precision components.
【Note】Accidental damage is beyond our responsibilities.
√ Don’t use it under such environment: Temperature change abruptly (high temperature above
60°, low temperature under-10°), high voltage, dusty, electrostatic interference, avoid any
corrosive liquid and dip into any liquid.
Page 88

√ Avoid radiated interference: The radiated interference from other electronic products will
affect the display and it will be normal after suppressing the interference source.
【Note】If you carry the unit by air, please put the GPS together with your luggage to pass the
X-ray detection system. Avoid scanning by the magnetic head detector (at the passage used for
passing) or the magnetic bar (held by the security checker), or it will destroy the system date in
the unit. We will take no responsibility for it.
Avoid direct, intense light: Don’t use the GPS navigator in high light and ultraviolet radiation
in order to increase the using life.
Page 89
Centru service & suport Smailo
AROBS Transilvania Software, Str. Săpătorilor Nr 5, Cluj-Napoca
Tel: 0364-730907
Email: [email protected]
Aruncarea echipamentelor electrice si electronice in
resedintele private
Acest simbol marcat pe produs, în manual sau pe certificatul
de garanţie şi/sau pe ambalaj indică faptul că acest produs nu
trebuie tratat ca deşeu menajer. Acesta trebuie transportat la un punct special
amenajat de colectare sau reciclare a echipamentelor electrice şi electronice.
Prin depozitarea corectă a aparatelor dvs. învechite, veţi preveni potenţiale
consecinţe negative asupra mediului înconjurător şi sănătăţii populației,
lucru care ar putea fi provocat de mânuirea incorectă a produsului.
Ȋn cazul în care echipamentul dvs. conţine baterii sau acumulatori, vă rugăm
să îi plasaţi şi pe aceştia separat, în funcţie de cerinţele locale.
Reciclarea materialelor ajută la conservarea resurselor naturale. Pentru mai
multe detalii în legatura cu reciclarea produselor, vă invităm să contactaţi
biroul primăriei din oraşul dvs., serviciul de salubrizare sau magazinul de
unde aţi achiziţionat acest produs.
Page 90
DECLARAŢIE DE CONFORMITATE
Noi, SC AROBS Transilvania Software SA, cu sediul social ȋn Cluj- Napoca, Str. Donath Nr. 11,
Bl. M4/28, cu nr. de inmatriculare la Registrul Comerţului J12/1845/1998, CUI RO11291045,
telefon 0264/406700, Fax. 0264/598426, asigurăm, garantăm și declarăm pe propria răspundere,
conform prevederilor art. 5 HG nr.1.022/2002 privind regimul produselor şi serviciilor care pot
pune în pericol viaţa, sănătatea, securitatea muncii şi protecţia muncii, că produsul:
Categorie produs: Echipament electric de joasă tensiune
Tip produs: Sistem de navigaţie GPS
Marca: Smailo
Model: HD 7.0
nu pune in pericol viaţa, sănătatea, securitatea muncii, nu produce impact negativ asupra mediului
şi este in conformitate cu cerinţele esenţiale şi celelalte prevederi aplicabile ale următoarelor acte
normative:
Directiva 1999/5/CE amendată (Directiva privind armonizarea legislaţiei Statelor Membre
referitoare la echipamentele radio şi echipamentele terminale de telecomunicaţii)
• Directiva 2011/65/UE (Directiva privind restricţiile de utilizare a anumitor substanţe periculoase în
echipamentele electrice şi electronice)
• Directiva 2004/108/CE (Directiva EMC privind ajustarea legislaţiei Statelor Membre referitoare la
compatibilitatea electromagnetică)
• OUG nr. 5/2015 privind deşeurile de echipamente electrice şi electronice
• H.G. 457/2003 modificată prin Hotărârea 1514/2003 privind asigurarea securităţii utilizatorului de
echipamente electrice de joasă tensiune
• H.G. 88/2003 privind echipamentele radio şi echipamentele terminale de telecomunicaţii şi
recunoaşterea mutuală a conformităţii acestora.
Conformitatea produsului cu cerinţele directivelor UE este atestată prin conformarea deplină cu
următoarele standarde:
Page 91
EN 60950-1:2006+A11:2009+A1:2010+A12:2011
EN 60950-1:2006+A11:2009+A1:2010+A12:2011+A2:2013
EN 301 489-1 V1.9.2
EN 301 489-3 V1.4.1
EN 301 489-7 V1.3.1
EN 301 489-17 V2.2.1:2009-05
EN 301 489-24 V1.5.1
EN 62209-1:2006
EN 62209-2:2010
EN 50360:2001/AC2012
EN 50371:2002
EN 50566:2013
EN 62479:2010
EN 300 328 V1.7.1:2006-10
EN 301 511 V9.0.2
EN 301 908-1 V5.2.1
EN 301 908-2 V5.2.1
EN 300 440-1 V1.6.1
EN 300 440-2 V1.4.1
Produsul mai sus menţionat poate fi comercializat, având marcajul de conformitate CE aplicat de
producător in anul 2012.
Raport de încercări nr. MTS/DNY/D12010060 din 06.02.2012, emis de laboratorul Most
Technology Service Co., Limited, Shenzen, Guangdong, China.
Certificat de conformitate/certificat de examinare CE din 16 ianuarie 2012, emis de Most Technology
Service Co., Limited, Shenzen, Guangdong, China.
Locul şi data emiterii declaraţiei: Cluj Napoca, 24 noiembrie 2016
Voicu Oprean
Manager General
 Loading...