


WASHING MACHINE
SERVICE MANUAL
CAUTION:
READ THIS SERVICE MANUAL CAREFULLY TO DIAGNOSE
TROUBLES CORRECTLY BEFORE OFFERING SERVICE.
CONTACT WITH YOUR SERVICE CENTER IF HAVE PROBLEM.
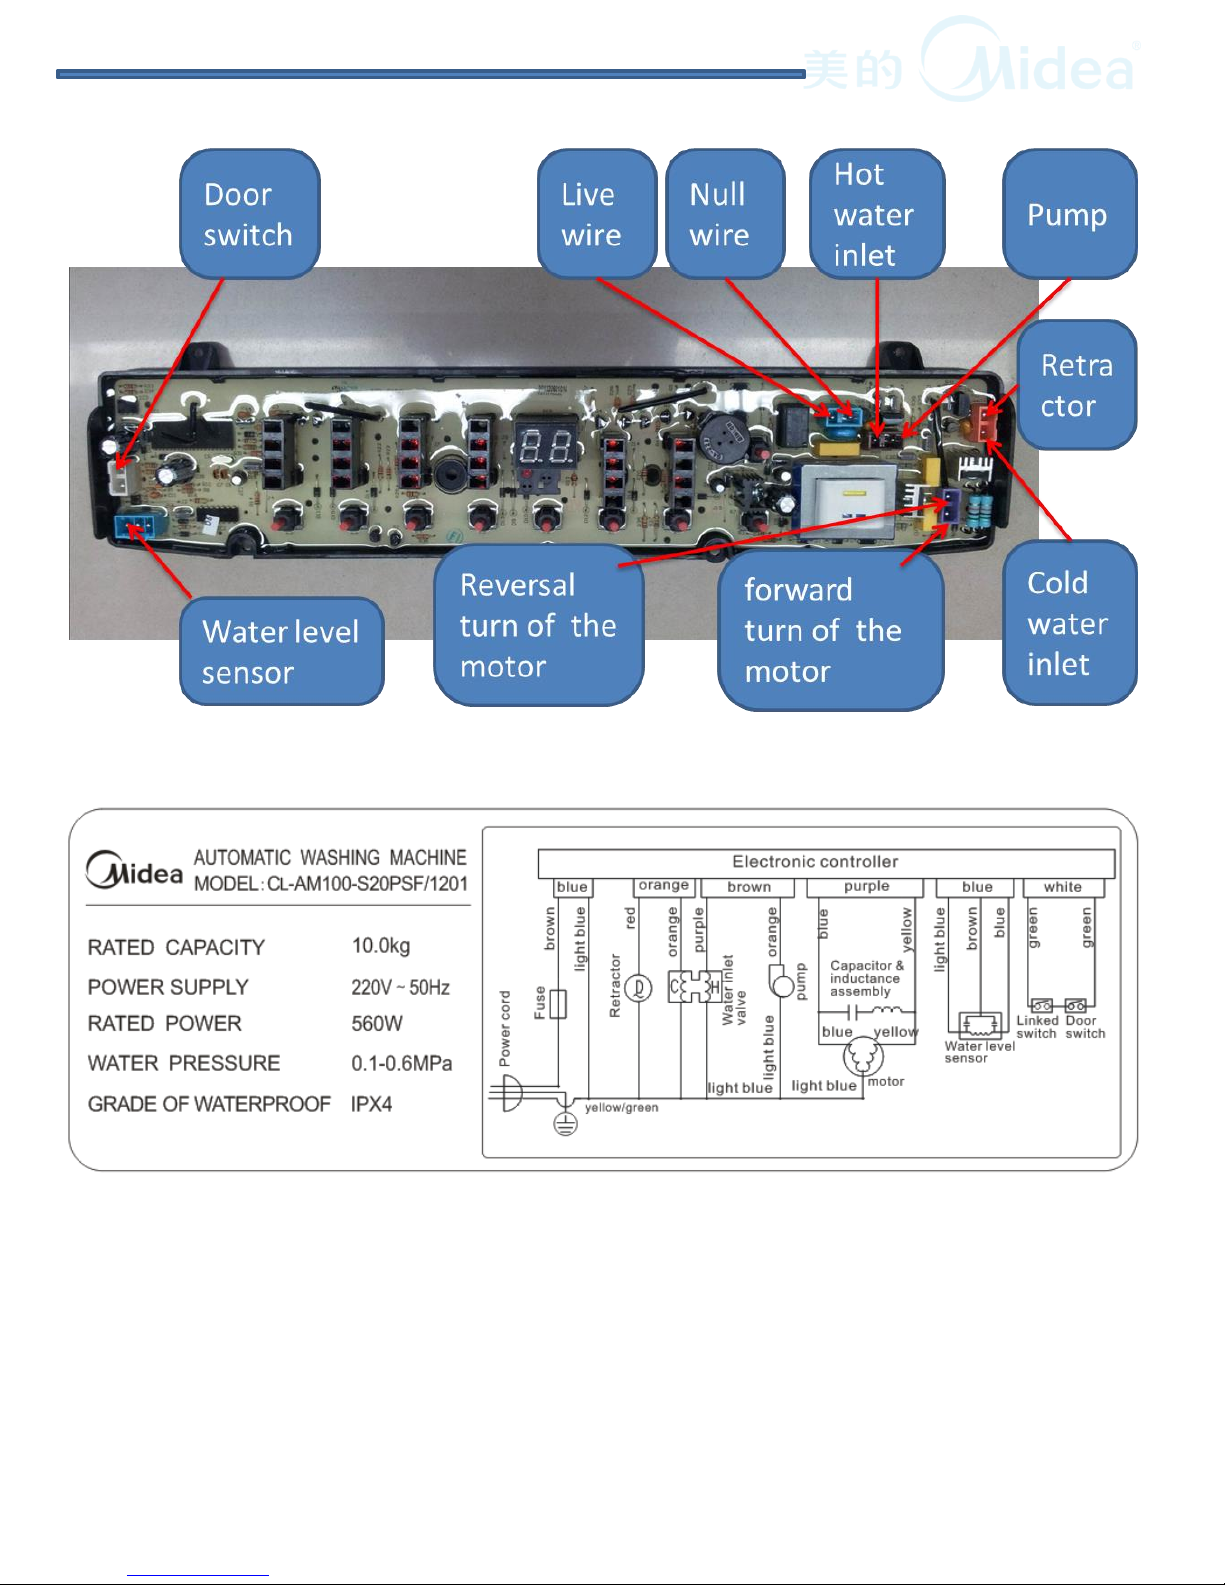
MODEL:
CL-AM100-S20PSF/1201
1 USER MANUAL
2 WIRING DIAGRAM / PCB LAYOUT / PROGRAM CHART
3 CAUTIONS FOR SAFETY
4 TEST MODE
5 DIASSEMBLY INSTRUCTION
6 ERORR CODES AND EXPLANATIONS
7 TROUBLE SHOOTING
8 HOW TO CHECK THE ELECTRIC PARTS
9 CHECK POINT AFTER SERVICE
10 EXPLOADED VIEW AND BOM LIST
Contents
2
UNPLUG POWER
• Unplug power cord for the work such as disassembling
which is not unnecessary to power on . Do not hold the plug
by a wet hand.
Failing to unplug may cause an electric shock.
WARNING
IMPORTANT SAFETY NOTICE
This service information is intended for individuals
possessing adequate backgrounds of electrical,
electronic and mechanical experience.
Any attempt to repair this appliance may result in
personal injury or property damage.
The manufacturer or seller can not be responsible for
the interpretation of this information, nor can it assume
any liability in connection with its use.
3
1 USER MANUAL
NOTE:
Please check the user manual about the installation,operation,
and spec etc.
4
2 WIRING DIAGRAM / PCB LAYOUT / PROGRAM CHART
NOTE
发给客户时候增加客户化铭牌
电压不同,上下排水需区分
WARNING
OUT OF CHILD
• Advise the customer to keep children out of the work place.
Children may be injured with a tool or a disassembled part.
UNPLUG POWER
• Unplug power cord for the work such as disassembling which
is not unnecessary to power on . Do not hold the plug by a wet
hand.
Failing to unplug may cause an electric shock.
USE
REPAIR PARTS
• Use the specified repair parts when repairing the product.
Otherwise, a malfunction or a defect may occur.
Also, a short circuit, ignition or other danger to the customer
may occur.
CHECK
INSULATION
RESISTANCE
• After repair, measure insulation resistance between the
charging part (power cord plug) and the non-charging metallic
part (ground) with an insulation resistance meter (500V). The
resistance shall be 10M• or more.
Failing to check the insulation resistance may cause a short
circuit, electric
shock or other diseases to the customer.
DO NOT MODIFY
• Do not modify the product.
An electric shock or ignition may occur.
DO NOT
DISASSEMBLE AND
REPAIR
• Only a repair technician can disassemble and repair.
An electric shock, ignition or malfunction may cause injury.
3 CAUTIONS FOR SAFETY
5
WARNING
USE EXCLUSIVE
SOCKET
• Use an exclusive A socket for the washing machine.
Otherwise, an electric shock or ignition may cause. Sharing the
same socket
with other instrument causes heating of a branch socket and
result in a fire.
CONNECT
GROUNDING WIRE
• Connect the grounding wire.
Failing to do so may cause an electric shock when a short
circuit occurs.
Consult an electric work shop or a sales shop.
DO NOT USE WET
PLACE
• Do not install in a bath room or a place exposed to wind or
rain.
An electric shock or a short circuit may cause a fire.
DO NOT SPLASH
WATER
• Do not pour or immerse electrical parts into water or liquid
solution.
An electric shock or ignition may occur.
REMOVE DUST
• Wipe off dust adhered to the plug of power cord.
Dust may cause a fire.
6
3 CAUTIONS FOR SAFETY
4 TEST MODE
8
1
2
3
4
5
678
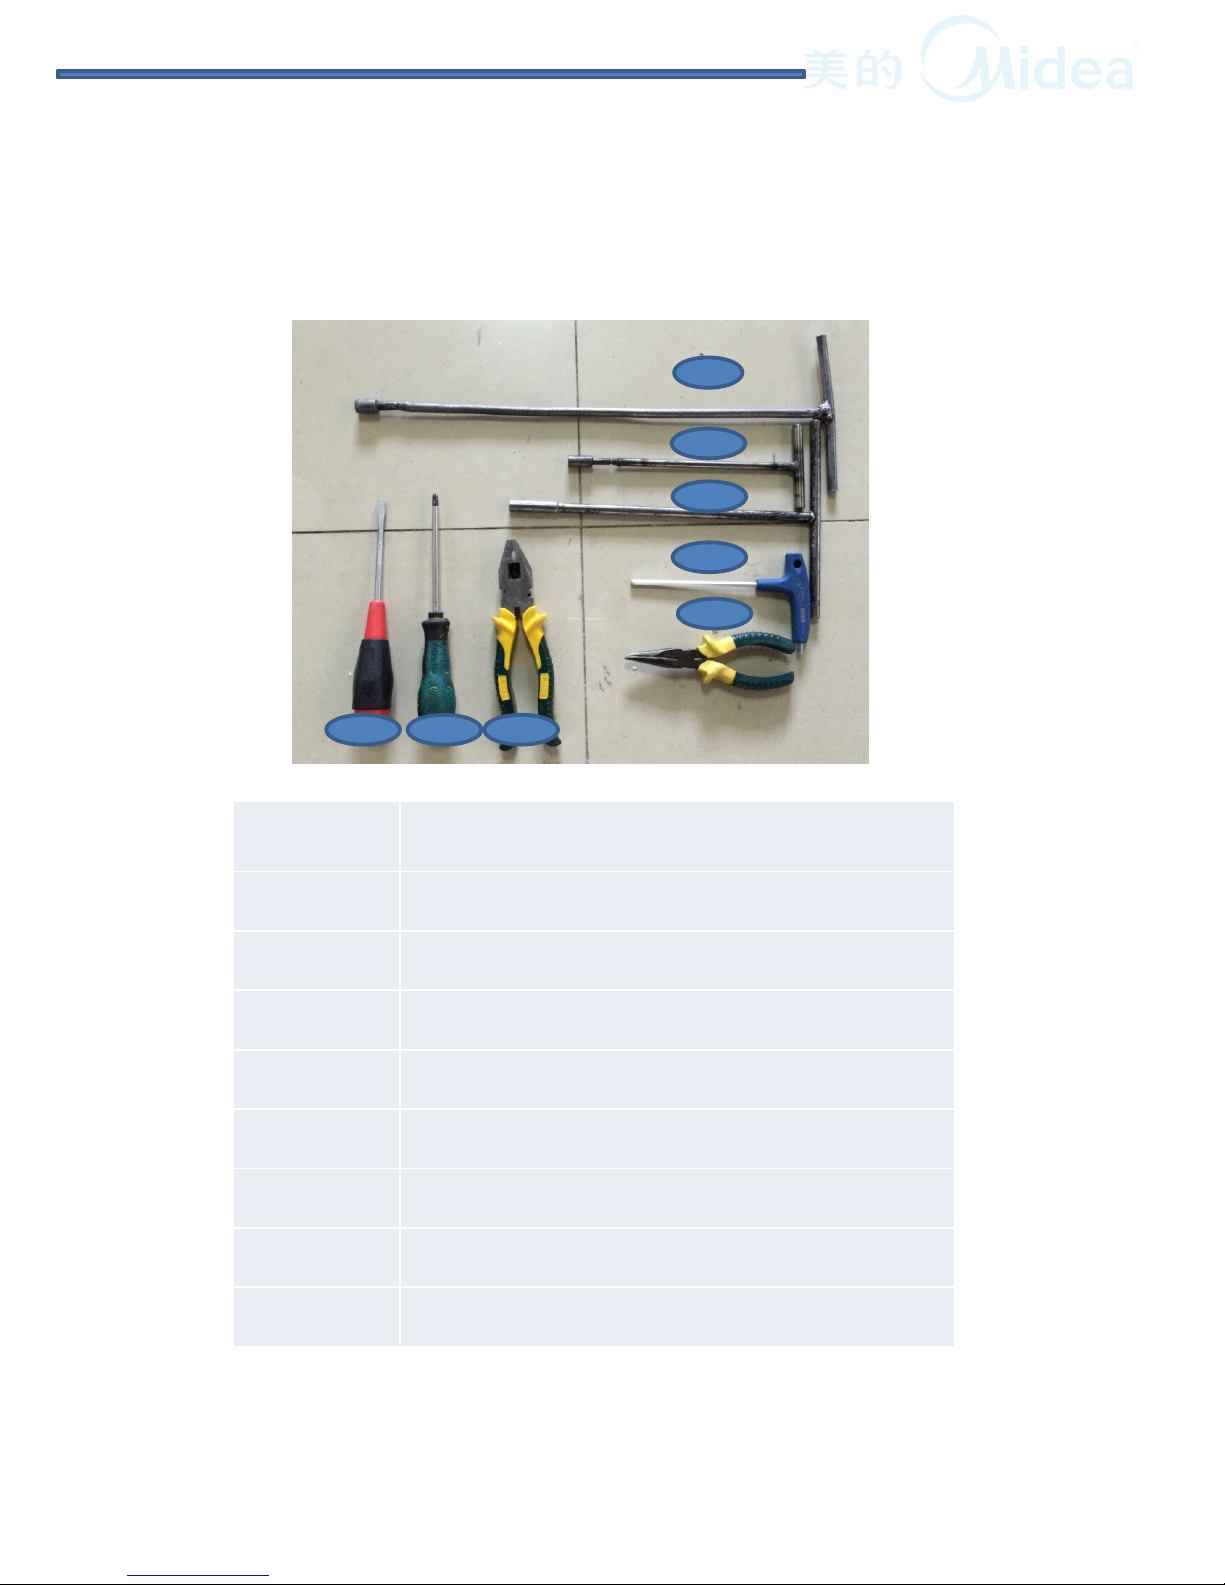
Number
Tools
1
13# sleeve spanner
2
8# sleeve
spanner
3
10# sleeve
spanner
4
6# inner six angle wrench
5
Needle
nose pliers
6
pliers
7
cross screwdriver
8
slot type screwdriver
5 DIASSEMBLY INSTRUCTION
Service tools needed
UNPLUG POWER
• Unplug power cord for the work such as disassembling
which is not unnecessary to power on . Do not hold the plug
by a wet hand.
Failing to unplug may cause an electric shock.
WARNING
9
5 DIASSEMBLY INSTRUCTION
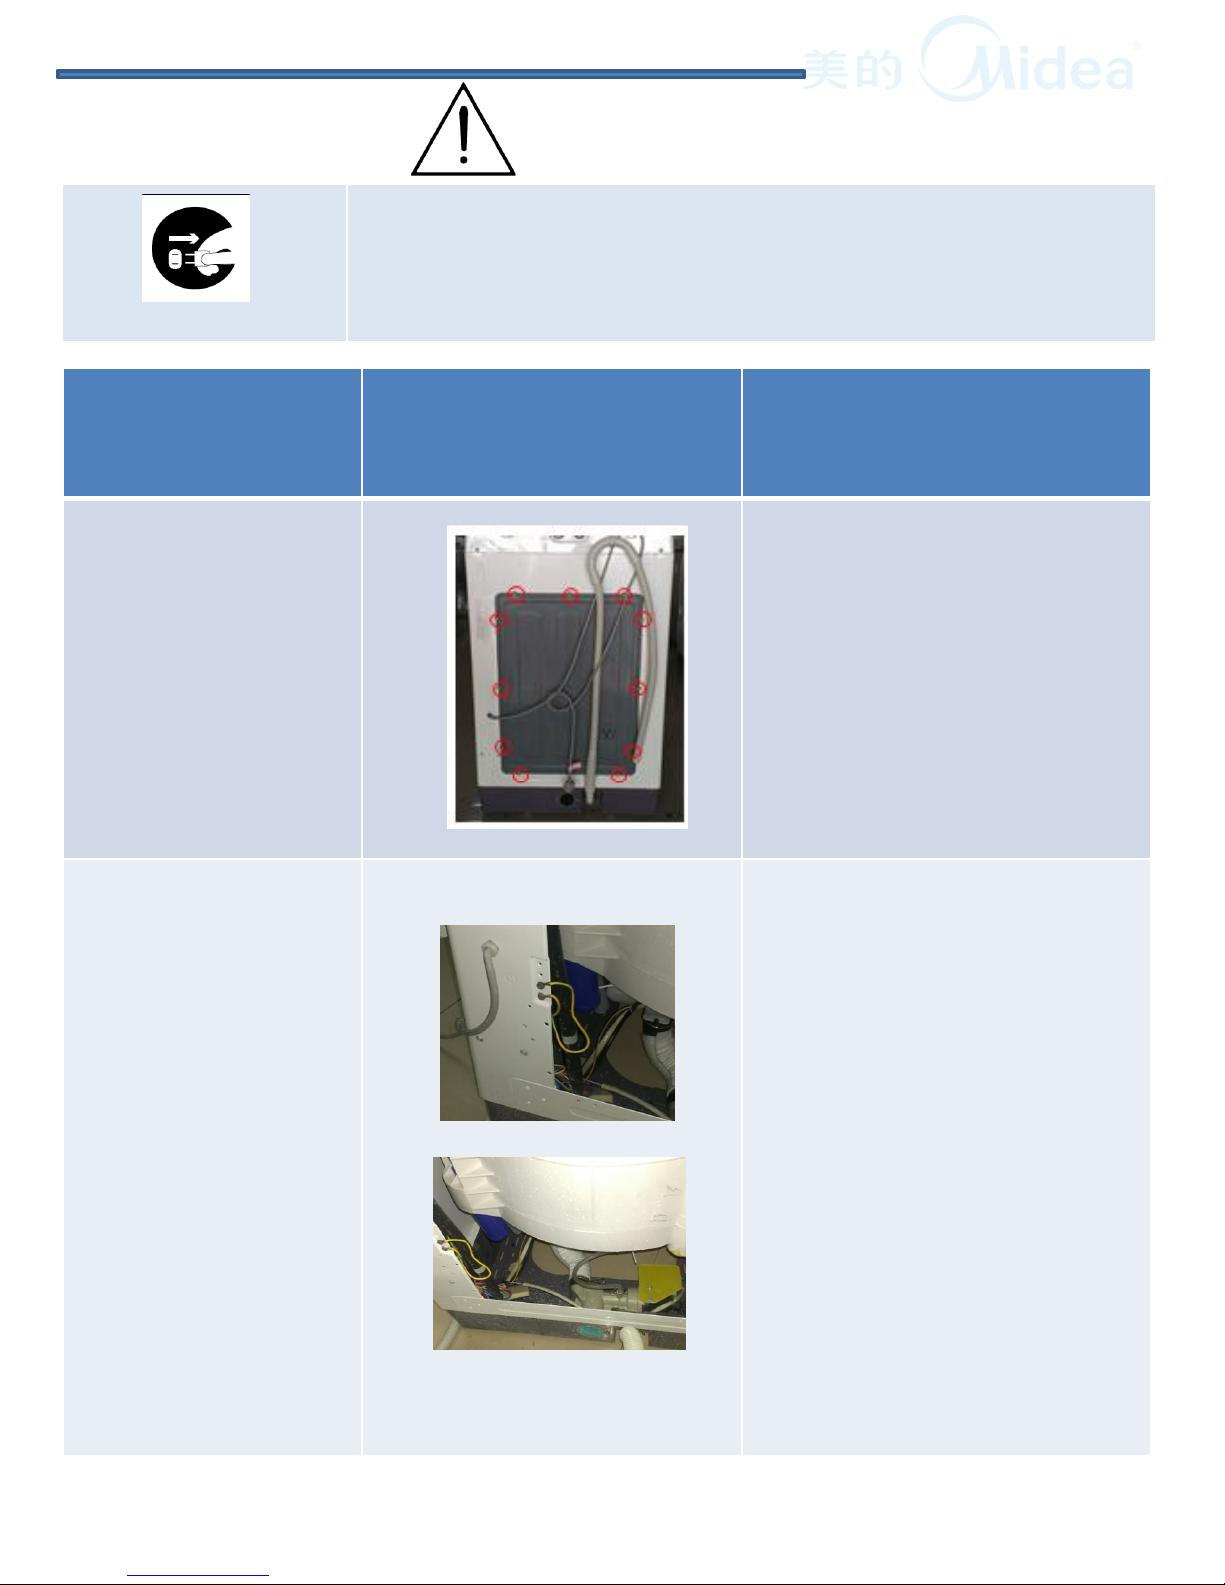
ITEM PICTURE HOW TO DISASSEMBLE
1.BACK COVER
①Unscrew the screws on the
back cover ( Red circle part) and
then take out the rear cover.
2. The earth screws,
capacitor screws, and
then pull out the air
pipe.
( make the air pipe
and
suspend poles
separate)
①Unscrew the earth screws to
make the earth wire
subassembly
and cabinet separate
②Unscrew the capacitor screws,
take down capacitor catch
③Pull out the air pipe to make
the air pipe and suspend poles
separate (When you install the
air pipe, you remember to coat
adhesive for preventing leakage)

ITEM PICTURE HOW TO DISASSEMBLE
3
Pull the insulating
bag and
then remove the
wire
connector.
①
Put the Nylon
cable ties, pull the
insulating bag
②
Remove the
crimp terminal by
pliers .
UNPLUG POWER
• Unplug power cord for the work such as disassembling
which is not unnecessary to power on . Do not hold the plug
by a wet hand.
Failing to unplug may cause an electric shock.
WARNING
10

ITEM PICTURE HOW TO DISASSEMBLE
4 Top cover
①Unscrew the screws on the Top cover
(normally 2 sides 2 back. It varies
according to different designs)
②Take down the top cover, and put it
in the right place ( avoid to scratch the
top cover)
5 Remove the PCB
①Unscrew the controller board
screws, pull out the controller
board terminals(When you
plug wire and connect wires,
you must insert terminals to
the roots for not easily pulling.)
②Take down the controller board
and the front control panel
separately
UNPLUG POWER
• Unplug power cord for the work such as disassembling
which is not unnecessary to power on . Do not hold the plug
by a wet hand.
Failing to unplug may cause an electric shock.
WARNING
11

ITEM PICTURE HOW TO DISASSEMBLE
6 Take down the
back control
panel, cover switch,
water inlet valve,
water level sensor,
and internal wire
subassembly
①Remove the back control panel
screws, and take out the back
control panel.
②Remove the cover switch screws.
③Take down the water inlet valve.
④Remove the water level sensor
Screws.
⑤Take out the internal wire
Subassembly.
7 Door Lid
Use cross
screwdriver
①First remove the door bolt.
②Take down the lid
③Take out the spring
UNPLUG POWER
• Unplug power cord for the work such as disassembling
which is not unnecessary to power on . Do not hold the plug
by a wet hand.
Failing to unplug may cause an electric shock.
WARNING
12

ITEM PICTURE HOW TO DISASSEMBLE
8 outer tub cover
①Unscrew the outer tub
cover screws, and take
out the outer tub cover
9 Impeller
①
Unscrew the impeller
screws, and take out
the impeller
UNPLUG POWER
• Unplug power cord for the work such as disassembling
which is not unnecessary to power on . Do not hold the plug
by a wet hand.
Failing to unplug may cause an electric shock.
WARNING
13

ITEM PICTURE HOW TO DISASSEMBLE
10 Spin tub
①
Unscrew the spin tub bolts and
take
out the spin tub cover
11 Out
tub
①
Firstly make suspension rods
and the outer tub subassembly
separately.
(Remember the rods
installing order.
)
②
Take out the out tub
UNPLUG POWER
• Unplug power cord for the work such as disassembling
which is not unnecessary to power on . Do not hold the plug
by a wet hand.
Failing to unplug may cause an electric shock.
WARNING
14

ITEM PICTURE HOW TO DISASSEMBLE
12 Parts
attached
on the out tub
①
Remove the motor screws, and
take out motor.
②
Remove the bracket screws,
and take out bracket.
③
Remove the clutch body
subassembly screws, and take
out clutch body subassembly.
④
Firstly make retractor and the
clutch body subassembly
separately., remove retractor
screws, and take out retractor
13 Base plate
①
Remove the base plate screws,
and take out the base plate.
UNPLUG POWER
• Unplug power cord for the work such as disassembling
which is not unnecessary to power on . Do not hold the plug
by a wet hand.
Failing to unplug may cause an electric shock.
WARNING
15

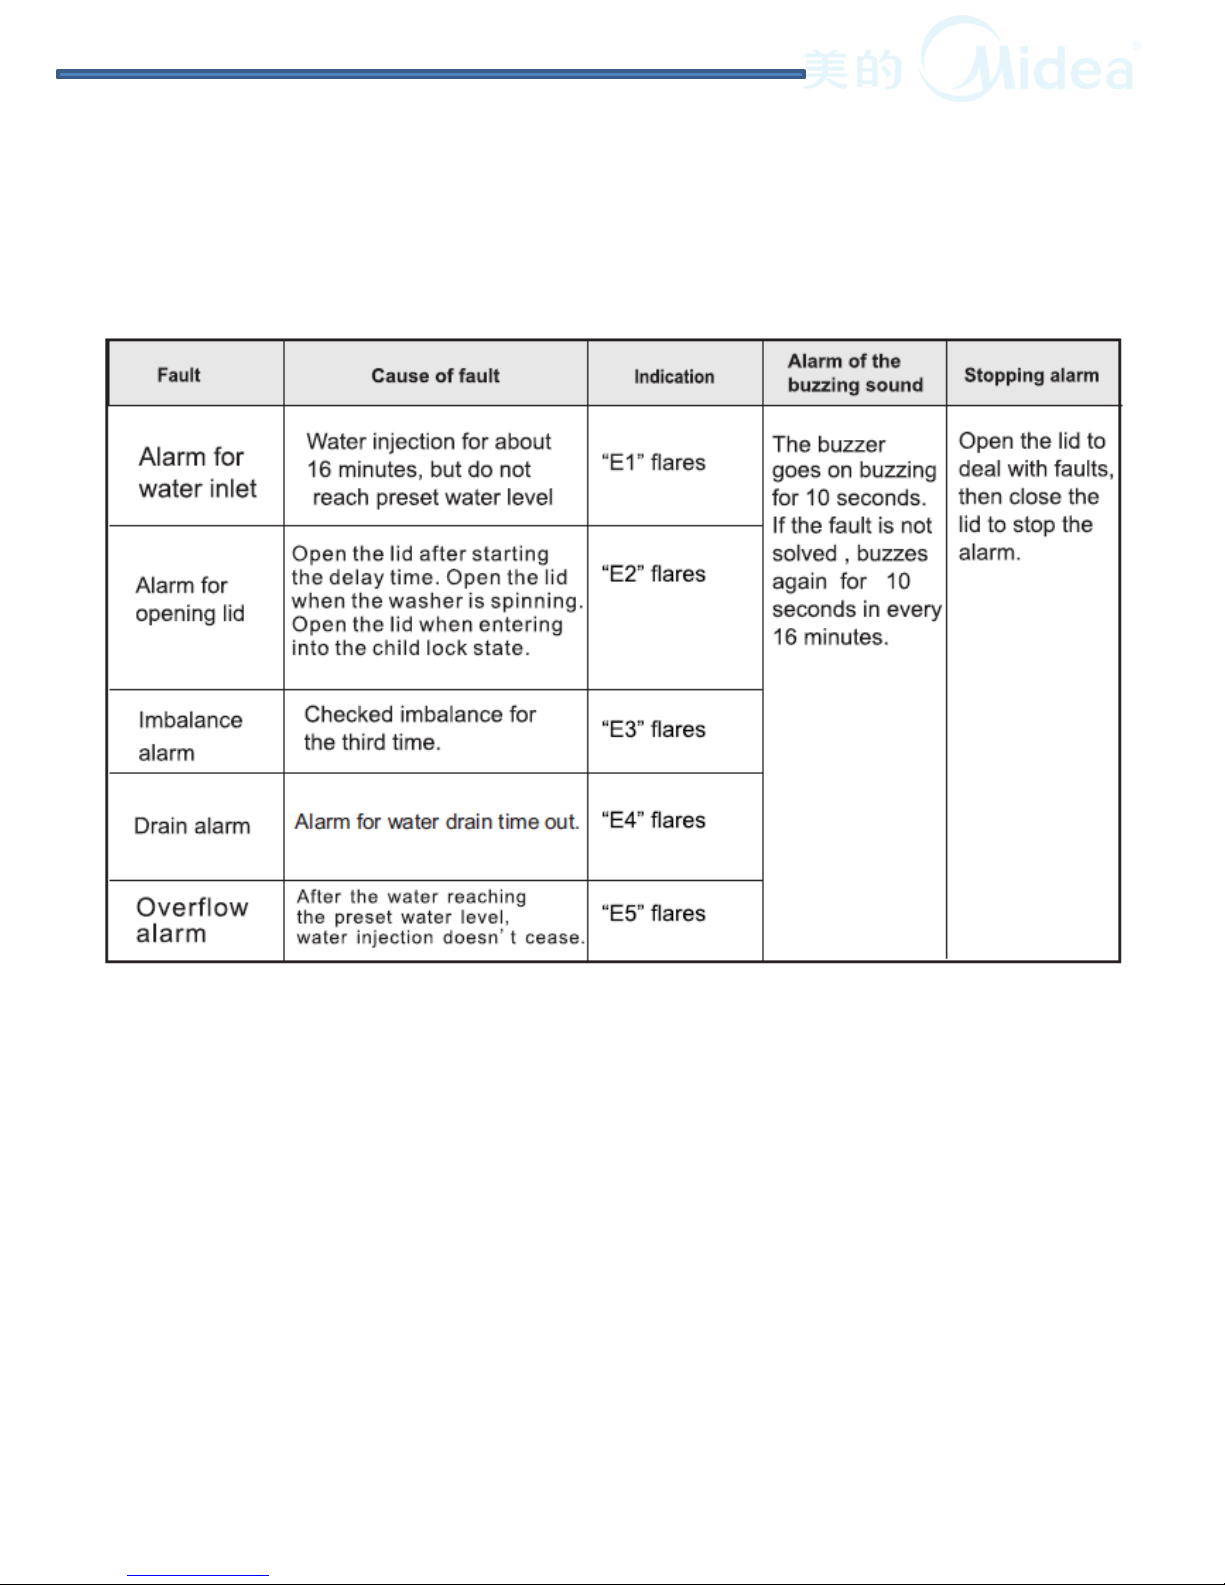
6 ERORR CODES AND EXPLANATIONS
16
Error Code
Unit Action
Description
PossibleCauses
Explanation
E1
Water is not
supplied
:
When water in the
tub didn`t achieve
the specified level in
30min,PCB will
display
“E1”.Remind the
timeout.
Some machine is
30min or more than
30min
There is no
water or
water is
very small
The water tap did not open
Check the tap have opened or not
Water pressure is small, into the
water is very small
Check the water pressure is smaller
than usual or not
water inlet valve is blocked, water
inflow is very small
When the water pressure normal
,
water inflow is small or not
Loose fill valve connected to the
power cord
Reconnect the power cord to check
whether can return to normal
Loose PCB connected to the
power cord
Reconnect the power cord to check
whether can return to normal
water inlet valve damage does
not work
Replace the inlet valve check
whether the function is OK
PCB failure
Replace the PCB check whether the
function is OK
Can't stop
the water
Water level sensor pressure pipe
is
loose,or water in the pipe
Check the water level sensor
pressure pipe is loose or leak
Water level sensor failure
Replace the Water level sensor
check whether the function is OK
PCB failure
Replace the PCB check whether the
function is OK
E2
Alarm for Lid open:
When the washing
machine in the
"spin" program,
safety switch is not
closed, cause the
machine alarm.
Cover is
opened
Cover is opened
Check that the lid is on or not
Cover is
closed
Safety switch contact undesirable
close the lid
,Check safety switch
contact undesirable or not
Safety switch and power cable
loose
Reconnect the power cord to check
whether can return to normal
PCB failure
Replace the PCB check whether the
function is OK
E3
Alarm for unbalance:
Ouer tub hit the
safety switch or
cabinet seriously,the
machine can`t spin
smoothly.
Machine is
unbalanced
Washing machine leg is
unbalanced
Check whether the machine is
unbalance or rock
clothes is unbalanced
Check whether the clothes is placed
evenly
The suspension failure
machine is
balanced,but it still
shaking seriously
Safety switch beam deformation
Safety switch beam deformation

17
6 ERORR CODES AND EXPLANATIONS
Error Code
Unit Action
Description
PossibleCauses
Explanation
E4
Alarm for not draining:
When water in the tub
didn`t drain out
absolutely in 10min,PCB
will display
“E4”.Remind the
timeout.
Some machine is 15min
or more than 15min
the water in the
tub didn`t drain
out absolutely
drain
-pipe is hung too
high
Drain pipe is not installed
correctly
Drain valve is blocked
Check whether there are
foreign bodies blocked drain in
drain valve
Drain valve is not fully
open
Bad fit with retractor and drain
valve
inner drain
-pipe is
blocked
Check that whether the drain
pipe have obvious bending
drain
-pipe is blocked
Check that whether the inner
drain pipe have obvious
bending
Drain pump filter is
blocked
Remove drainage pump filter
to check if there is any foreign
body blocked drain pump
Retractor is not open
Tractor has sound but can't
open the drain valve
The retractor is not running,
check whether the circuit is
normal
Replace the PCB check whether
the function is OK
Replace the retractor check
whether the function is OK
Drain pump cann`t drain
drain pump has sound but
can't drain normally
The drain pump is not running,
check whether the circuit is
normal
Replace the drain pump check
whether the function is OK
Replace the PCB check whether
the function is OK
PCB failure
Replace the PCB check whether
the function is OK
the water in the
tub is drain out
absolutely
Water level sensor
failure
Replace the water level sensor
check whether the function is
OK
PCB failure
Replace the PCB check whether
the function is OK
E5
Alarm for overflowing
:
When water level more
than the highest water
level,the machine will
alarm "E5",remind
Remind the overflowing
the water in the
tub is full
Inject extra water in the
washing machine
artificially
Inject extra water in the
washing machine artificially
Can't stop the
water
Water water inlet valve
can't turn off
water inlet valve can't stop the
water without power
the water level
is OK
Water level sensor
failure
Replace the water level sensor
check whether the function is
OK
PCB failure
Replace the PCB check whether
the function is OK

18
7 TROUBLESHOOTING
BEFORE SVC CHECKING
Before servicing ask the customer what the trouble is.
Check the work status of the problem.
Check the adjustments. (Power supply, water supply Installation
etc.
Check the troubles referring to the troubleshooting.
Decide service steps referring to disassembly instructions.
Check other related parts when do the service and repair.
After servicing, operate the appliance to see whether it works OK
or NOT.

7.1Washer Won't Start (Press the “POWER ”button, not light)
The most common part(s) or condition(s) which contribute to the
symptom Washer won't start are listed below. Check or test each item.
If you are still unable to solve the problem you may need to do
additional research and troubleshooting.
Causes Explanation
Incoming Power Problem
Check the power at the electrical outlet which the
washer is plugged into. Plug a lamp or radio into the
outlet to check it. If the outlet is dead, check the circuit
breakers or fuses for the home.
Power Cord
If power supply is OK, the power cord itself might be
defective. This is rare. You can check the power cord
with an Ohm meter for continuity.
Line Fuse
If the washer won't start the line fuse might have
blown, or the line fuse holder might be damaged and
need to be replaced.
Main Control Board(PCB)
If the washer won't start the main control board might
be defective.
19
7 TROUBLESHOOTING

7.2 Washer Fills slowly or not supply
(If the water supply is not finished in 30mins after the water supply
has started, the buzzer rings and “E1” is displayed on the indicator)
The most common part(s) or condition(s) which contribute to the
symptom Washer fills slowly are listed below. Check or test each item. If
you are still unable to solve the problem you may need to do additional
research and troubleshooting.
Causes Explanation
Low Water Pressure from
House Supply
If the washer fills very slowly, the water pressure from
the house might be too low. If the water inlet valve isn't
leaking and there are no other symptoms this problem
does not need to be corrected.
Water inlet hose
Make sure that water faucet is turned on and that the
screens on the hoses are not restricted.
Water inlet valve
(The voltage on the water
inlet valve is normal)
If the water pressure is good, try cleaning the screens
inside the water inlet valve hose connection ports. If
those are clean replace the water inlet valve.
Water level sensor or
control switch
(No voltage on the water
inlet valve)
A water lever control switch controls how much water
enters the washing machine by PCB. If the water level
control switch is defective, or more commonly, if the
small air pipe attached to the air bell restricted, The
switch will not be able to close the electrical contacts
to the washer fill valve.
CHECK THE AIR PIPE
CHECK THE WATER LEVERL SENSOR
CHECK THE PCB and the inner wire between PCB and
the sensor
20
7 TROUBLESHOOTING

7.3 Washer Overflowing (Water fills not stop)
The most common part(s) or condition(s) which contribute to the
symptom Washer overflowing are listed below. Check or test each item.
If you are still unable to solve the problem you may need to do
additional research and troubleshooting.
Causes Explanation
Water inlet valve
If the washer is overflowing and power is shut off to
the washer, the water inlet valve has failed. Replace it.
Water level sensor or
control switch
A water lever control switch controls how much water
enters the washing machine by PCB. If the water level
control switch is defective, or more commonly, if the
small air pipe attached to the air bell comes off, there
will no longer be pressure in the hose pushing on the
air tight diaphragm in the water level control switch.
The switch will not be able to open the electrical
contacts to the washer fill valve.
CHECK THE AIR PIPE
CHECK THE WATER LEVERL SENSOR
CHECK THE PCB and the inner wire between PCB and
the sensor
21
7 TROUBLESHOOTING

7.4 Washer Won't Agitate or some abnormal noise
The most common part(s) or condition(s) which contribute to the
symptom Washer won't agitate are listed below. Check or test each item.
If you are still unable to solve the problem you may need to do
additional research and troubleshooting.
Causes Explanation
Agitator or Impeller Kit
If the washer won't agitate this agitator repair kit may
solve the problem. The kit contains the components that
wear out over time. This is a relatively easy repair.
Door or Lid Latch
Assembly
The lid switch assembly might be defective. This is a very
common problem. The lid switch assembly can fail either
mechanically or electrically. Test any electrical switches
with an Ohm meter for continuity. The switches should
have continuity according to their design.
Motor Coupling
If the washer won't agitate the motor coupling might
have failed. The motor coupling connects the motor to
the washer transmission. It is designed to fail if the
washer is overloaded in order to protect both the motor
and transmission.
Drive Belt(V-BELT)
If the washer won‘t agitate the drive belt might have
worn out. Over time the drive belt will fail just from
normal use . Replace the belt every three or five years
depending on how much the washer is used.
Motor capacitor
The assembly of electric capacitor is mainly used to start
motor and control the motor rotation direction. If the
motor capacitor is defective the washer may not work at
all or function properly.
Drive Motor
This is not common. Check all of the other related parts to
this symptom before replacing the motor. If the motor is
visibly burned out or physically damaged it will have to be
replaced.
Main Control
Board(PCB)
If the washer won't Agitate the main control board might
be defective.
22
7 TROUBLESHOOTING

7.5 Washer Won't drain or some abnormal noise
The most common part(s) or condition(s) which contribute to the
symptom Washer won‘t drain are listed below. Check or test each item.
If you are still unable to solve the problem you may need to do
additional research and troubleshooting.
Causes Explanation
Clogged drain valve or
Hose
It's common for small socks or other small clothing items
to get into the water drain system and clog the hose
leading to drain valve or the drain valve itself. Remove the
hoses from the drain valve in order to remove the article
of clothing before replacing the drain valve.
Door or Lid Safety
switch Assembly
The lid switch assembly might be defective. This is a very
common problem. The lid switch assembly can fail either
mechanically or electrically. Test any electrical switches
with an Ohm meter for continuity. The switches should
have continuity according to their design.
Retractor
Retractor is consisted of motor and traction system, it can
drive the drain valve to drain water, and at the same time
control the clutch to achieve the conversion from washing
to spinning operation. If the washer won't drain, should
check the retractor.
Drain Pump
(Only for up drain
system)
It‘s common for a small sock or other article of clothing
to get caught in the drain pump .Check both for an
obstruction before check and replace the pump
Water level sensor or
control switch
If the water level control switch is defective, or more
commonly, if the small air pipe attached to the air bell
comes off, there will no longer be pressure in the hose
pushing on the air tight diaphragm in the water level
control switch. The switch will not be able to close the
electrical contacts to the drain valve.
CHECK THE AIR PIPE
CHECK THE WATER LEVERL SENSOR
CHECK THE PCB and the inner wire between PCB and the
sensor
23
7 TROUBLESHOOTING

7.6 Washer Won't spin or vibration, making noise
The most common part(s) or condition(s) which contribute to the
symptom Washer won‘t spin are listed below. Check or test each item.
If you are still unable to solve the problem you may need to do
additional research and troubleshooting.
Causes Explanation
Imbalance load
E4--Alarm for
imbalance
Is the laundry spread out evenly in the washer?
Is the washer set on a sturdy flat surface?
Washer vibration can occur if one of the leveling legs is
out of adjustment, be sure to adjust each leg until the
machine is level side to side and front to back
Won't drain
SEE 7.5 Washer Won't drain or some abnormal noise
Door or Lid Safety
switch Assembly
The lid switch assembly might be defective. This is a very
common problem. The lid switch assembly can fail either
mechanically or electrically. Test any electrical switches
with an Ohm meter for continuity. The switches should
have continuity according to their design.
Tub Seal and Bearing
Kit and Balance Ring
If the washer won't spin the tub seal and bearing kit and
Balance Ring might need to be replace. This is a very
involved repair and will require disassembling most of the
washer. If the bearing is bad the problem is going to get
worse very quickly and so either the kit will need to be
replaced or the washing machine.
The suspension rod
assembly
The suspension rod assembly connects the tub
subassembly to cabinet. It reduces the vibration of the
washer during washing and spinning.Washer vibration
can occur if one or more suspension rods are broken.
Check all four rods, replace any that are broken.
24
7 TROUBLESHOOTING

Causes Explanation
Motor Coupling
If the washer won't spin the motor coupling might have
failed. The motor coupling connects the motor to the
washer transmission. It is designed to fail if the washer is
overloaded in order to protect both the motor and
transmission.
Drive Belt(V-BELT)
If the washer won't spin, check the drive belt. If the belt is
broken or if it isn't tight on the pulleys the washer won't
spin properly.
Clutch
The clutch assembly makes the connection between the
transmission and the inner tub. As the clutch wears out it
may prevent the tub from spinning. The clutch is not
repairable, if it is loud or not working properly it will need
to be replaced.
Motor capacitor
The assembly of electric capacitor is mainly used to start
motor and control the motor rotation direction. If the
motor capacitor is defective the washer may not work at
all or function properly.
Drive Motor
This is not common. Check all of the other related parts to
this symptom before replacing the motor. If the motor is
visibly burned out or physically damaged it will have to be
replaced.
Main Control
Board(PCB)
If the washer won't spin the PCB also might be defective.
The motor control board provides power to the motor as
well as direction and force. If the motor control board is
defective the washer may not work at all or function
properly.
25
7 TROUBLESHOOTING

7.7 Electric leakage
The most common part(s) or condition(s) which contribute to the
symptom Electric leakage are listed below. Check or test each item.
If you are still unable to solve the problem you may need to do
additional research and troubleshooting.
Causes Explanation
Power cord
Power affected with damp or damaged
Incoming Power
Problem
Outlet ground connection not reliable
Earth Grounded wire
Make the ground connection reliable.
Motor
Motor affected with damp should be dried or replaced
Other parts have
electricity
Parts have water may leak electricity
26
7 TROUBLESHOOTING

7.8 Washer Leaking Water
The most common part(s) or condition(s) which contribute to the
symptom Washer Leaking Water are listed below. Check or test each item.
If you are still unable to solve the problem you may need to do
additional research and troubleshooting.
Causes Explanation
Water inlet hose
If the washer is leaking water, check the inlet hose, this is
the most common place for water to leak. Replace them
with stainless steel or some other, more durable hose.
Drain Hose
If the washer is leaking water check the drain hose. The
most common places for the hose to spring a leak is
from the connection to the valve out to the back of the
washer. Another common occurrence is when the
washer gets pushed too far back against the wall.
Tub Seal and Bearing
Kit
If the washer is leaking water the tub seal and bearing
kit might need to be replace. This is usually a very
involved repair and will require disassembling most of
the washer.
27
7 TROUBLESHOOTING

8 HOW TO CHECK THE ELECTRIC PARTS
28
Before repairing, use multimeter to judge circuit stand of fail
.
Part. Circuit Diagram/Principle Where, what & how to check?
Motor&
Capacitor
The assembly of electric
capacitor it is mainly used to
start motor and control the
motor rotation direction. And
different capacitance should
suit for different motor, or the
motor would not work
properly
Check resistance of the motor.
Check capacitance of the capacitor.
yellow
blue
Light
blue
blue
yellow
Test point
Normal value
Yellow-Blue
Indicating needle rises
and immediately
indicates ∞.
The needle
is stopped after it is
raised.
Means
Lack of capacitance of the
capacitor
.
The
needle doesn’t move Means
Capacitor is fully discharged.
Test point
Normal value
Yellow
—Light
blue
15
~25Ω
Blue
—Light blue
15
~25Ω.

29
8 HOW TO CHECK THE ELECTRIC PARTS
Part. Circuit Diagram/Principle Where, what & how to check?
Retractor
/Drain
motor
Retractor is consisted of motor
and traction system, it can
drive the drain valve to drain
water , and at the same time
control the clutch to achieve
the conversion from washing
to spinning operation .
Check resistance of the drain
motor
Drain
pump
Check resistance between terminals
Light
blue
red
Test point
Normal value
Red
-Light blue
5.5
—8.0KΩ
Test point
Normal value
Red
-Light blue
120
-170Ω
red
Light
blue

30
8 HOW TO CHECK THE ELECTRIC PARTS
Part. Circuit Diagram/Principle Where, what & how to check?
Inlet
Valve
Check resistance of the Inlet Valve
(
Coil)
Water
Level
Sensor
The water level sensor located
at the top frame ,consists of a
sensor and a pressure hose. It
can detect the pressure of
water and transfer the
information to PCB
Check frequency of the pressure
switch without load if wash is
proceeding without filling.
First
terminal
Second
terminal
First
terminal
Third
terminal
Test point
Normal value
1-24-
6KΩ
Test point
Frequency
(
KHZ
)
Water level
1
-2
26.70±0.
3
0.00
1
-2
24.05-
21.93
Full

31
8 HOW TO CHECK THE ELECTRIC PARTS
Part. Circuit Diagram/Principle
Where, what & how to
check?
Safety
Switch
The safety switch can cut off the
motor power when the cover is
lifted during spinning, another
function of the safety switch is to
prevent the tub from destroying
the cabinet, when the clothes in
the tub is out of balance
Check whether the lever of
the safety switch touches
the outer tub if touching
noise happens.
Check contact defect of the
safety switch, defect of
connection parts and
whether the lid is open if
door error is displayed.

32
9 CHECK POINT AFTER REPAIR
After repairing, be sure to make the following trial operation to see if
the washer operates normally.
Check Point Inspection & Judgement
1 Insulation resistance
Unplug the cord from the power outlet and turn on all
the timers. Then
measure the insulation resistance between the plug
(both of 2 pins) and
Grounding wire of the machine.
The measured value should be more than1M
In the following case, check sufficiently.
1)Replace the electrical part switch new ones.
2)Used in a moist place.
3)Used more than 5 years.
2 Safety designated
parts
Replace with the designated parts in the case the used
parts are not proper.
3 Wiring
Check to see if the lead wire is properly connected
without looseness or
Over tension and taping and setting are firmly performed.
washer.
4 Screws and Nuts
Check to see if the screws, nuts, etc are firmly tightened
and the screw locks are applied
5 Removal of useless
matter
Check to see if useless matters (Screws, bits of wire, etc.)
are left inside the machine.
6 Leakage of oil and
water
Check to see if oil or water leaks out around belowspinning, gear box, motors
7 Power-cord
Check to see if the cord, the plug, the outlet etc., are not
damaged. Do not use table
Tape with multi-wiring
8 Level Installation.
Check to see if the machine installed horizontally

33
10 EXPLOADED VIEW AND BOM LIST
 Loading...