

Page 1

Sunny Boy Control
Light
User Manual
Issue 1.1
Intelligent Powerline Modem for
SUNBCL-11:NE3400
PV-Plant Monitoring
Page 2

Sunny Boy Control Light User Manual
Alteration Review
Document-
Number
SUNBCL
-11:NE4899 1.0 A First Edition, as translation from first German issue Salisbury
-11:NE3400 1.1 A First Revision Salisbury
Issue
and Alteration
Review
1
)
Comments Author
1
) A: Alterations due to faulty documents or improvement of the documentation
B: Alterations maintaining full or upward compatibility
C: Alterations limiting or excluding compatibility
Name Date Signature
Approved L. Müller 08 / 14 / 2000
SUNBCL-11:NE - 2 - SMA Regelsysteme GmbH
Page 3

Sunny Boy Control Light User Manual
SMA Regelsysteme GmbH
Hannoversche Straße 1-5
D-34266 Niestetal
EG-Conformity Declaration
in accordance with EG-Regulation 89/336/EWG concerning Electromagnetic compatibility
Published in the "Amtsblatt der Europäischen Gemeinschaft" (AB1. No. L 139, 23.5.1989, page 19)
We declare that the component / device and the according product distributed by us, specified
below complies to the standards listed in the following due to its design and type of
construction.
Device type: SBCOLI
Device Description: Intelligent Powerline-Modem “Sunny Boy Control Light“
The device mentioned above complies to the following generic standards:
• Generic Emission Standard EN 50 081, Part 1
• Generic Immunity Standard EN 50 082, Part 2
Niestetal, August 2000 ______________________
P. Drews, managing director
SUNBCL-11:NE - 3 - SMA Regelsysteme GmbH
Page 4
Sunny Boy Control Light User Manual
r
Explanation of Symbols used in this Document
To enable optimal usage of this manual and safe operation of the device during
installation, operation and maintenance routines, please note the following
description of symbols:
This indicates a feature that is important either for optimal and comfortable
usage or optimal operation of the system.
Example: „Useful C routines for this purpose are on the support disk.“
This indicates a fact or feature very important for the safety of the use
and / or can cause a serious hardware defect if not appropriately applied.
Example: „Disconnect the mains plug before opening the case!“
This indicates an example.
SUNBCL-11:NE - 4 - SMA Regelsysteme GmbH
Page 5

Sunny Boy Control Light Content
Content
1 Introduction ...................................................................................................... 8
1.1 Technical Requirements................................................................................. 9
1.2 Normal Operation......................................................................................... 10
1.3 Security Notes.............................................................................................. 10
1.4 Usage of the Sunny Boy Control Light ......................................................... 11
2 Commissioning the Sunny Boy Control Light ............................................. 14
2.1 Switching on the Sunny Boy Control Light ................................................... 14
2.2 Plug & Play Setup ........................................................................................ 15
2.2.1 Language Selection ................................................................................. 15
2.2.2 Setting Date and Time ............................................................................. 16
2.2.3 Detection of Connected Devices.............................................................. 16
3 Installation of the Connectors....................................................................... 20
3.1 Connection to Sunny Boy Inverters.............................................................. 20
3.2 Connection to a PC...................................................................................... 20
3.2.1 Cabling a PC with RS232......................................................................... 20
3.2.2 Cabling a PC with Modem on RS232....................................................... 23
3.3 Connecting a Modem................................................................................... 24
3.4 Connection of an External Display ............................................................... 25
3.4.1 DATALITE, HvG and Siebert ................................................................... 26
3.4.2 EnergieCom............................................................................................. 26
4 Working with the Sunny Boy Control Light ................................................. 29
4.1 Display on Power-Up ................................................................................... 29
4.2 Online Info.................................................................................................... 31
4.3 Main Menu ................................................................................................... 32
SUNBCL-11:NE - 5 - SMA Regelsysteme GmbH
Page 6

Sunny Boy Control Light Content
4.3.1 Total Plant................................................................................................ 32
4.3.2 Spot Values.............................................................................................. 33
4.3.3 Daily Yield................................................................................................ 34
4.3.4 Events...................................................................................................... 35
5 Menu Functions for Configuration................................................................ 37
5.1 Password ..................................................................................................... 37
5.2 System ......................................................................................................... 38
5.2.1 Language Definition................................................................................. 39
5.2.2 Date / Time .............................................................................................. 39
5.2.3 Online-Info ............................................................................................... 40
5.3 Interfaces ..................................................................................................... 41
5.3.1 Communication........................................................................................ 41
5.3.2 Modem..................................................................................................... 41
5.3.3 External Display....................................................................................... 43
5.4 PV-Plant - Setup .......................................................................................... 52
5.4.1 Registration.............................................................................................. 52
5.4.2 Detection - Setup ..................................................................................... 54
5.4.3 Parameter Setup...................................................................................... 56
5.4.4 Adding a New Device............................................................................... 57
5.4.5 Removing a Device.................................................................................. 57
5.5 Control.......................................................................................................... 57
5.5.1 Tolerances ............................................................................................... 57
5.5.2 FAX-Info................................................................................................... 59
5.6 Diagnosis ..................................................................................................... 64
5.6.1 Report ...................................................................................................... 64
5.6.2 Communication........................................................................................ 65
6 PC and Sunny Data Control........................................................................... 66
SUNBCL-11:NE - 6 - SMA Regelsysteme GmbH
Page 7

Sunny Boy Control Light Content
7 Appendix ......................................................................................................... 69
7.1 Error Messages............................................................................................ 69
7.2 Troubleshooting Powerline Communication................................................. 71
7.2.1 Transmission Errors................................................................................. 72
7.2.2 Interference Suppression......................................................................... 78
7.2.3 Communication........................................................................................ 81
7.3 Technical Data ............................................................................................. 83
7.4 Default Parameters ...................................................................................... 84
7.5 AT-Commands............................................................................................. 88
7.6 Guarantee Regulations and Liability ............................................................ 89
7.7 Sources of supply......................................................................................... 91
7.8 Sunny Boy Control Light Service.................................................................. 93
7.9 Sunny Boy Info Service................................................................................ 95
7.10 Menu Overview ............................................................................................ 96
SUNBCL-11:NE - 7 - SMA Regelsysteme GmbH
Page 8

Sunny Boy Control Light Chapter 1: Introduction
1 Introduction
Thank you very much for purchasing a Sunny Boy Control Light. The Sunny Boy
Control Light will continuously monitor the PV-plant performance and lets you
modify the operating parameters of the Sunny Boy inverters.
We definitely know that there are very few people that actually appreciate reading
technical documents - we therefore have kept this manual as short as possible. But
the more you read this manual the more you can utilize the Sunny Boy Control
Light and optimize your PV-plant. Nevertheless, if you find any topics hard to
understand, please notify us and we will try to get things more understandable in the
next issue of this manual. Thank you.
This "User Manual" is split in the following sections:
Introduction Chapter 1
Commissioning the Sunny Boy Control Light Chapter 2
Installation of the Connectors Chapter 3
Working with the Sunny Boy Control Light Chapter 4
Menu Functions for Configuration Chapter 5
PC and Sunny Data Control Chapter 6
Troubleshooting, Guarantee,
Technical Data, Service etc. Chapter 7
The Sunny Boy Control Light supports a firmware update function, which is easy to
use without opening the device or similar. The firmware update is done with the PC
program Sunny Data Control. The latest version of this software and additional
information is available on http://www.sma.de
installation or have any serious problems feel free to contact SMA, simply send an
email to sunnyboy@sma.de
SUNBCL-11:NE - 8 - SMA Regelsysteme GmbH
. SMA will be glad to help you.
. If you encounter trouble with the
Page 9
Sunny Boy Control Light Chapter 1: Introduction
y
1.1 Technical Requirements
Necessary for the usage of the Sunny Boy Control Light:
• an electricity socket
• grid voltage and frequency must lie within the specified range
(90..260 V, 50/60 Hz)
• for Powerline communication, all devices must be equipped with a Powerline
modem
The parallel operation of the Powerline communication with a Sunny Bo
Control Light and other devices that also use the mains for data
transmission and do not comply to the standardized transmission protocol
(e.g.: baby phone) is normally not possible.
For the operation of the Sunny Boy Control Light it is necessary that
following safety measures are kept to:
1. The power supply socket must be equipped with a Protective Earth.
2. The grid plug must be accessible at any time.
Use the Sunny Boy Control Light only in dry and dust free environments!
SUNBCL-11:NE - 9 - SMA Regelsysteme GmbH
Page 10
Sunny Boy Control Light Chapter 1: Introduction
1.2 Normal Operation
The Sunny Boy Control Light has no on/off switch. You can turn it off by pulling the
plug-in out of the mains socket. You must enter the time and date after every restart.
Never pull out the grid plug while the Sunny Boy Control Light is saving
data. Saving is indicated on the display.
During operation, the Sunny Boy Control Light switches to idle mode at night (when
no device can be reached within 15 min). In 15 minute intervals the Sunny Boy
Control Light activates itself and checks the communication line for other devices. If
no device is available, the Sunny Boy Control Light falls back to standby, otherwise
it goes into normal operation mode. The user may interrupt the idle mode any time by
pressing any key. In case no key is pressed within 15 minutes, the Sunny Boy
Control Light will drop back to standby mode again.
1.3 Security Notes
Sunny Boy Control Light may only be opened by qualified personnel and
only when disconnected from the power supply.
Repairs of Sunny Boy Control Light are only to be done by the
manufacturer.
SUNBCL-11:NE - 10 - SMA Regelsysteme GmbH
Page 11
Sunny Boy Control Light Chapter 1: Introduction
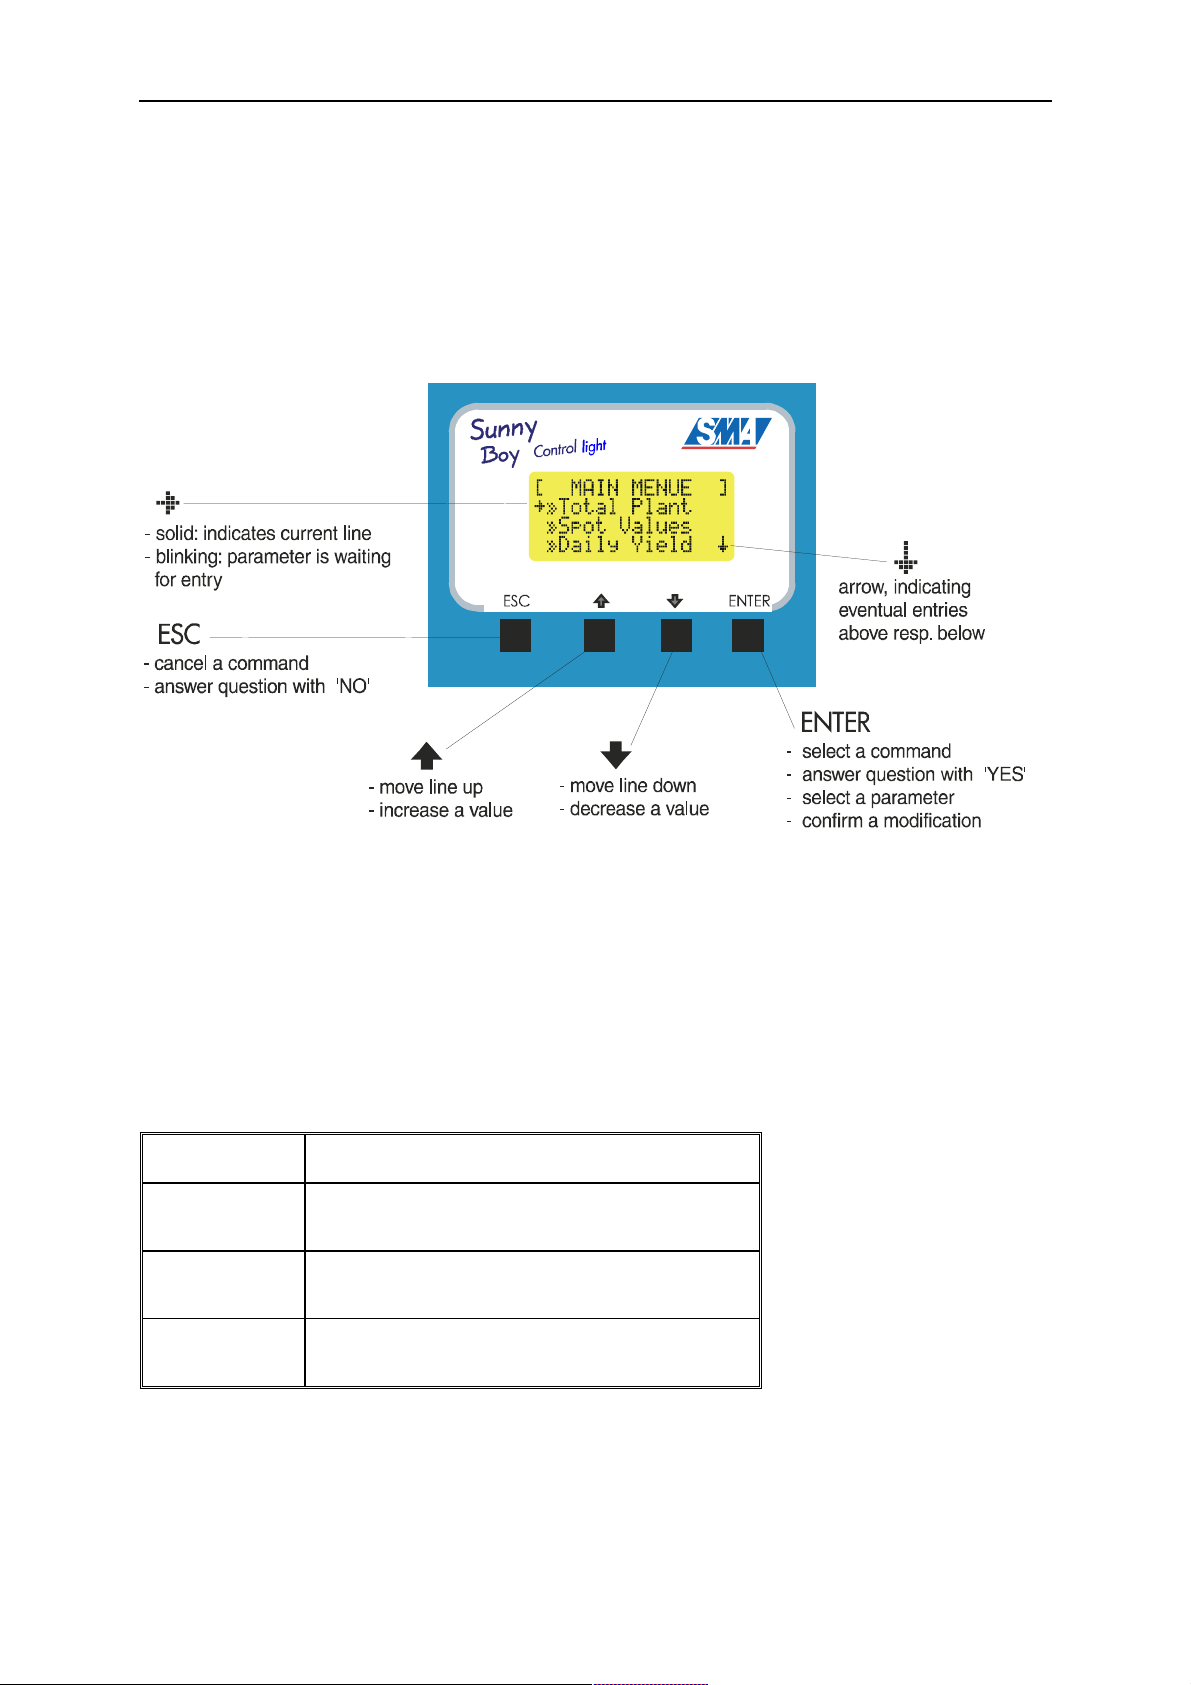
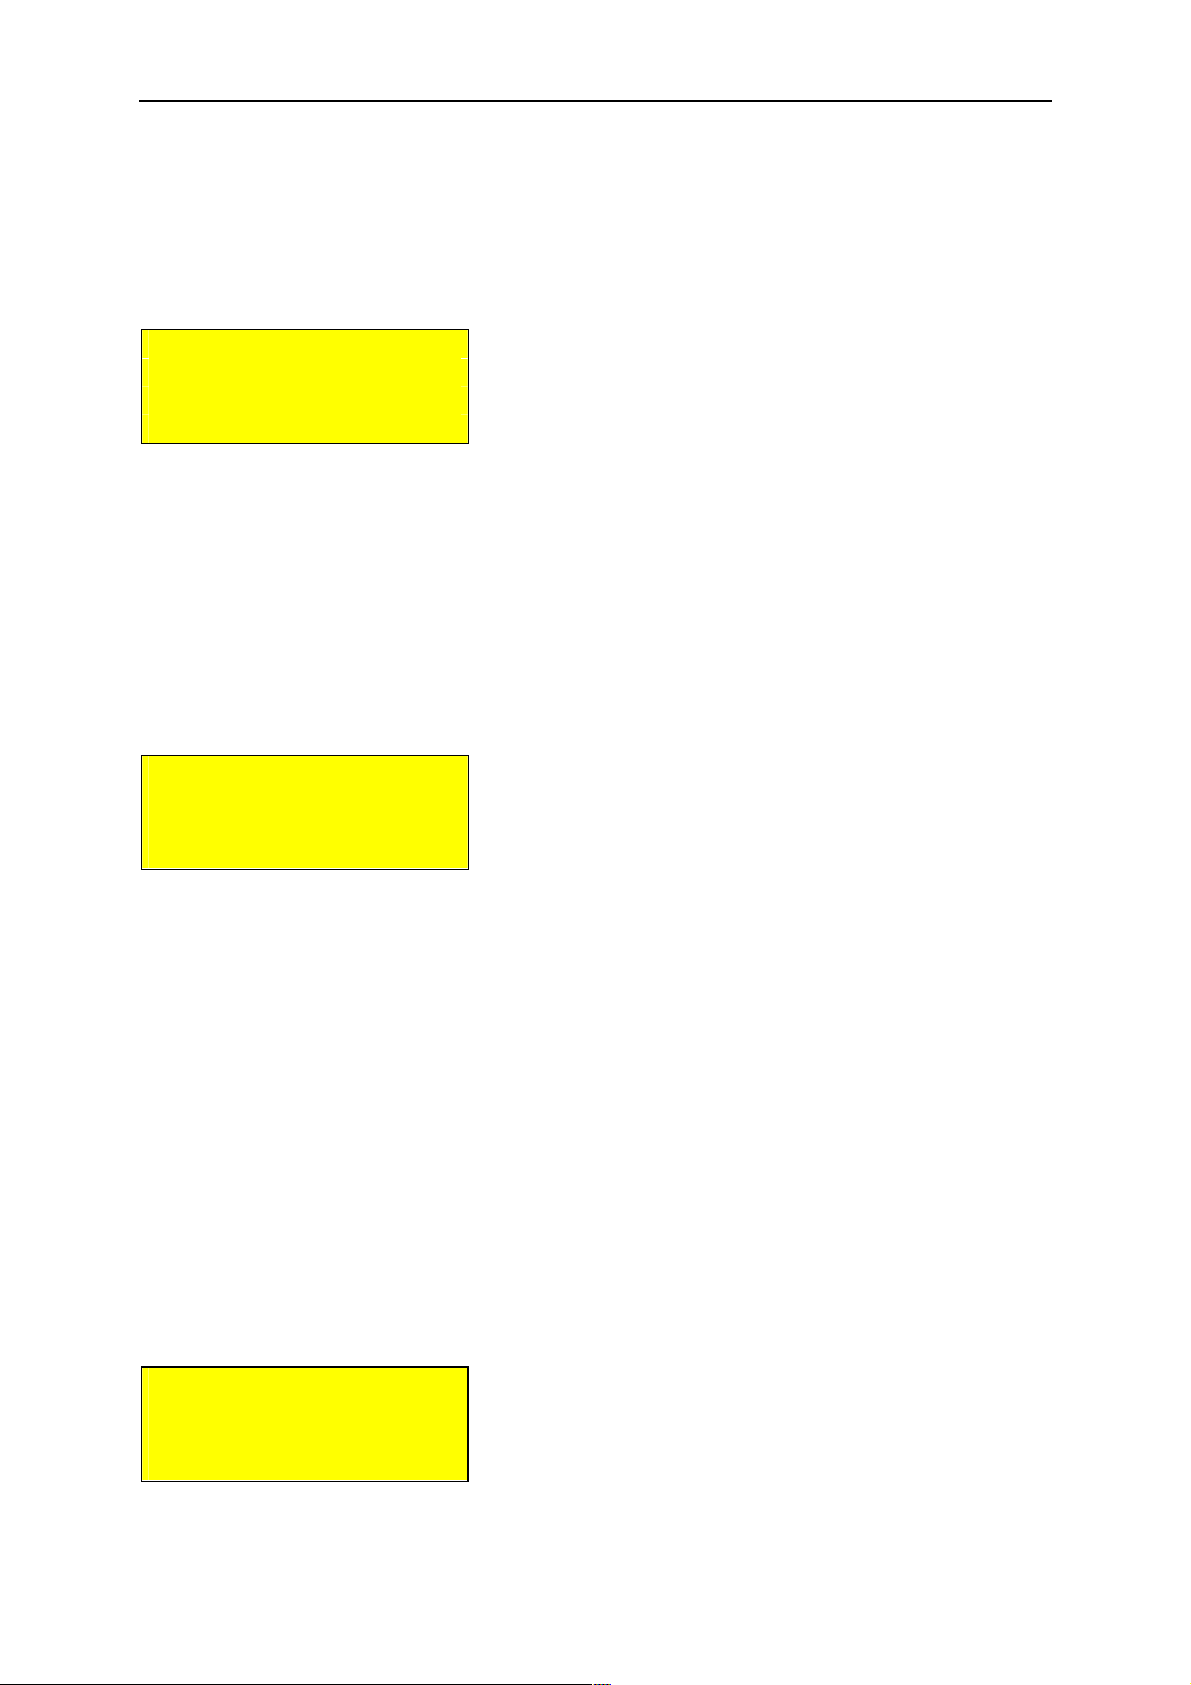
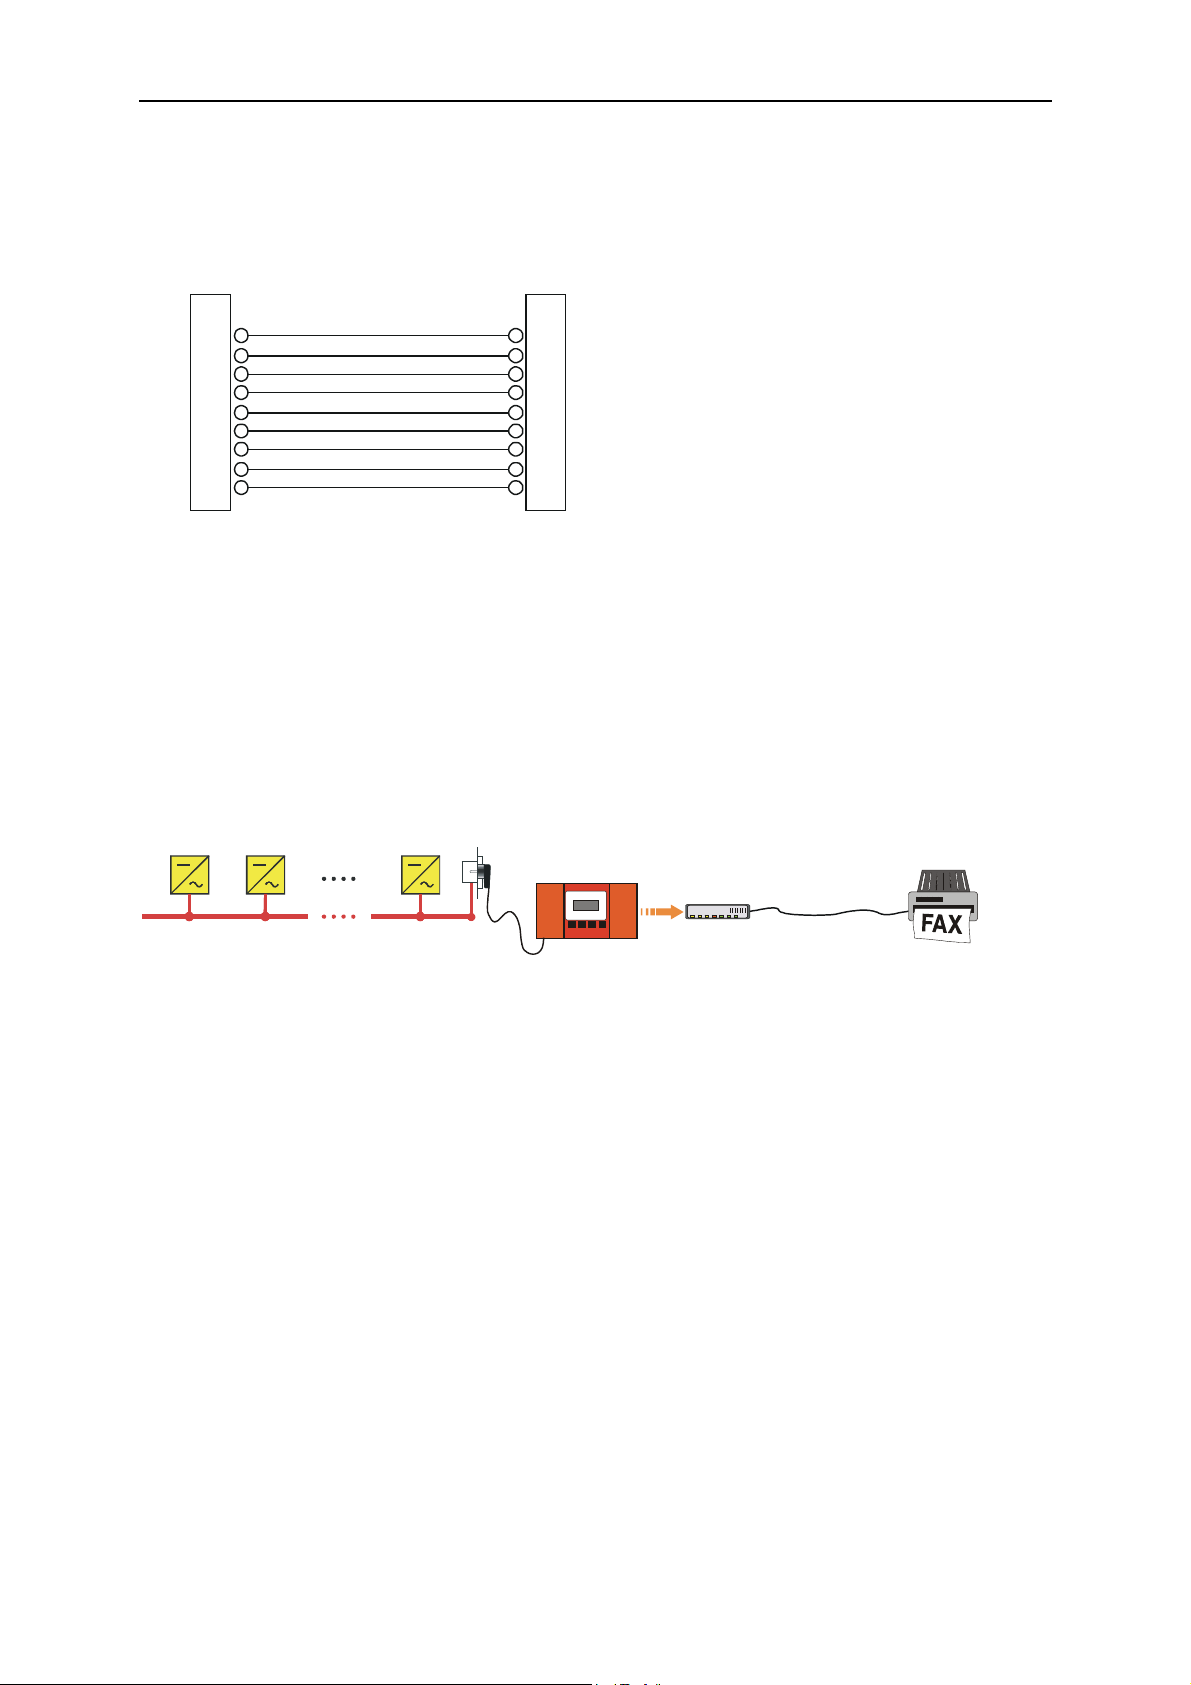
1.4 Usage of the Sunny Boy Control Light
The operation of the Sunny Boy Control Light is done with 4 keys below the LCDisplay.
Fig. 1.1: Display and keys of the Sunny Boy Control Light
Description of the Symbols
Often information consisting of more than four lines is displayed. An indicator
appears in the lower right of the display in this case, indicating that further lines are
available above and below the actual display.
Character Description
ñ
ò
more rows above the display
more rows below the display
more rows above and below the display
Fig. 1.2: Description of the arrow right bottom corner of the display
SUNBCL-11:NE - 11 - SMA Regelsysteme GmbH
Page 12

Sunny Boy Control Light Chapter 1: Introduction
Display-Contrast
Independent from the selected menu: Changing the display contrast is done by
pressing the [ESC] and the [↑↑↑↑] or [↓↓↓↓] keys simultaneously.
Key Description
[ESC] + [ ↑
[ESC] + [ ↓
↑ ]
↑↑
↓ ]
↓ ↓
- increase display-contrast
- decrease display-contrast
Table 1.1: Modifying display-contrast
Description of Characters
The selection arrow indicates the active line
Character Name Description
Warnings
15 min
15 min
[ MENU ]
submenu
"normal" arrow
"selection" arrow
"selection" arrow but
blinking
"double" arrow on the left: sub-menu
change lines with the [
[ENTER] selects the menu item in the current line
[ENTER] confirms selection
[ESC] cancels selection
current menu, press [ESC] to leave
↑↑↑↑ ] and [ ↓↓↓↓ ] keys
+495619522
Pac
1234W
"double" arrow on the right: more characters to come
three points more values follow
points continued line
Fig. 1.3: Description of the characters on the display
• [ ↑↑↑↑ ] and [ ↓↓↓↓ ] switch between the lines.
• Sub-menus are marked with "
" and are activated with [ENTER].
• A " " is on the end of lines that exceed 16 characters, more characters can be
seen in "Edit" mode.
SUNBCL-11:NE - 12 - SMA Regelsysteme GmbH
Page 13

Sunny Boy Control Light Chapter 1: Introduction
Edit mode
The edit mode enables modifications of specific settings or operation parameters.
You may activate the editing mode of the respective parameter (see selection arrow
above) if you select it with the arrow keys and press the [Enter] key.
The edit mode will only be started if it is actually possible to modify the parameter. In
that case the parameter begins to blink and you can make changes with both arrows
[[[[↑↑↑↑]]]] and [[[[↓↓↓↓]]]]. Changing numerical values can be accelerated by holding the arrow key
down. The longer you press the arrow key the bigger steps are used to change the
value.
• [Enter] accepts and saves your current settings.
• [ESC] cancels the current modification.
• If a parameter was changed in the "Edit" mode, the selection arrow blinks until
confirmed once more with the [Enter] key or is cancelled with the [ESC] key.
• If no further key is pressed the new setting will be automatically cancelled after
60 sec.
SUNBCL-11:NE - 13 - SMA Regelsysteme GmbH
Page 14

Sunny Boy Control Light Chapter 2: Commissioning the Sunny Boy Control Light
2 Commissioning the Sunny Boy Control Light
The initial installation and setting up of a Sunny Boy Control Light is quite simple
(Plug & Play). This means that the installation can be done without any tools while
the procedure is self-explaining.
For initial installation simply follow the configuration steps described in this chapter
and the Sunny Boy Control Light will be ready for performance. After the hardware
installation you will be systematically lead through the configuration dialogs in the
remaining passages of this chapter. Most dialogs are simply confirmed by pressing
the [[[[Enter]]]] key.
Please keep in mind that the initial installation is only done once. It defines basic
settings like language, display settings, date and time and finally starts the automatic
device detection. After the completion of the initial installation the Sunny Boy
Control Light begins its normal startup sequence. The initial installation is also
executed after resetting the device to the default values.
2.1 Switching on the Sunny Boy Control Light
The installation of the Sunny Boy Control Light is as simple as the connection of an
electric household device. You simply plug the plug-in into the socket. During the
initialization of the Sunny Boy Control Light, "BOOT
Sunny Boy Control Light display contrast is adjusted automatically. You will notice
a short darkening of the display.
BOOT" appears on the display, the
BOOTBOOT
BOOT BOOT BOOT
BOOT BOOT
BOOT BOOT BOOT
BOOT BOOT
Fig. 2.1: Initialization of the Sunny Boy Control Light
SUNBCL-11:NE - 14 - SMA Regelsysteme GmbH
Page 15
Sunny Boy Control Light Chapter 2: Commissioning the Sunny Boy Control Light
The initialization phase is finished after 15 sec and the Sunny Boy Control Light
shows the serial number and the software version number for 30 sec. After pressing
any key you may start the configuration procedure.
[ SUNNY BOY ]
[CONTROL LIGHT ]
SerNrxxxxxxxxx
SoftwareV2.xx
Fig. 2.2: Initial Message of the Sunny Boy Control Light
2.2 Plug & Play Setup
During the initial installation the Sunny Boy Control Light automatically starts the
Plug & Play setup with the following message:
[ SUNNY BOY ]
[CONTROL LIGHT ]
PLUG&PLAY
SETUP
Fig. 2.3: Starting Display of the Plug & Play Setup
All settings necessary for the initial installation (language, date/time and device
registration) will be displayed one after the other. Confirm the following configuration
steps one after the other. During the Plug & Play setup you may return to the start
message by pressing the key combination [[[[↑↑↑↑]]]] + [[[[↓↓↓↓]]]] and restart the initial installation
any time.
2.2.1 Language Selection
The Sunny Boy Control Light supports several languages.
[ LANGUAGE ]
deutsch
english
francais
Fig. 2.4: Language selection
SUNBCL-11:NE - 15 - SMA Regelsysteme GmbH
Page 16
Sunny Boy Control Light Chapter 2: Commissioning the Sunny Boy Control Light
Choose the language with the [[[[↑↑↑↑]]]] and [[[[↓↓↓↓]]]] keys. Confirm your selection with [[[[Enter]]]].
After confirming, the selection arrow in front of the selected language blinks. The
selection must be confirmed once again ([Enter] key) in order to save the current
setting or can be cancelled with the [Esc] key. You may exit the dialog with the [Esc]
key.
2.2.2 Setting Date and Time
[ DATE/TIME ]
MM.DD.YYYY
hh:mm: h
Fig. 2.5: Date / Time setting
Now you may adjust the clock of the Sunny Boy Control Light. The [[[[↑↑↑↑]]]] and [[[[↓↓↓↓]]]] keys
allow the selection of date or time. Input is possible after pressing [[[[Enter]]]]. Every digit
can be set separately in the sequence day, month, year resp. hours and minutes with
the [[[[↑↑↑↑]]]] and [[[[↓↓↓↓]]]] keys. The [[[[Enter]]]] key switches to the next input field. After the
rightmost digit has been entered, the selection arrow in front of the adjusted value will
start to blink. Now you can confirm the new setting by pressing [[[[Enter]]]] or cancel your
new settings with [[[[ESC]]]]. You can exit the dialog by pressing the key [[[[ESC]]]].
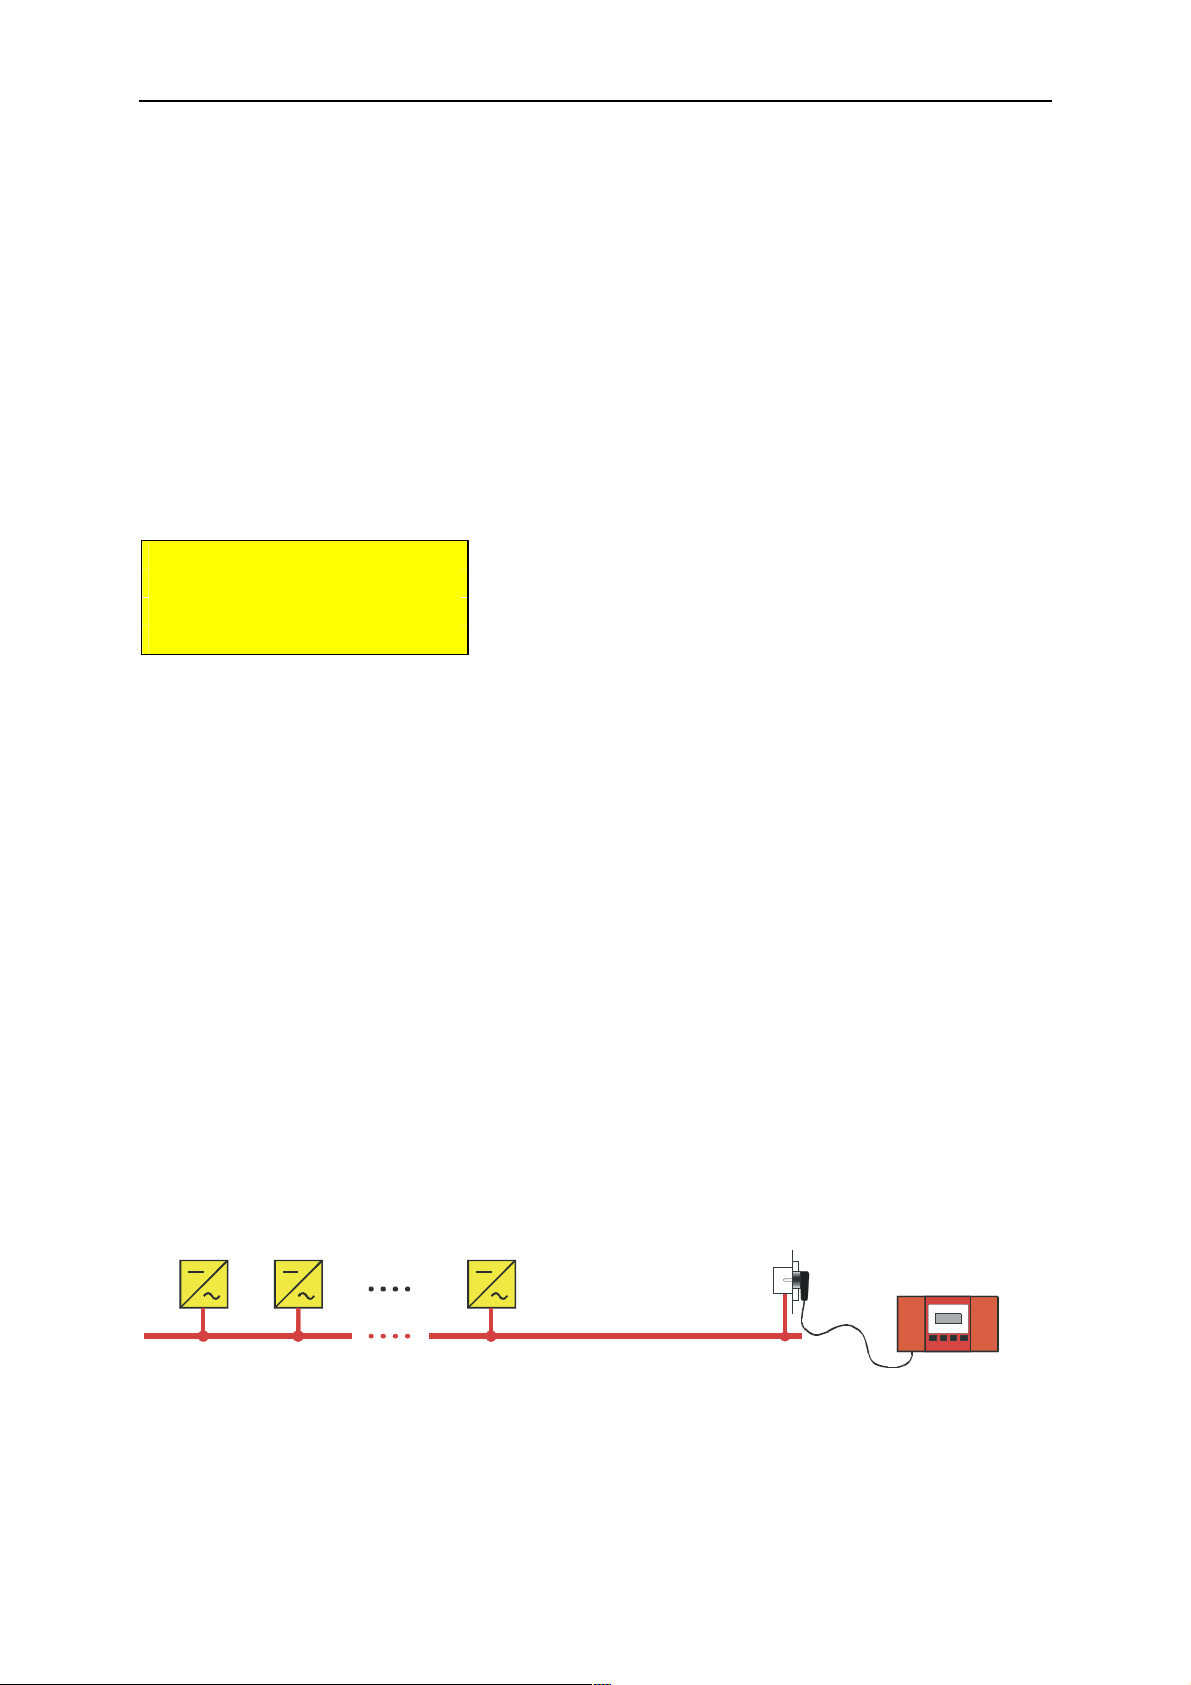
2.2.3 Detection of Connected Devices
Usage of Powerline Transmission
Sunny Boy
mains 230 V / 50 Hz
Sunny Boy
Sunny Boy
Sunny Boy
Control Light
Fig. 2.6: Powerline Communication
SUNBCL-11:NE - 16 - SMA Regelsysteme GmbH
Page 17

Sunny Boy Control Light Chapter 2: Commissioning the Sunny Boy Control Light
The electricity facilities in buildings supply energy to electric devices with
230 V / 50 Hz (or e.g. 120 V / 60 Hz in the USA). This electricity distribution system is
not optimized for the transmission of high frequency signals (approx. 132 kHz).
Therefore the interference-free communication in this frequency range essentially
depends on the selection of the transmission line between the units and the Sunny
Boy Control Light.
The transmission link should:
• use only one phase and
• be as short as possible
Pay attention about connecting all devices that transmit and receive data to one
phase or preferably even to the same line. Therefore you should choose a socket for
the Sunny Boy Control Light installed on the same line resp. at least on the same
phase as the device and is as near as possible to its feeding point.
In case the Sunny Boy Control Light and the according devices must be connected
to different phases the installation of a phase coupler can be necessary. Phase
couplers are available from SMA and must be installed on the site by a qualified
technician.
Further information on optimizing the installation is available in chapter 7.2.1
"Transmission Errors".
If there are any other users of Powerline equipment in your neighborhood, you
should have an eye on the device detection and pay special attention to the
according dialogs in order to ensure that you detect your own devices only. Sunny
Boy Control Light can run the device detection automatically if there is no special
interference. All device detection dialogs will be confirmed automatically after 60 sec
and therefore all devices found will be registered. All you have to do after the
automatic device detection is done by Sunny Boy Control Light is to exit the device
detection by pressing the [[[[ESC]]]] key and confirm the final security dialog with [[[[Enter]]]].
SUNBCL-11:NE - 17 - SMA Regelsysteme GmbH
Page 18
Sunny Boy Control Light Chapter 2: Commissioning the Sunny Boy Control Light
Automatic Device Detection
Sunny Boy Control Light begins with the detection of all accessible devices.
[ DETECTION ]
searching for
new devices
Fig. 2.7: Sunny Boy Control Light searching for new devices
This process may take several minutes depending on the number of devices that
have to be detected. An hourglass in the lower right corner of the display shows that
the program is active. In the bottom line of the display you will find the serial number
of every detected device.
After each detection cycle all devices found by Sunny Boy Control Light will be
displayed one after the other as follows:
New Device
Type xx
S.No xxxxxxxxxx
accept?
Fig. 2.8: Sunny Boy Control Light detecting new device
Please compare the serial numbers of the devices found by Sunny Boy Control
Light with the serial numbers of your devices, which you have written down before.
Register the devices with [[[[Enter]]]] in the device list resp. remove devices that you do
not want to register with [[[[ESC]]]]. Please note that the respective detected device is
registered automatically without confirmation if no key is pressed.
After this you will see the total number of newly registered devices. Please check if all
installed devices were found by Sunny Boy Control Light. If not, you should
activate "search again
SUNBCL-11:NE - 18 - SMA Regelsysteme GmbH
search again" with [[[[Enter]]]].
search againsearch again
Page 19
Sunny Boy Control Light Chapter 2: Commissioning the Sunny Boy Control Light
[ DETECTION
[ DETECTION ]
new xx devices
tot xx devices
search again?
Fig. 2.9: Display Message on end Search
By pressing the [[[[Enter]]]] key you may re-run the search as it is possible that the
Sunny Boy Control Light does not find all devices in the first search cycle. If no key
is pressed the Sunny Boy Control Light will automatically begin a new detection
cycle after 60 sec. If several attempts were unsuccessful, please check whether you
have correctly installed the devices to be detected. If Sunny Boy Control Light does
not detect a device in spite of a repeated search, please read chapter 7.2,
"Troubleshooting Powerline Communication".
Finish the device detection with the [[[[ESC]]]] key.
After the automatic detection you will be prompted to confirm the configuration.
During the initial installation the number of new devices corresponds with the total
number of registered devices.
]
Do you want
to save the
changes?
Fig. 2.10: Saving the detected Sunny Boys
• [[[[ESC]]]] cancels the detection sequence.
• [[[[Enter]]]] confirms the configuration and Sunny Boy Control Light begins
standard operation.
SUNBCL-11:NE - 19 - SMA Regelsysteme GmbH
Page 20
Sunny Boy Control Light Chapter 3: Installing of the connectors
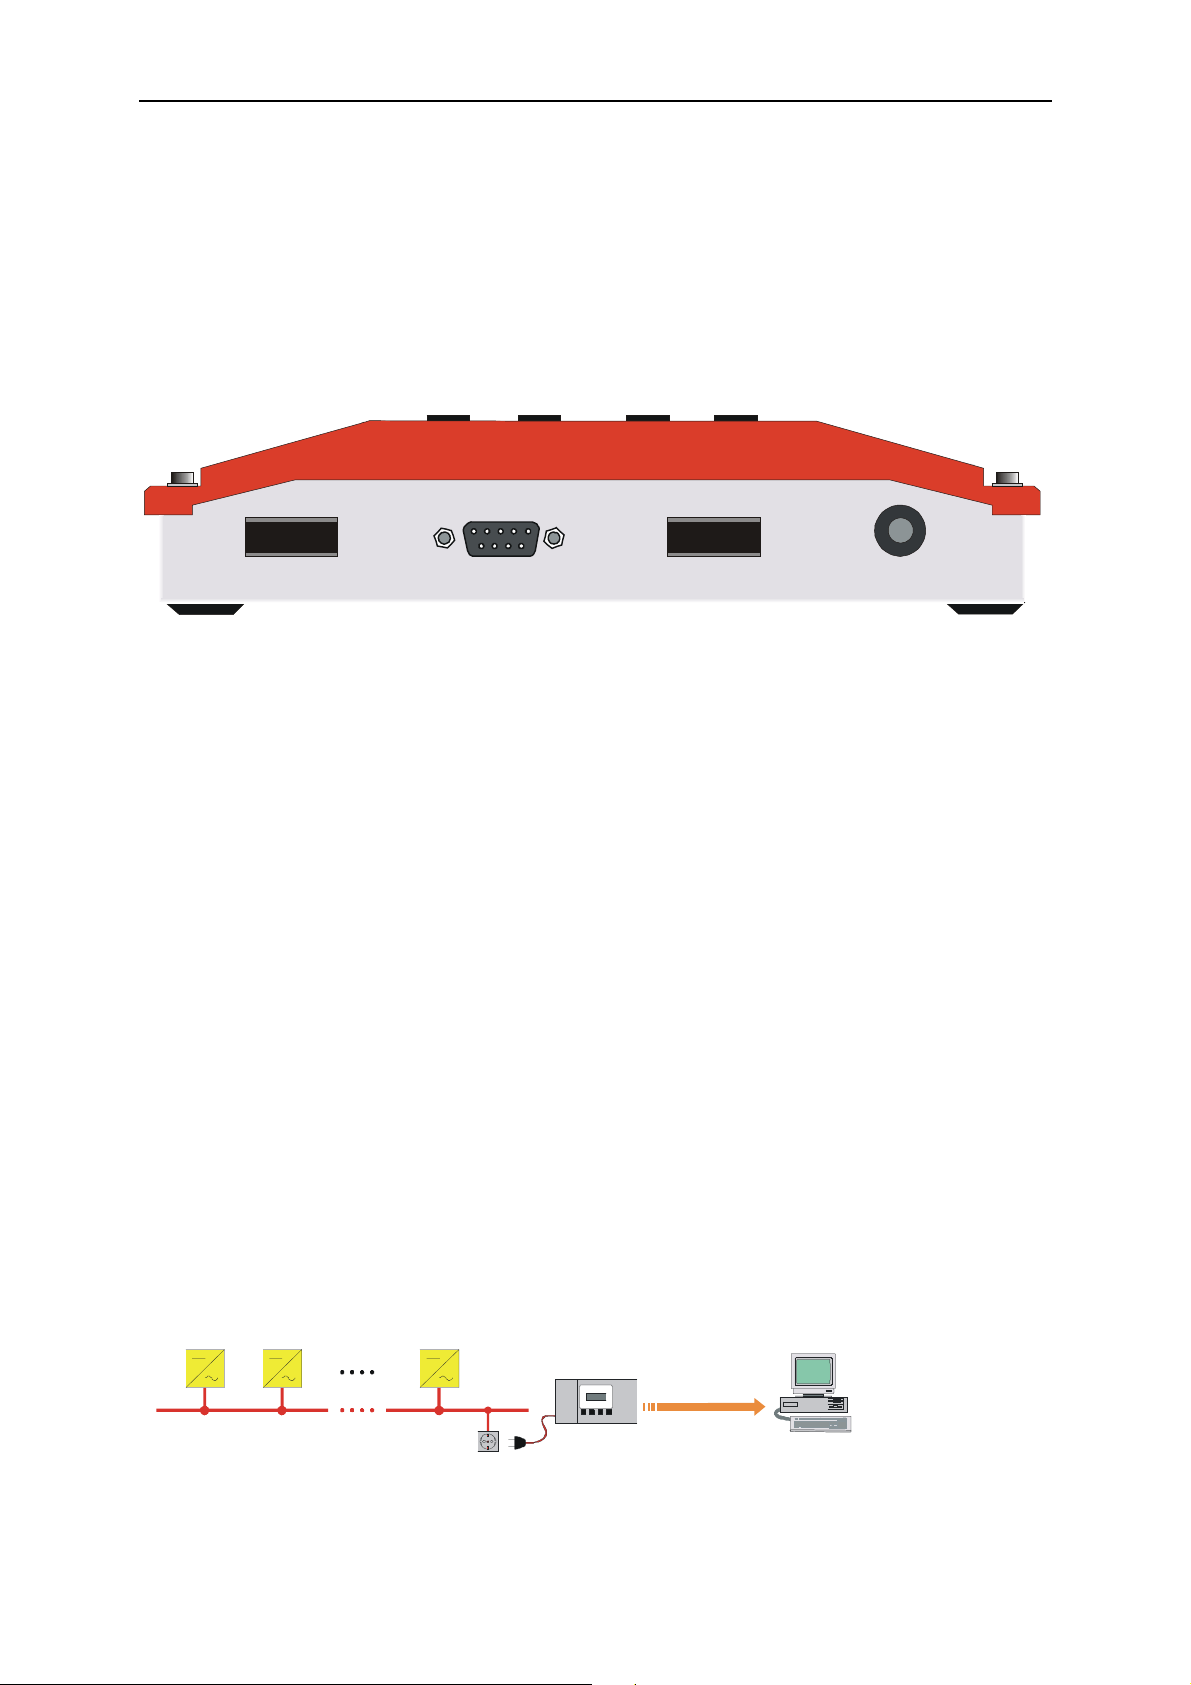
3 Installation of the Connectors
In the following chapters we define all possible connections for the Sunny Boy
Control Light.
RELAIS OUT
PC
(COM 2)
Sunny Boy
(COM 1)
LINE
90...260 V , 50/60 Hz
AC
Fig. 3.1: Bottom View of the Sunny Boy Control Light with interfaces and connectors
3.1 Connection to Sunny Boy Inverters
The data transmission is done via Powerline Communication
The Sunny Boy Control Light is therefore connected to the Sunny Boy inverters
by simply inserting the plug into the electricity socket.
3.2 Connection to a PC
The PC is connected to the Sunny Boy Control Light directly with RS232 or a
modem via telephone line for remote PV-plant management.
3.2.1 Cabling a PC with RS232
Sunny BoySunny Boy
Sunny Boy
230 V / 50 Hz
Sunny Boy
Control Light
RS 232
Modem elimination
cable
PC
Fig. 3.2: Connection to a PC with RS232.
SUNBCL-11:NE - 20 - SMA Regelsysteme GmbH
Page 21
Sunny Boy Control Light Chapter 3: Installing of the connectors
The PC is connected via RS232 with a PC data cable (SMA ordering No. 36-5001).
Note that is may be necessary to use a DB9 to DB25 adapter plug. (SMA ordering
No. 35-5010)
Pin Layout
PIN Signal RS232 Description
1 DCD Data Carrier Detect
2 /RXD Receive Data
3 /TXD Transmit Data
4 DTR Data Terminal Ready
5 GND Ground
6 DSR Data Set Ready
7 /RTS Ready To Send
8 /CTS Clear ToSend
Fig. 3.3: Connecting Configuration Device PC (COM2)
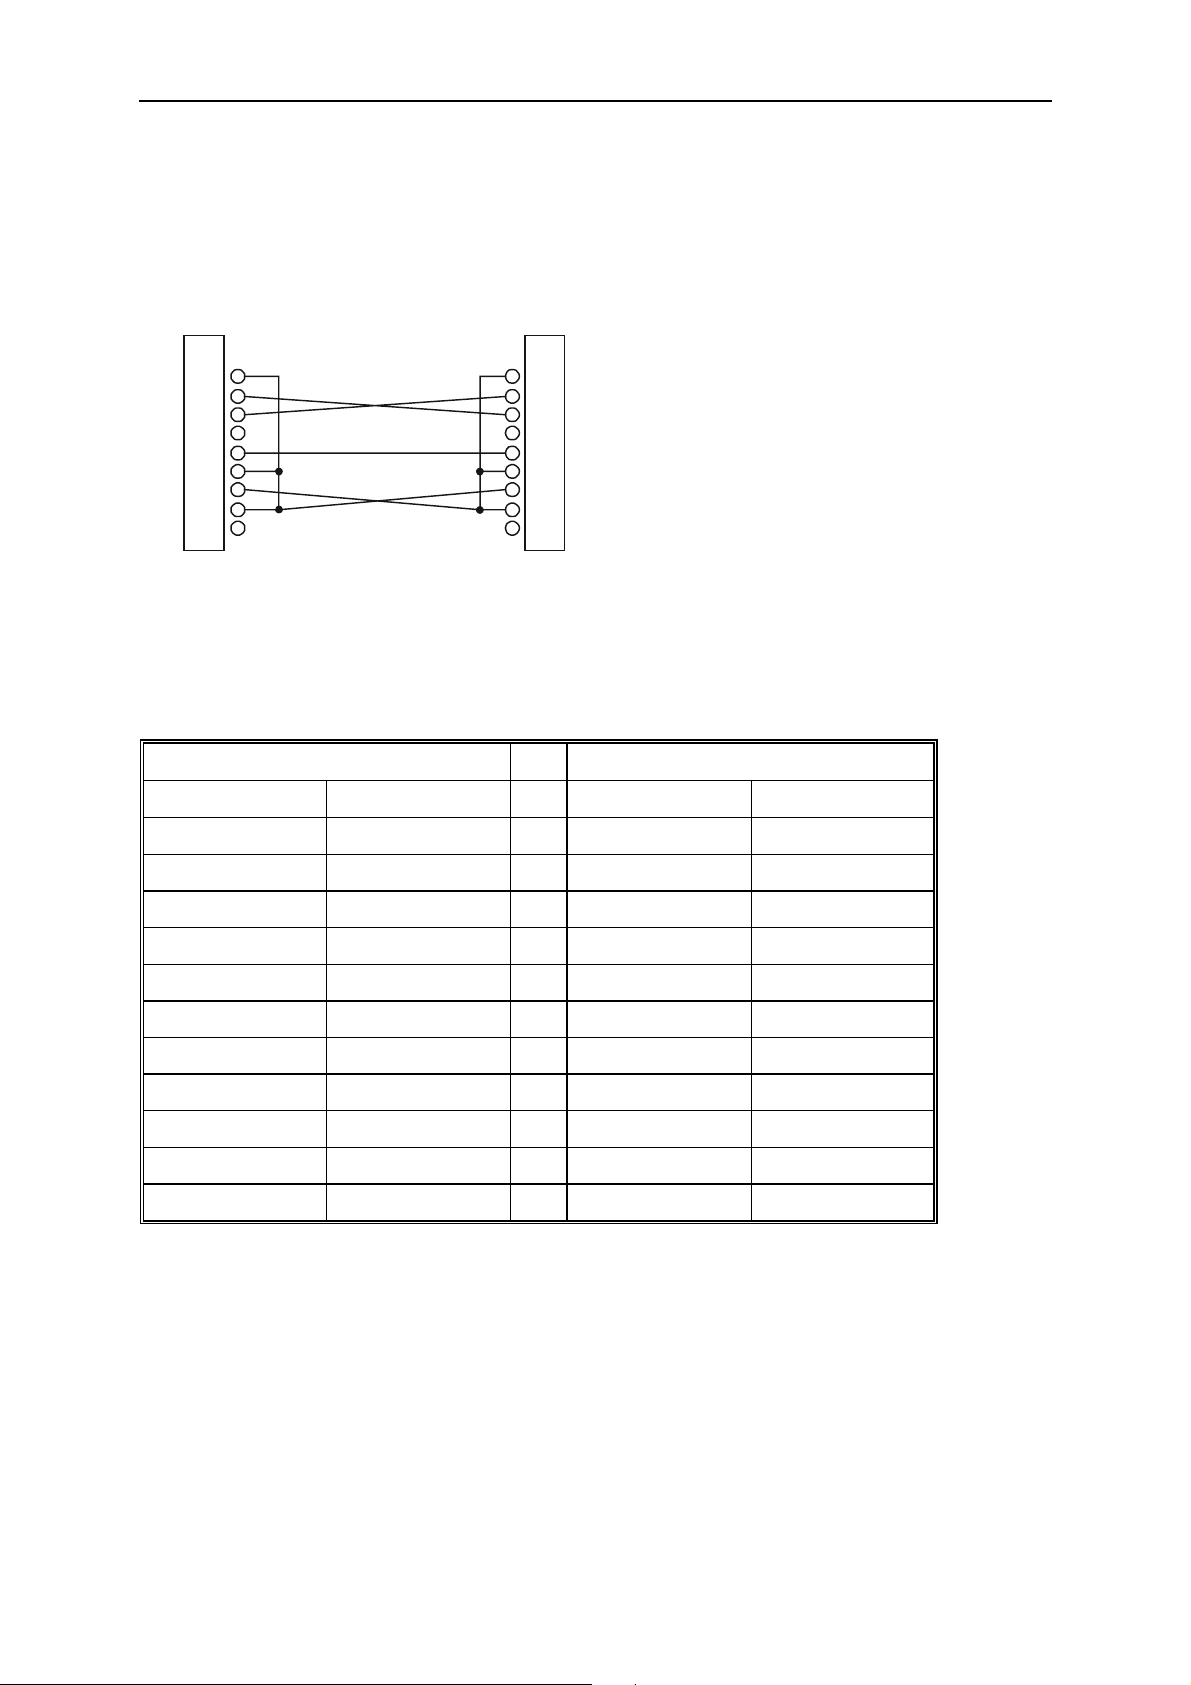
Pin Layout of a DSUB9<>DSUB9 cable
DSUB9 socket DSUB9 socket
Signal PIN PIN Signal
/RXD 2 <> 3 /TXD
/TXD 3 <> 2 /RXD
GND 5 <> 5 GND
| 1 DCD
| 6 DSR
RTS 7 <> 8 CTS
DCD 1 |
DSR 6 |
CTS 8 <> 7 RTS
Fig. 3.4: PIN designation of a PC data cable DSUB9<>DSUB9
SUNBCL-11:NE - 21 - SMA Regelsysteme GmbH
Page 22
Sunny Boy Control Light Chapter 3: Installing of the connectors
<>: These pins are connected to each other. Additionally to this PIN 1, PIN 6 and PIN
8 have to be connected with a bridge.
DSUB9-Socket
PIN
1
2
3
4
5
6
7
8
9
DSUB9-Socket
PIN
1
2
3
4
5
6
7
8
9
Fig. 3.5: PC data cable DSUB9<>DSUB9
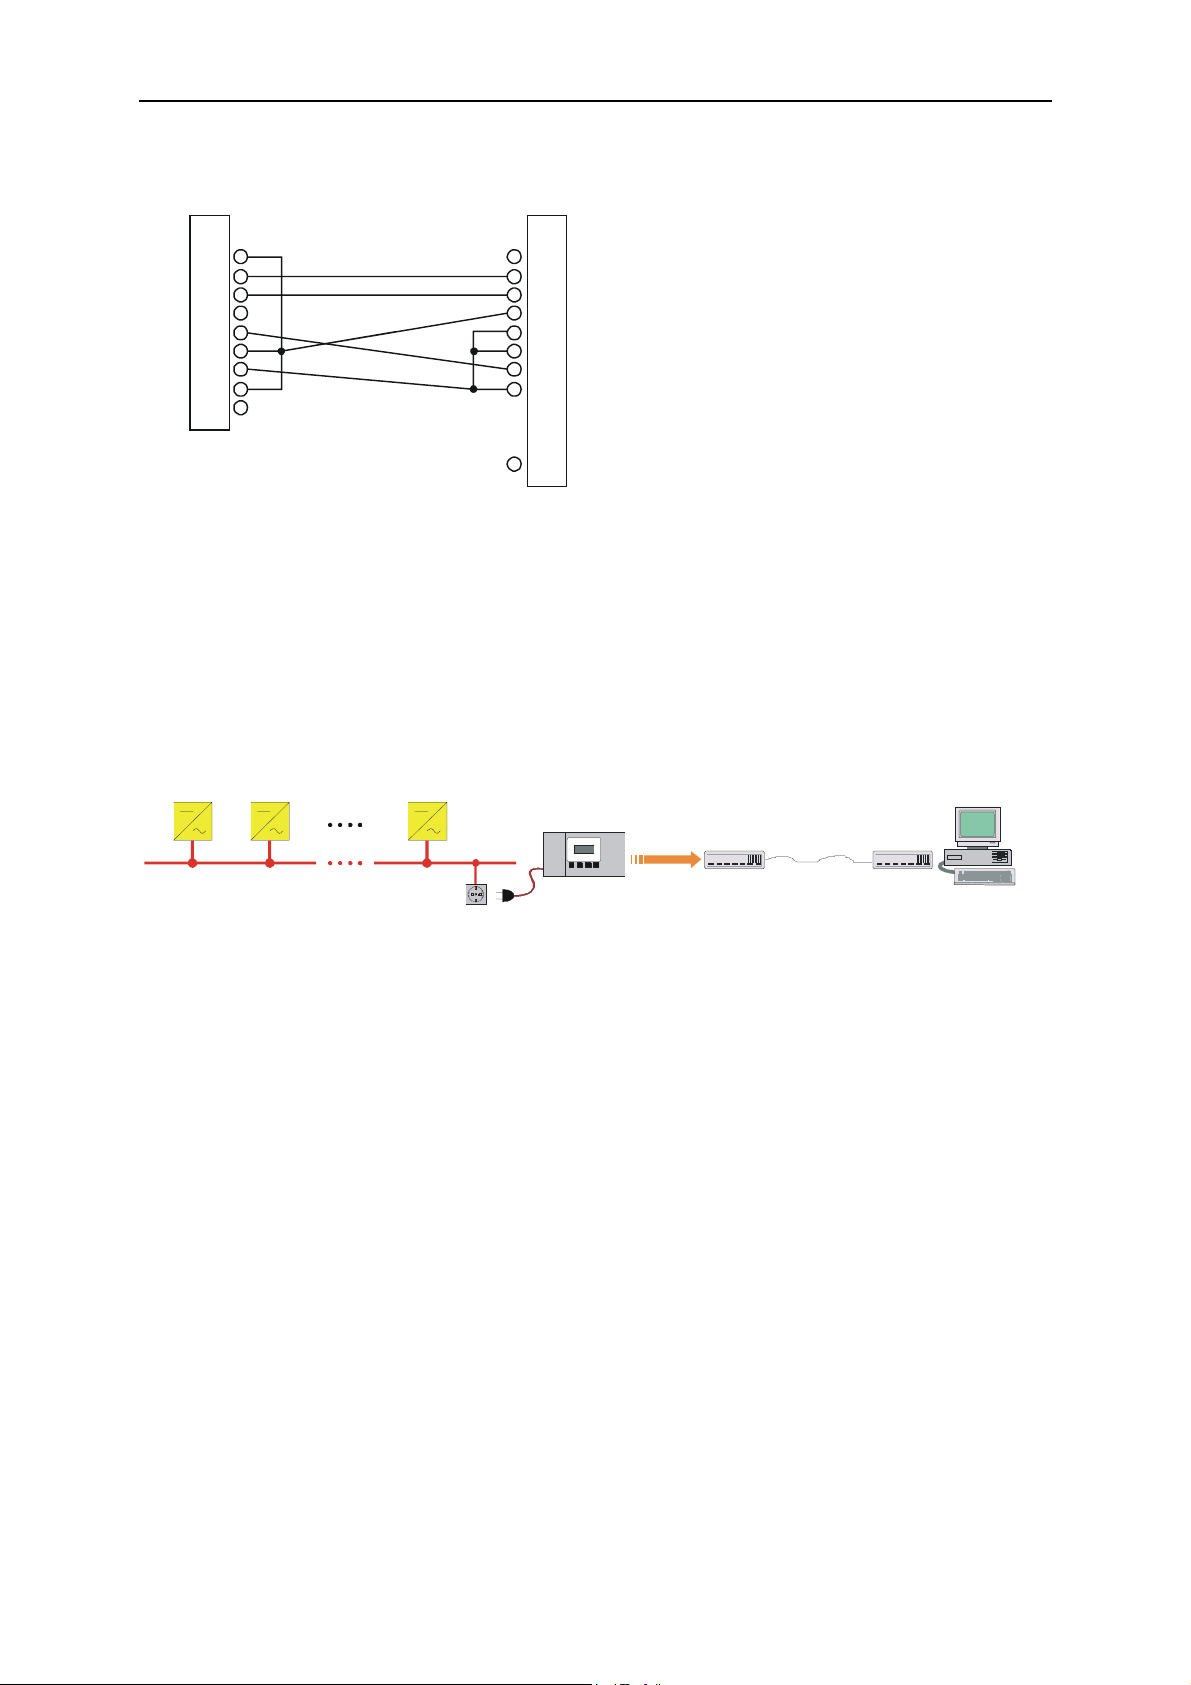
Cabling of a modem elimination cable DSUB9<>DSUB25
DSUB9 socket DSUB25 socket
Signal PIN PIN Signal
/RXD 2 <> 2 /TXD
/TXD 3 <> 3 /RXD
GND 5 <> 7 GND
RTS 7 <> 5 CTS
| 6 DSR
| 8 DCD
CTS 8 <> 4 RTS
DCD 1 |
DSR 6 |
Fig. 3.6: PIN designation PC data cable DSUB9<>DSUB25
<>: These pins are connected to each other
short circuits on PIN 1, PIN 6 and PIN 8 on the DSUB9 socket and PIN 5, PIN 6 and
PIN 8 on the DSUB25 socket.
SUNBCL-11:NE - 22 - SMA Regelsysteme GmbH
Page 23
Sunny Boy Control Light Chapter 3: Installing of the connectors
DSUB9-Socket
PIN
1
2
3
4
5
6
7
8
9
DSUB25 Socket
PIN
1
2
3
4
5
6
7
8
:
:
:
25
Fig. 3.7: PC data cable DSUB9<>DSUB25
3.2.2 Cabling a PC with Modem on RS232
Sunny Boy Sunny Boy Sunny Boy
230 V / 50 Hz
Sunny Boy
Control Light
RS 232
MODEMMODEM
PC
Fig. 3.8: Remote diagnosis via PC and modem
The modem is connected to the Sunny Boy Control Light with a standard 1 to 1
serial RS232 cable. The cables are connected to the "PC (COM 2)" port on the
bottom of the Sunny Boy Control Light.
SUNBCL-11:NE - 23 - SMA Regelsysteme GmbH
Page 24
Sunny Boy Control Light Chapter 3: Installing of the connectors
S
Serial RS232 Cable DSUB9<>DSUB9
DSUB9-Socket DSUB9-Socket
PIN
1
2
3
4
5
6
7
8
9
PIN
1
2
3
4
5
6
7
8
9
Fig. 3.9: Serial cable DSUB9<>DSUB9
For further information on how to connect a modem to the Sunny Boy Control please
read chapter 3.3 "Connecting a Modem".
3.3 Connecting a Modem
Sunny Boy
Sunny Boy
unny Boy
Sunny Boy
Control
Modem
230 V / 50 Hz
RS232
telephone line
Fig. 3.10: Connecting a Modem
You need an external modem for connecting the Sunny Boy Control Light to the
telephone line. We recommend „Microlink 56k“ from Elsa in most cases - check with
SMA before you try to connect a modem. Note that the modem must be Fax class 2
compliant in order to reliably communicate with the Sunny Boy Control Light. The
list of used AT-commands is included in this installation guide (See chapter 7.5, ATCommands).
Modem Cable to the Sunny Boy Control Light
Connect the modem (port: V24/RS232C) to the Sunny Boy Control Light (port: PC)
with a RS232 cable. Use the cable supplied with the modem and not the cable that
you use for connecting the Sunny Boy Control Light since these are different.
SUNBCL-11:NE - 24 - SMA Regelsysteme GmbH
Page 25
Sunny Boy Control Light Chapter 3: Installing of the connectors
The cable for connecting the modem must be a standard "one to one"
serial cable (V24). The PC data cable for connecting the Sunny Boy
Control to a PC is a so-called modem elimination cable, where the signals
are interchanged within the cable. The problem is, that the cables mostly
look identical.
Connect the modem to the mains with the transformer and connect the modem to the
telephone line with the provided telephone cable. Read the modem instructions
carefully.
Detection of the Modem by Sunny Boy Control Light
Switch the modem and the Sunny Boy Control Light on at the same time. The
Sunny Boy Control Light will automatically detect the modem after approximately 1
minute. The parameter COM2:PC automatically switches from RS232 to RS232
(Modem). Check the connection to the modem and the modem’s power supply if the
modem was not detected and turn the Sunny Boy Control Light on again, as it only
conducts a modem detection cycle on power-up.
The init-strings should be accepted by any FAX class 2 or 2.0 modem - in certain
cases it can be necessary to modify the init-strings. Do not modify the init-strings if
you are not absolutely sure about what you are doing.
3.4 Connection of an External Display
All data currently acquired by the Sunny Boy Control Light can be displayed on an
external display.
The following display types are supported:
• DATALITE (DX-series, 8 lines with 16 digits)
• HvG (PV-plant display)
SUNBCL-11:NE - 25 - SMA Regelsysteme GmbH
Page 26
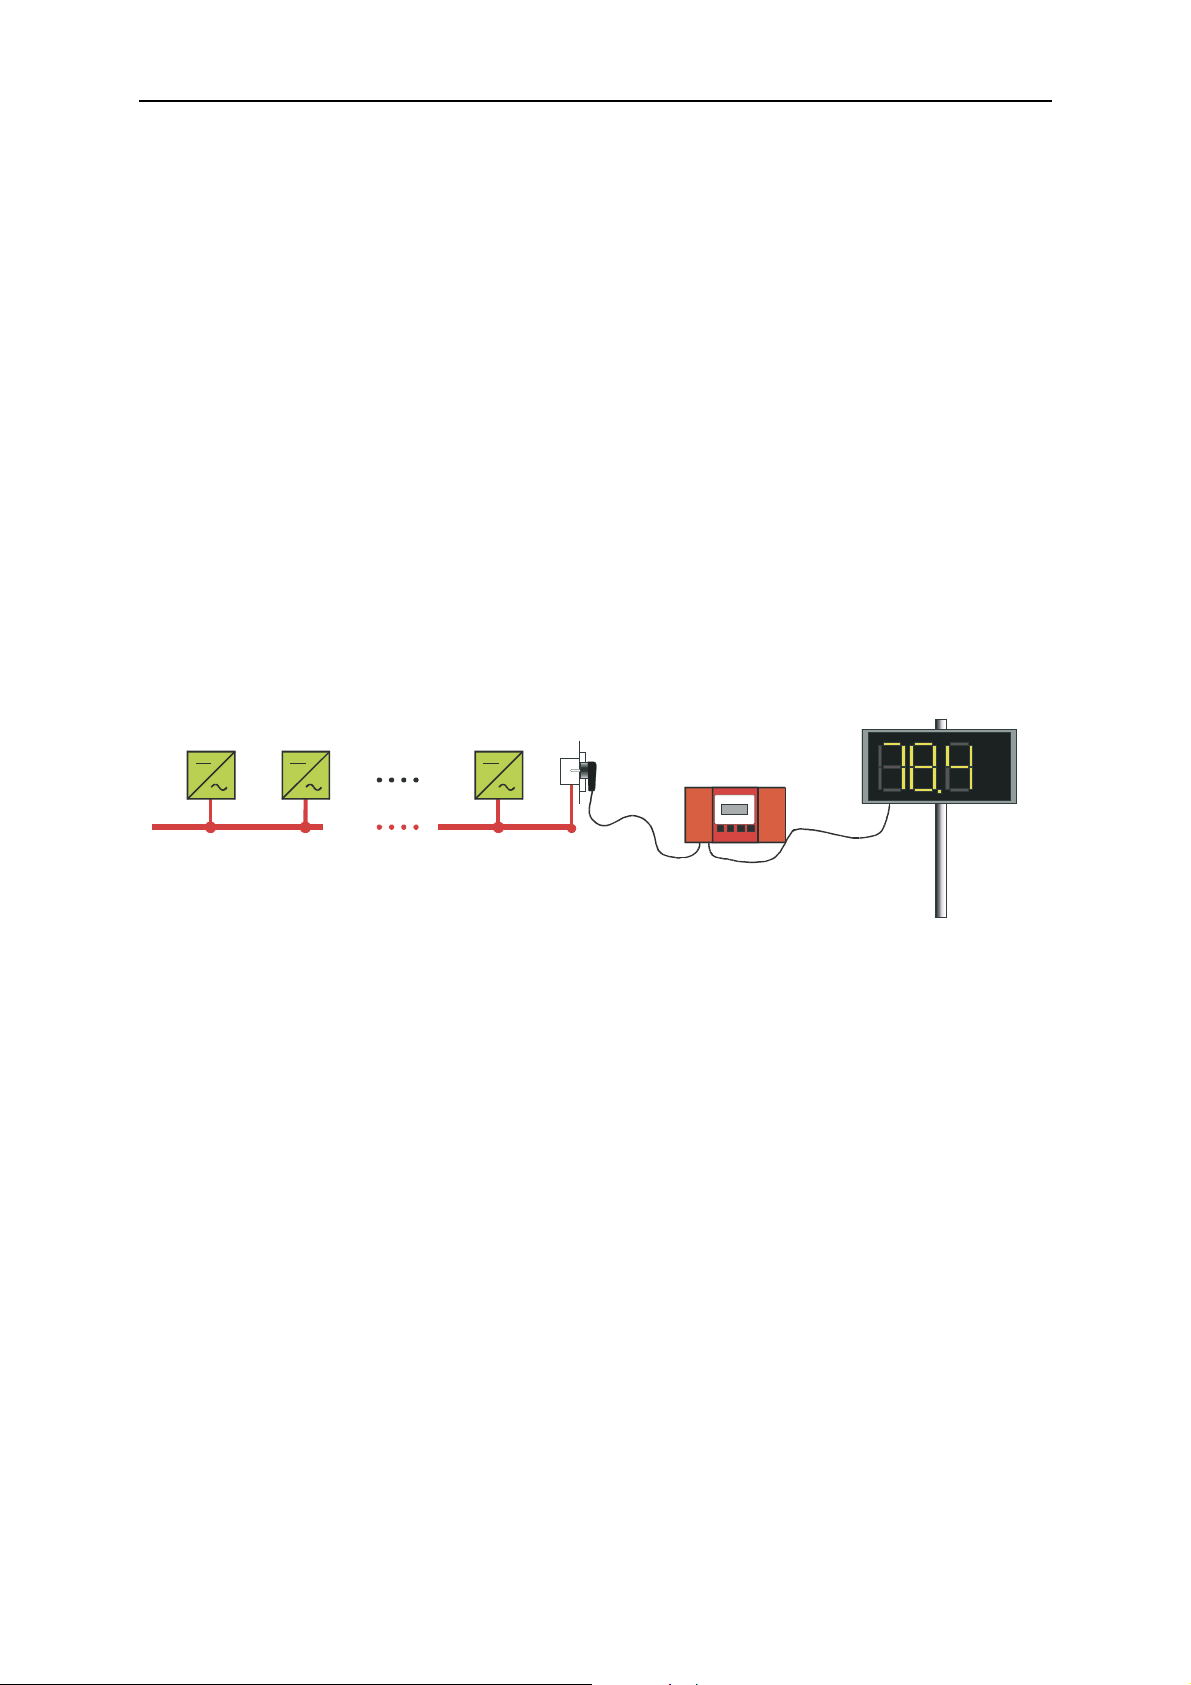
Sunny Boy Control Light Chapter 3: Installing of the connectors
• Siebert (PV-plant display or series S10, S30, S70)
• EnergieCom (mipan SI, one line, 2 to 15 digits)
Details concerning the different displays are available in the documentation of the
manufacturer. The external display is activated in the “external display” menu, details
about the activating are given in chapter 5.3.3.
3.4.1 DATALITE, HvG and Siebert
The external display is connected to the Sunny Boy Control Light with a serial cable,
port „PC“ (COM2). The maximal cable length is 12 meters.
External Display
Sunny Boy
Powerline 230 V / 50 Hz
Sunny Boy
Sunny Boy
Sunny Boy
Control Light
kW
Fig. 3.11: Direct connection of an external display (DATALITE, HvG and Siebert)
3.4.2 EnergieCom
EnergieCom displays are connected to the Sunny Boy Control Light
• with RS232, ‘PC (COM 2)’ 3 up to 5 displays (see. Fig. 3.11)
• with a RS485 converter up to 99 displays (see Fig. 3.12)
SUNBCL-11:NE - 26 - SMA Regelsysteme GmbH
Page 27
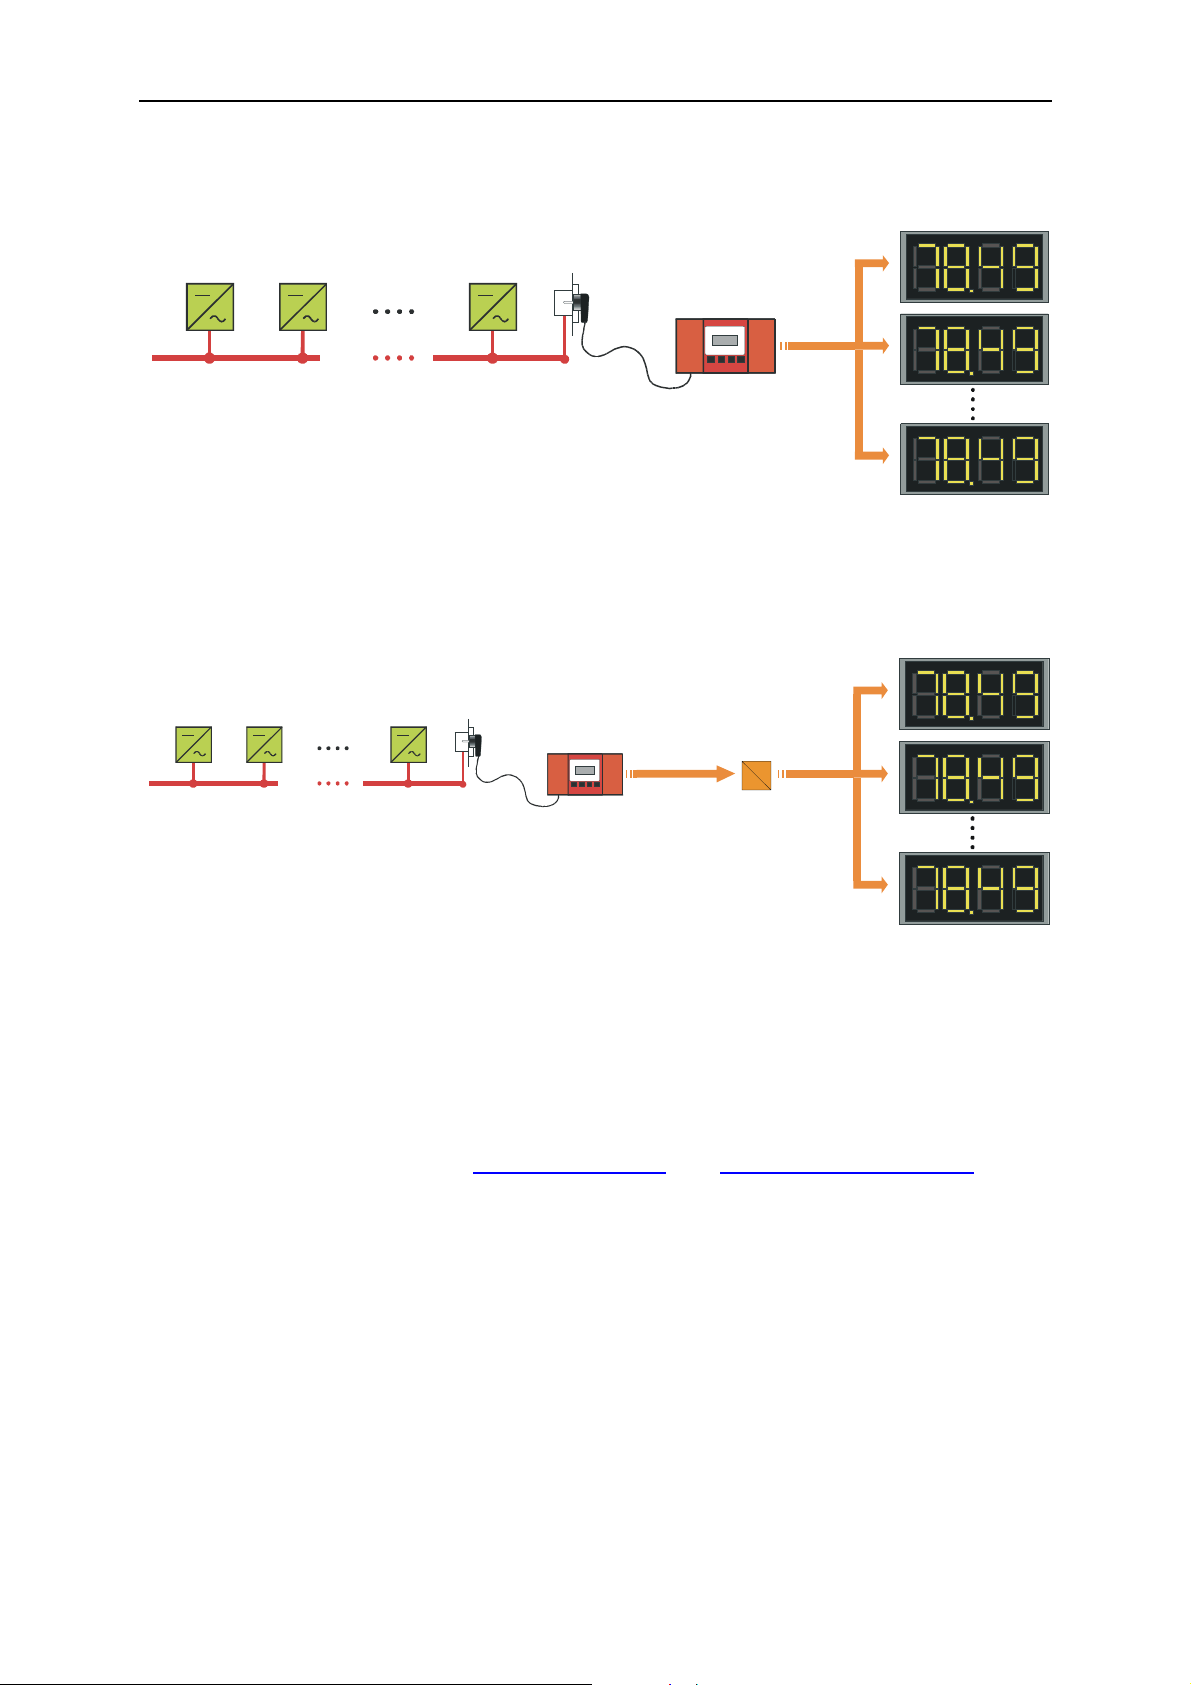
Sunny Boy Control Light Chapter 3: Installing of the connectors
99
max. 3 to 5
EnergieCom
Displays
Sunny Boy
Sunny Boy
Sunny Boy
Sunny Boy
Control
Powerline 230 V / 50 Hz
Fig. 3.12: Connection of EnergieCom displays with RS232
Sunny Boy
Powerline 230 V / 50 Hz
Sunny Boy
Sunny Boy
Sunny Boy
Control
Converter
RS 232
RS 232
max.
EnergieCom
Displays
RS 485
Fig. 3.13: Connection of EnergieCom displays with RS485
The cabling for both connection types is described in the following figure. Further
details are available in the manufacturer documentation of the display and
furthermore in the documentation of the interface converter. The web-sites of the
manufacturers are available at www.microsyst.de and www.phoenixcontact.de.
SUNBCL-11:NE - 27 - SMA Regelsysteme GmbH
Page 28
Sunny Boy Control Light Chapter 3: Installing of the connectors
+ 24 VDC
GND
DSUB9-Socket DSUB9-Socket
PIN
1
2
3
4
5
6
7
8
9
PIN
1
2
3
4
5
6
7
8
9
Sunny Boy Control Light
DSUB9-Socket
PIN
1
2
3
4
5
6
7
8
9
Sunny Boy Control Light
Display 3 to 5
RxD
GND
RS 232 / RS 485
Converter
Display 1
DSUB9-Socket
PIN
1
2
3
4
5
6
7
8
9
Display 2
Data -
Data +
GND
+ 24 VDC
GND
DSUB9-Socket
PIN
1
2
3
4
5
6
7
8
9
Display 1
DSUB9-Socket
PIN
1
2
3
4
5
6
7
8
9
Display 2
Display 3 to 99
Fig. 3.14: Cabling EnergieCom displays RS232 and RS485
SUNBCL-11:NE - 28 - SMA Regelsysteme GmbH
Page 29
Sunny Boy Control Light Chapter 4: Working with the Sunny Boy Control Light
4 Working with the Sunny Boy Control Light
4.1 Display on Power-Up
The Sunny Boy Control Light executes an automatic self-test at every start. On
error during this self-test, the according error or failure is indicated and - according to
system settings - an external signal is sent out or the beeper is activated. If no errors
are detected, the Sunny Boy Control Light will simply display its serial number and
software version.
[ SUNNY BOY ]
[CONTROL LIGHT ]
SerNoxxxxxxxxxx
SoftwareV2.xx
Fig. 4.1: Display on Power-Up
After this you have to input the date and time.
[ DATE/TIME ]
MM.DD.YYYY
hh:mm
Fig. 4.2: Date/Time settings
After completing the settings the Sunny Boy Control Light switches into Normal
Mode and starts "
"Online-Info
Online-Info"
""
Online-InfoOnline-Info
".
""
SUNBCL-11:NE - 29 - SMA Regelsysteme GmbH
Page 30

Sunny Boy Control Light Chapter 4: Working with the Sunny Boy Control Light
[ ONLINE-INFO ]
[ SCSBCL-002 ]
E-total
---kWh
Cyclic display of information, faults and warnings concerning Chap. 4.2
the plant
↓ ESC↑
[ MAIN MENU ]
Total Plant
Spot Values
Daily Yield
Events
--------------- Setup
↓ENTER ↑ESC
ß Sunny Boy Control Light main menu Chap. 4.3
ß total power, total energy yield etc. Chap. 4.3.1
ß spot values of selected device Chap. 4.3.2
ß measured daily data Chap. 4.3.3
ß Overview of failures and events Chap. 4.3.4
ß Setup menu (“see password”) Chap. 5
[ SETUP ]
Password
System
Interfaces
PV-Plant
Control
Diagnosis
Fig. 4.3: Menu structure of the Sunny Boy Control Light
(only with password) Chap. 5.1
ß lock/unlock menu with password Chap. 5
ß language, date and time, “Online-Info” configuration Chap. 5.2
ß interface configuration Chap. 5.3
ß device registration, detection, parameter, energy-offset Chap. 5.4
ß tolerances, FAX-Info Chap. 5.5
ß reports, communication test Chap. 5.6
SUNBCL-11:NE - 30 - SMA Regelsysteme GmbH
Page 31

Sunny Boy Control Light Chapter 4: Working with the Sunny Boy Control Light
4.2 Online Info
Online Info is the operating status of the Sunny Boy Control Light. It cycles
through various displays concerning the system status. The system status is
continuously monitored and according error messages or other warnings sent out in
case of a system malfunction.
"Online Info" cycles through the different displays automatically - it is additionally
possible to manually scroll through the display with the [[[[Enter]]]] key.
Messages Information Pause
start-up message serial number and software version 5 s (only once)
date/time date and time 5 s (only once)
plant data PAC and E today of the plant 10 s
warnings various warnings 10 s
malfunctions various errors until acknowledged
Fig. 4.4: Data from the „Online Info“
[[[[ESC]]]] exits „Online Info“. As long as you are in the main menu error displays are
suppressed.
Return to ”Online Info
Online Info“ from almost every menu entry by using the key
Online InfoOnline Info
combination [[[[↑↑↑↑]]]] + [[[[↓↓↓↓]]]], or the key [[[[ESC]]]] in the main menu. If no key is pressed in the
menu, the system returns to ”Online Info
Online Info“ after 15 minutes. For selecting the
Online InfoOnline Info
displayed channel see chapter 5.2.3.
SUNBCL-11:NE - 31 - SMA Regelsysteme GmbH
Page 32

Sunny Boy Control Light Chapter 4: Working with the Sunny Boy Control Light
4.3 Main Menu
You may select all available functions of Sunny Boy Control Light from the main
menu, and you may return to "Online In
[ MAIN MENUE ]
Total Plant
Spot Values
Daily Yield
Events
-------------- Setup
Online Info
Online InOnline In
ß Sunny Boy Control Light main menu
ß Total yield, total power etc. Chap. 4.3.1
ß Spot values for single devices Chap. 4.3.2
ß stored values for every device Chap. 4.3.3
ß events and failures Chap. 4.3.4
ß Setup menu Chap. 5
fo" by pressing the [[[[ESC]]]] key any time.
fofo
Fig. 4.5: Main Menu
The Sunny Boy Control Light will automatically return to "Online Info
Online Info" if no key
Online InfoOnline Info
is pressed within 60 sec in the main menu.
4.3.1 Total Plant
[ TOTAL PLANT ]
Pac
11.74kW
E-today
79kWh
E-total
188kWh
DATA STORAGE
Energy Values
7days
Detected
12devices
Registered
12devices
Fig. 4.6: Total plant
ß Total current output power
ß Total energy yield today
ß Total energy yield
ß Stored energy values
ß Number of detected inverters
ß Number of registered inverters
The function "Total Plant
Total Plant" gives you an overview of the operating condition of
Total PlantTotal Plant
your entire plant.
SUNBCL-11:NE - 32 - SMA Regelsysteme GmbH
Page 33

Sunny Boy Control Light Chapter 4: Working with the Sunny Boy Control Light
The Sunny Boy Control Light saves the data of the PV-plant of up to the
last 200 days. After this the oldest data is overwritten. Save the data to a
PC regularly in order to obtain a continuous overview of your PV-plants
performance.
4.3.2 Spot Values
The function "Spot Values
Spot Values" enables to show all accessible values of every single
Spot ValuesSpot Values
device. At first you will enter the following dialog, in which you may see the present
state of every single device.
[ SPOT VALUES ]
[ Pac/W Status ]
SC 2k operat
01 0 Stop
02 120 MPP
03 0 Stop
17 210 MPP
ß Device ID, current power (here 2 kW), status
ß Device ID, current power (here 120 W), status
Fig. 4.7: Device selection for Spot Value display
Select a device with [[[[Enter]]]] and all current values acquired in this device are
displayed. Scroll through the list with the [[[[↑↑↑↑]]]] and [[[[↓↓↓↓]]]] keys.
[01:SPOT VALUES]
Spot Time
14:11.00
Vpv
236.00V
Vpv-Setpoint
299.00V
Status
Mpp
Failure
------
[Device ID: Spot Values]
Fig. 4.8: Display of Spot Values for selected device
SUNBCL-11:NE - 33 - SMA Regelsysteme GmbH
Page 34

Sunny Boy Control Light Chapter 4: Working with the Sunny Boy Control Light
4.3.3 Daily Yield
The daily energy values will be saved for at least one year for every connected
device. The device with the identifier ’SC’ is the Sunny Boy Control Light itself and
therefore represents the total plant.
[ DAILY YIELD ]
SCSBCL-001
01WR700-08
02WR700-08
03WR700-04
17WR700-04
ß Device ID...Device Type
Fig. 4.9: Device Selection
Select a device with [[[[Enter]]]] and the daily energy values are displayed:
[05: YIELD kWh]
12/01/98 4.42
11/30/98 4.21
11/29/98 3.7
11/28/98 3.42
11/27/98 3.98
11/26/98 3.01
06/10/98 9.63
[Device ID: Energy yield in kWh]
Fig. 4.10: Daily Energy Values
[[[[↑↑↑↑]]]] and [[[[↓↓↓↓]]]] scroll through all available daily energy values.
SUNBCL-11:NE - 34 - SMA Regelsysteme GmbH
Page 35

Sunny Boy Control Light Chapter 4: Working with the Sunny Boy Control Light
4.3.4 Events
The Sunny Boy Control Light logs all events with date and time of occurrence.
Events are split in
• "Status"
• "Warnings"
• "Failures"
[ EVENTS ]
Status
Warnings
Failures
Fig. 4.11: Sub menu "Events"
[ STATUS ]
12.01.98 14:04
Startup
12.01.98 13:30
Time changed
12.01.98 13:07
Startup
ß Sunny Boy Control was restarted and connected to grid
ß Date / Time was modified
Fig. 4.12: Logged status messages
[ WARNINGS ]
11.17.98 11:43
FAX Retry
ß FAX transmission failure
Fig. 4.13:: Logged Warnings
[ FAILURES ]
11.17.98 11:43
Communication
ß Communication failure
Fig. 4.14:: Logged failures
SUNBCL-11:NE - 35 - SMA Regelsysteme GmbH
Page 36

Sunny Boy Control Light Chapter 4: Working with the Sunny Boy Control Light
All events with a " " (filled arrow) in the beginning have additional information in the
detailed view. Select the event and press [ENTER].
[ FAILURE ]
[ 01: WR15-005 ]
Communication
OK-total 57%
[Device ID: Device Type]
ß Details on failure
Fig. 4.15: Details on failure
[ESC] exits the detailed view of the logged event.
Summary of all Events
Event Type Description
Startup
Time Changed
Failure Conf.
System Reset
Device Failure
Offline
CommSpot20
Communication
Yield
24h Offline
FAX Plant-Inf.
FAX Error/War.
FAX Retry
FAX Error
Status Power on / system startup
Status Time or date was changed by user
Status The user confirmed a failure or warning
Warning System was restarted after a failure
Warning A connected device reported a failure
Warning A connected device does not reply
Warning Communication is partially disturbed
Failure Communication is disturbed over a longer time
Warning Energy yield of a single device is below threshold
Failure Device was offline for longer than 24 hours
Status FAX PV-plant info was sent
Status FAX failure warning fax was sent
Warning FAX transmission failure
Failure FAX transmission was not possible
Fig. 4.16: List of events
SUNBCL-11:NE - 36 - SMA Regelsysteme GmbH
Page 37

Sunny Boy Control Light Chapter 5: Menu Functions for Configuration
5 Menu Functions for Configuration
The "Setup
Setup" menu has all functions that exceed the normal operation of the Sunny
SetupSetup
Boy Control Light.
Please note that the usage of the functions in the "Setup
influence on the operational safety and the operation of the entire plant.
Use this menu carefully.
Setup" menu can have
SetupSetup
5.1 Password
The passwords for the Sunny Boy Control Light are on a separate sheet that was
shipped together with your "User Manual". The password level is automatically set to
"No Password" level
• at 00:00 h
• after a system reset or a restart
• or after entering a wrong password of none at all
The "Installer" password lets you change the operating parameters of the
Sunny Boy Inverters - THIS CAN INVALIDATE THE OPERATING
PERMISSION OF YOUR PV-PLANT. Use this parameter carefully.
The "User" password gives access to several sub-menus in the [SETUP] menu:
[ SETUP ]
Password
System
Interfaces
PV-Plant
Controlling
Diagnosis
Fig. 5.1: Setup Menu
SUNBCL-11:NE - 37 - SMA Regelsysteme GmbH
ß Locks ‘SETUP’ menu Chap. 5
ß Language Date and Time Chap. 5.2
ß Interface Configuration Chap. 5.3
ß device registration, detection, parameter, energy-offset Chap. 5.4
ß Thresholds, Signaling and Switching Contacts, Fax Info Chap. 5.5
ß Reports, Communication Test Chap. 5.6
Page 38

Sunny Boy Control Light Chapter 5: Menu Functions for Configuration
5.2 System
The menu "Setup-System
Setup-System" defines basic settings of the Sunny Boy Control Light
Setup-SystemSetup-System
such as Date/Time, Language etc.
[ SYSTEM ]
Language
Date/Time
Online-Info
--------------- Software
2.xxversion
Stand-By Mode
activated
Gatewaymode
automatic
Memory Function
-- Service Funct.
---
ß select language Chap. 5.2.1
ß set date and time Chap. 5.2.2
Chap. 5.2.3
ß installed software version
ß (only with Installer’s password)
ß energy saving mode on/off
ß select Gateway mode
ß (only with Installer’s password)
Fig. 5.2: Setup System
Description of the "Setup-System" Parameters
"Software
Software" is a fixed value and depends on the version installed on the Sunny Boy
SoftwareSoftware
Control Light. You cannot change it.
"Stand-By Mode
Stand-By Mode" activates or deactivates the standby function, which sends the
Stand-By ModeStand-By Mode
Sunny Boy Control Light into "standby" when no device is present for more than 15
minutes.
The “Gatewaymode
Gatewaymode” takes effect on the Sunny Boy Control Light as follows:
GatewaymodeGatewaymode
• Requests of Sunny Data Control were answered directly (‘automatic
• No packet forwarding to a connected PC (‘blocked
• Forwarding to a connected PC (‘transparent
transparent‘)
transparenttransparent
blocked‘)
blockedblocked
automatic‘)
automaticautomatic
SUNBCL-11:NE - 38 - SMA Regelsysteme GmbH
Page 39

Sunny Boy Control Light Chapter 5: Menu Functions for Configuration
"Memory Function
Memory Function" sets
Memory FunctionMemory Function
• the parameters to factory defaults ("Default P
• saves the parameter settings ("save parameter
• the channels shown in ‘Online-Info’ to factory defaults ("Default O.Info
Beyond this the "Memory Function
Memory Function" lets you
Memory FunctionMemory Function
• delete the stored daily values ("del Daily Val."
• delete the stored device channel information ("del Chan.Infos"
• reset the error counter and operation data ("
• reset only the error counter ("reset errors"
"reset errors")
"reset errors""reset errors"
• delete all data and set all parameters to factory default ("reset system"
Default Paaaaram.
Default PDefault P
save parameter")
save parametersave parameter
"del Daily Val.")
"del Daily Val.""del Daily Val."
"reset op.data"
""
ram.")
ram.ram.
"del Chan.Infos")
"del Chan.Infos""del Chan.Infos"
reset op.data")
reset op.data"reset op.data"
Default O.Info")
Default O.InfoDefault O.Info
"reset system")
"reset system""reset system"
5.2.1 Language Definition
[ LANGUAGE ]
deutsch
english
francais
Fig. 5.3: Selection of the language
Select the language with the arrow keys and confirm with [ENTER].
5.2.2 Date / Time
[ DATE/TIME ]
MM.DD.YYYY
hh:mm
Fig. 5.4: Setting date and time
Define the new date and time with the arrow keys and confirm with [ENTER].
SUNBCL-11:NE - 39 - SMA Regelsysteme GmbH
Page 40

Sunny Boy Control Light Chapter 5: Menu Functions for Configuration
5.2.3 Online-Info
The Message ‘Channel Cnt.
Channel Cnt.‘ specifies the number of displayed Channels (see
Channel Cnt.Channel Cnt.
Chapter 4.2).
[ ONLINE-INFO ]
Channel Cnt.
4
---------------
Chan. Select.
ß Number of displayed channels
ß Channel-Selection see below
Fig. 5.5: Configure ‘Online-Info’
To change the configuration choose ‘Chan. Select
Chan. Select‘. The list of available devices
Chan. SelectChan. Select
appears in the display.
[CHAN.SELECTION]
SCSBCL-02
01S0009401492
02WR20-001
03WR20-001
List of available Devices
ß Active line: Quick-info displays serial number and type
Fig. 5.6: Device- and Channel-Selection
Select a line of a device using the keys [ ↑↑↑↑ ] or [ ↓↓↓↓ ]. For 2 seconds the serial-number
of each device is shown in the active line. Choose [ENTER] for selecting a Channel.
[SC:C.SELECTION]
¯Pac
¯E-total
¯E-today
Operating Time
Netz-Ein
[ Device: Channel-Selection ]
ß selected Channel
ß selected Channel
ß selected Channel
↓ more Channels
Fig. 5.7: Channel-Selection
Channels shown in the ‘Online-Info’ are marked with a point. Use [ENTER] to
change the selection.
Choose [ESC] to reach the higher menus. When leaving “ONLINE-INFO“ all changes
must be confirmed in order to take effect.
SUNBCL-11:NE - 40 - SMA Regelsysteme GmbH
Page 41

Sunny Boy Control Light Chapter 5: Menu Functions for Configuration
5.3 Interfaces
[ INTERFACES ]
Communication
Modem
Ext. Display
Fig. 5.8: Setup Interfaces
5.3.1 Communication
The installed interfaces are automatically detected by the Sunny Boy Control Light
and displayed in this menu.
[COMMUNICATION ]
COM1:Sunny Boy
COM2:PC
Fig. 5.9: Selection of an interface
The Baud-rate can be defined for both interfaces. Powerline communication is limited
to 1200 Baud. COM2 can be set to 19200 Baud for RS232 connections.
[COM1:Sunny Boy]
Medium
PowerLine
Baudrate
1200Baud
Protcol
Sunny-Net
Fig. 5.10: COM1 Interface
5.3.2 Modem
Switch the modem and the Sunny Boy Control on at the same time. The Sunny Boy
Control Light will automatically detect the modem after approximately 1 minute. The
parameter COM2:PC automatically switches from RS232 to RS232(Modem). Check
the connection to the modem and the modem’s power supply if the modem was not
SUNBCL-11:NE - 41 - SMA Regelsysteme GmbH
Page 42

Sunny Boy Control Light Chapter 5: Menu Functions for Configuration
detected and turn the Sunny Boy Control on again, as it only conducts a modem
detection cycle on power-up.
[ MODEM ]
Interface
deactivated
Device
Hayes
Init-String
AT&FE0V1X0Q0L
ATS=1_________
AT&H0&D0&W____
External Code
________
Dialmode
tone (MFW)
--------------- Modem-Test
Fig. 5.11: Fax-Modem Configuration
The “Hayes
Hayes“ init-strings should be accepted by any FAX class 2 or 2.0 modem - in
HayesHayes
certain cases it can be necessary to modify the init-strings. For this use the setting
”us
user defined
er defined”. Do not modify the init-strings if you are not absolutely sure about
usus
er defineder defined
what you are doing. For operation with a private branch exchange (PBX) enter the
Dial out Code in field ”External Code
External Code
External CodeExternal Code
”. I.e. choose ”0W
0W” if it may be necessary
0W0W
that there is short break after dialing out.
When using the ”Siemens GSM
Siemens GSM” you’ll have to adapt the setting of “PIN” in the third
Siemens GSMSiemens GSM
sequence.
Select ”Modem-Test
Modem-Test” to check the proper function. The Sunny Boy Control sends
Modem-TestModem-Test
the init strings one after the other to the modem and checks the modem’s response.
Beside the Init-strings the Sunny Boy Control checks the dialtone detection. The init
strings must be modified - or the modem is not suitable if an error occurs. Some
Modem-types could respond an ”Error
Error”. This is not relevant for remote diagnosis via
ErrorError
PC and modem.
SUNBCL-11:NE - 42 - SMA Regelsysteme GmbH
Page 43

Sunny Boy Control Light Chapter 5: Menu Functions for Configuration
[ MODEM-TEST ]
Init1OK
Init2OK
Init3OK
DialtoneOK
Fig. 5.12: Result of Modem-test
If you want to use the FAX-Function check with ”Test-FAX
is built up right (see Chapter 5.5.2).
ISDN: Make sure that the ISDN system is correctly configured for the
Sunny Boy Control fax transmission. The recommended setting is
"multifunctional" or similar.
5.3.3 External Display
Test-FAX” whether the connection
Test-FAXTest-FAX
This menu defines the port for connecting the external displays. Further sub-menues
are available, depending on the selected display type.
[ EXT. DISPLAY ]
Interface
deactivated
Type
EnergieCom
Fig. 5.13: Activating the external display and defining the type
The following displays are available in the menu-entry “Type”:
• HvG
• Siebert
• EnergieCom
• DATALITE
SUNBCL-11:NE - 43 - SMA Regelsysteme GmbH
Page 44

Sunny Boy Control Light Chapter 5: Menu Functions for Configuration
r
The channel selection and the numeric format for the HvG, Siebert and
DATALITE cannot be changed.
Sunny Boy Control detects a connected PC. So the port need not be
stopped for operation with an external display. If there are no requests fo
60s the Sunny Boy Control sends Display-Data to COM2.
HvG and Siebert
Definition of the ASCII string:
Start E-Total
[kWh]
# LLLLLL LLLL LLRR LLRR LLLL LLLL LLLL CR,LF
E-today
[kWh]
Pac
[kW]
Iac-Ist
[A]
Upv-Ist
[V]
Uac
[V]
E-today
[Wh]
End
(Siebert)
L = left of the decimal point R = right of the decimal point
The ASCII string is sent with 2400 Baud (no parity, 8 bit, 1 stop bit) on the port ‘PC
(COM 2)’ and is updated regularly.
Example for the ASCII string
The string ‘#001104001802470314018902301827’
results in the following data to be displayed:
Start E-Total
[kWh]
Value 1104 18 2,47 3,14 189 230 1827
ASCII # 001104 0018 0247 0314 0189 02 30 1827 CR,LF
E-today
[kWh]
Pac
[kW]
Iac-Ist
[A]
Upv-Ist
[V]
Uac
[V]
E-today
[Wh]
End
(Siebert)
EnergieCom
Selecting EnergieCom as type results in various configuration possibilities. Measured
values of the Sunny Boy Control Light and the registered Sunny Boys can be
displayed. Up to 99 different displays can be generated in EnergieCom format. The
number of the display is the same as the two address bytes in the serial telegram.
Examples are given in Fig. 5.17.
SUNBCL-11:NE - 44 - SMA Regelsysteme GmbH
Page 45

Sunny Boy Control Light Chapter 5: Menu Functions for Configuration
[ EXT. DISPLAY ]
Interface
COM2:PC
Type
EnergieCom
--------------- configure
Fig. 5.14: External display “EnergieCom”
Configuration
The line selected with the cursor additionally shows the selected device and the
measured channels. Dot on the left indicates if the display is activated or not (dot =
selected; no dot = not selected).
[ DISPLAY-NO. ]
¯Display01
¯SC:E-Total
¯Display03
¯Display04
¯Display05
¯Display06
Display07
Display99
Fig. 5.15: Overview of the 99 possible displays
[ENTER] confirms the selection and displays an overview of the defined parameters.
Overview of the defined parameters
This sub-menu shows all settings of the selected display.
[ DISAPLAY 06 ]
Dev.:Channel
SC:E-today
Format06.2
Fig. 5.16: Display settings
The numeric format can be edited in the bottom line.
SUNBCL-11:NE - 45 - SMA Regelsysteme GmbH
Page 46

Sunny Boy Control Light Chapter 5: Menu Functions for Configuration
• The number left of the decimal point defines the total number of digits
• The number right of the decimal point defines the number of digits right of the
decimal point.
The example above, in Fig. 5.14 could result in the display of 1240.35 kWh.
Selecting the line above lets you select the channel for displaying data.
Device Selection
[ DISPLAY 02 ]
[ DEVICE ]
deactivated
¯SCSBCL-002
01WR725-16
01WR20-001
[ selected Display ]
List of available Devices
ß selected channel
Fig. 5.17: Device selection
The selected device is marked with a dot on the left, the line with the cursor
additionally shows the serial number of the selected device. Different devices are
selected by moving to the respective device with the cursor and pressing [ENTER].
This moves the dot on the left to the new selected device. Pressing [ENTER] once
more puts you to channel selection. Setting the dot to the upper line deletes the
settings for the deletes the settings for the display and deactivates it.
Channel Selection
[ DISPLAY 02 ]
[SC:C.SELECTION]
Pac
¯E-total
E-today
Operating Time
[ selected Display ]
[ Device: Channel Selection ]
ß selected channel
Fig. 5.18: Channel selection
The cursor buttons move the selection within the available channels. [ENTER]
selects the channel while the dot on the left indicates this. The display is now
SUNBCL-11:NE - 46 - SMA Regelsysteme GmbH
Page 47

Sunny Boy Control Light Chapter 5: Menu Functions for Configuration
configured. [ESC] leaves the menu. All changes must be confirmed in order to take
effect.
The following example shows the first 6 displays while the default values are used for
device, channel and format.
Display Device:Channel Format EnergieCom Display
01 SC:Pac 4.0
02 SC:E-total 4.0
03 SC:E-today 4.0
04 SC:Pac 6.2
05 SC:E-total 6.2
06 SC:E-today 6.2
7
4 8 2 8
2 3
6. 5 4
4 8 2 8. 4 7
2 3. 3 5
Fig. 5.19: Example for EnergieCom displays
• Zeros on the left are not displayed.
• The unit for Pac always is kW (even when the unit on the Sunny Boy Control
Light is “Watt”). Display in Watt is done by setting the format to “4.3”.
• Too large numbers are indicated with “o.Error” (overflow).
• The ASCII string is sent via port ‘PC (COM 2)’ (8, 1, N).
Example
05B@@482847 results in the following hexadecimal output
02 30 35 42 40 40 34 38 32 38 34 37 03
Start Address Format
P1 P2 P3
Hex 02 30 35 42 40 40 34 38 32 38 34 37 03
ASCII 0 5 B @ @ 4 8 2 8 4 7
Description Display 05 Point at digit 4 4828,47
Value End
SUNBCL-11:NE - 47 - SMA Regelsysteme GmbH
Page 48

Sunny Boy Control Light Chapter 5: Menu Functions for Configuration
Definition of the decimal point with P1, P2, P3
• P1 defines the decimal point for the digits 1 to 5,
• P2 defines the decimal point for the digits 6 to 10
• P3 defines the decimal point for the digits 11 – 15
Only one of the 3 bytes is set, the other two bytes are set to @. No decimal point is
defined with @@@.
Example: The decimal point is defined to the 8th digit with ‘@ D @’.
Decimal point at digit:
P1 P2 P3
1 6 11 80 P x50 010 10000
2 7 12 72 H x48 010 01000
3 8 13 68 D x44 010 00100
4 9 14 66 B x42 010 00010
5 10 15 65 A x41 010 00001
- - - 64 @ x40 010 00000
ASCII Hex Binary
Fig. 5.20: Definition of the decimal point
Example for the first six Display-Addresses
Telegram Adr. Display Format Value / Unit Channel
02 30 31 40 40 40 30 30 30 37 03 01 7 4.0 0,654 kW Pac
02 30 32 40 40 40 34 38 32 38 03 02 4828 4.0 4828 kWh E-total
02 30 33 40 40 40 30 30 32 33 03 03 23 4.0 23 kWh E-today
02 30 34 42 40 40 30 30 30 30 36 35 03 04 0.65 6.2 0,654 kW Pac
02 30 35 42 40 40 34 38 32 38 34 37 03 05 4828.47 6.2 4828,47 kWh E-total
02 30 36 42 40 40 30 30 32 33 33 35 03 06 23.35 6.2 23,35 kWh E-today
SUNBCL-11:NE - 48 - SMA Regelsysteme GmbH
Page 49

Sunny Boy Control Light Chapter 5: Menu Functions for Configuration
DATALITE
The Sunny Boy Control Light supports DATALITE DX systems with 8 lines and 16
columns. The display is activated by selecting the interface. After you select
DATALITE the Sunny Boy Control Light displays the following:
[ EXT. DISPLAY ]
Interface
COM2:PC
Type
DATALITE
--------------- configure
ß Activation by selecting an interface
ß Display-type
ß Menu ‘Set time’ (only with type DATALITE!)
Fig. 5.21: External display ‘DATALITE’
The internal date and time of the DATALITE display can be adjusted with the Sunny
Boy Control Light - e.g. for daylight saving time adjustment.
The internal time of the DATALITE display is adjusted as follows:
• Connect the DATALITE display to the serial port of the Sunny Boy Control
Light
• Activate the serial port
• Select “configure” and press [ENTER] – The Sunny Boy Control Light
displays ‘
[ DATALITE ]
Time Set
O.K.
O.K.
O.K.’.
O.K.O.K.
ß appears if information has been sent
Fig. 5.22: Adjusting internal time
The internal time of the DATALITE display is then synchronized with the internal time
of the Sunny Boy Control Light. [ESC] brings you back to the upper level menues.
The internal clock of the DATALITE display keeps running even when
SUNBCL-11:NE - 49 - SMA Regelsysteme GmbH
Page 50

Sunny Boy Control Light Chapter 5: Menu Functions for Configuration
there is no connection to the Sunny Boy Control Light . A time
adjustment after a power failure is not necessary.
The information is transmitted to the DATALITE display every 10 seconds as shown
in Fig. 5.21.
Power:
654 W
Today:
4.16 kWh
Total:
24177 kWh
Date: 29.10.99
Time: 13:57:25
Fig. 5.23: Example for the DATALITE display
The output power is displayed in kW with two decimal points whenever the power
exceeds 999 W.
ß output power of all Sunny Boys (unit changes automatically from
W to kW)
ß Energy yield today
ß Energy yield total
This results in the following maximal values:
• 9 999.99 kW for Pac
• 9 999.99 kWh for E-today
• 9 999.999 kWh for E-total
The ASCII string is sent to the DATALITE display with 4800 Baud (8, N, 1) via ‚PC
(COM 2)’.
SUNBCL-11:NE - 50 - SMA Regelsysteme GmbH
Page 51

Sunny Boy Control Light Chapter 5: Menu Functions for Configuration
Example DATALITE Display
Telegram (Hex) Meaning / Display
01 20 1C
30 41 6B 74 75 65 6C 6C 3A 1C
31 20 20 20 20 36 35 34 20 57 20 1C
32 48 65 75 74 65 3A 1C
33 20 20 20 34 2E 31 36 20 6B 57 68 1C
34 47 65 73 61 6D 74 3A 1C
35 20 20 32 34 31 37 37 20 6B 57 68 1C
36 44 61 74 75 6D 3° 20 20 25 44 2E 25 4D 2E 25 59 1C
37 5A 65 69 74 3A 20 20 20 25 48 3A 25 6D 3A 25 53 1C
16 0D 01 30 1C
0D
Start, Controller-Address, Field Separator
Power:
654 W
Today:
4.16 kWh
Total:
24177 kWh
Date: %D.%M.%Y
Time: %H:%m:%S
Synchronisation
End (CR)
Example for setting the internal time
at 30/11/1999 14:18:58
Telegramm (Hex) Meaning
01 7F 1C Start, Controller-Address, FS
1B 54 Adjust Real-Time-Clock
33
2B
20 No
3E
2E
32
5A
0D End
Year 1999: x33 = d51 = d99 + d32 – d80
Month 11: x2B = d43 = d11 + d32
Day 30: x2E = d62 = d30 + d32
Hour 14: x2E = d46 = d14 + d32
Minute 18: x32 = d50 = d18 + d32
Second 58: x5A = d90 = d58 + d32
Further details are available in the user manual of the display and on the internet
pages of the DATALITE manufacturer (www.datalite.nl).
SUNBCL-11:NE - 51 - SMA Regelsysteme GmbH
Page 52

Sunny Boy Control Light Chapter 5: Menu Functions for Configuration
[ PV-Plant
[REGISTRATION ]
[
WR700-08
5.4 PV-Plant - Setup
]
Registration
Detection
Parameter
--------------- E-Offset
100Wh
Fig. 5.24: "PV-Plant" - SETUP
Energy - Offset
E-Offset is used to define a difference between the display of your energy counter
and the displayed value "E-total": This value is added to the value the Sunny Boy
Control Light computes.
Chap.5.4.1
Chap.5.4.2
Chap.5.3
see below.
5.4.1 Registration
The device registration displays all detected devices with the device ID and the
device type.
SCSBCL-001
A1WR700-08
A2WR700-08
Fig. 5.25: "Registration" - PV-Plant
Select a device and press [Enter] in order to get detailed information consisting of
device ID, device type and network address of the device.
]
S/N 09401478
ID A2
Net 00/00/016
Fig. 5.26: Device ID and network address
ß device ID, device-type - serial no
[device type]
ß serial no. of Device
ß device ID
ß (bus address / string address / device address)
Every device has an unique net address for identification within the network.
SUNBCL-11:NE - 52 - SMA Regelsysteme GmbH
Page 53

Sunny Boy Control Light Chapter 5: Menu Functions for Configuration
Device ID
You may modify the device registration (01 .. 50) and net address automatically
placed by the Sunny Boy Control Light for every device separately, by pressing the
[Enter] key in order to select it and then to alter the settings with the keys [↑] and [↓].
Confirm every single character with the [Enter] key.
By using structured device registrations you can achieve a simple identification of the
specific devices within Sunny Boy Control Light menu. For example a device
registration indicates 'AL' for Above Left' or 'A1' for surface A, device 1'. In some
cases it makes sense to mark the according system components with according
signs or similar.
Please note that the device registration 'SC' is reserved by the Sunny Boy Control
Light.
Special device registration '99'
If you want to delete a device from the registration (e.g. to replace by another one)
give the device registration '99'. The device will be deleted after confirming.
Net Address
Within the network each device has to have an individual net address which is
divided in a bus address (0..15), a string address (0..15) and a device address
(0..255).
Bus Address and String Address
The bus address and the string address are identical for all devices monitored by the
Sunny Boy Control Light. They may adjusted with the Sunny Boy Control Light
(Fig. 5.12 select device 'SC') and modified for all devices on the plant simultaneously.
The default setting of the bus address and string address is 00/00. An alteration of
the bus- or string address is only necessary in the following cases:
SUNBCL-11:NE - 53 - SMA Regelsysteme GmbH
Page 54

Sunny Boy Control Light Chapter 5: Menu Functions for Configuration
[ DETECTION
• Separation from another plant
You should change the bus address of your system if you detect units from other
plants in the neighborhood. This ensures that the acquired data is correct and the
transmission is stabile.
• Large Plants
If your plant consists of several strings controlled by several Sunny Boy Control
Light each string must have a different address.
Device Address
Every device in your PV-plant has to have an unique device address in order to
prevent erroneous data transmission. During the detection of the PV-plant units the
single Sunny Boy Control Light automatically receive individual device addresses,
in recognition of eventual previous detection cycles. In case, however, a device is
registered with the same address, the new device gets a new individual device
address.
5.4.2 Detection - Setup
The Sunny Boy Control Light detects all accessible devices. The status informs
you of the current progress.
]
searching for
new devices
(status)
Fig. 5.27: Sunny Boy Control Light device detection procedure
After each detection cycle all devices found by Sunny Boy Control Light will be
displayed one after the other as follows:
New device
type xx
S.No xxxxxxxxxx
Fig. 5.28: New devices found
SUNBCL-11:NE - 54 - SMA Regelsysteme GmbH
Page 55

Sunny Boy Control Light Chapter 5: Menu Functions for Configuration
[ DETECTION
[ DETECTIO
N
Please compare the serial numbers of the devices found by Sunny Boy Control
Light with the serial numbers of your devices, which you have written down before.
Register the devices with [[[[Enter]]]] in the device list resp. remove devices that you do
not want to register with [[[[ESC]]]]. Please note that the respective detected device is
registered automatically without confirmation if no key is pressed.
After this you will see the total number of newly registered devices. Please check if all
installed devices were found by Sunny Boy Control Light. If not, you should
activate "search again
new xx devices
tot yy devices
search again?
Fig. 5.29: End of detection procedure
By pressing the [[[[Enter]]]] key you may re-run the search as it is possible that the
Sunny Boy Control Light does not find all devices in the first search cycle. If no key
is pressed the Sunny Boy Control Light will automatically begin a new detection
cycle after 60 sec. If several attempts were unsuccessful, please check whether you
have correctly installed the devices to be detected. If Sunny Boy Control Light does
not detect a device in spite of a repeated search, please read chapter 7.2,
“Troubleshooting Powerline Communication”.
search again" with [[[[Enter]]]].
search againsearch again
]
Finish the device detection by pressing the [[[[ESC]]]] key.
After this you will be prompted to confirm the configuration. During the initial
installation the number of new devices corresponds with the total number of
registered devices.
Do you want
to save the
changes?
Fig. 5.30: Saving the detected Sunny Boys
SUNBCL-11:NE - 55 - SMA Regelsysteme GmbH
]
Page 56

Sunny Boy Control Light Chapter 5: Menu Functions for Configuration
• [[[[ESC]]]] cancels the detection sequence.
• [[[[Enter]]]] confirms the configuration and Sunny Boy Control Light begins
standard operation.
5.4.3 Parameter Setup
The parameter setup function is used for changing the default operating parameters
of the connected Sunny Boy String Inverters. Select a device before changing the
parameters:
[ PARAMETER ]
SCSBCL-001
A1WR700-08
A2WR700-08
02WR700-08
ß device ID, device-type - serial no
Fig. 5.31: Device selection for parameter changing
Example of a Parameter List
[02: PARAMETER ]
Upv-Start
160.00V
T-Start
10.00s
Upv-Stop
120.00V
Fig. 5.32: Parameter display and modification
The parameters available for this device are displayed. The [[[[↑↑↑↑]]]] and [[[[↓↓↓↓]]]] keys scroll
through the different parameters. [[[[Enter]]]] selects the parameter for the according
modification and is then changed digit by digit.
This can invalidate the operating permission of your PV-Plant.
SUNBCL-11:NE - 56 - SMA Regelsysteme GmbH
Page 57

Sunny Boy Control Light Chapter 5: Menu Functions for Configuration
5.4.4 Adding a New Device
If you want to add a new device to an existing plant, proceed according to the
following steps:
• install the device
• start the configuration menu "Setup
serial number on the display).
• when the new device appears on the display and you are prompted to confirm this
device. Please confirm this in order to add the according device to your plant.
If the new device is not detected check the cabling and the connection.
SetupPV-Plant
SetupSetup
PV-PlantDetection
PV-PlantPV-Plant
Detection" (you will see the
DetectionDetection
5.4.5 Removing a Device
You may remove a device from the plant by giving it the identifier ‘99’ in the
"Setup
SetupPV-Plant
SetupSetup
PV-PlantRe
PV-PlantPV-Plant
Reggggistration
ReRe
istration" menu.
istrationistration
5.5 Control
[ CONTROL ]
Tolerances
FAX-Info
Fig. 5.33: Sub menu "Control"
5.5.1 Tolerances
"Tolerances
Tolerances" defines the thresholds for generating warnings concerning the
TolerancesTolerances
operation of the PV-plant.
SUNBCL-11:NE - 57 - SMA Regelsysteme GmbH
Page 58

Sunny Boy Control Light Chapter 5: Menu Functions for Configuration
[ TOLERANCES ]
Warnings
15min
Offline
30min
Energy
50%
Communication
50%
Fig. 5.34: Definition of the thresholds for the "Control"
"Warnings
Warnings" defines how long the failure must be occurring before a warning is
WarningsWarnings
generated by the Sunny Boy Control Light.
"Offline
Offline" defines the maximum period of time a device may be off-line before a
OfflineOffline
warning is generated. (This is based on the entire operating time of the plant as
"online time" of the first device and the shutdown of the last device). The minimal
time is 15 minutes.
"Energy
Energy" defines the deviation of a single device from the average yield of the entire
EnergyEnergy
plant in percent. Be generous with this parameter (or let’s say more tolerant, as it is in
the tolerance menu) due to the fact that there are always slight deviations resulting
from different panels, panel geometry and temperature. See the below example for
details. And note that the "energy
sense for plants with only one Sunny Boy Inverter since single inverters in a PV-plant
with only one inverter simply do not deviate from the average of the entire plant.
0% deactivates the "Energy
The following example is a PV-plant with 4 inverters (A, B, C and D)
with a defined tolerance of 90%:
Energy" controlling function.
EnergyEnergy
energy" controlling function naturally does not make
energyenergy
SUNBCL-11:NE - 58 - SMA Regelsysteme GmbH
Page 59

Sunny Boy Control Light Chapter 5: Menu Functions for Configuration
Device Yield Warning Remarks
A
B
C
D
total 6,0 kWh
average
tolerance
2,2 kWh none The device is operating optimally
1,7 kWh failure Yield is below the tolerated value -> warning
0 kWh offline Device is offline
2,1 kWh none The device is operating optimally
2,0 kWh Average computed from the active inverters
1,8 kWh Minimum yield for not generating a warning
Fig. 5.35: Tolerancing 4 Sunny Boy inverters
Inverters that are offline do not influence the calculation of the average
yield.
‘Communication
Communication’ defines the tolerable percentage of corrupt data packages.
CommunicationCommunication
5.5.2 FAX-Info
The Sunny Boy Control Light can send fax messages if desired. An external faxmodem must be installed on the COM2:PC port.
Sunny Boy Sunny Boy Sunny Boy
Powerline Mains Communication
Sunny Boy
Control Light
RS 232
modem
telephone line
Fig. 5.36: Schematic cabling of the fax-modem connection
A detailed description of the connection of the modem is in the "Installation Guide".
"FAX-Info
FAX-Info" activates / deactivates the Fax message function:
FAX-InfoFAX-Info
SUNBCL-11:NE - 59 - SMA Regelsysteme GmbH
Page 60

Sunny Boy Control Light Chapter 5: Menu Functions for Configuration
[
FAX-Inf
[
EVENTS
[ RECIPIENT
o ]
FAX-Info
deactivated
---------------
Recipient
Sender
Test-FAX
Fig. 5.37: "FAX-Info" configuration menu
Events
Fax messages can be sent as follows:
• "Plant-Info
• "Errors / Warnings
Plant-Info" as report of energy yield of the plant
Plant-InfoPlant-Info
Errors / Warnings": as report of occurred failures and warnings
Errors / WarningsErrors / Warnings
]
Plant-Info
daily report
Warnings
Errors
hourly Report
--------------- Send at
23:45h
Fig. 5.38: Definition of events for fax message
Recipient
Company/Name
FIRMA_XYZ-SOL
HERRN_MUSTERM
--------------- Area Code
________
Phone Number
______________
Fig. 5.39: Configuration of fax message recipient
SUNBCL-11:NE - 60 - SMA Regelsysteme GmbH
]
Page 61

Sunny Boy Control Light Chapter 5: Menu Functions for Configuration
"Company/Name": Two lines are available for identifying the recipient.
"Area Code" and "Phone Number" define the number of the fax machine you want
to send the fax messages to.
Sender
[ SENDER ]
Plant Name
MEINE_ANLAGE_
_____________
Plant PhoneNo
+49_123_12345
Fig. 5.40: Configuration of fax sender
“Plant Name": Two lines are available for identifying the fax header.
"Plant PhoneNo" appears in the fax-header, too.
Test-FAX
[ TEST-FAX ]
Start
Fig. 5.41: Send Test messages
This function can be used to generate Fax-messages in order to check the settings
you defined. Detailed information is then displayed on the Sunny Boy Control Light
step by step. In case you have trouble with the fax transmission, check the settings
i.e. modem configuration and init string.
[ TEST-FAX ]
FAX-Status
Wait Data
OK £
--------------- s:AT&FE0V1X1Q0
r:OK
Fig. 5.42: Send / receive test messages
SUNBCL-11:NE - 61 - SMA Regelsysteme GmbH
...Init Com, ...Init Modem, ...Init FAX, ...Dial, ...Send...
ß when OK or ERROR with [↓
ß sent
ß received
↓ ] to the sequences
↓↓
Page 62

Sunny Boy Control Light Chapter 5: Menu Functions for Configuration
The test fax looks like this:
Fig. 5.43: Example for a test fax
Here two simple examples of the fax messages:
Failures / Warnings
Daily Plant-Info
SUNBCL-11:NE - 62 - SMA Regelsysteme GmbH
Page 63

Sunny Boy Control Light Chapter 5: Menu Functions for Configuration
SUNBCL-11:NE - 63 - SMA Regelsysteme GmbH
Page 64

Sunny Boy Control Light Chapter 5: Menu Functions for Configuration
5.6 Diagnosis
The "Diagnosis
connected Sunny Boy inverters.
Diagnosis" function will help you get information about the status of the
DiagnosisDiagnosis
[ DATA INQUIRY ]
Report
Communication
Fig. 5.44: "Diagnosis" function
5.6.1 Report
[ REPORT ]
01OK
02Communic.
03OK
04Energy
50OK
Fig. 5.45: Device selection for report
The report for the devices is split in three sections:
Communication
Communication: Total transmitted data packages and transmitted data packages
CommunicationCommunication
with failures in %. (The status is "Offline" whenever the value set in SetupTolerances-Offline is reached.)
Accessible
Accessible: Activity this day and the time the device was offline
AccessibleAccessible
Yield
Yield: The device’s yield yesterday and the average yield of all devices yesterday
YieldYield
SUNBCL-11:NE - 64 - SMA Regelsysteme GmbH
Page 65

Sunny Boy Control Light Chapter 5: Menu Functions for Configuration
[01:REPORT ]
COMMUNICATION:
OK-Spot20100%
OK-Toatal100
Packets 3440
Errors 0
ACCESSIBLE:
Online04:17h
Offline00:00h
Yield:
E-Yesterday
4980Wh
E-Average
5070Wh
ß Device ID, Report
ß Communication data for the present day
ß Total communication quality of the present day
ß sent requests
ß Responses with failures
ß operation today
ß not available since
ß Energy yield yesterday
ß yield from this device
ß average yield of other devices
Fig. 5.46: Diagnosis report for single device
The communication status is set to "Communic." if the communication is lower as
defined in "Tolerance".
5.6.2 Communication
"Communication
Communication" helps you diagnose the communication with the Sunny Boy
CommunicationCommunication
inverters. Select a single inverter for diagnosis first.
[COMMUNICATION ]
01WR700-08
02WR700-08
03WR700-07
04WR700-07
Fig. 5.47: Device Selection
The Sunny Boy Control Light then sends data requests to the selected Sunny Boy
and evaluates the communication. The percentage of correct transmitted packages is
calculated from the last 20 transmissions.
ß Device ID / Serial No.
[02:COMMUNICAT.]
OK 99%
Packets 10233
Errors 123
ß percentage of correct transmissions
Fig. 5.48: Communication test
SUNBCL-11:NE - 65 - SMA Regelsysteme GmbH
Page 66

Sunny Boy Control Light Chapter 6: PC and Sunny Data Control
6 PC and Sunny Data Control
The Windows
interface and all positive features known from Windows 95
Sunny Boy Sunny Boy Sunny Boy
Sunny Boy
(TM)
Sunny Boy
based program Sunny Data Control offers a full graphical user
(TM)
230 V / 50 Hz
Sunny Boy
Control Light
Sunny Boy
230 V / 50 Hz
Sunny Boy
Control Light
RS 232
cable
RS 232
Fig. 6.1: Remote diagnosis via PC and Sunny Data Control
.
PC
MODEMMODEM
PC
Fig. 6.1: Sunny Data Control
SUNBCL-11:NE - 66 - SMA Regelsysteme GmbH
Page 67

Sunny Boy Control Light Chapter 6: PC and Sunny Data Control
You may acquire and evaluate the data (daily energy value and measuring channel
data) from a Sunny Boy Control Light with a PC and Sunny Data Control.
Additionally, all configurations of a Sunny Boy Control Light can be displayed and
modified with Sunny Data Control. This is independent from the PC’s connection to
the Sunny Boy Control Light (serial interface or modem). For further information
concerning Sunny Data Control refer to the Sunny Data Control manual.
Parameter Entry Description
CO_COM1 * PowerLine Interface type COM1
CO_COM1 Baud * 1200Baud Data transmission to PV-plant
CO_COM1-Prot. * Sunny-Net Used transmission protocol
CO_COM2 * RS232 Interface type COM2
CO_COM2 Baud * 19200Baud Data transmission to PC
CO_COM2-Prot. Sunny-Net Used transmission protocol
DA_Data Reading * ON "ON/OFF"
DA_Storage ON "ON/OFF" when system active,
permanent: ‘24h’
ED_InterfacePort * deactivated Interface for external display
ED_Type * EnergieCom External Display type
FI_Area Number FAX-Info ‘area number’
FI_Company/Name Firma XYZ-SOLAR FAX-Info recipient 1. line
FI_FAX-Info Deactivated FAX-Info activated / deactivated
FI_Phone Number FAX-Info ‘area code’ recipient
FI_Plant Name1 My Plant FAX-Info sender 1. Line
FI_Plant Name2 FAX-Info sender 2. Line
FI_Plant PhoneNo +49 123 1234567890 FAX-Info sender identification
FI_Plant-Info Daily report FAX-Info plant info / daily activated
FI_Recipient HERRN MUSTERMANN FAX-Info recipient 2. line
FI_RepError hourly report FAX-Info failure messages
FI_Report at 1425.00 h FAX-Info daily report at 23:45h (Value in
minutes)
FI_Warnings daily report FAX-Info failures hourly
report / deactivated
Firmware 2.07 Version Firmware version
MO_Dialmode * Tone dialing Dialing method
MO_External Code * Dial out code
MO_Interface * Deactivated Modem Interface (COM2)
SUNBCL-11:NE - 67 - SMA Regelsysteme GmbH
Page 68

Sunny Boy Control Light Chapter 6: PC and Sunny Data Control
Parameter Entry Description
MO_Modem-Init1 * AT&FE0V1X0Q0L2M1 Modem initialization sequence
MO_Modem-Init2 * ATS0=1 Modem initialization sequence
MO_Modem-Init3 * AT&H0&D0&W Modem initialization sequence
MO_Type * Hayes Used Modem type
PL_AddDevice * 0 Adds device with certain number
PL_Auto-Install * Deactivated Activated: Autom. search for devices
PL_DelDevice * 0 Deletes device with certain number
PL_Energy_Offs * 0,00 kWh Energy-offset value for E-Total display
SY_Gatewaymode * automatic Transmission Packet handling
SY_Idle Mode Activated Energy saving mode
activated/deactivated
SY_Language Deutsch Language English, French, German
SY_Memory Function --- Reset / store parameter
SY_Service Function * --- Delete stored values of daily yield /
Channel info / operating data / online-
Info and Reset System
TO_Communication 50.00 % Threshold for communication failure
TO_Energy 50.00 % Tolerance of energy yield monitoring
TO_Offline 30.00 min Threshold for offline time of device
TO_Warnings 15.00 min Threshold for message generation
Fig. 6.2: List of parameters, * only available with installer password
SUNBCL-11:NE - 68 - SMA Regelsysteme GmbH
Page 69

Sunny Boy Control Light Chapter 7: Appendix
7 Appendix
7.1 Error Messages
Error messages can occur, most times there is a simple solution for them.
Sometimes the parameter "Tolerance
Tolerance" is simply not tolerant enough. In the
ToleranceTolerance
following there is a brief description of all possible error messages.
Warning: (Device-) Error: Device reports error xy
[ Warning ]
[03: WR700-07 ]
reports Error
dZac-Bfr
[Device ID: Device Type]
ß description of the reported failure
Fig. 7.1: Example for a device failure
Check the user manual of the device that reports this error.
Warning: ‘Communication - Spot20’
[ WARNING ]
[03: WR700-07 ]
Communication
OK-Spot20 74%
[Device ID, Device type]
ß Communication quality of the last 20 packages
Fig. 7.2: Example for "Warning Communication"
Possible Reasons:
• Sunny Boy is defective or not installed right
• Communication on the transmission line is disturbed.
• The tolerance defined in chapter 5.5.1 for "Communication
SUNBCL-11:NE - 69 - SMA Regelsysteme GmbH
Communication" is too small
CommunicationCommunication
Page 70

Sunny Boy Control Light Chapter 7: Appendix
Warning: "No contact since ... "
[ WARNING ]
[03: WR700-07 ]
No Contact
since 14:15 Uhr
[Device ID: Device type]
Fig. 7.3: Example for Warning "No Contact since:..."
The period of time the device could not be reached exceeded the allowed value.
Possible Reasons:
• Sunny Boy is defective or not installed right
• Communication on the transmission line is disturbed
• The tolerance defined in "Offline
Use the "Diagnosis-Communication
(chapter 5.6.2)
Diagnosis-Communication" function for details of this error message.
Diagnosis-CommunicationDiagnosis-Communication
Offline" is too small (chapter 5.5.1).
OfflineOffline
Error: "Communication - Total"
[ ERROR ]
[03: WR700-07 ]
Communication
OK-Total 92%
[Device ID, Device type]
ß Communication was below the defined "Tolerance" level.
Fig. 7.4: Example for Error "Communication-Total"
The number of communication failures was higher as defined in "Tolerance
Tolerance".
ToleranceTolerance
Possible Reasons:
• Sunny Boy is defective or not installed right
• Communication on the transmission line is disturbed.
• The tolerance defined in "Communication
Communication" is too small (5.5.1)
CommunicationCommunication
Use the "Diagnosis-Communication
SUNBCL-11:NE - 70 - SMA Regelsysteme GmbH
Diagnosis-Communication" function for details of this error message.
Diagnosis-CommunicationDiagnosis-Communication
Page 71

Sunny Boy Control Light Chapter 7: Appendix
Error: Energy Yield xx %
[ ERROR ]
[03: WR700-07 ]
Energy Yield
48%
[Device ID: Device Type]
Fig. 7.5: Example for Error "Energy Yield"
The energy yield of the device is below the tolerance of the average yield of the
entire PV-plant.
Possible Reasons:
• Sunny Boy is defective or not installed right
• The tolerance defined in "Energy
Error: "No contact since 24h"
[ ERROR ]
[03: WR700-07 ]
No Contact
since 24h
Fig. 7.6: Example for Warning "No Contact since:..."
Energy" is too small (chapter 5.5.1)
EnergyEnergy
[Device ID: Device type]
The period of time the device could not be reached exceeded 24 hours.
Possible Reasons:
• Sunny Boy is defective or not installed right
• Communication on the transmission line is disturbed
7.2 Troubleshooting Powerline Communication
The Powerline Communication is covered in the Powerline Communication Manual
"SBKOMM-11-ED". This file is available on our internet server http://www.sma.de. In
SUNBCL-11:NE - 71 - SMA Regelsysteme GmbH
Page 72

Sunny Boy Control Light Chapter 7: Appendix
the following you will find an overview on how to manage problems you might have
with Powerline Communication.
7.2.1 Transmission Errors
Reasons for communication interference can be:
• Strong damping of the transmission signal
− The transmission line is too long
− The cabling layout is not suitable
• Damping by other connected electrical devices
- e.g. capacitors in fluorescent lamps
• Insufficient phase coupling
− The Sunny Boy Control Light and the Sunny Boy Inverters are
connected to different phases
− Interference by other communication signals
− Babyphone etc. in neighboring households
• Failures due to different signals
− Babyphone
− Interphone
Each of the mentioned failure sources has effect on the quality of the transmission
line. However, this must not necessarily prevent Powerline Communication. In one
household mains the data transmission is possible without any problem via several
phases with 100 m total transmission distance, and in another installation there is a
strong interference on one line with 30 m on the same phase.
SUNBCL-11:NE - 72 - SMA Regelsysteme GmbH
Page 73

Sunny Boy Control Light Chapter 7: Appendix
In the following please find the most important causes for Powerline transmission
faults and an overview of possible counter-measures (interference suppression). In
case of transmission errors between Sunny Boy Control Light and the connected
devices please read this chapter first and try to find the failure source by carrying out
the steps described in chapter 7.2.2: "Interference Suppression".
Strong Damping of the Carrier Signal
Most frequently transmission errors result from carrier signal damping. The reason for
this may be a too long distance between the inverters and Sunny Boy Control Light
however, often there are electric devices connected to this cable. Devices with a high
input capacity may dampen the carrier signal strongly, and it is not necessarily
important whether the device is on or off. Examples are washing machines, electric
ranges, microwave ovens, PCs, fluorescent lamps etc.
The easiest counter-measure is to connect the respective electrical devices to
another line resp. to another phase. Another possibility is to install a special filter in
the power supply of the interfering electrical devices.
If, in extreme cases, the wiring length resp. wiring arrangement is the cause for a
disturbed communication, the installation of a separate line from the inverters to the
Sunny Boy Control Light can be necessary.
SUNBCL-11:NE - 73 - SMA Regelsysteme GmbH
Page 74

Sunny Boy Control Light Chapter 7: Appendix
Sunny BoySunny Boy
house electricity distribution
2. plug
filter
connection to
public grid
1. reconnect to
other phase
Sunny Boy
Control Light
Interfering
device
Fig.7.7: Interference suppression at strong signal damping
Phase Coupler
If the communication is done with several phases, you have to consider a strong
damping resp. a significantly lower range for the data signal. If the string inverter,
contrary to our recommendation, is connected to another phase (e.g. L2) than Sunny
Boy Control Light (e.g. L1), the data transmission can only be successful if the
phases are coupled with sufficiently high frequency. In many households this is the
case by already installed three-phase current consumers (electric range, flow-type
heater and similar).
Additionally, the transmission line may be improved by the installation of a phase
coupler in the mains distribution. However, the communication over several phases
remains problematic:
Very long transmission paths result from the detour via the phase coupler, and by the
high-frequency coupling of the three phases the damping influence of electrical
devices connected to the other two phases is boosted.
SUNBCL-11:NE - 74 - SMA Regelsysteme GmbH
Page 75

Sunny Boy Control Light Chapter 7: Appendix
• Larger facilities: The optimal position of the phase coupler is sometimes difficult
to find. Main distribution and sub distribution are sometimes very far apart and
result in different reasonable positions of the phase coupler.
Sunny BoySunny Boy
connection to
public grid
House electricity distribution
phase coupler
L1
L2
L3
Sunny Boy
Control Light
sub-distribution
phase coupler
Fig. 7.8: Phase coupling for communication over different phases
Interfering Signals on the Grid
The data transmission is done with a frequency of 132.45 kHz. If other consumers
also use this frequency, the transmission may be disturbed when a certain level is
exceeded. Interfering signals can be developed by electric devices in the own
household (insufficiently filtered switching power supply or similar), but also by
devices in neighboring houses (e.g. electric devices with high power consumption in
the neighborhood).
SUNBCL-11:NE - 75 - SMA Regelsysteme GmbH
Page 76

Sunny Boy Control Light Chapter 7: Appendix
Acceptable transmission depends on the isolation or elimination of the interference
source. Either the connection of the interfering device to another phase is sufficient
or a carrier frequency suppression has to be installed. The suppression device has to
separate the part of the mains, in which the data transmission should take place,
from that part of the mains network in which the interfering consumers are installed.
The efficiency of suppression unit can be boosted by the installation of a damping
module active in the carrier frequency band of the interfering device on its side (in
front of the suppression unit.)
Sunny BoySunny Boy
Damping
Module
connection to
public grid
D
house electricity distribution
Blocking
Filter
Fig. 7.9: Powerline with strong external interference
Sunny Boy
Control Light
SUNBCL-11:NE - 76 - SMA Regelsysteme GmbH
Page 77

Sunny Boy Control Light Chapter 7: Appendix
Parallel-Working Mains Communication
The data transmission of the Sunny Boy Control Light uses a carrier frequency of
132 kHz. If other communication systems also use this frequency on the mains, the
transmission may be disturbed when exceeding a certain level. This can be affected
by the carrier frequency of an interphone, a babyphone or similar. In such a case the
communication systems will disturb each other.
Similar to devices generating interferences, the best solution is to separate the
transmission paths. But contrary to the case in the previous chapter, the suppression
of interference is not the problem in this case, because both communication systems
have to work simultaneously. That is why at least one of the systems should be
restricted to one phase resp. one wiring. This part of the electric installation may then
be supplied via a stop filter, which ensures that neither high frequency signals are put
in nor that the own carrier signal leaves this part of the electric installation. In case of
a strong coupling such a limitation of the transmission path and the use of a stop filter
might be necessary for both installed communication systems. By damping modules,
a further improvement can be reached, which completes the effect of the stop filter,
because these filters especially damp high frequency signals. Such a suppression
module should only be installed in parts of electric installations where no
transmission signals are desired at all.
SUNBCL-11:NE - 77 - SMA Regelsysteme GmbH
Page 78

Sunny Boy Control Light Chapter 7: Appendix
Sunny BoySunny Boy
Sunny Boy
Control Light
Damping
Module
D
house electricity distribution
connection to
public grid
Blocking
Filters
interfering device
Fig.7.10: Interference suppression from several communication systems
7.2.2 Interference Suppression
If the data transmission via Powerline is interrupted from time to time, or cannot be
established at all, the transmission line has to be cleared. For this purpose please
take the following steps:
Identification of Interference Sources
• Starting point of the examination should be a functioning data transmission, if
possible. Please disconnect all electric devices from the mains (it is sometimes
not sufficient merely to switch them off! Please think also about three-phase
current consumers!) which are connected to the same line as the devices and
the Sunny Boy Control Light. Switch off all remaining fuses in the household
distribution. Now connect the Sunny Boy Control Light with an extension
cable to the socket with the shortest wiring length to the inverter. Start the
function "Diagnosis - Communication
Diagnosis - Communication" and select the device to be
Diagnosis - CommunicationDiagnosis - Communication
monitored. Sunny Boy Control Light now tries to communicate with the device
SUNBCL-11:NE - 78 - SMA Regelsysteme GmbH
Page 79

Sunny Boy Control Light Chapter 7: Appendix
and informs you about the transmission results so that you can identify
transmission defects immediately.
• Plug the extension cable into different sockets of the mains line you are
analyzing while continuously increasing distance to the inverter, and check
whether the communication still works. A communication breakdown from a
certain line length to the inverter on (< 30 m) indicates a disturbance from
external devices outside the household distribution (countermeasure:
suppression filter in the branch circuit).
• Now reconnect the mains circuits one after the other and check if any errors
occur in the communication of Sunny Boy Control Light.
• In case of communication disturbances disconnect every electric consumer on
the last connected circuit one after the other in order to identify the disturbing
device.
• Leave disturbing devices disconnected from the mains and continue connecting
circuits and devices until all electric consumers are reconnected to the mains
except the disturbing ones.
Optimizing the Installation
• Check whether the influence of disturbing devices can be reduced sufficiently
by just connecting them to another circuit resp. phase.
• A junction line from the device to the Sunny Boy Control Light can help
reduce the filter expenditure in heavily disturbed installations.
Filtering Interference
• Supply the section of the electric installation for Powerline communication with a
suppression unit.
SUNBCL-11:NE - 79 - SMA Regelsysteme GmbH
Page 80

Sunny Boy Control Light Chapter 7: Appendix
• Please connect continuously disturbing devices to a suitable filter (see chapter
7.3, Technical Data).
Reduce external interference by the installation with a damping module in that part of
the electric installation where no communication with Powerline is planned.
This proposed procedure gives you a systematic overview of the number and
influence of interference sources on the transmission line.
All additional components (suppression unit, phase coupler, filter, damping
module) are commercial products that are available at standard electrician
suppliers or from SMA. The installation is done in the household
distribution and must be done by a qualified electricians.
SUNBCL-11:NE - 80 - SMA Regelsysteme GmbH
Page 81

Sunny Boy Control Light Chapter 7: Appendix
7.2.3 Communication
Testing the Communication
The reliability of a communication link can be tested with:
• 2 Sunny Boy Control Light
• 1 Sunny Boy Control Light and a PC with a Sunny Boy Control Light, Sunny
Boy Control or a SWRCOM.
It is recommendable to test the communication link before installing the system.
Test with two Sunny Boy Control Light
• connect both Sunny Boy Control Light to the same wall socket, where you want
to connect a part of the participants for your communication.
• Switch the data acquisition of Sunny Boy Control Light A off:
"Setup - System - Service Funct.: reset system
Setup - System - Service Funct.: reset system". Confirm twice,
Setup - System - Service Funct.: reset systemSetup - System - Service Funct.: reset system
the Sunny Boy Control Light A will start the Plug & Play sequence the next time
it is activated.
• start the device detection on for the Sunny Boy Control Light B.
("Setup - PV-Plant - Detection
Setup - PV-Plant - Detection"). This lets the Sunny Boy Control Light
Setup - PV-Plant - DetectionSetup - PV-Plant - Detection
B detect the Sunny Boy Control Light A.
• connect Sunny Boy Control A to the furthest away socket you want to connect
participants to. Define the Sunny Boy Control Light A to be communication test
participant in the "Setup - Diagnosis - Communication
Setup - Diagnosis - Communication" menu.
Setup - Diagnosis - CommunicationSetup - Diagnosis - Communication
Acceptable data transmission quality is given with 75 % and more.
Test with one Sunny Boy Control Light and one PC with a SWRCOM
• Sunny Data must be installed on the PC
• connect the PC and the Sunny Boy Control Light to the same socket.
SUNBCL-11:NE - 81 - SMA Regelsysteme GmbH
Page 82

Sunny Boy Control Light Chapter 7: Appendix
• switch the data acquisition of Sunny Boy Control off:
"Setup
Setup - System - Service Funct.: reset system
Setup Setup
- System - Service Funct.: reset system". Confirm twice,
- System - Service Funct.: reset system- System - Service Funct.: reset system
the Sunny Boy Control A will start the Plug & Play sequence the next time it is
activated.
• start "Device Detection
Device Detection" on the PC with Sunny Data and detect the Sunny
Device DetectionDevice Detection
Boy Control.
• connect Sunny Boy Control A to the furthest away socket you want to connect
participants to. Define the Sunny Boy Control A to be communication test
participant in the "Setup - Diagnosis - Communication
Setup - Diagnosis - Communication" menu.
Setup - Diagnosis - CommunicationSetup - Diagnosis - Communication
• Sunny Data version 1.30 and higher supports "'Dev Com Statistics'"
Acceptable data transmission quality is given with 75 % and more.
Testing the Communication to the Sunny Boys
"Setup - Diagnosis - Communication
Setup - Diagnosis - Communication" helps you detect transmission failures
Setup - Diagnosis - CommunicationSetup - Diagnosis - Communication
to single devices. Select the device that you want to test:
[COMMUNICATION ]
01: WR700-08
02: WR700-08
03: WR700-07
04: WR700-07
ß Device ID: Device Type
Fig. 7.11: Selecting a Device
The Sunny Boy Control Light then sends data inquiries to the selected device and
evaluates the transmission quality.
[02:COMMUNICAT.]
OK 99%
Pakets 10233
Errors 123
[Device ID: Device Type]
ß percentage of tolerably transmitted packets
Fig. 7.12: Communication test
SUNBCL-11:NE - 82 - SMA Regelsysteme GmbH
Page 83

Sunny Boy Control Light Chapter 7: Appendix
The Sunny Boy Control Light constantly displays the percentage of correctly
transmitted packages. Only the last 20 packages are evaluated.
7.3 Technical Data
Supply voltage: 90 ... 260 V, 50 ... 60 Hz
Power consumption: 4-6 W in operation (depends on the
amount of Sunny Boys to be managed)
3 W in standby mode
Carrier frequency for
Powerline communication: 132.45 kHz
Transmission protocol: compliant with DIN EN 50065 part 1
(VDE 0808 part 1)
Ambient temperature: 0 to 40 °C
Size: 229 x 126 x 46 mm
Display: 4 x 16 characters
Weight: approx. 1250 g
Protection type: IP 40
Protection: overload protection, 365 V / 90 mA
Connections:
• Mains connection: 2 m 3-wire power cable,
with protective earth
• PC (COM 2): for connection to a PC or
for connection to an External Display
SUNBCL-11:NE - 83 - SMA Regelsysteme GmbH
Page 84

Sunny Boy Control Light Chapter 7: Appendix
Accessories (optional):
SMA No. Description
• 35-5010 interface adapter D-SUB plug adapter for PC-connection
(9 pin to 25 pin)
• 36-5001 PC data cable PC-connection
for COM2 (RS232) to PC,
(D-SUB 9-pin)
Storage Capacity
The Sunny Boy Control can monitor 20 Sunny Boy Inverters. 4 different Sunny Boy
inverter types are allowed.
The storage capacity is large enough to store the energy data of 200 days. Back up
the data to a PC regularly in order to maintain a continuous data about the
performance of your plant.
7.4 Default Parameters
The default settings of the Sunny Boy Control are as follows:
Menu "Setup
"Setup…………System"
"Setup"Setup
Parameter Setting
Stand-By Mode Activated
System":
System"System"
Gatewaymode automatic
Fig. 7.13: Default settings in menu ‘System’
SUNBCL-11:NE - 84 - SMA Regelsysteme GmbH
Page 85

Sunny Boy Control Light Chapter 7: Appendix
Menu "Setup
"Setup…………System
"Setup"Setup
Parameter Setting
language German
System…………Language"
SystemSystem
Language":
Language"Language"
Fig. 7.14: Default language
Menu "Setup
"Setup…………System
"Setup"Setup
SC (Sunny Boy Control)
E-today
System…………Online-Info
SystemSystem
Pac
E-total
Status
Online-Info…………Chan.Selection
Online-InfoOnline-Info
Chan.Selection…………SC
Chan.SelectionChan.Selection
Fig. 7.15: Default channel for displaying in ‘Online-Info’
Menu "Setup
"Setup…………Interface
"Setup"Setup
Interface…………Commnunication
InterfaceInterface
Commnunication…………"""":
CommnunicationCommnunication
SC…………"""":
SCSC
Category Parameter Settings
Com1: Sunny Boy Medium Powerline
Baud 1200 Baud
Protocol Sunny-Net
Com2: PC Medium RS232
Baud 19200 Baud
Protocol Sunny-Net
Fig. 7.16: Default parameter ‘Communication’
The installed interface types (RS232, Powerline) are automatically detected by
Sunny Boy Control Light during its self test. Transmission is defined with 8 data
bits, no parity and 1 stop bit in any case. Only the Baud rate of the PC interface can
be modified.
SUNBCL-11:NE - 85 - SMA Regelsysteme GmbH
Page 86

Sunny Boy Control Light Chapter 7: Appendix
Menu "Setup
"Setup…………Interfaces
"Setup"Setup
Interface Deactivated
Type Hayes
Init string AT&FE0V1X1Q0L2M1
Dial out code --Dial mode Tone
Interfaces…………Modem
InterfacesInterfaces
ATS0=1
AT&H0&D0&W
Modem"
ModemModem
"
""
Fig. 7.17: Default values of the Modem Connection
Menu "Setup
"Setup…………Inter
"Setup"Setup
Interface Deactivated
Type Hayes
Configuration Display 01:SC:Pac 4.0
Interfaces
InterInter
Display 02:SC:E-total 4.0
Display 03:SC:E-today 4.0
Display 04:SC:Pac 6.2
Display 05:SC:E-total 6.2
Display 06:SC:E-today 6.2
faces…………Ext.Display"
facesfaces
Ext.Display"
Ext.Display"Ext.Display"
Fig. 7.18: Default values Ext. Display
Menu "Setup
"Setup…………Control
"Setup"Setup
Parameter Default
Warnings 15.00min
Offline 30.00min
Energy 50.00%
Communication 50.00%
Control…………Tolerances"
ControlControl
Tolerances"
Tolerances"Tolerances"
Fig. 7.19: Default settings for ‘Tolerances’
SUNBCL-11:NE - 86 - SMA Regelsysteme GmbH
Page 87

Sunny Boy Control Light Chapter 7: Appendix
Menu "Setup
Category Parameter Setting
Events Signaling via Daily Report
Warnings Daily Report
Failure Hourly Report
Daily Report at 23:45 PM
Recipient Company/Name FIRMA XYZ-SOLAR
Area Code Phone Number Sender Plant name MEINE ANLAGE
Plant Phone
"Setup…………Control
"Setup"Setup
Control…………Fax-Info"
ControlControl
FAX-Info disabled
Number
Fax-Info"
Fax-Info"Fax-Info"
HERRN MUSTERMANN
+49 123 123456789
Fig. 7.20: Default Parameter FAX-Info
Reset System
A system reset deletes all data and sets all parameters to factory default.
The system reset is only possible after entering the installer password.
Do the following to reset the system
• Enter the installer password
• Select “Setup - System - Service Funct.”
• Select “Reset system” and confirm by pressing the enter key twice.
SUNBCL-11:NE - 87 - SMA Regelsysteme GmbH
Page 88

Sunny Boy Control Light Chapter 7: Appendix
7.5 AT-Commands
The commands described in the following table are used for initializing the modem.
The init-strings can be modified according to your specific modem type.
Description Microlink
33.6TQV
Load factory settings &F &F &F
Disable character echo in command state E0 E0 E0
Display result code in verbose form V1 V1 V1
Ignore dial tone / busy tone X1 X1 X1
Return result code Q0 Q0 Q0
Speaker on level 2 L2 L2 L2
Speaker always on M1 M1 M1
Automatic answer after 1 ring S0=1 S0=1 S0=1
Flow control disabled \Q0 +IFC=0,0 &H0
Ring indication and answer possible with DTR=OFF
Automatic re-synchronization on
V.100 speed adaptation on,
Word length in async. direct mode 10 bit/char
S28=198
√
√
√
√
Microlink
56k
S28=128
√
-
-
-
Zyxel /
Hayes
Standard
Ignore DTR, assume DTR always on &D0 &D0 &D0
Automatic re-synchronization on - %E1
Save current settings as user profile 0 &W &W &W
Fig. 7.21: AT commands
SUNBCL-11:NE - 88 - SMA Regelsysteme GmbH
Page 89

Sunny Boy Control Light Chapter 7: Appendix
Description Class 2 Class 2.0
Local FAX station ID string (e.g.: +49 561 9522100) +FLID=“ID-String“ +FLI=“ID-String“
Current session negotiating session (196 dpi) +FDIS=1 +FIS=1,5,0,0,0,0
Phase C data bit order +FBOR=1 +FEA
Service class identification and control +FCLASS=2 +FCLASS=2.0
Set ‘Dial Tone’ ATT ATT
Set ‘Dial Pulse’ ATP ATP
Dial ATD ATD
Begin phase C data reception +FDT +FDT
End page or document +FET=2 +FKS
Quit Connection H0 H0
Fig. 7.22: Fax commands (these strings cannot be changed)
7.6 Guarantee Regulations and Liability
You have purchased a product, which was thoroughly checked before delivery. If
your device nevertheless is defective or shows malfunction during the guarantee
period, please contact your distributor or company that installed the device.
Guarantee
The guarantee period is 24 months from the date of purchasing the device by the end
user. It ends at the latest 30 months after the shipping date from SMA, and includes
all defects caused by material or manufacturing faults.
The guarantee period for guarantee repairs or compensation deliveries ends 6
months after delivery, but runs at least until the expiration of the original guarantee
period for the purchased device.
SMA will only guarantee services, if the rejected device is sent back to SMA together
with a copy of the invoice the distributor has issued to the customer. The type
identification sign on the device must be completely legible. In any other case SMA
reserves its right to refuse guarantee services.
SUNBCL-11:NE - 89 - SMA Regelsysteme GmbH
Page 90

Sunny Boy Control Light Chapter 7: Appendix
Conditions
The device will be repaired in its fabrication site without invoice for material and labor,
or a replacement device will supplied.
The objected device is to be sent back to SMA without charges in the original packing
or in a transport packing of equal quality.
The customer has to grant SMA the necessary time and opportunity to repair the
defects.
Exclusion of Liability
Excluded are any guarantee claims and liabilities for direct or consequential damages
due to
• transportation damages,
• improper installation or operation,
• alterations, modifications or unauthorized repairing attempts,
• inappropriate use or operation,
• insufficient air circulation for the device,
• violation of according safety regulations (VDE etc.),
• or force majeure (lightning, overvoltage, storm, fire).
We cannot guarantee the proper function of the data transmission via
mains (Powerline modem) in case it is carried out in electric grids with high
harmonic distortion resp. high-frequency line distortions like e.g. industrial
power supply grids, or the neighborhood of irregular consumers
(unshielded motors, switching power supplies, converters, etc.). Since the
simultaneous operation of babyphones may lead to short-time data
SUNBCL-11:NE - 90 - SMA Regelsysteme GmbH
Page 91

Sunny Boy Control Light Chapter 7: Appendix
transmission failures via mains.
We reserve the right to leave our products subject of modifications due to
improvements.
Sequential Damages
SMA in no case will cover any liability for damages resulting from the use of a Sunny
Boy Control Light (including and without restriction for direct and indirect damages
of used hardware, personal damages, profits lost, operating troubles, loss of data, or
any financial losses).
Further or other claims for direct and indirect damages, especially including claims for
damages from positive contract violation, are excluded insofar as not otherwise
compelling stated by law.
Trademarks
Microsoft, MS-Excel, MS-Word and MS-DOS are registered trademarks and
Windows is a trademark of the Microsoft Corporation.
IBM is a registered trademark of the International Business Machines Corporation.
CorelDRAW is a registered trademark of the Corel Corporation. Sunny Boy and
SMA
are registered trademarks of the SMA Regelsysteme GmbH.
We accept all trademarks mentioned in this manual.
7.7 Sources of supply
Sunny Boy Products, HvG External Display, Sensors:
Rosendahl Industrievertretungen, Adolf-Dembach-Straße 1, D-47829 Krefeld,
Tel. 02151 / 456789-0, eMail: ri@sma.de, www.rosendahl.net
SUNBCL-11:NE - 91 - SMA Regelsysteme GmbH
Page 92

Sunny Boy Control Light Chapter 7: Appendix
External Display:
ist EnergieCom GmbH, Stadtjägerstraße 11, D-86152 Augsburg,
Tel. 0821 / 34666-0, eMail: info@ist-energiecom.de, www.ist-energiecom.de
Datalite Electronics Europe, Rozenbottelberg 4, NL-3755 BR Eemnes,
Tel. +31 / 35 / 5317547, eMail: datalite@datalite.nl, www.datalite.nl
Siebert Industrieelektronik GmbH, Siebertstraße, D-66571 Eppelborn,
Tel. 06806 980-0, eMail: info@siebert.de, www.siebert.de
RS232 / RS485 Converter
PHOENIX CONTACT GmbH & Co, Flachsmarktstraße 8, 32825 Blomberg,
Tel.: 05235 / 300, eMail info@phoenixcontact.com, www.phoenixcontact.de
Modem:
ELSA-AG, Sonnenweg 11, D-52070 Aachen,
Tel.: 0241 / 606-0, www.elsa.de
ZyXEL Deutschland,
Tel.: 0180 / 5213247, eMail: support@zyxel.de, www.zyxel.de
Siemens AG, Wittelsbacherplatz 2, 80312 München,
eMail: www@siemens.de, www.siemens.de
Accessories for household distribution
Busch-Jäger Elektro GmbH, Freisenbergstr.2, 58513 Lüdenscheid,
Tel.: 0180 / 56 69 900, eMail: info.bje@de.abb.com, www.busch-jaeger.de
SUNBCL-11:NE - 92 - SMA Regelsysteme GmbH
Page 93

Sunny Boy Control Light Chapter 7: Appendix
7.8 Sunny Boy Control Light Service
S-Nr.: ______________
Company :
Name :
Street :
Zip-code : City :
Tel. :
Fax :
email :
SMA Regelsysteme GmbH
-Sunny Boy Control Service-
Hannoversche Straße 1 - 5
D - 34266 Niestetal
Tel.: 05 61 / 95 22 - 0
Fax: 05 61 / 95 22 - 100
http://www.sma.de
Sunnyboy@sma.de
Information concerning the PV-plant
Number of inverters :
Inverter Types :
Inverter Serial No.:
Sunny Boy Control Light Serial No.:
SUNBCL-11:NE - 93 - SMA Regelsysteme GmbH
Page 94

Sunny Boy Control Light Chapter 7: Appendix
Failure Description
Describe your problem:
Did this problem occur from the beginning?
yes no
Was the function Ok and then made trouble?
yes no
Does this failure always occur? yes no
Can you reproduce the failure? yes no
How can you reproduce the failure?
Do you have data files that describe the failure yes no
if yes:
sent to SMA on disk - via mail
sent to SMA via email to ________________
please call me (best is between ___h to ___h)
please send me a fax.
I will call you.
SUNBCL-11:NE - 94 - SMA Regelsysteme GmbH
Page 95

Sunny Boy Control Light Chapter 7: Appendix
7.9 Sunny Boy Info Service
If you are interested in getting information about Sunny
Boy products (Software-Updates, news, etc.), please
send an eMail with the following content to SMA.
To: listserver @ sma.de
Subject: subscribe SunnyBoy
Fig. 7.23: Registration via eMail
SUNBCL-11:NE - 95 - SMA Regelsysteme GmbH
Page 96

Sunny Boy Control Light Chapter 7: Appendix
7.10 Menu Overview
[ ONLINE-INFO ]
[ SCSBCL-002 ]
E-total
---kWh
Cyclic display of information, faults and warnings concerning Chap. 4.2
the plant
↓ ESC↑
[ MAIN MENU ]
Total Plant
Spot Values
Daily Yield
Events
--------------- Setup
ß Sunny Boy Control Light main menu Chap. 4.3
ß total power, total energy yield etc. Chap. 4.3.1
ß spot values of selected device Chap. 4.3.2
ß measured daily data Chap. 4.3.3
ß Overview of failures and events Chap. 4.3.4
ß Setup menu (“see password”) Chap. 5
↓ENTER ↑ESC
[ SETUP ]
Password
System
Interfaces
PV-Plant
Control
Diagnosis
Fig. 7.24: Sunny Boy Control Light menu structure
(only with password) Chap. 5.1
ß lock/unlock menu with password Chap. 5
ß language, date and time, “Online-Info” configuration Chap. 5.2
ß interface configuration Chap. 5.3
ß device registration, detection, parameter, energy-offset Chap. 5.4
ß tolerances, FAX-Info Chap. 5.5
ß reports, communication test Chap. 5.6
SUNBCL-11:NE - 96 - SMA Regelsysteme GmbH
 Loading...