

Page 1

EN
Charge controller
SUNNY ISLAND CHARGER
Installation Guide
SIC50-IA-en-11 | Version 1.1
Page 2

Page 3

SMA Solar Technology AG Table of Contents
Table of Contents
1 Notes on this Manual. . . . . . . . . . . . . . . . . . . . . . . . . . . . . . 7
1.1 Validity . . . . . . . . . . . . . . . . . . . . . . . . . . . . . . . . . . . . . . . . . . . . 7
1.2 Target Group . . . . . . . . . . . . . . . . . . . . . . . . . . . . . . . . . . . . . . . 7
1.3 Storage of the Manual . . . . . . . . . . . . . . . . . . . . . . . . . . . . . . . . 7
1.4 Symbols Used . . . . . . . . . . . . . . . . . . . . . . . . . . . . . . . . . . . . . . . 8
2 Safety Instructions . . . . . . . . . . . . . . . . . . . . . . . . . . . . . . . . 9
2.1 Appropriate Usage. . . . . . . . . . . . . . . . . . . . . . . . . . . . . . . . . . . 9
2.2 General Safety Instructions . . . . . . . . . . . . . . . . . . . . . . . . . . . . 10
3 Unpacking. . . . . . . . . . . . . . . . . . . . . . . . . . . . . . . . . . . . . . 11
3.1 Scope of Delivery . . . . . . . . . . . . . . . . . . . . . . . . . . . . . . . . . . . 11
3.2 Check for Transport Damage . . . . . . . . . . . . . . . . . . . . . . . . . . 11
3.3 Identifying the Charge Controller . . . . . . . . . . . . . . . . . . . . . . . 11
4 Battery Management and Charge Control . . . . . . . . . . . 12
4.1 SMA Operation . . . . . . . . . . . . . . . . . . . . . . . . . . . . . . . . . . . . 12
4.2 Stand-Alone Operation. . . . . . . . . . . . . . . . . . . . . . . . . . . . . . . 13
5 Assembly. . . . . . . . . . . . . . . . . . . . . . . . . . . . . . . . . . . . . . . 14
5.1 Selecting the Mounting Location. . . . . . . . . . . . . . . . . . . . . . . . 14
5.1.1 Dimensions . . . . . . . . . . . . . . . . . . . . . . . . . . . . . . . . . . . . . . . . . . . . . . . . . . 14
5.1.2 Ambient Conditions. . . . . . . . . . . . . . . . . . . . . . . . . . . . . . . . . . . . . . . . . . . . 15
5.1.3 Safety Clearances. . . . . . . . . . . . . . . . . . . . . . . . . . . . . . . . . . . . . . . . . . . . . 15
5.1.4 Position . . . . . . . . . . . . . . . . . . . . . . . . . . . . . . . . . . . . . . . . . . . . . . . . . . . . . 16
5.2 Mounting Instructions . . . . . . . . . . . . . . . . . . . . . . . . . . . . . . . . 16
6 Electrical Connection . . . . . . . . . . . . . . . . . . . . . . . . . . . . . 18
6.1 Safety . . . . . . . . . . . . . . . . . . . . . . . . . . . . . . . . . . . . . . . . . . . . 18
6.2 Overview of the Connection Area . . . . . . . . . . . . . . . . . . . . . . 19
6.3 Grounding . . . . . . . . . . . . . . . . . . . . . . . . . . . . . . . . . . . . . . . . 20
Installation Guide SIC50-IA-en-11 3
Page 4

Table of Contents SMA Solar Technology AG
6.3.1 Grounding the Charge Controller. . . . . . . . . . . . . . . . . . . . . . . . . . . . . . . . . 20
6.3.2 Grounding the Battery and the PV Plant . . . . . . . . . . . . . . . . . . . . . . . . . . . . 21
6.4 PV Array Connection (DC) . . . . . . . . . . . . . . . . . . . . . . . . . . . . 22
6.5 Battery Connection (DC). . . . . . . . . . . . . . . . . . . . . . . . . . . . . . 23
6.6 Communication. . . . . . . . . . . . . . . . . . . . . . . . . . . . . . . . . . . . . 25
6.6.1 Interface . . . . . . . . . . . . . . . . . . . . . . . . . . . . . . . . . . . . . . . . . . . . . . . . . . . . 25
6.6.2 Connection to PC Serial Interface . . . . . . . . . . . . . . . . . . . . . . . . . . . . . . . . . 25
6.6.3 SMA Operation . . . . . . . . . . . . . . . . . . . . . . . . . . . . . . . . . . . . . . . . . . . . . . 27
6.6.4 Stand-alone Operation . . . . . . . . . . . . . . . . . . . . . . . . . . . . . . . . . . . . . . . . . 28
6.7 Additional Connections. . . . . . . . . . . . . . . . . . . . . . . . . . . . . . . 30
6.7.1 Signaling Contact . . . . . . . . . . . . . . . . . . . . . . . . . . . . . . . . . . . . . . . . . . . . . 30
6.7.2 Battery Temperature Sensor . . . . . . . . . . . . . . . . . . . . . . . . . . . . . . . . . . . . . 32
7 (First) Commissioning. . . . . . . . . . . . . . . . . . . . . . . . . . . . . 34
7.1 Configuring the Charge Controller . . . . . . . . . . . . . . . . . . . . . . 34
7.1.1 Operating Mode. . . . . . . . . . . . . . . . . . . . . . . . . . . . . . . . . . . . . . . . . . . . . . 34
7.1.2 Battery System. . . . . . . . . . . . . . . . . . . . . . . . . . . . . . . . . . . . . . . . . . . . . . . . 35
7.1.3 Device Address . . . . . . . . . . . . . . . . . . . . . . . . . . . . . . . . . . . . . . . . . . . . . . . 35
7.1.4 Battery Type . . . . . . . . . . . . . . . . . . . . . . . . . . . . . . . . . . . . . . . . . . . . . .36
7.2 Commissioning . . . . . . . . . . . . . . . . . . . . . . . . . . . . . . . . . . . . . 36
8 Opening and Closing. . . . . . . . . . . . . . . . . . . . . . . . . . . . . 37
8.1 Opening the Charge Controller . . . . . . . . . . . . . . . . . . . . . . . . 37
8.2 Closing the Charge Controller . . . . . . . . . . . . . . . . . . . . . . . . . 37
9 Maintenance and Cleaning. . . . . . . . . . . . . . . . . . . . . . . . 38
9.1 Replacing the Thermal Fuses. . . . . . . . . . . . . . . . . . . . . . . . . . . 38
9.2 Cleaning the Cooling Fins. . . . . . . . . . . . . . . . . . . . . . . . . . . . . 38
10 Meaning of the Light Emitting Diodes (LEDs) . . . . . . . . . . 39
10.1 Multicolored LED . . . . . . . . . . . . . . . . . . . . . . . . . . . . . . . . . . . 39
10.2 Internal LEDs . . . . . . . . . . . . . . . . . . . . . . . . . . . . . . . . . . . . . . . 39
4 SIC50-IA-en-11 Installation Guide
Page 5

SMA Solar Technology AG Table of Contents
11 Failure Search. . . . . . . . . . . . . . . . . . . . . . . . . . . . . . . . . . . 40
11.1 SMA Operation . . . . . . . . . . . . . . . . . . . . . . . . . . . . . . . . . . . . 40
11.2 Stand-alone Operation . . . . . . . . . . . . . . . . . . . . . . . . . . . . . . . 40
12 Decommissioning . . . . . . . . . . . . . . . . . . . . . . . . . . . . . . . . 41
12.1 Disassembly . . . . . . . . . . . . . . . . . . . . . . . . . . . . . . . . . . . . . . . 41
12.2 Packaging . . . . . . . . . . . . . . . . . . . . . . . . . . . . . . . . . . . . . . . . . 41
12.3 Storage . . . . . . . . . . . . . . . . . . . . . . . . . . . . . . . . . . . . . . . . . . . 41
12.4 Disposal . . . . . . . . . . . . . . . . . . . . . . . . . . . . . . . . . . . . . . . . . . 41
13 Technical Data . . . . . . . . . . . . . . . . . . . . . . . . . . . . . . . . . . 42
14 Contact . . . . . . . . . . . . . . . . . . . . . . . . . . . . . . . . . . . . . . . . 45
Installation Guide SIC50-IA-en-11 5
Page 6

Table of Contents SMA Solar Technology AG
6 SIC50-IA-en-11 Installation Guide
Page 7

SMA Solar Technology AG Notes on this Manual
1 Notes on this Manual
This manual describes how to install, commission and service the Sunny Island Charger.
1.1 Validity
This manual applies to the following Sunny Island Charger type:
• SIC50-MPT
1.2 Target Group
This manual is intended for the installer and the operator.
1.3 Storage of the Manual
All manuals for the device and for the installed components must be stored in the immediate vicinity
of the charge controller and must be accessible at all times.
Installation Guide SIC50-IA-en-11 7
Page 8

Notes on this Manual SMA Solar Technology AG
1.4 Symbols Used
The following types of safety messages and general information appear in this document:
DANGER!
DANGER indicates a hazardous situation which, if not avoided, will result in death or
serious injury.
WARNING!
WARNING indicates a hazardous situation which, if not avoided, could result in death or
serious injury.
CAUTION!
CAUTION indicates a hazardous situation which, if not avoided, could result in minor or
moderate injury.
NOTICE!
NOTICE indicates a situation that can result in property damage if not avoided!
Information
Information provides tips that are valuable for the optimal installation and operation of
your product.
8 SIC50-IA-en-11 Installation Guide
Page 9

SMA Solar Technology AG Safety Instructions
2 Safety Instructions
2.1 Appropriate Usage
The ch arge controlle r is a DC/DC conve rter that reduc es the dire ct current of th e PV ar ray to the direct
current of a battery in order to charge it. The SIC50-MPT replaces the SIC40-MPT.
The charge controller can be operated in two different operating modes:
SMA operation Stand-alone operation
The "SMA" operating mode must be selected if
the charge controller is operated in a system
equipped with a Sunny Island 5048/2012/
2224.
Section 6.1.1 "Operating mode" (28) explains how to set the operating mode.
In SMA operating mode, the Sunny Island protects the battery from deep discharge. In stand-alone
operating mode without Sunny Island, an external device must protect the battery from deep
discharge.
The charge controller may only be operated with PV array (modules and cabling) of protection class
II. Do not connect any sources of energy other than PV modules to the charge controller.
Already when designing the PV plant, ensure that the values comply with the permitted operating
range of all components at all times. The maximum open circuit voltage of the PV array may not be
greater than the maximum input voltage of the charge controller (140 V), even at very low ambient
temperatures. The voltage of the PV array must always be at least 5 V higher than the battery voltage
during operation. The charge controller is suitable for battery currents of up to 50 A at 48 V/24 V/
12 V nominal battery voltage.
The suitability of a PV array for the charge controller primarily depends on the output voltage and
output power of the PV array. In this regard, observe the limits specified by the module manufacturer.
Appropriate usage also includes observing all documentation.
The "Stand-alone" operating mode must be
selected if the charge controller is operated in a
stand-alone grid system equipped with a
Sunny Island 3324/4248 or without a
Sunny Island.
Installation Guide SIC50-IA-en-11 9
Page 10

Safety Instructions SMA Solar Technology AG
2.2 General Safety Instructions
DANGER!
Danger to life due to high voltages in the charge controller.
• All work on the charge controller must only be carried out by an electrically skilled
person.
CAUTION!
Danger of burn injuries due to hot enclosure parts.
• Do not touch the enclosure of the charge controller during operation.
Grounding the PV array
Observe all local regulations for grounding the PV array. SMA Solar Technology AG
connecting the array frame and other electrically conductive surfaces so that there is
continuous conduction and to ground them in order to ensure optimal protection for plants
and persons.
10 SIC50-IA-en-11 Installation Guide
Page 11
SMA Solar Technology AG Unpacking
3 Unpacking
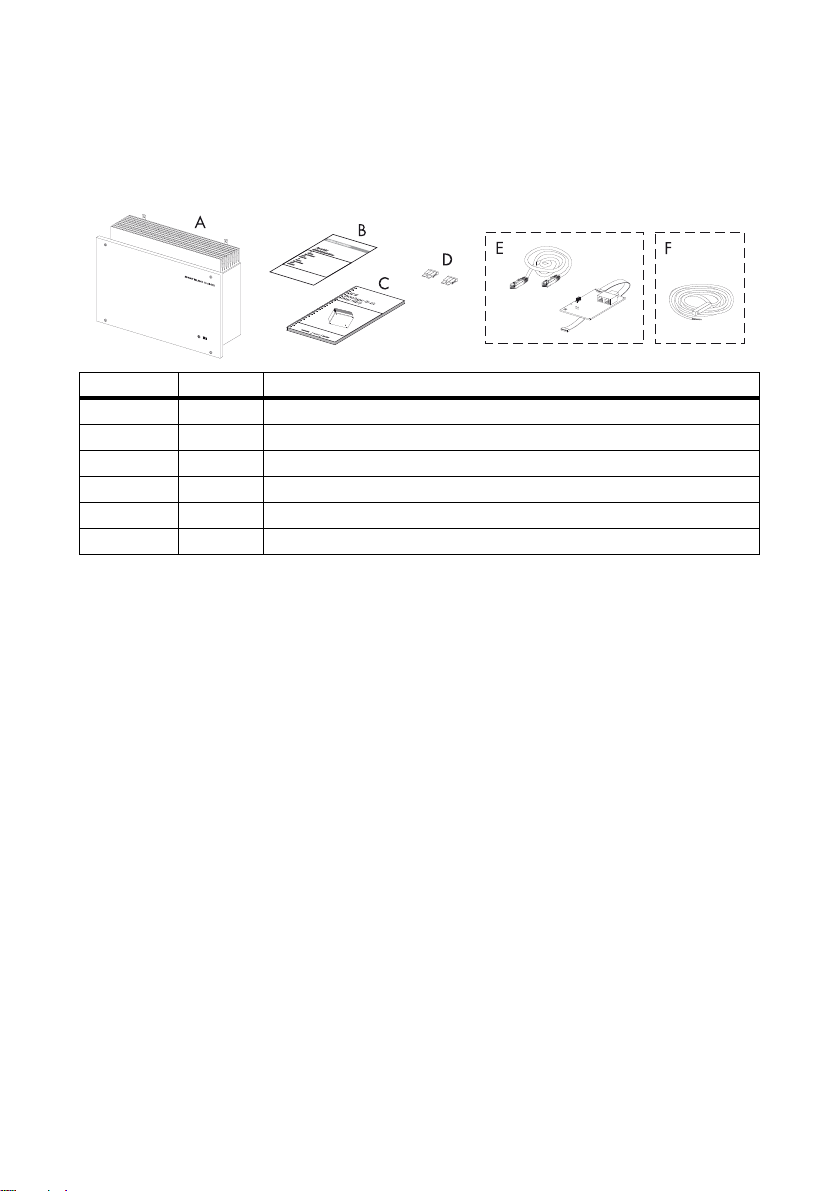
3.1 Scope of Delivery
Object Quantity Description
A 1 Charge controller
B1Document set
C 1 Technical description
D 2 Thermal fuse (30 A)
E 1 SIC-PB communication interface and RJ45 cable (5 m)
F 1 Battery temperature sensor
*
optional, required for SMA operation
**
optional
**
*
3.2 Check for Transport Damage
Check the charge controller for visible external damage, such as cracks in the enclosure. Contact your
dealer if you find any damage.
3.3 Identifying the Charge Controller
You can identify the charge controller by the type label. The type label is on the right side of the
enclosure.
Installation Guide SIC50-IA-en-11 11
Page 12
Battery Management and Charge Control SMA Solar Technology AG
Battery
Charge controller
Sync bus (CAN)
Array
Sunny Boy
Sunny Island
4 Battery Management and Charge Control
4.1 SMA Operation
The SIC-PB communication interface must be installed and connected to the Sunny Island 5048/
2012/2224 for SMA operation. If a communication connection is established, the Sunny Island will
control of battery management, including charge control.
The charge controller receives the current and temperature-compensated nominal charging voltage
from the Sunny Island and transmits the battery's present charging current back to the Sunny Island.
This ensures that the battery is always optimally charged and that the Sunny Island calculates the
correct charging state. For further details on battery management see the Sunny Island
documentation.
If communication does not function in SMA operation, the battery will only be charged with voltages
of 13.5/27/54 V.
Working principle of a Sunny Island system with a charge controller
12 SIC50-IA-en-11 Installation Guide
Page 13

SMA Solar Technology AG Battery Management and Charge Control
PC
Battery
Charge
controller
4.2 Stand-Alone Operation
During stand-alone operation or during operation with the 3324/4248 Sunny Island inverters, the
charge controller automatically controls the charging voltage of the battery, depending on the battery
type set and current charging phase, according to the "four-phase charging process" (MPP, boost,
continuous, float). During the first phase, charging is carried out using the maximum power provided
by the PV array. During the second phase, the charging current is reduced and the battery voltage is
regulated to the charging voltage set for the boost phase. This phase is only completed if the battery
voltage ever drops below 2.08 V/cell during the preceding discharging phase. Otherwise, the
charging process is immediately continued with the third phase, "continuous". The continuous and the
boost charging phases are identical, except that the continuous phase has a slightly lower charging
voltage. Once continuous charging is completed, the charge controller switches to float charging until
the next complete discharge.
If a ba tte ry t emp era tur e se nso r is con nec ted , th e ch arg ing vol tag e is adj ust ed t o th e te mpe rat ure usi ng
-4 mV/°C and cell.
Working principle of the charge controller in stand-alone operation
Installation Guide SIC50-IA-en-11 13
Page 14
Assembly SMA Solar Technology AG
5 Assembly
CAUTION!
Risk of injury due to the charge controller's heavy weight.
• Take the weight of the charge controller of approx. 10 kg into account.
5.1 Selecting the Mounting Location
DANGER!
Danger to life due to fire or explosion.
The charge controller enclosure can become hot during operation.
• Do not mount the charge controller on flammable construction materials.
• Do not mount the charge controller near highly flammable materials.
• Do not mount the charge controller in potentially explosive areas.
CAUTION!
Danger of burn injuries due to hot enclosure parts.
• Mount the charge controller in such a way that it cannot be touched inadvertently
during operation.
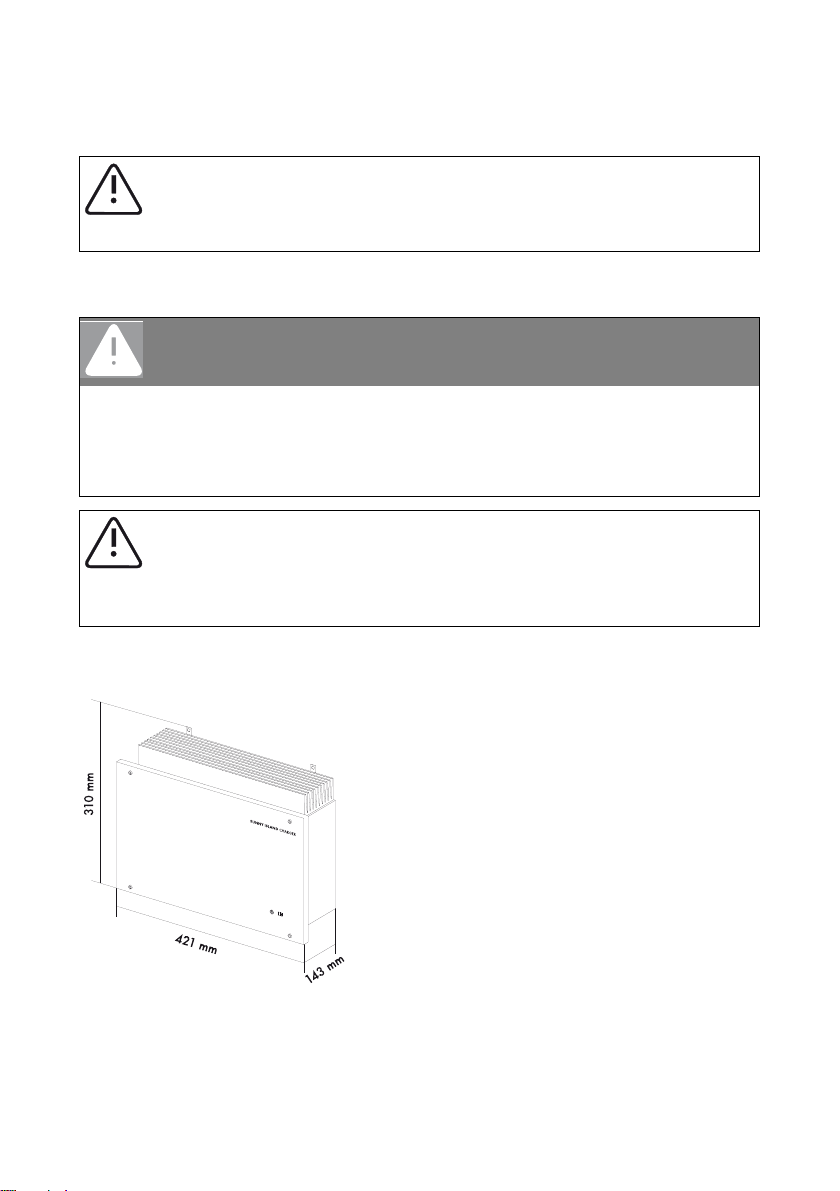
5.1.1 Dimensions
14 SIC50-IA-en-11 Installation Guide
Page 15
SMA Solar Technology AG Assembly
5.1.2 Ambient Conditions
• The mounting location and method must be suitable for the weight and dimensions.
• Mount on a solid surface.
• The mounting location must be accessible at all times.
• The charge controller must be easy to remove from the mounting location at any time.
• The ambient temperature should be between -25 °C and +60 °C to guarantee optimal
operation.
• Do not expose the charge controller to direct sunlight to avoid power losses due to overheating.
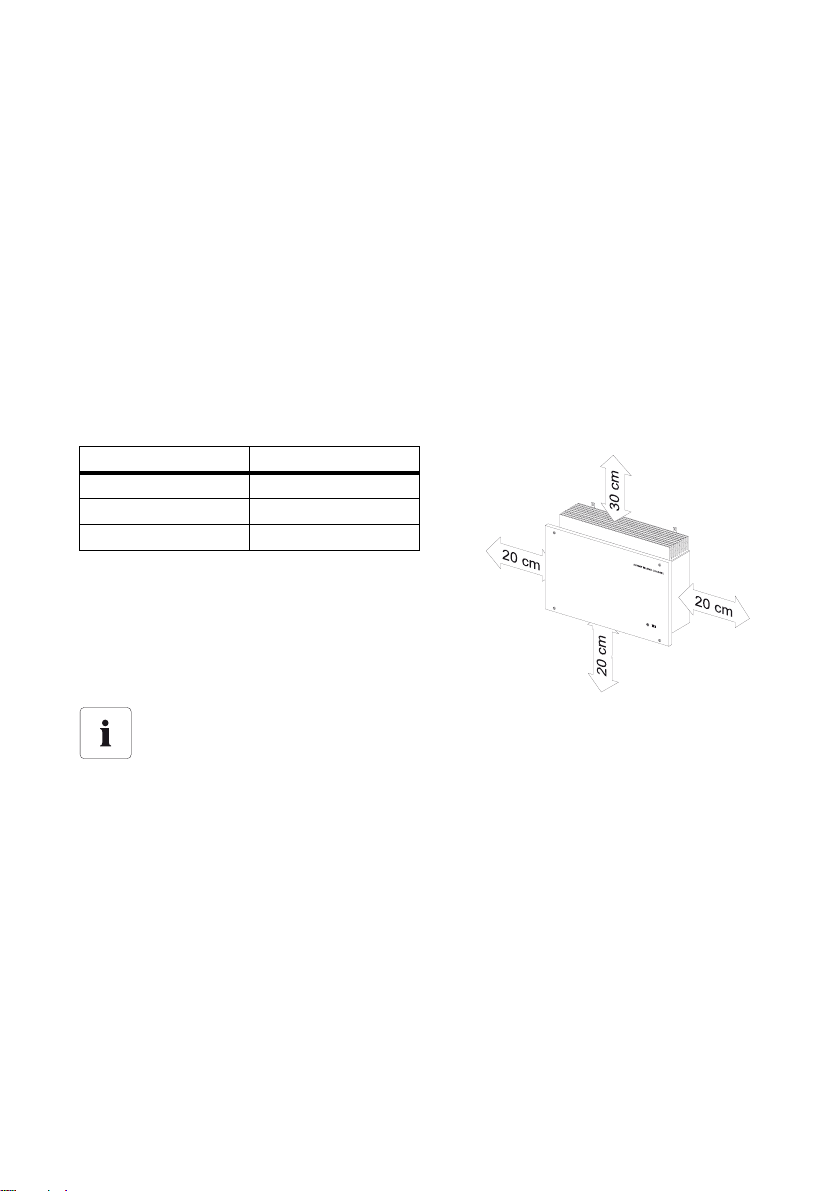
5.1.3 Safety Clearances
Observe the following safety clearances to walls, other devices or objects to ensure sufficient heat
dissipation.
Direction Safety clearance
Sides 20 cm
Top 30 cm
Bottom 20 cm
Multiple charge controllers installed in areas with high ambient temperatures
If necessary, increase the clearances between the individual charge controllers. In
addition, make sure there is enough ventilation to ensure sufficient cooling of the charge
controller.
Installation Guide SIC50-IA-en-11 15
Page 16

Assembly SMA Solar Technology AG
5.1.4 Position
• Mount vertically or tilted backwards by max. 45°.
• Install at eye level in order to allow operation conditions to be read at all times.
• Never mount the device with a forward tilt.
• Do not mount horizontally.
5.2 Mounting Instructions
1. Mark the position of the drill holes.
16 SIC50-IA-en-11 Installation Guide
Page 17

SMA Solar Technology AG Assembly
S
U
N
N
Y
IS
L
A
N
D
CH
A
R
G
E
R
2. Drill the holes (diameter: at least 8 mm) at the
indicated positions and use wall anchors (at least
M8).
3. Screw the charge controller onto the wall using the
three mounting plates. Use fastening material
suitable for the surface.
4. Make sure that the device is securely in place.
Installation Guide SIC50-IA-en-11 17
Page 18

Electrical Connection SMA Solar Technology AG
6 Electrical Connection
6.1 Safety
DANGER!
Danger to life due to high voltages in the charge controller.
• Disconnect the PV array using a disconnection unit and secure it against accidental
reactivation.
• Disconnect the miniature circuit breaker and ensure that it cannot be reconnected.
• Ensure that no voltage is present in the system.
WARNING!
Risk of injury due to electric shock.
If all cables with different voltages are routed in parallel, damaged cable insulations may
lead to a short circuit.
• Route all cables separately.
NOTICE!
Electrostatic discharges may damage the charge controller.
• Ground yourself before touching a component inside the charge controller.
NOTICE!
Overvoltage can destroy the system.
• Use an external overvoltage protector in areas with an increased risk of
thunderstorms and lightning.
18 SIC50-IA-en-11 Installation Guide
Page 19

SMA Solar Technology AG Electrical Connection
6.2 Overview of the Connection Area
Object Description
A "PV+" connection terminal for "PV+" cable of the PV array
B "PV–" connection terminal for "PV–" cable of the PV array
C "BAT–" connection terminal for "BAT–" cable of the battery
D "BAT+" connection terminal for "BAT+" cable of the battery
EThermal fuses
F "EARTH" connection terminal for grounding
G Connection terminal for the battery temperature sensor cables
H Connection terminal for the signaling contact cables
IDIL switch for configuration
K Internal LEDs (only visible to the installer)
L LED connection of the multicolored LED in the lid
M M20 metric-thread cable glands for the battery, PV array and PE cables
Installation Guide SIC50-IA-en-11 19
Page 20

Electrical Connection SMA Solar Technology AG
Object Description
N M25 metric-thread cable gland for the signaling contact and the battery temperature
sensor cables
O M25 metric-thread cable gland for communication cable
6.3 Grounding
6.3.1 Grounding the Charge Controller
DANGER!
Risk of lethal electric shock.
The charge controller has the protection class I.
• Ground the charge controller properly, regardless of whether the battery and PV are
grounded.
1. Open the charge controller. Loosen the screws of the enclosure lid and remove the lid.
2. Unscrew the lock nut of the metric-thread cable
gland (B) and slide it along the PE cable.
3. Route the PE cable through the cable gland into the
charge controller and connect it to the "EARTH"
connection terminal (A).
4. Retighten the lock nut of the cable gland.
20 SIC50-IA-en-11 Installation Guide
Page 21

SMA Solar Technology AG Electrical Connection
t = short-circuit duration in seconds
ISC = maximum battery current (short-circuit current) in amperes
S = conductor cross-section in mm²
6.3.2 Grounding the Battery and the PV Plant
DANGER!
Danger to life due to high voltages at the battery's negative ground terminal.
• Ground the battery.
No t gr oun din g th e batter y is per mit ted onl y if the batt ery con nections have protection
against accidental contact.
NOTICE!
Grounding the positive pole may lead to destruction of the battery.
• Never ground the positive pole of the battery or the PV plant.
Cross-section of the Protective Conductor
SMA Solar Technology AG cannot make any general statements regarding the required cross-section
of the protective conductor for external grounding of the battery. The conductor dimensions depend
on the type and size of the battery connected, the external fuse (DC side) and the material used in
the protective conductor.
Determining the cross-section
When determining the cross-section of the protective conductor, all standards and
guidelines that apply at the installation location must be observed.
The required cross-section of the protective conductor can be calculated using the following formula.
Tripping times for short-circuit currents of between 2 000 A and 10 000 A are typically about 25 ms.
A protective conductor with a cross-section of 16 mm² is therefore sufficient for short-circuit currents
up to 10 000 A.
Installation Guide SIC50-IA-en-11 21
Page 22

Electrical Connection SMA Solar Technology AG
6.4 PV Array Connection (DC)
NOTICE!
Improperly connecting the charge controller to the PV array may irreparably
damage it.
• Never connect several charge controllers in parallel on the side of the PV array.
The following threshold values at the DC input of the charge controller may not be exceeded:
Maximum input voltage Maximum input current
140 V (DC) 40 A (DC)
Connection Procedure
Sectioning point between PV array and charge controller
The DIN VDE 0100-712 standard stipulates that an all-pole sectioning point must be
installed between the PV array and the charge controller. Observe this standard as well as
all standards and guidelines that apply at the installation location for connecting the PV
array.
1. Unscrew the lock nut of the metric-thread cable
gland (C) and slide it along the PV array's "PV+"
cable.
2. Route the "PV+" cable of the PV array through the
cable gland into the charge controller and connect
it to the "PV+" connection terminal (A).
3. Retighten the lock nut of the cable gland.
4. Unscrew the lock nut of the metric-thread cable
gland (D) and slide it along the PV array's "PV-"
cable.
5. Route the "PV-" cable of the PV array through the
cable gland into the charge controller and connect
it to the "PV-" connection terminal (B).
6. Retighten the lock nut of the cable gland.
22 SIC50-IA-en-11 Installation Guide
Page 23

SMA Solar Technology AG Electrical Connection
6.5 Battery Connection (DC)
Connection Requirements
Battery capacity
The battery capacity depends on the connected PV power.
Observe the following table.
Nominal battery voltage Battery capacity per kWp PV
48 V at least 120 Ah/kWp PV
24 V at least 200 Ah/kWp PV
12 V at least 400 Ah/kWp PV
Excessively long battery cables reduce system efficiency
The cables leading from the battery to a DC distributor to which both the Sunny Island and
the charge controller are connected may not be longer than 5 m.
• O bse rve all sta ndards a nd g uid eli nes tha t ap ply at the in sta llation location (e.g. DIN VDE 0510
"Rules for Accumulators and Battery Systems").
• Observe all specifications of the battery manufacturer.
Cable Requirements
NOTICE!
Irreparable damage of the cable leading from the charge controller to the
battery.
• Do not lay the battery cables under plaster or in armored plastic pipes.
Cable Protection
In addition to the thermal fuses in the charge controller, install a separate fuse as close to the battery
as possible. Install a suitable fuse according to the maximum specified DC currents. You can, for
example, install a 63 A miniature circuit breaker.
NOTICE!
Irreparable damage of the cable leading from the charge controller to the
battery.
• Lay the battery cables so that they are protected against ground faults and short
circuits if no line circuit breaker is present.
• Make sure that the cable cross-section is sufficient.
Installation Guide SIC50-IA-en-11 23
Page 24

Electrical Connection SMA Solar Technology AG
Connection Procedure
NOTICE!
Reversing the poles when connecting the battery may irreparably damage the
charge controller.
• Make sure that the poles of the cables leading to the battery are correct.
1. Unscrew the lock nut of the metric-thread cable
gland (A) and slide it along the battery's "BAT-"
cable.
2. Route the "BAT-" cable of the battery through the
cable gland into the charge controller and connect
it to the "BAT-" connection terminal (C).
3. Retighten the lock nut of the cable gland.
4. Unscrew the lock nut of the metric-thread cable
gland (B) and slide it along the battery's "BAT+"
cable.
5. Route the "BAT+" cable of the battery through the
cable gland into the charge controller and connect
it to the "BAT+" connection terminal (D).
6. Retighten the lock nut of the cable gland.
Replacing the thermal fuses when reversing the poles of the DC cables
If the poles of the DC cables are reversed when connecting, the thermal fuse will be
irreparably damaged.
Proceed as described in section 9.1”Replacing the Thermal Fuses” (page38) to replace
the thermal fuses.
Multicolored LED
Once the battery has been connected, the multicolored LED of the charge controller will
gl ow r ed. If th e LE D is n ot g low ing , the pol es o f the DC c abl es are reversed and the thermal
fuses must be replaced. If this is not the case, the charge controller is defective and must
be replaced. In this case, contact the SMA Service Line. See section 14”Contact”
(page45).
24 SIC50-IA-en-11 Installation Guide
Page 25

SMA Solar Technology AG Electrical Connection
6.6 Communication
6.6.1 Interface
Object Description
AMSTE bus output
BMSTE bus input
C RJ45 socket for connecting a serial interface
D Socket for SIC-PB communication interface
E Socket for communication interface connection
6.6.2 Connection to PC Serial Interface
Connecting a PC to the charge controller is possible in both operating modes (SMA operation and
stand-alone operation). Measured values can only be read.
The connection is established via the RJ45 socket of the first charge controller (device address 0) to
the PC's serial interface. Use a RJ45 to RS232 adapter cable for this.
Installation Guide SIC50-IA-en-11 25
Page 26

Electrical Connection SMA Solar Technology AG
Configuring the Software
Use a terminal program in order to display the measured values on the PC. There are various termi nal
programs avail able, e.g. , Hyper Terminal. Hy per Termin al is a Microsoft Windows standard program
and is located under „Start\Programs\Accessories\Communication“.
The following table shows the connection settings for the terminal program:
Setting Value
Bits per second 300
Data bits 8
Parity none
Stop bits 1
Flow control none
Pin Assignment of the RJ45 Socket on the Charge Controller
Pin Function Level Description
1 Short circuit with PIN 2 must be established for activating RS232
2 Short circuit with PIN 1 must be established for activating RS232
3 TXD RS232, +9 V, − 9 V charge controller output
4 GND 0 V reference potential
9 Shield, protective earth
Pin Assignment of the PC's Serial Interface
Pin Function Level Description
5 GND 0 V reference potential
2 RXD RS232, +9 V, − 9 V PC input
26 SIC50-IA-en-11 Installation Guide
Page 27

SMA Solar Technology AG Electrical Connection
SIC50-MPT 1
SIC50-MPT 2
SIC50-MPT 3 SIC50-MPT 4
Sunny Island
6.6.3 SMA Operation
The communication between the charge controller and the Sunny Island 5048/2012/2224 allows
the charge controller to be controlled in a coordinated manner. This ensures precise calculation of the
state of charge in the Sunny Island without an additional battery current measuring shunt.
All important operating data of the charge controller can be read on the Sunny Island display. In
addition, the most important values are saved on the Sunny Island SD card.
Up to four charge controllers can be connected in parallel to one Sunny Island system.
More information on installing and connecting the SIC-PB communication interface can be found in
the SIC-PB installation guide.
Pin Assignment of the Micro Ribbon Cable
Pin Function Level Description
8 GND 0 V reference potential
10 GND 0 V reference potential
11 RXD TTL charge controller input
12 TXD TTL charge controller output
Installation Guide SIC50-IA-en-11 27
Page 28

Electrical Connection SMA Solar Technology AG
6.6.4 Stand-alone Operation
Up to 8 cha rge con tro lle rs c an b e co nne cte d to eac h ot her. Con nect the MST E bu s in put of t he c har ge
controller with the MSTE bus output of the following charge controller. Use an RJ45 cable for this.
Pin Assignment of the MSTE Bus
Pin Function Level Description
4 GND 0 V reference potential
3 TXD bus / RXD bus TTL, open collector resting potential: +5 V
active: 0 V
9 Shield, protective earth
28 SIC50-IA-en-11 Installation Guide
Page 29

SMA Solar Technology AG Electrical Connection
Communication Protocol
The charge controller sends and receives data through the TXN bus and the RXD bus. The data is
coded in ASCII format.
Character Sequence of the Request
The character sequence of the request consists of 4 characters. The co de l ett er a nd t he d evi ce a ddr ess
must be coded in ASCII format.
0123
Control character 13
(carriage return)
Character Sequence of the Response
The character sequence of the response consists of 14 characters. It beg ins wit h th e co ntr ol c har act ers
13 and 10 (carriage return and line feed) They are followed by the code letter of the measured value
and the device address.
The following table shows an example for the character sequence of the response (device
SIC50-MPT 0 with operating voltage of +50.0 V):
012345678910111213
1310V0=+0050. 0V!
Code Letter of the Measured Values
Code letter Description
D Temperature of the charge controller
E Device fault (see section 11”Failure Search” (page40))
I Charging current
L Charging threshold of the battery voltage
PCharging power
S Voltage at the PV array
T Temperature of the battery
V Operating voltage
Control character 10
(line feed)
Code letter Device address
Installation Guide SIC50-IA-en-11 29
Page 30

Electrical Connection SMA Solar Technology AG
6.7 Additional Connections
6.7.1 Signaling Contact
You can connect a signaling contact to your charge controller that automatically closes in case of
battery overvoltage (battery voltage > 65 V).
The signaling contact operates like a make contact and can be loaded with voltages of up to 200 V
(DC) and a contact load of 1 A/15 W.
NOTICE!
If a switch in the charge controller short circuits, the battery may be irreparably
damaged.
If a short circuit occurs in the charge controller, the battery is no longer protected against
overcharging.
• SMA Solar Technology AG recommends using the signaling contact to ensure that,
in case of a failure, the battery is disconnected from the charge controller by a relay
or contactor.
• I f se ver al charg e co ntr ollers a re c onn ected to the stand-a lon e grid system, a signaling
contact must be connected between each charge controller and the battery.
Cable Requirements
Signaling Contact Cable
To maintain the IP65 protection rating, use a cable with an outer diameter of 5 mm - 7 mm
to connect the signaling contact.
30 SIC50-IA-en-11 Installation Guide
Page 31

SMA Solar Technology AG Electrical Connection
AB
Connection Procedure
1. Unscrew the lock nut of the M25 metric-thread cable gland (A) and slide it along the signaling
contact cables.
2. Remove the seal insert from the cable gland and remove the filler plug.
3. Route the signaling contact cable through a cable opening into the seal insert.
4. Insert the seal insert along with signaling contact cables into the cable gland.
5. Route the cables of the signaling contact through the cable gland into the charge controller and
connect them to the connection terminal (B).
6. Retighten the lock nut of the cable gland.
Installation Guide SIC50-IA-en-11 31
Page 32

Electrical Connection SMA Solar Technology AG
6.7.2 Battery Temperature Sensor
To allow a temperature-independent charge control during stand-alone operation or during operation
with a Sunny Island 3324/4248, you can connect an external battery temperature sensor (BATTEMP-SENSOR: replacement battery temperature sensor, KTY type with 10 m connection cable for
Sunny Island, Sunny Backup or Sunny Island Charger) to the charge controller.
SMA Operation
No external battery temperature sensor is required when operating in "SMA operation"
mode.
NOTICE!
Damage to battery due to excessive or insufficient charging.
In "Stand-alone operation" mode, a battery temperature sensor must be connected.
Otherwise, the battery may be excessively or insufficiently charged if temperatures outside
of the temperature range +15 °C to 25 °C occur frequently.
• Connect an external battery temperature sensor if the charge controller is operated
in stand-alone mode or together with a Sunny Island 3324/4248.
2 kΩ resistor
A 2 kΩ resistor is connected by default to the connection terminal for the battery
temperature sensor.
If neither the resistor nor a battery temperature sensor are connected during stand-alone
operation or during operation with a Sunny Island 3324/4248, the charge controller
cannot be commissioned.
32 SIC50-IA-en-11 Installation Guide
Page 33

SMA Solar Technology AG Electrical Connection
AB
Connection Procedure
1. Remove the resistor.
2. Unscrew the lock nut of the M25 metric-thread cable gland (A) and slide it along the cable of
the battery temperature sensor.
3. Remove the seal insert along with the cable opening from the cable gland.
4. Route the cables through the cable openings in the seal insert.
5. Connect the battery temperature sensor cables to the connection terminal (B).
6. Retighten the lock nut of the cable gland.
Installation Guide SIC50-IA-en-11 33
Page 34

(First) Commissioning SMA Solar Technology AG
7 (First) Commissioning
7.1 Configuring the Charge Controller
Configure the charge controller before commissioning. You can carry out the basic configuration
using the operating switch (DIL switch).
The operating mode, battery system, battery type, device address of the charge controller and a fault
diagnosis can be configured by changing the position of the DIL switch.
Assignment of the DIL Switches
The DIL switches have the following assignments:
7.1.1 Operating Mode
The operating mode is set using the "D4" DIL switch.
Operation with Sunny Island 3324/4248
If the charge controller is operated in the stand-alone grid system together with a
Sunny Island 3324/4248, set the DIL switch D4 to "OFF", since this Sunny Island does not
support the charge controller's type of communication.
The following table displays the switch position for the required operating mode.
Switch SMA operation
(operation with Sunny
Island)
D4 ON OFF
34 SIC50-IA-en-11 Installation Guide
Stand-alone operation
Page 35

SMA Solar Technology AG (First) Commissioning
7.1.2 Battery System
The battery system is set using the C1, C2 and C3 DIL switches. The f oll owi ng t abl e di spl ays the swi tch
position of the required battery system.
Switch 12 V battery system 24 V battery system 48 V battery system
C1 ON OFF OFF
C2 OFF ON OFF
C3 OFF OFF ON
7.1.3 Device Address
The sequential order of the devices is determined by configuring the device address. The device
address is set using the D1, D2 and D3 DIL switches.
Stand-alone operation
In the "Stand-alone operation" mode, the device address must be set to 0.
SMA operation
In the "SMA operation" mode, up to four charge controllers may be connected to the
Sunny Island. The device addresses intended for these four devices are one to four.
The following table displays the switch position of the device addresses:
Device address D3 D2 D1
0 OFF OFF OFF
1OFFOFFON
2OFFONOFF
3OFFONON
4ONOFFOFF
5ONOFFON
6 ONONOFF
7 ONONON
Installation Guide SIC50-IA-en-11 35
Page 36

(First) Commissioning SMA Solar Technology AG
7.1.4 Battery Type
In stand-alone operation, the battery type and the charging voltage must be set. The battery type and
charging voltage are set using the B1, B2, B3 and B4 DIL switches. When performing these settings,
observe all the specifications of the manufacturer.
The possible settings for the charging voltage/cell can be found in the following tables.
Battery type Charging process Switch
Boost ContinuousFloat B1B2B3B4
Typical flooded battery 2.392 V 2.35 V 2.3 V OFF OFF OFF OFF
Type 2 flooded battery 2.392 V 2.35 V 2.267 V OFF OFF ON OFF
Type 3 flooded battery 2.375 V 2.35 V 2.283 V OFF ON OFF OFF
Type 4 flooded battery 2.358 V 2.33 V 2.25 V OFF ON ON OFF
Typical sealed battery 2.4 V 2.375 V 2.33 V ON OFF OFF OFF
Type 2 sealed battery 2.4 V 2.35 V 2.3 V ON OFF ON OFF
Type 3 sealed battery 2.467 V 2.35 V 2.3 V ON ON ON OFF
Type 4 sealed battery 2.583 V 2.35 V 2.3 V OFF OFF OFF ON
7.2 Commissioning
Check the following requirements before commissioning:
• Fuses designed correctly
• All DC cables completely connected (PV strings and batteries)
• Battery temperature sensor connected (only in stand-alone operation or when operated with a
Sunny Island 3324/4248)
•DIL switches configured
Commissioning Procedure
1. Check the polarity of the battery and the PV array.
2. Close the charge controller. Fasten the lid to the enclosure using four screws.
3. Connect the cables leading from the charge controller to the battery to the battery.
4. Switch on the miniature circuit breaker and the disconnection unit.
5. The LED changes its color from red to green. The green LED indicates that the device is
oper ating. This means that the commissioning procedure was succ essful. If the PV vol tage drops
and falls below the battery voltage, the LED will change from green to orange. If the PV voltage
exceeds the battery voltage, the device will restart and the LED will change from orange to
green.
36 SIC50-IA-en-11 Installation Guide
Page 37

SMA Solar Technology AG Opening and Closing
8 Opening and Closing
8.1 Opening the Charge Controller
DANGER!
Danger to life due to high voltages in the charge controller.
• Disconnect the miniature circuit breaker and ensure that it cannot be reconnected.
• Switch off power supply to the signaling contact and ensure that it cannot be
reactivated (if applicable).
• Ensure that no voltage is present in the system.
1. Remove the screws from the lid and set them aside.
2. Pull the lid slightly forward.
3. Disconnect the PE connection from the lid.
4. Carefully remove the multicolored LED from the charge controller's "LED" socket.
5. Remove the enclosure lid and set it aside.
8.2 Closing the Charge Controller
1. Create a PE connection to the lid.
2. Carefully insert the plug of the multicolored LED into the charge controller's "LED" socket.
3. Close the charge controller. Fasten the lid to the enclosure using four screws.
4. Switch on the miniature circuit breaker and the disconnection unit.
5. Check the LED to see if the charge controller is operating correctly.
Installation Guide SIC50-IA-en-11 37
Page 38

Maintenance and Cleaning SMA Solar Technology AG
9 Maintenance and Cleaning
9.1 Replacing the Thermal Fuses
NOTICE!
Using incorrect thermal fuses may irreparably damage the charge controller.
• Only use the thermal fuses included in the scope of delivery.
1. Open the charge controller as described in section 8.1”Opening the Charge Controller”
(page37).
2. Remove broken thermal fuses from the sockets (A).
3. Insert new thermal fuses (included in the scope of
delivery).
4. Close the charge controller as described in section
8.2”Closing the Charge Controller” (page37).
9.2 Cleaning the Cooling Fins
It is only necessary to clean the cooling fins if the charge controller's heat dissipation is restricted by
dirt.
• Carefully remove dirt with a suitable soft brush.
38 SIC50-IA-en-11 Installation Guide
Page 39

SMA Solar Technology AG Meaning of the Light Emitting Diodes (LEDs)
10 Meaning of the Light Emitting Diodes (LEDs)
10.1 Multicolored LED
LED Meaning
Green Operation
(PV voltage > battery voltage)
Red Fault/error
Orange Low PV voltage
(PV voltage < battery voltage)
10.2 Internal LEDs
Internal LEDs
The internal LEDs are located inside the charge
controller and are only visible to the installer.
Yellow
(ERROR)
Is glowing Is glowing––error/stop
––––charge controller is
––Is blinking–charge controller is
–––Is blinkingcharge controller is
Installation Guide SIC50-IA-en-11 39
Yellow
(ERROR)
Green (RXD) Green (TXD) Meaning
charging
receiving data from
Sunny Island
transmitting data
Page 40

Failure Search SMA Solar Technology AG
11 Failure Search
11.1 SMA Operation
You can find the description of all parameters and errors in the Sunny Island manual.
11.2 Stand-alone Operation
You can read the error messages through the serial interface using the terminal program. The device
number is shown as x in the following.
Error code Description
Ex=+0000.0 no error
Ex=+0000.2 DC input voltage missing
(also at night and during periods with low solar irradiation)
Ex=+0000.4 overvoltage at DC input voltage
Ex=+0000.8 battery temperature too high or sensor cable interrupted
Ex=+0001.6 battery temperature too low or short circuit in the sensor cable
Ex=+0003.2 charge controller temperature is higher than 90 °C
Ex=+0006.4 battery temperature is lower than -30 °C
Ex=+0012.8 battery voltage is lower than 8.1 V
Ex=+0025.5 short circuit, overload or overcurrent at battery or PV array
(also before first commissioning)
40 SIC50-IA-en-11 Installation Guide
Page 41

SMA Solar Technology AG Decommissioning
12 Decommissioning
12.1 Disassembly
CAUTION!
Risk of injury due to the charge controller's heavy weight.
• Take the weight of the charge controller of approx. 10 kg into account.
DANGER!
Danger to life due to high voltages in the charge controller.
• Switch off all fuses and ensure that they cannot be reactivated.
1. Wait until the LED on the charge controller has gone out.
2. Open the charge controller. Loosen the screws of the enclosure lid and remove the lid.
3. Disconnect the PV array from the charge controller.
4. Disconnect the battery from the charge controller.
5. Remove the communication cable from the charge controller.
6. Close the charge controller. Fasten the lid to the charge controller using four screws.
7. Remove the charge controller.
12.2 Packaging
If possible, always package the charge controller in the original packaging. If this is no longer
available, you can also use an equivalent box that fulfills the following requirements:
• Suitable for loads up to 10 kg
• Can be closed fully
12.3 Storage
Store the charge controller in a dry place with ambient temperatures between -25 °C and +60 °C.
12.4 Disposal
Dispose of the charge controller at the end of its service life in accordance with the disposal
regulations for electronic waste which apply at the installation site at that time. Alternatively, send it
back to SMA Solar Technology AG with shipping paid by sender, and labeled
"ZUR ENTSORGUNG" ("for disposal").
Installation Guide SIC50-IA-en-11 41
Page 42

Technical Data SMA Solar Technology AG
13 Technical Data
SIC50-MPT
Input (PV array)
Max. PV power (12 V / 24 V / 48 V) 630 W / 1 250 W / 2 400 W
Max. DC voltage 140 V
Optimal MPPT voltage range
(12 V / 24 V / 48 V) 25 V … 60 V / 40 V … 80 V / 70 V … 100 V
Number of MPP trackers 1
Max. PV current for 12 V / 24 V / 48 V system 40 A / 40 A / 40 A
PV current control unit MPPT (approximate current control every minute,
fine control every two seconds)
Clamping position screw terminals
Recommended cable cross-section 10 mm²
Max. cross-section of cables that can be
connected
Torque (bolt or screw terminals) 0.5 Nm ... 0.6 Nm
Output (battery)
Nominal DC power up to 40 °C
600 W / 1 200 W / 2 400 W
(12 V / 24 V / 48 V)
Power limitation at 50 °C / 60 °C 12 V : 600 W / 600 W
24 V : 1 200 W / 1 000 W
48 V : 1 500 W / 1 000 W
Nominal battery voltage (adjustable) 12 V / 24 V / 48 V
Battery voltage range 8 V … 65 V
Battery type flooded and sealed lead acid batteries
Max. charging current (12 V / 24 V / 48 V) 50 A / 50 A / 50 A
Permanent charging current (12 V / 24 V / 48 V) 50 A / 50 A / 50 A
Charge control IUoU
Clamping position screw terminals
Recommended cable cross-section 10 mm²
Max. cross-section of cables that can be
connected
Fuse type (max. contact unit) thermal fuse (2 x 30 A)
Torque
(bolt or screw terminals) 0.5 Nm ... 0.6 Nm
DC
16 mm²
16 mm²
42 SIC50-IA-en-11 Installation Guide
Page 43

SMA Solar Technology AG Technical Data
SIC50-MPT
Efficiency / Power consumption
Max. efficiency 98 %
Euro-Eta 97.3 %
Self-consumption during the day < 5 W @ U
Internal consumption at night < 3 W @U
Bat nom
Bat nom
= 48 V
= 48 V
DC
DC
General
Dimensions (W x H x D) 421 mm x 310 mm x 143 mm
Protection rating according to IEC 60529 IP65
Weight 10 kg
Device protection short circuit / reverse polarity / overload /
overvoltage and undervoltage / overtemperature
and undertemperature
EC Declaration of Conformity download area www.SMA.de/en
Display 1 x multicolored LED
Mounting type suspended
Configuration plug & play in combination with Sunny Island
(CAN Piggy-Back required) DIL switch with stand-
alone applications and in SMA operation
Parallel operation up to four devices through CAN bus
Battery temperature compensation -4 mV/°C
Interfaces CAN Piggy-Back (optional)
External temperature sensor KTY type (optional)
Ambient conditions
Permissible ambient temperature during
–25 °C … +60 °C
operation
Air humidity 0 % ... 100 %
Altitude (operational) 5 000 m above mean sea level
Transport height 16 000 m above mean sea level
Installation Guide SIC50-IA-en-11 43
Page 44

Technical Data SMA Solar Technology AG
SIC50-MPT
Safety
Device overtemperature derating/deactivation
Device undertemperature deactivation at -30 °C
Overvoltage (PV) deactivation > 140 V
Bat
< U
PV
> 65 V
Bat
Bat
+5 V
Undervoltage (PV) deactivation at U
reconnection at UPV = U
Overvoltage (battery) deactivation U
Undervoltage (battery) deactivation < 8 V; reconnection > 8.5 V
Short circuit PV deactivation
Battery short-circuit deactivation
Reverse polarity PV deactivation
Reverse polarity in battery fuse tripping
Displays
Operation display multicolored LED
Transmitted data display internal LED (not visible from outside)
Received data display internal LED (not visible from outside)
Sunny Island display battery current, PV power, PV voltage,
operating mode, error
44 SIC50-IA-en-11 Installation Guide
Page 45

SMA Solar Technology AG Contact
14 Contact
If you have technical problems concerning our products, contact the SMA Service Line. We need the
following information in order to provide you with the necessary assistance:
• Serial number of the charge controller
• Quantity of additional charge controllers
• Type and quantity of connected PV modules
• Type of connected stand-alone grid inverter
• Type of battery connected
• Nominal battery capacity
• Nominal battery voltage
• Communication products connected
SMA Solar UK Ltd
Unit 2B, Gemini Building
Sunrise Parkway,Linford Wood
Milton Keynes MK14 6NP
www.SMA-UK.com
SMA Serviceline
Tel. +44 1908 304899
E-Mail: service@SMA-UK.com
Installation Guide SIC50-IA-en-11 45
Page 46

Page 47

SMA Solar Technology AG Legal Provisions
Legal Provisions
The information contained in this document is the property of SMA Solar Technology AG. Publishing its content, either partially or
in full, requires the written permission of SMA Solar Technology AG. Any internal company copying of the document for the
purposes of evaluating the product or its correct implementation is allowed and does not require permission.
SMA Warranty
The current warranty conditions come enclosed with your device. These are also available online at www.SMA-Solar.com and can
be downloaded and are available on paper from the usual sales channels if required.
Trademarks
All trademarks are recognized even if these are not marked separately. Missing designations do not mean that a product or brand
is not a registered trademark.
The Bluetooth
SMA Solar Technology AG is under license.
QR Code
SMA Solar Technology AG
Sonnenallee 1
34266 Niestetal
Germany
Tel. +49 561 9522-0
Fax +49 561 9522-100
www.SMA.de
E-mail: info@SMA.de
© 2004 to 2014 SMA Solar Technology AG. All rights reserved.
®
word mark and logos are registered trademarks owned by Bluetooth SIG, Inc. and any use of such marks by
®
is a registered trademark of DENSO WAVE INCORPORATED.
Installation Guide SIC50-IA-en-11 47
Page 48

4."4PMBS5FDIOPMPHZ"(
XXX4."EF
 Loading...