

Page 1
CA
US
Central Inverter
SUNNY CENTRAL 500HE-US/CA
Installation Manual
SC500HEUS-IA-US_en-14 | 98-4017514 | Version 1.4
Page 2

Page 3

SMA America, LLC Legal Restrictions
Legal Restrictions
Copyright © 2013 SMA America,LLC. All rights reserved.
No part of this document may be reproduced, stored in a retrieval system, or transmitted, in any form
or by any means, electronic, mechanical, photographic, magnetic or otherwise, without the prior
written permission of SMA America,LLC.
Neither SMA America,LLC nor SMA Solar Technology Canada Inc. makes representations, express
or implied, with respect to this documentation or any of the equipment and/or software it may
describe, including (with no limitation) any implied warranties of utility, merchantability, or fitness for
any particular purpose. All such warranties are expressly disclaimed. Neither SMA America,LLC nor
its distributors or dealers nor SMA Solar Technology Canada Inc. nor its distributors or dealers shall
be liable for any indirect, incidental, or consequential damages under any circumstances.
(The exclusion of implied warranties may not apply in all cases under some statutes, and thus the
above exclusion may not apply.)
Specifications are subject to change without notice. Every attempt has been made to make this
document complete, accurate and up-to-date. Readers are cautioned, however, that
SMAAmerica,LLC and SMA Solar Technology Canada Inc. reserve the right to make changes
without notice and shall not be responsible for any damages, including indirect, incidental or
consequential damages, caused by reliance on the material presented, including, but not limited to,
omissions, typographical errors, arithmetical errors or listing errors in the content material.
All trademarks are recognized even if these are not marked separately. Missing designations do not
mean that a product or brand is not a registered trademark.
The Bluetooth
any use of such marks by SMA America,LLC and SMA Solar Technology Canada Inc. is under
license.
®
word mark and logos are registered trademarks owned by Bluetooth SIG, Inc. and
SMA America, LLC
3801 N. Havana Street
Denver, CO 80239 U.S.A.
SMA Solar Technology Canada Inc.
2425 Matheson Blvd. E
8th Floor
Mississauga, ON L4W 5K5
Canada
Installation Manual SC500HEUS-IA-US_en-14 3
Page 4

Important Safety Instructions SMA America, LLC
%"/(&3
8"3/*/(
$"65*0/
/05*$&
Important Safety Instructions
SAVE THESE INSTRUCTIONS
This manual contains important instructions for the following products:
• Sunny Central 500HE-US
This manual must be followed during installation and maintenance.
The product is designed and tested according to international safety requirements, but as with all
electrical and electronic equipment, certain precautions must be observed when installing and/or
operating the product. To reduce the risk of personal injury and to ensure the safe installation and
operation of the product, you must carefully read and follow all instructions, cautions and warnings
in this manual.
Warnings in this document
A warning describes a hazard to equipment or personnel. It calls attention to a procedure or practice,
which, if not correctly performed or adhered to, could result in damage to or destruction of part or all
of the SMA equipment and/or other equipment connected to the SMA equipment or personal injury.
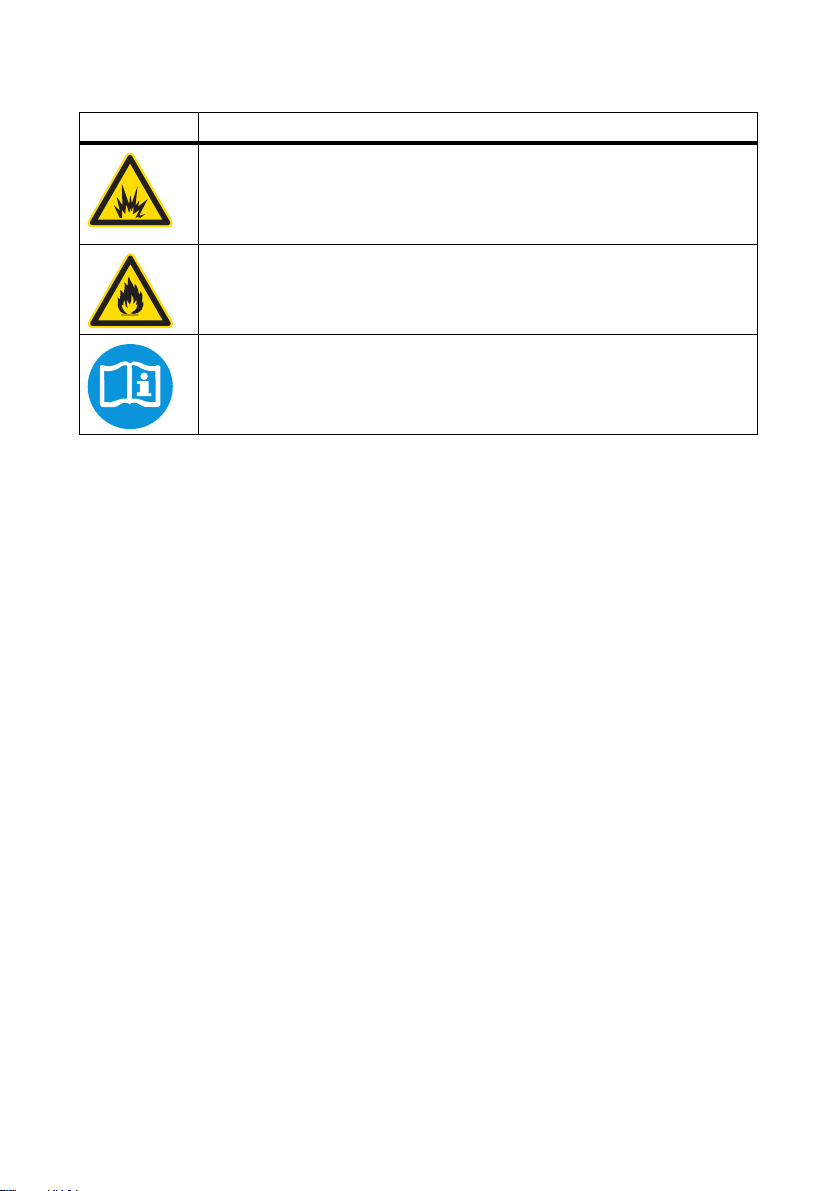
Symbol Description
DANGER indicates a hazardous situation which, if not avoided, will result in
death or serious injury.
WARNING indicates a hazardous situation which, if not avoided, could result
in death or serious injury.
CAUTION indicates a hazardous situation which, if not avoided, could result
in minor or moderate injury.
NOTICE is used to address practices not related to personal injury.
Warnings on this product
The following symbols are used as product markings with the following meanings.
Symbol Description
Warning regarding dangerous voltage
The product works with high voltages. All work on the product must only be
performed as described in the documentation of the product.
Beware of hot surface
The product can become hot during operation. Do not touch the product during
operation.
4 SC500HEUS-IA-US_en-14 Installation Manual
Page 5
SMA America, LLC
Symbol Description
Electric arc hazards
The product has large electrical potential differences between its conductors. Arc
flashes can occur through air when high-voltage current flows. Do not work on the
product during operation.
Risk of Fire
Improper installation of the product may cause a fire.
Observe the operating instructions
Read the documentation of the product before working on it. Follow all safety
precautions and instructions as described in the documentation.
Installation Manual SC500HEUS-IA-US_en-14 5
Page 6

SMA America, LLC
8"3/*/(
General Warnings
General Warnings
Al l el ect ric al ins tal lat ions m ust be m ade in acc ord anc e wi th the local and NationalElectrical Code
ANSI/NFPA 70 or the Canadian Electrical Code® CSAC22.1. This document does not and is not
intended to replace any local, state, provincial, federal or national laws, regulation or codes
applicable to the installation and use of the product, including without limitation applicable
electrical safety codes. All installations must conform with the laws, regulations, codes and
standards applicable in the jurisdiction of installation. SMA assumes no responsibility for the
compliance or noncompliance with such laws or codes in connection with the installation of the
product.
The product contains no user-serviceable parts.
For all repair and maintenance, always return the unit to an authorized SMA Service Center.
Before installing or using the product, read all of the instructions, cautions, and warnings in this
manual.
Before connecting the product to the electrical utility grid, contact the local utility company. This
connection must be made only by qualified personnel.
Wiring of the product must be made by qualified personnel only.
®
6 SC500HEUS-IA-US_en-14 Installation Manual
Page 7

SMA America, LLC Table of Contents
Table of Contents
1 Notes on this Manual. . . . . . . . . . . . . . . . . . . . . . . . . . . . . . . . . 11
1.1 Target Group. . . . . . . . . . . . . . . . . . . . . . . . . . . . . . . . . . . . . . . . . . . 11
1.2 Validity. . . . . . . . . . . . . . . . . . . . . . . . . . . . . . . . . . . . . . . . . . . . . . . . 11
1.3 Additional Information. . . . . . . . . . . . . . . . . . . . . . . . . . . . . . . . . . . . 11
1.4 Structure of this Documentation . . . . . . . . . . . . . . . . . . . . . . . . . . . . . 11
2 Safety . . . . . . . . . . . . . . . . . . . . . . . . . . . . . . . . . . . . . . . . . . . . . 14
2.1 Appropriate Usage . . . . . . . . . . . . . . . . . . . . . . . . . . . . . . . . . . . . . . 14
2.2 Safety Instructions . . . . . . . . . . . . . . . . . . . . . . . . . . . . . . . . . . . . . . . 16
3 The Sunny Central . . . . . . . . . . . . . . . . . . . . . . . . . . . . . . . . . . . 18
3.1 System Overview. . . . . . . . . . . . . . . . . . . . . . . . . . . . . . . . . . . . . . . . 18
3.2 The Design of the Sunny Central . . . . . . . . . . . . . . . . . . . . . . . . . . . . 18
3.3 Location of the Safety Notices. . . . . . . . . . . . . . . . . . . . . . . . . . . . . . 19
3.4 Identifying the Sunny Central. . . . . . . . . . . . . . . . . . . . . . . . . . . . . . . 20
3.5 Firmware . . . . . . . . . . . . . . . . . . . . . . . . . . . . . . . . . . . . . . . . . . . . . . 20
4 Unpacking. . . . . . . . . . . . . . . . . . . . . . . . . . . . . . . . . . . . . . . . . . 21
4.1 Unpacking and Inspection. . . . . . . . . . . . . . . . . . . . . . . . . . . . . . . . . 21
4.2 Scope of Delivery . . . . . . . . . . . . . . . . . . . . . . . . . . . . . . . . . . . . . . . 21
4.3 Storage . . . . . . . . . . . . . . . . . . . . . . . . . . . . . . . . . . . . . . . . . . . . . . . 22
5 Transport and Installation . . . . . . . . . . . . . . . . . . . . . . . . . . . . . 23
5.1 Choosing the Installation Site. . . . . . . . . . . . . . . . . . . . . . . . . . . . . . . 23
5.1.1 Dimensions and weight . . . . . . . . . . . . . . . . . . . . . . . . . . . . . . . . . . 23
5.1.2 Ambient Conditions . . . . . . . . . . . . . . . . . . . . . . . . . . . . . . . . . . . . . 24
5.1.3 Minimum Clearance. . . . . . . . . . . . . . . . . . . . . . . . . . . . . . . . . . . . . 24
5.1.4 Characteristics of the Base. . . . . . . . . . . . . . . . . . . . . . . . . . . . . . . . 26
5.2 Preparation of the Base . . . . . . . . . . . . . . . . . . . . . . . . . . . . . . . . . . . 27
5.2.1 Position of the Mounting Holes . . . . . . . . . . . . . . . . . . . . . . . . . . . . 27
5.2.2 Size of the Mounting Holes . . . . . . . . . . . . . . . . . . . . . . . . . . . . . . . 27
5.2.3 Drilling Holes into the Base . . . . . . . . . . . . . . . . . . . . . . . . . . . . . . . 28
Installation Manual SC500HEUS-IA-US_en-14 7
Page 8

Table of Contents SMA America, LLC
5.3 Transporting the Sunny Central . . . . . . . . . . . . . . . . . . . . . . . . . . . . . 28
5.3.1 Center of Gravity of the Sunny Central . . . . . . . . . . . . . . . . . . . . . . 28
5.3.2 Equipment for Transport. . . . . . . . . . . . . . . . . . . . . . . . . . . . . . . . . . 29
5.4 Transporting the Sunny Central with a Crane . . . . . . . . . . . . . . . . . . 30
5.4.1 Uninstalling the Roof of the Sunny Central. . . . . . . . . . . . . . . . . . . . 30
5.4.2 Moving the Sunny Central with a Crane . . . . . . . . . . . . . . . . . . . . . 32
5.4.3 Installing the Roof of the Sunny Central. . . . . . . . . . . . . . . . . . . . . . 32
5.5 Installing the Sunny Central . . . . . . . . . . . . . . . . . . . . . . . . . . . . . . . . 34
5.5.1 Removing the Kick Plates from the Sunny Central . . . . . . . . . . . . . . 34
5.5.2 Attach the Sunny Central to the base. . . . . . . . . . . . . . . . . . . . . . . . 35
5.5.3 Install Ventilation Plates . . . . . . . . . . . . . . . . . . . . . . . . . . . . . . . . . . 36
5.5.4 Attaching the Kick Plates to the Sunny Central. . . . . . . . . . . . . . . . . 36
6 Attaching the Conduits. . . . . . . . . . . . . . . . . . . . . . . . . . . . . . . . 37
6.1 Insert cables from the right into the Sunny Central . . . . . . . . . . . . . . 37
6.2 Insert cables from below into the Sunny Central . . . . . . . . . . . . . . . . 38
7 Connecting Optional Communication Devices . . . . . . . . . . . . 39
7.1 Position of the Communication Devices. . . . . . . . . . . . . . . . . . . . . . . 40
7.2 Connecting the Sunny SensorBox (optional). . . . . . . . . . . . . . . . . . . 41
7.2.1 Connecting the Data Cable of the Sunny SensorBox . . . . . . . . . . . 41
7.3 Sunny WebBox (optional). . . . . . . . . . . . . . . . . . . . . . . . . . . . . . . . . 42
7.3.1 Installing the WebBox in the Sunny Central. . . . . . . . . . . . . . . . . . . 45
7.3.2 Connecting the Sunny WebBox in the Sunny Central . . . . . . . . . . . 45
7.3.3 Connecting the Cable to the Sunny WebBox . . . . . . . . . . . . . . . . . 45
7.3.4 Termination. . . . . . . . . . . . . . . . . . . . . . . . . . . . . . . . . . . . . . . . . . . . 46
8 Electrical Connection . . . . . . . . . . . . . . . . . . . . . . . . . . . . . . . . . 47
8.1 Safety. . . . . . . . . . . . . . . . . . . . . . . . . . . . . . . . . . . . . . . . . . . . . . . . . 47
8.2 Connection in Control and Interface Cabinet . . . . . . . . . . . . . . . . . . 48
8.2.1 Connection Area for Analog inputs and auxiliary power . . . . . . . . 48
8.2.2 Connection Area of the Low Temperature Option . . . . . . . . . . . . . . 49
8.2.3 Requirements . . . . . . . . . . . . . . . . . . . . . . . . . . . . . . . . . . . . . . . . . . 50
8 SC500HEUS-IA-US_en-14 Installation Manual
Page 9

SMA America, LLC Table of Contents
8.2.4 Optional External 3-phase voltage supply
(3AC, 208/120V, 60Hz) . . . . . . . . . . . . . . . . . . . . . . . . . . . . . . . . 50
8.2.5 Connecting the external 208 V power supply. . . . . . . . . . . . . . . . . 50
8.2.6 Connecting Analog input setting cables. . . . . . . . . . . . . . . . . . . . . . 53
8.2.7 Connecting Cables for the Low Temperature Option. . . . . . . . . . . . 54
8.3 Connection Area for AC, DC cables and ground . . . . . . . . . . . . . . . 55
8.4 Connection Options. . . . . . . . . . . . . . . . . . . . . . . . . . . . . . . . . . . . . . 57
8.4.1 DC Fuses . . . . . . . . . . . . . . . . . . . . . . . . . . . . . . . . . . . . . . . . . . . . . 57
8.4.2 Grounding the PV modules . . . . . . . . . . . . . . . . . . . . . . . . . . . . . . . 57
8.4.3 Cable connection. . . . . . . . . . . . . . . . . . . . . . . . . . . . . . . . . . . . . . . 57
8.4.4 Cable requirements for DC, AC and PE connection . . . . . . . . . . . . 58
8.4.5 Additional cable requirements for DC connection . . . . . . . . . . . . . . 58
8.5 Connecting DC cables. . . . . . . . . . . . . . . . . . . . . . . . . . . . . . . . . . . . 59
8.5.1 Connecting DC cables with screw terminals . . . . . . . . . . . . . . . . . . 59
8.5.2 Connecting DC cables with cable lugs . . . . . . . . . . . . . . . . . . . . . . 60
8.6 Connection of the PV Modules . . . . . . . . . . . . . . . . . . . . . . . . . . . . . 62
8.6.1 PV Modules: DC − Connection at Negative Grounding and DC+
Connection at Positive Grounding . . . . . . . . . . . . . . . . . . . . . . . . . . 62
8.6.2 PV Modules: DC+ Connection at Negative Grounding and DC −
Connection at Positive Grounding . . . . . . . . . . . . . . . . . . . . . . . . . . 63
8.7 AC Connection . . . . . . . . . . . . . . . . . . . . . . . . . . . . . . . . . . . . . . . . . 65
8.7.1 Additional cable requirements for AC connection . . . . . . . . . . . . . . 65
8.7.2 Arranging AC cables . . . . . . . . . . . . . . . . . . . . . . . . . . . . . . . . . . . . 65
8.7.3 Connecting AC cables to busbars . . . . . . . . . . . . . . . . . . . . . . . . . . 67
8.7.4 AC Connection. . . . . . . . . . . . . . . . . . . . . . . . . . . . . . . . . . . . . . . . . 69
8.8 Connecting protective earth. . . . . . . . . . . . . . . . . . . . . . . . . . . . . . . . 71
8.8.1 Additional cable requirements for PE connection. . . . . . . . . . . . . . . 71
8.8.2 Connecting protective earth to Terminal Blocks . . . . . . . . . . . . . . . . 71
8.8.3 Connecting protective earth to busbar. . . . . . . . . . . . . . . . . . . . . . . 72
9 Commissioning . . . . . . . . . . . . . . . . . . . . . . . . . . . . . . . . . . . . . . 73
9.1 Visual Inspection of the Sunny Central . . . . . . . . . . . . . . . . . . . . . . . 73
9.2 Switching the Sunny Central On . . . . . . . . . . . . . . . . . . . . . . . . . . . . 74
9.2.1 Check the Ventilation . . . . . . . . . . . . . . . . . . . . . . . . . . . . . . . . . . . . 78
Installation Manual SC500HEUS-IA-US_en-14 9
Page 10

Table of Contents SMA America, LLC
10 Opening the Sunny Central. . . . . . . . . . . . . . . . . . . . . . . . . . . . 80
10.1 Opening the Control and Interface Cabinet . . . . . . . . . . . . . . . . . . . 80
10.2 Opening the Power Cabinet . . . . . . . . . . . . . . . . . . . . . . . . . . . . . . . 82
11 Technical Data . . . . . . . . . . . . . . . . . . . . . . . . . . . . . . . . . . . . . . 83
11.1 Measurement Accuracy. . . . . . . . . . . . . . . . . . . . . . . . . . . . . . . . . . . 84
11.2 Torques and Cable Sizes. . . . . . . . . . . . . . . . . . . . . . . . . . . . . . . . . . 85
12 Contact . . . . . . . . . . . . . . . . . . . . . . . . . . . . . . . . . . . . . . . . . . . . 86
13 Appendix - Celsius to Fahrenheit conversion. . . . . . . . . . . . . . 87
10 SC500HEUS-IA-US_en-14 Installation Manual
Page 11

SMA America, LLC 1 Notes on this Manual
1 Notes on this Manual
This manual describes the installation and the commissioning of a Sunny Central 500HE-US and
Sunny Central 500HE-CA with up to 9 DC fuses. This manual does not cover any details concerning
PV modules. Information concerning the PV modules is available from the manufacturer of the PV
modules.
1.1 Target Group
This manual is for qualified personnel. Qualified personnel has received training and has
demonstrated skills and knowledge in the construction and operation of the device. Qualified
personnel is trained to deal with the dangers and hazards involved in installing electric devices.
1.2 Validity
This manual is valid for the Sunny Central 500HE-US and Sunny Central 500HE-CA. In this manual
the Sunny Central 500HE-US and Sunny Central 500HE-CA are referred to as "Sunny Central".
In this document, the manufacturer of the SMA inverters described herein, being SMA America, LLC
or SMA Solar Technology Canada Inc. as indicated on the type label of the inverter, is referred to as
SMA.
1.3 Additional Information
You can find further information on special subjects in the download area of www.sma-america.com
or www.sma-solar.com.
Among other things, the download area contains the following items:
• Installation guide "Sunny Central String-Monitor Controller"
• Installation guide "Sunny Central 485HUB"
• Installation guide "Sunny Sensor 485HUB"
1.4 Structure of this Documentation
The Sunny Central's installation comprises several steps. Here we will describe the contents you will
find in the sections of the installation instructions.
The instructions are divided into the following sections:
Section 2: Safety
In this section you will find general safety directions which you must observe throughout the entire
installation process. Pay special attention to this section, so as to avoid personal and material
damages.
Installation Manual SC500HEUS-IA-US_en-14 11
Page 12

1 Notes on this Manual SMA America, LLC
Section 3: The Sunny Central
In this section you will see how one can identify the Sunny Central. A short description of the Sunny
Central's design and functions is given here.
Section 4: Unpacking
This section describes what to look out for upon receiving your Sunny Central, and who to turn to if
your Sunny Central is damaged.
Section 5: Transport and Installation
This section shows you how to find the best installation site for your Sunny Central. It provides
step-by-step instructions on how to transport and install the Sunny Central and connect the cabinets
with each other electrically. Observe all safety precautions in this section to avoid material and
personal damages.
Section 6: Attaching the Conduits
In this section you will learn where to insert the cables in the Sunny Central and where to punch the
holes for the conduits.
Section 7: Connecting Optional Communication Devices
The Sunny Central can be equipped with different communication devices. This section explains how
the communication devices in the Sunny Central are connected.
Section 8: Electrical Connection
This section describes how the Sunny Central is connected to the grid and to the PV modules, and
what precautions must be observed in order to avoid material and personal damages. It provides
information on the necessary cable sizes and the magnitude of the torque for the cable connection.
Section 9: Commissioning
This section explains, step-by-step, how to put the Sunny Central into operation, and how you can
determine that the commissioning was successful.
Section 10: Opening the Sunny Central
Th is s ect ion de scr ibe s how t o open the Sun ny Cen tra l an d what precautions must be observed in order
to avoid personal damages.
Section 11: Parameter
This section provides an overview of the parameters of the Sunny Central and their respective
threshold values.
12 SC500HEUS-IA-US_en-14 Installation Manual
Page 13

SMA America, LLC 1 Notes on this Manual
Section 12: Technical Data
In this section you will find the technical data for the Sunny Central's operation, the norms to which it
conforms and the required cables and torques.
Installation Manual SC500HEUS-IA-US_en-14 13
Page 14
2 Safety SMA America, LLC
A
B
C
D
G
E F
2 Safety
In this section you will find general safety directions which you must observe throughout the entire
installation process. Pay special attention to this section, so as to avoid personal and material
damages.
2.1 Appropriate Usage
The Sunny Central is a MPPT (maximum power point tracker) PV inverter that converts the DC energy
from PV modules to AC energy. This energy is then fed into the public grid.
The SunnyCentral500HE‑US is designed for indoor and outdoor installation.
The Sunny Central HE-US is a high efficiency PV inverter and it does not include a transformer inside
its cabinets. You can connect up to 2 Sunny Centrals to one transformer.
External output transformer requirements
• The Sunny Central has been evaluated by UL for compliance with Underwriters Laboratory (UL)
1741 / IEEE 1547 requirements at the inverter terminals and with UL Recognized external
transformer Model 3UI380/310, Manufactured by J. Schneider. This transformer is rated for a
voltage of 200 V L-L on the inverter side and an impedance of less than 6%.
• If the Sunny Central is used with a different transformer other than the transformer used during
testing, the external transformer used must be a UL Listed type, with separate primary and
secondary windings rated 500 kVA minimum, and limited to a maximum impedance variance
of less than or equal to 6%. This external transformer is required to be located between the
output of the Sunny Central and the utility power connection.
The Authority Having Jurisdiction (AHJ) must consider the possible consequences of using a different
transformer other than the one used to evaluate the Sunny Central by UL. In addition, the AHJ must
consider the effects of using different UL Listed transformers with respect to electrical ratings,
impedance, and the resultant affect on the performance of the inverter, with respect to the ratings and
impedance specified in the installation manual.
Refer to the technical description "Transformer Requirements" for a detailed Transfomer information.
The description is available at www.sma-america.com and www.sma-solar.com
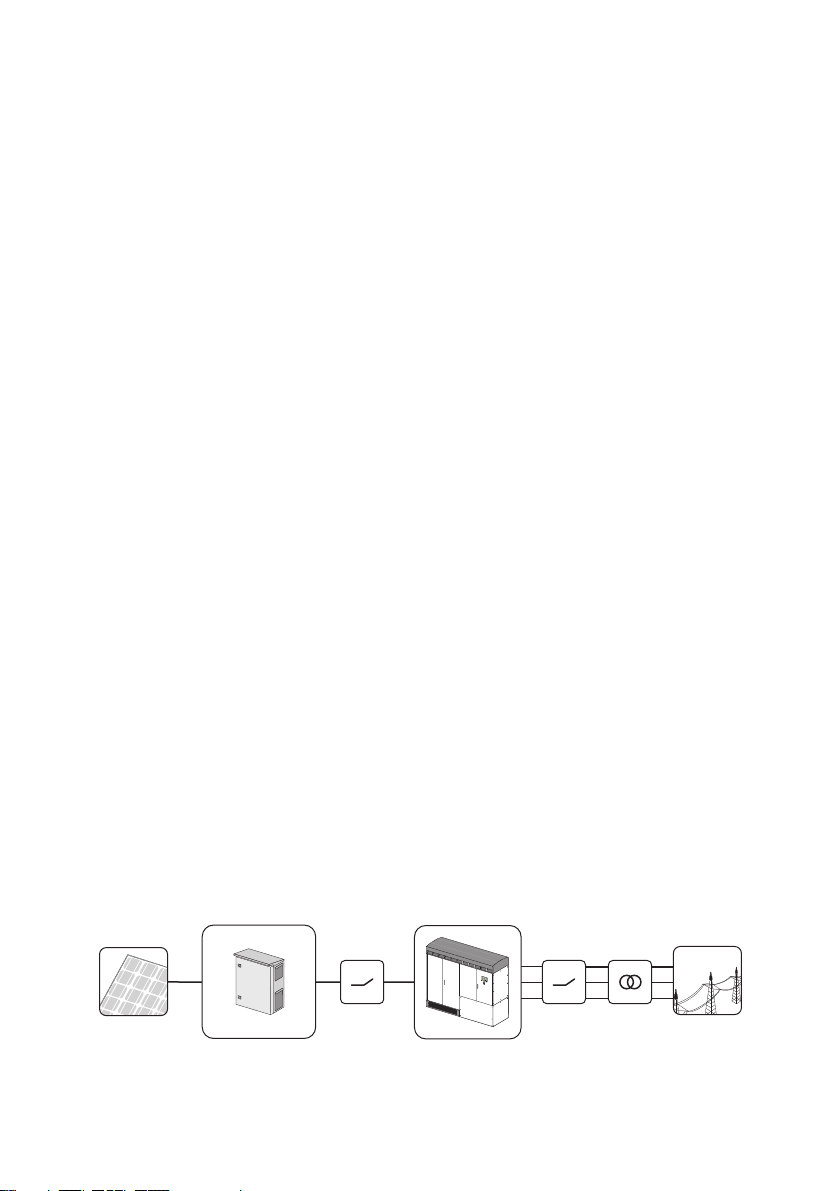
Principle of a PV Power System with a Sunny Central
14 SC500HEUS-IA-US_en-14 Installation Manual
Page 15
SMA America, LLC 2 Safety
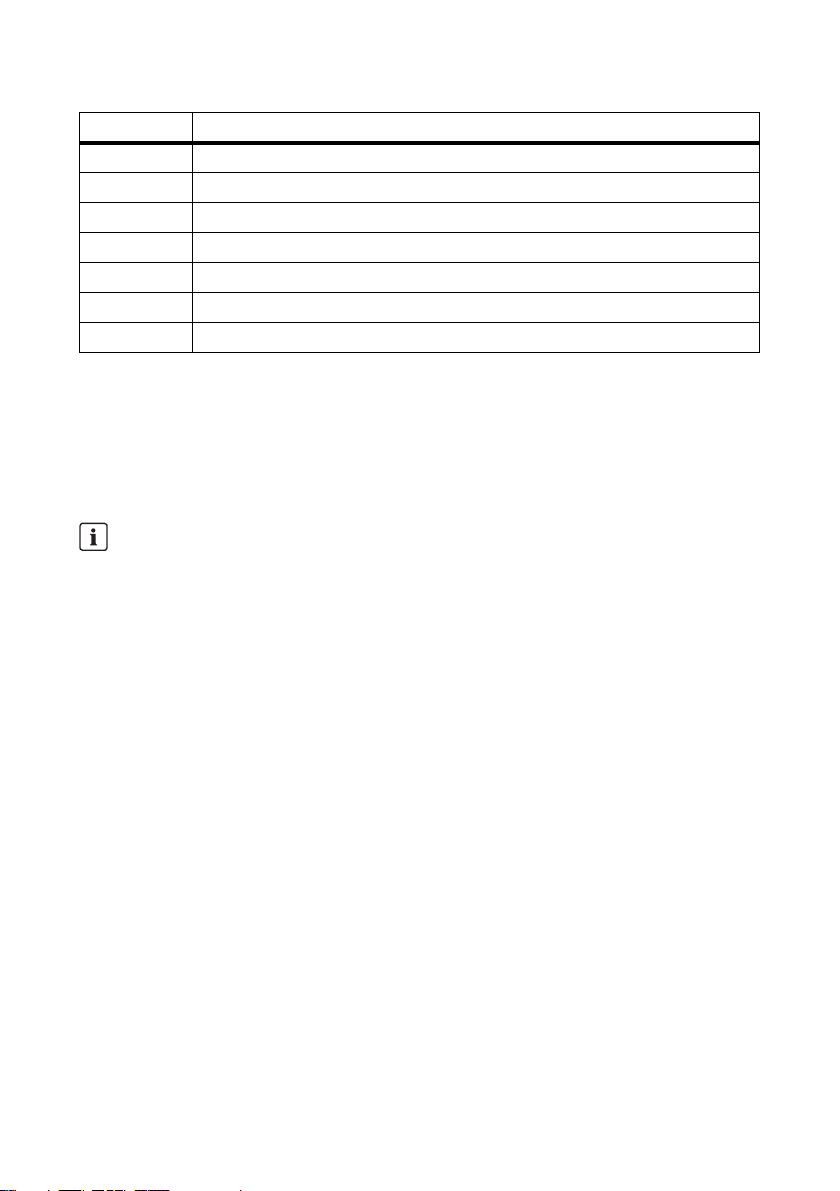
Position Description
APV modules
B DC distribution with DC fuses (e.g., Sunny Central String-Monitor)
C e. g. SMA Disconnect Unit
D Sunny Central
E e. g. SMA Disconnect Unit
FTransformer
GPublic grid
Any other application of the Sunny Central or installation of components and modifications which are
not explicitly allowed endanger the safety and void the warranty as well as the operation permit.
PV and AC disconnect
As an option, the internal AC circuit breaker of the Sunny Central can be mounted externally either in
the Disconnect Unit made by SMA or in another cabinet provided by others.
Th e un it i s prov ide d wi th a UL l isted cir cui t br eak er on t he o utp ut r ate d 16 00 A fo r br anc h ci rcu it
protection. If the circuit breaker shall be located externally to secure the AC path, you have to
use the same type of circuit breaker (ABB Emax E2B-A with 42 kA rated short-circuit current,
ABB Emax E2N-A with 65 kA rated short-circuit current or ABB Emax E2H-A with 85 kA rated
short-circuit current and and 1600 A continuous current rating each) to ensure UL listing of the
whole system.
®
According to National Electrical Code
neccessary to install a PV and AC disconnect. Therefore, either the Disconnect Unit made by
SMA for PV as well as AC disconnection or a solution provided by others has to be used to
satisfy this requirement.
ANSI/NFPA 70 and Canadian Electrical Code it is
Disclaimer
• It is prohibited to use the Sunny Central for purposes other than those described here.
• It is prohibited to modify the Sunny Central or to install components that are not explicitly
recommended by SMA or sold by SMA for this purpose.
• It is prohibited to connect the Sunny Central without transformer to the grid. Operating the
Sunny Central without transformer causes a short-circuit and can destroy the Sunny Central.
Installation Manual SC500HEUS-IA-US_en-14 15
Page 16
2 Safety SMA America, LLC
%"/(&3
%"/(&3
%"/(&3
%"/(&3
2.2 Safety Instructions
High voltages are present in the live components of the low voltage grid.
Death resulting from burning and electric shock.
• Do not touch the live components of the Sunny Central or low-voltage grid.
• Pay close attention to all safety precaution measures regarding the low voltage grid.
During operation, high voltages are present in the Sunny Central.
Death resulting from electric shock.
• Do not operate the Sunny Central with doors open.
During operation, high voltages are present in the Sunny Central.
Death resulting from electric shock.
• Before commencing work on the Sunny Central:
• Disconnect completely
• Ensure that the device cannot be reconnected
•Ensure that no voltage is present.
• Ground and short-circuit
• Cover any nearby live parts
Normally grounded conductors may be ungrounded and energized when a ground-fault is
indicated.
Risk of electric shock.
•Test before touching.
• Work on the Sunny Central must be carried out by qualified personnel.
16 SC500HEUS-IA-US_en-14 Installation Manual
Page 17
SMA America, LLC 2 Safety
8"3/*/(
8"3/*/(
$"65*0/
/05*$&
Failure to follow the manual, the operating instructions and the safety precautions may lead to
severe injury from electric shock.
• All work on the Sunny Central shall only be done as described in this manual.
• Pay attention to all safety instructions.
• Follow all operating instructions.
• If problems occur when performing the work described here, contact SMA America.
Operating a damaged Sunny Central may cause severe injury from electric shock.
• The Sunny Central shall only be used when it is technically faultless and safe to operate.
• Operate the Sunny Central only if there are no visible damages.
• Regularly check the Sunny Central for visible damage.
• Ensure that all safety features are accessible at all times and that their correct operation is
tested regularly.
Cuts and scratches due to sharp edges inside the Sunny Central.
• When working on the Sunny Central wear protective gloves.
The components in the Sunny Central can be damaged by electrostatic discharge.
• When working on the Sunny Central and when handling the components observe all ESD
safety regulations.
• Discharge electrostatic charge by touching the grounded Sunny Central enclosure.
• Only then is it safe to touch any electronic components.
Storage of handbooks
Keep this documentation in the immediate vicinity of the Sunny Central. It must be accessible to
service and maintenance personnel at any time.
Do not store the documentation or any other papers in the Sunny Central.
Installation Manual SC500HEUS-IA-US_en-14 17
Page 18
3 The Sunny Central SMA America, LLC
3 The Sunny Central
In this section you will see how to identify the Sunny Central. A short descrip tion of the Sunny Cen tral's
design and functions are given here.
3.1 System Overview
The Sunny Central is an inverter for indoor and outdoor. The enclosure is made of stainless steel and
al umi num whi ch con for ms t o th e NE MA 3 R pr ote cti on rat ing . NE MA 3R means that the Sunny Central
is protected against dust and water when it is closed. The Sunny Central is protected from salt fog
pariculars, it can be operated in chemically aggressive environments.
Operating Principles
The PV modules convert a portion of sunlight into electrical energy (direct current). The Sunny Central
then converts the direct current into alternating current and feeds it into the public grid. This current
can be used directly, or it can be sold to your energy provider.
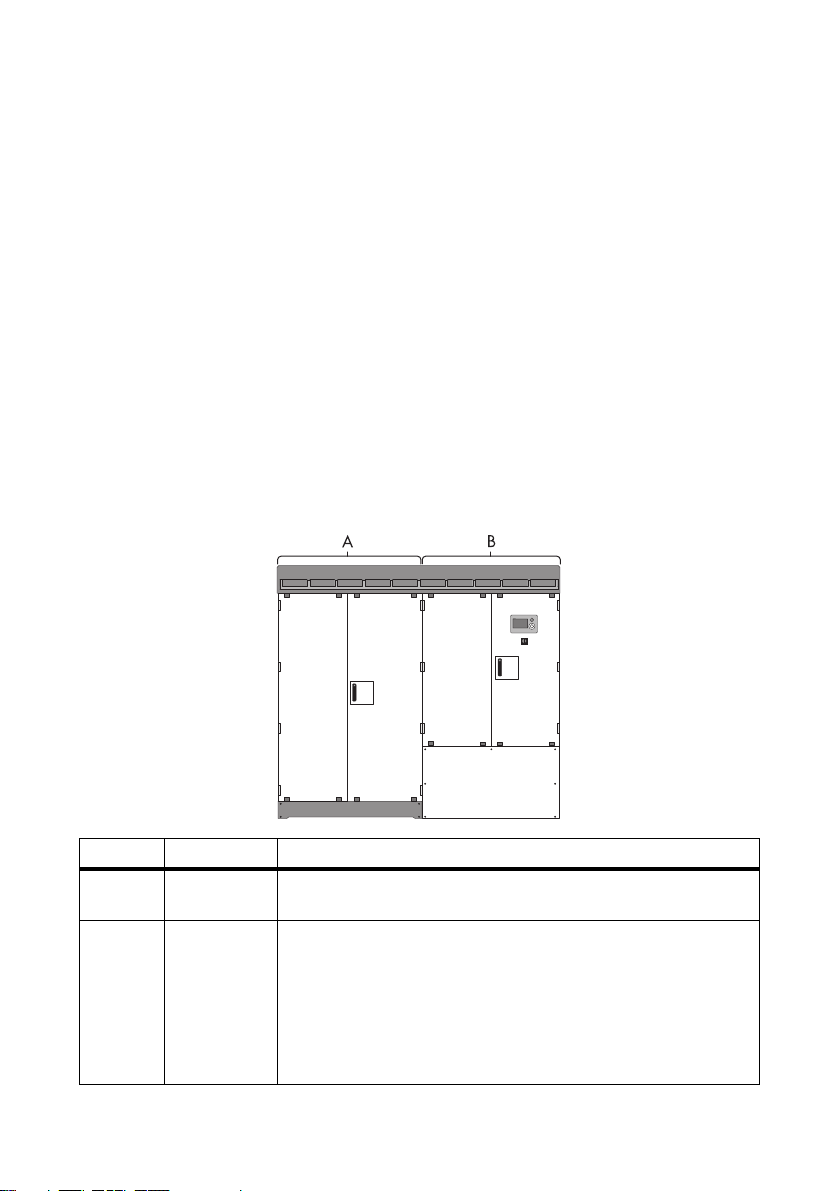
3.2 The Design of the Sunny Central
Position Cabinet Description
A Power Cabinet The power cabinet contains the power unit for converting direct
current to alternating current.
BControl and
Interface
Cabinet
18 SC500HEUS-IA-US_en-14 Installation Manual
All AC, DC and communication cables are connected in the control
and interface cabinet. The control and interface cabinet contains:
•system control
• Sunny Display
• stop/start switch
optional communication devices
Page 19
SMA America, LLC 3 The Sunny Central
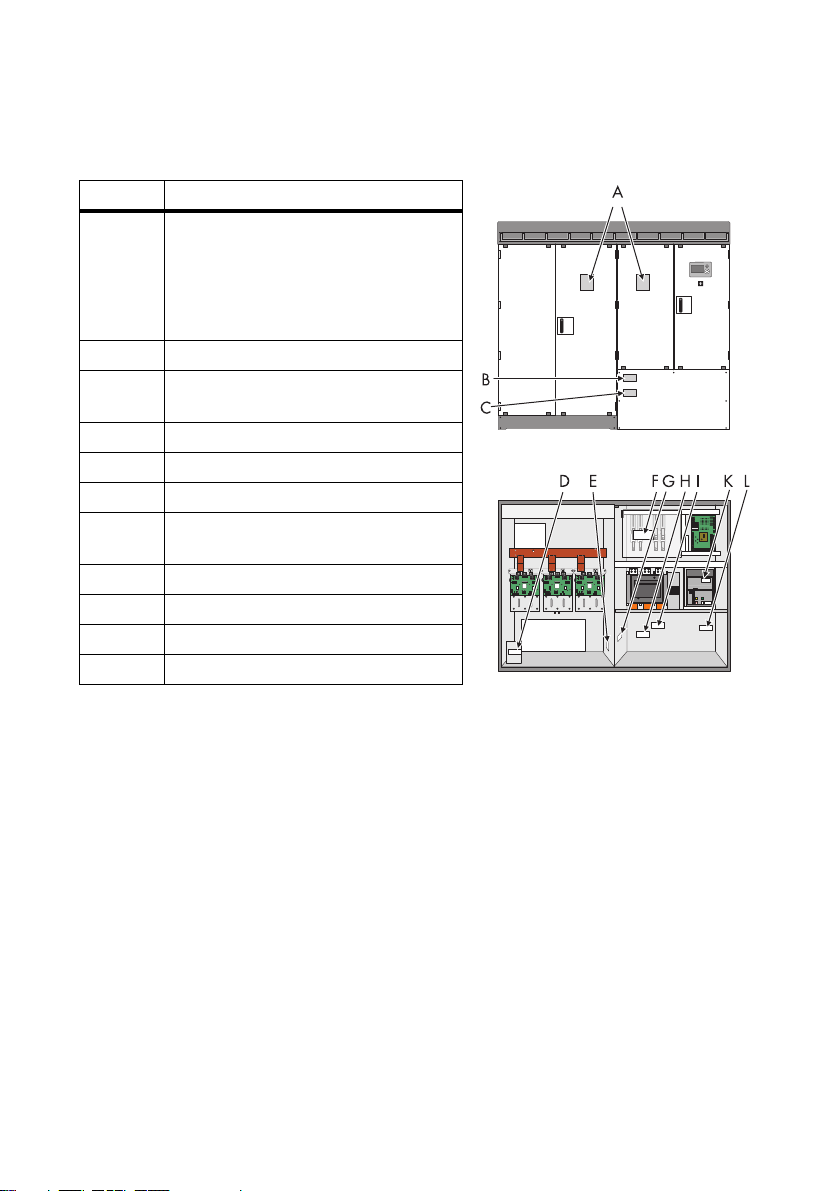
3.3 Location of the Safety Notices
The figure to the right shows the location of the safety notices on the Sunny Central.
Position Description
A Power Cabinet door and Control and
Interface Cabinet door
Warning regarding high voltages in the
Sunny Central.
B Warning regarding hazardous voltage.
C Notice regarding operation of the
Sunny Central without transformer.
D Warning regarding hazardous voltages.
E Warning regarding hot surface.
F Warning regarding hot surface.
G Information regarding negative
grounding.
H Information regarding positive grounding.
I Information regarding equipment ground
K Notice not to change settings
L Information regarding AC voltage.
Installation Manual SC500HEUS-IA-US_en-14 19
Page 20
3 The Sunny Central SMA America, LLC
SMA America
www.sma-america.com
SUNNY CENTRAL
Model:
xxxxxxxxxxxxxxxxxxxSC500HE-US
Serial No.: xxxxxxxxx
Fabrication Date:
Max. Continuous output Power*
Operating voltage range (Vac 3-Phase)*
Min
xxx
Operating frequency range (Hz)*
Max. continuous output current*
Range of input operating voltage
MPPT Range of operating DC voltage*
xxxkWac
Nominal Max
xxx xxx
Min
xx.x
Nominal Max
xx.x xx.x
xxx.xAac
Output power factor
x.xx
xxx - xxx Vdc
The unit contains DC-Ground and Fault Detector
and Interruptor
Max. operating current*
xxx - xxx Vdc
xxx Adc
ENCLOSURE
Type 3R (IP54)
*For more details and for tightening torque,
allowable wire size and type see the Operator’s
Manual
xx/xxxx
A
Fabrication Version: xxx
Utility interactive inverter
LISTED UL 1741 36AN
Range of input operating voltage
xxx - xxx Vdc
Range of input operating voltage
xxx - xxx Vdc
Engineered in Germany - Assembled in Denver/Colorado
US80
B
C
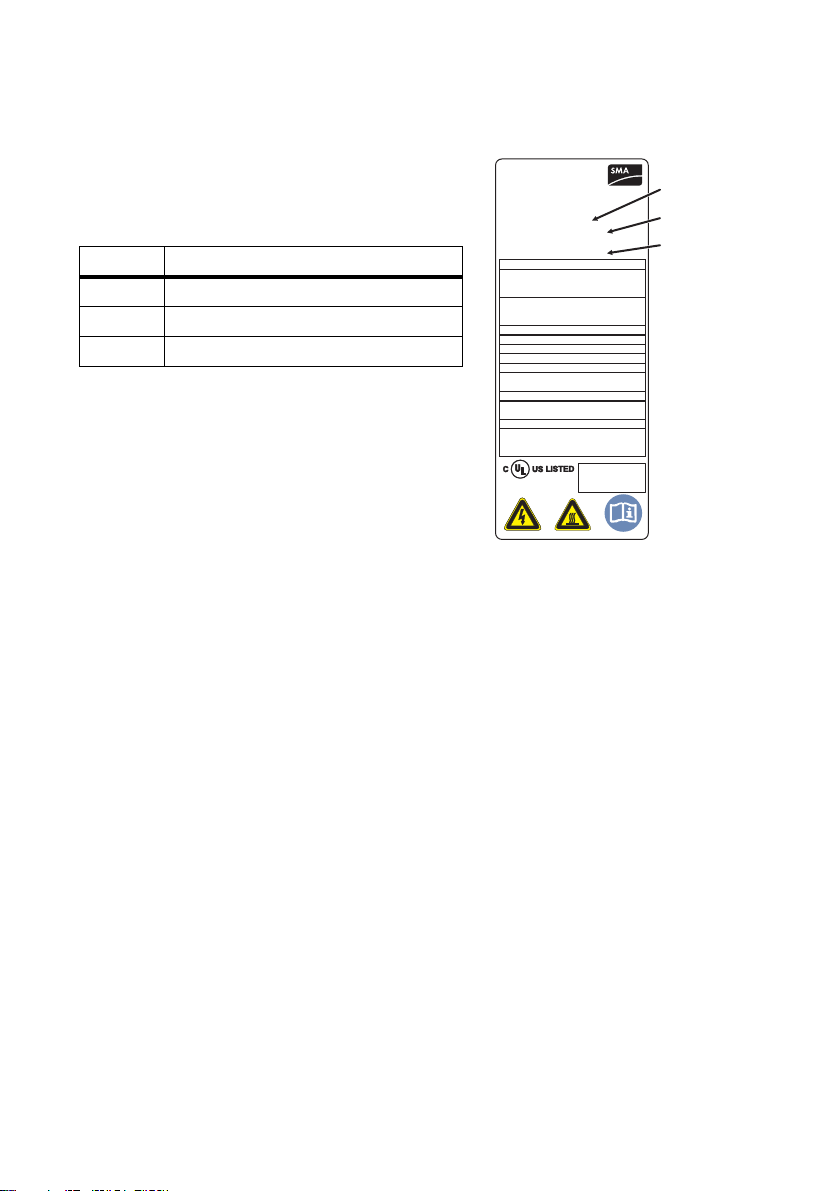
3.4 Identifying the Sunny Central
You can identify the Sunny Central using the type plate
(see figure at right). The type plate is on the inside of the
Control and Interface Cabinet on the upper left side and
in the Power Cabinet on the right side.
Position Description
A Type description of the Sunny Central
B Serial number of the Sunny Central
C Date of manufacture
3.5 Firmware
The Sunny Central's firmware, and that of the display, are shown on the display of the Sunny Central.
The Sunny Central’s user manual describes how to obtain the firmware version.
20 SC500HEUS-IA-US_en-14 Installation Manual
Page 21
SMA America, LLC 4 Unpacking
4 Unpacking
This section describes what to look out for upon receiving your Sunny Central, and who to turn to if
your Sunny Central is damaged.
Refer to the technical description "Unpacking the Sunny Central 500HE-US" for a detailed
step-by-step instruction. The description is fixed at the shipping container.
4.1 Unpacking and Inspection
All SMA Sunny Centrals are thoroughly checked before they are packaged and shipped. Although
they are shipped in sturdy packaging, damage can still occur during shipping and delivery. It is
important to carefully inspect the shipping container and contents prior to installation. If you detect
any external damage after unpacking, report the damage immediately to your SMA dealer and
shipping company that delivered the unit. If it becomes necessary to return the Sunny Central, use the
original packing material.
If you need assistance with a damaged Sunny Central, contact your SMA dealer or SMA America.
Contact information for SMA America is provided in chapter 12.
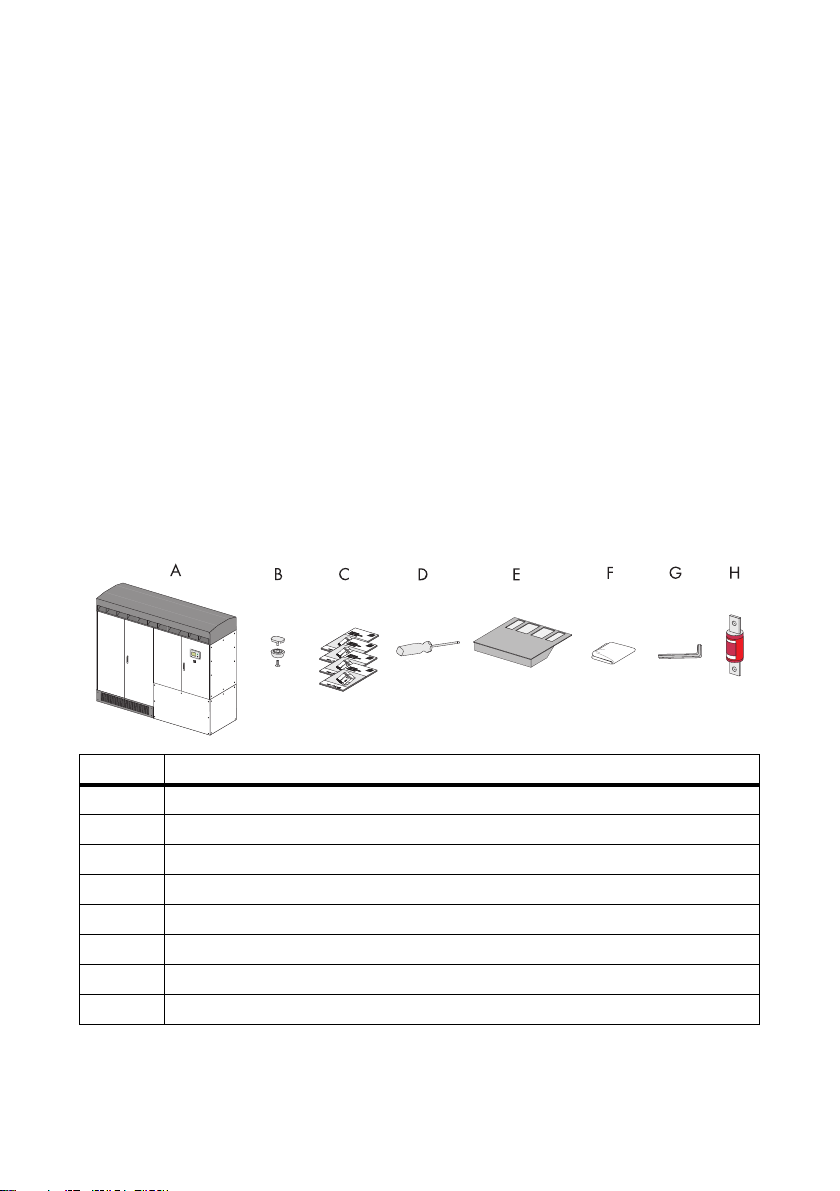
4.2 Scope of Delivery
Position Description
ASunny Central
B Condensate drain
C Installation Guide, User Manual, Circuit Diagram, Test Report
DTorx screwdriver
E Ventilation plate with air filters for installation in the base of the Sunny Central
F Non-woven abrasive
G Allen key
H Separate DC fuses*
*option
Installation Manual SC500HEUS-IA-US_en-14 21
Page 22

4 Unpacking SMA America, LLC
/05*$&
/05*$&
4.3 Storage
Improper storage can cause moisture to seep into the Sunny Central.
Damage to the Sunny Central.
• The Sunny Central must be closed during storage.
• If stored for 6 months or longer, make sure the storage area is dry.
• The storage temperature has to be between − 13°Fto140°F( − 25°Cto+60°C).
Uneven underground can damage the frame construction.
• The underground must be suitable for the weight of the inverter of 1,800 kg.
• The underground may only deviate from a level of 0.25%.
22 SC500HEUS-IA-US_en-14 Installation Manual
Page 23
SMA America, LLC 5 Transport and Installation
5 Transport and Installation
This section shows you how to find the best installation site for your Sunny Central. It provides
instructions on how to transport and install a single Sunny Central as well as two Sunny Centrals to
one transformer. Observe all safety precautions in this section to avoid material and personal
damages.
5.1 Choosing the Installation Site
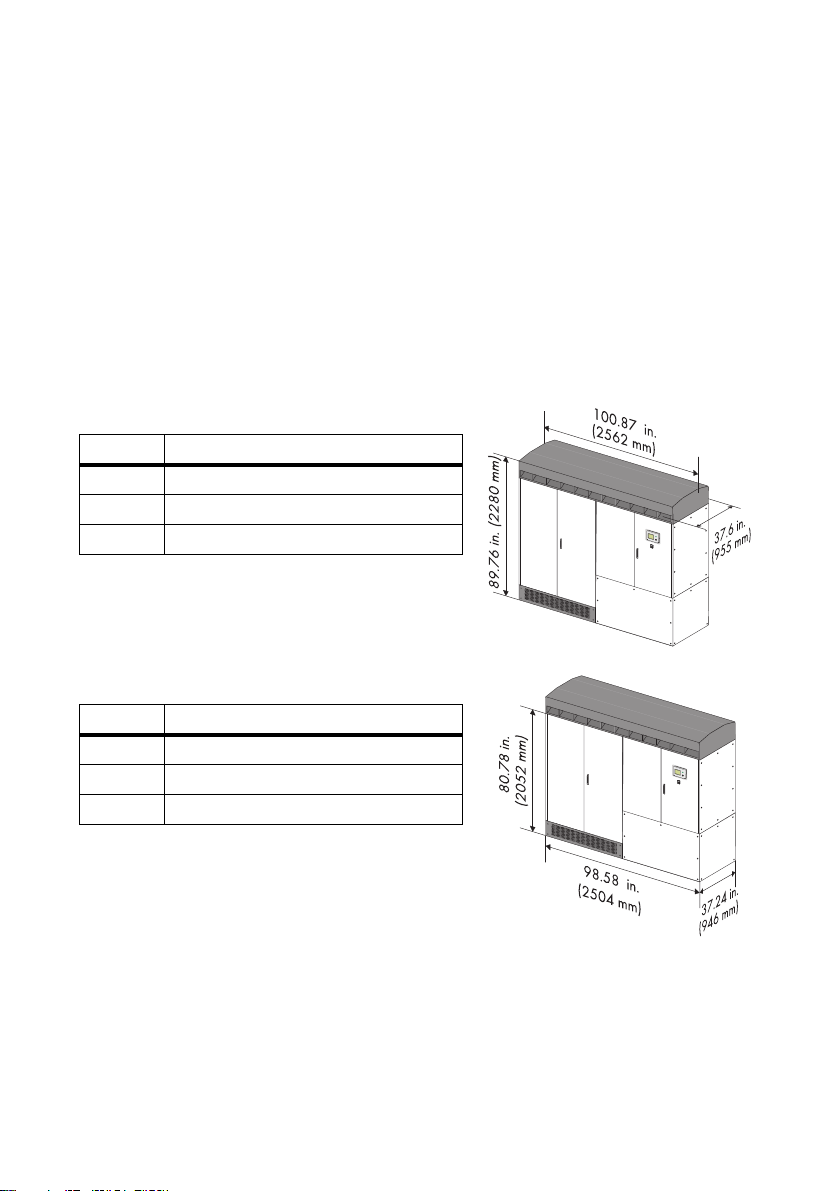
5.1.1 Dimensions and weight
The Sunny Central has a total weight of approx. 3,970 lbs (1,800 kg).
Dimensions with roof
Position Dimension
Height 89.76 in. (2,280 mm)
Width 100.87 in. (2,562 mm)
Depth 37.60 in. (955 mm)
Dimensions without roof
Position Dimension
Height 80.79 in. (2,052 mm)
Width 98.58 in. (2,504 mm)
Depth 37.24 in. (946 mm)
Installation Manual SC500HEUS-IA-US_en-14 23
Page 24
5 Transport and Installation SMA America, LLC
12 in.(300 mm)
6 in.
47 in.
6 in.(150 mm) A
16 in. (406 mm)
(150 mm)
(1200 mm)
47 in.
(1200 mm) B
5.1.2 Ambient Conditions
• The installation location must be accessible at all times.
• The ambient temperature must be between ‒13°F and +122°F (between –25°C and+50°C).
• Direct solar irradiation reduces the output power of the Sunny Central.
• Refer to the installation requirements for further information on indoor placement.
• For more information see section 11 and the "Installation requirements for Sunny Central
500HE-US" which can be downloaded at www.sma-america.com and www.SMA-Solar.com.
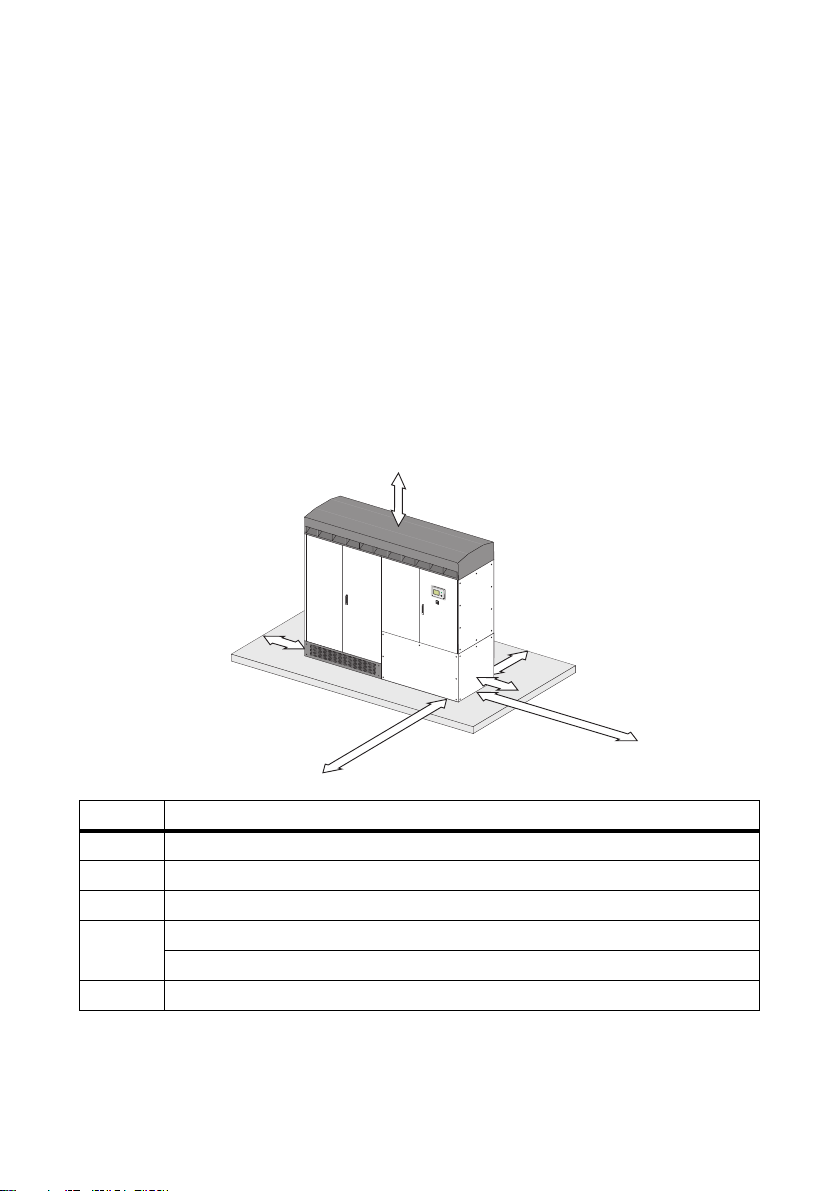
5.1.3 Minimum Clearance
Minimum Clearance 1 Sunny Central
Observe the specified minimum clearances for the cables, ventilation and for opening the doors. For
installing the Sunny Central in closed rooms an air supply of 1,766 CFM (3,000 m³/h) is needed.
Position Minimum Clearance
Front 47 in. (1,200 mm)
Left side 6 in. (150 mm)
Rear 12 in. (300 mm)
Right side A: Cables inserted from below 6 in. (150 mm)
B: Cables inserted from the side 47 in. (1,200 mm)
Top 16 in. (406 mm)
24 SC500HEUS-IA-US_en-14 Installation Manual
Page 25
SMA America, LLC 5 Transport and Installation
8"3/*/(
12 in.
(300 mm)
6 in.
48 in.
47 in.
A
B
D
D
(150 mm)
(1220 mm)
(1200 mm)
47 in.
(1200 mm)
12 in.
(300 mm)
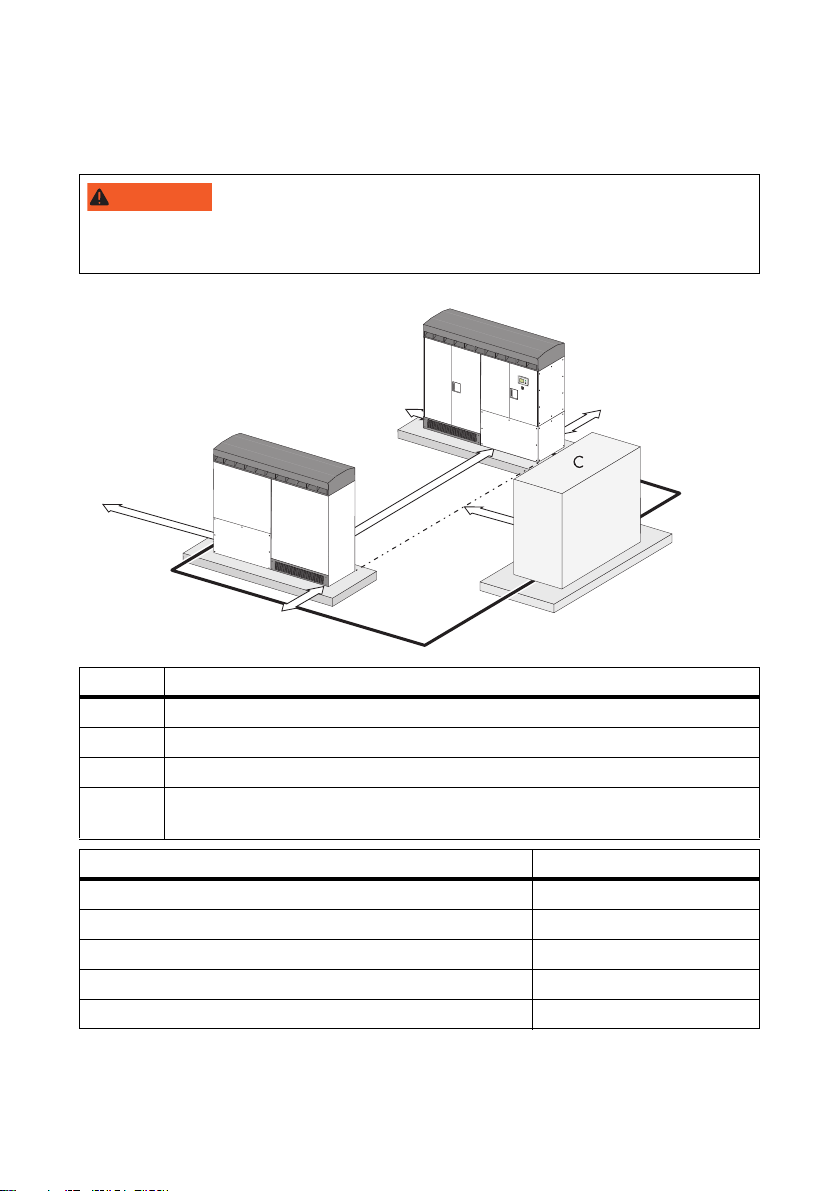
Minimum Clearance 2 Sunny Centrals with Transformer
Observe the specified minimum clearances for the cables, for ventilation and for opening the doors.
Opening the doors of two Sunny Central devices blocks the escape route.
• Only open the doors of one Sunny Central at the same time.
Position Description
A Sunny Central 1
B Sunny Central 2
C Medium voltage transformer
D Cable route between Sunny Central and transformer. The cables between the
Sunny Central and the transformer may not be longer then 49 ft. (15 m).
Position Dimensions
Sunny Central rear 12 in. (300 mm)
Distance between Sunny Central A an B 48 in. (1,800 mm)
Right side of Sunny Central A 47 in. (1,200 mm)
Left side of Sunny Central B 6 in. (150 mm)
Distance between transformer and Sunny Centrals 47 in. (1,200 mm)
Installation Manual SC500HEUS-IA-US_en-14 25
Page 26
5 Transport and Installation SMA America, LLC
min. 110 in.
min. 45. in.
(1150 mm)
(2800 mm)
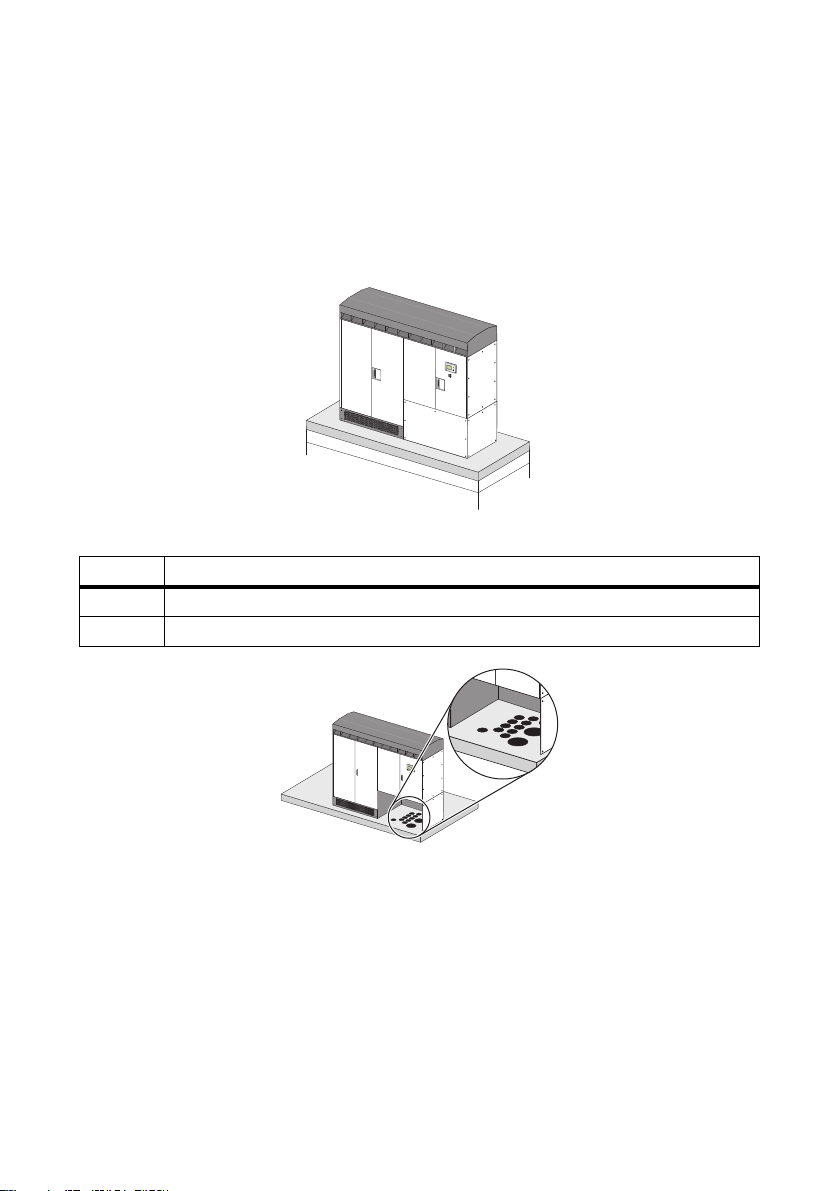
5.1.4 Characteristics of the Base
The foundation must be made of concrete or of a metal frame (skid).
• The mounting surface must be level and strong enough to support the weight of the inverter.
The evenness of the foundation must be better than 0.25%.
• The width and depth of the base must be at least the same size as the Sunny Central.
The recommended minimum sizing is shown in picture below.
Position Description
Width 110 in. (2,800 mm)
Depth 45 in. (1150 mm)
• To insert the cables from below, the cable conduits must be laid in the foundation
(see section 6.2).
26 SC500HEUS-IA-US_en-14 Installation Manual
Page 27
SMA America, LLC 5 Transport and Installation
5.2 Preparation of the Base
The inverter must be secured to the foundation per local building codes. At the bottom of the
Sunny Central there are 6 mounting holes for anchoring it to its base.
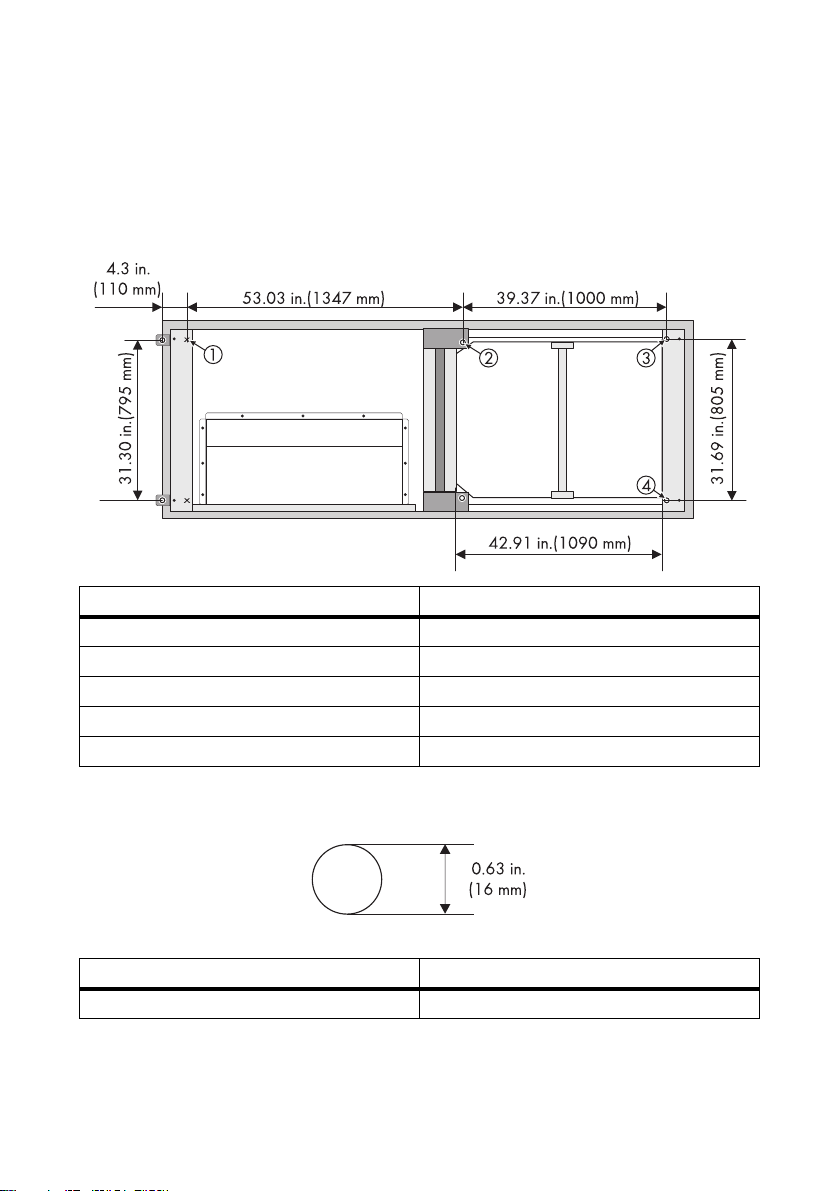
5.2.1 Position of the Mounting Holes
Position Dimension
Distance between hole 3 and 4 31.69 in. (805 mm)
Distance between hole 1 and 2 53.03 in. (1,347 mm)
Distance between hole 2 and 3 39.37 in. (1,000 mm)
Cable entry width 42.91 in. (1,090 mm)
Cable entry depth 31.69 in. (805 mm)
5.2.2 Size of the Mounting Holes
Position Dimension
Diameter 0.63 in. (16 mm)
Installation Manual SC500HEUS-IA-US_en-14 27
Page 28

5 Transport and Installation SMA America, LLC
%"/(&3
8"3/*/(
5.2.3 Drilling Holes into the Base
Drilling into live wires.
Death resulting from electric shock.
• Check the installation location for electric cables laid in the base.
1. Measure the distances for the holes.
2. Mark the positions of the holes.
3. Drill the holes into the base on marked positions.
4. Put dowels into the drill holes.
5.3 Transporting the Sunny Central
Remove the kick plates before transporting the Sunny Central (see section 5.5.1).
Sunny Central may tip over if improperly transported.
Bruises and fractures.
• Pay attention to the center of gravity of the Sunny Central (see section 5.3.1).
• Transport the Sunny Central only as described in this manual.
• Any equipment used for the transport of the Sunny Central must be suitable for the weight of
the Sunny Central.
• Do not tilt the Sunny Central during transport.
5.3.1 Center of Gravity of the Sunny Central
The center of gravity of the Sunny Central is marked on
the packaging with the symbol on the right.
The center of gravity is not in the middle of the
Sunny Central.
Position of Center of Gravity measured from left front
corner of inverter:
horizontal: 47.65 in
vertical: 23.62 in
depth: 18.50 in
28 SC500HEUS-IA-US_en-14 Installation Manual
Page 29

SMA America, LLC 5 Transport and Installation
5.3.2 Equipment for Transport
Any equipment used for the transport of the Sunny Central must be suitable for the weight of the
Sunny Central. The following equipment can be used for the transport of the Sunny Central:
• Crane with an according fork for the transport of the Sunny Central.
• Forklift or pallet truck.
• Crane and hoisting steele-wire rope hoisting hooks and steel loops.
Example of Transporting the Sunny Central Cabinet
Installation Manual SC500HEUS-IA-US_en-14 29
Page 30
5 Transport and Installation SMA America, LLC
A
5.4 Transporting the Sunny Central with a Crane
5.4.1 Uninstalling the Roof of the Sunny Central
To transport the Sunny Central with a crane you must remove the roof of the Sunny Central.
1. Loosen th e screws (A) of t he right air filte r and keep
them in a safe place.
2. Disassemble the right air filter by pulling its lower
side forward and up.
30 SC500HEUS-IA-US_en-14 Installation Manual
Page 31

SMA America, LLC 5 Transport and Installation
A
3. Loosen the screws of the left air filter (A) and keep
them in a safe place.
4. Dissassemble the left air filter by pulling its lower
side forward and up.
5. Move the front edge of the roof up and move the
roof slightly backwards to put it out off the guide
rail.
6. Unscrew the PE cable from the fixing point on top
of the Sunny Central.
7. Remove the roof of the Sunny Central.
Installation Manual SC500HEUS-IA-US_en-14 31
Page 32
5 Transport and Installation SMA America, LLC
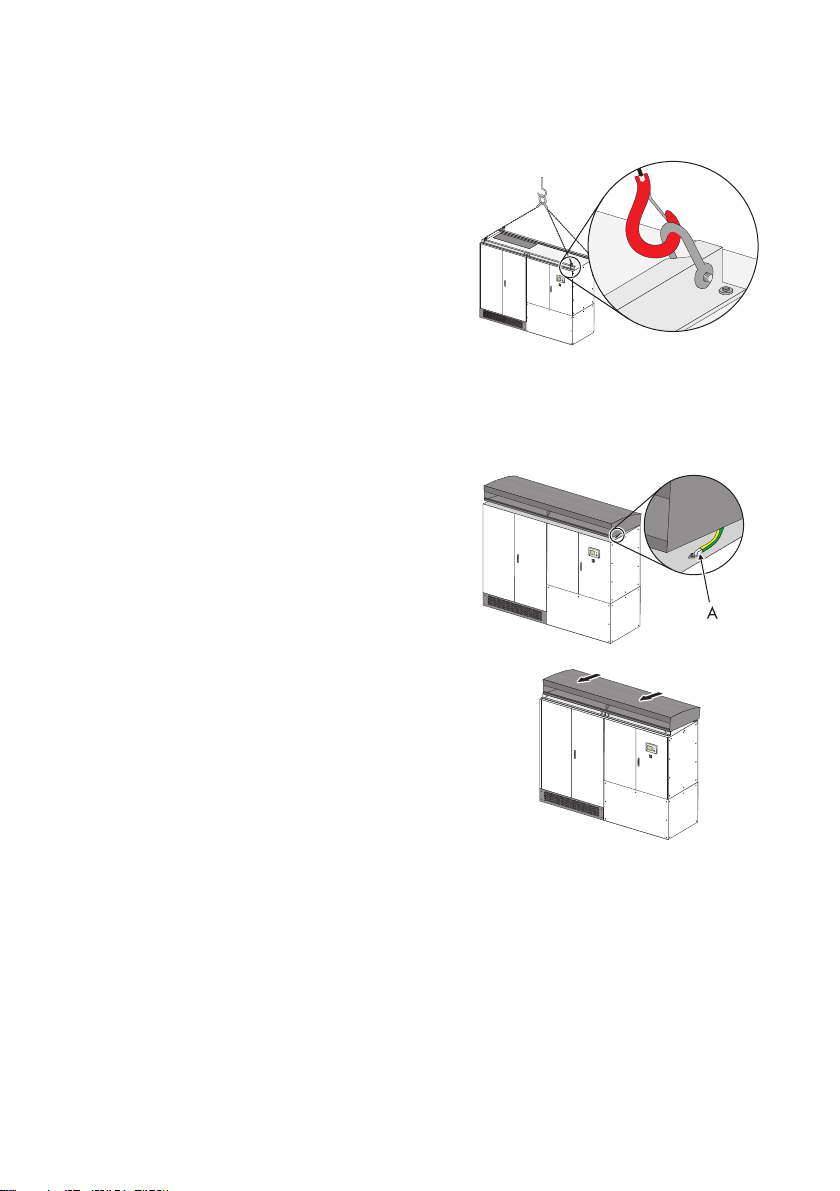
5.4.2 Moving the Sunny Central with a Crane
1. For transporting the Sunny Central with a crane use
suitable hoisting steel-wire ropes, hoisting hooks
and loops.
2. Anchor the loops at the intended openings in the
guide rails.
3. Take the heavy weight of the Sunny Central into
account.
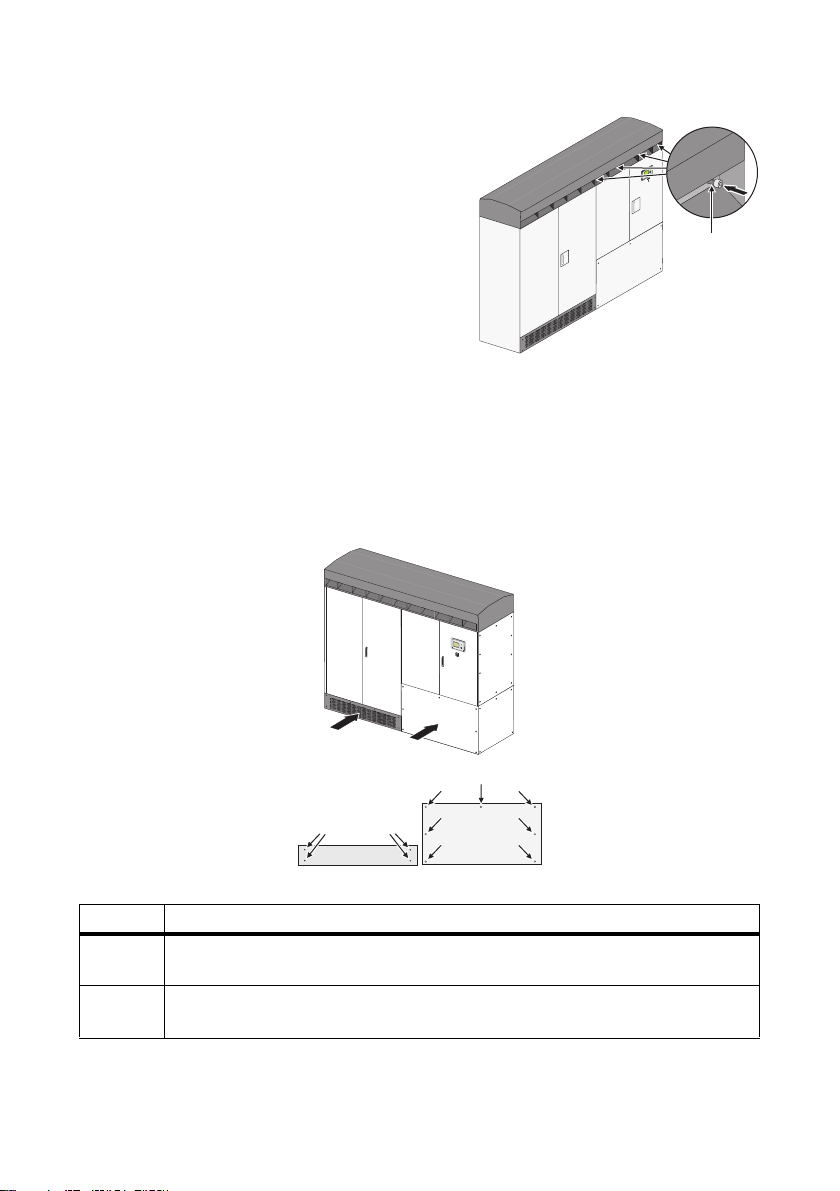
5.4.3 Installing the Roof of the Sunny Central
After moving the Sunny Central by crane you must install the roof of the Sunny Central.
1. Apply the roof to the top of the Sunny Central. Keep the front edge of the roof up.
Fasten the PE cable to the fixing point on top of the
Sunny Central.
2. Move the roof forward to apply it to the guid rail.
Move the front edge of the roof down.
32 SC500HEUS-IA-US_en-14 Installation Manual
Page 33

SMA America, LLC 5 Transport and Installation
A
3. Assemble the left air filter by pushing its upper side
forward and up.
4. Tighten the screws (A) of the left air filter.
5. As sem ble th e righ t air fil ter by pushi ng its upper si de
forward and up.
Installation Manual SC500HEUS-IA-US_en-14 33
Page 34
5 Transport and Installation SMA America, LLC
A
A
B
6. Tighten the screws (A) of the right air filter.
5.5 Installing the Sunny Central
5.5.1 Removing the Kick Plates from the Sunny Central
Kick plates are located on the front and back of the Sunny Central. The position of the kick plates is
shown in the figure below.The kick plates are mounted on the cabinets of the Sunny Central with
screws.
Position Description
A Power Cabinet front side and rear side. 4 screws in total. 2 screws on the right and
2 screws on the left.
B Control Cabinet front side and rear side. 7 screws in total. 3 screws on the right,
1 screw in the middle, 3 screws on the left.
1. Remove the screws of the kick plates on the front and on the rear of the Sunny Central using a
torx screwdriver.
34 SC500HEUS-IA-US_en-14 Installation Manual
Page 35

SMA America, LLC 5 Transport and Installation
2. Remove the kick plates of the Power Cabinet by
pulling them toward you (see figure on the right).
3. Remove the kick plates of the Control Cabinet
carefully by pulling it 3 to 4 in. toward you.
Pay attention not to tear the grounding-cable.
4. Remove the grounding-cables on the backside of
the kick plates.
5. Remove the kick plates of the Control Cabinet.
6. Load the cabinet on a forklift or a crane fork from
the front (see section 5.3.2).
7. Transport the cabinet to the installation site. During transport, be sure to follow all the instructions
provided in section 5.3).
5.5.2 Attach the Sunny Central to the base
The mounting holes (A) are located on the outside of the
Sunny Central's stands.
The holes for mounting the Sunny Central to the base
have a diameter of 0.63 in. (16 mm). Use appropriate
mounting material.
Figure to the right: Mounting hole in the front left stand of
the Power Cabinet.
1. Insert screws in all 6 mounting holes of the
Sunny Central (for the position of the mounting
holes, refer to section 5.2).
2. Tighten screws.
Installation Manual SC500HEUS-IA-US_en-14 35
Page 36

5 Transport and Installation SMA America, LLC
A
A
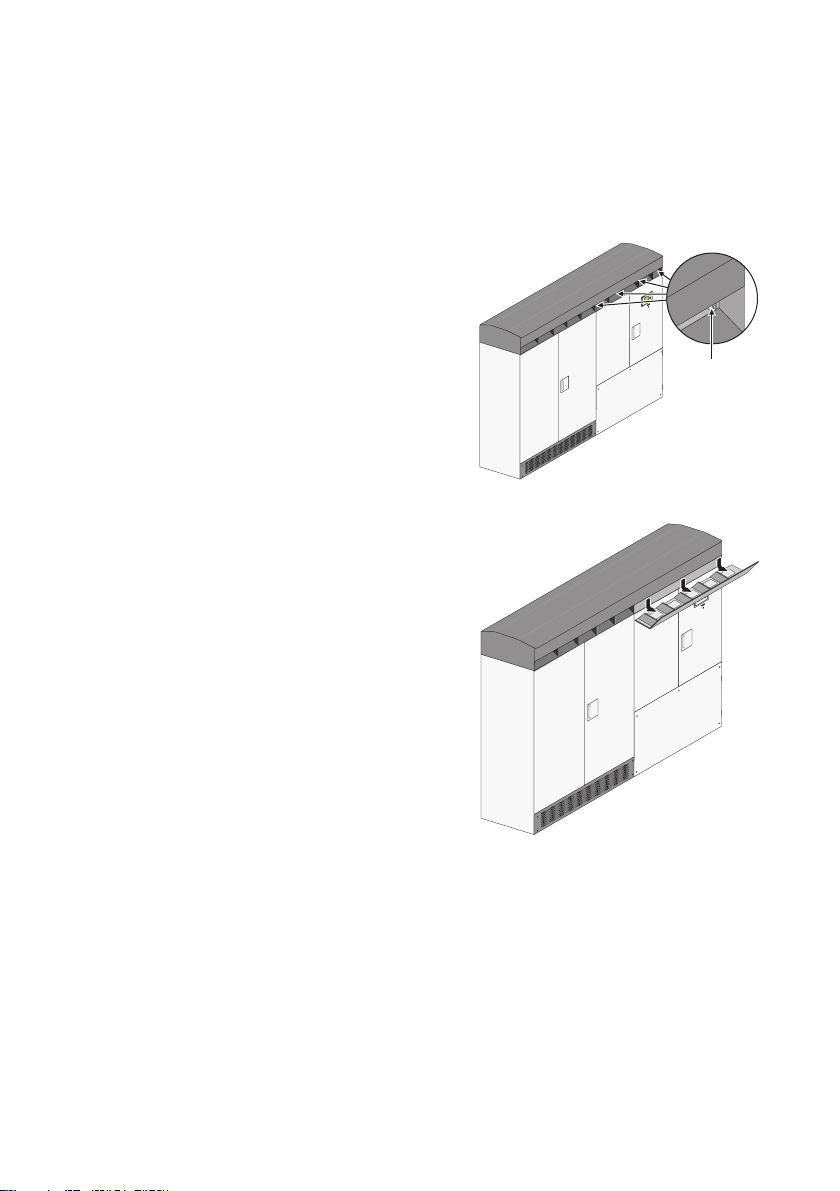
5.5.3 Install Ventilation Plates
Slides for installing the ventilation plate are located on the
stands of the Power Cabinet.
Figure to the right: slide in the front left stand (A) of the
Power Cabinet.
1. Place the ventilation plate (A) onto the slide in the
Power Cabinet and push into the Sunny Central.
The grille in the ventilation plate must be in the
back.
If properly installed, the ventilation plate should not
protrude from the cabinet.
Tip: If the ventilation plate gets stuck when pushing it into
the Sunny Central, hold it from the bottom and press the
middle area upwards while pushing it in.
5.5.4 Attaching the Kick Plates to the Sunny Central
1. Attach the kick plates to front and back of the
Power Cabinet and tighten the screws.
2. Install the Grounding-cables to the kick plates of the
Control Cabinet, attach the kick plates and tighten
the screws with a TX screwdriver.
36 SC500HEUS-IA-US_en-14 Installation Manual
Page 37

SMA America, LLC 6 Attaching the Conduits
/05*$&
AA A
C
BBBB
BBBBB
6 Attaching the Conduits
In this section you will learn where to insert the cables in the Sunny Central and where to punch the
holes for the conduits.
The DC cables, the AC cables and the communication cables can be routed into the Sunny Central's
Control and Interface Cabinet from the right or from below. The two options are described below.
6.1 Insert cables from the right into the Sunny Central
Insert the DC cables, the AC cables and the data cables into the Sunny Central from the right. A metal
sheet is attached to the Sunny Central for this purpose.
Seeping moisture during installation of the Sunny Central.
Damage to the electronics of the Sunny Central.
• Do not open the Sunny Central when it is raining or when a high humidity is present (> 95%).
• For conduit hubs, use only UL Listed rainproof, or wet location hubs complying with UL 514B
for entry into the enclosure.
1. Remove the plate screws.
2. Put the screws and washers aside.
3. Remove the kick plate of the Control Cabinet
carefully by pulling it 3 to 4 in. toward you. Pay
attention not to tear the grounding-cable.
4. Remove the grounding-cable on the backside of the
kick plate of the Control Cabinet.
5. Remove the kick plate of the Control Cabinet.
6. Remove the braces (A).
7. Mark all the holes for the conduits.
Example for a plate prepared for the connection of
9 DC strings.
A: Conduit for AC cable
B: Conduit for DC cable
C: Conduit for communication cable
Do not lay the AC connection cables of one phase together in one cable duct. All
cables of one phase must have the same length.
Please refer to section 8.7.2 for information on arrangement of AC cabling.
Installation Manual SC500HEUS-IA-US_en-14 37
Page 38

6 Attaching the Conduits SMA America, LLC
8. Punch holes for the conduits.
9. Check the seal of the plate.
10. Attach the plate to the Sunny Central.
11. Attach the screws and washers and tighten with a torque of 31 in.-lbs.
12. Insert the conduits into the openings.
13. Attach the conduits with the appropriate hubs.
6.2 Insert cables from below into the Sunny Central
Insert the DC cables, the AC cables and the data cables
into the Sunny Central from the bottom through the
foundation.
38 SC500HEUS-IA-US_en-14 Installation Manual
Page 39

SMA America, LLC 7 Connecting Optional Communication Devices
/05*$&
/05*$&
7 Connecting Optional Communication Devices
The Sunny Central can be equipped with a Sunny WebBox and/or a Sunny SensorBox and
Sunny Central String-Monitoring communication equipment. For more details concerning the
Sunny Central String-Monitor US see the manual of the Sunny Central String-Monitor US.
This section explains how the Sunny WebBox and the Sunny SensorBox in the Sunny Central is
connected.
The components in the Sunny Central can be damaged by electrostatic discharge.
• When working on the Sunny Central and when handling the components observe all ESD
safety regulations.
• Discharge electrostatic charge by touching the grounded Sunny Central enclosure.
• Only then is it safe to touch any electronic components.
Seeping moisture during installation of the Sunny Central.
Damage to the electronics of the Sunny Central.
• Do not open the Sunny Central when it is raining or when a high humidity is present (> 95%).
• For conduit hubs, use only UL Listed rainproof, or wet location hubs complying with UL 514B
for entry into the enclosure.
Installation Manual SC500HEUS-IA-US_en-14 39
Page 40
7 Connecting Optional Communication Devices SMA America, LLC
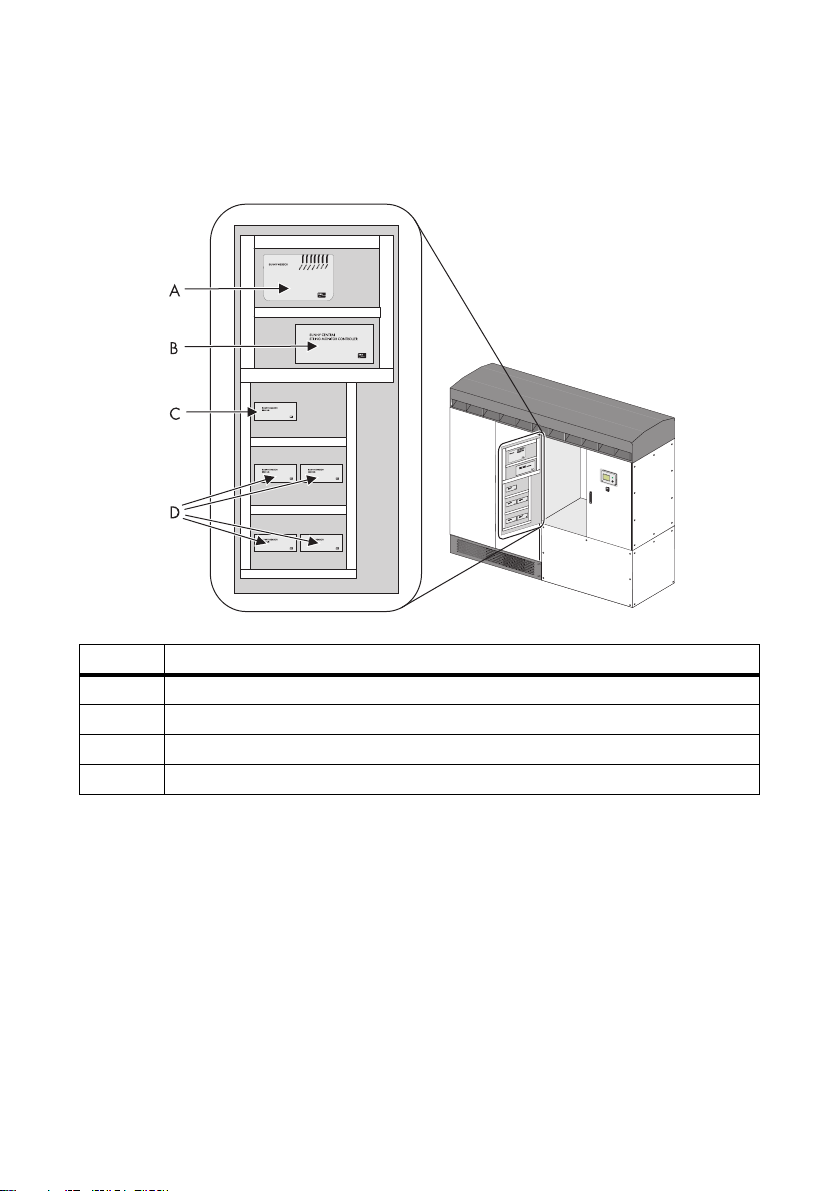
7.1 Position of the Communication Devices
The Sunny WebBox is located on the inside of the Power Cabinet's door.
Position Description
A Sunny WebBox (see section 7.3)
B Sunny Central String Monitor Controller
C Sunny Sensor 485Hub (see section 7.2)
D 485Hub-SC
40 SC500HEUS-IA-US_en-14 Installation Manual
Page 41

SMA America, LLC 7 Connecting Optional Communication Devices
SUNNY SENSOR
485HUB
SSB
Communication
A
c
tiv
ity
A
c
tiv
ity
Powe
r
Powe
r
+12V
GND
D+
D–
A
7.2 Connecting the Sunny SensorBox (optional)
This section describes how to connect the Sunny SensorBox to the Sunny Sensor 485Hub in the
Sunny Central.
Data cable
The data cable for the connection of the Sunny SensorBox to the Sunny Sensor 485Hub must meet
the following requirements:
• The data cable must not be longer than 4,000 ft (1,200 m).
•Use:
– cables with a section of 2 x 2 x AWG 24 (2x0.25mm
– shielded twisted pair cables
Data Cable Recommendation
SMA also provides data cables. Please contact your electrician or wholesaler.
2
)
7.2.1 Connecting the Data Cable of the Sunny SensorBox
Connect the data cable to the socket (A) on the bottom of the Sunny Sensor 485Hub.
1. Open the Control and Interface Cabinet as
described in section 10.1.
2. Route the data cables separately from AC and DC
cables. Draw the data cable into the Sunny Central
(see section 6)).
3. Remove the insulation of the data cable by approx.
2.4 in. (60 mm) and uncover the shield.
4. Uncover the wires about 1.8 in. (45 mm).
5. Strip the wires about 0.2 in. (5 mm).
Installation Manual SC500HEUS-IA-US_en-14 41
Page 42

7 Connecting Optional Communication Devices SMA America, LLC
6. Connect the wires to the connector as shown in the
figure on the right.
Position Description
A Sunny Sensor 485Hub socket
BPlug
CSunny SensorBox
7. Note down the wire color:
+12 V ______________________________
GND ______________________________
D+ ______________________________
D − ______________________________
8. Insert the plugs into the socket on the bottom of the
Sunny Sensor 485Hub.
9. Close the Sunny Central.
The operating manual of the Sunny SensorBox shows you
how to connect the data cable in the SensorBox and
connect the sensors to the Sunny SensorBox.
7.3 Sunny WebBox (optional)
For more information on the Sunny WebBox (e.g., operation) see its technical description.
The technical description is included in the scope of delivery and is available for download at
www.SMA-America.com.
The commu nication between the Sunny We bBox and the PC or the network is conducted via Ethernet.
The Sunny WebBox is equipped with an integrated network connection, which enables it to be
connected to any Ethernet network. The connection supports Ethernet and Fast-Ethernet networks.
The speed adapts automatically to the connected switch, router or PC.
42 SC500HEUS-IA-US_en-14 Installation Manual
Page 43

SMA America, LLC 7 Connecting Optional Communication Devices
Sunny WebBox in a Network
The Sunny WebBox can be integrated into a network via a router or a switch. If the Sunny WebBox
is permanently integrated into a network with Internet access, it can automatically transmit the data of
your PV system to Sunny Portal.
Position Description
ASunny WebBox
B Switch or router
CComputer
D Laptop
Data cable
The data cable for the connection of the Sunny WebBox to a network must meet the following
requirements:
• The data cable must not be longer than 330 ft. (100 m).
•Use:
– High-quality, straight-through patch cables,
– shielded twisted pair cables,
– of category 5 (CAT 5) or higher.
Installation Manual SC500HEUS-IA-US_en-14 43
Page 44

7 Connecting Optional Communication Devices SMA America, LLC
Sunny WebBox Connected to a PC / Laptop
To read out the data, the Sunny WebBox can be connected to a PC or Laptop. This connection should
not be made long-term; it only serves the purpose of reading the data.
Position Description
ASunny WebBox
B Laptop
Cable
The cable for the connection of the Sunny WebBox to a PC / Laptop must meet the following
requirements:
• The cable must not be longer than 330 ft. (100 m).
•Use:
– High quality crossover cable,
– shielded twisted pair cables,
– of category 5 (CAT 5) or higher.
44 SC500HEUS-IA-US_en-14 Installation Manual
Page 45
SMA America, LLC 7 Connecting Optional Communication Devices
2
3
4
A B
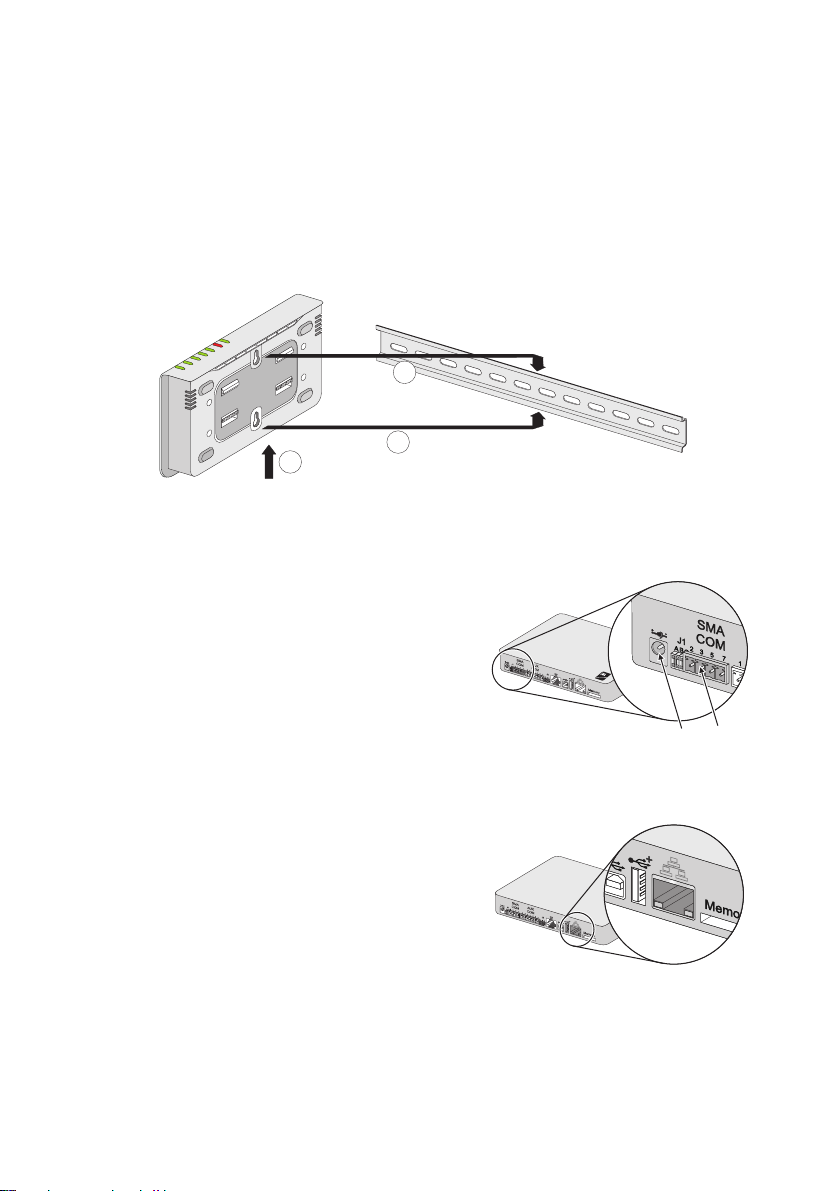
7.3.1 Installing the WebBox in the Sunny Central
1. Open the Control and Interface Cabinet as described in section 10.1.
2. Hook both lower brackets of the Sunny WebBox under the lower edge of the top-hat rail.
3. Press the Sunny WebBox upwards.
4. Snap the top edge of the top-hat rail into the top mounting brackets of the Sunny WebBox.
7.3.2 Connecting the Sunny WebBox in the Sunny Central
1. Plug the W215 connector into the SMA COM
socket (B) of the WebBox.
2. Insert the power supply plug into socket (A) of the
WebBox.
7.3.3 Connecting the Cable to the Sunny WebBox
The network connection on the Sunny WebBox is marked
as displayed on the adjacent graphic. The same marking
fo r th e ne two rk c onn ectio ns i s us ual ly t o be fou nd o n your
switch, router, PC or Laptop. If this is not the case, please
refer to the switch, router, PC or Laptop manual.
3. Route the cables separately from AC and DC
cables. Draw the cable into the Sunny Central
(see section 6).
4. Plug the cable into the Sunny WebBox's socket.
5. Plug the cable into the socket of the switch, router, PC or Laptop.
6. Close the Interface Cabinet of the Sunny Central.
Installation Manual SC500HEUS-IA-US_en-14 45
Page 46

7 Connecting Optional Communication Devices SMA America, LLC
A
7.3.4 Termination
To ensure sufficient signal quality of the RS485 data bus,
it must be terminated on both ends.
The Sunny WebBox is located at one of the end points of
the RS485 data bus.
• Mount jumper to J1A.
The jumper is mounted upon delivery.
Signal biasing (jumper J1B and jumper J1C)
To ensure sufficient signal quality of the RS485 communication bus, a bias must be connected to the
WebBox.
• Connect jumper to J1B and J1C.
Both jumpers are mounted upon delivery.
46 SC500HEUS-IA-US_en-14 Installation Manual
Page 47

SMA America, LLC 8 Electrical Connection
/05*$&
/05*$&
8 Electrical Connection
This section describes how the Sunny Central is connected to the grid and to the PV modules, and
what precautions must be observed in order to avoid material and personal damages. It provides
information on the necessary cable sizes and the magnitude of the torque for the cable connection.
8.1 Safety
The components in the Sunny Central can be damaged by electrostatic discharge.
• When working on the Sunny Central and when handling the components observe all ESD
safety regulations.
• Discharge electrostatic charge by touching the grounded Sunny Central enclosure.
• Only then is it safe to touch any electronic components.
Seeping moisture during installation of the Sunny Central.
Damage to the electronics of the Sunny Central.
• Do not open the Sunny Central when it is raining or when a high humidity is present (> 95%).
• For conduit hubs, use only UL Listed rainproof, or wet location hubs complying with UL 514B
for entry into the enclosure.
Installation Manual SC500HEUS-IA-US_en-14 47
Page 48

8 Electrical Connection SMA America, LLC
ABCD E
8.2 Connection in Control and Interface Cabinet
8.2.1 Connection Area for Analog inputs and auxiliary power
The illustration below shows the connecting area for analog inputs and auxiliary power.
Position Description
A Analog input limiting active power 4mAto20mA
B Analog input set point reactive power 4mAto20mA
C External start/stop
D Fault external transformer
E 208V external control voltage
48 SC500HEUS-IA-US_en-14 Installation Manual
Page 49

SMA America, LLC 8 Electrical Connection
8.2.2 Connection Area of the Low Temperature Option
For the low-temperature option, the supply voltage for the heating elements is provided by means of
the external terminals. If the ambient temperature is below –13°F (–25°C), the heating elements
switch on. This ensures that the temperature in the inverter cannot decrease any further.
Position Designation Wire size
AHeating ‒
B X481: 24 V signal. The 24 V signal
disconnects the auxiliary power supply
of the inverter.
C X483: The 24 V signal switches on/
disconnects the inverter externally.
D X482: 230 V supply voltage of the
heating.
E X220: 208 V control voltage. See section 8.2.3
AWG12
In accordance with National Electrical Code
ANSI/NFPA 70
AWG12
In accordance with National Electrical Code
ANSI/NFPA 70
AWG14
In accordance with National Electrical Code
ANSI/NFPA 70
®
®
®
Installation Manual SC500HEUS-IA-US_en-14 49
Page 50

8 Electrical Connection SMA America, LLC
/05*$&
8.2.3 Requirements
Cable Requirements
Cable Size Cable
2
12 AWG (4mm
14 AWG (4mm2) minimum 194°F (90°C) minimum, copper wire
) minimum 140°F (60°C) minimum, copper wire
Grid
For connecting the external voltage, a 208 V grid is required at the installation site.
8.2.4 Optional External 3-phase voltage supply (3AC, 208/120V, 60Hz)
It is possible to connect the Sunny Central to an external 208 V voltage supply. The Sunny Central
consumes up to 1,700 W in operation. It draws the energy from the PV field. At installation sites,
where the feed-in tariff per kWh does apply, it may be useful to connect the Sunny Central to an
ex ter nal vol tag e su ppl y. T he S unn y Ce ntr al t hen dra ws t he e lec tri cit y fo r its inte rna l po wer sup ply fro m
the grid via the external voltage supply.
Fuses between external power supply and Sunny Central
The installer is responsible for installing the fuses between the external power supply and the
Sunny Central. The Sunny Central has an internal fuse of 16 A.
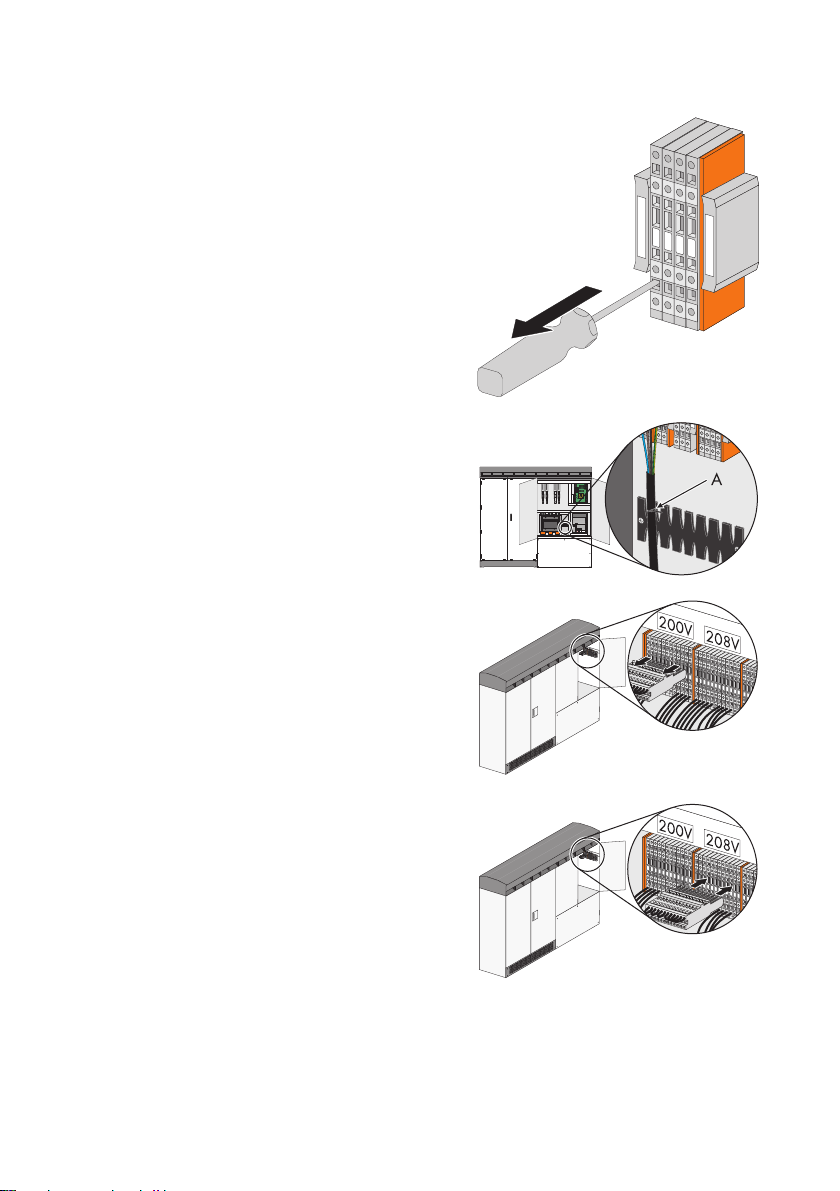
8.2.5 Connecting the external 208 V power supply
Details for auxiliary power connection are shown in the circuit diagrams attached to the
Sunny Central.
1. Insert the cable through a separate cable duct into the Sunny Central (see section 6).
2. Loosen the 4 screws on top of the gasket plate in
the base of the Control Cabinet in a
counterclockwise direction and remove them.
50 SC500HEUS-IA-US_en-14 Installation Manual
Page 51

SMA America, LLC 8 Electrical Connection
3. Loosen the 3 screws on the side of the gasket plate
in a counterclockwise direction and remove them.
4. Remove a rubber gasket out from the gasket plate.
5. Place the rubber gaskets on the cable.
6. Install the rubber gasket on the cable in the opening
of the gasket plate.
7. Place the 3 screws on the side of the gasket plate and tighten them in a clockwise direction.
8. Place the 4 screws on top of the gasket plate and tighten them in a clockwise direction in the
base of the Control Cabinet.
9. Remove the insulation of the cable by
approx. 2.4 in. (60 mm).
10. Uncover the wires about 1.8 in. (45 mm).
11. Strip the wires about 0.2 in. (5 mm).
12. Insert the screwdriver into the rectangular opening
of the terminal and press it.
☑ The terminal is open.
13. Connect the AC wire line A to the terminal 1.
14. Connect the AC wire line B to the terminal 2.
15. Connect the AC wire line C to the terminal 3.
16. Connect the grounding cable to the terminal 4.
17. Pull the screwdriver out of the terminal.
Installation Manual SC500HEUS-IA-US_en-14 51
Page 52
8 Electrical Connection SMA America, LLC
18. Pull the insulated conductor to check that it is
securely in place.
☑ The insulated conductors of the external power
supply are connected.
19. Fasten the cable to the cable anchoring rail using a
cable tie.
☑ The cable is protected against pulling out.
20. Pull the plug out of the terminal block marked with
"200 V".
21. Insert the plug into the terminal block marked with
"208 V".
☑ The external 208 V power supply is connected.
52 SC500HEUS-IA-US_en-14 Installation Manual
Page 53

SMA America, LLC 8 Electrical Connection
8.2.6 Connecting Analog input setting cables
1. Remove the insulation of the cable by
approx. 2.4 in. (60 mm).
2. Uncover the wires about 1.8 in. (45 mm).
3. Strip the wires about 0.2 in. (5 mm).
4. Insert the screwdriver into the rectangular opening
of the terminal and press it.
5. The terminal is open.
6. Connect the positive wire of the active power to
terminal A.
7. Connect the negative wire of the active power to
terminal B.
8. Connect the ground wire of the active power to
terminal C.
9. Connect the positive wire of the reactive power to
terminal A.
10. Connect the negative wire of the reactive power to
terminal B.
11. Connect the ground wire of the reactive power to
terminal C.
Installation Manual SC500HEUS-IA-US_en-14 53
Page 54

8 Electrical Connection SMA America, LLC
12. Pull the screwdriver out of the terminal.
13. Pull the insulated conductor to check that it is securely
in place.
☑ The insulated conductors of the external power
supply are connected.
14. Fasten the cable to the cable anchoring rail using a
cable tie.
☑ The cable is protected against pulling out.
8.2.7 Connecting Cables for the Low Temperature Option
• Connect the cables to the terminals in accordance with the circuit diagram.
54 SC500HEUS-IA-US_en-14 Installation Manual
Page 55

SMA America, LLC 8 Electrical Connection
8.3 Connection Area for AC, DC cables and ground
The cables of the PV modules and the external transformer / switch gear are connected in the
Interface area.
Sunny Central for the Connection of 9 DC Strings with busbars (Standard)
Position Description
A DC − connection (neg. grounding), DC+ connection (pos. grounding)
B DC+ connection (neg. grounding), DC − connection (pos. grounding)
CAC connection
D Ground connection
Installation Manual SC500HEUS-IA-US_en-14 55
Page 56

8 Electrical Connection SMA America, LLC
Sunny Central for the Connection of 9 DC Strings with Terminal Blocks (Option)
Position Description
A DC − connection (neg. grounding), DC+ connection (pos. grounding)
B DC+ connection (neg. grounding), DC − connection (pos. grounding)
CAC connection
D Ground connection
56 SC500HEUS-IA-US_en-14 Installation Manual
Page 57

SMA America, LLC 8 Electrical Connection
/05*$&
8.4 Connection Options
There are various options for connecting the Sunny Central to the public grid and the PV modules.
When placing your order these options will enable you to adapt the Sunny Central connection area
to the characteristics of the PV modules and the grid. This section demonstrates the various connection
options.
8.4.1 DC Fuses
The Sunny Central must be equipped with 6 to 9 DC fuses. All other numbers of fuses contradict
UL listing of the inverter system. Every fuse has a separate rail to which 1 or 2 DC strings can be
connected.
The fuse characteristics have to match the following to ensure UL listing of the inverter system:
• Supplementary cartridge fuses suitable for branch circuit protection
• Type LDC, manufactured by Littelfuse
• Provided for branch circuit protection of DC field wiring
• Rated 600 Vac/Vdc
• Rated 130°C
• Maximum current rating of 450 A, no minimum limit
• Intermixing of different fuse ratings is possible
Such fuse types will be installed as defined in the option code upon order. The Sunny Central can be
delivered without fuses which are allowed to be provided in the end installation. Such fuses can be
ordered via SMA Service.
The DC fuse installation on site must be done by SMA Service only.
8.4.2 Grounding the PV modules
Depending on the configuration option, you can connect positive or negative grounded PV modules
to the Sunny Central.
8.4.3 Cable connection
You can connect all AC and DC cables to terminals or to busbars. Use cable lugs to connect the
cables to the busbars.
Installation Manual SC500HEUS-IA-US_en-14 57
Page 58

8 Electrical Connection SMA America, LLC
8.4.4 Cable requirements for DC, AC and PE connection
☐ Connect all cable using copper or aluminium conductors that are suitable for temperatures of
+194°F (+90°C) and in accordiance with National Electrical Code
☐ Use the screw terminal or the screws included in scope of delivery for mounting cable lugs only.
Cable lugs have to be UL listed compression lugs with two securement holes (
in diameter) and a distance between the holes of 13⁄4 in. (44mm). Both holes have to be
utilized in installation. The width of the lugs has to exceed the washer diameter of 1
(32mm) to ensure defined torque values listed below.
The screw terminals can be connected with 1 or 2 conductors each.
☐ Use the screw terminals or cable lugs to connect the DC cables.
☐For individual cable sizing refer to article National Electrical Code
Connection method Cable size Torque
Cable fixing in screw terminal 4AWGto600kcmil
(25mm²to304mm²)
Cable lug, aluminum on
copper busbar
Cable lug, copper on
copper busbar
4AWGto800kcmil
(25mm²to405mm²)
4AWGto800kcmil
(25mm²to405mm²)
Screw terminals are pre-mounted upon delivery. If they have to be fixed again on the copper busbar,
use a torque of 27.5ft.-lbs. (37 Nm).
®
ANSI/NFPA 70.
1
/2in. (13mm)
®
310.
41.5ft.-lbs. (56.5Nm)
27.5ft.-lbs. (37Nm)
44.5ft.-lbs. (60Nm)
1
⁄4in.
8.4.5 Additional cable requirements for DC connection
• Use the cable lugs to connect DC cables.
• Connect 2 conductors per input terminal maximum. Both conductors must have the same sizing.
• The DC inputs are isolated from the enclosure and the system grounding. If required by section
250 of the National Electrical Code
grounding.
Maximum number of DC inputs: 9xPV+, 9xPV − , 9xground
Maximum number of DC fuses: 9 (sized 450 A maximum)
DC input voltage: 330-600 V
Maximum DC current: 1600 A
58 SC500HEUS-IA-US_en-14 Installation Manual
®
, ANSI/NFPA 70, the installer is responsible for this
Page 59

SMA America, LLC 8 Electrical Connection
%"/(&3
%"/(&3
E
D
C
A
F
C
A
B
C
F
C
B B
B
8.5 Connecting DC cables
8.5.1 Connecting DC cables with screw terminals
Voltage is present in PV modules exposed to light.
Death resulting from electric shock.
•Cover the PV modules.
• Switch off the fuses in the DC distribution boxes (e.g. Sunny Central String-Monitor) and
secure them against reconnection.
• Follow all safety precautions of the module manufacturer.
Normally grounded conductors may be ungrounded and energized when a ground-fault is
indicated.
Risk of electric shock.
•Test before touching.
• Work on the Disconnect Unit must be carried out by qualified personnel.
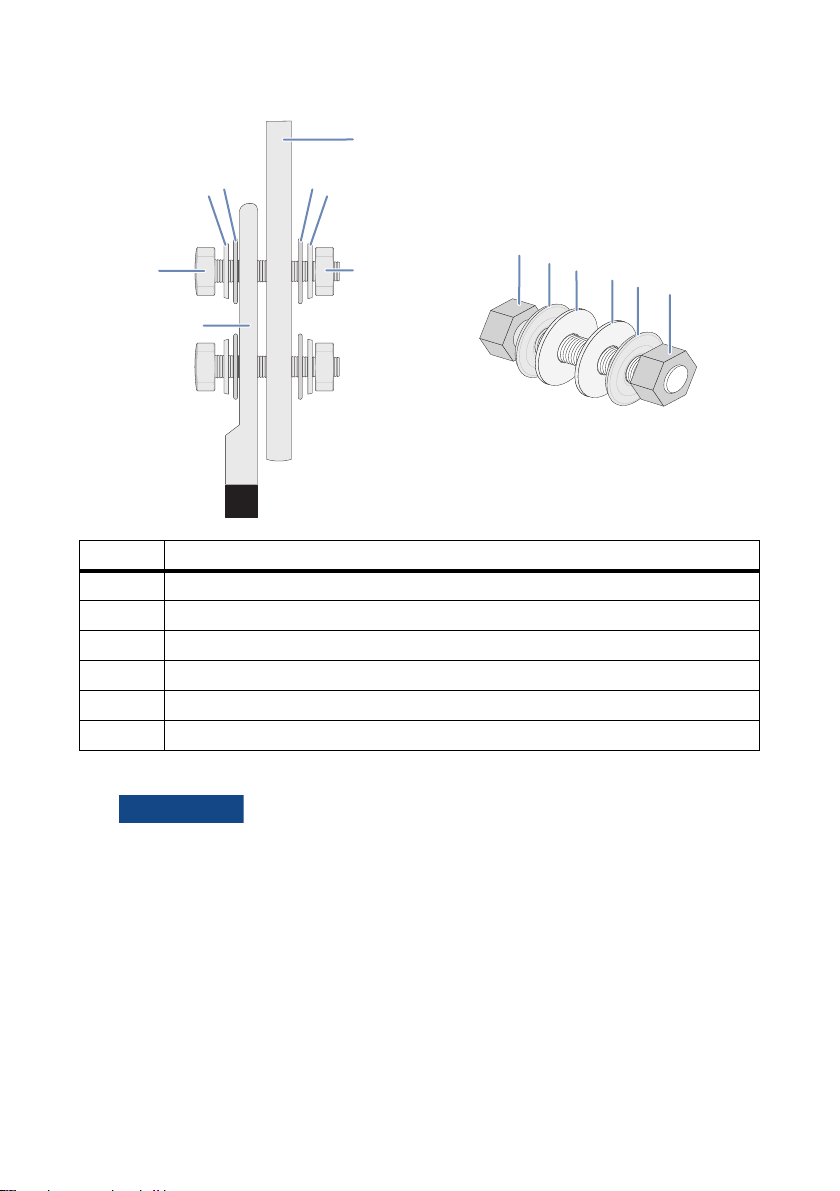
Position Description
A Nut ‒ size: M 12
Installation Manual SC500HEUS-IA-US_en-14 59
Page 60

8 Electrical Connection SMA America, LLC
%"/(&3
%"/(&3
Position Description
B Spring washer
C Washer
D Cable lug
E Busbar
F Screw head ‒ size: M12
1. Strip the cable by about 11⁄5 in. (30 mm).
2. Open the set screw of the terminal completely.
3. Plug the copper or aluminum conductor of the cable into the screw terminal and tighten it with
the specified torque.
4. If necessary, tighten the screw terminal to the busbar again using a torque wrench with a torque
of 27ft.-lbs.(37Nm).
8.5.2 Connecting DC cables with cable lugs
Voltage is present in PV modules exposed to light.
Death resulting from electric shock.
•Cover the PV modules.
• Switch off the fuses in the DC distribution boxes (e.g. Sunny Central String-Monitor) and
secure them against reconnection.
• Follow all safety precautions of the module manufacturer.
Normally grounded conductors may be ungrounded and energized when a ground-fault is
indicated.
Risk of electric shock.
•Test before touching.
• Work on the Disconnect Unit must be carried out by qualified personnel.
60 SC500HEUS-IA-US_en-14 Installation Manual
Page 61
SMA America, LLC 8 Electrical Connection
/05*$&
E
D
B
C
A
F
C
B
A
B
C
B
F
C
Position Description
A Screw head - size: M12
B Spring washer
C Washer
D Cable lug
E Busbar
F Nut - size: M12
Procedure of connecting
1.
Oxide layers on contact surfaces after transport and storing of the Disconnect Unit.
Yield loss resulting due to poor electrical conductivity.
• Before connecting the cables, clean the contact surfaces.
• Use only the non-woven abrasive delivered with the Sunny Central.
• Do not clean the surfaces with sandpaper.
• Do not damage the tin coating.
• Do not touch the contact surfaces after they have been cleaned.
2. Position the cable lug or lugs on the busbar.
3. Tighten the screw with a nut in a clockwise direction.
4. Connect all DC cables as illustrated above.
Installation Manual SC500HEUS-IA-US_en-14 61
Page 62

8 Electrical Connection SMA America, LLC
1.2 in.
8.6 Connection of the PV Modules
Do not connect the PV modules until the optional communication cables have been connected
(see section 7). DC distribution boxes (e.g. Sunny Central String-Monitor) must be installed between
the PV modules and the Sunny Central, where the PV module cables are gathered and led to the
Sunny Central.
The Photovoltaic System Grounding must be installed per the requirements of Sections 690.41
through 690.47 of the National Electrical Code, ANSI/NFPA 70 and is the responsibility of the
installer.
8.6.1 PV Modules: DC − Connection at Negative Grounding and DC+ Connection at Positive Grounding
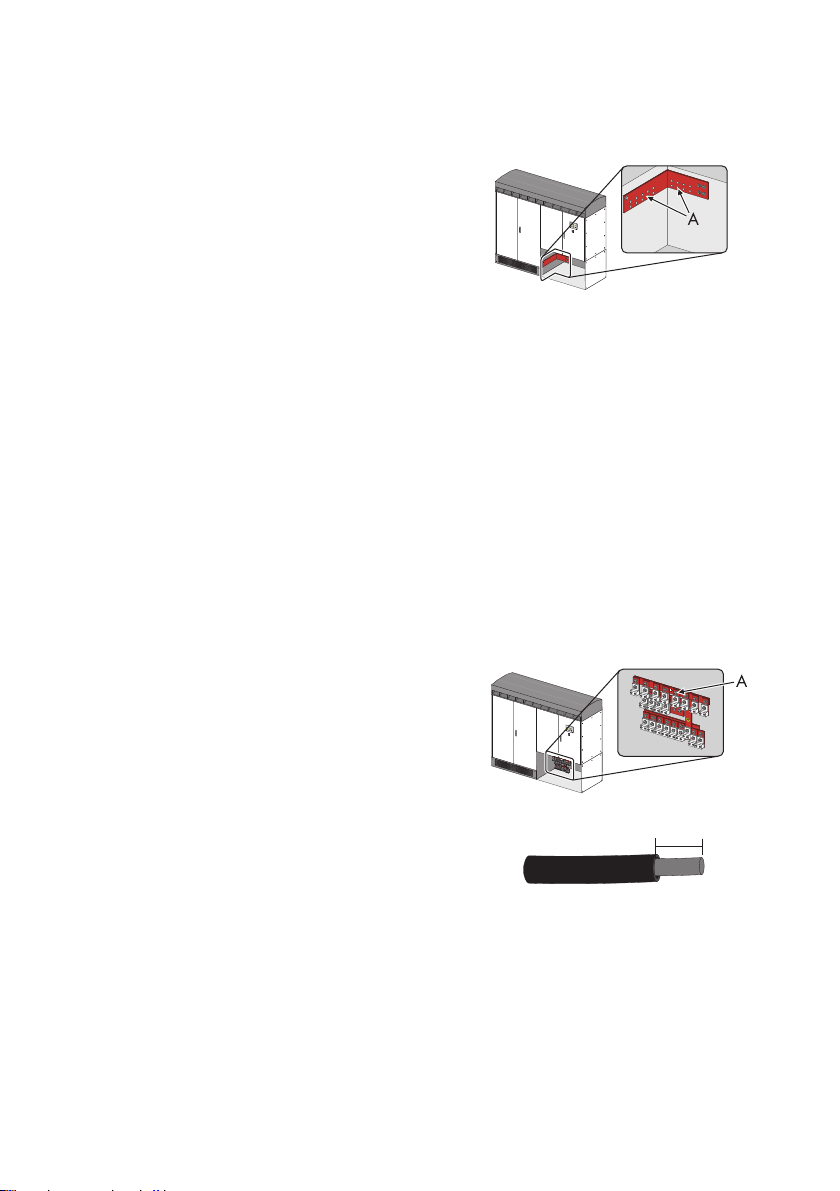
Connection with Terminal Blocks
The illustration below shows a Sunny Central which is equipped for connection to 9 or 18 DC strings.
A Sc rew ter min als for the co nne cti on o f th e PV mo dul es'
grounded DC path cables.
1. Strip the cable by about 1.2 in. (30 mm).
2. Open the screw terminal completely.
3. Plug the copper inner conductor of the cable into
the screw terminal.
4. Tighten the screw terminal using a screwdriver.
The required torque is 315 in-lb.
5. Connect all grounded DC path cables of the PV
modules as described above.
62 SC500HEUS-IA-US_en-14 Installation Manual
Page 63
SMA America, LLC 8 Electrical Connection
1.2 in.
Connection to busbars
A Busbars for the connection of the PV modules'
grounded DC path cables.
1. Open the Sunny Central as described in section 10.1.
2. Position the cable lug or lugs on the busbar.
3. Insert the lock washers and screws into the holes.
4. Tighten the screw with a nut in a clockwise direction using a torque of 55 ft.-lbs.
5. Connect all grounding cables as described above.
6. The DC– cables are connected.
8.6.2 PV Modules: DC+ Connection at Negative Grounding and DC − Connection at Positive Grounding
Connection with Terminal Blocks
The illustration below shows a Sunny Central which is equipped for connection to 9 or 18 DC strings.
A Sc rew ter min als for the co nne cti on o f th e PV mo dul es'
ungrounded DC path cables.
Position: Interface Cabinet, right wall, middle.
1. Strip the cable by about 1.2 in. (30 mm).
2. Open the screw terminal completely.
Installation Manual SC500HEUS-IA-US_en-14 63
Page 64

8 Electrical Connection SMA America, LLC
3. Plug the copper inner conductor of the cable into
the screw terminal.
4. Tighten the screw terminal using a screwdriver.
The required torque is 315 in-lb.
5. Connect all ungrounded DC path cables of the PV
modules as described above.
Connection to busbars
A Busbar for the connection of the PV modules'
ungrounded DC path cables.
Position: Interface Cabinet, right wall, middle.
1. Open the Sunny Central as described in section 10.1.
2. Position the cable lug or lugs on the busbar.
3. Insert the lock washers and screws into the holes.
4. Tighten the screw with a nut in a clockwise direction using a torque of 55 ft.-lbs.
5. Connect all grounding cables as described above.
6. The ungrounded DC path cables are connected.
64 SC500HEUS-IA-US_en-14 Installation Manual
Page 65

SMA America, LLC 8 Electrical Connection
/05*$&
/05*$&
$"65*0/
8.7 AC Connection
The AC outputs are isolated from the enclosure and the system grounding, so that the
AC output and neutral are not bonded to ground. If required by section 250 of the
National Electrical Code®, ANSI/NFPA 70, the installer is responsible for this grounding.
8.7.1 Additional cable requirements for AC connection
• Use th e screw terminals or cable lugs to conn ect the AC cables to the AC breakers as described
in section 8.7.3.
• Connect 6 conductors per phase maximum.
External AC fuses
The Disconnect Unit for Sunny Central 500HE-US/CA/CP is provided with UL listed circuit breaker
on output rated 1,600A for branch circuit protection.
The unit is provided with a UL listed circuit breaker on the output rated 1,600 A for branch circuit
protection. If the circuit breaker shall be located externally, see section 2.1 for further details.
• To reduce the risk of fire, connect only to a circuit provided with over-current protection in
accordance with National Electrical Code®, ANSI/NFPA 70.
8.7.2 Arranging AC cables
Th is s ect ion exp lai ns h ow to a rra nge the AC c abl es t o mi nimiz e the interferences between the different
phases. Make sure that the cables of the different phases have got the same length.
Cable arragement for AC cables shorter than 61⁄2ft.(2m)
Arrange the cables as shown in the following figure for all number of cables with length shorter than
61⁄2ft.(2m). The description is exemplary for an arrangement with 4 cables per phase. The distance
between the cables should be twice the diameter of a single cable.
Figure1: AC cable arrangement 1
Installation Manual SC500HEUS-IA-US_en-14 65
Page 66

8 Electrical Connection SMA America, LLC
/05*$&
Cable arragement for AC cables longer than 61⁄2ft.(2m)
Arrange the cables as shown in the following figure For all number of cables with length longer than
1
⁄2ft.(2m). The description is exemplary for an arrangement with 4 cables per phase.
6
For AC cable arrangement 1: the distance between the cables should be twice the diameter of of a
single cable.
The maximum AC cable length between Disconnect Unit and transformer has to be lower than
49 ft. (15 m).
Figure2: AC cable arrangement 2
Number of cables
3456
per phase
AC cable
arrangement 1.
Figure3: AC cable arrangement 3
If possible:
AC cable
arrangement 2.
else:
AC cable
arrangement 1
AC cable
arrangement 1.
If possible: AC
cable
arrangement 3.
else:
AC cable
arrangement 1.
66 SC500HEUS-IA-US_en-14 Installation Manual
Page 67
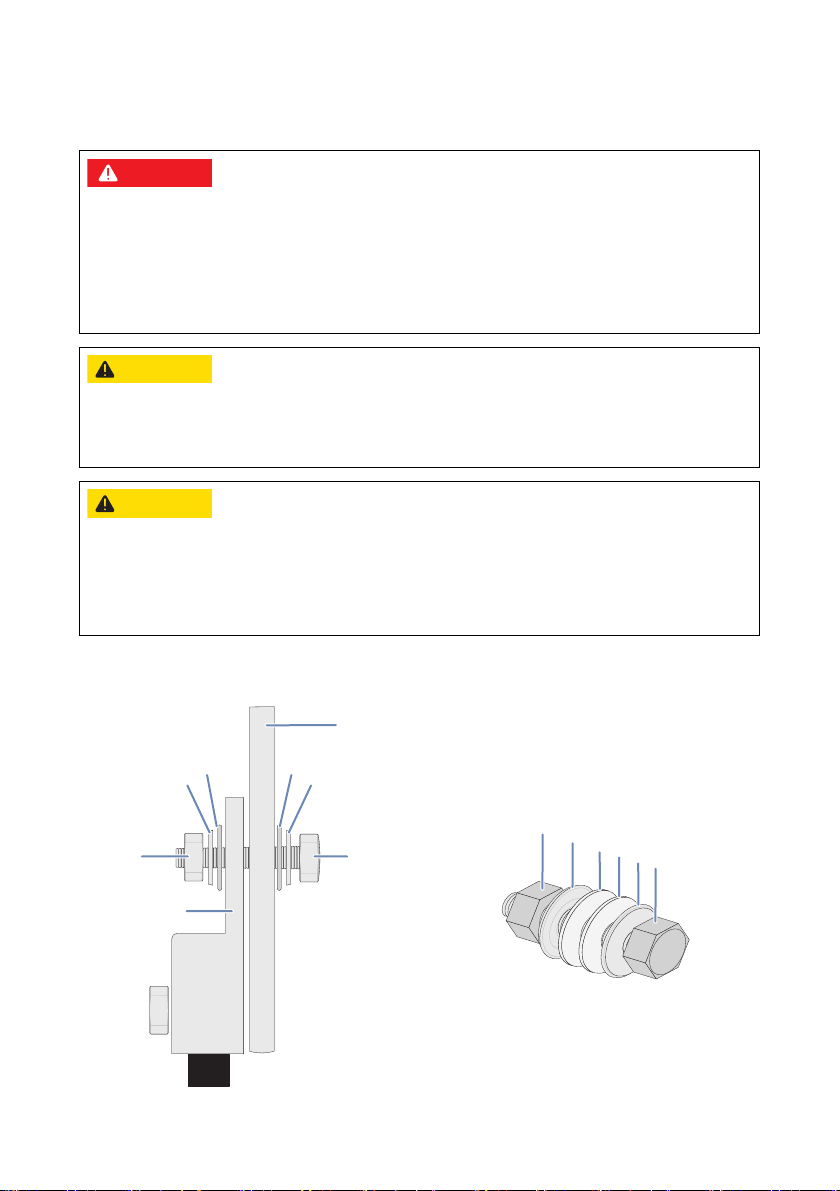
SMA America, LLC 8 Electrical Connection
%"/(&3
$"65*0/
$"65*0/
E
D
C
A
F
C
A
B
C
F
C
B B
B
8.7.3 Connecting AC cables to busbars
High voltages are present in the live components of the low voltage grid.
Death resulting from burning and electric shock.
• Pay close attention to all safety precaution measures regarding the low-voltage grid.
• Switch off the AC and DC circuit breaker and secure it against accidental switching on.
•Ensure that no voltage is present.
Danger of fire caused by improper connection to the power distribution grid.
• To reduce the risk of fire, do not connect to an AC load center (circuit breaker panel) having
multi-wire branch circuits connected.
Danger of fire caused by different length of AC cables
Danger of fire.
• Different cable lengths within one phase result in overheating of the shortest cable.
• Connect all AC cables with the same length per phase.
Connecting AC cables to busbars with screw terminals
Installation Manual SC500HEUS-IA-US_en-14 67
Page 68

8 Electrical Connection SMA America, LLC
E
D
B
C
A
F
C
B
A
B
C
B
F
C
Position Description
A Nut ‒ size: M 12
B Spring washer
C Washer
D Cable lug
E Busbar
F Screw head ‒ size: M12
1. Strip the cable by about 11⁄5 in. (30 mm).
2. Open the set screw of the terminal completely.
3. Plug the copper and aluminum conductor of the cable into the screw terminal and tighten it with
the specified torque.
If necessary, tighten the screw terminal to the busbar again using a torque
wrench with a torque of 27ft.-lbs.(37Nm).
Connecting AC cables to busbars with cable lugs
Position Description
A Screw head - size: M12
B Spring washer
68 SC500HEUS-IA-US_en-14 Installation Manual
Page 69

SMA America, LLC 8 Electrical Connection
/05*$&
1.2 in.
Position Description
C Washer
D Cable lug
E Busbar
F Nut - size: M12
Connecting procedure
1.
Oxide layers on contact surfaces after transport and storing of the Disconnect Unit.
Yield loss resulting due to poor electrical conductivity.
• Before connecting the cables, clean the contact surfaces.
• Use only the non-woven abrasive delivered with the Sunny Central.
• Do not clean the surfaces with sandpaper.
• Do not damage the tin coating.
• Do not touch the contact surfaces after they have been cleaned.
2. Position the cable lug or lugs on the busbar.
3. Tighten the screw with a nut in a clockwise direction.
Connect all AC cables as illustrated above.
8.7.4 AC Connection
Connection with Terminal Blocks
The AC cables are connected to the screw terminals A, B
and C. Connect 3 cables each to the terminal blocks for
the phases A, B and C.
1. Strip the cable by about 1.2 in. (30 mm).
2. Open the screw terminals completely.
Installation Manual SC500HEUS-IA-US_en-14 69
Page 70
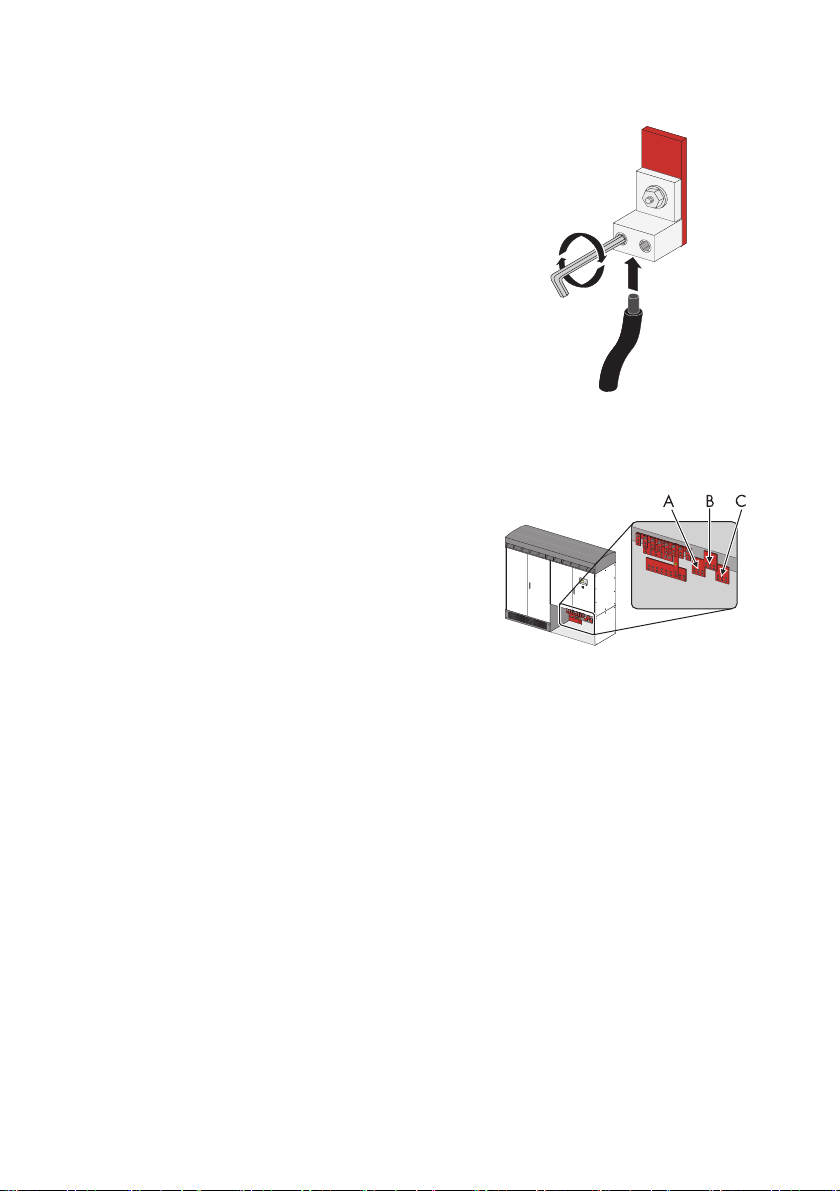
8 Electrical Connection SMA America, LLC
3. Plug the copper inner conductors of the cables into
the screw terminals.
4. Connect the 3 AC cables line A to the terminals A.
5. Connect the 3 AC cables line B to the terminals B.
6. Connect the 3 AC cables line C to the terminals C.
7. Tighten the screw terminal using a screwdriver.
The required torque is 315 in.-lbs.
8. Check the AC connection for a possible clockwise
phase sequence. For this purpose, hold the
terminals of the phase sequence indicator onto
the three phases of the AC connection in the
Sunny Central. The indicator shows you whether
there is clockwise phase sequence.
Connection to busbars
The AC cables are connected to the screw terminals A, B
and C.
1. Position the cable lug or lugs on the busbar.
2. Insert the lock washers and screws into the holes.
3. Connect the 5 AC cables line A to the busbar A.
4. Connect the 5 AC cables line B to the busbar B.
5. Connect the 5 AC cables line C to the busbar C.
6. Tighten the screw with a nut in a clockwise direction using a torque of 55 ft.-lbs.
7. Pull the cables to make sure they are securely connected.
☑ The AC cables are connected.
70 SC500HEUS-IA-US_en-14 Installation Manual
Page 71

SMA America, LLC 8 Electrical Connection
/05*$&
L+
PE
L
+
P
E
A
1.2 in.
8.8 Connecting protective earth
The AC outputs are isolated from the enclosure and the system grounding, so that the
AC output and neutral are not bonded to ground. If required by section 250 of the
National Electrical Code®, ANSI/NFPA 70, the installer is responsible for this grounding.
Refer to section 8.4.4 for general requirements for DC, AC and PE connection of the Disconnect Unit.
8.8.1 Additional cable requirements for PE connection
• Use th e screw terminals or cable lugs to conn ect the AC cables to the AC breakers as described
in section 8.7.3.
• The conductor size of the PE connection is depending on the installed over-current protection
device. For determination see National Electrical Code
®
, ANSI/NFPA 70 article 250.122.
• The Photovoltaic System Grounding must be installed per the requirements os sections 690.41
through 690.47 of the National Electrical Code®, ANSI/NFPA 70 and is the responsibility of
the installer.
8.8.2 Connecting protective earth to Terminal Blocks
A Screw terminals for grounding the AC and
DC cables.
1. Strip the cable by about 1.2 in. (30 mm).
2. Open the screw terminal completely.
3. Plug the copper inner conductor of the cable into
the screw terminal.
4. Tighten the screw terminal using an Allen key. For
required torque see tables above.
5. Connect all grounding cables as described above.
Installation Manual SC500HEUS-IA-US_en-14 71
Page 72
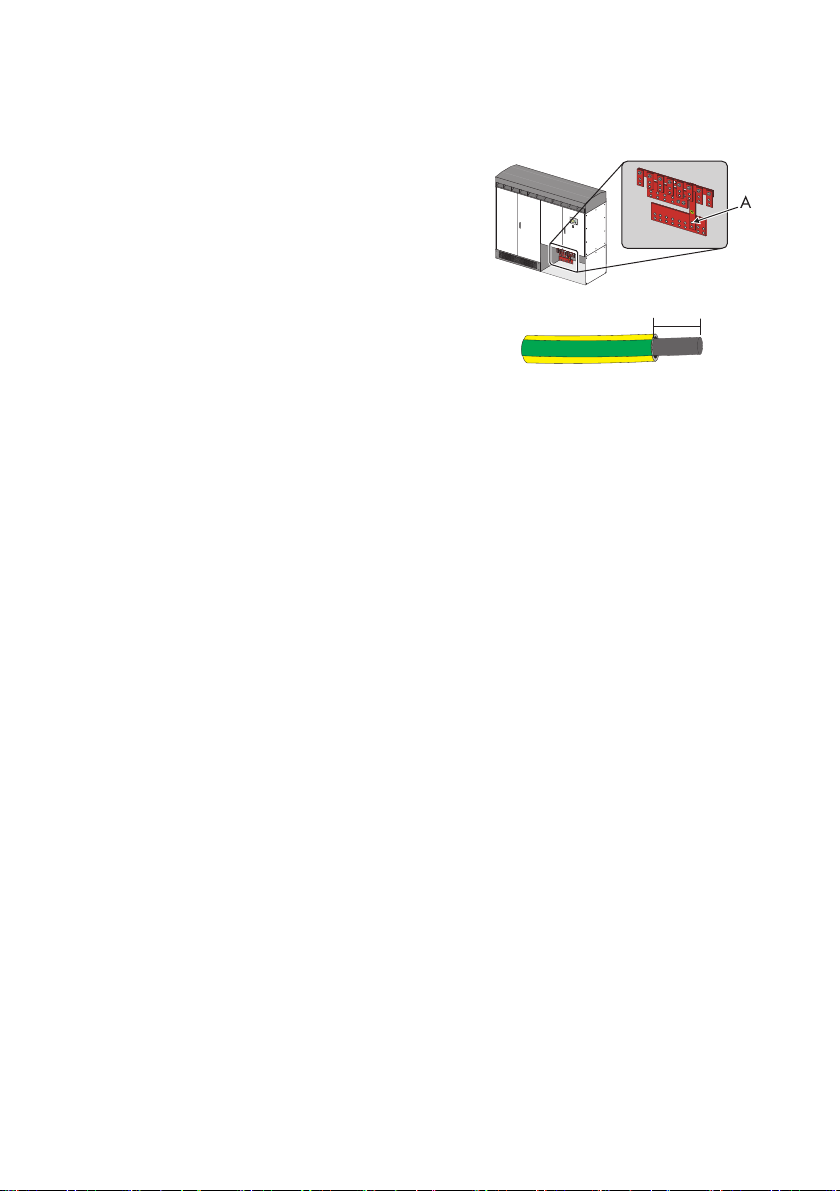
8 Electrical Connection SMA America, LLC
1.2 in.
8.8.3 Connecting protective earth to busbar
A Busbar for grounding the AC and DC
cables.
You can connect up to 4 PE cables to the
busbar(s).
For every PE cable:
1. Strip the PE cable by about 1
2. Open the screw terminal completely.
3. Pl ug t he c opper inn er con duc tor of the PE cable int o
the screw terminal.
4. Tighten the screw terminal with a torque wrench and a torque of 41ft.-lbs. (56Nm).
1
⁄5in. (30mm).
72 SC500HEUS-IA-US_en-14 Installation Manual
Page 73

SMA America, LLC 9 Commissioning
%"/(&3
9 Commissioning
This section explains, step-by-step, how to put the Sunny Central into operation, and how you can
determine that the commissioning was successful.
Electric shock due to improper startup of the Sunny Central.
Death resulting from burning and electric shock.
• All procedures described in this section shall only be conducted by qualified personnel.
• If problems occur when performing the work described here, contact SMA America.
Application to Energy Supply Company
Be for e yo u co mmi ssi on t he Sun ny C ent ral , in form t he r ele van t en erg y pr ovi der . Yo u must sub mit
the following information:
• Date of commissioning.
• Technical data of the plant.
9.1 Visual Inspection of the Sunny Central
1. Ensure that all AC and DC voltages are not connected to the inverter.
2. Wait 8 minutes for all internal power supplies to discharge.
3. Check voltage in order to ensure that all voltages have been removed.
4. Inspect all large power cables and bus connections throughout the inverter to verify that they
are tight.
5. Verify that all PV wires are connected with the proper polarity.
6. Verify that all PV wires are tightened to the proper torque specification.
7. Verify that the PV ground wires are connected to ground and are isolated from PV+ or PV–.
8. Verify that the AC phase wires are connected correctly.
9. Verify that all AC phase wires are tightened to the proper torque specification.
10. Verify that the AC ground wire is connected correctly.
11. Inspect the interior of the Control and Interface Cabinet and the Power Cabinet to insure that
they are free of any tools, foreign objects, water, debris or documents.
12. Ensure that the area around the Sunny Central is clear of any tools, foreign objects or debris.
13. Check the AC connection for a possible clockwise phase sequence. For this purpose, hold the
terminals of the phase sequence indicator onto the three phases of the AC connection in the
Sunny Central. The indicator shows you whether there is clockwise phase sequence.
Installation Manual SC500HEUS-IA-US_en-14 73
Page 74
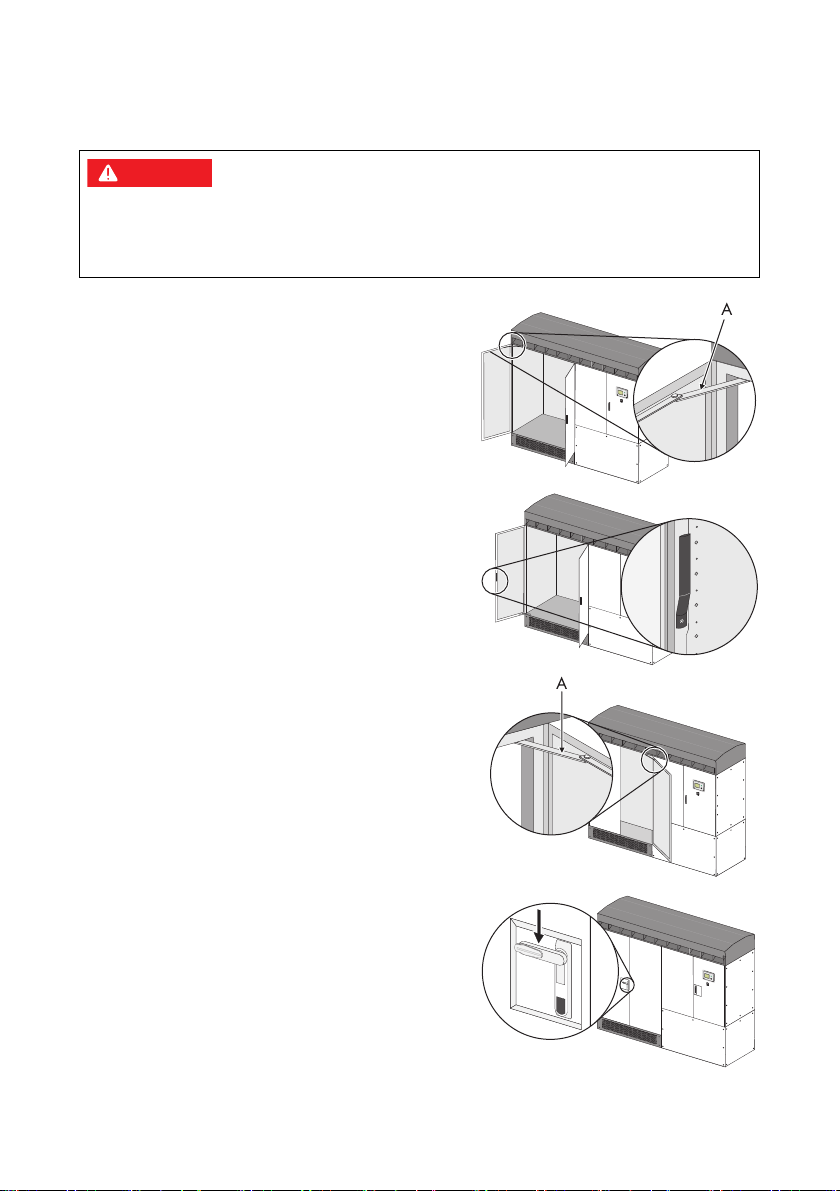
9 Commissioning SMA America, LLC
%"/(&3
9.2 Switching the Sunny Central On
During operation, high voltages are present in the Sunny Central.
Death resulting from electric shock.
• Do not operate the Sunny Central with doors open.
1. Push the door stay (A) at the bottom of the
Power Cabinet's left door upwards.
2. Close the left door of the Power Cabinet.
3. Turn the handle inside the Power Cabinet at 180°
to the right.
4. Push the door stay (A) at the bottom of the
Power Cabinet's right door upwards.
5. Close the right door of the Power Cabinet.
6. Turn the handle downward.
7. Push the handle down into the direction of the
Sunny Central until the handle audibly locks into
place.
8. Put the key into the Power Cabinet's lock.
74 SC500HEUS-IA-US_en-14 Installation Manual
Page 75

SMA America, LLC 9 Commissioning
9. Close the lock.
10. Remove the key.
11. Turn the handle cover downward.
12. Push the door stay (A) at the bottom of the Control
and Interface Cabinet's left door upwards.
13. Close the left door of the Control and Interface
Cabinet.
14. Turn the handle inside the Control and Interface
Cabinet through 180° to the right.
15. Turn on the automatic circuit-breaker on the inside
of the Control and Interface Cabinet’s door.
Installation Manual SC500HEUS-IA-US_en-14 75
Page 76

9 Commissioning SMA America, LLC
16. Push the door stay (A) at the bottom of the Control
and Interface Cabinet's right door upwards.
17. Turn the handle downward.
18. Push the handle down into the direction of the
Sunny Central until it audibly locks into place.
19. Put the key into the Control and Interface Cabinet's
lock.
20. Close the lock.
21. Turn the handle downward.
22. Push the handle down into the direction of the
Sunny Central until it audibly locks into place.
23 . Att ach the pla te to t he l ower p art of t he C ontro l an d
Interface Cabinet.
76 SC500HEUS-IA-US_en-14 Installation Manual
Page 77

SMA America, LLC 9 Commissioning
%"/(&3
Stop Start
24. Attach the 7 screws and tighten them with a torx
screwdriver.
25. Turn the stop/start switch on the Control and
Interface Cabinet's door to the right until it reaches
the start position.
26.
During operation, high voltages are present in the Sunny Central. The key left in the lock allows
unauthorized personnel to open the Sunny Central.
Death resulting from burning and electric shock.
• Remove the keys from the locks of the door and from the lock of the stop/start switch.
• Keep the key in a safe place.
27. Switch on the fuses in the DC distribution boxes (e.g., Sunny Central String-Monitor).
28. Remove the cover of the PV modules in the array.
29. Switch on the AC main circuit breaker.
☑ If there is enough radiation, the DC and AC switches switch on audibly and the Sunny Central
is in operation. The display shows the power of the Sunny Central (A) and the switch symbol (B)
is closed.
Installation Manual SC500HEUS-IA-US_en-14 77
Page 78

9 Commissioning SMA America, LLC
A
B
9.2.1 Check the Ventilation
In ope rat ion the Sunny Cen tra l is coo led by fans in cas e th e te mperature exceeds a defined threshold.
In the Power Cabinet, the air is sucked in from the top front and expelled at the bottom in the back.
Check the ventilation air flow using a sheet of paper.
1. Hold the piece of paper in front of the air shafts.
2. Check to see whether the sheet is blown away from or sucked toward the inverter.
78 SC500HEUS-IA-US_en-14 Installation Manual
Page 79

SMA America, LLC 9 Commissioning
3. Compare the air circulation with what is described in this section.
Result 1
The Sunny Central sucks in air and blows it out as described in this section. Commissioning has
been successfully completed.
Result 2
The Sunny Central does not suck air in, nor does it blow it out as described in this section.
– Shut down the Sunny Central.
– Contact SMA America (see section 12)).
Result 3
The Sunny Central does not suck air in nor does it blow it out, at all.
– Check to see whether the Sunny Central is in operation.
– If the Sunny Central is in operation, shut it down.
– Contact SMA America (see section 12)).
Installation Manual SC500HEUS-IA-US_en-14 79
Page 80

10 Opening the Sunny Central SMA America, LLC
%"/(&3
$"65*0/
Stop Start
10 Opening the Sunny Central
Electric shock due to improper opening of the Sunny Central.
Death resulting from burning and electric shock.
• All procedures described in this section shall only be conducted by qualified personnel.
• Observe the sequence described here when opening the Sunny Central.
• If problems occur when performing the work described here, contact SMA America
The DC fuses in the Power Cabinet become hot during operation.
Danger of burn injury due to hot components.
• When working on the Sunny Central wear protective gloves.
10.1 Opening the Control and Interface Cabinet
1. Turn the stop/start switch on the Control and
Interface Cabinet's door to the left until it reaches
the stop position.
2. The AC and DC switches in the Sunny Central
switch off audibly.
3. Switch off the internal AC main circuit breaker and/
or the external AC disconnect.
– When the Sunny Central is disconnected, the
display turns off.
4. Cover the PV modules.
5. Switch off the DC disconnects and secure them against reconnection.
6. Switch off the fuses in the DC distribution boxes (e.g. Sunny Central String-Monitor) and secure
them against reconnection.
7. Wait 5 minutes
When the Sunny Central is switched off, voltage will remain in the internal capacitors for
another 8 minutes.
☑ The Sunny Central is deactivated and can be opened.
80 SC500HEUS-IA-US_en-14 Installation Manual
Page 81

SMA America, LLC 10 Opening the Sunny Central
8. Pu ll t he h and le o f th e Co ntr ol a nd I nte rfa ce Cab ine t
upwards and turn it to the right.
9. Put the key into the Control and Interface Cabinet's
lock and open it.
10. Open the right door of the Control and Interface
Cabinet.
11. Turn off the automatic circuit-breaker on the inside
of the Control and Interface Cabinet’s door.
12. Inside of the left door is a handle (A). Turn the
handle through 180° to the top left.
☑ The door‘s catch is released and the left door of
the Control and Interface Cabinet can be
opened.
13. Open the left door of the Control and Interface
Cabinet.
14. Loosen and remove the seven screws at the plate
below the doors of the Control and Interface
Cabinet by using a Torx screwdriver.
15. Carefully pull off the metal plate toward the front.
Installation Manual SC500HEUS-IA-US_en-14 81
Page 82

10 Opening the Sunny Central SMA America, LLC
16. Disconnect the grounding cable inside the metal plate.
17. Put the metal plate aside.
18. Verify the absence of voltage with respect to ground at the AC clamp with an appropriate
meter.
☑ If there is a voltage present, the installation must be checked.
19. Verify the absence of voltage with respect to ground at the DC clamp with an appropriate
meter.
☑ If there is a voltage present, the installation must be checked.
10.2 Opening the Power Cabinet
1. Switch off the Sunny Central as described in section 10.1.
2. Pull the handle of the Power Cabinet upwards and
turn it to the right.
3. Put the key into the Power Cabinet's lock and open
it.
4. Open the door.
5. Inside of the left door is a handle (A). Turn the
handle through 180° to the top left.
☑ The door‘s catch is released and the left door of
the Power Cabinet can be opened.
6. Open the left door of the Power Cabinet.
82 SC500HEUS-IA-US_en-14 Installation Manual
Page 83

SMA America, LLC 11 Technical Data
11 Technical Data
In this section you will find the technical data for the Sunny Central's operation, the norms to which it
conforms and the required cables and torques.
PV Generator Connection Data
MPP range 330VDCto600VDC at full power
DC Input voltage 330VDC to 480 V DC at full power
DC starting voltage 390 V DC (adjustable)
Max. input current 1,600 A
DC voltage ripple (peak to peak) < 3%
Maximum number of DC inputs 9 x PV+/ 9 x PV − / 9 x ground
Maximum number of DC fuses 9 (sized 450 A maximum)
Maximum array short-circuit current
(concerning NEC)
Grid Connection Data
Nominal output power up to 113°F (45°C) 500 kW
Output power at 122°F (50°C) approx. 347 kW
Nominal AC voltage 200 V AC 3 phase without neutral
Operating range 180 to 220 V AC
AC nominal frequency 60 Hz
Operating range 59.3 to 60.5 Hz
Max. AC current 1,470 A AC (at 200 V AC)
450 A / 1.56 = 288.4 A
General Data
Inverter technology True sine wave, current source, high frequency
PWM with galvanic insulation
Max. operating altitude 13,000 ft. above sea level
Power Reduction:
The Sunny Central can function without power
reduction up to 3,300 ft. above sea level.
At higher altitudes the power is reduced by 5%
per 3,300 ft.
Installation Manual SC500HEUS-IA-US_en-14 83
Page 84

11 Technical Data SMA America, LLC
Ambient temperatures − 13°F to 113°F ( − 25°C to 45°C)
(without power reduction)
− 13°F to 122°F ( − 25°C to 50°C)
(with power reduction)
Storage Temperature − 13°Fto140°C
Display read-out ambient temperatures 5°Fto113°F
Cooling Temperature-controlled forced fans for cooling.
Easily removable filters, easily accessible.
Dimensions W x H x D, including roof 101 x 90 x 38 in.
(2,562 mm x 2,277 mm x 955 mm)
Weight 3,970 lbs.
Enclosure rating NEMA 3R, stainless steel and aluminium
Current THD < 5% (with respect to IEEE 1547)
Power factor 0.9 leadingto0.9lagging
Internal consumption <110 VA Standby, <1,700 VA with fans
Compliance * UL 1741, IEEE-1547
*The Sunny Central 500HE-US was evaluated by UL for compliance with UL 1741 at the inverter
terminals and with UL Recognized external transformer Model DLHX0724T07001, Manufactured by
J. Sch nei der. T his tra nsf orm er i s rate d fo r a v olt age of 200 V L- L on the pri mar y side and an imp eda nce
less than or equal to 6%.
Efficiency
Maximum efficiency approx. 98.6%
CEC efficiency 98%
11.1 Measurement Accuracy
The Sunny Central is not equipped with a calibrated meter. The display values may deviate from the
actual values and must not be used as a basis for invoicing. The Sunny Central’s measured values are
required for the system management and to control the current to be fed to the grid.
Deviation
Voltage measurement: +/–5.6 V
Frequency measurement: +/–0.08 Hz
Disconnect time: +/–4.5%
84 SC500HEUS-IA-US_en-14 Installation Manual
Page 85

SMA America, LLC 11 Technical Data
11.2 Torques and Cable Sizes
Connect all cable using copper or aluminium conductors that are suitable for temperatures of
+194°F (+90°C) and in accordiance with National Electrical Code® ANSI/NFPA 70 and
Canadian Electrical Code respectively.
Required torque values
Connection method Cable size Torque
Cable fixing in screw terminal 4AWGto600kcmil
(25mm²to304mm²)
Cable lug, aluminum on copper
busbar
Cable lug, copper on copper
busbar
4AWGto800kcmil
(25mm²to405mm²)
4AWGto800kcmil
(25mm²to405mm²)
41.5ft.-lbs. (56.5Nm)
27.5ft.-lbs. (37Nm)
44.5ft.-lbs. (60Nm)
Installation Manual SC500HEUS-IA-US_en-14 85
Page 86

12 Contact SMA America, LLC
12 Contact
If you have technical problems concerning our products, contact your installer or the SMA Service
Line. We require the following information in order to provide you with the necessary assistance:
• Inverter type
• Type and number of modules connected
•Communication method
• Serial number of the Sunny Central
• Failure or warning number of the Sunny Central
• Display of the Sunny Central
SMA Solar Technology America, LLC
6020 West Oaks Blvd, Ste 300
Rocklin, CA 95765
Tel. +1 916 625 0870
Tel. +1 877-MY SMA TECH
Tel. +1 877 697 6283 (Toll free, available for USA, Canada and Puerto Rico)
Fax +1 916 625 0871
Service@SMA-America.com
www.SMA-America.com
SMA Solar Technology Canada Inc.
2425 Matheson Blvd. E, 8th Floor
Mississauga, ON L4W 5K5
Canadá
Tel. +1 877 506 1756 (Toll free, available for Canadá)
Service@SMA-Canada.ca
www.SMA-Canada.ca
86 SC500HEUS-IA-US_en-14 Installation Manual
Page 87

SMA America, LLC 13 Appendix - Celsius to Fahrenheit conversion
-10
-10
0
20
40
0 20 40 60 80 100 120
°C
°F
140 160 180
60
80
13 Appendix - Celsius to Fahrenheit conversion
The Sunny Central measures temperature in degrees Celsius (e.g., set external temperature for
derating).
Conversion from Degrees Celsius to Degrees Fahrenheit
•Formula:
F = (C * 9/5) +32
F: Degrees Fahrenheit, C: Degrees Celsius.
• Example for 30°C
F = (30 *9/5) +32
F = (54) + 32
F = 86°F
Conversion from Degrees Fahrenheit to Degrees Celsius
•Formula:
C = (F - 32) * 5/9
F: Degrees Fahrenheit, C: Degrees Celsius.
• Example for 86°F
C = (86 - 32) * 5/9
C = (54) *5/9
C = 30°C
Diagram
Installation Manual SC500HEUS-IA-US_en-14 87
Page 88

SMA Solar Technology
www.SMA-Solar.com
SMA America, LLC
www.SMA-America.com
 Loading...