

Page 1

UserManual
SUNNYCENTRAL500CPXT/ 630CPXT/ 720CPXT/
760CPXT/ 800CPXT/ 850CPXT/ 900CPXT
SCCPXT-BA-E4-en-54 | 98-100500.04 | Version 5.4
ENGLISH
Page 2

Legal Provisions
SMA Solar Technology AG
Legal Provisions
The information contained in these documents is property of SMA Solar Technology AG. Any publication, whether in
whole or in part, requires prior written approval by SMA Solar Technology AG. Internal reproduction used solely for
the purpose of product evaluation or other proper use is allowed and does not require prior approval.
SMA Warranty
You can download the current warranty conditions from the Internet at www.SMA-Solar.com.
Trademarks
All trademarks are recognized, even if not explicitly identified as such. A lack of identification does not mean that a
product or symbol is not trademarked.
The BLUETOOTH® word mark and logos are registered trademarks of BluetoothSIG,Inc. and any use of these marks
by SMASolarTechnologyAG is under license.
Modbus® is a registered trademark of Schneider Electric and is licensed by the Modbus Organization, Inc.
QR Code is a registered trademark of DENSO WAVE INCORPORATED.
Phillips® and Pozidriv® are registered trademarks of Phillips Screw Company.
Torx® is a registered trademark of Acument Global Technologies, Inc.
SMASolarTechnologyAG
Sonnenallee 1
34266 Niestetal
Germany
Tel. +49 561 9522-0
Fax +49 561 9522-100
www.SMA.de
E-mail: info@SMA.de
© 2004 to 2015SMASolarTechnologyAG. All rights reserved.
User ManualSCCPXT-BA-E4-en-542
Page 3

SMA Solar Technology AG
Table of Contents
Table of Contents
1 Information on this Document ..................................................................................................... 9
1.1 Validity .............................................................................................................................................................. 9
1.2 Target Group .................................................................................................................................................... 9
1.3 Additional Information...................................................................................................................................... 9
1.4 Symbols............................................................................................................................................................. 9
1.5 Typographies.................................................................................................................................................... 10
1.6 Nomenclature................................................................................................................................................... 10
2 Safety............................................................................................................................................. 11
2.1 Intended Use..................................................................................................................................................... 11
2.2 Safety Information ............................................................................................................................................ 12
2.3 Personal Protective Equipment......................................................................................................................... 14
3 Product Overview......................................................................................................................... 16
3.1 Design of the inverter ....................................................................................................................................... 16
3.2 Devices of the Inverter...................................................................................................................................... 16
3.3 Operating and Display Elements..................................................................................................................... 17
3.3.1 Function of the Switches................................................................................................................................... 17
3.3.1.1 Key Switch........................................................................................................................................................ 17
3.3.1.2 AC Disconnection Unit .................................................................................................................................... 18
3.3.1.3 DC Switchgear................................................................................................................................................. 18
3.3.2 Touch Display................................................................................................................................................... 19
3.3.2.1 Design............................................................................................................................................................... 19
3.3.2.2 Explanation of Symbols................................................................................................................................... 19
3.3.3 LEDs of the SC-COM ....................................................................................................................................... 23
3.3.3.1 LEDs on the Enclosure...................................................................................................................................... 23
3.3.3.2 LEDs on the Network Port................................................................................................................................ 24
3.3.3.3 LEDs on the Optical Fiber Terminals ............................................................................................................... 25
3.3.4 User Interface ................................................................................................................................................... 26
3.3.4.1 Design of the User Interface............................................................................................................................ 26
3.3.4.2 Tree View and Device View ............................................................................................................................ 26
3.3.4.3 Status Symbols ................................................................................................................................................. 27
3.4 Symbols on the Product.................................................................................................................................... 27
4 Commissioning.............................................................................................................................. 28
4.1 Safety during Commissioning .......................................................................................................................... 28
4.2 Requirements for Commissioning..................................................................................................................... 28
4.3 Visual Inspection and Mechanical Test........................................................................................................... 29
4.3.1 Sequence for Visual Inspection and Mechanical Test ................................................................................... 29
4.3.2 Checking the Connections of the Cables for Communication, Control Supply Voltage and Monitoring.. 29
4.3.3 Checking the High-Current Contacts Made at the Installation Site .............................................................. 30
4.3.4 Checking the High-Current Contacts Made at the Factory ........................................................................... 30
4.3.5 Checking the Settings of the Switching Units.................................................................................................. 30
4.3.6 Checking the Connectors................................................................................................................................. 31
4.4 Connection and Measurement ....................................................................................................................... 31
4.4.1 Sequence for Connection and Measurement ................................................................................................ 31
4.4.2 Checking the Output Voltage of the Inverter.................................................................................................. 31
4.4.3 Checking the DC Voltage................................................................................................................................ 32
4.4.4 Switching On the Supply Voltage and the AC Disconnection Unit .............................................................. 32
4.5 Function Test...................................................................................................................................................... 33
User Manual 3SCCPXT-BA-E4-en-54
Page 4

Table of Contents
SMA Solar Technology AG
4.5.1 Checking the Fans............................................................................................................................................ 33
4.5.2 Checking the Heating Elements and Hygrostat.............................................................................................. 34
4.6 Configuration.................................................................................................................................................... 35
4.6.1 Configuring the Network Settings on the Computer...................................................................................... 35
4.6.2 Information on Integrating the Inverter into a Local Network ....................................................................... 35
4.6.3 Configuring the Inverter for a Static Network ................................................................................................ 36
4.6.4 Adjusting Network Ports .................................................................................................................................. 36
4.6.5 Detecting New Devices ................................................................................................................................... 37
4.6.6 Setting the Power Limitation............................................................................................................................. 37
4.6.6.1 Setting the Active Power Ramp-Up ................................................................................................................. 37
4.6.6.2 Setting the Frequency-Dependent Active Power Limitation ........................................................................... 37
4.6.6.3 Setting the Frequency-Independent Active Power Limitation......................................................................... 38
4.6.6.4 Setting Reactive Power Control....................................................................................................................... 38
4.6.6.5 Setting Q at Night ........................................................................................................................................... 39
4.6.7 Setting Grid Monitoring and Grid Limits......................................................................................................... 40
4.6.7.1 Setting Grid Voltage Monitoring .................................................................................................................... 40
4.6.7.2 Setting Power Frequency Monitoring ............................................................................................................. 40
4.6.7.3 Activating the Manual Resume Mode ............................................................................................................ 40
4.6.8 Setting the Grid Support.................................................................................................................................. 41
4.6.8.1 Setting Full and Limited Dynamic Grid Support (FRT) ................................................................................... 41
4.6.8.2 Setting Enable Islanding Detection ................................................................................................................. 41
4.6.8.3 Setting the Medium Voltage ........................................................................................................................... 41
4.6.9 Setting Project-Specific Parameters ................................................................................................................. 42
4.6.9.1 Setting the Remote Shutdown ......................................................................................................................... 42
4.6.9.2 Deactivating the "Fully Hermetic" Transformer Protection ............................................................................. 42
4.6.10 Setting the String Current Monitoring ............................................................................................................ 42
4.6.10.1 Detecting the Sunny Central String-Monitor Controller and the Inverter...................................................... 42
4.6.10.2 Setting the Date and Time of the Sunny Central String-Monitor Controller ................................................. 42
4.6.10.3 Detecting the Sunny String-Monitors via the Sunny Central String-Monitor Controller............................... 42
4.6.10.4 Redetecting the Sunny String-Monitors via the Sunny Central String-Monitor Controller ........................... 43
4.6.10.5 Detecting the Sunny String-Monitors via the Communication Unit ............................................................... 43
4.6.10.6 Adjusting the Identification of the Sunny String-Monitors.............................................................................. 43
4.6.10.7 Changing the Communication Period ............................................................................................................ 43
4.6.10.8 Changing the Monitoring Period.................................................................................................................... 44
4.6.10.9 Assigning Strings to Different Measuring Channels ...................................................................................... 44
4.6.10.10 Assigning Strings to Different Groups............................................................................................................. 44
4.6.10.11 Setting the Tripping Time................................................................................................................................. 45
4.6.10.12 Setting the Tolerance....................................................................................................................................... 45
4.6.11 Configuring the Zone Monitoring ................................................................................................................... 45
4.6.12 Changing System Settings via Touch Display ................................................................................................ 46
4.6.12.1 Selecting the Language................................................................................................................................... 46
4.6.12.2 Setting the Date, Time and Time Zone ........................................................................................................... 46
4.6.12.3 Selecting the Display Format........................................................................................................................... 46
4.6.12.4 Setting the Brightness....................................................................................................................................... 46
4.6.13 Changing the System Settings via the User Interface .................................................................................... 46
4.6.13.1 Selecting the Language................................................................................................................................... 46
4.6.13.2 Setting the Date, Time and Time Zone ........................................................................................................... 47
4.6.13.3 Entering the Operator Name.......................................................................................................................... 47
4.6.13.4 Changing the Password for the User Groups................................................................................................ 47
4.6.14 Configuring System Settings via XML File....................................................................................................... 48
4.6.14.1 Uploading the File custom.xml........................................................................................................................ 48
4.6.14.2 Downloading the File custom.xml................................................................................................................... 48
4.6.14.3 Deleting the File custom.xml............................................................................................................................ 49
User ManualSCCPXT-BA-E4-en-544
Page 5

SMA Solar Technology AG
Table of Contents
4.6.15 Resetting the Communication Unit................................................................................................................... 49
4.7 Switching the Inverter On................................................................................................................................. 49
5 Disconnecting and Reconnecting................................................................................................. 51
5.1 Safety When Disconnecting and Reconnecting Voltage Sources................................................................. 51
5.2 Disconnecting the Inverter................................................................................................................................ 51
5.2.1 Switching off the Inverter ................................................................................................................................. 51
5.2.2 Disconnecting the DC Side.............................................................................................................................. 51
5.2.3 Disconnecting the AC Side.............................................................................................................................. 52
5.2.4 Disconnecting the Supply Voltage and External Voltages ............................................................................ 52
5.3 Reconnecting the Inverter................................................................................................................................. 53
5.3.1 Reconnecting the Supply Voltage and External Voltages ............................................................................. 53
5.3.2 Reconnecting the AC Side............................................................................................................................... 54
5.3.3 Reconnecting the DC Side............................................................................................................................... 54
5.3.4 Restarting the Inverter ...................................................................................................................................... 54
6 Operation...................................................................................................................................... 55
6.1 Safety during Operation.................................................................................................................................. 55
6.2 Displaying Operating Data ............................................................................................................................. 55
6.2.1 Displaying Operating Data via the User Interface ........................................................................................ 55
6.2.2 Displaying the Operation Data via Sunny Portal........................................................................................... 55
6.2.2.1 Registering the Inverter in Sunny Portal .......................................................................................................... 55
6.2.2.2 Adjusting the PV System Identifier for Sunny Portal ....................................................................................... 56
6.2.2.3 Deleting the Sunny Portal Buffer ..................................................................................................................... 56
6.3 Saving Operating Data.................................................................................................................................... 56
6.3.1 Reducing Storage Capacity by Averaging .................................................................................................... 56
6.3.2 Setting the Data Transmission Frequency ....................................................................................................... 57
6.3.3 Downloading Operating Data Using the FTP Server..................................................................................... 57
6.3.3.1 Defining Read and Write Access Rights......................................................................................................... 57
6.3.3.2 Accessing the FTP Server via the Web Browser ............................................................................................ 57
6.3.3.3 Activating Automatic Data Transmission via FTP Push ................................................................................... 58
6.3.4 Downloading Operating Data via HTTP Download...................................................................................... 58
6.3.4.1 Downloading Data in XML Format ................................................................................................................. 58
6.3.4.2 Downloading Data in CSV Format ................................................................................................................. 59
6.3.5 Saving Operating Data on a Memory Card.................................................................................................. 60
6.3.5.1 Information on Saving Data on a Memory Card .......................................................................................... 60
6.3.5.2 Inserting the Memory Card ............................................................................................................................. 60
6.3.5.3 Enabling Data Storage on the Memory Card ............................................................................................... 60
6.3.5.4 Displaying the Memory Capacity Available on the Memory Card ............................................................. 61
6.4 Updating the Firmware .................................................................................................................................... 61
6.4.1 Automatic Update............................................................................................................................................ 61
6.4.2 Update via User Interface ............................................................................................................................... 61
6.5 Changing the Insulation Monitoring................................................................................................................ 62
6.5.1 Insulation Monitoring with GFDI and Insulation Monitoring Device ........................................................... 62
6.5.1.1 Safety during Insulation Monitoring of the PV Power Plant with GFDI and Insulation Monitoring Device 62
6.5.1.2 Switching to Insulated Operation ................................................................................................................... 62
6.5.1.3 Switching to Grounded Operation................................................................................................................. 63
6.5.2 Insulation Monitoring with Remote GFDI and Insulation Monitoring Device............................................... 63
6.5.2.1 Information on Insulating PV Modules with Remote GFDI and Insulation Monitoring Device ................... 63
6.5.2.2 Switching to Insulated Operation ................................................................................................................... 63
6.5.2.3 Switching to Grounded Operation................................................................................................................. 63
6.6 Deleting the Device Description....................................................................................................................... 63
User Manual 5SCCPXT-BA-E4-en-54
Page 6

Table of Contents
SMA Solar Technology AG
6.7 Sending a ZIP File with Service Information ................................................................................................... 63
7 Troubleshooting ............................................................................................................................ 65
7.1 Safety during Troubleshooting......................................................................................................................... 65
7.2 Activating Alert in the Event of a Fault ............................................................................................................ 65
7.3 Reading Off Disturbance Messages ............................................................................................................... 66
7.3.1 Reading Off Error Messages via Touch Display............................................................................................ 66
7.3.2 Reading Off Disturbance Messages via the User Interface .......................................................................... 66
7.3.3 Displaying the Event Report............................................................................................................................. 66
7.3.3.1 Enabling Automatic Read-Out of Events......................................................................................................... 66
7.3.3.2 Displaying and Downloading the Event Report............................................................................................. 66
7.4 Acknowledging Disturbance Messages.......................................................................................................... 67
7.4.1 Acknowledging Disturbance Messages via the Key Switch.......................................................................... 67
7.4.2 Acknowledging Disturbance Messages via the User Interface..................................................................... 67
7.5 Remedial Action in Case of Disturbances....................................................................................................... 67
7.5.1 Inverter Behavior in Case of Disturbances...................................................................................................... 67
7.5.2 Explanation of the Error Tables....................................................................................................................... 69
7.5.3 Error Numbers 01xx to 13xx - Disturbance on the Utility Grid .................................................................... 69
7.5.4 Error Numbers 34xx to 40xx - Disturbance on the PV Array........................................................................ 70
7.5.5 Error Numbers 6xx to 9xx - Disturbance on the Inverter............................................................................... 72
7.5.6 Displaying Disturbance Messages for Active Power Limitation..................................................................... 75
7.5.7 Displaying Disturbance Messages for the Reactive Power Setpoint............................................................. 76
8 Disposal ......................................................................................................................................... 78
9 Periodic Actions............................................................................................................................. 79
9.1 Mounting and Disassembly Work................................................................................................................... 79
9.1.1 Disassembling and Mounting the Panels........................................................................................................ 79
9.1.2 Disassembling and Mounting the Protective Covers...................................................................................... 80
9.2 Entering the Password via the Touch Display ................................................................................................. 81
9.3 Parameter Overview......................................................................................................................................... 81
9.3.1 Accessing the Parameter Overview ................................................................................................................ 81
9.3.2 Saving Parameter Changes............................................................................................................................. 81
9.4 User Interface.................................................................................................................................................... 81
9.4.1 Logging Into the User Interface ....................................................................................................................... 81
9.4.2 Logging Out of the User Interface................................................................................................................... 82
10 Function Description ..................................................................................................................... 83
10.1 Operating States .............................................................................................................................................. 83
10.1.1 Overview of the Operating States .................................................................................................................. 83
10.1.2 Stop................................................................................................................................................................... 84
10.1.3 Grid Monitoring .............................................................................................................................................. 84
10.1.3.1 Monitoring the Grid Voltage........................................................................................................................... 84
10.1.3.2 Monitoring the Power Frequency ................................................................................................................... 85
10.1.4 Grid Monitoring Time Reached....................................................................................................................... 85
10.1.5 Startup............................................................................................................................................................... 86
10.1.5.1 In Normal Operation: Active Power Ramp-Up .............................................................................................. 86
10.1.5.2 After Grid Fault: Decoupling Protection Ramp............................................................................................... 86
10.1.6 Load Operation................................................................................................................................................ 86
10.1.6.1 MPP .................................................................................................................................................................. 86
10.1.6.2 Q at Night........................................................................................................................................................ 86
10.1.7 Shutdown.......................................................................................................................................................... 87
User ManualSCCPXT-BA-E4-en-546
Page 7

SMA Solar Technology AG
Table of Contents
10.1.8 Disturbance....................................................................................................................................................... 87
10.2 Safety Functions................................................................................................................................................ 87
10.2.1 Manual Shutdown Functions........................................................................................................................... 87
10.2.1.1 External Fast Stop ............................................................................................................................................ 87
10.2.1.2 Remote Shutdown............................................................................................................................................ 88
10.2.2 Automatic Shutdown Functions ....................................................................................................................... 88
10.2.2.1 Grid Management Shutdown......................................................................................................................... 88
10.2.2.2 Transformer Protection..................................................................................................................................... 88
10.2.2.3 Active Islanding Detection............................................................................................................................... 88
10.2.2.4 Passive Islanding Detection............................................................................................................................. 89
10.2.3 Grounding and Insulation Monitoring............................................................................................................ 89
10.2.3.1 Mode of Operation......................................................................................................................................... 89
10.2.3.2 GFDI ................................................................................................................................................................. 89
10.2.3.3 Remote GFDI.................................................................................................................................................... 90
10.2.3.4 Insulation Monitoring Device .......................................................................................................................... 91
10.2.3.5 GFDI and Insulation Monitoring Device......................................................................................................... 92
10.2.3.6 Remote GFDI and Insulation Monitoring Device........................................................................................... 93
10.2.4 Low-Temperature Option ................................................................................................................................. 94
10.3 Power Control................................................................................................................................................... 94
10.3.1 Frequency-Dependent Active Power Limitation .............................................................................................. 94
10.3.2 Frequency-Independent Active Power Limitation............................................................................................ 95
10.3.2.1 No Active Power Limitation: Off Mode.......................................................................................................... 95
10.3.2.2 Active Power Limitation with Setpoint Command via Modbus Protocol: WCtlCom Mode ........................ 95
10.3.2.3 Active Power Limitation with Absolute Value: WCnst Mode ........................................................................ 95
10.3.2.4 Active Power Limitation as a Percentage of Nominal Power: WCnstNom Mode ...................................... 96
10.3.2.5 Active Power Limitation via Standard Signal: WCnstNomAnIn Mode ........................................................ 96
10.3.3 Reactive Power Control ................................................................................................................................... 96
10.3.3.1 No Reactive Power Control: Off Mode ......................................................................................................... 96
10.3.3.2 Reactive Power Control with Setpoint Command via Modbus Protocol: VArCtlCom Mode...................... 96
10.3.3.3 Reactive Power Control with Setpoint Command via Modbus Protocol: PFCtlCom Mode........................ 96
10.3.3.4 Reactive Power Control with Absolute Value: VArCnst Mode...................................................................... 96
10.3.3.5 Reactive Power Control as a Percentage of the Nominal Power: VArCnstNom Mode ............................. 96
10.3.3.6 Reactive Power Setpoint via Standard Signal: VArCnstNomAnIn Mode .................................................... 97
10.3.3.7 Reactive Power Setpoint via Displacement Power Factor cos φ: PFCnst Mode .......................................... 97
10.3.3.8 Displacement Power Factor cos φ via Standard Signal: PFCnstAnIn Mode................................................ 98
10.3.3.9 Displacement Power Factor cos φ as a Function of Feed-In Power: PFCtlW Mode.................................... 99
10.3.3.10 Reactive Power as a Function of the Grid Voltage: VArCtlVol Mode.......................................................... 99
10.3.3.11 Measures for Voltage Support through Parameterization of Reactive Power/Voltage Characteristic
Curve: VArCtlVolHystDb Mode...................................................................................................................... 100
10.3.3.12 Measures for Voltage Support through Parameterization of Reactive Power/Voltage Characteristic
Curve: VArCtlVolHystDbA Mode ................................................................................................................... 103
10.3.4 Q at Night ........................................................................................................................................................104
10.3.4.1 No Q at Night: Off Mode.............................................................................................................................. 104
10.3.4.2 Q at Night with Operation Command via Modbus Protocol: VArCtlCom Mode....................................... 104
10.3.4.3 Q at Night with Absolute Value: VArCnst Mode .......................................................................................... 104
10.3.4.4 Q at Night as a Percentage of the Nominal Power: VArCnstNom Mode .................................................. 104
10.3.4.5 Q at Night via Standard Signal: VArCnstNomAnIn Mode .......................................................................... 104
10.3.4.6 Q at Night Depending on the Grid Voltage: VArCtlVol Mode.................................................................... 105
10.3.4.7 Measures for Voltage Support through Parameterization of Reactive Power/Voltage Characteristic
Curve: VArCtlVolHystDb Mode...................................................................................................................... 106
10.3.4.8 Measures for Voltage Support through Parameterization of Reactive Power/Voltage Characteristic
Curve: VArCtlVolHystDbA Mode ................................................................................................................... 109
10.3.5 Behavior in the Absence of Active and Reactive Power Setpoints................................................................110
10.4 Structure of the Communication Network.......................................................................................................110
User Manual 7SCCPXT-BA-E4-en-54
Page 8

Table of Contents
SMA Solar Technology AG
10.5 Grid Management Services.............................................................................................................................112
10.5.1 Requirements for Grid Management Services ...............................................................................................112
10.5.2 Dynamic Grid Support (FRT) ...........................................................................................................................112
10.5.2.1 Full and Limited Dynamic Grid Support (FRT)................................................................................................ 112
10.5.2.2 Grid Support in Case of Untervoltage (LVRT)................................................................................................ 113
10.5.2.3 Dynamic Undervoltage Detection................................................................................................................... 114
10.5.2.4 Grid Support in the Event of Overvoltage (HVRT)......................................................................................... 115
10.6 Zone Monitoring...............................................................................................................................................115
11 Operating Data and Parameters ................................................................................................117
11.1 Operating Data ................................................................................................................................................117
11.1.1 Inverter..............................................................................................................................................................117
11.1.1.1 Power Limitation............................................................................................................................................... 117
11.1.1.2 Error Channels ................................................................................................................................................. 119
11.1.1.3 Measured Values............................................................................................................................................. 119
11.1.1.4 Internal Device Values..................................................................................................................................... 119
11.1.1.5 Internal Meters................................................................................................................................................. 120
11.1.1.6 Service-Relevant Displays................................................................................................................................ 120
11.1.2 Sunny Central String-Monitor Controller ........................................................................................................121
11.1.2.1 Instantaneous Values....................................................................................................................................... 121
11.1.2.2 Internal Device Values..................................................................................................................................... 121
11.1.2.3 Status Values.................................................................................................................................................... 121
11.1.3 Sunny String-Monitor .......................................................................................................................................121
11.1.3.1 Instantaneous Values....................................................................................................................................... 121
11.1.3.2 Internal Device Values..................................................................................................................................... 121
11.1.3.3 Status Values.................................................................................................................................................... 122
11.1.4 Zone Monitoring ..............................................................................................................................................122
11.1.4.1 Instantaneous Values....................................................................................................................................... 122
11.1.4.2 Status Values.................................................................................................................................................... 122
11.2 Parameters .......................................................................................................................................................123
11.2.1 Inverter..............................................................................................................................................................123
11.2.1.1 Power Limitation............................................................................................................................................... 123
11.2.1.2 Grid Monitoring and Grid Limits..................................................................................................................... 134
11.2.1.3 Grid Support .................................................................................................................................................... 137
11.2.1.4 Insulation monitoring ....................................................................................................................................... 138
11.2.1.5 Project-Specific Parameters ............................................................................................................................. 139
11.2.2 Sunny Central String-Monitor Controller ........................................................................................................141
11.2.3 Sunny String-Monitor .......................................................................................................................................143
11.2.4 Zone Monitoring ..............................................................................................................................................144
12 Appendix.......................................................................................................................................146
12.1 Information for Installation ...............................................................................................................................146
12.1.1 Minimum Clearances.......................................................................................................................................146
12.1.1.1 Minimum Clearances for Outdoor Installation .............................................................................................. 146
12.1.1.2 Minimum Clearances in Electrical Equipment Rooms.................................................................................... 148
12.2 Type Label.........................................................................................................................................................150
12.3 XML File custom.xml .........................................................................................................................................150
12.3.1 Structure of the XML File custom.xml...............................................................................................................150
12.3.2 Parameters and Values for the File custom.xml..............................................................................................151
13 Contact...........................................................................................................................................154
14 Revision History ............................................................................................................................156
User ManualSCCPXT-BA-E4-en-548
Page 9
SMA Solar Technology AG
1 Information on this Document
1.1 Validity
This document is valid for the following device types:
1 Information on this Document
Device type Production version OCU firmware
version
SC500CP‑10 (SunnyCentral500CPXT) E4 01.70.20.R 01.70.62.R
SC630CP‑10 (SunnyCentral630CPXT)
SC720CP‑10 (SunnyCentral720CPXT)
SC760CP‑10 (SunnyCentral760CPXT)
SC800CP‑10 (SunnyCentral800CPXT)
SC850CP‑10 (SunnyCentral850CPXT)
SC900CP‑10 (SunnyCentral900CPXT)
The production version is indicated on the type label.
The firmware version can be read off from the user interface.
Illustrations in this document are reduced to the essential and may deviate from the real product.
DSP firmware
version
1.2 Target Group
The tasks described in this document must only be performed by qualified persons. Qualified persons must have the
following skills:
• Knowledge of how the product works and is operated
• Training in how to deal with the dangers and risks associated with installing and using electrical devices and
systems
• Training in the installation and commissioning of electrical devices and systems
• Knowledge of all applicable standards and directives
• Knowledge of and adherence to this manual and all safety precautions
1.3 Additional Information
Links to additional information can be found at www.SMA-Solar.com.
1.4 Symbols
Symbol Explanation
Indicates a hazardous situation which, if not avoided, will result in death or serious injury
Indicates a hazardous situation which, if not avoided, can result in death or serious injury
Indicates a hazardous situation which, if not avoided, can result in minor or moderate injury
Indicates a situation which, if not avoided, can result in property damage
Information that is important for a specific topic or goal, but is not safety-relevant
User Manual 9SCCPXT-BA-E4-en-54
Page 10
1 Information on this Document
Symbol Explanation
Indicates a requirement for meeting a specific goal
Desired result
A problem that might occur
1.5 Typographies
Typographies Use Example
SMA Solar Technology AG
bold
>
[Button/Key]
• Display messages
• Elements on a user interface
• Terminals
• Slots
• Elements to be selected
• Elements to be entered
• Connects several elements to be
selected
• Button or key to be selected or
pressed
• Set parameter WGra to 0.2.
• Select PV system > Detect.
• Select [Start detection].
1.6 Nomenclature
Complete designation Designation in this document
SunnyCentral Inverter
SunnyCentralCommunicationController SC-COM or communication unit
User ManualSCCPXT-BA-E4-en-5410
Page 11

SMA Solar Technology AG
2 Safety
2 Safety
2.1 Intended Use
The SunnyCentral is a PV inverter which converts the direct current generated in the PV modules into grid-compliant
alternating current. An external MV transformer fitted downstream feeds the generated alternating current into the
utility grid.
The product is suitable for indoor and outdoor use.
The enclosure complies with degree of protection IP54. The inverter is classified under Class4C2 as per
EN60721-3-4 and is suitable for operation in a chemically active environment.
The maximum permissible DC input voltage of the inverter must not be exceeded.
The inverter must only be operated in conjunction with a suitable MV transformer.
• The MV transformer must be designed for voltages that arise during pulsed mode of the inverter.
• For the SunnyCentral 500CPXT/ 630CPXT/ 720CPXT/ 760CPXT/ 800CPXT the maximum voltage to
ground is: ±1,450V
• For the SunnyCentral 850CPXT/900CPXT the maximum voltage to ground is: ±1,600V
• Do not connect more than one inverter to one winding of the MVtransformer.
• The neutral conductor on the low-voltage side of the MV transformer must not be grounded.
You can find further information on suitable transformers in the Technical Information "Requirements for MediumVoltage Transformers and Transformers for Internal Power Supply for the SunnyCentral series CPXT and CP-JP and for
SunnyCentralStorage".
Do not deactivate or modify settings that affect grid management services without first obtaining approval from the grid
operator.
Use this product only in accordance with the information provided in the enclosed documentation and with the locally
applicable standards and directives. Any other application may cause personal injury or property damage.
Alterations to the product, e.g. changes or modifications, are only permitted with the express written permission of
SMA Solar Technology AG. Unauthorized alterations will void guarantee and warranty claims and usually void the
operation permit. SMA Solar Technology AG shall not be held liable for any damage caused by such changes.
Any use of the product other than that described in the Intended Use section does not qualify as appropriate.
The enclosed documentation is an integral part of this product. Keep the documentation in a convenient place for
future reference and observe all instructions contained therein.
All work on the product must only be performed using appropriate tools and in compliance with the ESD protection
regulations.
Suitable personal protective equipment is to be worn by all persons working on or with the product.
Unauthorized persons must not operate the product and must be kept at a safe distance from the product.
The product must not be operated with open covers or doors.
The product must not be opened when it is raining or when humidity exceeds 95%.
The product must not be operated with any technical defects.
The type label must remain permanently attached to the product.
User Manual 11SCCPXT-BA-E4-en-54
Page 12
2 Safety
SMA Solar Technology AG
2.2 Safety Information
This section contains safety information that must be observed at all times when working on or with the product. To
prevent personal injury and property damage and to ensure long-term operation of the product, read this section
carefully and observe all safety information at all times.
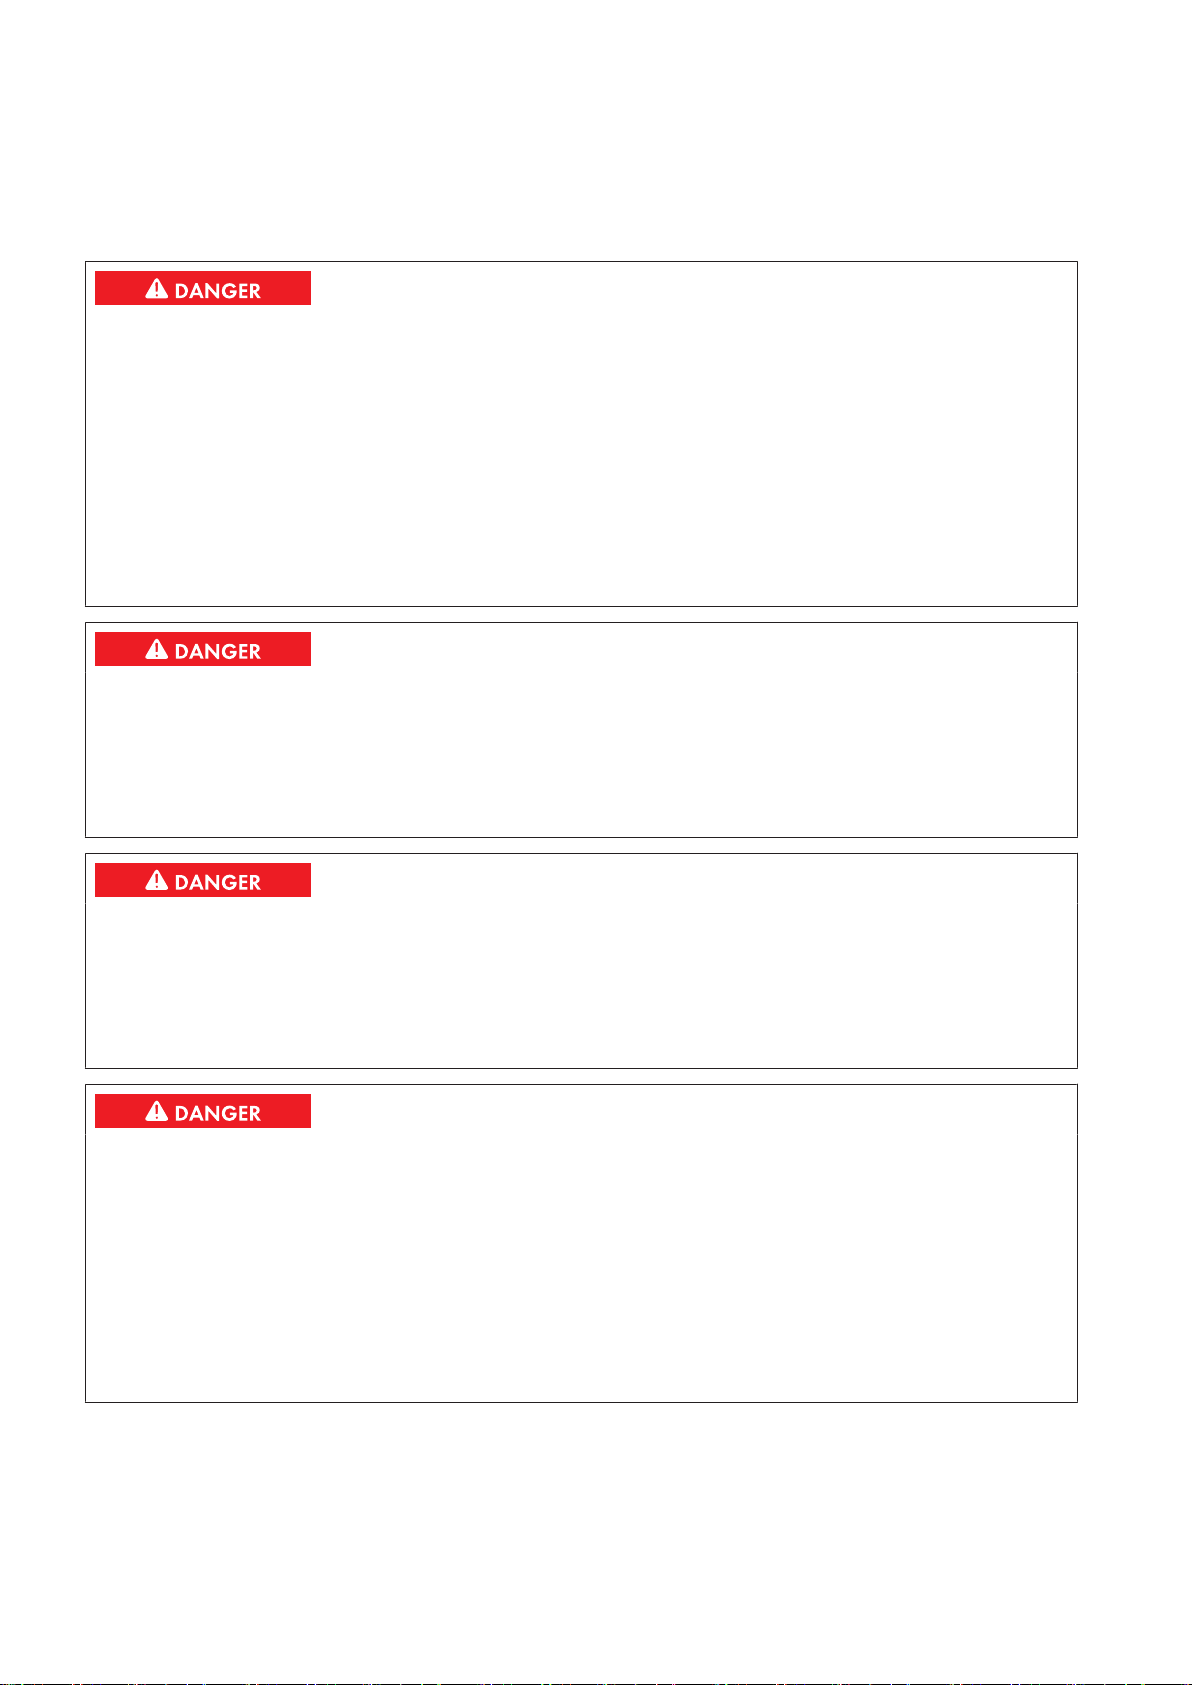
Danger to life from electric shock due to live voltage
High voltages are present in the live components of the product. Touching live components results in death or serious
injury due to electric shock.
• Wear suitable personal protective equipment for all work on the product.
• Do not touch any live components.
• Observe all warning messages on the product and in the documentation.
• Observe all safety information of the module manufacturer.
• After switching off the inverter, wait at least 15minutes before opening it to allow the capacitors to discharge
completely (see Section5.2, page51).
Danger to life from electric shock due to live DC cables
DC cables connected to PV modules that are exposed to sunlight carry live voltage. Touching live cables results in
death or serious injury due to electric shock.
• Prior to connecting the DC cables, ensure that the DC cables are voltage-free.
• Wear suitable personal protective equipment for all work on the device.
Danger to life from electric shock due to ground fault
If a ground fault has occurred, parts of the PV power plant that are supposedly grounded may in fact be live.
Touching incorrectly grounded parts of the PV power plant results in death or serious injuries from electric shock.
• Before working on the PV power plant, ensure that no ground fault is present.
• Wear suitable personal protective equipment for all work on the device.
Danger to life from electric shock due to damaged product
Operating a damaged product can lead to hazardous situations that result in death or serious injuries due to electric
shock.
• Only operate the product when it is in a flawless technical condition and safe to operate.
• Check the product regularly for visible damage.
• Make sure that all external safety equipment is freely accessible at all times.
• Make sure that all safety equipment is in good working order.
• Wear suitable personal protective equipment for all work on the product.
User ManualSCCPXT-BA-E4-en-5412
Page 13
SMA Solar Technology AG
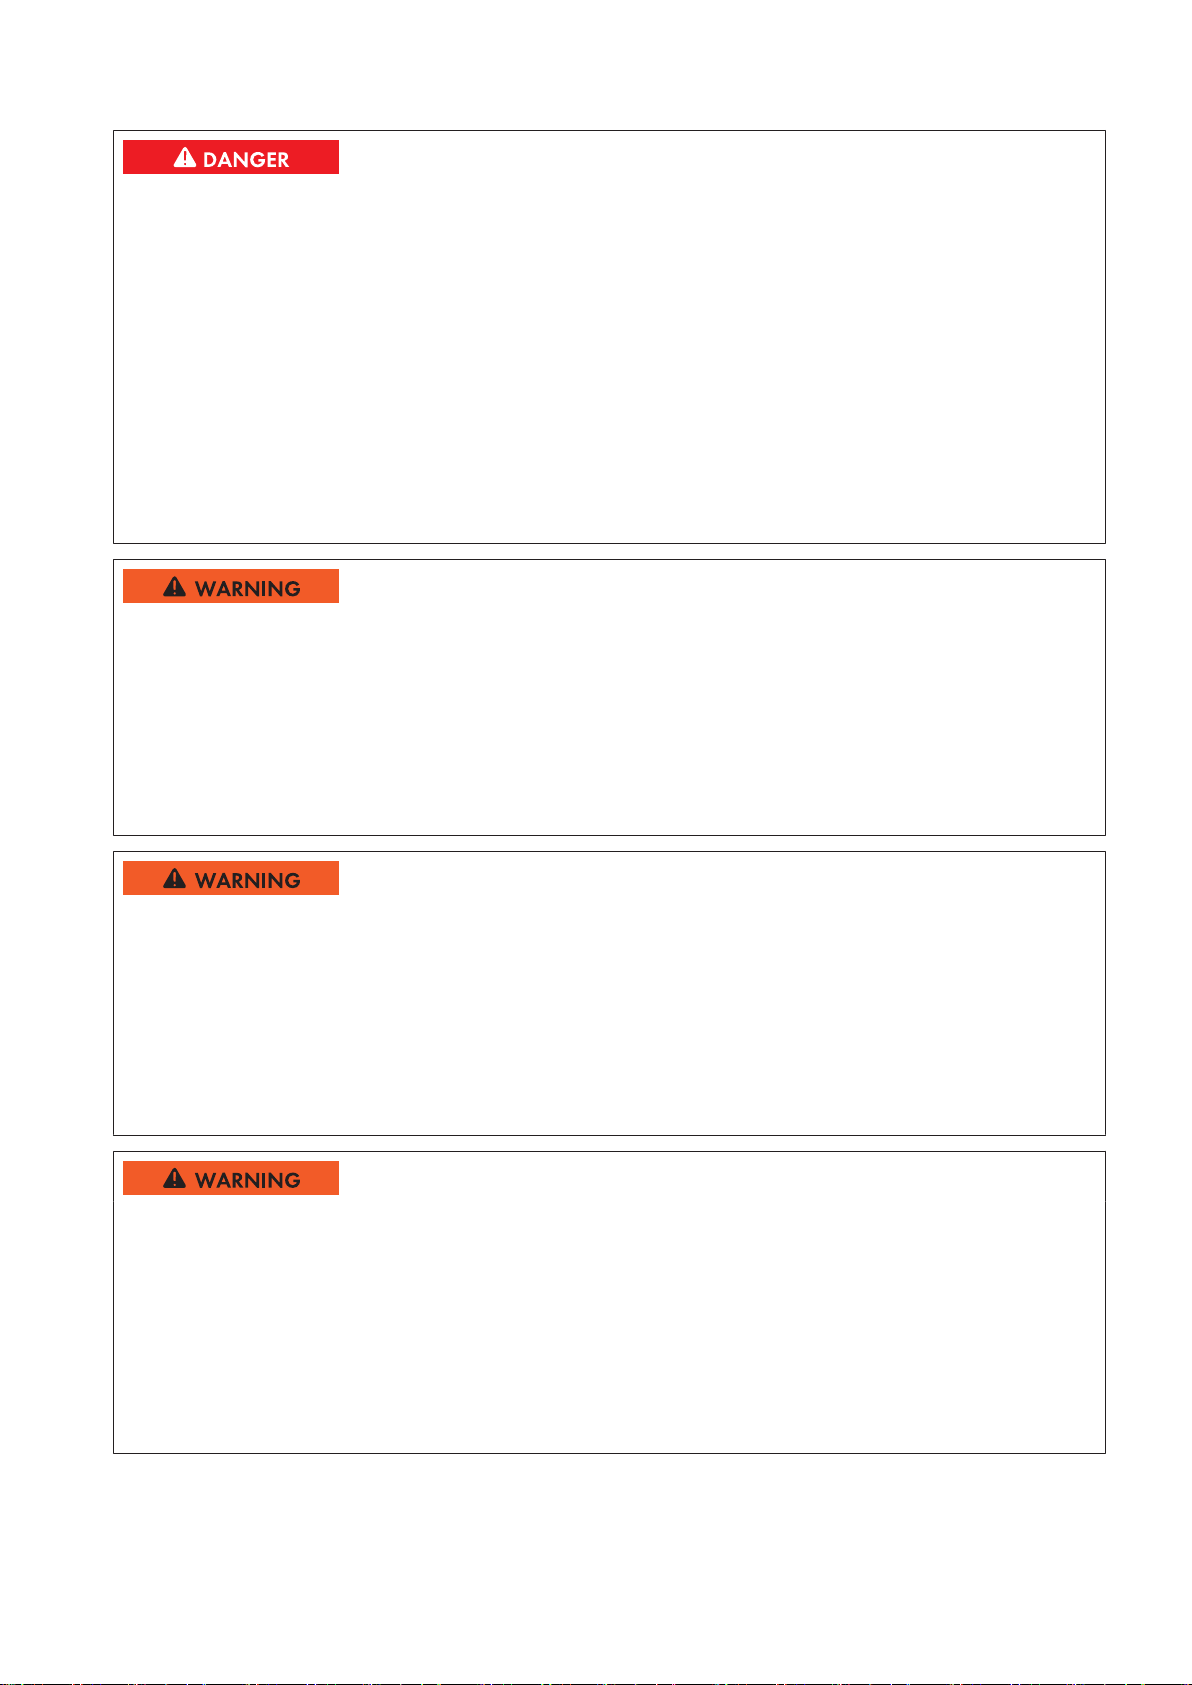
Danger to life from electric shock even if the inverter is disconnected on the AC and DC sides
The precharge unit of the order option "QatNight" will carry live voltage even if the AC disconnection unit and the
DC switchgear are open. Touching live components results in death or serious injury due to electric shock.
• Do not touch any live components.
• Switch off the inverter.
• After switching off the inverter, wait at least 15minutes before opening it to allow the capacitors to discharge
completely.
• Ensure that no voltage is present.
• Do not remove protective covers.
• Observe the warning messages.
• Wear suitable personal protective equipment for all work on the product.
Danger to life from electric shock when entering the PV field
2 Safety
Ground-fault monitoring does not provide protection from personal injury. PV modules which are grounded with
ground-fault monitoring discharge voltage to ground. Entering the PV field can result in lethal electric shocks.
• Ensure that the insulation resistance of the PV field exceeds the minimum value. The minimum value of the
insulation resistance is: 1 kΩ.
• Before entering the PV field, switch the PV modules to insulated operation.
• Configure the PV power plant as a closed electrical operating area.
Danger to life from electric shock if the product is not locked
If the product is not locked, unauthorized persons will have access to live components carrying lethal voltages.
Touching live components can result in death or serious injury due to electric shock.
• Always close and lock the product.
• Remove the keys.
• Store the keys in a safe place.
• Ensure that no unauthorized persons have access to the closed electrical operating area.
Danger to life due to blocked escape routes
In hazardous situations, blocked escape routes can lead to death or serious injury. Opening the doors of two
products located opposite each other can block the escape route. It is imperative that the escape route is freely
accessible at all times.
• An escape route must be available at all times. Make sure the minimum passage width of the escape route
meets local standards.
• Do not place any objects in the escape route area.
• Remove all tripping hazards from escape routes.
User Manual 13SCCPXT-BA-E4-en-54
Page 14

2 Safety
Risk of fire due to failure to observe torque specifications on live bolted connections
Failure to follow the specified torques reduces the ampacity of live bolted connections so that the contact resistances
increase. This can cause components to overheat and catch fire.
• Ensure that live bolted connections are always tightened with the exact torque specified in this document.
• When working on the device, use suitable tools only.
• Avoid repeated tightening of live bolted connections as this may result in inadmissibly high torques.
Risk of burns due to hot components
Some components of the product can get very hot during operation. Touching these components can cause burns.
• Observe the warnings on all components.
• During operation, do not touch any components marked with such warnings.
• Wear suitable personal protective equipment for all work on the product.
SMA Solar Technology AG
Property damage due to dust intrusion and moisture penetration
Dust or moisture intrusion can damage the product and impair its functionality.
• Do not open the enclosure during rainfall or when humidity exceeds the specified thresholds. The humidity
thresholds are: 15%…95%.
• Only perform maintenance work when the environment is dry and free of dust.
• Operation of the product is only permitted when it is closed.
• Connect the external supply voltage after mounting and installing the product.
• If the installation or commissioning process is interrupted, mount all panels.
• Close and lock the enclosure.
• The product must always be closed for storage.
• Store the product in a dry and covered location.
• Temperature at the storage location must be in the specified range. The temperature range is: −25°Cto+70°C
.
Damage to electronic components due to electrostatic discharge
Electrostatic discharge can damage or destroy electronic components.
• Observe the ESD safety regulations when working on the product.
• Wear suitable personal protective equipment for all work on the product.
• Discharge electrostatic charge by touching grounded enclosure parts or other grounded elements. Only then is
it safe to touch electronic components.
2.3 Personal Protective Equipment
Always wear suitable protective equipment
When working on the product, always wear the appropriate personal protective equipment for the specific job.
The following personal protective equipment is regarded to be the minimum requirement:
User ManualSCCPXT-BA-E4-en-5414
Page 15

SMA Solar Technology AG
☐ In a dry environment, safety shoes of categoryS3 with perforation-proof soles and steel toe caps
☐ During precipitation or on moist ground, safety boots of categoryS5 with perforation-proof soles and steel toe
caps
☐ Tight-fitting work clothes made of 100%cotton
☐ Suitable work pants
☐ Individually fitted hearing protection
☐ Safety gloves
Any other prescribed protective equipment must also be used.
2 Safety
User Manual 15SCCPXT-BA-E4-en-54
Page 16
3 Product Overview
3 Product Overview
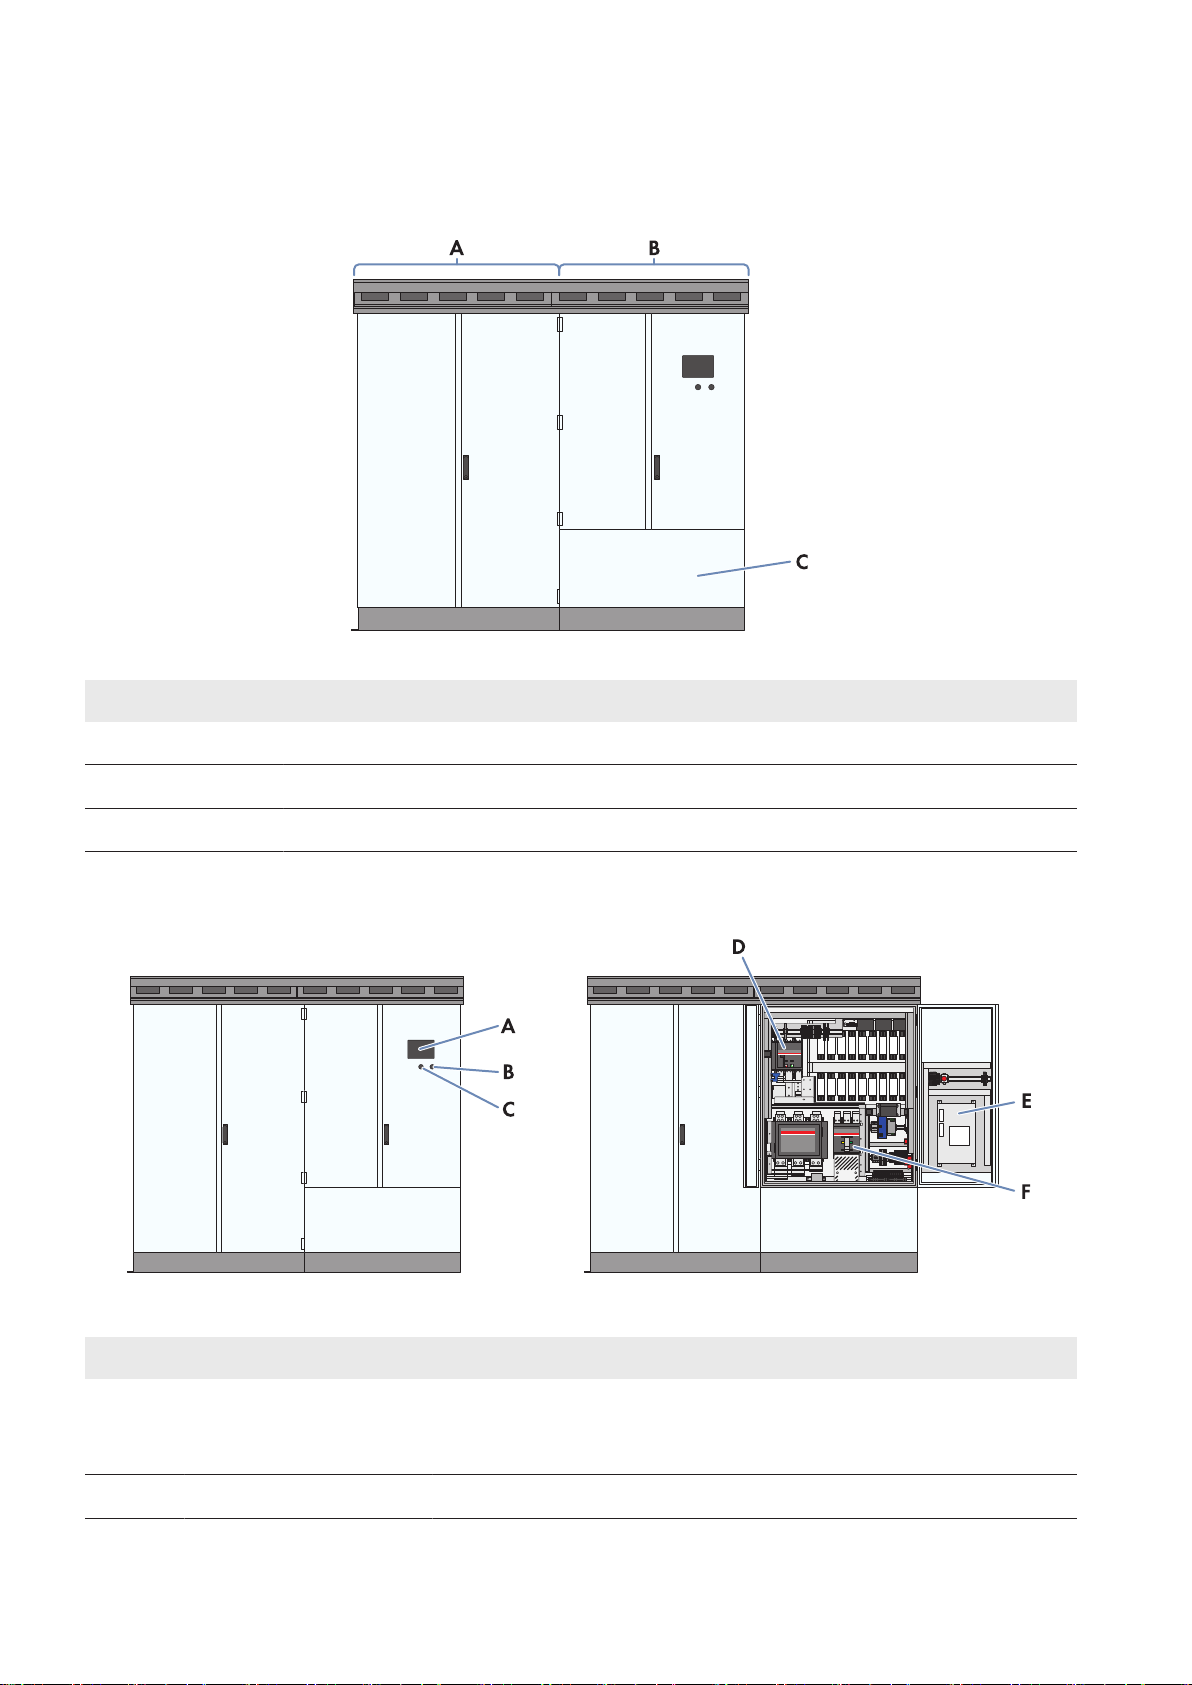
3.1 Design of the inverter
SMA Solar Technology AG
Figure 1: Design of the Inverter
Position Designation
A Inverter cabinet
B Interface cabinet
C Connection area
3.2 Devices of the Inverter
Figure 2: Devices of the inverter
Position Device Description
A Touch display Different kinds of inverter data can be viewed on the touch display. The
touch display is only used to view data. The display screen is activated by
touching the touch display.
B Service interface The service interface allows access to the user interface.
User ManualSCCPXT-BA-E4-en-5416
Page 17
SMA Solar Technology AG
Position Device Description
C Key switch The key switch is used to switch the inverter on and off.
D DC switchgear The DC switchgear disconnects the inverter from the PV array.
E SC-COM The SC-COM is the communication unit of the inverter. The SC-COM estab-
lishes the connection between the inverter and the system operator.
F AC disconnection unit The AC disconnection unit disconnects the inverter from the MVtrans-
former.
3 Product Overview
3.3 Operating and Display Elements
3.3.1 Function of the Switches
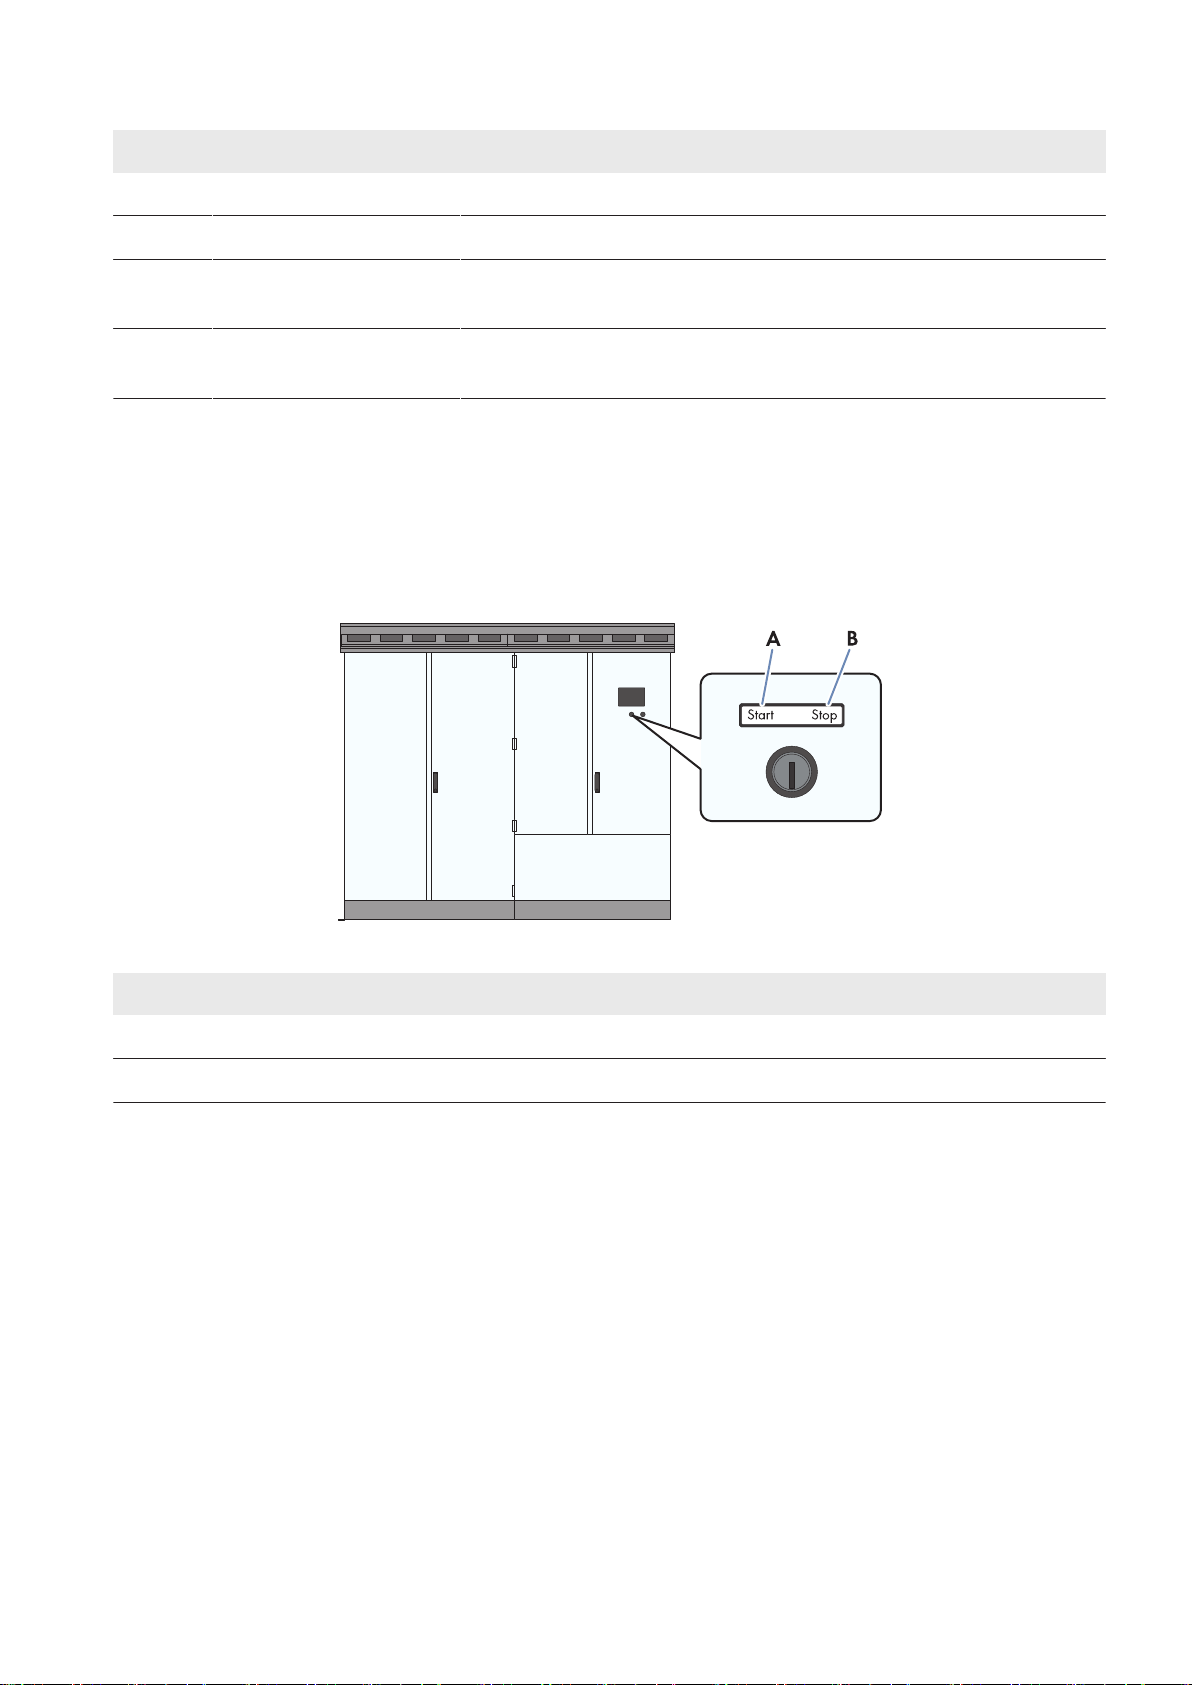
3.3.1.1 Key Switch
The key switch is used to switch the inverter on and off.
Figure 3: Switch positions of the key switch
Position Designation
A
B
Switch position Start
Switch position Stop
Switch position "Start"
If the key switch is turned to Start, a motor drive switches the DC switchgear on and the inverter switches from the
operating state "Stop" to the operating state "Grid monitoring". Provided that there is sufficient irradiation and a valid
utility grid connection, the inverter switches to feed-in operation. If there is insufficient irradiation and the input voltage
is therefore too low, the inverter remains in the operating state "Grid monitoring".
Switch position "Stop"
If the key switch is turned to Stop while the inverter is in the operating state "Grid monitoring", a motor drive switches
the DC switchgear off. The inverter switches to the operating state "Stop". If the key switch is turned to Stop while the
inverter is in the operating state "MPP load operation", the inverter switches to the operating state "Shutdown". Once
shutdown is complete, the AC disconnection unit and the DC switchgear are opened automatically and the inverter
switches to the operating state "Stop".
User Manual 17SCCPXT-BA-E4-en-54
Page 18

3 Product Overview
3.3.1.2 AC Disconnection Unit
The AC disconnection unit disconnects the inverter from the MV transformer.
Figure 4: Switch positions of the AC disconnection unit from ABB
SMA Solar Technology AG
Position Designation Explanation
A
B Central switch position The AC disconnection unit was tripped and is open.
C
Switch position on
Switch position off
The AC disconnection unit is closed.
The AC disconnection unit is open.
3.3.1.3 DC Switchgear
The DC switchgear disconnects the inverter from the PV power plant.
Figure 5: Indicators on the DC load-break switch
Position Designation
A Spring status indicator
B Position indicator
User ManualSCCPXT-BA-E4-en-5418
Page 19

SMA Solar Technology AG
Position Designation
C ON button
D OFF button
3 Product Overview
3.3.2 Touch Display
3.3.2.1 Design
The touch display is used to display instantaneous values and parameter settings. Tapping the symbols on the touch
display activates the corresponding functions. If the touch display has not been touched for five minutes, it will switch
off and the logged in user will be logged out. The touch display is divided into three areas.
Figure 6: Design of the touch display
Position Designation Explanation
A Status info line Number of the active menu, login status and time
B Information field Area of the main menu
C Navigation line Navigation area
3.3.2.2 Explanation of Symbols
Information field
You can access the following sub-menus and screens from the information field:
Symbol Designation Explanation
E-today line graph Diagram 103: Representation of energy fed in during the current day in
kWh.
Bar chart Diagram 104: Representation of energy fed in during the last 14days in
kWh.
User Manual 19SCCPXT-BA-E4-en-54
Page 20

3 Product Overview
Symbol Designation Explanation
DC side Representation of the instantaneous value
• PV power in W
• Insulation resistance in Ω
• PV current in A
• PV voltage in V
• Diagram of string-current monitoring
– Diagram 132 and 133: Group currents of the individual Sunny
String‑Monitors
– Diagram 140 to 146: String currents of the individual Sunny
String‑Monitors
SMA Solar Technology AG
String-current monitoring of
the DC side
Switch on DC or AC side
closed
Switch on DC or AC side
open
Status of switches on DC or
AC side unknown
Inverter data Representation of the following inverter data:
Representation of the instantaneous values of the string-current monitoring
of the individual Sunny String-Monitors
If you see this symbol between the "DC side" symbol and the "Inverter
data" symbol, the DC switchgear is closed.
If you see this symbol between the symbol "Inverter data" and the symbol
"AC side", the AC disconnection unit is closed.
If you see this symbol between the "DC side" symbol and the "Inverter
data" symbol, the DC switchgear is open.
If you see this symbol between the symbol "Inverter data" and the symbol
"AC side", the AC disconnection unit is open.
If you see this symbol between the "DC side" symbol and the "Inverter
data" symbol, the switch status of the DC switchgear is not known.
If you see this symbol between the symbol "Inverter data" and the symbol
"AC side", the switch status of the AC disconnection unit is unknown.
• Device type
• Operating state
• Symbol for utility grid menu
• Symbol for temperature display
• Symbol for fan display
User ManualSCCPXT-BA-E4-en-5420
Page 21

SMA Solar Technology AG
Symbol Designation Explanation
AC side Representation of the following instantaneous values:
• Active power in W
• Reactive power in VAr
• Power frequency in Hz
• AC current in A
• AC voltage in V
Utility grid First menu page:
• Active mode of active power limitation
• Target active power in kW
• Actual active power in kW
Second menu page
• Active mode of reactive power setpoint
• Target reactive power in VAr
3 Product Overview
• Target displacement power factor cos φ
• Target excitation type of the displacement power factor
• Actual reactive power in VAr
• Actual displacement power factor cos φ
• Actual excitation type of the displacement power factor
Settings menu
Symbol Designation Explanation
Language selection Select this symbol to open the language selection menu.
Brightness setting Select this symbol to open the brightness setting menu.
Time setting Select this symbol to open the time setting menu.
Format selection Select this symbol to open the format selection menu.
Password entry Select this symbol to open the password entry menu.
Navigation line
Symbol Designation Explanation
Back Select this symbol to go back to the previous page.
Homepage Select this symbol to go to the homepage.
User Manual 21SCCPXT-BA-E4-en-54
Page 22
3 Product Overview
Symbol Designation Explanation
Settings • Language selection
• Brightness setting
• Time setting
• Format selection
• Password entry
Information • OS: version of the operating system
• App.: version of the application software
• SC-COM version: SC-COM software version
• Ser.No.: inverter serial number
• Hardware: hardware version and serial number of the SC-COM
Error • ErrNo: error number
• TmsRmg: time until reconnection
• Msg: error message
SMA Solar Technology AG
• Dsc: corrective measure
Service • Telephone receiver: Contact Service.
• Tool: Contact your installer.
User ManualSCCPXT-BA-E4-en-5422
Page 23

SMA Solar Technology AG
3.3.3 LEDs of the SC-COM
3.3.3.1 LEDs on the Enclosure
3 Product Overview
Figure 7: LEDs on the enclosure
LED designation Status Explanation
POWER glowing green The SC-COM is supplied with voltage.
off The SC-COM is not supplied with voltage.
SD1 flashing green Read or write access to system drive
SD2 flashing green Read or write access to internal data drive
CF flashing green Read or write access to external SD memory card
H1 flashing green The SC-COM is transmitting data to Sunny Portal/FTP server.
glowing green The most recent data transmission to Sunny Portal/FTP server was
successful.
glowing red The most recent data transmission to Sunny Portal/FTP server has
failed.
off Data transmission to Sunny Portal/FTP server is deactivated.
User Manual 23SCCPXT-BA-E4-en-54
Page 24
3 Product Overview
LED designation Status Explanation
H2 flashing green The SC-COM is communicating with the devices connected within the
system.
glowing green Internal communication has taken place in the last five minutes.
glowing red An error has occurred in the internal communication.
off No internal communication for more than five minutes.
H3 flashing red The SC-COM is starting up.
glowing red An error has occurred in the SC-COM.
glowing green The SC-COM is ready for use.
H4 glowing green An internal memory card exists and less than 92% of its storage ca-
pacity is used.
glowing red The internal memory card is full and the oldest saved data is being
overwritten.
SMA Solar Technology AG
flashing red 92% of the storage capacity of the internal memory card is used.
H5 glowing green An external memory card exists and less than 92% of its storage ca-
pacity is used.
glowing red The external memory card is full.
flashing red 92% of the storage capacity of the external memory card is used.
off There is no external memory card.
H6 - Not assigned
H7 - Not assigned
H8 flashing green Application is running.
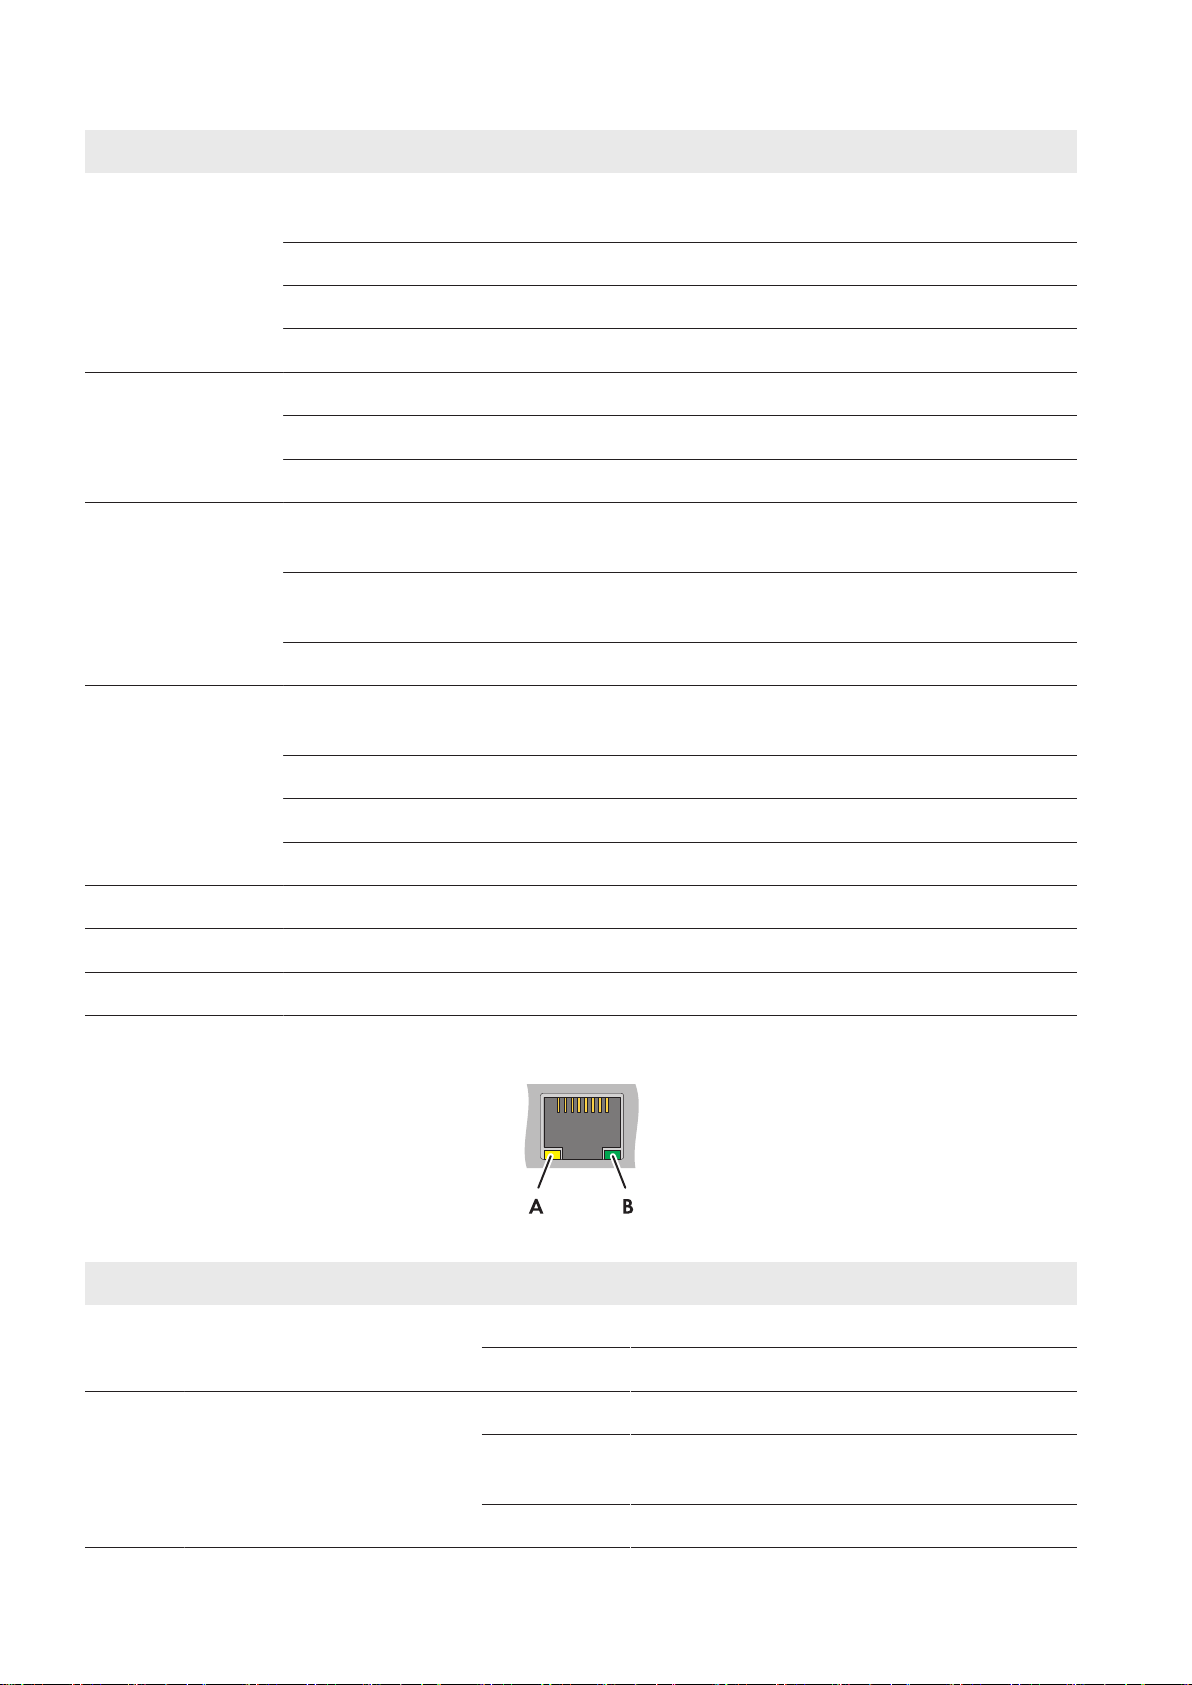
3.3.3.2 LEDs on the Network Port
Figure 8: LEDs on the network port
Position LED Color Status Explanation
A Speed yellow on 100 MBit data transfer rate
off 10 MBit data transfer rate
B Link/Activity green on Connection (Link) established.
flashing The SC-COM is transmitting or receiving data (Ac-
tivity).
off No connection established.
User ManualSCCPXT-BA-E4-en-5424
Page 25
SMA Solar Technology AG
3 Product Overview
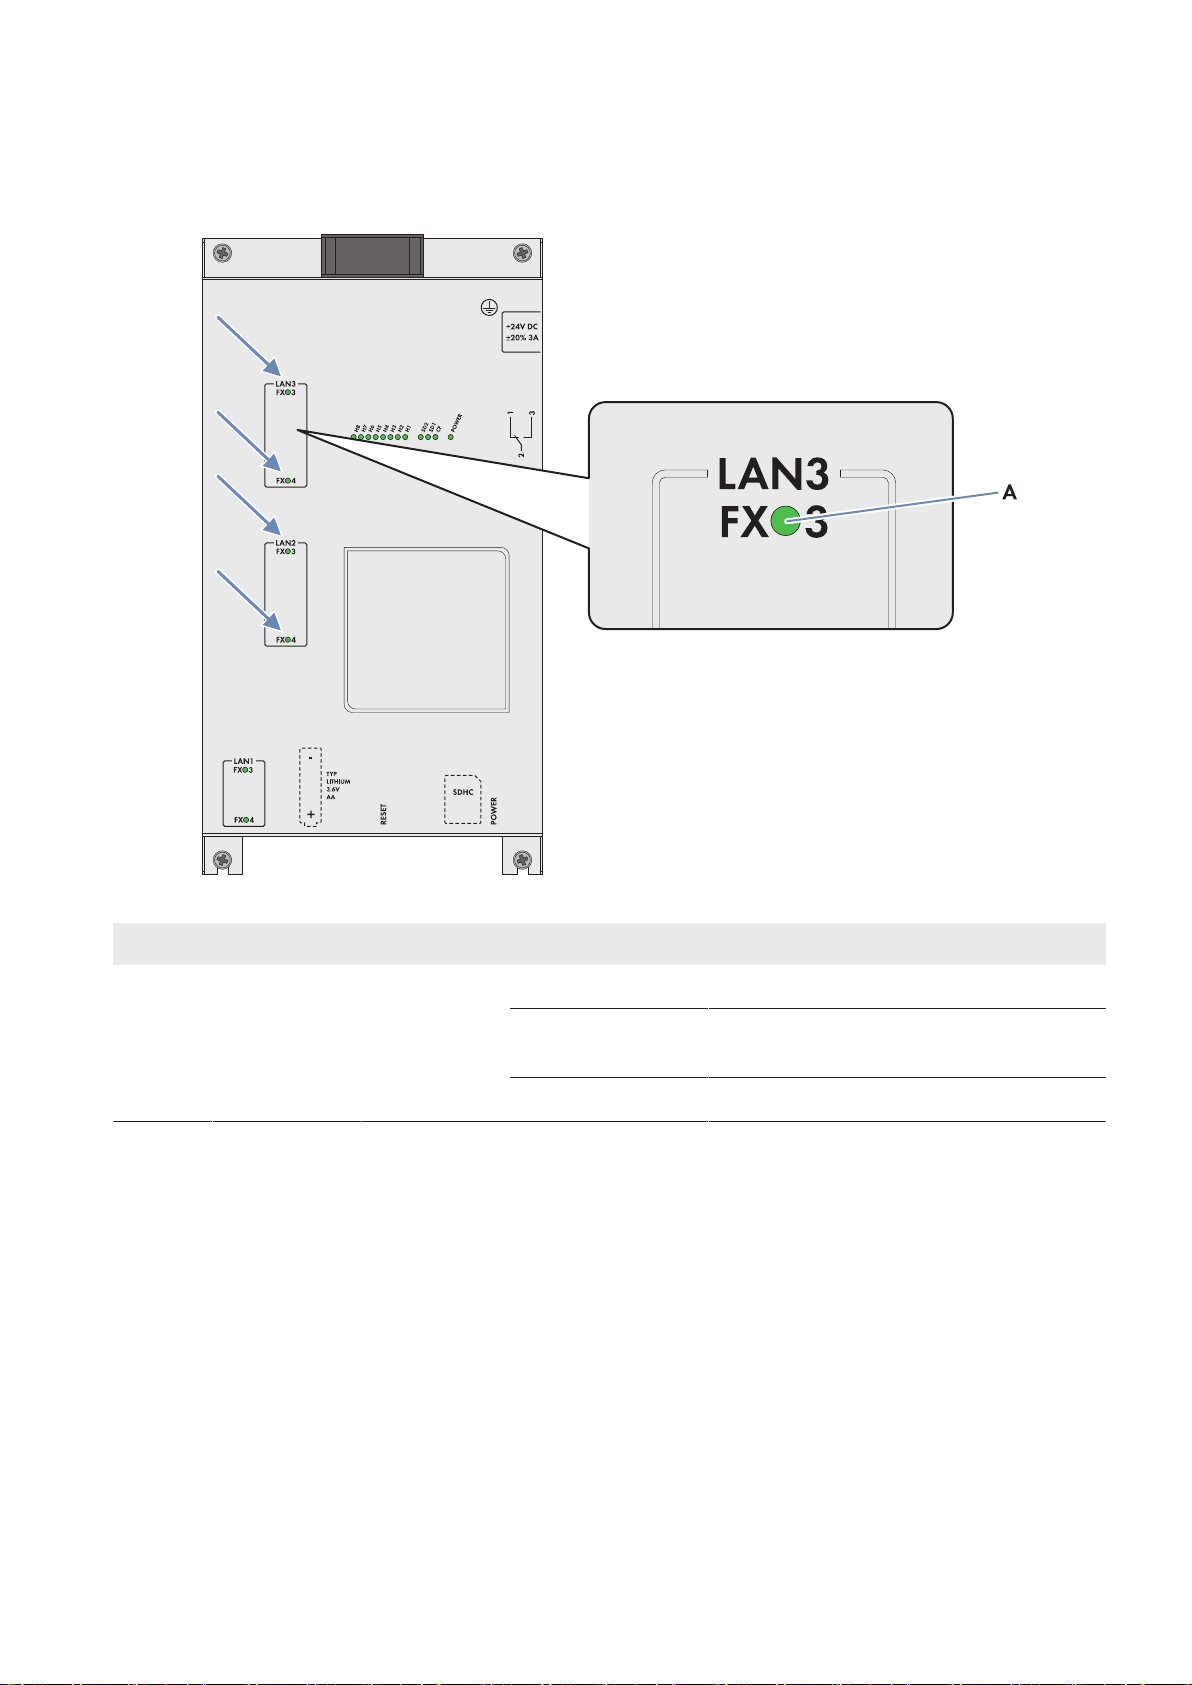
3.3.3.3 LEDs on the Optical Fiber Terminals
The SC-COM is also available with pre-wired optical fiber connections. If the optical fibers are connected to the splice
box of the inverter, the status of the connection will be indicated by the LEDs of the SC-COM.
Figure 9: LEDs for the status of the optical fiber connection
Position LED Color Status Explanation
A Link / Activity green on Connection (Link) established.
flashing The SC-COM is transmitting or receiving data
(Activity).
off No connection established.
User Manual 25SCCPXT-BA-E4-en-54
Page 26

A
B
C
D
E
3 Product Overview
SMA Solar Technology AG
3.3.4 User Interface
3.3.4.1 Design of the User Interface
Via the user interface, you can set the communication of the devices of your PV power plant, configure the inverter
parameters and read off error messages and operating data.
Figure 10: Design of the user interface (example)
Position Designation
A Tree view or device view
B Status bar
C Logout button
D Navigation bar
E Content area
3.3.4.2 Tree View and Device View
You can call up data of the individual devices of your PV power plant in the tree view or the device view. Depending
on which view you have selected, the devices are sorted differently.
Symbol Designation Explanation
Tree view In the tree view, the user interface shows the devices in the or-
der in which they are connected to the data bus.
Device view In the device view, the user interface shows all devices sorted
by device type. The number shown in parentheses indicates the
number of devices of a device type.
User ManualSCCPXT-BA-E4-en-5426
Page 27

SMA Solar Technology AG
3 Product Overview
3.3.4.3 Status Symbols
Depending on the status of the device communication, the device symbols are displayed in the tree or device view with
various status symbols.
Symbol Explanation
The inverter is ready for operation.
There is an error in the inverter.
An error has occurred in the communication with the inverter.
3.4 Symbols on the Product
The following gives an explanation of all the symbols found on the inverter and on the type label.
Symbol Designation Explanation
CE marking The product complies with the requirements of the applicable EU di-
rectives.
Protection classI All electrical equipment is connected to the grounding conductor sys-
tem of the product.
Degree of protectionIP54 The product is protected against interior dust deposits and splashing
water from all angles.
Beware of a danger zone This warning symbol indicates a danger zone. Be particularly vigilant
and cautious when working on the product.
Beware of dangerous voltage
Beware of hot surface The product can get hot during operation. Avoid contact during oper-
Use hearing protection. The product generates loud noises. When working on the product,
Observe the documentation.
The product operates at high voltages. All work on the product must
be carried out by qualified persons only.
ation. Allow the product to cool down sufficiently before carrying out
any work. Wear personal protective equipment such as safety
gloves.
wear hearing protection.
Observe all documentation supplied with the product.
User Manual 27SCCPXT-BA-E4-en-54
Page 28

4 Commissioning
SMA Solar Technology AG
4 Commissioning
4.1 Safety during Commissioning
Danger to life from electric shock due to live voltage
High voltages are present in the live components of the product. Touching live components results in death or serious
injury due to electric shock.
• Wear suitable personal protective equipment for all work on the product.
• Do not touch any live components.
• Observe all warning messages on the product and in the documentation.
• Observe all safety information of the module manufacturer.
• After switching off the inverter, wait at least 15minutes before opening it to allow the capacitors to discharge
completely (see Section5.2, page51).
Danger to life from electric shock due to ground fault
If a ground fault has occurred, parts of the PV power plant that are supposedly grounded may in fact be live.
Touching incorrectly grounded parts of the PV power plant results in death or serious injuries from electric shock.
• Before working on the PV power plant, ensure that no ground fault is present.
• Wear suitable personal protective equipment for all work on the device.
Property damage due to dust intrusion and moisture penetration
Dust or moisture intrusion can damage the product and impair its functionality.
• Do not open the enclosure during rainfall or when humidity exceeds the specified thresholds. The humidity
thresholds are: 15%…95%.
• Only perform maintenance work when the environment is dry and free of dust.
• Operation of the product is only permitted when it is closed.
• Connect the external supply voltage after mounting and installing the product.
• If the installation or commissioning process is interrupted, mount all panels.
• Close and lock the enclosure.
• The product must always be closed for storage.
• Store the product in a dry and covered location.
• Temperature at the storage location must be in the specified range. The temperature range is: −25°Cto+70°C
.
4.2 Requirements for Commissioning
☐ None of the devices must display any damage.
☐ All devices must be correctly installed.
☐ All devices must be properly grounded.
☐ All transport locks and desiccant bags must be removed.
☐ All cables of the inverters must be correctly routed and connected.
User ManualSCCPXT-BA-E4-en-5428
Page 29

SMA Solar Technology AG
☐ All doors and locks must function properly.
☐ All documentation must be available.
☐ All labels must be in place.
4 Commissioning
4.3 Visual Inspection and Mechanical Test
4.3.1 Sequence for Visual Inspection and Mechanical Test
Procedure See
1. Ensure that the minimum clearances are complied with. Section12.1.1, page146
2. Ensure that the grounding busbar has been professionally connected to the external grounding system.
3. Ensure that the cables for communication, control, supply voltage and
monitoring are correctly connected.
4. Ensure that the high-current contacts made on the installation site are correctly connected.
5. Ensure that the high-current contacts made at the factory are correctly
connected.
6. Ensure that the connection busbars do not show any discoloration.
If the connection busbars show any discoloration, please contact us (see Section13 "Contact", page154).
7. Ensure that the settings of the switching units are made correctly. Section4.3.5, page30
8. Ensure that all connectors are correctly connected. Section4.3.6, page31
Section4.3.2, page29
Section4.3.3, page30
Section4.3.4, page30
4.3.2 Checking the Connections of the Cables for Communication, Control Supply Voltage and Monitoring
Test Point Tasks
Cables Ensure that the cable type and cross-section, the number of cables and the labeling comply
with the specifications in the schematic diagram.
Cable connection Ensure that the cable connection complies with the specifications in the schematic diagram.
If no external fast stop is to be installed, ensure that the terminals are wired with a jumper
wire in accordance with the schematic diagram.
Cable insulation Make sure that the insulation of the cables is correctly stripped. The insulation must not pre-
vent the contact with the terminal.
Bootlace ferrules Ensure that the bootlace ferrules are correctly crimped and that no stranded wires are visible.
Cable support rails Ensure that the cables are adequately attached to the cable support rails.
Shield clamping saddles
User Manual 29SCCPXT-BA-E4-en-54
Ensure that the contact between the cable shield and the shield bus is intact.
Page 30
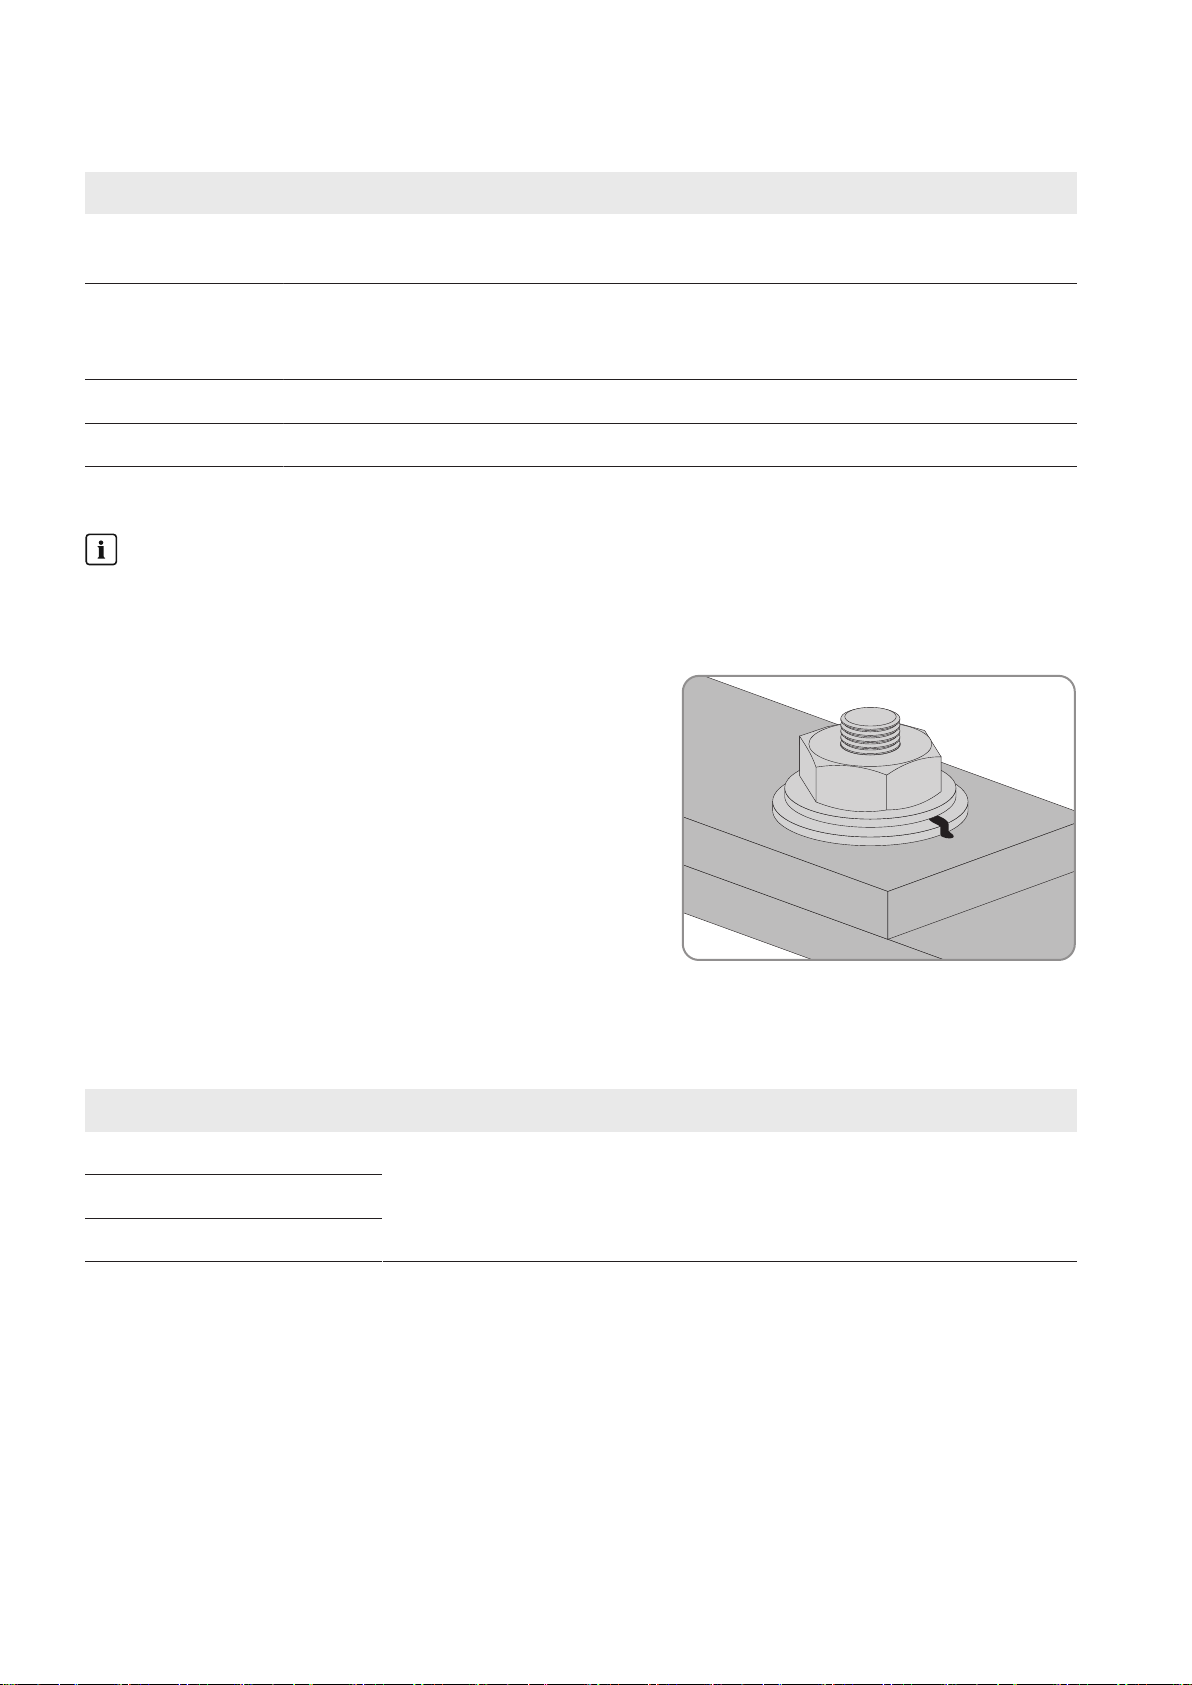
4 Commissioning
SMA Solar Technology AG
4.3.3 Checking the High-Current Contacts Made at the Installation Site
Test point Tasks
Cables Ensure that the cable type and cross-section, the number of cables and the labeling comply
with the specifications in the schematic diagram.
High-current contact Check whether the high-current contacts established at the installation site are tightened to
the correct torque. If the torque is not correct, release and clean the high-current contact and
tighten with the required torque.
Terminal lugs Ensure that the terminal lugs are crimped edge to edge.
Cable support rails Ensure that the cables are adequately attached to the cable support rails.
4.3.4 Checking the High-Current Contacts Made at the Factory
High-current contacts made at the factory
High-current contacts made at the factory are marked off. Providing that the marking is not damaged and runs
across the bolted connection as shown in the figure, this means that the torque complies with the specifications.
Procedure:
• Check whether the high-current contacts made at the factory
are correctly marked off.
If a high-current contact is not correctly marked off, release the high-current contact, tighten with the required
torque and mark off again.
4.3.5 Checking the Settings of the Switching Units
Test Point Tasks
AC circuit breaker Ensure that the settings comply with the specifications in the schematic diagram.
GFDI
Hygrostat
User ManualSCCPXT-BA-E4-en-5430
Page 31

SMA Solar Technology AG
4 Commissioning
4.3.6 Checking the Connectors
Test Point Tasks
Connectors on the CAN bus Ensure that all connectors are securely in place.
Connectors on the SC20cont
Connectors on the inverter bridge
Connectors on the communication unit
Connectors on the hub
Connectors on the router
4.4 Connection and Measurement
4.4.1 Sequence for Connection and Measurement
1. Use the tap changer on the MV transformer to adjust the voltage of the utility grid (see documentation of the MV
transformer).
2. Switch the transformer field and the ring circuit of the medium-voltage switchgear on (see documentation of the
medium-voltage switchgear).
3. Measure the voltages on the primary and secondary sides of the MV transformer and record the values in the
commissioning report.
4. Ensure that the supply voltage is within the permissible voltage range of the inverter of −10% to +15%.
5. Check the output voltage of the inverter (see Section4.4.2, page31).
6. Check the DC voltage (see Section4.4.3, page32).
7. Mount the protective covers (see Section9.1.2, page80).
8. Mount the panels (see Section9.1.1, page79).
9. Switch on the supply voltage and the AC disconnection unit (see Section4.4.4, page32).
4.4.2 Checking the Output Voltage of the Inverter
1. Use a rotating field instrument to measure whether a right-hand rotating magnetic field is connected at the AC
connection brackets.
If a left-hand rotating magnetic field is detected, two line conductors must have been wrongly connected.
• Swap the connections L1 and L3.
2. Check whether the AC voltage is approximately the same as the nominal voltage of the inverter. Measure the AC
voltage between the terminals at the AC connection brackets and record in the commissioning report.
If the AC voltage differs significantly from the nominal voltage of the inverter, the transformation ratio of the MV
transformer must be adjusted by a duly authorized person.
User Manual 31SCCPXT-BA-E4-en-54
Page 32

4 Commissioning
SMA Solar Technology AG
4.4.3 Checking the DC Voltage
Danger to life due to electric arcs if measuring device is not connected correctly
If the measurement points are incorrectly contacted, this can cause an electric arc. Electric arcs can result in death or
serious injury.
• Select the appropriate measurement range on the measuring device.
• Wear suitable personal protective equipment for all work on the device.
• Select correct measurement points.
Damage to the inverter due to excessive DC voltages
The DC voltage of the PV array must not exceed the maximum voltage of the inverter.
• Make sure the maximum voltage is no more than 1,000V.
Procedure:
1. Measure the DC voltage for each input and record it in the commissioning report. Use the DC+ and DC‒
connection brackets as measuring points.
2. Check that the DC voltages do not exceed the maximum DC voltage of the inverter.
If the DC voltages differ from one another or exceed the maximum DC voltage, make sure that the cabling of the
PV modules has been configured in accordance with the circuit diagram.
3. Make sure that the polarity of each input is correct.
4. Measure the DC voltage for each non-grounded pole to ground and record in the commissioning report. Use the
connection brackets of the ungrounded terminal and the grounding busbar as check points.
☑ There is a measurable voltage drop.
✖ There is no measurable voltage drop?
A ground fault is present.
• Eliminate the ground fault.
4.4.4 Switching On the Supply Voltage and the AC Disconnection Unit
1. Close the measurement and disconnect terminals.
User ManualSCCPXT-BA-E4-en-5432
Page 33

SMA Solar Technology AG
2. Switch on the motor-protective circuit-breaker of the grid
monitoring.
3. Switch on the AC circuit breaker.
4 Commissioning
4. Switch the supply voltage circuit breaker on.
☑ The electronic components of the inverter switch on.
☑ The fans switch on and start drawing air in through the air intake vents.
✖ The fans do not switch on?
• Contact the Service (see Section13, page154).
4.5 Function Test
4.5.1 Checking the Fans
Danger to life due to electric shock or electric arc if live components are touched
• Switch off the inverter and wait at least 15minutes before opening it to allow the capacitors to discharge
completely.
• Disconnect the inverter (see Section5, page51).
User Manual 33SCCPXT-BA-E4-en-54
Page 34

4 Commissioning
Procedure:
1. Switch the inverter to Stop.
2. Connect the supply voltage (see Section5.3.1, page53).
☑ The fans start to run for a few moments.
✖ The fans do not start up?
• Contact SMAServiceLine.
4.5.2 Checking the Heating Elements and Hygrostat
SMA Solar Technology AG
Figure 11: Position of the heating element and the hygrostat
Position Designation
A Hygrostat
B Heating element
Danger to life due to electric shock or electric arc if live components are touched
• Switch off the inverter and wait at least 15minutes before opening it to allow the capacitors to discharge
completely.
• Disconnect the inverter (see Section5, page51).
Risk of burns due to hot components
Some components of the product can get very hot during operation. Touching these components can cause burns.
• Observe the warnings on all components.
• During operation, do not touch any components marked with such warnings.
• Wear suitable personal protective equipment for all work on the product.
User ManualSCCPXT-BA-E4-en-5434
Page 35

SMA Solar Technology AG
Procedure:
1. Switch the inverter to Stop (see Section5.2.1, page51).
2. Connect the supply voltage (see Section5.3.1, page53).
3. Set the hygrostat to the minimum value. To do this, pull the selector switch out slightly.
Tip: the hygrostat is adjusted correctly if the relay of the hygrostat emits an audible click.
4. Check whether the heating elements are radiating heat after a delay time of fiveminutes.
If the heating elements are not radiating heat, contact us (see Section13 "Contact", page154).
5. Reset the hygrostat to the initial value. To do this, press the selector switch back towards the hygrostat. The initial
value of the hygrostat is indicated in the circuit diagram.
4 Commissioning
4.6 Configuration
4.6.1 Configuring the Network Settings on the Computer
Before your computer can communicate with the inverter, you must set the computer to the network settings of the
inverter. The network settings include the IP address, subnet mask, gateway and DNS server address.
The communication interface of the inverter has three LAN interfaces to the connected nodes. The IP address to be
configured in your computer depends on whether the computer is connected to the service interface of the inverter, the
control network or the monitoring network.
Network Default IP address
LAN1: Service interface of the inverter 192.168.100.2*
LAN2: Control network 172.24.1.51
LAN3: Monitoring network 172.16.1.51
* This IP address cannot be changed.
Administrator rights in the operating system
To commission the communication unit, you need to have the appropriate administrator rights to change the
network settings of the computer.
• Contact your network administrator if you are uncertain about administrator rights.
Procedure:
1. Note down the IP address of the computer.
2. Adapt the IP address of the computer to the address range of the communication unit.
4.6.2 Information on Integrating the Inverter into a Local Network
Protecting the local network from cyber attacks
• If the local network is to be accessible via the Internet, you can set up port forwarding via your router or
configure a VPN. Using a VPN is recommended.
• Protect the local network from cyber attacks by means of suitable safety measures such as setting up a
firewall and allocating secure passwords.
Using a static IP address is recommended. You can select the IP address yourself. Use the address range which is
available to your router. If necessary, refer to the router manual.
If you are using a Power Plant Controller for the automatic control of your PV power plant, a dynamic IP address with
DHCP is not possible.
For further information on this subject, see the Technical Information "System Communication in Large-Scale PV Power
Plants" at www.SMA-Solar.com.
User Manual 35SCCPXT-BA-E4-en-54
Page 36

4 Commissioning
SMA Solar Technology AG
4.6.3 Configuring the Inverter for a Static Network
You can configure the IP address of the inverter for the control network and the monitoring network via the user
interface. Alternatively, you can also change the network settings of the inverter via the XML file custom.xml (see
Section4.6.14, page48).
Procedure:
1. Log into the user interface (see Section9.4.1, page81).
2. Select SunnyCentral > Settings > Network.
3. In the field IP address, enter the static IP address that you want to use to access the inverter in the local network.
4. Enter the subnet mask of your network in the field Subnet mask.
5. Enter the gateway IP address of your network in the field Gateway address. Usually, the IP address of the
router has to be entered here.
6. Enter the IP address of the DNS server (Domain Name System) in the field DNS server address. Usually, the IP
address of the router has to be entered here.
7. Select the button [Save].
8. Select the button [Confirm].
4.6.4 Adjusting Network Ports
If you wish the inverter to be accessible via the Internet so that you can access it, for example, directly from
SunnyPortal, you must configure port forwarding in your router. This may require adjustment of the network ports.
For the various services, the communication unit of the inverter uses four network ports. If these ports are reserved for
other applications in your network, you can adjust the ports.
Adjusting the network ports
Check your access to the user interface before you change the setting Public virtual HTTP port on the user
interface. In most cases, the settings do not have to be changed manually, as the router automatically forwards
the queries to the correct ports via the network. Before adjusting the ports, contact your network administrator.
Unauthorized access to the inverter
If you activate the Modbus protocol, unauthorized access to the inverter will be possible. In this case, even users
without a password will be able to view the instantaneous values of supported devices or perform actions such as
changing the system time. Using a VPN is recommended.
Procedure:
1. Log into the user interface (see Section9.4.1, page81).
2. Select SunnyCentral > Settings > Network.
3. In the field Virtual public HTTP port, enter the port enabled in the router for HTTP access. Via this port, you can
access the user interface from the Internet.
4. In the field Webserver port, enter the port via which the user interface can be accessed.
5. In the field Webservice port, enter the port via which the data of the inverter is to be transmitted to SunnyPortal
and firmware updates are to be uploaded.
6. If you would like to use the Modbus protocol, activate the box Use Modbus.
7. In the field Modbus port, enter the port to be used by the inverter when communicating via the Modbus
protocol. The default setting is port 502.
8. If you would like to use a proxy server, activate the box Use proxy server.
9. Enter the IP address and the port of the proxy server in the field Proxyserver address.
10. If you would like to use the authentication of the proxy server, activate the box Use authentication.
User ManualSCCPXT-BA-E4-en-5436
Page 37

SMA Solar Technology AG
11. Enter the data of your proxy server in the fields User name and Password.
12. Select the button [Save].
4 Commissioning
4.6.5 Detecting New Devices
During commissioning of a PV power plant, all devices must be detected. If multiple interfaces (e.g. COM2 and
COM3) are used in the inverter, detection of new devices must be carried out separately for all interfaces.
Devices will need to be redetected if you have:
• replaced devices in your PV power plant
• removed devices from your PV power plant
• added devices to your PV power plant
Detection of the PV power plant may take several minutes
Depending on the number of devices in your PV power plant, the duration of the detection process may vary.
• If there is no indication of progress on the communication unit after three minutes, cancel the search.
• Make sure the data cable of each device is properly connected and repeat the search.
Procedure:
1. Log into the user interface (see Section9.4.1, page81).
2. Select Data > Detection.
3. In the field Total number of devices to be detected, enter the number of devices connected to the
communication unit. Hint: If you do not know the number, enter 1.
4. Select the button [Start detection].
☑ The communication unit starts detecting all inverters and displays its progress. Once all devices have been
detected, the message ### Device detection finished ### is displayed.
5. Select the button [OK].
4.6.6 Setting the Power Limitation
4.6.6.1 Setting the Active Power Ramp-Up
Parameter block
Some parameters must only be changed in the operating state "Stop". The entry will not be accepted in any other
operating state.
The inverter works up to its maximum feed-in power via a ramp. This means that the inverter gradually increases the
ratio of feed-in power per second by the value set in the parameter WGra.
Procedure:
1. Make sure the inverter is in the operating state "Stop".
2. Call up the parameter overview (see Section9.3.1, page81).
3. Set the parameter WGra to the required value.
4. Save the parameter changes (see Section9.3.2, page81).
4.6.6.2 Setting the Frequency-Dependent Active Power Limitation
Parameter block
Some parameters must only be changed in the operating state "Stop". The entry will not be accepted in any other
operating state.
User Manual 37SCCPXT-BA-E4-en-54
Page 38

4 Commissioning
Procedure:
1. Make sure the inverter is in the operating state "Stop".
2. Call up the parameter overview (see Section9.3.1, page81).
3. If necessary, set the parameter WCtlHzMod to CurveHys.
4. Change the parameters P-HzStr, P-HzStop and P-WGra and save (see Section9.3.2, page81).
5. Save the parameter changes (see Section9.3.2, page81).
SMA Solar Technology AG
4.6.6.3 Setting the Frequency-Independent Active Power Limitation
Operation failure of the PV power plant due to incorrectly set parameters
If the parameter settings for grid management services are incorrect, the PV power plant may not be able to meet the
requirements of the grid operator. This can involve yield losses and the inverter may have to be disconnected by the
grid operator.
• When setting the modes of grid management services, ensure that the control procedures agreed with the grid
operator are parameterized.
• If the inverter is operated with a PowerPlantController, ensure that the mode WCtlCom for active power
limitation and the mode VArCtlCom for reactive power control are selected in the inverter.
Parameter block
Some parameters must only be changed in the operating state "Stop". The entry will not be accepted in any other
operating state.
Procedure:
1. Make sure the inverter is in the operating state "Stop".
2. Call up the parameter overview (see Section9.3.1, page81).
3. Set the parameter P-WMod to the desired value.
4. Change the parameters belonging to the selected mode (see Section10.3.2, page95).
5. Use the parameter PwrMonErrMod to select the desired behavior in the absence of setpoint specifications as
follows (see Section10.3.5, page110).
6. If SubVal has been selected, enter the substitute values for normal feed-in operation and for operation outside of
normal feed-in operation.
7. In the parameter PwrMonErrTm configure the time lapse until recognition of the absence of setpoint
specifications.
8. Save the parameter changes (see Section9.3.2, page81).
4.6.6.4 Setting Reactive Power Control
Operation failure of the PV power plant due to incorrectly set parameters
If the parameter settings for grid management services are incorrect, the PV power plant may not be able to meet the
requirements of the grid operator. This can involve yield losses and the inverter may have to be disconnected by the
grid operator.
• When setting the modes of grid management services, ensure that the control procedures agreed with the grid
operator are parameterized.
• If the inverter is operated with a PowerPlantController, ensure that the mode WCtlCom for active power
limitation and the mode VArCtlCom for reactive power control are selected in the inverter.
User ManualSCCPXT-BA-E4-en-5438
Page 39

SMA Solar Technology AG
Avoiding electromagnetic interference emissions in large-scale PV systems
To avoid electromagnetic interference emissions in large-scale PV systems at the changeover from night mode to
feed-in operation, it is recommended using Modbus communication for setpoint in feed-in operation and night
mode.
For smaller-sized PV systems without farm control, the use of fixed setpoints for reactive power control is
recommended.
Validity of parameters in feed-in operation and in "QatNight" operation
The parameters used for these substitute values are valid in feed-in operation and in "QatNight" operation.
• Ensure that the settings of the parameters for the substitute values meet the requirements for feed-in operation
and "QatNight" operation.
Procedure:
1. Make sure the inverter is in the operating state "Stop".
2. Call up the parameter overview (see Section9.3.1, page81).
3. Set the parameter Q-VArMod to the desired value.
4. Change the parameters belonging to the selected mode (see Section10.3.3, page96).
5. Use the parameter PwrMonErrMod to select the desired behavior in the absence of setpoint specifications as
follows (see Section10.3.5, page110).
4 Commissioning
6. If SubVal has been selected, enter the substitute values for normal feed-in operation and for operation outside of
normal feed-in operation.
7. In the parameter PwrMonErrTm configure the time lapse until recognition of the absence of setpoint
specifications.
8. Save the parameter changes (see Section9.3.2, page81).
4.6.6.5 Setting Q at Night
Operation failure of the PV power plant due to incorrectly set parameters
If the parameter settings for grid management services are incorrect, the PV power plant may not be able to meet the
requirements of the grid operator. This can involve yield losses and the inverter may have to be disconnected by the
grid operator.
• When setting the modes of grid management services, ensure that the control procedures agreed with the grid
operator are parameterized.
• If the inverter is operated with a PowerPlantController, ensure that the mode WCtlCom for active power
limitation and the mode VArCtlCom for reactive power control are selected in the inverter.
Avoiding electromagnetic interference emissions in large-scale PV systems
To avoid electromagnetic interference emissions in large-scale PV systems at the changeover from night mode to
feed-in operation, it is recommended using Modbus communication for setpoint in feed-in operation and night
mode.
For smaller-sized PV systems without farm control, the use of fixed setpoints for reactive power control is
recommended.
Validity of parameters in feed-in operation and in "QatNight" operation
The parameters used for these substitute values are valid in feed-in operation and in "QatNight" operation.
• Ensure that the settings of the parameters for the substitute values meet the requirements for feed-in operation
and "QatNight" operation.
User Manual 39SCCPXT-BA-E4-en-54
Page 40

4 Commissioning
Procedure:
1. Make sure the inverter is in the operating state "Stop".
2. Call up the parameter overview (see Section9.3.1, page81).
3. Set the parameter QoDQ-VarMod to the desired value.
4. Change the parameters belonging to the selected mode (see Section10.3.4, page104).
5. Use the parameter PwrMonErrMod to select the desired behavior in the absence of setpoint specifications as
follows (see Section10.3.5, page110).
6. If SubVal has been selected, enter the substitute values for normal feed-in operation and for operation outside of
normal feed-in operation.
7. In the parameter PwrMonErrTm configure the time lapse until recognition of the absence of setpoint
specifications.
8. Save the parameter changes (see Section9.3.2, page81).
SMA Solar Technology AG
4.6.7 Setting Grid Monitoring and Grid Limits
4.6.7.1 Setting Grid Voltage Monitoring
Consultation prior to parameter change
The parameters of this mode can only be selected or changed after consultation (see Section13 "Contact", page154
).
Procedure:
1. Call up the parameter overview (see Section9.3.1, page81).
2. Set the parameters for monitoring the grid voltage (see Section10.1.3.1, page84).
3. Save the parameter changes (see Section9.3.2, page81).
4.6.7.2 Setting Power Frequency Monitoring
Consultation prior to parameter change
The parameters of this mode can only be selected or changed after consultation (see Section13 "Contact", page154
).
Procedure:
1. Call up the parameter overview (see Section9.3.1, page81).
2. Set the parameters for monitoring the power frequency (see Section10.1.3.2, page85).
3. Save the parameter changes (see Section9.3.2, page81).
4.6.7.3 Activating the Manual Resume Mode
If the inverter is switched off due to a grid limit infringement, you can prevent an automatic restart of the inverter. Only
once the error has been acknowledged will the inverter switch back on. You can activate the Manual Resume Mode
for individual errors of grid limit infringement. You can read off the reason for the current restart block in the
instantaneous value ManResStt.
Procedure:
1. Call up the parameter overview (see Section9.3.1, page81).
2. To activate the Manual Resume Mode for individual disturbances, set the desired parameters to On:
Manual Resume Mode after Parameter
Disconnection due to overvoltage
ManResOvrVol
User ManualSCCPXT-BA-E4-en-5440
Page 41

SMA Solar Technology AG
Manual Resume Mode after Parameter
4 Commissioning
Disconnection due to undervoltage
Disconnection due to overfrequency
Disconnection due to underfrequency
Disconnection due to passive islanding detection
Disconnection due to disturbance in a line conductor
3. Save the parameter changes (see Section9.3.2, page81).
ManResUndrVol
ManResOvrFrq
ManResUndrFrq
ManResPID
ManResPLD
4.6.8 Setting the Grid Support
4.6.8.1 Setting Full and Limited Dynamic Grid Support (FRT)
1. Call up the parameter overview (see Section9.3.1, page81).
2. Set dynamic grid support with the parameter FRTEna.
3. Set operating mode for dynamic grid support with the parameter FRTMod.
4. Set deactivation delay for LVRT with the parameter FRTSwOffTm.
5. Set the scaling of the k factor for LVRT with the parameter FRTArGraNom.
6. Set the upper limit of the voltage deadband with the parameter FRTDbVolNomMax.
7. Set the lower limit of the voltage deadband with the parameter FRTDbVolNomMin.
8. In operating mode FRT_SDLWindV, set the gradient for the FRT characteristic curve in case of overvoltage with the
parameter FRT2ArGraNomHi.
9. For the operating mode FRT_SDLWindV, set the gradient for the FRT characteristic curve in case of undervoltage
with the parameter FRT2ArGraNomLo.
10. Save the parameter changes (see Section9.3.2, page81).
4.6.8.2 Setting Enable Islanding Detection
1. Call up the parameter overview (see Section9.3.1, page81).
2. Set the islanding detection with the parameter EnaAid.
3. Save the parameter changes (see Section9.3.2, page81).
4.6.8.3 Setting the Medium Voltage
The line-to-line voltage of the overvoltage side of the MV transformer (parameter TrfVolExlHi) has to be adapted to
the nominal conductor voltage of the utility grid (parameter VRtg). It is important that the transmission ratio of the
external MV transformer is adjusted at the same time. The undervoltage side is already preset for the specific device.
Procedure:
1. Call up the parameter overview (see Section9.3.1, page81).
2. Set the parameter TrfVolExlHi.
3. Set the parameter VRtg.
4. Save the parameter changes (see Section9.3.2, page81).
User Manual 41SCCPXT-BA-E4-en-54
Page 42

4 Commissioning
SMA Solar Technology AG
4.6.9 Setting Project-Specific Parameters
4.6.9.1 Setting the Remote Shutdown
1. Call up the parameter overview (see Section9.3.1, page81).
2. To activate remote shutdown, set the parameter ExlStrStpEna to On (see Section10.2.1.2, page88).
3. To deactivate remote shutdown, set the parameter ExlStrStpEna to Off (see Section10.2.1.2, page88).
4. Save the parameter changes (see Section9.3.2, page81).
4.6.9.2 Deactivating the "Fully Hermetic" Transformer Protection
1. Call up the parameter overview (see Section9.3.1, page81).
2. Set the parameter ExlTrfErrEna to Off (see Section10.2.2.2 "Transformer Protection", page88)
3. Save the parameter changes (see Section9.3.2, page81).
4.6.10 Setting the String Current Monitoring
4.6.10.1 Detecting the SunnyCentralString-MonitorController and the Inverter
1. Log into the user interface (see Section9.4.1, page81).
2. Select Data > Detection.
3. In the field Total number of devices to be detected, enter the value 2.
4. Select the button [Start detection].
☑ The communication unit starts detecting all inverters and displays its progress. Once all devices have been
detected, the message ### Device detection finished ### is displayed.
☑ The devices have been detected.
4.6.10.2 Setting the Date and Time of the SunnyCentralString-MonitorController
1. Log into the user interface (see Section9.4.1, page81).
2. Select Data > Devices.
3. Select .
☑ A list of the existing device types appears.
4. Select SunnyCentralString-MonitorController.
5. Select the tab Instantaneous values.
6. Make sure that the date SysDt and time SysTm of the SunnyCentralString-MonitorController are correct.
If the settings are incorrect, change the parameters Dt and Tm .
4.6.10.3 Detecting the SunnyString-Monitors via the SunnyCentralStringMonitorController
It may take several minutes to detect the Sunny String-Monitors, depending on the number of devices and how far
apart they are.
Procedure:
1. Log into the user interface (see Section9.4.1, page81).
2. Select the tab Parameters.
3. Set the parameter DevFunc to AutoDetect_SSMU.
4. Select the button [Save].
User ManualSCCPXT-BA-E4-en-5442
Page 43

SMA Solar Technology AG
5. Select the tab Instantaneous values.
6. Select SSMUNoOf and check the number of detected Sunny String-Monitors.
Once all Sunny String-Monitors have been detected, detect them via the communication unit(see
Section4.6.10.5, page43).
If only some of the SunnyString‑Monitors have been detected, use SunnyCentralString‑MonitorController to
redetect them (see Section4.6.10.4, page43).
4 Commissioning
4.6.10.4 Redetecting the SunnyString-Monitors via the SunnyCentralStringMonitorController
1. Log into the user interface (see Section9.4.1, page81).
2. Select the tab Parameters.
3. Set the parameter DevFunc to Retry.
4. Select the button [Save].
5. Select the tab Instantaneous values.
6. Select SSMUNoOf and check the number of detected Sunny String-Monitors.
Once all Sunny String-Monitors have been detected, detect them via the communication unit(see
Section4.6.10.5, page43).
If only some of the SunnyString-Monitors have been detected, contact the Service .
4.6.10.5 Detecting the Sunny String-Monitors via the Communication Unit
1. Log into the user interface (see Section9.4.1, page81).
2. Select Data > Detection.
3. In the field Total number of devices to be detected, enter the number of Sunny String-Monitors +2.
4. Select the button [Start detection].
☑ The communication unit starts detecting all inverters and displays its progress. Once all devices have been
detected, the message ### Device detection finished ### is displayed.
☑ The Sunny String-Monitors have been detected.
4.6.10.6 Adjusting the Identification of the Sunny String-Monitors
1. Log into the user interface (see Section9.4.1, page81).
2. Select the first Sunny String-Monitor from the device list.
3. Select the tab Parameters.
4. Select the parameter SSMId and allocate a unique identification number to the SunnyString-Monitor. Note the
identification number.
5. Adjust the identification of the remaining Sunny String-Monitors using the same process.
4.6.10.7 Changing the Communication Period
The communication period is the time for which the SunnyCentralString-MonitorController communicates with the
SunnyString-Monitors. The communication period is set from 10:00a.m. to 3:00p.m. by default.
Procedure:
1. Log into the user interface (see Section9.4.1, page81).
2. Select the parameter MoniTmComOn and set the start of the communication period.
3. Select the parameter MoniTmComOff and set the end of the communication period.
4. Select the button [Save].
User Manual 43SCCPXT-BA-E4-en-54
Page 44

4 Commissioning
SMA Solar Technology AG
4.6.10.8 Changing the Monitoring Period
The monitoring period refers to the time for which the PV power plant is monitored by the SunnyString-Monitors. The
monitoring period is set from 10.00 a.m. to 3.00 p.m. by default.
You can set the monitoring period for all SunnyString-Monitors or allocate a separate monitoring period to each
group of SunnyString-Monitors.
The monitoring period must be within the communication period.
Setting the monitoring period for all SunnyString-Monitors
1. Log into the user interface (see Section9.4.1, page81).
2. Select the parameter MoniTmGrAllOn and set the start of the monitoring period.
3. Select the parameter MoniTmGrAllOff and set the end of the monitoring period.
4. Select the button [Save].
Setting the monitoring period for individual Groups of SunnyString-Monitors
1. Log into the user interface (see Section9.4.1, page81).
2. Select the desired Sunny String‑Monitor from the device list.
3. Select the tab Parameters.
4. Select the parameter MoniTmGr1On and set the start of the monitoring period.
5. Select the parameter MoniTmGr1Off and set the end of the monitoring period.
6. Confirm the entry with [Save].
7. Repeat steps 2 to 6 for the remaining groups.
4.6.10.9 Assigning Strings to Different Measuring Channels
To simplify monitoring, you can assign the strings to the eight measuring channels.
You can select the number of strings per channel between 1 and 4 for each of the eight measuring channels. The
default setting is 1.
You can use the parameter No.of Strings to assign a string number between 1 and 4 to all measuring channels of the
SunnyString-Monitor. This avoids having to set the number of strings for individual channels, since this number is
automatically adopted for the grouped channels.
Procedure:
1. Select the desired Sunny String‑Monitor from the device list.
2. Select the tab Parameters.
3. Enter the number of strings per measuring channel in the parameter fields No.of Strings 1 to No.of Strings 8, or
the number of strings for all measuring channels in the field No.of Strings.
4. Select the button [Save].
4.6.10.10 Assigning Strings to Different Groups
In the SunnyCentralString-MonitorController, the string data is continuously monitored and the group data compared
so that potential errors are detected immediately. It is therefore advisable to split the strings into different groups if
some strings are shaded, aligned differently or equipped with different modules.
By default, all strings are assigned to Group 1.
Group 0 is not monitored, which means only strings excluded from monitoring should be assigned to this group.
User ManualSCCPXT-BA-E4-en-5444
Page 45

SMA Solar Technology AG
Procedure:
1. Select the desired Sunny String‑Monitor from the device list.
2. Select the tab Parameters.
3. Select the parameters Group String 1 to Group String 8 and assign them to a group . Each group must include
at least four measuring channels.
4. Select the button [Save].
4 Commissioning
4.6.10.11 Setting the Tripping Time
You can use the tripping time to set the sensitivity of the string-current monitoring, since the tripping time is a factor in
the calculation of the error sum. By default, the tripping time is set to 180 minutes.
Procedure:
1. Select the desired SunnyCentralString-Monitor Controller from the device list.
2. Select the tab Parameters.
3. Enter the tripping time in minutes in the parameter field SMU_T_Ausl.
4. Select the button [Save].
4.6.10.12 Setting the Tolerance
You can use the tolerance to set the sensitivity of the string-current monitoring. The tolerance is a factor in the
calculation of the error sum.
Since only a significant deviation of a measuring channel from the mean value is an indication of a faulty string, the
tolerance value should be set correspondingly high. Minor deviations are considered normal.
Procedure:
1. Select the desired SunnyCentralString-MonitorController from the device list.
2. Select the tab Parameters.
3. Enter the tolerance value in percent for the groups in the parameter fields SMU_tolerance grp1 to
SMU_tolerance grp3.
4. Select the button [Save].
4.6.11 Configuring the Zone Monitoring
For configuring the Zone Monitoring, enter the maximum input currents for each input and set the tolerance (see
Section10.6, page115). A tolerance value of 4% or more is recommended.
For activating the error analysis, the parameter AlarmEna has to be set to On. In this case, an error message is
generated, if the input current is lower or higher than the set tolerance value. If the error analysis is deactivated, the
communication interface sends the measured value without analysing them. You can activate the alarm under fault
conditions in order to receive an e-mail with the error message (see Section7.2, page65).
Requirement:
☐ At least two inputs have to be configured in order to activate the Zone Monitoring.
Procedure:
1. Call up the parameter overview (see Section9.3.1, page81).
2. In the parameters DcCfg.AmpMax[1] to DcCfg.AmpMax[8], enter the maximum input currents in ampere.
3. In parameter MaxTol, enter the tolerance value in percent.
4. Set the parameter AlarmEna to On. Thus, you activate the error analysis.
5. Save the parameter changes (see Section9.3.2, page81).
User Manual 45SCCPXT-BA-E4-en-54
Page 46

4 Commissioning
SMA Solar Technology AG
4.6.12 Changing System Settings via Touch Display
4.6.12.1 Selecting the Language
1. Select .
2. Select .
3. Use the country symbol to select the language.
4. Confirm your entry by selecting .
4.6.12.2 Setting the Date, Time and Time Zone
Inverter adopts changes
The inverter will adopt date, time or time zone changes made via the display.
Procedure:
1. Select .
2. Select .
3. To change the date, select the day, month and year in the field . Use the and buttons to change the day,
month and year.
4. To change the time, select the hours, minutes and seconds in the field . Use and to change the hours,
minutes and seconds.
5. To change the time zone, select a time zone in the field . Use the and buttons to change the time zone.
6. Confirm your entry by selecting .
4.6.12.3 Selecting the Display Format
1. Select .
2. Select .
3. Select the date format.
4. Select the hour format.
5. Select the number format.
6. Confirm your entry by selecting .
4.6.12.4 Setting the Brightness
1. Select .
2. Select .
3. Set the display brightness. Select for a darker screen or for a lighter screen.
4. Confirm your entry by selecting .
4.6.13 Changing the System Settings via the User Interface
4.6.13.1 Selecting the Language
You can also set the language of the user interface via the XML file custom.xml (see Section4.6.14, page48).
Procedure:
1. Log into the user interface (see Section9.4.1, page81).
2. Select SunnyCentral > Settings > System.
3. Select the desired language in the field Language.
User ManualSCCPXT-BA-E4-en-5446
Page 47

SMA Solar Technology AG
4. Select the button [Save].
5. To log off from the user interface, select the button [Logout].
4 Commissioning
4.6.13.2 Setting the Date, Time and Time Zone
1. Log into the user interface (see Section9.4.1, page81).
2. Select SunnyCentral > Settings > System.
3. Select [Change] in the field Time zone (UTC offset).
4. Select the correct time zone in the Time zone (UTC offset) drop-down list.
5. Select an option in the Automatic change from summer time to winter time field:
Option Explanation
yes Automatic change from daylight saving time to standard time is active.
no Automatic change from daylight saving time to standard time is not active. Date and time
have to be set manually.
6. Enter the current date in the New date field.
7. Enter the current time in the New time field.
8. Select [Save].
9. To log off from the user interface, select the button [Logout].
4.6.13.3 Entering the Operator Name
1. Log into the user interface (see Section9.4.1, page81).
2. Select SunnyCentral > Settings > System.
3. Enter the operator name in the Operator name field.
4. Select the button [Save].
5. To log off from the user interface, select [Logout].
4.6.13.4 Changing the Password for the User Groups
The user interface distinguishes between the user groups "user" and "installer" . To change the password for the
"installer" user group, you must be logged in as an installer. To change the password for the "user" user group, you can
be logged in as a user or an installer.
Identical passwords for the user groups
If your "User" password is the same as your "Installer" password, you will automatically be logged in as an
installer.
During entry of the password, the user interface displays information on the security level of the password entered.
Passwords are categorized as very unsafe, unsafe, adequate, safe and very safe. Only choose passwords with at least
the security level safe. You can also change the password of the "installer" user group via the XML file custom.xml
(see Section4.6.14, page48).
Procedure:
1. Log into the user interface (see Section9.4.1, page81).
2. Select SunnyCentral > Settings > Security.
3. Enter a secure password in the User password or Installer password field and confirm it in the second field.
4. Select the button [Save].
5. To log off from the user interface, select the button [Logout].
User Manual 47SCCPXT-BA-E4-en-54
Page 48

4 Commissioning
SMA Solar Technology AG
4.6.14 Configuring System Settings via XML File
4.6.14.1 Uploading the File custom.xml
When you upload the file custom.xml to the user interface, the communication unit checks the file to ensure that the
values entered are valid and accurate, and adopts the settings at the next reset of the communication unit.
Correct network settings
While uploading, the communication unit checks the XML file custom.xml for validity and accuracy of the
entered values. The accuracy of the network settings is not checked.
• Ensure that the file custom.xml includes the correct network settings.
Procedure:
1. Create the file custom.xml with the required settings (see Section12.3, page150).
2. Log into the user interface as an installer (see Section9.4.1, page81).
3. Select SunnyCentral > Settings > System.
4. Select [Browse] in the field Upload settings (custom.xml).
5. Double-click on the file custom.xml in the open dialog box.
6. Select the button [Upload].
☑ The message Do you really want to apply the customer-specific settings is displayed.
✖ The message The settings have not been activated because the file has an invalid format or invalid
entries. is displayed?
• Click on the symbol.
• Read off the error in the open dialog box and correct the file custom.xml.
• Ensure that the file custom.xml is valid and correct.
7. Select the button [Confirm].
☑ The following message is displayed: The settings were successfully saved. The settings will become
effective by carrying out a reset to default settings.
8. To enable the settings in the file custom.xml., the communication unit must be reset to the default settings (see
Section4.6.15, page49).
9. To log off from the user interface, select the button [Logout].
4.6.14.2 Downloading the File custom.xml
The file custom.xml that you have uploaded can also be downloaded.
Procedure:
1. Log into the user interface as an installer (see Section9.4.1, page81).
2. Select SunnyCentral > Settings > System.
3. Click on the link (custom.xml) in the field Upload settings (custom.xml).
4. Choose a storage location for the file and save it.
5. To log off from the user interface, select the button [Logout].
User ManualSCCPXT-BA-E4-en-5448
Page 49

SMA Solar Technology AG
4 Commissioning
4.6.14.3 Deleting the File custom.xml
You can delete the file custom.xml via the user interface. If you have enabled your personal settings via the file
custom.xml before deleting it, these settings will remain effective.
No confirmation after deleting the file custom.xml
If you perform the following steps, the file custom.xml will be deleted immediately without displaying a dialog
box confirming the deletion.
• Save the file custom.xml before deleting it.
Procedure:
1. Log into the user interface as an installer (see Section9.4.1, page81).
2. Select SunnyCentral > Settings > System.
3. In the field Upload settings (custom.xml), select the button [Delete].
☑ The file custom.xml is immediately deleted.
4. To log off from the user interface, select the button [Logout].
4.6.15 Resetting the Communication Unit
Resetting the communication unit will restore all of its original default settings. If you have uploaded an XML file
custom.xml, the settings of this file will be adopted (see Section4.6.14.1 "Uploading the File custom.xml", page48).
Perform data backup
• Before you reset the communication unit, note down all settings such as network or portal settings.
• To avoid data loss, be sure to back up your operating data.
PV system identifier in SunnyPortal
If you reset all settings, all settings for logging into SunnyPortal will also be deleted. If you restart the
communication unit after the reset without changing any settings, the communication unit will create a new PV
system with a new PV system identifier in Sunny Portal.
• If the data is to be sent to the existing PV system in Sunny Portal, adjust the identifier of the old PV system (see
Section6.2.2.2, page56).
• Enter the e-mail address of a user who has SunnyPortal administrator rights for the PV system.
Procedure:
1. Log into the user interface as an installer (see Section9.4.1, page81).
2. Select SunnyCentral > Info.
3. Select the button [Default setting].
☑ A security prompt opens.
4. Select the button [Confirm].
5. To log off from the user interface, select [Logout].
4.7 Switching the Inverter On
Requirements:
☐ All electrical connections executed on site must be correct and firmly attached.
☐ The entire PV power plant, including the PV array, must have been tested by the PV system builder in accordance
with the applicable standards.
☐ A test protocol of the tests carried out must have been compiled in accordance with the applicable standards.
User Manual 49SCCPXT-BA-E4-en-54
Page 50

4 Commissioning
☐ The ground resistance of the PV system must have been determined.
☐ All values measured must be within the permissible range.
Procedure:
1. Lock the inverter.
2. Turn the key switch to Start.
☑ The DC switch switches on with an audible click.
☑ Under conditions of sufficient irradiation, the inverter starts feeding into the utility grid.
✖ Disturbance message on the touch display?
• Eliminate the disturbance (see Section7, page65).
SMA Solar Technology AG
User ManualSCCPXT-BA-E4-en-5450
Page 51

SMA Solar Technology AG
5 Disconnecting and Reconnecting
5 Disconnecting and Reconnecting
5.1 Safety When Disconnecting and Reconnecting Voltage Sources
Danger to life from electric shock due to live voltage
High voltages are present in the live components of the product. Touching live components results in death or serious
injury due to electric shock.
• Wear suitable personal protective equipment for all work on the product.
• Do not touch any live components.
• Observe all warning messages on the product and in the documentation.
• Observe all safety information of the module manufacturer.
• After switching off the inverter, wait at least 15minutes before opening it to allow the capacitors to discharge
completely (see Section5.2, page51).
Danger to life from electric shock due to ground fault
If a ground fault has occurred, parts of the PV power plant that are supposedly grounded may in fact be live.
Touching incorrectly grounded parts of the PV power plant results in death or serious injuries from electric shock.
• Before working on the PV power plant, ensure that no ground fault is present.
• Wear suitable personal protective equipment for all work on the device.
Risk of burns due to hot components
Some components of the product can get very hot during operation. Touching these components can cause burns.
• Observe the warnings on all components.
• During operation, do not touch any components marked with such warnings.
• Wear suitable personal protective equipment for all work on the product.
5.2 Disconnecting the Inverter
5.2.1 Switching off the Inverter
1. Turn the key switch to Stop.
2. Remove the key. This will protect the inverter from inadvertent reconnection.
3. Wait 15 minutes before opening the doors. This allows the inverter capacitors to discharge.
5.2.2 Disconnecting the DC Side
1. Switch off the inverter (see Section5.2.1, page51).
2. Disconnect all poles of the DC voltage in the DC main distribution or DC subdistribution (see documentation of the
main or subdistribution).
3. Ensure that the DC switchgear in the inverter is open.
4. Ensure that no voltage is present on the load side of the DC switchgear.
5. Cover or isolate any adjacent live components.
User Manual 51SCCPXT-BA-E4-en-54
Page 52

5 Disconnecting and Reconnecting
6. Disassemble the protective covers of the fuses (see Section9.1.2, page80).
7. Remove all fuses and disconnection blades from all fuse holders of the inverters. Use an LV/HRC fuse extractor.
SMA Solar Technology AG
5.2.3 Disconnecting the AC Side
1. Switch off the inverter (see Section5.2.1, page51).
2. Disconnect the DC side (see Section5.2.2, page51).
3. Externally disconnect the AC voltage of the MV transformer.
4. Switch off the AC disconnection unit in the inverter.
5. Ensure that no voltage is present.
6. Cover or isolate any adjacent live components.
5.2.4 Disconnecting the Supply Voltage and External Voltages
1. If the supply voltage is only to be disconnected upstream from
the circuit breaker, switch the circuit breaker of the supply
voltage off.
2. If the supply voltage is also to be disconnected downstream from the supply voltage circuit breaker, switch the
external circuit breaker of the supply voltage off.
Tip: The external circuit breaker of the supply voltage is usually located in a subordinate distribution station.
3. Disconnect any additional external voltage.
4. Switch the motor-protective circuit-breakers of the grid
monitoring off.
User ManualSCCPXT-BA-E4-en-5452
Page 53

SMA Solar Technology AG
5. Open the measurement and disconnect terminals.
6. Ensure that no voltage is present.
7. Cover or isolate any adjacent live components.
5 Disconnecting and Reconnecting
5.3 Reconnecting the Inverter
5.3.1 Reconnecting the Supply Voltage and External Voltages
1. Close the measurement and disconnect terminals.
2. Switch on the motor-protective circuit-breakers of the grid
monitoring.
3. Connect any additional external voltage.
4. If the supply voltage has been disconnected downstream from the circuit breaker, switch the external circuit
breaker of the supply voltage on.
Tip: The external circuit breaker of the supply voltage is usually located in a subordinate distribution station.
User Manual 53SCCPXT-BA-E4-en-54
Page 54

5 Disconnecting and Reconnecting
5. If the supply voltage has been disconnected upstream from the
circuit breaker, switch the circuit breaker of the supply voltage
on.
5.3.2 Reconnecting the AC Side
1. Reconnect the supply voltage and external voltages (see Section5.3.1, page53).
2. Reconnect the AC voltage of the MV transformer.
3. Switch on the AC disconnection unit in the inverter.
SMA Solar Technology AG
5.3.3 Reconnecting the DC Side
1. Insert all fuses and disconnection blades into all fuse holders of the inverter. Use an LV/HRC fuse extractor.
2. Mount the protective covers over the fuses (see Section9.1.2, page80).
3. Switch on the DC voltage in the DC main distribution or DC subdistribution (see documentation of the main or
subdistribution).
5.3.4 Restarting the Inverter
• Turn the key switch to Start.
User ManualSCCPXT-BA-E4-en-5454
Page 55

SMA Solar Technology AG
6 Operation
6 Operation
6.1 Safety during Operation
Operation failure of the PV power plant due to incorrectly set parameters
If the parameter settings for grid management services are incorrect, the PV power plant may not be able to meet the
requirements of the grid operator. This can involve yield losses and the inverter may have to be disconnected by the
grid operator.
• When setting the modes of grid management services, ensure that the control procedures agreed with the grid
operator are parameterized.
• If the inverter is operated with a PowerPlantController, ensure that the mode WCtlCom for active power
limitation and the mode VArCtlCom for reactive power control are selected in the inverter.
6.2 Displaying Operating Data
6.2.1 Displaying Operating Data via the User Interface
1. Log into the user interface (see Section9.4.1, page81).
2. Select Data > Devices.
3. Select .
☑ A list of the existing device types appears.
4. Select the desired device type.
☑ A list appears containing all existing devices of this type.
5. Select the desired device from the list.
6. Select the tab Instantaneous values.
6.2.2 Displaying the Operation Data via Sunny Portal
6.2.2.1 Registering the Inverter in Sunny Portal
Automatic PV system identifier
In general, you do not have to change the preset number in the field PV system identifier. SunnyPortal uses this
number to uniquely identify the PV power plant. If you have not yet registered the PV power plant in SunnyPortal,
the predefined PV system identifier will be automatically entered in SunnyPortal after the first successful data
upload. Sunny Portal sends the login data to the e-mail address you have entered in the field Operator e-mail.
After this, your PV power plant is registered in Sunny Portal.
Procedure:
1. Log into the user interface (see Section9.4.1, page81).
2. Select SunnyCentral > Settings > Data transmission.
3. Enter the name of your PV system in the field PV system name. This name will be displayed as the name of the
PV system in SunnyPortal.
4. Set the data transmission frequency (see Section6.3.2, page57).
5. Select yes in the field Use Sunny Portal.
6. If the PV system is already registered in SunnyPortal, adapt the PV system identifier in the field PV system
identifier (see Section6.2.2.2, page56).
User Manual 55SCCPXT-BA-E4-en-54
Page 56

6 Operation
7. Enter your e-mail address in the field Operator e-mail. Sunny Portal will send the access data to this e-mail
address.
8. Select the button [Save].
9. Select SunnyCentral > Info.
10. Select [Register] in the field Last Sunny Portal registration. The Sunny Portal password will be sent to the email address you have entered.
SMA Solar Technology AG
6.2.2.2 Adjusting the PV System Identifier for Sunny Portal
Sunny Portal identifies the inverter via the PV system identifier. In the following cases, you will need to adjust the PV
system identifier of the inverter:
• Data of the PV power plant has already been sent to Sunny Portal via another communication unit.
• The set PV system identifier of the communication unit has been reset.
• The communication unit has been replaced.
Procedure:
1. Log into Sunny Portal (www.SunnyPortal.com).
2. Select Configuration > PV system properties.
3. Copy the PV system identifier to the clipboard.
4. Log into the user interface (see Section9.4.1, page81).
5. Select SunnyCentral > Settings > Data transmission.
6. Delete the content of the PV system identifier field.
7. Paste the PV system identifier from the clipboard into the PV system identifier field.
8. Select the button [Save].
6.2.2.3 Deleting the SunnyPortal Buffer
You can delete the data on the internal ring buffer.
Procedure:
1. Log into the user interface as an installer (see Section9.4.1, page81).
2. Select SunnyCentral > Info.
3. Select the button [Delete] in the field Sunny Portal Buffer Load.
6.3 Saving Operating Data
6.3.1 Reducing Storage Capacity by Averaging
The communication unit can average the data over a defined time period. This helps to compress the data of the
connected devices so that it occupies less memory space in the communication unit.
Procedure:
1. Log into the user interface (see Section9.4.1, page81).
2. Select SunnyCentral > Recording.
3. In the field Averaging over, select the time period over which the communication unit is to calculate the
average.
4. Select the button [Save].
User ManualSCCPXT-BA-E4-en-5456
Page 57

SMA Solar Technology AG
6 Operation
6.3.2 Setting the Data Transmission Frequency
The communication unit can transmit the data to SunnyPortal or an external FTP server. You can set how often and at
what interval data will be sent by the communication unit. All data upload settings relate to both data upload to Sunny
Portal and data upload to an external FTP server.
If the data transmission to SunnyPortal or the external FTP server fails, the communication unit will make further
attempts to transmit the data.
Procedure:
1. Log into the user interface (see Section9.4.1, page81).
2. Select SunnyCentral > Settings > Data transmission.
3. Select the upload frequency and time window in the field Upload frequency per time window.
4. Select the maximum number of upload attempts in each time window in the field Maximum number of upload
attempts per time window.
5. Select the button [Save].
6.3.3 Downloading Operating Data Using the FTP Server
6.3.3.1 Defining Read and Write Access Rights
The communication unit is equipped with an integrated FTP server. You can use the FTP server to access the data of the
communication unit. The data is available for view and download in CSV or XML format. In order to use the FTP server,
you must first assign read and write access rights for the FTP server on the communication unit.
Procedure:
1. Log into the user interface (see Section9.4.1, page81).
2. Select SunnyCentral > Settings > Security.
3. Select an option in the field FTP server:
Option Explanation
Read/write You have read and write access rights on the integrated FTP server.
Read only You have read access rights only on the integrated FTP server.
Off The integrated FTP server is deactivated.
4. Select the button [Save].
6.3.3.2 Accessing the FTP Server via the Web Browser
You can log into the FTP server of the communication unit as either "user" or "installer".
Stored user name and password in the web browser
After you have accessed the FTP server of the communication unit with a web browser, user name and passwords
can be saved in the browser cache.
• Clear the web browser cache to prevent unauthorized access to the FTP server of the communication unit.
Procedure:
1. Start your web browser.
2. Enter the FTP address of the communication unit with your user name and password as follows: ftp://[user name]:
[password]@[IP address]
User Manual 57SCCPXT-BA-E4-en-54
Page 58

6 Operation
SMA Solar Technology AG
Example: entering the FTP address
If you want to log into the communication unit with IP address 192.168.100.2 and your user name is "user" and
password "1234", the correct FTP address is ftp://user:1234@192.168.100.2
3. Press the enter key.
6.3.3.3 Activating Automatic Data Transmission via FTP Push
The communication unit is equipped with an FTP push function. With this function, the data collected from your PV
power plant can be uploaded as an XML file to a local FTP server.
Option Explanation
Yes Authentication is needed for the FTP server.
No No authentication is required.
Procedure:
1. Log into the user interface (see Section9.4.1, page81).
2. Select SunnyCentral > Settings > Data transmission.
3. In the field Use FTP-Push service, select yes.
4. In the field FTP server, enter the URL and port of the FTP server.
5. In the field Upload directory, specify the folder on the FTP server to which the data is to be saved.
6. In the field Use authentication, select an option.
7. Enter the data of your FTP server in the fields User name and Password.
8. Set the data transmission frequency (see Section6.3.2, page57).
9. To test the FTP push function, select the button [testing] in the field Test FTP connection.
☑ A test file is sent to the FTP server.
✖ No test file is sent to the FTP server?
• Ensure that the address of the FTP server and the upload directory are correct.
• Repeat the FTP connection test.
• If an error occurs, contact your network administrator.
10. Select the button [Save].
6.3.4 Downloading Operating Data via HTTP Download
6.3.4.1 Downloading Data in XML Format
You can download the data collected by the communication unit via HTTP download. This function enables manual
download of your collected PV system data in CSV or XML format to your computer.
Requirement:
☐ Averaging must be activated (see Section6.3.1, page56).
Procedure:
1. Log into the user interface (see Section9.4.1, page81).
2. Select SunnyCentral > Recording.
3. In the field Format, select the option XML.
4. In the field Download, select the required month. The data of the last twelve months is available for download
via the user interface.
User ManualSCCPXT-BA-E4-en-5458
Page 59

SMA Solar Technology AG
5. Select the button [Download].
6. Choose the save location.
7. Select the button [Save].
6 Operation
6.3.4.2 Downloading Data in CSV Format
Data saved in CSV format can be automatically imported into tables (e.g. in Microsoft Excel). The configured
separator and end of line characters are used to structure the data.
Requirement:
☐ Averaging must be activated (see Section6.3.1, page56).
Procedure:
1. Log into the user interface (see Section9.4.1, page81).
2. Select SunnyCentral > Recording.
3. In the field Format, select the option CSV.
4. Select [Configure].
5. Select the desired format of the file name in the field Filename format.
6. In the field Create column headers, select an option:
Option Explanation
Yes A header is added to the CSV file.
No No header is added to the CSV file.
7. Select an option in the field End-of-line character.
Option Explanation
CRLF (Windows) Control character used in Windows to separate lines in a CSV file.
LF (Unix/Linux) Control character used in Linux to separate lines in a CSV file.
CR (Mac) Control character used in Macintosh to separate lines in a CSV file.
8. In the field Separator character , select the separator character to be used to separate content within the CSV
file. Tip: If you intend to import CSV data into Microsoft Excel for evaluation, choose Comma as the separator.
9. In the field Number format, select the desired number format. Tip: If you intend to import CSV data into
Microsoft Excel for evaluation, select #.## as the number format.
10. In the field Timestamp format, select the desired time format.
11. In the field Format of the status channels, select an option:
Option Explanation
Numeric Status information on the inverter is displayed in numeric format.
Plain text Status information on the inverter is displayed as text.
12. Select the button [Save].
13. In the field Download, select the required month. The data of the last twelve months is available for download
via the user interface.
14. Select the button [Download].
15. Select the button [Save].
User Manual 59SCCPXT-BA-E4-en-54
Page 60

6 Operation
16. Choose the save location.
17. Select the button [Save].
SMA Solar Technology AG
6.3.5 Saving Operating Data on a Memory Card
6.3.5.1 Information on Saving Data on a Memory Card
You can save all the data collected from the inverter to a memory card. The save-to-memory-card feature is disabled by
default. If a memory card is inserted into the slot of the communication unit and data storage on external storage
media is enabled, the communication unit will copy all data from the internal ring buffer to the external SD memory
card. The communication unit continues to store data on the memory card for as long as the memory card is inserted in
the slot. The communication unit creates a folder on the memory card. The name of the folder is "SCCOM_[SerialNumber]". [SerialNumber] designates the serial number of the respective communication unit. In this
folder, the communication unit creates a new subfolder for each day. Each subfolder contains all the data collected by
the communication unit. When the memory card has reached its capacity, the LED H5 glows red and the
communication unit ceases to store data on the memory card. Replace the memory card or reformat it on the
computer.
Data loss if memory card is removed
Do not remove the memory card while the communication unit is in process of storing data. This can damage the
file system of the memory card and lead to data loss. Depending on the amount of data, the write process can
take some time.
6.3.5.2 Inserting the Memory Card
Danger to life due to electric shock or electric arc if live components are touched
• Switch off the inverter and wait at least 15minutes before opening it to allow the capacitors to discharge
completely.
• Disconnect the inverter (see Section5, page51).
Procedure:
• Insert the memory card in the slot of the communication unit.
6.3.5.3 Enabling Data Storage on the Memory Card
1. Log into the user interface (see Section9.4.1, page81).
2. Select SunnyCentral > Settings > Security.
User ManualSCCPXT-BA-E4-en-5460
Page 61

SMA Solar Technology AG
3. To activate data storage to the memory card, select the option Enabled in the field External memory.
4. To deactivate data storage to the memory card, select the option Disabled.
5. Select the button [Save].
6 Operation
6.3.5.4 Displaying the Memory Capacity Available on the Memory Card
1. Log into the user interface (see Section9.4.1, page81).
2. Select SunnyCentral > Info.
3. In the field Sunny Portal Buffer Load, you can see the space available in the internal ring buffer.
4. In the field SD card memory capacity, you can see the space available on the memory card.
6.4 Updating the Firmware
6.4.1 Automatic Update
If the communication unit has access to SunnyPortal, you can select automatic update of the firmware. The
communication unit checks whether a new firmware version is available every time data is transmitted to SunnyPortal.
If a new firmware update is available, the communication unit will download the firmware update from the Internet and
install it at night between 1:00a.m. and 4:00a.m. The automatic firmware update function is disabled by default.
Requirement:
☐ Connection to SunnyPortal must be established (see Section6.2.2, page55).
Procedure:
1. Log into the user interface (see Section9.4.1, page81).
2. Select SunnyCentral > Settings > Data transmission.
3. In the field Automatic firmware update, select the option yes.
4. Select the button [Save].
6.4.2 Update via User Interface
1. Log into the user interface (see Section9.4.1, page81).
2. Select SunnyCentral > Info.
3. Select the button [Refresh] in the field VersionFirmware.
User Manual 61SCCPXT-BA-E4-en-54
Page 62

6 Operation
SMA Solar Technology AG
6.5 Changing the Insulation Monitoring
6.5.1 Insulation Monitoring with GFDI and Insulation Monitoring Device
6.5.1.1 Safety during Insulation Monitoring of the PV Power Plant with GFDI and Insulation Monitoring Device
Danger to life from electric shock due to live voltage
High voltages are present in the conductive components of the inverter. Touching live components results in death or
serious injury due to electric shock.
• After switching off the inverter, wait at least 15minutes before opening it to allow the capacitors to discharge
completely.
• Wear suitable personal protective equipment for all work on the product.
• All work must be carried out in accordance with this document. All safety information must be observed.
• Do not touch any live components of the inverter or the medium-voltage grid. Comply with all applicable safety
regulations for handling medium-voltage grids.
Ground-fault monitoring with GFDI does not provide protection from personal injury.
The order option "GFDI and insulation monitoring device" allows you to manually switch the PV power plant from
grounded operation to insulated operation. To ensure that there is no insulation error on the grounded terminal, an
insulation measurement is carried out. After switching to insulated operation, the insulation monitoring device checks all
poles of the PV power plant for potential insulation errors. Switching to insulated operation is useful for performing
maintenance or service work on or near the PV power plant (e.g. cutting the grass) or for checking the status of the
insulation at regular intervals. After completion of the maintenance work, the PV power plant must be switched back to
grounded operation.
6.5.1.2 Switching to Insulated Operation
1. Turn the key switch to Stop.
2. Wait 15minutes before opening the inverter. This will ensure that the capacitors are discharged.
3. Disconnect the circuit breaker of the GFDI manually.
4. Close the inverter.
5. Turn the key switch to Start.
☑ The insulation monitoring device starts collecting data. If the parameter IsoErrIgn is set to On, the error
3504 ‒ Insulation failure ignored is displayed.
✖ After 15minutes, the displayed error 3504 does not disappear?
The insulation is defective.
• Have the insulation checked and, if necessary, repaired by a qualified person.
• Acknowledge the error.
6. Log into the user interface (see Section9.4.1, page81).
7. Wait a few minutes and then call up the instantaneous value Riso on the user interface.
☑ The insulation resistance is greater than 45kΩ. It is safe to enter the PV system.
✖ The insulation resistance is less than 45kΩ?
There is an insulation error and you must not enter the PV system.
• Have the insulation checked and, if necessary, repaired by a qualified person.
User ManualSCCPXT-BA-E4-en-5462
Page 63

SMA Solar Technology AG
6 Operation
6.5.1.3 Switching to Grounded Operation
1. Turn the key switch to Stop.
2. Wait 15minutes before opening the inverter. This will ensure that the capacitors are discharged.
3. Manually switch on the GFDI circuit breaker.
4. Close the inverter.
5. Turn the key switch to Start.
6.5.2 Insulation Monitoring with RemoteGFDI and Insulation Monitoring Device
6.5.2.1 Information on Insulating PV Modules with Remote GFDI and Insulation Monitoring Device
Ground-fault monitoring does not provide protection from personal injury. Ground-fault monitoring and the insulation
monitoring device enable the PV array to be switched automatically from grounded operation to insulated operation.
To ensure that there is no insulation error on the grounded terminal, an insulation measurement is carried out. After
switching to insulated operation, the insulation monitoring device checks all poles of the PV array for potential
insulation errors. Switching to insulated operation is useful for performing maintenance or service work near the PV
array (e.g. cutting the grass) or for checking the status of the insulation at regular intervals.
6.5.2.2 Switching to Insulated Operation
1. Log into the user interface (see Section9.4.1, page81).
2. Set the parameter RemMntSvc to On.
☑ The insulation monitoring device starts collecting data. If the parameter IsoErrIgn is set to On, the error 3504 -
Insulation failure ignored is displayed.
✖ After 15minutes, the displayed error 3504 does not disappear?
The insulation is defective.
• Have the insulation checked and, if necessary, repaired by a qualified person.
• Acknowledge the error.
6.5.2.3 Switching to Grounded Operation
1. Log into the user interface (see Section9.4.1, page81).
2. Set the parameter RemMntSvc to Off.
6.6 Deleting the Device Description
Whenever you replace a device in your PV power plant, the descriptions of the existing devices need to be deleted so
that the communication unit is able to detect new devices.
Procedure:
1. Log into the user interface as an installer (see Section9.4.1, page81).
2. Select SunnyCentral > Info.
3. Select the button [Delete device descriptions].
6.7 Sending a ZIP File with Service Information
In order to help you quickly and effectively, a ZIP file containing service information may be required. This ZIP file can
be downloaded from the user interface. The files are protected with a service password.
User Manual 63SCCPXT-BA-E4-en-54
Page 64

6 Operation
Procedure:
1. Log into the user interface (see Section9.4.1, page81).
2. Select SunnyCentral > Info.
3. Select [Create service information].
☑ A dialog box for downloading the ZIP file is opened.
4. Save the ZIP file on the computer.
5. Send the ZIP file to us (see Section13, page154).
SMA Solar Technology AG
User ManualSCCPXT-BA-E4-en-5464
Page 65

SMA Solar Technology AG
7 Troubleshooting
7 Troubleshooting
7.1 Safety during Troubleshooting
Danger to life from electric shock due to high voltages on the product
High voltages can be present on the product under fault conditions. Touching live components results in death or
serious injury due to electric shock.
• Observe all safety information when working on the product.
• Wear suitable personal protective equipment for all work on the product.
• If you cannot remedy the disturbance with the help of this document, contact the Service (see Section13
"Contact", page154).
7.2 Activating Alert in the Event of a Fault
You can be notified by e-mail of events that have occurred. This allows a rapid response to failures in the PV power
plant and minimizes downtimes. The alert is deactivated upon delivery.
Communication unit reports an error-type event after two averaging intervals
The communication unit reports error-type events which have persisted twice as long as the time set for averaging.
Example: If the averaging setting is 15 minutes, the communication unit will report an error once it has existed for
longer than 30 minutes.
Procedure:
1. Log into the user interface (see Section9.4.1, page81).
2. Select SunnyCentral > Settings > Data transmission.
3. In the field Notification active, select yes.
4. Select an option in the field Multiple Notices (24h/48h):
Option Explanation
yes You will receive an e-mail immediately upon occurrence of an event. If the event
persists after 24 hours and 48 hours, the e-mail will be sent again.
no You will receive an e-mail once when an event occurs. An e-mail with error-type
events is sent after two averaging intervals.
5. In the field E-mail address, enter the e-mail address. If an e-mail is to be sent to multiple e-mail addresses,
separate the e-mail addresses with commas.
6. In the field E-mail when, select the desired event type for which the e-mail is to be sent.
7. Enter the required data in the fields Mail server (SMTP), Sender e-mail, User name and Password.
8. Select the button [Testing].
☑ A test e-mail will be sent to the specified e-mail address.
✖ No test e-mail received?
• Check whether the test e-mail is in the spam folder.
• Make sure that the network settings of the communication unit are correct.
• Make sure the settings of the e-mail server are correct.
9. Select the button [Save].
User Manual 65SCCPXT-BA-E4-en-54
Page 66

7 Troubleshooting
SMA Solar Technology AG
7.3 Reading Off Disturbance Messages
7.3.1 Reading Off Error Messages via Touch Display
If an error occurs, a warning symbol is shown on the touch display.
Procedure:
• Select the warning symbol.
☑ The touch display lists the error number, waiting time, error message and the necessary corrective measure to
eliminate the disturbance.
7.3.2 Reading Off Disturbance Messages via the User Interface
1. Log into the user interface (see Section9.4.1, page81).
2. To display the error number, select the instantaneous value ErrNo in the instantaneous value view.
3. To display the delay time, select the instantaneous value TmsRmg in the instantaneous value view.
4. To display the error message, select the instantaneous value Msg in the instantaneous value view.
5. To display the corrective measure, select the instantaneous value Dsc in the instantaneous value view.
7.3.3 Displaying the Event Report
7.3.3.1 Enabling Automatic Read-Out of Events
1. Log into the user interface (see Section9.4.1, page81).
2. Select SunnyCentral > Recording.
3. In the field Collect automatically fault logs, select yes.
4. Select the button [Save].
7.3.3.2 Displaying and Downloading the Event Report
The event report keeps a log of various events, e.g. errors and warnings. All events can be downloaded in a CSV file.
Upon delivery, the automatic transfer of the events is deactivated.
Procedure:
1. Log into the user interface (see Section9.4.1, page81).
2. In order to have the event report of the inverter displayed manually, proceed as follows:
• Select SunnyCentral > Recording.
• In the field Manually requesting fault memory, select [Request].
• In the field Manually requesting event memory, select [Request].
3. Select SunnyCentral > Events.
4. To download the events as CSV file, carry out the following steps:
• Select the button [Download].
• Choose the save location.
• Select the button [Save].
User ManualSCCPXT-BA-E4-en-5466
Page 67

SMA Solar Technology AG
7.4 Acknowledging Disturbance Messages
7.4.1 Acknowledging Disturbance Messages via the Key Switch
Dealing with disturbances
Disturbance messages should only be acknowledged once the underlying causes have been eliminated.
If the causes of the disturbance have not been eliminated, the disturbance will still be detected after
acknowledgment and the disturbance message will reappear.
Procedure:
1. If an insulation error has occurred, switch the insulation monitoring device back on.
2. Turn the key switch switch to Stop and then back to Start after two seconds.
7.4.2 Acknowledging Disturbance Messages via the User Interface
Dealing with disturbances
Disturbance messages should only be acknowledged once the underlying causes have been eliminated.
If the causes of the disturbance have not been eliminated, the disturbance will still be detected after
acknowledgment and the disturbance message will reappear.
7 Troubleshooting
You will only be able to acknowledge error messages via the user interface after entering the installer password.
Procedure:
1. If an insulation error has occurred, switch the insulation monitoring device back on.
2. Log into the user interface (see Section9.4.1, page81).
3. Select the parameter Ackn in the device displaying the error, and set to Ackn.
4. Select the button [Save].
7.5 Remedial Action in Case of Disturbances
7.5.1 Inverter Behavior in Case of Disturbances
If a disturbance occurs during operation, this may be caused by a warning or an error.
There are two levels assigned to each disturbance which influence the display and system behavior. With certain
disturbances, the inverter behavior will differ depending on the level. The level is increased from 1 to 2 if the
disturbance occurs five times within two hours or without interruption for two hours.
Inverter behavior in the disturbance levels 1 and 2:
• Waiting time
The inverter switches to the operating state "Disturbance" and opens the AC disconnection unit and DC
switchgear. The inverter does not feed into the grid for the defined waiting time.
The waiting time specifies how long the disturbance will be shown on the touch display and saved as a
disturbance. Once the waiting time has elapsed, the disturbance is no longer shown on the touch display. The
inverter then checks whether the cause of the disturbance has been rectified.
If the cause of the disturbance still exists after the waiting time has expired or the disturbance has been
acknowledged, the inverter remains in the operating state "Disturbance".
User Manual 67SCCPXT-BA-E4-en-54
Page 68

7 Troubleshooting
• Waiting for acknowledgement
The inverter switches to the operating state "Disturbance" and opens the AC disconnection unit and DC
switchgear. The inverter does not feed in until the disturbance is acknowledged.
Once the disturbance has been acknowledged, it is no longer shown on the touch display. The inverter then
checks whether the cause of the disturbance has been rectified.
If the disturbance is no longer pending, it is deleted from the memory. If the cause of the disturbance still exists
after the disturbance has been acknowledged, the inverter remains in the operating state "Disturbance".
• Day change
The inverter switches to the operating state "Disturbance" and opens the AC disconnection unit and DC
switchgear. The inverter does not feed in.
The disturbance is automatically reset when the day changes. Once the disturbance has been reset, it is no longer
shown on the touch display. The inverter then checks whether the cause of the disturbance has been rectified.
If the disturbance is no longer pending, it is deleted from the memory. If the cause of the disturbance still exists
after the day has changed or the disturbance has been acknowledged, the inverter remains in the operating state
"Disturbance".
• System-specific
The inverter switches to the operating state "Disturbance" and opens the AC disconnection unit and DC
switchgear. The inverter does not feed in. How long the inverter remains in this state depends on the systemspecific influencing factors.
SMA Solar Technology AG
Once the time has elapsed, the disturbance is no longer shown on the touch display. The inverter then checks
whether the cause of the disturbance has been rectified. If the disturbance is no longer pending, it is deleted from
the memory. If the cause of the disturbance still exists after the disturbance has been acknowledged, the inverter
remains in the operating state "Disturbance".
• Warning
A warning does not affect inverter behavior. The cause of the warning must be determined and remedied.
In the operating state "Disturbance", the touch display shows a warning symbol, error number, waiting time, error
message and the required measure to eliminate the disturbance message.
Once the cause of the disturbance has been rectified and the disturbance is no longer displayed, it is deleted from the
fault memory. To view previous disturbances after they have been deleted from the fault memory, an event report is
filed on the SD memory card. The event report logs the time and type of disturbance. The event report can also be
displayed on the user interface.
Depending on the type of disturbance, a reset may be performed. When this happens, the relays are checked and the
supply voltage of the control system is switched off. This process takes less than one minute. While the control system is
booting, the regular waiting times for grid monitoring are complied with.
User ManualSCCPXT-BA-E4-en-5468
Page 69

1301
3803
0104
Error no.
Grid voltage is too high.
DC current of PV array is too high.
Left-hand rotating magnetic field
is connected.
Explanation
W
1 min
30 s
S1
C
D
Q
S2
‒
x
‒
R Corrective measures
• Check phase position.
• Check DC input current.
• Check grid voltage.
A B
SMA Solar Technology AG
7.5.2 Explanation of the Error Tables
You will find the following information in the error tables in the following sections:
Position Explanation
A Behavior of the inverter: disturbance levelS1, disturbance levelS2
• s / min: waiting time
• C: system-specific
7 Troubleshooting
• D: day change
• Q: waiting for acknowledgement
• W: warning
B Reset
7.5.3 Error Numbers 01xx to 13xx - Disturbance on the Utility Grid
After a grid failure, the inverter monitors the utility grid for a specific period before reconnecting. When the inverter
monitors the utility grid after a grid error, the grid monitoring time is complied with. Certain errors, such as grid errors,
cause the inverter to shut down. In this case, the instantaneous value TmsRmg indicates the time for which the inverter
monitors the utility grid before reconnecting. This grid monitoring time can be defined in parameter GdErrTm.
Error no. Explanation Inverter behavior Corrective measures
S1 S2 R
0103* Grid voltage is too high. Overvolt-
age detected by redundant monitoring.
0104* Grid voltage is too high. Overvolt-
age detected by standard monitoring.
0203* Grid voltage is too low. Undervolt-
age detected by redundant monitoring.
30s 30s ‒ • Check the grid voltage.
• Check grid connections.
• Check stability of the utility grid.
C C ‒
30s 30s ‒
• Make sure the external fuses work
properly.
• Make sure the AC cable connections
are tight.
User Manual 69SCCPXT-BA-E4-en-54
0204* Grid voltage is too low. Undervolt-
age detected by standard monitoring.
0205* Grid synchronization not possible 30s 30s ‒
30s 30s ‒
Page 70

7 Troubleshooting
Error no. Explanation Inverter behavior Corrective measures
S1 S2 R
SMA Solar Technology AG
0404* Frequency change per second too
high for grid operation
0502* Power frequency is too low. Power
frequency disturbance detected by
standard monitoring.
0503* Power frequency is too high.
Power frequency disturbance detected by standard monitoring.
0504* Power frequency is too low. Power
frequency disturbance detected by
redundant monitoring.
0505* Power frequency is too high.
Power frequency disturbance detected by redundant monitoring.
0506* The inverter has detected a stand-
alone grid and has disconnected
from the utility grid.
0801* One line conductor of the utility
grid has failed.
0802*
30s 30s ‒ ‒
30s 30s ‒ • Check power frequency.
• Check the display of the grid monitoring
relay.
30s 30s ‒
30s 30s ‒
30s 30s ‒
W W ‒ • Check power frequency.
30s 30s ‒ • Check the grid voltage.
• Make sure the fuses in the load circuit
function properly.
• Make sure the external fuses work
properly.
• Make sure the AC cable connections
are tight.
1301 Left-hand rotating magnetic field is
connected.
1500 The conditions for grid reconnec-
tion have not yet been reached after a grid error.
* Depending on the parameterization, the disturbance message may have to be acknowledged manually.
30s Q ‒ • Check phase position.
• Make sure all fuses are switched on.
W W ‒ • Check the power frequency and grid
voltage.
7.5.4 Error Numbers 34xx to 40xx - Disturbance on the PV Array
Error no. Explanation Inverter behavior Corrective measures
S1 S2 R
3403 PV array voltage is too high. 15
min
3404 Open-circuit voltage is too high.
Disturbance detected by standard
monitoring.
15
min
30
min
30
min
‒ • Check the DC voltage.
• Check the module wiring and system
‒
design.
3406 DC voltage is too high. 15
min
30
min
‒
User ManualSCCPXT-BA-E4-en-5470
Page 71

SMA Solar Technology AG
Error no. Explanation Inverter behavior Corrective measures
S1 S2 R
7 Troubleshooting
3501 The insulation monitoring device
has measured a too low grounding resistance.
3502 The GFDI has tripped. C C ‒ • Check the PV array for ground faults.
3504 The insulation monitoring device
has detected an insulation error.
If the parameter IsoErrIgn is set to
On, this error is ignored.
3507 A ground fault has occurred on
the ungrounded terminal of the PV
array.
3510 The inverter has detected an insu-
lation error on the inverter bridge.
3511 The inverter has detected an insu-
lation error.
3512 The RemoteGFDI has detected a
permanent ground fault.
3515 A ground fault detected by
SoftGrounding has been ignored.
C C ‒ • Check the PV array for ground faults.
W W ‒ • Check the PV array for ground faults.
Q Q ‒ • Check the PV array for ground faults.
Q Q ‒ • Check the PV array for ground faults.
W W ‒ • Check the PV array for ground faults.
Q Q ‒ • Check the PV array for ground faults.
W W ‒ • Check the PV array for ground faults.
3517 Insulation measuring is being per-
formed.
3601 Leakage current to ground has oc-
curred in the PV array or the
threshold defined in parameter
RisoCtlWarn has been reached.
3803 The PV array current is too high. 1 min D ‒ • Check the DC input current.
4003 Reverse currents detected in the PV
array or DC connection polarity
reversed.
W W ‒ ‒
W W ‒ • Check the grounding and equipotential
bonding.
• Check the module wiring and system
design.
• Check the parameter RisoCtlWarn.
• Check the module wiring and system
design.
30s Q ‒ • Check the PV modules for short circuits.
• Check the module wiring and system
design.
• Check the DC terminals for correct
polarity.
• Check the functionality of the entire
string.
User Manual 71SCCPXT-BA-E4-en-54
Page 72

7 Troubleshooting
SMA Solar Technology AG
7.5.5 Error Numbers 6xx to 9xx - Disturbance on the Inverter
Error no. Explanation Inverter behavior Corrective measures
S1 S2 R
6002 Calibration data cannot be
loaded.
6113 Data block cannot be loaded from
EEPROM or channel list has
changed (e.g. after firmware update)
6115 Setting of hardware thresholds on
D/A converters is not possible.
6116 Real-time clock has not initialized. W W ‒ • Contact SMAServiceLine.
6117 Device address not recognized. 5 min 5 min x • Contact SMAServiceLine.
6119 Data structure for communication
between operation control unit
and digital signal processor is invalid.
6120 Watchdog tripping error 30s W ‒ • Contact SMAServiceLine.
6121 No response from watchdog 30s W ‒ • Contact SMAServiceLine.
6122 Ten internal monitoring errors have
occurred in succession.
Q Q ‒ • Contact SMAServiceLine.
W W ‒ • Contact SMAServiceLine.
5 min 5 min x • Contact SMAServiceLine.
5 min 5 min x • Contact SMAServiceLine.
W 5 min ‒ • Contact SMAServiceLine.
6128 General error 5 min 5 min x • Contact SMAServiceLine.
6404 Overcurrent at line conductor L1,
L2 or L3
6405 Overvoltage in the DC link of the
inverter bridge
6410 24V supply voltage is invalid. 5 min 5 min x • Contact SMAServiceLine.
6417 15V supply voltage is invalid. 5 min 5 min x • Contact SMAServiceLine.
6418 Overtemperature of the inverter
bridge
6422 Inverter bridge in undefined state 30s 5 min ‒ • Contact SMAServiceLine.
6423 Overtemperature in the switch
cabinet
6425 Synchronization error with utility
grid
6427 Sensor error of DC voltage mea-
surement
C Q x • Contact SMAServiceLine.
30s 5 min ‒ • Contact SMAServiceLine.
5 min 15
min
5 min 30
min
30s 5 min x • Contact SMAServiceLine.
30s C ‒ • Contact SMAServiceLine.
‒ • Contact SMAServiceLine.
‒ • Contact SMAServiceLine.
6440 The MV transformer is no longer
hermetically sealed.
30s 5 min ‒ • Check the MV transformer.
User ManualSCCPXT-BA-E4-en-5472
Page 73

SMA Solar Technology AG
Error no. Explanation Inverter behavior Corrective measures
S1 S2 R
7 Troubleshooting
6441 Sensor error during measurement
of DC voltage
6443 Unspecified error in digital signal
processor
6447 Self-test of inverter bridge failed Q Q ‒ • Contact SMAServiceLine.
6448 Insulation monitoring provides non-
permitted values
6451 Measured AC voltage of the in-
verter is less than utility grid voltage.
6452 Measured AC voltage of the utility
grid is less than inverter voltage.
6453 AC voltage of grid limit monitoring
is faulty.
6454 AC current is faulty. W W ‒ • Contact SMAServiceLine.
6455 AC voltage is faulty. W W ‒ • Contact SMAServiceLine.
6456 Pre-charging circuit of DC link is
defective.
30s 30s ‒ • Contact SMAServiceLine.
30s ‒ x • Contact SMAServiceLine.
W W ‒ • Check insulation monitoring.
W W ‒ • Contact SMAServiceLine.
W W ‒ • Contact SMAServiceLine.
W W ‒ • Contact SMAServiceLine.
W W ‒ • Contact SMAServiceLine.
6457 Capacitor self-test has failed. Q Q ‒ • Contact SMAServiceLine.
6461 Insulation monitoring device has
not adopted threshold.
6471 Online capacitor self-test has
failed.
6472 Endless loop between online and
offline capacitor test
6501 Interior temperature of inverter is
too high.
6502 Temperature of inverter bridge is
too high.
6508 Outside temperature is too high. 30s 1 min ‒
6605 The fast stop was tripped due
overtemperature in the switch cabinet.
15
min
Q Q x • Contact SMAServiceLine.
Q Q x • Contact SMAServiceLine.
30s 1 min ‒ • Check function of the fans.
30s 1 min ‒
30s 1 min ‒ • Contact SMAServiceLine.
15
min
x • Check the insulation monitoring device
and cabling.
• Clean the fans.
• Clean clogged fan inlets and ventilation
plates.
User Manual 73SCCPXT-BA-E4-en-54
Page 74

7 Troubleshooting
Error no. Explanation Inverter behavior Corrective measures
S1 S2 R
SMA Solar Technology AG
7001 Cable break or short circuit at in-
verter temperature sensor
7002 W W ‒
7004 W W ‒
7006 W W ‒
7501 Interior fan is defective. W W ‒ • Check function of the fans.
7502 W W ‒
7503 Inverter bridge fan is defective. W W ‒
7507 Motor-protective circuit breaker of
fan has tripped.
7510 Interior fan is defective. W W ‒
7600 Communication between touch dis-
play and communication unit is interrupted. The error number appears on the display only.
7601 Internal inverter error 30s 1 min x • Contact SMAServiceLine.
W W ‒ • Check the wiring of the temperature
sensor.
• Contact SMAServiceLine.
• Clean the fans.
• Clean clogged fan inlets and ventilation
plates.
W W ‒
W W ‒ • Check cabling between touch display
and communication unit.
• Contact SMAServiceLine.
7602 Internal communication error has
7605 30s 1 min x • Contact SMAServiceLine.
7704 Faulty switching status of the DC
7706 The AC disconnection unit is open
7707 Faulty switching status of the AC
7708 Faulty switching status of Re-
7709 90% of switch cycles of the DC
7710 100% of switch cycles of the DC
occurred or communication is interrupted.
switchgear
or was tripped.
disconnection unit
moteGFDI
switchgear reached
switchgear reached
30s 1 min x • Contact SMAServiceLine.
30s Q ‒ • When disconnecting the inverter, check
that all motor-driven circuit breaker
switches are set to the OFF position. If
not, set all switches to OFF.
• Contact SMAServiceLine.
30s Q ‒ • Contact SMAServiceLine.
30s Q ‒ • Contact SMAServiceLine.
W W ‒ • Contact SMAServiceLine.
10s 10s ‒ • Contact SMAServiceLine.
30s 30s ‒ • Contact SMAServiceLine.
7714 Maximum number of GFDI switch
cycles reached
30s 30s ‒ • Replace GFDI.
User ManualSCCPXT-BA-E4-en-5474
Page 75

SMA Solar Technology AG
Error no. Explanation Inverter behavior Corrective measures
S1 S2 R
7 Troubleshooting
7801 The surge arrester is defective or
the back-up fuse of the surge arrester was tripped.
7901 Reverse current has occurred in PV
array.
8004 The inverter starts to derate due to
overcurrent at the DC switchgear
(SMID).
8701 External active power setpoints
are smaller than 2mA and therefore invalid. The last valid value or,
after a day change, Pmax is
used. Once valid setpoints are
available again, these will be
used.
8702 Several digital active power set-
points are available.
8703 Power factor of the external reac-
tive power setpoint is invalid.
W W ‒ • Check the surge arrester.
• Check the back-up fuse of the surge
arrester.
1 min D x • Contact SMAServiceLine.
W W ‒ ‒
W W ‒ • Contact SMAServiceLine.
W W ‒ • Contact SMAServiceLine.
W W ‒ • Contact SMAServiceLine.
8704 External active and reactive power
setpoints are invalid.
9000 Power electronics self-test is run-
ning. This message disappears
once the self-test is complete.
9008 Doors have been opened during
operation.
9009 Fast stop was manually tripped. 30s 30s ‒ • Eliminate error and switch fast stop back
9013 This relates to a grid management
shutdown. The error is reset by a
signal from the grid operator or
from the safety system of the grid
interconnection point.
9019 Defective fast stop 30s C ‒ • Check the fast stop cabling.
W W ‒ • Contact SMAServiceLine.
W W ‒ ‒
30s 1 min ‒ • Contact SMAServiceLine.
on.
30s 30s ‒ • Eliminate error and switch fast stop back
on.
7.5.6 Displaying Disturbance Messages for Active Power Limitation
The instantaneous value P‑WModFailStt displays errors or warnings associated with active power limitation.
User Manual 75SCCPXT-BA-E4-en-54
Page 76

7 Troubleshooting
Procedure:
1. Log into the user interface (see Section9.4.1, page81).
2. Select the instantaneous value P-WModFailStt.
Display Cause and corrective measures
Off No mode for active power limitation has been selected.
OK A mode for active power limitation has been selected and no error is present.
SMA Solar Technology AG
ComFail
AnInFail
ComInvalid
The mode WCtlCom has been selected and the expected signal with a valid active
power limitation has been absent for at least five minutes.
Corrective measures:
• Ensure that the communication units can be accessed via the Internet.
• Ensure that the communication units are connected correctly.
• Ensure that the cabling between the communication units is ok.
The mode WCnstNomAnIn has been selected and the value measured at the analog input is less than 2mA.
Corrective measures:
• Make sure the cable is correctly connected to the analog input.
The mode WCtlCom has been selected and there is invalid content in the power setpoint
information.
Corrective measures:
• Check the power specification settings.
7.5.7 Displaying Disturbance Messages for the Reactive Power Setpoint
The instantaneous value Q‑VArModFailStt displays errors or warnings relating to the reactive power setpoint.
Procedure:
1. Log into the user interface (see Section9.4.1, page81).
2. Select the instantaneous value Q-VArModFailStt.
Display Cause and corrective measure
Off No mode for specifying the reactive power setpoint has been selected.
OK A mode for specifying the reactive power setpoint has been selected and no error is
present.
ComFail
The mode VArCtlCom or PFCtlCom has been selected and the expected signal with a
valid reactive power setpoint has been absent for at least five minutes.
Corrective measures:
• Ensure that the communication units can be accessed via the Internet.
• Ensure that the communication units are connected correctly.
• Ensure that the cabling between the communication units is ok.
User ManualSCCPXT-BA-E4-en-5476
Page 77

SMA Solar Technology AG
Display Cause and corrective measure
7 Troubleshooting
AnInFail
ComInvalid
The mode VArCnstNomAnIn or PFCnstAnIn has been selected and the value measured at the analog input is less than 2mA.
Corrective measures:
• Make sure the cable is correctly connected to the analog input.
The mode VArCtlCom or PFCtlCom has been selected and there is invalid content in
the power setpoint information.
Corrective measures:
• Check the power specification settings.
User Manual 77SCCPXT-BA-E4-en-54
Page 78

8 Disposal
SMA Solar Technology AG
8 Disposal
Proper disposal
PV power plants which have come to the end of their service life constitute electronic waste. Electronic waste
contains on the one hand valuable materials which can be recycled as secondary raw materials, and on the
other, substances which are hazardous to the environment. Contact your local commercial disposal services for
information on optimum material utilization.
User ManualSCCPXT-BA-E4-en-5478
Page 79

SMA Solar Technology AG
9 Periodic Actions
9 Periodic Actions
9.1 Mounting and Disassembly Work
9.1.1 Disassembling and Mounting the Panels
Danger to life due to electric shock or electric arc if live components are touched
• Switch off the inverter and wait at least 15minutes before opening it to allow the capacitors to discharge
completely.
• Disconnect the inverter (see Section5, page51).
Property damage due to rupture of grounding conductors
The components are connected to the inverter via the grounding conductor. If the roof is not disassembled correctly,
the grounding conductors may be pulled out.
• Take care not to damage the grounding conductors during disassembly.
Disassembling the panels
1. Remove the screws of the front panels using a Torx screwdriver.
2. Detach the grounding straps from the panels.
3. Remove the panels.
Mounting the panels
Requirement:
☐ The protective covers in the connection area must be mounted (see Section9.1.2, page80).
Procedure:
1. Attach the grounding straps to the panels of the interface cabinet (torque: 8Nmto10Nm).
2. Ensure that the grounding straps are firmly in place.
3. Attach the panels using a Torx screwdriver (torque: 2Nmto3Nm).
User Manual 79SCCPXT-BA-E4-en-54
Page 80

9 Periodic Actions
9.1.2 Disassembling and Mounting the Protective Covers
SMA Solar Technology AG
Figure 12: Position of the protective covers
Position Designation
A Protective cover
Danger to life due to electric shock or electric arc if live components are touched
• Switch off the inverter and wait at least 15minutes before opening it to allow the capacitors to discharge
completely.
• Disconnect the inverter (see Section5, page51).
Disassembling the protective covers
Requirements:
☐ The panels must be disassembled (see Section9.1.1, page79).
Procedure:
• Disassemble the protective covers.
Mounting the protective covers
1. Tighten all protective covers (torque: 5Nm).
2. Ensure that the protective covers are firmly in place.
User ManualSCCPXT-BA-E4-en-5480
Page 81

SMA Solar Technology AG
9.2 Entering the Password via the Touch Display
Installer access
The "Installer" access level is activated by entering the installer password. The access level is reset after 15
minutes.
Procedure:
1. Select .
2. Select .
3. Confirm your entry by selecting .
☑ The symbol appears in the status info line.
9.3 Parameter Overview
9.3.1 Accessing the Parameter Overview
1. Log into the user interface as an installer.
2. Select Data > Devices.
9 Periodic Actions
3. Select the desired device from the list.
4. Select the tab Parameters.
9.3.2 Saving Parameter Changes
Requirement:
☐ You must be logged in on the user interface.
Procedure:
1. Change the respective parameter via the field Value.
2. To adopt this value for all devices of the same type and with the same firmware version, activate the box Save
for all devices of this device type.
3. Select the button [Save].
☑ The communication unit adjusts the required value on the device(s).
4. Select the button [OK].
9.4 User Interface
9.4.1 Logging Into the User Interface
Default network settings for the service interface
IP address: 192.168.100.2
Subnet mask: 255.255.255.0
Password for the user groups "installer" and "user": sma
Identical passwords for the user groups
If your "user" password is the same as your "installer" password, you will automatically be logged in as an
installer.
Requirement:
☐ JavaScript must be enabled in your web browser (e.g. Internet Explorer).
User Manual 81SCCPXT-BA-E4-en-54
Page 82

9 Periodic Actions
Procedure:
1. Connect the laptop to the service interface of the inverter.
2. Start your web browser.
3. Enter the IP address of the communication unit in the address bar and press the enter key.
☑ The user interface opens.
4. To change the language, select the desired language in the field Language.
5. Enter the password in the field Password.
6. Select the button [Login].
SMA Solar Technology AG
9.4.2 Logging Out of the User Interface
Always log out from the user interface when you have finished your work. If you only close the web browser, you will
not be logged out. If the user interface is left idle for 15minutes, you will be logged out automatically.
Procedure:
• Select the button [Logout].
User ManualSCCPXT-BA-E4-en-5482
Page 83

SMA Solar Technology AG
10 Function Description
10.1 Operating States
10.1.1 Overview of the Operating States
10 Function Description
Figure 13: General overview of the operating states of the inverter
User Manual 83SCCPXT-BA-E4-en-54
Page 84

10 Function Description
SMA Solar Technology AG
10.1.2 Stop
The inverter is switched off. Stop, Fast stop or Remote shutdown active will appear on the touch display. If the key
switch is set to Start, the inverter switches to the operating state "Grid monitoring".
10.1.3 Grid Monitoring
10.1.3.1 Monitoring the Grid Voltage
In the operating state "Grid monitoring", Waiting for valid AC grid appears on the touch display. The grid limits are
monitored continuously from now on. If no grid error occurs during the grid monitoring time, the AC disconnection unit
closes and the inverter switches to the operating state "Grid monitoring time reached". If the grid limits are exceeded
during the monitoring time, the inverter will restart "Grid monitoring".
You can specify the thresholds and the delay time manually. For voltage monitoring, you can set two limits for
overvoltage and two limits for undervoltage. If the grid voltage increases above the value defined in the parameter
VCtlhhLim or VCtlhLim, the inverter waits for the time defined in the parameter VCtlhhLimTm or VCtlhLimTm and
disconnects from the utility grid.
Figure 14: Temporal inverter behavior when the grid limits are exceeded
Position Parameter Description
A VCtlhhLimTm Delay time for grid limit level 2
B VCtlhLimTm Delay time for grid limit level 1
C ‒ Startup/MPP load operation
D ‒ Grid monitoring
E ‒ Disturbance
1 VCtlhhLim Grid voltage limit level 2
2 VCtlhLim Grid voltage limit level 1
3 ‒ Connection limit, maximum nominal voltage deviation
User ManualSCCPXT-BA-E4-en-5484
Page 85

SMA Solar Technology AG
Position Parameter Description
4 ‒ Grid limit level 1 is breached, timer for B starts counting
5 ‒ Grid limit level 2 is breached, timer for A starts counting
6 ‒ Grid limit level2 is breached for delay time level2 → grid disconnec-
tion
7 ‒ Grid limit level 1 is breached for delay time level 1 → grid disconnec-
tion (has already occurred on level 2)
8 ‒ Connection conditions fulfilled → grid monitoring time starts counting
9 ‒ Utility grid within valid range during grid monitoring time → grid con-
nection
10 Function Description
10.1.3.2 Monitoring the Power Frequency
In the operating state "Grid monitoring", Waiting for valid AC grid appears on the touch display. The grid limits are
monitored continuously from now on. If no grid error occurs during the grid monitoring time, the AC disconnection unit
closes and the inverter switches to the operating state "Grid monitoring time reached". If the grid limits are exceeded
during the monitoring time, the inverter will restart "Grid monitoring".
You can specify the thresholds and delay times manually. For frequency monitoring, threethresholds can be
configured for both overfrequency and underfrequency. For example, at an overfrequency of 50.5Hz, tripping can
take place after one second, and at an overfrequency of 51.5Hz already after 0.1seconds.
Figure 15: Tripping characteristics and time behavior as exemplified by frequency monitoring with the set parameters
10.1.4 Grid Monitoring Time Reached
The inverter is in the operating state "Grid monitoring time reached". Waiting for PV voltage or Waiting for utilities
company appears on the touch display. If the input voltage VPV exceeds the start voltage PvVtgStrLevMin, the
inverter waits until the time specified in parameter PvStrT has elapsed. If the input voltage VPV does not fall below the
start voltage PvVtgStrLevMin during this time, the inverter checks whether the utility grid is connected. If a valid AC
grid is connected, the inverter switches to the operating state "Startup". The start voltage PvVtgStrLevMin must be
adjusted to conform with the PV array connected to the inverter.
User Manual 85SCCPXT-BA-E4-en-54
Page 86

10 Function Description
SMA Solar Technology AG
10.1.5 Startup
10.1.5.1 In Normal Operation: Active Power Ramp-Up
The inverter works up to its maximum feed-in power via a ramp. This means that the inverter gradually increases the
ratio of feed-in power per second by the value set in the parameter WGra.
10.1.5.2 After Grid Fault: Decoupling Protection Ramp
After a grid fault, the inverter restarts at a maximum of 10% nominal power per minute using a decoupling protection
ramp. You have the option of switching this decoupling protection ramp on or off. If you deactivate the decoupling
protection ramp, the inverter rapidly reverts to maximum power. If you wish to deactivate the decoupling protection
ramp, contact us (see Section13 "Contact", page154).
10.1.6 Load Operation
10.1.6.1 MPP
In the MPP operating state, the inverter feeds power into the utility grid and operates permanently at the Maximum
Power Point (MPP). Operation and the amount of power being fed in appear on the touch display. If the measured
power PPV during the time interval PvPwrMinT is less than the minimum feed-in power PvPwrMin or the key switch is
set to Stop, the inverter switches to the operating state "Shutdown".
10.1.6.2 Q at Night
With the order option "Q at Night", the inverter can provide reactive power in order to stabilize the utility grid during
non-feed-in operation, e.g. at night. This function is independent of normal feed-in operation. Only limited dynamic grid
supportis available in the operating state "Q at Night".
Figure 16: General overview of the operating states of the inverter in the operating state "QatNight"
User ManualSCCPXT-BA-E4-en-5486
Page 87

SMA Solar Technology AG
If the AC power generated by the inverter falls below 5kW, the inverter switches from feed-in operation to
"QatNight" operation. The inverter feeds in reactive power in accordance with the parameters set. Since this status
can also occur during the day, the DC switchgear initially remains closed in order to avoid unnecessary switching
cycles of the DC switchgear. If the inverter is in "QatNight" operation for one hour or the DC current falls below −60
A, the DC switchgear opens. The inverter continues to feed in reactive power.
If reactive power feed-in is interrupted after a grid fault and the AC disconnection unit is opened while the DC
switchgear is open, the DC circuit is initially pre-charged. This reduces the stress on the electronic components. This
process takes a maximum of one minute. Once the DC circuit is sufficiently pre-charged, the AC disconnection unit is
closed and the inverter monitors the grid limits. If all of the feed-in requirements are met, the inverter will revert to
reactive power feed-in within one minute.
While the inverter is feeding in reactive power, the inverter monitors whether the conditions for active power feed-in
are met. Once the feed-in requirements are met, the inverter closes the DC switchgear and switches to feed-in
operation. To protect the PV array, the amount of reverse current is set by default to −60A in the parameter
QoDInvCurPv. This value must be adjusted according to the maximum permissible reverse current of the PV array.
10 Function Description
10.1.7 Shutdown
The inverter is in the operating state "Shutdown". Operation appears on the touch display. If the key switch has been
set to Stop, the inverter switches to the operating state "Stop". The AC disconnection unit and the DC switchgear open
automatically. If the inverter shuts down because the feed-in conditions are no longer met, the inverter switches to the
operating state "Grid monitoring".
10.1.8 Disturbance
If a disturbance occurs during operation, the inverter displays a warning symbol in the touch display. The inverter
behavior depends on the type of disturbance. Certain disturbances cause the inverter to shut down.
10.2 Safety Functions
10.2.1 Manual Shutdown Functions
10.2.1.1 External Fast Stop
The inverter comes equipped with a fast stop input. You have the option of connecting an external switch to this fast
stop input which is activated via a 24V signal. The external fast stop disconnects the inverter from the utility grid in less
than 100ms. The inverter is delivered with open terminals. The following options are available for configuring the
external fast stop:
• External fast stop is deactivated
The terminals of the active fast stop are bridged. The fast stop function is thus deactivated. You will need to bridge
the terminals if required.
• External fast stop operated with internal 24 V supply
An external switch (break contact) is connected to the inverter terminals via the internal supply voltage in the
inverter. When the switch is closed, the relay is activated and the inverter feeds into the grid. If the fast stop is
tripped, the switch opens and the relay is deactivated. The inverter is stopped and no longer feeds into the grid.
• External fast stop operated with external 24 V supply
An external switch (break contact) is connected to the inverter terminals via an external 24V power supply.
When the switch is closed, the relay is activated and the inverter feeds into the grid. If the fast stop is tripped, the
switch opens and the relay is deactivated. The inverter is stopped and no longer feeds into the grid.
User Manual 87SCCPXT-BA-E4-en-54
Page 88

10 Function Description
Tripping the fast stop
The fast stop should only be tripped in case of imminent danger. Tripping of the fast stop does not entail fast
discharge of the capacitors. If the inverter is to be switched off and properly shut down via an external signal, the
remote shutdown input is to be used.
SMA Solar Technology AG
10.2.1.2 Remote Shutdown
By means of remote shutdown, you can selectively shut down and switch off the inverter within approximately six
seconds, for example, from a control room. The function of the remote shutdown is similar to the stop function of the
key switch.
If the remote shutdown function is activated from the control room while the inverter is in the operating state "Grid
monitoring", a motor drive automatically shuts off the DC switchgear and the inverter switches to the operating state
"Stop".
If the remote shutdown unit is activated from the control room while the inverter is in the operating state "MPP load
operation", the SunnyCentral switches to the operating state "Shutdown". Once shutdown is complete, the AC
disconnection unit and the DC switchgear are switched off automatically and the inverter switches to the operating
state "Stop".
The remote shutdown is designed as an open-circuit fail-safe function and must be connected to an external 24V
supply voltage. If 24V is present in the remote shutdown, the inverter continues to operate in the current operating
state. If the remote shutdown unit is tripped or if a wire-break occurs, 0V is present in the remote shutdown unit and the
inverter switches from the current operating state to the operating state "Stop".
Use of the remote shutdown will only be possible if the parameter ExlStrStpEna is set to On.
10.2.2 Automatic Shutdown Functions
10.2.2.1 Grid Management Shutdown
If the utility grid becomes unstable, grid management requires that the inverter disconnects from the utility grid
immediately to avoid grid overload. In this event a corresponding Modbus signal will be transmitted by the grid
operator or the safety system at the point of interconnection. The inverter disconnects from the utility grid immediately
and displays error message 9013. After another signal from the grid operator or the safety system at the point of
interconnection, the error will be reset in the inverter.
10.2.2.2 Transformer Protection
A fully hermetic protector can be connected to the inverter. This fully hermetic protector is integrated in the MV
transformer. If a fault occurs in the MV transformer, the inverter immediately shuts down. Two terminals with
230V/50Hz are connected to the customer terminal strip. To deactivate this function, the associated parameter must
be disabled.
10.2.2.3 Active Islanding Detection
The islanding detection function detects the formation of stand-alone grids and disconnects the inverter from the utility
grid.
Islanding can occur when at the time of utility grid failure, the load in the shut-down sub-grid is roughly equivalent to
the current feed-in power of the PV power plant.
With active islanding detection, the inverter continuously checks the stability of the utility grid. If the utility grid is intact,
this has no impact on the utility grid. Only if a stand-alone grid has formed will the inverter disconnect from the utility
grid.
To enable the active islanding detection function, contact us (see Section13 "Contact", page154).
User ManualSCCPXT-BA-E4-en-5488
Page 89

SMA Solar Technology AG
10 Function Description
10.2.2.4 Passive Islanding Detection
The inverter is equipped with passive islanding detection. This function can be activated if required. The islanding
detection function detects the formation of stand-alone grids and disconnects the inverter from the utility grid.
Islanding can occur when at the time of utility grid failure, the load in the shut-down sub-grid is roughly equivalent to
the current feed-in power of the PV power plant.
Unlike active islanding detection, with passive islanding detection the utility grid is not actively influenced, but simply
passively monitored. This involves monitoring the speed of the frequency change.
If the power frequency changes by a certain amount in a certain time, a stand-alone grid is detected and the inverter
disconnects from the utility grid. The magnitude of the frequency change and the time in which this change must take
place can be configured via parameters on the grid monitoring relay.
10.2.3 Grounding and Insulation Monitoring
10.2.3.1 Mode of Operation
In grounded PV arrays
The ground-fault monitoring is implemented by means of a residual-current monitoring device. If a ground fault occurs,
the residual currents are detected and interrupted.
• Ground fault on the ungrounded terminal
If a ground fault occurs on the ungrounded terminal of the PV array, the normally ungrounded terminal of the PV
array is grounded non-specifically by the ground fault and a residual current flows to the grounded terminal. This
residual current flows through the ground-fault monitoring device, e.g. the GFDI, and triggers it.
• Ground fault on the grounded terminal
The GFDI is bypassed when a ground fault occurs on the grounded terminal of the PV array. A ground fault on
the grounded terminal cannot be reliably detected. If an undetected ground fault occurs on the grounded
terminal, this will pose a safety risk. A further ground fault occurring on the ungrounded terminal will lead to high
residual currents that cannot be interrupted by the ground-fault monitoring unit.
Residual current monitoring in grounded systems
In order to ensure the residual current monitoring function in grounded systems, the PV array insulation must be
checked at regular intervals. It is therefore advisable to use an additional insulation monitoring device in
grounded systems. This will enable the insulation to be checked at regular intervals.
In ungrounded PV arrays
An insulation monitoring device constantly determines the insulation resistance using an active measurement
procedure. As soon as the insulation resistance falls below the warning threshold specified in the insulation monitoring
device, an insulation warning will appear on the touch display. As a result, preventative measures can be taken before
errors such as personal injury due to leakage currents or system failure occur. If the insulation resistance falls below the
configured warning threshold, the PV power plant switch off. Use the parameter IsoErrIgn to activate or deactivate the
disconnection process under fault conditions.
10.2.3.2 GFDI
Depending on the order option, ground-fault monitoring in the inverter may be carried out via ground fault detection
and interruption (GFDI). This grounds one terminal of the PV array. GFDI is performed via a high-performance K-type
circuit breaker with adjustable operating current. The GFDI is integrated in the inverter and connected between an
input busbar and the grounding busbar.
User Manual 89SCCPXT-BA-E4-en-54
Page 90

10 Function Description
Figure 17: GFDI
Position Designation
SMA Solar Technology AG
A GFDI
10.2.3.3 Remote GFDI
Depending on the order option, ground fault monitoring in the inverter may be carried out via ground fault detection
and interruption with motor drive, in short "Remote GFDI". This grounds one terminal of the PV array. Remote GFDI also
enables automatic error processing. This reduces downtimes and avoids service calls due to temporary insulation
errors such as when condensation occurs on the PV modules. Remote GFDI is performed via a high-performance K-type
circuit breaker with adjustable operating current. The remote GFDI is integrated in the inverter and connected between
an input busbar and the grounding busbar.
Figure 18: Remote GFDI
Position Designation
A Remote GFDI
User ManualSCCPXT-BA-E4-en-5490
Page 91

SMA Solar Technology AG
If the RemoteGFDI trips, initially a temporary error will be assumed and a motor drive will close the RemoteGFDI after
a defined waiting time. No external switch command is required to close the tripped RemoteGFDI. The inverter can
switch back to feed-in operation after a waiting time. In the default setting of the inverter, the software will attempt to
start the RemoteGFDI up to three times per day. If the RemoteGFDI is tripped on several consecutive days, the
software assumes a permanent insulation error and the inverter will no longer switch back on. In this case, a qualified
person will need to check and, if necessary, repair the insulation and then acknowledge the error.
10 Function Description
10.2.3.4 Insulation Monitoring Device
Depending on the order option, an insulation monitoring device can monitor the insulation resistance of the PV power
plant in ungrounded PV arrays.
In the operating state "MPP load operation", the insulation resistance of the entire system, from the PV array to the MV
transformer, will be measured.
If the inverter is in the operating state "Grid monitoring", only the insulation resistance from the PV array to the inverter
will be measured.
Figure 19: Insulation monitoring device
Position Designation
A Insulation monitoring device
A measuring circuit and a relay with a change-over contact are integrated in the insulation monitoring device.
The insulation monitoring device is connected between the PV voltage and the grounding conductor. The contacts of
the relay are routed to the customer terminal plate and can be used by the customer to trip a signal light or siren. The
characteristics of the relay are indicated in the circuit diagram.
If the insulation resistance falls below the warning threshold specified in the parameter RisoCtlWarn, the measuring
circuit closes and the LED ALARM1 on the insulation monitoring device is glowing. The error message 3601‒
Warning insulation failure is generated by the inverter. Simultaneously, the insulation monitoring device activates
the relay with change-over contact. This relay is installed in the inverter.
If the insulation resistance falls below the error threshold (1kΩ), an insulation error has occurred and the LEDs
ALARM1 and ALARM2 on the insulation monitoring device are glowing. In this case, the operating behavior of the
inverter can be set via parameters as follows:
• If the parameter IsoErrIgn is set to Off, the measuring circuit issues a disturbance when the insulation resistance
falls below the error threshold, the inverter switches off and issues the error message 3501 - Insulation Failure.
The LEDs ALARM1 and ALARM2 are glowing.
User Manual 91SCCPXT-BA-E4-en-54
Page 92

10 Function Description
• If the parameter IsoErrIgn is set to On, the error message from the measuring circuit is ignored when the
insulation resistance falls below the error threshold. The inverter continues to feed into the grid and generates the
error message 3504‒Insulation failure ignored.
• If the parameter IsoErrIgn is set to Run and the insulation resistance falls below the error threshold, the error
message from the measuring circuit will only be ignored if the inverter is in feed-in operation. In feed-in operation,
the inverter continues to feed into the grid and generates the error message 3504 ‒ Insulation failure ignored.
If the insulation resistance falls below the error threshold in another operating state, the error is not ignored and
the inverter does not switch to feed-in operation. The error message 3501 ‒ Insulation Failure appears on the
touch display. The LEDs ALARM1 and ALARM2 are glowing.
Type of insulation monitoring device used
The insulation monitoring device used is the A-ISOMETERiso-PV1685 device supplied by BenderGmbH&Co.KG.
SMA Solar Technology AG
10.2.3.5 GFDI and Insulation Monitoring Device
With the order option "GFDI and Insulation Monitoring", it is possible to temporarily disable the PV array grounding
and to check the insulation via the integrated insulation monitoring device.
Figure 20: GFDI and insulation monitoring
Position Designation
A Insulation monitoring device
B GFDI
When the GFDI is closed, the PV array is grounded. In this state, the insulation resistance cannot be determined.
When the GFDI is open, grounding is disabled. In this state, the insulation monitoring device continuously measures the
insulation resistance. In the operating state "MPP load operation", the insulation resistance of the entire system, from the
PV array to the MV transformer, will be measured. If the inverter is in the operating state "Grid monitoring", only the
insulation resistance from the PV array to the inverter will be measured.
Insulation monitoring should be performed in the operating state "MPP load operation". This will ensure that all parts of
the system are included in the insulation measurement.
Insulation monitoring
The insulation monitoring device will start measuring once the GFDI is open. The insulation monitoring device will
initially assume that the insulation is poor. If the parameter IsoErrIgn is set to Off, the inverter will switch off
temporarily.
User ManualSCCPXT-BA-E4-en-5492
Page 93

SMA Solar Technology AG
The insulation monitoring device takes approximately fiveminutes to detect the correct insulation resistance. The value
of the insulation resistance can be read off from the user interface in the instantaneous value Riso. If the insulation is
intact, the inverter switches back to the operating state "MPP load operation." Once the insulation monitoring process is
complete, the GFDI should be closed again, thus enabling the PV array to revert to grounded operation.
If after approximately fiveminutes one of the errors 3501 ‒ Insulation Failure, 3504 ‒ Insulation failure ignored
or 3601 ‒ Warning insulation error is displayed, the insulation is defective. In this case, a qualified person will
need to check and, if necessary, repair the insulation and then acknowledge the error.
Type of insulation monitoring device used
The insulation monitoring device used is the A-ISOMETERiso-PV1685 device supplied by BenderGmbH&Co.KG.
10 Function Description
10.2.3.6 RemoteGFDI and Insulation Monitoring Device
With the order option "RemoteGFDI and Insulation Monitoring", it is possible to automatically correct errors which
have occurred, to temporarily disable the grounding connection of the PV array and to check the insulation with the
integrated insulation monitoring device.
Figure 21: RemoteGFDI and Insulation Monitoring Device
Position Designation
A Insulation monitoring device
B Remote GFDI
When the RemoteGFDI is closed, the PV array is grounded. In this state, the insulation resistance cannot be
determined. If the RemoteGFDI trips, initially a temporary error will be assumed and a motor drive will close the
RemoteGFDI after a defined waiting time. No external switch command is required to close the tripped RemoteGFDI.
The inverter can switch back to feed-in operation after a waiting time.
In the default setting of the inverter, the software will attempt to start the RemoteGFDI up to three times per day.
If the RemoteGFDI is tripped on several consecutive days, the software assumes a permanent insulation error and the
inverter will no longer switch back on. In this case, a qualified person will need to check and, if necessary, repair the
insulation and then acknowledge the error.
When the RemoteGFDI is open, the grounding connection is disabled. In this state, the insulation monitoring device
continuously measures the insulation resistance. In the operating state "MPP load operation", the insulation resistance
of the entire system, from the PV array to the MV transformer, will be measured. If the inverter is in the operating state
"Grid monitoring", only the insulation resistance from the PV array to the inverter will be measured.
User Manual 93SCCPXT-BA-E4-en-54
Page 94

10 Function Description
Insulation monitoring should be performed in the operating state "MPP load operation". This will ensure that all parts of
the system are included in the insulation measurement.
SMA Solar Technology AG
Insulation monitoring
To disable the grounding of the PV array, the parameter RemMntSvc must be set to On. This will open the
RemoteGFDI by means of a motor drive.
If the Remote GFDI has been opened by a motor drive via the parameter RemMntSvc, the insulation monitoring
device will start measuring after the waiting time defined in parameter IsoMeasDly has elapsed. This allows the
insulation monitoring device to determine the insulation resistance without interrupting feed-in operation. If an insulation
error is present, this will only be taken into account at the end of the waiting time.
Once the insulation monitoring process is complete, the parameter RemMntSvc should be set to Off, thus switching
the PV array into grounded operation.
If after approximately five minutes one of the errors 3501 ‒ Insulation Failure, 3504 ‒ Insulation failure ignored
or 3601 ‒ Warning insulation failure is displayed, the insulation is defective. In this case, a qualified person will
need to check and, if necessary, repair the insulation and then acknowledge the error.
Type of insulation monitoring device used
The insulation monitoring device used is the A-ISOMETERiso-PV1685 device supplied by BenderGmbH&Co.KG.
10.2.4 Low-Temperature Option
With the "low-temperature option", the operating temperature range is extended to the following range:
−40°Cto+62°C. The inverter is in feed-in operation until the switch-off threshold is exceeded. The temperature of the
switch-off threshold is: −25°C.
If the ambient temperature falls below the switch-off threshold, the inverter goes into the operating state "Stop" and the
supplementary heating element is activated. As soon as the temperature exceeds the switch-on threshold again, the
inverter resumes feed-in operation. The temperature of the switch-on threshold is: −20°C.
10.3 Power Control
10.3.1 Frequency-Dependent Active Power Limitation
With frequency-dependent active power limitation, the inverter constantly checks the connected power frequency. If the
active power is to be limited by a hysteresis, the parameter WCtlHzMod must be set to CurveHys.
Figure 22: Power behavior of the inverter when the frequency limit P-HzStr is exceeded
User ManualSCCPXT-BA-E4-en-5494
Page 95

SMA Solar Technology AG
10 Function Description
If the power frequency exceeds a threshold defined in the parameter P‑HzStr, shown here at pointA, the inverter will
store the current feed-in power P
. The reduced feed-in power is calculated based on this saved value. The reduction
cur
of the feed-in power is defined via the parameter P-WGra. This parameter indicates the percentage of the saved
power P
by which the power per Hz will be reduced if the power frequency continues to rise. If the power frequency
cur
decreases again as shown in point B, the last feed-in power value reached will remain valid. Only when the power
frequency falls below the threshold defined in the parameter P-HzStop, as shown here at pointC, can the feed-in
power be increased again. In this case, the saved value P
forfeits its validity. In addition, a minimum threshold for
mom
power frequency shortfall can be defined with the parameter P-HzStopMin, shown here at pointD. If the power
frequency falls below the grid limit, the inverter will shut down and switch to the operating state "Grid monitoring". The
inverter will remain in the operating state "Grid monitoring" until all feed-in conditions are fulfilled again.
Calculation of the power limit:
P
= P
max
P
max
f
AC
Power limit P
Power frequency P-WGra Gradient for reducing active power
‒ [(fAC ‒ P-HzStr) · P-WGra · P
cur
P-HzStr Selected frequency limit from which feed-
in power will be reduced
cur
]
cur
Current power
Example:
An inverter with 500kW is feeding 350kW (P
difference between the current power frequency and P-HzStr (51.2Hz ‒ 50.2Hz) multiplied by the gradient P-
WGra (40%/Hz) results in an active power reduction of 40% of the last available power P
in a power limitation of 140kW and thus a maximum active power of 210kW.
Calculation:
210kW = 350kW ‒ [(51.2Hz ‒50.2Hz) · 40%/Hz · 350 kW]
) into the utility grid. The frequency will reach up to 51.2Hz. The
cur
(350kW). This results
cur
10.3.2 Frequency-Independent Active Power Limitation
10.3.2.1 No Active Power Limitation: Off Mode
The feed-in power is limited to the parameter Pmax.
The parameter Pmax defines the inverter power at the feed-in point and is adjusted to the local conditions during
commissioning. The parameter Pmax can only be changed when the device is in the operating state "Stop" and the
installer password has been entered.
10.3.2.2 Active Power Limitation with Setpoint Command via Modbus Protocol: WCtlCom Mode
The communication unit receives the setpoint for active power limitation and transmits it to the inverter. If the inverter
has received no signal for five minutes, an error message will be displayed in the instantaneous value P-WModFailStt
.
10.3.2.3 Active Power Limitation with Absolute Value: WCnst Mode
The active power limitation is entered as an absolute value via the parameter P-W. The parameter P‑W defines the
active power to be fed in. The parameter P-W can be changed in feed-in operation. The parameter P-W must not be
greater than the parameter Pmax.
User Manual 95SCCPXT-BA-E4-en-54
Page 96

10 Function Description
SMA Solar Technology AG
10.3.2.4 Active Power Limitation as a Percentage of Nominal Power: WCnstNom Mode
The active power limitation is set as a percentage value via the parameter P‑WNom. The percentage value refers to
the parameter Pmax. The parameter P‑WNom indicates what percentage of the maximum possible power is to be
fed in. The parameter P-WNom can be changed during feed-in operation.
10.3.2.5 Active Power Limitation via Standard Signal: WCnstNomAnIn Mode
The active power limitation is set via an analog signal at the input terminals for the setpoint. This is usually implemented
by a ripple control signal. The electrical current strength of the connected signal determines the nominal active power.
The analog measured values must be between 4mAand19mA. If the analog signal is less than 2mA, an error
message will be displayed in the instantaneous value P-WModFailStt.
Signal Power limit Description
< 2 mA
2mA to 4mA 0 kW No power is fed into the grid.
4mA to 19mA
> 19 mA
The analog value is converted to a setpoint for power limitation. Here, the parameter Pmax forms the end point of the
linear characteristic curve.
Last valid value or Pmax after restart
0 kW to Pmax
Pmax The energy fed into the grid equals Pmax.
Signal is in the invalid range.
The energy fed into the grid is determined by a characteristic curve.
10.3.3 Reactive Power Control
10.3.3.1 No Reactive Power Control: Off Mode
The reactive power setpoint is limited to 0kVAr. This setpoint cannot be controlled.
10.3.3.2 Reactive Power Control with Setpoint Command via Modbus Protocol: VArCtlCom Mode
The reactive power setpoint is received by the communication unit and transmitted to the inverter. The setpoint is
transmitted as a percentage value and converted to kVAr in the device. If the inverter has not received any signal for
five minutes, the error message Q-VArModFailStt will be displayed.
10.3.3.3 Reactive Power Control with Setpoint Command via Modbus Protocol: PFCtlCom Mode
The reactive power setpoint is received by the communication unit and transmitted to the inverter. The setpoint is
transmitted as a displacement power factor cosφ. If the inverter has not received any signal for the last five minutes, an
error message will be displayed in the instantaneous value Q-VArModFailStt.
10.3.3.4 Reactive Power Control with Absolute Value: VArCnst Mode
The reactive power setpoint is set via the parameter Q-VAr. The parameter Q-VAr is permitted to be within the range
from ‒Qmax to+Qmax.
10.3.3.5 Reactive Power Control as a Percentage of the Nominal Power: VArCnstNom Mode
The parameter Q-VArNom is used to set the reactive power setpoint in%. The parameter Q-VArNom refers to
Pmax. If the calculated amount of reactive power exceeds the predefined value of Qmax, the power will be limited
to Qmax. If the calculated amount of reactive power falls below the predefined value of ‒Qmax, the power will be
limited to ‒Qmax.
User ManualSCCPXT-BA-E4-en-5496
Page 97

SMA Solar Technology AG
10 Function Description
10.3.3.6 Reactive Power Setpoint via Standard Signal: VArCnstNomAnIn Mode
The reactive power setpoint is set at the input terminals for the setpoints via an analog signal. This is usually
implemented by a ripple control signal. The analog value is converted into a reactive power setpoint. The electrical
current strength of the connected signal determines the setpoint. The analog measured values must be between
4mAand19mA. If the analog signal is less than 2mA, an error message will be displayed in the instantaneous value
Q‑VArModFailStt.
Signal Power limit Description
<2mA Last valid mean value or 0kVAr after
restart
2 mA to 4 mA
4mA
11.5mA 0 kVAr Zero-crossing of the characteristic curve
>19mA
The analog value is converted to a setpoint for power limitation. Here, the parameter Qmax forms the end point of the
linear characteristic curve.
Qmax / underexcited
Qmax / underexcited
Qmax / overexcited
Signal is in the invalid range.
The maximum amount of negatively excited reactive
power is fed in.
Start point of the characteristic curve
The maximum amount of negatively excited reactive
power is fed in.
No reactive power is fed in.
End point of the characteristic curve
The maximum amount of positively excited reactive
power is fed in.
Figure 23: Limitation of the reactive power to the parameter Qmax
10.3.3.7 Reactive Power Setpoint via Displacement Power Factor cosφ: PFCnst Mode
The reactive power setpoint is set via the parameters PF‑PF and PF‑PFExt. The parameter PF‑PF indicates the
displacement power factor cosφ and the parameter PF‑PFExt indicates the degree of overexcitation or
underexcitation.
User Manual 97SCCPXT-BA-E4-en-54
Page 98

10 Function Description
SMA Solar Technology AG
10.3.3.8 Displacement Power Factor cosφ via Standard Signal: PFCnstAnIn Mode
The reactive power setpoint is set at the input terminals for the setpoints via an analog signal. This is usually
implemented by a ripple control signal. The analog value is converted into a displacement power factor cos φ. The
electrical current strength of the connected signal determines the setpoint. The analog measured values must be
between 4mAand19mA. If the analog signal is less than 2mA, an error message will be displayed in the
instantaneous value Q‑VArModFailStt.
Signal Power limit Description
< 2 mA Last valid mean value or 0kVAr after
restart
2mA to 4mA
4 mA
11.5 mA 0 kVAr Zero-crossing of the characteristic curve
> 19 mA
The analog value is converted into a setpoint for the displacement power factor cos φ. Here, the parameter PFAbsMin
is the starting and end point of the linear characteristic curve.
PFAbsMin/underexcited
PFAbsMin/underexcited
PFAbsMin / overexcited
Signal is in the invalid range.
The maximum amount of negatively excited reactive
power is fed in.
Start point of the characteristic curve
The maximum amount of negatively excited reactive
power is fed in.
No reactive power is fed in.
End point of the characteristic curve
The maximum amount of positively excited reactive
power is fed in.
User ManualSCCPXT-BA-E4-en-5498
Page 99

SMA Solar Technology AG
10 Function Description
10.3.3.9 Displacement Power Factor cosφ as a Function of Feed-In Power: PFCtlW
Mode
In the PFCtlW mode, the displacement power factor cosφ is set as a function of feed-in power. This dependency is
depicted by a configurable characteristic curve. The characteristic curve can be configured as increasing or
decreasing. The start and end points of the characteristic curve can be configured by means of parameters.
Figure 24: Characteristic curve for reducing reactive power as a function of active power
On the basis of a linear characteristic curve with an upper and lower cap, a displacement power factor cos φ can be
regulated depending on the active power currently being fed in. The start and end points of the characteristic curve
can be configured by means of parameters. The shape of the characteristic curve is determined by the start and end
points.
10.3.3.10 Reactive Power as a Function of the Grid Voltage: VArCtlVol Mode
Consultation prior to parameter change
The parameters of this mode can only be selected or changed after consultation (see Section13 "Contact", page154
).
User Manual 99SCCPXT-BA-E4-en-54
Page 100

10 Function Description
The reactive power is set as a function of the grid voltage. The reactive power setpoint is adjusted in stages.
SMA Solar Technology AG
Figure 25: Characteristic curve for reducing reactive power as a function of the grid voltage
If the grid voltage is changed by the configurable voltage difference Q-VDif for the configurable duration of Q-
VDifTm, the reactive power setpoint will be adjusted by the value Q‑VArGra. The parameterization of this function
refers to the medium voltage.
10.3.3.11 Measures for Voltage Support through Parameterization of Reactive Power/ Voltage Characteristic Curve: VArCtlVolHystDb Mode
Consultation prior to parameter change
The parameters of this mode can only be selected or changed after consultation (see Section13 "Contact", page154
).
User ManualSCCPXT-BA-E4-en-54100
 Loading...