

SMA SBeamBT-BUS092710 User Manual
SBeamBT-BUS092710 | 98-0013510 | Version 1.0
US
Solar Data Technology
SUNNY BEAM with Bluetooth
®
Wireless Technology
User Manual


SMA Solar Technology AG
User Manual SBeamBT-BUS092710 3
Copyright © 2009 SMA America, Inc. All rights reserved.
No part of this document may be reproduced, stored in a retrieval system, or transmitted, in any form
or by any means, electronic, mechanical, photographic, magnetic or otherwise, without the prior
written permission of SMA America, Inc.
SMA America makes no representations, express or implied, with respect to this documentation or
any of the equipment and/or software it may describe, including (with no limitation) any implied
warranties of utility, merchantability, or fitness for any particular purpose. All such warranties are
expressly disclaimed. Neither SMA America nor its distributors or dealers shall be liable for any
indirect, incidental, or consequential damages under any circumstances.
(The exclusion of implied warranties may not apply in all cases under some statutes, and thus the
above exclusion may not apply.)
Specifications are subject to change without notice. Every attempt has been made to make this
document complete, accurate and up-to-date. Readers are cautioned, however, that SMA America
reserves the right to make changes without notice and shall not be responsible for any damages,
including indirect, incidental or consequential damages, caused by reliance on the material
presented, including, but not limited to, omissions, typographical s, arithmetical s or listing s in the
content material.
The Bluetooth® word mark and logos are registered trademarks owned by Bluetooth SIG, Inc. and
any use of such marks by SMA Solar Technology AG is under license. Other trademarks and trade
names are those of their respective owners.
SMA America, Incorporated
4031 Alvis Court
Rocklin, California 95677-4011
Tel 916.625.0870
Fax 916.625.0871
www.SMA-America.com
SMA Solar Technology AG
4 SBeamBT-BUS092710 User Manual
IMPORTANT SAFETY INSTRUCTIONS
SAVE THESE INSTRUCTIONS
This manual contains important instructions for the SMA Bluetooth® Piggy-Back - system monitoring
unit, that shall be followed during installation and maintenance of the unit.
The SMA Bluetooth Piggy-Back is designed and tested according to international safety requirements,
but as with all electrical and electronic equipment, certain precautions must be observed when
installing and/or operating the SMA Bluetooth Piggy-Back. To reduce the risk of personal injury and
to ensure the safe installation and operation of the SMA Bluetooth Piggy-Back, you must carefully
read and follow all instructions, cautions and warnings in this Installation Guide.
Warnings
A Warning describes a hazard to equipment or personnel. It calls attention to a procedure or
practice, which, if not correctly performed or adhered to, could result in damage to or destruction of
part or all of the SMA equipment and/or other equipment connected to the SMA equipment or
personal injury.
DANGER!
DANGER indicates a hazardous situation which, if not avoided, will result in death or
serious injury.
WARNING!
WARNING indicates a hazardous situation which, if not avoided, could result in death or
serious injury.
SMA Solar Technology AG
User Manual SBeamBT-BUS092710 5
CAUTION!
CAUTION indicates a hazardous situation which, if not avoided, could result in minor or
moderate injury.
NOTICE!
NOTICE indicates a situation that can result in property damage if not avoided.
SMA Solar Technology AG
6 SBeamBT-BUS092710 User Manual
Other Symbols
In addition to the safety and hazard symbols described on the previous pages, the following symbol
is also used in this Installation Guide:
General Warnings
Warranty
The currect guarantee conditions are available at www.SMA-America.com and can be downloaded
or are available on paper from the usual sales channels if required. For warranty coverage, or if you
have questions about the SMA Bluetooth Piggy-Back warranty, contact SMA America at the address,
telephone number or Web site listed on page 3 (to send an E-mail, see the Contact section of the SMA
America Web site).
Information
This symbol accompanies notes that call attention to supplementary information that you
should know and use to ensure optimal operation of the system.
General Warnings
All electrical installations must be done in accordance with the local and National Electrical
Code ANSI/NFPA 70.
Before installing or using the SMA Bluetooth Piggy-Back, read all of the instructions,
cautions, and warnings on the SMA Bluetooth Piggy-Back and the inverter, in this
Installation Guide and the manual of the inverter.

SMA Solar Technology AG Table of Contents
User Manual SBeamBT-BUS092710 7
Table of Contents
1 Notes on this Manual. . . . . . . . . . . . . . . . . . . . . . . . . . . . . 13
1.1 Area of Validity. . . . . . . . . . . . . . . . . . . . . . . . . . . . . . . . . . . . . 13
1.2 Additional Information . . . . . . . . . . . . . . . . . . . . . . . . . . . . . . . 13
1.3 Terminology . . . . . . . . . . . . . . . . . . . . . . . . . . . . . . . . . . . . . . . 13
2 Sunny Beam with Bluetooth . . . . . . . . . . . . . . . . . . . . . . . 14
2.1 Field of application . . . . . . . . . . . . . . . . . . . . . . . . . . . . . . . . . . 14
2.2 Functions . . . . . . . . . . . . . . . . . . . . . . . . . . . . . . . . . . . . . . . . . . 14
3 Safety . . . . . . . . . . . . . . . . . . . . . . . . . . . . . . . . . . . . . . . . . 15
3.1 Appropriate Usage. . . . . . . . . . . . . . . . . . . . . . . . . . . . . . . . . . 15
3.2 Safety Instructions . . . . . . . . . . . . . . . . . . . . . . . . . . . . . . . . . . . 16
4 Unpacking. . . . . . . . . . . . . . . . . . . . . . . . . . . . . . . . . . . . . . 17
4.1 Packing List . . . . . . . . . . . . . . . . . . . . . . . . . . . . . . . . . . . . . . . . 17
4.2 Identifying the Sunny Beam . . . . . . . . . . . . . . . . . . . . . . . . . . . 17
5 Commissioning . . . . . . . . . . . . . . . . . . . . . . . . . . . . . . . . . . 18
5.1 Sunny Beam Controls . . . . . . . . . . . . . . . . . . . . . . . . . . . . . . . . 18

Table of Contents SMA Solar Technology AG
8 SBeamBT-BUS092710 User Manual
5.2 Initial settings. . . . . . . . . . . . . . . . . . . . . . . . . . . . . . . . . . . . . . . 19
6 Operation . . . . . . . . . . . . . . . . . . . . . . . . . . . . . . . . . . . . . . 32
6.1 Display . . . . . . . . . . . . . . . . . . . . . . . . . . . . . . . . . . . . . . . . . . . 32
6.1.1 Switching on the display/calling up the main menu . . . . . . . . . . . . . . . . . . . 33
6.2 Menu . . . . . . . . . . . . . . . . . . . . . . . . . . . . . . . . . . . . . . . . . . . . 34
6.3 Chart view. . . . . . . . . . . . . . . . . . . . . . . . . . . . . . . . . . . . . . . . . 35
6.3.1 Calling up the chart "Complete PV system". . . . . . . . . . . . . . . . . . . . . . . . . . 35
6.3.2 Calling up the chart "No. of Inverters" . . . . . . . . . . . . . . . . . . . . . . . . . . . . . 37
6.4 Power and energy display . . . . . . . . . . . . . . . . . . . . . . . . . . . . 39
6.5 Symbols in the chart view . . . . . . . . . . . . . . . . . . . . . . . . . . . . . 40
6.5.1 Symbol for the connection quality. . . . . . . . . . . . . . . . . . . . . . . . . . . . . . . . . 41
6.5.2 Battery symbol/Charging the batteries . . . . . . . . . . . . . . . . . . . . . . . . . . . . . 42
6.5.3 Fault and warning symbols . . . . . . . . . . . . . . . . . . . . . . . . . . . . . . . . . . . . . . 43
6.6 Calling up events . . . . . . . . . . . . . . . . . . . . . . . . . . . . . . . . . . . 44
6.7 Sunny Beam alarms . . . . . . . . . . . . . . . . . . . . . . . . . . . . . . . . . 46
6.7.1 Set / disable alarm for faults . . . . . . . . . . . . . . . . . . . . . . . . . . . . . . . . . . . . 47
6.8 Display settings . . . . . . . . . . . . . . . . . . . . . . . . . . . . . . . . . . . . . 47
6.8.1 Changing the contrast. . . . . . . . . . . . . . . . . . . . . . . . . . . . . . . . . . . . . . . . . . 47
6.8.2 Changing the display switch-off . . . . . . . . . . . . . . . . . . . . . . . . . . . . . . . . . . 47

SMA Solar Technology AG
User Manual SBeamBT-BUS092710 9
6.8.3 Setting the coefficients of balance . . . . . . . . . . . . . . . . . . . . . . . . . . . . . . . . 48
6.9 Data query . . . . . . . . . . . . . . . . . . . . . . . . . . . . . . . . . . . . . . . . 49
6.9.1 Changing the data query frequency. . . . . . . . . . . . . . . . . . . . . . . . . . . . . . . 49
6.9.2 Changing the live query duration . . . . . . . . . . . . . . . . . . . . . . . . . . . . . . . . . 49
6.9.3 Disabling the Overnight Shutdown . . . . . . . . . . . . . . . . . . . . . . . . . . . . . . . . 50
6.10 Service Functions . . . . . . . . . . . . . . . . . . . . . . . . . . . . . . . . . . . 51
6.10.1 Checking the connection quality . . . . . . . . . . . . . . . . . . . . . . . . . . . . . . . . . . 51
6.10.2 Accessing device information . . . . . . . . . . . . . . . . . . . . . . . . . . . . . . . . . . . . 52
6.10.3 Performing an update . . . . . . . . . . . . . . . . . . . . . . . . . . . . . . . . . . . . . . . . . . 53
6.10.4 Resetting the Sunny Beam. . . . . . . . . . . . . . . . . . . . . . . . . . . . . . . . . . . . . . . 55
6.11 System settings . . . . . . . . . . . . . . . . . . . . . . . . . . . . . . . . . . . . . 56
6.11.1 Calling up the list of connected devices . . . . . . . . . . . . . . . . . . . . . . . . . . . . 56
6.11.2 Entering the system password . . . . . . . . . . . . . . . . . . . . . . . . . . . . . . . . . . . . 56
6.11.3 Repeating the system search. . . . . . . . . . . . . . . . . . . . . . . . . . . . . . . . . . . . . 57
6.11.4 Changing the device name. . . . . . . . . . . . . . . . . . . . . . . . . . . . . . . . . . . . . . 58
6.11.5 Adjusting the energy meter when switching devices . . . . . . . . . . . . . . . . . . . 59
6.11.6 Setting the maximum plant power in kWp . . . . . . . . . . . . . . . . . . . . . . . . . . 59
6.12 Country settings . . . . . . . . . . . . . . . . . . . . . . . . . . . . . . . . . . . . 61
6.12.1 Changing the language . . . . . . . . . . . . . . . . . . . . . . . . . . . . . . . . . . . . . . . . 61
6.12.2 Changing the currency . . . . . . . . . . . . . . . . . . . . . . . . . . . . . . . . . . . . . . . . . 62

SMA Solar Technology AG
10 SBeamBT-BUS092710 User Manual
6.12.3 Changing the unit of CO2 avoided. . . . . . . . . . . . . . . . . . . . . . . . . . . . . . . . 62
6.12.4 Changing the Decimal Separator . . . . . . . . . . . . . . . . . . . . . . . . . . . . . . . . . 62
6.12.5 Changing the date format. . . . . . . . . . . . . . . . . . . . . . . . . . . . . . . . . . . . . . . 62
6.12.6 Changing the Timestamp Format. . . . . . . . . . . . . . . . . . . . . . . . . . . . . . . . . . 63
6.13 Changing the date and time . . . . . . . . . . . . . . . . . . . . . . . . . . . 63
6.14 Activating/deactivating daylight saving time . . . . . . . . . . . . . . 63
6.15 Changing the Time Zone. . . . . . . . . . . . . . . . . . . . . . . . . . . . . . 64
7 Managing System Data. . . . . . . . . . . . . . . . . . . . . . . . . . . 64
7.1 System requirements . . . . . . . . . . . . . . . . . . . . . . . . . . . . . . . . . 65
7.2 Copying system data to the computer . . . . . . . . . . . . . . . . . . . 65
7.2.1 CSV format . . . . . . . . . . . . . . . . . . . . . . . . . . . . . . . . . . . . . . . . . . . . . . . . . . 66
8 Menu overview . . . . . . . . . . . . . . . . . . . . . . . . . . . . . . . . . 67
9 Maintenance and Care . . . . . . . . . . . . . . . . . . . . . . . . . . . 68
9.1 Maintenance. . . . . . . . . . . . . . . . . . . . . . . . . . . . . . . . . . . . . . . 68
9.1.1 Replacing the batteries . . . . . . . . . . . . . . . . . . . . . . . . . . . . . . . . . . . . . . . . . 68
9.2 Care . . . . . . . . . . . . . . . . . . . . . . . . . . . . . . . . . . . . . . . . . . . . . 70
10 Decommissioning . . . . . . . . . . . . . . . . . . . . . . . . . . . . . . . . 70
10.1 Decommissioning the Sunny Beam . . . . . . . . . . . . . . . . . . . . . . 70

SMA Solar Technology AG
User Manual SBeamBT-BUS092710 11
10.2 Disposing of the Sunny Beam . . . . . . . . . . . . . . . . . . . . . . . . . . 71
10.3 Disposing of the batteries . . . . . . . . . . . . . . . . . . . . . . . . . . . . . 71
11 Troubleshooting . . . . . . . . . . . . . . . . . . . . . . . . . . . . . . . . . 72
12 Technical Data . . . . . . . . . . . . . . . . . . . . . . . . . . . . . . . . . . 75
12.1 FCC Compliance Information . . . . . . . . . . . . . . . . . . . . . . . . . . 77
13 Accessories . . . . . . . . . . . . . . . . . . . . . . . . . . . . . . . . . . . . . 79
13.1 USB plug-in power supply . . . . . . . . . . . . . . . . . . . . . . . . . . . . 79
13.2 Replacement batteries. . . . . . . . . . . . . . . . . . . . . . . . . . . . . . . . 79
14 Contact . . . . . . . . . . . . . . . . . . . . . . . . . . . . . . . . . . . . . . . . 80

SMA Solar Technology AG
12 SBeamBT-BUS092710 User Manual
SMA Solar Technology AG Notes on this Manual
User Manual SBeamBT-BUS092710 13
1Notes on this Manual
1.1 Area of Validity
This manual is valid for the Sunny Beam firmware version 1.0 and later.
This manual does not contain any detailed information about the connected products. Detailed
information about the products connected can be found in the user manual of the devices.
1.2 Additional Information
You can find further information on the following subjects in the 'Downloads' area of www.SMAAmerica.com.
•SMA Bluetooth
®
Wireless Technology
•CO2 factor
1.3 Terminology
This user manual uses the terminology indicated in the following table.
Type Example of terminology
Main menu item Select "Settings".
Submenu item Select "Settings > Date".

Sunny Beam with Bluetooth SMA Solar Technology AG
14 SBeamBT-BUS092710 User Manual
2 Sunny Beam with Bluetooth
2.1 Field of application
Sunny Beam is a communication device which requests, displays
and saves data from up to 12 inverters in a Bluetooth PV plant.
Communication with the inverters takes place via Bluetooth
®
Wireless Technology. The transmitting power corresponds to
Bluetooth Class 1.
Sunny Beam only supports inverters from SMA Solar Technology
that are fitted with Bluetooth. Most SMA Solar Technology inverters
that do not have integrated Bluetooth can be retrofitted with the SMA Bluetooth Piggy-Back.
2.2 Functions
• Processing data from up to 12 inverters
• Connection to the inverters via Bluetooth
• Range of up to 330 ft. in the open space with direct visual contact
• Supports inverters with Bluetooth from SMA Solar Technology:
– Inverters with integrated SMA Bluetooth with software package 2.06 and later
– Inverters with integrated SMA Bluetooth Piggy-Back
• Display of faults and warnings on the integrated display
• Acoustic alarms to indicate faults in the PV plant
• Connection to the computer via the USB connection cable (max. 9.8 ft. cable length)

SMA Solar Technology AG Safety
User Manual SBeamBT-BUS092710 15
• Saves the system data in CSV format for at least 100 days as well as up to 25 faults and
warnings. The storage volume depends on the number of inverters. If the memory is full, the old
system data will be overwritten.
• Graphical display of the following data for the complete PV system and for each inverter on the
integrated display:
– Performance today / Performance yesterday
– Energy for the last 31 days / Energy for the last 12 months
– Specific annual yield
– Allowance for the current day and total allowance so far
–CO
2
emissions avoided for the present day and total present CO2 emissions avoided.
• Display of the following values for the entire system and for individual inverters:
–Present AC power
– Daily yield (E-Today)
– Energy yield yesterday (E-Yday) when calling up the chart "Power yesterday"
– Total energy yield (E-Total)
3Safety
3.1 Appropriate Usage
Sunny Beam is only suitable for indoor use. The ambient temperature must be between 32 °F and
+104 °F. The power supply for Sunny Beam may only be provided by rechargeable nickel-metal
hydride batteries (NiMH), type Mignon (AA) with low self-discharge, e.g. Eneloop batteries.
Sunny Beam is only suitable for use with original accessories from SMA Solar Technology or
accessories recommended by SMA Solar Technology.
Safety SMA Solar Technology AG
16 SBeamBT-BUS092710 User Manual
3.2 Safety Instructions
Please follow all operating and safety precautions in this manual. Failure to follow these instructions
may result in damage to the device and risk of personal injuries.
The Sunny Beam data must not be used for billing purposes.
Data collected by Sunny Beam regarding the power generated by your PV plant may
deviate from the electricity meter.
Notice!
Damage to Sunny Beam caused by leaking batteries. Batteries of the wrong type may leak
into the Sunny Beam and damage the device.
• You must only use rechargeable nickel-metal hydride batteries (NiMH), type Mignon
(AA) with low self-discharge, e.g. Eneloop batteries (see section 13 "Accessories"
(page79)).
SMA Solar Technology AG Unpacking
User Manual SBeamBT-BUS092710 17
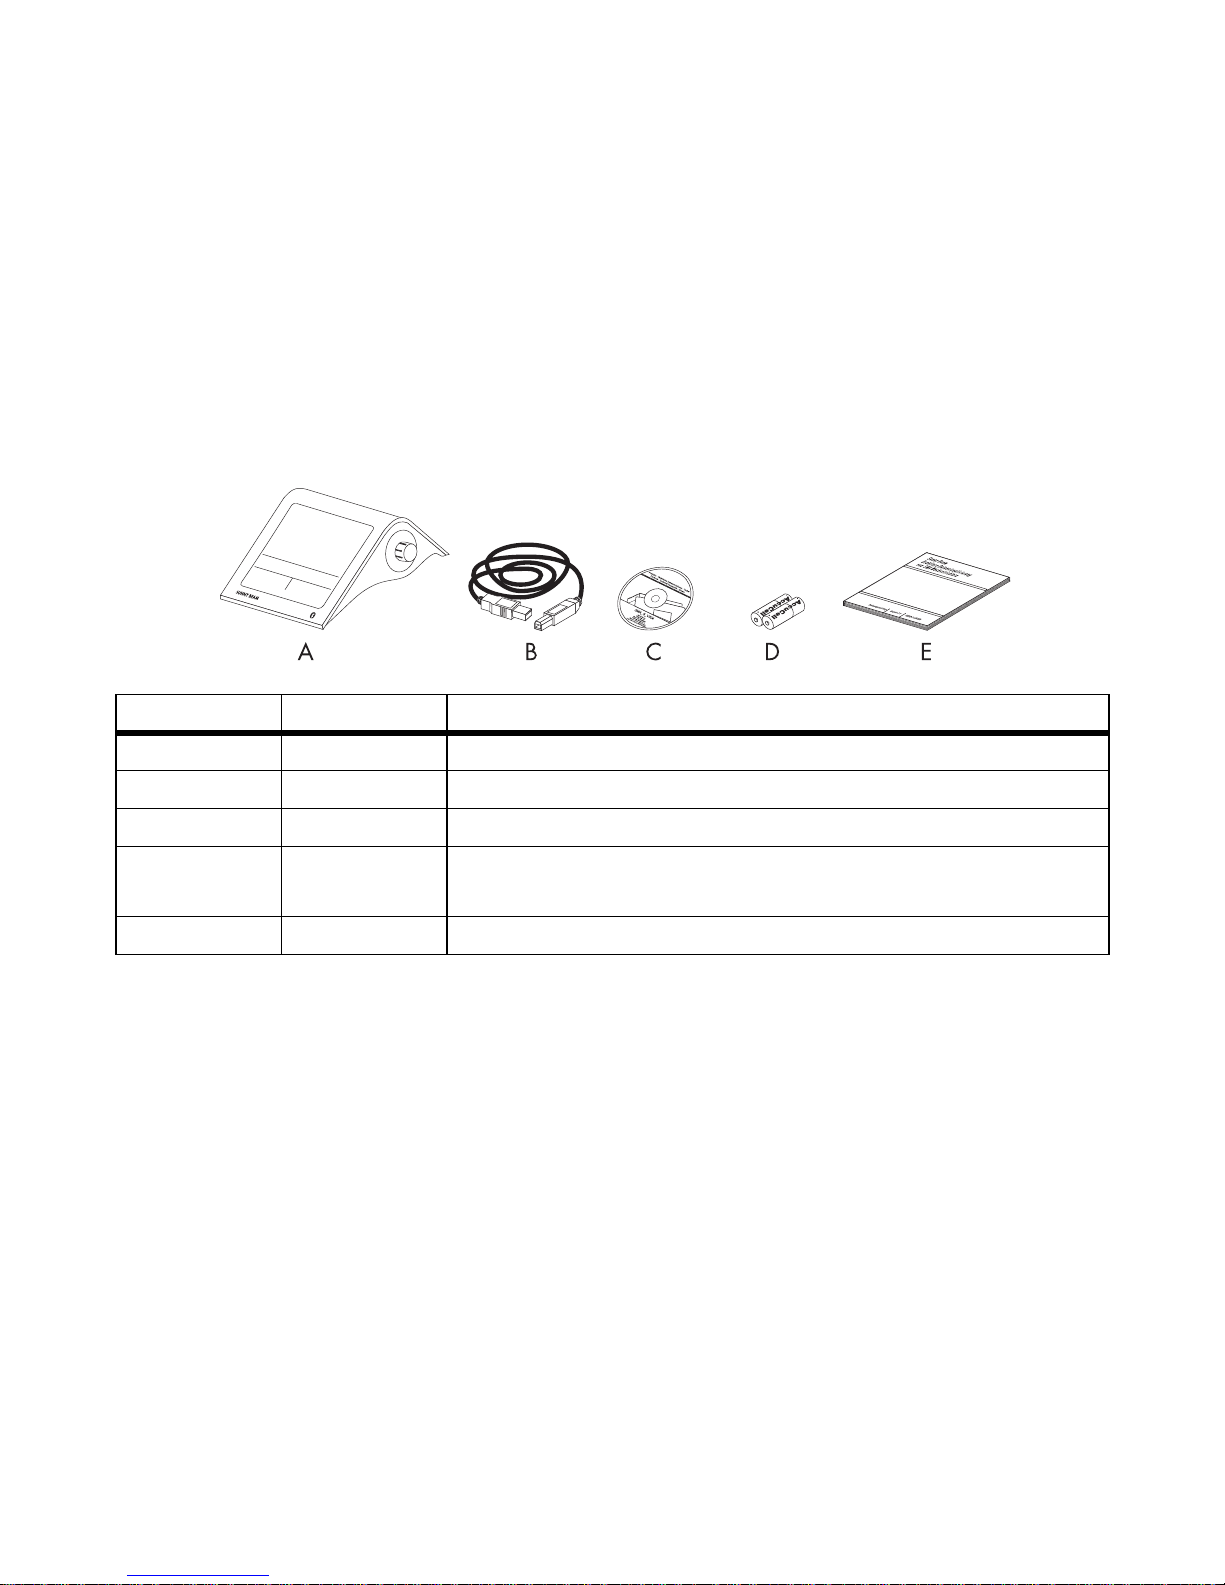
4 Unpacking
4.1 Packing List
4.2 Identifying the Sunny Beam
Type Plate
You can identify the Sunny Beam by the type plate. The type plate is located on the lower side of the
Sunny Beam.
Firmware Version
You can check the firmware version of the Sunny Beam in the Menu "Service > Diagnostics > Device
information > Sunny Beam".
Position Quantity Name
A1Sunny Beam with Bluetooth
B 1 USB connection cable for connection to the computer
C1Software DVD
D 2 Nickel-metal hydride batteries (NiMH), type Mignon (AA) with
low self-discharge
E1Manual
Commissioning SMA Solar Technology AG
18 SBeamBT-BUS092710 User Manual
5 Commissioning
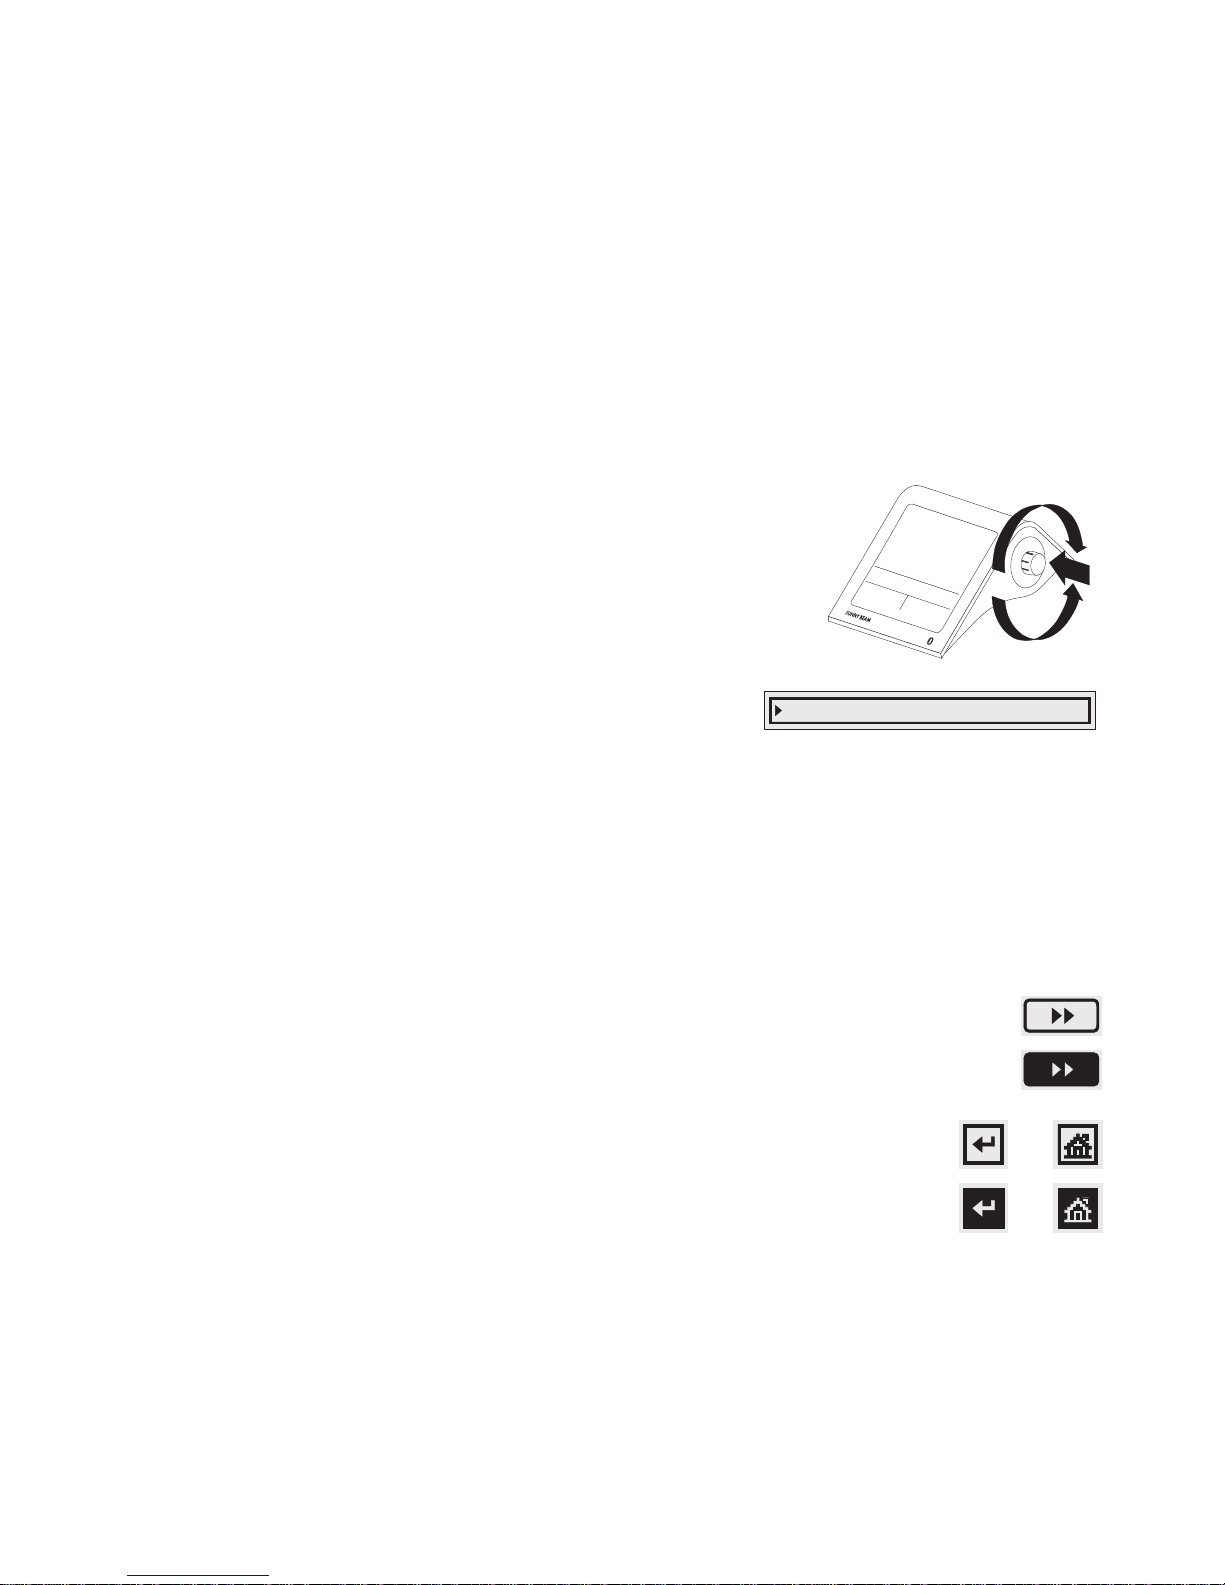
5.1 Sunny Beam Controls
The Sunny Beam is operated using the push button that can be
turned and pressed.
Moving the selection frame
The selection frame (see fig. on the right) indicates which menu
item is currently selected. By turning the push button, you can
move the selection frame to the next menu item or the previous
menu item.
Selecting a menu item, setting values
When the selection frame is placed over a menu item, you may open the menu item by pressing the
push button. When you have opened a menu item with a colon, you can set the values by turning the
button.
Selecting a button
When the selection frame is placed over a button (see example in the fig. on the
right), the button becomes dark. The selection frame is not displayed.
Navigating backwards in the menu
Using the arrow icon you can go backwards in the menu until the main menu is
displayed. By selecting the house icon, you will go straight to the main menu.
SMA Solar Technology AG Commissioning
User Manual SBeamBT-BUS092710 19
5.2 Initial settings
The first steps are described in detail, so that you can familiarize yourself with the controls of Sunny
Beam.
Sunny Beam will guide you through the commissioning procedure. If a fault occurs during
commissioning, you can restart commissioning by pressing the push button for about 10 seconds, until
the SMA logo is displayed.
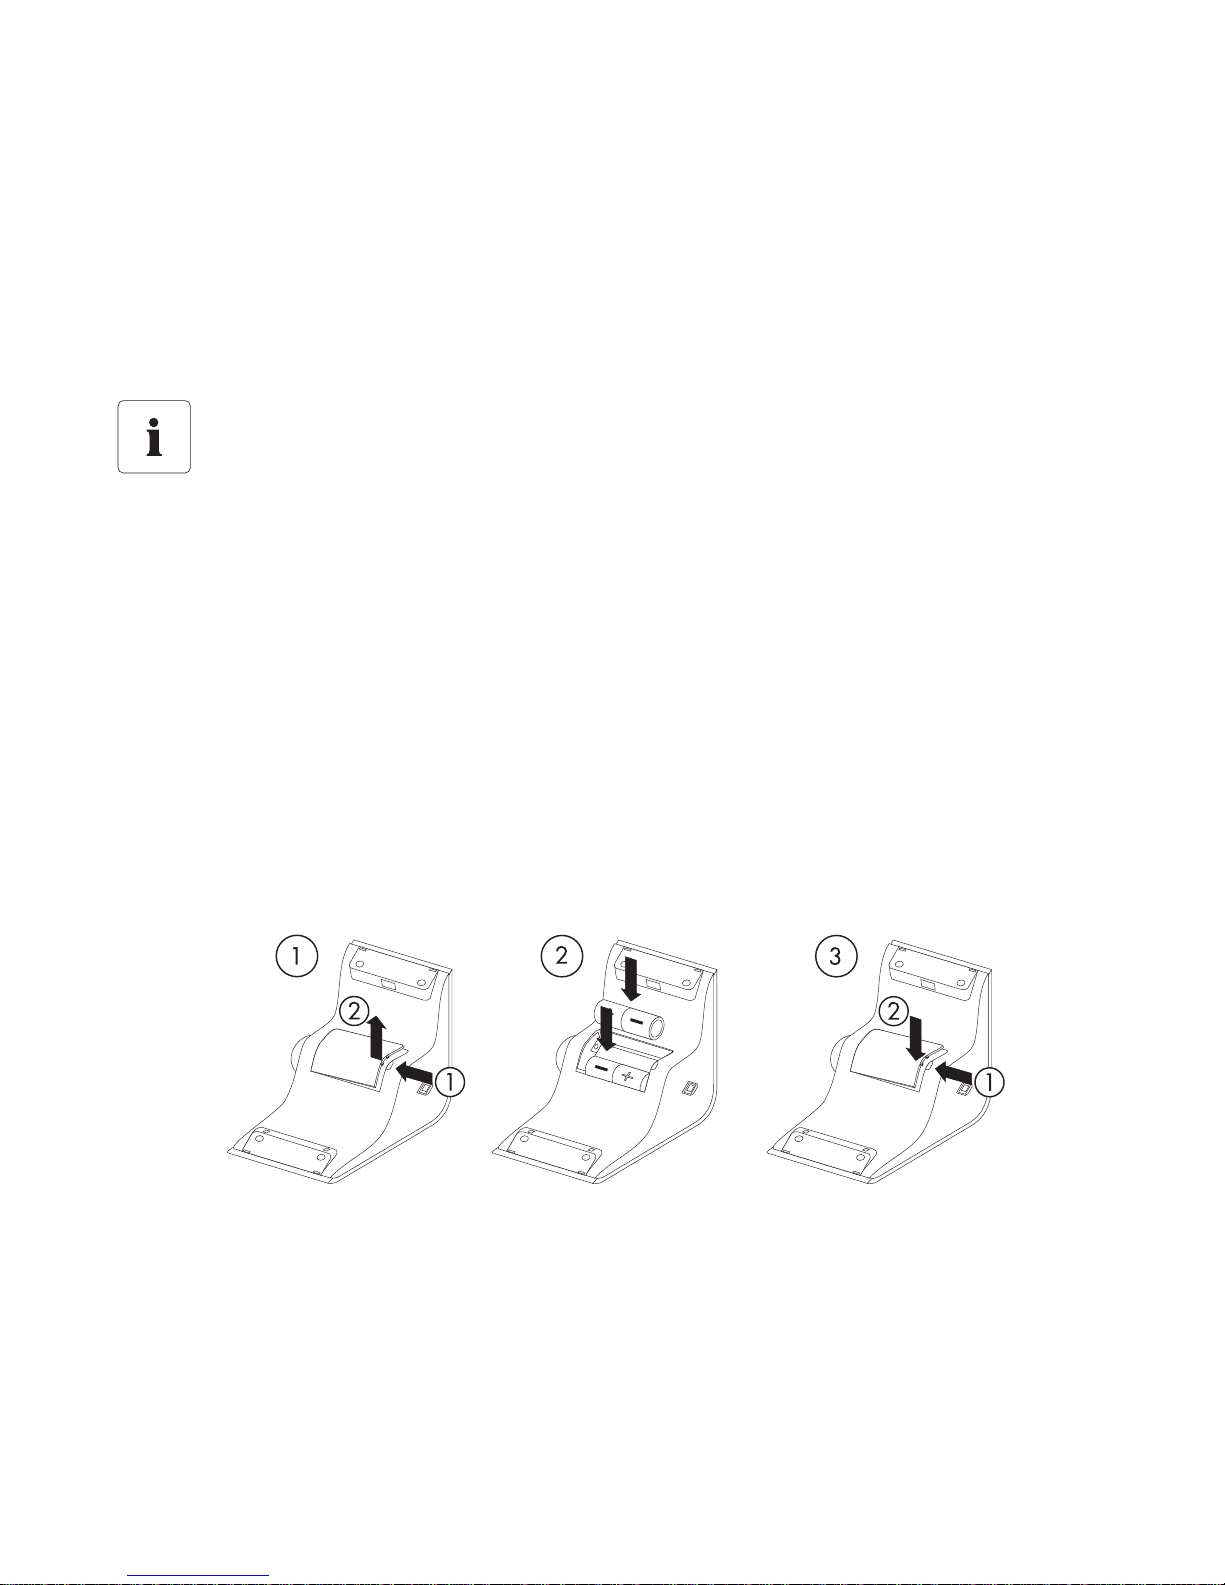
1. Open the battery compartment on the underside of the Sunny Beam.
2. Place the included batteries into the battery compartment of the Sunny Beam according to the
indication.
3. Close the lid of the battery compartment.
4. Press the button.
Commissioning of a Bluetooth PV plant with only 1 master at all times.
A Bluetooth PV plant must only be commissioned with 1 master (e.g. Sunny Beam with
Bluetooth, Sunny Explorer). As soon as the Bluetooth network is up and running, you can
integrate further masters into the Bluetooth network.
Commissioning SMA Solar Technology AG
20 SBeamBT-BUS092710 User Manual
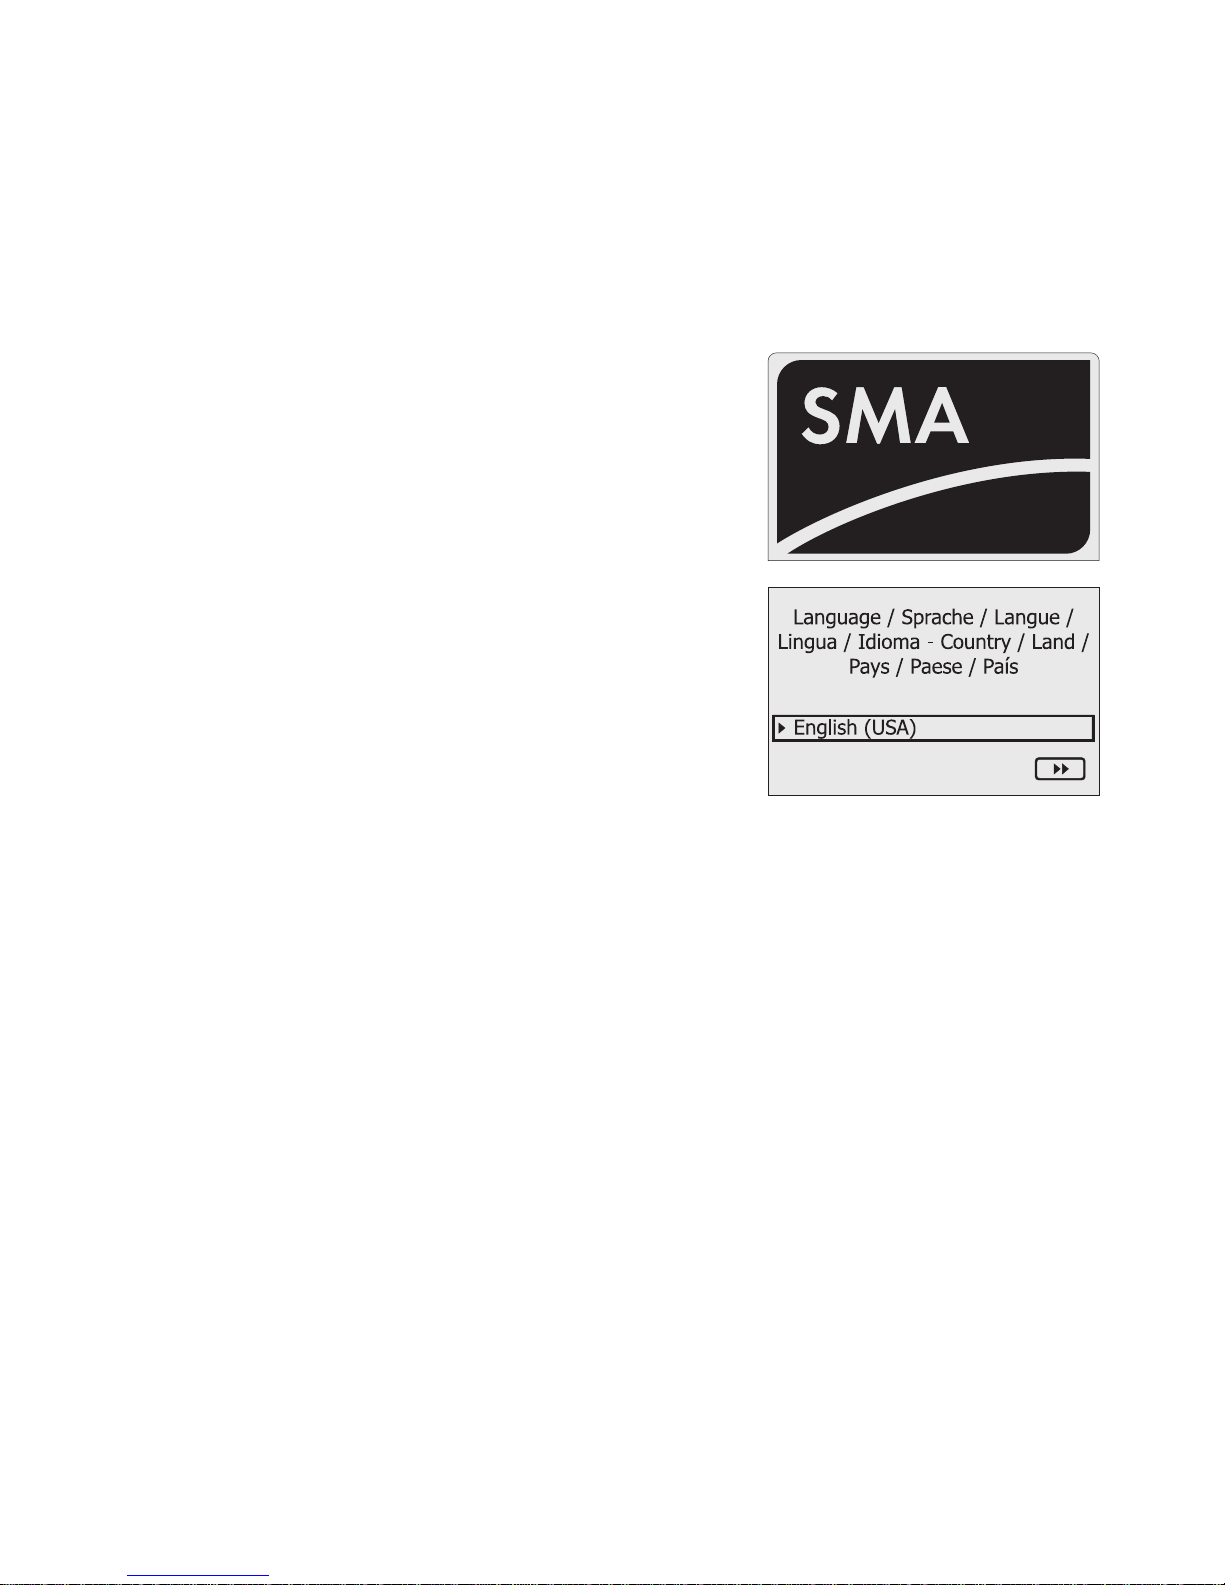
☑ The start screen appears.
5. Press the button.
☑ The page for setting the language appears. This page
appears automatically after 10 seconds.
Setting the language and the country
6. If you want to change the selected language and country, press the button.
☑ The background of the selected language and country becomes dark.
7. Turn the button until the required language and country are displayed.
8. Press the button.
☑ No items remain dark. The language and country have ben set.
9. Move the selection frame to the button ">>" (next) by turning the button.
SMA Solar Technology AG Commissioning
User Manual SBeamBT-BUS092710 21
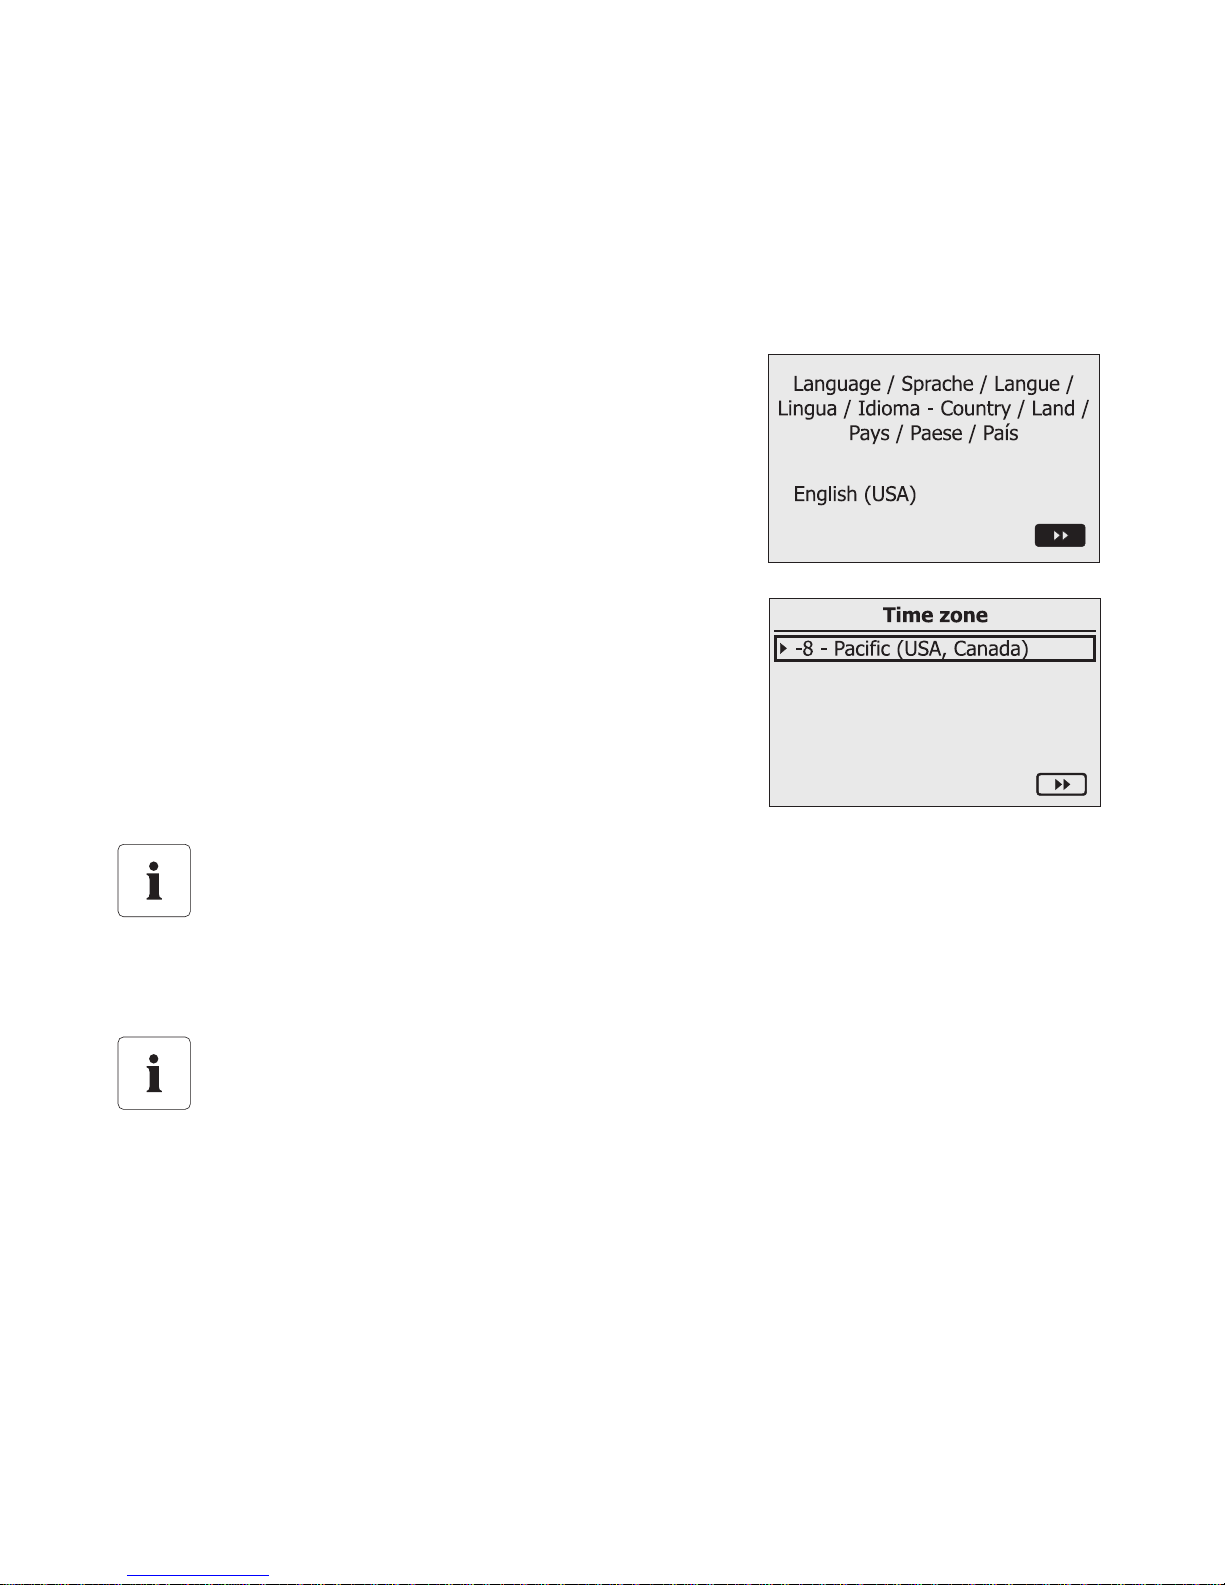
☑ The button ">>" (next) becomes dark.
10. Press the button.
☑ The page for setting the time zone appears.
11. To change the time zone, press the button.
☑ The time zone will become dark.
Setting the time zone
Be sure to set the correct values for date, daylight saving time, time and time zone on the
Sunny Beam. If you reset the time after commissioning, the data associated with the time
difference will be deleted from the inverter. Please note that the time may also be reset if
you change the settings for time zone or daylight saving time.
Confirming the time settings
Due to the extensive time management in your PV plant, the first attempt to change the time
settings may not be successful, if, for example, the time has already been set using Sunny
Explorer. Check the time settings again after commissioning and correct them, if required.
Commissioning SMA Solar Technology AG
22 SBeamBT-BUS092710 User Manual
12. Turn the button until the required time zone is displayed.
13. Press the button.
☑ No items remain dark. The time zone has been set.
14. Move the selection frame to the button ">>" (next) by turning the button.
☑ The button ">>" (next) becomes dark.
15. Press the button.
☑ The page for setting the date and time appears.
Setting the date
16. Press the button.
☑The first adjustable digits become dark.
17. Turn the button until the required value is shown.
18. Press the button and repeat the steps until no digits are dark.
To change incorrect values, press the push button until the value that you need to change
becomes dark.
☑ The date has been set.
SMA Solar Technology AG Commissioning
User Manual SBeamBT-BUS092710 23
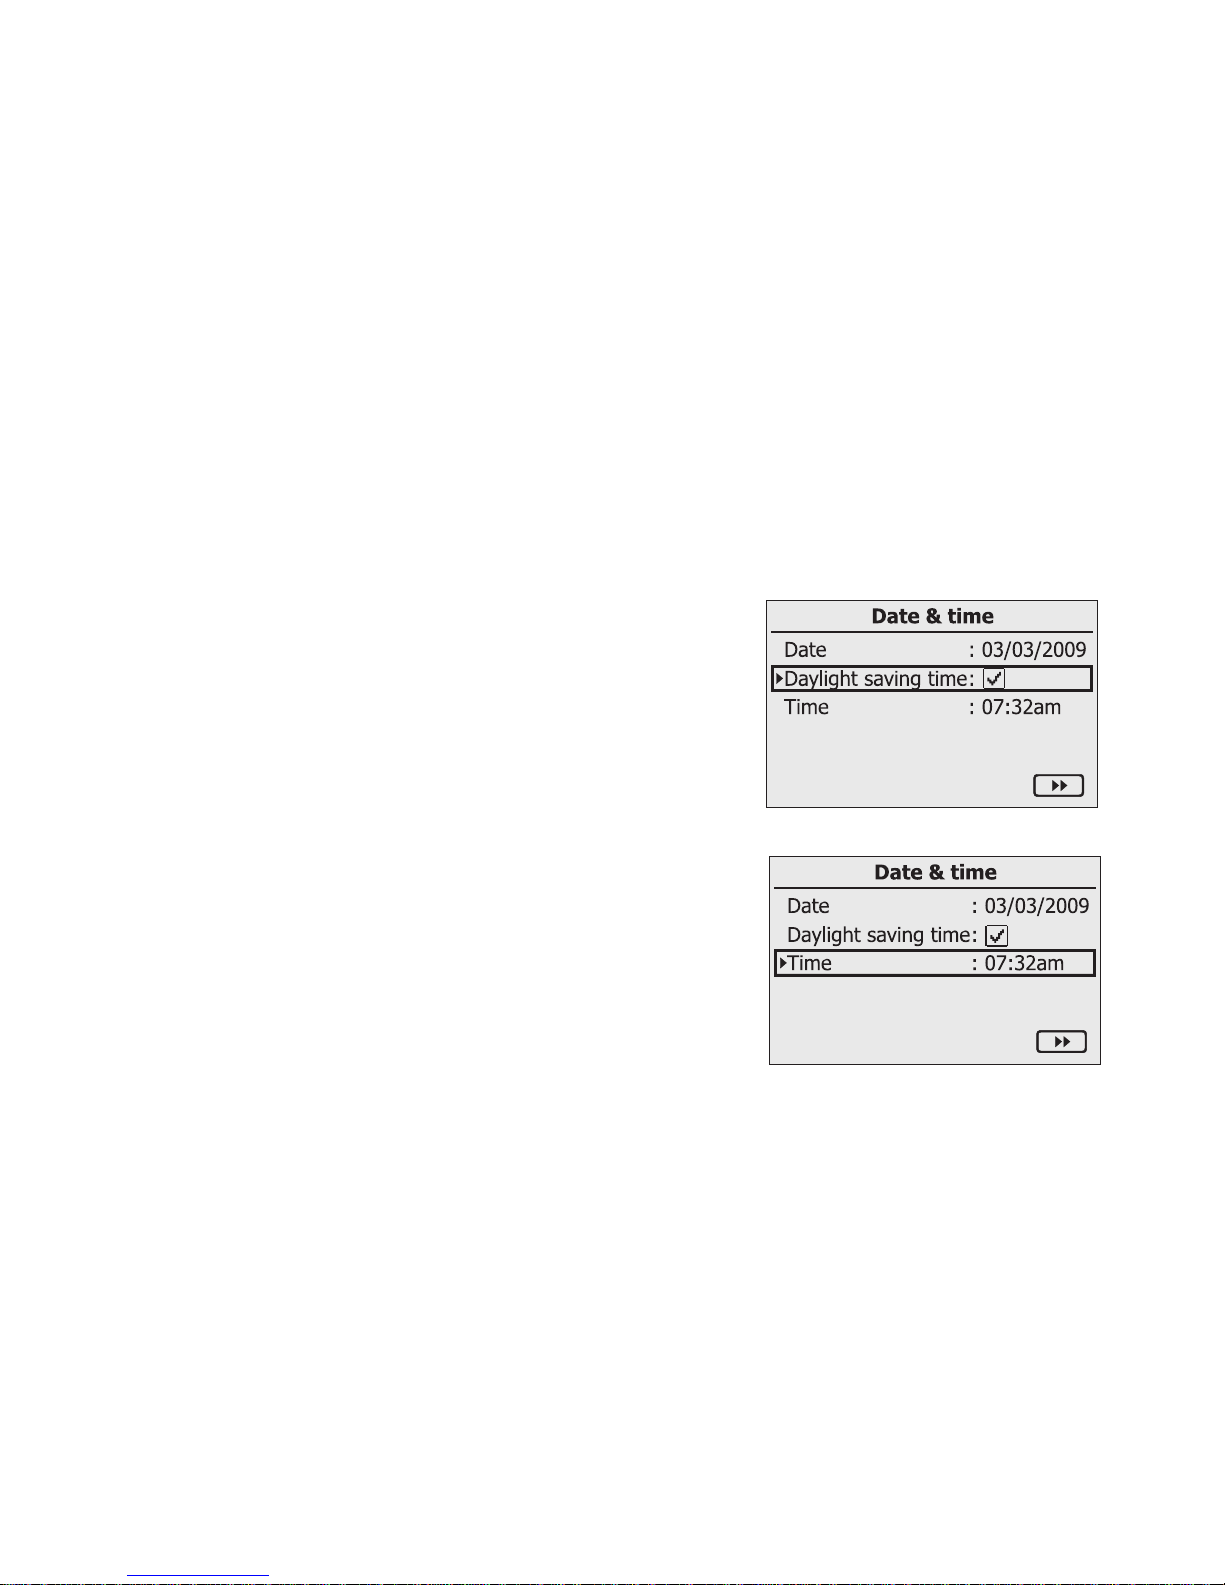
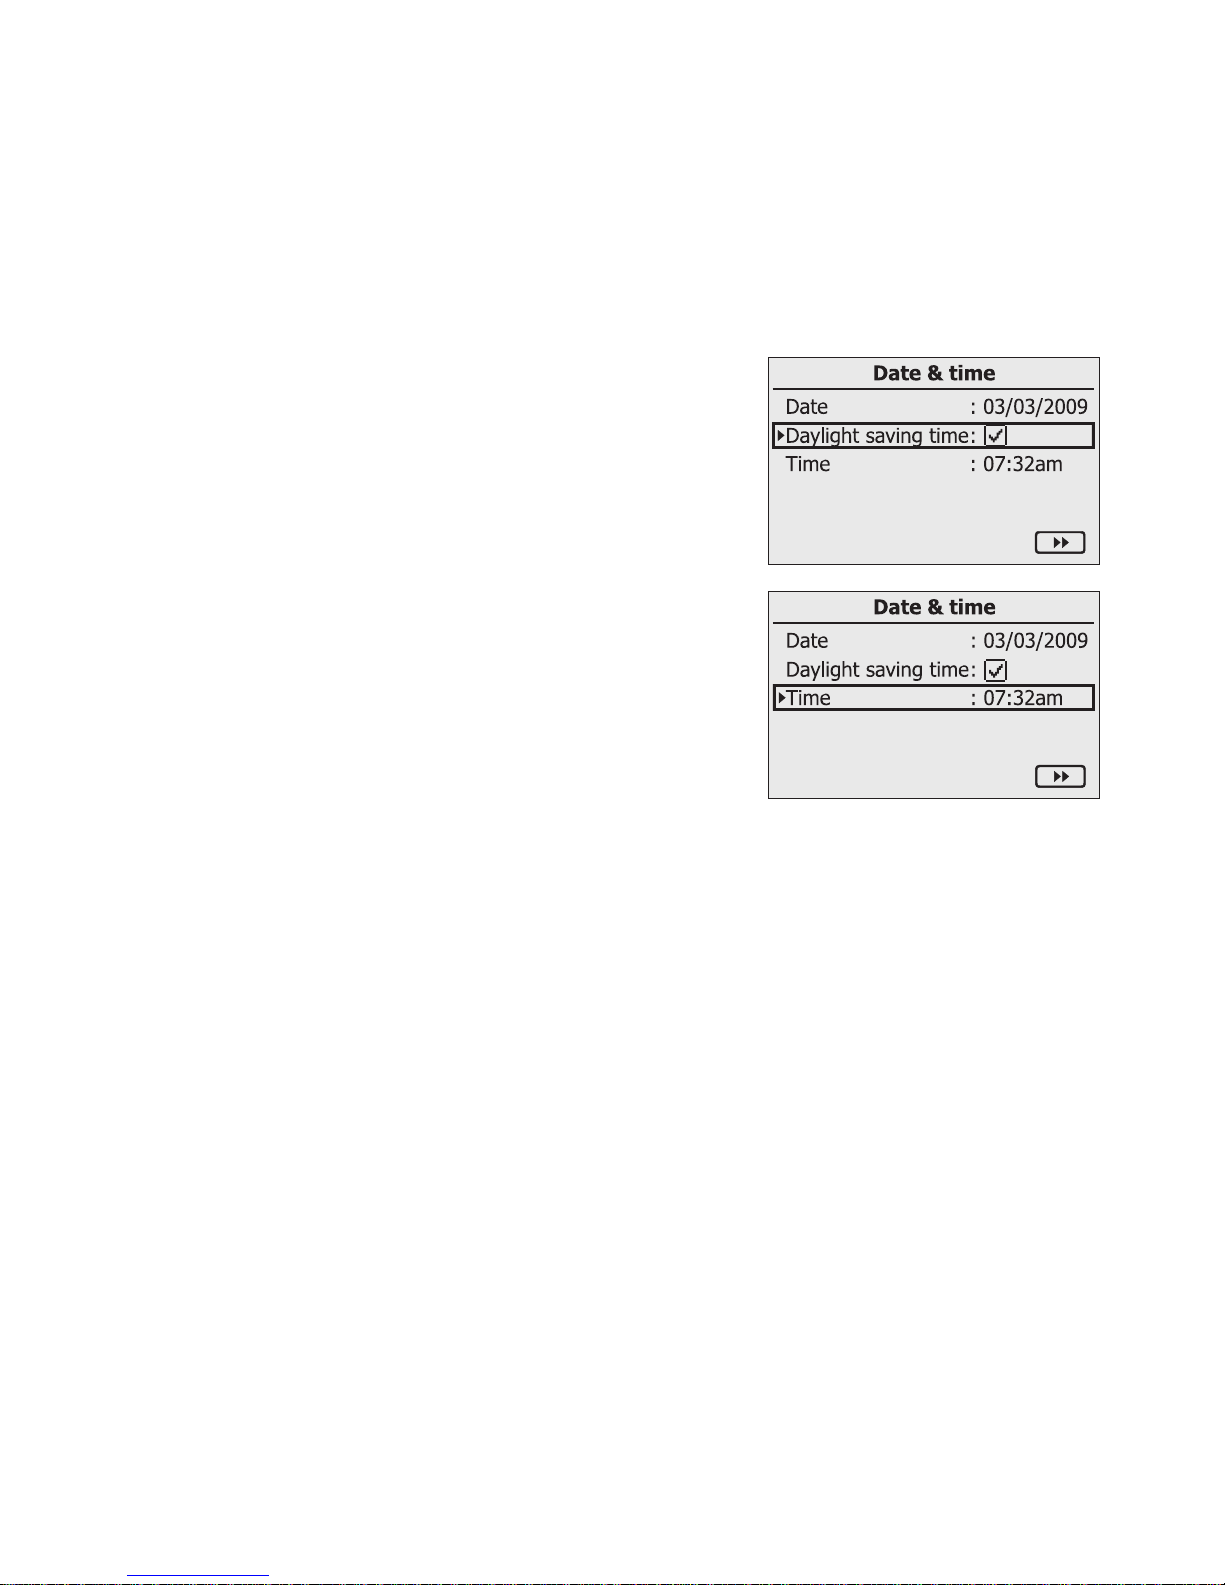
Activating daylight saving time
19. To activate daylight saving time, move the selection frame
to "Daylight saving time:" by turning the button, then press
the button to tick the box.
☑ Daylight saving time is activated.
Setting the time
20. Move the selection frame to "Time" by turning the button.
21. Press the button.
☑The first adjustable digits become dark.
22. Turn the button until the required value is shown.
23. Press the button and repeat the steps until no digits are dark.
The time will start counting again as soon as no digits in the menu item "Time" are dark.
☑ Time has been set.
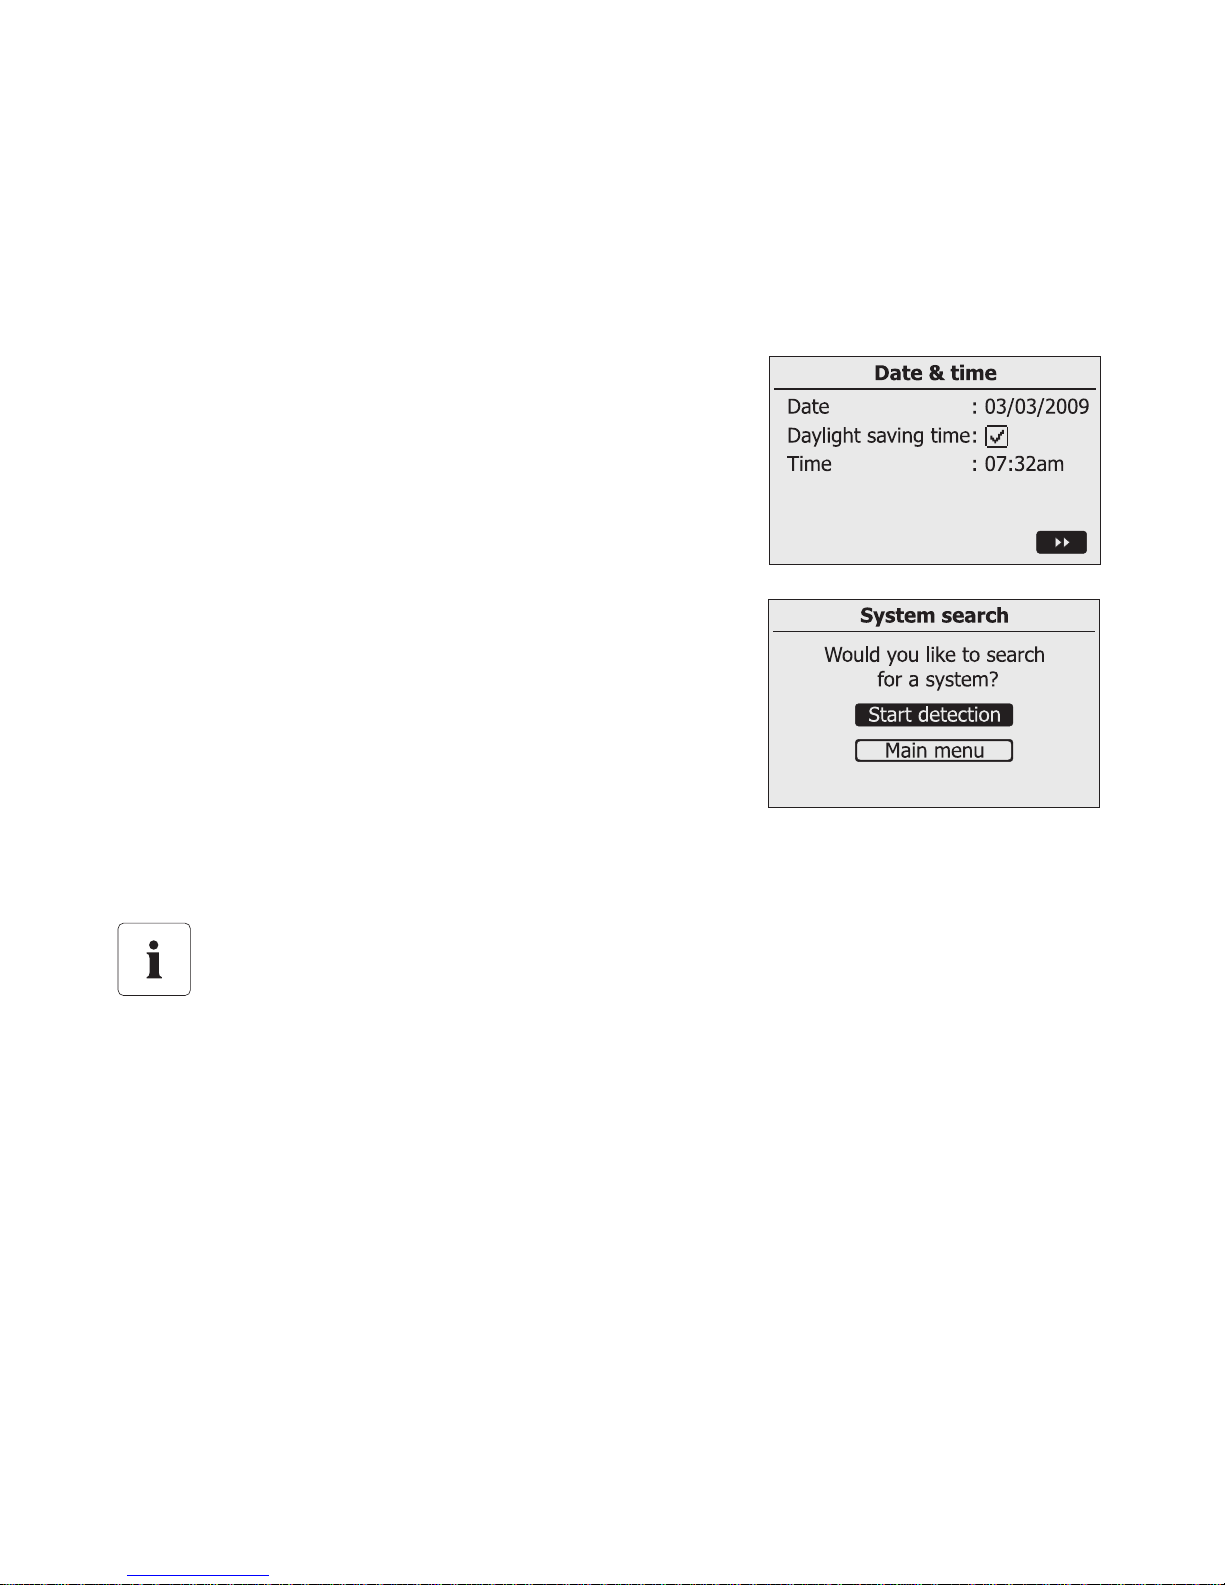
24. Move the selection frame to the button ">>" by turning the button.
Commissioning SMA Solar Technology AG
24 SBeamBT-BUS092710 User Manual
☑ The button becomes dark.
25. Press the button.
☑ The page for searching for systems appears.
Determining a free NetID
This section explains what a NetID is and how you determine a free NetID before commissioning your
PV plant.
You can select one of the NetIDs for your Bluetooth PV plant, if this NetID is not already used by
another PV plant with SMA Bluetooth in the vicinity.
NetID
The NetID serves to distinguish PV plants with SMA Bluetooth in close proximity from one
another. SMA Solar Technology Bluetooth devices recognize your Bluetooth PV plant via
an assigned NetID.
The NetID can be a number from 2 to 9 or a letter from A to F. NetID 1 is not possible for
Sunny Beam.

SMA Solar Technology AG Commissioning
User Manual SBeamBT-BUS092710 25
To check whether there is another PV plant with SMA Bluetooth within the radio range of your device
and which NetID it uses, carry out a system search with Sunny Beam on the installation site for each
device of your Bluetooth PV plant.
Alternatively, you can also determine a free NetID using a laptop with Bluetooth and the program
Sunny Explorer from SMA Solar Technology. For more information on how to do this, please refer to
the Sunny Explorer Help. You can download the program Sunny Explorer from www.SMAAmerica.com free of charge.
The following table lists the functions of the NetIDs. NetID 0 and NetID 1 have special functions.
NetID 1 is the default setting for the inverters and the SMA Bluetooth Repeater when delivered. Sunny
Beam cannot detect any devices with the NetID set to 1.
26. Place the Sunny Beam near a device of your Bluetooth PV plant.
NetID Function
0 Bluetooth is switched off.
1
(Condition upon
delivery)
Bluetooth is switched on.
The inverter or the SMA Bluetooth Repeater can only connect to a
maximum of 2 computers with Sunny Explorer from SMA Solar
Technology. A connection to the Sunny Beam is not possible.
2 - F Bluetooth is switched on.
The inverter or the SMA Bluetooth Repeater can interlink with all SMA
Bluetooth products with the same NetID.
Initially leave the devices on the preset NetID 1. Start by determining a free NetID, as
follows.
Commissioning SMA Solar Technology AG
26 SBeamBT-BUS092710 User Manual
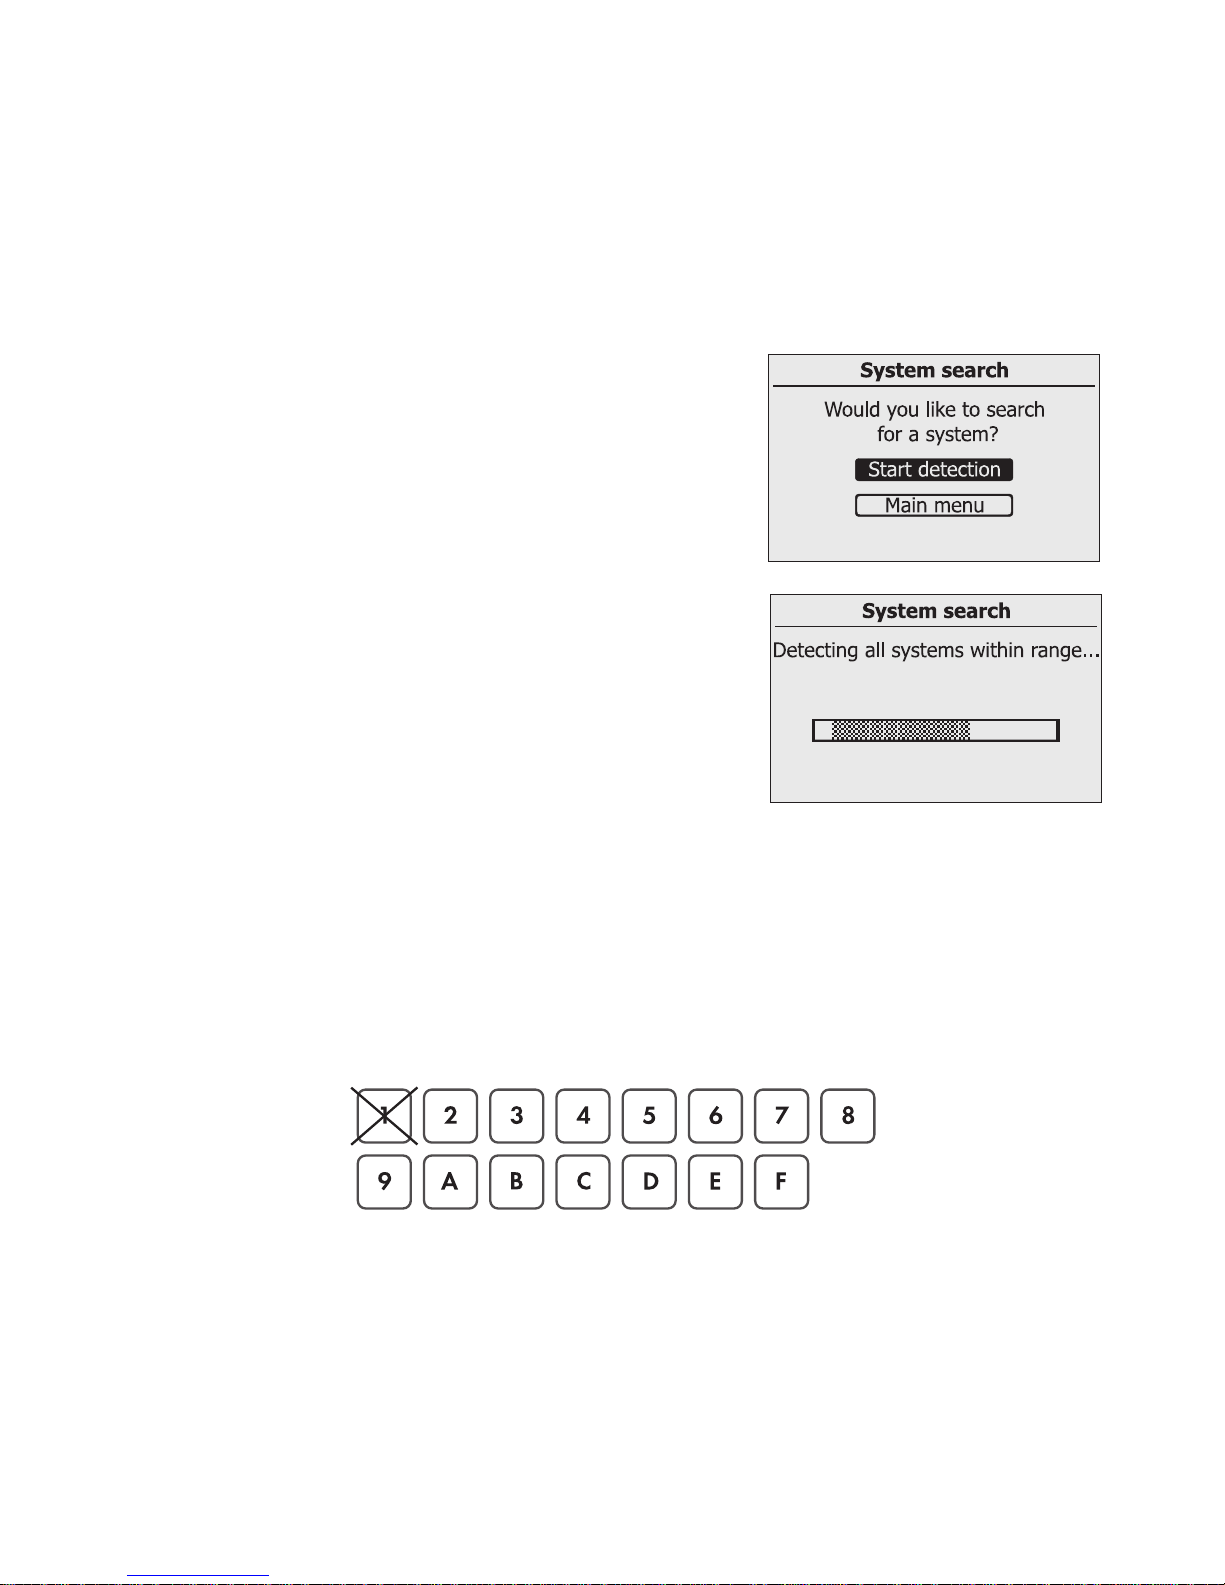
27. To start the system search, the button "Start detection"
must be dark. Press this button.
☑ The system search will begin.
☑ The Sunny Beam detects all Bluetooth PV plants within
range and lists the NetIDs of the detected Bluetooth PV
plants. In the list, the NetIDs are sorted according to
connection quality; the NetID with the best connection
quality is placed at the top. The listed NetIDs are
already in use on Bluetooth PV plants in the vicinity.
You may not use these NetIDs.
– If the Sunny Beam does not list any NetIDs, there are no Bluetooth PV plants within the radio
range of the Sunny Beam. All NetIDs are free.
28. Note down the NetIDs already in use, or cross them out in the following illustration.
29. Repeat the system search with the Sunny Beam for each device in the PV plant and at the desired
installation site of the Sunny Beam itself. Note down the NetIDs already in use, or cross them
out in the following illustration.
 Loading...