

Sly Electronics SL414CM User Manual
Overview
1. Foreword
Thank you for purchasing this player. Please read this manual carefully before using the product.
Specifications and software updates may be subject to change without notice. Some pictures in this
manual may be different than the product display yet it should perform the same functions.
2. Warnings
a) Do not use the product in extreme temperatures, dusty or wet environments
b) Do not leave the product under direct sunlight
c) Handle the player with care or the hardware and housing may be damaged
d) When inserting or removing a TF card, make sure the player is set to the “OFF” position.
e) When formatting or transferring files, do not disconnect the USB cable from the PC, this may
cause damage to the player (Always do “Safely Remove”)
f) Do not open the housing of the player
g) Keep away from extremely dry places to avoid damage caused by Electrostatic Discharge (ESD)
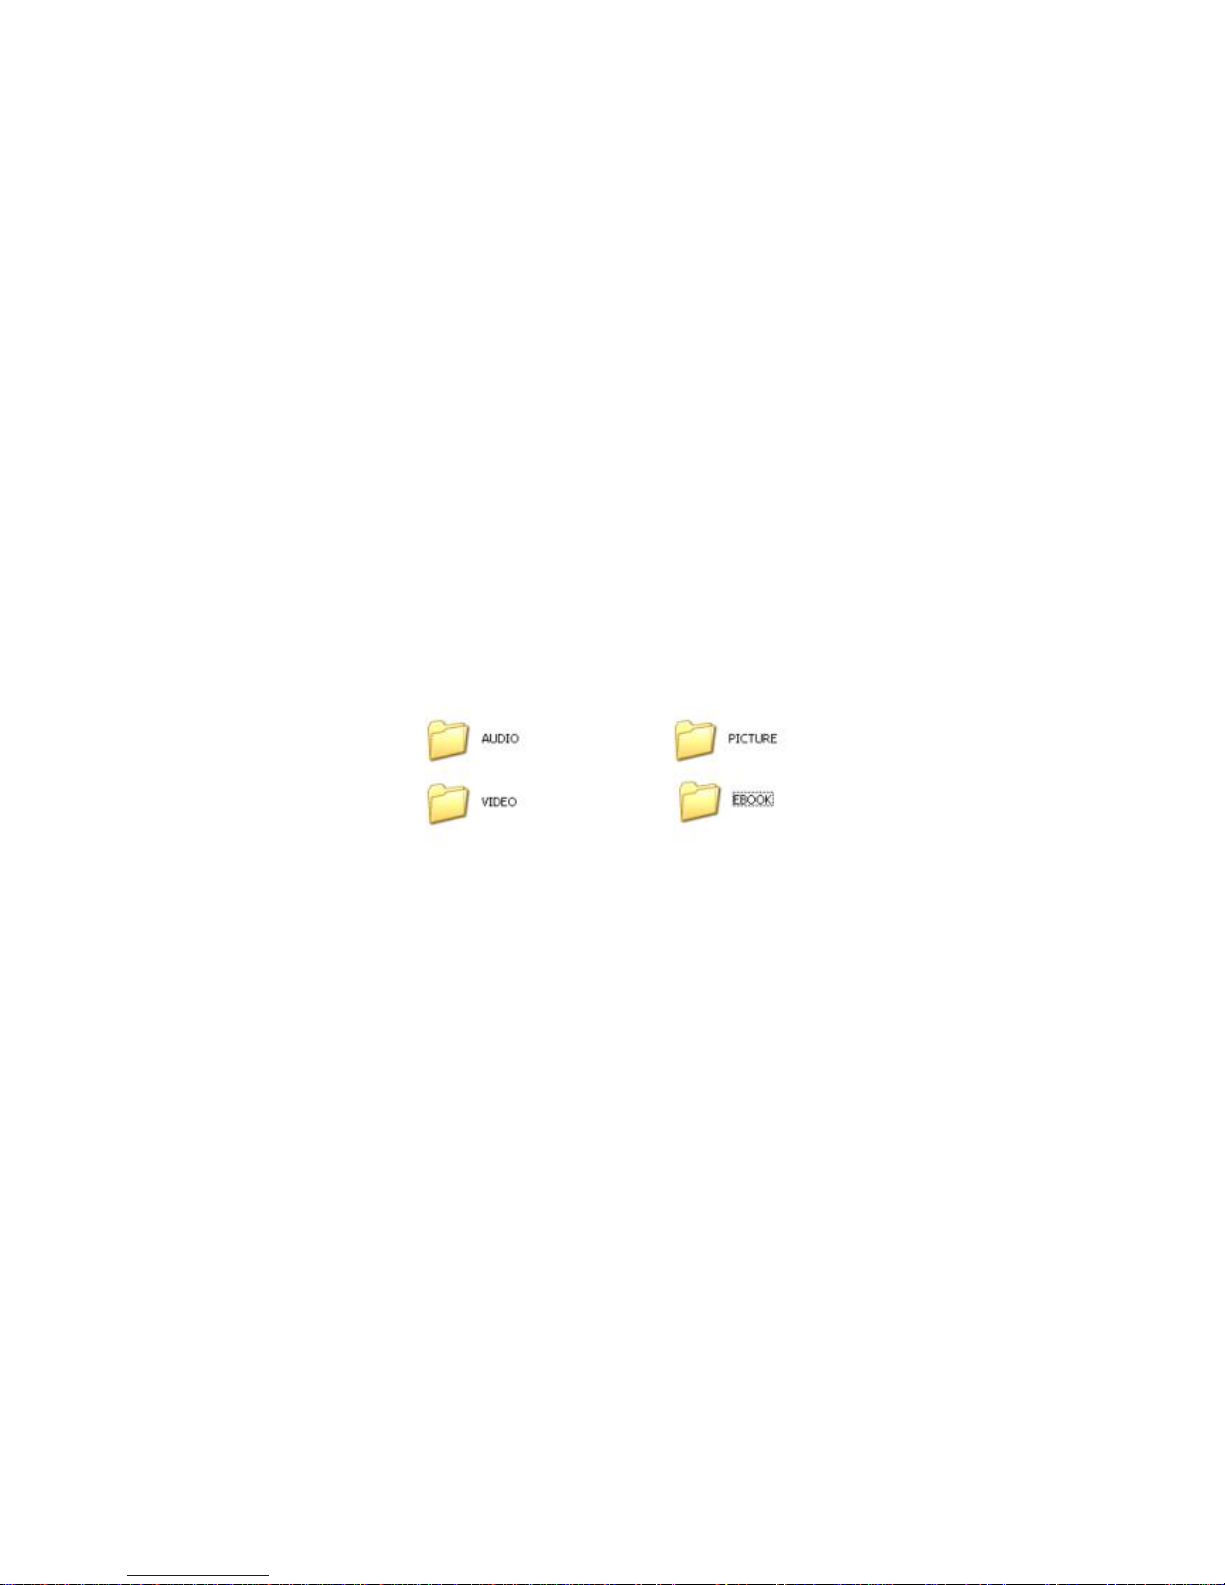
h) Avoid formatting the player. If formatting is necessary, four directories MUST be created for the
player to resume working (AUDIO, VIDEO, PICTURE, and EBOOK);
We urge you to first read the Quick Start Guide as that will answer most of your questions
Table of Contents
z Controls………………………………………………………………………………………P2
z Charging the Player…………………………………………………………………………..P3
z Basic Operations………………………………………….………………………………….P3
z Adding Pictures……………………………………………………………………………...P4
z Adding Music………………………………………………………………………………..P4
z Adding Videos……………………………………………………………………………….P4
z Adding TXT Files………………………………………………………………………….. .P6
z Video Player…………………………………………………………………………………P6
z Audio Player………………………………………………………………………………....P8
z Picture View…………………………………………………………………………………P9
z Camera………………………………………………………………………………...…….P10
z Video Recording………………………………………………………………………...…..P12
z Audio Recording……………………………………………………………………………P13
z Learning Mode (E-Book)…………………………………………………………………...P14
z Tool…………………………………………………………………………………………P15
z System Setup………………………………………………………………………………..P17
1
z Communicating With The PC………………………………………………………………P18
z Adding a TF Card…………………………………………………………………………P19
z Adding/deleting Files……………………………………………………………………..P19
z Formatting the Player……………………………………………………………………..P20
z Disconnecting From the PC………………………………………………………………P21
z Technical Specifications…………………………………………………………………..P21
z Common Problems……………………………………………………………………….P22
4. Requirement for PC
a) At least Pentium 100MHz;
b) OS of Windows 98/2000/ME/XP/Vista;
c) USB slot;
d) CD-ROM drive;
e) At least 15MB free hard disk space;
f) At least 32MB memory;
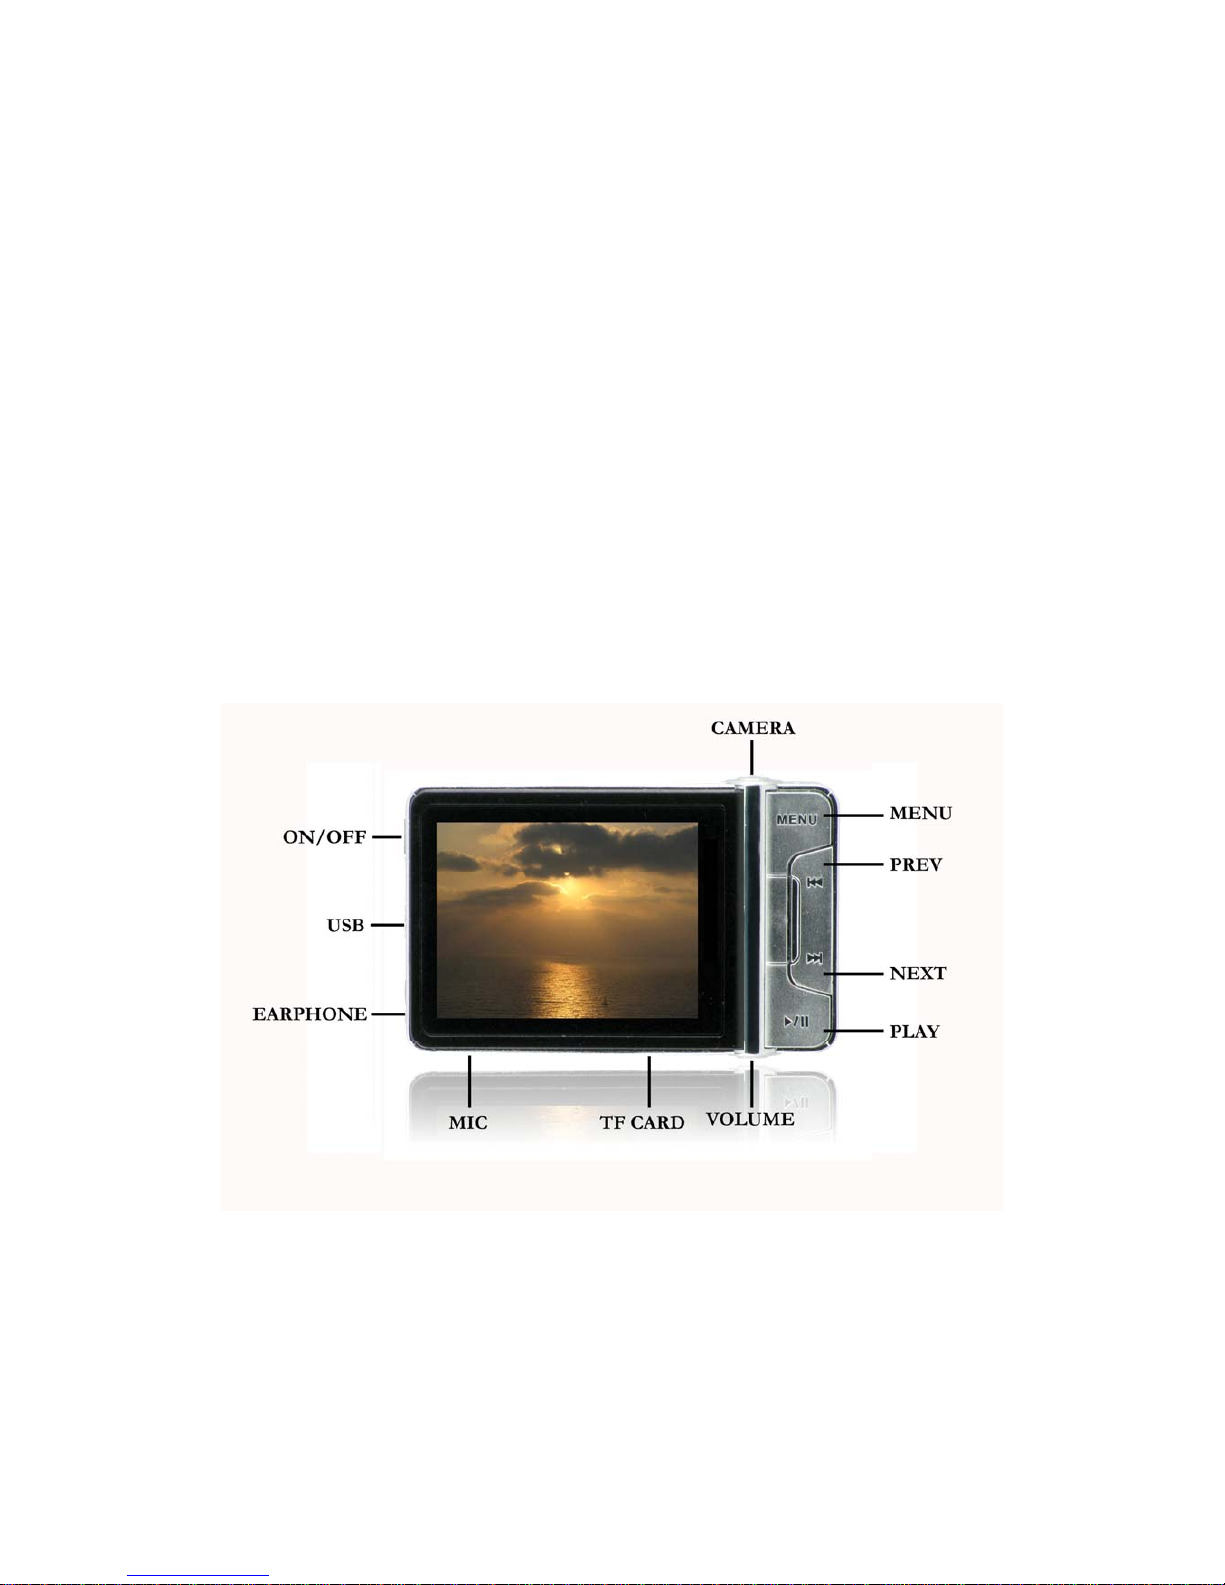
5. Layout of the Player
SLY CAM Controls
2

User Guidelines
1. Battery Warnings
The icon of the battery with different status
Note: If player fails to start, the battery may be empty. Please recharge it and try again.
2. Recharging the Battery
1) Connect one end of the supplied mini USB cable to the player (make sure player is OFF)
2) Connect the other end of the mini USB cable to the computer
3) Charging process begins automatically
4) When it is fully charged, it will show a full battery icon
5) Be sure to safely remove the device
3. Basic Operation
A) POWER ON
• With the player switched to the ON position, long-press the PLAY key until the screen turns on.
B) POWER OFF
• In any working status, long-press the PLAY key, the LCD will shut down and the system will
turn off.
• The product will be switched off automatically when the battery is empty. It will also turn off if
left idle for 3 minutes in any working status, unless the Time for “Switch Off Automatically” is
set as NEVER (Go to System Setup and then go to Power Mode).
C) Enter/Select
• In any working status, short-press the PLAY key to select an option.
D) Directional Keys
• Short-press
or to choose the different icons you want to select.
E) Exit (Going to Main Menu)
• Short-press the Menu button to Exit any mode (may need to short-press the Menu button twice
3

to get to the Main Menu).
Transferring Files
1. Adding Pictures – Copy & Paste
1) Connect the player using the USB cable.
2) Once the player has been detected, go to My Computer.
3) Select the Removable Disk that correlates to your player.
4) In a new window, go to the folder of your pictures and copy the picture file(s) you want (jpeg
files only).
5) Paste the files to the Removable Disk under the PICTURE folder
6) After copying is complete, safely remove the Removable Disk.
2. Adding Music – Copy & Paste
1) Connect your player using the USB cable.
2) Once your player has been detected, go to My Computer.
3) Select the Removable Disk that correlates to your player.
4) In a new window, go to the folder where you keep your music on your computer (usually “My
Music” in My Documents) and then copy the audio file(s) you want.
5) Open the Removable Disk, then Open the AUDIO folder and Paste the songs. You may create
subfolders within the AUDIO folder.
• We recommend that you
do not use Windows Media Player with this device. However, if
you do sync your player with Windows Media Player
, follow these steps:
• With Windows Media Player open and the player connected, click on the sync tab.
• Click on the arrow at the bottom of the sync tab.
• Go to “Mass Storage” and choose Set Up Sync from the submenu.
• Uncheck the box marked “Sync this device automatically” in the window that pops up
and click “Finish”.
• Highlight the files you want transferred to your device and drag them into the Sync List
column.
• Hit “Start Sync” to transfer the files.
• When the conversion is finished, open the removable disk that correlates to your player.
There will be a new folder called “Music”.
• Drag the “Music” folder into the AUDIO folder. Your songs will now be available on
the device.
*Note: After the initial syncing of the device, if you want to sync it again and add more songs
using Windows Media Player
, you MUST move the “Music” folder back to the main level of
the removable disk before adding additional songs, then move it back to the AUDIO folder when
finished syncing. To do this, follow these steps:
• Open the removable disk and go to the AUDIO folder.
• Right-click on the “Music” folder and select Cut.
• Hit “Back” on the window to go back to the main level of the removable disk.
4

• Right-click and select Paste. Your music folder will now be visible next to the AUDIO,
VIDEO, PICTURE, and EBOOK folders.
• Go to Windows Media Player and add files to the Sync List that you would like
transferred to your player.
• Hit “Start Sync” to transfer the files.
• When transfer is complete, drag the “Music” folder back into the AUDIO folder on the
removable disk. Your files will now be available on the player.
6) After copying is complete, safely remove the Removable Disk.
*Please be aware that the player does not support music purchased on iTunes
because
those songs are copyright protected. You can download songs from websites such as
Emusic.com, MP3.com or any songs in MP3 Format will work with this player. Other sites
will also work – just make sure the files are not Protected WMA. For further assistance you
can email us at
support@slyelectronics.com
3. Adding Videos
*Note: All videos must be converted into the correct format before transferring.
-To install the Conversion Software from the CD that came with the player, insert the CD into
your computer. Open the CD folder and select AUTORUN. Next, select “Install Transcoding Tool”
and then click NEXT. Last, click INSTALL and the program will install to your computer. You are
now ready to convert videos.
1) Connect your player using the USB cable.
2) Open the Video Converter
- Go to: Start Menu→Programs→MultimediaTranscoding Tool/Media Convert
3) At the bottom of the converter box (Figure 1), click BROWSE.
4) Find the Removable Disk, and select the VIDEO folder as the save destination for the converted
files. The converter screen should appear as below (Figure 1):
Figure 1: Video Conversion Software
5) Click “Add Files” and select the video file(s) you would like converted.
6) Click “Start” to begin video conversion. Your progress is displayed in the bar below the video
(see Figure 2). Your converted files will be saved directly to the player. Do not disrupt or move
the player while converting files.
5

Figure 2: Converting a Video
7) After conversion is complete, safely remove the Removable Disk (player).
4. Adding TXT Files (E-Book)
1) Connect your player using the USB cable.
2) Once your player has been detected,go to My Computer.
3) Select the Removable Disk that correlates to your player.
4) Go to the folder of your txt file(s) and copy the txt file(s) you want.
5) Paste the files to the Removable Disk under the EBOOK folder.
6) After copying is complete, safely remove the Removable Disk.
If you have inserted a TF Card: Users have the option to copy the file(s) either to the flash memory
or the TF memory; it will show on your computer as a separate Removable Disk signifying Flash and
TF memory (Refer to the section on TF Card).
Main Menu
1. The Main Menu
6

Figure 3: Main Menu
2. Video Player
a) To enter video player mode:
• Use the directional keys to choose the Video Player mode icon in the Main Menu, shown in
Figure 4 (below).
• Short-press the PLAY key to enter video player mode.
Figure 4: Video Player Mode
b) Video Configuration
• Long-pressing the MENU key while in the video player menu will display the sub-menu of the
video mode.
• Press
or to scroll through the sub-menu options, and short-press the PLAY key to
access them.
• Press PLAY to confirm your choice.
• Press MENU to go back to the video menu.
The functions of the video player sub-menu are listed in Figure 5 (below)
List
Disp Mode
Thumbnail
Current
All
Loop Mode
Random
Lock
File Protect
Unlock
7
 Loading...