

SLV TRISTAN Instruction Manual [ml]
D Gebrauchsanweisung
ENG Instruction Manual
F Mode d'emploi
E Instrucciones de montaje
NL Gebruiksaanwijzing
für/for/pour/para/voor
TRISTAN
2 x T8 36W
2 x T8 18W
2 x TC-L 18W
2 x T8 58W
D Gebrauchsanweisung TRISTAN
1. Bestimmungsgemäße Verwendung:
Dieses Produkt dient nur Beleuchtungszwecken und darf:
nur mit einer Spannung von 230V ~50Hz betrieben werden.
nur in trockenen, also nicht:
in feuchten oder schmutzgefährdeten Räumen.
im Bereich hoher Luftfeuchtigkeit betrieben werden.
keinen starken mechanischen Beanspruchungen oder starker
Verschmutzung ausgesetzt werden.
nach einer feuchten oder verschmutzenden Lagerung erst nach
einer Zustandsprüfung betrieben werden.
nicht verändert oder modifiziert werden.
Sollten diese zuvor genannten Punkte nicht eingehalten werden, so
kann es zum Kurzschluss oder elektrischen Schlag kommen.
2. Technische Daten:
Betriebsspannung: 230V ~50Hz
Schutzklasse: I
Leuchtmittel: 2x T8(T26),
Maße cm (L/B/H): 131,5/
Gewicht: 4,00 kg 2,30 kg 1,5 kg 5,3 kg
Importeur: SLV Elektronik GmbH
160761/64 160841/44 160851/54 160861/64
G13, 36W
18,5/6,2
2x T8(T26),
G13, 18W
70,5/
18,5/6,2
2x TC-L
2G11, 18W
34/
18,5/6,2
2x T8(T26)
G13, 58W
161/
18,5/6,2
3. Montage
Der elektrische Anschluss darf nur durch einen Elektro-Fachmann
durchgeführt werden, der mit den geltenden Richtlinien vertraut ist!
Achtung: Schalten Sie die Stromversorgung bzw. die
Anschlussleitung spannungsfrei, bevor Sie jegliche Arbeiten
vornehmen! Verwenden Sie nur Teile, die mit dem Produkt mitgeliefert
oder definitiv als Zubehör beschrieben werden! Andernfalls kann die
Anlage, als auch das Produkt nicht ausreichend sicher sein!
Montageort
Das Produkt ist für die Montage an der Decke geeignet.
Achten Sie darauf, dass das Produkt auf einem stabilen, ebenen,
kippfesten Untergrund montiert wird.
Der Lichtaustritt des Produkts sollte mindestens soweit entfernt sein von
der angestrahlten Fläche, wie der auf dem Typenschild der Leuchte
angegebene Mindestabstand:
leicht entzündlichen Gegenständen (z. B.: Vorhänge, Gardinen, etc.).
Einzelne Montageschritte
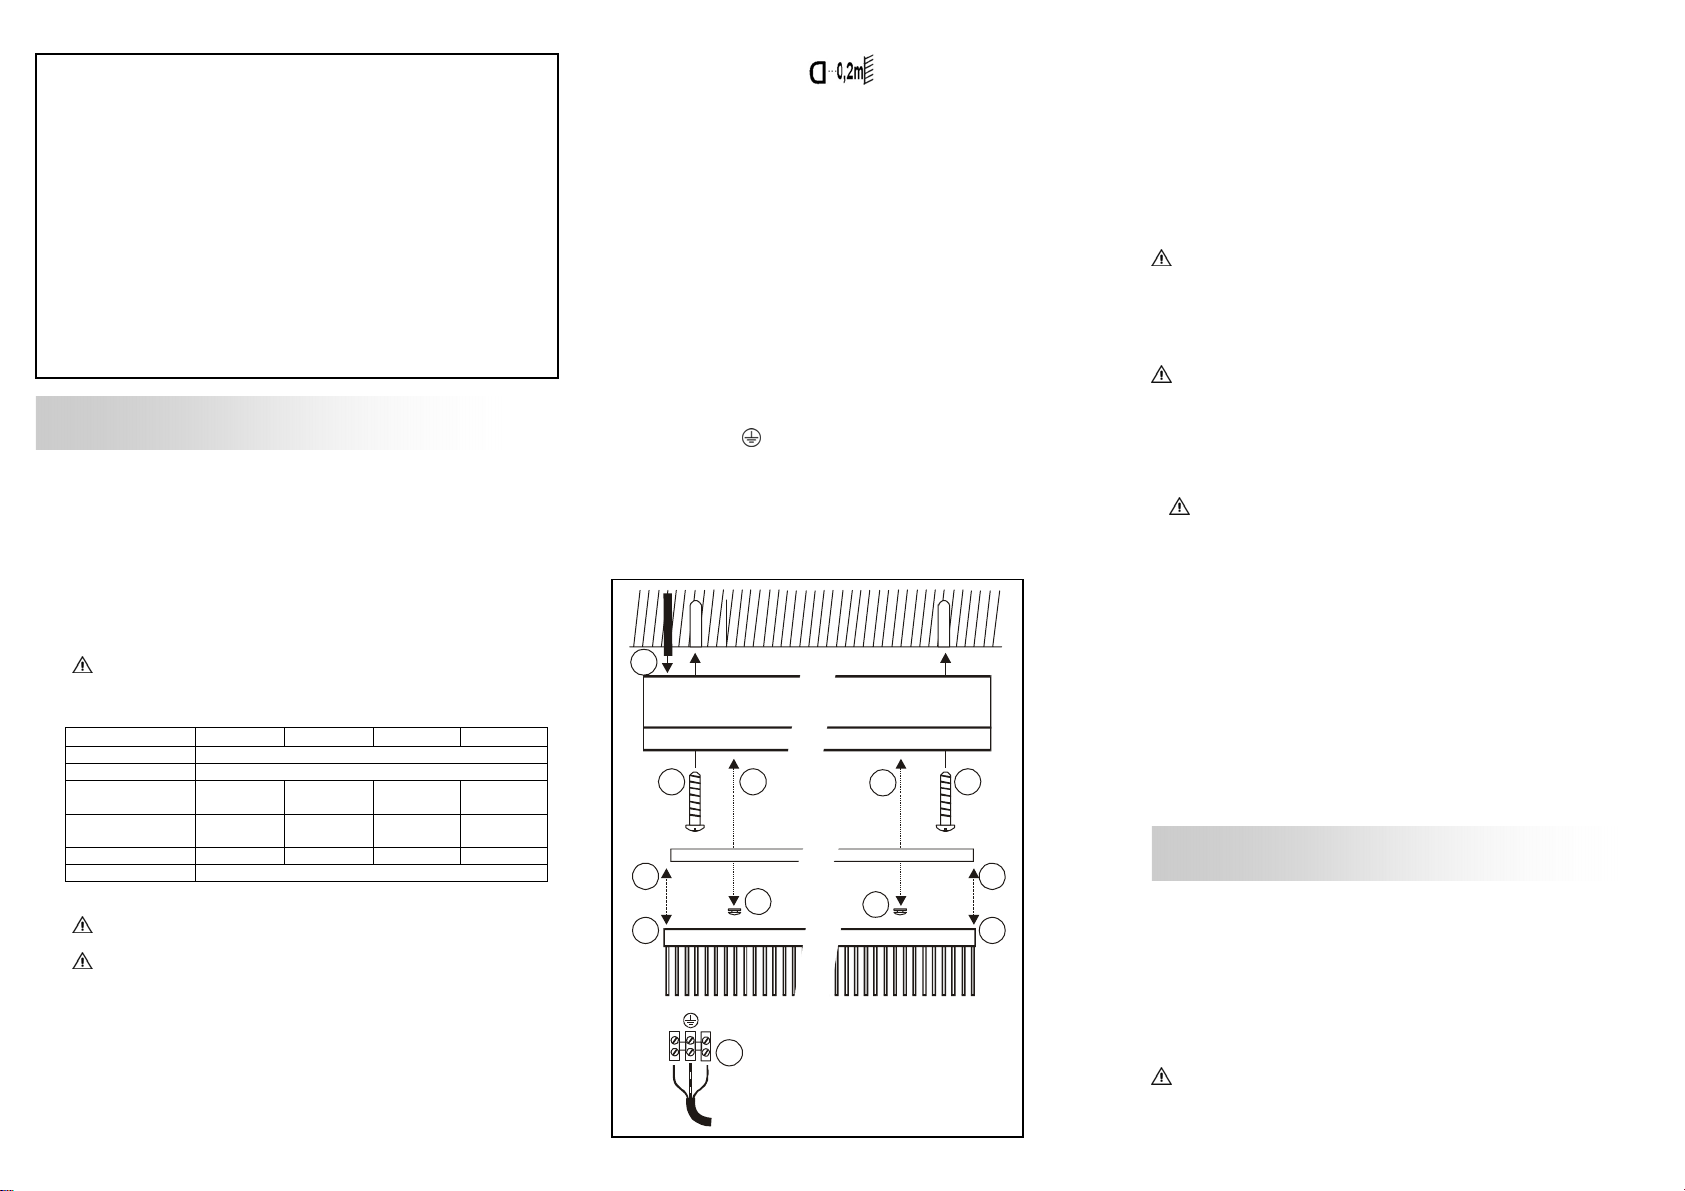
Nehmen Sie die Raster vorsichtig von der Leuchte ab (1).
Entfernen Sie mit einer Vierteldrehung die zwei Kunststoffhalter um den
Reflektor abzunehmen (2).
Markieren und bohren Sie die Löcher zur Befestigung gemäss den
Löchern auf der Rückseite der Leuchte. Beachten Sie dabei die Position
der Zuleitung. Beschädigen Sie nicht die Zuleitung, z. B. durch Bohren,
Schrauben oder scharfes Knicken. Dies kann zu einem Kurzschluss
führen.
Führen Sie die Zuleitung durch die Gummidichtung (3).
Befestigen Sie die Leuchte mit ausreichend dimensionierten
Befestigungsmaterial an der Decke (4).
Elektrischer Anschluss (5)
Das Produkt muss durch eine allpolige Trennung von der
Stromversorgung getrennt werden können.
Zum elektrischen Anschluss verbinden Sie die schwarze oder braune
Ader (Außenleiter) der Anschlussleitung mit der Klemme L und die
blaue Ader (Neutralleiter) der Anschlussleitung mit der Klemme N. Die
grün-gelbe Ader (Schutzleiter) der Anschlussleitung wird mit der
Erdungsklemme
Befestigen Sie wieder den Reflektor mit den Kunststoffhaltern (6).
Setzen Sie die Leuchtmittel ein. T8: Setzen Sie die Leuchtstoffröhre in
die Aussparungen der Fassung. Durch eine Vierteldrehung lässt sich
das Leuchtmittel fixieren. TC-L: Stecken Sie das Leuchtmittel auf die
Fassung.
Bringen Sie wieder die Raster an (7).
Achten Sie auf den sicheren Halt der Leuchte!
Das Produkt ist nun betriebsbereit.
des Produktes fest verschraubt.
. Besondere Vorsicht gilt bei
3
644
6
7
1
2
2
7
1
LN
5
4. Betrieb:
Informationen für den Betreiber:
Betreiben Sie das Produkt nur, wenn es einwandfrei funktioniert. Im
Fehlerfall schalten Sie das Produkt sofort aus und betreiben es erst wieder
nach Überprüfung durch einen Elektro-Fachmann. Dies ist der Fall, wenn:
sichtbare Beschädigungen auftreten.
das Produkt nicht einwandfrei arbeitet.
es qualmt, dampft, oder bei hörbaren Knistergeräuschen.
eine Überhitzung zu erkennen ist.
Reparaturen des Produktes oder Arbeiten an netzspannungsführenden
Teilen dürfen nur Fachkräfte des Elektrohandwerks vornehmen.
Achtung: Hier besteht sonst Lebensgefahr durch elektrischen Schlag!
So vermeiden Sie Störungen und Brandgefahren:
Decken Sie das Produkt nicht ab. Beeinträchtigen Sie nicht die
Luftzirkulation.
Hängen und befestigen Sie nichts an dem Produkt, insbesondere keine
Dekoration.
Lassen Sie Kinder nicht unbeaufsichtigt mit elektrischen Produkten
spielen! Kinder können Gefahren im Umgang mit elektrischer Energie nicht
immer richtig einschätzen.
Was ist zu tun, wenn ein Leuchtmittel defekt ist oder nicht
funktioniert?
Schalten Sie erst das Produkt spannungsfrei, bevor Sie das
Leuchtmittel (Lampe) austauschen.
Vorsicht: Lassen Sie nach vorangegangenem Betrieb erst das
Leuchtmittel abkühlen – andernfalls besteht wegen der heißen
Oberfläche Verletzungsgefahr.
Ersetzen Sie nur Leuchtmittel mit den gleichen Daten wie Sockel,
Spannung und Wattage - jede andere Art von Leuchtmittel kann zu
Beschädigungen der Leuchte führen.
Leuchtmittelwechsel: s. Montage.
5. Was ist sonst noch zu beachten?
Schalten Sie erst das gesamte Produkt spannungsfrei, bevor Sie...
Reinigungs- oder Pflegearbeiten ausführen.
Arbeiten an dem Produkt oder seinen Komponenten vornehmen (nur
Elektro-Fachmann).
160761/64 160841/44/51/54/61/64 07/2007 © by SLV Elektronik
GmbH
Technische Änderungen vorbehalten. Vervielfältigung verboten !
ENG Instruction Manual TRISTAN
1. Use as directed:
This product serves exclusively lighting purposes and may:
only be used with a voltage of 230V ~50Hz.
only be used in dry condition,
not in damp or dirt-endangered rooms.
not in areas of high air humidity.
not be exposed to strong mechanical loads or to strong
contamination.
only be installed and operated after a condition inspection if the
product is dirty or has been moistened through storage.
not be modified or converted.
If these points named above are not adhered to, a short circuit or
electrical shock may occur!
2. Technical Data:
Operating voltage: 230V ~50Hz
Safety class: I
Bulb: 2x T8(T26),
Dimensions cm
(L/W/H):
Weight: 4,00 kg 2,30 kg 1,5 kg 5,3 kg
Importer: SLV Elektronik GmbH
160761/64 160841/44 160851/54 160861/64
G13, 36W
131,5/
18,5/6,2
2x T8(T26),
G13, 18W
70,5/
18,5/6,2
2x TC-L
2G11, 18W
34/
18,5/6,2
2x T8(T26)
G13, 58W
161/
18,5/6,2
3. Installation
The electric connection may be executed only by an electric expert
who is familiar with the valid directives!
Attention: Switch off the power of the mains supply line or
respectively of the connection lead before doing any works
parts, which are supplied with the product or are described as accessories!
Otherwise the product or the installation might not be sufficiently safe.
Installation place:
The product is suited for ceiling installation.
Make sure that the product is mounted on a stable, even and tilt-fixed
background.
The light exit should be placed at least so far from the illuminated surface,
as indicated as minimum distance on the type plate of the luminaire:
curtains).
Separate Installation Steps
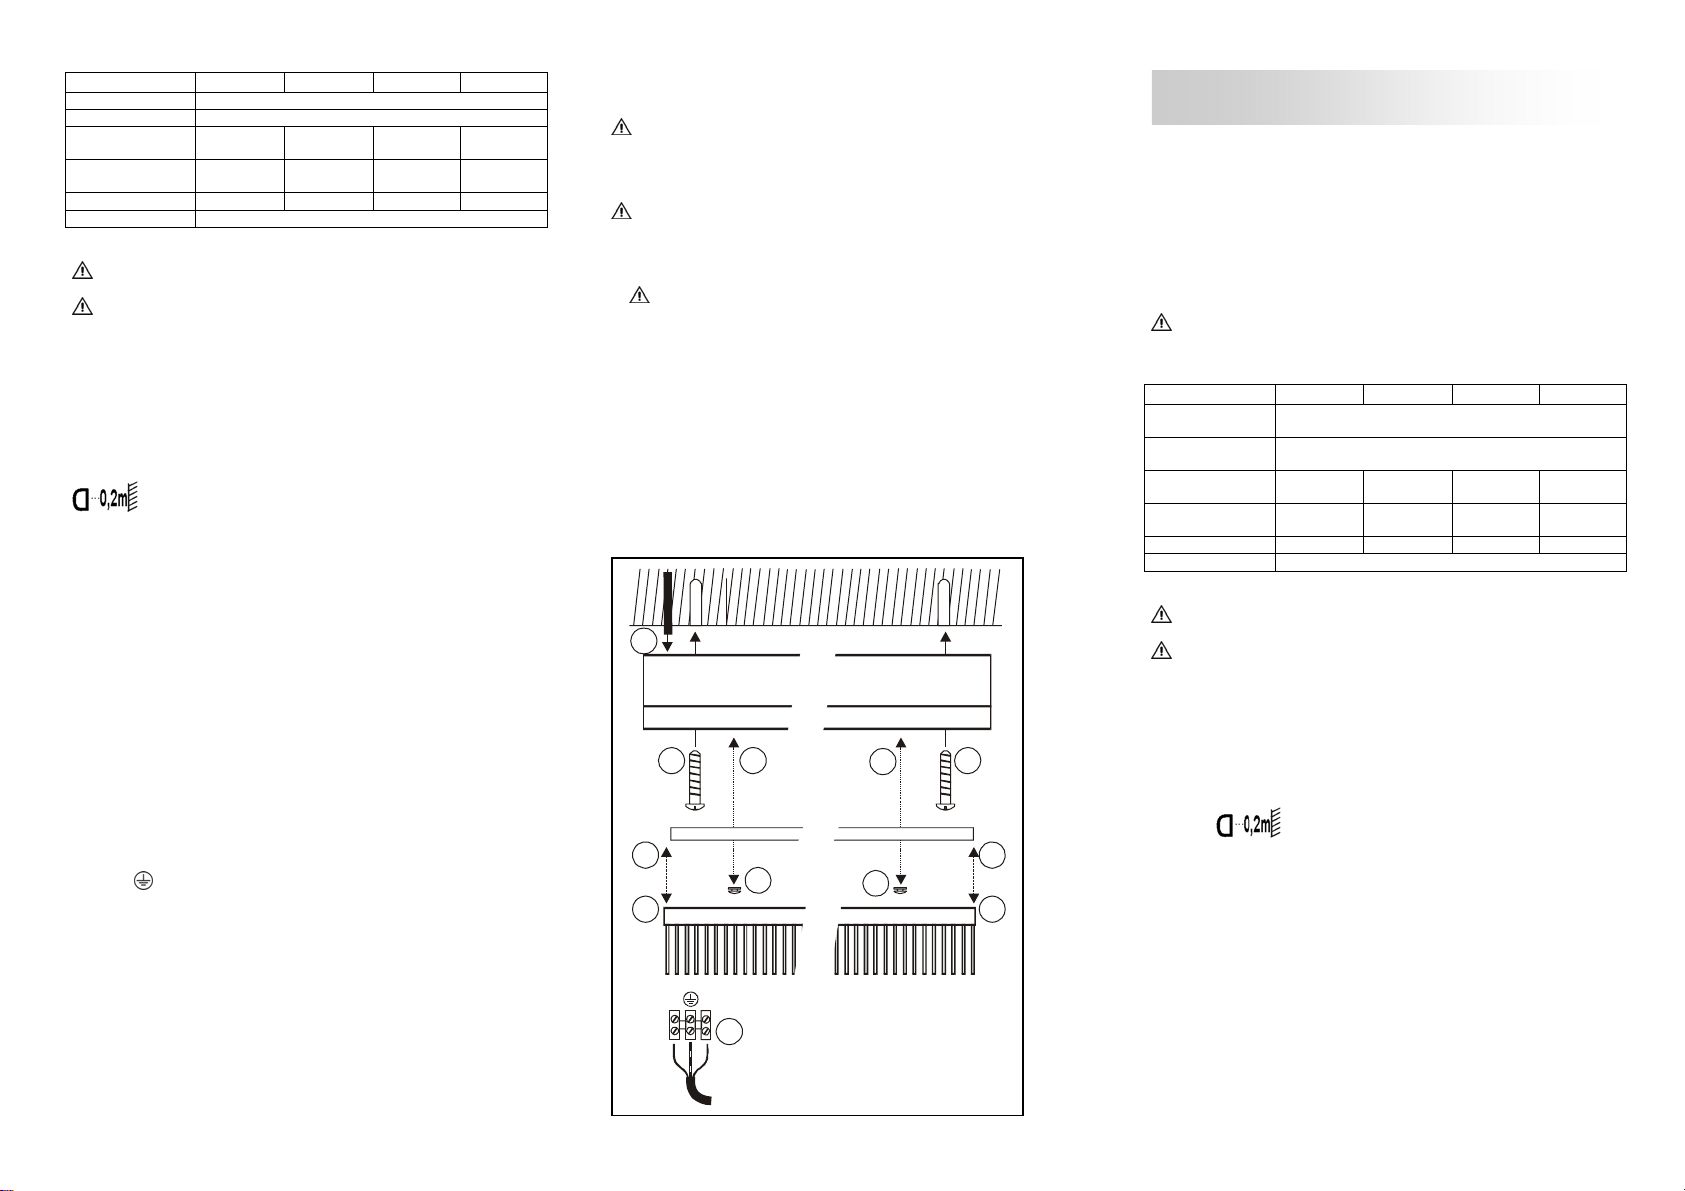
Carefully take the screens off the fixture (1).
With a quarter-turn the plastic retainer are loosened to remove the
Mark and drill the fastening holes corresponding to the holes on the
of the fixture. Note the position of the cable inlet. Do not damage the
Direct the power supply cable through the rubber gasket into the fixture
Fasten the fixture to the ceiling using properly dimensioned fastening
Electrical Connection (5)
The product must be able to be separated by an all pole separation from
For electric connection attach the black or brown wire (live conductor) of
Fasten the reflector back to the fixture using the two plastic retainer (6).
Place the tubes into the fixture. T8: Insert the fluorescent tube into the
Put the screens back on. (7)
Ensure that the light fixture holds securely!
The product is now ready for operation.
. Pay special caution to easily inflammable objects (e.g.
reflector (2).
backside
power supply line in the, i.e. by drilling, screws or strong bending. This
can lead to a short circuit.
(3).
materials (4).
the current supply.
the mains supply with the clamp L and the blue wire (neutral conductor)
of the mains supply with the clamp N. The green-yellow wire (protective
conductor) of the mains supply has to be tightly screwed into the earth
clamp
recesses of the sockets. With a quarter-turn the bulb is fixed. TC-L: Stick
the bulb into the socket.
of the product.
. Use only
4. Operation
Information for the user:
Operate the product only if it is working correctly. Switch off the product
with a malfunction immediately and operate it again only after examination
by an electrical specialist. This is the case, when:
visible damages appear.
the product does not work.
:
smoke, steam or crackling sounds appear.
an overheating is recognisable.
Repairs of the product or work on mains voltage-prominent sections may
only be carried out by qualified electricians.
Attention: Here exists mortal danger from an electric shock!
How to avoid failure and fire risk:
Do not cover the product - provide free air circulation!
Do not hang or fasten anything on the product, especially no decoration.
Never let children play unsupervised with electric products! Children
can not always estimate dangers in dealing with electric energy correctly.
What is to do if a bulb is defect or does not work?
Disconnect the product from power, before you exchange the bulbs.
Caution: Let the bulb cool down first before replacement – otherwise
considerable risk of injury exists because of the hot surface.
Replace the bulbs only with bulbs of the same data like socket, power
and capacity. Every other sort of bulb can lead to damages of the light.
Replacing the bulb: see Installation.
5. What else has to be considered?
Disconnect the product from power, before you…
clean or maintain the product.
do any works on the product or its components (electric expert).
160761/64 160841/44/51/54/61/64 07/2007 © by SLV
Elektronik GmbH
Technical Details are subject to change. Duplication prohibited !
3
7
1
LN
644
6
7
2
2
1
5
F Mode d'emploi TRISTAN
1. A utiliser comme indiqué :
Ce produit ne sert qu’à éclairer:
il est prévu pour une tension de 230V ~50Hz.
il peut uniquement être utilisé dans un endroit sec et surtout pas :
dans un environnement poussièreux ou humide
dans un environnement d'air humide
il ne doit être soumis ni aux efforts mécaniques importants ni à un
encrassement important.
il ne doit être utilisé qu’après examen si le produit a été stocké dans un
entrepôt humide ou sale.
il ne doit pas être modifié.
Un non-respect de ces points peut causer un court-circuit ou une
décharge électrique!
2. Informations techniques:
Tension
d'alimentation:
Classe de
protection:
Ampoule: 2x T8(T26),
Dimensions cm
(L/L/H):
Poids: 4,00 kg 2,30 kg 1,5 kg 5,3 kg
Importateur: SLV Elektronik GmbH
160761/64 160841/44 160851/54 160861/64
G13, 36W
131,5/
18,5/6,2
230V ~50Hz
2x T8(T26),
G13, 18W
70,5/
18,5/6,2
I
2x TC-L
2G11, 18W
34/
18,5/6,2
2x T8(T26)
G13, 58W
161/
18,5/6,2
3. Installation
La connection électrique doit être exécutée par un professionnel,
lequel est familier des normes en vigueur!
Attention: Mettez l’alimentation électrique ou le raccordement au
secteur hors tension avant de travailler!
Utilisez seulement des pièces qui ont été livrées avec le produit ou qui sont
uniquement décrites comme accessoires ! Sinon, l’installation ainsi que le
produit ne peuvent pas être garantis.
Lieu d'installation
Ce produit est fait pour un montage au plafond. Veillez à ce que le produit
soit monté de manière stable et résistante au basculement.
La distance entre la sortie de lumière et la face illuminée devrait au moins
être tant que la distance minimale indiquée sur l’étiquette du type du
luminaire:
(comme rideaux etc.).
Etapes successives pour installer le luminaire
Enlevez prudemment les trames de la lampe (1).
Enlevez prudemment les deux maintiens en plastique en les tournant
d’un quart de tour pour enlever le réflecteur.
Marquez et percez les trous pour la fixation en fonction des trous au dos
de la lampe. Faites attention à la position de l’adduction. Soyez attentif à
ce que le câble d'alimentation ne soit pas endommagé. Dans le cas
contraire, il pourrait causer un court-circuit.
Passez l’adduction à travers le joint en caoutchouc (3).
Fixez la lampe au plafond avec assez de matériel de fixation
dimensionné (4).
Raccordement électrique (5):
Ce système doit pouvoir être coupé du réseau individuellement.
Pour réaliser le raccordement électrique, connecte z le fil électrique noir
ou brun (la phase) du réseau électrique à la borne L et le fil électrique
bleu (fil neutre) du réseau électrique à la borne N. Le fil électrique vert
. Soyez prudent avec les matières inflammables
 Loading...