

SLV GLENOS LED PRO Instruction Manual [ml]
DEUTSCH
Gebrauchsanweisung
Für LED Leuchte
GLENOS LED PRO
Bitte sorgfältig lesen und aufbewahren !
1. Bestimmungsgemäße Verwendung:
Dieses Produkt dient nur Beleuchtungszwecken und darf:
nur mit einem geeigneten Netzteil, Ausgangsspg.: 24VDC
konstant, betrieben werden (z.B. SLV Art.-Nr. 470502).
nur in trockenen, also nicht:
keinen starken mechanischen Beanspruchungen oder starker
nach einer feuchten oder verschmutzenden Lagerung erst nach einer
nicht verändert oder modifiziert werden.
Sollten diese zuvor genannten Punkte nicht eingehalten werden,
so kann es zum Kurzschluss oder elektrischen Schlag kommen!
in feuchten oder schmutzgefährdeten Räumen.
im Bereich hoher Luftfeuchtigkeit betrieben werden.
Verschmutzung ausgesetzt werden.
Zustandsprüfung betrieben werden.
2. Technische Daten:
Betriebspannung: 24VDC
Leistung: 7,5W
Schutzklasse: III
Leuchtmittel: 78 x SMD LED
Maße (B/H/T): 99/5,8/5 cm
Einbaumaße (B/H/T): 97,7/4,7/9,5 cm
Gewicht: 0,98 kg
Importeur: SLV Elektronik GmbH
3. Montage
Die komplette Installation darf nur durch einen Elektro-Fachmann
durchgeführt werden, der mit den geltenden Richtlinien vertraut ist.
Achtung: Schalten Sie die Anschlussleitung spannungsfrei, bevor
Sie jegliche Arbeiten vornehmen!
Verwenden Sie nur Teile, die mit dem Produkt mitgeliefert oder definitiv als
Zubehör beschrieben werden! Andernfalls kann das Produkt nicht
ausreichend sicher sein!
Hinweis für den Installateur: Insofern Sie kein kom plett geliefertes
System (also mit Transformator) installieren, gelten Sie als “Hersteller” im
Sinne der Niederspannungsrichtlinie. In diesem Fall obliegt es Ihnen, die
Konformität des gesamten Systems herzustellen und durch Anbringung des
CE-Zeichens zu erklären.
Montageort
Das Produkt ist für den Wandeinbau und Deckeneinbau geeignet.
Achten Sie darauf, dass das Produkt auf einem stabilen, ebenen,
kippfesten Untergrund montiert wird.
In der Wand/Decke muss ein Abstand (min. 5 cm zu allen Seiten)
eingehalten werden. Das Produkt nicht abdecken, insbesondere nicht mit
Isoliermaterial.
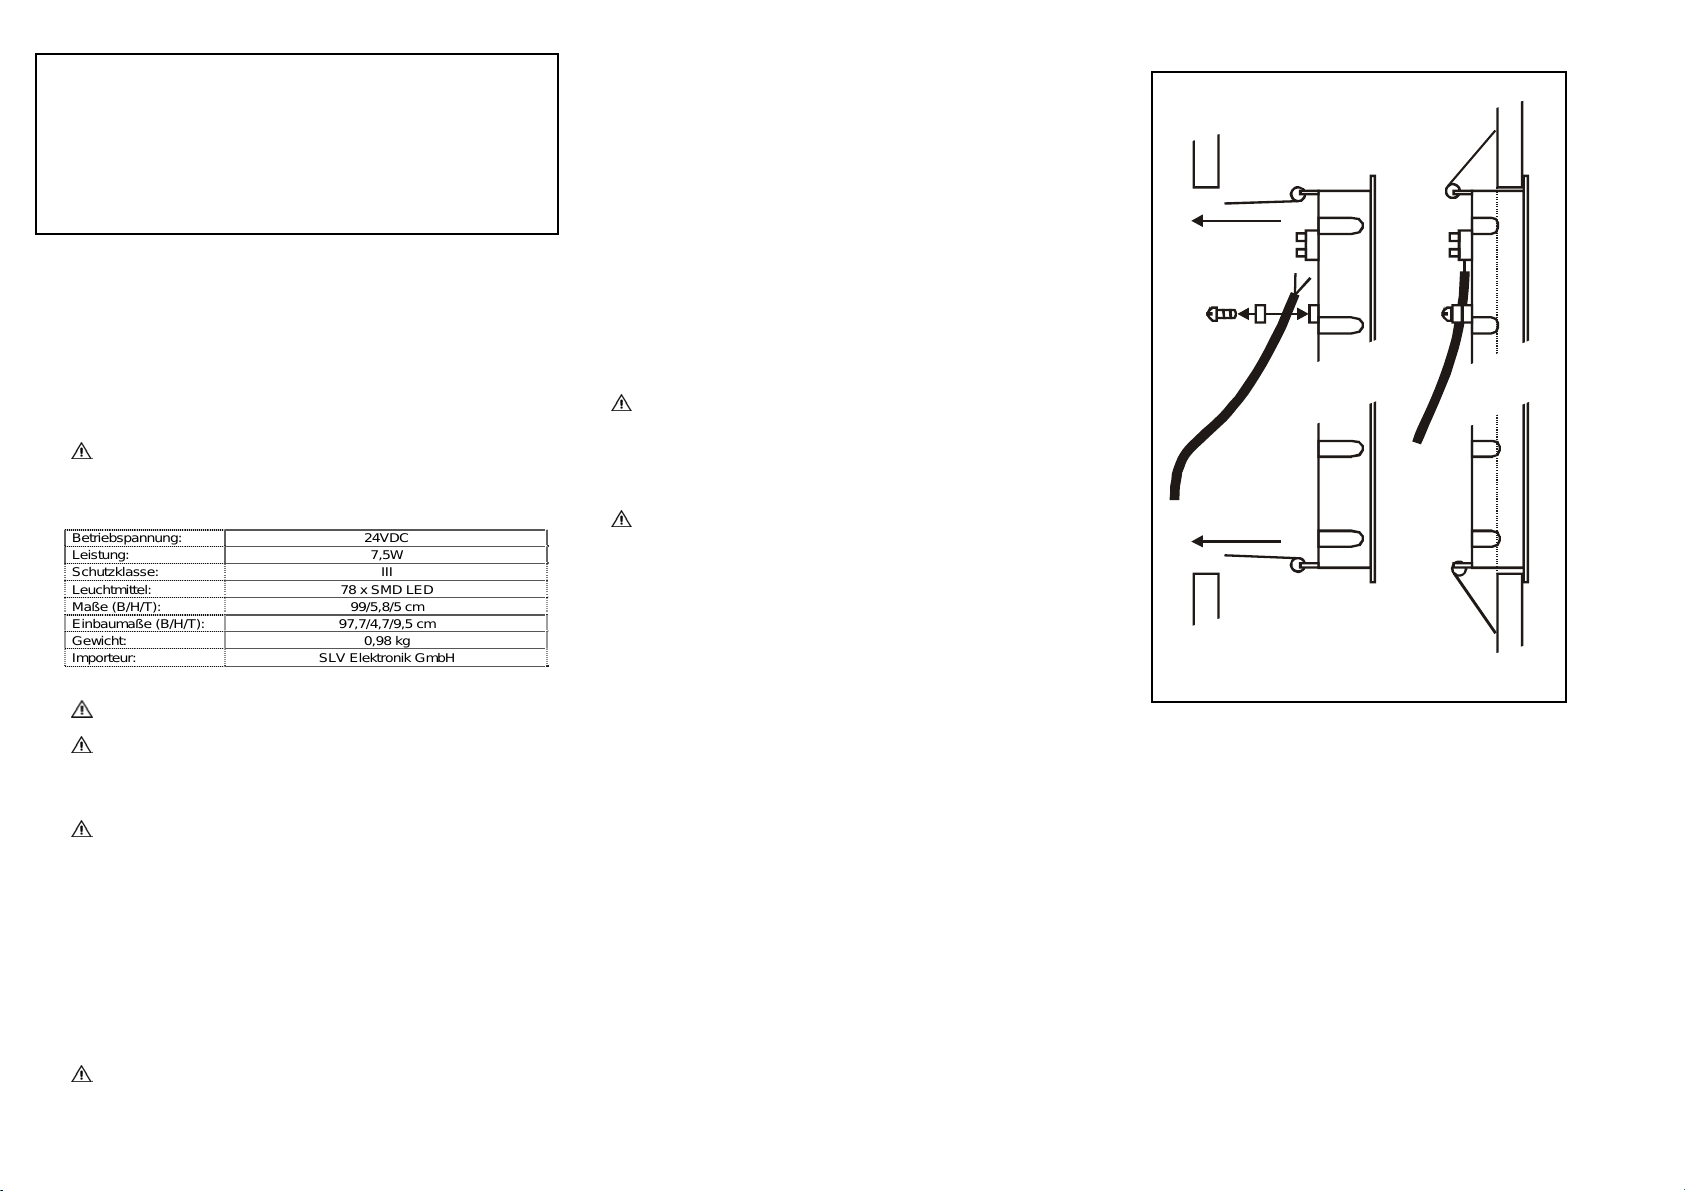
Einzelne Montageschritte
Während der gesamten Dauer der Installation muss die
Anschlussleitung spannungsfrei bleiben! Ein Anschluss unter
Spannung zerstört die LED!
Den Ausschnitt (Ø : s. Technische Daten) ausmessen und
ausschneiden.
Bereiten Sie die Stromversorgung vor. Verwenden Sie nur ein
geeignetes Netzteil, Ausgangsspg.: 24VDC konstant.
Führen Sie die Anschlußleitung durch die Zugentlastung.
Verbinden Sie den Plus –und Minuspol des Netzteils mit den
entsprechenden Polen an der Leuchte.
Sichern Sie die Zugentlastung.
Setzen Sie die Leuchte in die Öffnung ein.
Achten Sie auf einen sicheren Halt der Leuchte!
Das Produkt ist nun betriebsbereit.
4. Betrieb:
Informationen für den Betreiber:
Betreiben Sie das Produkt nur, wenn es einwandfrei funktioniert. Im
Fehlerfall schalten Sie das Produkt sofort aus und betreiben es erst wieder
nach Überprüfung durch einen Elektro-Fachmann. Dies ist der Fall, wenn:
sichtbare Beschädigungen auftreten.
das Produkt nicht einwandfrei arbeitet.
es qualmt, dampft, oder bei hörbaren Knistergeräuschen.
eine Überhitzung zu erkennen ist.
Reparaturen des Produktes oder Arbeiten an netzspannungsführenden
Teilen dürfen nur Fachkräfte des Elektrohandwerks vornehmen.
Achtung: Hier besteht sonst Lebensgefahr durch elektrischen Schlag.
So vermeiden Sie Störungen und Brandgefahren:
Decken Sie das Produkt nicht ab. Beeinträchtigen Sie nicht die
Luftzirkulation.
Hängen und befestigen Sie nichts an dem Produkt, insbesondere keine
Dekoration.
Lassen Sie Kinder nicht unbeaufsichtigt mit elektrischen Produkten
spielen! Kinder können Gefahren im Umgang mit elektrischer Energie nicht
immer richtig einschätzen.
Was ist zu tun, wenn ein Leuchtmittel defekt ist oder nicht
funktioniert?
Das LED Leuchtmittel hat im normalen Gebrauch eine äusserst lange
Lebensdauer. Sollte es dennoch zu Schäden oder Störungen kommen,
wenden Sie sich an Ihren Fachhändler.
5. Was ist sonst noch zu beachten?
Schalten Sie erst das gesamte Produkt spannungsfrei, bevor Sie...
Reinigungs- oder Pflegearbeiten ausführen.
Arbeiten an dem Produkt oder seinen Komponenten vornehmen (nur
Elektro-Fachmann).
112821 02/2007 © by SLV Elektronik GmbH
Technische Änderungen vorbehalten. Vervielfältigung verboten !
ENGLISH
Instruction Manual
for LED fitting
GLENOS LED PRO
Please read carefully and keep for further reference !
1. Use as directed:
This product serves exclusively lighting purposes and may:
only be used with a suitable power supply unit, output voltage: 24VDC
constant (e.g. art.-no 470502).
only be used in dry condition,
not be exposed to strong mechanical loads or to strong contamination.
only be installed and operated after a condition inspection if the product
is dirty or has been moistened through storage.
not be modified or converted.
If these points named above are not adhered to, a short circuit or
electrical shock may occur!
not in damp or dirt-endangered rooms.
not in areas of high air humidity.
2. Technical Data:
Operating voltage: 24VDC
Power: 7,5W
Safety class: III
Bulb: 78 x SMD LED
Dimensions(W/H/D): 99/5,8/5 cm
Recess dim. (W/H/D): 97,7/4,7/9,5 cm
Weight: 0,98 kg
Importer: SLV Elektronik GmbH
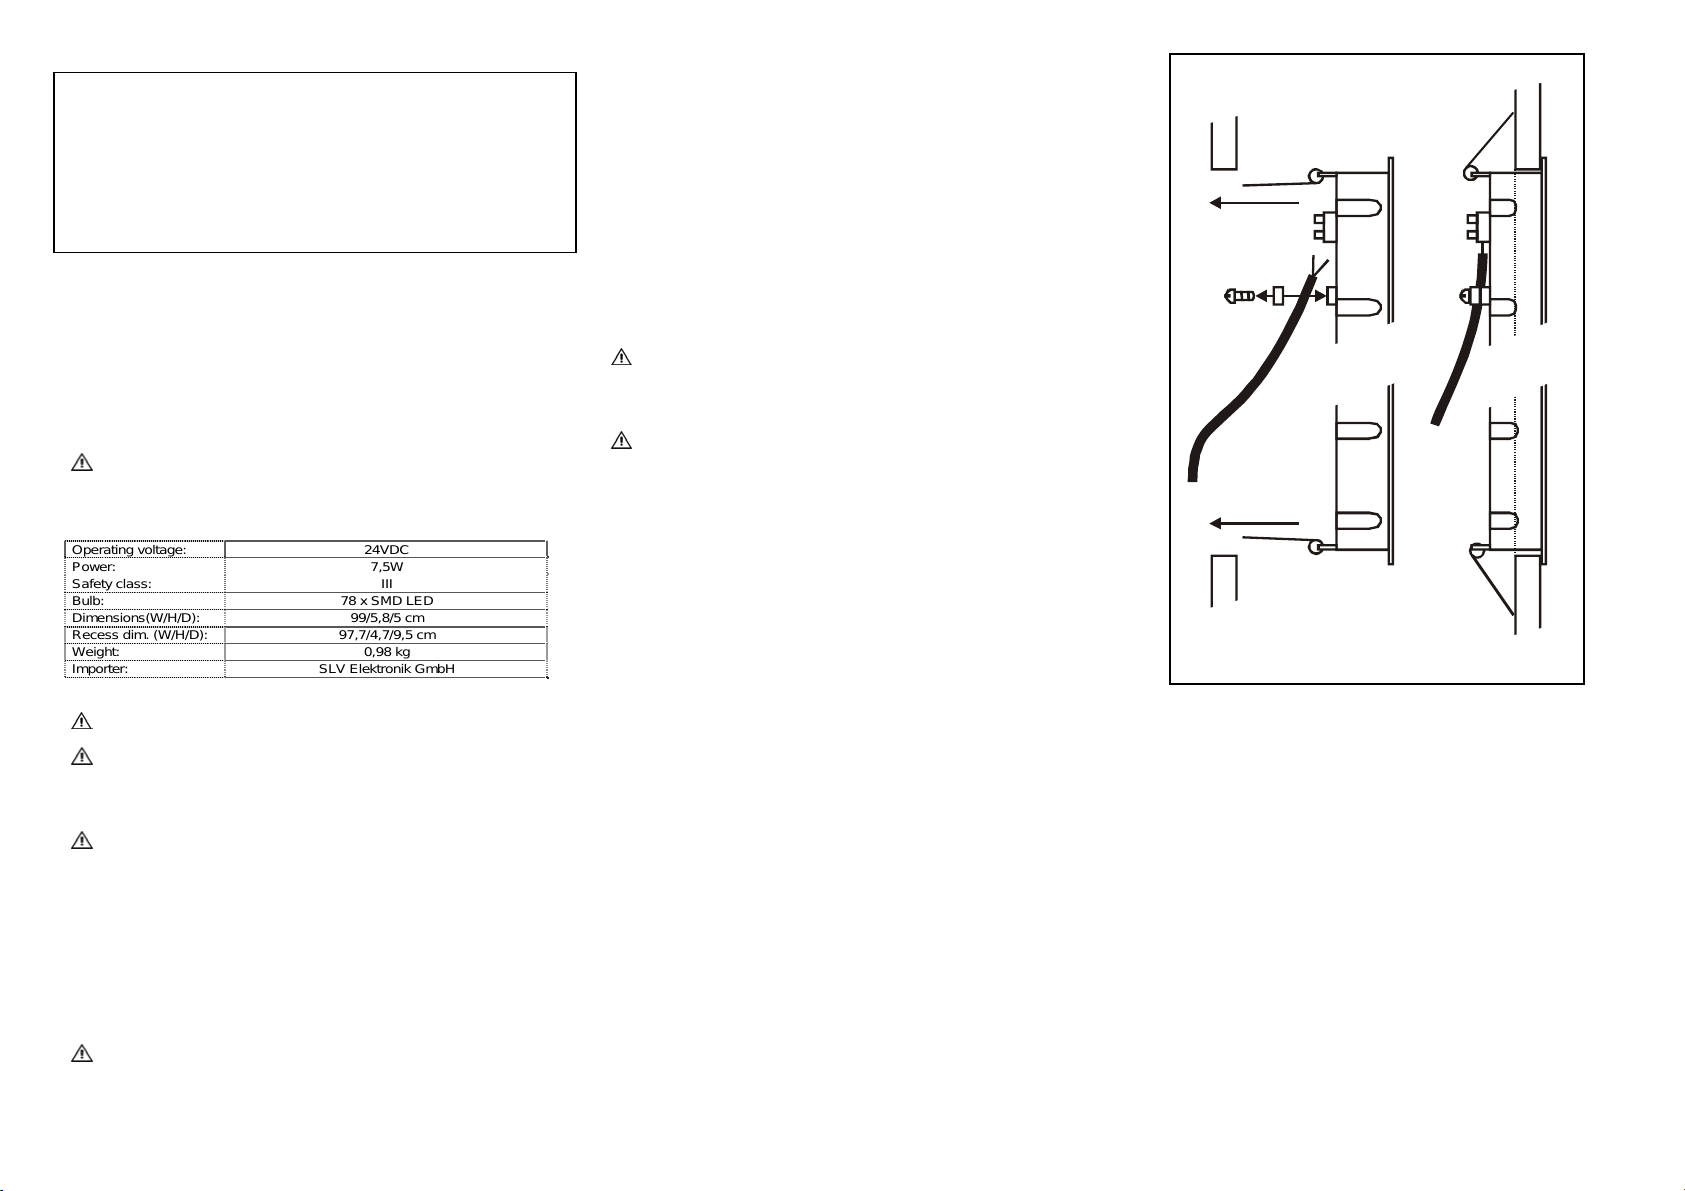
Connect the positive and negative pole of the power supply unit with the
corresponding poles on the fitting.
Secure the strain relief.
Insert the fixture into the opening as shown in the figure.
Pay attention that the product cannot fall down after installation!
The product is now ready for operation.
4. Operation
Information for the user:
Operate the product only if it is working correctly. Switch off the product
with a malfunction immediately and operate it again only after examination
by an electrical specialist. This is the case, when:
visible damages appear.
the product does not work.
smoke, steam or crackling sounds appear.
an overheating is recognisable.
Repairs of the product or work on mains voltage-prominent sections may
only be carried out by qualified electricians.
Attention: Here exists mortal danger from an electric shock!
How to avoid failure and fire risk:
Do not cover the product - provide free air circulation!
Do not hang or fasten anything on the product, especially no decoration.
Never let children play unsupervised with electric products! Children
can not always estimate dangers in dealing with electric energy correctly.
What is to do if a bulb is defect or does not work?
Under regular usage the LED bulb has an extraordinary long lifetime. If
nevertheless damage or failure occurs, contact your local dealer to
exchange the LED bulb.
5. What else has to be considered?
Disconnect the product from power, before you…
clean or maintain the product.
do any works on the product or its components (electric expert).
3. Installation
The complete installation must be done by an electrical expert,
who is familiar with the valid directives.
Attention: Switch off power of the mains supply or respectively of
the connection lead before doing any works.
Use only parts, which are supplied with the product or are described as
accessories! Otherwise the product or the installation might not be
sufficiently safe!
Indication for the installer: In case you do not install a completely
supplied system (with transformer), you are considered a "manufacturer" by
the low-voltage directive. In this case you are required to ensure the
conformity of the whole system and declare it by attaching the CE-sign.
Installation place:
The product is suited for recessed wall- and ceiling installation.
Make sure that the product is mounted on a stable, even and tilt-fixed
background. Note the minimum distances in the ceiling/wall. The minimum
distances in the ceiling/wall are 5 cm to all sides. Do not cover the
product, especially not with insulating materials.
Separate Assembly Steps
Keep the whole installation off power until the work is completely
finished. A connection with the power on will destroy the LED.
Mark and cut the opening (see tech. data).
Prepare the power supply. Use only a suitable power supply unit, output
voltage: 24VDC constant (e.g. art.-no 470502).
Direct the connection lead through the strain relief.
:
112821 02/2007 © by SLV Elektronik GmbH
Technical Details are subject to change. Duplication prohibited !
 Loading...