

SLV AIXLIGHT PENDANT Instruction Manual [ml]
SLV Elektronik GmbH
BETRIEBSANLEITUNG FÜR
BELEUCHTUNGSSYSTEM
OPERATING MANUAL FOR
LIGHTING SYSTEM
MODE D’EMPLOI POUR
SYSTEME D’ECLAIRAGE
INSTRUCCIONES DE SERVICIO PARA
SISTEMA DE ILUMINACIÓN
ISTRUZIONI DI FUNZIONAMENTO PER
SISTEMA DI ILLUMINAZIONE
GEBRUIKSHANDLEIDING VOOR
VERLICHTINGSSYSTEEM
INSTRUKTIONSVEJLEDNING FOR
BELYSNINGSSYSTEM
art.-no.154704: 110 x 22,5 x 4,5cm / 2,50kg
art.-no.154724: 22,5 x 22,5 x 3,5cm / 2,00kg
art.-no.154734: 11 x 10 x 4cm / 0,67kg
art.-no.154714: 160 x 22,5 x 4,5cm / 3,54kg
art.-no.154744
F
NOT OK
1
1b
art.-no. 154704/14
34
art.-no. 154704/14
5
2
art.-no. 154724
art.-no. 154774/84/94
art.-no.154744
art.-no. 154704/14
NLNLNL
N L
NLNLNL
OK
NLNLNL
NLNLNL
AIXLIGHT PENDANT
art.-no.
154734
(4a)
(5a)
art.-no. 154724
art.-no. 154704/14/24/34 07/2009 Technische Änderungen vorbehalten. Technical Details are subject to change. Les détails techniques sont sujet à des changements. Nos reservamos el derecho a modificaciones técnicas. Modifiche tecniche
riservate. Behoudens technische wijzigingen. Ret til tekniske ændringer forbeholdes.
© SLV Elektronik GmbH, Daimlerstr. 21-23, 52531 Übach-Palenberg, Germany, Tel. +49 (0)2451 4833-0
SLV Elektronik GmbH
DEUTSCH
BETRIEBSANLEITUNG FÜR
BELEUCHTUNGSSYSTEM
AIXLIGHT PENDANT
1. SICHERHEITSHINWEISE
Installations-, Montagearbeiten und Arbeiten am elektrischen
Anschluss darf nur eine zugelassene Elektrofachkraft
durchführen.
Decken Sie das Produkt nicht ab. Beeinträchtigen Sie nicht die
Luftzirkulation.
Hängen und befestigen Sie nichts an dem Produkt, insbesondere
keine Dekoration.
Halten Sie Kinder von dem Produkt fern.
Betreiben Sie das Produkt nur, wenn es einwandfrei funktioniert:
Im Fehlerfall dürfen Sie das Produkt NICHT mehr berühren und
weiter betreiben. Schalten Sie das Produkt am externen Lichtschalter
oder durch Freischalten der Leitung an der Sicherung sofort aus!
Bei Berührung und weiterem Betrieb im Fehlerfall besteht
Lebensgefahr durch elektrischen Schlag, Verbrennungsgefahr
oder Brandgefahr!
Ein Fehlerfall liegt vor, wenn
sichtbare Beschädigungen auftreten.
das Produkt nicht einwandfrei arbeitet (z.B. flackern).
es qualmt, dampft, oder bei hörbaren Knistergeräuschen.
Brandgerüche entstehen.
eine Überhitzung zu erkennen ist (z.B. Verfärbungen, auch an
angrenzenden Flächen).
Betreiben Sie das Produkt erst wieder nach Instandsetzung und
Überprüfung ausschließlich durch eine zugelassene
Elektrofachkraft!
2. BESTIMMUNGSGEMÄSSE VERWENDUNG
Dieses Produkt dient nur Beleuchtungszwecken und darf:
nur mit einer Spannung von 230V ~50Hz betrieben werden (nur Art.-
Nr. 154724/34).
nur fest montiert betrieben werden.
nur in trockenen, also nicht:
in feuchten oder schmutzgefährdeten Räumen.
im Bereich hoher Luftfeuchtigkeit betrieben werden.
keinen starken mechanischen Beanspruchungen oder starker
Verschmutzung ausgesetzt werden.
nach einer feuchten oder verschmutzenden Lagerung erst nach einer
Zustandsprüfung betrieben werden.
Das Produkt darf nicht verändert oder modifiziert werden.
3. WARTUNG UND PFLEGE
Schalten Sie erst das gesamte Produkt spannungsfrei und lassen es
abkühlen, bevor Sie Reinigungs- oder Pflegemaßnahmen an dem
Produkt vornehmen. Lassen Sie das Produkt erst abkühlen.
Ist das Produkt nicht spannungsfrei und abgekühlt besteht bei der
Reinigung die Gefahr eines elektrischen Schlags oder der
Verbrennung.
Reinigung: Reinigen Sie das Produkt regelmäßig - nur mit einem
leicht angefeuchteten, weichen und fusselfreien Tuch.
4. WEITERE WICHTIGE HINWEISE
Lagerung: Das Produkt muss trocken, vor Verschmutzungen und
mechanischen Belastungen geschützt, gelagert werden.
Garantie: Im Garantiefall wenden Sie sich bitte an Ihren Fachhändler.
Entsorgung: Hinweise zur ordnungsgemäßen Entsorgung finden Sie im
Internet unter www.slv.de
Telefonnummer.
oder unter der unten angegebenen
5. MONTAGE (nur durch zugelassene Elektrofachkraft!)
Schalten Sie die Stromversorgung bzw. die Anschlussleitung
spannungsfrei, bevor Sie jegliche Arbeiten vornehmen!
Es besteht die Gefahr eines elektrischen Schlags mit Todesfolge!
Verwenden Sie nur Zubehörteile, die mit dem Produkt mitgeliefert sind
oder definitiv als Zubehör beschrieben werden!
Andernfalls ist ein sicherer Betrieb nicht gewährleistet. Es könnte
Lebens- und Brandgefahr bestehen!
Überprüfen Sie, ob sich im Produkt lose Teile befinden. Ist das der Fall,
und das Vorkommen solcher Teile nicht explizit beschrieben, darf das
Produkt nicht installiert oder in Betrieb genommen werden.
Berührbare Teile könnten nach Anschluss unter Spannung stehen –
Lebensgefahr!
Verwenden Sie das beiliegende Montagematerial nur, wenn es für den
Montageuntergrund geeignet ist. Ist dies nicht der Fall, verwenden Sie
nur für den Montageuntergrund geeignetes Montagematerial.
Bei ungeeignetem Montagematerial besteht Lebens- oder
Verletzungsgefahr durch Herabfallen des Produktes.
Auspacken
Nehmen Sie das Produkt vorsichtig aus der Verpackung und entfernen
Sie jeglichen Transportschutz.
Überprüfen Sie vor Entsorgung des Verpackungsmaterials, ob alle
Bestandteile des Produkts entnommen sind.
Montageort
Das Produkt ist nur für die Montage an der Decke geeignet.
Installieren Sie das Produkt nur auf einem stabilen, ebenen,
kippfesten Untergrund.
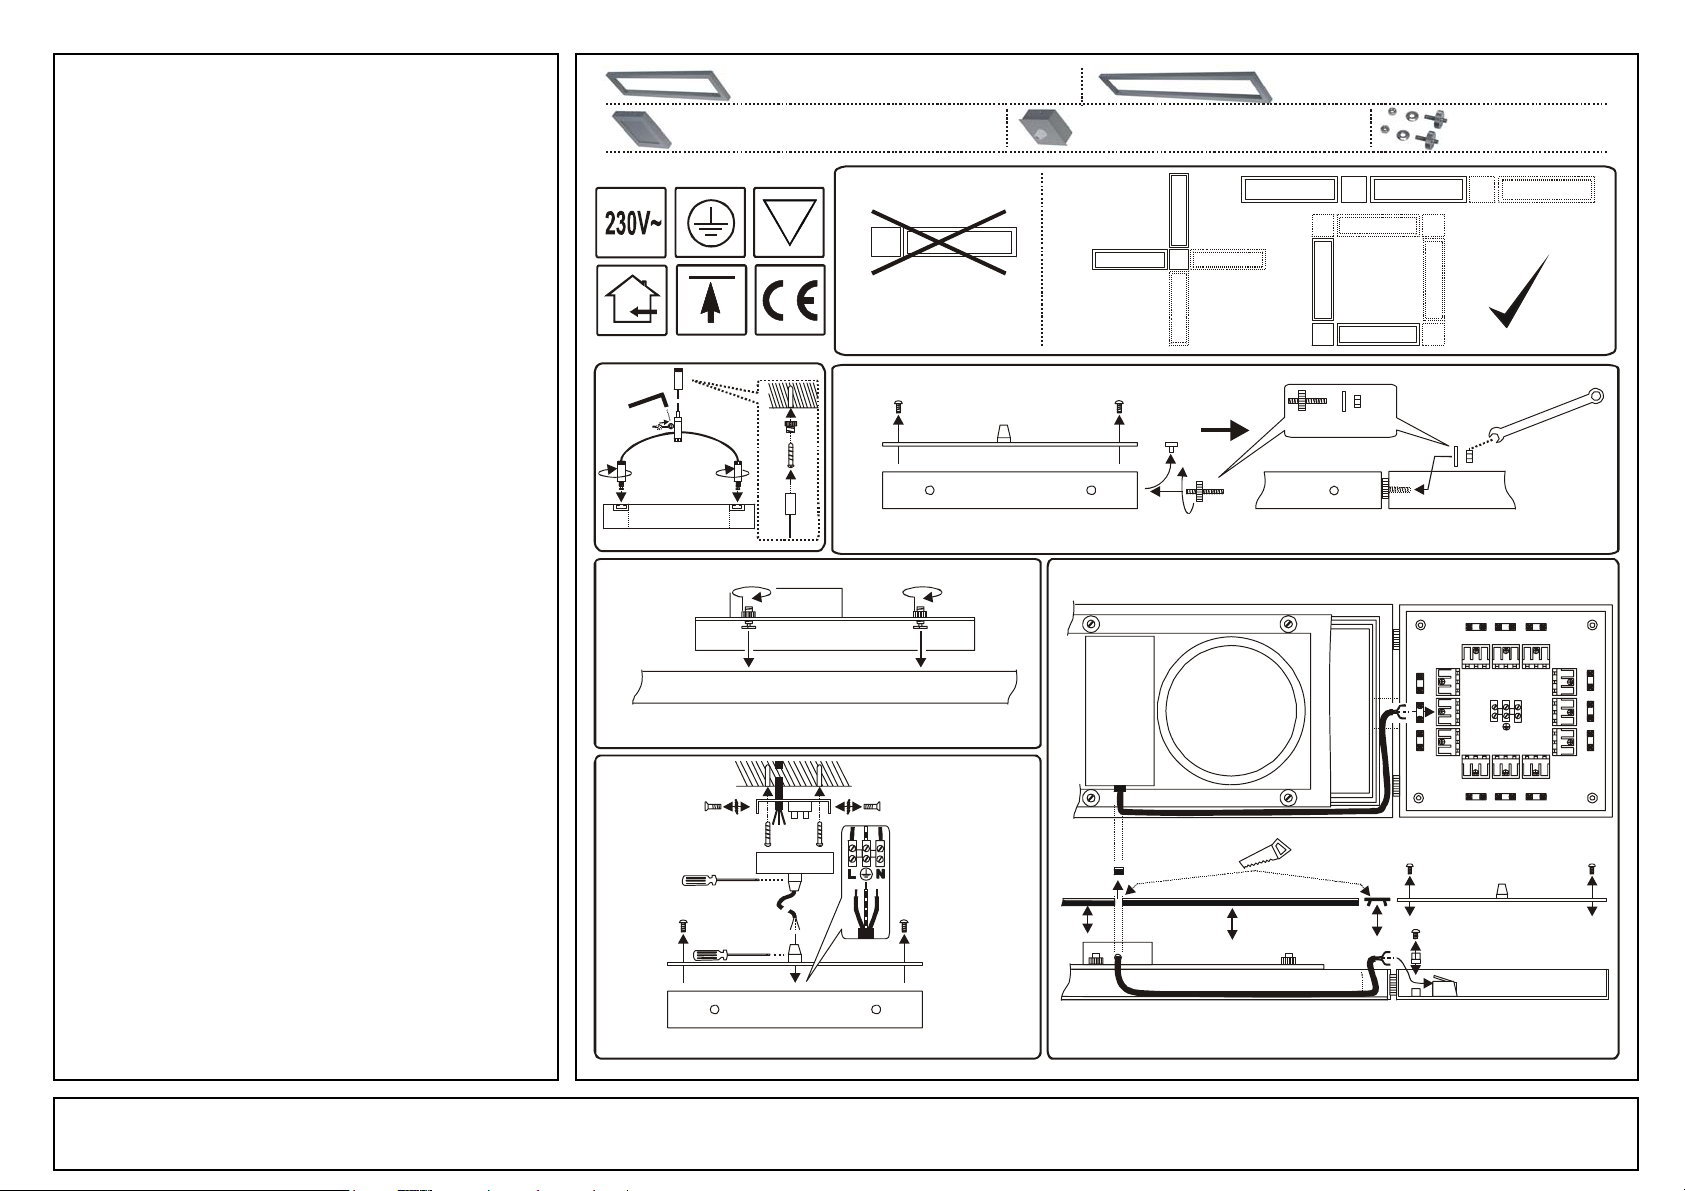
Montageschritte
An jedem Einspeisemodul (Art.-Nr. 154724) muss mindestens an
zwei Seiten jeweils ein Rahmen befestigt sein!
Kleinere Installationen (2 Rahmen und 1 Einspeisemodul) können zuerst
komplett am Boden oder auf einer Ablage vorbereitet werden.
Größere Installationen sollten Stück für Stück direkt an die Decke
montiert werden.
Gehen Sie in folgender Reihenfolge vor:
Befestigen Sie die Seilabhängungen an den Rahmen (Abb. 1).
Verwenden Sie für jeden Rahmen zwei Abhängungen.
Befestigen Sie den ersten Rahmen an der Decke (Abb. 1b).
Befestigen Sie das Einspeisemodul an den Rahmen (Abb. 2).
Befestigen Sie weitere Rahmen und ggf. weitere Einspeisemodule.
Setzen Sie die Leuchtenmodule in den Rahmen ein und befestigen
Sie diese (Abb. 3).
Erstellen Sie den elektrischen Anschluss der Leuchtemodule zum
Einspeisemodul (Abb. 4). Entfernen Sie dort die
Kunststoffabdeckungen am Rahmen, wo das Anschlusskabel des
Leuchtenmoduls zum Einspeisemodul geführt wird. Die
Kunststoffprofile können in der Länge angepasst und danach wieder
eingesetzt werden (4a).
Beachten Sie die Anleitung zu den Leuchtenmodulen. Sichern Sie
alle Anschlussleitungen mit den entsprechenden Zugentlastungen.
Schließen Sie die Deckenbox an das dafür vorgesehene
Einspeisemodul an (Abb. 5).
Erstellen Sie den elektrischen Anschluss der Deckenbox (Abb. 5)
Das Produkt muss durch eine allpolige Trennung von der
Stromversorgung getrennt werden können.
Zum elektrischen Anschluss verbinden Sie die schwarze oder
braune Ader (Außenleiter) der Anschlussleitung mit der Klemme L
und die blaue Ader (Neutralleiter) der Anschlussleitung mit der
Klemme N. Die grün-gelbe Ader (Schutzleiter) der
Anschlussleit u ng wird mit der Erdungsklemme
fest verschraubt.
Befestigen Sie die Deckenbox an der Decke (Abb. 5).
Die Leitung der Deckenbox zum Einspeisemodul darf nicht
mechanisch belastet werden (5a).
Überprüfen Sie die einwandfreie Funktion und den sicheren Halt
der Installation!
Das Produkt ist nun betriebsbereit.
Art.-Nr. 154704/14/24/34
07/2009 © SLV Elektronik GmbH, Daimlerstr. 21-23, 52531 Übach-
Palenberg,
Technische Änderungen vorbehalten.
des Produktes
SLV Elektronik GmbH
ENGLISH
INSTRUCTION MANUAL FOR
LIGHTING SYSTEM
AIXLIGHT PENDANT
1. NOTES ON SAFETY
Installation, mounting or works on the electrical connection may
only be carried out by an approved electrician.
Do not cover the product - provide free air circulation!
Do not hang or fasten anything on the product, especially no
decoration.
Keep children away from the product.
Operate the product only when it functions properly:
In case of a malfunction you may NOT touch the product or operate it
further. Disconnect the product from the power supply by an external
switch or by the fuse.
If touched or further operated there is danger from electric shock,
burning, or fire.
A malfunction exists when:
visible damages appear.
the product does not work properly (e.g. flickering).
smoke, steam or crackling sounds appear.
smell of burning is recognisable.
an overheating is recognisable (e.g. by discolouration of adjacent
surfaces).
Operate the product only after maintenance and examination by an
approved electrician!
2. USE AS DIRECTED
This product serves exclusively lighting purposes and may:
only be used with a voltage of 230V ~50Hz (only art.-no. 154724/34).
only be operated when firmly mounted.
only be used in dry condition,
not in damp or dirt-endangered rooms.
not in areas of high air humidity.
not be exposed to strong mechanical loads or to strong
contamination.
only be installed and operated after a condition inspection if the
product is dirty or has been moistened through storage.
not be modified or converted.
3. MAINTANANCE AND CARE
Disconnect the product from the power supply and let it cool down,
before you clean the product.
If disregarded there may be danger of electric shock or by burning
when cleaning the product.
Cleaning: Clean the product on a regular basis using a slightly
moistened, soft and fluff-free cloth.
4. ADDITIONAL IMPORTANT NOTES
Storage: The product must be stored in a dry and clean environment. Do
not strain the product mechanically during storage.
Warranty: In case of a warranty contact your dealer.
Disposal: Notes on the correct disposal in Germany are found on
www.slv.de.
5. INSTALLATION (only by an approved electrician)
Switch off the mains or respectively the connection lead before doing
any works.
There exists mortal danger from an electric shock.
Use only parts, which are supplied with the product or are described as
accessories!
Otherwise the product or the whole installation may not be secure.
Danger for life or danger of fire may exist!
Inspect the product for loose parts inside the housing. When there are
loose parts inside the housing and these are not explicitly described the
product may not be installed or operated.
The housing maybe voltage-carrying. Danger of electric shock!
Use the supplied fastening material only when it is suited for the
installation background. If this is not the case use only fastening material
suiting the installation background.
When using fastening material that is not suitable there may be
danger from falling objects.
Unpacking
Carefully take the product out of the packaging removing any transport
safeguards.
Before disposal of the packaging material make sure that all
components of the product are removed.
Installation place
The product is solely suited for ceiling installation.
Make sure that the product is mounted on a stable, even and tilt-fixed
background.
Installation Steps
On at least two sides of a feed-in module (art.-no. 154724) a frame
must be attached.
Prepare small installations (2 frames with one feed-in module) on the
floor or on a table.
Larger installations should be mounted piece by piece directly on the
ceiling.l
Keep the following sequence:
Attach the suspensionon the frame (figure 1). Use two suspensions
for each frame.
Mount the first frame on the ceiling (figure 1b).
Attach the feed- in module on that frame (figure 2).
Attach further frames and feed-in modules if desired.
Insert the light modules into the frame and fix these (figure 3).
Establish the electrical connection to the feed-in module (figure 4).
Remove the plastic cover, where the connection lead of the module is
laid to the feed-in module. The cover may be adapted in length and
applied back on the frame (fig. 4a).
Note the instructions of the light module. Secure all connection
applying the strain reliefs.
Connect the canopy to the feed-in module (figure 5).
Establish the electrical connection to the canopy (figure 5)
The product must be able to be separated by an all pole
separation from the current supply.
For electric connection attach the black or brown wire (live
conductor) of the mains supply with the clamp L and the blue wire
(neutral conductor) of the mains supply with the clamp N. The
green-yellow wire (protective conductor) of the mains supply has
to be tightly screwed into the earth clamp
Fasten the canopy to the ceiling (figure 5).
The connection cable between canopy and feed-in module may not
be strained mechanically (5a).
Check if the product functions properly and is securely fixed.
The product is now ready for operation.
art.-no. 154704/14/24/34
07/2009
© SLV Elektronik GmbH, Daimlerstr. 21-23, 52531 Übach-
Palenberg, Germany, Tel. +49 (0)2451 4833-0
Technical Details are subject to change.
of the product.
 Loading...