

Page 1
CUSTOM AMPLIFICATION
CUSTOM 18G GUITAR AMPLIFIER
OWNERS MANUAL
Copyright 2012, Sluggo Music Technology LLC
All Rights Reserved.
Page 2

Sluggo Music Limited Warranty
Sluggo Music Technology LLC warrants this product to be free of defects in material and
workmanship for the period of one year from the date of original purchase. Vacuum tubes
are warranted for 90 days from the date of purchase. This warranty is only applicable to
the original retail purchaser. To be protected by this warranty, the purchaser must
complete and return the enclosed warranty card within 14 days of the date of purchase.
During the warranty period Sluggo Music shall, at its sole discretion, either repair or
replace, free of charge, any product that it deems to be defective upon inspection by
Sluggo Music Technology LLC or its authorized service representative. To obtain
warranty service, the purchaser must first obtain a Return Authorization Number from
our service department and shipping address where to return the unit for service. All
authorized returns must be sent to our service department postage prepaid, insured for full
replacement value, properly packaged and accompanied with a description of the
problem. Sluggo Music reserves the right to update any unit returned for repair and the
right to change or improve the design of the product at any time without prior notice.
This warranty does not cover claims for damage due to abuse, neglect, alteration or
attempted repair by unauthorized personnel, and is limited to failures arising during
normal use that are due to defects in material or workmanship in the product only. Any
warranties, including implied warranties of merchantability and fitness for a particular
purpose, are limited in duration to the length of this original warranty. In no event will
Sluggo Music Technology LLC be liable for incidental or consequential damages
resulting from the breach of any express or implied warranty including damage to
property, damage based on inconvenience or loss of use of the product, and personal
injury to the extent permitted by law. This warranty gives you specific legal rights,
which may vary from state to state. This warranty applies only to products sold in the
United States of America. For warranty information in all other countries please refer to
your local distributor.
Sluggo Music Technology LLC
P.O. Box 913
Dunedin, FL 34697-0913
(727) 247-2520
“SUNCOAST” is a trademark of
Sluggo Music Technology LLC, Copyright 2012
All Rights Reserved
Page 3

1 Overview
1.1 Introduction
1.2 Features
2 Controls
2.1 Front Panel Layout
2.2 Preamp Controls
2.3 Rear Panel Layout
2.4 Rear Panel Jack Description
3 Operation
3.1 Operating Instructions
3.2 External Effects Patching
3.3 Amplifier tone settings
4 Technical
4.1 Specifications
4.2 Vacuum Tube Replacement
4.3 Tube Location Diagram
Page 4

1.1 Introduction
Thank you for purchasing the SUNCOAST CUSTOM 18G guitar amplifier.
It is our commitment to providing our customers with the highest quality,
handcrafted musical instrument amplifiers, built in the USA. Utilizing our
knowledge of classic designs from the past 50 years, we set out to recreate
that unique sound of some of our personal favorite artists. The Custom 18G
is a low wattage amp whose design is based on the mid 70’s Alembic F-2B
preamp driving a HIWATT DR103 power amp section. This combination
has been used by David Gilmour of Pink Floyd for his distinctive tone. We
created a custom 20W, wide-bandwidth output transformer to emulate the
response of the original 100W Partridge transformer. Next, we re-designed
the phase inverter circuit to drive the EL84 output stage with a bold, bright,
aggressive tone of it’s big brother. Finally, we reduced the bottom end of
the preamp’s output as described by Phil Taylor, David’s guitar tech/guru.
The result is a clean, classic “Black Face Twin” tone married with the
dynamic, touch sensitive compression and presence of a vintage HIWATT.
The ultimate Pink Tone amp at an 18W, club or studio volume level.
1.2 Features
The following is a summary of your Custom 18G’s unique features:
• Timeless, Classic Preamp design.
• Custom 18W, Dual EL84 Output design.
• Custom Output and Power transformers.
• Front panel 18W/11W switch for Class AB Push-Pull or Single-Ended
Class A output.
• Rear panel Pentode/Triode switch for Output tube operating mode.
• Rear panel effects loop Send and Return jacks.
• Rear panel line level Preamp Output jack.
• Separate 4, 8, 16 ohm speaker output jacks.
• Rear panel Standby switch.
*Alembic and HIWATT are trademarks of their respective owners
Page 5
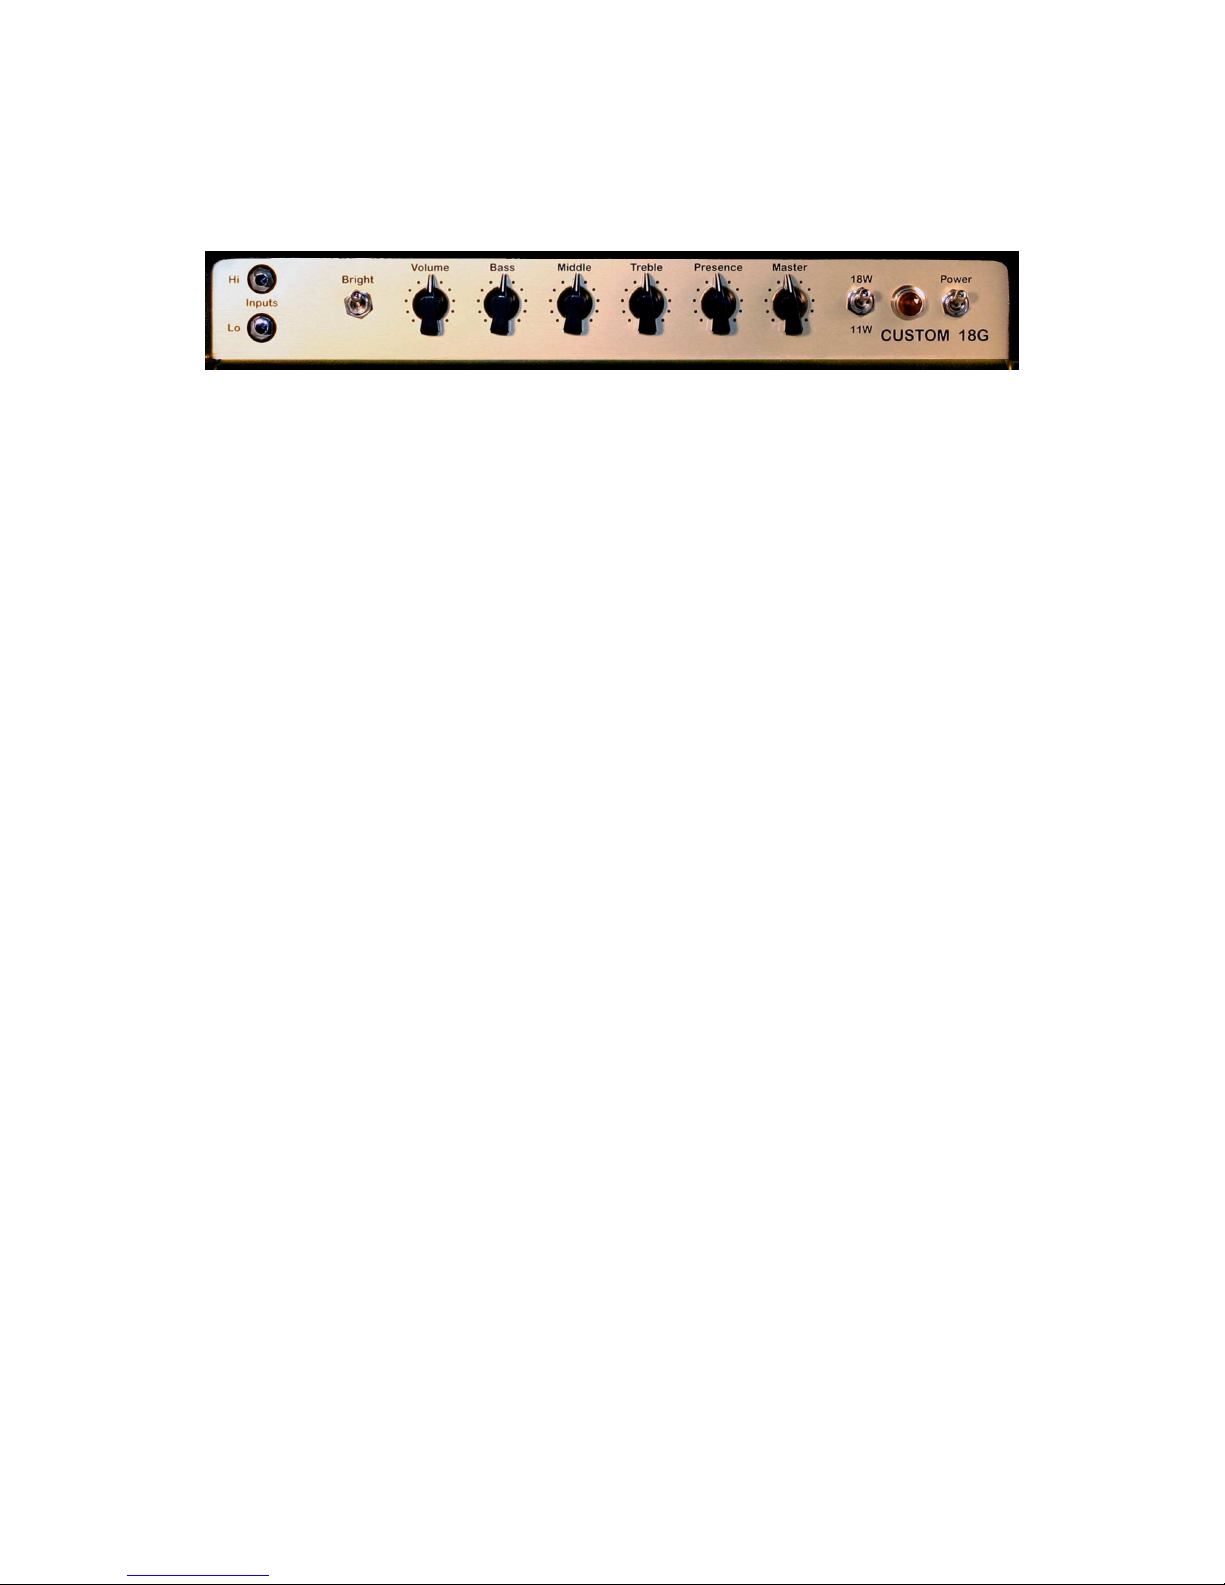
2.1 Front Panel Layout
2.2 Preamp Controls
Hi & Lo Inputs - Hi and Lo gain instrument input jacks.
Bright Switch – Adds more treble in response to the input volume level.
Volume – This control adjusts the level of the preamplifiers input gain from
clean to overdrive.
Bass – This tone control adjusts the amount of low frequencies.
Middle - This tone control adjusts the amount of midrange frequencies.
Treble - This tone control adjusts the amount of high frequencies.
Presence - This tone control adjusts the amount of upper high frequencies.
Master - This control adjusts the output level of the power amplifier.
18W/11W Mode Switch – Selects Class AB Push-Pull or Single-Ended
Class A output power.
Indicator Lamp – Lights up red when power is On.
Power Switch – Main On/Off Switch.
Page 6

2.3 Rear Panel Layout
2.4 Rear Panel Jack Description
Power Input - Power line cord input jack.
Main Fuse - Main power fuse. Replace with only same type and rating.
B+ Fuse - High Voltage tube power supply fuse.
Standby Power Switch - Unit standby power switch. Allowing the unit to
warm up for one minute before turning the standby switch On will extend
tube life.
Pentode/Triode Mode Switch - Power tube output mode select switch.
Use the Pentode mode for that classic British rock tone. Triode mode has a
darker tone with less edge suitable for Jazz and Blues.
4 Ohm Speaker Output Jack – Use this jack for a 4 Ohm speaker load.
8 Ohm Speaker Output Jack - Use this jack for a 8 Ohm speaker load.
16 Ohm Speaker Output Jack - Use this jack for a 16 Ohm speaker load.
Preamp Output Jack - Line level output to PA or slave power amp. This
output is a line level attenuated signal taken from the 8 ohm speaker output.
Effects Return Jack - Input from external effects unit. This input is a pre
master volume line level input.
Effects Send Jack - Output to external effects unit. This output is a post
preamp line level output.
Page 7

3.1 Operating Instructions
• Always connect the loudspeaker to the correct speaker output jack
impedance prior to turning the unit ON.
• Use only correct 2-conductor speaker wire (16 gauge or greater) with
mono ¼” ends. The use of coaxial instrument cable (guitar cord) for
connecting speakers will invalidate your warranty and may damage your
amplifier.
• Always connect the unit to the proper power source and use a grounded
outlet, otherwise a shock hazard may result, especially when the unit is
connected to other equipment. Domestic units should be connected to
115VAC, 60 Hz. Connection to improper line voltage will cause
permanent damage.
• Do not expose this unit to rain or excessive moisture. This may cause a
shock hazard or damage to the unit.
• Do not block the ventilation grilles on the rear panel of the amplifier head
or top panel of the combo amp.
• Do not touch the output tubes while the unit is ON, severe burns can
occur.
CAUTION: Use only one speaker output jack at a time. Using more
than one jack at a time will overheat your output transformer.
WARNING: You MUST have a speaker load connected to this amp at
all times. Operating the Custom 18G with no load will burn out your
output tubes and could destroy the output transformer. This will void
your warranty!
SAFETY NOTICE: Do not open the unit. There are no user serviceable
parts inside the unit. Refer servicing to qualified personnel only.
Extremely high voltages are present inside this unit that may result in
severe injury or death.
Page 8

3.2 External Effects Patching
Here is a list of effects in their respective order to achieve the ultimate Pink
Tone. (No Reverb) The rest of the magic is in your hands:
Guitar
|
Fuzz
Overdrive/Sustainer
Phase Shifter
Flanger
Tube Driver
Wah
Compressor
Chorus
|
Amplifier (HI Input)
Amplifier (Effects Send)
|
Volume Pedal
Digital Delay
Echo
Noise Gate/Line Driver
|
Amplifier (Effects Return)
3.3 Amplifier Tone Settings
These settings are merely a suggested starting point from which you can set
to your own personal taste.
Bright Switch - On
Volume – 6
Bass – 2
Middle – 4
Treble – 7
Presence – 7
Master – 5 (adjust for desired loudness)
Page 9

4.1 Specifications
Input Line Voltage – 120VAC, 60Hz
Power Consumption – 55W
Line Fuse Rating – 1A, Time Lag
B+ Fuse Rating – 1/4A, Time Lag
Output Power – 18W RMS
Output Impedance – 4, 8, 16 Ohms
Tube Types: V1, V4 – 12AX7 (ECC83)
V3 – 12AT7 (ECC81)
V5, V6 – 6BQ5 (EL84)
Dimensions: Amp Head – 20”W x 8.25”H x 8.25”D
Combo 1x12” – 24”W x 19.875”H x 9.5”D
Combo 2x12” – 28”W x 19.875”H x 10.5”D
Weight: Amp Head – 17lbs
Combo 1x12” – 35lbs
Combo 2x12” – 39lbs
4.2 Vacuum Tube Replacement
Generally speaking, tubes last a very long time. Output tubes should last for
approximately 2000 hours or one year of daily use. Preamp tubes can last
upwards of 15-30 years and do not need to be replaced unless they become
noisy with popping or microphonic squeals through your speakers. Your
amp comes stock with JJ - 12AX7 preamp tubes and a matched pair of
Mullard EL84 output tubes. The phase inverter tube (V3) is a JJ - 12AT7,
low gain tube. Using a different type of tube other than a 12AT7 for V3 can
result in high frequency oscillations. We do not recommend any substitutes.
ALWAYS disconnect the power to the unit and let the tubes cool before
replacement.
Page 10
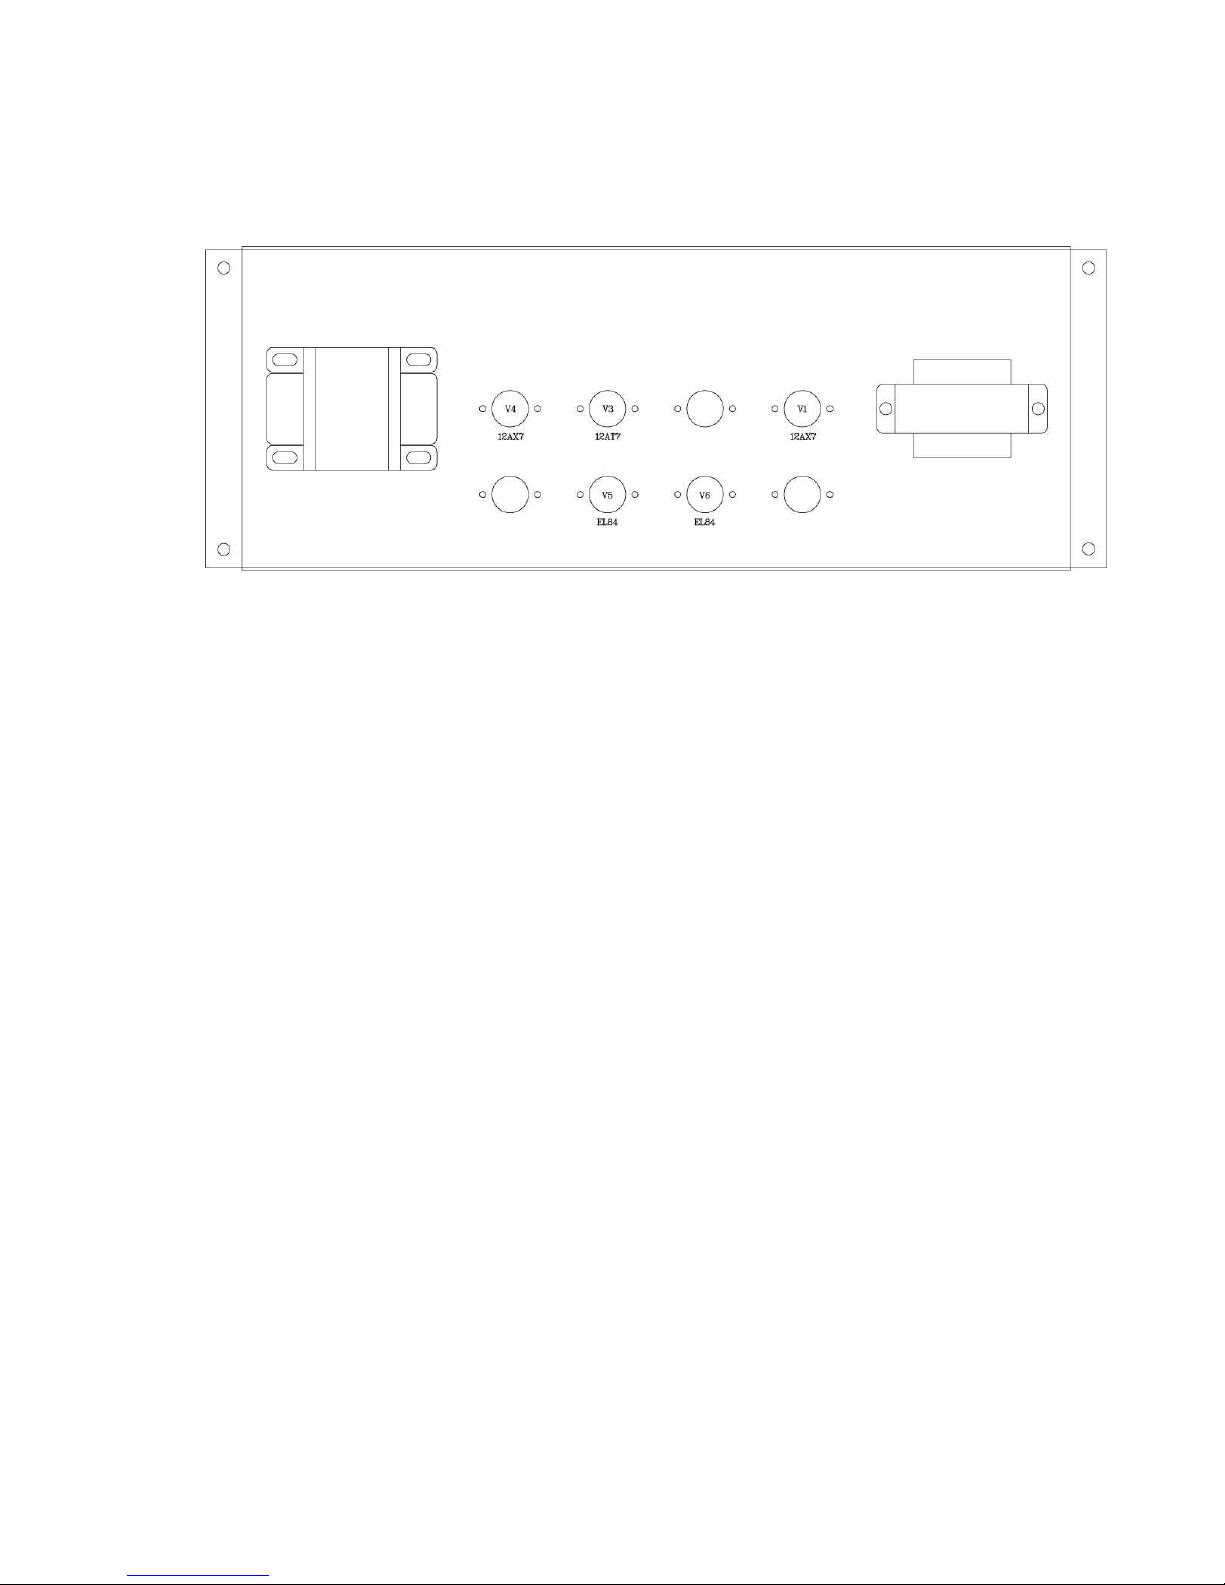
4.3 Tube Location Diagram
Sluggo Music Technology LLC, Copyright 2012
All Rights Reserved
 Loading...