

Page 1
Page 1 of 4
TECHNICAL DATA SHEET
General Information:
HighLINER is intended for linear lighting in storerooms, walk-in coolers, sots
and a variety of other lighting applications.
HighLINER luminaires should only be used with a SloanLED 100 Watt 24 V power supply.
FOR YOUR SAFETY
• Read and observe all NOTES, CAUTIONS and WARNINGS shown throughout these instructions.
• Installation of power supplies to be performed by licensed electrician only.
• Safety glasses or goggles should be worn while performing installation.
• This product is ETL listed for dry, damp and wet locations.
•
• Install to NEC, local and state regulations.
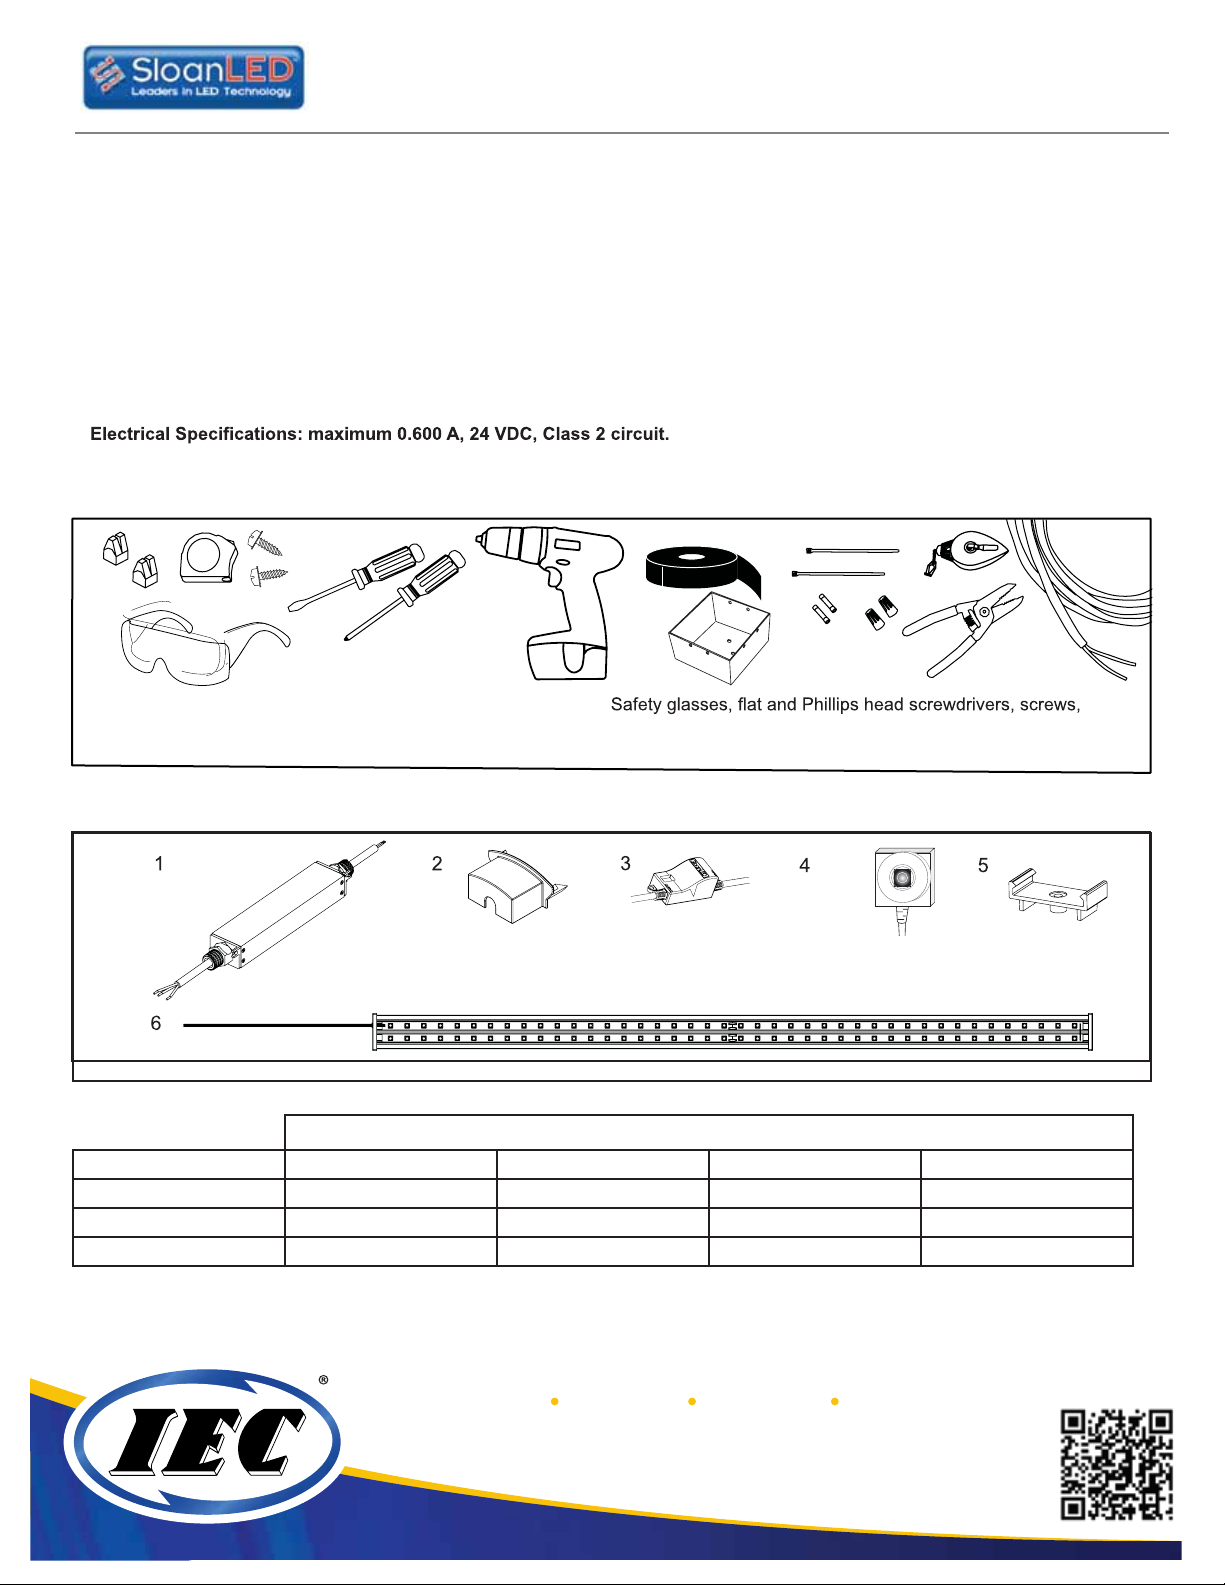
Tools and Accessories Recommended
Tools and connections shown are for secondary connections: drill,
measuring tape, electrical tape, wire strippers, twist-on or push-in UL Listed wire connectors, tie-wraps, chalk line, junction-box, and
18 AWG UL Listed PLTC cable.
LED Linear Lighting System
HighLINER
Installation Manual
SLO-HL-OLL
Items Provided
1. Power Supply 2. RDL-Linear Wire Nut Housing 3. RDL-Dimmer 4. RDL-Sensor 5. Mounting Clip 6. RDL-Linear Light
(optional)(optional)
Number of luminaires required per 100 square-feet (9,29 square-meters) for open, continuously lit areas.
Minimum Illumination Intensities* (lux)
Ceiling Height 300 lx 400 lx 500 lx 600 lx
8 ft (2,4 m) 2 3 3 4
10 ft (3,0 m) 2 3 3 4
12 ft (3,7 m) 2 3 4 4
* Intensity measured at standard tabletop height (30 in (760 mm) from ground)
†100 lux = 9.29 foot-candela
For complete workplace lighting requirements, see OSHA requirements - Code of Federal Regulations Title 29, Section 1926.56:
†
SIGN LIGHTING GRAPHICS DISPLAY
Excellence in Distribution Since 1946
www.IECDelivers.com
2240 Yates Ave. Commerce, CA 90040 |
Fax 323.803.2019 | 800.CALL IEC
(225.5432)
Page 2
Page 2 of 4
Preparation for Install
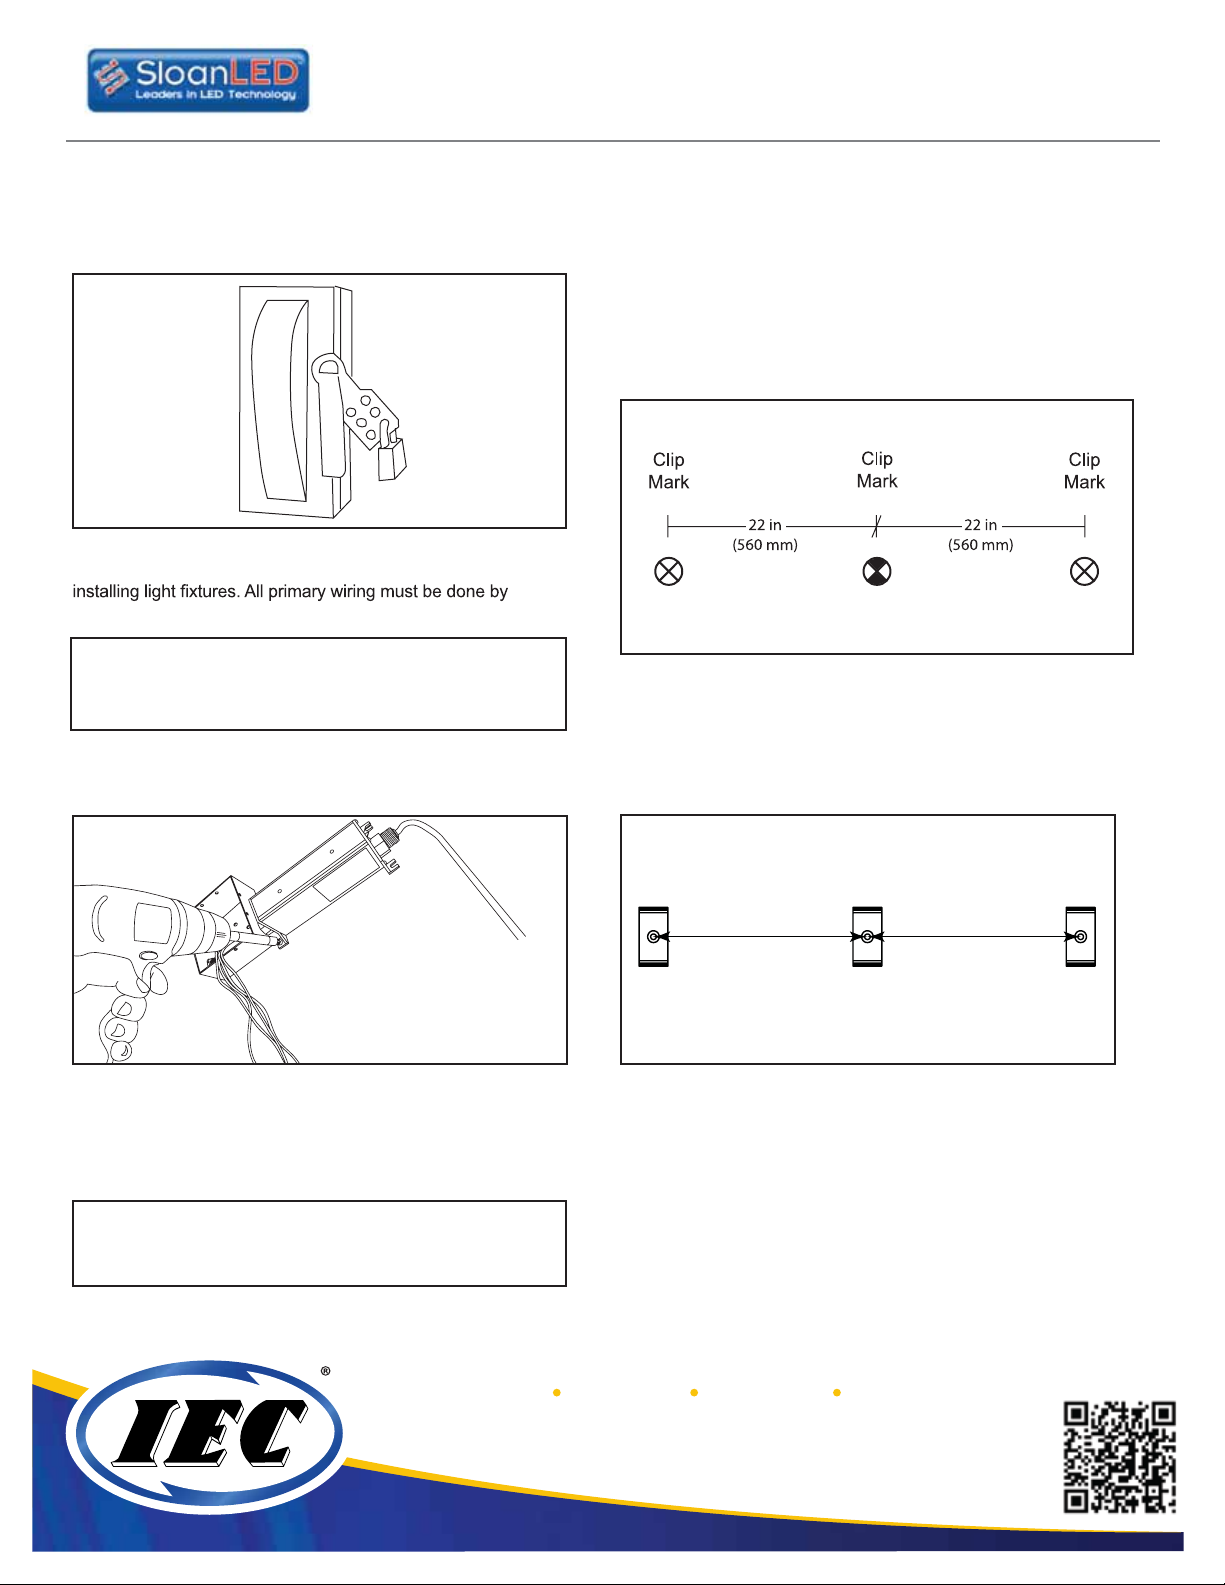
WARNING: Risk of electrical shock. Locate main circuit breaker
panel, de-energize, and perform lockout/tagout prior to
a licensed electrician.
CAUTION: Power supplies should not be mounted near
any other heat generating element. Mount power supply
with two self drilling/self tapping screws through tabs in both
end caps.
TECHNICAL DATA SHEET
HighLINER
LED Linear Lighting System
Installation Manual
SLO-HL-OLL
Mark clip locations: Snap a chalk line on surface. Measure
22 in (560 mm) off center to left and to right determine
clip location.
Install
1. Install junction box and power supply: Follow
power supply instructions for installing the secondary side.
Use UL listed twist-on, push-in, wire nut or equivalent
connectors for connections. Follow connector
manufacturer’s instructions.
CAUTION: All primary connections including grounding
must comply with NEC, local and state regulations. Have a
licensed electrician connect primary wires.
44.00 in (1120 mm) Center-to-Center
22 in (560 mm) 22 in (560 mm)
2. Attach mounting clips as shown in diagram: Three
mounting clips per luminaire. Use screw of appropriate
length and thread type for mounting surface, #8 or #10
(4 mm or 5 mm), pan or hex head screws. Stainless steel
screws are recommended.
SIGN LIGHTING GRAPHICS DISPLAY
Excellence in Distribution Since 1946
www.IECDelivers.com
2240 Yates Ave. Commerce, CA 90040 |
Fax 323.803.2019 | 800.CALL IEC
(225.5432)
Page 3
Page 3 of 4
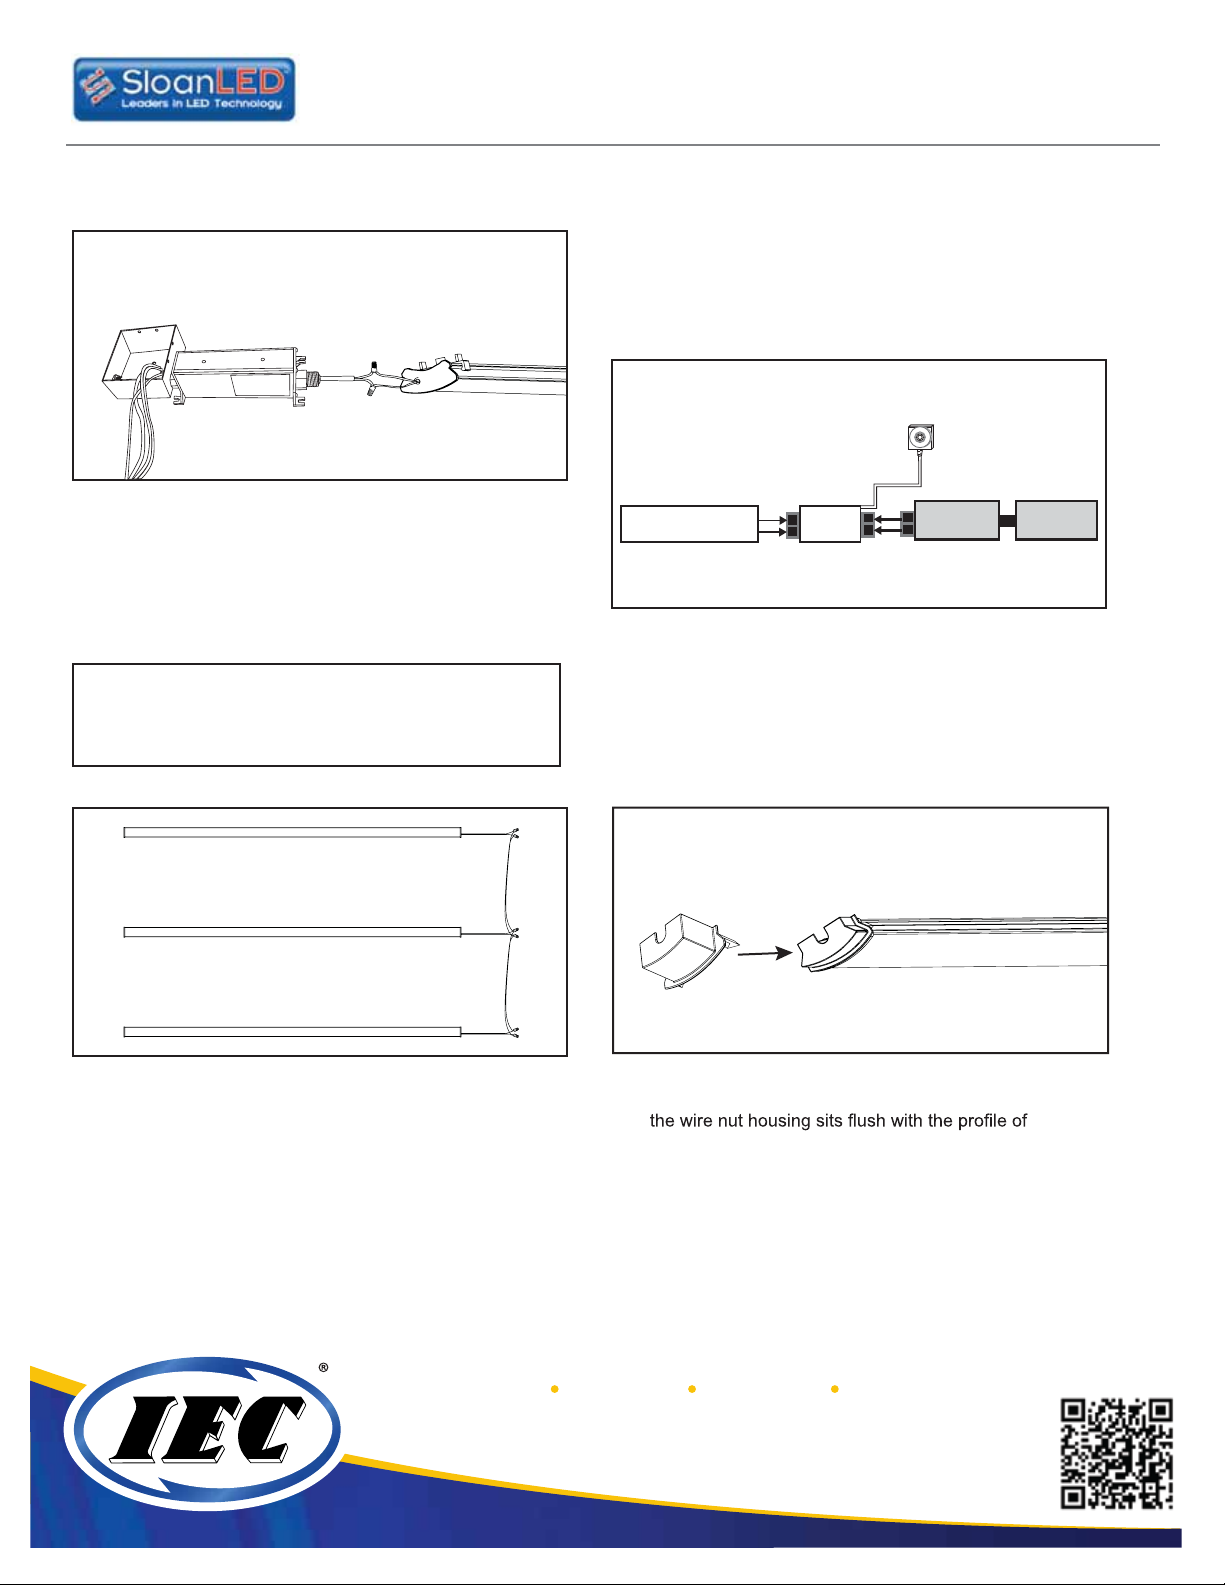
3. Install luminaire: Orient luminaire so that the lead
wires face towards power supply and junction box. Snap
luminaire into mounting clips. Attach wires to power
supply using twist-on wire connectors or equivalent.
NOTE: If multiple luminaires are being attached to the same
power supply refer to step 5 for daisy chain instructions.
WARNING Check polarity:
RED-TO-RED (+) and BLACK-TO-BLACK (-). Reverse
polarity connections may damage the LEDs and will void
product warranty.
All connections must be
TECHNICAL DATA SHEET
HighLINER
LED Linear Lighting System
Installation Manual
SLO-HL-OLL
Sensor
RDL-Linear
4. Install RDL-Dimmer and RDL-Sensor (optional):
Connect RDL-Dimmer to the secondary side of the power
supply. Ensure the motion sensor is aimed at the primary
task area. Cat 5 cable may be concealed as required.
DM
PS
Junction
Box
5. Daisy chain as required: Up to six luminaires can be
attached to a single power supply. Multiple luminaires can
be connected at the same locations using 18 AWG UL
Listed PLTC cable and twist-on or equivalent wire
connector. Length will be determined by luminaire
placement.
SIGN LIGHTING GRAPHICS DISPLAY
Excellence in Distribution Since 1946
2240 Yates Ave. Commerce, CA 90040 |
6. Wire nut housing: Conceal twist-on wire connectors
using provided wire nut housing. When properly installed,
the luminaire.
www.IECDelivers.com
Fax 323.803.2019 | 800.CALL IEC
(225.5432)
Page 4
Page 4 of 4
Sensor
RDL-Linear
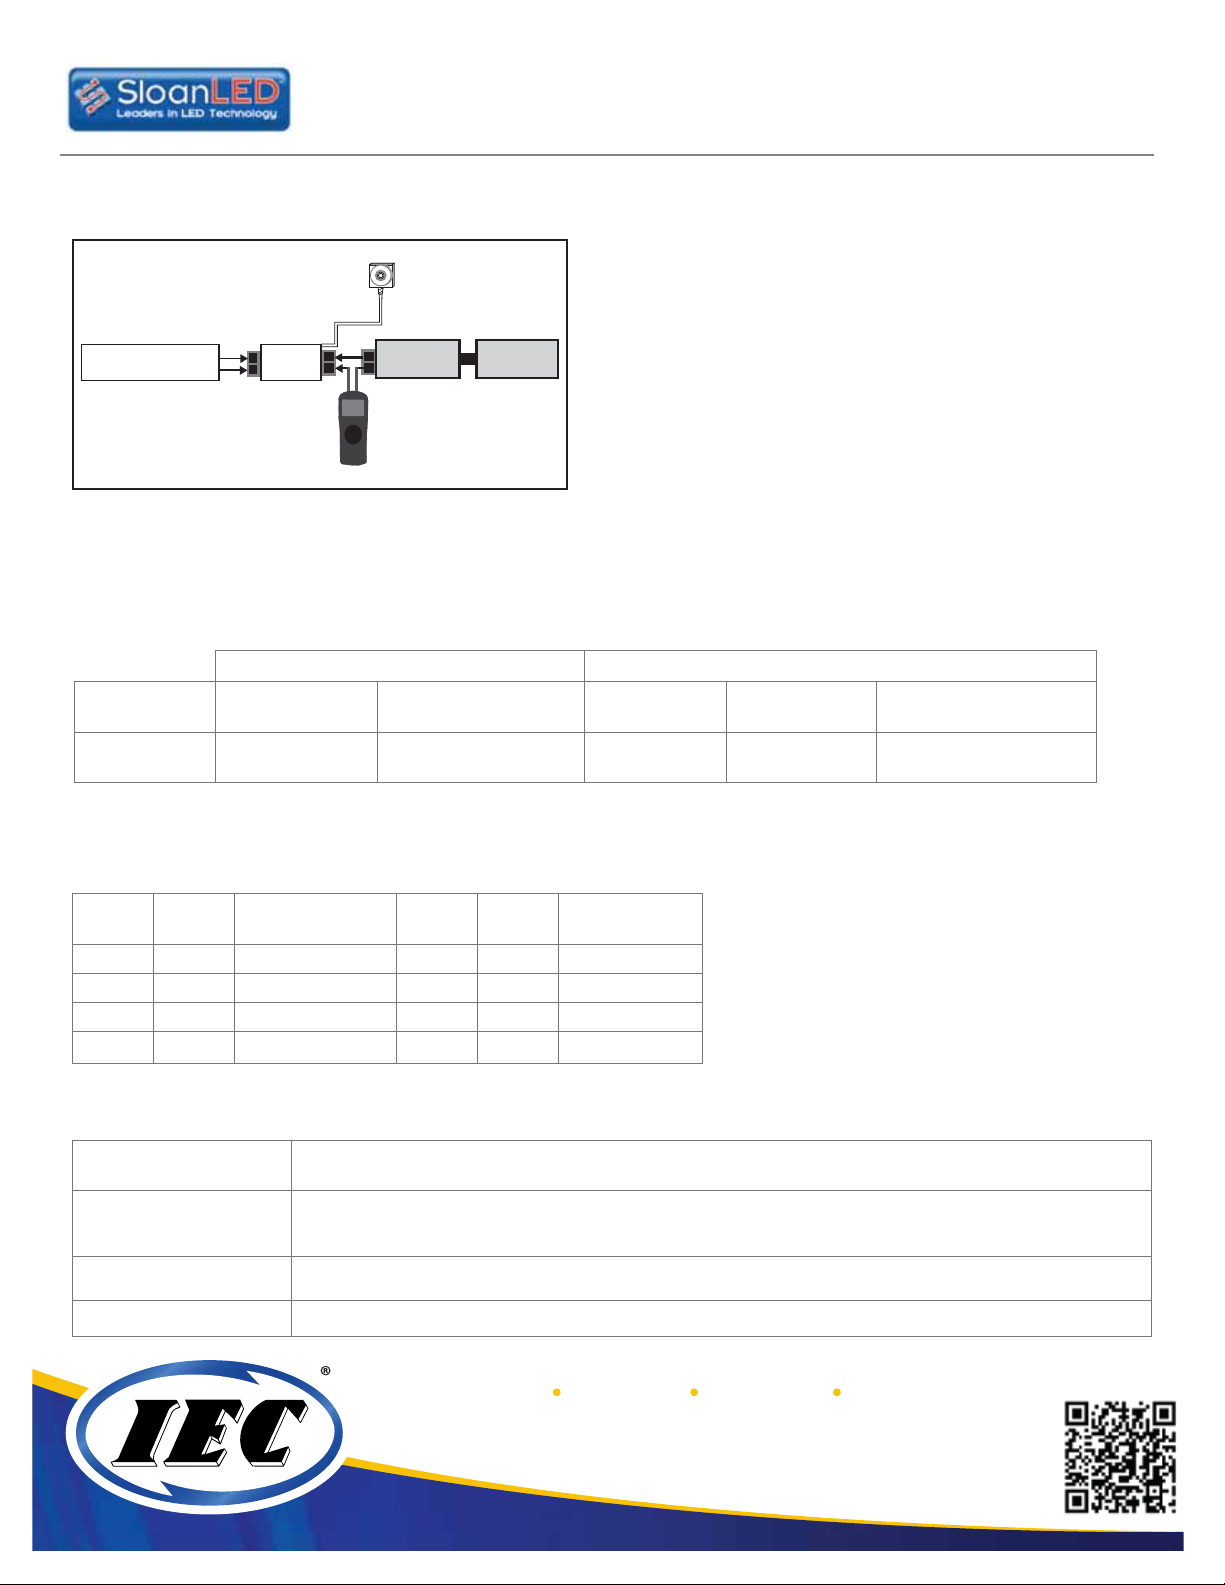
7. Turn on the system: Re-energize the power circuit after
the installation is complete. Check secondary current of
each power supply to ensure it is not overloaded per rating
on label.
100 Watt 24 VDC power supply capacity table for RDL-Linear
Part number Nominal input
701895-24C 100 - 240 VAC,
DM
voltage
50 - 60 Hz
PS
Input Output
1.4 A at 110/220 VAC
Junction
Box
Input current Power
output
2.0 A Max
TECHNICAL DATA SHEET
HighLINER
LED Linear Lighting System
Installation Manual
Output
voltage
100 W 24 VDC 6
Maximum number
luminaires
SLO-HL-OLL
Dimming controller settings
Switches 1 and 2 adjust brightness level
Switches 3 and 4 adjust dim mode brightness
Switch 1Switch 2Brightness level Switch 3Switch 4Percent of
full brightness
Off Off NA Off Off 0.0%
On Off Energy Saver On Off 12.5%
Off On Standard Off On 25.0%
On On MerchandiserMax On On 50.0%
Troubleshooting
Luminaire won’t light.
More than one luminaire
does not light.
Still does not light
Luminaire is dim
Most likely a connector or connection problem. Check connections and voltage at the connector. It could be a loose
connection, wire or connector.
Most likely a connection problem. Check connections where the product stops lighting. Another cause could be that the
power supply is overloaded and the secondary output circuit protection is engaged. Check how many feet/meters of
product are on each leg of the power supply. Check output current of power supply
Replace power supply.
Check to ensure total number of lights does not exceed power supply capacity.
SIGN LIGHTING GRAPHICS DISPLAY
Excellence in Distribution Since 1946
www.IECDelivers.com
2240 Yates Ave. Commerce, CA 90040 |
Fax 323.803.2019 | 800.CALL IEC
(225.5432)
 Loading...