

Page 1
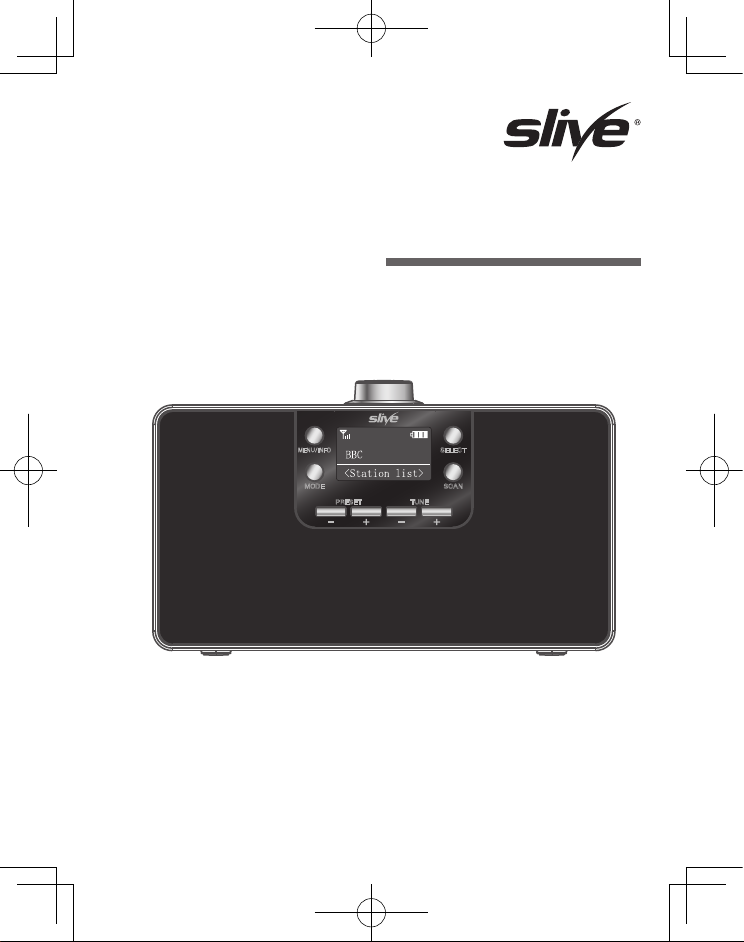
USER MANUAL
DAB/DAB+/FM Radio
Bluetooth
Model No: SL-718
MENU/INFO
MODE
PRESET
TUNE
SELECT
SCAN
Thank you for purchasing this product.
For optimum performance and safety, please read these
instructions carefully.
Please keep this manual for future reference.
Page 2
Contents
Safety precautions
Check the package contents
Getting started
Location of controls
Setting up your DAB radio
Using rechargeble battery
Charging the battery
Battery level indicate
Switching your DAB radio on and standby
Changing the volume
Using headphones (not included)
DAB radio
Listening to digital radio
Power on and auto scan
Scanning for DAB stations
Changing the digital radio station
Storing a radio station as a preset
Listening to a preset
Manually tuning to digital radio station
DRC (Dynamic Range Control)
Prune(Clearing the invalid radio stations)
FM radio
Listening to FM radio
Scanning for FM stations
Changing the FM radio stations
Storing a radio station as a preset
Listening to a preset
Manually tuning to FM radio station
Changing the scan setting for FM radio
Audio setting for FM radio
2
3
4
4
5
5-6
6
6
6
6
7
7
7
7
7
8
8
8
9
9
10
11
11
11
11
12
12
12
13
13
Menus tree
Using Bluetooth
Basic operation
Setting sleep time
Setting alarm
Setting time
Factory reset
SW version
Troubleshooting
Technical specification
Correct disposal
14-15
15
16
16
16
17
18
19
19
20
21
1
Page 3
Safety Precautions
Ensure that you read all of the safety information before
using this unit
WARNING!
■ Unit
To reduce the risk of fire, electric shock or product
damage,
● Do not let water or other liquids drip or splash inside the unit.
● Do not expose accessories to rain, moisture, dripping or
splashing.
● Do not place objects filled with liquids, such as vases, on
accessories.
● Use only the recommended accessories.
● Do not remove covers.
● Do not repair this unit by yourself. Refer servicing to qualified
service personnel.
CAUTIONS
■ Unit
● Do not place sources of naked flames, such as lighted
candles, on this unit.
● This unit is intended for use in moderate climates.
● This unit may receive radio interference caused by mobile
telephones during use. If such interference occurs,please
increase separation between this unit and the mobile
telephone.
2
Page 4
■ Battery
● Danger of explosion if battery is incorrectly replaced.Replace
only with the type recommended by the manufacturer.
● When disposing of the batteries,please contact your local
authorities or dealer and ask for the correct method of disposal.
● Do not near or expose to flame.
● Do not leave the battery in a car exposed to direct sunlight for
a long period of time with doors and windows closed.
● Do not break open or short-circuit the battery.
● Do not use the battery if the cover has peeled off.
● Keep in cool,dark area.
■ Small objects
● The volume knob and battery door can come off when pulled
hard.To prevent children from swallowing,do not pull it off.
Supplied Accessories
Carefully remove your DAB Digital Radio from the box. You
may wish to store the packaging for future use.
In the box
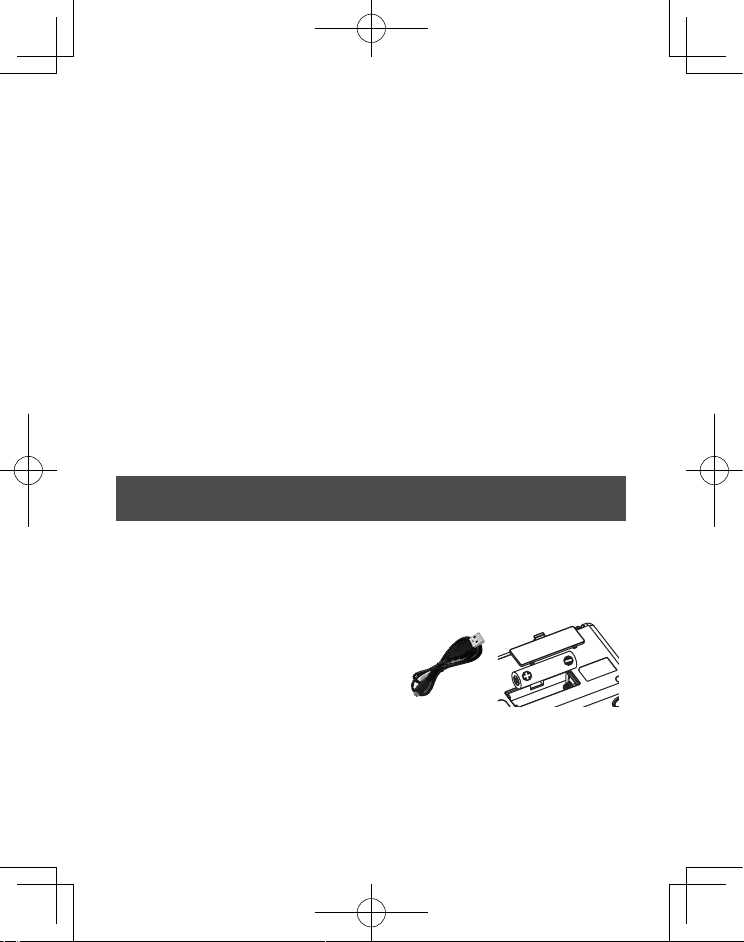
■ 1× DAB Radio(main unit)
■ 1× Build-in Lithium Battery 18650
■ 1× USB Charging Cable
■ 1× User Manual
3
Page 5
Getting started
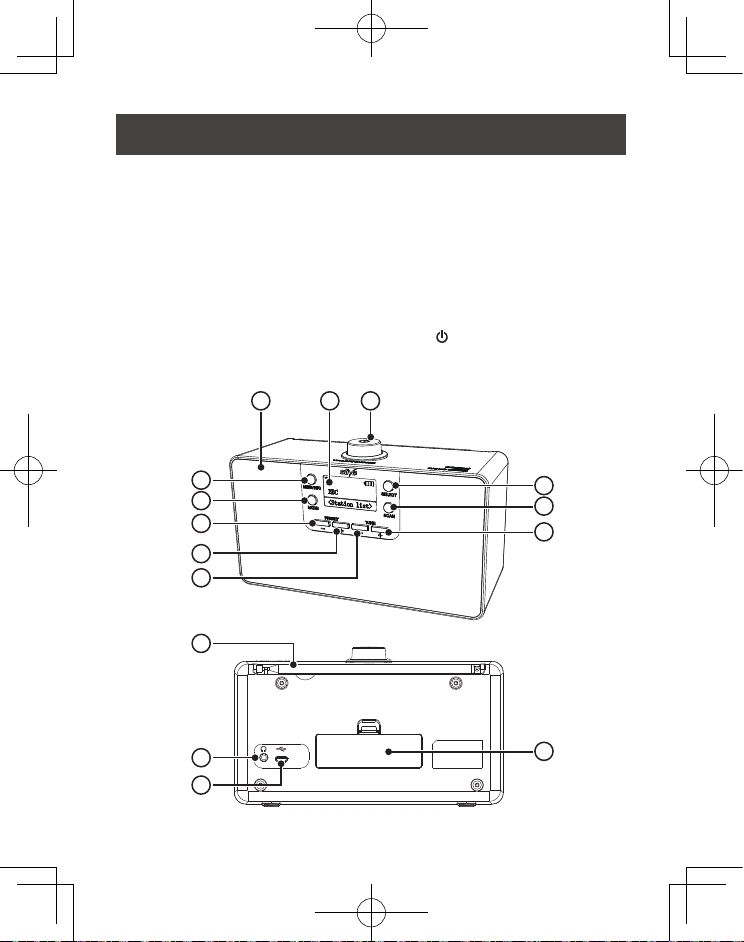
Location of controls
1.SPEAKER
2.MENU/INFO
3.LCD DISPLAY
4.SELECT
5.MODE
6.SCAN
7.PRESET -
8.PRESET +
1 3 15
9. TUNE -
10.TUNE +
11.ROD ANTENNA
12.BATTERY DOOR
13.HEADPHONE SOCKET
14.MICRO USB IN SOCKET
15.STANDBY /VOLUME/SNOOZE
11
13
14
2
5
7
8
9
4
6
10
12
4
Page 6
Setting up your DAB radio
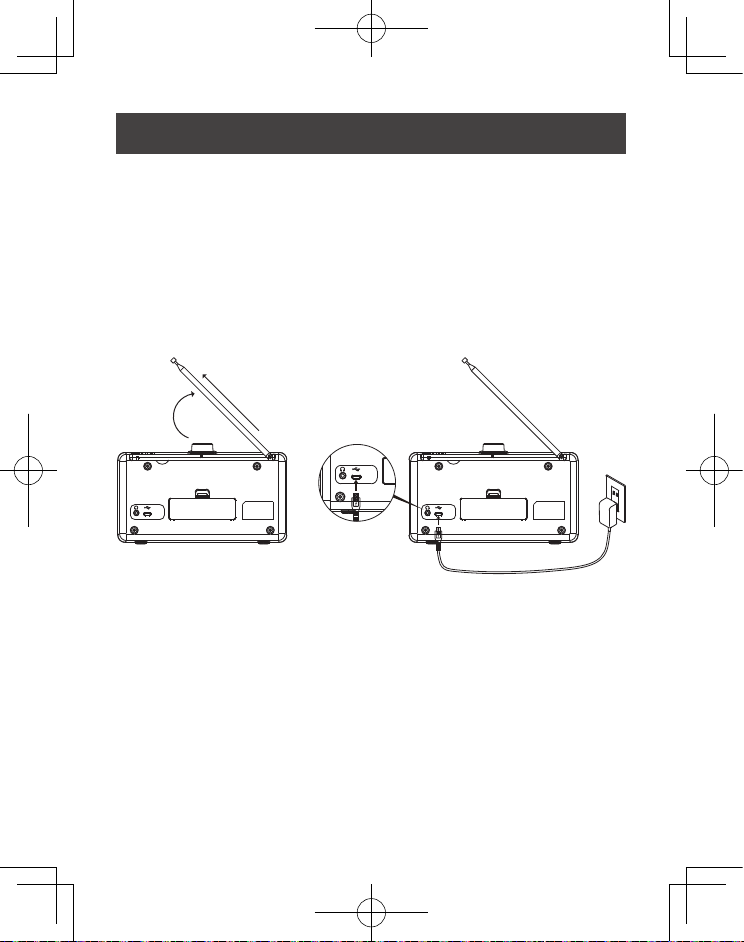
1. Unclip the antenna and fully extend it(F.1).
2.Connect the micro USB end of the charging cable to the
back of the radio (DC INPUT SOCKET)(F.2).
3.Plug the standard USB end of the charging cable into a
computer or other USB charging device.
Remarks: If the AC voltage is over than 6V, it will possible
make the line damage.
(F.1) (F.2)
Using rechargeble battery
Build-in rechargeable battery that allows you to listen to your
music anywhere.When your radio is connected to a power
outlet,it charges the battery.You can then disconnect your
radio from the power and take your music with you.
1.Connect your radio to the power supply.
The battery starts charging.If the battery is new or has not
been used for a long time,we recommend you charge it for at
least 12 hours.
5
Page 7
Note:When the battery is charging,It is normal for it to get
warm.The efficiency of the battery may decrease over time.
2.Charging the battery
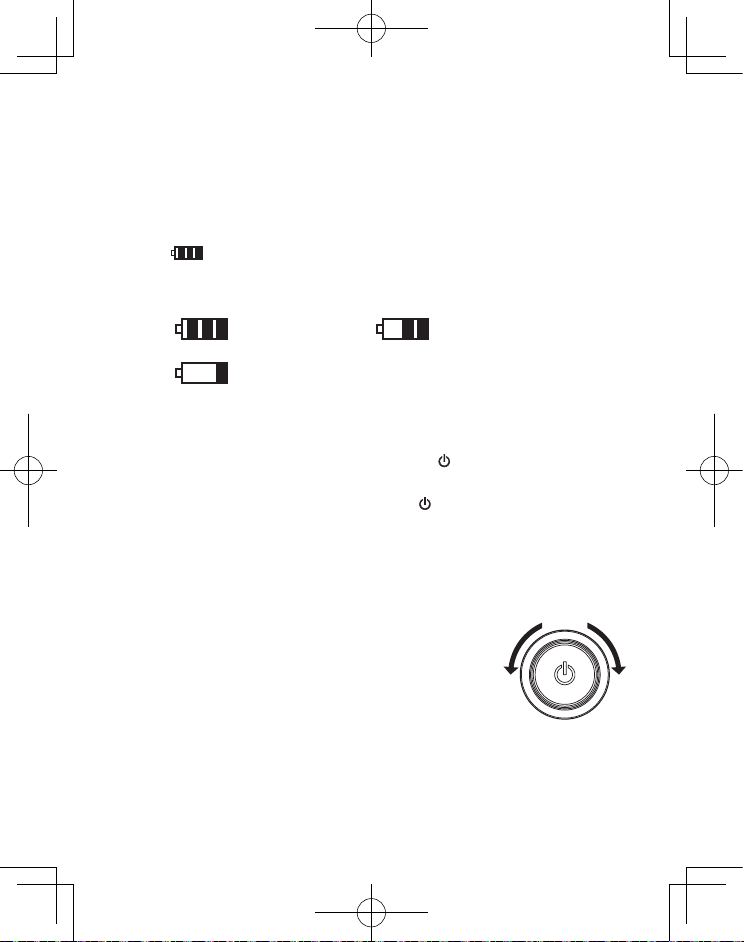
When the battery starts charging,The battery bar keeps
running on the display,When the battery is fullly charged,It will
show ‘ ’ to indicate the charging process is done.
3.Battery level indicate
Fully charged 50% battery
Low battery,Time to charge
Switching your DAB radio on and standby
• To turn on the unit,Press and hold the STANDBY BUTTON
for 2 seconds (F.3)
• With the unit on,Press and hold the STANDBY BUTTON for
2 seconds to switch to standby mode (F.3)
Note: When you switch your radio on for the first time,It will
automaticlly enter into the DAB mode.
Changing the volume
• To increase the volume,Turn the VOLUME
button clockwise(F.3)
• To decrease the volume,Turn the VOLUME
button anticlockwise.(F.3)
(F.3)
VOLUME/SNOOZE
6
Page 8
Using headphones (not included)
A stereo headphone jack has been provided so that the radio
can be used without disturbing others. Plug in the headphones
at the point marked and adjust the listening volume to your
chosen level.
Note: Excessive sound pressure from earphones and
headphones can cause hearing loss.
The speakers will not operate when earphones are fitted.
DAB radio
Listening to digital radio
To listen to digital radio
For initial use, your radio will conduct a full scan store all DAB+
radio stations possibly it can detected. In normal operation, this
order can be performed by following this process:
Auto scan
1. Turn the unit on.
2. Press the MODE button to choose DAB mode.
3. To activate auto scan, press and hold the SCAN button, The
display shows ‘Scanning’ together with a slide bar that
indicates the progress of the scan and the amount of stations
that have been found so far(F. 4) Once the scan has finished,
The number of DAB stations will be shown on the top.
7
Page 9
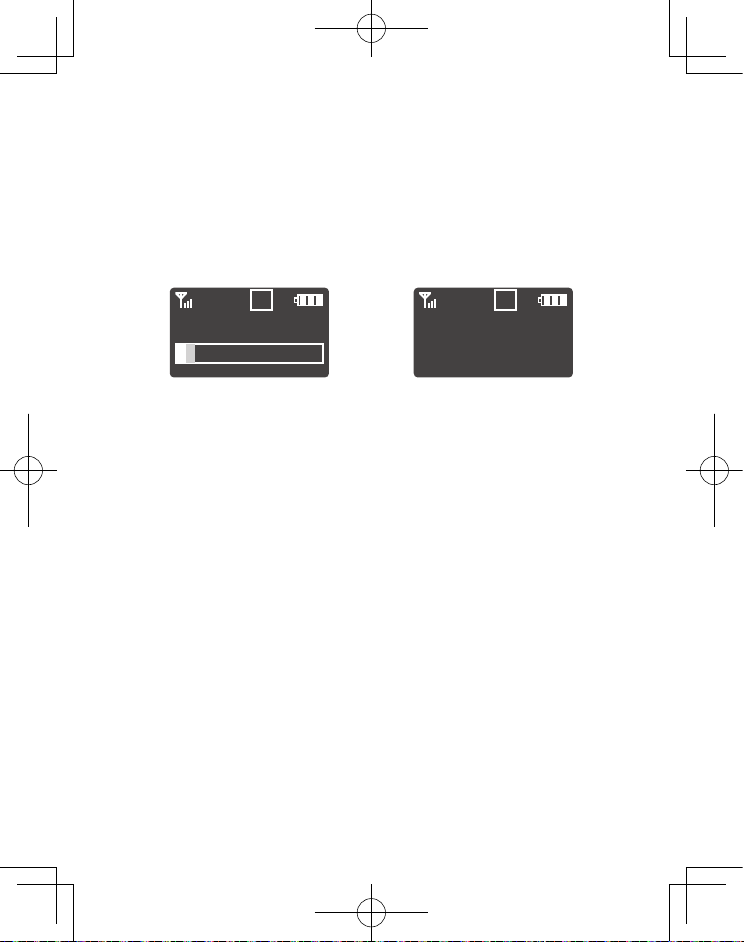
Note: The auto scan will search for the entire DAB Band III
channels, If there is no stations found after auto scan, the radio
will display "Full Scan", All the stations that have been found
will be stored automatically.After the scan has finished, the first
alphanumerically found stations will be automatically selected
and played.
(F.4) (F.5)
3
Scanning
01
Preset 1
stored
Changing DAB stations(DAB mode):
1.Press and release the ‘Tune-’ or ‘Tune+’ buttons to scroll
through the available stations in the station list.
2.Listen to the DAB radio stations that you would like to listen.
Storing a DAB station preset
1. Your radio can store up to 20 DAB radio stations in its preset
memories for instant access to your favourite stations.
2. Tune the Radio to the DAB radio station that you wish to
preset.
3. Press and hold the ‘SELECT’ button to enter the <Preset
Store>.
4.‘Preset Store’ <1:(Empty)> is displayed. Press and release
the ‘Tune –‘ or ‘Tune +’ buttons to scroll to the preset location
that you would like to store the radio station to (1-20).
5.Press and release the ‘SCAN’ button, the display will confirm
‘Preset X stored’(F.5), where ‘X’ is the number of the preset
(1-20).
8
Page 10
Note: If there is already an existing DAB station stored under
a preset, it will be over written when you store the new station.
DAB Manual tune
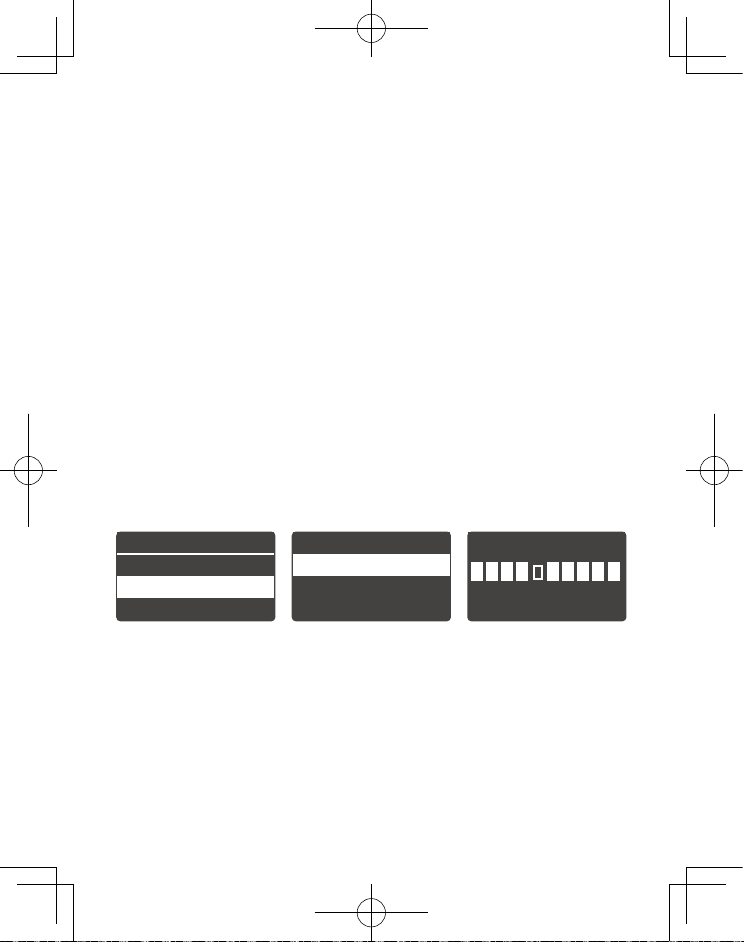
1. Press and hold the MENU/INFO button, and press the TUNE
+ button to select “2:Manual tune”(F.6). And then press the
SCAN button to final confirm.
2. Press the TUNE - / + buttons to move through the DAB
channels, and choose your desired channel and then press the
SCAN button to confirm(F.7),the display will show “5A to 13F”
and their associated frequencies(F.8).
3. When your desired frequency appears on the display, press
the SCAN button to listen, the name of the station group
(ensemble/multiplex) will be displayed.
Note: A“?”next to a radio station name means the station is
inactive or unavailable.
(F.6) (F.7) (F.8)
Setting
1:Full scan
2:Manual tune
3:DRC
Manual tune
01:5A 174.928MHz
02:5B 176.640MHz
03:5C 178.352MHz
5A 174.928MHz
DRC (Dynamic Range Control)
You can set the level of the compression of stations to
eliminate the differences in dynamic range or sound level
between radio stations.
Note:Set DRC to off indicates no compression, set DRC to low
indicates little compression, and set DRC to high shows
maximum compression.
9
Page 11
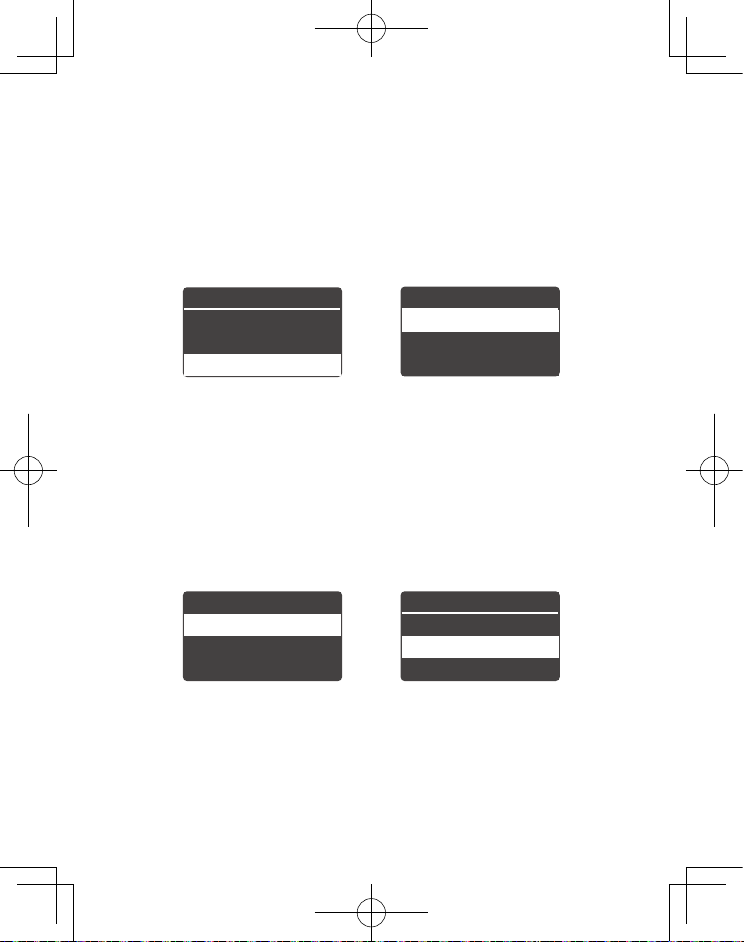
1. Press and hold the MENU/INFO button, and press the TUNE
+ button to select ‘3:DRC’, and then press the SCAN button to
confirm (F.9).
2. Press the TUNE - /+ buttons to choose ‘1:DRC off / 2:DRC
low / 3: DRC high’ and press the SCAN button to final
confirm(F.10).
(F.9)
Setting
1:Full scan
2:Manual tune
3:DRC
(F.10)
DRC
1:DRC off *
2:DRC low
3:DRC high
Prune
1.Press and hold the MENU/INFO button, and press the TUNE
+ button to select ‘4:Prune’, and then press the SCAN button to
final confirm (F.11).
2.Press the TUNE + button to choose ‘2: No <Yes>,and press
the SCAN button to confirm to clear the invalid radio stations
(F.12).
(F.11) (F.12)
Setting
4:Prune
5:System
Prune?
1: <No> Yes
2: No <Yes>
10
Page 12
FM RADIO
Listening to FM radio
Auto scan and change the FM radio station
1.Turn the unit on.
2. Press the MODE button to choose FM mode.
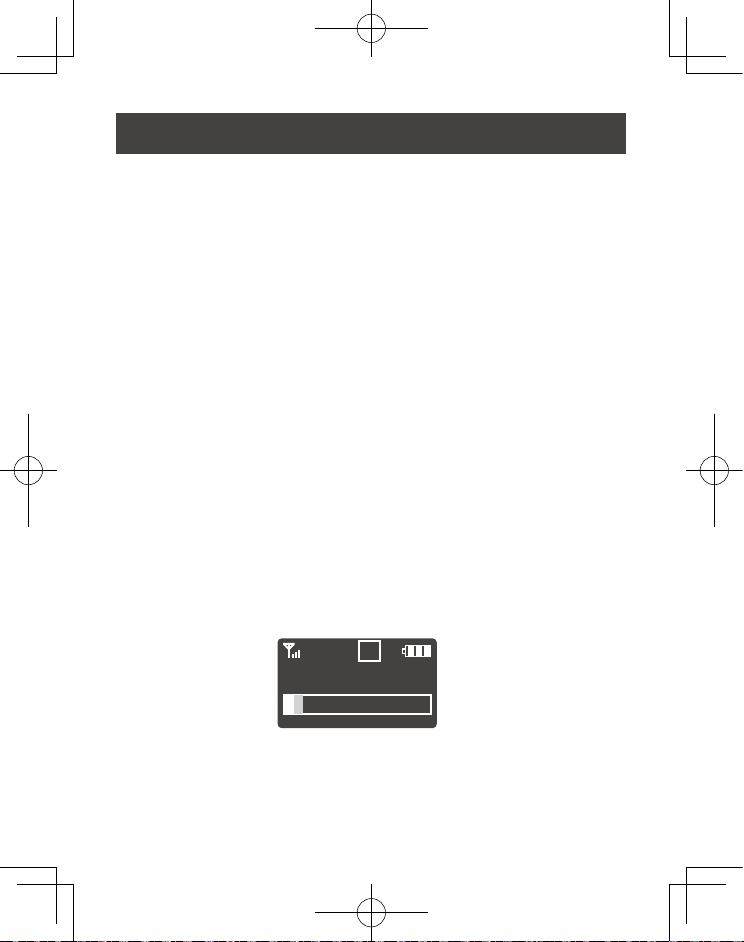
3. To activate auto scan, press and hold the SCAN button, The
display shows ‘Scanning’ together with a slide bar that
indicates the progress of the scan and the amount of stations
that have been found so far (F.13). Once the scan has
finished,The number of FM stations will be shown on the top.
4.Press the PRESET - / + buttons to change the stations and
play it.
Note: If there is no stations found after auto scan, the radio
will display "Full Scan", All the stations that have been found
will be stored automatically.After the scan has finished, the first
alphanumerically found stations will be automatically selected
and played.
Note: ‘Empty’ next to a radio station No. means the station is
inactive or unavailable.
(F.13)
3
Scanning
11
Page 13
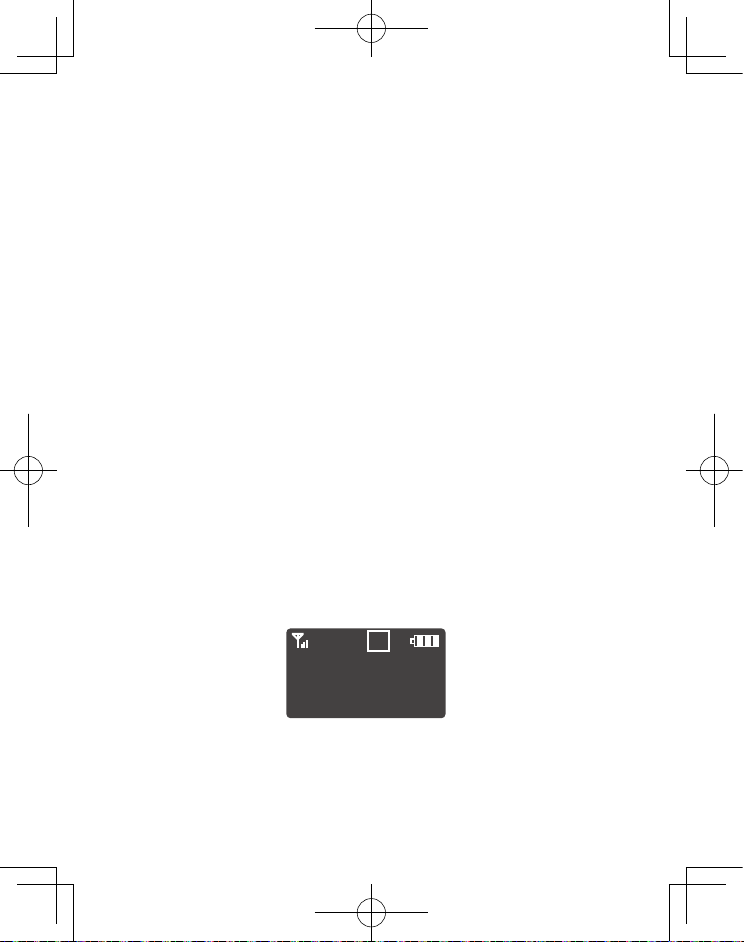
Storing a FM station preset
1.Your radio can store up to 20 FM radio stations in its preset
memories for instant access to your favourite stations.
2. Choose the FM radio station frequency that you wish to
preset.
3. Press and hold the ‘SELECT’ button to enter the <Preset
Store>.
4.‘Preset Store’ <1:(Empty)> is displayed. Press and release
the ‘Tune –‘ or ‘Tune +’ buttons to scroll to the preset location
that you would like to store the radio station to (1-20).
5.Press and release the ‘SCAN’ button, the display will confirm
‘Preset X stored’(F.14). where ‘X’ is the number of the preset
(1-20).
Note: If there is already an existing FM station stored under a
preset, it will be over written when you store the new station.
FM Manual tune
1.Press the TUNE - / + buttons in the desired direction to
increment the frequency by 0.05MHz.
2. Please refer to ‘Storing a FM station preset”and redo steps 2
to 5.
(F.14)
01
Preset 1
stored
12
Page 14
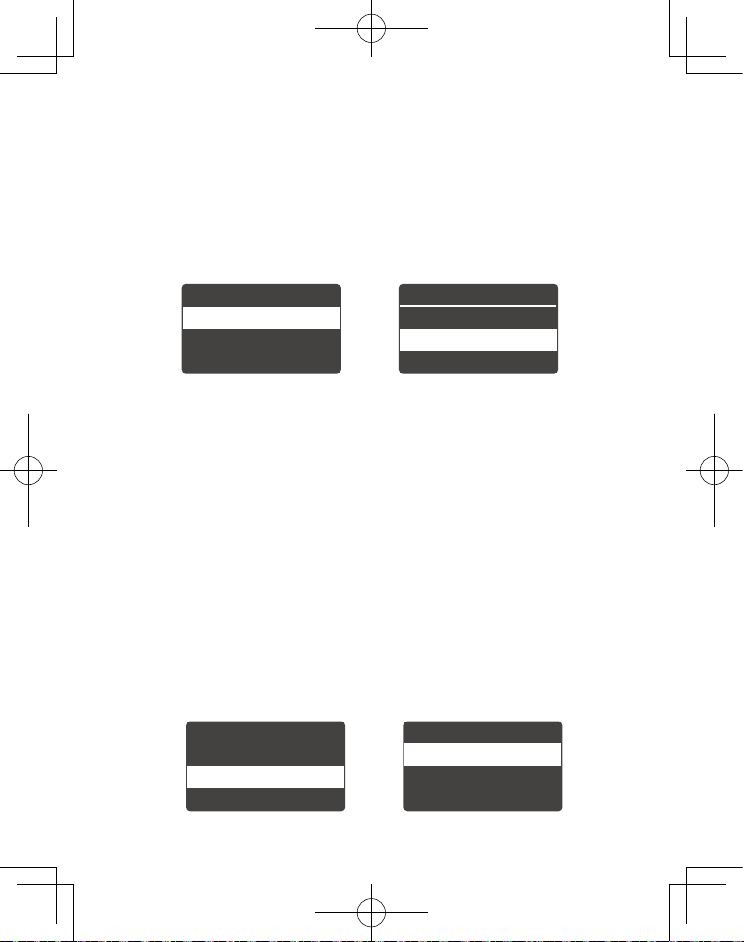
Scan setting
In FM mode, press and hold the MENU/INFO,select “1:scan
setting”. and press the SCAN button to confirm(F.15 ). Press
the TUNE- / +buttons to choose “1:All stations / 2:Strong
stations only”, and then press the SCAN button to confirm the
setting(F.16).
(F.15)
Setting
1:Scan setting
2:System
(F.16)
Scan setting
1:All stations
2:Strong statio*
Audio setting
In FM mode, press and hold the MENU/INFO button,and press
the TUNE + button to select ‘2:Audio setting’(F.17). And then
press the SCAN button to confirm. Press the TUNE - /+ buttons
to select ‘1:Stereo allowed / 2:Forced mono’, (F.18)and then
press the SCAN button to confirm the setting.
Note:If reception is still poor adjust the position of the antenna
or try moving the radio to another location.By default,your radio
uses stereo reception for FM radio,If your FM radio stations
have a week signal, try using mono reception to improve the
signal strength.
(F.17)
Setting
1:Scan setting
2:Audio setting
3:System
(F.18)
Audio setting
1:Stereo allowed
2:Forced mono *
13
Page 15
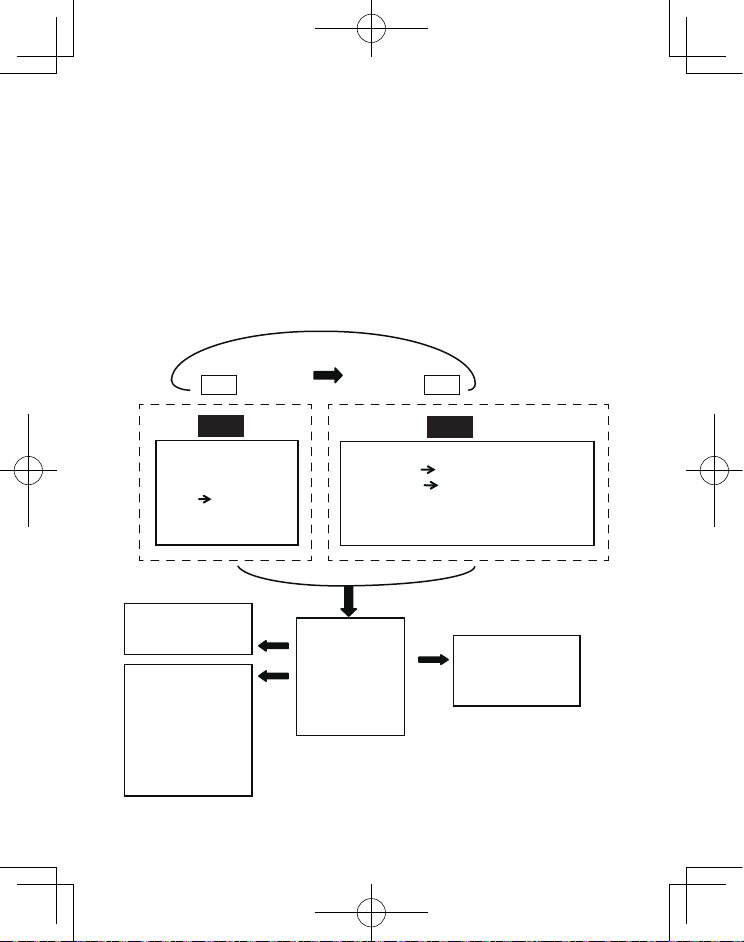
Menus:
The following controls are used to move about the menu tree to
choose and select the required settings:
Press and hold the MENU/INFO button to enter into the
“MENU”. Press the TUNE- / +buttons to navigate the desired
option,and then press the SCAN button to confirm,or you can
press the MENU/INFO button to exit the operation.
MENU Tree as below:
Mode Mode
DAB FM
Menu Menu
DAB Menu
1:Full Scan
2:Manual Tune
3:DRC off/low/high
4:Prune
5:System
FM Menu
1:Scan Setting All stations/Strong stations only
2:Audio Setting Stereo Allowed/Forced mono
3:System
1.Sleep Menu
Sleep
off/30/60/90/120 minutes
3:Time
Set Time/Date
hh:mm /DD-MM-YY
Auto Update
1:Update from Any
2:Update from DAB
3:Update from FM
4:No Update
System Menu
1:Sleep
2:Alarm
3:Time
4:Factory Reset
5:SW version
2:Alarm Menu
ON/OFF
Set 24 hour : hh:mm
FM / DAB/ BUZZ
14
Page 16
View stations information
Note: there is a diversity of station information transmitted by
broadcast, and this radio also offers a shortcut for you to view
them.
In DAB mode, press the MENU/INFO button repeatedly, the
display will show the information through DLS (Dynamic Link
Segment) ,Program type,Ensemble Frequency, Audio Bit
Rate,Stereo,Time.
In FM mode, press the MENU/INFO button repeatedly, the
display will show the information through Program type,
Program name,Stereo,Time.
Using Bluetooth
The unit has a Bluetooth function that can receive a signal
within 10 meters. Pair the unit with a Bluetooth device to listen
to music:
1. Press the Mode button to select Bluetooth mode.
2. The display will flashing ‘Disconnect’repeatedly.
3. Activate your Bluetooth device and select the search mode.
4. ‘SL-DAB’will appear on your Bluetooth device.
5. Select ‘SL-DAB’ , ‘Connected’ will show on the display when
connection is successful.
6. Press the TUNE - / +buttons to choose previous or next
song, or use your Bluetooth device to operate.
7. To disconnect the Bluetooth function, switch to another
mode on the unit or disable the function from your Bluetooth
device.
15
Page 17
Basic operation
Setting Sleep Time
This function enables your unit to switch to standby mode by
itself after a set sleep time
1. Press and hold the MENU/INFO button,Select ‘System’and
choose ‘1:Sleep’,and then press the‘SCAN’ button to confirm.
2. Press the TUNE - /+ buttons to choose 30, 60, 90 or 120
minutes,and press the SCAN button to confirm.‘Zzz’ will show
in the display.
3. To view the set sleep time, redo above step 1.
4. To turn the sleep function off while the sleep timer is still
counting down, redo above step 1-2 and select ‘off ’.
Setting alarm
Your radio includes dual alarms. Setting Alarm, make sure
setting time at first.
1.Press and hold the MENU/INFO button,Select ‘System’and
press the TUNE+ button to choose ‘2:Alarm’and then press
the‘SCAN’ button to confirm.
2.Select ‘ON’ ,and press the SCAN button to confirm.
3.Press the TUNE - /+ buttons to set your desired alarm,and
press the SCAN button to confirm the setting.
Alarm states: On or Off
Alarm time: On Time: 00:00 (Set 24H, hh:mm, manually set up
the time )
Alarm source: DAB, FM or Buzz (since you were selected DAB
or FM as alarm source, select last listened or saved preset
station to play when alarm sounds)
16
Page 18
Alarm active day: Daily
When the display shows ‘Alarm Saved’, the alarm setting is
successful,the
4. To temporarily switch off alarm, press to activate Snooze
function when the alarm is sounding. Press the SNOOZE button
can set snooze time of 10 minutes. The set snooze time will
show as ‘Snooze mm : ss’ on the display.
5. To turn off alarm, press and hold the SNOOZE button for two
seconds or turn the SNOOZE anticlockwise when the alarm is
sounding.
6. To cancel Alarm, refer to steps1-2 to set Alarm states to ‘OFF’.
‘ ’
will show on the display.
Setting Time
1. Press and hold the MENU/INFO button,Select ‘System’and
press the TUNE + button to choose ‘3:Time’,and then press the
‘SCAN’ button to confirm.
2. Follow the MENU Tree steps to operate,Press the TUNE - /+
buttons to adjust the time/Date,and then press the SCAN button
to confirm.
3. Then setting time according to your personal preference.
17
Page 19
Factory reset
Note:If moving the radio to another location in the country the
pre-tuned and stored DAB stations may no longer be available
and it will be necessary to reset the radio back to the factory
settings.
1.With the unit switched on, press and hold the MENU/INFO
button and press the TUNE + button to select‘System’and then
press the SCAN button to cofirm.
2. Press TUNE + button to choose‘4:Factory Reset ’and press
the SCAN button to confirm(F.19).
3.Press the TUNE +button to choose“2: No <Yes>” and press
the SCAN button(F.20).
4.The radio will display “Restarting….” and will then go into
standby mode(F.21).
Note 1: All stored programmed stations will be lost during
reset.
(F.19)
(F.20)
System
3:Time
4:Factory Reset
5:SW version
(F.21)
Restarting...
Factory Reset?
1: <No> Yes
2: No <Yes>
18
Page 20
SW version
Displays the software version of your DAB
Troubleshooting
Problem
I can’t hear any sound
The display shows ‘NO
SERVICES AVAILABLE’in DAB
I can’t find an FM or digital
radio station
Some of the buttons on the
DAB Digital Radio are not
Solution
.Use the VOLUME dial to turn
the volume up
.Make sure that the radio has
been able to locate DAB/FM
.Make sure that DAB coverage
exists in your area
.Try adjusting the position of
.Adjust your antenna and check
it is fully extended.
Move your radio to another
.Turn the DAB Digital Radio off,
disconnect the USB plug and
retry after a few seconds
19
Page 21
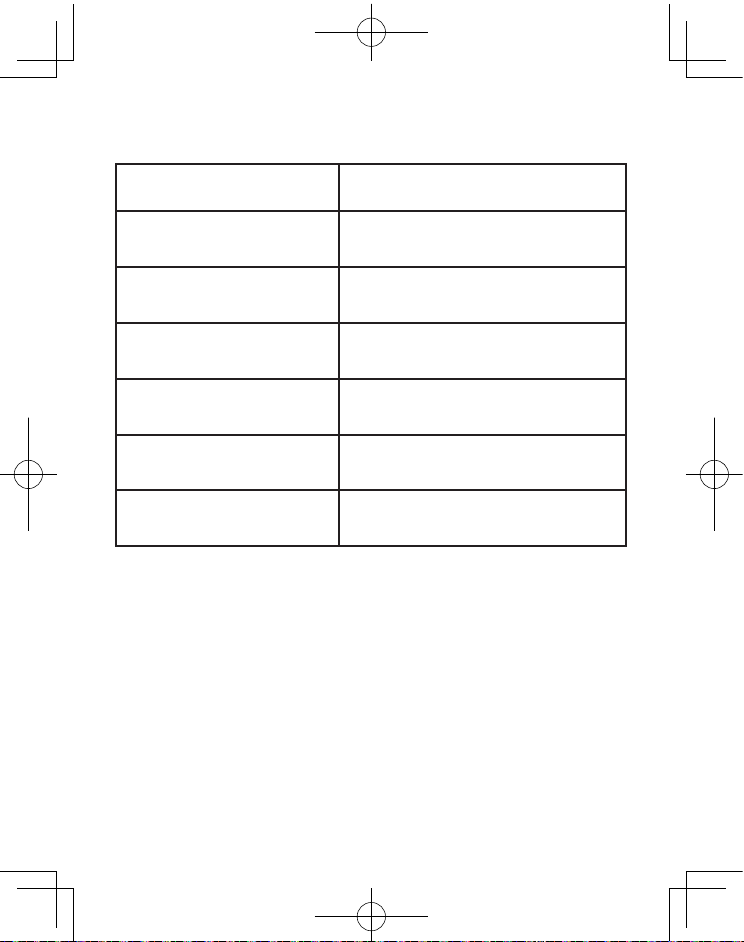
Technical Specification
Model Number
AC Adaptor (Not included)
Speaker Output Power
Frequency Range
LCD Display
Battery Capacity
Dimensions
SL-718
Input AC100-240V, 50/60Hz, 0.5A
1W×2
DAB/DAB+
FM radio 87.5-108MHz
128×64 Backlit dot matrix LCD
18650 3.7V 2000mAh
Lithium rechargeable battery
101mm high×190mm wide×80mm deep
20
Page 22
www.shengli-cn.com
Correct disposal of this product
This marking indicates that this product should not be
disposed with other household waste throughout the EU.To
prevent possible harm to the environment or human health
from uncontrolled waste disposal, recycle it responsibly to
promote the sustainable reuse of material resources.To return
your used device,please use the return and collection system
where product was purchased.They can take this Product for
environment safe recycling.
21
Page 23
Page 24
 Loading...