

Page 1
Prohibited
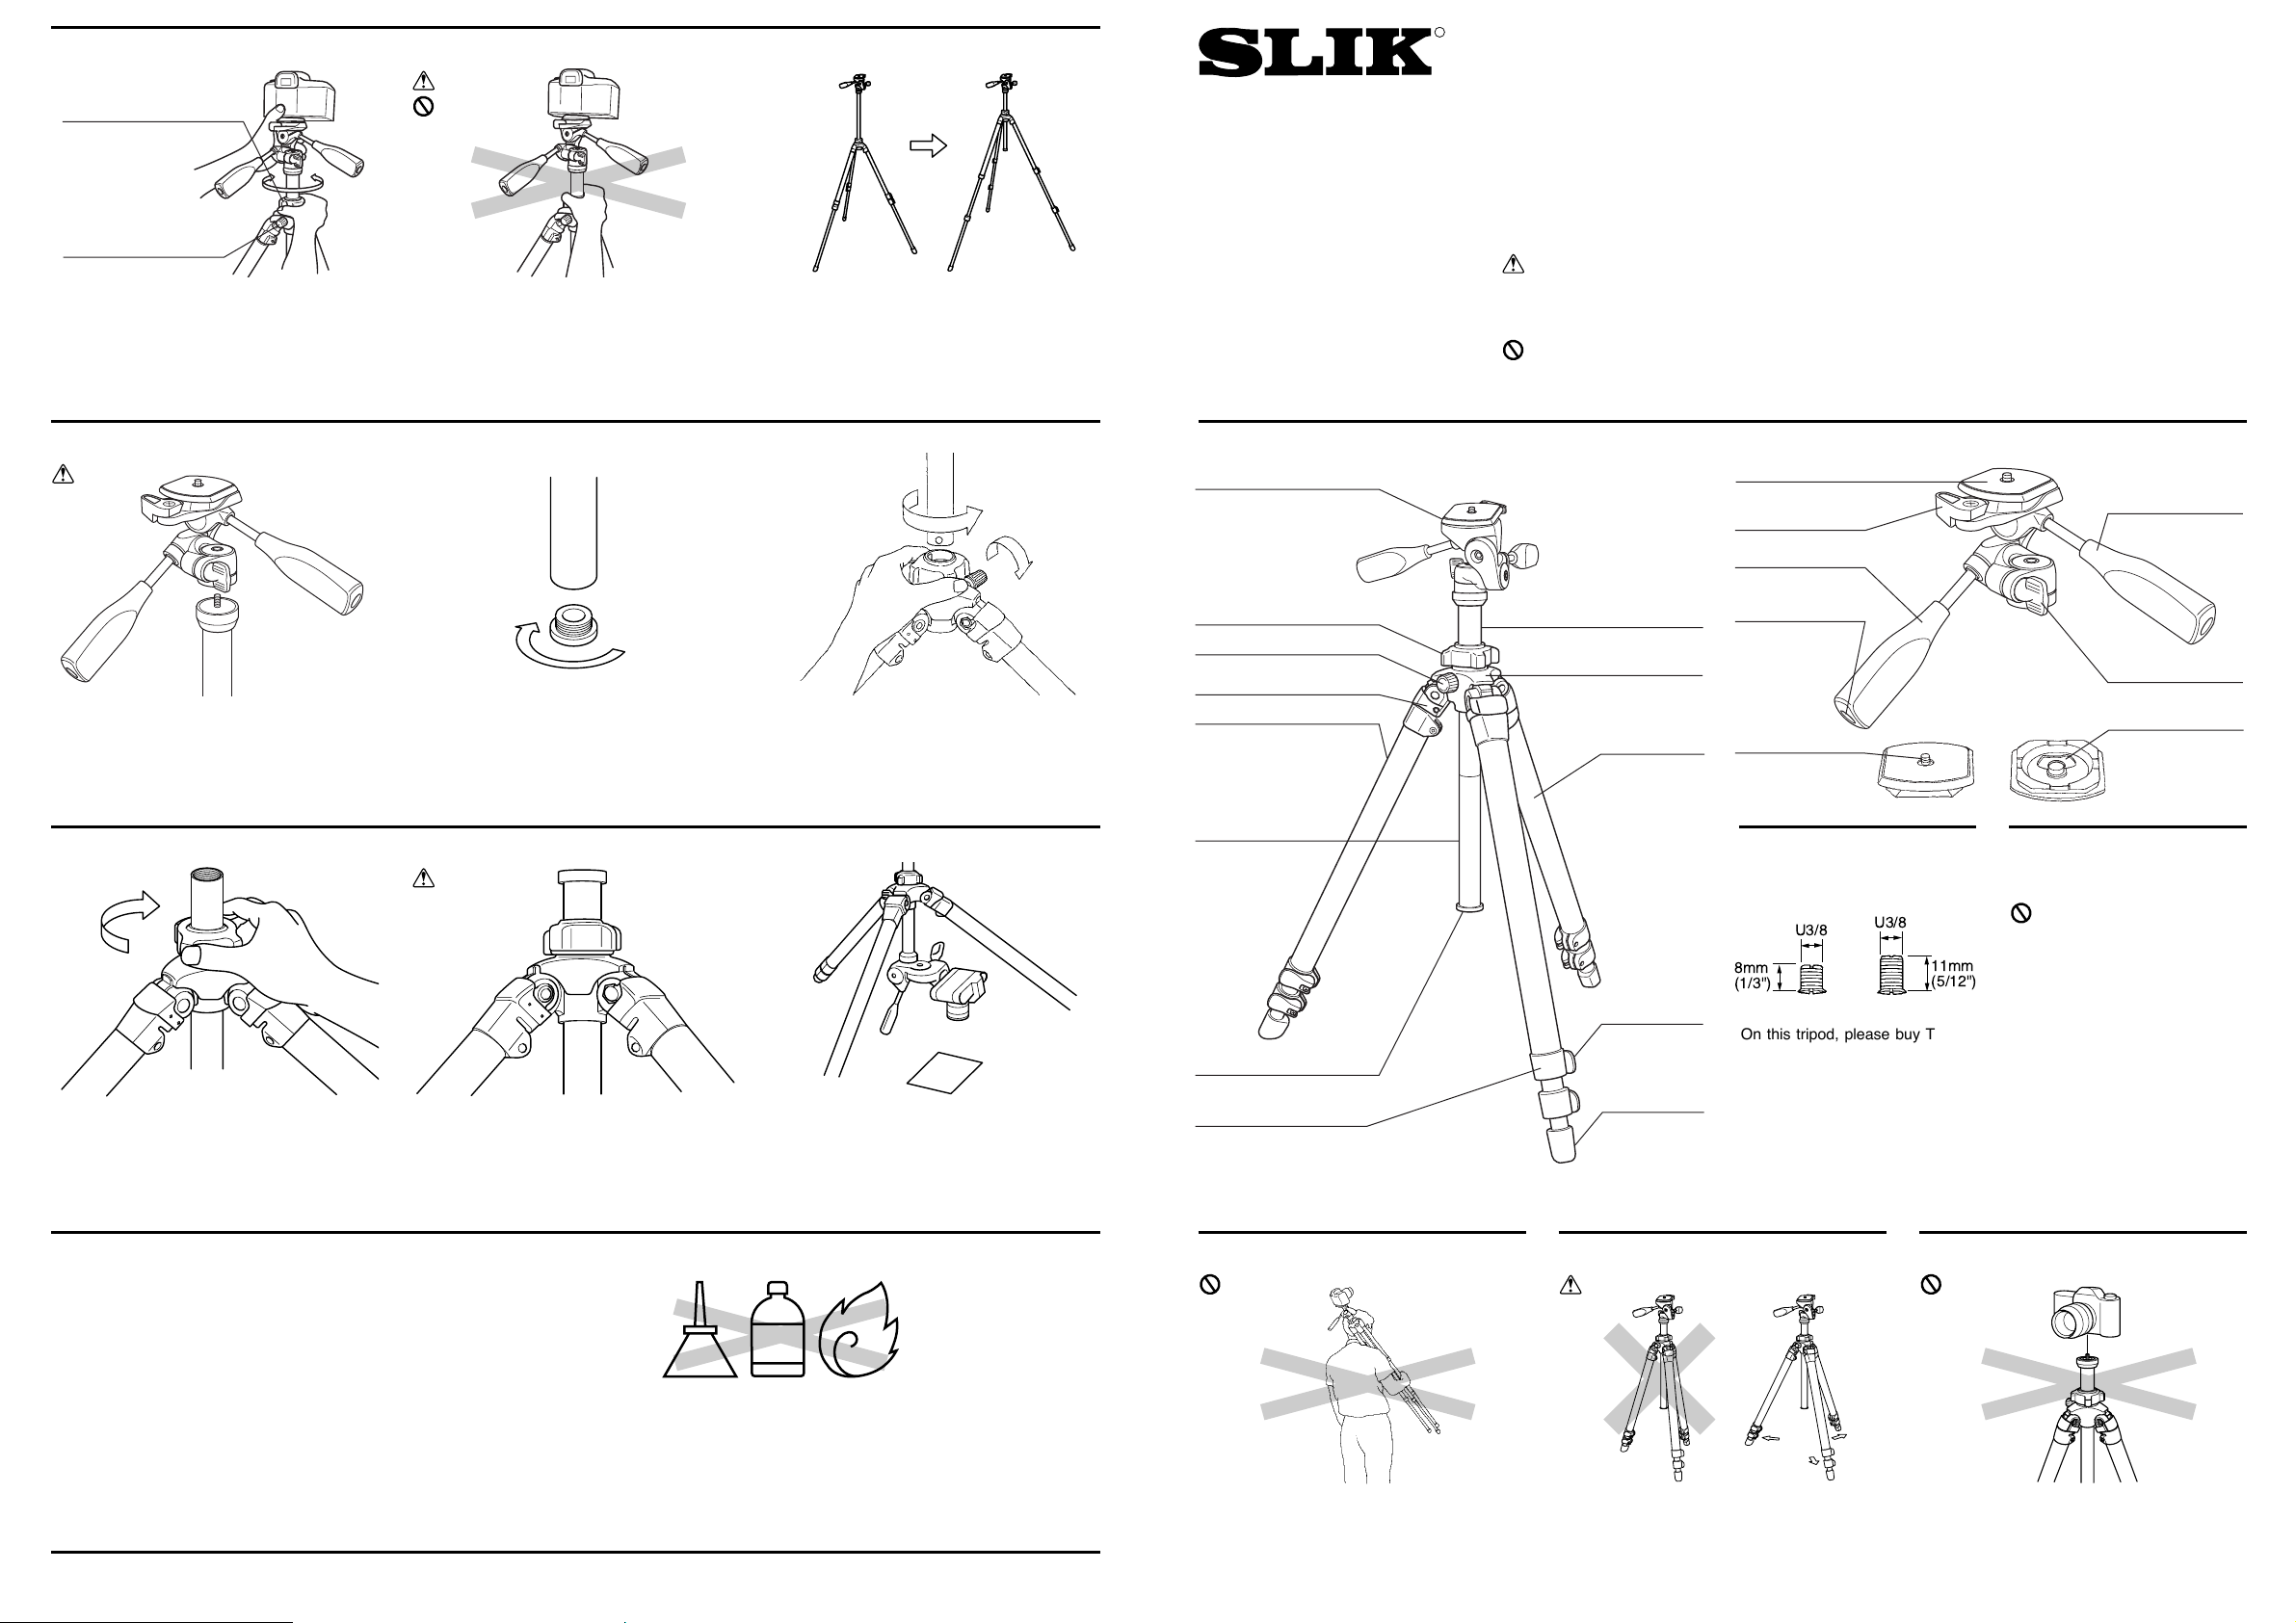
Components Pan Head
Equipment that can be
used with this Tripod
Carrying the Tripod
Prevent accidental equipment fall, or tripod tipping over, by making sure all levers, knobs,
and handles on the tripod are securely tightened, and that all three legs are opened all the
way.
Carrying a tripod with a camera left on can
result in unexpected accidents. We therefore,
recommend you to remove your camera while
carrying the tripod.
D393E-1
PRO 400DX
Operating Instructions
Congratulations on the purchase of a SLIK PRO 400DX Tripod.
The SLIK Corporation has designed your tripod to be a sturdy,
rugged, dependable product that will provide you with many years of
satisfactory use.
Please take a few moments to read this instruction sheet carefully so
you can take full advantage of your Tripod's many fine features.
Retain this instruction sheet in case you might want to refer back to it.
Caution
This caution icon refers to information pertaining to important safety
procedures in preventing injuries, and damages which may occur as
a result of mishandling this product.
Prohibited
This prohibited icon refers to information pertaining to prohibited contents. Please refer to instructions closely to avoid accidents.
Specification
Length folded 650mm
(25 7/12")
Max. operating height 1,550mm
(61")
Max. center column ext.
280mm
(11")
Weight 2.52kg
(5 lbs 9 oz)
Setting up
Caution
This product has been designed
to handle equipment weighing
under 5 kgs (11 lbs).
Do not overload.
Some equipment weighing under
5 kgs (11 lbs), such as long lenses, may not balance well due to
its weight distribution. In such
case, please use a larger tripod.
Prohibited
Prohibited
Pan Head mounting post
Do not attach camera directly to the threaded
post of the Center Column.
This may damage both camera and tripod.
Options
THREAD ADAPTER SET
On this tripod, please buy Thread
Adapter Set when the Pan Head
that there are large screw (U3/8)
tripod installation screws is
attached.
Using the Center Column
Loosen the Center Column Stopper and the
Locking Collar, and then pull out the Center
Column.
Remove the Pan Head when inverting &/or
replacing the Center Column.
Printed in Thailand.
Care of the Tripod
OIL
THINNER
・DO NOT apply any grease or oil to this product.
・Clean with a mild detergent and a soft cloth only.
・DO NOT use close to flame. Avoid extreme heat.
Hold onto the Pan Head with one hand, and
loosen the Center Column Locking Collar with
the other hand.
Raise or lower Pan Head to desired height, and
while maintaining a hold of the Pan Head, tighten the Locking Collar.
Inverting the Center Column
Slik corporation reserves the right to make changes in design and/or improvements on the products without any obligation and advanced notice.
Caution
To avoid unnecessary camera vibrations, try to
keep the Center Column height to a minimum.
Also use the larger legs first, when extending
the legs.
You may injure your hand by a sudden fall, if
you let go of the Pan Head before locking the
Collar.
Turn the Locking Collar with your fingers on the
side of the Collar.
Make sure to re-attach the Base Stopper, in
order to prevent the Center Column from falling
out.
By inverting the Center Column, it is possible to
do copy, and close up work.
Insert the Center Column from the lower side of
Main Body, and tighten the Locking Collar and
the Center Column Stopper.
SLIK CORPORATION
853, Kayama, Hidaka-shi, Saitama 350-1231, Japan Phone 81-429-89-2141 Fax. 81-429-85-0210 ©2005
Remove the center column Base Stopper turning
to the way of arrow.
Caution
Prohibited
Caution
Center Column
Locking Collar
Center Column Stopper
NO
YES
R
Pan Head
Center Column
Locking Collar
Center Column Stopper
3-Position Leg Angle
Adjustment Locks
Leg
Lower part of
Center Column
Base Stopper
Leg Lock
Center Column
Main Body
Soft Grip
Leg Lock Lever
Rubber Leg Tip
Quick Release Platform
Quick Release
Lock Lever
Pan & Tilt Handle
Handle Connecting
Screw
Camera
Mounting Screw
U3/8
8mm
(1/3")
U3/8
Vertical Tilt Handle
Panning Lock Knob
Mounting Wing Nut
11mm
(5/12")
Page 2
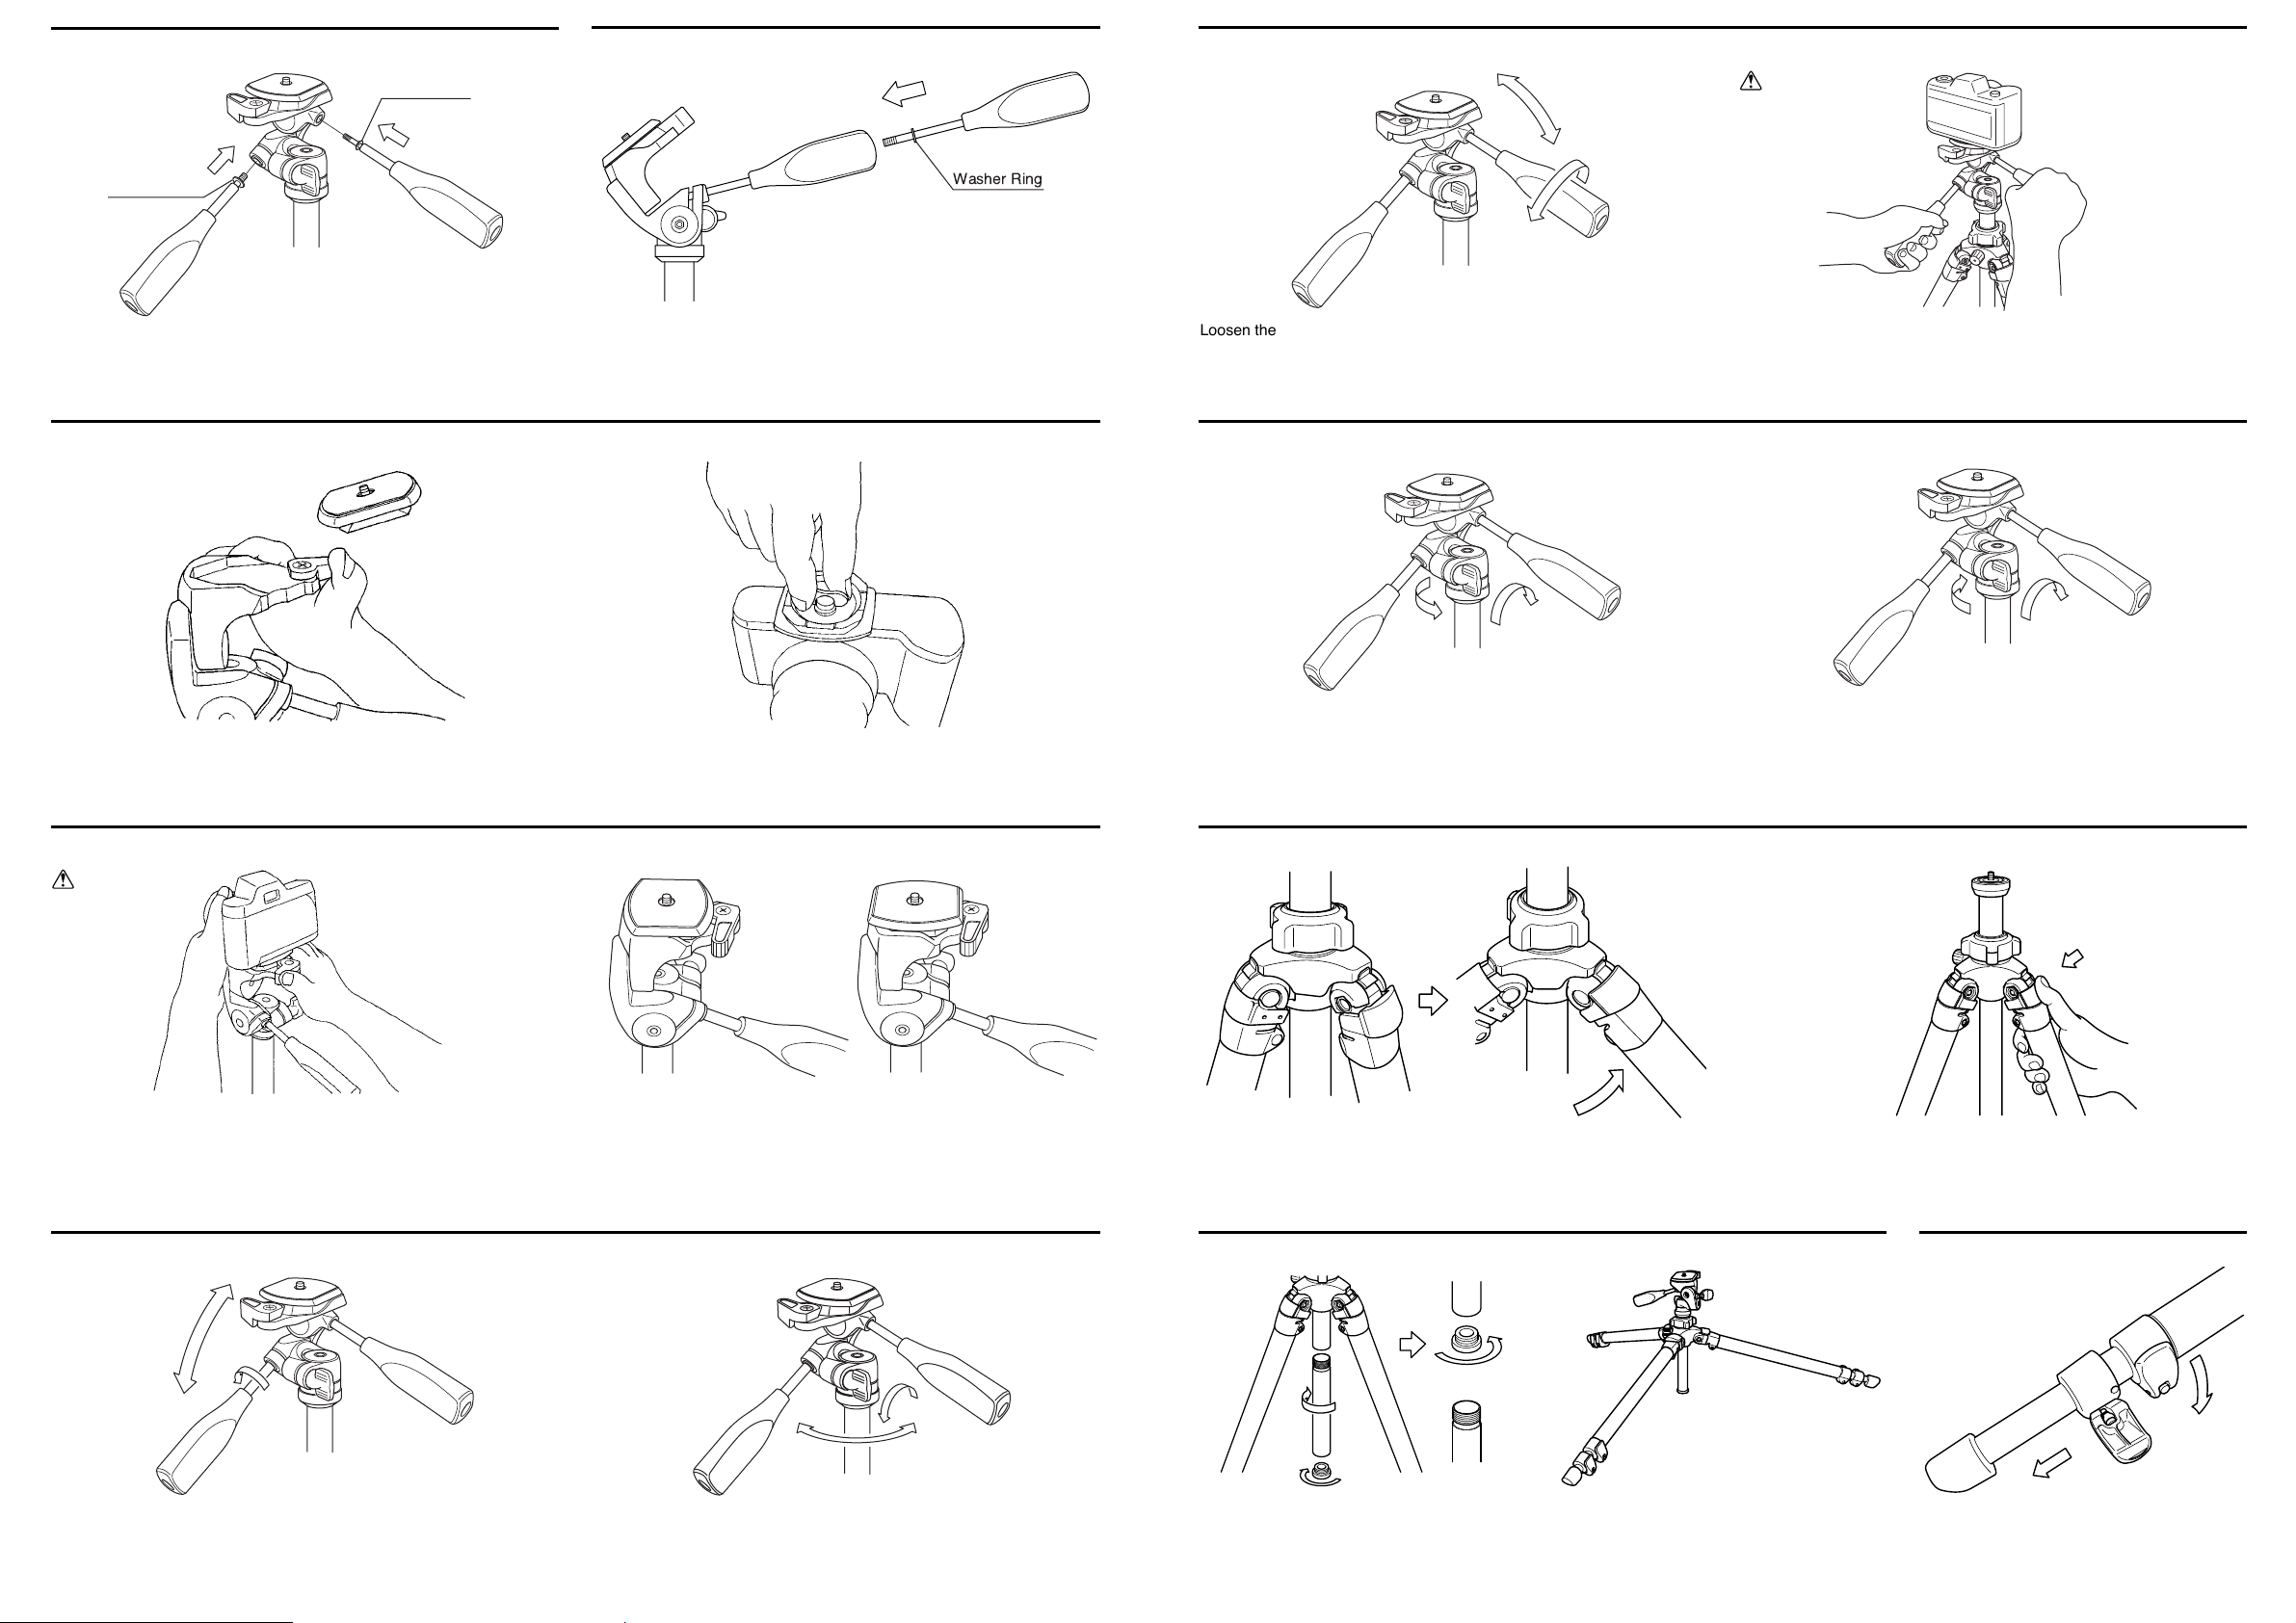
Attach the two Pan Handles to the Pan Head, by inserting the shorter
handle to the left, and the longer handle to the right. Do not reverse.
Install the Handles
To remove the Quick Release Platform from the Pan Head, turn Quick
Release Lock Lever and lift out Platform from its back.
Attaching the camera to the Quick Release Platform
Align the length of the Platform along the base of the camera body, and
securely tighten the Mounting Wing Nut.
When attaching the camera to the Pan Head, check to make sure that the
Quick Release Platform is engaged in the catch of the Pan Head before
locking the lever.
Using the Pan Head
The Quick Release Platform can be attached to the camera body in either
directions (along the length, or along the width).
This feature facilitates your camera set up into the vertical position, simply
by the turn of one of the tilt handles.
Loosen the Pan & Tilt Handle, and the head will tilt back and forth. Loosen the Panning Lock Knob, and the head will rotate along the horizontal
direction.
Caution
Remove the Vertical Tilt Handle from the Pan Head, and screw into the
back of the Pan & Tilt Handle.
Make sure the washer ring on the thread stays on with the handle.
Storage
Loosen the Vertical Tilt Handle, and the level can be adjusted.
Using the Pan Head (Continued)
When loosening either the Pan & Tilt Handle, or the Vertical Tilt Handle, take
precaution by keeping a firm grip on the handle until the Pan Head is locked
down.
Removing the Head from the Center Column
Use the following instructions if you wish to change heads, or attach
accessories.
First, lock the Panning Lock Knob, then grasp the Pan, or Vertical Tilt
Handle and turn the head, counter-clockwise to loosen.
Set the new head, or accessory on the tripod's threaded post, and turn
clockwise until it comes to a stop.
Tighten the Panning Lock Knob and turn clockwise slightly more.
Three Position Adjustable Legs
Open the Leg Lock Lever for extending/folding
of tripod legs.
Lock the lever tightly at your required position.
After choosing the desired leg angle, securely push in the Adjustment
Lock.
Caution
Extending/Folding of Tripod Legs
To change the angle of each leg, close the Leg slightly, and then pull the Leg
Angle Adjustment Lock out.
There is a choice of two other angle positions.
How to get low level shots
Remove the center column Base Stopper and
then, remove the lower part of the center column.
Put the center column Base Stopper on the
upper part of the center column.
Then, you can get lower height.
Washer Ring
Washer Ring
 Loading...