

Page 1

Adjustment of the Pan & Tilt Handle
Components
This product has been designed
to handle equipment weighing
under 3 kgs (6 lbs 10oz). Do not
overload.
Some equipment weighing under
3 kgs (6 lbs 10oz), such as long
lenses, may not balance well due
to its weight distribution. In such
case, please use a larger tripod.
Equipment that can be
used with this Tripod
Carrying the Tripod
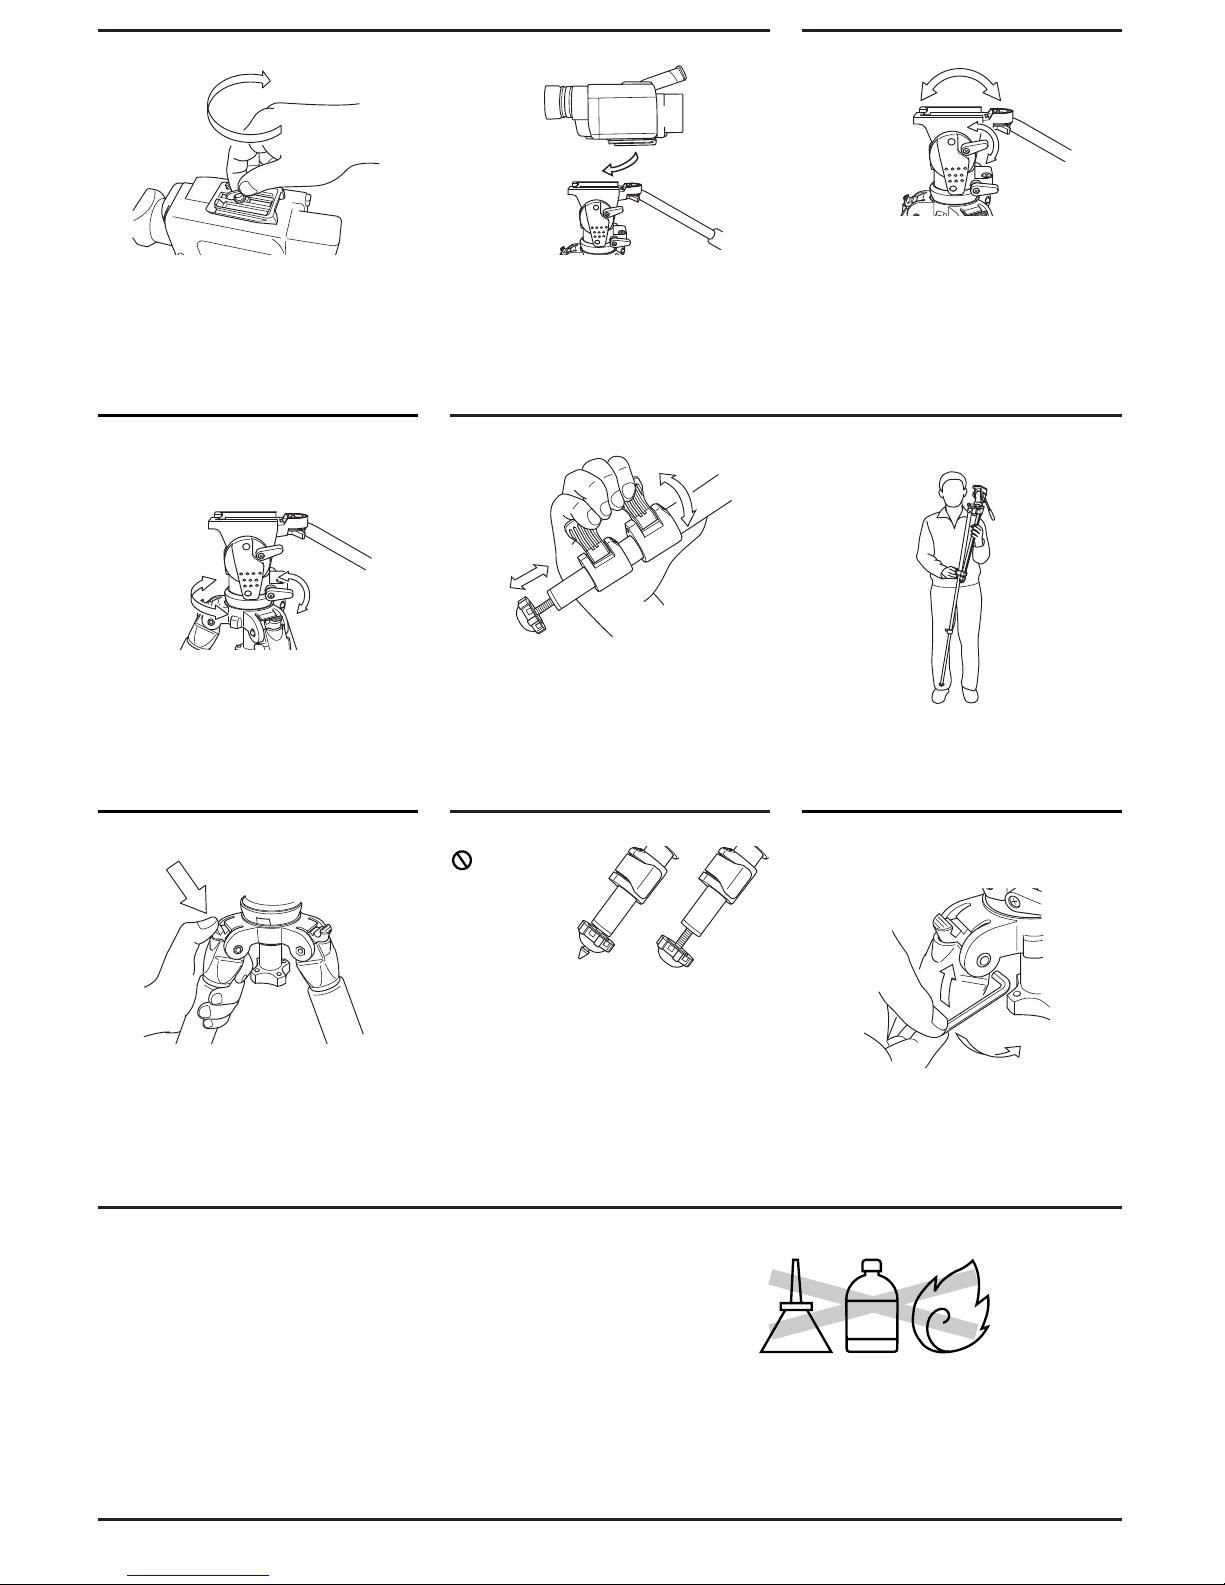
Loosen the Pan Handle Lock Knob first.
Then, adjust the angle as needed and lock it.
Remove the Quick Release Platform turning
the Lock Lever.
(con.
→)
Prohibition
H426
Operating Instructions
Thank you very much for choosing SLIK DST-3 Tripod.
The SLIK Corporation has designed your tripod to be a sturdy,
rugged, dependable product that will provide you with many years of
satisfactory use.
Please take a few moments to read this operating instruction carefully
before use so that you can take full advantage of many fine features on
your tripod.
Retain this operating instruction in case you might want to refer back to it.
Caution
This caution icon refers to information pertaining to important safety
procedures in preventing injuries, or damages which may occur as a
result of mishandling this product.
Prohibition
This prohibited icon refers to information pertaining to prohibited contents. Please refer to instructions closely to avoid accidents.
Specification
Folded Length 755mm
(29 9/12")
Maximum Height 1,510mm
(59 5/12")
Ball Base 60mm
(2 1/3")
Weight 2.85kg
(6lbs 3oz)
Adjust the level before putting the camera on
the pan head.
1) Loosen the Bowl-Locking Knob and adjust
the bubble in the level to fit into the red color
mark, while shaking the pan head.
2) Tighten the Bowl-Locking Knob.
Remarks:
This is just rough aim and recommendable to
test in advance before operating.
(4mm)
Quick Release
Platform
Pan & Tilt Handle
Pan Handle Lock Knob
Leg Lock Lever
2-way Leg Tip
Bowl Leveler
Bowl-Locking Knob
Leg Lock Angle
Adjustment Lock
Belt for Strap
Allen Wrench
Soft Grip
Pan Head
Quick Release
Lock Lever
Panning Lock Knob
Tilting Lock Lever
Built in Level
Camera
Positioning Pin
Camera
Mounting Screw
Quick Release Platform
Mounting Wing Nut
Carrying a tripod with a camera
left on can result in unexpected
accidents. We therefore, recommend you to remove your camera
while carrying the tripod.
Prohibition
How to adjust the level of pan head
Caution
Attaching the camera to the
Quick Release Platform
CE
Caution
Soft Grip is consumption and cannot be used permanently.
Please relace is whenever ragged.
R
DST-3
Page 2
Slik Corporation reserves the right to make changes in design and/or improvements on the products without any obligation and advanced notice.
SLIK CORPORATION
853 Kayama, Hidaka City, Saitama 350-1231 Japan Phone 81-42-989-2141, Fax. 81-42-985-0210 ©2004
OIL
THINNER
Flip up the Leg Lock Lever to extend or shorten
any of the individual leg sections to the desired
length, and press the Leg Lock Lever flush
against the Leg to Lock.
For greater stableness, use the thicker leg
columns first.
Loosen the Tilting Lock Lever, and the head
will tilt back and forth.
Note:
Since the panhead has the structure of a
smooth feeling on operation, it looks sometimes standing. Please be sure to lock a tilting
lock lever when you leave from your tripod.
Attaching the camera to the Quick Release Platform (Continued)
Extending the Tripod Legs
Please set the Camera Mounting Screw and the
Retractable Camera Positioning Pin to holes at
the camera side. Then, fix it with Mounting Wing
Nut tightly.
*You can also use this tripod for your still camera
as the Camera Positioning Pin is retractable.
・DO NOT apply any grease or oil to this product.
・Clean with a mild detergent and a soft cloth only.
・DO NOT use close to flame. Avoid extreme heat.
Using the Pan Head
The front part of the shoe gears with the head.
Please fix to make it slide into a front from the
back of the head.
The leg has structure that is inelastic only turning downward.
2-Way Leg Tips
Spiked tips are useful outdoors especially on
loose grounds or on rocky terrain. Rubber leg
tips are recommended for indoor works.
To use the spikes, turn the rubber tips clockwise sevelal times until they stop.
To get the rubber tips back into position, just
turn them counterclockwise.
It is not recommendable to move with a spike
exposed. Please be sure to change into the
state where the spike was contained.
You can adjust the leg angle in 3 different positions.
To change the angle of each leg, move the leg
slightly towards the center column, and while
pressing down the Leg Angle Adjustment Lock,
pull leg open to the desired position.
Leg Angle Adjustment
PAT.
Loosen the Panning Lock Knob, and the head
will rotate along the horizontal direction.
Care of the Tripod
Prohibition
Please check the existence of slack before
use. When slack is large, please adjust by the
attached Allen wrench.
 Loading...