

Page 1
Caution
Prohibition
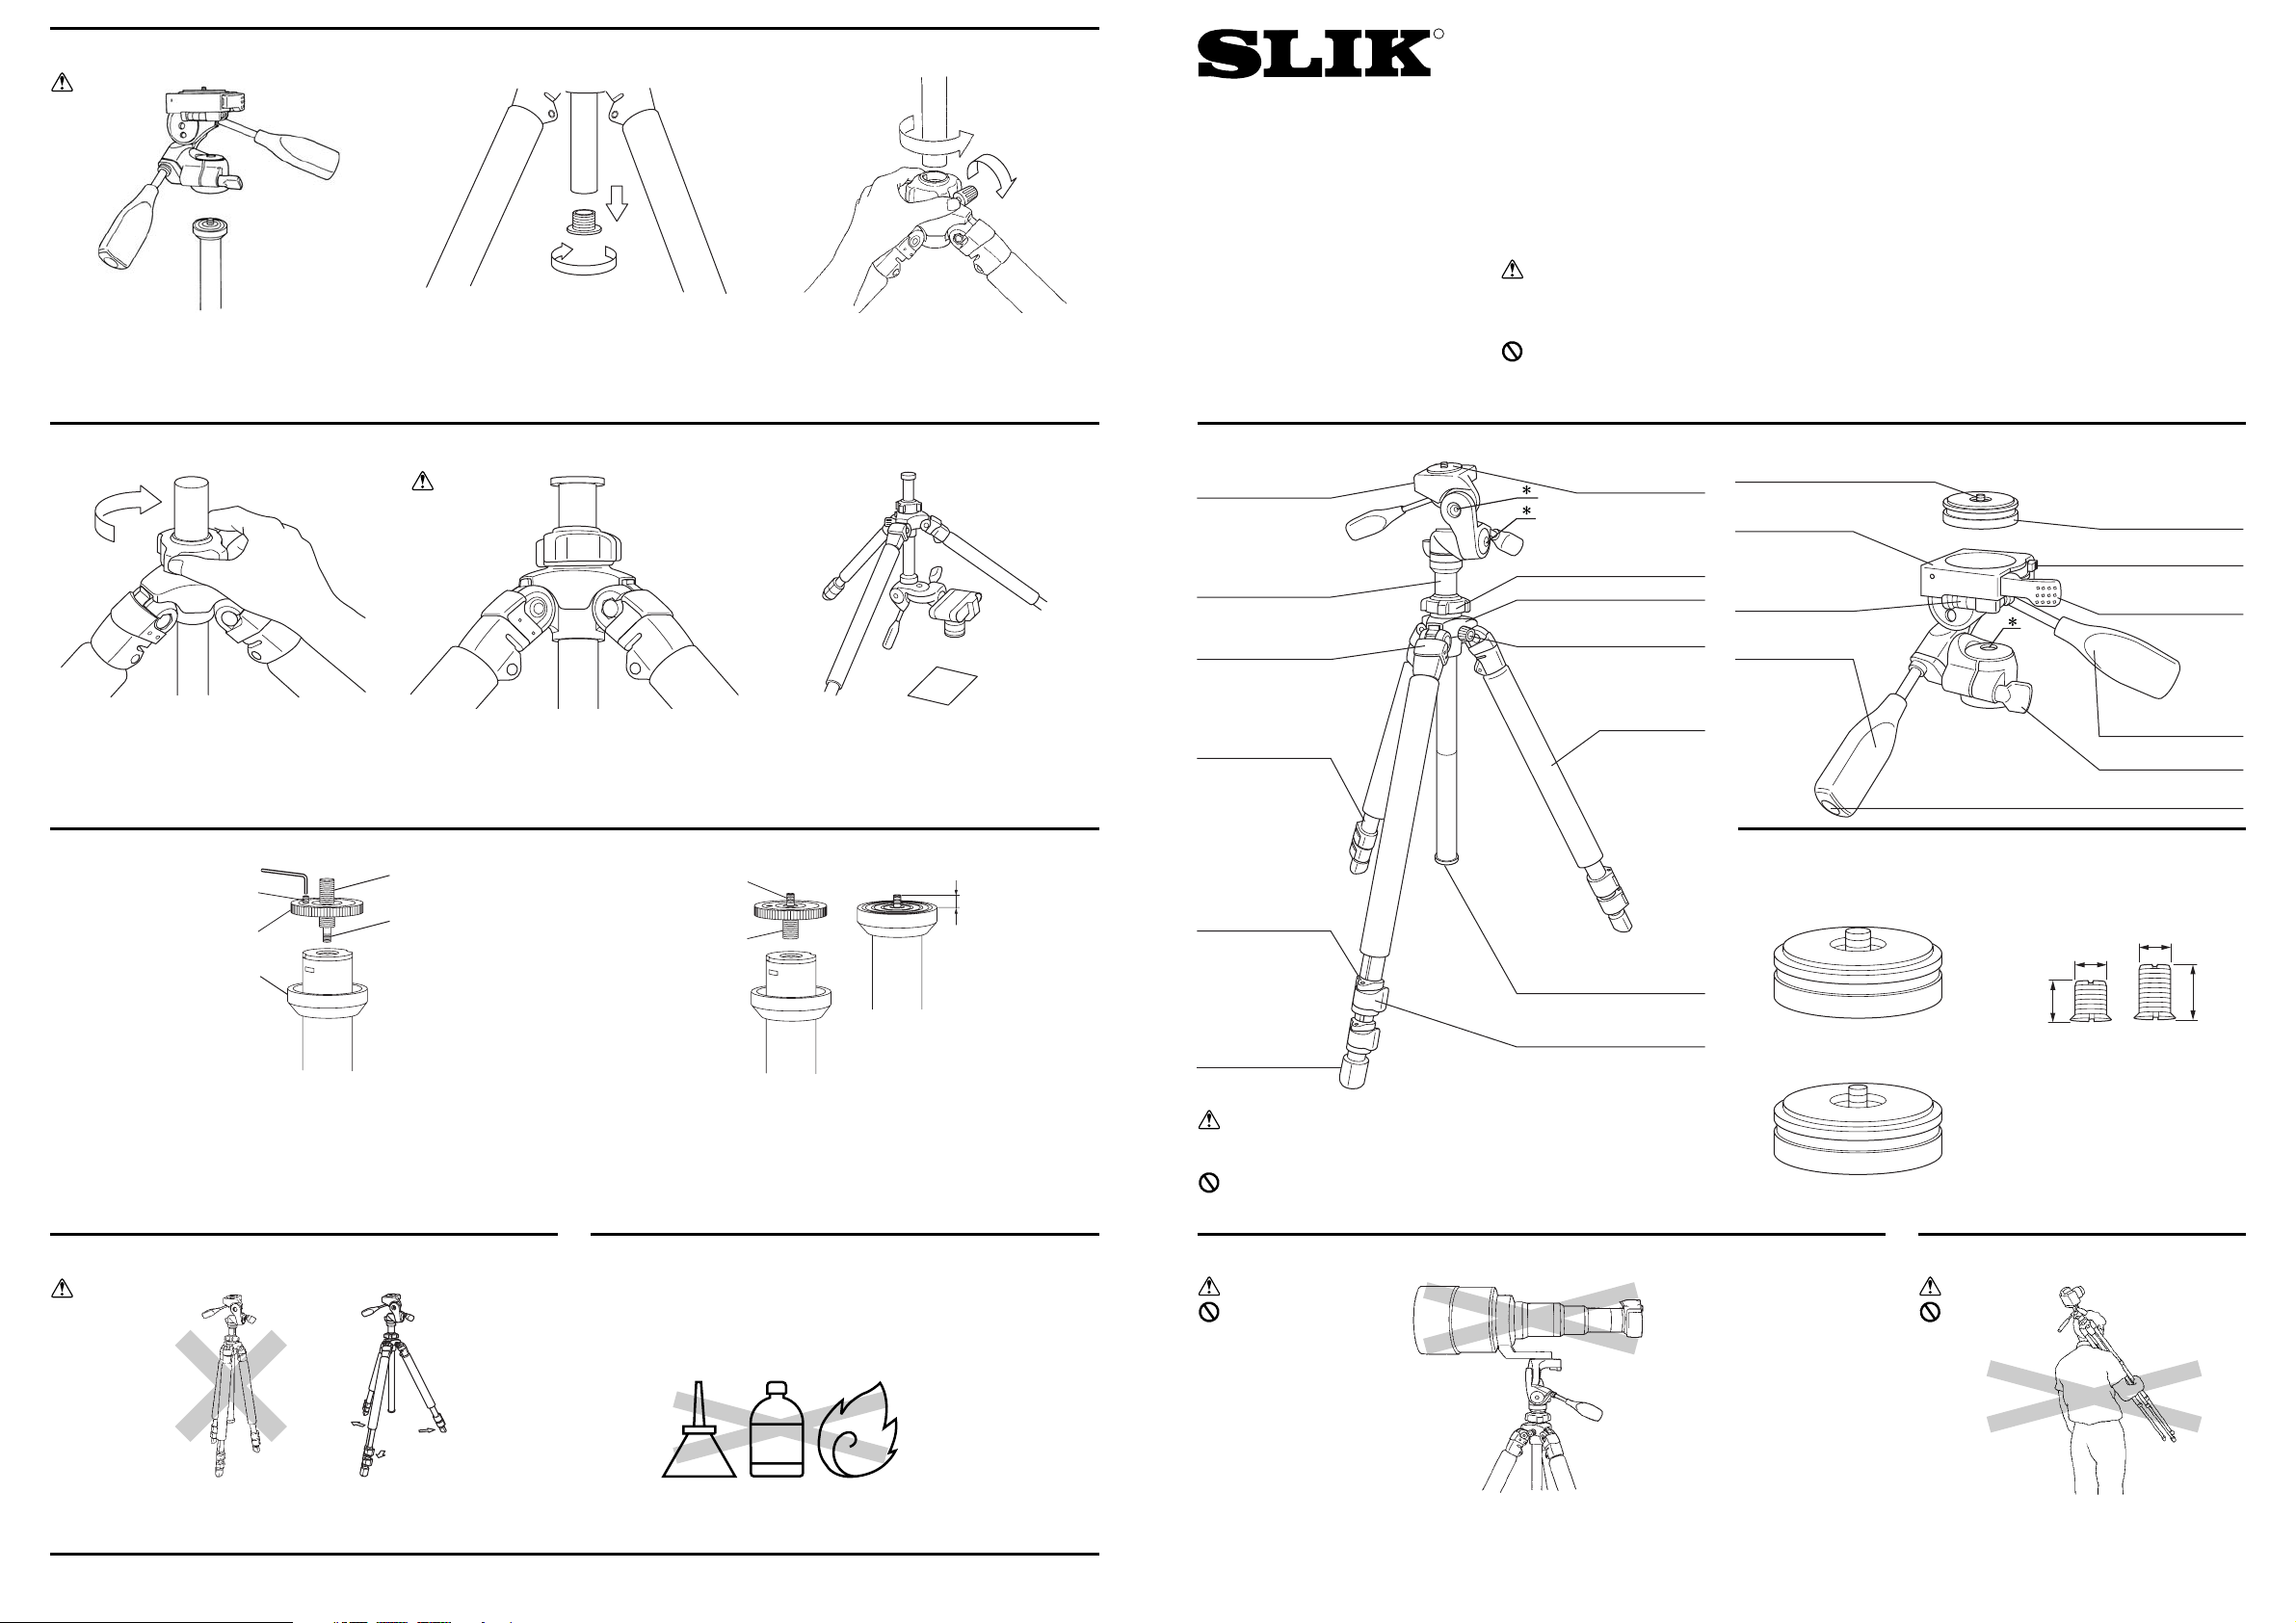
Components Pan Head
Options
This product is designed to withstand equipment up to 5kgs. Please do not use equipment
exceeding this limit.
Equipment that can be used with this Tripod Carrying the Tripod
Equipment with uneven weight distribution
should not be panned by the Quick Shoe.
A loose mounting screw may go unnoticed, and
result in a sudden accidental fall.
Carrying a tripod with a camera left on can
result in unexpected accidents. We therefore,
recommend that you remove your camera
when carrying the tripod.
Caution
Prohibition
G273-1
PRO 700DX Tripod
Operating Instructions
Thank you very much for choosing SLIK PRO 700DX Tripod.
The SLIK Corporation has designed your tripod to be a sturdy,
rugged, dependable product that will provide you with many years of
satisfactory use.
Please take a few moments to read this instruction sheet carefully
before use so that you can take full advantage of your Tripod's many
fine features.
Retain this instruction sheet in case you might want to refer back to it.
Caution
This caution icon refers to information pertaining to important safety
procedures in preventing injuries, or damages which may occur as a
result of mishandling this product.
Prohibition
This prohibited icon refers to information pertaining to prohibited contents. Please refer to instructions closely to avoid accidents.
Specification
Length folded 760mm
(29 11/12")
Max. operating height
1,900mm
(74 5/6")
Max. center column ext.
380mm
(14 11/12")
Weight 3.53kg
(7lbs 13oz)
BALL HEAD 800
QUICK SHOE(U3/8")
Cat. No. 618-340
THREAD ADAPTER SET
Cat. No. 618-331
BALL HEAD 800
QUICK SHOE(U1/4")
Cat. No. 618-335
Caution
Soft Grip is consumption and cannot be used parmanently.
Please relace it whenever ragged.
Prohibition
The bolts of the Pan Head marked “ ” should not be adjusted nor operated.
Loosen the Center Column Stopper and the
Locking Collar, and then pull out the Center
Column.
Inverting the Center Column
Make sure to re-attach the Center Column
Base Stopper, in order to prevent the Center
Column from falling out.
By inverting the Center Column, it is possible to
do copy, and close up work.
Opening the Tripod Legs
Insert the Center Column from the lower side of
Main Body, and tighten the Locking Collar and
the Center Column Stopper.
Caution
Caution
How to change the Pan Head fixing screw
Printed in Thailand.
Care of the Tripod
OIL
THINNER
DO NOT apply any grease or oil to this product.
Clean with a mild detergent and a soft cloth only.
DO NOT use close to flame. Avoid extreme heat.
Always remove the Pan Head when replacing the
Center Column.
Remove the Center Column Base Stopper truning
to the way of arrow.
Caution
Inverting the Center Column(Continued)
The Pan Head fixing screw is reversible for either large thread (U3/8) or
small thread (U1/4).
1. Move the Plate Cover down.
2. Loosen the small screw in about three turnings with an Allen wrench
(2mm width).
3. Loosen the Plate without removing the small screw.
4. Loosen the Pan Head fixing screw and pull it out. Then, screw it in
again after reversing top and bottom.
5. Adjust the height of screw in approx. 8mm above the Plate and then,
tighten the small screw by an Allen wrench.
6. Put the Plate Cover back.
Be sure to open all three legs completely in order to prevent camera
shaker, or accidental tip overs caused by unstableness.
SLIK CORPORATION
853 Kayama, Hidaka City, Saitama 350-1231, Japan Phone 81-42-989-2141, Fax. 81-42-985-0210 ©2007
R
Small
Screw
Plate
Plate Cover
U3/8
U1/4
U1/4
U3/8
8mm
Pan Head
Center Column
3-Position Leg Angle
Adjustment Locks
Leg
Quick Shoe
Center Column
Locking Collar
Main Body
Center Column Stopper
Soft Grip
1/4" Camera Mounting Screw
Camera Platform
Dual Axis Bubble
Levels
Pan & Tilt Handle
Leg Lock
Center Column
Base Stopper
Leg Lock Lever
Rubber Leg Tip
Detach Proof Groove
Release Button
Locking Lever
Vertical Tilt Handle
Panning Lock Knob
Handle Connecting Screw
U3/8
U3/8
8mm
(1/ 3")
11m m
(5/12")
Page 2
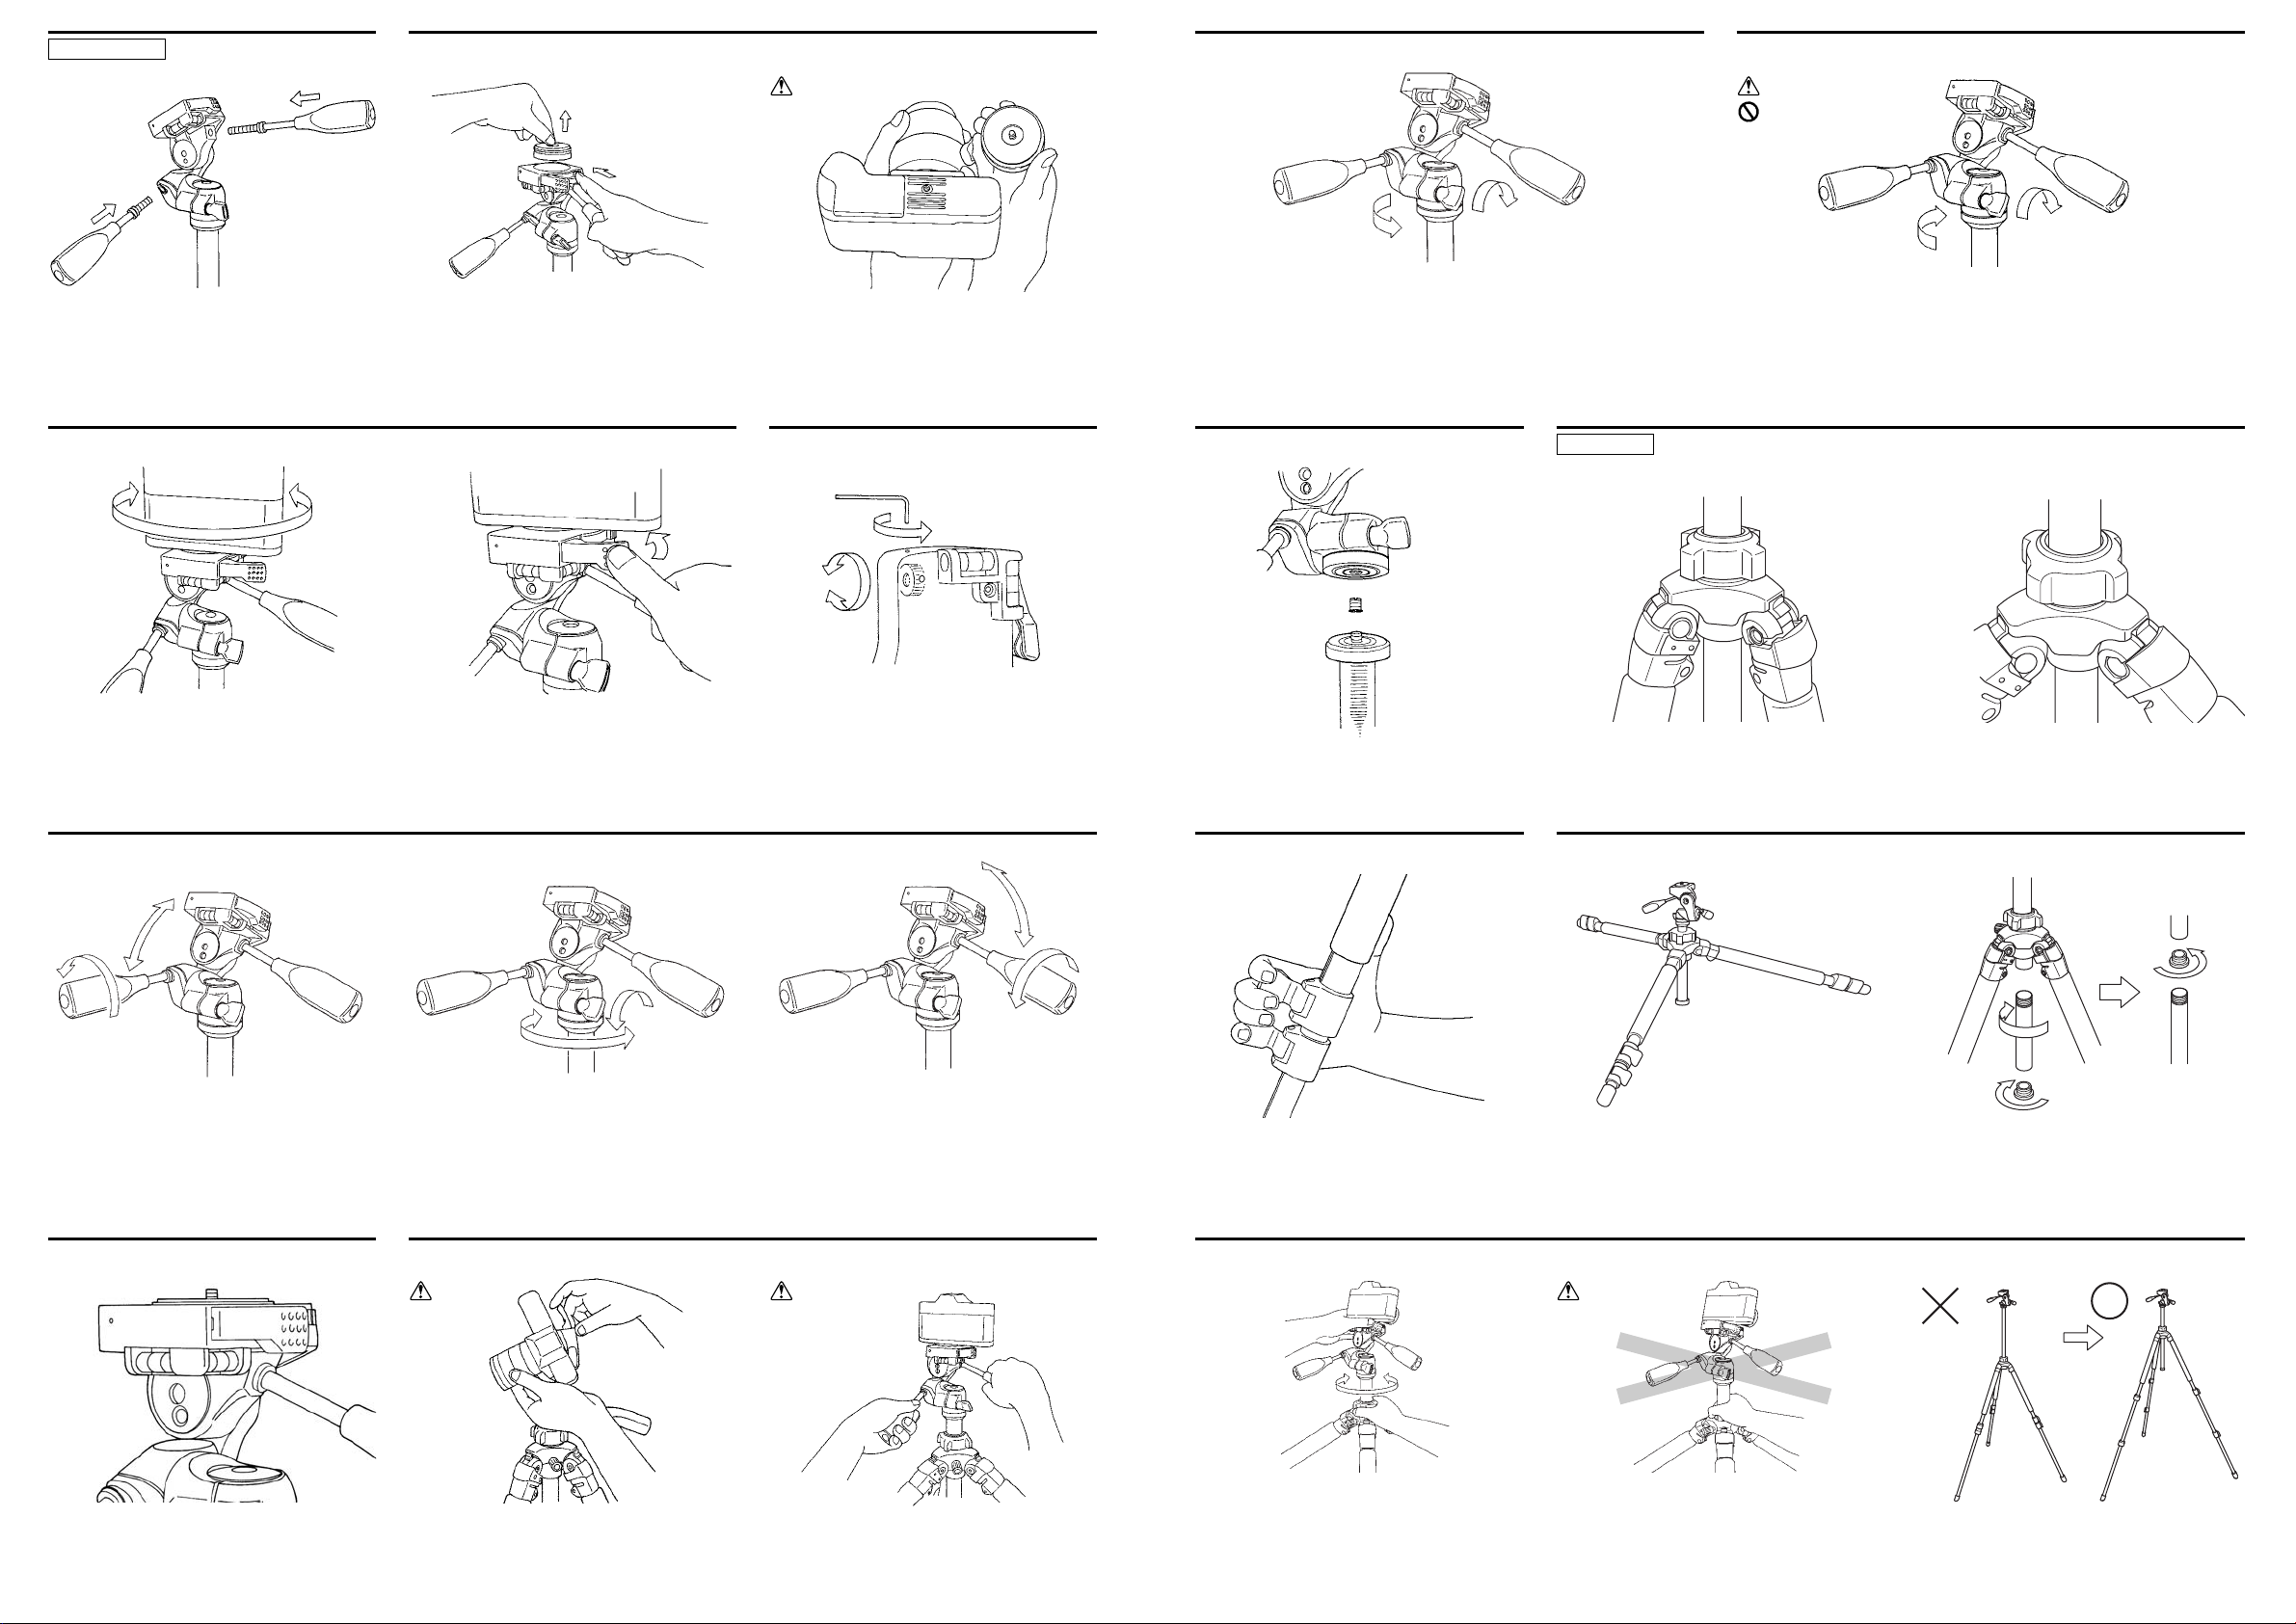
Attach the two Pan Handles to the Pan Head,
by inserting the shorter handle to the left, and
the longer horizontal tilt handle to the right.
Do not reverse.
Install the handles
Remove Quick Shoe by opening the Locking
Lever and then pressing the Release Button.
Screw Quick Shoe on to camera, and insert
back into the Camera Platform.
Please DO Not over tight your Quick Shoe.
Correctly installed you will hear a "click", and
the Quick Shoe will rotate 360°.
Using the Quick Shoe Adjusting the firmness of the
Locking Lever
Fix the Quick Shoe at a desired position by closing
the Locking Lever.
After long use, you may need to re-tighten the
Lever Lock mechanism through the window
located underneath the Pan Head.
First, you will need to loosen the locking pin
with an ordinary allen wrench(1.5 mm).
We advise you not to tamper with this part until
it becomes necessary.
Two bubble levels are built-in for vertical and
horizontal positioning.
Bubble levels Safeguards during operation with a Camera
The camera may fall suddenly when the
Locking Lever is loosened, causing damages
and injuries. Always hold on to the camera during such operation.
When loosening either the Pan & Tilt Handle, or
the Vertical Tilt Handle, take precaution by keeping a firm grip on the handle until the Pan Head is
locked down.
Caution
Using the Pan Head
Loosen the Pan & Tilt Handle, and the head
will tilt back and forth.
Loosen the Panning Lock Knob, and the head will
rotate along the horizontal direction.
Loosen the Vertical Tilt Handle, and the level
can be adjusted.
Caution
Pan Head Section
tighten
loosen
Caution
Attaching the Camera
Please exchange by the following method to attach other heads or accessories to this leg. Fix the Center Column of the legs firmly by both the
Center Column Locking Collar and the Center Column Stopper. Next,
tighten the Panning Lock Knob of the head firmly. The Pan & Tilt Handle
and the Vertical Tilt Handle are grasped and then, turn the head counterclockwise forcibly. The head loosens now.
Removing the Pan Head from the Center Column
Set the new head, or accessory on the tripod's threaded post, and turn
clockwise until it comes to a stop. Tighten the Panning Lock Knob and
turn clockwise slightly more.
Do not attach camera directly to the threaded post of the Center Column.
This can damage both camera and tripod.
When attaching the Pan Head to a tripod with a
small thread(U1/4) use the optional small
thread adapter.
Three Position Adjustable Legs
To change the angle of each leg, close the Leg
slightly, and then pull the Leg Angle Adjustment
Lock out. There is a choice of two other angle
positions.
After choosing the desired leg angle, securely
push in the Adjustment Lock.
To avoid unnecessary camera vibrations, try to
keep the Center Column height to a minimum.
Also use the larger legs first, when extending
the legs.
Extending the Tripod Legs
Flip up the Leg Lock Lever to extend or shorten
any of the individual leg sections to the desired
length, and press the Leg Lock Lever flush
against the Leg to lock.
You can get lower height.
You may injure your hand by a sudden fall, if
you let go of Pan Head before locking the
Collar.
Turn the Locking Collar with your fingers on the
side of the Collar.
How to get low position shots
Caution
Prohibition
Caution
Tripod Section
Using the Center Column
Attaching the Pan Head (Continued)
Hold onto the Pan Head with one hand, and
loosen the Center Column Stopper and the Center
Column Locking Collar with the other hand.
Raise or lower Pan Head to desired height, and
while maintaining a hold of the Pan Head, tighten
the Locking Collar and the Stopper.
Remove the Center Column Base Stopper and
then, remove the Lower part of Center Column.
Put the Center Column Base Stopper on the
Upper part of Center Column.
Attaching the Pan Head
 Loading...