


IMPORTANT: BEFORE BEGINNING, FOR A SMOOTH TROUBLE-FREE INSTALLATION, PLEASE READ THESE
Installed
before? See our
‘Quick Start’
Guide on the
back!
INSTRUCTIONS COMPLETELY UPON OPENING THE MASTER CARTON OF YOUR ORDER/SHIPMENT.
DETAILED PICTORIAL INSTALLATION INSTRUCTIONS
(Models using full extension and full extension soft-close rails)
These install instructions apply to our Standard, High Sides and Box model made-to-fit slide-out shelves. Our standard
slide-outs come fully assembled ready to install. The High Side and Box models require minor assembly (separate
instructions provided). For other Slide-A-Shelf TM specialty organizers/items please follow the installation/assembly
instructions provided with the item.
Tools Needed:
#1 (bit provided for specialty items)
and #2 Phillips tip screw drivers* and
a flashlight (if necessary)
Manual tools
* For an easier installation, we highly recommend using a right angle version
of either the manual ratchet style screwdriver or a battery operated one.
Workspace:
Ideally, if assembly is necessary you
will need a table or work-surface
with 8-10 sq. ft. of clear space
Battery and ratchet style tools
Note:
Magnetic tip screwdrivers or bit holders
are highly recommended.
All other needed hardware is provided
including a custom-cut ‘easy-install’
template provided for each slide-out
width ordered!
In the event you have to manage
around a protruding obstacle like a gas
line or water valve, which can often be
accommodated with a cut-out to the
shelf back, you will need a coping
handsaw, jig saw or reciprocating saw
to make minor cut-outs in the back and/
or sides of your slide-out/organizer.
STEP 1
All products
•
Unpacking Your Slide-outs
Our standard made-to-fit slide-outs ship completely assembled. Once unpacked, installation is
quick and easy by securing the included cabinet rail assemblies to the base inside your cabinet or the
existing full-depth shelf/surface. Only a few simple steps are required to install any Slide-A-Shelf
slide-out organizer/system. Allow 5 to 10 minutes for the first unit you install to get a feel for it. As you
get familiar with the process, subsequent units will take less time...perhaps 3 to 5 minutes each
Please be kind to our environment and recycle your product’s packaging.
First, begin to carefully unpack each item and be sure to only discard the corrugated materials. Do not
mistake the rigid install templates for cardboard! (Products are typically packed 1 to 4 units per carton).
TO PREVENT CONFUSION IF YOUR SHIPMENT COMES IN MULTIPLE CARTONS, WE
RECOMMEND unpacking, then installing each slide-out/level before unpacking the next carton. It is
helpful if you wait to receive the carton labeled “Master Carton,” opening and installing its contents first.
We have provided one easy-to-use installation template for each unique shelf width you have ordered.
Each template is labeled and will be used to set the proper distance the cabinet rails need to be apart
and to keep them parallel and square to the front of the cabinet while they are being secured with the
hardware that is provided. Under normal circumstances, by using the provided template the
installation of your slide-outs will be quick and easy and you should not need any other hand tools. DO
NOT DISCARD ANY OF THE TEMPLATE PANELS until all your slide-outs are installed.
Made-to-fit slide-
•
out shelf
Custom install
•
template
Pictorial installation
•
instructions
Page 1 of 6Rev A. SAS-100-F&S 04/16
Lay everything out on
your work surface!
Shelf rail members
•
(attached to shelf)
Cabinet rail
•
members (adjustable
steel L-brackets
attached)
CABINET RAIL SCREWS
#6 x 5/8” Pan-head
Phillips screws
TM

STEP 2
Standard, high
•
sides and box
model slide-out
shelves
IMPORTANT INFO: You can quickly determine which location each slide-out will be installed in
your cabinets if you typed a location for each during the ordering process. Locate the Line/Loc.#
label on the white underside of each base shelf/level. The line/location number indicated will
correspond to each line # on the Item Location Listing. You should have printed the listing/
summary during Step 4 of the Order Wizard process and maintained for reference. As a back-up
we have included an additional copy in the Master Carton of your shipment.
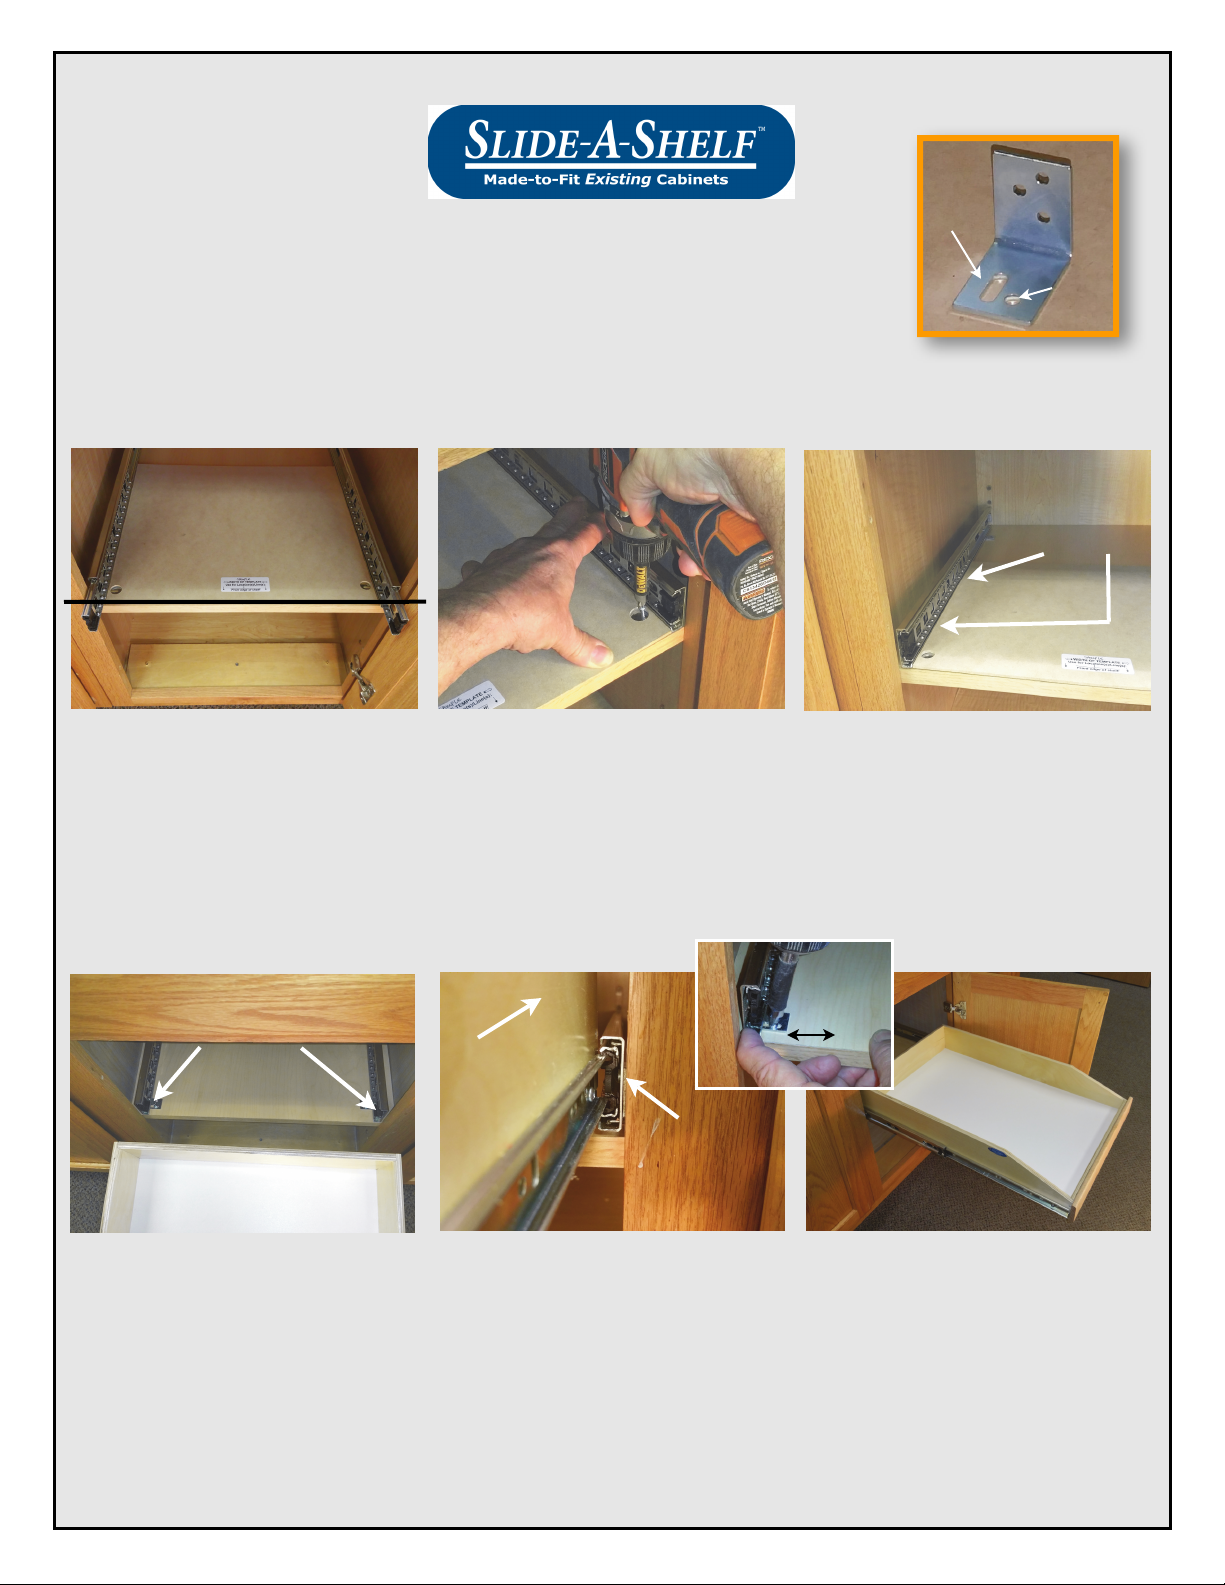
Identifying Cabinet Rails, Shelf/Cabinet Locations and Prepping Cabinets
Your slide-out shelf or slide-out cabinet organizer is now ready to be installed. The first step in the
installation process is to identify where the unit will go by referencing the Line/Loc. # label number on
the bottom of each base shelf assembly and matching it to the same # located on it’s corresponding
install template label. Check your printed order summary/Item Location Listing to determine which
cabinet to install in....as the Line/Loc. # on the labels match the line(s) listed. See note above and
photos below. Of course all the contents of your cabinets must first be removed!
START HERE
FOR
INSTALLING
ALL SLIDE-ASHELF MADETO-FIT
ORGANIZERS
Numbers will match!
TEMPLATE BOARD
BOTTOM
OF SHELF
The # on the label on the
underside of the unit matches
the line/location description you
typed during order placement.
Each unique width slide-out
has a template which can be
used for all slide-outs with the
same width.
This is the order confirmation &
item location listing you should
have printed identifying the
location you want to install your
slide-outs.
ITEM LISTING
RAIL TYPES: Securing the cabinet rail assembly is virtually the same regardless which rail version
comes with the slide-outs you ordered. Simply be aware that if you ordered more than one version,
you will need to match them up correctly. See photos below. These instructions pertain to the full
extension and full extension soft-close rail systems. REMEMBER, if you have varying cabinet depths
you may receive cabinet rails of different lengths. Be sure to match the correct length cabinet rail pairs
to each slide-out before securing in the cabinet.
LEFT rail
RIGHT rail
The rail with
the upside
down “U”
shape
channel is
the right
cabinet rail
FE rail SC rail
For 3/4 extension rails (3/4) the rollers are
the front end of the cabinet rails. Match
cabinet rail length to each unit.
Full-extension (FE) and Soft-close (SC)
full-extension rail systems are silver in
color and look very similar. The SC
version will have a spring/piston assembly
integrated on the inside of the cabinet rail
(w/L-brackets) at the back end.
Install Tip!
If you will be installing your slide-outs on existing adjustable shelving in your
cabinet, i.e. they rests on pegs, pins or clips that can be moved up or down, you
will need to secure these shelves with a simple steel L-bracket and screws.
They are available at your local hardware store or home center. Simply place
two L-brackets 3/4’s of the way toward the back, one screwed to the left cabinet
wall and shelf...the other screwed to the right cabinet wall and shelf. This will
assure your slide-out will not tip forward once extended out of the cabinet. AND
NOW your slide-out shelves are adjustable up and down too!
Page 2 of 6Rev A. SAS-100-F&S 04/16
Soft close
mechanism
INSIDE OF CABINET

STEP 3
All slide-out
•
cabinet
organizers
The process of
setting the cabinet
rail member inside
your cabinet is the
same regardless of
which rail model you
ordered. (The full
extension rails are
pictured here!)
Securing the Right Cabinet Rail (Full extension & Full extension soft-close)
Once you have emptied your cabinets, securing your slide-out organizer is a straightforward process.
The alignment/install template and adjustable L-brackets make the procedure straightforward and
simple. For ease and convenience, as mentioned above, we recommend a battery operated drill-type
screwdriver….preferably one that is a right-angle version…a plain old Phillips screwdriver will be
adequate, but will require a bit more effort!
Place the right and left cabinet rails (the ones with the steel L- brackets attached) inside the cabinet
on the floor/cabinet base or the existing shelf where you want the slide-out organizer. The horizontal
bottom ‘leg’ of the L-brackets face the center of the cabinet. For single door cabinets, justify the rails
to the non-hinge side of the opening to give you as much margin as possible in the event the door
hinges protrude into the opening.
The front end of both rails should be placed flush with the front edge of the shelf surface, which is
typically in-line with but behind the back of cabinet face frame. Be aware, depending on your cabinet
design, the front edge of the existing shelf may not be touching the back of your cabinet frame(s).
Also, if the back of your door sets into the door frame area, set both rails back 3/8” (see far right photo
below).
1/16”
gap
Flush up to the back
of the face frame
...or line up with the
shelf edge
Back of
frame
Set rail
back 3/8”
Leave about a 1/16” gap
between frame and front of rail
Extend inner ball-bearing
carriage to be certain it clears
If your door is a partial or full
frame inset style door...set the
front of the rails back 3/8”
With the rails in place on the left and right of the opening as described above, roughly parallel to each
other, place the template between the two rails on top of the front L-brackets so that the holes in the
front brackets are visible through the holes in the template. Slide the inner ball-bearing tracks forward
to be certain it clears your cabinet opening by at least 1/16” on both rails/sides (see inset photo
above!). Now, focusing on the right rail to start, make sure the right edge of the template is snug
against the base of the rail the full length of the template...as shown below. Keeping the right edge of
the template against the rail, align the front edge of the template with the front of the shelf surface or
front cabinet frame if installing on the base/floor of the cabinet. The front edge of the template should
be perfectly parallel to the front of the shelf/cabinet opening. This will assure the rail is at a 90 degree
angle so that the front of your slide out is aligned to the front of your cabinet properly.
(You can check this by measuring the distance the template edge is from the shelf edge on the right
and left. These measurements should be the same.) See photos below for reference.
Check the door to verify it will close all the way and have the appropriate number of #6 x 5/8” panhead
screws and your #2 tip Phillips screwdriver ready.
Keep the front edge of the
template lined-up with or perfectly
Template placed
between rails over
front L-brackets
Cabinet base level
parallel to the front of mounting
surface (the existing shelf in the
cabinet)
Template edge is against
the rail the entire length
(both rails)
90°
angle
LEFT side RIGHT side
Measurement
should be the
same
Measure from shelf edge to the
edge of the template...both sides
Rev A. SAS-100-F&S 04/16
Page 3 of 6
Template performs as a
carpenter’s square...rails
should be 90 degrees to
front of cabinet

STEP 3
(continued)
All slide-out
•
cabinet
organizers
Holding the template in place, making certain the right rail is against the right edge of the template,
use your #2 Phillips screwdriver, ideally one with a magnetic tip, and drive a #6 x 5/8” panhead screw
into the small ROUND hole in the front right L-bracket...do not use the oval hole here!
IMPORTANT: For proper rail alignment ALL screws must be driven into the center of the hole on each
bracket. (See the photos below for additional detail.)
Continue to hold the template down and reach back with your driver and another screw set on its tip
and drive the screw into the small round hole in the L-bracket at the back end of the right rail. BE
CERTAIN THAT THE RAILS DO NOT MOVE off of the 90 degree square position.
STEP 4
All slide-out
•
cabinet
organizers
☼ Using a lit
flashlight in a dark
cabinet will make
installation easier!
Drive each screw into to center of
the round L-bracket hole
IMPORTANT INFO: It is not necessary to slide the template backwards prior to securing the rear
L-bracket on the right rail. Simply make certain the rail is held in place against the template.
If you are using manual screw drivers you will want to pre-punch a
starter hole for the tip of the screw to set down into. You can use a
nail punch to do this or even a medium sized nail. Doing so will
make starting the screw easier and more accurate!
KEEP RAIL AGAINST THE
RIGHT EDGE OF TEMPLATE
Also keep front edge of template
parallel to the front of the cabinet
Install Tip!
Reach in and drive the screw into
the round hole of back right Lbracket
Securing the Left Cabinet Rail (Full extension & Full extension soft-close)
Using the adjustable oval holes!
With the template still held in place, and similar to the right cabinet rail, be certain that the bottom
edge of the left cabinet rail is up against the left edge of the template the entire length. This should
result in the left and right rails being in perfect parallel alignment and ready receive the slide-out shelf
or organizer once secured into place.
As pictured below on the left, drive a screw into the middle of the oval hole in the left front L-bracket.
By driving a screw into the middle of the oval hole, you will have the opportunity if necessary to make
slight alignment adjustments to the rail position very easily. Occasionally once you insert the slide-out
shelf/organizer it may be too tight or too loose requiring you to loosen the front and/or the rear left
screws and shifting the rail to a wider or narrower position. Typically a very slight adjustment is all that
is necessary. As you did with the right rail, now reach back to the rear L-bracket on the left rail and
secure a screw down through the middle of the oval hole.
KEEP RAIL AGAINST THE
LEFT EDGE OF TEMPLATE
Hold rail against
LEFT RAIL
Template
IMPORTANT INFO: Slide the template forward, up and out from between the rails. Be sure to save
it for any other slide-out shelf/organizer with the same width.
Page 4 of 6Rev A. SAS-100-F&S 04/16
RIGHT RAIL
template edge

STEP 5
All slide-out
•
cabinet
organizers
Inserting Your Slide-out Shelf (pictured) or Organizer (not pictured)
Once the rails are secure inside your cabinet, be sure to slide the inner rail assembly back into the
cabinet rail housing...BUT with your finger tip, pull the inner ball-bearing carriage all the way forward
until it touches the plastic track clip/insert at the front of the cabinet rail. This will make engaging the
rails attached to the slide-out much easier. (See photo on left below.)
Now take the slide-out shelf/organizer and aligning the right and left sides to the cabinet rails in the
opening place the back end of the silver shelf rail into the black or gray plastic track clips at the very
front of the inner rail carriage. Note the upper and lower grooves in the clips and align the shelf rails
into those grooves. Keeping the slide-out centered and parallel to the floor, gently engage the back
ends of the steel shelf rails and push the slide-out into the cabinet slowly. You will feel some
resistance as the rail channels engage the ball-bearing carriages on both sides. Push FIRMLY all the
way, but do not excessively force the slide-out if it stops abruptly. Once the slide-out unit is all the
way in, move it in and out several times to help the three different sections to engage with each other.
Slide ball-bearing
carriage forward
Align with left and right
cabinet rail
2. Push shelf
into cabinet
firmly
Although optional,
this extra screw
prevents rails from
moving over time
Back of slide-out
shelf
1. Engage the
back end of the
shelf rails into
the cabinet rails
Once you complete this step, and are happy with the in and out glide motion, (see Install Tip below)
you should extend the unit out to have access to the left L-brackets. In the front and rear add an
additional screw in the round hole adjacent to the oval hole of both L-brackets. This will assure that
the cabinet rails will not shift out of position over time with usage.
Also see the Troubleshooting flyer included in the Master Carton for other tips and to adjust the rails.
Now, you’re “up and running”…OR as we like to
say, “smoothly sliding”!
CONGRATULATIONS! It’s quick and easy and
Voila!
you save a money installing made-to-fit slideout cabinet organizers yourself. Follow these
same steps for each made-to-fit Slide-A-Shelf
cabinet organizer you have purchased and
ENJOY!
TM
Final Install Tip!
Once the cabinet rails are secured, if you determine your slide-out shelf or organizer is too tight (or even to loose), you
can make rail adjustments by simply removing the slide-out unit and slightly loosening the screws that are in the oval
holes of the left steel L-brackets. Shift the rail to the right or left and re-tighten. Re-install your slide-out, test and repeat
if necessary. See the photo below for an up close look at further securing these brackets with two additional screws
placed in the round holes if desired.
Loosen these screws to
make make rail
Loosen screw
in oval hole to
adjust rail
Rev A. SAS-100-F&S 04/16
adjustments if necessary.
Don’t forget to re-tighten.
NOTE: With weight on the
slide-out and over time
with usage, the glide
motion will smooth out.
Extending and retracting
the slide-out will be easy
and convenient!
Page 5 of 6
Cosmetic
Front
Side
Assembly
Front
FINAL NOTE: During
our manufacturing
process we have
allowed for a tolerance
at the front of each
slide-out shelf where the
sides attach to the front.
If present a slight gap
here is normal.
NEW!
Adjustable rail bracket
Oval hole
OPTIONAL QUICK START
INSTALLATION PAGE
After reviewing page one and completing Step 1 -
If you have previously installed a Slide-A-Shelf TM made-to-fit slide-out organizer...or are familiar with the
concept/process, feel free to reference this Quick Start page to install your slide-out(s).
Round
hole
Template placed
between rails over
front L-brackets
Cabinet base level
In the target cabinet opening lay the left
•
and right cabinet rails into place parallel
with each other, overlay the template
between the rails aligning the front Lbrackets with the template’s corner
access holes.
Align with left and
right cabinet rail
Hold rail against
template edge
square to the front
Position the rails between the template
•
to be parallel and square to the front of
the shelf/cabinet, making certain both
inner rail extenders clear the opening by
sliding them out and back in. Using the
#6 x 5/8” pan head screws provided
drive a screw thru the small round hole
in both the front and rear L-brackets of
the right rail. Do not use the oval holes.
2. Push shelf
into cabinet
firmly
KEEP RAIL AGAINST THE
LEFT EDGE OF TEMPLATE
Holding the template in place with both
•
rails up against the left and right edges
of the template, as you did on the right
side/rail, drive a pan head screw into
the center of the oval holes in both the
front and rear L-brackets of the left rail.
Remove the template.
Loosen
screw in oval
hole to
adjust rail
Voila!
1. Engage the
Back of slide-out shelf
For both rails, slide the INNER ball
•
bearing carriage all the way forward to
the stop, then insert the slide-out shelf
or organizer into the cabinet rails as
shown and test the in and out glide
motion to be sure it is smooth, not too
tight and not too loose.
The end of the shelf rails are placed into
•
the plastic guide clip of their
corresponding cabinet rail. If the shelf
seems to tight or loose, loosen the screws
in the oval holes of the left rail L-brackets
and nudge the rail to the right or left as
needed and re-tighten. Re-test the motion
and repeat to your satisfaction.
back end of the
shelf rails into
the cabinet rails
When you are satisfied that the rail
•
alignment results in smooth sliding
action, remove the slide-out/organizer
and drive a screw into the round hole
of each L-bracket on the left rail. This
will lock the rails into position.
CONGRATULATIONS! Your slide-out installation is complete. We are confident you will enjoy your
made-to-fit Slide-A-Shelf
Rev A. SAS-100-F&S 04/16
TM
for years to come. Comments? Questions? Call toll-free 800-507-0522.
Page 6 of 6
 Loading...