

Page 1
SMARTWATCH
Quick Start Guide
Please read this manual before use.
SW300
Visit us at
www.slideusa.com
or contact us at
Page 2
• Please charge the watch for at
least two hours prior to its rst
use.
• If prompted for a password,
enter “1122.” This is the default
password. You can change the
password under Settings, in the
Security Settings menu.
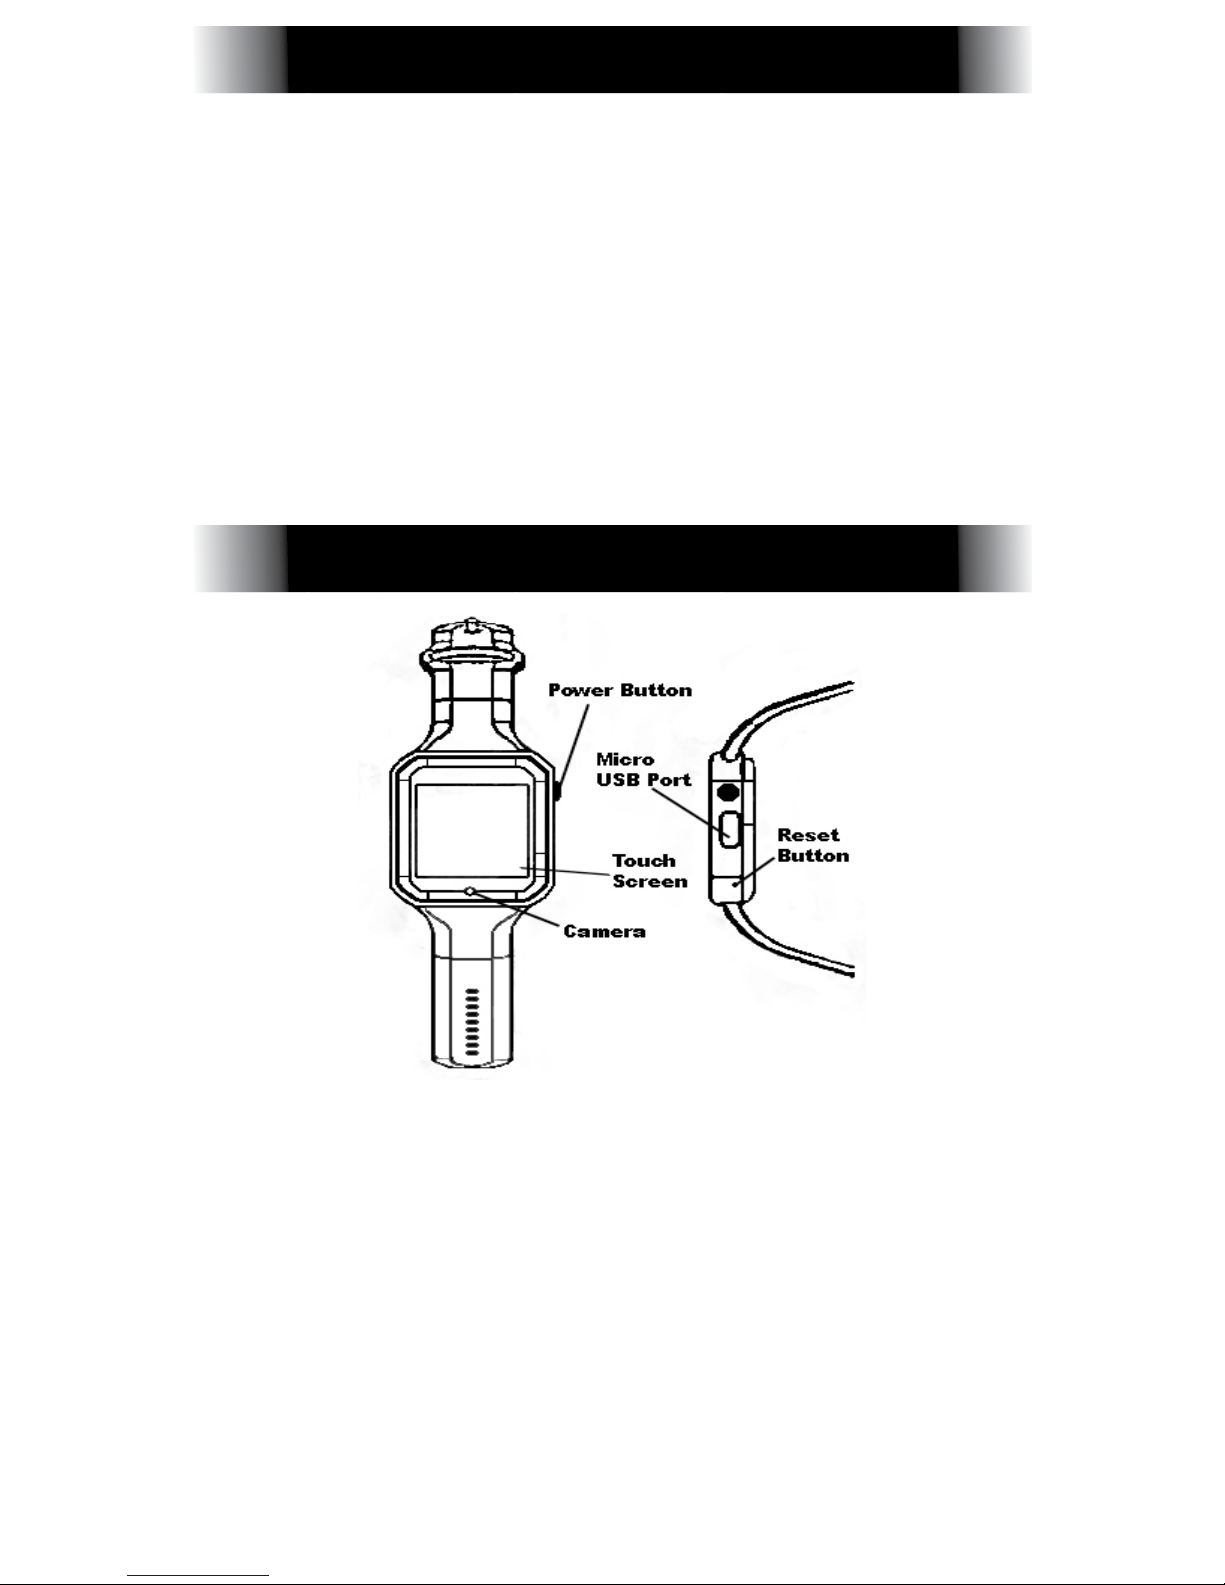
Power Button: Power the watch
On/Off, turn the screen On/Off, or
return to the Main Menu.
Micro USB Port: Charge or transfer
data to/from the device.
Touch Screen: Available functions will
be shown on the touch screen, and
can be controlled by simply touching
them and following the instructions.
SAFETY WARNING
PRODUCT DETAILS
Page 3

• Slide the screen to the left to
change to the next page.
• Slide the screen to the right to
return to the previous page.
• Swipe from the top of the screen
to the bottom to bring up the
Settings menu.
• Swipe from the bottom of the
screen to the top to bring up the
available applications.
To change the clock face, touch
the center of the screen when
the clock is active. You can cycle
through the different styles of clock
face. The watch will automatically
save the most recently selected
clock face.
FOR ANDROID PHONES:
Scan the QR code to
the right to download
the app and sync your
phone. Always update
the Sync software
as updates become
available.
QUICK CONTROLS
CLOCK DESIGN
USING YOUR SMARTWATCH
Page 4

FOR IOS PHONES: Turn on Bluetooth
®
on both the watch and the phone.
Then, from the watch, go to the
Bluetooth® option in the menu and
touch “Search for New Device.”
Locate your phone, and connect
the two. Make sure to allow the
Phone Book to be shared, as that
will help with displaying incoming
notications.
You can also connect by searching
for the watch on your phone’s Bluetooth® screen. Follow the same steps
as above.
These functions can be found in
the Main Menu:
• Messaging: Sync with your phone to
receive messages.
• Bluetooth
®
• Call Logs
• Dialer
• Phone Book
• Remote Notier: Incoming notications or
SMS messages from the connected phone
receive alerts on the watch.
• Remote Camera: Control the phone camera with your watch.
• Anti-Lost: Locate your phone using your
watch, and vice versa.
• Settings
• Pedometer
• Sleep Monitoring: Show your sleep quality,
BASIC FUNCTIONS
Page 5

based on sleep time.
• Sedentary Reminder: Set a reminder to
get up and exercise, preventing you from
staying stationary for too long.
• Quick Response: Provides the QR code
to download the Sync Software on your
phone.
• Alarm
• Calendar
• File Manager
• Audio Player: Play music loaded onto the
watch, or on your phone.
• Camera
• Calculator
• Audio Player
• Image Viewer
• Sound Recorder
• Browser: Requires a SIM Card.
SIM CARD AND MEMORY
The watch accepts SIM Cards for
wireless usage and MicroSD Cards
as an internal memory source. To
install both, remove the back case
off of the watch, and remove the
battery. You will see a sliding metal
xture for the SIM Card. Slide it to
Open and insert the SIM Card.
Next to the SIM Card slot is a place
for the MicroSD Card. Make sure
both are secure before inserting
the battery and back case.
Page 6

• It usually takes about 1-2 hours
to achieve a full charge.
• Use the included cable and
charger to charge the watch.
You can use your Android accessories with the watch.
• Bluetooth® will disconnect when
the phone is too far from the
watch. Reconnect with the
watch if Bluetooth® becomes
disconnected for any reason.
When reconnecting, agree to
the Phone Book sync to receive
notications properly on your
watch.
Unable to Turn the Watch On
• The power button may not be held
for long enough. Press and hold the
power button for at least 3 seconds.
• The watch may have low power.
Charge the watch fully, then attempt
to turn the watch on.
Watch Shuts Down Automatically
• The watch may have low power.
Charge the watch fully.
NOTES
TROUBLESHOOTING
Page 7

Usage Time is Short
• The battery may not be adequately
charged. Charge the watch fully.
• When using a SIM Card, the power
may run out quickly if the signal is
poor. Move to a location with better
signal.
Unable to Charge
• Check that the charger is working,
and try using another Micro USB
Cable for charging.
• Check that the connection in the
Micro USB Port is good.
Wrong Caller Name on Watch
• The Phone Book may not have
synced when the watch initially
connected to the phone. Disconnect, then reconnect the phone and
watch, and select Sync Phone Book
when prompted.
Poor Voice Quality on Phone Calls
• The watch and phone may be
too far apart. Move them closer
together.
• The signal may be bad for the
phone. Try to move to a location with
better phone signal.
Page 8
WARRANTY CARD
Customer Information
Model
Selling Company
(signature)
Customer
Name
Phone Number
Sales Phone
Number
Purchase Date
Product IMEI
Code
Customer
Address
Sale Address
SUMMARY
DATE
SYMPTOMS
SERVICING
NOTES
Page 9
RELOJ INTELIGENTE
Guía de Inicio Rápido
Por favor lea este manual
antes de su uso.
SW300
Visitanos en
www.slideusa.com
o póngase en contacto con nosotros en
Page 10
• Por favor, cargue el reloj durante al
menos dos horas antes de su primer
uso.
• Si se le solicita una contraseña,
introduzca “1122”. Esta es la contraseña estándar. Puede cambiar
la contraseña bajo Conguración,
en el menú de Conguración de
seguridad.
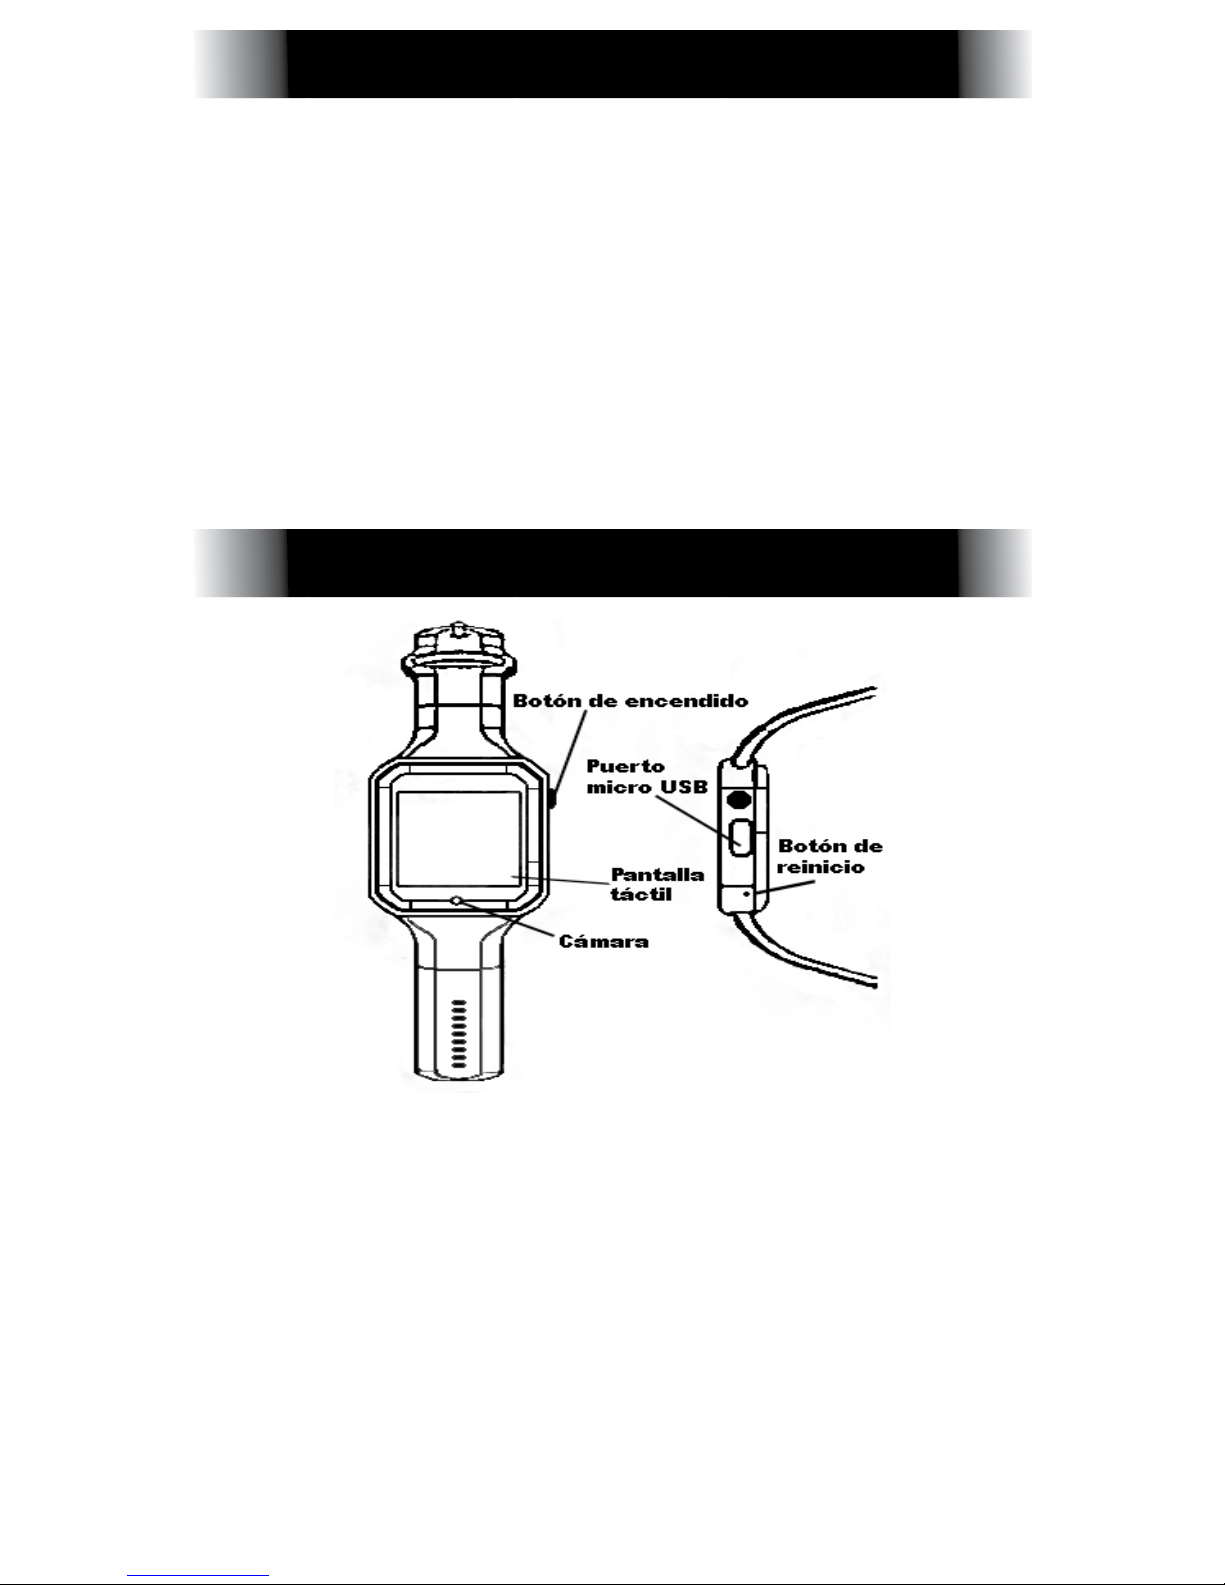
Botón de encendido: Enciende y apaga
el reloj , enciende y apaga la pantalla,
o vuelve al menú principal.
Puerto micro USB: Carga o transere
datos hacia / desde el dispositivo.
Pantalla táctil: Las funciones disponibles
se mostrarán en la pantalla táctil, y se
pueden controlar simplemente tocándolos y siguiendo las instrucciones.
ADVERTENCIA DE SEGURIDAD
DETALLES DEL PRODUCTO
Page 11

• Deslizar la pantalla hacia la izquierda
para cambiar a la página siguiente.
• Desliza la pantalla hacia la derecha
para volver a la página anterior.
• Desliza el dedo de la parte superior
de la pantalla a la parte inferior para
que aparezca el menú de Conguración.
• Desliza el dedo de la parte inferior
de la pantalla a la parte superior
para mostrar las aplicaciones disponibles.
Para cambiar la esfera del reloj, toque
el centro de la pantalla cuando el reloj
está activo. Puede desplazarse por los
diferentes estilos de la cara del reloj.
El reloj guardará automáticamente
la esfera del reloj seleccionado más
recientemente.
PARA LOS TELÉFONOS ANDROID: Escanee el código
QR a la derecha para
descargar la aplicación y
sincronizar su teléfono. Siempre actualice el software de
sincronización cuando las
actualizaciones se hagan
disponibles.
CONTROLES RAPIDOS
DISEÑO DEL RELOJ
USO DEL RELOJ SMARTWATCH
Page 12

PARA LOS TELÉFONOS IOS: Encienda
Bluetooth® en ambos el reloj y el teléfono.
Luego, desde el reloj, vaya a la opción
Bluetooth® en el menú y toque “Buscar
nuevo dispositivo”. Localice el teléfono,
y conecte los dos. Asegúrese de dejar la
guía telefónica para ser compartida, ya
que esto ayudará con la visualización de
las noticaciones entrantes.
También se puede conectar al buscar
el reloj en la pantalla Bluetooth de su
teléfono. Siga los mismos pasos mencionados arriba.
Estas funciones se pueden encontrar en el Menú Principal:
• Mensajería: Sincronización con el teléfono
para recibir mensajes.
• Bluetooth
®
• Registros de llamadas
• Marcador
• Directorio Telefónico
• Noticador a distancia: Noticaciones en-
trantes o mensajes SMS desde el teléfono
conectado recibir alertas en el reloj.
• Cámara Remota: Control de la cámara del
teléfono con su reloj.
• Anti-Perdida: Localizar el teléfono con su
reloj, y viceversa.
• Conguración
• Podómetro
• Monitoreo del sueño: Muestra su calidad
del sueño, basado en el tiempo de sueño.
FUNCIONES BÁSICAS
Page 13

• Recordatorio sedentario: Establece un
recordatorio para levantarse y hacer ejer-
cicio, que le impide permanecer inmóvil
durante mucho tiempo.
• Respuesta rápida: Proporciona el código
QR para descargar el software de sincroni-
zación en su teléfono.
• Alarma
• Calendario
• Administrador de Archivos
• Reproductor de Audio: Reproducción
de música cargado en el reloj, o en el
teléfono.
• Cámara
• Calculadora
• Reproductor de audio
• Visor de Imágenes
• Grabadora de Sonido
• Navegador: Requiere una tarjeta SIM.
TARJETA SIM Y MEMORIA
El reloj acepta tarjetas SIM para su uso
inalámbrico y tarjetas MicroSD como
fuente de memoria interna. Para instalar
ambas, quite la chapa trasera del reloj
y retire la batería. Verá un accesorio
deslizante de metal para la tarjeta SIM.
Deslícelo para abrir e insertar la tarjeta
SIM. Al lado de la ranura de tarjeta SIM
es un lugar para la tarjeta MicroSD.
Asegúrese de que ambos estén jas
antes de insertar la batería y la chapa
posterior.
Page 14

• Por lo general toma alrededor de
1-2 horas para realizar una carga
completa.
• Utilice el cable incluido y el cargador
para cargar su reloj. Puede utilizar sus
accesorios Android con el reloj.
• Bluetooth® se desconectará cuando
el teléfono está demasiado lejos
del reloj. Vuelva a conectar con el
reloj si Bluetooth® se desconecta por
cualquier razón. Al volver a conectar, acepte la sincronización de Guía
Telefónica para recibir las notica-
ciones correctamente en su reloj.
No Se Puede Encender El Reloj
E l botón de encendido no se ha pulsado durante el tiempo suciente. Pulse y
mantenga pulsado el botón de encen-
dido durante al menos 3 segundos.
• El reloj puede tener baja carga.
Cargue el reloj completamente, a
continuación, intente encender el
reloj.
Reloj Se Desconecta Automáticamente
• El reloj puede tener baja carga.
Cargue el reloj completamente.
Tiempo De Uso Es Corto
• La batería puede no estar cargada
NOTAS
SOLUCIÓN DE PROBLEMAS
Page 15

de forma correcta. Cargar el reloj
completamente.
• Cuando se utiliza una tarjeta SIM, la
carga puede agotarse rápidamente
si la señal es pobre. Vaya a un lugar
con mejor señal.
No Puede Cargar
• Compruebe que el cargador está
funcionando, e intente utilizar otro
cable micro USB para la carga.
• Compruebe que la conexión en el
puerto Micro USB es buena.
Nombre Del Llamante Incorrecto
• El libro de teléfono puede no
haber sincronizado cuando el reloj
inicialmente conectado al teléfono.
Desconectar, a continuación, vuelva
a conectar el teléfono y el reloj, y se-
leccione Sincronizar guía telefónica
cuando se le solicite.
Mala Calidad De Voz En Llamadas Telefónicas
• El reloj y el teléfono pueden estar
demasiado separados. Acérquelos.
• La señal puede ser mala para el
teléfono. Trate de mover a un lugar
con mejor señal de teléfono.
Page 16
 Loading...