

Page 1

SlickEdit®Core v3.3
for Eclipse
™
Code Quick | Think Slick
®
Page 2

Page 3

SlickEdit® Core v3.3 for Eclipse™
Page 4

SlickEdit® Core v3.3 for Eclipse™
Information in this documentation is subject to change without notice and does not represent a commitment on the part of SlickEdit
Inc. The software described in this document is protected by U.S. and international copyright laws and by other applicable laws, and
may be used or copied only in accordance with the terms of the license or nondisclosure agreement that accompanies the software.
It is against the law to copy the software on any medium except as specifically allowed in the license or nondisclosure agreement.
The licensee may make one copy of the software for backup purposes. No part of this documentation may be reproduced or transmitted in any form or by any means, electronic or mechanical, including photocopying, recording, or information storage and retrieval
systems, for any purpose other than the licensee's personal use, without the express written permission of SlickEdit Inc.
Copyright 1988-2008 SlickEdit Inc.
SlickEdit, Visual SlickEdit, Clipboard Inheritance, DIFFzilla, SmartPaste, Context Tagging, Slick-C, and Code Quick | Think Slick are
registered trademarks of SlickEdit Inc. All other products or company names are used for identification purposes only and may be
trademarks of their respective owners. Protected by U.S. Patent 5,710,926.
Page 5

Page 6

Page 7

Table of Contents
1. Introduction ................................................................................................................... 1
Getting the Most Out of SlickEdit® Core ....................................................................................2
Cool Features ....................................................................................................................2
Write More Code, Faster ...................................................................................................2
Get Started ........................................................................................................................3
Documentation and Conventions ..............................................................................................4
Accessing Documentation ................................................................................................4
Documentation Conventions .............................................................................................4
Supported Languages and Environments .................................................................................6
Supported Languages and File Types ..............................................................................6
Supported Editor Emulations ............................................................................................9
Install/Uninstall .........................................................................................................................10
System Requirements .....................................................................................................10
Installing SlickEdit® Core ................................................................................................10
Licensing .........................................................................................................................11
Uninstalling SlickEdit® Core ............................................................................................13
Help and Product Support .......................................................................................................14
Using the Help System ...................................................................................................14
Product Support ..............................................................................................................14
2. Quick Start ................................................................................................................... 15
General Options .......................................................................................................................16
Extension-Specific Options ......................................................................................................17
3. User Interface .............................................................................................................. 19
Screen Layout ..........................................................................................................................20
The Workbench ...............................................................................................................20
The Workspace ...............................................................................................................21
Perspectives ....................................................................................................................21
The SlickEdit® Core Editor ..............................................................................................21
Switching Between the SlickEdit® Core Editor and Eclipse Editors ................................23
Menus .............................................................................................................................24
Views ...............................................................................................................................25
Status Area .....................................................................................................................25
Dialogs ............................................................................................................................25
Command Line ................................................................................................................26
SlickEdit Views ........................................................................................................................27
Opening SlickEdit Core Views ........................................................................................27
Available SlickEdit® Core Views .....................................................................................27
The SlickEdit® Core Command Line .......................................................................................30
Activating the Command Line .........................................................................................30
Command Line History ...................................................................................................31
Command Line Completions ...........................................................................................31
Using Shortcuts Inside the Command Line .....................................................................31
v
Page 8

SlickEdit® Core v3.3 for Eclipse™
Using the Command Line to View Key Binding Associations .........................................31
Starting a Program from the Command Line (Shelling) ..................................................32
Command Line Prompting ..............................................................................................32
Common SlickEdit® Core Commands ............................................................................33
Using the Mouse and Keyboard ..............................................................................................35
Key Shortcuts in Text Boxes ...........................................................................................35
Redefining Common Keys ..............................................................................................37
4. User Preferences ......................................................................................................... 39
Introduction to User Preferences .............................................................................................40
Global Preferences .........................................................................................................40
Extension-Specific Preferences ......................................................................................40
Emulations ...............................................................................................................................41
Supported Emulations .....................................................................................................41
Changing Emulations ......................................................................................................42
Determining Keys/Functions ...........................................................................................43
Key and Mouse Bindings .........................................................................................................44
What is a Binding? ..........................................................................................................44
Managing Bindings .........................................................................................................45
Key Binding Settings .......................................................................................................50
Cursor, Mouse, and Scroll Settings .........................................................................................52
Setting the Cursor Style ..................................................................................................52
Hiding the Mouse Pointer ................................................................................................52
Displaying Tool Tips ........................................................................................................52
Scroll Style Settings ........................................................................................................52
Setting Fonts and Colors .........................................................................................................53
Fonts ...............................................................................................................................53
Colors ..............................................................................................................................55
Setting Colors for Screen Elements ................................................................................56
Restoring Settings on Startup ..................................................................................................59
5. Context Tagging® ........................................................................................................ 61
Context Tagging® Overview ....................................................................................................62
Tag-Driven Navigation ....................................................................................................62
List Members ...................................................................................................................62
Parameter Information ....................................................................................................63
Auto List Compatible Parameters ...................................................................................64
Completions ....................................................................................................................65
Symbol Browsing ............................................................................................................65
Statement Level Tagging ................................................................................................66
Building and Managing Tag Files ............................................................................................67
Building Tag Files ............................................................................................................67
Managing Tag Files ........................................................................................................70
Context Tagging® Options ..............................................................................................73
6. Editing Features .......................................................................................................... 75
Navigation ................................................................................................................................76
Code Navigation .............................................................................................................76
Cursor Navigation ...........................................................................................................79
Symbol Browsing .....................................................................................................................81
vi
Page 9

SlickEdit® Core v3.3 for Eclipse™
Class View ......................................................................................................................82
Outline View ....................................................................................................................86
Find Symbol View ...........................................................................................................88
Preview View ...................................................................................................................89
References View .............................................................................................................91
Symbols View ..................................................................................................................93
Symbol Properties View ................................................................................................101
Code Templates ....................................................................................................................103
Instantiating a Template ................................................................................................103
Creating Templates .......................................................................................................105
Substitution Parameters ................................................................................................106
Organizing Templates ...................................................................................................108
Template Manager Operations .....................................................................................109
Template Manager Dialog .............................................................................................110
Template Options Dialog ..............................................................................................111
Add File Dialog ..............................................................................................................111
Add Parameter Dialog ...................................................................................................111
Add New Item Dialog ....................................................................................................112
Locating Templates .......................................................................................................113
Manually Creating a Template ......................................................................................113
Code Template Metadata File Reference .....................................................................116
Text Editing ............................................................................................................................126
Selections ......................................................................................................................126
Cutting, Copying, and Moving Text ...............................................................................134
Working with Lines ........................................................................................................135
Sorting Text ...................................................................................................................136
Inserting Literal Characters ...........................................................................................138
Color Coding ..........................................................................................................................139
Resetting Modified Lines on Save ................................................................................139
Adding Color-Coded Keywords to Supported Languages ............................................139
Creating Color Coding for a New Language .................................................................140
Color Coding Configuration ...........................................................................................140
Color Coding Settings ...................................................................................................142
Syntax Indent and SmartPaste® ............................................................................................143
Syntax Indent ................................................................................................................143
SmartPaste® .................................................................................................................144
Completions ...........................................................................................................................146
Auto-Complete ..............................................................................................................146
Word Completion ..........................................................................................................148
Configuring Completion Settings ..................................................................................148
Aliases ...................................................................................................................................150
Directory Aliases ...........................................................................................................150
Extension-Specific Aliases ............................................................................................152
Syntax Expansion ..................................................................................................................159
Syntax Expansion Settings ...........................................................................................159
Modifying Syntax Expansion Templates .......................................................................160
Adding Syntax Expansion for Other Languages ...........................................................160
Dynamic Surround and Surround With ..................................................................................162
Dynamic Surround ........................................................................................................162
vii
Page 10

SlickEdit® Core v3.3 for Eclipse™
Surround With ...............................................................................................................166
Unsurround ...................................................................................................................170
Bookmarks .............................................................................................................................172
Named Bookmarks .......................................................................................................172
Pushed Bookmarks .......................................................................................................174
Setting Bookmark Options ............................................................................................174
Setting Breakpoints ................................................................................................................176
Setting Conditional Breakpoints ....................................................................................176
Setting Java Exception Breakpoints .............................................................................176
Commenting ..........................................................................................................................177
Commenting Blocks and Lines .....................................................................................177
Creating Doc Comments ...............................................................................................178
String Editing .................................................................................................................180
Comment Wrapping ......................................................................................................180
Find and Replace ...................................................................................................................182
Quick Search and Replace ...........................................................................................182
Incremental Searching ..................................................................................................182
Find and Replace Commands ......................................................................................184
Find and Replace View .................................................................................................190
Find Symbol View .........................................................................................................192
Find and Replace with Regular Expressions ................................................................192
Undoing/Redoing Replacements ..................................................................................196
Beautifying Code ...................................................................................................................197
Code Beautifiers ............................................................................................................197
Reflowing Text ..............................................................................................................197
Refactoring ............................................................................................................................198
Quick Refactoring .........................................................................................................198
C++ Refactoring ............................................................................................................200
Reviewing Refactoring Changes ...................................................................................220
Java Refactoring ...........................................................................................................221
Viewing and Displaying ..........................................................................................................223
Hexadecimal View and Edit Mode ................................................................................223
Viewing Special Characters ..........................................................................................223
Selective Display ...........................................................................................................224
Other Display Options ...................................................................................................227
7. Language-Specific Editing ....................................................................................... 229
Language-Specific Editing Overview .....................................................................................230
Language Editing Modes ..............................................................................................230
Extension Options .........................................................................................................231
C and C++ .............................................................................................................................233
C/C++ Formatting Options ............................................................................................233
C/C++ Beautifier ............................................................................................................237
C/C++ Compiler Settings ..............................................................................................244
C/C++ Preprocessing ....................................................................................................245
Java .......................................................................................................................................248
Java Formatting Options ...............................................................................................248
Java Beautifier ..............................................................................................................251
Javadoc Beautifier ........................................................................................................251
viii
Page 11

SlickEdit® Core v3.3 for Eclipse™
Javadoc Editor ..............................................................................................................252
Organizing Java Imports ...............................................................................................252
Java Refactoring ...........................................................................................................253
XML and HTML ......................................................................................................................254
XML ...............................................................................................................................254
HTML ............................................................................................................................266
XML/HTML Formatting ..........................................................................................................279
Enabling/Disabling XML/HTML Formatting ...................................................................279
Working with Schemes .................................................................................................281
Working with Tags .........................................................................................................284
Formatting Settings .......................................................................................................285
Ada ........................................................................................................................................292
Ada Formatting Options ................................................................................................292
Ada Beautifier ................................................................................................................292
COBOL ..................................................................................................................................299
COBOL Formatting Options ..........................................................................................299
Pascal ....................................................................................................................................301
Pascal Formatting Options ............................................................................................301
PL/I ........................................................................................................................................303
PL/I Formatting Options ................................................................................................303
Python ....................................................................................................................................305
Begin/End Structure Matching for Python .....................................................................305
8. Tools and Utilities ..................................................................................................... 307
Comparing and Merging ........................................................................................................308
DIFFzilla® ......................................................................................................................308
3-Way Merge .................................................................................................................314
File History and Backups .......................................................................................................317
Compare Two Backup History Elements Using DIFFzilla .............................................317
Compare a Local Backup History Element with the Current Version Using DIFFzilla ..317
FTP ........................................................................................................................................318
Working with FTP ..........................................................................................................318
Setting FTP Options ......................................................................................................320
The Regex Evaluator .............................................................................................................321
Using the Regex Evaluator ...........................................................................................321
Using the Calculator and Math Commands ...........................................................................323
The Calculator ...............................................................................................................323
Math Commands ...........................................................................................................324
OS File Browser .....................................................................................................................327
9. Macros and Macro Programming ............................................................................ 329
Recorded Macros ..................................................................................................................330
Recorded Macro Operations .........................................................................................330
Using Macros to Discover and Control Options ............................................................335
Programmable Macros ..........................................................................................................336
Loading Macros ............................................................................................................336
Setting Macro Variables ................................................................................................336
10. SlickEdit Core Dialogs ............................................................................................ 339
Editing Dialogs .......................................................................................................................339
ix
Page 12

SlickEdit® Core v3.3 for Eclipse™
Select Text to Paste Dialog ...........................................................................................340
Enumerate Dialog .........................................................................................................340
Filter Selection: Command Dialog ................................................................................341
Search Dialogs ......................................................................................................................343
Find and Replace View .................................................................................................343
Find Symbol View .........................................................................................................354
Go to Definition Dialog ..................................................................................................357
Dialogs Related to Viewing and Displaying ...........................................................................358
Selective Display Dialog ...............................................................................................358
Macro Dialogs ........................................................................................................................361
Save Macro Dialog ........................................................................................................361
List Macros Dialog ........................................................................................................361
Variable Editor Dialog ...................................................................................................362
Grid Settings Dialog ......................................................................................................364
Menu Editor Dialog .......................................................................................................364
Auto Enable Properties Dialog ......................................................................................366
Tools Dialogs .........................................................................................................................369
Organize Imports Options Dialog ..................................................................................369
3-Way Merge Dialog .....................................................................................................370
DIFFzilla® Dialog ...........................................................................................................372
Multi-File Diff Output Dialog ..........................................................................................377
Context Tagging® - Tag Files Dialog ............................................................................378
Options Dialogs .....................................................................................................................380
General Options Dialog .................................................................................................380
Extension Options Dialog ..............................................................................................398
Select a Tag Dialog .......................................................................................................420
File Options Dialog ........................................................................................................421
Key Bindings Dialog ......................................................................................................429
Bind Key Dialog .............................................................................................................432
Redefine Common Keys Dialog ....................................................................................433
Context Tagging® Options Dialog .................................................................................436
Color Coding Setup Dialog ...........................................................................................439
Color Settings Dialog ....................................................................................................453
Font Configuration Dialog .............................................................................................454
XML/HTML Formatting Dialog ......................................................................................456
URL Mappings Dialog ...................................................................................................457
Proxy Settings Dialog ....................................................................................................458
Network Options Dialog ................................................................................................459
Web Browser Setup Dialog ...........................................................................................459
FTP Options Dialog .......................................................................................................461
Reflow Comment Dialog ...............................................................................................466
Current Document Options Dialog ................................................................................467
11. Appendix .................................................................................................................. 469
Encoding ................................................................................................................................470
Using Unicode ...............................................................................................................470
Environment Variables ...........................................................................................................475
Setting Environment Variables in vslick.ini ...................................................................477
Using the set Command ...............................................................................................477
x
Page 13

SlickEdit® Core v3.3 for Eclipse™
Configuration Variables .........................................................................................................479
Viewing Configuration Variables ...................................................................................479
Setting/Changing Configuration Variables ....................................................................479
Table of Configuration Variables ...................................................................................479
Directories and Files ..............................................................................................................484
Configuration Directory .................................................................................................484
System Configuration Files ...........................................................................................487
File Search Order ..................................................................................................................489
Search Order for Configuration Files ............................................................................489
Search Order for Executable Files ................................................................................489
VLX File and Color Coding ....................................................................................................490
Modifying the VLX File to Change a Color Definition ....................................................491
Creating a Lexer Name and a New VLX File ................................................................491
Editing the Key Binding Source .............................................................................................498
Menu Editing ..........................................................................................................................499
Creating and Editing Menus ..........................................................................................499
Using the ISPF and XEDIT Emulations .................................................................................501
ISPF Options Dialog .....................................................................................................501
ISPF Primary Commands .............................................................................................503
ISPF Line Commands ...................................................................................................505
Regular Expression Syntax ...................................................................................................520
UNIX Regular Expressions ...........................................................................................520
SlickEdit® Regular Expressions ....................................................................................526
Brief Regular Expressions ............................................................................................531
Unicode Category Specifications for Regular Expressions ...........................................537
Unicode Character Blocks for Regular Expressions .....................................................539
xi
Page 14

xii
Page 15

List of Figures
1.1. Embedded Languages in HTML ..................................................................................................8
1.2. HTML Embedded in Perl .............................................................................................................9
3.1. The Workbench .........................................................................................................................20
3.2. Managing File Associations .......................................................................................................21
3.3. Opening Source Files with SlickEdit Core .................................................................................23
3.4. Status Area ................................................................................................................................25
3.5. Redefine Common Keys Dialog ................................................................................................37
4.1. Emulation Options .....................................................................................................................42
4.2. Emulation Prompt ......................................................................................................................42
4.3. Key Bindings Dialog ..................................................................................................................45
4.4. Bind Key Dialog .........................................................................................................................48
4.5. Font Configuration Dialog ..........................................................................................................53
4.6. Color Settings Dialog .................................................................................................................56
5.1. List Members: Example 1 ..........................................................................................................63
5.2. List Members: Example 2 ..........................................................................................................63
5.3. Parameter Info: Example 1 ........................................................................................................64
5.4. Parameter Info: Example 1 ........................................................................................................64
5.5. Auto List Compatible Parameters ..............................................................................................65
5.6. Automatic Tagging Dialog .........................................................................................................67
5.7. Add Tag File Dialog ...................................................................................................................68
5.8. Add Tags Database Dialog .......................................................................................................69
5.9. Context Tagging® - Tag Files Dialog .........................................................................................70
5.10. Rebuild Tag File Dialog ...........................................................................................................72
6.1. Class View .................................................................................................................................82
6.2. Class Exclusion Manager Dialog ...............................................................................................84
6.3. Outline View ..............................................................................................................................86
6.4. Preview View .............................................................................................................................89
6.5. References View .......................................................................................................................91
6.6. Symbols View ............................................................................................................................93
6.7. Symbol Uses/Calling Tree Dialog ..............................................................................................96
6.8. Base Classes Dialog .................................................................................................................97
6.9. Symbol Browser Filter Options Dialog .......................................................................................98
6.10. Symbol Properties View ........................................................................................................101
6.11. Add New Item Dialog .............................................................................................................103
6.12. Parameter Entry Dialog .........................................................................................................104
6.13. Block Insert Mode: Example 1 ...............................................................................................127
6.14. Block Insert Mode: Example 2 ...............................................................................................127
6.15. Block Insert Mode: Example 3 ...............................................................................................128
6.16. Sort Dialog .............................................................................................................................136
6.17. Color Coding Setup: Tokens Tab ..........................................................................................140
6.18. Example of Auto-Complete ...................................................................................................146
6.19. Select Alias File Dialog ..........................................................................................................150
6.20. Alias Editor Dialog .................................................................................................................153
6.21. Dynamic Surround: Example 1 ..............................................................................................162
xiii
Page 16

SlickEdit® Core v3.3 for Eclipse™
6.22. Dynamic Surround: Example 2 ..............................................................................................163
6.23. Dynamic Surround: Example 3 ..............................................................................................164
6.24. Dynamic Surround: Example 4 ..............................................................................................165
6.25. Surround With Dialog ............................................................................................................167
6.26. Alias Editor Dialog for Surround With ....................................................................................167
6.27. Delete Code Block Dialog .....................................................................................................170
6.28. Find and Replace View .........................................................................................................190
6.29. Quick Rename Refactoring ...................................................................................................198
6.30. Quick Extract Method Refactoring .........................................................................................199
6.31. C++ Refactoring: Rename .....................................................................................................201
6.32. C++ Refactoring: Extract Method ..........................................................................................201
6.33. C++ Refactoring: Modify Parameter List ...............................................................................202
6.34. C++ Refactoring: Push Down to Derived Class ....................................................................203
6.35. C++ Refactoring: Push Down - Selecting Members to Move ................................................204
6.36. C++ Refactoring: Pull Up to Super Class ..............................................................................205
6.37. C++ Refactoring: Pull Up - Selecting Members to Move .......................................................206
6.38. C++ Refactoring: Encapsulate Field ......................................................................................207
6.39. C++ Refactoring: Extract Class 1 ..........................................................................................208
6.40. C++ Refactoring: Extract Class 2 ..........................................................................................208
6.41. C++ Refactoring: Extract Super Class ..................................................................................209
6.42. C++ Refactoring: Move Method 1 .........................................................................................210
6.43. C++ Refactoring: Move Method 2 .........................................................................................211
6.44. C++ Refactoring: Move Static Field .......................................................................................211
6.45. C++ Refactoring: Convert Global to Static Field ...................................................................212
6.46. C++ Refactoring: Convert Local to Field ...............................................................................213
6.47. C++ Refactoring: Replace Literal with Constant ...................................................................213
6.48. C++ Refactoring: Create Standard Methods .........................................................................214
6.49. Test Parsing Configuration: Example 1 .................................................................................216
6.50. Test Parsing Configuration: Example 2 .................................................................................217
6.51. Test Parsing Configuration: Example 3 .................................................................................219
6.52. Refactoring Results ...............................................................................................................220
6.53. Selective Display ...................................................................................................................225
7.1. Extension Options Dialog ........................................................................................................231
7.2. New Extension Dialog .............................................................................................................232
7.3. C/C++ Formatting Options: Begin-end style Tab ....................................................................233
7.4. C/C++ Formatting Options: Indentation Tab ...........................................................................234
7.5. C/C++ Formatting Options: Other Tab ....................................................................................236
7.6. C/C++ Beautifier: Begin-End Style Tab ...................................................................................238
7.7. C/C++ Beautifier: Indenting Tab ..............................................................................................239
7.8. C/C++ Beautifier: Comments Tab ...........................................................................................240
7.9. C/C++ Beautifier: Other Tab ....................................................................................................242
7.10. C/C++ Beautifier: Schemes Tab ............................................................................................243
7.11. C/C++ Compiler Properties Dialog ........................................................................................244
7.12. C/C++ Preprocessing Dialog .................................................................................................246
7.13. Java Options Dialog ..............................................................................................................248
7.14. Organize Imports Dialog ........................................................................................................252
7.15. XML Formatting Options Dialog ............................................................................................254
7.16. XML Beautifier: Indent Tab ....................................................................................................256
7.17. XML Beautifier: Tags Tab ......................................................................................................258
xiv
Page 17

SlickEdit® Core v3.3 for Eclipse™
7.18. XML Beautifier: Attributes/Values Tab ..................................................................................260
7.19. XML Beautifier: Comments Tab ............................................................................................262
7.20. XML Beautifier: Advanced Tab ..............................................................................................263
7.21. XML Beautifier: Schemes Tab ...............................................................................................264
7.22. URL Mappings Dialog ...........................................................................................................265
7.23. Web Browser Setup Dialog ...................................................................................................266
7.24. HTML Formatting Options Dialog ..........................................................................................268
7.25. HTML Beautifier: Indent Tab .................................................................................................271
7.26. HTML Beautifier: Tags Tab ...................................................................................................272
7.27. HTML Beautifier: Attributes/Values Tab ................................................................................274
7.28. HTML Beautifier: Comments Tab ..........................................................................................275
7.29. HTML Beautifier: Advanced Tab ...........................................................................................277
7.30. XML/HTML Formatting Menu ................................................................................................279
7.31. Current Document Options Dialog ........................................................................................280
7.32. XML/HTML Formatting Scheme Configuration Dialog ..........................................................281
7.33. New Formatting Scheme Dialog ............................................................................................283
7.34. XML/HTML Formatting: General Tab ....................................................................................285
7.35. XML/HTML Formatting: Content Wrap Tab ...........................................................................287
7.36. XML/HTML Formatting: Tag Layout Tab ...............................................................................289
7.37. COBOL Formatting Options Dialog .......................................................................................299
7.38. Pascal Formatting Options Dialog .........................................................................................301
7.39. PL/I Formatting Options Dialog .............................................................................................303
8.1. DIFFzilla® Dialog .....................................................................................................................309
8.2. Multi-File Diff Output Dialog ....................................................................................................311
8.3. Save Multi-File Output Dialog ..................................................................................................312
8.4. 3-Way Merge Setup Dialog .....................................................................................................314
8.5. 3-Way Merge Results Dialog ...................................................................................................315
8.6. FTP Profile Manager Dialog ....................................................................................................318
8.7. Regex Evaluator View .............................................................................................................321
8.8. The SlickEdit® Calculator ........................................................................................................323
9.1. Binding Recorded Macros .......................................................................................................332
9.2. Set Variable Dialog ..................................................................................................................336
9.3. Variable Editor Dialog ..............................................................................................................336
10.1. Select Text to Paste Dialog ...................................................................................................340
10.2. Enumerate Dialog ..................................................................................................................341
10.3. Filter Selection: Command Dialog .........................................................................................342
10.4. Find and Replace View .........................................................................................................343
10.5. Find and Replace: Find Tab ..................................................................................................344
10.6. Find and Replace: Find in Files Tab ......................................................................................347
10.7. Find and Replace Replace Tab .............................................................................................350
10.8. Find and Replace: Replace in Files Tab ...............................................................................352
10.9. Find Symbol View ..................................................................................................................354
10.10. Go to Definition Dialog ........................................................................................................357
10.11. Selective Display Dialog ......................................................................................................358
10.12. List Macros Dialog ...............................................................................................................361
10.13. Variable Editor Dialog ..........................................................................................................362
10.14. Grid Settings Dialog ............................................................................................................364
10.15. Menu Editor Dialog ..............................................................................................................364
10.16. Auto Enable Properties Dialog ............................................................................................366
xv
Page 18

SlickEdit® Core v3.3 for Eclipse™
10.17. Organize Imports Options Dialog ........................................................................................369
10.18. 3-Way Merge Dialog ............................................................................................................370
10.19. DIFFzilla®: Files Tab ...........................................................................................................372
10.20. DIFFzilla®: File Compare Options .......................................................................................374
10.21. DIFFzilla®: Dialog Setup Options ........................................................................................376
10.22. Multi-File Diff Output Dialog ................................................................................................377
10.23. Context Tagging® - Tag Files Dialog ...................................................................................378
10.24. General Options: General Tab ............................................................................................380
10.25. General Options: Search Tab ..............................................................................................383
10.26. General Options: Selections Tab ........................................................................................386
10.27. General Options: Special Characters Tab ...........................................................................389
10.28. General Options: More Tab .................................................................................................391
10.29. General Options: Exit Tab ...................................................................................................394
10.30. General Options: Virtual Memory Tab .................................................................................396
10.31. Extension Options Dialog ....................................................................................................398
10.32. Extension Options: Indent Tab ............................................................................................400
10.33. Extension Options: Word Wrap Tab ....................................................................................402
10.34. Extension Options: General Tab .........................................................................................404
10.35. Extension Options: Comments Tab .....................................................................................406
10.36. Extension Options: Comment Wrap Tab .............................................................................411
10.37. Extension Options: Advanced Tab ......................................................................................413
10.38. Extension Options: Auto-Complete Tab ..............................................................................415
10.39. Extension Options: Context Tagging® Tab .........................................................................417
10.40. Select a Tag Dialog .............................................................................................................421
10.41. File Options: Load Tab ........................................................................................................422
10.42. File Options: Save Tab ........................................................................................................424
10.43. File Options: AutoSave Tab ................................................................................................426
10.44. File Options: File Filters Tab ...............................................................................................428
10.45. Key Bindings Dialog ............................................................................................................429
10.46. Bind Key Dialog ...................................................................................................................432
10.47. Redefine Common Keys Dialog ..........................................................................................433
10.48. Context Tagging® Options Dialog .......................................................................................436
10.49. Color Coding Setup Dialog ..................................................................................................439
10.50. Color Coding Setup: Tokens Tab ........................................................................................441
10.51. Color Coding Setup: Numbers Tab .....................................................................................443
10.52. Color Coding Setup: Strings Tab .........................................................................................445
10.53. Color Coding Setup: Language Tab ....................................................................................447
10.54. Color Coding Setup: Comments Tab ..................................................................................449
10.55. Color Coding Setup: Tags Tab ............................................................................................451
10.56. Color Settings Dialog ...........................................................................................................453
10.57. Font Configuration Dialog ....................................................................................................455
10.58. XML/HTML Formatting Dialog .............................................................................................457
10.59. Proxy Settings Dialog ..........................................................................................................458
10.60. Network Options Dialog .......................................................................................................459
10.61. Web Browser Setup Dialog .................................................................................................460
10.62. FTP Options: General Tab ..................................................................................................461
10.63. FTP Options: Advanced Tab ...............................................................................................462
10.64. FTP Options: Firewall/Proxy Tab ........................................................................................463
10.65. FTP Options: SSH/SFTP Tab .............................................................................................465
xvi
Page 19

SlickEdit® Core v3.3 for Eclipse™
10.66. FTP Options: Debug Tab ....................................................................................................465
10.67. Reflow Comment Dialog ......................................................................................................466
10.68. Current Document Options Dialog ......................................................................................468
11.1. Configuration Directory Preferences .....................................................................................484
11.2. ISPF Options Dialog ..............................................................................................................501
xvii
Page 20

xviii
Page 21

List of Tables
1.1. Supported Languages and File Types ........................................................................................6
3.1. UI Commands vs. Command Line Counterpart ........................................................................33
3.2. Common SlickEdit Core Commands .........................................................................................33
3.3. Text Box Editing Key .................................................................................................................35
4.1. Command Line Font Recommendations ...................................................................................55
6.1. Preview View Information ..........................................................................................................91
6.2. Predefined Substitution Parameters ........................................................................................107
6.3. Summary of Metadata Element ...............................................................................................116
6.4. Selection Key ..........................................................................................................................128
6.5. Operations for Selected Text ...................................................................................................129
6.6. Sorting Options ........................................................................................................................138
6.7. Alias Escape Sequences .........................................................................................................155
6.8. Escape Sequence Examples ..................................................................................................156
6.9. Incremental Search Key ..........................................................................................................183
6.10. OptionCharacters for find and Slash (/) Commands ............................................................184
6.11. Replace Key ..........................................................................................................................187
6.12. Replace Command Search Examples ..................................................................................189
6.13. Examples of Replacing Using Regular Expressions .............................................................193
6.14. Examples of Tagged Search Expressions ............................................................................194
6.15. Hex Mode Key .......................................................................................................................223
8.1. Binary Operators .....................................................................................................................324
8.2. Math Command Examples ......................................................................................................325
11.1. Environment Variables ..........................................................................................................475
11.2. Configuration Variable ...........................................................................................................479
11.3. User Configuration Files ........................................................................................................485
11.4. System Configuration File .....................................................................................................487
11.5. VLX File Statement ...............................................................................................................491
11.6. Table of style Value ...........................................................................................................494
11.7. ISPF Primary Commands ......................................................................................................503
11.8. ISPF Line Commands ...........................................................................................................506
11.9. XEDIT Line Commands .........................................................................................................516
11.10. Unsupported ISPF Primary Commands ..............................................................................517
11.11. Supported ISPF Commands ...............................................................................................518
11.12. UNIX Regular Expression ...................................................................................................520
11.13. UNIX Regular Expression Examples ...................................................................................525
11.14. SlickEdit Regular Expressions ............................................................................................526
11.15. SlickEdit Regular Expression Examples .............................................................................531
11.16. Brief Regular Expressions ...................................................................................................532
11.17. Brief Regular Expression Examples ....................................................................................536
11.18. Unicode SubCategories for Regular Expressions ...............................................................538
11.19. Unicode Character Blocks for Regular Expressions ...........................................................540
xix
Page 22

xx
Page 23

Chapter 1. Introduction
1
Page 24

Cool Features
Getting the Most Out of SlickEdit® Core
At SlickEdit, we take great pride in delivering unparalleled power, speed, and flexibility to our customers.
Our goal is to remove the tedious tasks involved with programming, allowing you to focus on the reason
you first got into programming: the thrill of writing great code.
SlickEdit Core brings the rich history of excellence of SlickEdit to the Eclipse framework. It delivers the
power programming capabilities needed to write more code faster and more accurately, making it an indispensable plug-in for developers.
Cool Features
SlickEdit® Core contains powerful editing features and capabilities. Some of our coolest features are listed in the Cool Features dialog. Using this dialog, you can read a description of each feature and watch a
short demo of the feature in action. By default, the Cool Features dialog appears each time Eclipse is
started. It can also be displayed anytime by clicking Help → SlickEdit Cool Features.
Write More Code, Faster
These keys to programming efficiency will help you write more code, faster than you ever have before:
• Keep your hands on the keyboard - Time is wasted each time you reach for the mouse. SlickEdit®
Core contains 13 editor emulations with predefined key bindings that are ready for use in performing
common tasks. Define your own key bindings or invoke editor operations from the SlickEdit Core command line. For more information, see Using the Mouse and Keyboard.
• Type as little as possible - SlickEdit Core contains many features that reduce the number of key-
strokes you type, including automatic completions, syntax expansion, aliases, macros, code templates,
and code generators. For information about these features, see the topics in Chapter 6, Editing Fea-
tures.
• Rapidly navigate code - Instantly jump from a symbol to its definition or view a list of references. Pre-
view definitions for the current symbol without having to open the file. Use bookmarks to mark important
locations in the code. SlickEdit Core includes powerful browse and search capabilities, allowing you to
quickly find the code you want. See Navigation for more information.
• Access information quickly - SlickEdit Core uses visual indicators to provide you with information
about your code, including syntax highlighting and color coding. Special views are also available for
looking up information about files, classes, symbols, definitions, and more. To learn more, see SlickEdit
Views, Symbol Browsing, and other topics in Chapter 6, Editing Features.
• Let SlickEdit Core do the formatting - Syntax indenting, SmartPaste®, and code beautifiers are just a
few of the automatic formatting features in SlickEdit Core. For more information, see the topics in
Chapter 6, Editing Features.
• Utilize utilities - SlickEdit Core provides many utilities for working with your code, such as DIFFzilla®,
3-Way Merge, a RegEx Evaluator, math commands, and even a calculator. See the topics in Chapter 8,
2
Page 25

Get Started
Tools and Utilities for more information.
Get Started
To get started, check out Chapter 2, Quick Start. This will guide you through configuration of some of the
most common user preference settings, so you can get more work done in less time, your way.
3
Page 26

Accessing Documentation
Documentation and Conventions
Accessing Documentation
Documentation is located in the SlickEdit® Core installation directory at
<PathToSlickEditCore>/eclipse/plugins/com.slickedit.core_VERSION/docs. The docs
directory contains PDFs of the following items:
• The User Guide - This guide provides comprehensive information about using SlickEdit Core.
• The Slick-C® Macro Programming Guide - This guide contains details about how to write macros using
the Slick-C macro programming language.
• Emulation charts for the following editors: BBEdit, Brief, CodeWarrior™, CodeWright®, CUA (default),
Epsilon, GNU Emacs, ISPF, SlickEdit (Text Mode edition), Vim, Visual C++ ® 6, Visual Studio®, and
Xcode®.
In addition to the documentation, SlickEdit Core provides a built-in Help system. The contents of the Help
system is the same as the contents of the User Guide.
Documentation Feedback
We welcome your comments and suggestions regarding our documentation. Please send feedback to
<docs@slickedit.com>.
Documentation Conventions
The subsequent topics describe conventions that are used in the SlickEdit® Core documentation.
Default Emulation/Key Binding Mode
CUA is the default editor emulation mode. Therefore, key bindings and shortcuts listed in the documentation follow the CUA emulation.
Platform-Specific Notes
Platform-specific notes for for Microsoft Windows and Linux® are listed throughout the documentation
where applicable.
Menus and Dialogs
Instructions for navigating to items accessed from the main menu are written in the form:
MainMenuItem > SubMenuItem
For example, the text "click Window → Preferences" indicates that you should first select Window from
4
Page 27

Supported Languages and En-
vironments
the main menu, then select Preferences from the Window submenu.
Our documentation structure is set up so that instructions for using the product make up the bulk of the
content, while listings of dialog boxes and options can be found in Chapter 10, SlickEdit Core Dialogs.
Buttons on dialogs, such as OK and Close, are not usually documented since the meaning is obvious.
Code Syntax Conventions
• Commands, switches, keywords, properties, operators, options, variables, and text to be typed by the
user are shown in bold type.
• User-input variables and placeholders are shown in bold italic type.
• Code samples and file names are displayed in a monospaced font.
• File extensions and environment variables are written with an UPPERCASE font.
• SlickEdit® Core commands that contain two or more words are written with underscore separators: for
example, cursor_down. Note that in the user interface, however, these commands are displayed with
hyphen separators: for example, cursor-down. Both of these forms work, so you can use whichever
style you prefer.
5
Page 28

Supported Languages and File
Types
Supported Languages and Environments
This section lists the languages and file types supported by each SlickEdit® Core feature as well as the
supported emulations.
Supported Languages and File Types
The table below indicates the languages and file types that support key SlickEdit® Core features. Features that are not language-specific, such as DIFFzilla®, are not listed here.
Table 1.1. Supported Languages and File Types
Feature Languages
Automatic Syntax Expansion ActionScript, Ada, AWK, C, C#, C++, CFML, CF-
Script, Ch, COBOL, DTD, Fortran, HTML, IDL, InstallScript, J#, Java, JavaScript™, JSP™, Objective-C, Pascal, Perl, PHP, PL/SQL, PV-WAVE ®, Python™, REXX, Ruby, SAS®, Slick-C®, Tcl, Transact-SQL®, VBScript, Verilog®, VHDL, Visual Basic®,
Visual Basic .NET™, XML, XSD
Code Beautifier ActionScript, Ada, C, C#, C++, CFML, HTML, Java,
JavaScript, JSP, Slick-C, XML, XSD
Color Coding ActionScript, Ada, ANTLR, AppleScript®, Assembly
Language, AWK, Bourne shell scripts, C, C Shell,
C#, C++, CFML, CFScript, Ch, CICS®, COBOL,
DB2®, DTD, Fortran, High Level Assembler, HTML,
IDL, InstallScript, J#, Java, JavaScript, JCL, JSP,
Lex, Modula-2, Objective-C, Pascal, Perl, PHP, PL/
I, PL/SQL, PowerNP™ Assembler, Progress® 4GL,
PV-WAVE, Python, REXX, Ruby, SAS, Slick-C, Tcl,
Transact-SQL, VBScript, Verilog, VHDL, Visual Basic, Visual Basic .NET, Windows batch files, x86
Assembly, XML, XSD, Yacc
Context Tagging®: Auto List Members, Auto
Parameter Info
ActionScript, Ada, C, C#, C++, CFML, CFScript,
Ch, CICS, COBOL, DTD, High Level Assembler,
HTML, IDL, InstallScript, J#, Java, JavaScript, JSP,
Objective-C, Pascal, Perl, PHP, PL/I, PV-WAVE,
Python, Ruby, Slick-C, VBScript, Verilog, VHDL,
Visual Basic .NET, XML, XSD
Context Tagging: Auto List Parameters ActionScript, C, C++, Ch, J#, Java, Slick-C
6
Page 29

Supported Languages and File
Types
Feature Languages
Javadoc™ Editor ActionScript, C, C#, C++, J#, Java, JavaScript,
Slick-C
Select/Hide Code Block ActionScript, Ada, C, C#, C++, CFML, Ch, COBOL,
DB2, Fortran, High Level Assembler, HTML, IDL,
InstallScript, J#, Java, JavaScript, Modula-2, Objective-C, Pascal, Perl, PHP, PL/SQL, Slick-C, Tcl,
Visual Basic, Visual Basic .NET, XML, XSD
Selective Display
Collapsible code block and function bodies.
SmartPaste®
Pasted code re-indents to correct level.
Source Code Navigation and Lookup
Includes Class, Outline, Preview, References, and
Symbols views, as well as symbol navigation.
ActionScript, Ada, ANTLR, C, C#, C++, CFML, CFScript, Ch, CICS, COBOL, DB2, DTD, Fortran, High
Level Assembler, HTML, IDL, InstallScript, J#,
Java, JavaScript, JCL, JSP, Lex, Modula-2, Objective-C, Pascal, Perl, PHP, PL/I, PL/SQL, PowerNP
Assembler, PV-WAVE, Python, REXX, Ruby, SAS,
Slick-C, Tcl, Transact-SQL, VBScript, Verilog,
VHDL, Visual Basic, Visual Basic .NET, x86 Assembly, XML, XSD, Yacc
ActionScript, AWK, C, C#, C++, IDL, InstallScript,
J#, Java, JavaScript, JSP, Objective-C, Pascal,
Perl, PHP, PL/I, PV-WAVE, Python, Ruby, Slick-C,
Tcl
ActionScript, Ada, ANTLR, Assembly Language,
AWK, Bourne shell scripts, C, C Shell, C#, C++,
CFML, CFScript, Ch, CICS, COBOL, DB2, DTD,
Fortran, High Level Assembler, HTML, IDL, InstallScript, J#, Java, JavaScript, JCL, JSP, Lex, Makefile, Modula-2, Objective-C, Pascal, Perl, PHP, PL/I,
PL/SQL, PowerNP Assembler, Progress 4GL, PVWAVE, Python, REXX, Ruby, SAS, Slick-C, Tcl,
Transact-SQL, VBScript, Verilog, VHDL, Visual Basic, Visual Basic .NET, Windows batch files, x86
Assembly, XML, XSD, Yacc
Syntax Indenting
Cursor is placed at correct indent level.
ActionScript, Ada, AWK, C, C#, C++, CFML, CFScript, Ch, COBOL, Fortran, HTML, IDL, InstallScript, J#, Java, JavaScript, JSP, Objective-C, Pascal, Perl, PHP, PL/SQL, PV-WAVE, Python, REXX,
Ruby, SAS, Slick-C, Tcl, Transact-SQL, VBScript,
Verilog, VHDL, Visual Basic, Visual Basic .NET,
XML, XSD
7
Page 30
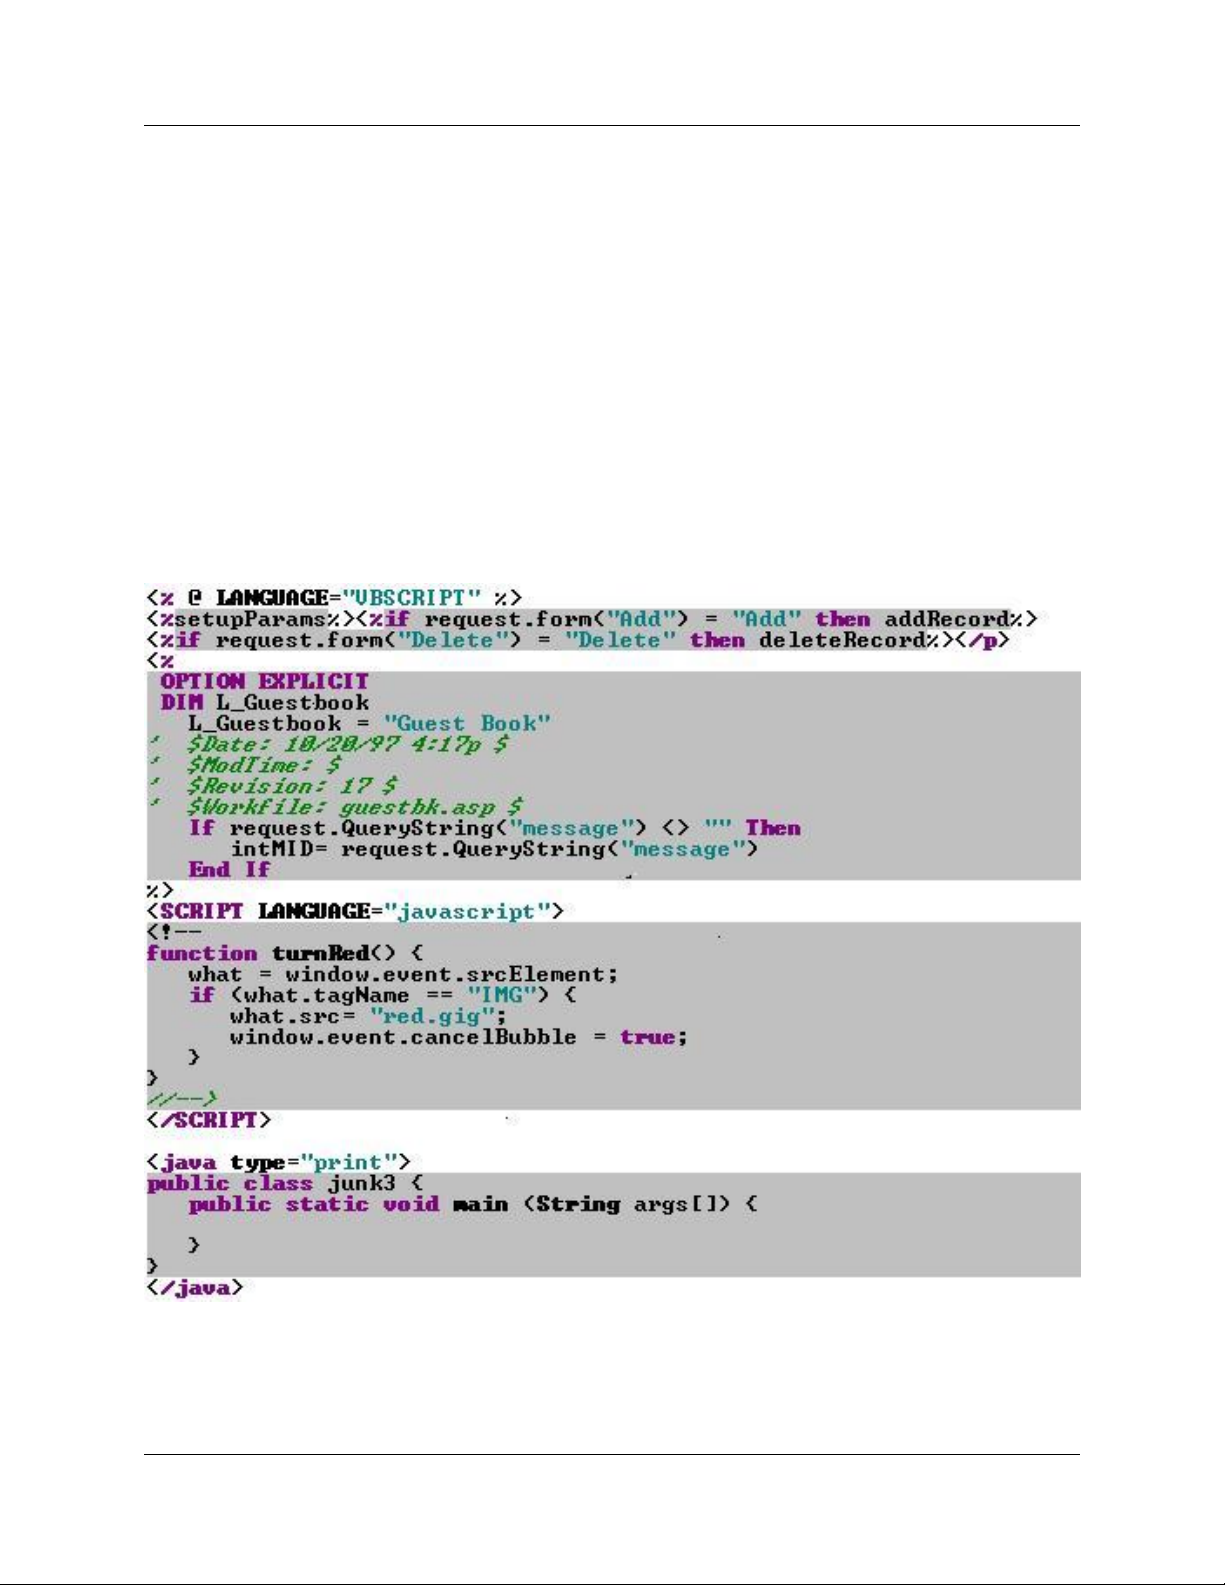
Supported Languages and File
Types
Embedded Languages
SlickEdit® Core recognizes languages embedded in HTML, COBOL, Perl scripts, and UNIX shell scripts.
When editing embedded languages, all language-sensitive features are supported, including Context Tagging®, SmartPaste®, Syntax Expansion, Syntax Indenting, and Color Coding. In fact, Context Tagging
picks up embedded tags. For example, the Outline view displays function names if any exist. Embedded
language colors are user-defined.
Embedded Languages in HTML
SlickEdit® Core supports any embedded language in HTML. However, Web browsers usually only support VBScript, JavaScript, and/or Java, while Web servers typically support VBScript, Java, or PHP. The
following screen is an example of VBScript, JavaScript, and Java embedded in HTML:
Figure 1.1. Embedded Languages in HTML
Embedded Languages in Perl and Other Scripting Languages
To allow SlickEdit® Core to recognize embedded source in a Perl script or UNIX shell, prefix the HERE
8
Page 31

Supported Editor Emulations
document terminator with the color coding lexer name. The following Perl example shows HTML embedded in a Perl script. Unknown languages are color-coded in string color.
Figure 1.2. HTML Embedded in Perl
Supported Editor Emulations
SlickEdit® Core provides keyboard emulations for the following editors:
• BBEdit
• Brief
• CodeWarrior
• CodeWright
• CUA (the SlickEdit Core default)
• Epsilon
• GNU Emacs
• ISPF
• SlickEdit® (text mode edition)
• Vim
• Visual C++ 6
• Visual Studio default
• Xcode
See Emulations for more information.
9
Page 32

System Requirements
Install/Uninstall
System Requirements
SlickEdit® Core runs on Microsoft® Vista™, Windows® XP, or Windows 2000 as well as Linux® x86/GTK
2 (kernel 2.4 or later), with the following requirements:
• 256 MB minimum recommended memory
• 150 MB available hard disk space on Windows, 200 MB on Linux
• Eclipse 3.3, including JDT
• Java 5 or later (Linux only)
• Internet connection required to activate license
Optionally, CDT 3.1 is needed to run, compile, and debug C and C++ programs.
Installing SlickEdit® Core
SlickEdit Core is provided as an annual subscription that includes support. Installation can be performed
by using the Eclipse Update Manager, or you can download ZIP files.
Installing with the Update Manager
To install the SlickEdit® Core with the Eclipse Update Manager:
1. In Eclipse, select Help → Software Updates → Find and Install.
2. Select Search for new features to install.
3. Click the New Remote Site button on the Update sites to visit screen.
4. Enter a name for the plug-in, like "SlickEdit Core", and enter the following for the URL:
http://www.slickedit.com/updates/secore
5. Select SlickEdit Core in the list of features to install, and click Next.
6. Accept the license agreement to continue.
7. Click Finish.
Installing with ZIP Files
SlickEdit also provides ZIP files for installing SlickEdit® Core. Unzip the files to your Eclipse installation
directory, then follow the instructions below to complete setup.
10
Page 33

Licensing
Setup on Windows
1. Open a command line utility and change to the SlickEditCoreSetup subdirectory of your Eclipse
installation.
2. Run the following command as a user with administrator privileges:
.\ias add SlickEditCore3.3.0
Setup on Linux
1. Open a command line utility and change to the SlickEditCoreSetup subdirectory of your Eclipse
installation.
2. Change to the root directory of your Eclipse installation, and run the following command:
chmod -R +x plugins/com.slickedit.linux.libs_3.3.0/slickedit
3. Run the following command as a user with root access:
sh install_fnp.sh FNPLicensingService
Finding Updates
To find updates for SlickEdit® Core:
1. In Eclipse, select Help → Software Updates → Find and Install.
2. Select Search for updates of the currently installed features.
3. Select the SlickEdit update site from the list of sites, and click Next.
4. Accept the license agreement to continue.
5. Click Finish.
Licensing
SlickEdit® Core v3.3 uses FLEXnet™ Publisher from Macrovision to manage licenses.
When Eclipse with SlickEdit® Core is run, it checks for an activated license. If one can't be found, the
SlickEdit License Manager wizard is run. This gives you the option to get a trial license, buy a license, or
enter a license key. You can also manually run the SlickEdit License Manager by selecting Help →
SlickEdit License Manager.
• To try out SlickEdit Core, click the option to obtain a trial license. This will take you to a Web page
where you can register for a trial. A license key will be e-mailed to you to activate the product. A trial
can be converted to full license by entering a full license key at any time in the SlickEdit License Manager.
11
Page 34

Licensing
• To buy a full license, visit the SlickEdit Web site at http://www.slickedit.com or select the Purchase a
License option. That will take you directly to the product page for SlickEdit Core.
• To enter a license key for an existing license, select Enter a license key.
Activation
After you enter a license key to activate the product, SlickEdit® Core contacts the license server over the
Internet.
You are permitted up to five concurrent activations of SlickEdit Core, initially. You can contact SlickEdit
Sales to get additional activations at no additional cost if you need more. Activating SlickEdit Core enables your subscription to run on a particular machine. You can deactivate a license if you want to use it
on a different machine. Uninstalling SlickEdit Core does not automatically deactivate the license.
Your license key is good for one year. Any new versions of SlickEdit Core that are released will work with
the existing key. You will not need to reactivate a machine when installing a new version of SlickEdit
Core. When your subscription expires, you will need a new license key. Each machine will need to be reactivated using that key.
Deactivation
Once you have activated SlickEdit® Core on five machines, you will not be able to activate it on another
machine until you have deactivated one of the other five. If you need more than five machines activated at
one time, you can contact SlickEdit Sales to request additional activations at no cost. You can deactivate
a license using the SlickEdit License Manager. Select Help → SlickEdit License Manager and then select the Deactivate a license option.
You can also deactivate a license using a stand-alone utility shipped with SlickEdit Core: vsact.exe in
the flex subdirectory of your SlickEdit Core installation directory. You can copy the flex directory from
one machine to another and run vsact.exe. You can also download these utilities from the SlickEdit
Web site.
To deactivate a license with vsact.exe, type:
vsact deactivate
If you have more than one license active on this machine, perhaps for other SlickEdit products, you will
need to specify an ID for the license to deactivate. Run vsact list to display a list of the licenses and their
IDs.
Note
Uninstalling SlickEdit Core does not deactivate the license. If you have uninstalled SlickEdit Core,
you can copy the utilities in the flex subdirectory of another installation and run vsact to deactivate this license.
Repairing a License
12
Page 35

Uninstalling SlickEdit® Core
FLEXnet Publisher identifies your machine using a combination of information about the hardware on this
machine. No personal data is used in creating this ID. Small changes to your machine, like switching display cards, upgrading memory, or changing hard drives can cause the license to become "damaged". A license can also be damaged by changing the system date by more than one day. When this happens you
will need to repair the license.
SlickEdit® Core automatically detects damaged licenses and launches the SlickEdit License Manager.
You will be prompted to enter your license key. The number of repairs is limited, but enough are available
to handle any reasonable hardware changes. If you run out of repairs, please contact Product Support.
If enough hardware is changed, then this will appear to be a different machine and you will have to activate the license as though this was the first time Eclipse with SlickEdit Core was run. In that case, you will
lose the activation you had previously. Therefore, we strongly recommend that you deactivate your license prior to making substantial changes to your computer's hardware.
Adjusting the System Date
Changing the system date on your computer could damage your license. The SlickEdit® License Manager
records the date each time the product is run. If you run Eclipse with SlickEdit Core with a system date
that is more than one day earlier than a previous run then your license will be damaged. This is part of the
tamper protection on time-limited licenses, like a trial license or the SlickEdit Core subscription.
Changing your system date is a normal part of testing time-based behavior in the software you are developing. For example, you may need to set your clock ahead to test alerts on a task management program.
As long as you don't run Eclipse with SlickEdit Core (or another FLEXnet Publisher licensed product)
while your clock is set ahead, you will not have any repair issues. If you do need to run SlickEdit Core,
your license will be damaged when you run again at the current date. When this occurs, you can repair
the license as described in Repairing a License. The number of repairs is limited, so you should be cautious about running SlickEdit Core when your clock is set ahead. If you run out of repairs, please contact
Product Support.
Daylight savings time will not cause this to occur since it is only adjusting the date by one day. Only
changes larger than one day will trigger this.
Uninstalling SlickEdit® Core
To uninstall SlickEdit® Core:
1. In Eclipse, select Help → Software Updates → Manage Configuration.
2. Select SlickEdit Core from the list.
3. Right-click and select Uninstall.
13
Page 36

Using the Help System
Help and Product Support
There are several ways to get help about SlickEdit® Core:
• Use the Help system - See Using the Help System below.
• Search the FAQ - A list of frequently asked questions and answers is available from the Product Sup-
port section of our Web site at http://www.slickedit.com.
• Use the Community Forums - Search for or post your question on the SlickEdit Community Forums to
seek help from other SlickEdit Core users. The forums are located at http://community.slickedit.com.
• Contact Product Support - See Contacting Product Support below.
Using the Help System
When SlickEdit® Core is installed, the searchable Help system is installed with the product. The contents
of the Help system are the same as the contents of the User Guide located in the docs installation subdirectory (see Accessing Documentation).
To access the Help system, from the main menu, click Help → Help Contents, then expand SlickEdit
Core v3.3 for Eclipse in the tree.
Note
Context-sensitive Help is currently not available in SlickEdit Core.
Product Support
Patches, macros, FAQs, and more are available on the Product Support section of our Web site at ht-
tp://www.slickedit.com. From within Eclipse, you can click Help → SlickEdit Support Web Site to launch
the site in a browser window.
Contacting Product Support
Use the SlickEdit Community Forums at http://community.slickedit.com to report all defects and share any
feedback you have on this release. For problem reports, please provide the following information:
• A description of the problem.
• The language you are working in (C/C++, Java, etc.).
• SlickEdit Core program information. Select Help → About SlickEdit Core, then select the Program In-
formation tab, click Copy To Clipboard and paste the information in the problem report.
• A code snippet to help us reproduce it (if possible).
14
Page 37

Chapter 2. Quick Start
SlickEdit® Core provides numerous configuration options so you can customize your environment according to your working style and preferences. To help get you up and running as quickly as possible, the
Quick Start describes commonly used option settings that are found in most programming editors. The
options fall into two categories: General Options and Extension-Specific Options.
15
Page 38

Extension-Specific Options
General Options
General options affect all language extensions. You may want to look through all of the dialogs mentioned
to see if there are any other settings you want to make. To see a listing of all of the option dialogs and
their descriptions, see the appropriate topics in Chapter 10, SlickEdit Core Dialogs.
Use the Preferences dialog to access SlickEdit® Core options described below. To display the Preferences dialog, from the main menu, click Window → Preferences. In the tree, expand SlickEdit and click
General.
• Changing the emulation - During the product installation, you are prompted to choose the editor emu-
lation. The default is CUA. To change the emulation at any time, double-click the Emulation setting
and specify the desired emulation.
• Expanding/collapsing with a single click - Selective Display Plus and Minus bitmaps can be expan-
ded or collapsed with a single click rather than a double-click. To specify this option, double-click the
General setting. On the General Options dialog, select the General tab, then select the option Expand/
collapse single click.
• Clicking past the end of a line - To have the ability to place the cursor past the end of a line, double-
click the General setting. On the General Options dialog, select the General tab, then select the option
Click past end of line.
• Specifying cursor up/down behavior - By default, cursor_up and cursor_down commands go to
the same column of the next or previous line, unless that line is shorter than the current column, in
which case the cursor is placed at the end of the line. To have the cursor placed in virtual space at the
end of the line, double-click the Redefine Common Keys setting. Uncheck the option Up/Down on
text.
• Changing the line insert style - In code, a line of text is a meaningful unit of functionality. SlickEdit®
Core treats line selections differently than character selections. Line selections are pasted either above
or below the current line, saving you from tediously positioning the cursor at the beginning or end of a
line prior to pasting. To specify where line selections are pasted, double-click the General setting. On
the General Options dialog, select the More tab, then set the Line insert style option to Before or
After. The default is After.
• Setting color schemes and fonts - Predefined color schemes, as well as individual settings, are avail-
able for changing the colors of screen elements. To use a different color scheme, double-click the Col-
or setting. Click the Schemes button, and select a scheme that you like from the Color scheme dropdown list. To change the fonts used for screen elements, go back to the Preferences dialog and doubleclick the Font setting.
16
Page 39

Extension-Specific Options
Extension-Specific Options
These options are specific to file extensions, and are available on the Extension Options dialog (open the
Preferences dialog, expand SlickEdit and click General in the tree, then double-click the File Extension
Setup setting). When the Extension Options dialog is displayed, before setting the options, select the extension you wish to affect from the Extension drop-down list.
In addition to the options described below, more settings for the selected language extension are available by pressing the Options button on the Extension Options dialog. Because each of these dialogs is
different based on the selected extension, we recommend that you look through these dialogs for any settings that you may want to make.
To see a listing of all of the option dialogs and their descriptions, see topics in Chapter 10, SlickEdit Core
Dialogs.
• Changing the brace style - To change the brace style used for C, C++, C#, Java, and other languages
that use braces, click the Options button on the Extension Options dialog, then specify the Begin-End
Style that you want to use.
• Changing the tab and indent styles:
• Indenting with spaces - By default, when you press the Tab key to indent, literal spaces are inserted. This is a feature called Syntax Indent. To change the amount of spaces, select the Indent tab,
make sure the Indent style is set to Auto, then specify the amount of spaces in the Syntax indent
text box.
• Indenting with tabs - If you plan to indent your code using tabs, or if you will be editing files that
already contain tabs, specify your tab preferences on the Indent tab. Select the option Indent with
tabs, then specify the amount of spaces tab characters should have in the Tabs text box.
Note
For C, C++, Java, and similar languages, you can find more indenting options by clicking the Options button on the Extension Options dialog.
• Enabling/disabling Syntax Expansion - When you type a keyword, such as if or for, press the spacebar to expand that syntax element, inserting the rest of the if or for statement. This feature is called
Syntax Expansion. To turn it off, select the Indent tab, then deselect the option Syntax expansion.
• Setting symbol navigation - For C and C++, by default, with each attempt to navigate to a definition
(Ctrl+Dot or Search → Go to Definition), you will be prompted for whether you wish to navigate to the
definition (proc) or the declaration (proto). To specify that Go to Definition always navigates to one or
the other, select the Context Tagging® tab, then select one of the Go to Definition options.
• Showing the info for a symbol under the mouse - By default, as the mouse cursor floats over a symbol, the information and comments for that symbol are displayed. To turn this behavior off, select the
Context Tagging® tab, then deselect the option Show info for symbol under mouse.
• Configuring C/C++ preprocessing - For C and C++, your source code base will typically include pre-
17
Page 40

Extension-Specific Options
processor macros that you use in your code for portability or convenience. For performance considerations, Context Tagging does not do full preprocessing, so preprocessing that interferes with normal C++
syntax can cause the parser to miss certain symbols. To configure your preprocessing to avoid these
omissions, see C/C++ Preprocessing.
18
Page 41

Chapter 3. User Interface
19
Page 42

The Workbench
Screen Layout
Note
SlickEdit® Core does not modify the Eclipse screen layout, so this information is intended only as
a brief overview. See "Workbench User Guide" in the Eclipse Help for more details about the Eclipse layout.
The Workbench
The workbench is the area where the workspace, projects, and programs are contained. Use the workbench to manage and edit all projects in various perspectives, views, or editors. Work may only occur in
one workbench at a time.
Figure 3.1. The Workbench
20
Page 43

Perspectives
The Workspace
The workspace is a collection of projects. A project contains all resources such as source files, subfolders, icons, and generated code.
By default, the workspace files are placed in a workspace subdirectory under the install directory.
Perspectives
A perspective in Eclipse is a set of views and editors. For example, the Java perspective has a much different set of views than the Debug perspective. You can customize each perspective's layout by dragging
and dropping.
The SlickEdit® Core Editor
Use the SlickEdit Core editor to create and change projects, folders, files, and classes. To edit files and
classes in SlickEdit Core, first associate those files or classes with the editor or open the source file using
the editor.
Figure 3.2. Managing File Associations
21
Page 44

The SlickEdit® Core Editor
To associate files to edit, complete the following steps:
1. From the main menu, click Window → Preferences.
2. Expand General, then expand Editors and select File Associations.
3. From the File Types list, select the desired file type. Or, to add an extension, click Add.
4. From the Associated Editors list, select the desired editor.
5. To make this the default editor for this file type, click the Default button.
6. Click OK.
Source files can be opened with the SlickEdit Core editor in the following ways:
22
Page 45

Switching Between the
SlickEdit® Core Editor and Ec-
• To open a source file in the workspace, from the Navigator view, select the desired file. Right-click the
file, then select Open.
• To open a file using a specific editor, from the Navigator view, select the desired file. Right-click the file,
then select Open With.
• To open a file that is outside of the workspace, from the main menu, click File → Open.
Figure 3.3. Opening Source Files with SlickEdit Core
Switching Between the SlickEdit® Core Editor and Eclipse Editors
SlickEdit Core provides the ability to switch from the SlickEdit Core editor to several other Eclipse editors,
for the current buffer. These commands are provided in the right-click context menu of the editor:
• Switch to Java Editor – Changes to the JDT editor. Visible only for Java files.
23
Page 46

Menus
• Switch to C/C++ Editor – Changes to the CDT editor. Visible only for C/C++ files.
• Switch to Ant Editor – Changes to the Eclipse Ant build.xml editor. Visible only for build.xml
files.
• Switch to Plug-in Manifest Editor – Changes to the Eclipse plugin.xml editor. Visible only for plu-
gin.xml files.
Similarly, you can also switch from any Eclipse editor to the SlickEdit Core editor for the current buffer. To
do this, use the Switch To SlickEdit, accessible from the right-click context menu in the Eclipse editor.
Menus
If a menu specific to SlickEdit Core is not visible, such as the Format menu, then close the open files or
classes and re-open with the SlickEdit Core editor.
To open with the SlickEdit Core editor, complete the following steps:
1. Right-click on the desired file or class and select Open With.
2. Select the SlickEdit Core editor, even if it appears to have already been chosen.
3. If this is the first time opening the editor, prompts appear to tag the run-time libraries.
4. Follow the remaining prompts.
The following menus are specific to or affected by SlickEdit Core:
• File
• Edit
• Format
• Display
• Navigate
• Search
• Macro
• Tools
• C/C++ Refactoring
• Window
• Help
24
Page 47

lipse Editors
Views
Views are windows that show various types of information that you can move around and dock within Eclipse. See SlickEdit Views for information.
Status Area
The status area for a perspective and an editor displays text messages. It indicates if the current mode is
insert, overwrite, or replace, and if a file is read-only.The editor status area also displays the line and
column number for the cursor location.
Figure 3.4. Status Area
Dialogs
Although SlickEdit® Core shares a heritage with our stand-alone editor, SlickEdit, dialogs within SlickEdit
Core may contain options that are not available when the functionality is not applicable to the Eclipse en-
25
Page 48

Command Line
vironment. By the same token, some SlickEdit commands may not be available.
See Chapter 10, SlickEdit Core Dialogs for descriptions of each dialog specific to SlickEdit Core, broken
into the following categories:
• Editing Dialogs
• Search Dialogs
• Editing Dialogs
• Dialogs Related to Viewing and Displaying
• Macro Dialogs
• Tools Dialogs
• Options Dialogs
Command Line
To activate the SlickEdit Core command line, press Esc in CUA emulation, Ctrl+A in Vim emulation, or
Alt+X in GNU Emacs emulation.
See The SlickEdit Core Command Line for more information.
26
Page 49

Opening SlickEdit Core Views
SlickEdit Views
Views complement the file opened in the editor. You can move, resize, and customize views easily. All
the views and perspectives have live connectivity, meaning that if a file name or property in one view is
modified, then that change stays true for that item in every area of the workspace.
Views support editors and provide alternative presentations as well as ways to navigate the information in
your workbench.
Views also have their own menus. To open the menu for a view, click the icon at the left end of the view's
title bar. Some views also have their own toolbars. The actions represented by buttons on view toolbars
only affect the items within that view.
A view might appear by itself, or stacked with other views in a tabbed notebook. You can change the layout of a perspective by opening and closing views and by docking them in different positions in the workbench window.
Opening SlickEdit Core Views
Perspectives offer pre-defined combinations of views and editors. To open a view that is not included in
the current perspective, from the main menu, click Window → Show View. To open a SlickEdit Core
view, click Window → Show View → Other, expand SlickEdit Views and double-click the view you want
to open.
Tip
• You can create fast views to provide a shortcut to views that you use often.
• After adding a view to the current perspective, you may want to save your new layout by clicking Window → Save Perspective As.
For more information on views and the multiple operations they allow, see the Eclipse online
Help.
Available SlickEdit® Core Views
The views below are made available by SlickEdit® Core.
Bookmarks
Displays a list of bookmarks that have been set. Note that the bookmark functionality in SlickEdit® Core
integrates with the Eclipse Bookmarks view. For more details, see Bookmarks.
Breakpoints
27
Page 50

Available SlickEdit® Core Views
Lists breakpoints (and exception breakpoints for Java) and allows you to modify them. You must use this
view to set breakpoint properties. It can be used when you are not in debug mode. Right-click within the
view window to display a context menu which allows you to jump to the location of a breakpoint or modify
breakpoints. Note that the breakpoints functionality in SlickEdit® Core integrates with the Eclipse Breakpoints view. For more details on this topic, see Setting Breakpoints.
Class
Provides an outline of both the members of the current class as well as any visible inherited members.
This view also shows the inheritance hierarchy of the current class, useful for object-oriented programming languages such as Java. See Class View for more information.
Outline
Provides an outline of symbols in the current workspace. See Outline View for more information.
Find and Replace
Used to perform search and replace operations. This view can also be displayed by using the key binding
Ctrl+F. See Find and Replace for more information.
Find Symbol
Used to locate symbols which are declared or defined in your code. It allows you to search for symbols by
name using a regular expression, substring, or fast prefix match. See Find Symbol View for more information.
FTP
Used to connect to FTP servers and open files. Right-click on files to display a menu of FTP operations.
See FTP for more information.
SlickEdit Output
Displays output from various operations within the editor, such as errors.
Preview
Provides a portal for viewing information in other files without having to open them in the editor. It automatically shows this information when you are working with certain features. See Preview View for more
information.
References
Displays the list of symbol references (uses) found the last time that you used the Go to Reference feature (Ctrl+/ or push_ref command—see Symbol Navigation for more information). See References View
for more information.
Regex Evaluator
28
Page 51

The SlickEdit® Core Command
Line
Provides the capability to interactively create and test regular expressions. See The Regex Evaluator for
more details.
SlickEdit Search
Displays the results of multi-file searches, or when the option List all occurrences is selected on the
Find and Replace View. See Find and Replace for more information about searching and replacing.
Slick-C® Stack
Displays errors that occur within the editor. If errors occur during normal use, you can send this information to Product Support as a reference (see Contacting Product Support). If an error occurs in one of your
macros, you can use this information to help debug it. Double-clicking on a line of code in this window will
open the file and go to the line in the file that contains the error.
Symbols
Contains the symbol browser, which lists the symbols from all of the tag files. See Symbols View for more
information.
29
Page 52

Activating the Command Line
The SlickEdit® Core Command Line
SlickEdit Core provides its own command line as a means to execute most SlickEdit Core operations so
you can work without taking your hands off of the keyboard. This is useful for less frequently used operations that may not warrant a key binding, or complex commands that require arguments.
Note
• SlickEdit® Core commands that contain two or more words are written throughout our documentation with underscore separators: for example, cursor_down. Note that in the user interface, however, these commands are displayed with hyphen separators: for example, cursor-
down. Both of these forms work, so you can use whichever style you prefer.
• Although SlickEdit® Core shares a heritage with our stand-alone editor, SlickEdit, some
SlickEdit commands may not available when the functionality is not applicable to the Eclipse
environment.
Activating the Command Line
To activate or toggle the command line, press the key or key sequence for your emulation:
• BBEdit - Esc
• Brief - Esc
• CodeWarrior - Esc
• CodeWright - F9
• Epsilon - Alt+X or F2
• GNU Emacs - Alt+X or F2
• ISPF - Esc
• SlickEdit (Text Mode edition) - Esc
• Vim - Ctrl+A
• Visual C++ - Esc
• Visual Studio - Esc
• Xcode - Esc
See Emulations for more information.
30
Page 53

Command Line Completions
Command Line History
The command line maintains a command history, allowing you to quickly reuse previously entered commands. Once the command line is open, use the arrow keys to scroll up and down in the command history.
Command Line Completions
As you type a command, a list of matching completions is displayed, including any command line arguments used in a previous command. Use Tab or the Down arrow to move to the next command in the list,
and Shift+Tab or the Up arrow to move to the previous command. Press the Enter key to select the current command.
Some commands, like set_var, prompt for arguments. SlickEdit® Core maintains a history of arguments
used for each command. Use the same completion and history mechanism as described above for commands to complete arguments. Typically, the most recent argument you typed is automatically displayed.
Tip
Command completions are useful for discovering other useful operations. For instance, to find all
operations that begin with "find", type find in the command line, and a list of those commands is
displayed. Some search commands do not begin with "find", like gui_find, so you may not discover all related commands this way. To find all commands containing the word "find," use the
Key Bindings dialog (click Window → Preferences, expand SlickEdit and click General in the
tree, then double-click the Key Bindings setting; alternatively, use the gui_keybindings command). See Key and Mouse Bindings for more information.
For information about other items that can be automatically completed, see Completions.
Disabling Command Line Completions
To disable command line completions, from the main menu, click Window → Preferences, expand
SlickEdit and click General in the tree, then double-click the General setting. On the General Options
dialog, select the General Tab. Uncheck the option List command line completions. Note that this option does not apply to the Vim command line.
Using Shortcuts Inside the Command Line
The command line is a text box control just like the text boxes that appear in various dialog boxes. For a
list of key shortcuts that can be used inside the command line and other text boxes within SlickEdit® Core,
see Key Shortcuts in Text Boxes.
Using the Command Line to View Key Binding Associations
31
Page 54

Starting a Program from the
Command Line (Shelling)
You can use the SlickEdit® Core command line to determine what keys are associated with what commands, and vice-versa.
Tip
Alternatively, you can use the Key Bindings dialog (click Window → Preferences, expand
SlickEdit and click General in the tree, then double-click the Key Bindings setting, or, use the
gui_keybindings command) to see a list of command/key binding associations. See Key Bind-
ings Dialog for more information.
Determining the Command of a Key Binding
To determine the function of a key or key binding, use the what_is command (Help → What Is Key). For
example:
1. Click Help → What Is Key, or activate the SlickEdit® Core command line (by pressing Esc) and type
what_is (or type what and press the spacebar for auto-completion), then press Enter.
2. The message line will prompt with the text What is key. Enter the key sequence in question, and the
message line will display the information. If the key or key sequence is not bound to a command, no
message will appear.
Determining the Key Binding of a Command
To determine the key to which a command is bound, use the where_is command (Help → Where Is
Command). For example:
1. Click Help → Where Is Command, or activate the command line and type where_is, then press
Enter.
2. A dialog will prompt with the text Where is command. Enter the command in question. The Eclipse
message area will display the key binding or state that the command is not bound to a key.
Starting a Program from the Command Line (Shelling)
You can use the command line to start a program. Press Esc to toggle the cursor to the command line.
Type the program name and arguments and press Enter. When entering a command that the editor does
not recognize as an internal command, a path search is performed to find an external program to execute.
To use a program whose name contains space characters, enclose the name in double quotes. For example, "this is" will start a program named this is.exe if it exists.
To get an operating system prompt, type the command dos with no arguments or from the main menu,
click Tools → OS Shell.
Command Line Prompting
32
Page 55

Common SlickEdit® Core Com-
mands
Many commands that display dialog boxes have equivalent commands that prompt for arguments on the
command line or on the Eclipse message area. For faster prompting than the dialog boxes allow, you can
choose to be prompted for arguments on the command line instead. To set this option, from the main
menu, click Window → Preferences, expand SlickEdit and click General in the tree, then double-click
the General setting. On the General Options dialog, select the General Tab, then select the option Com-
mand line prompting. To be more selective than this option permits, change the key bindings. For example, to be prompted only on the command line when opening files, bind the edit command to Ctrl+O,
which is bound to the gui_open command by default.
The following table contains a partial list of user interface commands and their command line counterparts.
Table 3.1. UI Commands vs. Command Line Counterpart
Graphical Command Command Line Version
gui_open edit
gui_find find
gui_replace replace
gui_write_selection put
gui_append_selection append
gui_margins margins
gui_tabs tabs
gui_find_proc find_proc
Common SlickEdit® Core Commands
Commands are essentially the names of functions. The following is a list of commands that we use frequently in our own work, which you may also find useful.
Table 3.2. Common SlickEdit Core Commands
Command Description
e file Edit a file
number Go to line number
33
Page 56

Using the Mouse and Keyboard
Command Description
f symbol Find a symbol
/search_string/options Search for a string
c/search/replace/options Replace a string
sb name Set a bookmark
gb name Jump to a bookmark
man command Show UNIX man page
del filename Delete file
dos command Execute command outside of editor
math expr Evaluate expression
34
Page 57

Key Shortcuts in Text Boxes
Using the Mouse and Keyboard
SlickEdit® Core provides four ways to launch operations: commands, menu items, key bindings, and buttons. For example, to launch the Open dialog box in order to open a file, you could use any of the following methods:
• Type the gui_open command on the SlickEdit command line.
• Click File → Open File.
• Press the key binding F7 or Ctrl+O.
The command forms the basis of each method. As you can see, commands are often bound to more than
one key sequence. They can also be bound to mouse events, including the spin wheel. Key bindings are
the fastest and most efficient means of executing operations.
See The SlickEdit Core Command Line for more information about commands, and Key and Mouse Bind-
ings for more information about bindings.
Key Shortcuts in Text Boxes
Key shortcuts for text operations (such as Cut, Copy, and Paste) can be used inside of all text boxes within SlickEdit® Core (including the command line).
Tip
The CUA emulation contains the shortcuts Ctrl+X, Ctrl+C, and Ctrl+V for Cut, Copy, and Paste,
respectively. If you are not using the CUA emulation, by default, these key bindings still work inside of text boxes. To deactivate this feature, from the main menu, click Window → Preferences,
expand SlickEdit and click General in the tree, then double-click the General setting. On the
General Options dialog, select the More Tab, then clear the option CUA Text Box.
Text Box Editing Keys
The table below contains a list of the key shortcuts (based on the CUA emulation) that can be used inside
the command line and other text boxes within SlickEdit Core.
Table 3.3. Text Box Editing Key
Key or Key Sequence Operation
Insert Insert mode toggle
Spacebar Expand partially-typed parameter or insert a space
35
Page 58

Key Shortcuts in Text Boxes
Key or Key Sequence Operation
? List matches to partially-typed parameter
Ctrl+Shift+O Expand alias
Ctrl+E Cut to end of line
Ctrl+Backspace Cut line
Ctrl+K Copy word to clipboard
Ctrl+Shift+K Cut word
Ctrl+Shift+L Lowercase word
Ctrl+Left arrow Previous word
Ctrl+Right arrow Next word
Ctrl+V Paste
Ctrl+X Cut
Ctrl+C Copy
Ctrl+Shift+X Append cut
Ctrl+Shift+C Append to clipboard
Ctrl+Shift+V List clipboards
Shift+Home Select text between cursor and beginning of line
Shift+End Select text between cursor and end of line
Shift+Click Extend selection to mouse position
Backspace Delete previous character or selection
Delete Delete character under cursor or selection
Left arrow Move cursor left
Right arrow Move cursor right
36
Page 59

Redefining Common Keys
Key or Key Sequence Operation
End Move cursor to end of line
Home Move cursor to beginning of line
Double-click Select word
Triple-click Select line
Redefining Common Keys
Many users have a preference for the functions of the keys Backspace, Delete, Enter, Tab, and Home.
The Redefine Common Keys dialog is designed for changing the function of these keys. To access this
dialog, from the main menu, click Window → Preferences, expand SlickEdit and click General in the
tree, then double-click the Redefine Common Keys setting.
Figure 3.5. Redefine Common Keys Dialog
37
Page 60

Redefining Common Keys
In the Key list box, select the name of the key that you want to configure. The commands available for
that key are then displayed in the Command list box. Additional options can be set using the check
boxes.
Click the Tab Options button to change the function of the Tab key. The Indent tab of the Extension Options dialog box is displayed. For more information on changing Tab key functions, see Indenting with
Tabs.
For descriptions of all the elements on the Redefine Common Keys dialog, see Redefine Common Keys
Dialog.
38
Page 61

Chapter 4. User Preferences
39
Page 62

Global Preferences
Introduction to User Preferences
SlickEdit® Core can be customized to accommodate your own individual preferences. Most user preference information is available by clicking Window → Preferences, expanding SlickEdit and clicking Gen-
eral in the tree.
User preferences are broken into two categories: preferences that apply to all languages (global preferences), and preferences that apply to specific language extensions.
Tip
If you are using SlickEdit Core in a multiple user environment, each user must pass a local directory to eclipse using the command line flag -vsconfig. This allows each user to have their own
configuration. If making modifications to vslick.ini, make a local copy of this file and place it
in the -vsconfig directory file. See Changing the Configuration Directory for more information.
Global Preferences
Global preferences that can be set include the following:
• Emulation modes (see Emulations)
• Fonts and colors (see Setting Fonts and Colors)
• Auto Restore settings (see Restoring Settings on Startup)
Other global preferences, such as search settings, selection styles, etc., can be configured by using the
General Options dialog (click Window → Preferences, expand SlickEdit and click General in the tree,
then double-click the General setting). These options are described in the documentation on a contextual
basis. For a flat listing of the options on the General Options dialog, see General Options Dialog.
Extension-Specific Preferences
The behavior of the editor can be customized for files based on specific language extensions. Indent,
Word Wrap, Commenting, Auto-Complete, Context Tagging®, and other code-style settings are all extension-specific. These settings are located on the Extension Options dialog (click Window → Preferences,
expand SlickEdit and click General in the tree, then double-click the File Extension Setup setting). The
options are described in the documentation on a contextual basis. For a flat listing of the options on the
Extension Options dialog, see Extension Options Dialog.
For more information about working with language extensions, see Language-Specific Editing Overview.
40
Page 63

Supported Emulations
Emulations
Emulation is the process of imitating another program. SlickEdit® Core provides emulations of key bind-
ings for 13 editors so that you can use the style to which you are accustomed, making your coding experience as efficient as possible.
The Key Bindings dialog allows you see what keys or key sequences are bound to what commands.
Emulation charts are also available as printable PDF documents in the docs subdirectory of your SlickEdit Core installation directory. See Key and Mouse Bindings for more information.
Supported Emulations
This section lists each emulation mode and any special notes.
• BBEdit
• Brief - This emulation relies heavily on Alt key bindings. In addition to Brief emulation support,
SlickEdit® Core also supports Brief regular expressions. See Regular Expression Syntax for more information.
• CodeWarrior
• CodeWright
• CUA - CUA is an acronym for Common User Interface, a standard set of user interface guidelines simil-
ar to those used in Microsoft products. This is the default emulation mode used by SlickEdit Core.
• Epsilon - This emulation relies heavily on Ctrl+X and Escape (meta) key bindings.
• GNU Emacs - This emulation relies heavily on Ctrl+X and Escape (meta) key bindings. It does not in-
clude an Emacs Lisp emulator.
• ISPF - Support is included for ISPF prefix line commands, the ISPF command line, rulers, line number-
ing, and some XEDIT extensions. In addition to the ISPF emulation charts, additional documentation
about using this emulation is available—see Using the ISPF and XEDIT Emulations.
• SlickEdit® (Text Mode Edition)
• Vim - The Vim emulation contains special keys and key sequences that are case-sensitive. A plus (+)
sign separates the simultaneous key presses. For example, the key binding Ctrl+x,k, which closes the
current file, indicates to press at the same time the Ctrl key and lowercase x, release, then press k to
insert the lowercase k. Another example is the key binding gP, which pastes the text before the cursor.
Press the G key (which inserts a lowercase g), release, then press Shift plus p at the same time (which
inserts the uppercase P).
• Visual C++ 6
• Visual Studio - The key bindings provided for the Visual Studio emulation are not the same as the key
bindings used in Visual C++, but there might be some overlap. If Microsoft Visual Studio does not
41
Page 64

Changing Emulations
provide a default key binding for a particular SlickEdit Core command, the corresponding Visual C++
key binding is used.
• Xcode
Changing Emulations
After SlickEdit® Core is installed, you are prompted to choose an emulation. CUA is the default emulation
mode. Key bindings and shortcuts mentioned in our documentation are based on this emulation. You can
change emulation modes at any time: Click Window → Preferences, expand SlickEdit and click Gener-
al in the tree, then double-click the Emulation setting.
Figure 4.1. Emulation Options
You should save custom key/mouse bindings for the current emulation before switching emulations. You
can do this by exporting your custom bindings using the Key Bindings dialog (see Exporting and Importing
Bindings), or you can save using the prompt that appears when switching emulations.
Figure 4.2. Emulation Prompt
42
Page 65

Determining Keys/Functions
By saving your custom key bindings when you switch emulations, when you return to the original emulation those bindings are automatically available. For example, if you have created and saved custom bindings in the CUA emulation, and then switch to Vim, switching back to CUA will make your custom bindings for CUA available again.
To remove custom key bindings for an emulation, resetting to the defaults, select the Restore to default
key bindings option in the Emulation settings.
See Managing Bindings for more information on working with custom bindings.
Determining Keys/Functions
When/if you switch emulations, the key bindings that are assigned to commands change according to the
emulation chosen. You can use the Key Bindings dialog to look up what command is bound to what key
or key sequence (or vice-versa), or you can use the SlickEdit® Core menu and command line to determine these items. See Key and Mouse Bindings and Using the Command Line to View Key Binding Associ-
ations for more information.
43
Page 66

What is a Binding?
Key and Mouse Bindings
Key and mouse bindings are quick ways to execute operations in SlickEdit® Core. Key bindings are the
most efficient. Time is wasted each time you lift your hand from the keyboard to grab the mouse, and
more time is wasted when you move your hand back to the keyboard in preparation for more typing.
Therefore, if you learn the key bindings associated with operations that you use most frequently, you will
save time coding. If an operation you use frequently isn’t already bound by default, create your own easyto-remember binding.
What is a Binding?
A key or mouse binding is a key sequence or mouse event associated with a command. Key terms are
defined as follows:
• Mouse event - The clicking of any button or motion of the mouse wheel.
• Key sequence - A series of one or more keys or key combinations. For example, Ctrl+X,R.
• Key combination - Two or more keys pressed simultaneously. For example, Ctrl+O.
• Key - Any single key on the keyboard.
An example of a key binding with one key combination is Ctrl+O (in CUA emulation, associated with the
gui_open command and File → Open File). The plus (+) sign between the keys indicates that these keys
must be pressed simultaneously: press the Ctrl and O keys at the same time. Note that the last key is
case-insensitive. You do not need to press Shift.
An example of a key binding with a key sequence is Ctrl+X,R (in Vim emulation, this binding is associated
with the redo command and Edit → Redo). The comma (,) indicates that each key must be pressed consecutively: press Ctrl and X at the same time, release, then press the R key.
To view or change bindings, create new bindings, and export/import custom bindings, see Managing
Bindings.
The available key bindings change depending on the selected emulation. While SlickEdit® Core provides
emulations for 13 editors, CUA is the default emulation, so key bindings listed throughout the documentation will be for the CUA emulation. To change the emulation mode, click Window → Preferences, expand
SlickEdit and click General in the tree, then double-click the Emulation setting. For more information,
see Emulations.
Note
• For documentation purposes, both mouse events and keys that are bound to commands are often referred to collectively as key bindings.
• The main menu displays the key bindings for commands associated with each menu entry. See
Menus Accessing Menus and Creating and Editing Menus for more information.
44
Page 67

Managing Bindings
• A menu hotkey is a key sequence that corresponds to an underlined letter on a menu name.
Managing Bindings
Create and manage key bindings using the Key Bindings dialog. The dialog displays a list of all SlickEdit®
Core commands, including macros that you have recorded, their associated key sequences, and the language editing mode in which the key binding can be used. Documentation for the selected command, if
available, is also displayed. The Key Bindings dialog provides capabilities to incrementally search by
command or by key sequence, export and import custom bindings, save an HTML chart of your bindings,
and run a selected command or user-recorded macro.
To access the Key Bindings dialog, click Window → Preferences, expand SlickEdit and click General in
the tree, then double-click the Key Bindings setting, or use the gui_keybindings command.
The first time the Key Bindings dialog is invoked, the Building Tag File progress bar may be displayed
while Slick-C® macro code is tagged.
Figure 4.3. Key Bindings Dialog
45
Page 68

Managing Bindings
Bindings are based on the editor emulation mode (CUA is the default). The title bar of the Key Bindings
dialog shows the current emulation. (To change the emulation mode, see Changing Emulations.)
The Search by command and Search by key sequence boxes are used to filter the data. See Viewing
and Filtering Bindings.
The Command column shows all of the SlickEdit Core commands including macros that you have recorded. The Key Sequence column shows the key sequence or mouse event to which the command/macro
is bound. If there is no binding, this field is empty. The Mode column shows the language editing mode to
which the binding is assigned. The Recorded column indicates if the item is a command (No) or userrecorded macro (Yes).
Tip
What is a language editing mode? SlickEdit Core uses the extension of the current file to determine what language you are using, thereby only making available the options and features that are
possible or useful in that language. You can also manually set the language editing mode. See
46
Page 69

Managing Bindings
Language Editing Modes for more information.
The bottom of the dialog contains documentation (if available) for the selected command.
Columns can be sorted by clicking on the column headers. An up or down arrow in the column header in-
dicates ascending or descending sort order. All of the columns as well as the documentation pane can be
resized by dragging the separator bars.
The sections below describe different ways to use the Key Bindings dialog. For a listing and descriptions
of elements on this dialog, see Key Bindings Dialog.
Viewing and Filtering Bindings
You can filter the data in the Key Bindings dialog by using the Search by command and Search by key
sequence boxes at the top. This is useful for finding a command/macro for creating, editing, or removing
a binding, and for determining what key sequences are associated with a command/macro and viceversa.
• To find a command/macro, search for it by entering a string in the Search by command box. The
column of commands is filtered incrementally as you type, to show only commands that contain the
specified string. Commands that have more than one key sequence associated with them are listed on
separate rows. For example, in CUA emulation, the command gui_open is bound to F7 and Ctrl+O.
Therefore, gui_open appears in the Command column three times–one row per key sequence.
• To find a key sequence, place the focus in the Search by key sequence box (by tabbing or using the
mouse) and then press the actual key or key sequence. The column of key sequences is filtered to
show only bound sequences that contain the specified key(s). For example, to see all commands/macros that are bound to Ctrl+O, with the focus in the search box, simply press Ctrl+O.
To clear either field, click the red X button to the right of each box. This is especially handy for the key sequence search, due to the fact that the field recognizes any keyboard/mouse input including Backspace.
Alternatively, you can use the what_is and where_is commands (Help → What Is Key and Help →
Where Is Command) on the SlickEdit Core command line to determine binding associations. See Using
the Command Line to View Key Binding Associations for more information.
Creating Bindings
You can work more efficiently if you create key/mouse bindings for commands or user-recorded macros
that you use frequently. To create a new key or mouse binding:
1. Using the Key Bindings dialog, find the command or user macro you want to bind. You can search for a
command/macro by entering a string in the Search by command box (see Viewing and Filtering Bind-
ings).
2. Initiate the binding by using one of the following methods:
• Select the row, then click the Add button.
• Select the row, then press Enter.
47
Page 70

Managing Bindings
• Double-click on the row.
3. When you initiate a binding, the Bind Key dialog is displayed with focus in the Key Sequence box.
Figure 4.4. Bind Key Dialog
• For a key binding, press the key sequence just as you would to use it. For example, to bind surround_with to Ctrl+W, simply press Ctrl+W. The key sequence you pressed is displayed in the box.
• For a mouse binding, click the mouse button you want to use. For example, to bind surround_with
to the right-click mouse event, simply right-click with the mouse, and RButtonDn is displayed in the
box.
Use the red X button to clear the input field if you make a mistake. If you enter a key sequence or
mouse event that is already assigned to another command/macro, a warning prompt is displayed. If
you continue, the previous binding is unbound and reassigned.
Tip
• SlickEdit Core allows key sequences that are very long, but shorter sequences are easier to remember and more practical to use.
• Do not begin key sequences with keys that are normally used in typing. Otherwise, these keys
will launch the operation and not appear when you type. For example, binding a command to
the A key will prevent you from using that letter in your code. It is best to always begin your key
sequences with a Ctrl or Alt key combination.
4. The default language editing mode is the default language editing mode for new bindings, which
means the binding will work in all language editing modes. If you want the binding to work only in a
48
Page 71

Managing Bindings
specific language editing mode, you can change it now by clicking the Advanced button on the Bind
Key dialog. Click Bind to mode, then from the drop-down list, select the mode for which the binding
should apply. Bindings assigned to a specific language editing mode override those assigned to de-
fault.
Tip
You can create multiple bindings for the same command/macro and have one binding set to default and the others set to specific modes. In this case, when you are editing in a specified mode,
that binding is in effect, and when editing in any other language editing mode not specified, the
default binding will be in effect. For example, in CUA emulation, Ctrl+L is bound to select_line by
default, but when in HTML mode, you may want to use Ctrl+L to insert an HTML link instead (in-
sert_html_link command). Therefore, you can bind Ctrl+L to insert_html_link and specify the
HTML mode for use only when editing HTML files.
5. When finished, click Bind. The key sequence or mouse event now appears in the Key Sequence
column on the Key Bindings dialog.
Editing Bindings
To change the binding or language editing mode for a command/macro that is already bound, you will
need to first unbind the command/macro, then recreate it. See Removing Bindings and Creating Bindings.
If you have advanced knowledge of SlickEdit® Core, you can edit the Slick-C® key binding source directly.
See Editing the Key Binding Source for more information.
Removing Bindings
To remove a binding:
1. Using the Key Bindings dialog, find the command/user macro or key sequence that you want to unbind.
You can search by using the search boxes at the top (see Viewing and Filtering Bindings).
2. With the command/macro row selected, click Remove, or press Delete. You are prompted to confirm
the unbind operation.
Exporting and Importing Bindings
Key and mouse bindings can be exported out of the editor and imported in, useful for creating backups,
sharing with other team members, or taking with you should you switch computers.
Exporting Bindings
When you export bindings using the Key Bindings dialog, custom bindings for all language editing modes
in the current emulation are exported into an XML file with a name and location that you can specify.
To export your bindings:
1. Click the Export button on the Key Bindings dialog. The Save As dialog is displayed.
49
Page 72

Key Binding Settings
2. If you want, change the directory location and change the file name to something more meaningful to
you, such as myname_cua.xml.
3. Click Save.
Importing Bindings
Imported bindings override any existing bindings for the selected emulation. For example, if you have the
surround_with command bound to Ctrl+W, and import surround_with bound to Ctrl+Q, then Ctrl+Q is
now the binding for that command in the selected emulation. When you import for the selected emulation,
SlickEdit® Core resets the key bindings to the default, then loads the user key bindings.
If you import a key bindings file from a different emulation than the one currently selected, a warning is
displayed that prompts whether or not you want to continue. If you continue, the emulation mode is
changed and the key bindings are loaded for that emulation.
To import bindings:
1. Click the Import button on the Key Bindings dialog. The Open dialog is displayed.
2. Find and select a bindings file that was previously exported, then click Open.
Saving a Bindings Chart
Click the Save Chart button on the Key Bindings dialog to save an HTML reference chart of all current
bindings for all language editing modes in the selected emulation. Commands and user macros that are
not bound are not included.
Running a Command/Macro using the Key Bindings Dialog
If you have the Key Bindings dialog open, you can conveniently run a selected command or user-recorded macro by clicking the Run button.
Resetting Default Bindings
To reset bindings for the selected emulation to the SlickEdit® Core defaults, from the main menu, click
Window → Preferences, expand SlickEdit and click Emulation in the tree, then select the Restore to
default key bindings option. See Emulations for more information.
Key Binding Settings
The following are settings that you can make pertaining to key bindings.
Key Message Delay
For key bindings that contain multiple key combinations, like Ctrl+X,Ctrl+C, you can specify the maximum delay between the two combinations. If that time limit is exceeded, this key sequence will be interpreted as two separate bindings, executing the command bound to Ctrl+X followed by the command
50
Page 73

Cursor, Mouse, and Scroll Set-
tings
bound to Ctrl+C, rather than the command bound to Ctrl+X,Ctrl+C.
To change this option, click Window → Preferences, expand SlickEdit and click General in the tree,
then double-click the General setting. On the General Options dialog, select the More Tab. In the Key
message delay spin box, enter the amount to delay before a prefix key in tenths of a second. The prefix
key is not displayed if the next key is pressed before the delay specified in this text box.
Using Shorter Key Names in Menus
The main menu displays the key bindings for commands associated with each menu entry. These bindings can be condensed for non-CUA emulations. See Menus for more information.
51
Page 74

Setting the Cursor Style
Cursor, Mouse, and Scroll Settings
This section describes settings for the cursor, mouse, and scroll style. For cursor navigation information,
see Cursor Navigation.
Setting the Cursor Style
You can use a text mode style cursor instead of a vertical cursor. To set this option, from the main menu,
click Window → Preferences, expand SlickEdit and click General in the tree, then double-click the Gen-
eral setting. On the General Options dialog, select the More Tab, then select the option Use block cursor.
Hiding the Mouse Pointer
To hide the mouse pointer when typing, from the main menu, click Window → Preferences, expand
SlickEdit and click General in the tree, then double-click the General setting. On the General Options
dialog, select the More Tab, then select the option Hide mouse pointer. The mouse pointer is then only
displayed when moving the mouse or when a dialog box is displayed.
Displaying Tool Tips
By default, hovering the mouse pointer over a button displays a tool tip about the item. To turn tool tips off
or to change the amount of time before tool tips are displayed, from the main menu, click Window →
Preferences, expand SlickEdit and click General in the tree, then double-click the General setting. On
the General Options dialog, select the More Tab, then clear the option Show tool tips, or change the
value in the Delay spin box. The Delay value is in tenths of a second.
Scroll Style Settings
To set the scroll style, select the More Tab on the General Options dialog, then select the Scroll style
setting that you wish to use. Commands that move the cursor more than one page of text, such as
searching, always center scroll text into view. The following scroll settings are available:
• Center - When center scrolling is on and the cursor moves out of view the cursor will be centered and
the text will move by half the height or width of the window.
• Smooth - Smooth scrolling is a line by line scroll of the screen that occurs when the cursor moves out
of view. Smooth scrolling is the default configuration.
• Scroll when - Specifies how close (in number of lines) the cursor may get to the top or bottom of the
window before scrolling occurs. Does not affect horizontal scrolling.
52
Page 75

Fonts
Setting Fonts and Colors
The SlickEdit® Core editor and views do not use the Eclipse color and font settings. To change the fonts
and colors in the SlickEdit Core editor and views, change the color and font settings using the SlickEdit
Core options.
For information about changing the colors of code, such as colors used for keywords, see Color Coding.
Fonts
SlickEdit® Core provides the capability to change the fonts used by edit windows, the command line,
status text, and other screen elements. Recommended fonts are listed. You can also set fonts for editor
windows.
Tip
Xft fonts are supported on Linux.
Setting Fonts for Screen Elements
To configure font settings for screen elements, use the Font Configuration dialog. To access this dialog,
from the main menu, click Window → Preferences, expand SlickEdit and click General in the tree, then
double-click the Font setting.
Figure 4.5. Font Configuration Dialog
53
Page 76

Fonts
For descriptions of the options on this dialog, see Font Configuration Dialog.
Recommended Fonts for Elements
Font recommendations are given for the best screen display. The information below contains recommended fonts for some of the screen elements.
Note
Some font names are portable font names which are translated into other fonts. This allows SlickC® macros and dialog boxes to be portable across Windows and UNIX.
Command Line Fonts
The following table contains recommendations, based on the operating system, for the Command Line
54
Page 77

Colors
font element:
Table 4.1. Command Line Font Recommendations
Platform Font Recommendation
Windows Choose Courier, Courier New, OEM Fixed Font, or
Terminal fonts for the most visually appealing character displays.
Linux Choose Courier, Lucida Sans Typewriter or a con-
sole font for the most visually appealing character
displays. If these fonts are not visible, look for the
UNIX fonts below.
UNIX Choose Adobe Courier, B&H Lucida Typewriter, or
Width x Height family fonts for the most visually appealing fixed fonts.
Selection List Fonts
Choose Courier for best display of selection lists that need a fixed font.
Dialog Box Fonts
Choose MS Sans Serif as an attractive font for dialogs.
Text Box Fonts
Choose System or MS Sans Serif for fonts used in text boxes.
SBCS/DBCS Source Window Fonts
This is the element used for all non-Unicode source windows. Choose Terminal for the most attractive
visual display.
Unicode Source Window Fonts
Default Unicode Font is the default font for the Unicode Source Windows element. When this font is se-
lected, the Arial Unicode MS font is used if it is installed. Otherwise, the ANSI Fixed Font is used, which
only supports the English character set. Arial Unicode MS is a fairly complete font which is included with
Microsoft Office. Currently, no version of Windows ships with a complete Unicode font. For more information on Unicode support, see Using Unicode.
Colors
Use the Color Settings dialog (click Window → Preferences, expand SlickEdit and click General in the
tree, then double-click the Color setting; alternatively, use the color command) to set the color for differ-
55
Page 78

Setting Colors for Screen Ele-
ments
ent screen elements in SlickEdit® Core. This includes syntactic elements in the editor window, like
keywords, comments, strings, etc. as well as other user interface elements like the message area or the
status line. Window colors and backgrounds are set using the facilities provided by the operating system.
Color and Color Coding are different. Color Coding is a feature that combines current line coloring, modified line coloring, and language-specific coloring. SlickEdit Core recognizes and automatically displays
color support for many languages. See Color Coding for more information.
Setting Colors for Screen Elements
Colors can be customized in the user interface. Colors can be set either individually or by editing a
scheme. To change the default colors, complete the following steps:
1. From the main menu, click Window → Preferences, expand SlickEdit and click General in the tree,
then double-click the Color setting (or use the color command). The Color Settings dialog box is displayed.
Figure 4.6. Color Settings Dialog
2. Select the element you want to change from the Screen element list box (for descriptions of some of
these elements, see Color Settings Dialog).
3. Set the Foreground and Background colors by clicking on the color squares. The Color Picker dialog
56
Page 79

Setting Colors for Screen Ele-
ments
is displayed, allowing you to pick a color from the palette, or set your own custom color using RGB values.
Note
If you have chosen the Selection screen element, note that SlickEdit Core will attempt to render
selections using your normal color settings for the Foreground color. The selected foreground
color will only be used if there is not enough contrast between the font colors to be readable. It is
best to specify a Background color for selections that is as close as possible to your normal
background color, ensuring that the color-coded fonts are still easy to read.
4. If you change the background color for an element in the editor window, you can use the Sync Back-
grounds button to propagate the background color for the currently selected element to other related
elements. For example, if you change the background color for Keywords you will probably want that
same color used for Strings, Comments, Numbers, etc. The Sync Backgrounds button prevents you
from having to manually make all these changes.
5. If you want, choose a Font Style for the text.
6. Click Apply to update the colors that you have modified without closing the dialog box, or click OK to
apply the changes and close the dialog.
For a complete list of all of the options available on the Color Settings dialog, see Color Settings Dialog.
Using Color Schemes
Color schemes store the settings for all screen elements, allowing you to quickly change the look of your
editing environment. Several predefined color schemes are provided, and you can create your own.
To use color schemes, click the Schemes button on the Color Settings dialog (see the previous screen
shot). To try a different color scheme, from the Color scheme drop down text box, select a color scheme
and click Apply. A sample of the color scheme is displayed in the Sample text box. To use this color
scheme, click OK.
To define a new color scheme, set your colors for the various screen elements and click Save Scheme.
User-defined color schemes are stored in the uscheme.ini file located in your configuration directory.
You can change the name of a scheme by clicking Rename Scheme.
Setting an Embedded Language Color
The option Set embedded language color allows you to specify the colors used for embedded languages. These occur when a file of one type embeds a language of another type within it, like HTML files
containing JavaScript. For HTML, the syntax color coding recognizes the <script language="???"> tag
and uses embedded language colors for the new language. In addition, for Perl and UNIX shell scripts,
you can prefix your HERE document terminator with one of the color coding lexer names to get embedded language color coding. The following is an example for Perl:
print <<HTMLEOF
<HTML><HEAD><TITLE>...</TITLE></HEAD>
57
Page 80

<BODY>
...
</BODY>
</HTML>
HTMLEOF
Restoring Settings on Startup
58
Page 81

Restoring Settings on Startup
Restoring Settings on Startup
By default, the files, current directory, and more from the previous edit session are automatically restored
when you switch workspaces or close and re-open the editor.
To access auto restore settings, from the main menu, click Window → Preferences, expand SlickEdit
and click General in the tree, then double-click the General setting. On the General Options dialog, select
the General Tab. The Auto restore options, listed below, control which elements of your SlickEdit Core
environment that are restored.
• Files - (Unavailable in SlickEdit Core) If checked, the files and windows that were opened in your last
edit session are restored and re-opened when you start the editor.
• Clipboards - If checked, clipboards are saved across edit sessions.
• Working directory - (Unavailable in SlickEdit Core) If checked, the working directory is saved across
edit sessions.
• Workspace files - (Unavailable in SlickEdit Core) If checked, when switching workspaces, the files and
windows that were opened for a workspace when it was last closed will be restored.
• Line modify - If checked, the line modification flags are saved and restored when you save and open
files, respectively. Line modification information for the last 200 files is saved. SlickEdit Core stores line
modification information in temporary files placed in the SelDisp directory.This option works best
when the Modified Lines color coding option is selected (click Window → Preferences, expand
SlickEdit and click General in the tree, double-click the File Extension Setup setting and select the
Advanced Tab).
• Selective display - If checked, Selective Display is saved and restored when saving and opening files,
respectively. Selective Display for the last 200 files is saved. See Selective Display for more information.
• Symbol browser tree - If checked, the symbol browser tree (see Symbols View) is restored across edit
sessions. The current position (displayed selected) is always restored regardless of this setting.
59
Page 82

60
Page 83

Chapter 5. Context Tagging®
61
Page 84

Tag-Driven Navigation
Context Tagging® Overview
Context Tagging is a feature set that performs expression type, scope, and inheritance analysis as well as
symbol look-up within the current context to help you navigate and write code. Context Tagging uses an
engine that parses your code and builds a database of symbol definitions and declarations—commonly
referred to as tags. Context Tagging features work with your source code, not just standard APIs
(application program interfaces), and the features are dynamic, in the sense that symbols are updated immediately or in the background as you edit your source code.
The Context Tagging feature set includes:
• Tag-Driven Navigation
• List Members
• Parameter Information
• Auto List Compatible Parameters
• Completions
• Symbol Browsing
• Statement Level Tagging
Before you begin working with these features, some configuration is required. See Building Tag Files.
Tag-Driven Navigation
The Context Tagging® database allows you to navigate your code, jumping from a symbol to its definition
or its references. For more information, see Symbol Navigation.
List Members
When typing a member access operator (Dot, Comma, ->, and : for C++; Dot for Java; IN and OF for
COBOL), members are automatically listed. You can access this feature on demand by pressing Alt+Dot,
finding identifiers when there is no member operator (list locals, global variables, current class members,
etc.). For example, for the C language, to find a string function, type the string on the command line and
press Alt+Dot. If you want to disable automatic listing and only list members on demand, turn List Members off, as follows:
1. From the main menu, click Window → Preferences, expand SlickEdit and click General in the tree,
then double-click the File Extension Setup setting.
2. On the Extension Options dialog, select the extension you want to affect from the Extension dropdown list.
3. Select the Context Tagging Tab.
62
Page 85

Parameter Information
4. Clear the Auto-list members check box.
The following example shows the results of what is displayed after typing a Dot when entering Java
source. Notice that the Javadoc comments are displayed in a mini-HTML browser. To view documentation for Java APIs, you must install the source files as part of the JDK. If clicking on a URL, the default
HTML browser starts. Clicking on other hypertext links navigates within the comment window. The equals
method in the example below has two occurrences, one in the String class and one in the Object class.
Press Ctrl+PgDn or Ctrl+PgUp to select the next or previous occurrence.
Figure 5.1. List Members: Example 1
The example below shows the display after typing a Dot when entering C++ source code. The stack class
is one of the C++ standard template library classes.
Figure 5.2. List Members: Example 2
Parameter Information
The prototype for a function is automatically displayed when typing a function operator such as the open
parenthesis. This also highlights the current argument within the displayed prototype. When working with
C++, parameter info is also automatically displayed when typing a template argument operator such as <.
The following example shows the result of pressing Alt+Comma inside the argument list of the Java API
String method startsWith. The Javadoc comments are displayed in a mini-HTML browser. To view documentation for Java APIs, you must install the source files as part of the JDK. If clicking on a URL, the default HTML browser starts. Clicking on other hypertext links will navigate within the comment window. The
startsWith method has two overloads that accept different arguments. Press Ctrl+PgDn or Ctrl+PgUp to
63
Page 86

Auto List Compatible Paramet-
ers
select the next or previous occurrence.
Figure 5.3. Parameter Info: Example 1
The example below shows the result of pressing Alt+Comma inside the argument list of the WIN32 API
function CreateWindowEx.
Figure 5.4. Parameter Info: Example 1
Auto List Compatible Parameters
When typing a function operator such as the open parenthesis, (, a list of compatible variables and expressions for the current argument is displayed. Auto List Compatible Parameters can also be used instead of List Members, in assignment statements (x=<Alt+Comma>) and when listing members of a
class or struct. Keep in mind, not all possible variables and expressions are listed. Press Alt+Dot if the
symbol that you want is not listed. To access Auto List Compatible Parameters on demand, press
Alt+Comma. If you want to disable automatic listing and only list parameters on demand, turn Auto List
Compatible Parameters off, as follows:
1. From the main menu, click Window → Preferences, expand SlickEdit and click General in the tree,
then double-click the File Extension Setup setting.
2. On the Extension Options dialog, select the extension you want to affect from the Extension dropdown list.
3. Select the Context Tagging Tab.
64
Page 87

Completions
The following example displays the results of pressing Alt+Comma after an assignment operator. The
Rect, pRect, and argv are not listed because their types do not match.
Figure 5.5. Auto List Compatible Parameters
Completions
Completions save keystrokes as you are typing code by providing a way to automatically complete partially-typed text. Press Ctrl+Space to complete (type the rest of) the current symbol. If a unique match is
not found, a list is displayed allowing the selection of the exact match. See Completions for more information about working with this feature.
Symbol Browsing
SlickEdit® Core gives you the ability to browse and view symbols in your files or workspaces. There are
several views that display information as you work to help you find what you need exactly when you need
it. To open one of these views, click Window → Show View → Other, expand SlickEdit Views and
double-click the view you want to see.
• Class - This view provides an outline of both the members of the current class as well as any visible in-
herited members. It also shows the inheritance hierarchy of the current class.
• Outline - The Outline view provides an outline of symbols in the current workspace.
65
Page 88

Statement Level Tagging
• Find Symbol - This view is used to locate symbols (tags) in your code. It allows you to search for sym-
bols by name using either a regular expression, substring, or fast prefix match. A quicker way to access
this view is to use the Search → Find Symbol menu item.
• Preview - Preview provides a portal for viewing information in other files without having to open them in
the editor. It automatically shows this information when you are working with certain features.
• References - This view displays the list of symbol references (uses) found the last time that you used
the Go to Reference feature (Ctrl+/ or push_ref command—see Symbol Navigation for more information).
• Symbols - The Symbols view contains the symbol browser, which lists symbols from all of the tag files.
For more detailed information about these views and how SlickEdit Core can help you browse symbols,
see Symbol Browsing. For information about how to navigate between symbols in files, see Symbol Nav-
igation.
Statement Level Tagging
Statement Level Tagging is a feature of Context Tagging ® that provides a more detailed view of items in
the Outline view for C/C++, Java, Python, and Visual Basic .NET. Along with definitions, view constructs
like if, while, and for statements. It also displays every non-comment line of code. To see this feature in
action, from the Outline View, right-click and select Show Statements.
66
Page 89

Building Tag Files
Building and Managing Tag Files
Context Tagging® creates tag files to store information about symbols and, optionally, cross-reference information from your source code. Many of the most powerful SlickEdit® Core features use this information
to speed your coding.
Building Tag Files
Tag files are automatically created and maintained for files in the workspace (see Creating Tag Files for
Run-Time Libraries). You may need to create extension-specific tag files for compiler includes or other lib-
raries that you have (see Tagging Run-Time Libraries).
After a tag file is created, it is updated in the background when you make modifications. If you modify
some source files using a different application, you will need to rebuild the tag file. Tag file names have
the extension .vtg. By separating tag files for different languages, the Context Tagging features can
identify symbol information for the file that you are currently editing.
Creating Tag Files for Run-Time Libraries
The Create Tag Files for Run-Time Libraries dialog appears when SlickEdit® Core is run for the first time.
It allows you to build tag files for commonly used languages and their libraries, including C, C++, Java,
and .NET. You can access this dialog at any time in order to create tag files, from the Context Tagging -
Tag Files Dialog (click Tools → Tag Files, then click Auto Tag).
Figure 5.6. Automatic Tagging Dialog
67
Page 90

Building Tag Files
To create tag files for the languages listed, enter the base directory for your package (if it is not already
filled in), as well as the destination of your tag file. Click Create tag file(s) and the Building Tag Files dialog box opens showing the progress as the tag file is built.
For source files other than these languages, use the Add Tag File dialog, which allows you to choose
from a list of languages the source type for which to insert the tag file. See Creating Extension-Specific
Tag Files below.
Creating Extension-Specific Tag Files
Extension-specific tag files provide the same symbolic information for libraries that is provided for code in
your projects. A library is a pre-built unit of code that is not edited as part of this development effort.
These tag files are accessible from any project written in the same language.
You need to create an extension-specific tag file if your project uses a compiler whose standard libraries
are not tagged by the Create Tag Files for Run-Time Libraries dialog (see Creating Tag Files for Run-
Time Libraries) or if you are using a third-party library.Additionally, you may have local libraries that are
reused from project to project.
To create an extension-specific tag file, complete the following steps:
1. From the main menu, click Tools → Tag Files. The Context Tagging - Tag Files Dialog is displayed.
2. Click Add Tag File to open the Add Tag File dialog.
Figure 5.7. Add Tag File Dialog
3. Select the source type into which you want the tag file inserted. Select Generate References only if
you want library functions to be shown when you list references.
Note
68
Page 91

Building Tag Files
Generate References creates an inverted file index so that you can quickly find which files con-
tain which symbols. Workspace tag files create this index by default. This information is used to
build a list of references (using the push_ref command, bound to Ctrl+/ in the CUA emulation). In
general, it’s better to have the reference list contain functions that are part of this workspace and
not in libraries. If Generate References is not checked, you will still be able to jump from a symbol to its definition in a library using Ctrl+Dot (push_tag).
This option is off by default since most programmers do not want to see library functions shown in
the reference list.
4. Click OK. The Add Tags Database dialog opens.
Figure 5.8. Add Tags Database Dialog
5. Select an existing tag file or enter the name for the new tag file. Tag files have the extension .vtg.
6. Click Open to display the Add Tree dialog. Navigate to the root of the library source code and click the
OK button.
7. The Building Tag File dialog opens showing the progress as the tag file is built. When finished, the contents are displayed in the Context Tagging® - Tag Files dialog.
69
Page 92

Managing Tag Files
See Managing Tag Files for more information.
Tagging Run-Time Libraries
Create extension-specific tag files for include files of compiler packages or utility libraries or both. This allows the Context Tagging® feature set to work for all symbols, not just those symbols in the project. Context Tagging needs all symbol information to work properly.
A tag file is automatically built for the run-time libraries of C#, InstallShield, JavaScript, Perl, PV-WAVE,
Slick-C®, Tornado, TCL, and Visual Basic .NET, and usually it is not necessary to build tag files for the
run-times of these languages. If you already built a tag file for run-times during installation, you can skip
this section. If you are using Perl, Python, or TCL, and the compiler cannot be found in PATH (or registry
for Windows), you need to build tag files for these run-time libraries.
Configuring Context Tagging® for COBOL
All of the Context Tagging features for COBOL, except Parameter Information, are provided by scanning
COBOL source file and the copy books that are included. This information is used by List Members, completions, tag-driven navigation, symbol preview, and in the Outline view. Parameter Information for COBOL commands and intrinsic functions are provided by the COBOL built-ins file created during product installation. To provide Parameter Information for subroutines, you must build a tag file that will hold linkage
information from the subroutine’s point of view.
Managing Tag Files
The Context Tagging - Tag Files Dialog (Tools → Tag Files) is used to manage your tag files.
Figure 5.9. Context Tagging® - Tag Files Dialog
70
Page 93

Managing Tag Files
The left pane of the dialog lists all of your tag files, separated into categories (see Tag File Categories be-
low). A tag file having a File bitmap with blue arrows indicates the tag file is built with support for crossreferencing. The right pane of the dialog lists all the source files indexed by the currently selected tag file.
For information about the buttons available, see Context Tagging - Tag Files Dialog.
Tag File Categories
The Tag File categories, described below, are listed on the left side of the Context Tagging ® - Tag Files
dialog (Tools → Tag Files).
• Workspace Tag Files - The tag files for the current active workspace. Each project in the workspace
has a separate tag file. Visible only if a workspace is open.
• Auto-Updated Tag Files - These tag files are designed to be shared by multiple users of the editor on
a network. You can use the vsmktags utility to rebuild these tag files as part of your nightly build process. When SlickEdit® Core detects that a newer version of an auto-updated tag file is available, it will
automatically copy in the newer version and begin using it.
• "C" Compiler Configuration Tag Files - These tag files correspond to one of the C/C++ compiler con-
figurations. These may be configured by using the C/C++ Compiler Properties dialog box (Tools →
C++ Refactoring → C/C++ Compiler Options). See C/C++ Compiler Settings for more information.
• "Java" Compiler Configuration Tag Files - These tag files correspond to one of the Java compiler
configurations. These may be configured by using the Java Compiler Properties dialog box (Tools →
Tag Files → Auto Tag and click the Browse button beside the Java Compiler drop-down menu.
71
Page 94

Managing Tag Files
• Other Extension-Specific Tag Categories - The tag files listed under each of the other language-spe-
cific categories apply to that language only. Use these categories to add tag files for third-party libraries.
Tag File Search Order
When doing tag lookups, the tag files are searched in a specific order, which affects the tags found. The
following are examples of the order in which tag files are searched.
Example: Java Tag File Search Order
If a Java source file is open, when a tagging-related operation is performed, the tag files are searched in
the following order:
1. Workspace tag file, providing it contains other Java source files.
2. Auto-updated tag files containing other Java source files.
3. The "Java" Compiler Configuration tag file corresponding to the Java environment specified for your
project.
4. Extension-specific Java tag files, in the order that they are listed in the Context Tagging - Tag Files
Dialog.
Example: C/C++ Tag File Search Order
If a C/C++ source file is open, when a tagging-related operation is performed, the tag files are searched in
the following order:
1. Workspace tag file, providing it contains other C/C++ source files.
2. Auto-updated tag files containing other C/C++ source files.
3. The "C" Compiler Configuration tag file corresponding to your default C compiler configuration as specified in your project (C/C++ Refactoring → C/C++ Compiler Options), or global default.
4. Extension-specific C tag files, in the order that they are listed in the Context Tagging - Tag Files Dialog.
Note that if you have a "C" Compiler Configuration tag file, cpp.vtg will be excluded from this list.
Rebuilding Tag Files
The Rebuild Tag File dialog box contains options for rebuilding the selected file. To display the Rebuild
Tag File dialog, click Tools → Tag Files. When the Context Tagging - Tag Files Dialog is displayed, se-
lect a file to rebuild, then click Rebuild Tag File.
Figure 5.10. Rebuild Tag File Dialog
72
Page 95

Context Tagging® Options
The following settings are available:
• Retag modified files only - If checked, SlickEdit® Core will incrementally rebuild the tag file, only re-
tagging files that have been modified since the last time they were tagged. If not checked, SlickEdit
Core will rebuild the entire tag file from scratch.
• Generate References - If checked, the tag file will be built with support for cross-referencing. Tag files
with support for references are slightly larger and take slightly more time to build. They will also be included in all symbol references searches, which may not be necessary, especially for third-party libraries.
• Remove all deleted files without prompting - If checked and the tag file contains a source file which
no longer exists on disk, the source file will be removed from the tag file without prompting for confirmation.
• Keep all deleted files without prompting - If checked and the tag file contains a source file which no
longer exists on disk, the source file will not be removed from the tag file without prompting for confirmation.
Note
The options Remove all deleted files without prompting and Keep all deleted files without
prompting are mutually exclusive—selecting one will deselect the other.
Context Tagging® Options
General Context Tagging® Options
The Context Tagging Options Dialog allows you to set general parameters for the Context Tagging fea-
ture set. Here, you designate how tagging is done, how the references function within the application, and
you can also tune the application to maximize performance. To display this dialog, click Window → Pref-
erences, expand SlickEdit and click General in the tree, then double-click the Context Tagging Op-
73
Page 96

Context Tagging® Options
tions setting. See Context Tagging Options Dialog for descriptions of the options.
Tip
To improve tagging performance, you may need to adjust the Tag file cache size on the Virtual
Memory tab of the General Options dialog (click Window → Preferences, expand SlickEdit and
click General in the tree, then double-click the General setting). See Virtual Memory Tab for
more information.
Extension-Specific Context Tagging® Options
Context Tagging options can be configured for each file extension type. This allows you to activate and
deactivate particular features on a per-language basis. To set options, from the main menu click Window
→ Preferences, expand SlickEdit and click General in the tree, then double-click the File Extension
Setup setting. On the Extension Options dialog, select the Context Tagging® tab, then from the Extension drop-down list, select the extension you wish to work with. Options are described in the section Con-
text Tagging Tab.
74
Page 97

Chapter 6. Editing Features
75
Page 98

Code Navigation
Navigation
There are two types of navigation in SlickEdit® Core: Code Navigation, which provides in-depth symbol
navigation and structure matching, and Cursor Navigation, which pertains to more simple movements
within text and files.
Code Navigation
Some of the most powerful features in SlickEdit® Core are its code navigation methods, particularly Sym-
bol Navigation. These features allow you to navigate your code the way you think about it, rather than just
as a set of files. If you aren’t using the code navigation features in SlickEdit® Core, then you aren’t getting
the most out of the editor.
Symbol Navigation
Symbol Navigation allows you to jump from a symbol to its definition or to a reference with a single keystroke. A pushed bookmark is set, allowing you to return to the symbol with another keystroke. You can
chain a series of these navigation operations together, creating a stack of locations. Then pop your way
back to the starting location.
To navigate between symbols use the following operations:
• Go to Definition - To quickly move the cursor from a symbol to its definition, pushing a bookmark in
the process, press Ctrl+Dot. Alternatively, click Navigate → Go to Definition or use the push_tag
command.
• Go to Reference - To create a list of references and optionally jump to the first one, pushing a book-
mark in the process, press Ctrl+/. Alternatively, click Navigate → Go to Reference or use the
push_ref command.
• Pop Bookmark - To pop the bookmark and return to the previous location, press Ctrl+Comma. Altern-
atively, click Search → Pop Bookmark or use the pop_bookmark command. See Pushed Bookmarks
for more information about working with bookmarks.
When you first call these operations, if a tag file does not exist for the current file, it will be built (see Build-
ing Tag Files).
Tip
• Procs and prototypes - In C and C++, navigating from a symbol to its definition will prompt
you to select whether you want to go to the prototype or the function. You can tell SlickEdit®
Core to always go to one or the other by setting one of the options Go to Definition navigates
to symbol definition (proc) or Go to Definition navigates to symbol declaration (proto).
To set these options, click Window → Preferences, expand SlickEdit and click General in the
tree, then double-click the File Extension Setup setting. On the Extension Options dialog, select the extension you want to affect from the Extension drop-down list, then select the Context
76
Page 99

Code Navigation
Tagging Tab. When the cursor is in the prototype, pressing Ctrl+Dot will navigate to the func-
tion and vice versa. If you do not set one of these options, you will be prompted with the Select
a Tag Dialog the first time you navigate from a symbol to its definition.
• Auto-close visited files - SlickEdit Core can automatically close a visited file, one that was
opened through symbol navigation but not edited. Click Window → Preferences, expand
SlickEdit and click General in the tree, then double-click the General setting. On the General
Options dialog, select the General Tab, then select the option Automatically close visited
files.
Navigating Between Multiple Instances
If more than one instance of the definition or reference is found, the Select a Tag dialog is displayed, from
which you can select the instance to navigate to. To go to the next occurrence, press Ctrl+G or use the
find_next command. To go to the previous occurrence, press Ctrl+Shift+G or use the find_prev com-
mand.
Alternatively, press Ctrl+Down (next_tag command) or Ctrl+Up (prev_tag command) to place the cursor on the next or previous symbol definition.
Using the Find Symbol View
The Find Symbol view (Search → Find Symbol) is used to locate symbols (tags) which are declared or
defined in your code. It allows you to search for symbols by name using either a regular expression, substring, or fast prefix match. See Find Symbol View for descriptions of the options that are available.
More Symbol Navigation Methods
There are several other methods for navigating to symbols:
• The Symbols View shows the symbols for all tag files. Right-click in the view window and select Find
Tag to search for a specific symbol. You can also use the cb_find command to find the symbol under
the cursor and display it in the Symbols view.
• At the SlickEdit® Core command line, use the f command and completion keys (Space and ?) to enter
a tag name. For example, if tagging the C run-time library, type f str? on the command line for a list of
tag names starting with "str" (such as strcpy, strcmp, etc.).
• To navigate to a Slick-C® symbol, you can use the fp command (a shortcut for find_proc). If editing a
Slick-C macro, then enter the push_tag command (Ctrl+Dot) to find the symbol at the cursor. The
push_tag command actually calls the find_proc command with the symbol name at the cursor to perform the task.
Begin/End Structure Matching
Begin/End Structure Matching moves the cursor from the beginning of a code structure to the end, or vice
versa. This works for languages using curly braces "{ }", "begin" and "end", or any other defined begin/end
pairs.
77
Page 100

Code Navigation
To place the cursor on the opposite end of the structure when the cursor is on a begin or end keyword
pair, press Ctrl+] (find_matching_paren command or from the menu click Navigate → Go to Matching
Parenthesis). The find_matching_paren command supports matching parenthesis pairs { }, [ ] and ( ).
Tip
For Python, SlickEdit® Core supports the matching of the colon (:) token and the end of context.
See Begin/End Structure Matching for Python for more information.
Viewing and Defining Begin/End Pairs
Use the Extension Options Dialog to view or define the begin/end pairs for any language. To access this
dialog, click Window → Preferences, expand SlickEdit and click General in the tree, then double-click
the File Extension Setup setting. On the Extension Options dialog, select the extension you wish to work
with from the Extension drop-down list, then select the Advanced Tab.
In the Begin/end pairs text field, specify the pairs in a format similar to a regular expression.
Note
This text box is unavailable for languages that have special begin/end matching built-in.
The examples below illustrate the syntax for defining the begin/end pairs. The begin and end pair matching option is case-sensitive by default. Append ;I to ignore case.
Example 1
(begin),(case)|(end);|
The above begin/end pairs are for the Pascal language. The Pascal language requires a more sophisticated expression. This expression indicates the keywords begin or case start a block and the keyword
end terminates the block. The , (comma) is used to specify multiple begins or multiple ends. The | operator is used to separate begins from ends.
Example 2
(#ifdef),(#ifndef),(#if)|(#endif)
The above pairs are for the C language. The C language has the added complication that #if is a substring of #ifdef. Due to the implementation of begin/end matching, #ifdef must appear before #if.
More settings for begin/end pairs can be found on the Formatting Options dialog specific to the extension
you are working with. From the main menu, click Window → Preferences, expand SlickEdit and click
General in the tree, then double-click the File Extension Setup setting. On the Extension Options dialog,
select the extension you wish to work with from the Extension drop-down list, then click the Options button. See the individual language sections in the chapter Chapter 7, Language-Specific Editing for more information about these options.
78
 Loading...