

Page 1
INSTALLATION MANUAL
USER GUIDE
SMART MIRROR
Page 2

5
INSTALLATION MANUAL
AND USER GUIDE
SMART
MIRROR
Lighting solution
for dressing rooms
CORRELATED
COLOUR
TEMPERATURE
SCHEDULERBRIGHTNESSMOVEMENT
SENSOR
INSTALLATION
Page 3
700 mm
44 mm
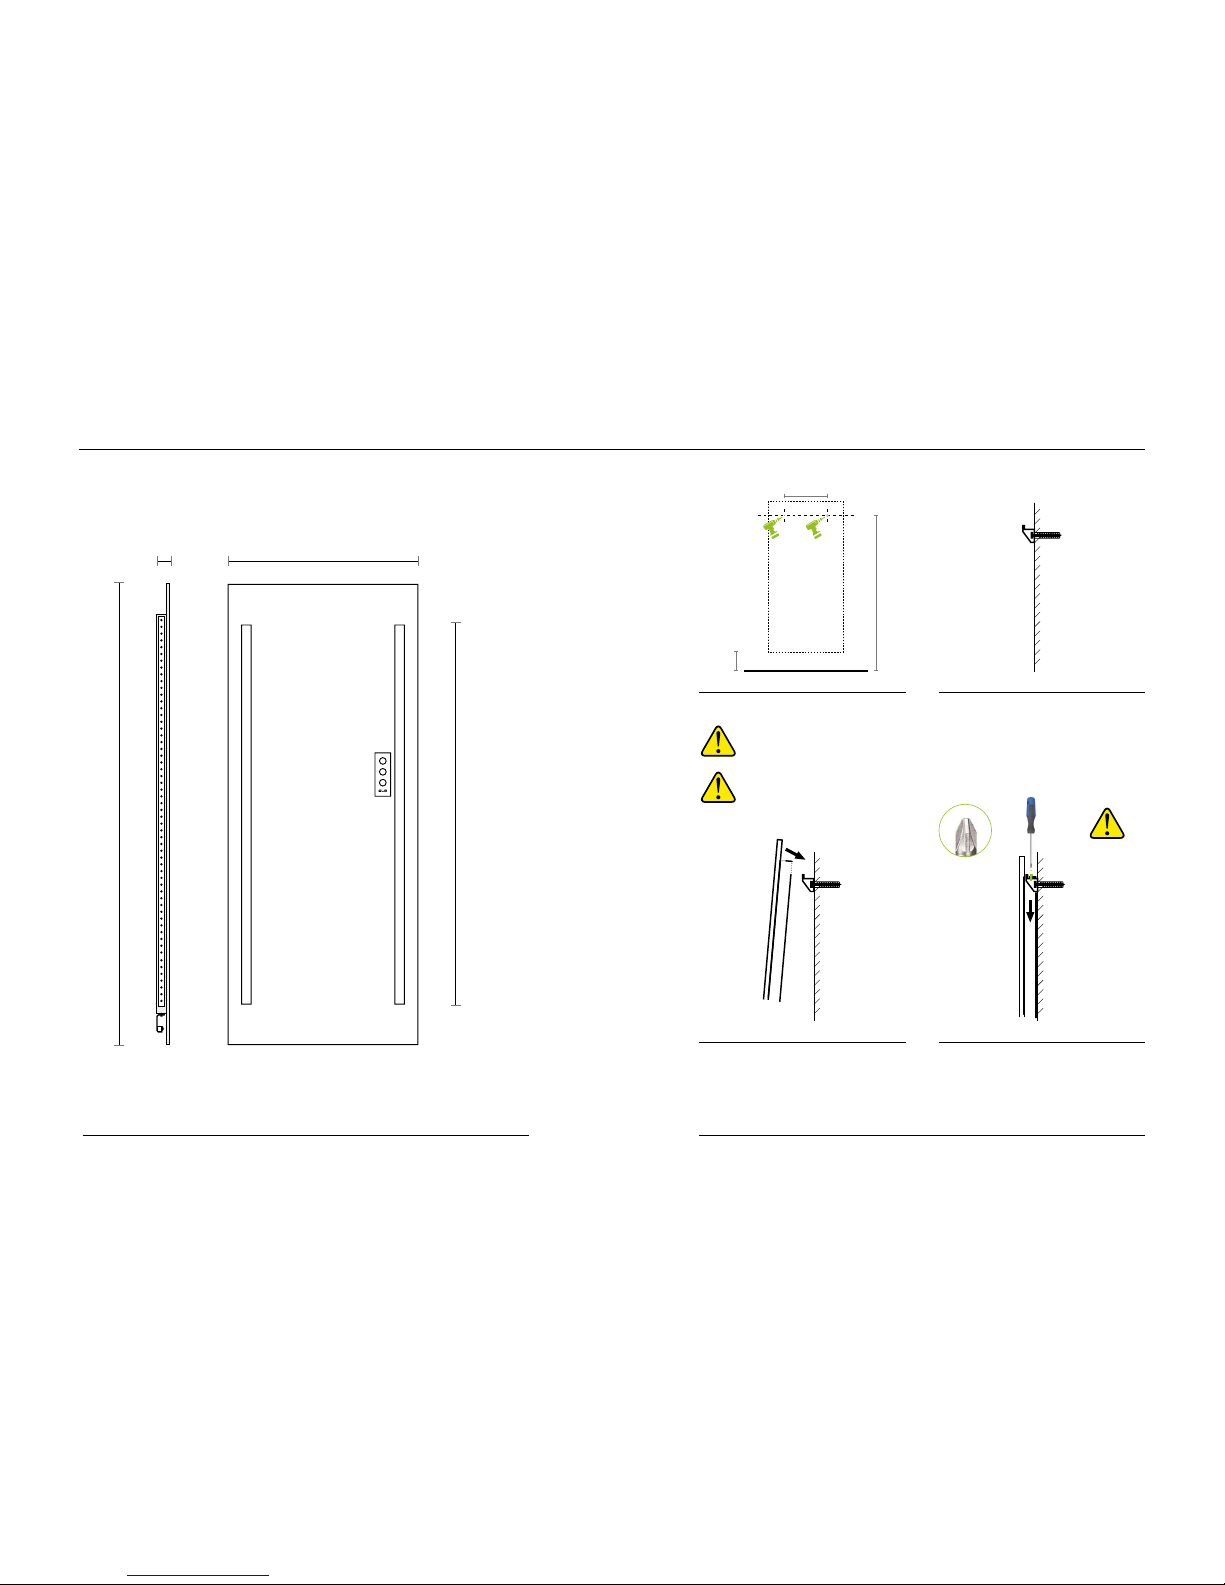
INSTALLATION
1. Drill holes according to the picture above.
NOTE: The bottom edge of the mirror has to
be at least 50 mm (ideally 200 mm) above
the ground lever so that the movement
sensor be functional.
NOTE:
You will need at
least 10 cm long
screwdriver for cross
head.
2. Insert wall plugs in the holes and screw
the wall brackets into the anchor tightly.
4. Secure the mirror with safety screws.3. Hang the mirror on the wall brackets.
NOTE: Before you hang the mirror, make
sure the sensor on the bottom side is
hidden behind the mirror, otherwise it could
get damaged.
1,800
200
400
1,700 mm
1,400 mm
Page 4
78°
0.7 m
0 m
1.0 m
1.6 m
1.0 m
78°
MOVEMENT SENSOR
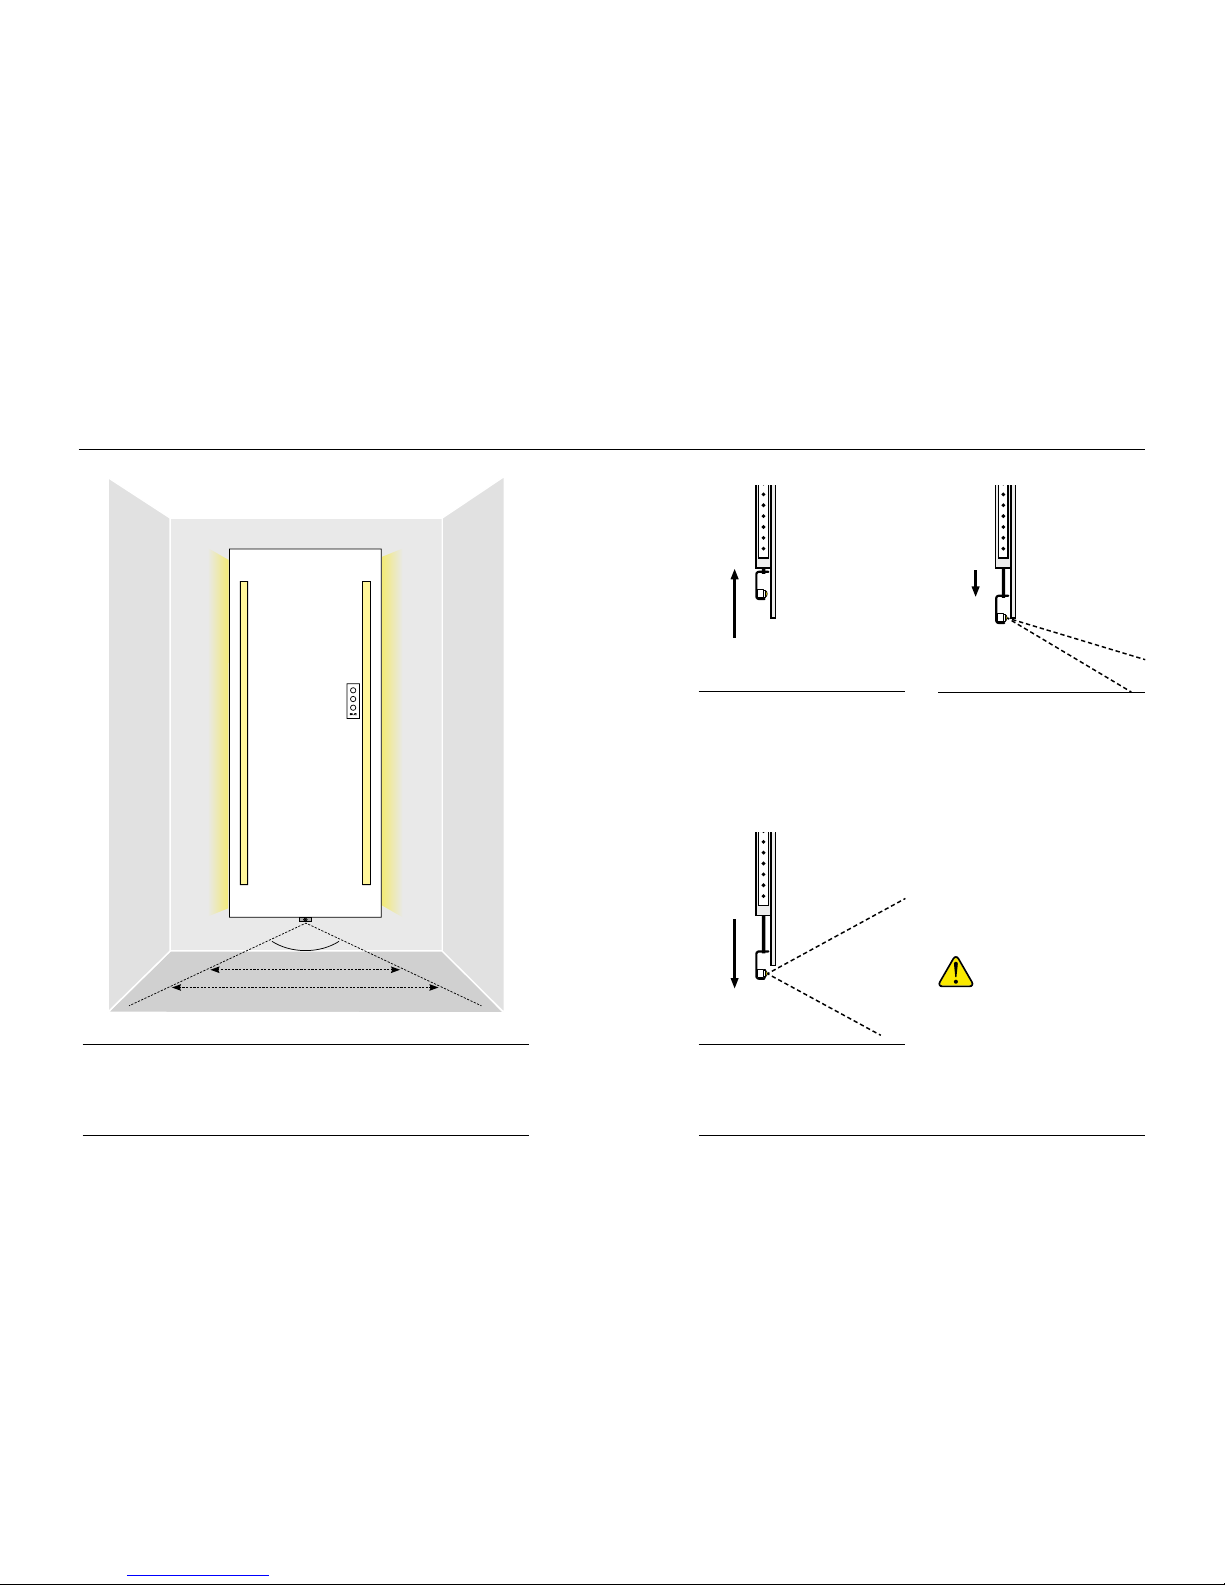
Scanning zone
The scanning angle of the PIR sensor is 78% both vertically and horizontally. In the distance
of 0.7 m from the sensor, the scanning zone will be 1 m wide (see the picture above).
Sensor position: POSITION 1
Movement sensors in the dressing rooms
which are not closed from all sides could
detect movement also from the outside of
the cubicle. In that case, pull the sensor
to the position just below the edge of the
mirror. This way, the scanning zone of the
sensor will be limited only to the space
for feet. If necessary, you can adjust the
position according to the needs of the
cubicle space.
NOTE: It is quite hard to move the pulling
mechanism. Be careful not to break it when
applying force.
Sensor position: POSITION 2
Movement sensors in the dressing rooms
which are closed from all sides can be pulled
to maximum so that the mirror would not
interfere with the scanning range at all.
Sensor position: HIDDEN
When buying the Smart Mirror, the
movement sensor on the bottom side is
hidden behind the mirror.
Page 5
1
2
3
OK
1
2
3
1
2
3
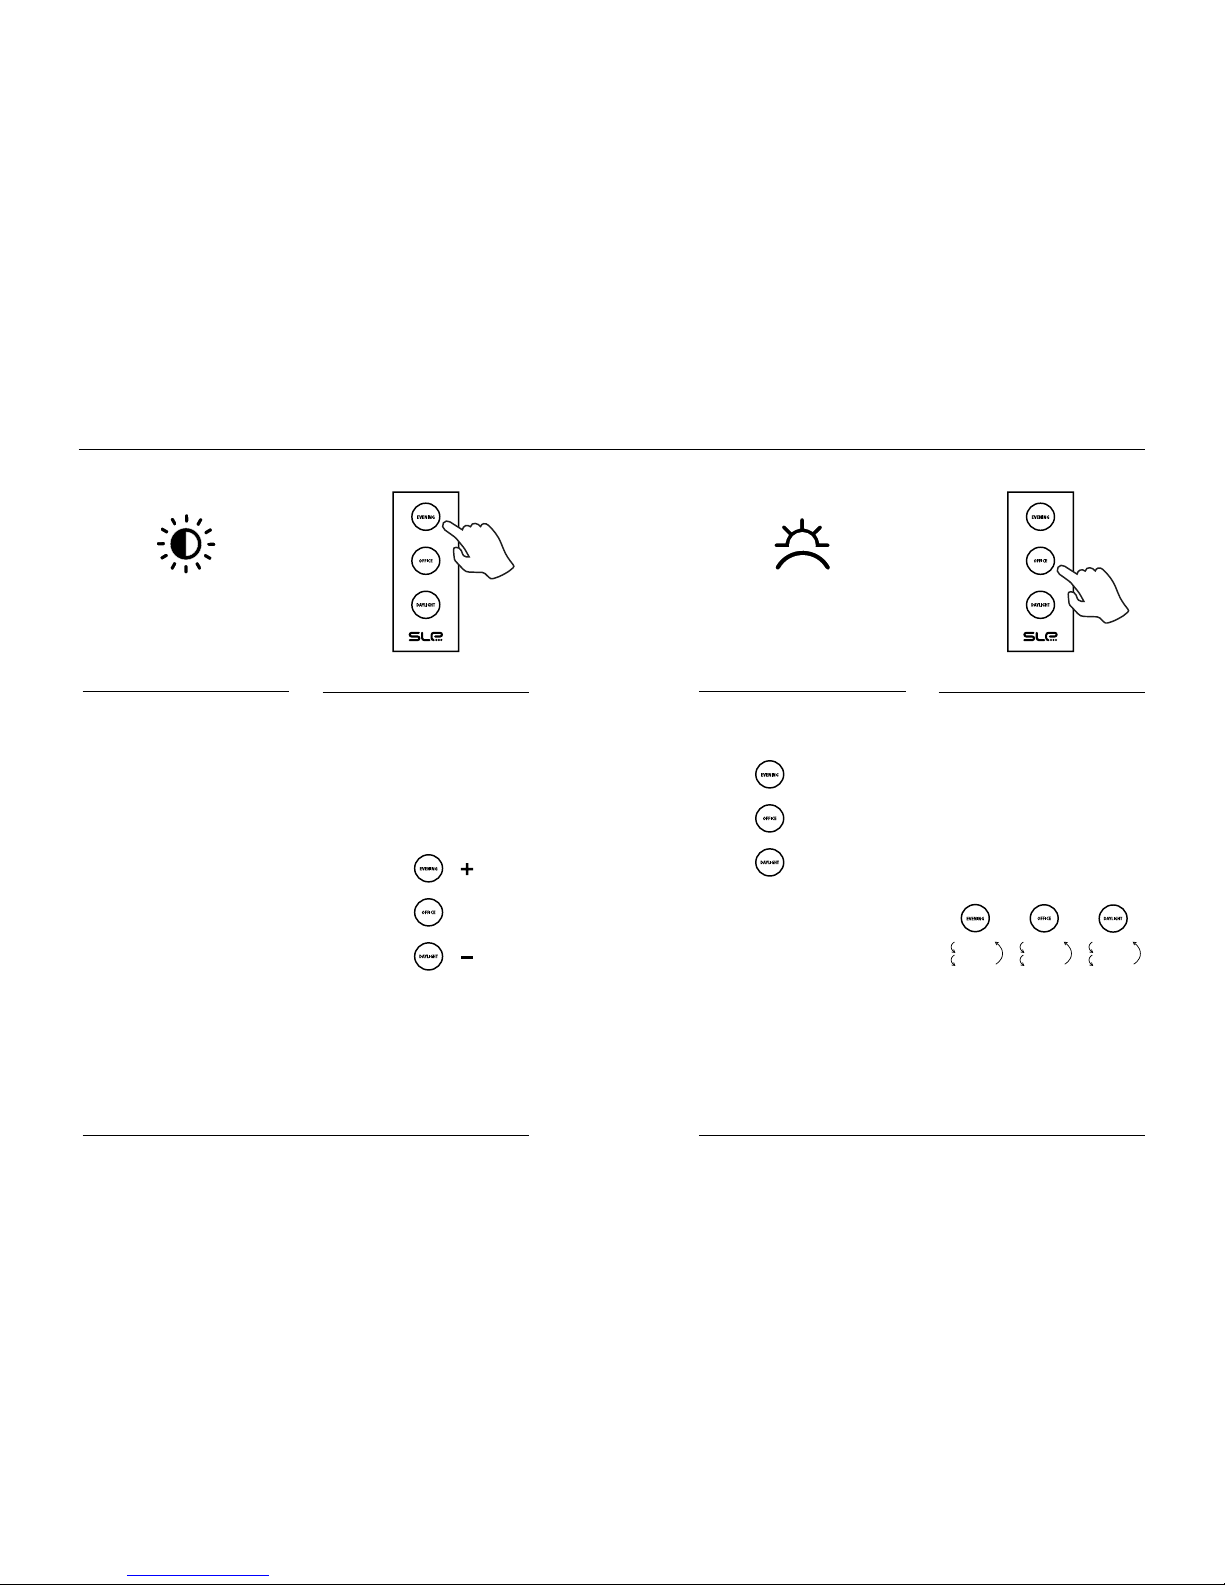
Setting
You can set up CCT.
Instructions:
1. Press the button 2 for 4 seconds
(the buttons will blink twice and pulse).
2. Press the button which you wish to set
(the selected button will be alight while
the remaining two buttons will keep
pulsing)
3. Press the selected button repeatedly
until you get the desired colour, see the
CCT schema below:
4. After you select the desired CCT, you can
move on to the next button which you
wish to set.
5. Once you have all buttons set, wait for 4
seconds to save the setting automatically
(the buttons will blink twice).
BRIGHTNESS
Setting
The brightness level can be adjusted from
10 to 100 %.
Instructions:
1. Press the button 1 for 4 seconds (the
buttons will blink twice and light up).
2. Press the buttons 1 (+) and 3 (-) to set
the desired brightness level.
3. Confirm your selection by pressing the
button 2 (OK) or wait 4 seconds to save
the setting automatically (the buttons
will blink twice).
Brightness
Brightness is set to 100 % by the
manufacturer.
4 seconds
Correlated Colour Temperature
(CCT)
CCT is set by the manufacturer as follows:
CORRELATED COLOUR TEMPERATURE (CCT)
2,500 K (default)
3,000 K
3,500 K
4,000 K (default)
4,500 K
5,000 K
5,500 K
6,000 K
6,500 K (default)
4 seconds
Warm
Neutral
Cold
2,500 K
3,000 K
3,500 K
4,000 K
4,500 K
5,000 K
5,500 K
6,000 K
6,500 K
Page 6
1 1
2
3 3
2
Settings
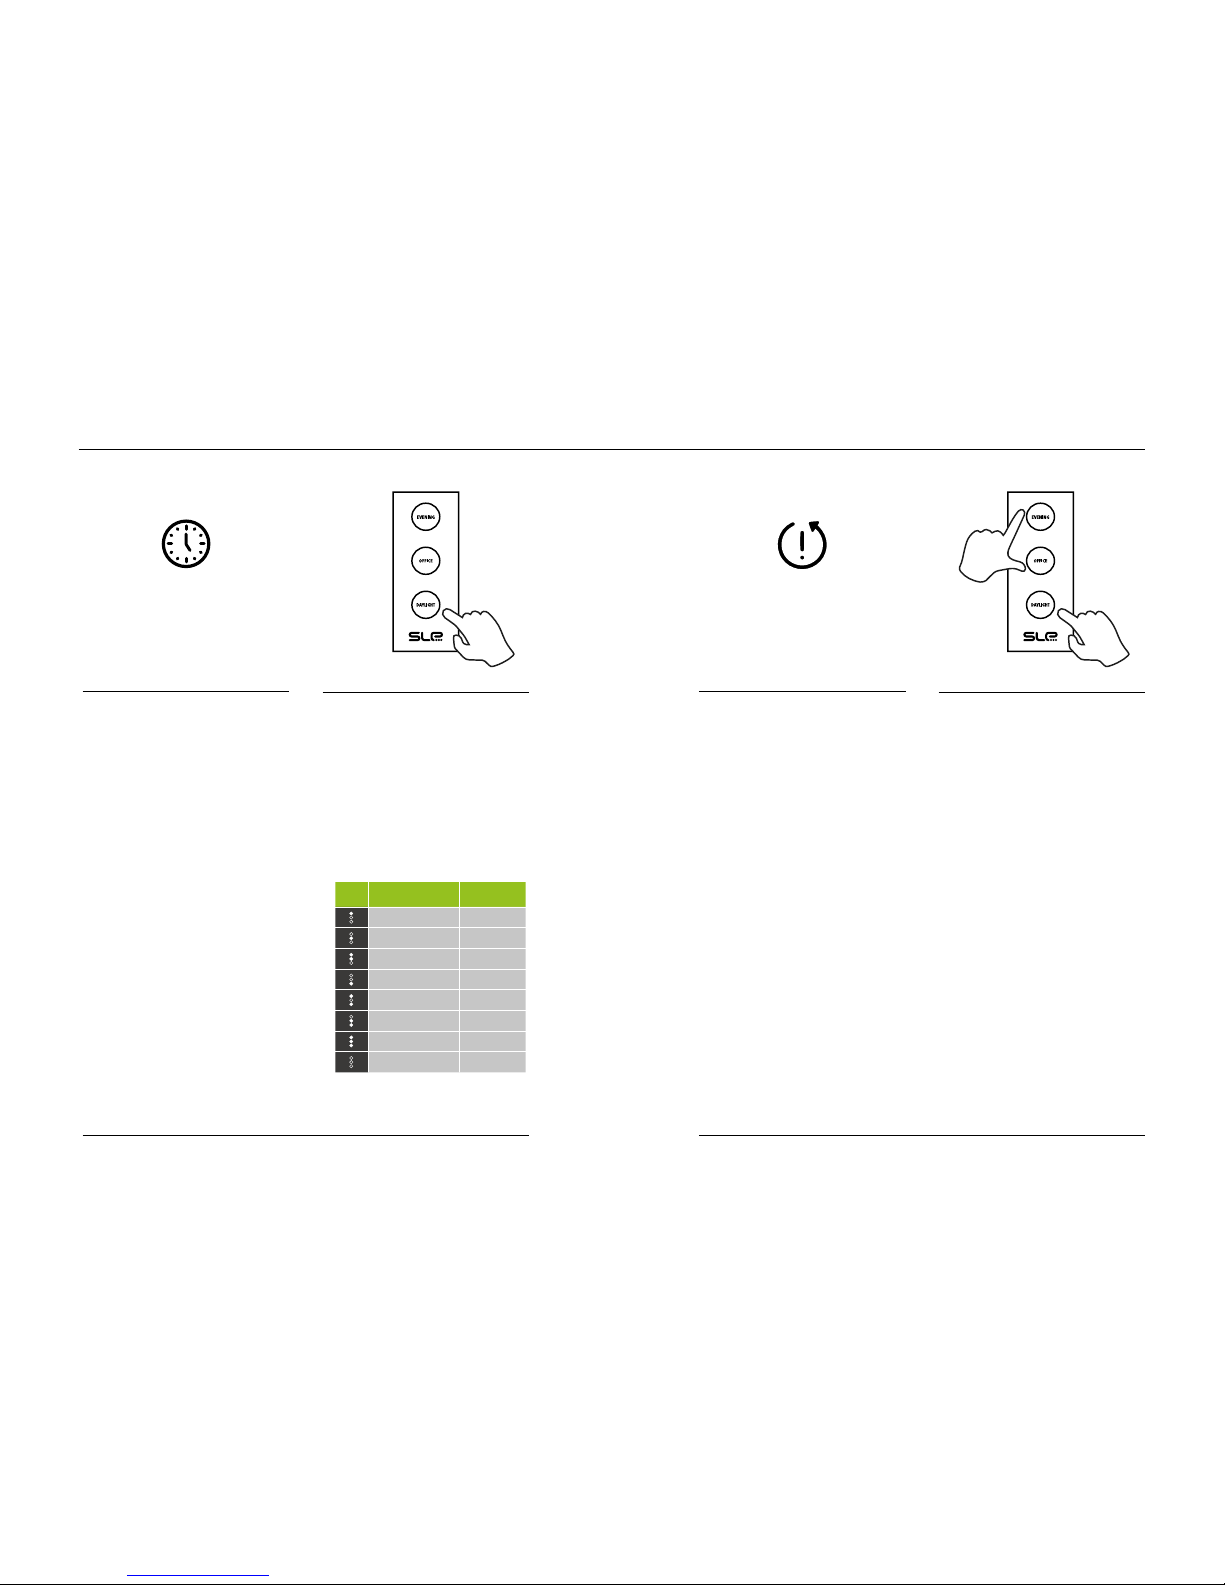
The scheduler of automatic switch-off can
be set in the range from 1 to 7 minutes or
it can be completely deactivated.
Instructions:
1. Press the button 3 for 10 seconds
(the buttons will blink twice and show
actual setting)
2. Turn the specific buttons on or off,
depending on how much time you wish
to set for the switch-off.
3.
After you select the desired combination,
wait for 4 seconds to save the setting
automatically (the buttons will blink twice).
Automatic switch-off
If the sensor does not detect any movement
for more than 1 minute, the lighting of
the mirror will turn off automatically.
Automatic switch-off
(after 1 minute)
RESET
4 seconds 4 seconds
Reset
It is possible to reset the mirror to the
factory settings.
Instructions:
1. Press the buttons 1, 2, and 3 at the
same time for 4 seconds (the buttons
will blink twice).
2. The mirror is reset to factory settings.
BUTTON
AUTOMATIC
SWITCH-OFF
AFTER
1 min. (default)
2 on 2 min.
1 and 2 on 3 min.
3 on 4 min.
1 and 3 on 5 min.
2 and 3 on 6 min.
1, 2, and 3 on 7 min.
1, 2, and 3 off deactivated
SCHEDULER RESET
Page 7

SLE
Dojč 419
906 02 Dojč
Slovakia
+421 34 694 0847
offi[email protected]
www.sleprojects.com
 Loading...