

Page 1

1
SLAYER STEAM X USER MANUAL
Slayer Steam X
Professional Espresso Machine Series
2-Group and 3-Group Models
USER MANUAL 1.0
FIRST DRAFT JANUARY 19, 2018
Page 2

2
SLAYER STEAM X USER MANUAL
COPYRIGHT INFO
COPYRIGHT © 2016 BY SEATTLE ESPRESSO MACHINE CORPORATION
ALL RIGHTS RESERVED. NO PART OF THIS PUBLICATION MAY BE
REPRODUCED, DISTRIBUTED, OR TRANSMITTED IN ANY FORM OR
BY ANY MEANS WITHOUT THE PRIOR WRITTEN PERMISSION OF
THE PUBLISHER, EXCEPT IN THE CASE OF NONCOMMERCIAL USES
PERMITTED BY COPYRIGHT LAW. FOR PERMISSION REQUESTS,
CONTACT THE PUBLISHER.
SEATTLE ESPRESSO MACHINE CORPORATION
6133 6TH AVENUE SOUTH
SEATTLE, WASHINGTON, USA 98108
SLAYERESPRESSO.COM
TERMS AND CONDITIONS
SLAYER MAKES NO REPRESENTATIONS OR WARRANTIES WITH
RESPECT TO THE CONTENTS OF THIS PUBLICATION. INFORMATION
CONTAINED HEREIN IS SUBJECT TO CHANGE WITHOUT NOTICE. EVERY
PRECAUTION HAS BEEN TAKEN IN THE PREPARATION OF THIS MANUAL;
NEVERTHELESS, SLAYER ASSUMES NO RESPONSIBILITY FOR ERRORS
OR OMISSIONS OR ANY DAMAGES RESULTING FROM THE USE OF THIS
INFORMATION.
READ THIS MANUAL COMPLETELY BEFORE INSTALLING AND OPERATING
YOUR SLAYER STEAM X ESPRESSO MACHINE. INCORRECT INSTALLATION AND
OPERATION MAY RESULT IN DAMAGE TO THE EQUIPMENT, PERSONAL INJURY,
OR EVEN DEATH. DISREGARDING THE INSTRUCTIONS CONTAINED HEREIN
INDEMNIFIES SLAYER FROM ALL RESULTING DAMAGES AND MAY VOID THE
EQUIPMENT WARRANTY.
FOR ADDITIONAL SAFETY PRECAUTIONS, SEE THE SAFETY ADVISORY
ON PAGE #7.
Page 3

3
SLAYER STEAM X USER MANUAL
1 Slayer Steam X
3 Table of Contents
4 Welcome
5 Resources
6 Warranty Information
7 Safety Advisory
8 Water Treatment Requirements
9 Recommended Tools & Accessories
10 Installation
11 Step 1: Prepare Site
12 Step 2: Unpack Equipment
13 Step 3: Connect Plumbing
14 Step 4: Connect Power
15 Step 5: Fill Tanks
15 Step 6: Turn On Elements
16 Using Slayer Steam X
17 Espresso Basics
20 Factory Settings
21 The Barista Dashboard™
24 Prepare Espresso
25 Steam Milk
26 Use Hot Water Tap
26 Adjust Hot Water Temperature
26 Adjust Drain Tray
27 Adjust Brew Pump Pressure
27 Adjust Brew Volumes
28 Adjust Brew Tank Temperatures
28 Adjust Steam Tank Pressure
29 Adjust Hot Water Dose
29 Adjust Hot Water Temperature
30 Other Menu Actions
33 Cleaning & Preventative Maintenance
34 Clean Your Machine
34 Clean the Steam Wands
35 General Grouphead Care
35 Backflush the Groupheads
36 Backflush the Groupheads, continued
37 Fast Clean
38 Part Diagrams
Table of Contents
Page 4

4
SLAYER STEAM X USER MANUAL
Established in 1997 the Slayer story catalog of hand crafted machines continues to grow
and meet the demands of Slayer users. The second machine in the new Steam series,
Steam X celebrates what you have come to love in Slayer, exceptional design, durability
and consistent results for high volume cafes. When the details matter, this back to
basics model is a barflow dream, with professional features that streamline beverage
production with a moderate entry into ownership.
Jason Prefontaine founded Slayer when he had an idea for revolutionizing espresso, but
that was just the beginning. The Steam series is the result of his continued commitment
to Make Coffee Better⊤м. Expanding the Slayer portfolio of professional equipment, we
now turn to the milk-dominated world of high-volume coffee business with the same
inventive approach that we first took to espresso.
Slayer Steam X lever activated, dual volumetrics in each group head and numerous
time-saving features. A must have model for cafe chains that are looking to scale cup
consistency and guest engagement in high volume cafes.
Research and Development is led by Jason Prefontaine, Chris Flechtner, and the
Experience Team, Steam is the result of a creative collaboration between this dedicated
group and many talented friends in the industry. When industry professionals talk, Slayer
listens with our most powerful tool being the advise of professional baristas, coffee
people and technicians.
Welcome
Page 5

5
SLAYER STEAM X USER MANUAL
For quick installation, see the QUICK START GUIDE that was included with your machine upon delivery located in the clear packing envelope taped on the lid of your crate.
For everything else, contact your authorized Slayer reseller or the appropriate party listed below.
TECHNICAL SUPPORT & PARTS
SALES
MARKETING
TRAINING & EDUCATION
ORDERS
SHIPPING
Resources
Page 6

6
SLAYER STEAM X USER MANUAL
Slayer provides a 15-month (fifteen month) warranty on all equipment and parts,
beginning at the date of shipment from the Seattle headquarters. All equipment
and parts are warranted to be free from defect in material or workmanship. Unless
otherwise specified in writing, this warranty covers materials only (e.g. equipment,
parts) and excludes labor, shipping, and any other costs.
This warranty does not cover accidental damage to equipment, abuse of
equipment, or improper use of equipment. “Improper use” includes, but is not
limited to, the operation of a machine with inadequately treated water and/or the
operation of a machine with inadequate water supply. Any and all damage resulting
from inadequate water treatment is expressly excluded from the coverage of this
warranty. Read “Water Treatment Requirements” on page #8 for information about
water-related issues.
Damage resulting from improper installation of equipment is expressly excluded
from this warranty.
Warranty coverage does not include parts that are subject to normal wear and tear,
as determined by Slayer. These include, but are not limited to, shower screens,
portafilter gaskets, expansion or anti-suction valves, and preventative maintenance
parts. Warranty coverage excludes glass or plastic parts.
This warranty will immediately expire if you or a third party performs faulty
maintenance, excessive use, or neglect of necessary service. This will include any
instances in which, following the occurrence of a defect, you fail to immediately take
all suitable measures to limit damage to the equipment and/or fail to provide Slayer
with an opportunity to remedy the defect.
Slayer’s sole responsibility and liability under the warranty set forth herein is limited
to, in Slayer’s sole discretion, repair or replacement of defective parts. Unless
otherwise specified in writing, this excludes labor, shipping, and any other costs.
To the fullest extent permitted by applicable Washington State (USA) laws, Slayer’s
warranty set forth herein is limited to the original purchaser of the equipment.
Slayer does not, directly or indirectly, offer any warranty to any other person, unless
otherwise agreed in writing.
Except as expressly provided herein, all goods are provided to you as they are.
Slayer disclaims all representations and warranties, whether expressed or implied,
including warranties of title, non-infringement, merchantability, and fitness for a
particular purpose.
Warranty claims must be authorized by a Slayer representative prior to repair or
remedial action.
Warranty Information
Page 7

7
SLAYER STEAM X USER MANUAL
This guide includes important instructions about safe espresso machine installation,
operation, and maintenance. Read this manual completely before installing and
operating your Slayer espresso machine. Incorrect installation and operation may
result in damage to the equipment, personal injury, or even death. Disregarding the
instructions contained herein indemnifies Slayer from all resulting damages and
may void the machine’s warranty.
Shipping is coordinated by the customer and performed by a third party. Slayer
is not responsible for damage incurred during transport. Upon receiving your
machine, carefully inspect all packaging, equipment, and accessories for visible
damage. Photograph any visible damage and immediately contact your shipping
company representative. Comply with shipping company regulations. Do not
connect your machine to power, water, or drainage until all issues have been
resolved or your Slayer representative or reseller instructs you to do so. Failure to
resolve issues before using equipment may result in further damage or injury.
Installation should be performed by qualified personnel only and must comply
with all regulations and requirements of the authorities in your area. If guidance
is needed to safely install your machine, contact your Slayer representative or
reseller.
It is critical that an appropriately-rated and grounded electrical plug is used to
supply your machine with power. This is essential for the safe operation and use of
the equipment. Contact your Slayer representative or reseller with questions about
this requirement. If you are unsure about the safety of the electrical configuration,
do not attempt to install your machine.
Your Slayer espresso machine should only be used for the functions it was
designed to perform. Using your machine outside of its defined functionality – as
it is described in the “Using Slayer” section on page #16 of this guide – may be a
safety hazard, resulting in property damage, physical injury, or even death, and will
immediately void the warranty.
Slayer espresso machines are electrical appliances that should be used in a safe
manner appropriate to devices of their kind:
• Do not connect your Slayer espresso machine to electrical power through an
extension cord. The machine must be directly connected to an appropriately- rated
and grounded power source.
• Do not position the power cord in walkways or other high-traffic areas.
• Slayer espresso machines are designed to be used indoors. When using your
machine outdoors, take precautionary measures to protect it from moisture,
humidity, and other natural elements.
• Before performing service on your machine, disconnect the power
source.
Safety Advisory
Page 8

8
SLAYER STEAM X USER MANUAL
Water Treatment Requirements
Improper water treatment is the most frequent cause of espresso machine damage.
Water is complex and varies significantly between regions, so take great care to
test the water quality at your location and adjust as necessary. Employ professional
help to evaluate your water and administer treatments.
When evaluating water quality, the two most important factors to consider are
calcium carbonate and chloride:
Calcium Carbonate: a dissolved mineral that determines the “hardness” or
“softness” of water. The desirable range of hardness is 4-5 grains. Over time,
calcium carbonate accumulates as a hard substance, called “scale”, and will inhibit
the flow of water. Machines subjected to “harder” water (greater than 5 grains) will
accumulate scale faster and require maintenance earlier.
Chloride: chlorine combined with an electron from a negatively charged ion. There
are many types of chlorides, including calcium chloride, magnesium chloride,
sodium chloride, etc. Chlorides produce salts that impart a strong taste, which
alters the flavor of the espresso. Chlorides also encourage pitting corrosion, which
causes damage to the machine.
Your water filtration company will create a treatment plan based on your water
needs. Choose a filtration company that has solutions for addressing issues related
to both calcium carbonate and chloride.
Common treatment options include carbon filtration, ion exchange, and reverse
osmosis:
Carbon Filtration: a process by which water passes through the granular activated
carbon, which attracts and retains many chemicals in the water that have an
unpleasant color, taste or odor. Carbon filtration is necessary for all machines. For
water with 4-5 grains of hardness, carbon filtration is likely the only necessary water
treatment.
Ion Exchange: a process by which water passes through an ion exchange
system, where undesirable mineral components are retained and more desirable
substances such as sodium are released. An ion exchange system should be used
in combination with a carbon filtration system and is especially beneficial for water
in the range of 6-9 grains of hardness. This system is relatively inexpensive and
effective in removing inorganic substances. It does not, however, remove organic
substances, such as bacteria.
Reverse Osmosis with Blend-Back Valve (or Remineralized RO): a process by
which water is forced through a semi-permeable membrane with selective pore
sizes at high pressure, then blended with the appropriate amount of desired
minerals. Reverse osmosis may be a good solution for water in the range of 6-9
grains of hardness and is mandatory for water above 9 grains. When blending
minerals with the filtered water, target a TDS (total dissolved solids) value of of
75-125 ppm. Experiment with various TDS levels to determine what produces your
preferred taste.
All Slayer espresso machines need to be connected to a carbon water filter to
remove chlorine, sediments, odor, and undesirable tastes. This requirement is in
addition to any other necessary water filtration systems.
Filtration requirements may vary seasonally. Water should be tested during each
season to determine the best filtration plan. Once a filtration method has been
selected, take note of the filter’s peak capabilities. Contact the equipment vendor
to inquire about the life expectancy of the filters, then schedule replacement and
reinstallation accordingly.
IMPORTANT: Every time a new water filter is installed, thoroughly rinse the filter before
attaching it to your machine or pump. Run water from the supply line through the filter
and down a drain for at least 2 minutes. Skipping this step will cause damage to your
machine. Damage to or failure of your machine due to inadequately treated water is not
covered under warranty.
Page 9

9
SLAYER STEAM X USER MANUAL
Recommended Tools & Accessories
BEVERAGE PREPARATION
• Espresso grinder
• Scale (must measure in 0.1-gram increments)
• Tamper (must have a 58-millimeter base diameter)
• Shot glasses
• Steaming pitcher
• Soft towels
EQUIPMENT CARE & MAINTENANCE
• Allen keys
• crescent wrench
• flat-head screwdriver
• Grouphead brush
• Needle-nose pliers
• #2 Phillips-head screwdriver
• Pick or awl
• Pliers
• 9/16-inch socket wrench
• Adjustable wrench
• Approved espresso machine cleaner
• Approved espresso machine steam wand cleaner
• Non-abrasive surface cleaner
• Slayer lubricant
• Teflon tape
Page 10

10
SLAYER STEAM X USER MANUAL
Installation
Only qualified service personnel should
install Slayer espresso machines. Incorrect
installation may result in injury and/or damage
to the equipment. Please read the “Safety
Advisory” on page #7 before beginning
installation.
Install your Slayer espresso machine with the following ordered steps:
11 Step 1: Prepare Site
12 Step 2: Unpack Equipment
13 Step 3: Connect Plumbing
14 Step 4: Connect Power
15 Step 5: Fill Tanks
15 Step 6: Turn On Elements
Page 11
11
SLAYER STEAM X USER MANUAL
Step 1: Prepare Site
Your installation site will require access to power, water, and drainage. Building
regulations vary by region, so confirm local requirements before connecting your
machine.
Using quality, treated water is essential to achieving the best possible results
when preparing coffee and may also extend the life of your machine. Read
“Water Treatment Requirements” on page #8 for information about avoiding and
addressing water-related issues.
Your Slayer Steam X machine needs to be installed on a structure that is capable of
supporting its weight, including the weight of the water, once filled:
STEAM WITH ALL TANKS FILLED
2-group 100 kilograms (220 pounds)
3-group 140 kilograms (305 pounds)
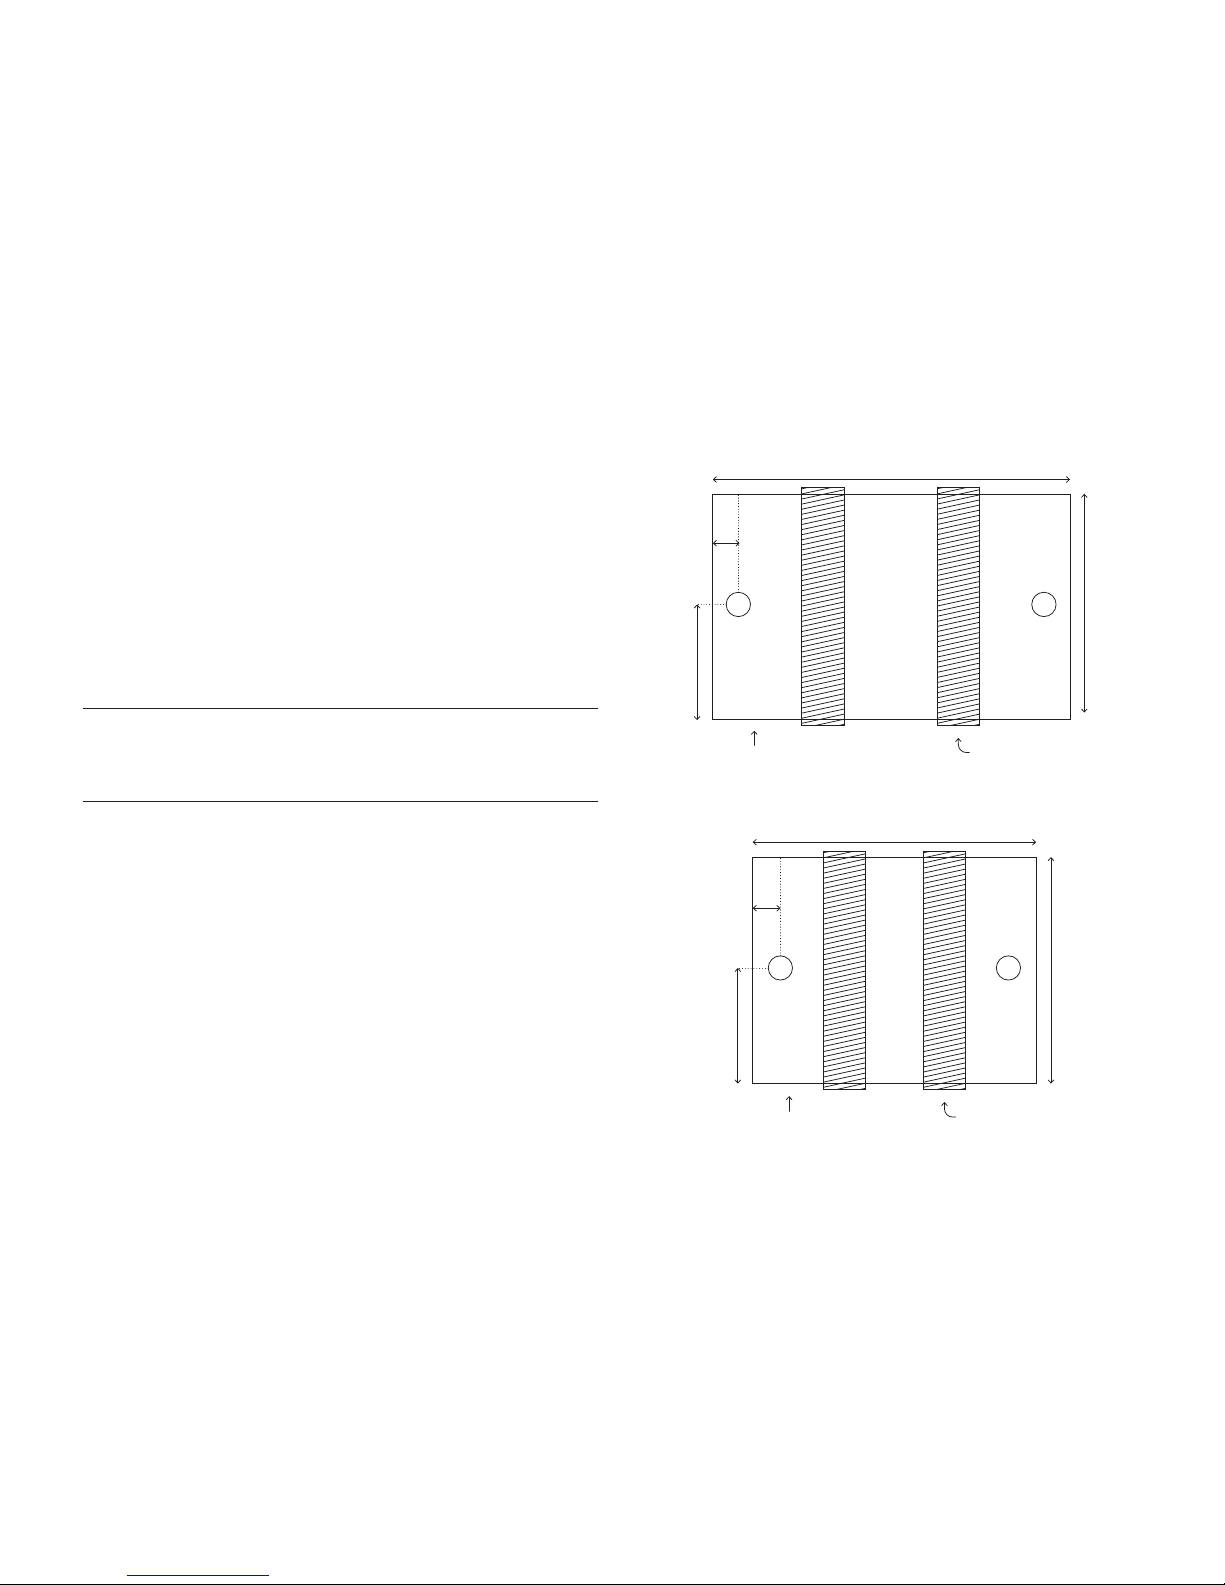
Use the following diagrams to locate and drill holes in the counter for the power
cords and plumbing lines. Note that electrical plugs vary in size and a larger hole
may be required to accommodate the main power cord.
Optional: prepare two (2) or more identical block risers, each with a maximum
height of 15 centimeters (6 inches) and capable of supporting 140 kilograms (305
pounds). The risers should be designed to elevate the machine approximately
15 centimeters (6 inches) above the counter without touching the drain tray or
wing legs. Position the risers on the prepared counter, according to the following
diagrams.
44.5 in / 113 cm
Risers
3.25 in /
8.5 cm
Ø 3 in /
7.5 cm
28 in / 71 cm
13.75 in / 35 cm
35 in / 89 cm
Risers
3.25 in /
8.5 cm
Ø 3 in /
7.5 cm
28 in / 71 cm
13.75 in / 35 cm
3-group
2-group
Drip tray edge
Drip tray edge
Page 12
12
SLAYER STEAM X USER MANUAL
Step 2: Unpack Equipment
Your Slayer Steam X machine will arrive in a lidded wooden crate, bolted to a pallet at
the base. Unpack with the following steps. At least three (3) able-bodied people will be
needed to lift your machine.
INCLUDED PARTS
• Four (4) rubber feet
REQUIRED TOOLS & SUPPLIES
• #2 Phillips-head screwdriver
• Knife or box cutter
• 9/16-inch socket wrench
• Optional: two (2) or more identical block risers with a maximum height of 15
centimeters (6 inches), capable of supporting 305 pounds (140 kilograms)
PROCEDURE
1. Use a Phillips-head screwdriver to loosen and remove the eight (8) screws
found along the lower edge of the crate, two (2) at each corner, then lift the
crate from the pallet.
2. Remove the plastic sheet from the machine and identify all crate contents:
• Slayer Steam X espresso machine
• Attached power cords (2), plumbing lines (2), and drain hoses (2)
• External rotary pump
• Accessories box
3. Set aside the accessories box.
4. Locate the two (2) bolts and two (2) nuts that secure the pump to the pallet, then
use a wrench to loosen and remove the nuts; set aside the pump.
5. Use a knife or box cutter to remove the banding from the machine body. To
protect the machine during installation, keep all other packing material in place.
6. Locate the four (4) bolts that are threaded into the two (2) wing legs, then use a
9/16-inch socket wrench to loosen and remove all bolts.
7. Pull the locking pins on both sides of the drain tray, one at a time, to move the
drain tray to the highest position (if not already in the highest position); release
the pins to set the tray height.
8. Employ the assistance of at least three people to lift the machine up and away
from the crate base, minding the attached cords, lines, and hoses.
Lift only from the chassis; do not handle the drain tray, cup rail, or any part
of the wing legs. To protect yourself during this step, wear thick gloves or
drape a small towel over each wrist and forearm.
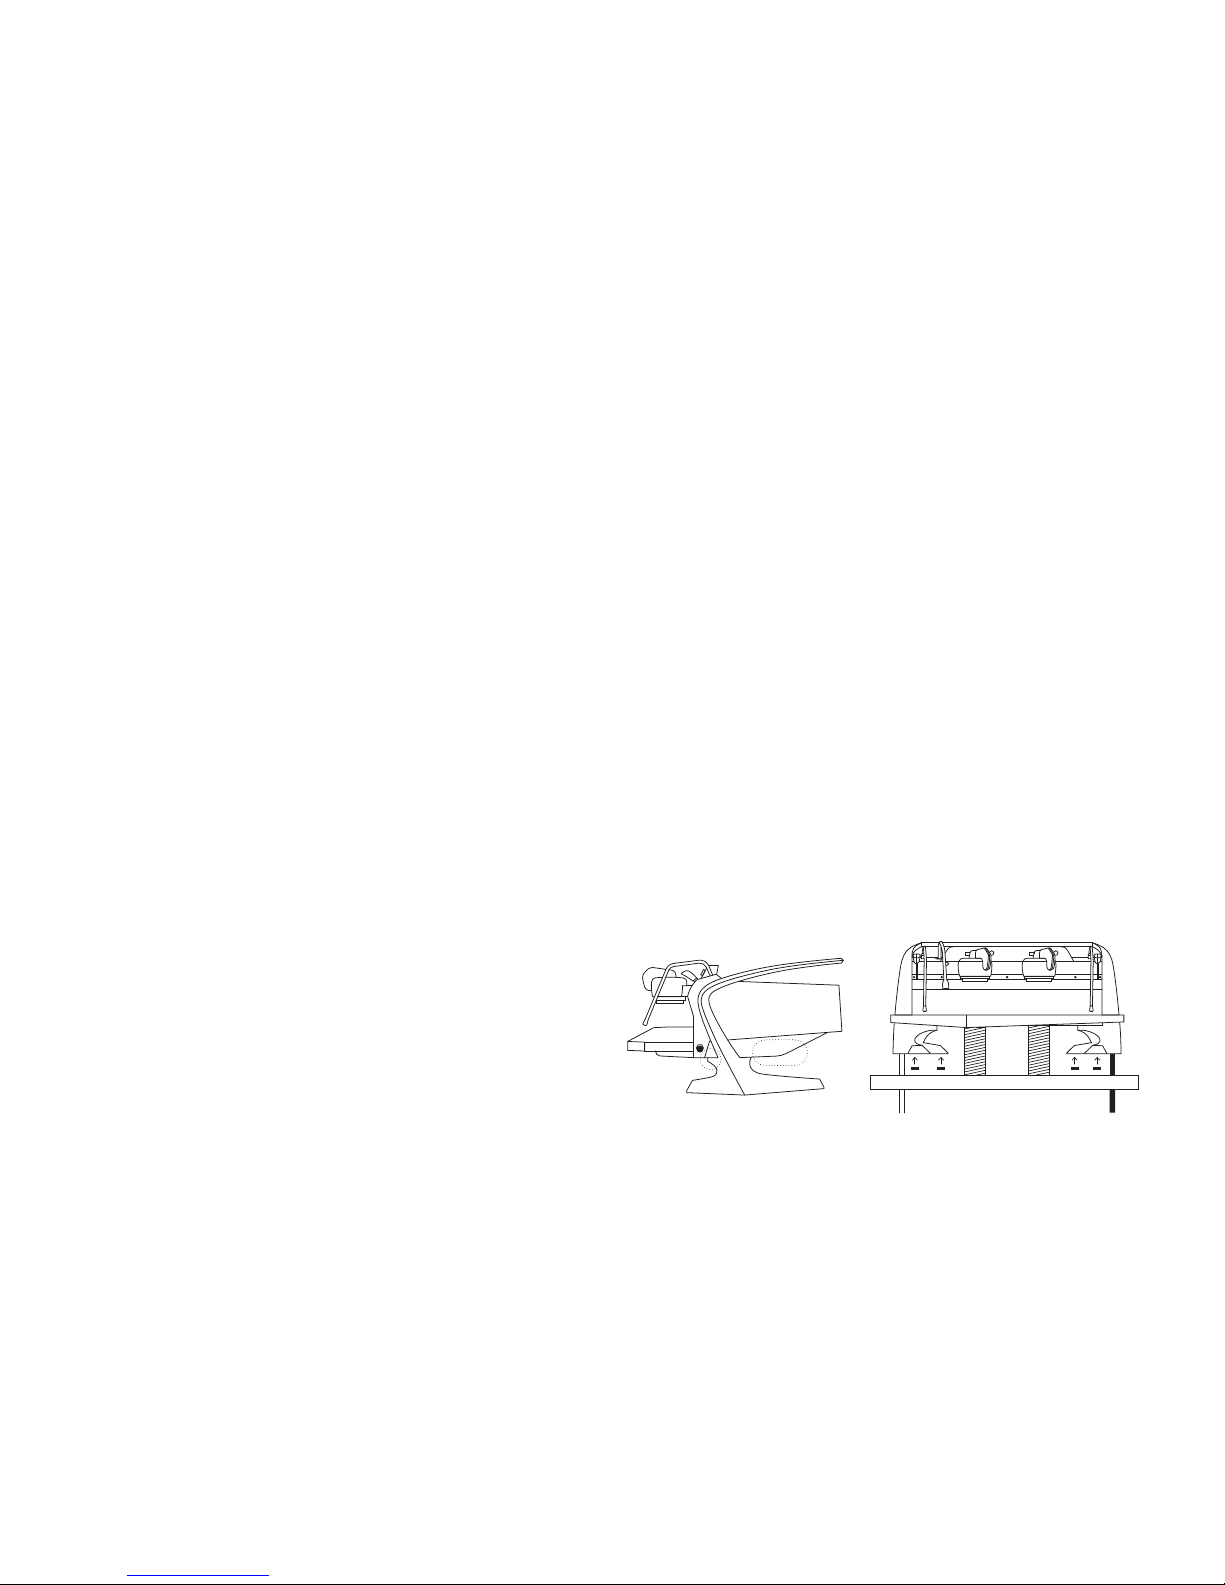
9. Suspend the machine with the wing channels located directly above the
prepared counter holes. If using risers, lower the machine onto the risers. The
risers should support the chassis without touching the drain tray.
10. Locate the four (4) rubber feet inside of the accessories box and install them on
the wing legs. Later, adjust the feet individually to level the machine.
11. Remove the packing material from the attached cords, lines, and hoses, then
run them through the wing channels and counter holes.
12. Lower the machine into the prepared position and remove all packing material.
13. Lift to remove the four (4) cup tray panels; set aside.
Page 13
13
SLAYER STEAM X USER MANUAL
Step 3: Connect Plumbing
Your Slayer Steam X machine will arrive with two (2) plumbing lines and two (2) drain
hoses attached. One (1) additional plumbing line will arrive inside of the accessories
box. A water treatment system is required, but not included. Read “Water Treatment
Requirements” on page #8 for information about avoiding and addressing water-related
issues.
INCLUDED PARTS
• Two (2) drain hoses with an inside diameter of 5/8 inch (16 millimeters)
• One (1) 30 inch by 3/8 inch braided hose (in North America, includes 3/8-inch
compression fitting)
• Two (2) 60 inch by 3/8 inch braided hoses, color-coded
• External rotary pump
REQUIRED TOOLS & SUPPLIES
• Water treatment system (see page #8 for recommendations)
• Adjustable wrench
PROCEDURE
1. Install your water treatment system according to the instructions provided by the
manufacturer, then turn off the main water supply.
Before use, all treatment systems should be flushed with water for at least
two (2) minutes.
2. Ensure that the machine is in position, with all cords, lines, and hoses running
through the wing channels and counter holes (per previous steps).
3. Run the two (2) drain hoses to an open gravity drain, ensuring that the lines
always slope downwards.
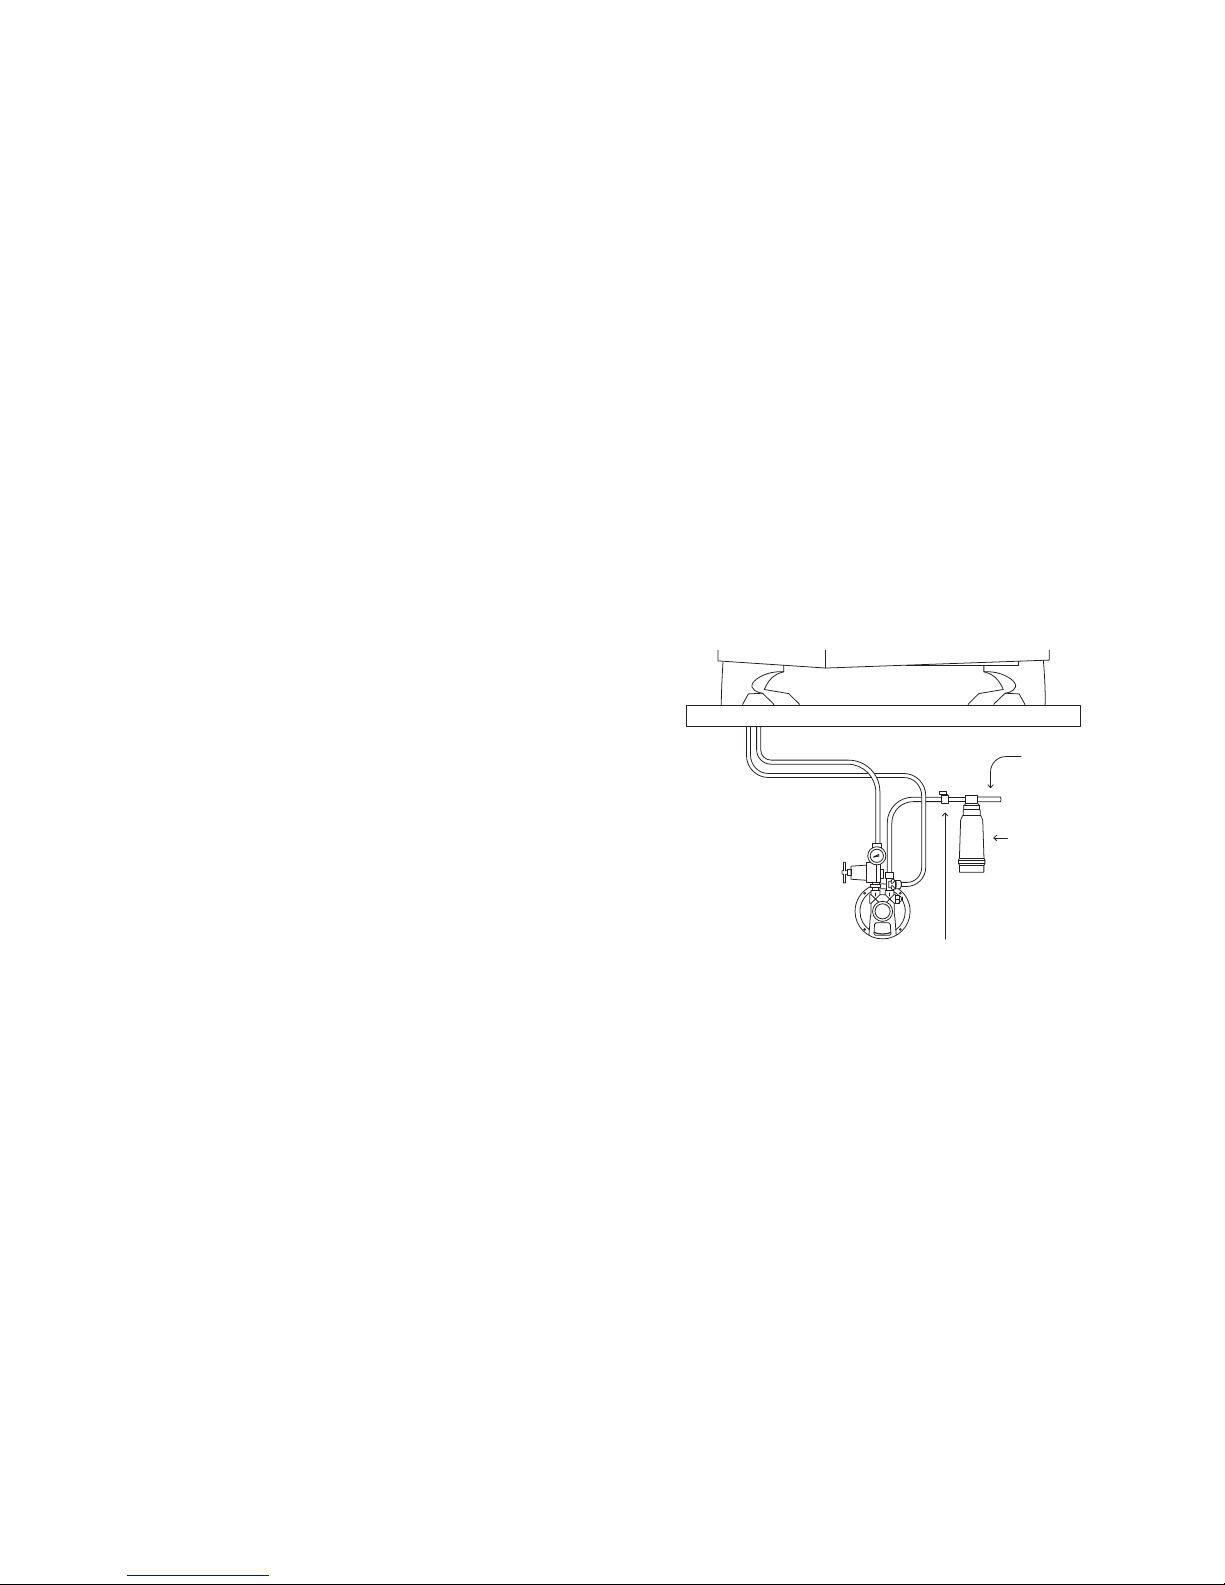
4. Locate the 30 inch by 3/8 inch braided hose inside of the accessories box
and use it to connect the water treatment system to the external rotary pump,
tightening with a wrench.
5. Locate the two (2) color-coded braided hoses, attached to the machine, and the
color-coded connections on the pump.
6. Connect each hose to its color-matched connection on the pump, tightening
with a wrench.
Do not turn on the main water supply.
Water filter
Water line in
Shut-off
Page 14
14
SLAYER STEAM X USER MANUAL
Step 4: Connect Power
Your Slayer Steam X machine will ship with the power configuration requested at the
time of purchase. In most cases, this will include a plug end on the power cord. If your
machine does not include a plug, do not attempt to wire it yourself. Only an electrician or
approved technician should wire the power cord into an appropriately-rated plug end.
INCLUDED PARTS
• External rotary pump
PROCEDURE
1. Ensure that both steam actuators are in the “off” position and the drain hoses
and water lines are connected (per previous steps).
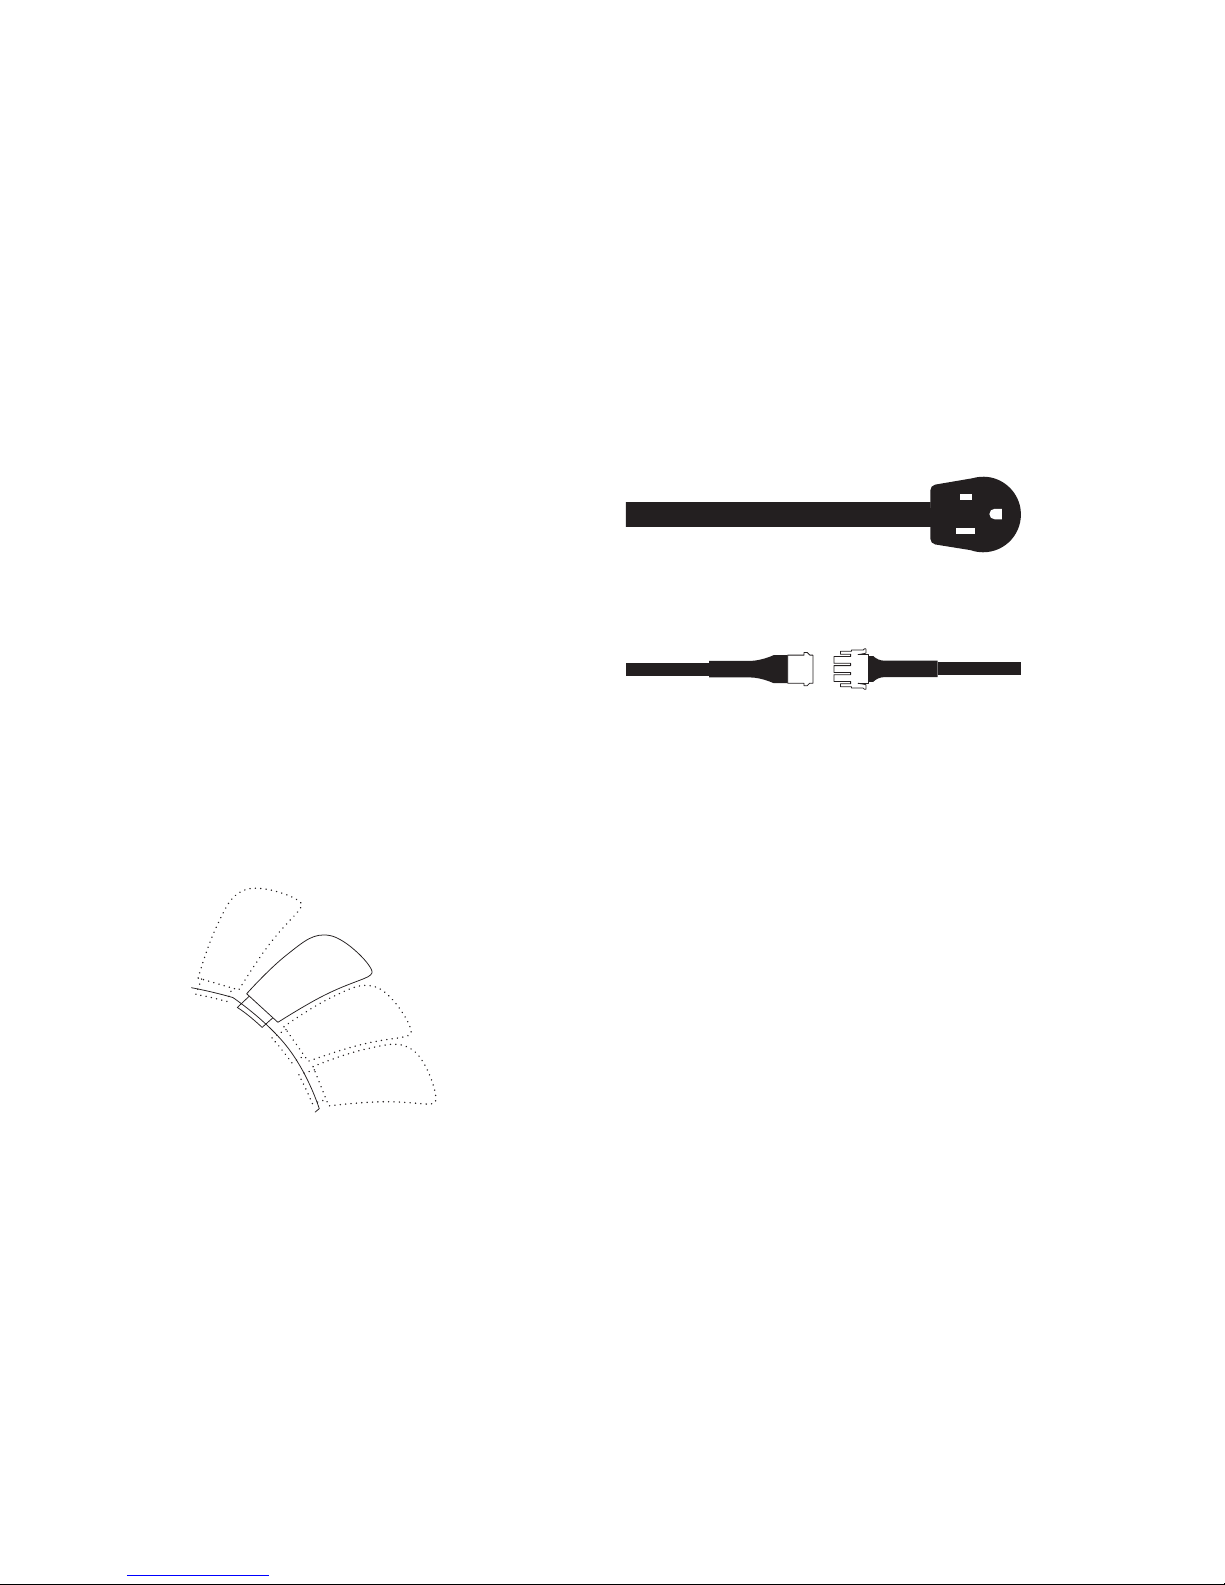
2. Insert the main power plug into an appropriately-rated and grounded receptacle
3. Locate the quick connect plug, found on one of the electrical cords that extends
from your machine, and insert it into the matching plug unit on the pump motor.
Do not move the steam actuators to the “on” position.
Do not turn on the main water supply.
Main power
Quick connect plug
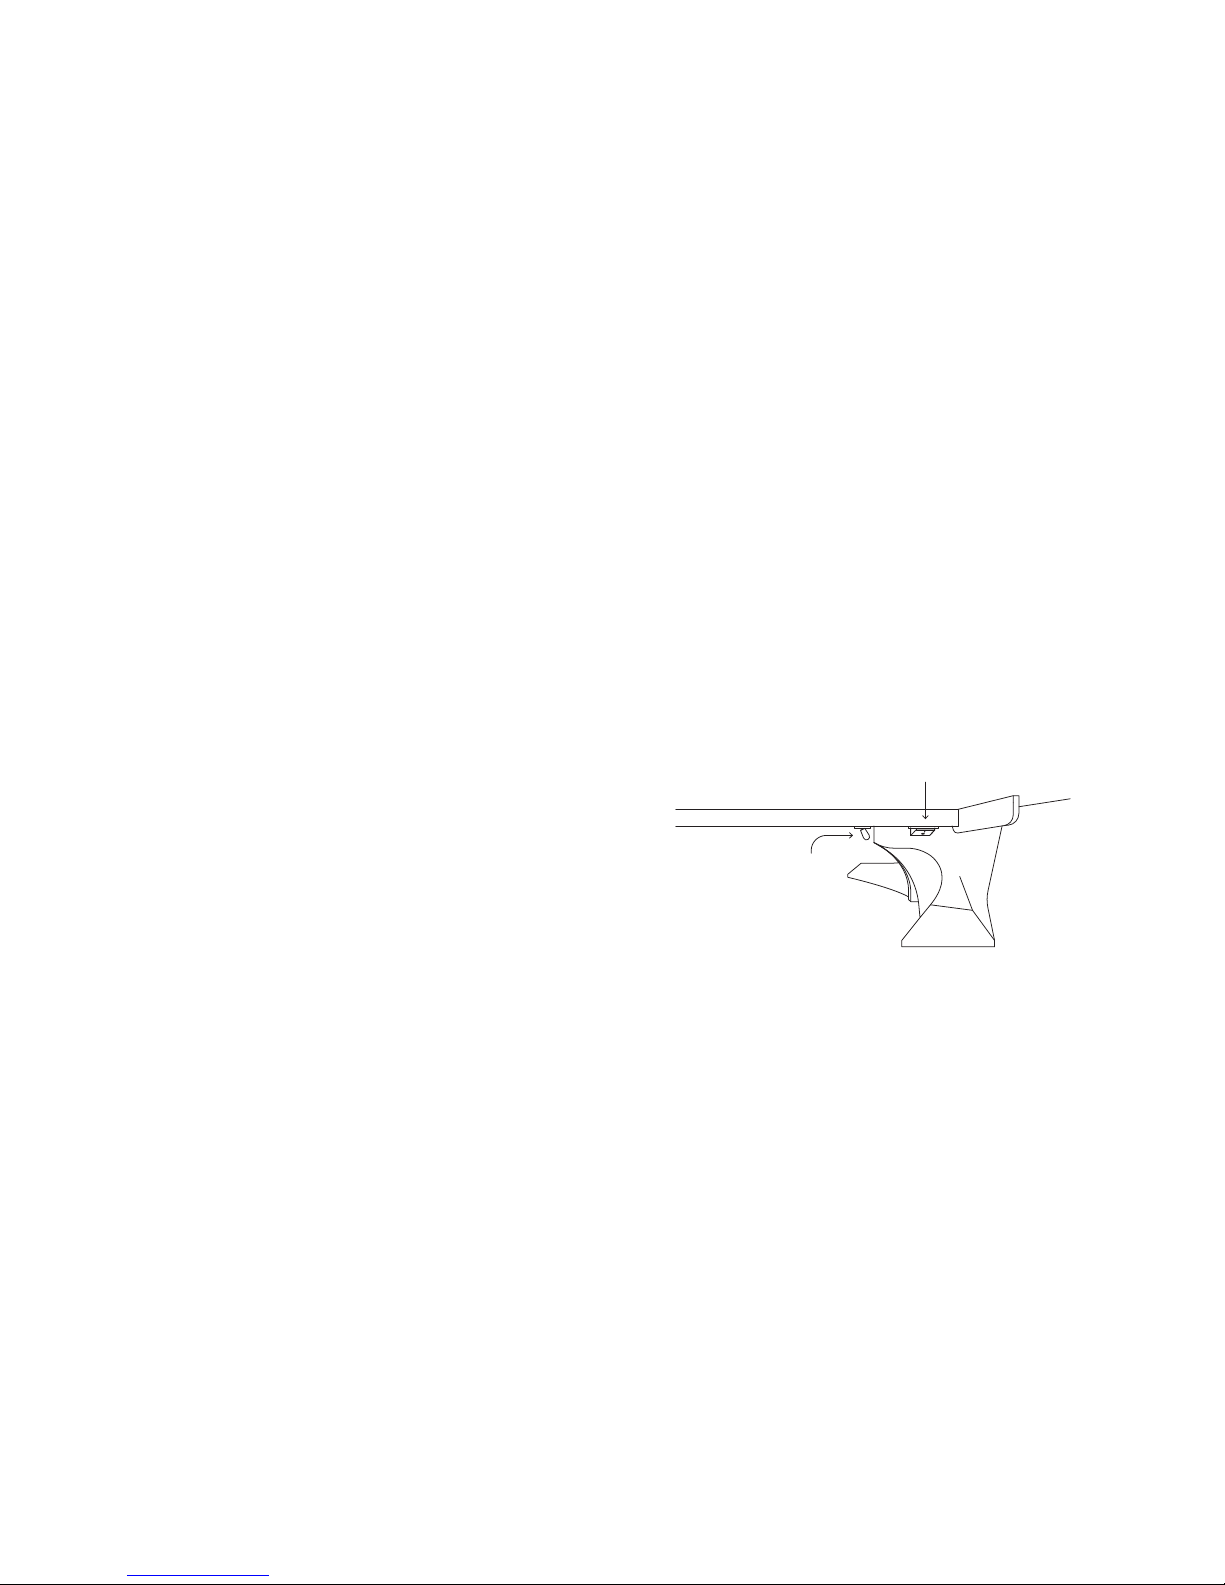
Purge
Off
On
Page 15
15
SLAYER STEAM X USER MANUAL
Step 5: Fill Tanks
PROCEDURE
1. Ensure that both steam actuators are in the “off” position, the drain hoses and
water lines are connected, and the cup tray panels have been removed (per
previous steps).
2. Turn on the main water supply.
3. Check the inside of the machine for leaks or collected water.
4. Turn on the power to your machine by pressing the power switch; the steam
tank will begin to fill.
Filling will take 1-2 minutes and is complete when the pump motor ceases
to work and a “click” is heard.
5. Wait until the steam tank has filled completely, then fill the groupheads by
moving the brew actuators left, to the “on” position, until water begins to flow.
Factory settings for the volumetrics are set (reference Factory Settings on
page #20). You may need to repeat this step multiple times, until water
begins to flow.
6. Move the brew actuators right, to the “off” position.
7. Activate the electronics by pressing any one of the jog wheels on the Barista
Dashboard.
Do not move the steam actuators to the “on” position.
Do not engage the white heating element breaker.
PROCEDURE
1. Ensure that both steam actuators are in the “off” position, the cup tray panels
have been removed, and the tanks have filled completely (per previous steps).
2. Turn on the heating elements by moving the heating element breaker left, to the “on”
position.
Do not move the steam actuators to the “on” position.
3. Wait until the machine has heated fully, then move one of the steam actuators
down, to the “on” position. If steam is produced, proceed to the next step. If no
steam is produced, wait several minutes before repeating this step.
4. Check the inside of the machine for leaks or collected water.
The anti-suction valve on the steam tank may sputter and release small
drops of water when first building pressure. During your inspection, check
for large pools or steady streams of water.
5. Install the four (4) cup tray panels.
Step 6: Turn On Elements
Breaker
Power
Page 16

16
SLAYER STEAM X USER MANUAL
Using Slayer Steam X
Your new machine features sophisticated
technologies that are designed to improve
numerous aspects of coffee beverage production.
These innovations will promote efficiency,
accuracy, and comfort on every bar where
Slayer Steam X is found. Whether this is your first
espresso machine or the latest in a long career,
our instructions should serve as a helpful baseline
for getting the most out of Steam X.
We can’t wait to see what you do with it.
Contents
17 Espresso Basics
20 Slayer Steam X Factory Settings
21 The Barista Dashboard™
24 Prepare Espresso
25 Steam Milk
26 Use Hot Water Tap
26 Adjust Drain Tray
27 Adjust Brew Pump Pressure
27 Adjust Shot Volumes
28 Adjust Brew Tank Temperature
28 Adjust Steam Tank Pressure
29 Adjust Hot Water Dose
29 Adjust Hot Water Temperature
30 Other Menu Options
Page 17

17
SLAYER STEAM X USER MANUAL
Espresso Basics
Coffee “beans” are the seeds from berry-like fruits that grow on shrubs in equatorial
regions. After picking and processing, the beans are roasted, ground, and dissolved
in water to yield a coffee beverage.
Brewing espresso is a unique method of coffee extraction in which water is added
to ground coffee under intense pressure. As a result, the beverage, when compared
to filter coffee (e.g. pour-over, immersion), contains a higher concentration of
dissolved coffee, feels heavier in the mouth, and asserts stronger flavor.
The espresso machine is the preferred equipment for preparing espresso. Therein,
coffee is secured, water is heated, pressure is applied, filtration occurs, and the
beverage is dispensed. The entire process takes less than one (1) minute.
Many variables affect espresso extraction and therefore require the attention of
the barista. Consider the following generalizations and guidelines when preparing
espresso.
COFFEE ORIGIN
Coffee plants are cultivated around the world in equatorial regions that have varying
climates and growing conditions. Every location – country, locale, farm, and lot –
produces coffee with distinct characteristics that contribute to discernible differences in
beverage flavor. Slayer Steam X is well-suited for preparing coffee from any single origin,
as well as blends of coffees from varying origins.
PLANT VARIETY
Like other fruits (e.g. apples, oranges), coffee beans may come from one of
many varieties of the same plant. Common varieties include Typica, Bourbon,
Heirloom, and Caturra, among others. Every variety produces coffee with distinct
characteristics that contribute to discernible differences in beverage flavor.
PROCESSING METHOD
There are many unique processes by which coffee seeds may be separated from
the fruit containing them. Every process produces coffee with distinct characteristics
that contribute to discernible differences in beverage flavor. Note these examples:
• “Washed” process: increased acidity, enhanced flavor clarity, clean body
• “Natural” process: fruit-forward flavor, full body
• “Pulped natural”, “semi-washed”, and “honey” processes: borrowed
characteristics from washed and natural processes
GREEN COFFEE FRESHNESS
After it has been picked and processed, green (i.e. un-roasted) coffee has
a considerable shelf life. However, the potential quality of coffee beverages
deteriorates with the age of the green coffee. For best results, buy roasted coffee
from a trustworthy supplier that guarantees the freshness of its green coffee.
ROAST PROFILE
Roasting makes the dense, green coffee bean porous and soluble and is the first
step in preparing coffee for extraction. Coffee may be roasted to varying degrees
by a variety of technologies, each producing coffee with distinct characteristics that
contribute to discernible differences in beverage flavor.
Generally, the flavor of espresso prepared from light-roasted coffee will more
closely resemble the characteristics of its origin, variety, and processing method
(e.g. “bright”, “fruity”, etc.). Conversely, the flavor of espresso prepared from
dark-roasted coffee will more closely resemble the characteristics of the roasting
process (e.g. “smoky”). Typically over developed roast profiles do not exhibit the full
potential of your machine, nor the flavorful complexity of your coffee.
Page 18

18
SLAYER STEAM X USER MANUAL
ROASTED COFFEE FRESHNESS
After roasting, coffee beans are increasingly vulnerable to deterioration. Preserve
freshness by storing in a sealed container in a cool, dark area. Ideally, use a
container that allows the outward flow of gas, which coffee releases as it ages,
but prevents the inward flow of oxygen. Espresso is generally most flavorful when
prepared with coffee that has “rested” for at least two (2) days after roasting but has
not exceeded three (3) weeks. These guidelines are especially important for dark-
roasted coffee, which deteriorates faster than light-roasted coffee.
GROUND PARTICLE SIZE
Preparing espresso requires finely-ground coffee and a professional grinder. When
setting up your grinder, target a setting that achieves the recommended beverage
yield with the recommended dose weight in the recommended brew time. Continue
reading for recommendations regarding these brewing parameters. Adjust grind as
necessary, noting these rules:
Finer grind setting (smaller particles):
• Longer extraction time
• Enhanced body
• Reduced clarity
Recommended when espresso tastes sour, feels thin, extracts quickly, or has no
crema.
Coarser grind setting (larger particles):
• Shorter extraction time
• Reduced body
• Enhanced clarity
Recommended when espresso tastes bitter, feels muddy, or extracts slowly.
DOSE WEIGHT
Dose weight refers to the amount of ground coffee used for a serving of espresso.
When considered alongside the beverage yield, dose weight is part of the brew
ratio, which correlates with the perceived strength of the espresso and influences
the extraction process. Slayer recommends using a scale to measure 18-21 grams
of ground coffee per espresso serving. Begin with 18 grams, then adjust dose
weight as necessary, noting these rules:
Larger coffee dose (more weight):
• Increased flavor intensity
• Longer extraction time
Recommended when espresso tastes sour, feels thin, extracts quickly, or has no
crema.
Smaller coffee dose (less weight):
• Decreased flavor intensity
• Shorter extraction time
Recommended when espresso tastes bitter, feels muddy, or extracts slowly.
BED DEPTH
Tamping ground coffee is essential to forming a puck through which water will
evenly flow. Instead of tamping to a specific pressure (e.g., 30 pounds), Slayer
recommends tamping to a specific depth in order to achieve the adequate
headspace between the coffee puck and the shower screen. To ensure consistent
results, target a tamp depth that levels the top of the tamper piston with the top of
the portafilter basket (approximately 1 centimeter).
Page 19

19
SLAYER STEAM X USER MANUAL
WATER TEMPERATURE
At the factory, the brew tank temperature is set to 93° C (200° F). Coffee is best
brewed with water heated to 92-95° C (195-205° F).
Begin with the factory setting, then adjust the temperature as necessary, noting
these rules:
Higher temperature:
• Increased extraction rate
• Enhanced acidity
Recommended when espresso tastes sour.
Lower temperature:
• Decreased extraction rate
• Reduced acidity
Recommended when espresso tastes bitter.
To adjust the brew temperature, see instructions under Using Slayer > Adjust Brew
Temperature on page #26.
WATER PRESSURE
At the factory, the brew pump pressure is set to 9 bar. Generally, espresso is best
brewed with water pressurized to 6-10 bar. More dense coffees (such as those
grown at a higher elevation, processed with the “washed” method, and/or roasted
light) may endure higher pressure, while less dense coffees (such as those grown
at a lower elevation, processed with the “natural” method, and/or roasted medium-
to-dark) prefer lower pressure.
To adjust the brew pump pressure, see instructions under “Using Slayer > Adjust Brew
Pump Pressure” on page #27.
BEVERAGE YIELD
Beverage yield refers to the weight or volume of a serving of espresso. When
considered alongside the dose weight, beverage yield is part of the brew ratio,
which correlates with the perceived strength of the espresso and influences the
extraction process. Slayer recommends using a scale or graduated shot glasses to
measure 25-40 grams or 1.0-1.5 fluid ounces of espresso per serving. Begin with
35 grams or 1.25 fluid ounces, then adjust beverage yield as necessary, noting
these rules:
Larger yield (more weight or volume):
• Decreased flavor intensity
• Longer extraction time
Recommended when espresso lacks clarity.
Smaller yield (less weight or volume):
• Increased flavor intensity
• Longer extraction time
Recommended when espresso lacks body.
BREW TIME
Brew time refers to the total duration of extraction. Begin with 25 seconds, then
adjust brew time as necessary, noting these rules:
Longer brew time:
• Higher extraction yield
Recommended when espresso tastes sour.
Shorter brew time:
• Lower extraction yield
Recommended when espresso tastes bitter.
Page 20

20
SLAYER STEAM X USER MANUAL
SLAYER STEAM X FACTORY SETTINGS
Brew Tank Temperature 93° C (200° F)
Brew Pump Pressure 9 bar
Steam X Tank Pressure 1.7 bar
Volumetrics Dose 1/Dose 2 30/ 60
Slayer Steam X Factory Settings
Page 21

21
SLAYER STEAM X USER MANUAL
The Barista Dashboard™
Slayer Steam X is equipped with a digital interface that displays the essential functions of
the machine. Through the Barista Dashboard™, you have access to brewing parameters,
advanced operating settings, and more.
BASICS OF NAVIGATION
• Menus, settings, and queries display in rectangular screens, located directly
above each grouphead.
• Jog wheels, located to the right of each screen, are used to enter menus, cycle
options, make selections, and adjust settings. These actions are accomplished
by pressing in or rotating the jog wheel.
• During the initial setup, select the item to change, choose to save across
multiple groups if applicable, then scroll to the next menu setting until setup is
complete.
• The menu layout is circular; after cycling through the end of the menu options,
the first menu option will reappear.
Protip: At any time, you may move the grouphead actuator left/right to
quickly save/exit the menu.
GETTING STARTED
The left group screen is the main menu for all machine adjustments. Groups 2
and 3 (if applicable) have limited menus affecting only basic brewing parameters.
While the machine is idle, the left group screen will display up to four (4) units of
information: [add photo]
• Brew temperature (“Temp”) reading, displayed in tenth-degree (0.1-degree)
increments in Fahrenheit or Celsius.
• Brew time (“Time”) for the previous extraction, displayed in tenth-second
(0.1-second) increments. At the beginning of each extraction, the timer will
automatically reset and begin counting up from zero (0). At the end of each
extraction, the timer will automatically stop and will remain visible until the next
extraction begins.
• Brew weight (“WT ”) for the previous extraction, measured by a flow meter and
displayed in tenth-gram (0.1-gram) increments. When a scale is not in use, weight will
be displayed as an approximation based on readings from the flow meter.
• Steam tank pressure (“Stm”) reading, displayed in 0.1-bar increments.
The screen that corresponds to the leftmost grouphead will display two (2)
additional units of information:
• Heating element activity, represented by a colon (“:”). When a brew tank is being
heated, the colon will flash near the brew temperature reading on the corresponding
screen.
• Steam tank fill status, represented by an upward-facing arrow. When the
steam tank is being filled, the arrow will appear next to the steam tank pressure
reading.
MENU OPTIONS
The first level of navigation is the Barista Menu, which contains the options listed
below. The screen will display as shown.
Option 1: Brew Volume
• Volumetric extraction setting, based on readings from flow meter
• Minimum setting: 10.0 grams
Maximum setting: 99.9 grams
Adjustable in tenth-gram (0.1-gram) increments
To adjust the brew volume, see instructions under Using Slayer > Adjust Brew Volume on
page #27.
Option 2: Brew Temperature
• Brew tank temperature setting, measured in real-time at each grouphead and
displayed in degrees Fahrenheit or Celsius, depending on saved preference.
Page 22

22
SLAYER STEAM X USER MANUAL
• Minimum setting: 82° C (180° F)
Maximum setting: 97° C (206° F)
Adjustable in tenth-degree (0.1-degree) increments
To adjust the brew temperature, see instructions under Using Slayer > Adjust Brew Tank
Temperature on page #28.
Option 3: Steam Tank Pressure
• Steam tank pressure setting, measured and displayed in bar units
• Minimum setting: 0.8 bar
Maximum setting: 1.7 bar
Adjustable in tenth-bar (0.1-bar) increments
To adjust the steam tank pressure, see instructions under Using Slayer > Adjust Steam
Tank Pressure on page #28.
Option 4: Hot Water Dose
• Hot water dose timer setting, measured and displayed in seconds
• Minimum setting: 0.0 seconds (off)
Maximum setting: 20.0 seconds
Adjustable in tenth-second (0.1-second) increments
To adjust the hot water dose, see instructions under Using Slayer > Adjust Hot Water
Dose on page #29.
Option 5: Automatic Group Cleaning Program
• Fast Clean
• Group Clean
To initiate the group cleaning program, see instructions under Cleaning & Preventative
Maintenance > Backflush the Groupheads on page #35.
ADVANCED MENU
The second level of navigation is the Advanced Menu, which contains the options listed
below. While navigating the Barista Menu, access the Advanced Menu at any time by
pressing in the jog wheel and holding for five (5) seconds.
Do not interact with the Advanced Menu before reading this manual in its
entirety. Then – if unsure – consult your Slayer representative, reseller, or
qualified service personnel.
Advanced Option 1: Heater Control Element On/Off
• Heating element controls for brew tanks, steam tank, and vaporizer
To adjust the heater controls, see instructions under Using Slayer > Other Menu Actions
on page #30.
Advanced Option 2: Temperature Choose C or F
• Unit of temperature measurement setting: Celsius (C) or Fahrenheit (F)
To adjust the unit of temperature measurement, see instructions under Using Slayer >
Other Menu Actions on page #30.
Advanced Option 3: Language
• Choose between English, Spanish, German, Italian, or French
To adjust the language, see instructions under Using Slayer > Other Menu Actions>
Change Language on page #32.
Advanced Option 4: Shot Lights Adj. Brightness
• Brightness setting for shot lights, represented with a percentage value relative
to maximum brightness
• Minimum setting: 0% (off)
• Maximum setting: 100%
Adjustable in .01 increments
To adjust the shot lights setting, see instructions under Using Slayer > Other Menu
Actions on page #30.
Page 23

23
SLAYER STEAM X USER MANUAL
Advanced Option 5: Auto-Flushing
The Auto-Flushing feature works to stream line busy bar flow and keep the group
head flushed and fresh between brews. By enabling the feature in the Advanced
Menu you enable a two second flush of brew group water to exit the group directly
into the drain tray by simply moving the Actuator back to the OFF position.This
feature was designed to improve workflow and encourage cleanliness of the
group before each extraction. Factory settings for the Auto Flush are set to the Off
position, <Disabled>.
• Enable or Disable
To enable the feature, see instructions under Advanced Menu Actios on page #33.
Advanced Option 6: Set Time/Day
• Time, date, and clock type settings
To adjust the time, date, or clock type, see instructions under Using Slayer > Other Menu
Actions on page #31.
Advanced Option 7: Times for Power Save to Begin
You must set the Time/Day to proceed with the setup of powersave mode.
• Power-save settings, with separate schedules for each day individually
• When power-save is “OFF”, all systems normal
• When power-save is “ON”, machine is in sleep mode
• Steam pressure reduced to 0.3 bar
• Brew temperature reduced to 100.0° F
• All systems begin heating for normal operation thirty (30) minutes before power-
save is scheduled “OFF”
To configure the power-save program, see instructions under Using Slayer > Other Menu
Actions on page #31.
Advanced Option 8: Brew Temp Offset
To configure the offsets, you must have a scace device or defer to a certified
Slayer technician.
• Brew temperature calibration settings, used to ensure accurate heating by
compensating for physical variations between temperature probes
• Use offset to adjust displayed brew temperature, when different from actual
• Adjustable in tenth-degree (0.1-degree) Fahrenheit increments
To adjust the brew temperature offset, see instructions under Using Slayer > Other Menu
Actions on page #31.
Advanced Option 9: Flow Meter Calibration
Flow meters are Factory set at 30g (dose A) 60g (dose B). This configuration is defined by
three different measurements:
• Volume of water it takes to fill the headspace (water from the puck surface up to the
dispersion screen
• the average volume of water left behind in a saturated puck
• the released water through the three way valve at the end of a shot.
If your yield does not match the readings in the barista dashboard, you will need to
calibrate your Flow Meter.
To initiate the flow meter calibration, see instructions under Using Slayer > Other Menu
Actions on page #32.
Page 24

24
SLAYER STEAM X USER MANUAL
Prepare Espresso
Slayer Steam X utilizes a classic “9-bar” extraction method to produce espresso in a
system with custom gicleurs and precision screens. Brew actuators allow for three (3)
positions: “off ”, “dose 1”, and “dose 2”. A manual mode is also available.
The following steps represent a good starting point when first using Slayer Steam X to
prepare espresso.
INCLUDED PARTS
• Portafilter
RECOMMENDED SUPPLIES & EQUIPMENT
• Soft, clean towel
• Espresso grinder
• Large portafilter scale
See complete list on page #9.
PROCEDURE
1. Remove the portafilter from the grouphead and wipe the basket with a dry towel.
2. Set the grinder to a degree of coarseness suitable for brewing espresso, a fine
powder without clumps.
3. Grind and dose 18-21 grams of coffee into the portafilter.
4. Tamp until the top of the tamper base is level with the rim of the portafilter
basket, leaving approximately 1 centimeter of empty space above the puck.
5. Set aside the portafilter while you flush the grouphead, then wipe the grouphead
until dry and lock the portafilter into the grouphead.
6. Position a shot glass directly under the portafilter.
The hole pattern on the drain tray indicates a location that is centered
under the portafilter.
7. Move the brew actuator to one of the “on” positions, “Dose 1” or “Dose 2”.
8. Allow the espresso to brew until the preferred extraction has been achieved
(when blonding occurs, when the desired beverage yield has dispensed, or
when the desired brew time has elapsed), then move the actuator to the “off”
position.
9. Remove the portafilter from the grouphead and discard the puck, then wipe the
portafilter with a towel to remove grounds and oil.
10. Flush the grouphead to purge grounds and oil, then return the portafilter to the
grouphead.
Protip: Enable the automatic grouphead flush to clean the brew group
after each extraction To enable this feature see page #30.
Off
Dose A
Dose B
Page 25

25
SLAYER STEAM X USER MANUAL
Steam Milk
Slayer Steam X Actuator has three positions. Move the lever up to purge out the steam
wand of built up condensation or the post steam purge to push out any steam wand
milk residue. OFF is the resting position. Press the lever downward to slide it into the ON
position for full steam ahead.
The following steps represent a good starting point when first using Slayer Steam X to
prepare milk.
RECOMMENDED SUPPLIES & EQUIPMENT
• Steaming pitcher
• Soft, clean towel
See complete list on page #9.
PROCEDURE
1. Fill a pitcher with the desired volume of fresh, cold milk.
2. Aim the steam wand toward the drain tray or into a towel and briefly move the
steam actuator up to the “purge” position to release steam and condensation.
3. Submerge the steam tip in milk and move the actuator to position A or B.
4. Move the pitcher down to expose the steam tip to the surface of the milk,
incorporating fine air bubbles.
5. Submerge the steam tip when the milk reaches body temperature, then tilt the
pitcher to form a whirlpool.
6. Turn off the steam wand when the pitcher feels hot to the touch. The final milk
temperature should be 55-65º C (130-150º F).
Wipe the steam wand with a damp cloth, removing all milk residue, then purge.
Protip: Purge the actuator twice within one second to activate a 30 second
run cycle, preheating the entire inline system. This feature enables the
barista to quickly increase the temperature of all the metal components in
resting steam wand, to maintain the consistency of the temperature. Use
this feature between long pauses in service (ten minutes or more of down
time between drink steaming), start of day, or if you have changed the
Vaporizer temperature. To exit the 30 second run cycle early, tap the steam
actuator up once.
Page 26

26
SLAYER STEAM X USER MANUAL
Use Hot Water Tap
Slayer Steam X features a blended hot water valve that draws from the steam tank
and main cold water line. The hot water tap is located on the left side of the machine,
adjacent to the steam wand. Water volumes may be configured in the Barista Dashboard.
Dispense hot water by pressing the button to right of the tap. The flow of water will stop
automatically, after the pre-configured volume has been dispensed. To adjust the volume
and temperature, see instructions under Using Slayer > Adjust Hot Water Dose on page
#29 and Adjust Hot Water Temperature on page #29.
Adjust Hot Water Temperature
Custom water temperatures can be raised or lowered to your desired temperature
at the mix valve. To adjust the hot water temperature, see instructions under Using
Slayer > and Using Slayer > Adjust Hot Water Temperature on page #31.
Frequent or heavy use of the hot water tap may result in reduced steam tank
pressure and temperature, causing decreased steaming ability.
Adjust Drain Tray
Slayer Steam X features an adjustable-height drain tray with four (4) distinct positions.
Use the following steps to djust the height.
1. Locate the two (2) locking pins, one (1) on each side of the drain tray.
2. Clear the drain tray of any items that are subject to tipping, such as shot glasses
or tall cups.
3. Brace the drain tray with one hand, then pull one locking pin while sliding the
drain tray into the desired position, one side at a time. Release the locking pin to
set the tray height.
Do not use excessive force to move the drain tray.
4. Repeat step 3 with other side of the drain tray.
WARNING: When adjusting the drain tray keep a firm grip on the tray
ends, as it was designed to be fully removable for easy washing. Failure
to hold the tray ends while pulling the side tabs for height adjustment will
result in the tray falling to the counter.
Page 27

27
SLAYER STEAM X USER MANUAL
INCLUDED PARTS
• External rotary pump
• Inline pump regulator
REQUIRED TOOLS
• None
PROCEDURE
1. Locate the pressure gauge and adjustment screw on the external rotary pump.
2. Move the brew actuator to the on position.
3. Turn clockwise to increase the pump pressure. Turn counterclockwise to
decrease the pump pressure.
4. Return the brew actuator to the off position.
Adjust Brew Pump Pressure
Slayer Steam X features automatic-volumetric operation, which is based on readings
from the flow meter. The left group screen is the main menu for all machine adjustments.
Additionally, each grouphead has two (2) programmable shot volumes: “dose A” and
“dose B”. Adjust the doses with the following steps:
PROCEDURE
1. Press and release the jog wheel above the left grouphead to activate the menu
for all groupheads.
2. Rotate the jog wheel clockwise until the “Brew Volume” setting appears.
3. Press and release the jog wheel to enter the “Brew Volume” setting. The option
to adjust “dose A” will be presented.
4. Rotate the jog wheel to adjust the shot volume for “dose A” in tenth-gram (0.1-
gram) increments: clockwise rotations increase the dose; counter-clockwise
rotations decrease the dose.
5. Press and release the jog wheel to confirm your new setting and proceed to
the next step; the option to apply your new setting to all groupheads will be
presented.
6. Rotate the jog wheel to cycle between “N” and “Y”. Selecting “N” will apply your
new setting to the designated grouphead only; selecting “Y” will apply your new
setting to all groupheads.
7. Press and release the jog wheel to confirm your new setting and proceed to the
next shot volume; the option to adjust “dose B” will be presented.
To configure different doses for each grouphead, repeat steps 1-7 at each
grouphead.
Note: When using a scale to measure output, if the weight in the glass does not
match the adjusted shot volume, you may need to calibrate your flow meters. To
calibrate your flow meter, see instructions on page #23.
Adjust Brew Volumes
Page 28

28
SLAYER STEAM X USER MANUAL
At the factory, the brew tank temperatures are set to 93° C (200° F). Adjust the
brew tank temperatures with the following steps.
PROCEDURE
1. Press and release the jog wheel above the left grouphead to activate the menu
for all groupheads.
2. Rotate the jog wheel clockwise until the “Brew Temperature” setting appears.
3. Press and release the jog wheel to enter the “Brew Temperature” setting.
4. Rotate the jog wheel to adjust the brew tank temperature in tenth-degree
(0.1-degree) increments: clockwise rotations increase the temperature; counter-
clockwise rotations decrease the temperature.
5. Press and release the jog wheel to confirm your new setting and proceed to
the next step; the option to apply your new setting to all groupheads will be
presented.
6. Rotate the jog wheel to cycle between “N” and “Y”. Selecting “N” will apply your
new setting to the designated grouphead only; selecting “Y” will apply your new
setting to all groupheads.
7. Press and release the jog wheel to confirm your new setting and return to the
menu, and scroll to the next menu option.
To configure a different temperature for each brew tank, repeat steps 1-7 at each
grouphead.
Protip: To quick exit the program menu move the actuator Left/Right to
Save and Exit the menu.
At the factory, the steam tank temperature is set to 1.7 bar (25 psi). Adjust the steam tank
temperature with the following steps.
PROCEDURE
1. Press and release the jog wheel above any grouphead to activate the menu.
2. Rotate the jog wheel clockwise until the “Steam Tank” setting appears.
3. Press and release the jog wheel to enter the “Steam Tank” setting.
4. Rotate the jog wheel to adjust the steam tank pressure in tenth-bar (0.1-bar)
increments: clockwise rotations increase the temperature; counter-clockwise
rotations decrease the temperature.
5. Press and release the jog wheel to confirm your new setting and return to the menu,
or press and hold the jog wheel to confirm your new setting and exit the menu.
Adjust Brew Tank Temperatures Adjust Steam Tank Pressure
Page 29

29
SLAYER STEAM X USER MANUAL
Slayer Steam X utilizes a timer to dispense pre-configured volumes of hot water. Adjust
the hot water dose with the following steps.
PROCEDURE
1. Press and release the jog wheel above the left grouphead to activate the main
menu.
2. Rotate the jog wheel clockwise until the “Hot Water Dose” setting appears.
3. Press and release the jog wheel to enter the “Hot Water Dose” setting. The “on”
button, found directly next to the hot water tap, will begin to flash.
4. Rotate the jog wheel to adjust the hot water dose in tenth-second (0.1-second)
increments: clockwise rotations increase the hot water dose; counter-clockwise
rotations decrease the hot water dose.
5. Press and release the jog wheel to confirm your new setting and return to the
menu, or press and hold the jog wheel to confirm your new setting and exit the
menu.
Alternatively, after completing steps 1-3, you may skip to the “Alternative
Procedure”, below.
ALTERNATIVE PROCEDURE
1. Complete “Adjust Hot Water Dose” steps 1-3, above.
2. Press and release the “on” button to dispense hot water. The Barista Dashboard
will begin a timer to display and record the duration of the dose.
3. Press and release the “on” button again to stop the flow of hot water. The
duration of the dose will be recorded.
The hot water dose may not exceed 20 seconds.
4. Press and release the jog wheel to confirm your new setting and return to the
menu, or press and hold the jog wheel to confirm your new setting and exit the
menu.
Slayer Steam X features a blending valve that draws water from the steam tank and main
cold water line simultaneously. Custom water temperatures are configured with the
blending valve. Adjust the hot water temperature with the following steps.
REQUIRED TOOLS
• Flat Blade Screwdriver
PROCEDURE
1. Remove the cups and tray. You will NOT need to remove the back or side
panels to make this adjustment.
2. Locate the blending valve between the Vaporizer and the Proportional valve.
[see attached photo]
3. Adjust the hot water temperature from the rear right side of the machine (guest
expereince side): clockwise rotations increase the hot water temperature;
counter-clockwise rotations decrease the hot water temperature.
4. Verify the temperature at the hot water tap with a digital thermometer.
Adjust Hot Water Dose Adjust Hot Water Temperature
Page 30

30
SLAYER STEAM X USER MANUAL
Through the Advanced Menu, you may access additional settings. Do not interact
with the Advanced Menu before reading this manual in its entirety, then – if unsure
– consulting your Slayer representative, reseller, or qualified service personnel.
From the idle screen, access the Advanced Menu by pressing and holding the jog
wheel, until a beep sounds. At any time, you may press and hold the jog wheel or
move the actuator Left to Right to save your new settings and exit the menu.
HEATER CONTROL ELEMENT ON/OFF
1. Press and hold the jog wheel above the left grouphead for five seconds to
activate the Advanced Menu options. Press and release the jog wheel to
enter the “Heater Control” setting. The option to adjust all heating elements,
universally, will be presented.
2. Rotate the jog wheel to cycle between “On” and “Off”.
3. Press and release the jog wheel to confirm your new setting and proceed to the
next step.
4. Repeat steps 4-5 for all remaining settings:
• Gp1 (heating element for leftmost brew tank)
• Gp2 (on 2-group, right brew tank; on 3-group, middle brew tank)
• Gp3 (rightmost brew tank; 3-group only)
• Stm (steam tank)
TEMPERATURE CHOOSE C OR F
1. Press and hold the jog wheel above the left grouphead for five seconds to
activate the Advanced Menu options.
2. Rotate the jog wheel clockwise until the “Temperature” setting appears.
3. Press and release the jog wheel to enter the “ Temperature” setting. The option
to adjust the unit of temperature measurement will be presented.
4. Rotate the jog wheel to cycle between “C” (Fahrenheit) and “F” (Celsius).
5. Press and release the jog wheel to confirm your new setting and return to the
menu for additional adjustments OR move the brew actuator Left to Right to
save and exit the Advanced Menu.
SHOT LIGHTS ADJUST BRIGHTNESS
1. Press and hold the jog wheel above the left grouphead for five seconds to
activate the Advanced Menu options.
2. Rotate the jog wheel clockwise until the “Shot Lights” setting appears.
3. Press and release the jog wheel to enter the “Shot Lights” setting. The option to
adjust the brightness of all shot lights will be presented.
4. Rotate the jog wheel to adjust the brightness of all shot by a percentage value.
(0 is OFF to 100%) increments: clockwise rotations increase the brightness;
counter-clockwise rotations decrease the brightness.
5. Press and release the jog wheel to confirm your new setting and return to the
menu, OR move the brew actuator Left to Right to save and exit the Advanced
Menu
AUTO FLUSH
1. Press and hold the jog wheel above the left grouphead for five seconds to
activate the Advanced Menu options.
2. Rotate the jog wheel clockwise until “Auto-Flushing” setting appears.
3. Press and release the jog wheel to enter the “Auto-Flush” setting. The option is
tuned to OFF and will show as <Disabled>, our factory setting.
4. Rotate the jog wheel clockwise one click to the screen <Enable> to activate the
setting.
5. Press and release the jog wheel to confirm your new setting and return to the
menu for additional adjustments OR move the brew actuator Left to Right to
save and exit the Advanced Menu.
Other Menu Actions
Page 31

31
SLAYER STEAM X USER MANUAL
SET CURRENT TIME/DAY
1. Press and hold the jog wheel above the left grouphead for five seconds to
activate the Advanced Menu options.
2. Rotate the jog wheel clockwise until the “Set Time/ Day” setting appears.
3. Press and release the jog wheel to enter the “Set Time/ Day” setting. The option
to adjust the clock type will be presented.
4. Rotate the jog wheel to cycle between “12H” (12-hour clock) and “24H” (24-hour
clock).
5. Press and release the jog wheel to confirm your new setting and proceed to the
next step. The option to adjust the hour will be presented.
6. Rotate the jog wheel to adjust the hour.
7. Press and release the jog wheel to confirm your new setting and proceed to the
next step.
8. Repeat steps 6-7 for all remaining settings:
• Min (minute)
• Day
9. Press and release the jog wheel to confirm your new setting and return to the
menu for additional adjustments OR move the brew actuator Left to Right to
save and exit the Advanced Menu.
Time/ Day must be programmed before you can move onto setting up Power Save
options.
PROGRAM ON/OFF TIMES FOR POWER SAVING
1. Press and hold the jog wheel above the left grouphead for five seconds to
activate the Advanced Menu options.
2. Rotate the jog wheel clockwise until the “Times For Power Save To Begin”
setting appears.
3. Press and release the jog wheel to enter the “ Times for Power Save To Begin”
setting. The option to adjust the “on at” setting for the weekday schedule
(Monday-Friday) will be presented.
4. Rotate the jog wheel to adjust the “on at” setting for the weekday schedule to
the exact time you want the feature to turn on. The “on at” setting determines
the time at which the machine will enter power-save mode and fall asleep.
5. Press and release the jog wheel to confirm your new setting and proceed to the
next step; the option to adjust the “off at” setting for the weekday schedule will
be presented.
6. Rotate the jog wheel to adjust the “off at” setting for the weekday schedule the
exact time you want the feature to turn off. The “off at” setting determines the
time at which the machine will be ready to resume normal operations or wake
up. The machine will exit power-save mode and begin heating thirty minutes (30
minutes) before the programmed “off at” time.
7. Press and release the jog wheel to confirm your new setting and proceed to the
next step. The option to configure the weekend schedule (Saturday-Sunday) will
be presented.
8. Repeat steps 4-7 for every day of the week. Adjust accordingly for the weekend
schedule to accommdate varied hours of operation.
9. Press and release the jog wheel to confirm your new setting and return to the
menu for additional adjustments OR move the brew actuator Left to Right to
save and exit the Advanced Menu.
BREW TEMP OFFSET
When adjusting a brew temp offset you will need a scace device or the professional
services provided by a Slayer technician.
1. Press and hold the jog wheel above the left grouphead for five seconds to
activate the Advanced Menu options.
2. Rotate the jog wheel clockwise until the “Brew Temp Offset” setting appears.
3. Press and release the jog wheel to enter the “Brew Temp Offset” setting. The
option to adjust the offset for the leftmost grouphead (Gp1) will be presented.
4. Rotate the jog wheel to adjust the brew temperature offset for the leftmost
grouphead in tenth-degree (0.1-degree) Fahrenheit increments: clockwise
rotations increase the offset value; counter-clockwise rotations decrease the
Page 32

32
SLAYER STEAM X USER MANUAL
offset value.
If the displayed brew temperature is lower than the actual brew
temperature, increase the offset value. If the displayed brew temperature is
higher than the actual brew temperature, decrease the offset value.
5. Press and release the jog wheel to confirm your new setting and proceed to the
next step.
6. Repeat steps 4-5 for all remaining settings:
• Gp2 (on 2-group, right brew tank; on 3-group, middle brew tank)
• Gp3 (rightmost brew tank; 3-group only)
7. Press and release the jog wheel to confirm your new setting and return to the
menu for additional adjustments OR move the brew actuator Left to Right to
save and exit the Advanced Menu.
SET LANGUAGE
1. Press and hold the jog wheel above the left grouphead for five seconds to
activate the Advanced Menu options.
2. Rotate the jog wheel clockwise until the “Language” setting appears.
3. Press and release the jog wheel to enter the “Language” setting.
4. Scroll to select your desired Language.
5. Press and release the jog wheel to cofirm your language and return to the menu
for additional adjustments OR move the brew actuator Left to Right to save and
exit the Advanced Menu.
CALIBRATE YOUR FLOW METERS
1. Press and hold the jog wheel above the left grouphead for five seconds to
activate the Advanced Menu options.
2. Rotate the jog wheel clockwise until the “FlowMeter Calib.” setting appears.
3. Press and release the jog wheel to enter the “FlowMeter Calib” setting.
• Adjust this value up or down based on the need to increase or decrease the
water volume.
• Factory settings will not fit every recipe, therefore fine tuning your
volumetrics to match the output on your scale is the best way to acheive
consistency
4. Once you have acheived your desired value, press the jog wheel to save. You
will immediatley be prompted to enter a value for Group 2 and Group 3 (if
applicable).
5. Press and release the jog wheel to confirm and save the settings.
Page 33

33
SLAYER STEAM X USER MANUAL
Cleaning & Preventative Maintenance
Keeping your machine clean and properly
maintained is essential to ensuring espresso
quality and equipment longevity. Espresso
machines require both daily cleaning and
ongoing periodic maintenance. The frequency
with which these tasks should be completed
will depend on the location and use of your
espresso machine. The following instructions
assume heavy use in a commercial setting.
Contents
34 Clean Your Machine
34 Clean the Steam Wands
35 General Grouphead Care
35 Backflush the Groupheads
36 Backflush the Groupheads, continued
37 Fast Clean
Page 34

34
SLAYER STEAM X USER MANUAL
Use a soft, clean towel to wipe the surfaces of the machine. Do not use abrasive
cleaners. Small amounts of window cleaner may be used on glass and metal
components.
Immediately after steaming milk, clean the exterior of the steam wand by wiping it
thoroughly with a damp towel, then clear the interior by briefly moving the steam
actuator up to the “purge” position.
If clogging occurs, soak the steam wand in hot water for several minutes, then
purge while submerged. For tough clogs, use an approved espresso machine
steam wand cleaning solution.
Clean the Machine Exterior Clean the Steam X Wands
Page 35

35
SLAYER STEAM X USER MANUAL
Regular cleaning and backflushing optimizes machine performance and espresso
flavor by preventing the buildup of coffee oils. Complete the following steps for each
grouphead as part of every backflush cycle or as needed, at least once daily.
REQUIRED TOOLS
• Cleaning brush
• Flat-head screwdriver
RECOMMENDED SUPPLIES
• Soft, clean towel
PROCEDURE
1. Remove portafilter from grouphead, then use a cleaning brush to scrub the
portafilter gasket, loosening oil and coffee grounds.
2. Use a flat-head screwdriver to remove the dispersion screw and shower screen,
then rinse with clean water.
Ensure that the dispersion screw holes remain clear of coffee grounds, as
they may otherwise damage internal parts of the grouphead.
3. Use a damp towel to wipe oil and grounds from the face and sides of the
dispersion block, as well as the portafilter body.
4. Return the clean dispersion screw and shower screen to the grouphead.
Failure to reinstall the dispersion screw and shower screen before next
use may cause the grouphead to clog. Do not attempt to brew espresso or
backflush the grouphead before the dispersion screw and shower screen
have been correctly installed.
5. Rinse the portafilter with hot water, then insert the portafilter basket and lock it in
the grouphead.
Through the Barista Dashboard, Slayer Steam X automates backflush cycles for each
grouphead. Backflush with an approved espresso machine cleaning powder at least once
daily. Complete the “Fast Clean” procedure as needed.
To maximize efficiency and lengthen the life of wearable parts, keep on hand two
(2) complete sets of shower screens, dispersion screws, portafilter baskets, and
portafilter springs. Alternate between sets for each full backflush cycle.
INCLUDED PARTS
• Blind portafilter insert
• Replacement portafilter
REQUIRED TOOLS
• Cleaning brush
• Flat-head screwdriver
RECOMMENDED PARTS & SUPPLIES
• Replacement shower screens, one (1) per grouphead
• Replacement dispersion screws, one (1) per grouphead
• Replacement portafilter baskets, one (1) per grouphead
• Replacement portafilter springs, one (1) per grouphead
• Approved espresso machine cleaning powder
• 1-liter (or larger) heat-tolerant container
• Soft, clean towel
General Grouphead Care Backflush the Groupheads
Page 36

36
SLAYER STEAM X USER MANUAL
PROCEDURE
1. Complete “General Group Cleaning” steps 1-3 on page #35. Set aside shower screens
and dispersion screws.
2. Prepare a solution of hot water and approved espresso machine cleaning
powder in a 1-liter (or larger) heat-tolerant container.
3. Remove portafilter baskets and portafilter springs from all portafilter bodies.
4. Add all shower screens, dispersion screws, portafilter baskets, portafilter
springs, and portafilter bodies to prepared solution. Soak for a minimum of 20
minutes, then rinse thoroughly with clean water. Meanwhile, complete remaining
steps.
Do not submerge portafilter handles in solution or fading will occur.
5. Use a flat-head screwdriver to install a second set of shower screens and
dispersion screws, then complete the following steps for each grouphead.
6. Install a blind insert in a replacement portafilter, add cleaning powder, and lock it
in the grouphead.
7. Press and release the jog wheel above the grouphead to activate the menu.
8. Rotate the jog wheel clockwise until the “Group Cleaning” setting appears.
9. Press and release the jog wheel to enter the “Group Cleaning” setting. The
option to select a cleaning program will be presented.
10. Rotate the jog wheel to cycle between cleaning programs:
• All (all groupheads)
• Gp1 (leftmost grouphead)
• Gp2 (on 2-group, right grouphead; on 3-group, middle grouphead)
• Gp3 (rightmost grouphead; 3-group only)
11. Press and release the jog wheel to select and initiate a cleaning program. A
countdown will begin at the grouphead(s) running the cleaning program. The
cleaning program is complete when a buzz sounds and the shot light pulses.
12. Follow the prompt on the screen to remove the portafilter(s) from the
grouphead(s), then press and release the jog wheel to continue. A purging cycle
will begin at the grouphead(s) running the cleaning program. The purging cycle
is complete when the shot light pulses, after approximately thirty (30) seconds.
13. Reassemble the portafilter, inserting the portafiler spring and portafilter basket,
then lock it in the grouphead.
14. Repeat steps 6-13 for each grouphead, as needed.
Backflush the Groupheads, continued
Page 37

37
SLAYER STEAM X USER MANUAL
Designed to be done without the use of detergent after the busy portion of the day,
at the shift change or when changing out the coffees in the hopper. Leave the
screen, screw in place. Complete the following steps for each grouphead whenever
your machine requires minor cleaning.
INCLUDED PARTS
• Blind portafilter insert
REQUIRED TOOLS
• group brush or non-fiber towel and a blunt end object
RECOMMENDED SUPPLIES
• Soft, clean towel
PROCEDURE
1. Remove portafilter from grouphead, then use a cleaning brush to scrub the
portafilter gasket, loosening oil and coffee grounds.
2. Replace portafilter basket with a blind insert and lock it in the grouphead.
3. Press and release the jog wheel above the grouphead to activate the menu.
4. Rotate the jog wheel counterclockwise to the “Fast Clean” setting
5. Press and release the jog wheel to enter the “Fast Clean” setting. The option to
select a cleaning program will be presented.
6. Press and release the jog wheel to select and initiate Fast Clean.
7. Follow the prompt on the screen to remove the portafilter from the grouphead,
then press and release the jog wheel to continue.
8. Remove the blind insert from the portafilter and use a damp towel to wipe oil
and grounds from portafilter body.
9. Rinse the portafilter with hot water, then insert the portafilter basket and lock it in
the grouphead.
10. Repeat all steps for each grouphead, as needed. This feature is available per
group and intuitively placed last on the menu for counter clockwise turn to, quick
activation.
Fast Clean
Page 38

38
SLAYER STEAM X USER MANUAL
Part Diagrams
Preventative maintenance and appropriate
water filteration will not only extend the life
of your espresso machine, it will additionally
maintain the output of high quality beverages.
Only qualified service personnel should repair
Slayer Espresso machines. Incorrect repair
may result in injury and/or damage to the
equipment. Please consult your distributor for
a qualified Slayer service technician.
Contents
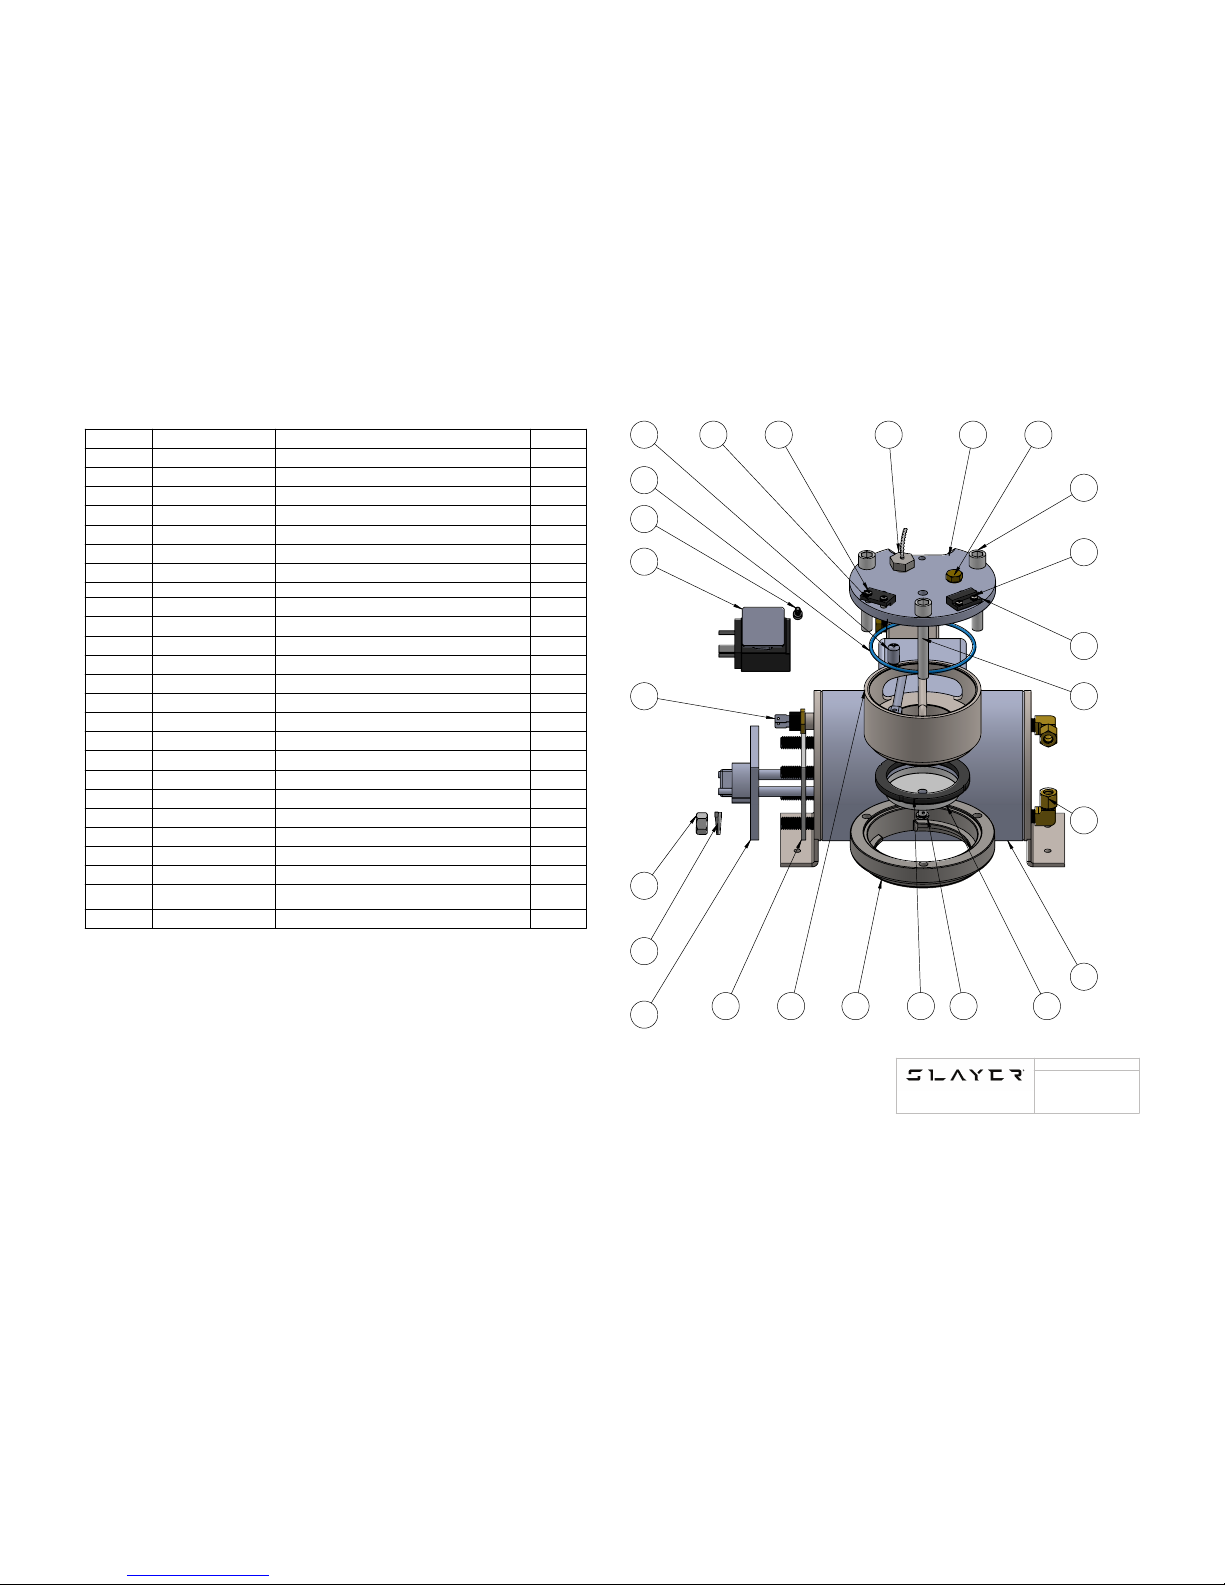
39 Brew Tank Assembly
40 Group Cap Assembly
41 Steam Tank Assembly
42 Steam Manifold Assembly
43 Water Inlet Manifold Assembly
44 Hot Water Mix Valve
45 Drain Manifold Assembly
46 Flow Meter Assembly
47 Steam Actuator Assembly
48 Barista Dashboard Upper Panel Display
49 Barista Dashboard Display Assembly
50 Electronics Panel
51 Wing Assembly
Page 39
39
SLAYER STEAM X USER MANUAL
ITEM NO.
PART NUMBER
DESCRIPTION
QTY.
1
10000-16051
BREW CAP
1
2
42000-34300
BLEED SCREW PLUG
2
3
44000-56000
BAYONET BOLT
3
4
44000-36130
SCREW/WASHER POWER SUPPLY
2
5
30000-20040
MAGNETIC SWITCH N/O
2
6
44000-56000
BAYONET BOLT
3
7
42000-34560
1/4 COMP 90 DEG
2
8
15005-16060
TANK
1
9
46000-50070
58 MM SHOWER SCREEN
1
10
46000-50080
DIFFUSER SCREW
1
11
46000-56090
PORTAFILTER GASKET
1
12
20000-56010
BAYONET RING
1
13
46000-50100
GROUP CAP PAPER GASKET
1
14
30000-20140
ELEMENT GASKET
1
15
30000-20130
600 WATT BREW TANK ELEMENT
1
16
44000-36070
3/8 LOCK WASHER
4
17
44000-36080
3/8-16 NUT
4
18
30000-20250
100 DEG C THERMOSTAT
1
19
30000-20151
3 WAY SOLENOID VALVE
1
20
44000-36310
MOUNT SCREW
2
21
46000-50090
GROUP CAP O RING
1
22
10000-16061
.7MM GIGGLEUR
1
23
44000-36000
INVERTED MAG SWITCH SPACER
2
24
44000-36140
SCREW/WASHER FOR INVERTED MAGNET
2
25
30005-20080
3K3 NTC
1
Brew Tank Assembly
2423 25 1 2
3
22
4
5
6
7
8
910111214
15
16
17
18
19
13
20
21
99005-16060
WWW.SLAYERESPRESSO.COM
206-284-7171
NAME
Page 40
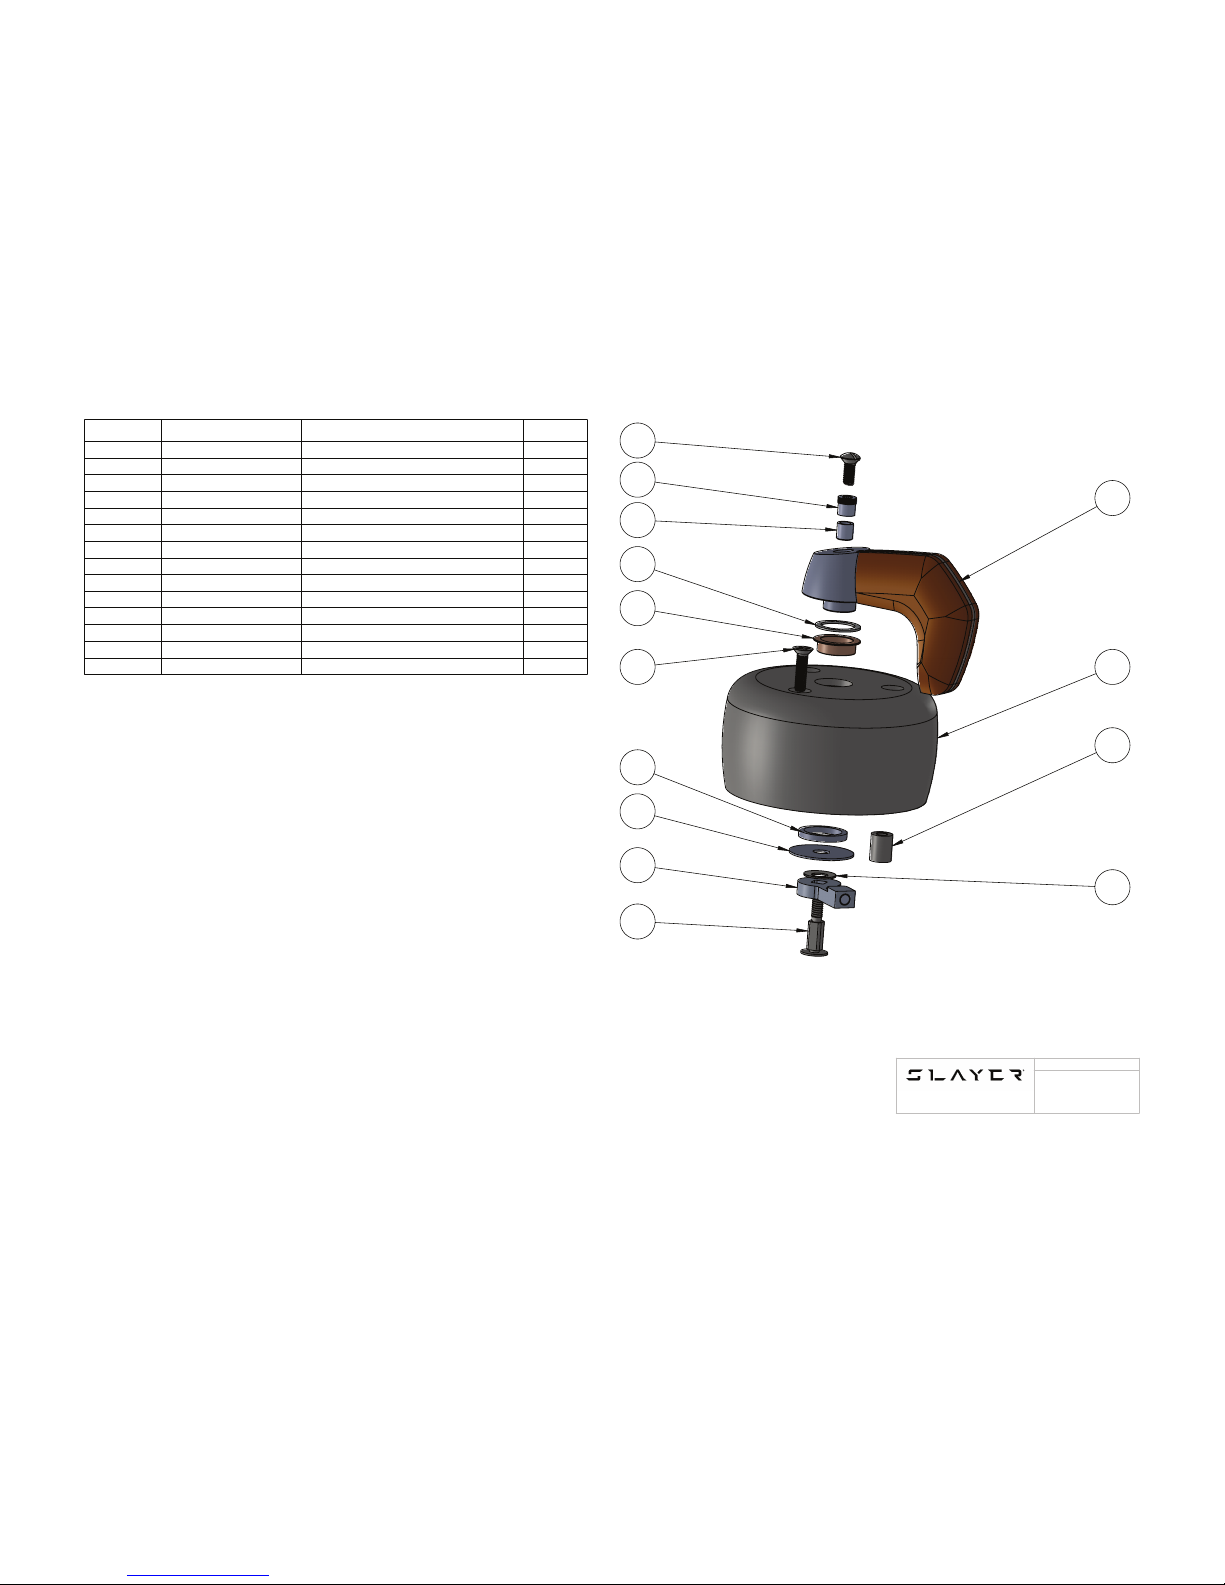
40
SLAYER STEAM X USER MANUAL
Group Cap Assembly
ITEM NO.
PART NUMBER
DESCRIPTION
QTY.
1
99005-56500
1
2
20000-16080
GROUP COVER
1
3
46000-50270
GROUP COVER SPACER
3
4
46000-50240
DISC SPRING
1
5
44000-50220
HANDLE LOCK SCREW
1
6
44000-50210
INSERT NUT
1
7
46000-50190
HANDLE SPACER
1
8
46000-53070
TEFLON GASKET 27MM
1
9
10000-16200
OILITE BUSHING
1
10
44000-50260
GROUP COVER MOUNT SCREW
3
11
10000-16210
PLASTIC SPACER
1
12
44000-16220
STAINLESS FINDER WASHER
1
13
99000-50050
TONGUE ASSEMBLY
1
14
10000-16161
VALVE STEM
1
7
5
1
3
2
9
8
6
14
4
13
12
10
11
99005-16080
WWW.SLAYERESPRESSO.COM
206-284-7171
NAME
Page 41
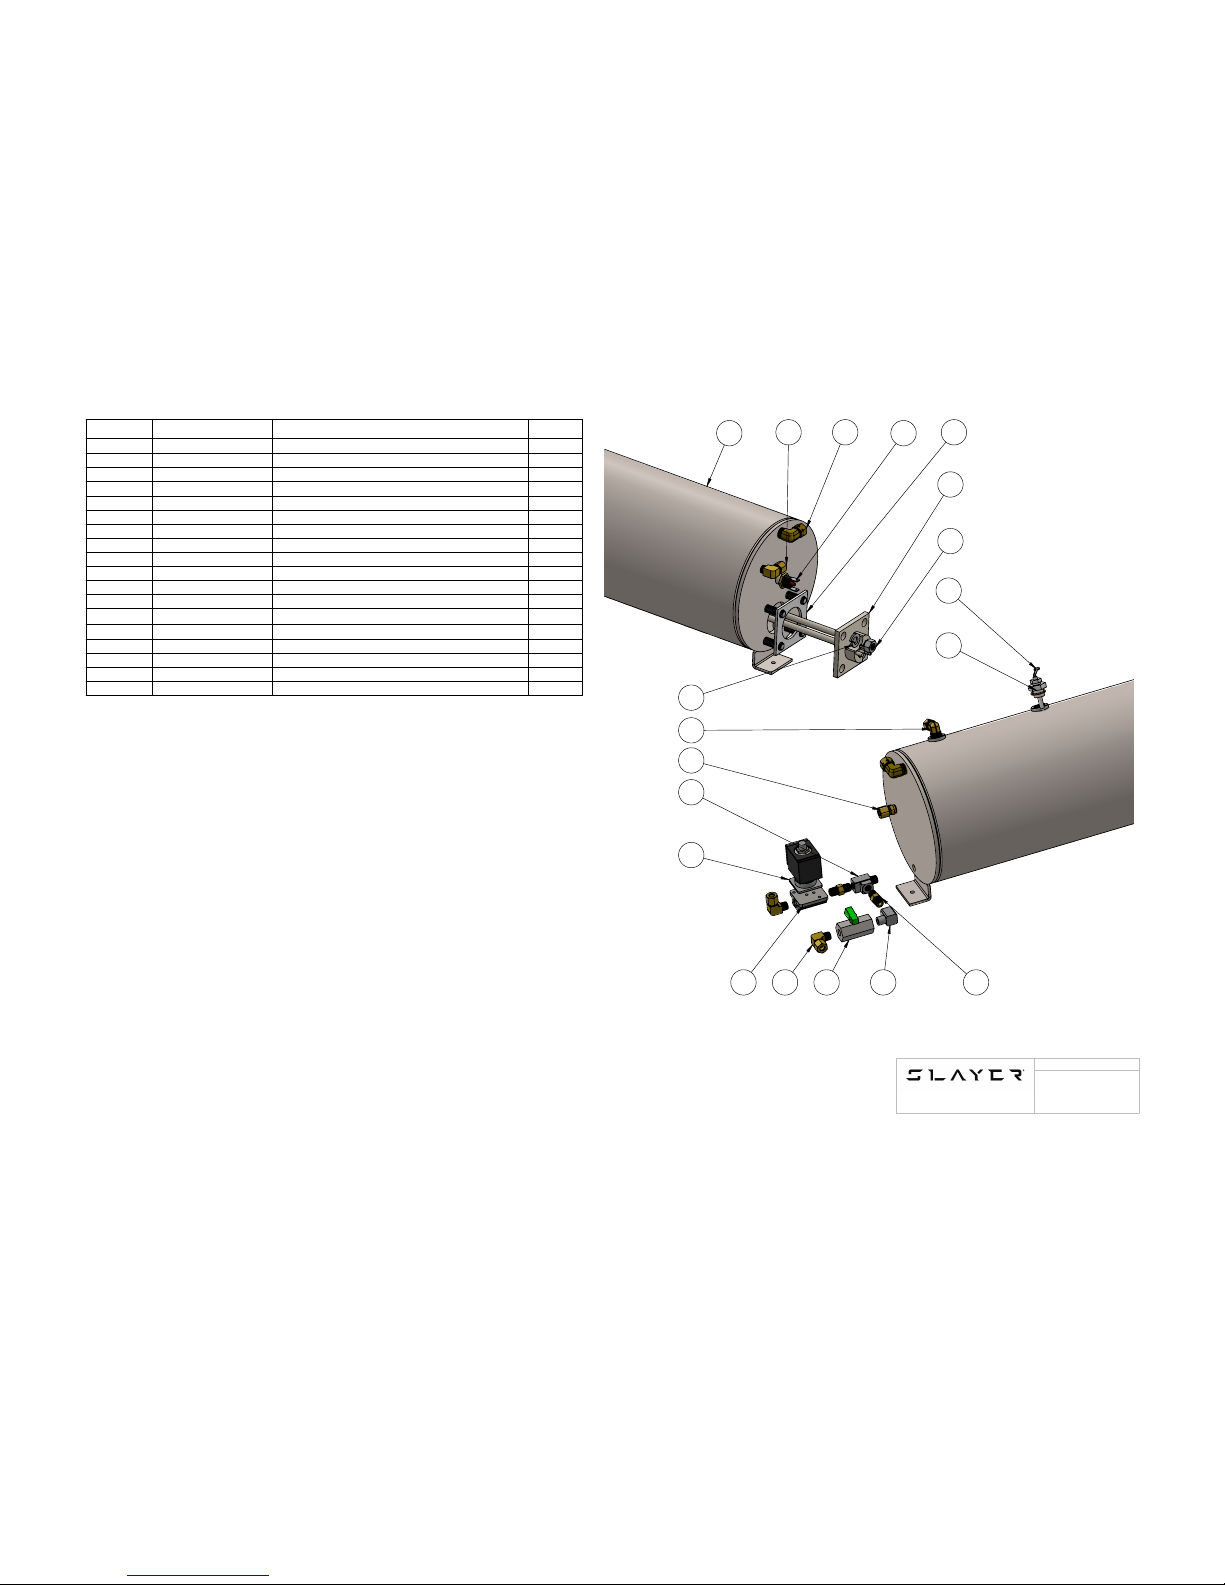
41
SLAYER STEAM X USER MANUAL
Steam Tank Assembly
ITEM NO.
PART NUMBER
DESCRIPTION
QTY.
1
15005-13110
TANK BODY, 3 GROUP, STEAM
1
2
42000-34560
1/4 COMP 90 DEG
3
3
42000-34680
STEAM LINE ELBOW
2
4
30000-20260
145 DEG C THERMOSTAT
1
5
30000-20140
ELEMENT GASKET
1
6
30000-20100
STEAM ELEMENT, 220V, 4500W, 3 GROUP
1
7
44000-36080
3/8-16 NUT
4
8
30000-50170
WATER LEVEL PROBE
1
9
46000-50150
COPPER GASKET 1/4 NPT
1
10
44000-36070
3/8 LOCK WASHER
4
11
42000-34702
WATER OUT FITTING
1
12
42000-34500
1/8 NPT X 1/4 COPPER COMP.
1
13
42000-34580
1/8 NPT PIPE TEE M-F-F
1
14
30000-20191
2 WAY SOLENOID
1
15
10999-20191
SOLENOID MOUNT
1
16
46000-50290
1/8 BALL VALVE
1
17
42000-34110
1/8 NPT 90 DEG ELBOW M-F
1
18
42000-34180
1/8 NPT HEX NIPPLE
2
32
4
5
6
7
10
1
9
8
17 18
13
16215
14
12
11
99005-13110
WWW.SLAYERESPRESSO.COM
206-284-7171
NAME
Page 42
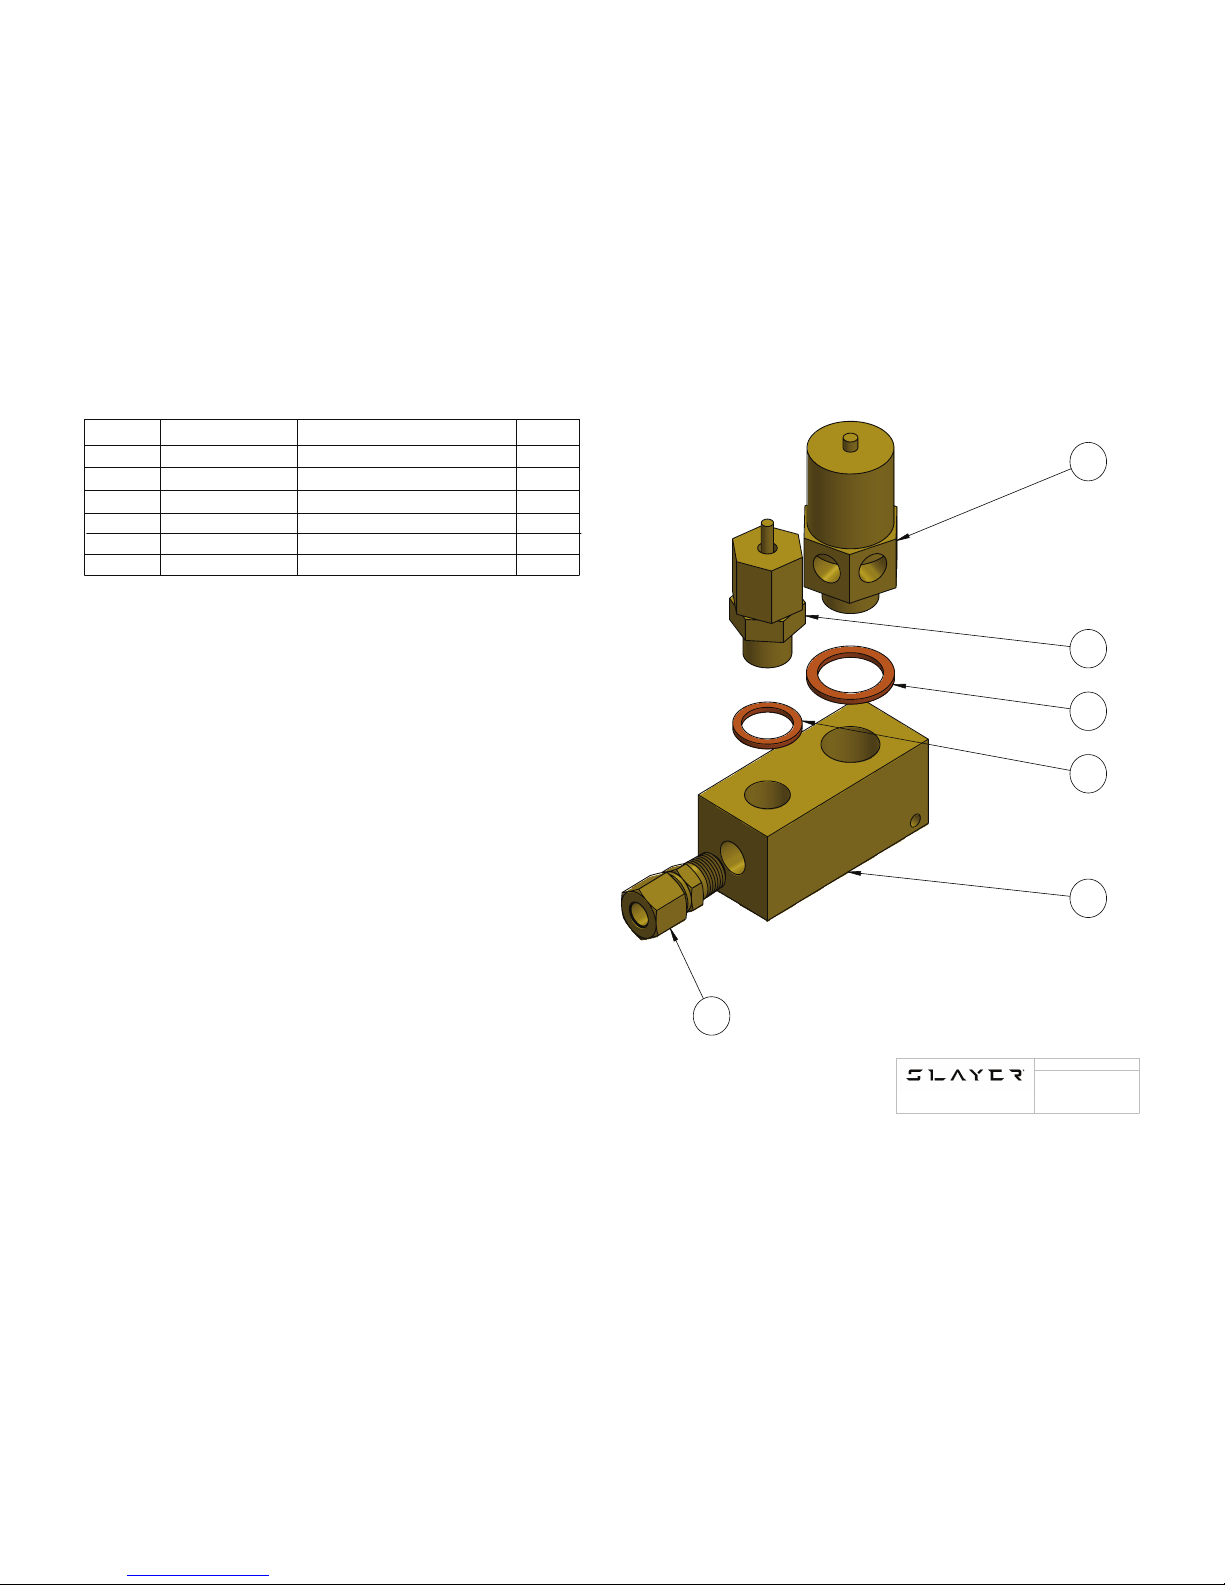
42
SLAYER STEAM X USER MANUAL
Steam Manifold Assembly
ITEM NO.
PART NUMBER
DESCRIPTION
QTY.
1
46000-50120
PRV 2.5 BAR
1
2
46000-50140
VACUUM BREAKER
1
3
46000-50130
COPPER GASKET 3/8 NPT
1
4
46000-50150
COPPER GASKET 1/4 NPT
1
5
10005-03030
WATER INLET MANIFOLD
1
6
42000-34500
1/8 NPT X 1/4 COPPER COMP.
1
1
2
3
4
5
6
99005-03030
WWW.SLAYERESPRESSO.COM
206-284-7171
NAME
Page 43
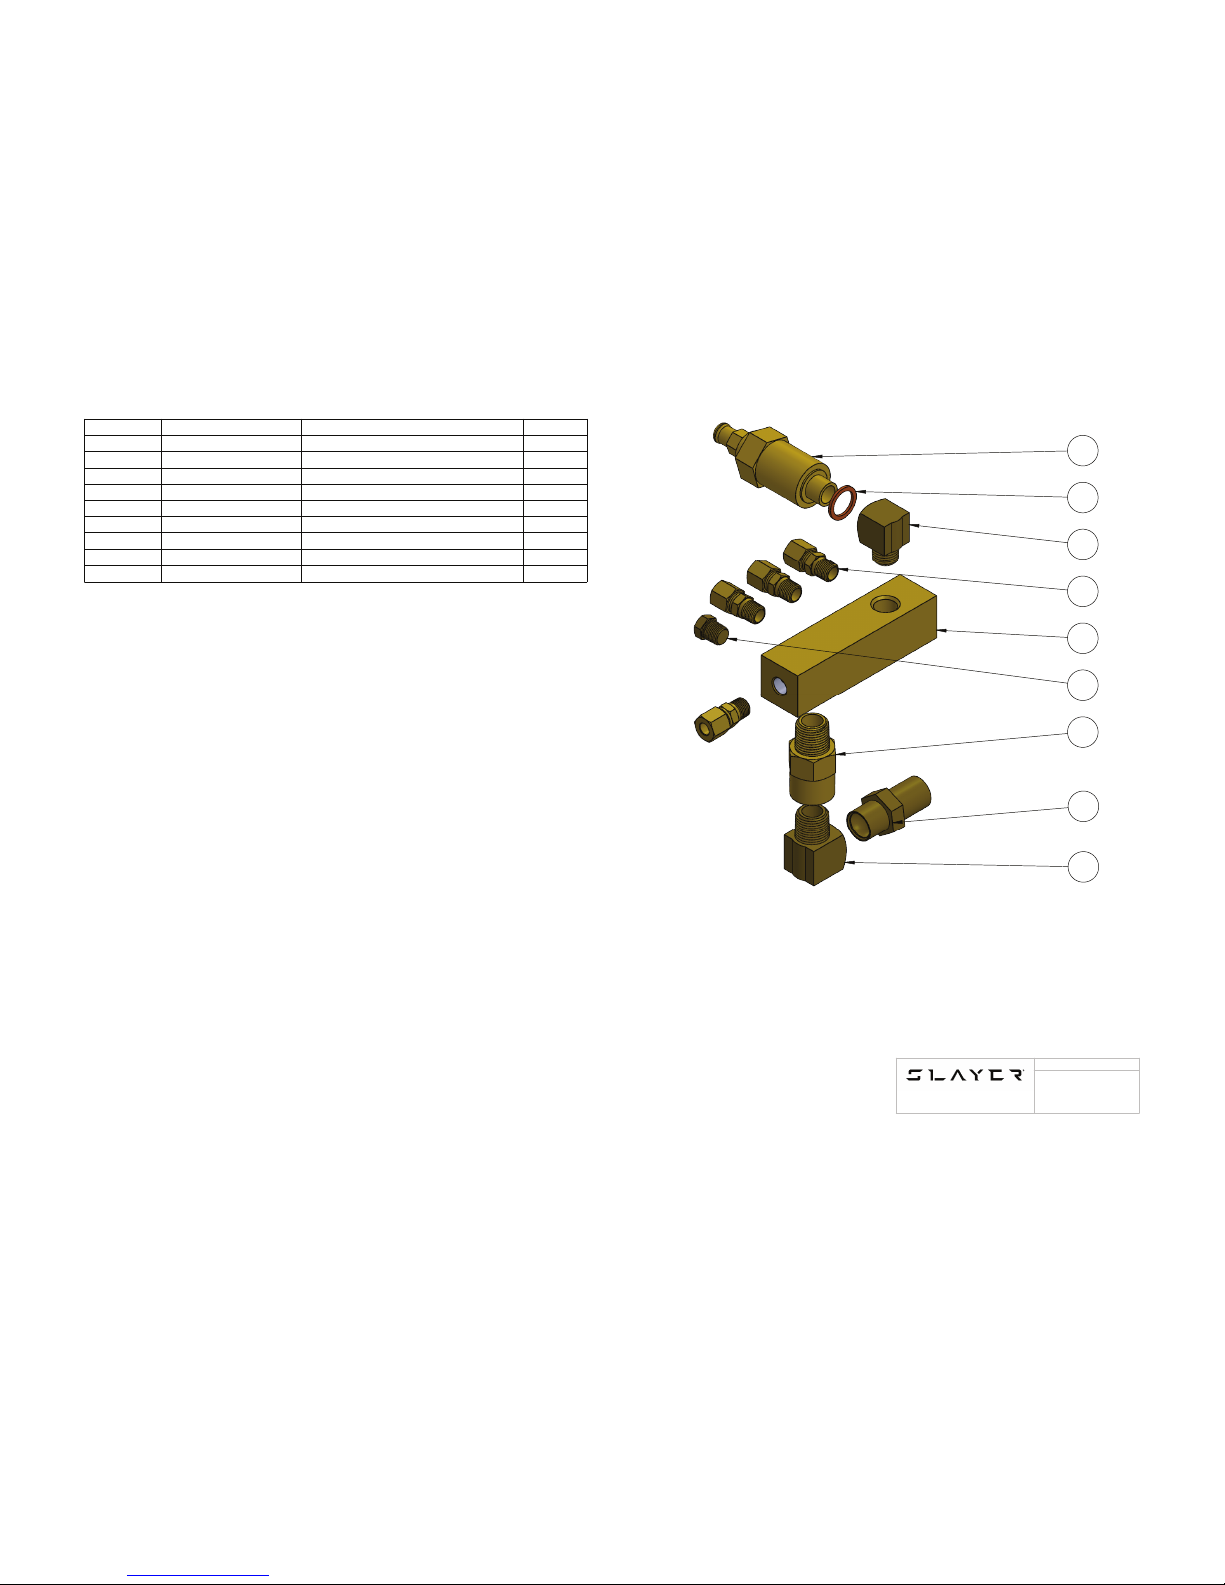
43
SLAYER STEAM X USER MANUAL
Water Inlet Manifold Assembly
ITEM NO.
PART NUMBER
DESCRIPTION
QTY.
1
46000-50110
EXPANSION VALVE
1
2
46000-50150
COPPER GASKET 1/4 NPT
1
3
42004-34510
TRANSDUCER ELBOW
1
4
42000-34500
1/8 NPT X 1/4 COPPER COMP.
4
5
10005-03050
WATER INLET MANIFOLD
1
6
42000-34300
BLEED SCREW PLUG
1
7
46005-34620
1 WAY VALVE
1
8
42000-10010
3/8 WATER INLET FITTING
1
9
42004-34500
PRV ELBOW
1
1
2
3
4
5
6
7
8
9
99005-03050
WWW.SLAYERESPRESSO.COM
206-284-7171
NAME
Page 44
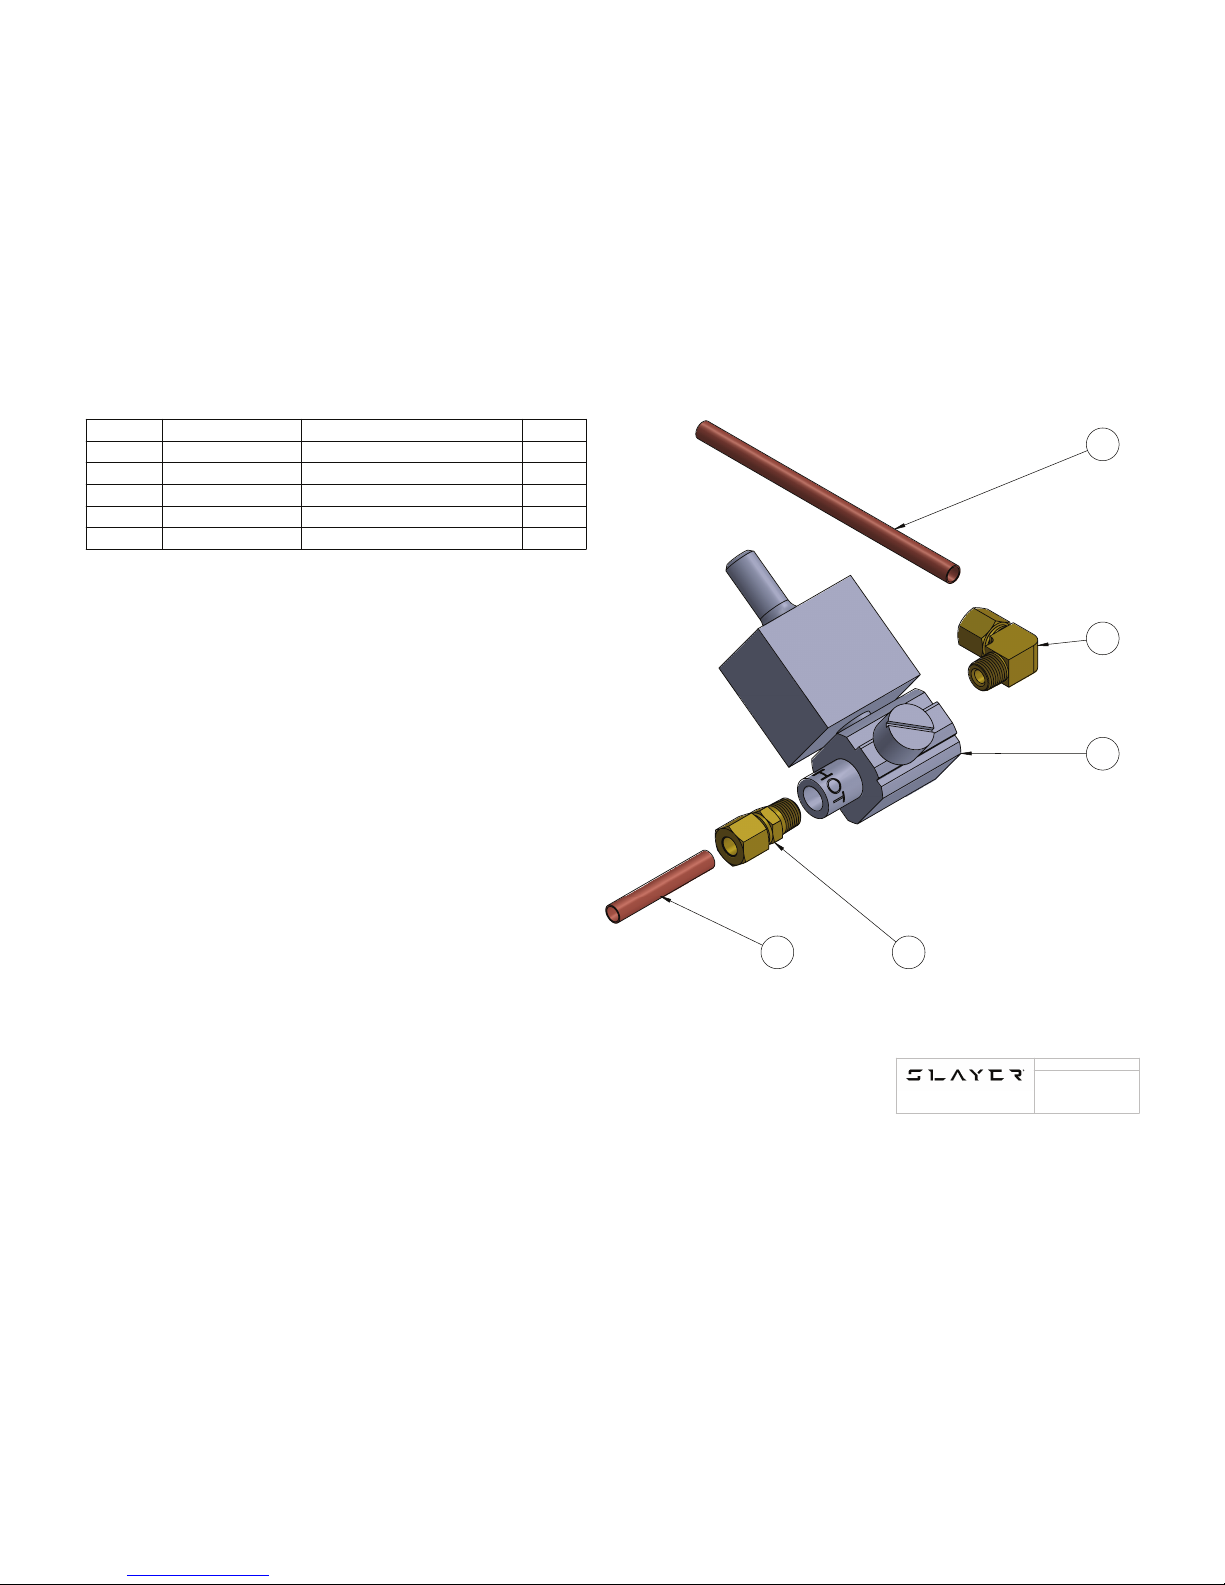
44
SLAYER STEAM X USER MANUAL
Hot Water Mix Valve
ITEM NO.
PART NUMBER
DESCRIPTION
QTY.
1
40005-32070
COLD WATER IN TUBE
1
2
42000-34560
1/4 COMP 90 DEG
1
3
30003-20351
HOT WATER MIX SOLENOID
1
4
42000-34500
1/8 NPT X 1/4 COPPER COMP.
1
5
40005-32060
Hot Water to Mix Valve Tube
1
2
3
4
1
5
99005-20351
WWW.SLAYERESPRESSO.COM
206-284-7171
NAME
Page 45
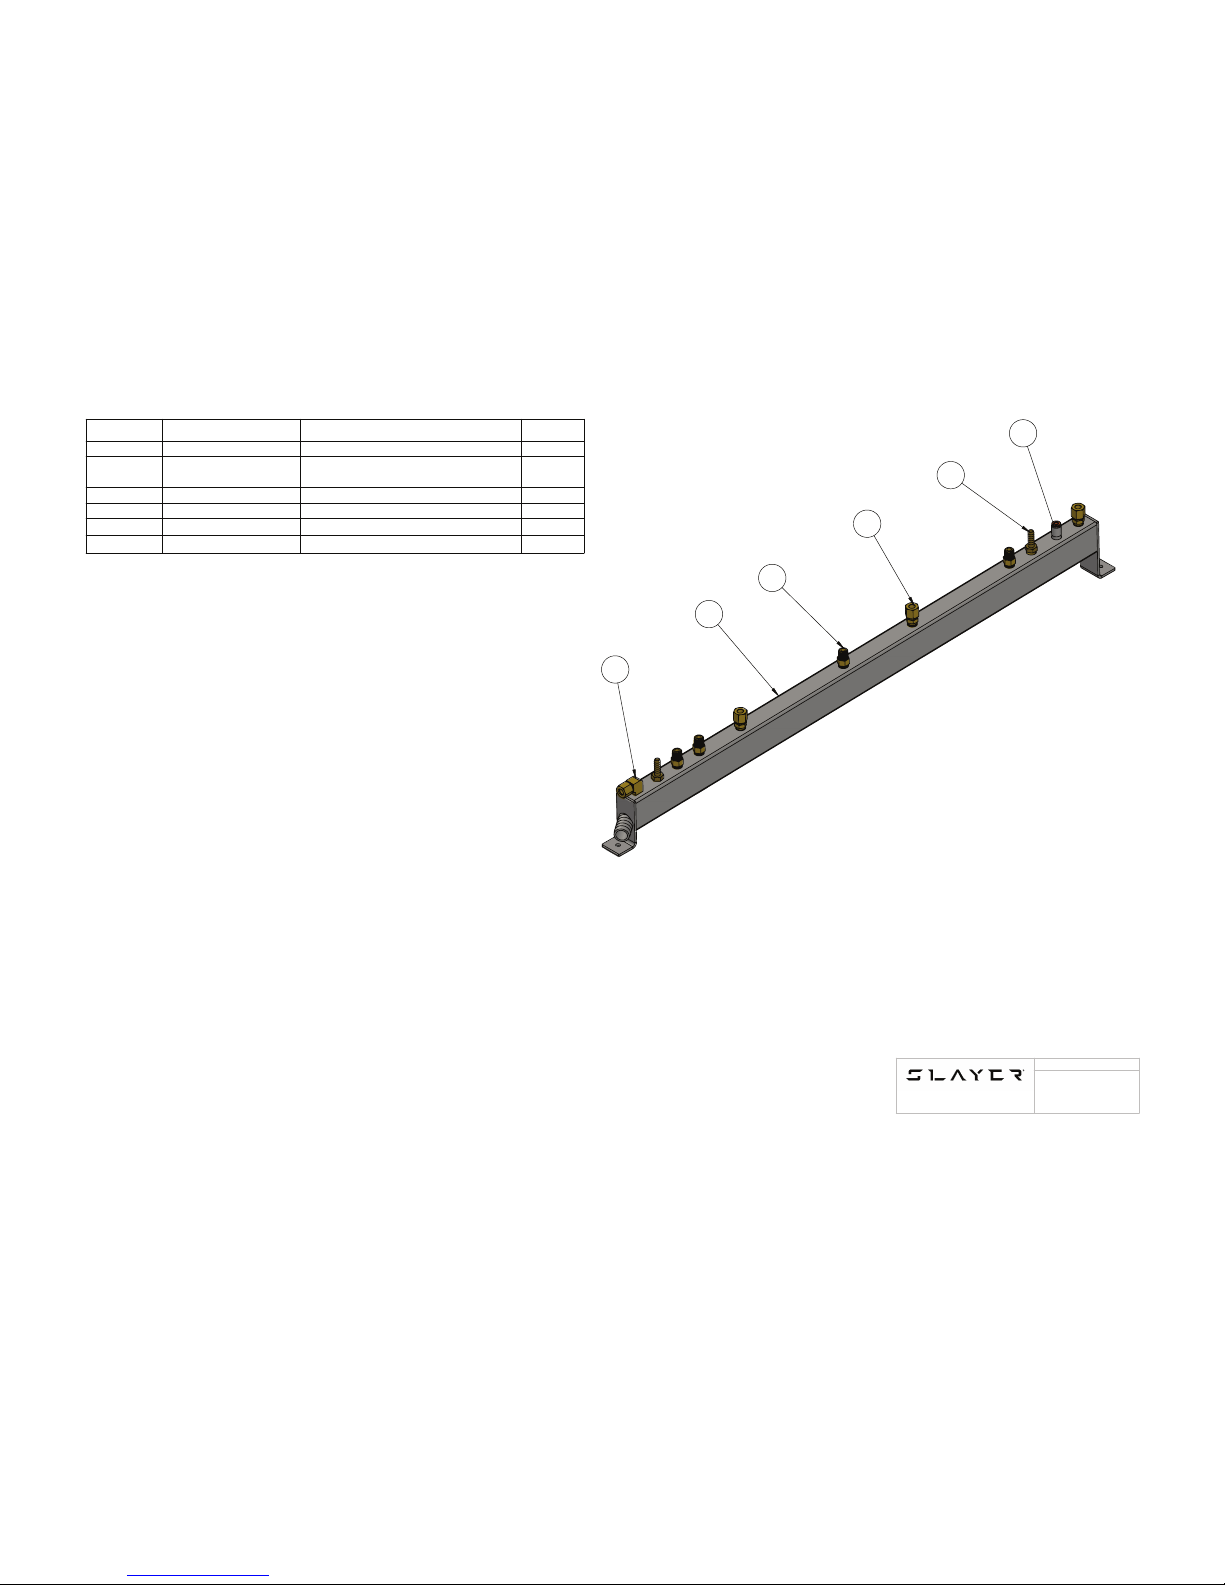
45
SLAYER STEAM X USER MANUAL
Drain Manifold Assembly
ITEM NO.
PART NUMBER
DESCRIPTION
QTY.
1
42000-34560
1/4 COMP 90 DEG
1
2
13005-30018
13005-20018
DRAIN MANIFOLD, 3GRP
DRAIN MANIFOLD, 2GRP
1
3
42000-34180
1/8 NPT HEX NIPPLE
4
4
42000-34500
1/8 NPT X 1/4 COPPER COMP.
3
5
42005-10000
5/16 HOSE BARB
2
6
42000-34220
PUSH CONNECT FITTING
1
6
5
4
2
3
1
99005-30018
WWW.SLAYERESPRESSO.COM
206-284-7171
NAME
Page 46
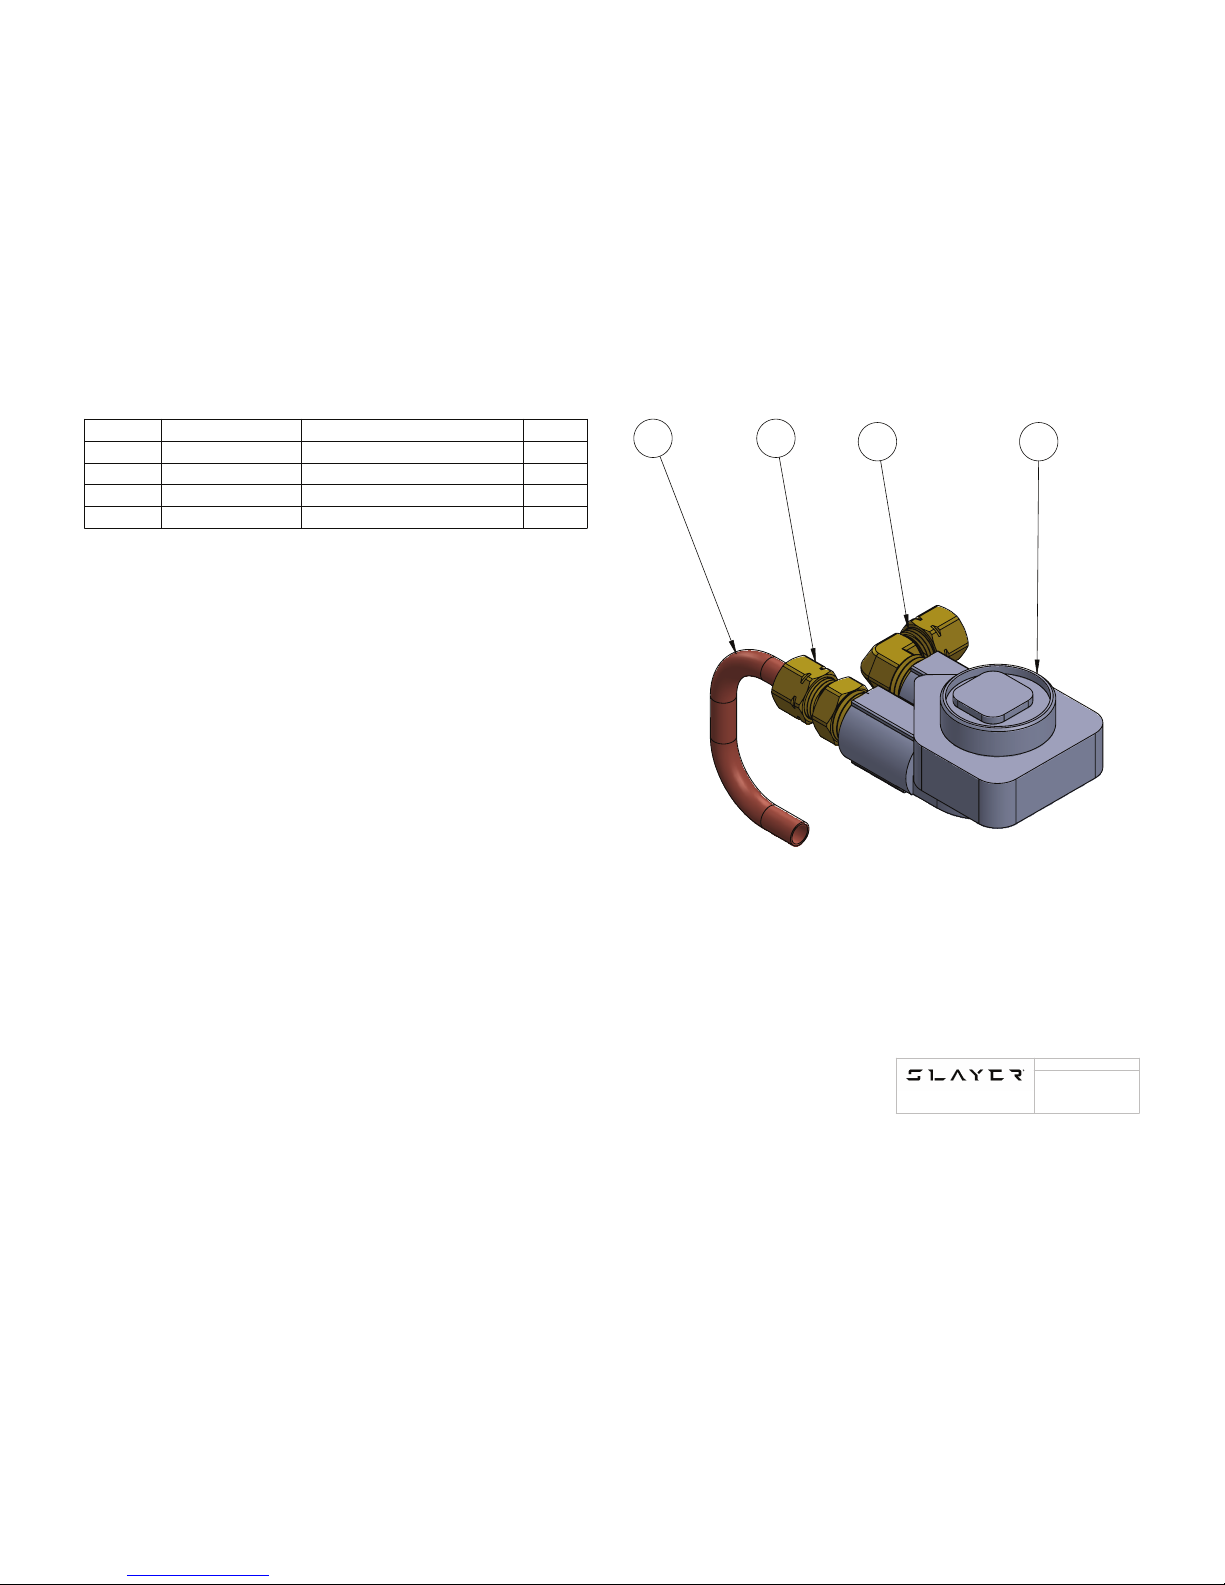
46
SLAYER STEAM X USER MANUAL
Flow Meter Assembly
ITEM NO.
PART NUMBER
DESCRIPTION
QTY.
1
40005-32110
TO BREW TANK TUBE
1
2
42000-34700
WATER INLET FITTING
1
3
42000-34702
WATER OUT FITTING
1
4
30005-30170
FLOW METER
1
3 4
1 2
99005-30170
WWW.SLAYERESPRESSO.COM
206-284-7171
NAME
Page 47
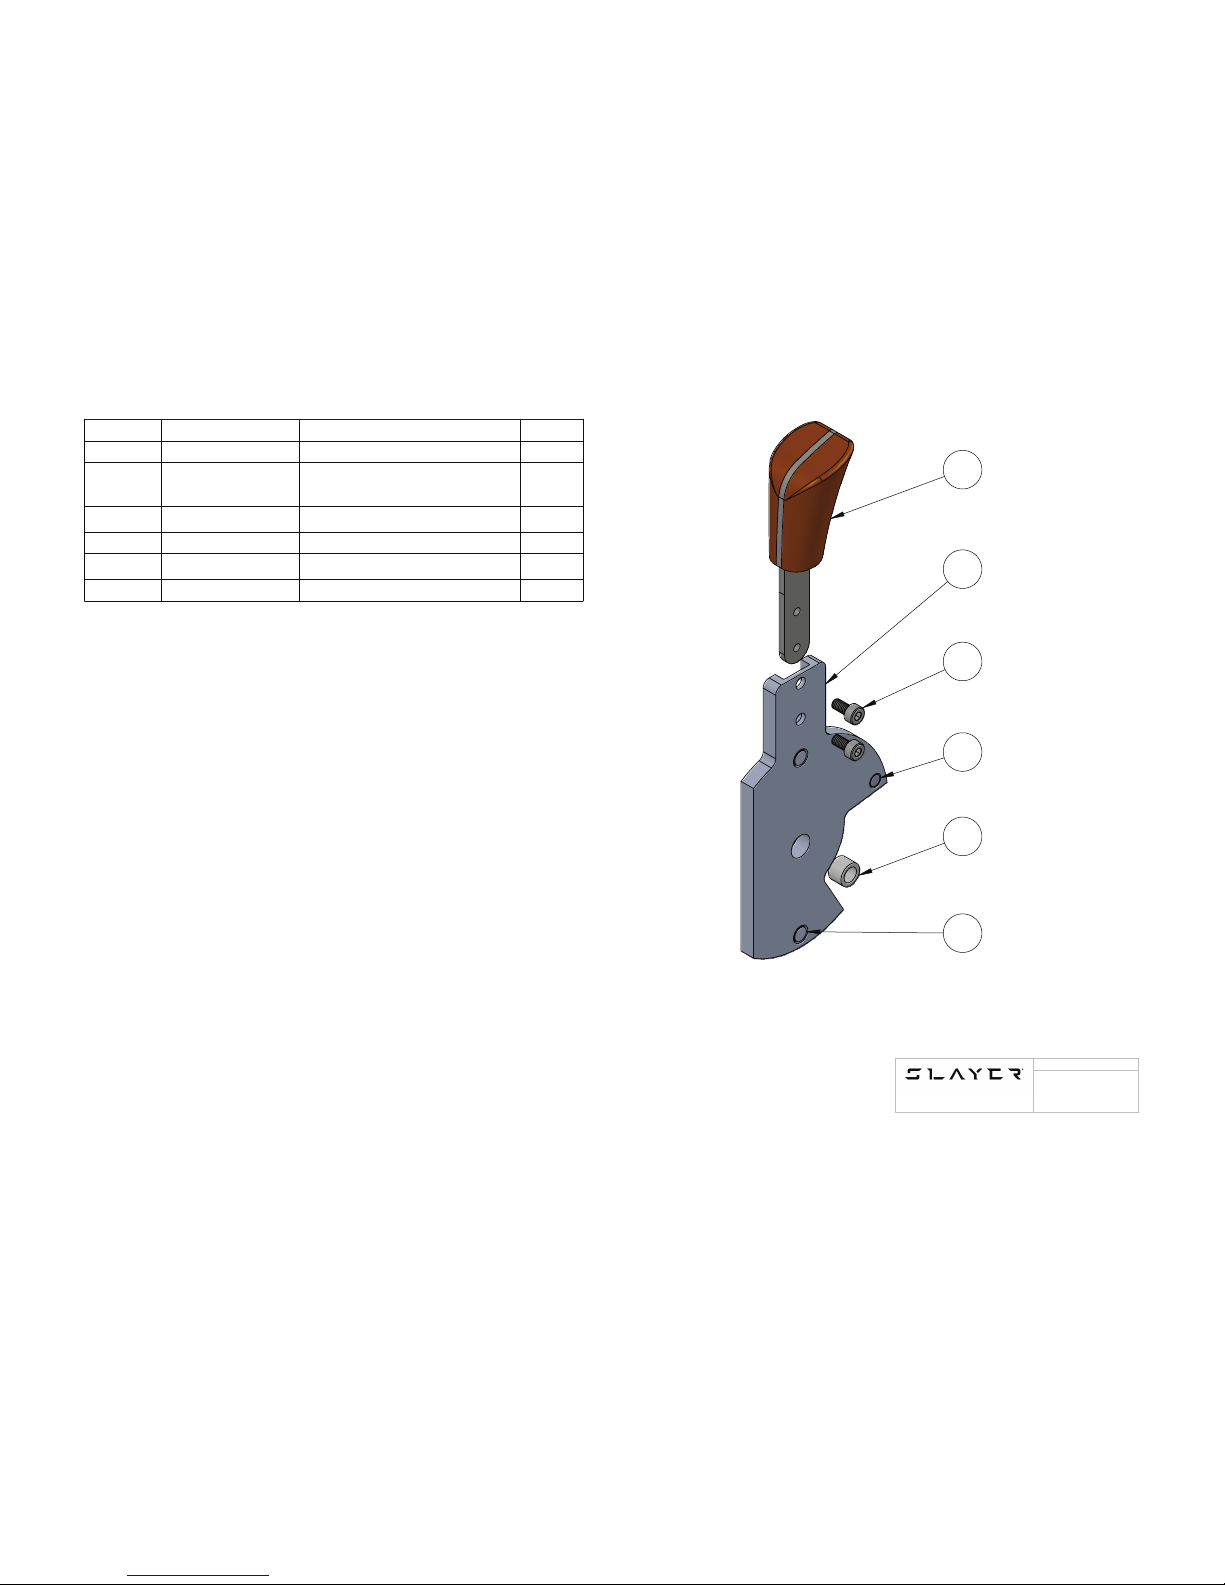
47
SLAYER STEAM X USER MANUAL
Steam Actuator Assembly
99005-10003
WWW.SLAYERESPRESSO.COM
206-284-7171
NAME
ITEM NO.
PART NUMBER
DESCRIPTION
QTY.
1
99005-30036
STEAM ACTUATOR HANDLE
1
1
2
10005-10003
10005-10004
RIGHT ACTUATOR BODY
LEFT ACTUATOR BODY
3
44000-36310
MOUNT SCREW
2
4
46003-50062
3/16 MAGNET
1
5
46000-10000
PLASTIC BUSHING
1
6
46003-50060
1/4 MAGNET
2
3
4
5
6
2
1
Page 48
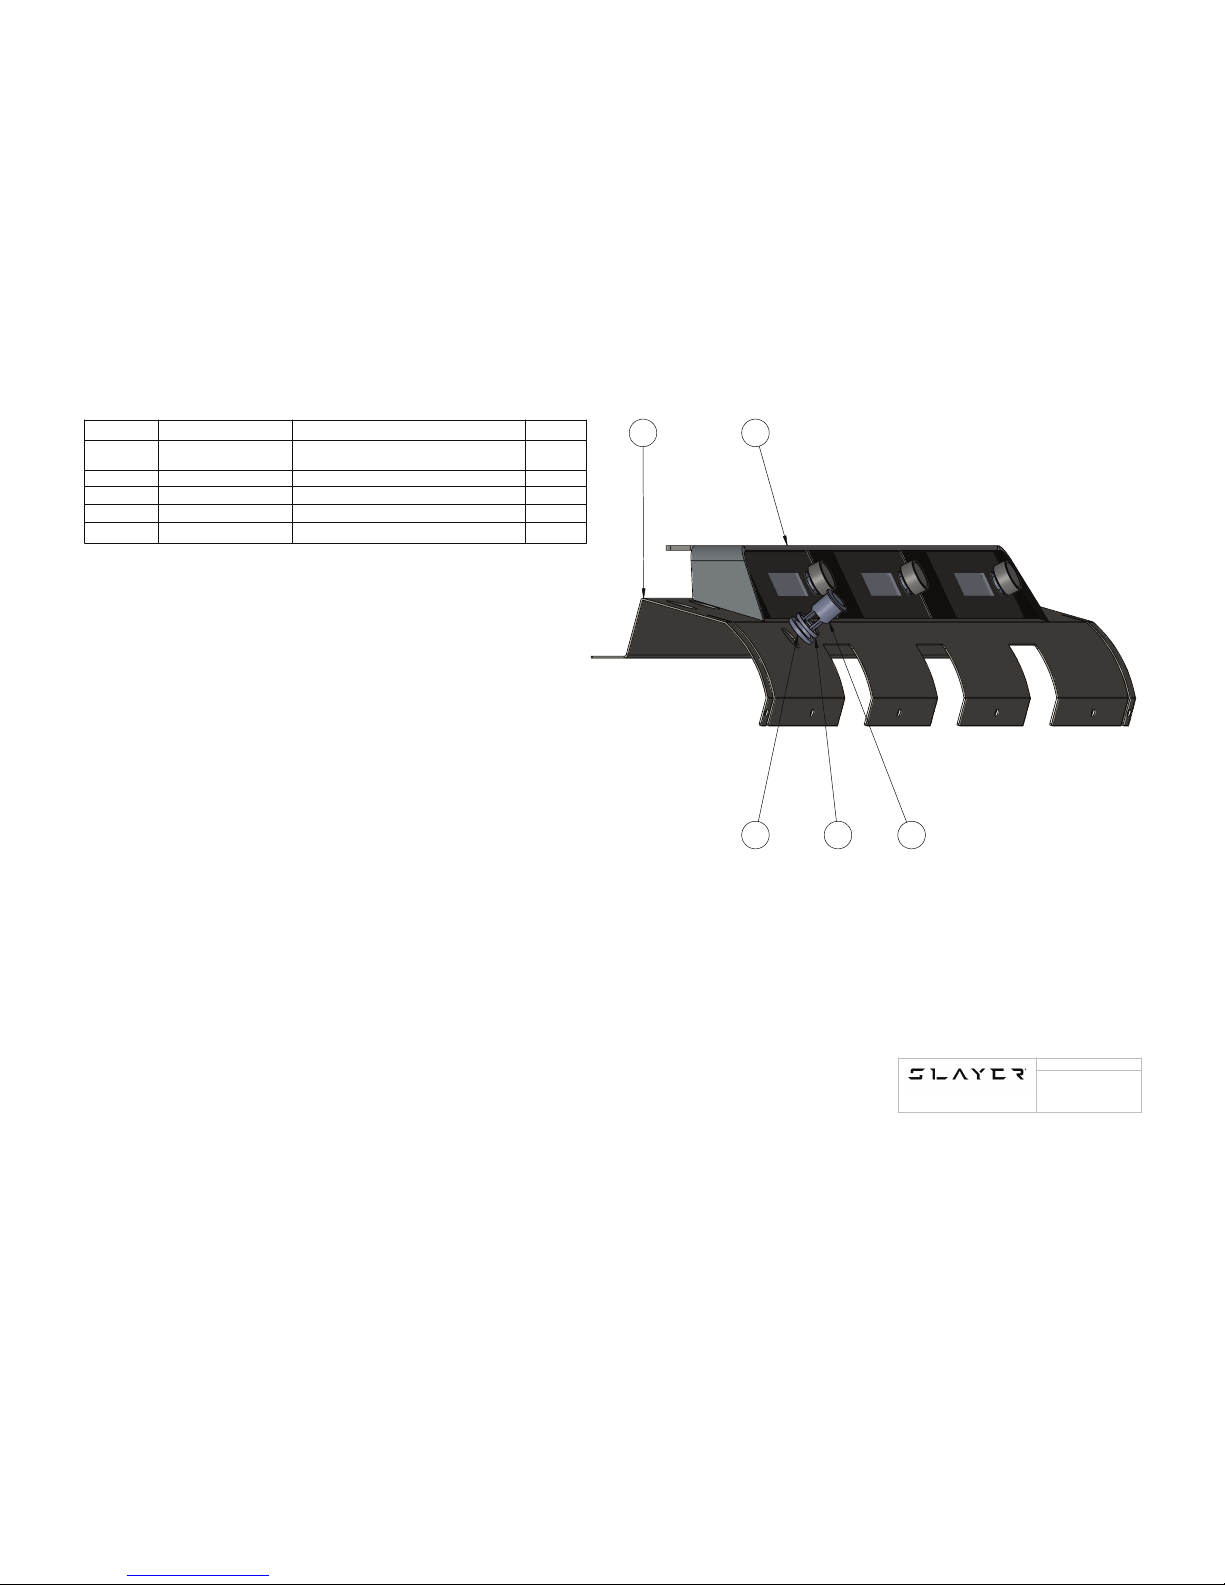
48
SLAYER STEAM X USER MANUAL
Barista Dashboard Upper Panel Display
99005-30026
WWW.SLAYERESPRESSO.COM
206-284-7171
NAME
ITEM NO.
PART NUMBER
DESCRIPTION
QTY.
1
13005-30026
13005-20026
UPPER FRONT PANEL, 3GP
UPPER FRONT PANEL, 2GP
1
2
99005-30020
DISPLAY ASSEMBLY
1
3
10005-03080
Button Ring, Lower
1
4
10005-03070
Button Ring, Upper
1
5
30005-20340
MOMENTARY PUSH BUTTON
1
3 4
2
5
1
Page 49
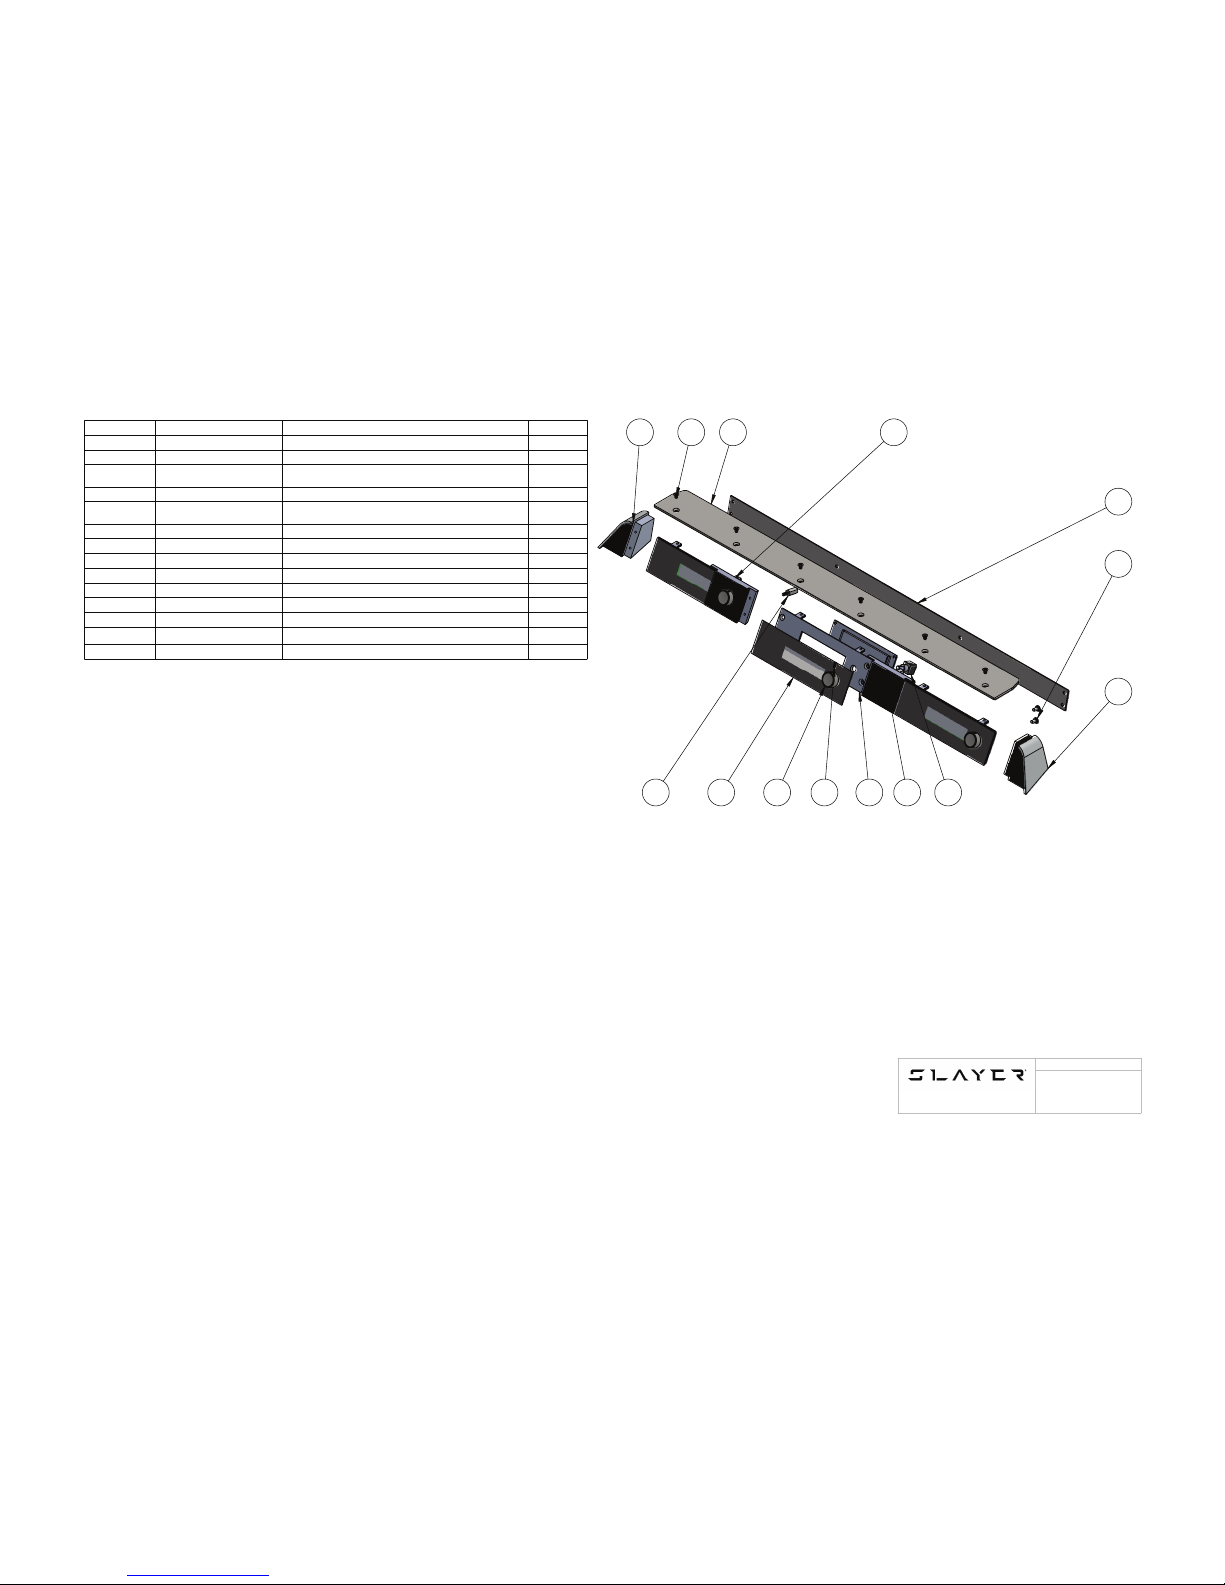
49
SLAYER STEAM X USER MANUAL
99005-30020
WWW.SLAYERESPRESSO.COM
206-284-7171
NAME
ITEM NO.
PART NUMBER
DESCRIPTION
QTY.
1
20005-10003
DISPLAY END LEFT
1
2
44005-10020
RAIL CLIP SCREW
6
3
13005-30052
13005-20052
DISPLAY COVER, 3GP
1
4
20005-10002
DISPLAY ATTACHMENT
2
5
13005-30053
13005-20053
DISPLAY COVER LOWER PANEL 3GRP
DISPLAY COVER LOWER PANEL 2GRP
1
6
44005-10130
PANEL MOUNT SCREW
6
7
20005-10000
DISPLAY END RIGHT
1
8
93655A459
THREADED SPACER
2
9
26005-10000
DISPLAY GLASS
3
10
10005-03010
ENCODER KNOB
3
11
92605A102
SET SCREW 3
12
20005-10001
FACE PLATE
3
13
30005-60110
DISPLAY
1
14
30005-20100
OPTICAL ENCODER
3
2 4
8
3
5
6
7
14131110 129
1
Barista Dashboard Display Assembly
Page 50
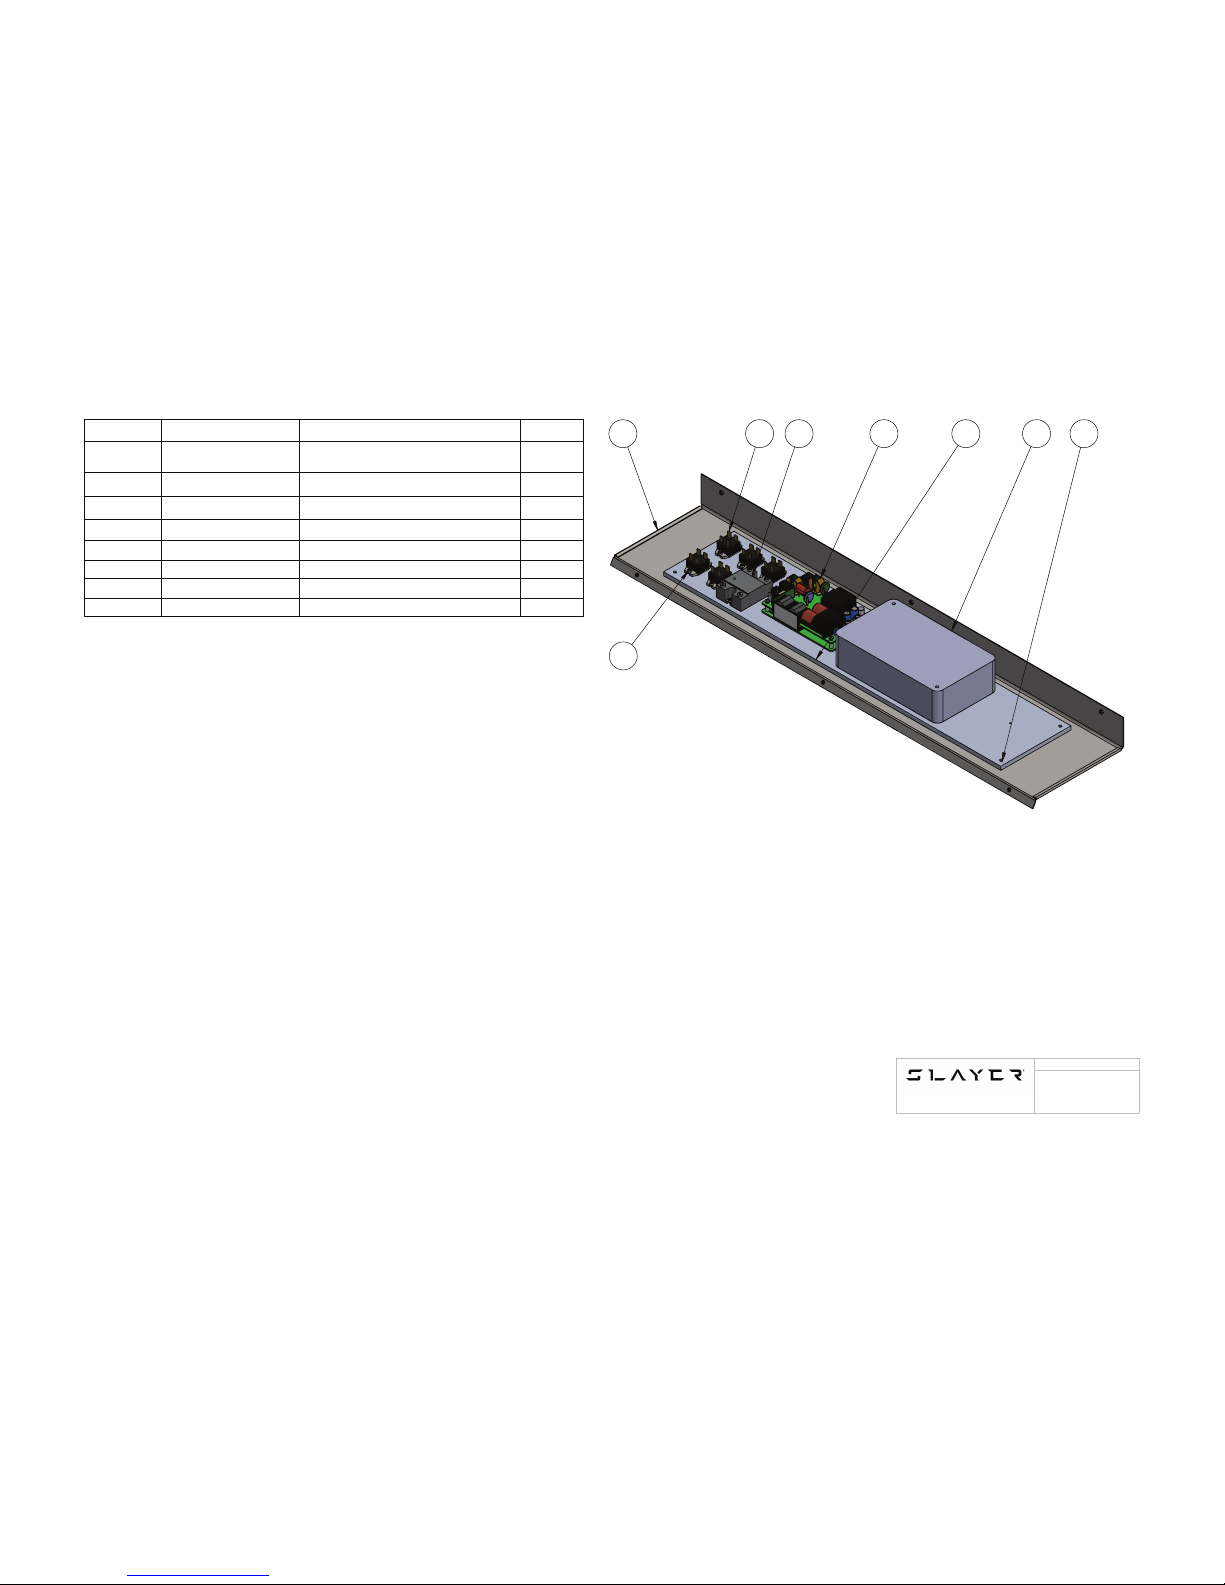
50
SLAYER STEAM X USER MANUAL
Electronics Panel
99005-10005
WWW.SLAYERESPRESSO.COM
206-284-7171
NAME
ITEM NO.
PART NUMBER
DESCRIPTION
QTY.
1
13005-30027
13005-20027
ELECTRICAL SHIELD, 3GP
ELECTRICAL SHIELD, 2GP
1
2
30000-20011
MINI 20 AMP SSR
5
3
30000-20050
50 AMP RELAY
1
4
30000-20003
POWER SUPPLY
1
5
10005-10005
SUB PLATE
1
6
30005-60100
MAIN BOARD
1
7
44005-10130
PANEL MOUNT SCREW
4
8
44005-10210
RELAY MOUNT BOLT
12
2 3 4 5 6 7
8
1
Page 51
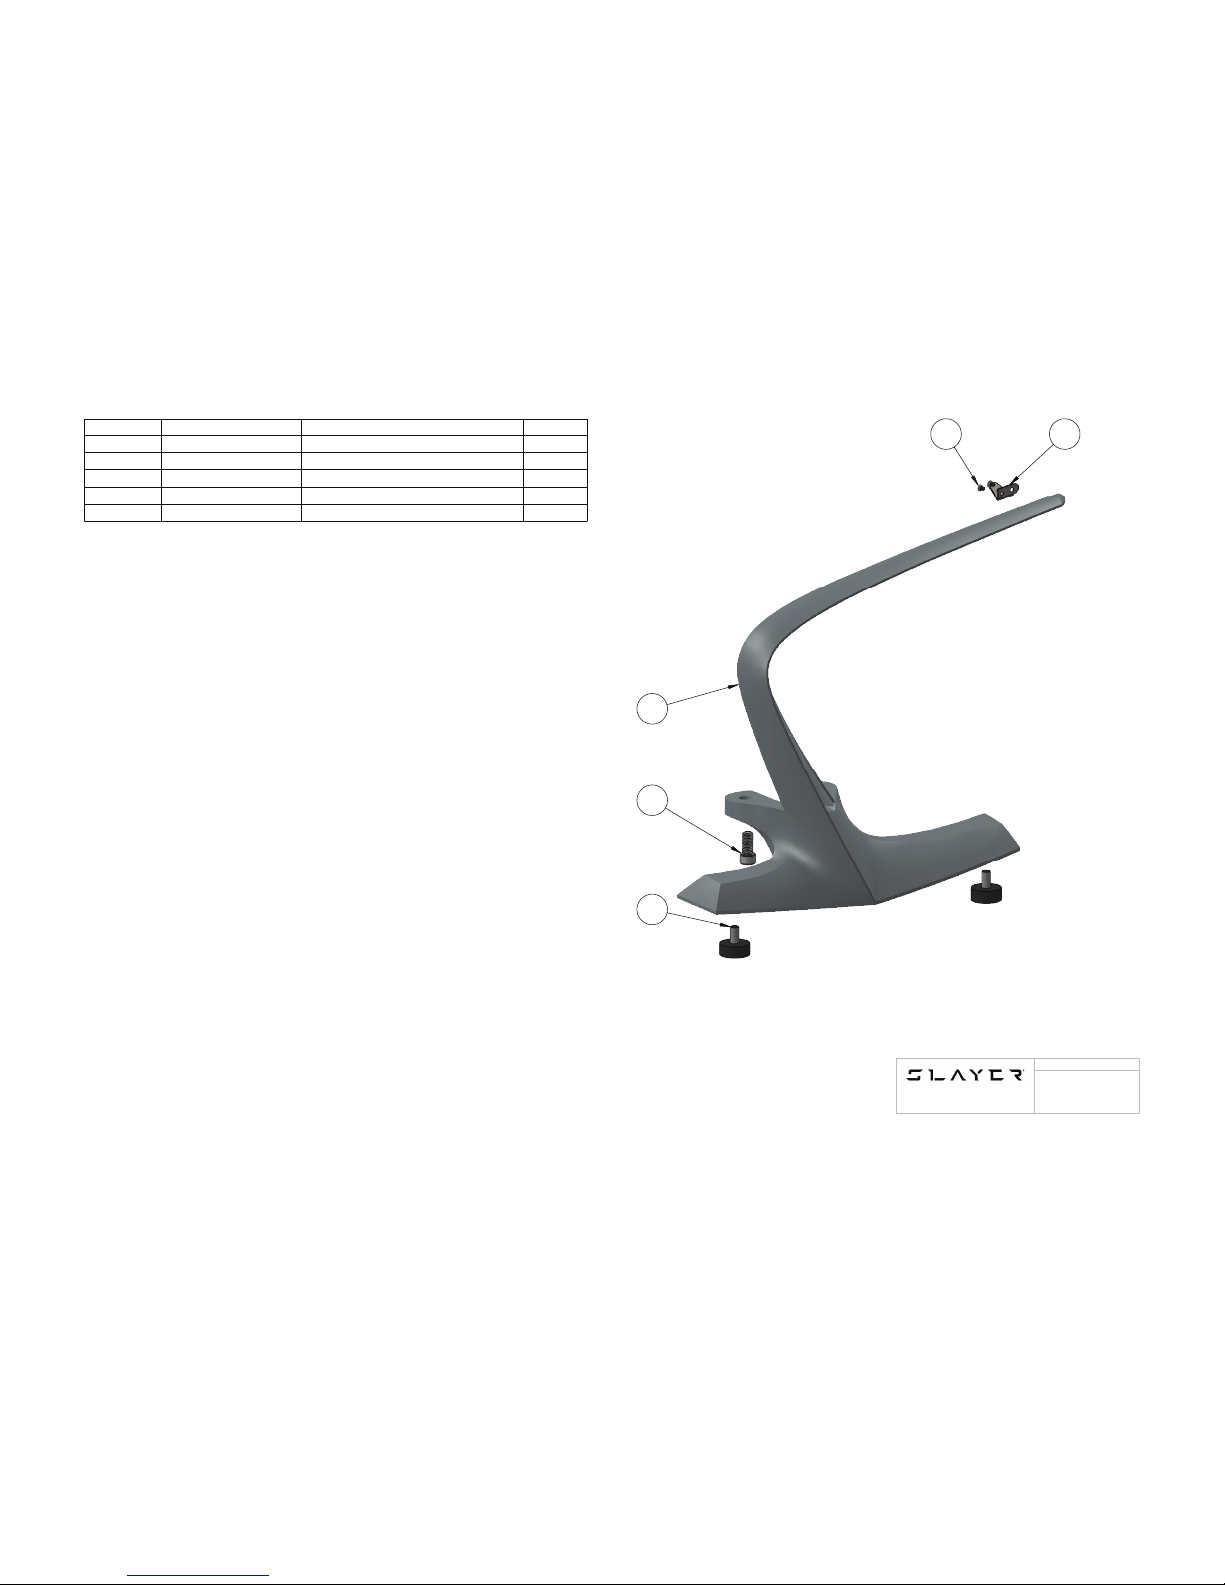
51
SLAYER STEAM X USER MANUAL
Wing Assembly
99005-10000
WWW.SLAYERESPRESSO.COM
206-284-7171
NAME
ITEM NO.
PART NUMBER
DESCRIPTION
QTY.
1
44005-10020
RAIL CLIP SCREW
2
2
13005-30047
RAIL CLIP, RIGHT
1
3
20200-10000
WING, RIGHT SIDE
1
4
44005-10110
WING MOUNT BOLT
2
5
46005-50180
RUBBER FOOT
2
1 2
3
5
4
 Loading...