

Page 1
Ingenico iWL25X Series
QUICK GUIDE
Single/Multi Merchant
15.4
VERSION
Page 2
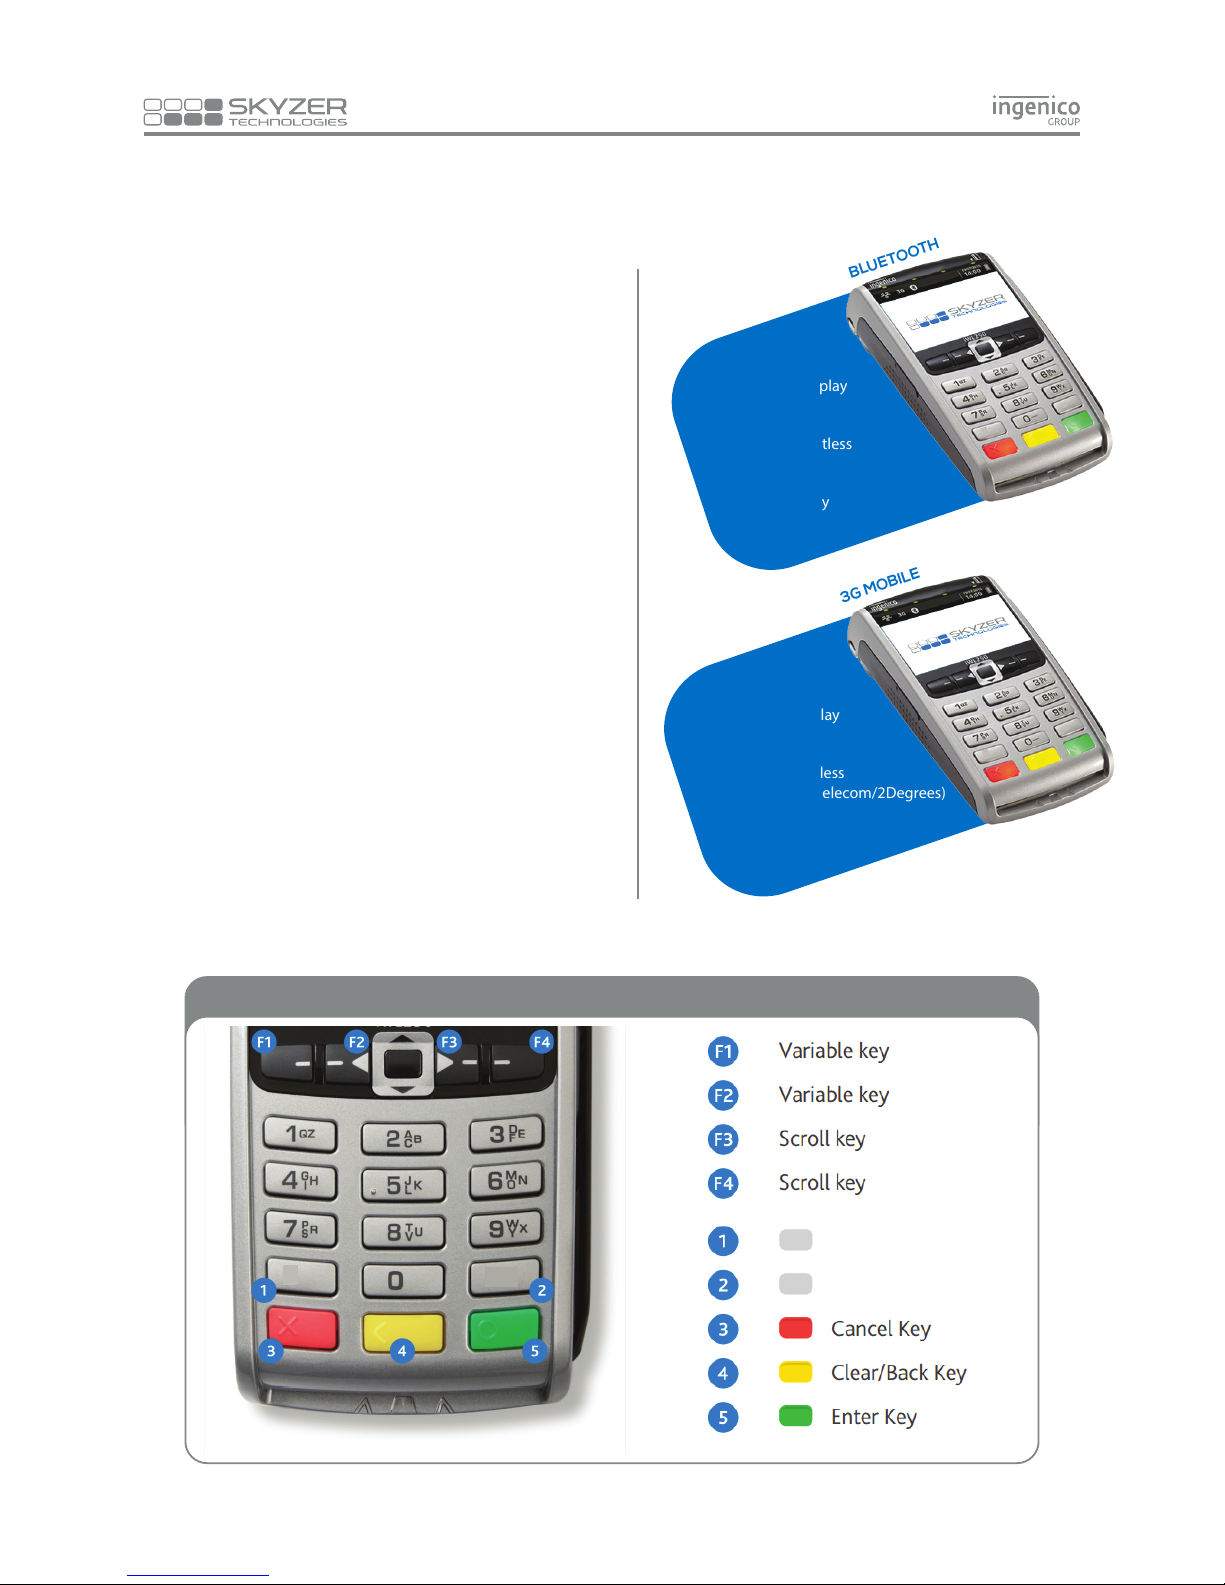
FUNCTION AND MENU KEYS
1. LOG ON
2. PURCHASE WITH DEBIT/CREDIT CARD WITH PIN
3. PURCHASE WITH CREDIT CARD WITHOUT PIN
4. REFUND
5. REPRINT LAST CARDHOLDER RECEIPT
6. PURCHASE + CASH OUT WITH DEBIT CARD
7. CASH OUT WITH DEBIT CARD
8. SHIFT TOTAL
9. SETTLEMENT INQUIRY
10. SETTLEMENT CUTOVER
11. EMV CHIP CARD TRANSACTION
12. PAYMARK KEY MANAGEMENT SYSTEM (PKMS)
13. CARD NOT PRESENT TRANSACTION WITH CSC
(CARD SECURITY CODE) AVAILABLE
14. CARD NOT PRESENT REFUND TRANSACTION
15. INSTANT TIPPING QUICK GUIDE
16. PURE COMMERCE CSE
PURCHASE WITH DEBIT/CREDIT CARD WITH PIN
17. EXTRA TERMINAL FUNCTION
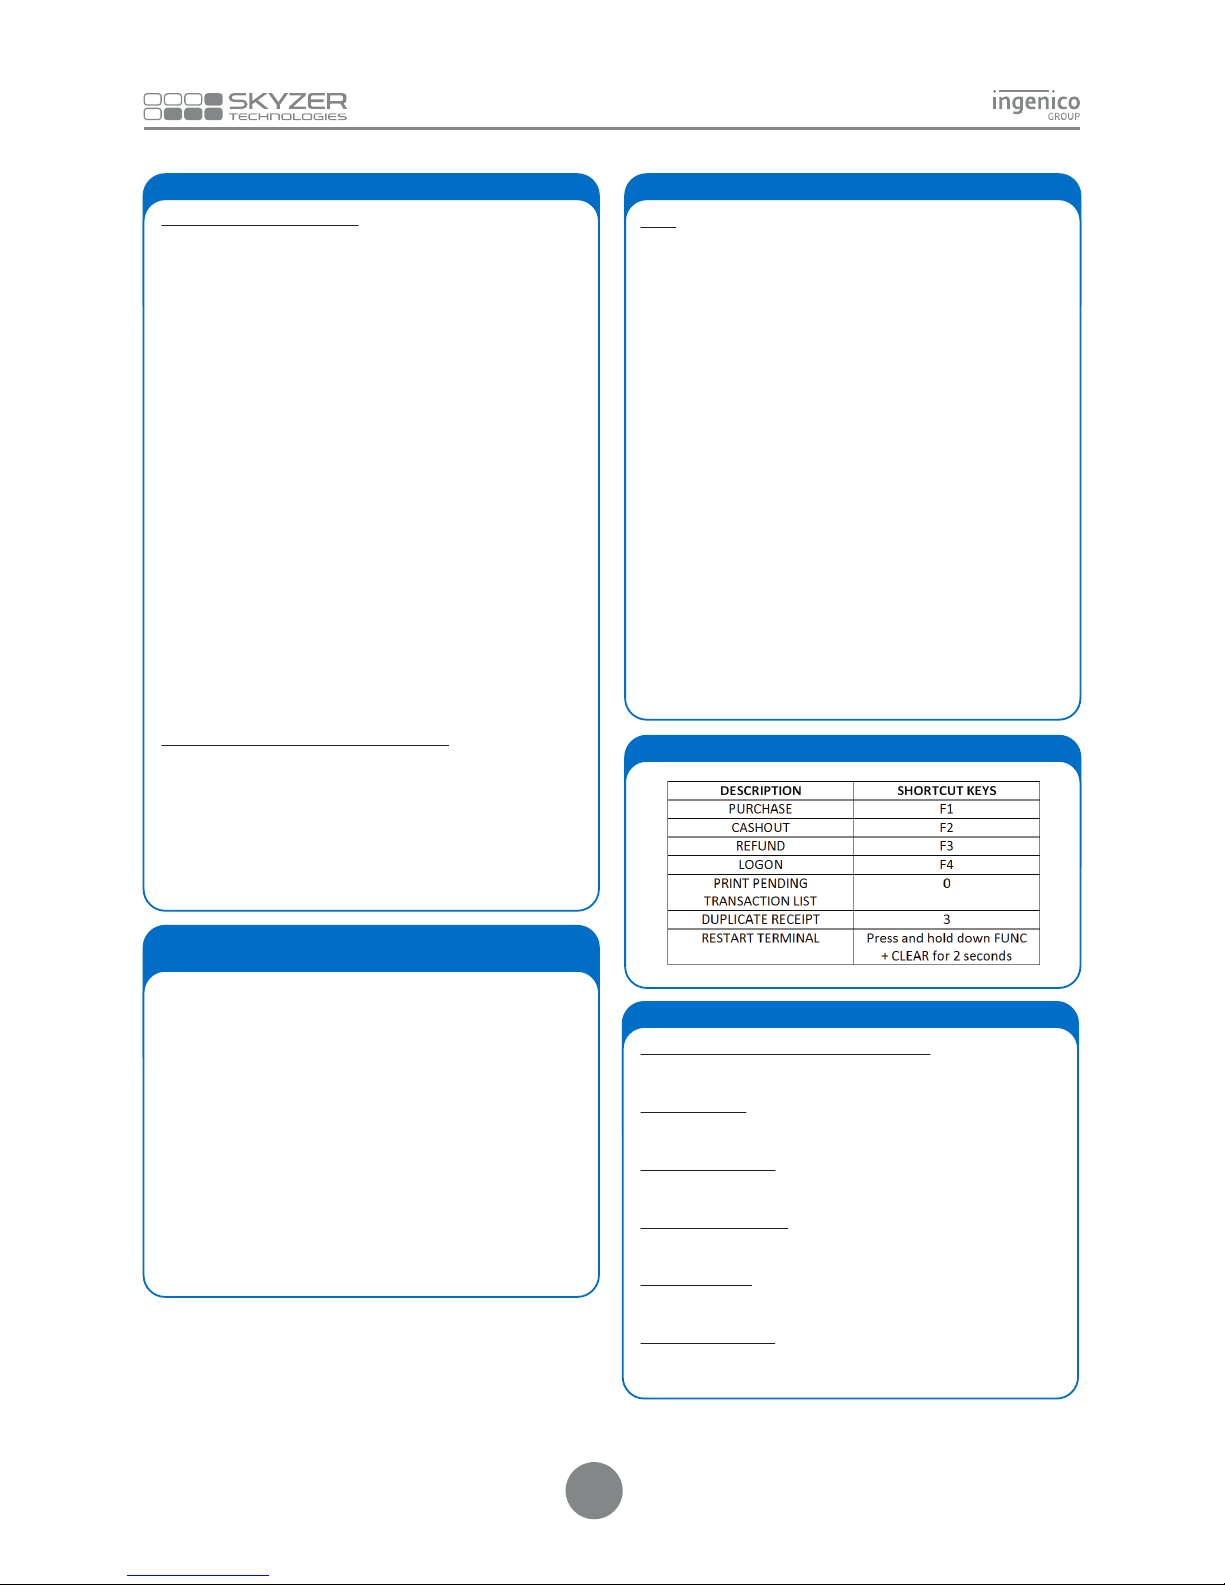
18. SHORTCUT KEY
19. PURE COMMERCE CSE
20. CREDIT CARD HOSPITALITY QUICK GUIDE
21. EMV CHIP CARD SIGNATURE TRANSACTION
22. EFTPOS OFFLINE VOUCHERS (EOV)
23. SURCHARGE
24. POWER
25. CREDIT CARD TIPPING QUICK GUIDE
CONTENT
Full Colour Display
Backlit Display
Backlit Keypad
In-Built Contactless
Dialup Modem
Broadband
128MB Memory
iWL252
BLUETOOTH
Full Colour Display
Backlit Display
Backlit Keypad
In-Built Contactless
3G ( Vodafone/ Telecom/2Degrees)
128MB Memory
iWL255
3G MOBILE
Func
Menu
Function
Menu
Menu
Func
Menu
Func
Menu
Func
Page 3
Swipe or Insert the customer’s card from the idle screen OR
Simply press F4 key on idle screen OR
Press MENU and scroll down to select SUPERVISOR MENU
followed by ENTER
Scroll down to select LOG ON and press ENTER or simply press F4
key on idle
1. LOG ON
2. PURCHASE WITH DEBIT/CREDIT CARD WITH PIN
Swipe or Insert the customer’s card from the idle screen OR
simply press F1 key on idle screen OR
Press MENU and scroll to select EFTPOS MENU followed by
ENTER
Scroll down to select PURCHASE and press ENTER
(Select the merchant to transact with and press ENTER FOR MULTI-MERCHANT ONLY)
Enter the purchase amount and press ENTER
Enter the cash out amount or press ENTER to bypass
Prompt customer to PRESENT/INSERT OR SWIPE their card
Prompt customer to select account type and enter their PIN
followed by ENTER
3. PURCHASE WITH CREDIT CARD WITHOUT PIN
Swipe or Insert the customer’s card from the idle screen OR simply
press F1 key on idle screen
Press MENU and then scroll down to select EFTPOS MENU
followed by ENTER
Scroll down to select PUR and press ENTER
(Select the merchant to transact with and press ENTER - FOR
MULTI-MERCHANT ONLY)
Enter the purchase amount and press ENTER
Enter the cash out amount or press ENTER to bypass
Prompt customer to PRESENT/INSERT OR SWIPE their card
Prompt customer to select account type and enter their PIN
followed by ENTER
Customer signs receipt
Check customer signature
Press ENTER to confirm signature, or CLEAR to void the transacon
4. REFUND
Simply press F3 key on idle screen OR
Press MENU and scroll to select EFTPOS MENU followed by
ENTER
Scroll down to select REFOUND and press the ENTER
(Select the merchant to transact with and press ENTER - FOR
MULTI-MERCHANT ONLY)
Swipe the Merchant Refund Card
Enter the Merchant PIN
Swipe or Insert the customer’s card
Enter the amount to refund and press ENTER
Prompt customer to select account type and enter their PIN
followed by ENTER
5. REPRINT LAST CARDHOLDER RECEIPT
Swipe or Insert the customer’s card from the idle screen
OR simply press 3 key on idle screen OR
Press MENU and scroll down to select SUPERVISOR MENU
followed by ENTER
Scroll down to select DUPLICATE and press ENTER
(Select the merchant and press ENTER - FOR MULTI-MERCHANT
ONLY)
Swipe or Insert the customer’s card from the idle screen
OR simply press F1 key on idle screen OR
Press MENU and scroll to select EFTPOS MENU followed by ENTER
Scroll down to select PURCHASE and press ENTER
(Select the merchant to transact with and press ENTER - FOR
MULTI-MERCHANT ONLY)
Enter the purchase amount and press ENTER
Enter the cash out amount and press ENTER
Swipe or Insert the customer’s card
Prompt customer to select account type and enter their PIN
followed by ENTER
6. PURCHASE + CASH OUT WITH DEBIT CARD
Press MENU and scroll to select EFTPOS MENU followed by
ENTER or simply press F2 key on idle screen
Scroll down to select CASH and press ENTER
(Select the merchant to transact with and press ENTER - FOR
MULTI-MERCHANT ONLY)
Enter the cash out amount and press ENTER
Swipe or Insert the customer’s card
Prompt customer to select account type and enter their PIN
followed by ENTER
7. CASH OUT WITH DEBIT CARD
Press MENU and scroll down to select ADMIN MENU followed by
ENTER
Scroll down to select TOTA L followed by ENTER
(Select the merchant and press ENTER - FOR MULTI-MERCHANT
ONLY)
Press ENTER to reset totals or CLEAR to exit
8. SHIFT TOTAL
Press MENU and scroll down to select ADMIN MENU followed by
ENTER
Scroll down to select INQUIRY and press ENTER
(Select the merchant and press ENTER - FOR MULTI-MERCHANT
ONLY)
Press the corresponding key to select the date shown or select
OTHER to enter another selement period date in the format
DDMMYYYY and press ENTER
NOTE: Selement inquiry data can be retrieved retrospecvely
to a maximum of 14 days.
9. SETTLEMENT INQUIRY
Press MENU and scroll down to select ADMIN MENU followed by
ENTER
Scroll down to select CUTOVER and press ENTER
(Select the merchant and press ENTER - FOR MULTI-MERCHANT
ONLY)
Press ENTER to carry out cutover or CLEAR to cancel the cutover
selecon
NOTE: Terminal will prompt for any stored Electronic Offline
Voucher/Contactless to be transmied. Press ENTER to transmit
Electronic Offline Voucher/Contactless or CLEAR to proceed
with selement cutover.
10. SETTLEMENT CUTOVER
1
Page 4
PIN ENTRY TRANSACTION
Swipe or Insert the customer’s card from the idle screen
OR simply press F1 key on idle screen OR
Press MENU and then scroll down to select EFTPOS MENU
followed by ENTER
Scroll down to select PUR and press ENTER
(Select the merchant to transact with and press ENTER - FOR
MULTI-MERCHANT ONLY)
Enter the purchase amount and press ENTER
Press ENTER to bypass “CASH OUT”
Insert the customer’s chip card into the chip card reader, facing
the chip upwards
Prompt customer to select account type and enter their PIN
followed by ENTER
Remove card from chip card reader at the end of the transacon
when REMOVE CARD prompt is displayed
SIGNATURE TRANSACTION
Swipe or Insert the customer’s card from the idle screen
OR simply press F1 key on idle screen OR
Press MENU and then scroll down to select EFTPOS MENU
followed by ENTER
Scroll down to select PUR and press ENTER
(Select the merchant to transact with and press ENTER - FOR
MULTI-MERCHANT ONLY)
Enter the purchase amount and press ENTER
Press ENTER to bypass “CASH OUT”
Insert the customer’s chip card into the chip card reader, facing
the chip upwards
Prompt customer to select account type and enter their PIN
followed by ENTER
NOTE: If the cardholder does not have a PIN (or cannot remember
their PIN), the merchant has the opon to allow a signature
transacon
Prompt customer to press ENTER on the pinpad to proceed with
the PIN BYPASS
Remove card from chip card reader at the end of the transacon
when REMOVE CARD prompt is displayed
Tear off the receipt and give it to the customer for signature
Verify the signature on the receipt with the signature on the back
of the card, if matches, press ENTER to accept the transacon or
CLEAR to decline.
11. EMV CHIP CARD TRANSACTION
The merchant must perform the PKMS (RKI) process to logon to
the Paymark network.
Once the terminal is sent to operator, the operator is required to
remotely download the keys to the terminal to obtain connecvity
with Paymark network. To perform the PKMS (RKI) process, which
are available through the dial up, broadband and GPRS mode. The
operator needs to program the terminal for preferred comms
mode and then simply iniate a PKMS (RKI) logon to remotely
download keys by performing the following steps:
1. Press FUNC and then key in 87 followed by RKI password 6987
2. Terminal will display REMOTE INIT IN PROGRESS while
downloading the keys. When successful, terminal will display
ACCEPTED
3. Then iniate a merchant logon to establish connecvity with
Paymark network
12. PAYMARK KEY MANAGEMENT SYSTEM (PKMS)
Simply press F1 key on idle screen to select Purchase OR
Press MENU and scroll to select EFTPOS MENU followed by
ENTER
Scroll down to select PUR and press ENTER
(Select the merchant to transact with and press ENTER - FOR
MULTI-MERCHANT ONLY)
Enter the purchase amount and press ENTER
Enter the cash out amount or press ENTER to bypass
Press FUNC at “PRESENT/INSERT OR SWIPE CARD”
Key in the card number and press ENTER
Key in the expiry date and press ENTER
At “CSC on Card” prompt, press ENTER for YES
Key in CSC number and press ENTER
Press the corresponding number key to select type
Press the corresponding number key to select applicable opon
Press CR to select account to process the transacon
CARD NOT PRESENT TRANSACTION WITH NO CSC (CARD
SECURITY CODE) AVAILABLE
Simply press F1 key on idle screen to select Purchase OR
Press MENU and scroll to select EFTPOS MENU followed by
ENTER or simply press F1 key on idle screen to select PURCHASE
Scroll down to select PURCHASE and press ENTER
(Select the merchant to transact with and press ENTER - FOR
MULTI-MERCHANT ONLY)
Enter the purchase amount and press ENTER
Enter the cash out amount or press ENTER to bypass
Press FUNC at “PRESENT/INSERT OR SWIPE CARD”
Key in the card number and press ENTER
Key in the expiry date and press ENTER
At “CSC on Card” prompt, press CLEAR for NO
Press the corresponding number key to reason type
Press the corresponding number key to select type
Press the corresponding number key to select applicable opon
13. CARD NOT PRESENT TRANSACTION WITH CSC
(CARD SECURITY CODE) AVAILABLE
Simply press F3 key on idle screen to select Refund OR
Press MENU and scroll to select EFTPOS MENU followed by
ENTER
Scroll down to select REFUND and press ENTER
(Select the merchant to transact with and press ENTER - FOR
MULTI-MERCHANT ONLY)
Swipe the Merchant Refund Card
Enter the Merchant PIN
Key in the amount to refund and press ENTER
Press FUNC at “SWIPE OR INSERT CARD”
Key in the card number and press ENTER
Key in the expiry date and press ENTER
Press the corresponding number key to select type
Press the corresponding number key to select applicable opon
Press CR to select account to process the transacon
14. CARD NOT PRESENT REFUND TRANSACTION
2
Page 5
15. INSTANT TIPPING QUICK GUIDE
PURCHASE WITH INSTANT TIP
Simply press F1 key on idle screen to select Purchase OR
Press MENU and scroll down to select EFTPOS MENU followed by
ENTER
Scroll down to select PURCHASE and press ENTER
(Select the merchant to transact with and press ENTER - FOR
MULTI-MERCHANT ONLY)
Enter the purchase amount and press ENTER
DO YOU WISH TO ADD A TIP Y/N will be displayed. Press ENTER
for YES to add a p or CLEAR for NO
If ENTER is pressed, then ask the customer how much they would
like to add the p amount (Tip amount will be less than 40% of
the purchase amount)
Enter the cash out amount and press ENTER
Swipe or Insert the customer’s card
Prompt customer to select account type and enter their PIN
followed by ENTER (FOR PIN ENTRY ONLY)
OR
Prompt customer to select account type and press ENTER (FOR
SIGNATURE ONLY)
Customer signs receipt
Check customer signature
Press ENTER to confirm signature, or CLEAR to void the transac-
on
OR:
EMV CHIP CARD SIGNATURE TRANSACTION
Prompt customer to select account type and press ENTER
Remove card from chip card reader at the end of the transacon
when REMOVE CARD prompt is displayed
Tear off the receipt and give it to the customer for signature
Verify the signature on the receipt with the signature on the back
of the card, if matches, press ENTER to accept the transacon or
CLEAR to decline.
Swipe or Insert the customer’s card from the idle screen OR
simply press F1 key on idle screen OR
Press MENU and scroll to select EFTPOS MENU followed by
ENTER
Scroll down to select PURCHASE and press ENTER
(Select the merchant to transact with and press ENTER - FOR
MULTI-MERCHANT ONLY)
Enter the purchase amount and press ENTER
Enter the cash out amount or press ENTER to bypass
Prompt customer to PRESENT/INSERT OR SWIPE their card
Prompt customer to select account type
Advise the cardholder to select the currency to process the
payment through by pressing the corresponding key
Advice the cardholder to confirm the currency selected by
pressing the corresponding key and accepts the exchange rate
Prompt customer to enter their PIN followed by ENTER.
16. PURE COMMERCE CSE
PURCHASE WITH DEBIT/CREDIT CARD WITH PIN
17. EXTRA TERMINAL FUNCTION
XTRA
Press MENU and scroll down to select SUPERVISOR MENU
followed by ENTER
Scroll down to select XTRA and then press ENTER
(Select the merchant to transact with and press ENTER - FOR
MULTI-MERCHANT ONLY)
Enter the Terminal Funcons by pressing the corresponding
number key
- Opon 0 – Print Stored Transacon Totals
Prints the record of all stored transacons awaing transmission in the terminal
- Opon 1 – Restart Terminal
Press ENTER to restart the terminal or CLEAR to return to idle
screen
- Opon 2 – Display KVC and Print Terminal Configuraon
Terminal displays KVC. Press ENTER to print the terminal config-
uraon or CLEAR to return to ADMIN menu
- Opon 3 – Print EMV Public Keys and CTL Public keys
Select the opon to print by pressing the corresponding
number key
- Opon 5 – Print Pending Transacons
Select the opon to print by pressing the corresponding
number key
- Opon 8 – Date and Time
Set date in the DDMMYY format and me in the HHMM format
18. SHORTCUT KEY
3
19. PURE COMMERCE CSE
Enable/Disable Pure Commerce Applicaon
Perform FUNC 3025707 to enable or disable Pure Commerce
Applicaon
Connecon Test
Perform FUNC 3025700 to test the connecon test from the site
to Pure Commerce host
BIN Table Download
Perform FUNC 3025701 to download the BIN table from Pure
Commerce host
Rates Table Download
Perform FUNC 3025702 to download the Rates table from Pure
Commerce host
Print Rates Table
Perform FUNC 3025705 to print the receipt with the current rates
table.
Configuraon Reset
Perform FUNC 3025706 to reset CSE configuraon on the
terminal.
Page 6
20. CREDIT CARD HOSPITALITY QUICK GUIDE
AUTHORIZATION
Press MENU and scroll down to select HOSPITALITY MENU
followed by ENTER key
Scroll down to AUTH and press ENTER
(Select the merchant to transact with and press ENTER - FOR
MULTI-MERCHANT ONLY)
Swipe or Insert the customer’s credit card
Enter the purchase amount and press ENTER
Prompt customer to select account type and enter their PIN
followed by ENTER (PIN ENTRY ONLY)
OR
Prompt customer to select account type and press ENTER (FOR
SIGNATURE ONLY)
Customer signs receipt
Check customer signature
Press ENTER to confirm signature, or CLEAR to void the transacon
OR
EMV CHIP CARD SIGNATURE TRANSACTION
Prompt customer to select account type and press ENTER
Remove card from chip card reader at the end of the transacon
when REMOVE CARD prompt is displayed
Tear off the receipt and give it to the customer for signature
Verify the signature on the receipt with the signature on the back
of the card, if matches, press ENTER to accept the transacon or
CLEAR to decline
COMPLETION
Press MENU and scroll down to select HOSPITALITY MENU
followed by ENTER
Scroll down to select COMP followed by ENTER
(Select the merchant to transact with and press ENTER - FOR
MULTI-MERCHANT ONLY)
Press corresponding number key to retrieve transacon
Enter required transacon details and press ENTER
Press ENTER to confirm the required transacon or CLEAR to
return to previous screen
Enter the Final Amount and press ENTER
Only applicable if Pure Commerce CSE is enabled
Advise the cardholder to select the currency to process the
payment through by pressing the corresponding key
Advice the cardholder to confirm the currency selected by pressing
the corresponding key and accepts the exchange rate
Receipt will be printed for cardholder to sign for acceptance
Terminal will process the payment with cardholder’s home currency
TOP-UP AUTHORIZATION
Press MENU and scroll down to select HOSPITALITY MENU
followed by ENTER
Scroll down to UTIL and press ENTER
(Select the merchant to transact with and press ENTER - FOR
MULTI-MERCHANT ONLY)
Select TOP-UP AUTH by pressing the corresponding number key
Swipe or Insert the customer’s card
Enter the purchase amount and press ENTER
Prompt customer to select account type and enter their PIN
followed by ENTER (FOR PIN ENTRY ONLY)
OR
Prompt customer to select account type and press ENTER (FOR
SIGNATURE ONLY)
Customer signs receipt
Check customer signature
Press ENTER to confirm signature, or CLEAR to void the transacon
OR: (21)
Prompt customer to select account type and press ENTER
Remove card from chip card reader at the end of the transacon
when REMOVE CARD prompt is displayed
Tear off the receipt and give it to the customer for signature
Verify the signature on the receipt with the signature on the back
of the card, if matches, press ENTER to accept the transacon or
CLEAR to decline.
21. EMV CHIP CARD SIGNATURE TRANSACTION
Swipe or Insert the customer’s card from the idle screen OR simply
press F1 key on idle screen OR
Press MENU and scroll to select EFTPOS MENU followed by ENTER
Scroll down to select PURCHASE and press ENTER
(Select the merchant to transact with and press ENTER - FOR
MULTI-MERCHANT ONLY)
Enter the purchase amount and press ENTER
Enter the cash out amount or press ENTER to bypass
Prompt customer to PRESENT/INSERT OR SWIPE their card
Prompt customer to select CR account type
Terminal will then display the surcharge amount that will be applied
to the purchase amount
Prompt customer to press ENTER to accept surcharge or CANCEL/-
CLEAR to cancel the transacon
If customer has accepted the surcharge, prompt customer to enter
their PIN followed by ENTER
23. SURCHARGE
Merchants that have obtained specific approval from their acquire
also have the opon of being able to process transacons despite
certain EFTPOS system failure events.
Such transacons are called EFTPOS Offline Voucher (EOV)
transacons, where transacons using certain cards can be
approved and stored locally on the terminal unl the EFTPOS
system is restored.
In such instances, the merchant will be prompted by the terminal
to confirm that they wish to process a transacon in EOV mode.
The cardholder will be unaware of the offline nature of the
transacon.
Care must be taken when using EOV, since there is always a risk
that if the terminal is prevented from uploading EOV transacon
data (e.g. the terminal is damaged), then the value of these
transacons may be lost.
22. EFTPOS OFFLINE VOUCHERS (EOV)
4
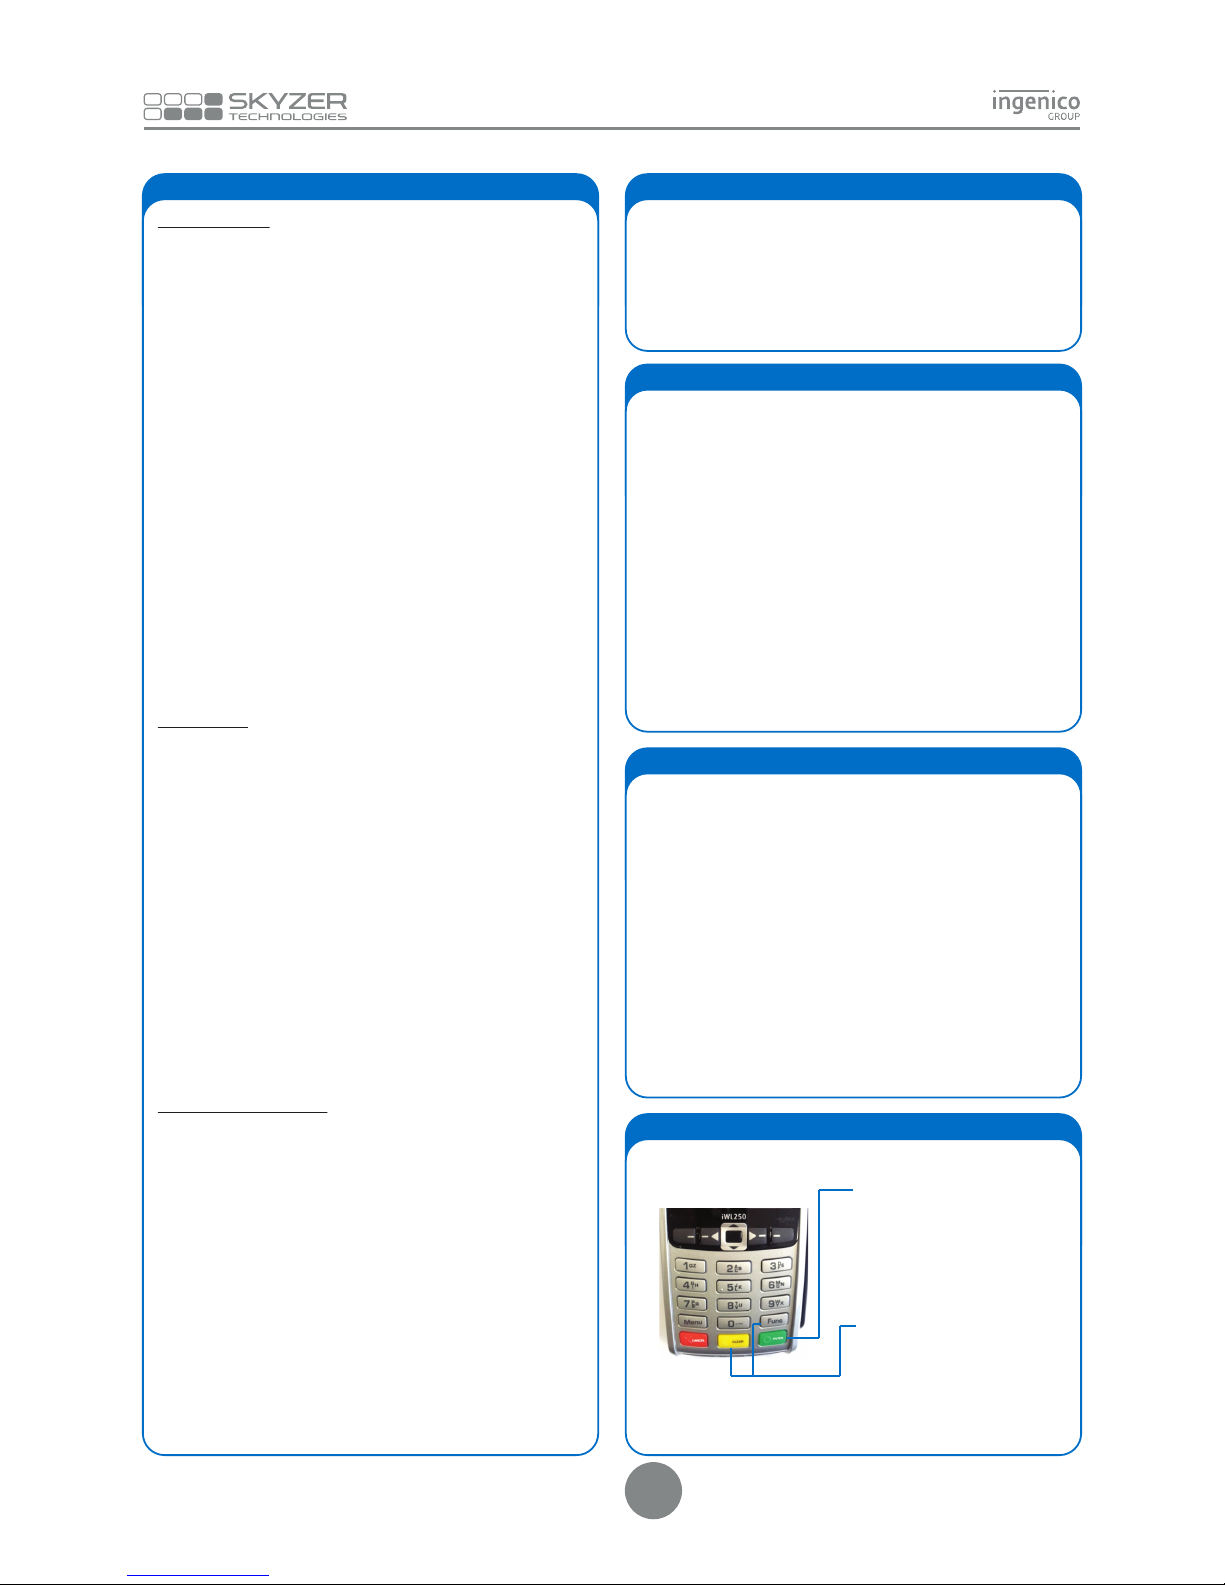
POWER OFF TERMINAL
To power off the iWL2XX terminal,
simply press and hold down the
CLEAR/Yellow and FUNC key together.
Ensure the terminal is not plugged to
charger and off the base when perform
this funcon.
24. POWER ON TERMINAL
POWER ON TERMINAL
To power on the iWL250 terminal,
simply press the ENTER/Green Key.
Page 7
25. CREDIT CARD TIPPING QUICK GUIDE
AUTHORIZATION
Press ENTER unl TIPPING menu is displayed
Press CHQ key to select AUTH
(Select the merchant to transact with and press ENTER - FOR
MULTI-MERCHANT ONLY)
Swipe or Insert the customer’s credit card
Enter the purchase amount and press ENTER
Prompt customer to press CR to indicate credit account
Tear off the receipt and write in TIP amount
Prompt customer to sign the receipt
Check customer signature
TIP/ADJUST
Press ENTER unl TIPPING menu is displayed
Press SAV key to select ADJ
(Select the merchant to transact with and press ENTER - FOR
MULTI-MERCHANT ONLY)
Press corresponding number key to retrieve transacon
Enter required transacon details and press ENTER
Press ENTER to confirm the required transacon or CLEAR to
return to previous screen
Press ENTER to add TIP amount
Enter the TIP amount which customer has advised followed by
ENTER
Check the TIP amount entered is correct and press ENTER or
CLEAR to re-enter the correct TIP amount.
NOTE: The terminal is to limit the total amount of the purchase
compleon to a maximum of 140% of the value of the accepted
authorizaon i.e. The TIP amount cannot exceed 40% of the
authorized amount.
VOID TIP TRANSACTION
Press ENTER unl TIPPING menu is displayed
Press CR key to select UTIL
(Select the merchant to transact with and press ENTER - FOR
MULTI-MERCHANT ONLY)
Select VOID TIP by pressing the corresponding number key
Press the corresponding number key to retrieve transacon
Enter required transacon details and press ENTER
Press ENTER to confirm the required transacon or CLEAR to
return to previous screen
Press ENTER to cancel the TIP Transacon, or CLEAR to exit.
UPLOAD
Press ENTER unl TIPPING menu is displayed
Press CR key to select UTIL
(Select the merchant to transact with and press ENTER - FOR
MULTI-MERCHANT ONLY)
Select UPLOAD by pressing the corresponding number key
TIP Transacons total will be displayed, press ENTER to upload or
CLEAR to view transacons
PRINT
Press ENTER unl TIPPING menu is displayed
Press CR key to select UTIL
(Select the merchant to transact with and press ENTER - FOR
MULTI-MERCHANT ONLY)
Select PRINT by pressing the corresponding number key
Press corresponding number key to retrieve transacon
Enter required transacon details and press ENTER
Press ENTER to print the transacon or CLEAR to select another or
exit the menu.
5
Ingenico shall have no liability under the warranty in respect of:
• Defects, breakdown or malfuncon due to the failure to properly
follow the installaon process and instrucons for use or an
external cause to the equipment (including but not limited to shock,
lightening fire, vandalism, malicious acon, contacts with various
liquids or vermin or water damage of any nature, inappropriate
electric voltage), or modificaons to the equipment made without
the wrien approval of Ingenico; or a lack of every day maintenance
(as described in the documentaon supplied with the equipment)
or to a lack of supervision or care, or improper storage or poor
environmental condions, parcularly those related to temperature
and hygrometry effects of variaons of electric voltage from the
electric network or from the earth or repair, work (opening or
aempt to open the equipment) or maintenance of the equipment
by persons not authorized by Ingenico;
• Damage due to insufficient or bad packaging of equipment when
returned to Ingenico or agent
• Wear and tear from normal daily use of the equipment and its
accessories;
• Work on any equipment modified or added without the consent
of Ingenico or agent;
• Malfuncon due to the use of products, consumables or
accessories which are non compable with the equipment;
• Communicaon problems related to an unsuitable environment,
including in parcular:
i. problems related to access and/or connecon to the
Internet such as interrupons by access networks or
malfuncon of the line used by the subscriber or their
correspondent,
ii. transmission faults (for example poor geographical coverage
by radio transmiers, interference or poor line quality),
iii. the local network fault (wiring, servers, workstaons) or the
failure of the transmission network (such as but not limited to
interferences, fault or poor quality of the network),
iv. modificaon of the parameters of the cellular network
earned out aer the sale of the equipment;
• Supply of new versions of soware;
• Work in connecon with normal use: delivery, installaon or
exchange of consumable supplies;
• Equipment returned to Ingenico or agent without its prior consent;
• Opening or locking of an operator's SIM key and work due to the
non funconing of the equipment caused by the opening or locking
of an operator's SIM key earned out without the original operator's
approval;
• Defects from materials supplied or chosen by the Customer or
from a design imposed by the Customer.
WARRANTY STATEMENT
Page 8

 Loading...