

Skyworth SLTV-3219A-3S User Manual

SKYWORTH EL ECTRONICS, IN C.
For Sales Information Please Contact
RoadTrucker Inc
(www.RoadTrucker.com)
8312 Sidbury Rd.
Wilmington, NC 28411
(800) 507-0482 / (910) 686-4281
1312 John Reed Court
City of Indus try, CA 91745
Phone: (626 ) 336-3698
Email: skyworthsales@v erizon.ne t
USER’S MANUAL
LED HDTV
USER’S MANUAL
MODEL
SLTV-3219A-3S
Fax: (626) 336- 3238
Safety Information
For Sales Information Please Contact RoadTrucker Inc (www.RoadTrucker.com)
8312 Sidbury Rd.; Wilmington, NC 28411 - (800) 507-0482 / (910) 686-4281
IMPORTANT SAFETY INS TR UC TI ONS
Read th ese ins truction s.
Keep th ese ins truction s.
Heed al l warni ngs.
Follo w all ins truction s.
Do not us e this ap paratus ne ar wate r.
Clean o nly wit h dry cloth.
Do not bl ock any v entilati on open ings. Inst all in ac cordance w ith the m anufactu re’s
instr uctio ns.
Do not in stall n ear any heat s ource s such as radi ators , heat regis ters, s toves, or ot her
appar atus (i ncluding a mplif iers) that p roduc e heat.
Do not de feat th e safety pur pose of t he polariz ed or gro unding plu g. A polari zed plu g
has two b lades w ith one wide r than th e other. A ground ing plu g has two blad es and a
third g round ing prong. The wi de blad e or the th ird p rong is p rovid ed for your sa fety.
If the pr ovide d plug does no t fit int o your outle t, cons ult an elect ricia n for replac ement
of the ob solet e outlet.
Prote ct the po wer cord fro m being w alked on or pi nched p articula rly at th e plugs,
conve nienc e receptac les, an d at the point w here th ey exit from t he appa ratus.
Only us e attac hments/a ccess ories spec ified b y the manufa cture r.
Use onl y with th e cart, stan d, trip od, bracke t, or tab le specifi ed by the m anufactu rer,
or sold w ith the a pparatus . When a ca rt or rack is us ed, use c aution whe n movin g the
cart/ appar atus combi natio n to avoid inj ury fro m tip-over.
Unplu g the app aratus dur ing lig htning sto rms or wh en unused fo r long pe riods o f tim e.
Refer a ll serv icing to qua lifie d personne l. Serv icing is req uired w hen the a ppa ratus h as
been da maged i n any way, such as pow er supp ly cord o r plu g is dama ged, li quid has
been sp illed o r objects ha ve fall en into the ap parat us has been ex posed t o rain or
moist ure, do es not opera te norm ally, or has be en dr opped .
CAUTI ON: These se rvicing in struc tions a re fo r use by qu alifi ed se rvice p erson nel only.
To reduce t he risk o f electric s hock, d o not perfor m any ser vicing oth er than t hat
conta ined in t he operati ng inst ructions u nless y ou are quali fied to d o so.
WAR NING:To red uce t he risk o f fire or e lectric sh ock, do n ot expose th is appa ratus to
rain or m oistu re. The appa ratus s hall not be ex posed t o dripping o r splas hing an d tha t
objec ts fill ed with liqu ids, su ch as vases, s hall no t be placed on a ppara tus.
WAR NING: T he ma ins plu g is used a s disconne ct devi ce, the disc onnec t device sha ll
remai n readi ly operabl e.
- This light ning fl ash with arr owhea d symbo l wit hin an eq uilat eral trian gle is in tended to
alert t he user t o the presen ce of non -insulat ed “dan gerous vol tage” w ithin the pr oduct ’s
enclo sure th at may be of suffic ient ma gnitu de to c onsti tute a ri sk of e lectr ic shoc k.
- War ning: To reduc e the risk of el ectri c shock, do no t remov e cover (or ba ck) as th ere
are no us er-se rviceabl e parts i nside. Ref er serv icing to qua lifie d personne l.
- The exclam ation p oint withi n an equi later al tr iangl e is inte nded to aler t the use r to the
prese nce of im portant op erati ng and maint enanc e instruct ions in t he literat ure
accom panyi ng the appli ance.
Apparatus with class I construction shall be con nected to a mains socket out let
with a protective earthing connection.
Important Safety Precautions
For Sales Information Please Contact RoadTrucker Inc (www.RoadTrucker.com)
8312 Sidbury Rd.; Wilmington, NC 28411 - (800) 507-0482 / (910) 686-4281
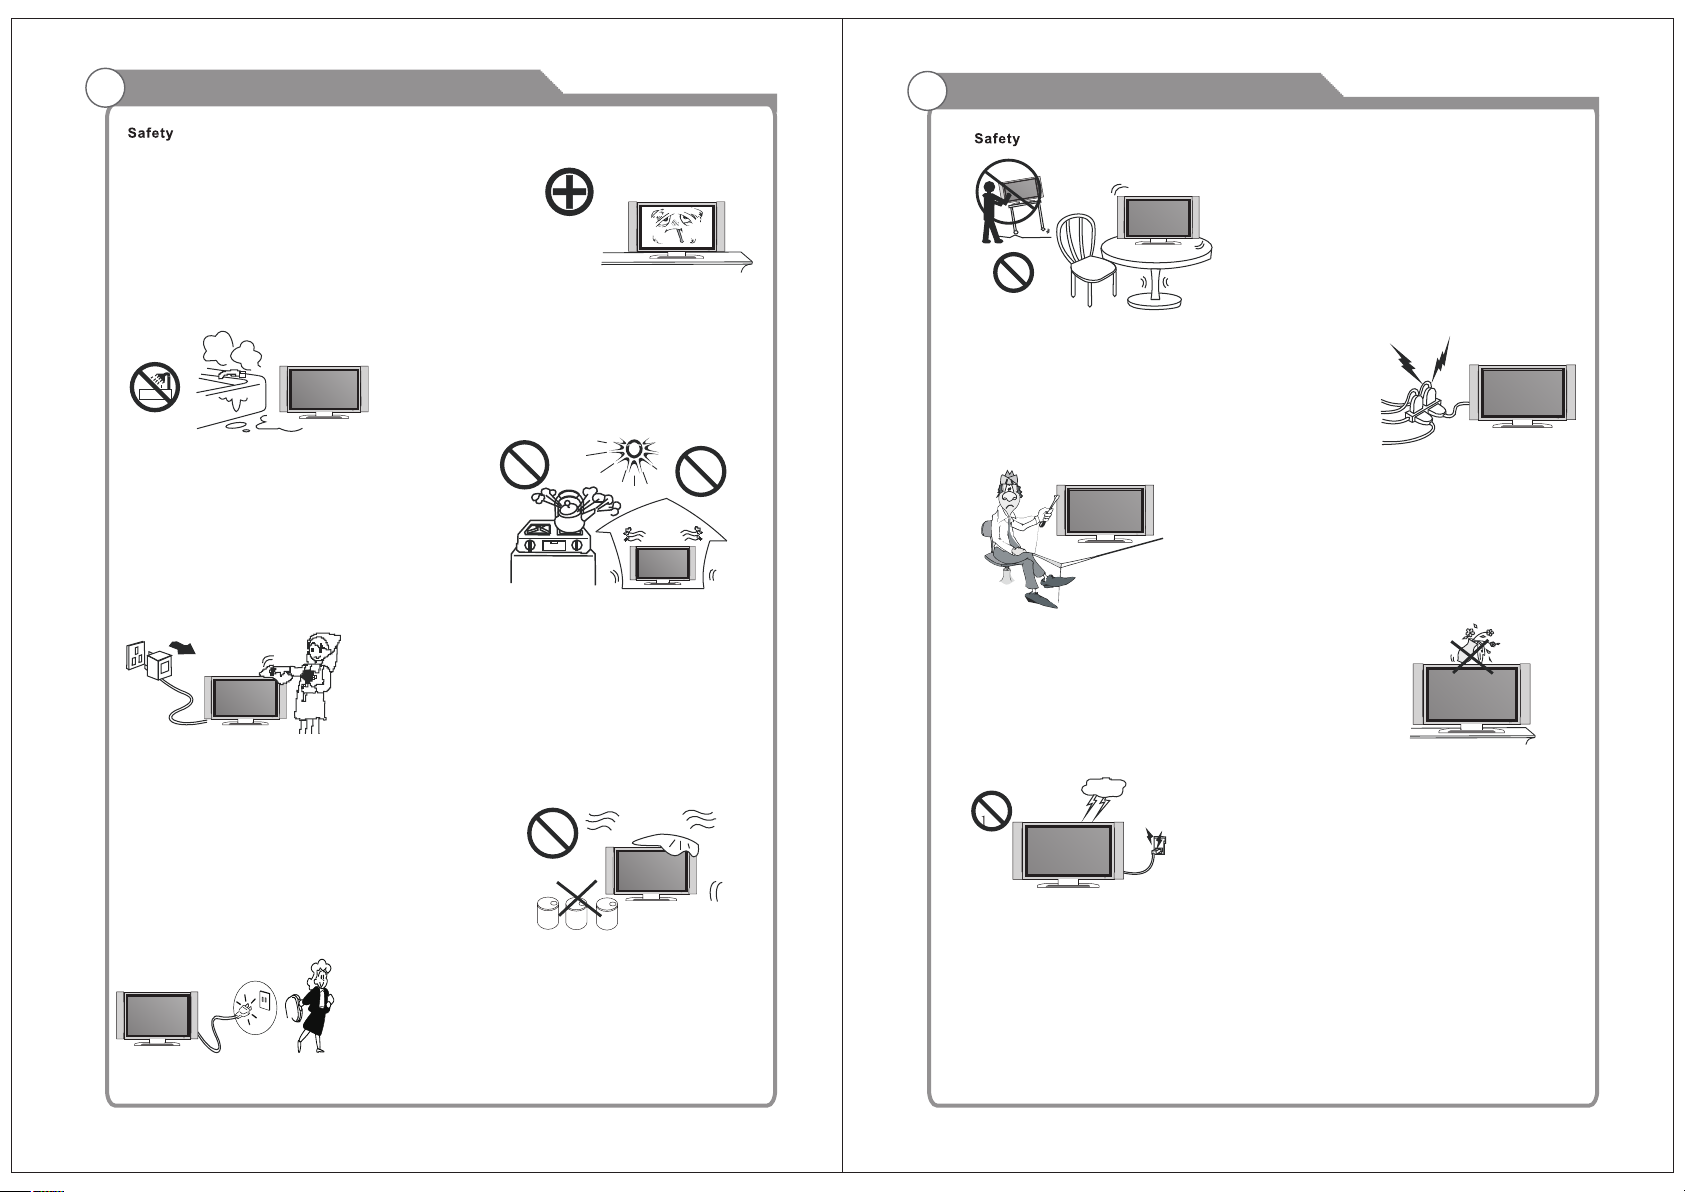
Please, immediately pull out the AC power
plug from adapter if there is an abnormal sound or
smell or the LED TV has sou nd but no p ictur e,
and contact after sal es support.
The LED TV shoul d be kept f ree fro m rain,
moisture and dust to prevent electrical
shock and short circuits. Do not cover the
ventilation openings with table clothes,
curta ins, newspapers, etc.
The LED TV shoul d be kept f rom hig h
temperature heating sources or direct
sunlight. Good ventilation is required.
Allow 10 cm. between the LED TV an d
other appliances or built-in cabinet walls.
Important Safety Precautions
Do not place the LED TV on an u nstab le
surfa ce.
Do not place the power cord or other cables
across a walkway in case it is trampled on. Do
not overload the power cord or power socket.
When th e power plug is used to disconnect and
connect the device, it should easily go into the
power source.
Do not disassemble the back cover, as it
contains high voltages inside and will cause
electric shock. Onl y qualified professionals
should conduct internal adjustments,
maintenance, and checks.
When you wipe the front cabinet, please
make sure the power plug is pulled out and
use a soft, dry, li nt-fr ee clot h and han dle it
with care. Do not repeatedly wipe the panel,
nor scrape, ta p or stri ke the pa nel with a hard
object.
Do not wipe the LED TV with a ny petr ol,
chemical or alcohol based solvents as it
will lead to product damage of the panel
and cabinet.
When th e television receiver is not used for an
extended period of time, it is advisable to disconnect
the AC power cord from the AC outlet.
The TV se t shoul d not be su bject ed to
water droplets, vapor, or splash. Th is
equipment should not be placed on objects
filled with liquids. Do not place flame
sources, such as lit ca ndles, on or near the
LED TV. Please, pull out the power plug
and contact after sal es support if th ere are
abnormal objects or water in the TV.
Pull out the power cord and antenna cable
during electrical storms so the LED TV is not
damaged by electrical surges. Keep all
people away from the antenna cable during
electrical storms.

Table of Contents
For Sales Information Please Contact RoadTrucker Inc (www.RoadTrucker.com)
8312 Sidbury Rd.; Wilmington, NC 28411 - (800) 507-0482 / (910) 686-4281
Table of Contents
Introduction
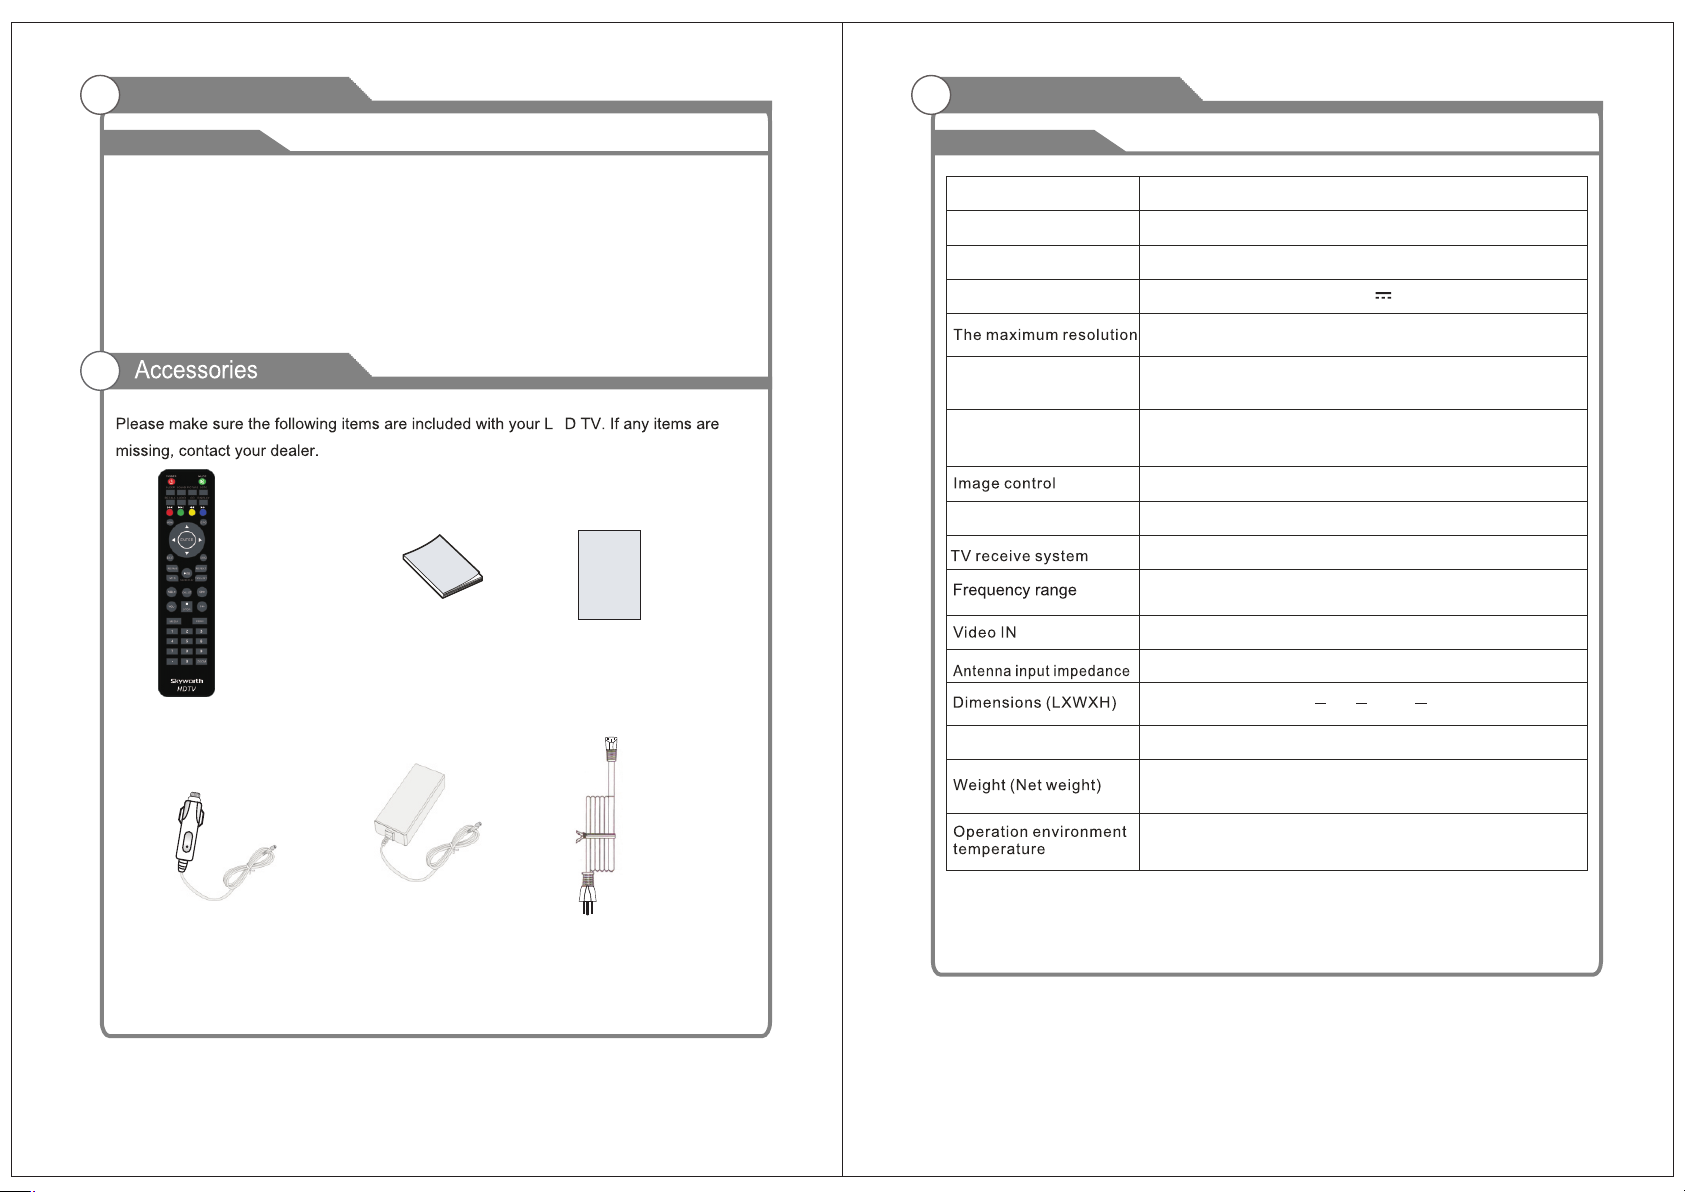
Features
Accessories
Specifications
General Description
Overview of front and side panel
Base bracket guide
Overview of back panel
External Connection
Antenna connection
Connecting VCR
Connecting DVD Player/Set-Top Box
Connecting Digital Audio System
Connecting DVD Player/Set-Top Box via HDMI
Connecting PC
Supporting signals
3
3
4
5
6
7
8
10
10
11
12
13
14
15
15
Menu system introduction
Sdjust the OSD Screen
Instr uctio n for mai n menu
Pictu re
Audio
Tim e
Setup
Lock
Channel
Troubleshooting
Picture defects and the reason
17
17
19
20
21
22-23
24-34
35-39
40
41
Basic operation
Turning the TV On and Off
1
16
2
Introduction
For Sales Information Please Contact RoadTrucker Inc (www.RoadTrucker.com)
8312 Sidbury Rd.; Wilmington, NC 28411 - (800) 507-0482 / (910) 686-4281
Introduction
Features
Input terminals used for external equipment connection
One Computer VGA/PC input
One AV input
One EARPHONE output
One ANTENNA input
One COAXIAL output
Remote Control
One PC Audio input
HDMI x 3 input
One
USB Service input
One YPbPr input
E
Instr uctio ns
Manual
Quick Setup Gu ide
Quick s etup Gu ide
Specifications
W arnings
Model
Display Size
Display Screen Type
Power adaptor
Power Consumption(Max)
Sound output(Max)
Display screen type
Wal l mount
SLC-3219A-3S
32”
LED
DC 12V 6A
1366X768
55W
2 x 10 W
Fine digital control
Color active matrix LED display
NTSC System, ATSC System
Antenna: 2~69; Cable: 1~135 (Analog: 1-125,
Digital: 1-135)
NTSC3.58
75 (Unbalance)
7
28 Lx6 Wx19 H
988
VESA 100
1
6
Car charger cable
3
Adapter
Power Cord
9.92 lbs
0 C-40 C
Remarks:
The above listed specifications and data are subject to change without prior notice.
o o
4
General Description
For Sales Information Please Contact RoadTrucker Inc (www.RoadTrucker.com)
8312 Sidbury Rd.; Wilmington, NC 28411 - (800) 507-0482 / (910) 686-4281
Introduction
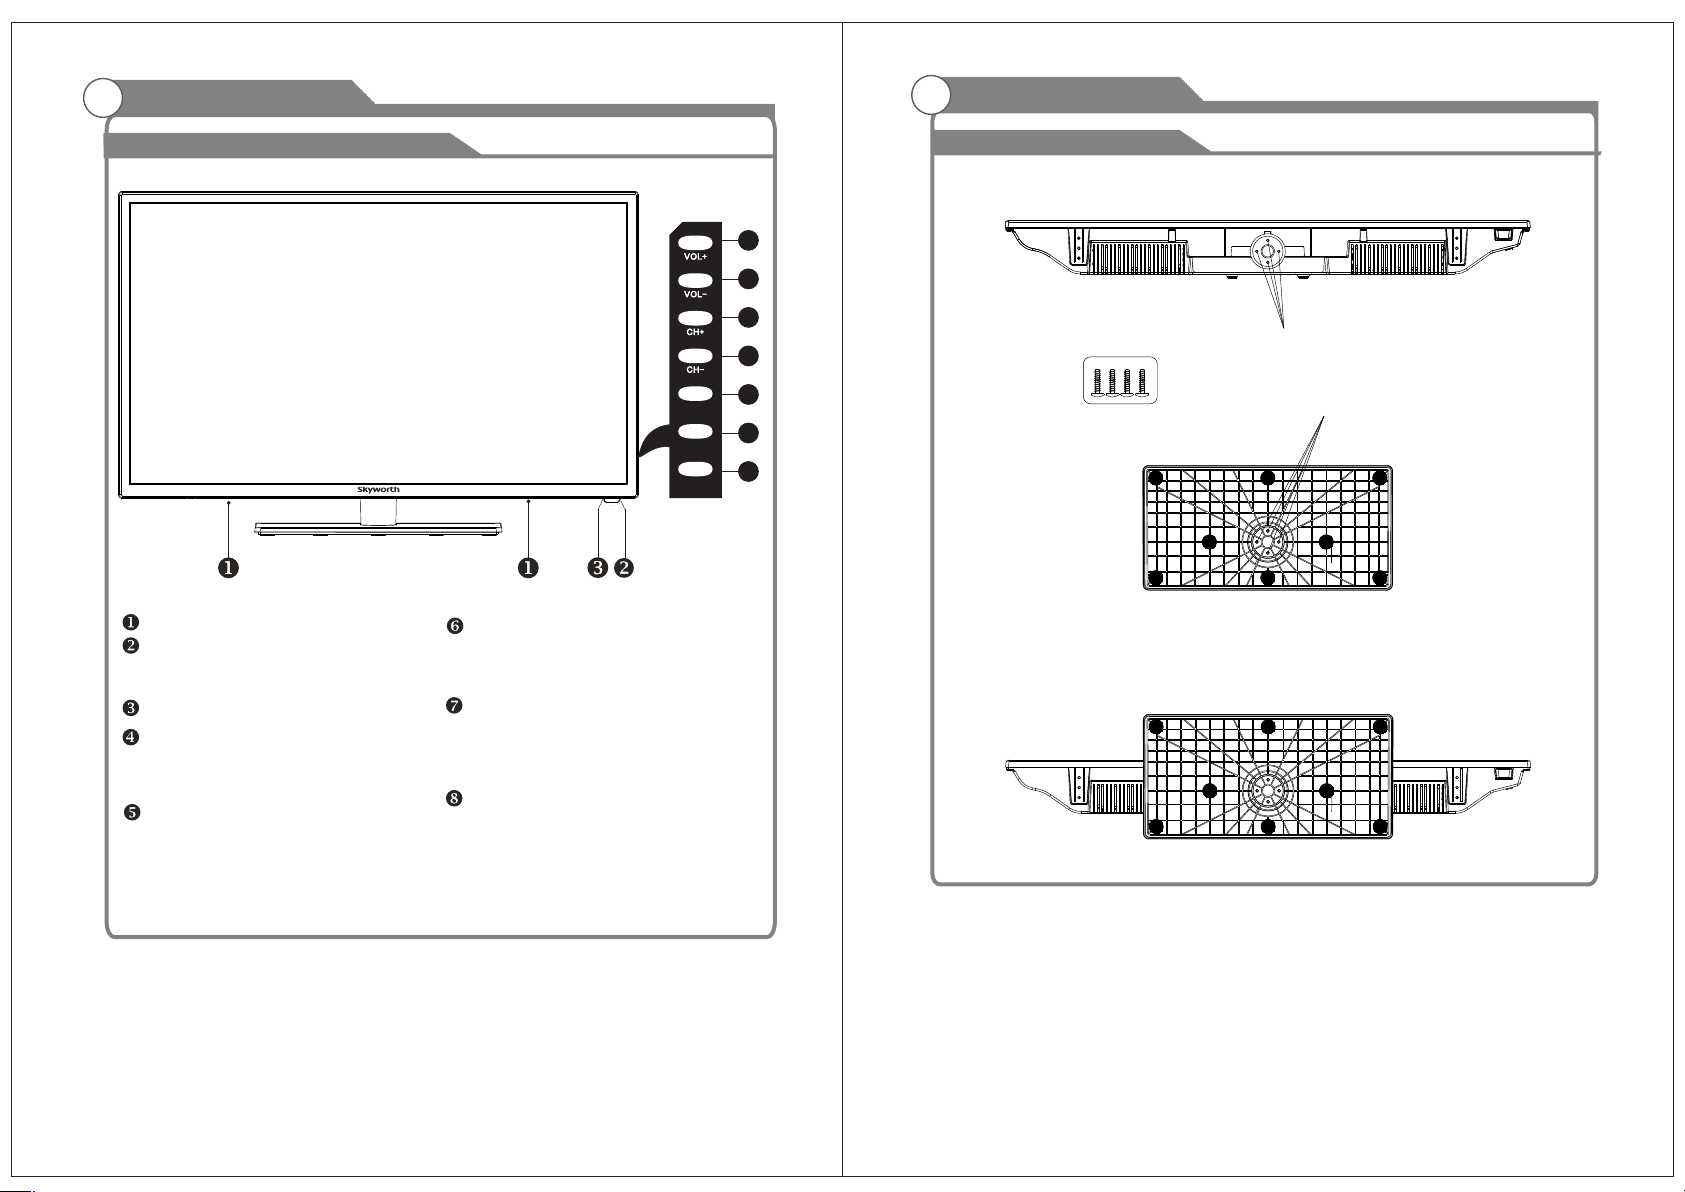
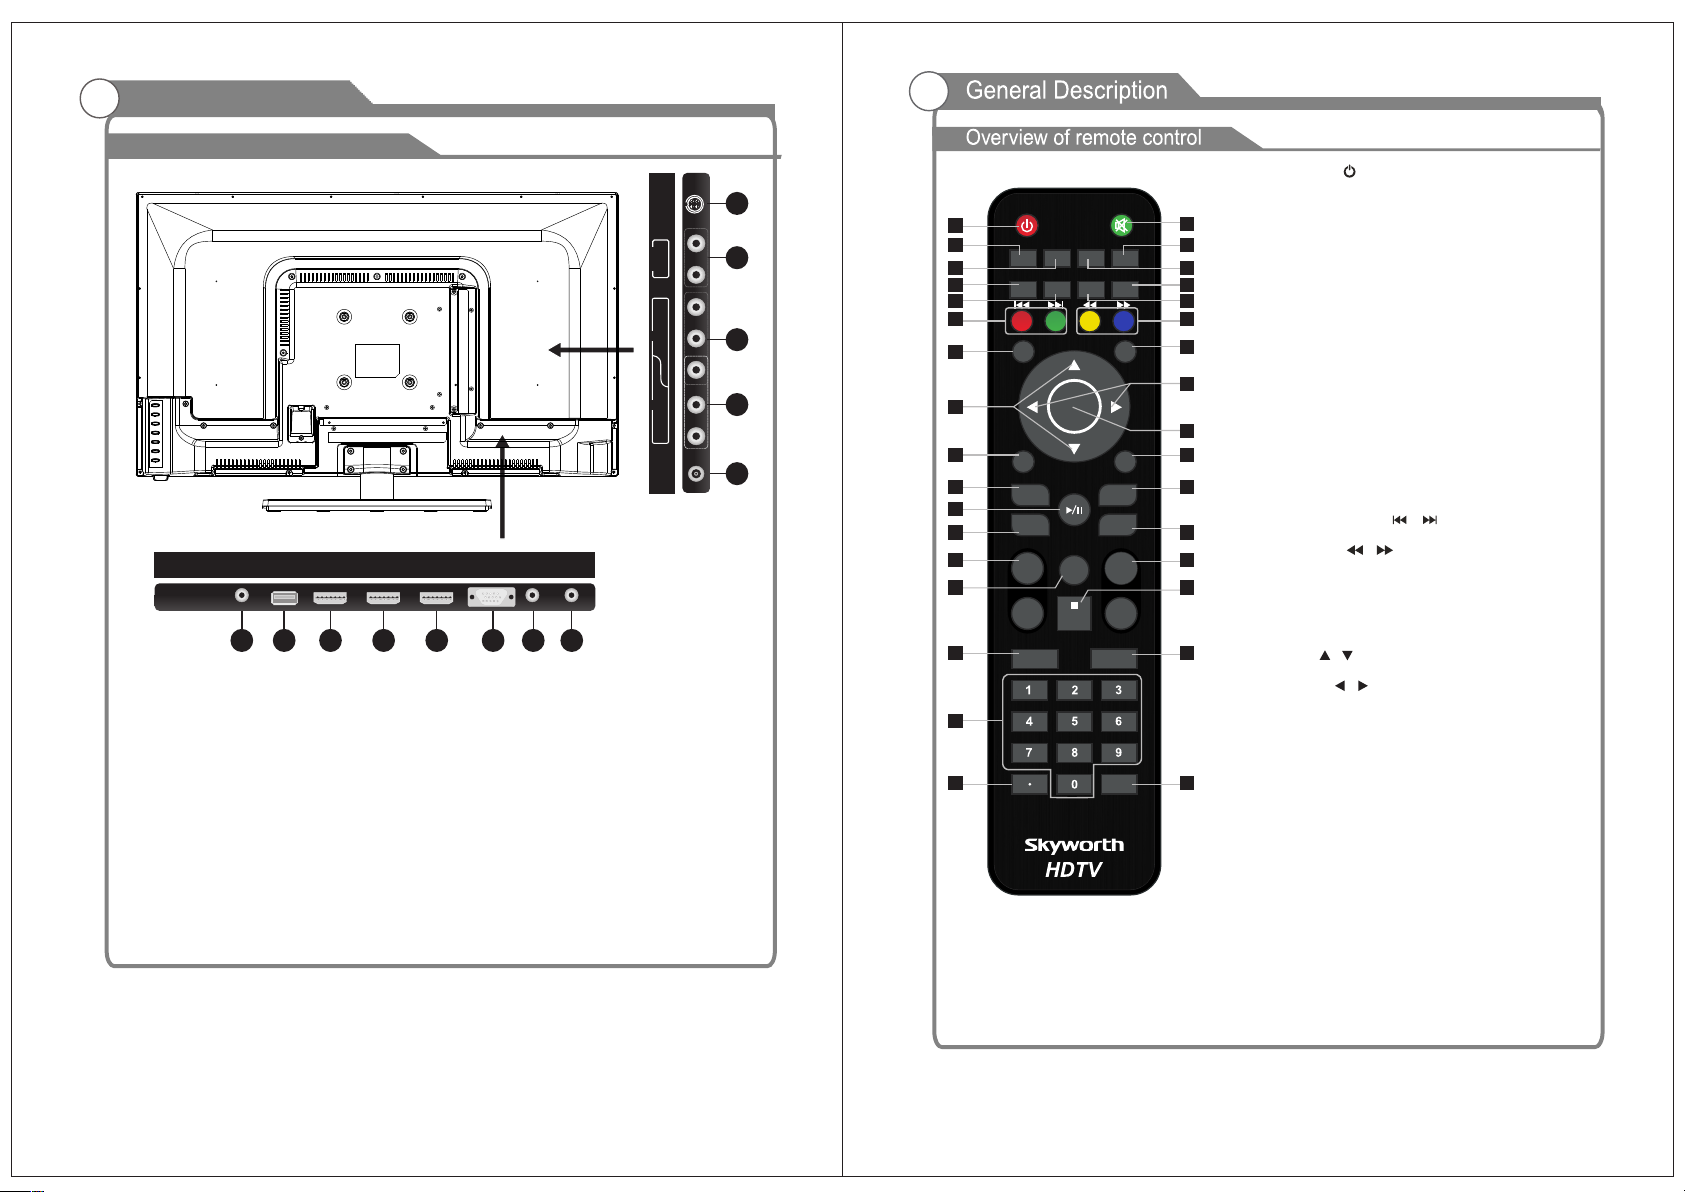
Overview of front and side panel
SPEAKER
POWER INDICATOR
Green: In power on mode.
Red: In standby mode.
REMOT E CONTROL SENSO R
SOURC E
Chang e and sel ect t he desi red mode
(TV, AV, Compo nent, HDMI 1,
HDMI2 , HDMI3, VGA , USB)
MENU
Press to see an on-screen menu of your
TV's features.
7
7
6
6
MEN U
SOU RCE
POW ER
CH+/-
Press to change channels.
In the on-screen menu, use the CH +/-
buttons as up/down arrow buttons.
VOL+/ Press to increase or decrease the volume.
In the on-screen menu, use the VOL +/ buttons as left/right arrow buttons.
POWER
Press t his button t o turn th e TV on o r off .
5
4
8
Base bracket guide
W
Screw
Instruction:
1.Place the TV unit on a flat and clean table.
2.Fix stand by 4 pcs scerws via scerw hole B and A.
Screw hole A
Screw hole B
5
6
General Description
For Sales Information Please Contact RoadTrucker Inc (www.RoadTrucker.com)
8312 Sidbury Rd.; Wilmington, NC 28411 - (800) 507-0482 / (910) 686-4281
Overview of back panel
EARP HONE
USB
Serv ice por t
OUT
1
2 3 3 5
1. EARP HONE
Connect a set of phone for private
listening
2. USB Se rvice p ort .
3. HDMI (1/2/ 3)
Connect a device with a HDMI output.
VGA/P C IN4.
Connect to your PC.
5. PC AUDIO
Audio i nput for ext ernal d evices
6. COAX IAL
Connect to a Digital Audio devices.
HDMI 2HDMI 1
3
DC 12V
POWE R INPUT
R
OUT
AUDIO
L
Pr
IN IN
Pb
Y
VIDE O
VIDE O
R
L
IN
RF
PC
HDMI 3 VGA
4
AUDI O
COAX IAL
IN
OUT
6
7. RF
Connect to an antenna or cable
NTSC & ATSC .
COMPO SITE VI DEO8.
Video i nput fo r exter nal dev ices, s uch
as a camcorder or VCR.
9. COMPO NENT
Connect Component video.
AUD IO outp ut10.L/ R
Audio outputs for external devices.
11. POWE R(DC 12V) inpu t
11
10
9
1. POWER Button ( )
Press this b utt on to t urn t he TV on or into st and by mo de.
POWE R MUTE
1
SLEE P
3
5
7
9
11
13
8
7
15
17
20
22
23
25
27
29
31
32 33
MENU
EXIT
PICT URE
SOUN D
CCRECA LL DISP LAY
AUDI O
ENT ER
REPA- B
MTS FAV.LIST
VOL+
VOL-
MEDI A
REPE AT
PAUSE /PLAY
CH.L IST
STOP
HDMI
ZOOM
GOTO
EPG
SOUR CE
CH+
CH-
2. MUTE Button
Press this b utt on to m ute t he so und .
2
3. SLEEP Button
4
Press this b utt on to s et th e sle ep ti mer.
The sleep ti mer v alu es ar e: off.5.10 .15 .30 .45 .60 .90 .12 0.
6
180.240 mi nut es.
8
4.GO TO Bu tton
10
Press this b utt on to g o to de sir ed po sit ion t he pl aye r
12
provides 3 s ear ch mo de.
5.SOUND Butto n
14
Press this b utt on to s ele ct de sir ed so und m ode .
6.PICTUR E But ton
16
Press this b utt on to s ele ct de sir ed pi ctu re mo de.
7.RECALL Button
This butto n is us ed to r etu rn to t he pr evi ous c han nel .
8. DISPLAY But ton
18
Pre ss this butto n to display the in formation on curr ent input.
19
9. AU DIO B utt on
Press to dis pla y the l ang uag e of th e aud io in D TV.
21
10. CC Button
Press to tur n ON/ OFF c los ed ca pti ons .
11. PREV/NE XT Bu tto n ( / )
24
Play previ ous / n ext m edi a fil e.
12. FR/FF Butto n( / )
26
Play fast ba ckw ard / f orw ard .
13. MEUN But ton
28
Press this b utt on to e nte r the m enu m ode f or va rio us
optional a dju sta ble s ett ing s or qu it fr om cu rre nt me nu.
14. ELECTR ONI C PRO GRA M GUI DE( EPG )Bu tto n
Press this b utt on to c all u p the E lec tro nic P rog ram G uid e.
30
15. UP/DOWN( / )B utt on
Press thes e but ton t o sel ect t he de sir ed it ems i n the m enu .
16. LEFT/RIGH T( / )B utt on
Press thes e but ton t o sel ect t he de sir ed it ems i n the
menu, or ent er th e sel ect ed.
17. EXIT Button
Press this b utt on to e sca pe fr om th e cur ren t ope rat ion .
18. ENTER Butto n
Press this b utt on to e nte r the s ele cte d ite m.
19. SOURCE B utt on
Press this b utt on to d isp lay t he in put s our ce.
Using UP/D OWN b utt on to s ele ct an d RIG HT or
ENTER butt on to c onf irm .
20. A-B RE PEAT Butt on (R EP A-B )
You ca n rep eat edl y pla y a giv en po rtion by
operatin g as fo llo ws:
To press this bu tto n onc e to de fin e the p ort ion
head.
To press this bu tto n aga in to d efi ne th e por tio n toe .
Then the por tio n wil l be pl aye d rep eat edl y.
To press this bu tto n aga in to r etu rn to n orm al
playback .
7
8
21. REPEAT Button
For Sales Information Please Contact RoadTrucker Inc (www.RoadTrucker.com)
8312 Sidbury Rd.; Wilmington, NC 28411 - (800) 507-0482 / (910) 686-4281
Return to th e pre vio usl y vie wed p rog ram .
22. PLAY AND PAUSE B utt on( )
Press this b utt on to s tar t pla yba ck. P res s thi s but ton a gain to pause playback.
23. MTS Button
When stere o pro gra m is re cei ved , pre ss th is bu tto n to sw itch sound system between mo no an d ste reo .
When SAP program is received, press th is bu tto n to sw itc h sou nd sy ste m bet wee n mon o and SAP.
When stere o and S AP program is receive d, pr ess t his b utt on to s wit ch am ong m ono , ste reo and SAP.
24. FAVORI TE LIST (FAV.LI ST) B utton
Press this b utt on to d isp lay t he fa vor ite p rog ram l ist .
25. VOL+/VOL- B utt on
Press thes e but ton t o inc rea se or d ecr eas e the v olu me.
26. CH+/CH - But ton
Press thes e but ton t o sel ect c han nel s in as cen din g or de scending order.
27. CH.LIST But ton
Press this b utt on to d isp lay t he ch ann el li st in T V mod e.
28. STOP B utt on( )
When this bu tto n is pr ess ed on ce, t he un it re cor ds th e sto pped point from where playba ck wi ll re sum e
(resume fu nct ion ) if PL AY is pre sse d afterwards. But if STOP bu tto n is pr ess ed ag ain instead of PLAY
button, th ere w ill b e no re sum e fun cti on.
29. MEDIA But ton
Directly s wit ch to U SB ch ann el fr om an y oth er so urc e.
30. HDMI Button
Directly s wit ch to H DMI c han nel .
31.NUMBE R(0 -9) B utt on
Enter digi ts fo r cha nne l sel ect ion o r pas swo rd se tti ng.
32.
For sub-ch ann el se lec tio n.
33. ZOOM Button
Press this b utt on to Z OOM P ict ure s.
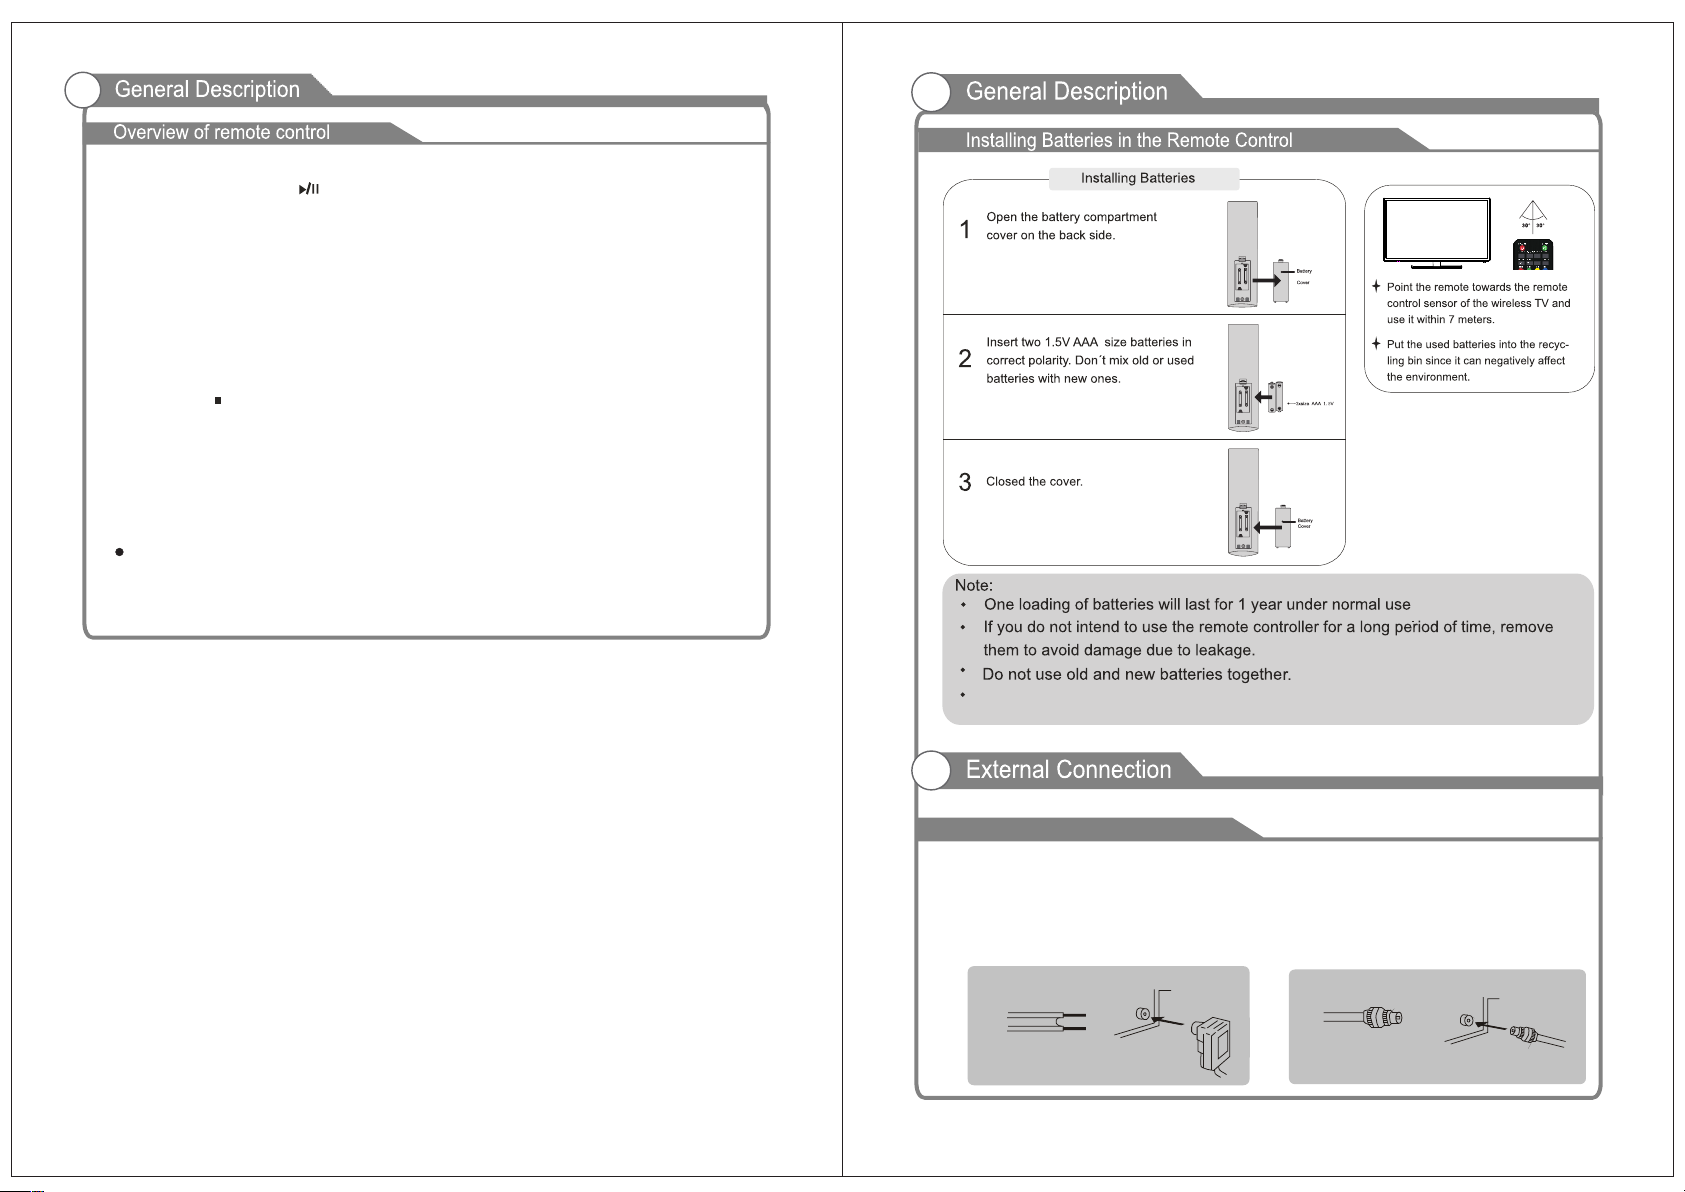
The battery (b atter y or batt eries o r batte ry pack ) shall n ot be exp osed
to exce ssive heat such as sunshine, fire or the like.
9
Antenna connection
Antenna input impedance of this unit is 75ohm. VHF/UHF 75ohm coaxial cable can be
connected to the antenna jack directly, if the antenna cable is 300ohm parallel flat feeder
cable, you need to use the 300ohm/75ohm converter to connect the antenna cable to the
antenna jack. For details Please refer to the following drawing.
Antennas with 300 ohm flat twins Leads
Use a 75ohm - 300ohm converter
ANT IN
300ohm coaxial cable
Antenna feeder
Antennas with 75 ohm Round Leads
75ohm coaxial cable
Antenna cable
10
 Loading...