

Page 1
Page 2

Page 3
N100 Convertible
© 2011 Skyworth Wireless. All rights reserved.
Page 4

2
CONTENTS
01 Safety Information
02 Other Guidelines for Phone Use
03 Get Started
3.1 What’s in the Box
3.2 Assemble Your Phone
3.3 Charge the Battery
04 Phone Basics
4.1 Parts of the Phone
4.2 Switch the Phone On/ Off
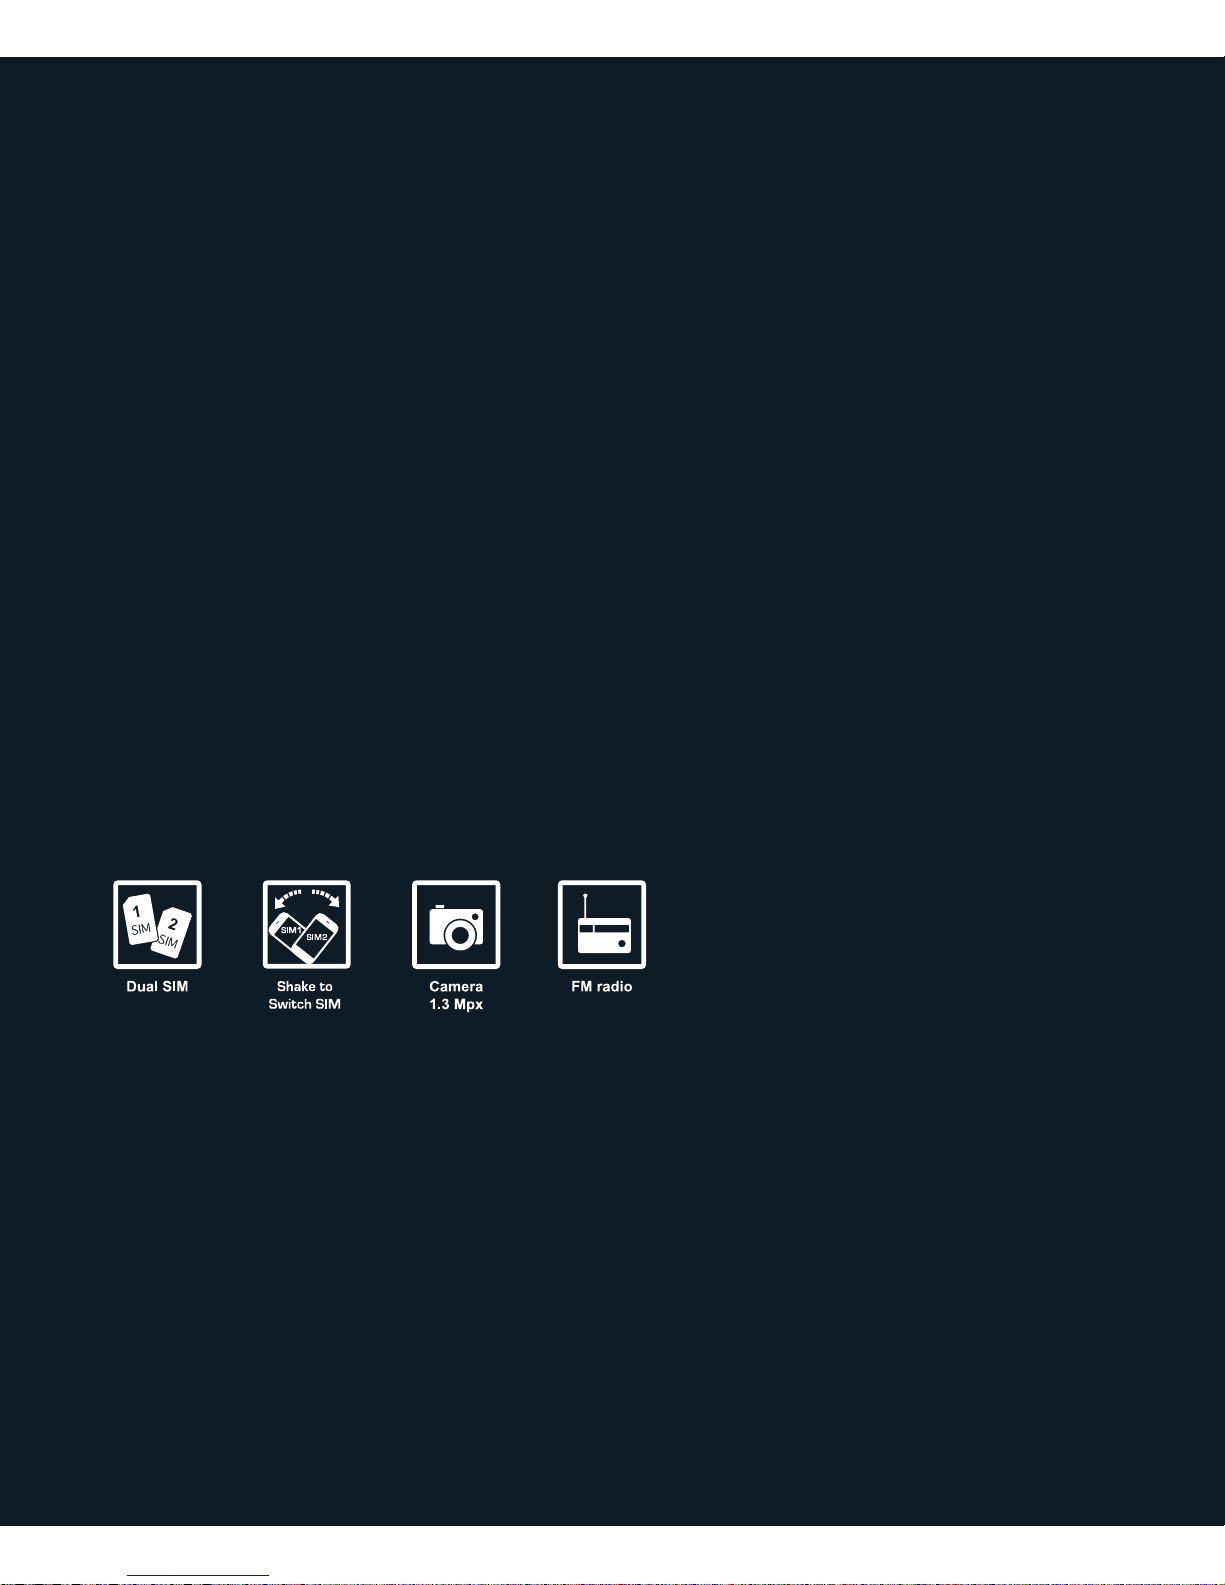
4.3 If You Have Two Sim Cards
4.4 Shake To Switch SIM
4.5 Basic Use
05 Navigate The Phone Menu
5.1 Standby Mode
5.2 My Shortcuts
5.3 Menu
5.4 What the Status Icons Mean
06 Make/Receive Calls
6.1 Make Calls
6.2 Go Hands-free
6.3 Receive Calls
6.4 Customize Call Settings
6.5 View Call Log
Page 5

3
07 Messages
7.1 Enter Text
7.2 SMS
7.3 Messages Settings
7.4 MMS
7.5 View MMS
7.6 Broadcast Messages
08 Personalize Your Phone
8.1 Dual SIM Cards
8.2 Change the Language
8.3 Set the Date and Time
8.4 Customize the Display
8.5 Customize User Profiles
8.6 Set Security Features
09 Get Organized
9.1 Contacts
9.2 Personal Organizer
10 Use Bluetooth
10.1 Connect the Bluetooth
Headset
10.2 Other Bluetooth Functions
10.3 Bluetooth Settings
11 Multimedia On Your Phone
11.1 Install a Memory card
11.2 Take photos
11.3 Record Videos
11.4 Record Audio Clips
11.5 Play Music
11.6 Listen to FM Radio
11.7 Slide Show
12 More Features
12.1 Access the Web
12.2 Applications
12.3 Back-up Phone Data
12.4 Reset the Phone
Page 6

01
02
Safety Information
Other Guidelines
for Phone Use
Page 7

05
Safety Information
Use your phone in a safe and responsible manner.
Normal use
Use your phone only in its normal position: place near the ear with the
antenna pointing over the shoulder.
When driving
Using a hand-held mobile device while driving may be dangerous. Park
your vehicle, or use a hands-free headset or speaker phone.
Near medical equipments or devices
Switch off your phone as it may affect the performance of medical
equipments and medical devices. Follow all regulations and warnings in
hospitals and other health-care facilities.
With pacemakers
Keep your phone with a minimum separation of 15cm from the
pacemaker. If you suspect any interference is taking place, switch off
your phone immediately.
In potentially explosive areas
Switch off your phone at refueling points (service stations) or other
potentially explosive areas. Obey all warning signs and instructions.
In an aircraft
Switch off your phone as it may interfere with electronic equipments on
an aircraft.
Page 8

06
Interference
All mobile phones are subject to radio frequency interference which
may affect their performance.
Emergency calls
To make emergency calls, the phone must be switched on and in
service. If needed, press the End key to clear other functions. Then dial
the emergency number and press the Send key. Emergency calls will
not end until you hang up.
Specific Absorption Rate (SAR) certification
Your phone meets international standards that limit exposure to radio
waves. The recommended SAR limit for mobile phones is 2.0 watts/
kilogram (W/kg).
The highest SAR values of the N100 Convertible are 0.322 W/kg for DCS
and 0.665 W/kg for GSM. During normal use, the SAR level can be well
below the maximum as the phone is designed to operate at the lowest
power required to reach the nearest base station.
CAUTION : Listening to a headset at high volume can damage your
hearing. Use only the minimum volume setting necessary to hear
the voice or listen to music.
Page 9

07
Other Guidelines for Phone Use
n
Back up the data from your phone to your computer or other media
regularly.
n
Keep your phone and its accessories out of reach of young children.
n
Avoid your phone to get wet. It is not waterproof.
n
Clean the phone with a soft cloth slightly dampened with a mild
soap solution. Do not use harsh chemicals, cleaning solvents or
strong detergents.
n
Rough handling can damage internal circuit boards. Treat your
phone with care.
n
Keep your phone away from dusty and dirty areas.
n
Keep your phone away from very hot or very cold areas.
n
Do not paint your phone. Paint can clog the parts and cause
improper operation.
n
Do not connect incompatible accessories or devices to your phone.
n
Use only Skyworth Wireless approved batteries and accessories.
Incompatible products may damage your phone.
n
Repair your phone only at Skyworth Wireless approved service
centers.
n
The acceptable ambient temperature for the N100 Convertible is as
follows:
Charging: 0°C to 45°C
Discharging: -20°C to 45°C
CAUTION: Replacing the battery with an incorrect type may
present a risk of explosion. Dispose of used batteries according to
the manufacturer’s instructions.
Page 10

03
Get Started
3.1 What’s in the Box
3.2 Assemble Your Phone
3.3 Charge the Battery
Page 11
09
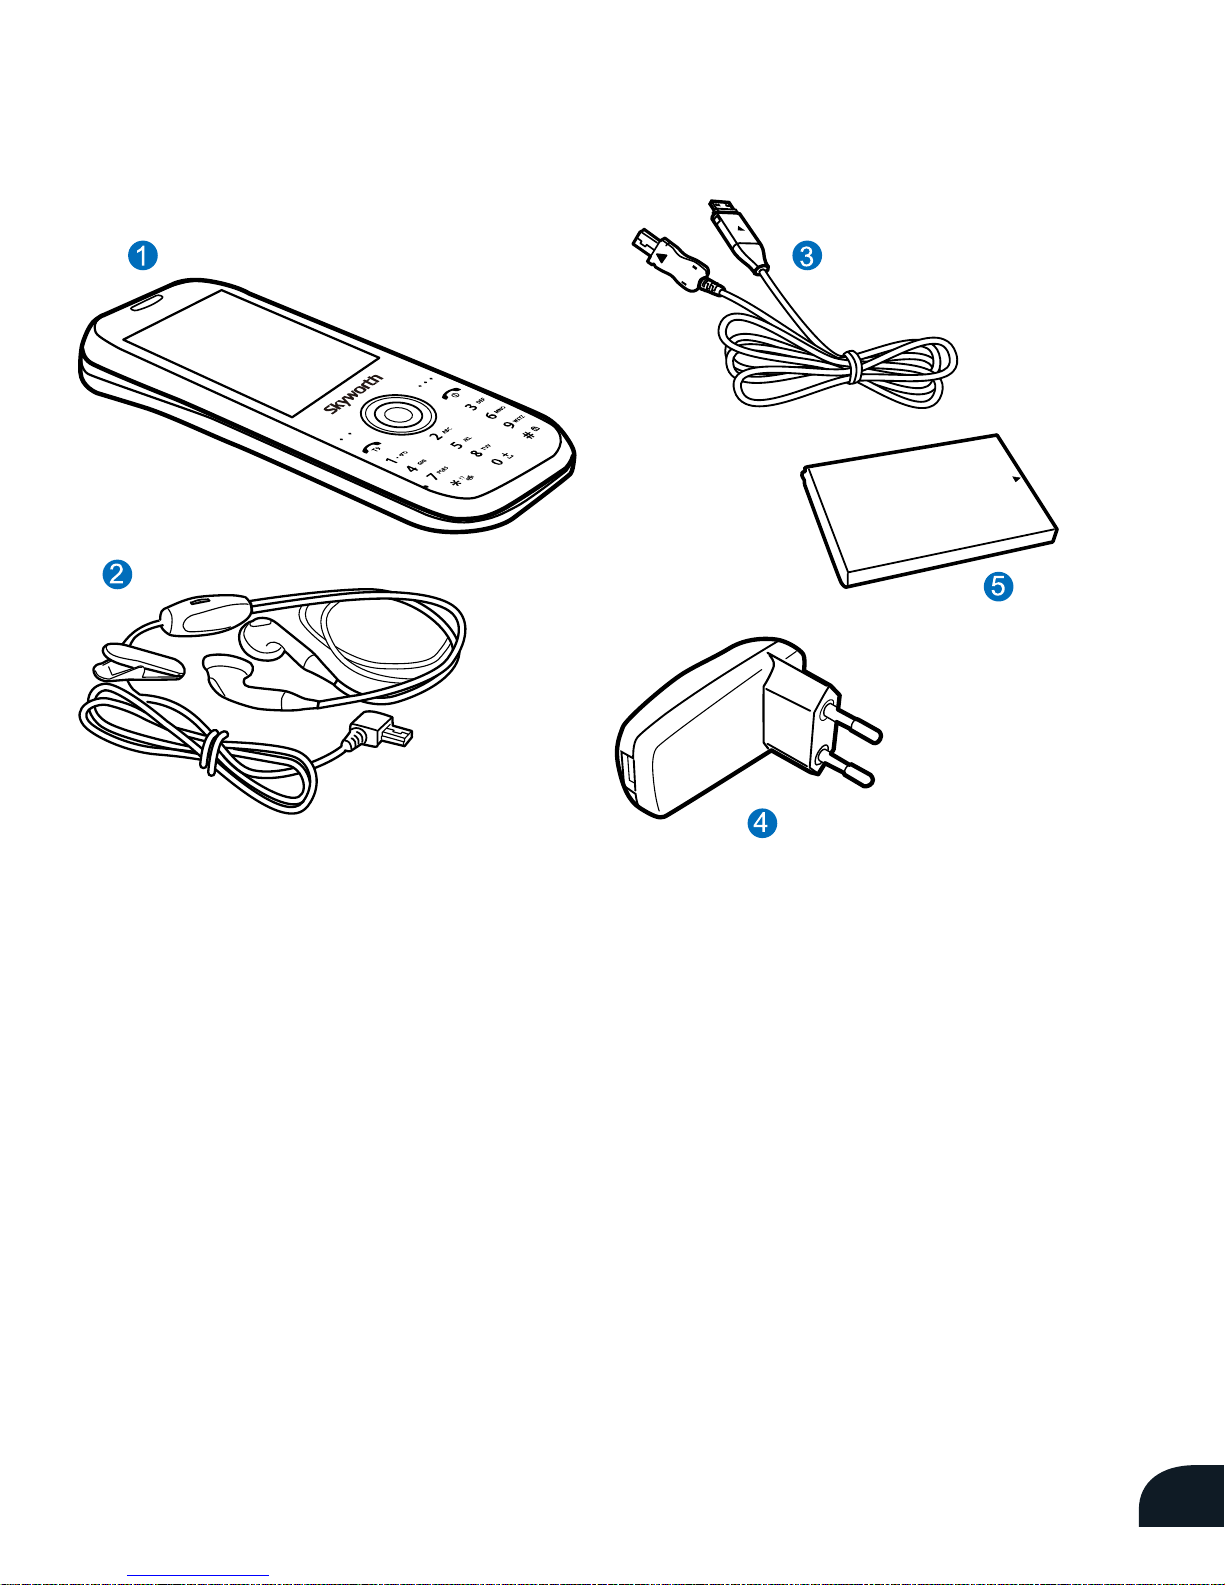
3.1 What’s in the Box
The items included may vary
depending on your service
provider or region.
1. Mobile Device
2. USB Ear-mic
3. USB Cable
4. Travel Adapter
5. Battery
NOTES: Accessory contents may dier by countries
Dual-SIM mode
Your N100 Convertible allows you
to install and use two SIM cards at
the same time. You can change SIM
preferences to choose one-card or
dual-card mode. If you are installing
only one SIM card, insert it in the
slot labeled SIM1.
Page 12
10
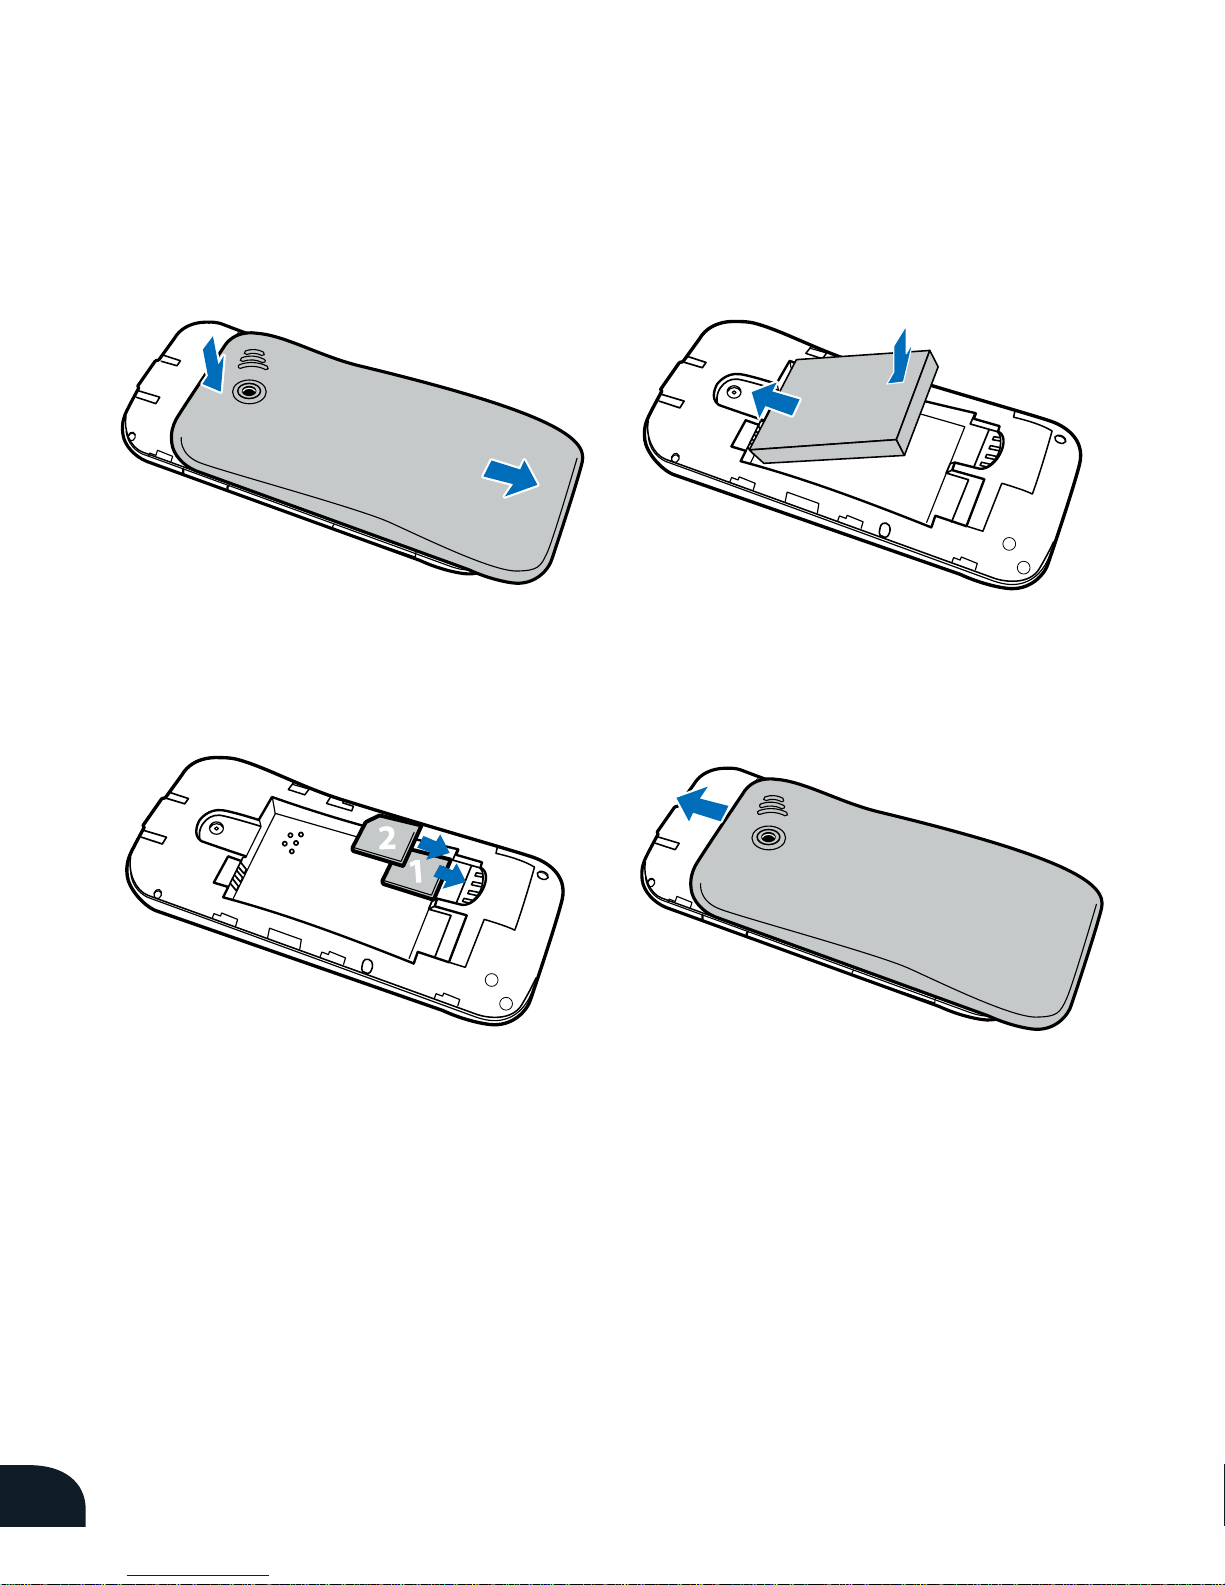
3.2 Assemble Your Phone
1. Remove the back cover.
2. Insert the SIM card(s).
3. Insert the battery.
4. Replace the back cover.
Page 13
11
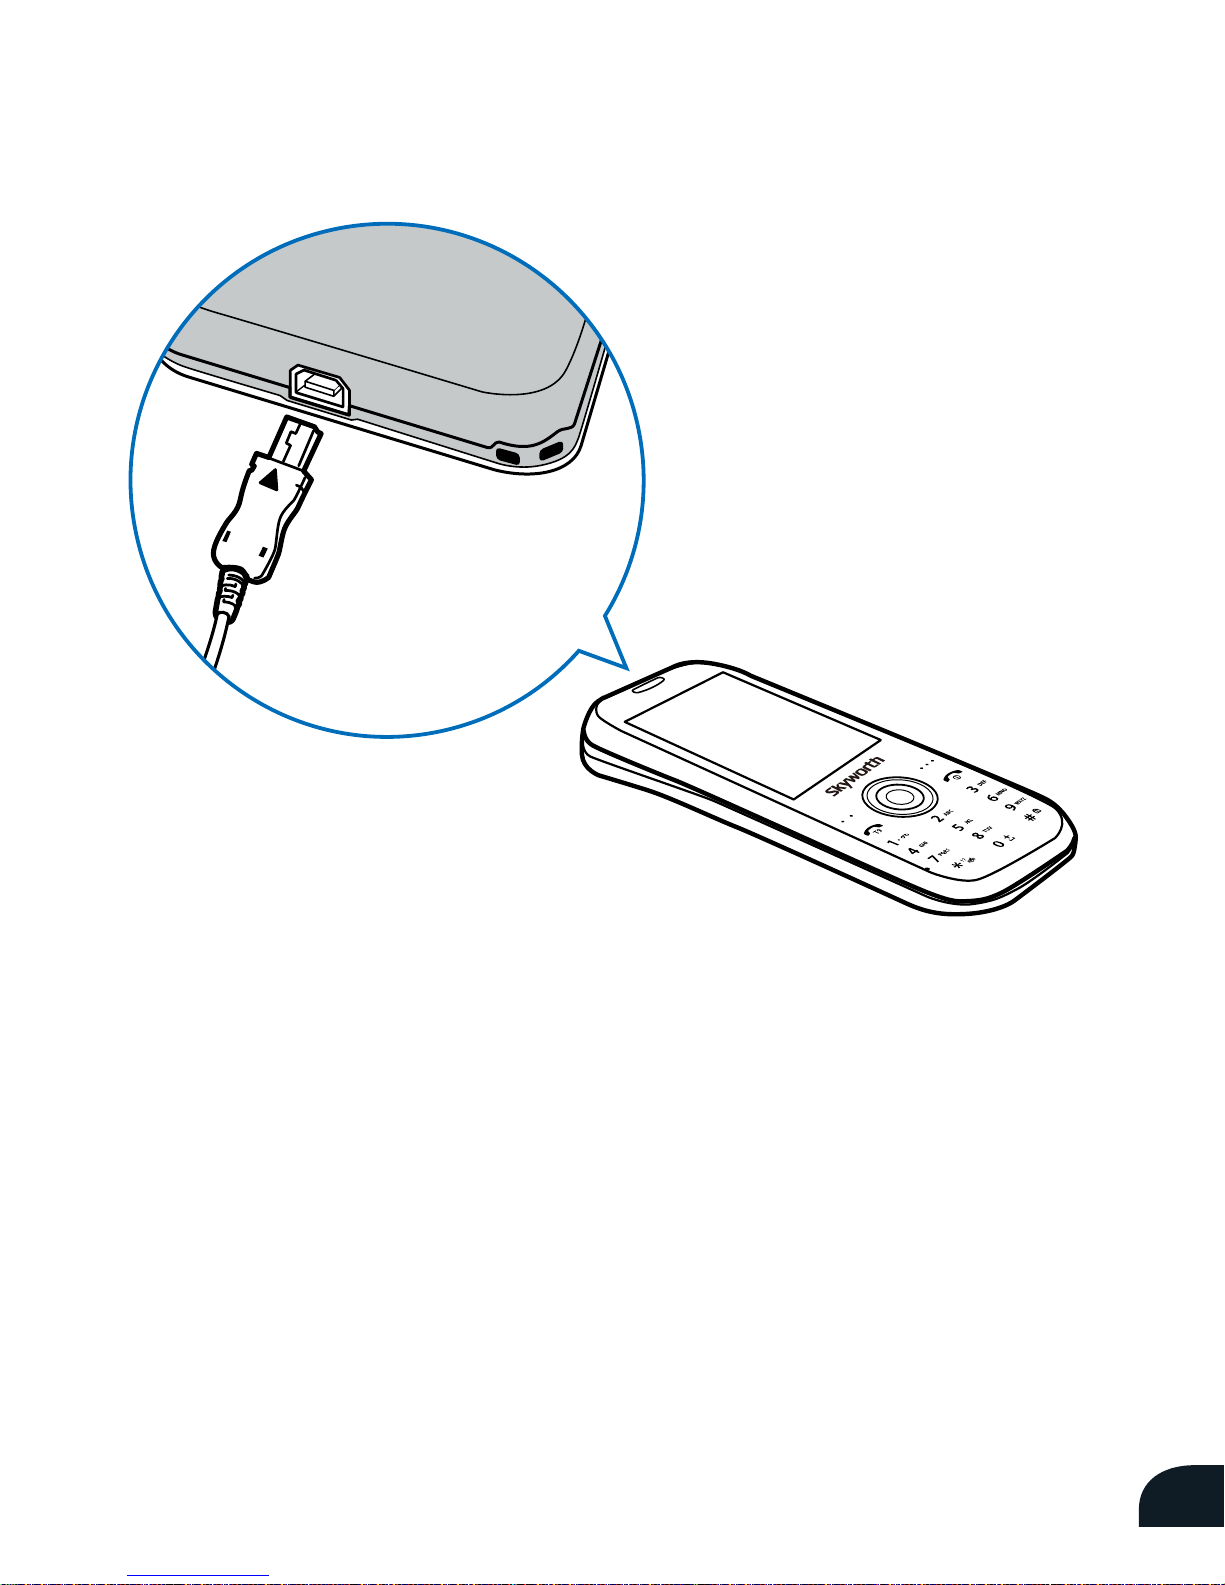
3.3 Charge the Battery
To charge the battery for the first time, use the power adapter. It will
take about three hours.
Your mobile phone can also be charged using the USB cable provided.
Charging via the USB cable is not as eective as charging from a power
outlet.
Page 14

Phone Basics
4.1 Parts of the Phone
4.2 Switching the Phone On / Off
4.3 If You Have Two SIM Cards
4.4 Shake To Switch SIM
4.5 Basic Use
04
Page 15
13
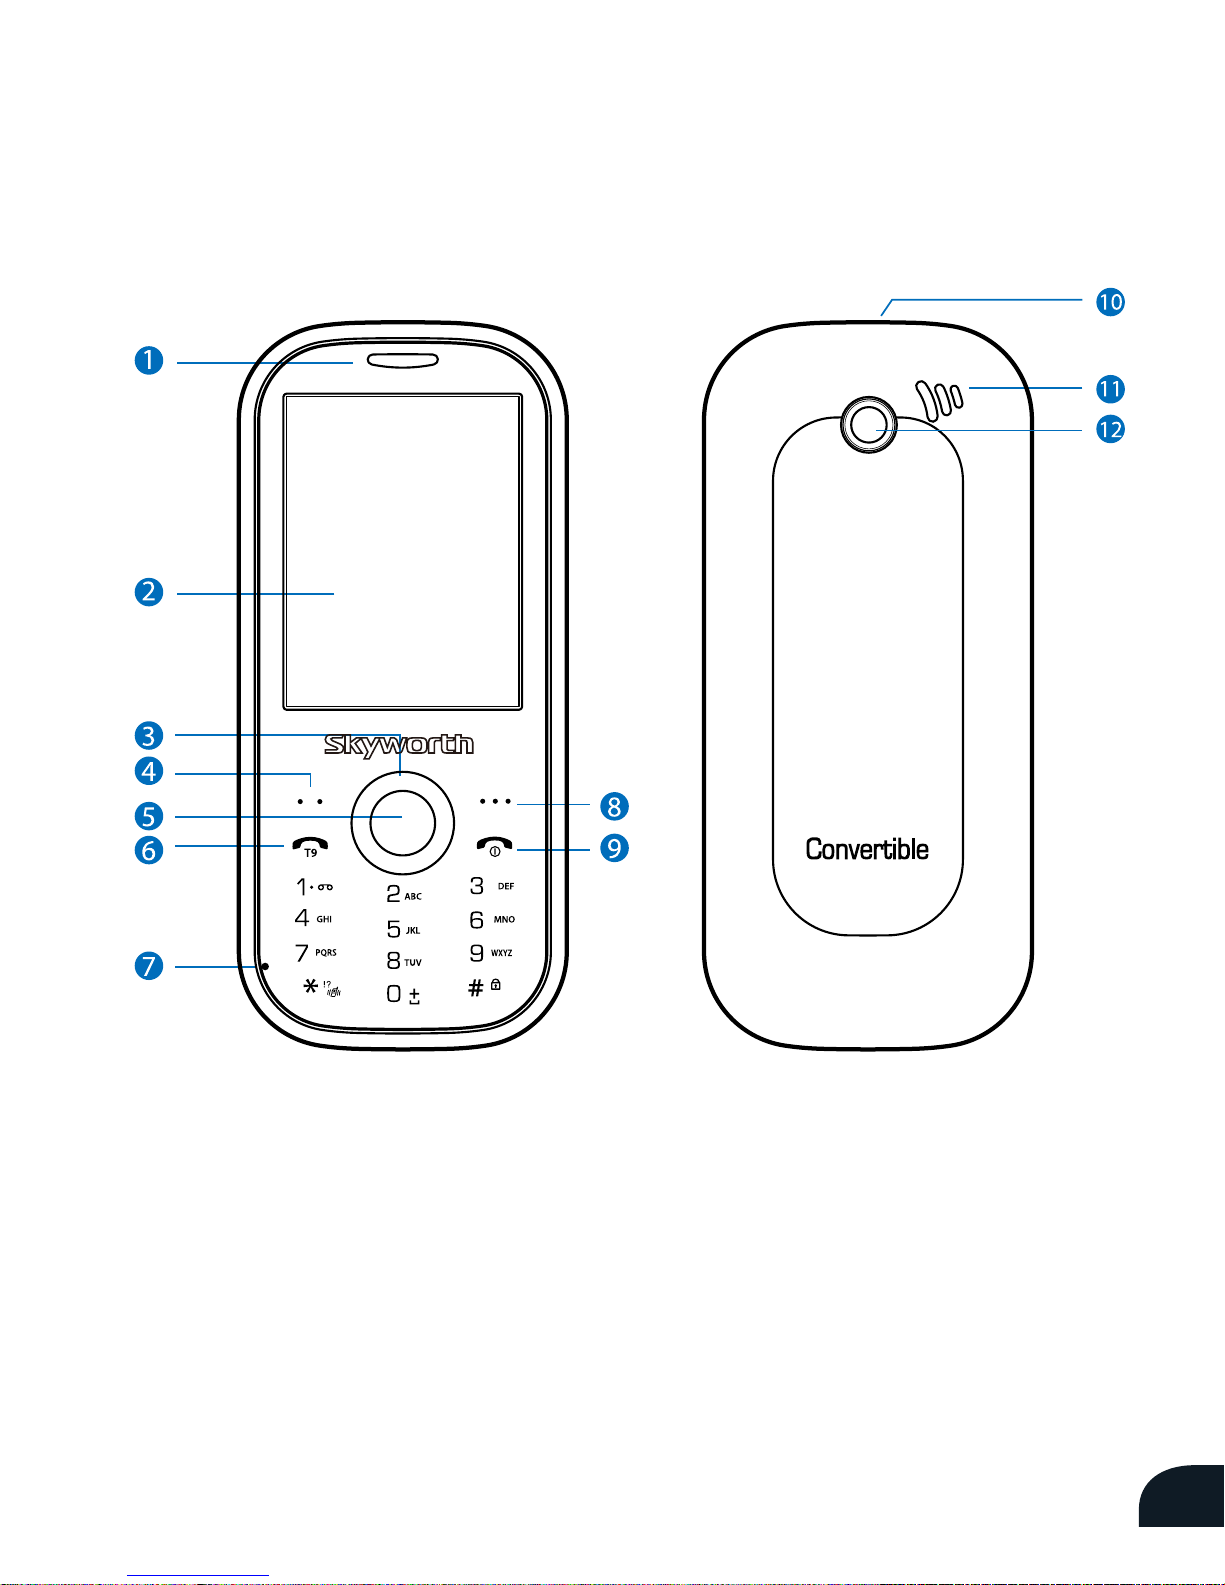
4.1 Parts of the Phone
1. Earpiece
2. Display
3. Navigation Key (4-way)
4. Left Selection Key
5. Mainmenu / Ok Key
6. Send Key
7. Mouthpiece
8. Right Selection Key
9. Power / End Key
10. Multifunction Connector
11. Speaker
12. Camera Lens
Page 16

14
4.2 Switch The Phone On/O
1. To switch the phone on, press and hold the Power key.
2. If a PIN code is needed, enter it and tap OK. Be careful not to enter the
PIN incorrectly three times in a row as it will block your SIM card. To switch
o the phone, press and hold the
Power key again.
4.3 If You Have Two SIM Cards
When two SIM cards are installed, both will be powered on and active. SIM1
is the default line for all outgoing calls and messages.
To change these defaults, see “Dual SIM Cards” on page 30.
4.4 Shake To Switch SIM
This model N100 Convertible comes
with Default SIM Selection (DSS) feature,
which allows you to switch between
two phone lines for making calls and
sending SMS text messages. The SIM 1
line is selected by default for which you
can configure phone settings, such as
ringtone, wallpaper and user profile. In
order to switch the default SIM line from
SIM 1 to SIM 2 or vice versa, you may
simply shake the phone, then the default
SIM line will be switched over to the
other SIM line after a short vibration and
a pop-up message informing the change
of default SIM line.
Page 17

15
4.5 Basic Use
Make a call
Enter the number and press the
(Send key). During a call,
press the Center selection key
to use the speaker phone and
adjust the volume control.
Answer a call
Press the (Answer key).
End a call
Press the (End key).
Send a text message
Press the Navigate key [Left]
to compose a text message.
Change ringtones and
alerts
Select Menu > User
Profiles
to customize and activate any
of the user profiles. You can set
the ringtone, volume, alert type,
and other options
(see page 32).
Switch to silent mode
To quickly switch to Silent mode,
press and hold the
star (*) key.
Press and hold the star (*) key
again to return to the default
profile.
Lock/unlock the keypad
To lock the keypad and prevent
any accidental operation, press
and hold the hash (#) key
To unlock the keypad, press the
unlock key. You can also set the
keypad to lock automatically after
a specified interval if there is no
activity.
Select
(Settings) > Security
>Auto keypad lock.
Page 18

05
Navigate the Phone
Menu
5.1 Standby Mode
5.2 Menu
5.3 My Shortcuts
5.4 What the Status Icons Mean
Page 19

17
5.1 Standby Mode
5.2 Menu
Status icons
Desktop
Selection Menu
Press the Menu to display the menu icons
Call log
Messages
Contacts
Web
Apps
Multimedia
Organizer
User profiles
File manager
Display
SIM manager
Settings
Page 20

18
5.3 My Shortcuts
Keypad Shortcuts
Navigation key
Navigate [Left] Write
Navigate [Right] Calendar
Navigate [Up] Media player
Navigate [Down] Camera
Center selection key
Press the Center selection key to access
the Menu.
End key
Keylock / Screen O Function
Send key
Press the Send key to access the Call log.
Page 21

19
5.4 What the status icons mean
Icon Definition Icon Definition
2 SIM card 1 activated only
2 SIM card 2 activated only
2 Default line selected to SIM 1
2 Default line selected to SIM 2
Incoming message
Missed call
Incoming call with music
Incoming call with music and
vibration
Incoming vibration
SIM card 1 roaming
SIM card 2 roaming
Keypad unlocked
Keypad locked
Battery power level
Bluetooth activated
GPRS activated
EDGE activated
Alarm activated
Page 22

06
Make / Receive Calls
6.1
Make Calls
6.2
Go Hands-Free
6.3
Receive Calls
6.4
Customize Call Settings
6.5 View Call Log
Page 23

21
6.1 Make Calls
Select the SIM card for a call
To select a dierent SIM card for a call, select Options > Call.
During a call
To increase or decrease the volume, press the Navigation key or Volum
control button up or down respectively.
Options during a call include:
• Hold single call, end the single call, or record the current call.
• Call another number
• Browse the phonebook.
• Send a message.
Make a call
Make an
International call
Redial a number
Speed dial a
number
Call from contacts
Enter the number and press the Send key.
Hold down the 0 key till the + symbol appears on
the screen. Then enter the country code and phone
number.
Hold down the Send key to display the Call Log
and select the number.
Press and hold the assigned key ( 2 to 9).
Select Names to display your contacts.
Page 24

22
6.2 Go Hands-Free
6.3 Receive Calls
To answer a call using any key, select the Answer mode setting
in a user profile. See "Customize User Profiles" on page 32.
Speaker phone
Bluetooth headset
Other headset
(optional accessory)
Answer a call
Reject a call
Mute the ringtone
During a call, press the Left selection key to activate
the speaker. To return to normal call mode, press the
Left selection key again.
See “Use the Bluetooth Headset” on page 38.
Plug the headset into the multifunction connector
at the top (USB socket) of the phone. The phone will
detect it automatically.
Press the Send key.
Press the End key.
Press the Center selection key or by turning the
phone over.
Page 25

23
6.4 Customize Call Settings
Select (Settings) > Call settings to customize the following:
• SIM1 or SIM2 call settings such as caller ID display, call waiting, and call
divert (depending on your service provider).
• Auto redial - Choose whether to redial unsuccessful calls automatically.
• Call time display - Display the duration of completed calls.
• Call time reminder - Activate a reminder when a call exceeds a specified
duration.
• Auto quick end - End a call after a specified duration.
• Reject by SMS
6.5 View Call Log
Select > (Call log) to view the following:
• Recent calls made, received, and missed.
• Call duration.
• Number of messages sent and received.
• Amount of data sent and received.
You also have the option to clear the call lists and reset the counters.
Page 26

07
Messages
7.1
Enter Text
7.2
SMS
7.3
Messages Settings
7.4
MMS
7.5 View MMS
7.6 Broadcast Messages
Page 27

25
7.1 Enter Text
The N100 Convertible supports sending and receiving text (SMS),
multimedia (MMS), and email messages. For subscription to these services,
contact your service provider.
Enter text
Use the keypad to enter text.
Text input with the keypad
• Press a number key (2 to 9) repeatedly until the desired character
appears.
• Press 0 to add a space.
Predictive text input (T9)
1. Press a number key only once for each letter (for example, to enter 'cat'
press 2,2, and 8). Word choices are displayed and change as you press
each key.
2. Press the Navigation key [Up] or [Down] to scroll through the word
choices. Press the Center selection key to select the word you want.
Shortcuts
You can use the following shortcuts:
Send key Enable or disable T9 input.
Hash (#) key Switch between uppercase and lowercase input.
Start (*) key Insert special characters.
Options depend on the message type. They include:
• Paste text from a template.
• Add pictures and insert symbol.
• Format the message.
• Insert contact names or numbers from
the phonebook.
• Send the message from SIM1 or SIM2.
Page 28

26
7.2 SMS
Menu > (Messages) > SMS
Send SMS
1. Select Create message.
2. Compose your message.
3. Select Send options and
send the message.
View SMS
Messages are organized as
follows:
7.3 Message Settings
Select Message Settings to:
• Set preferred storage (phone
or SIM card)
• View the amount of memory
used.
• Define SMS profiles, if needed.
They specify the message
center number, message type
and validity period.
• Activate voicemail server.
7.4 MMS Menu >
(Messages) >MMS
Send MMS
1. Select Write message.
2. Enter the number or email
address of the recipient(s)
and a subject.
3. Compose your message.
4. Select Options to add
multimedia files. You can also
add more slides. A Preview
options lets you view the
MMS before sending.
5. When finished, select Done
to select Save and Send
options.
Inbox
Sent items
Outbox
Templates
Incoming messages
Successfully sent
messages
Draft messages
Often-used text to be
added to your message
Page 29

27
7.5 View MMS
Message are organized as follows: Select Message settings to:
• Set preferences for composing
messages and define your
signature.
• Define how the phone sends and
retrieves messages.
• Filter messages.
• Define MMS server profiles, if
needed. They specify account
details and connection type.
• View the amount of memory
used.
7.6 Broadcast Messages
Selection Menu > (Messages) > Broadcast messages
Broadcast messages are broadcast to mobile phones within a specific
service area.
They include traffic reports, weather information, and advertisements.
You can:
• Choose whether to receive info messages and filter them by language.
• Select channels to filter messages by subject.
Inbox
Outbox
Drafts
Templates
Incoming messages
Outgoing messages that
have not been sent yet
Incomplete messages
Templates you created
as well as predefined
templates.
Page 30

08
Personalize Your Phone
8.1
Dual SIM Management
8.2
Change the Language
8.3
Set the Date and Time
8.4
Customize the Display
8.5 Customize User Profiles
8.6 Set Security Features
Page 31

29
8.1 Dual SIM Management
Select Menu > (SIM manager)
Dual SIM Cards
When two SIM cards are installed, both will be powered on and active, in
which SIM1 is the default line for all outgoing calls and messages. When
you return a call or reply to a message, it will be sent from the same SIM
line that the call or message was received on. You can change the SIM
settings as described below.
Select active SIM card(s)
You can choose to have both SIM cards active, only one active, or both
powered off and inactive (flight mode).
1. Select Dual SIM Settings.
2. Select your preferred option and tap OK.
Select default SIM card
1. Select SIM Manager
2. Select the SIM Manager - set default SIM and tap OK.
The selected SIM will be the default line for all outgoing calls and
messages.
Select SIM card for a call or message
If you don't want to use the default SIM for a particular call or message,
do the following:
• When calling, Option> Call, then can select SIM1 or SIM2
• When sending a message, press Options > Send text message, and
then select SIM1 or SIM2
Page 32

30
8.2 Change the Language
Select Menu > (Settings)
You can change the phone language as well as the writing language for
composing messages.
8.3 Set the Date and Time
Select Menu > (Settings)
Select Time & Date to set your time zone, preferred date and time formats,
as well as the date and time. The N100 Convertible can synchronize the date
and time with your service provider. To do so, set Settings > Auto update of
date and time to On.
8.4 Customize the Display
Select Menu >
(Display)
Select Display to do the following:
• Wallpaper can be saved separately by SIM1 and SIM2.
• Select the wallpaper, screen saver and Power On/Off display. You can choose
from images provided by the phone or your own images.
• Choose whether to display the date and time, and your phone numbers on
the wallpaper.
• Choose the language you like.
• You can write the greeting text such as Welcome, Hello¡Ketc or any text you
like.
• Select LCD to set the brightness of the display. The phone automatically dims
the display after a specified interval (up to 60 seconds) if there is no activity.
• Choose the Clock type.
• Show owner number.
Page 33

31
8.5 Customize User
Profiles
Select Menu > (User profiles)
A user profile defines the tone
setting, volume, alert type, ring
type, extra tone, answer mode, and
other options.
1. Select User profiles to display a list
of predefined profiles.
2. Select a profile to activate or
customize it.
Note: The Headset and Bluetooth
profiles are automatically activated
when you connect a wired
headset or a Bluetooth headset
respectively.
The settings that can be customized
are:
• Tone settings - The ringtones for
incoming calls and messages, as
well as keypad tone.
• Volume - The ringing volume and
keypad tone volume.
• Alert type - Ring, vibrate, or a
combination of both.
• Incoming call alert - Play the
ringtone once, repeatedly, or with
increasing volume.
• Extra tone - Choose to play
additional alerts, for example, to
indicate a warning or error.
• Answer mode - Answer a call
using any key.
8.6 Set Security
Features
Select Menu > (Settings) >
Security settings
Select Security to set the following:
• SIM card security - Lock the SIM
card with a password to prevent
• unauthorized use, allow outgoing
calls to selected numbers only, or
prevent outgoing calls to selected
numbers.
• Lock the phone with a password
to prevent unauthorized use. To
enable
• this feature for the first time, enter
0000. Then change the password.
• You can also set the phone to
automatically lock the keypad. See
• Lock/unlock the keypad on page
16.
Page 34

09
Get Organized
9.1
Contacts
9.2
Personal Organizer
Page 35

33
9.1 Contacts
Selection Menu > (Contacts)
Contacts can be saved to the SIM card or phone memory. The phonebook
will show all the contacts from the SIM cards and phone. Only two details
can be saved to a SIM card, name and phone number. More details can be
stored in the phone memory, including multiple phone numbers, pictures,
and video.
Contact details to save
Select Menu > (Contacts) > Options
You can choose the Send message, Writing language, Speed dial, Call,
IP dial, Send contact and Edit for contact details in phonebook.
Default storage for contacts
Select Menu > (Contacts) > Options > Contacts settings
• Select Preferred storage to define the default storage location for
contacts: phone or SIM card.
• Select Memory status to see the number of contacts and available
space.
• Select Blacklist to set blacklisted contacts list (up to max. 20 contacts).
Add a contact
1. Select Add new contact.
2. Choose where to save the new contact: phone or SIM card.
3. Enter details.
You can also save phone numbers from the call log or from messages
(select the Save option from the Options menu).
Page 36

34
Copy, move, or delete contacts
• From the Contacts menu, select Copy all to copy all contacts from the
phonebook memory to a SIM card or vice versa.
• Search for a contact and select Options to find the Copy, Move, and
Delete functions.
Create caller groups
You can organize your contacts into caller groups such as family,
friends, or business, and customize the attributes for each group.
Note: Only contacts from the phone memory can be added to caller
groups.
1. Select Caller groups.
2. Select the group to edit.
3. Choose the ringtone, picture, and video.
4. Select Member list and then OK to show the members in this group.
5. From the Member list, select Options to add and remove members.
Page 37

35
9.2 Personal Organizer
Select Menu > (Organizer)
Use the personal organizer to keep track of events and tasks.
Calendar
From the Calendar - Options menu:
Select Add event to add reminders, meetings, and other events. Each
type of event lets you enter different details.
Select View and select date to view all events for that day.
Select View all to view all upcoming events.
Tasks
From the Tasks menu, to add your task with date and time. Create to add
these different types of tasks, and set Alarm reminders for the tasks.
Alarm clock
1. Select any of the profiles to display the alarm settings.
2. Activate the profile by setting it to On.
3. Set the alarm time and other settings.
4. Select Done.
World clock
The world clock shows the current time for various cities around the
world. Press the < and > key to scroll through the cities.
Notes
You could write any notes here for your memory.
Page 38

10
Use Bluetooth
10.1
Connect the Bluetooth Headset
10.2
Other Bluetooth Functions
10.3 Bluetooth Settings
Page 39

37
Select Menu > (Settings) > Bluetooth
Select Power to enable or disable Bluetooth on your phone.
Bluetooth technology enables the N100 Convertible to connect to
compatible devices within a range of 10 meters. Although the devices
need not be in direct line of sight, the connection may be affected by other
electronic devices or obstructions such as walls.
NOTE: Make sure that the device you want to add has the Bluetooth
function activated and visible.
10.1 Connect the Bluetooth Headset
CAUTION
Listening to a headset at high volume can damage your hearing. Use
only the minimum volume setting necessary to hear the conversation
or music.
Register Bluetooth headset
The first time you use the Bluetooth headset, select Bluetooth> My
device to Search new device. Then, Register the headset to pair it with
the phone. The headset is automatically connected and ready for use.
Subsequently, you will only need to use the Register headset option if
you are having connection problems with the headset.
Connect or disconnect Bluetooth headset
Select headset > Connect or Disconnect.
Page 40

38
10.2 Other Bluetooth Functions
Connect with audio devices
Select Search audio devices to automatically search for and connect
with compatible audio devices (such as wireless headphones).
Connect with other devices
To connect with other Bluetooth devices such as a notebook computer
or another mobile phone:
1. Select My devices > Search new device to enable your phone
searches for and lists any Bluetooth devices in range.
2. Select a device and select Pair to connect.
3. You may be required to enter a pass code, depending on your
authentication setting. Successfully paired devices are listed in My
devices.
• To share data with a paired device, select Options > Connect.
• To disconnect a paired device, select Options > Delete.
10.3 Bluetooth Settings
Select settings for these Bluetooth options:
• Visibility - Choose whether to allow other Bluetooth devices to find
and pair with your phone.
• My name - Rename your phone.
• Audio path - Choose whether to send audio to the Bluetooth headset.
• Sharing permission - Specify full control or read-only when sharing
data with another device.
Page 41

11
Mutimedia on Your Phone
11.1
Install a Memory card
11.2
Take photos
11.3 Record Videos
11.4 Record Audio Clips
11.5 Play Music
11.6 Listen to FM Radio
11.7 Slide Show
Page 42

11.1 Install a Memory Card
The camera and other multimedia features on the N100 Convertible
require an external microSD memory card. SDHC is also supported.
1. Remove battery cover and battery. 2. Insert memory card with label facing
up.
3. Replace the battery cover.
Page 43

41
1. Select Camera.
2. Press the Center selection Key to take a
photo.
3. Press the Left selection key to save it.
From the Options menu, change camera
settings, size and quality, lighting, and special
effects.
Select Multimedia > Image viewer
From the Options menu, choose View, Print,
Browse style, Rename, Delete and Storage
location.
You can use a picture or animation as a
wallpaper or
screen saver, attach it to a contact in the
phonebook, or send it in an MMS.
1. Select Video recorder.
2. Press the Center selection key to start
recording. Use it to pause and resume
recording as well.
3. Press the Right selection key to stop and
save the recording.
From the Options menu, change camcorder
settings, size and quality, special effects,
storage location.
Select Options > Storage.
Select Menu >
Multimedia
11.2 Take photos
Change settings
View photos
11.3 Record Videos
Change settings
Check memory
Page 44

42
Select Video player to play video clips and
movies.
You can use a video clip as a screen saver, or
send it in an MMS.
1. Select Sound recorder.
2. To start recording, select Options > Record.
3. Select Stop to stop recording.
Select Options > Play to play an audio clip.
From the Options menu, select the recording
format (AMR, WAV or AWB) and storage
(phone memory or memory card).
Use audio clips as ringtones for incoming
calls, and send them in an MMS.
Select Media player to play music.
Select Options > Settings to change playback
preferences.
1. Connect a headset to the multi-function
connector at the top of the phone.
2. Select FM radio.
Auto search or manually input radio channels.
You can save up to 9 FM radio channels.
Select Slide show to see the photos in slide
format.
Play Videos
Options
11.4 Record Audio
Clips
Play audio clip
Change settings
Other options
11.5 Play Music
Change
preferences
11.6 Listen to FM
Radio
Add radio
channels
11.7 Slide Show
Page 45

12
More Features
12.1
Access the Web
12.2
Applications
12.3 Back-up Phone Data
12.4 Reset the Phone
Page 46

44
12.1 Access the Web
Select Menu > (Web)
The N100 Convertible is equipped with a WAP browser for surfing the web.
Availability of WAP services depends on your service provider. The WAP
browser can access websites that use WML or XHTML. The appearance of
the web pages may vary due to the limited display size.
Set up your account
1. Select (Web)> Connectivity> Data account.
2. Select an account and edit the settings: enter the home page address,
your user name, password, and other account settings (obtain the
details from your service provider).
Internet Services
1. Select (Web) > Internet Services.
2. You could select Homepage, Bookmarks, Input address, Stored
pages, Settings for your internet services control.
12.2 Applications
Select Menu > (Apps)
These applications are provided on the N100 Convertible:
• Games
• E-Book reader
• Calculato
• Java & downloadable apps
• Currency converter
Page 47

45
12.3 Back-up Phone Data
Connect the N100 Convertible to your computer to explore the folders on
your phone and back-up the data.
1. Connect the phone to your computer using the USB cable provided.
2. Select Mass Storage on your phone.
3. On your computer, double-click My Computer. You should see a new
removable disk.
4. Double-click the removable disk to browse the folders on your phone.
The PCSuite folder on the phone contains an installer file that you can
copy to your computer and run. It includes Windows drivers for the N100
Convertible and an application that lets you synchronize your phone data
with your Windows applications.
12.4 Reset the Phone
It may be necessary to reset the N100 Convertible from time to time.
1. Switch off the phone.
2. Remove the battery and reinstall it a few seconds later.
3. Switch the phone back on.
Page 48

www.skyworthwireless.com
Unit A Rm 3A01, Skyworth Bldg, Gaoxin Ave 1S, Nanshan District, Shenzhen, China. P.C:518057
N100 Convertible
Page 49

FCC Statement
1. This device complies with Part 15 of the FCC Rules. Operation is subject to the following two conditions:
(1) This device may not cause harmful interference.
(2) This device must accept any interference received, including interference that may cause undesired
operation.
2. Changes or modifications not expressly approved by the party responsible for compliance could void the
user's authority to operate the equipment.
NOTE:
This equipment has been tested and found to comply with the limits for a Class B digital device, pursuant to
Part 15 of the FCC Rules. These limits are designed to provide reasonable protection against harmful
interference in a residential installation.
This equipment generates uses and can radiate radio frequency energy and, if not installed and used in
accordance with the instructions, may cause harmful int erference to radio communications. However, there is
no guarantee that interference will not occur in a particular installation. If this equipment does cause harmful
interference to radio or television reception, which can be determined by turning the equipment of f and on, the
user is encouraged to try to correct the interference by one or more of the following measures:
Reorient or relocate the receiving antenna.
Increase the separation between the equipment and receiver.
Connect the equipment into an outlet on a circuit different from that to which the receiver is connected.
Consult the dealer or an experienced radio/TV technician for help.
SAR Information Statement
Your wireless phone is a radio transmitter and receiver. It is designed and manufactured not to exceed the
emission limits for exposure to radiofrequency (RF) energy set by the Federal Communicatio ns Commission
of the U.S. Government. These limits are part of comprehensive guideline s an d establish permitted levels of
RF energy for the general population. The guidelines are based on standards tha t were developed by
independent scientific organizations through periodic and thorough evaluation of scie ntific studies. The
standards include a substantial safety margin designed to assure the safety of all persons, regardle ss of age
and health. The exposure standard for wireless mobi le phones employs a unit of measurement known as the
Specific Absorption Rate, or SAR. The SAR limit set by the FCC is 1.6 W/kg. * Tests for SAR are conducted
with the phone transmitting at its highest certified power level in all tested frequ ency bands. Although the SAR
is determined at the highest certified power level, the actual SAR level of the phone while operating can be
well below the maximum value. This is because the phone is designed to operate at multiple power levels so
as to use only the power required to reach the network. In general, the closer you are to a wireless base
station antenna, the lower the power output. Before a phone model is available for sale to the public, it must
be tested and certified to the FCC that it does not exceed the limit established by the government adopted
requirement for safe exposure. The tests are perform ed in positions and locations (e.g., at the ear and worn
on the body) as required by the FCC for each model. The highest SAR value for this model phone when
tested for use at the ear is 0.621W/Kg and when worn on the body, as described in this user guide, is
1.043W/Kg(Body-worn measurements differ among phone models, depending upon available accessories
and FCC requirements). While there may be differences between the SAR levels of various phones and at
various positions, they all meet the government requirement for safe exposure. The FCC has granted an
Equipment Authorization for this model phone with all reported SAR levels evaluated as in compliance with
the FCC RFexposure guidelines. SAR information on this model phone is on file with the FCC and can be
found under the Display Grant section of http://www.fcc.gov/ oet/fccid after searching on
FCC ID: Z44GMGB100 Additional information on Specific Absorption Rates (SAR) can be found on the
Cellular Telecommunications Industry Asso-ciation (CTIA) web-site at http://www.wow-com.com. * In the
United States and Canada, the SAR limit for mobile phones used by the public is 1.6 watts/kg (W/kg)
averaged over one gram of tissue. The standard incorporates a sub-stantial margin of safety to give additional
protection for the public and to account for any variations in measurements.
Body-worn Operation
This device was tested for typical body-worn operations. To comply with RF exposure requirements, a
minimum separation distance of 1.5 cm must be maintained between the user’s body and the handset,
including the antenna. Third-party belt-clips, holsters, and similar accessories used by this device should not
contain any metallic components. Body-worn accessories that do not meet these requirements may not
comply with RF exposure requirements and should be avoided. Use only the supplied or an approved
antenna.
 Loading...