

Page 1

User Manual of LCD Television
LCD-42L29-FHD
Thank you for your purchased of the Skyworth LCD TV product. Please read a manual
carefully prior to use.
The design and specifications are subject to change without any further notice.
Page 2

Introduction
To ensure safety and best performance of your product, this manual introduces of using,
setting and other important information. Please read the manual carefully before using
this product.
Safety Precaution
Cleaning Unplug the AC cord from the wall outlet before
cleaning.Do not use liquid cleaners or aerosol cleaners.
Use a dry cloth for cleaning. Do not use corrosive cloth.
Do not use sharp object scratch this LCD board and shell.
Heat sources - Do not install the product near any heat
sources such as radiators; heaters, stoves and other heat generating products (including amplifiers).
Do not insert foreign objects. Placing objects into the vent holes (rear cabinet) may
cause an electric shock and electric short circuit.
Wall mount installation - Please comply with manufacturer's instructions to install the
product on the wall and ceiling installation. Use only the mounting hardware
recommended by the manufacturer.
Water and moisture - Do not use the product near water, such as bathtub, washbasin,
laundry tub, in a wet basement and swimming pool, etc.
Electrical source - Do not connect too many electrical items to the same socket
outlet, it may cause in fire or electric shock.
Servicing - Do not attempt to repair the product yourself. Removing covers can
expose you to high voltage and other dangerous conditions. Request our qualified
repairer to perform servicing
Product protection - To prevent damage due to lightning storm, please unplug
it from the wall outlet and disconnect the antenna or cable system.
Wire protection - Please protect the electrical wire and do not stomp, twist and
squeeze it. Careful to inspect the plug and electrical wire.
Earthing device - Make sure connect the earth wire to prevent possible electric shock.
If grounding methods are not possible, have a qualified electrician install a separate
circuit breaker.
To avoid still picture for a long time
Do not display a still picture for a long time; this may cause an afterimage to remain.
Suggestion:
Do not still picture exceeding half hour, this may cause an
afterimage.
Do not still picture for a long time when play the TV game or
see a movies.
Please reduce the brightness and contrast ratio before still picture.
The warranty service doses not contain the problem of afterimage.
Page 3

Contents
Connection and Basic Operations
Standard Accessories
Host Panel
Rear Connection Diagram
Installation and Connection
Remote Controller
Batteries Installation
Power ON/OFF
Standby Mode
Picture Setting
Sound Setting
Channel Setting
Time Setting
Option Setting
PC Setting
Install PC Software
Display Mode
Troubleshooting
Technical Specifications
42" Wide Screen LCD TV
Page 4

Basic Operations
Standard Accessories
P.M S.M MUTE
SLEEP ASPECT FREEZE EPG
LIST
PROG
SOURCE
FAV TV/RADIO SUBTITLE
VOL
INFO
+
+
-
Remote Controller
Batteries
User Manual
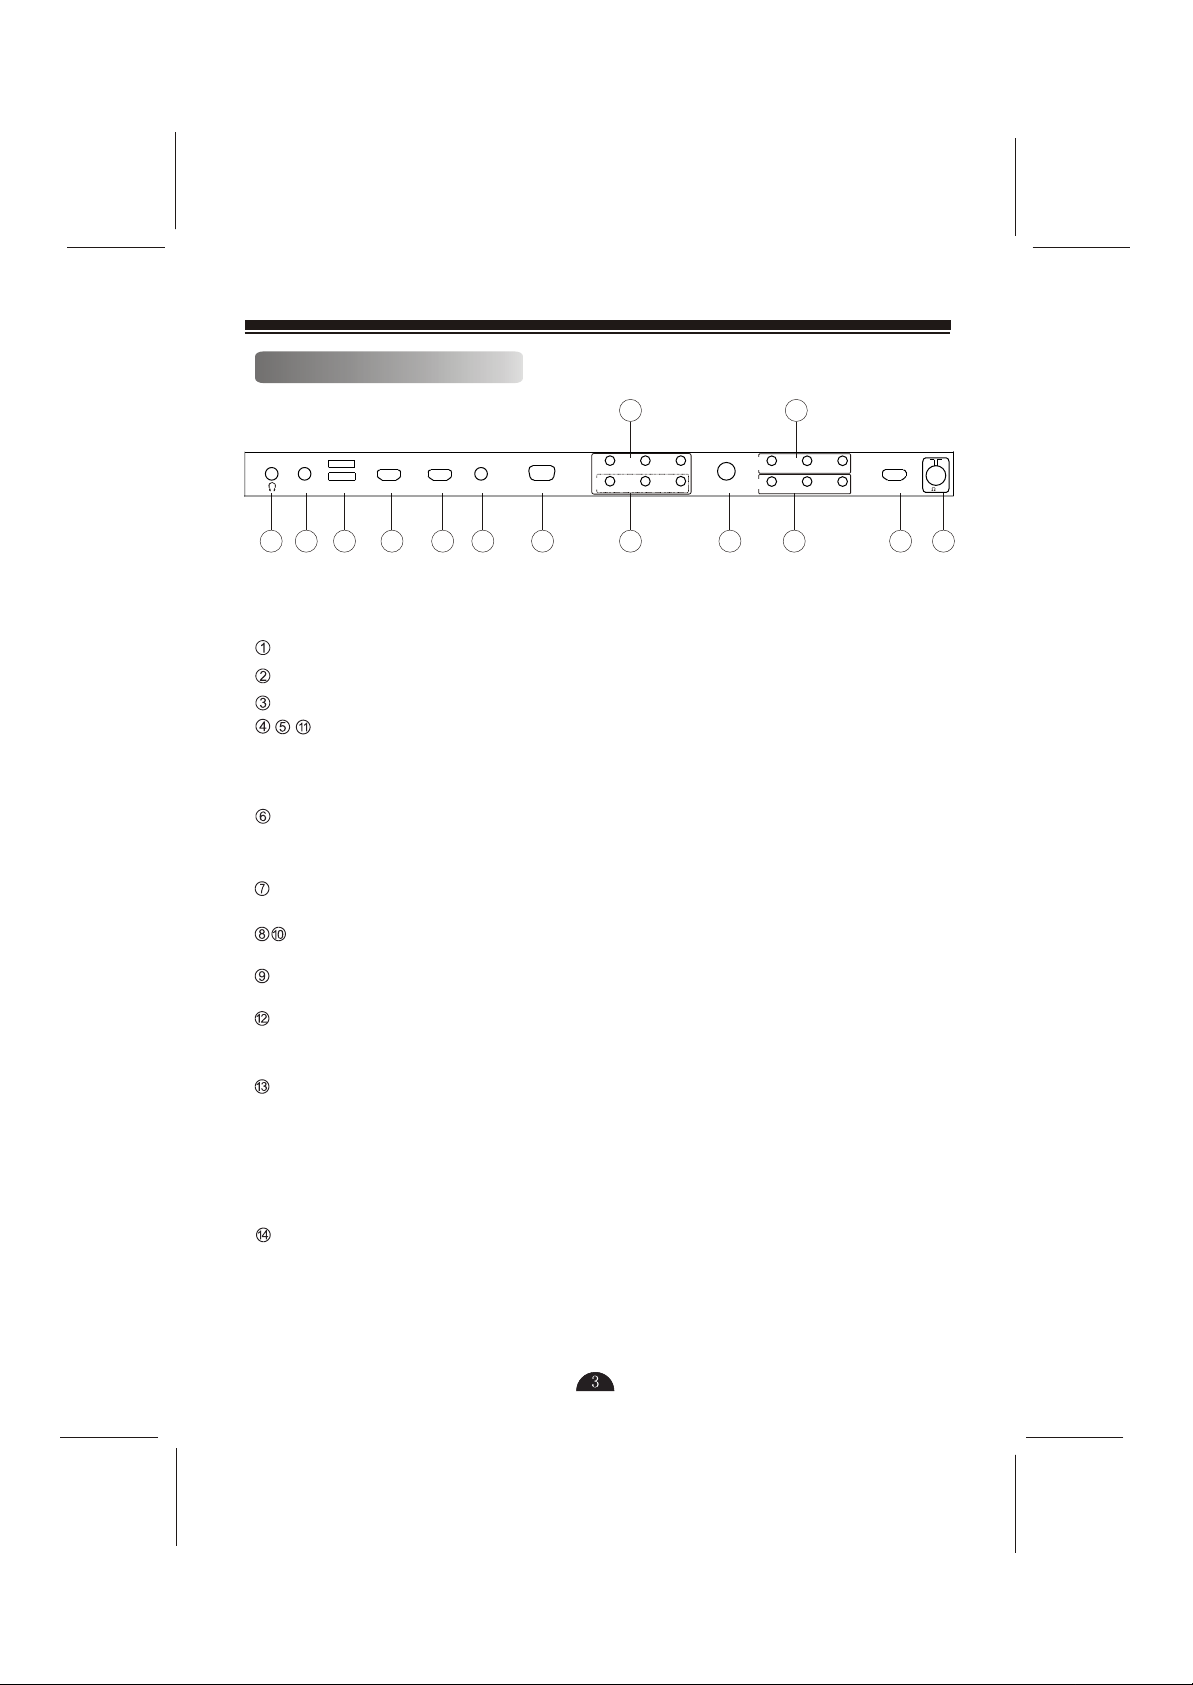
Host Panel
7
8
1. Press this key to power on TV or enter standby state.
2. Video Signal
Video input mode. DTV, TV, Component, PC, HDMI1,
HDMI2, HDMI3, Video1, Video2, S-Video.
3. Menu
Display the main menu on the screen.
4. Volume
Adjust the volume.
5. Channel
Select TV channels.
6. Power Indicator
The indicator turns red when the TV is in standby mode.
7. Remote Control Sensor
Receive signal from the remote controller.
8. Sound Speaker
6
AV Cable
5
2
4
3
2
1
-
+ VOL
+ VOL + PROG
-
MENU
MENU
TV/AV ON/OFF
TV/AV ON/OFF
Page 5
Rear Connection Diagram
S/PDIF
13
Pb
HDMI1
HDMI2
VGA AUDIO
VGA
USB
AV2
PrY
L - AUDIO - RVIDEO
S-VIDEO
14
AV OUT
L - AUDIO - RVIDEO
AV1
L - AUDIO - RVIDEO
1 2 3 4 5 6 7 8 9 10
Head Phone Output Interface
Coaxial Output Interface (S/PDIF)
USB Interface for software update
HDMI 1/HDMI 2/HDMI3
-Support to connect HDMI output devices .(STB, DVD Player, AV device and Digital TV)
-HDMI connects with HDMI, video and audio signal are transmitted by one cable.
PC Audio Input Interface (VGA AUDIO)
-Connect one end of the stereo audio cable into the plug of "personal computer
audio output (VGA AUDIO)" at the back of TV.
Connect to PC
-Connect this VGA interface to the VGA interface of personal computer.
Video Output Interface
S-Video Output Interface
- S-Video, Video1 and YPbPr use the same group audio interface.
Connect with Antenna and Cable TV Network
- To correct watch TV channels, it must receive signals with one of the bellow signal
source: outdoor antenna/cable TV broadcast/satellite broadcast.
YPBPR- Make up Equipment Connection
- Connect an end of component to an interface of the back of TV. (Y, Pb, Pr), and
another end to the corresponded output interface of component video of DVD
- Combine YPBPR of the equipment (DTV or DVD) AV connector, or marked as Y, BY, R-Y, or Y, Cb, Cr.
- Connect RCA audio to left audio "AUDIO (L)" and right audio "AUDIO (R)"
interfaces in the back of TV, and another end to the corresponded audio output
interface "AUDIO OUT" of DTV or DVD.
Video Output Interface
HDMI3
75 ANT
11
12
Page 6

Installation and Connection
Connect VHF/UHF Antenna
Power Connection
300/75-ohm adapter (except)
300-ohm power cable
UHF/VHF
antenna
Press ON/OFF key on the remote controller to power on TV or enter Standby state.
Please disconnect the power when the TV is going not to use for a long time.
Press ON/OFF key to power on TV or enter Standby state can not cut off
the power supply.
Please pull out the power plug if need to cut of the power.
Page 7

Use Video Cable to Connect AV Device
S/PDIF
Pb
HDMI1
HDMI2
VGA AUDIO
VGA
USB
AV2
PrY
L - AUDIO - RVIDEO
S-VIDEO
AV OUT
L - AUDIO - RVIDEO
AV1
L - AUDIO - RVIDEO
Game machine
HDMI3
Camera
75 ANT
AV cable
DVD player
Satellite signal receiver
TV box
Use the video cable to connect AV device to this machine
Please check the connection of all signal cables before press ON/OFF key
Press ON/OFF key on the remote controller to power on TV
Press Video Signal key on the remote controller to enter the function list
and then press key to select AV option, press OK key to confirm
Page 8

Use S-Video Cable to Connect AV Device
S/PDIF
Pb
HDMI1
HDMI2
VGA AUDIO
VGA
USB
AV2
PrY
L - AUDIO - RVIDEO
S-VIDEO
AV OUT
L - AUDIO - RVIDEO
AV1
L - AUDIO - RVIDEO
HDMI3
75 ANT
S-video cable
Camera
DVD player
Game machine
Audio cable
Satellite signal receiver
TV box
Use S-video cable to connect AV device to this machine and then use audio cable to
connect the audio output and input terminals
Please check the connection of all signal cables before press ON/OFF key
Press ON/OFF key on the remote controller to power on TV
Press Video Signal key on the remote controller to enter the function list and then
press key to select S-VIDEO option, press OK key to confirm
Page 9

Use Chromatic Cable (YPbPr) to Connect AV Device
S/PDIF
Pb
HDMI1
HDMI2
VGA AUDIO
VGA
USB
AV2
PrY
L - AUDIO - RVIDEO
Audio cable
S-VIDEO
AV OUT
L - AUDIO - RVIDEO
AV1
L - AUDIO - RVIDEO
Game machine
HDMI3
Camera
75 ANT
Charomatic cable
Satellite signal receiver
Not all AV devices may be connected to TV, please refer to the manual
for more information when connect.
Use chromatic cable to connect AV device to this machine and then use audio cable to connect
the audio output and input terminals
Please check the connection of all signal cables before press ON/OFF key
Press ON/OFF key on the remote controller to power on TV
Press Video Signal key on the remote controller to enter the function list and then
press key to select YPbPr option, press OK key to confirm
The surface of some AV devices is marked YPbPr or YCbCr. Please
refer to the manual for more information.
Page 10

Use HDMI Cable to Connect AV Device
S/PDIF
Pb
HDMI1
HDMI2
VGA AUDIO
VGA
USB
AV2
PrY
L - AUDIO - RVIDEO
S-VIDEO
AV OUT
L - AUDIO - RVIDEO
AV1
L - AUDIO - RVIDEO
HDMI cable
AV device
Use HDMI cable to connect AV device to this machine
Please check the connection of all signal cables before press ON/OFF key
Press ON/OFF key on the remote controller to power on TV
Press Video Signal key on the remote controller to enter the function list and then
press key to select HDMI option, press OK key to confirm
HDMI3
75 ANT
HDMI cable may transfer audio and video signals synchronously, it's
unnecessary to use audio cable.
Page 11

Use VGA Connector to Connect AV Device
S/PDIF
Pb
HDMI1
HDMI2
VGA AUDIO
VGA
USB
AV2
PrY
L - AUDIO - RVIDEO
S-VIDEO
AV OUT
L - AUDIO - RVIDEO
AV1
L - AUDIO - RVIDEO
HDMI3
75 ANT
Audio cable
PC input cable
Use VGA cable to connect to PC and then use audio cable to connect the audio output and
input terminals
Please check the connection of all signal cables before press ON/OFF key
Press ON/OFF key on the remote controller to power on TV
Press Video Signal key on the remote controller to enter the function list and then
press key to select PC (VGA) option, press OK key to confirm
Page 12

Remote Controller
Remote Controller
1
3
2
6
7
10
11
13
14
16
18
19
20
22
23
P.M S.M MUTE
SLEEP ASPECT FREEZE EPG
LIST
PROG
SOURCE
FAV TV/RADIO SUBTITLE
VOL
INFO
Power ON/OFF
Press this key to power on TV or enter
Standby state.
Picture Mode
Press this key to switch the picture mode.
Sound Mode
Press this key to switch the sound mode.
I/II
When watch bilingual or stereo program,
4
5
9
8
press this key to select audio language or
sound output.
Mute
Press this key to make the sound mute or
restore the sound output.
Sleep
Press this key to set up the sleep timer.
Aspect Ratio
Press this key to select the aspect ratio of
the picture.
Freeze
Press this key to freeze the picture or
12
restore the picture state.
EPG
Press this key to enter the electronic
program menu.
Digital Keys
15
Press the keys to select the channels.
Channel List
Press this key to list the channel list.
Return
17
Press this key to return to the previouslywatched channel.
Color Keys
Press the keys to operate MHEG5.
Program
21
Press this key to select TV channel.
Volume
Press this key to adjust the volume.
24
Menu
Press this key to display the current menu.
Information
Press this key to display the information of
the current program such as program
number, name and sound system.
OK
Press this key to confirm the selection.
Up/Down/Left/Right
Signal Source
Press this key to select the signal source.
Exit
Press this key to exit the menu.
Favorite
Press this key to watch the favorite
programs.
DTV/RADIO
Press this key to switch between DTV and
Radio signals.
DTV Subtitle
Press this key to select DTV subtitle.
Page 13

Battery Installation
1. Open the battery cover
2. Load two AAA batteries according to the
indications
3. Move back the cover and lock
Note: please take out the batteries if the controller is
going not to use for a long time.
Power ON/OFF
Power ON
Press Power key on the panel or remote controller to power on TV set.
Standby Mode
It may reduce the power consumption in Standby mode.
This mode is very useful when you want to leave and suspend TV set (have dinner).
1. Press Power key
Note: TV set is turned off and LED lamp turns red.
2. Further press Power key to restore
Note: it's advised not to keep TV in standby mode for too long time, if you go out
for a holiday, please pull out the power plug and antenna.
Page 14

Picture
Picture
The functions are to adjust the picture quality.
1. Press Menu key to enter OSD menu and
then press key to select Picture option.
2. Press key to select the option.
3. Press key to adjust the function.
4. Press Menu key to return to the previous menu.
1. Picture Mode: press key to select picture
mode, four options are available including:
standard, mild, user and dynamic.
2. Contrast: adjust the brightness of the bright part
but keep the deep color.
3. Brightness: adjust the brightness of the picture.
4. Color: adjust the saturation.
5. Sharpness: adjust the sharpness of some
details.
6. Tint: adjust the tint of the picture.
7. Color Temperature: select the color temperature
as you like.
User: the user may customize the color
temperature.
Medium: keep the original white
Warm: red
Cold: blue.
Note: in Customize mode, the change will be
stored automatically.
8.Aspect Ratio: press key to select, five
modes are available including 16:9, Zoom1,
Zoom2, Out and 4:3
9.Noise Reduction: press key to select, five
modes are available including OFF, Auto, High,
Standard and Low.
PICTURE
Picture Mode Standard
Contrast
Brightness
Color
Sharpness
Tint
PICTURE
Color Temperature Medium
R
G
B
Aspect Ratio
Noise Reduction Auto
Page 15

PC Menu Setting
The user may set up PC menu after select and
enter PC signal.
1. Press Menu key to enter OSD menu and then
press key to select Picture option.
2. Press key to select the Screen Setting.
3. Press key to adjust the function.
4. Press Menu key to return to the previous menu.
5. Refer to the manual if necessary.
Auto Adjust: press key on the remote controller
to adjust the horizontal position, vertical position to
make the picture get the best display.
Horizontal Position: adjust the horizontal position
of the PC screen.
Vertical Position: adjust the vertical position of the
PC screen.
Size: adjust the size of the screen.
Phase: adjust the phase of pixels to avoid
interruption when need.
Sound Setting
Sound
The user may customize different sound modes to
realize the best sound effect.
1. Press Menu key to enter OSD menu and then
press key to select Sound option.
2. Press key to select the option.
3. Press key to adjust the function.
4. Press Menu key to return to the previous menu.
PICTURE
Auto Adjust
Horizontal Pos.
Vertical Pos.
Size
Phase
SOUND
Sound Mode: press key to select, five modes
are available including user, movie, music,
standard and sport.
Balance: adjust the balance of sound
Auto volume: if this function is used, when the user
powers on TV set, it shall adjust the volume to the
level of last watch automatically. This function may
be set as ON or OFF.
Surround Sound: press this option to enter to set
ON/OFF.
SPDIF Output: press key to select, three
modes area available including PCM, AC3 and
OFF. (only for digital television in HDMI state)
Sound Mode Standard
EQ
Balance
Auto Volume Off
Surround Sound Off
SPDIF Output PCM
Page 16

Channel Setting
Digital Television
1. Press Menu key to enter OSD menu and then
press key to select Channel Setting option.
2. Press key to select the option.
3. Press key to adjust the function.
4. Press Menu key to return to the previous menu.
Auto Tuning:
Tune and memorize the local channels (subject to
the actual conditions of the place), and then
automatically distribute the channels, some of them
are not in compliance with the user's requirements;
however the user may cancel them through manual
tuning.
DTV Manual Tuning/ATV Manual Tuning:
The television shall display the frequencies of all
channels and the user may manually tune them.
Program Edit: enter the interface of program edit.
Press the red/green/yellow/blue key to make the
corresponding settings, press OK key to confirm.
Press Menu key to return to the previous menu.
Time Setting
CHANNEL
Auto Tuning
DTV Manual Tuning
ATV Manual Tuning
Programe Edit
Programe Edit
The user may set up the time in this interface. And set up
ON/OFF time according to the living habit.
1. Press Menu key to enter OSD menu and
then press key to select Time option.
2. Press key to select the option.
3. Press key to adjust the function.
4. Press Menu key to return to the previous
menu.
Sleep Timer: press key to select, the
following options are available including OFF,
10min, 20min, 30min, 60min, 90min, 120min,
180min and 240min.
Clock
Off Time
On Time
Sleep Timer
TIME
Off
Off
Page 17

Clock
1. Press Menu key to enter OSD menu and then
press key to select Time option.
2. Press key to select Clock option and press
OK key to enter and then press key to select
the option.
3. Press key to set up.
4. Press Menu key to return to the previous menu.
Close
Date
Month
Year
Hour
Minute
Close
1. Press Menu key to enter OSD menu and then
press key to select Time option.
2. Press key to select Close option and press
OK key to enter and then press key to select
the option.
3. Press key to set up.
4. Press Menu key to return to the previous menu.
ON Time
1. Press Menu key to enter OSD menu and then
press key to select Time option.
2. Press key to select ON Time option and
press OK key to enter and then press key to
select the option.
3. Press key to set up.
4. Press Menu key to return to the previous menu.
Repeat
Hour
Minute
Activate
Hour
Minute
Volume
Mode
Off
Close
Off
DTV
Close
Page 18

Option Setting
Option Setting
1. Press Menu key to enter OSD menu and
then press key to select option.
2. Press key to select the option.
3. Press key to adjust the function.
4. Press Menu key to return to the previous
menu.
Language: press key to select the language.
OSD Time Out: the following options are
available including OFF, 10s, 15s, 30s, 45s and
60s.
OSD Transparency: adjust the brightness of OSD
menu background: OFF, 25%, 50%, 75% and
100%.
Restore Factory Default: restore the defaulted
value of the television.
Software Update: update the software inside.
OPTION
Language English
OSD Time Out Off
OSD Transparency Off
Restore Factory Default
Software Update
Page 19

PC Setting
Install PC Software (Windows XP)
The picture below describes the typical PC display settings. The actual screen operation
may vary with different Windows systems or displays; however the basic installation is
same.
1. Click Start button to select and enter "ontrol Panel";
2. Click Display option on the control panel to pop up a
dialog window;
3. Click Setting option at the upper side of the dialog
window. Advised resolution: 1360*768
Display Mode
If the signal from the system is standard, the screen shall make adjustment
automatically. If the signal is not standard, please adjust according to the instructions.
The list of display modes is described as follow: the screen has been optimal by the
maker when leave the factory.
Resolution
Frequency
Mode
Page 20

Troubleshooting
If you have the following troubles when use this product, please use the method we tell you
to solve, if the trouble couldn't be solved through the following methods, please contact
our company or the authorized service center; do not try to dismantle the product to repair
by yourself, or accident might occur.
No sound and picture
Have picture but no sound
No image or black/white screen
Picture/sound is disturbed
Blurred/snow screen with noise
Remote controller fails to work
In PC mode, display NO SIGNAL
In PC mode, display NOT SUPPORT
Check the connection of power supply
Press Power key to power on TV
Check whether mute function is used
Check whether the volume is 0
Check the connection of all cables
Adjust the color
Check whether the broadcasting settings are correct
Check whether the television is too close to other electronic
product, move it away or change a power socket
Check the connection, direction and position of antenna
Generally it's caused by the indoor antenna
Replace new batteries
Clear the upper edge of the controller (IR receiving window)
Check whether the batteries are installed correctly
Check whether the signal cable is connected to PC
Check whether the PC is powered on
Check the maximum resolution and field frequency of the
video card and then make comparison with the display mode.
Page 21

Technical Specifications
42" Wide Screen LCD TV
1. Display
Visual Area
Pixels
Brightness
Visual Angle
Service Time of the Screen
Color
2. Power Supply
Input Voltage
Power Consumption
Standby Power
3. Connection
ATV
DTV
S-VIDEO
AV IN
YPbPr
PC
HDMI
AV OUT
USB
4. Compatibility
Color System
PC
Scanning
5. Audio Output (RMS)
6. Display Mode
7. Size
8. Net Weight
9. Working Temperature
10. Working Humidity
11. Storage Temperature
12. Storage Humidity
983 576
1920 1080
Hours
1004X684X270
19.8
For software update
(With Stand)
Page 22

Note: do NOT dispose the used electronic product together with the household
refuses, it should be disposed at the designated place, please consult the
environment protection bureau or local dealer for details. (Refer to the Disposal
Ordinance of the Used Electronic Products)
 Loading...