

Page 1

Bluetooth Transmitter & Receiver I2
User Manual
Contents:
1. Product Overview-------------------------------------------------------------- 2
2. Basic Operation --------------------------------------------------------------- 3
3. How to use as a Bluetooth Transmitter (TX)---------------------------------- 4
4. How to use as a Bluetooth Receiver (RX)------------------------------------ 7
5. Charging------------------------------------------------------------------------10
6. LED Indicator ------------------------------------------------------------------11
7. Product Specification-----------------------------------------------------------12
8. Attention and Q & A------------------------------------------------------------13
Page 2
1.Product Overview
Working Status Indicator / Audio Mode Indicator / Connected Device Indicator / CODEC Indicator /
Pair Button / [Multi Function Button(MFB)/Charge Indicator] / Working Status Switch / Audio Mode
Switch / 3.5mm Audio Port / SPDIF Input / SPDIF Input / Micro USB Charge Port
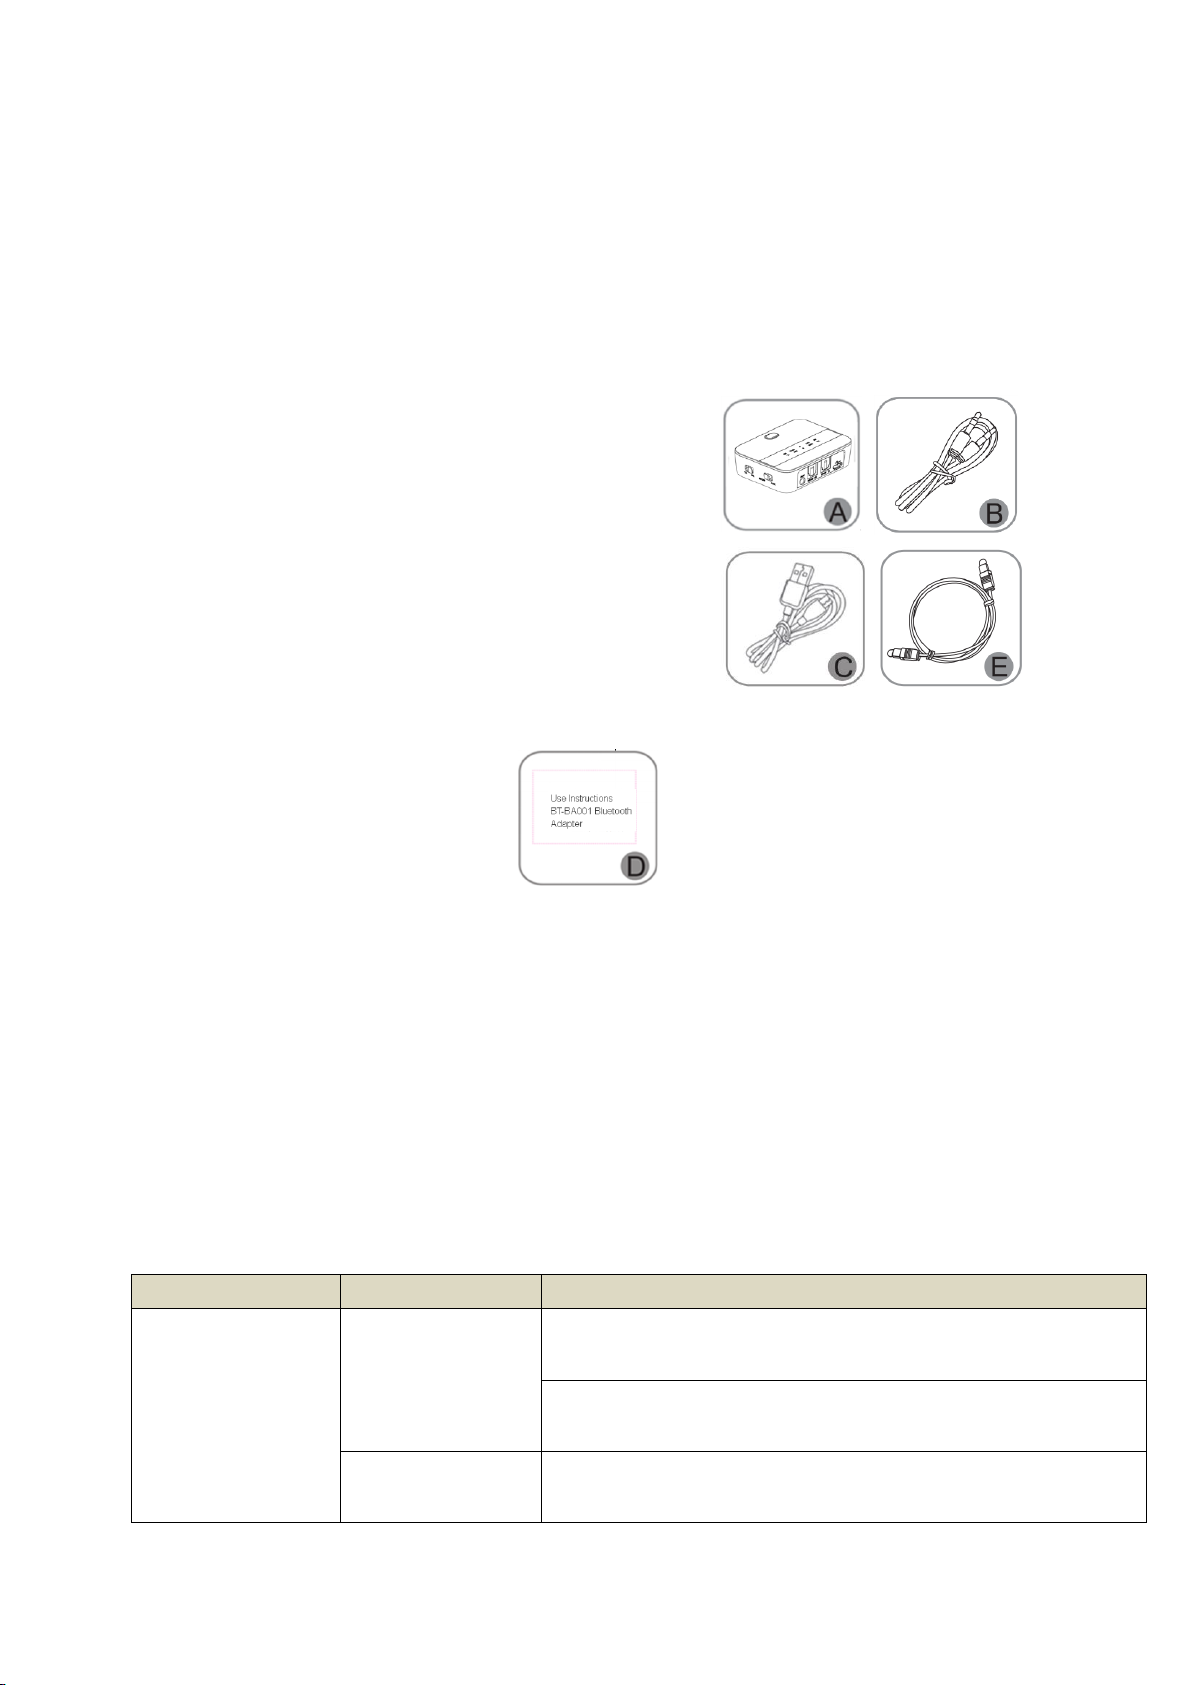
Package Contents:
A. Bluetooth Transmitter & Receiver *1
B. 3.5mm Audio Cable *1
C. Micro USB Charging Cable *1
D. User Manual *1
E. Fiber Optic Cable *1
2.Basic Operation
Button
Function
Operation
MFB (Multi
Function Button)
Power on
Long press for 3 seconds (TX)
Long press for 2 seconds (RX)
Power off
Long press for 2 seconds (TX/RX)
Page 3

Play/Pause
Short press to play or pause music during playing (RX)
*Not work in TX status.
Delete pairing
record
Under power on/off, long press for 7 seconds, the pairing
record would be deleted include RX’s (TX)
*Not work in RX status.
Pair button
Enter paring
mode
Under power on, short press to enter paring mode (Not
work in Multi Point Connection) (TX/RX)
(RX: RX LED fast flash; TX: TX LED fast flash)
aptX™ HD on / off
Under power on, long press for 7 seconds to turn on/off
*It will power on automatically
Working Status
Switch
Switch working status between RX receiver and TX transmitter
*When switching the TX/RX on the power on status, wait for the current status
indicator and mode indicator to light up then switch to another status
Audio Mode
Switch
Short press to switch between AUX and Optical
3. How to use as a Bluetooth Transmitter (TX)
3.1 Bluetooth pairing and connection
A.Under power off status, switch to TX side and long press MFB for 3 seconds to power
on (Or power on then switch to TX side).
B.Short press pair button to enter pairing mode with TX LED fast flash if doesn’t enter
when power on.
Page 4
C.Set your device (bluetooth headphone, speaker or receiver) to power on and pairing
mode, with Red & Blue LED flash alternately or Blue LED fast flash.
D.Place I2 and your device close and wait for 5-30 seconds. TX, “A”and CODEC LED
will turn on after connected.
E.Connect I2 and your phone with 3.5 mm audio cable, and could play music from your
phone to the headphone or speaker.
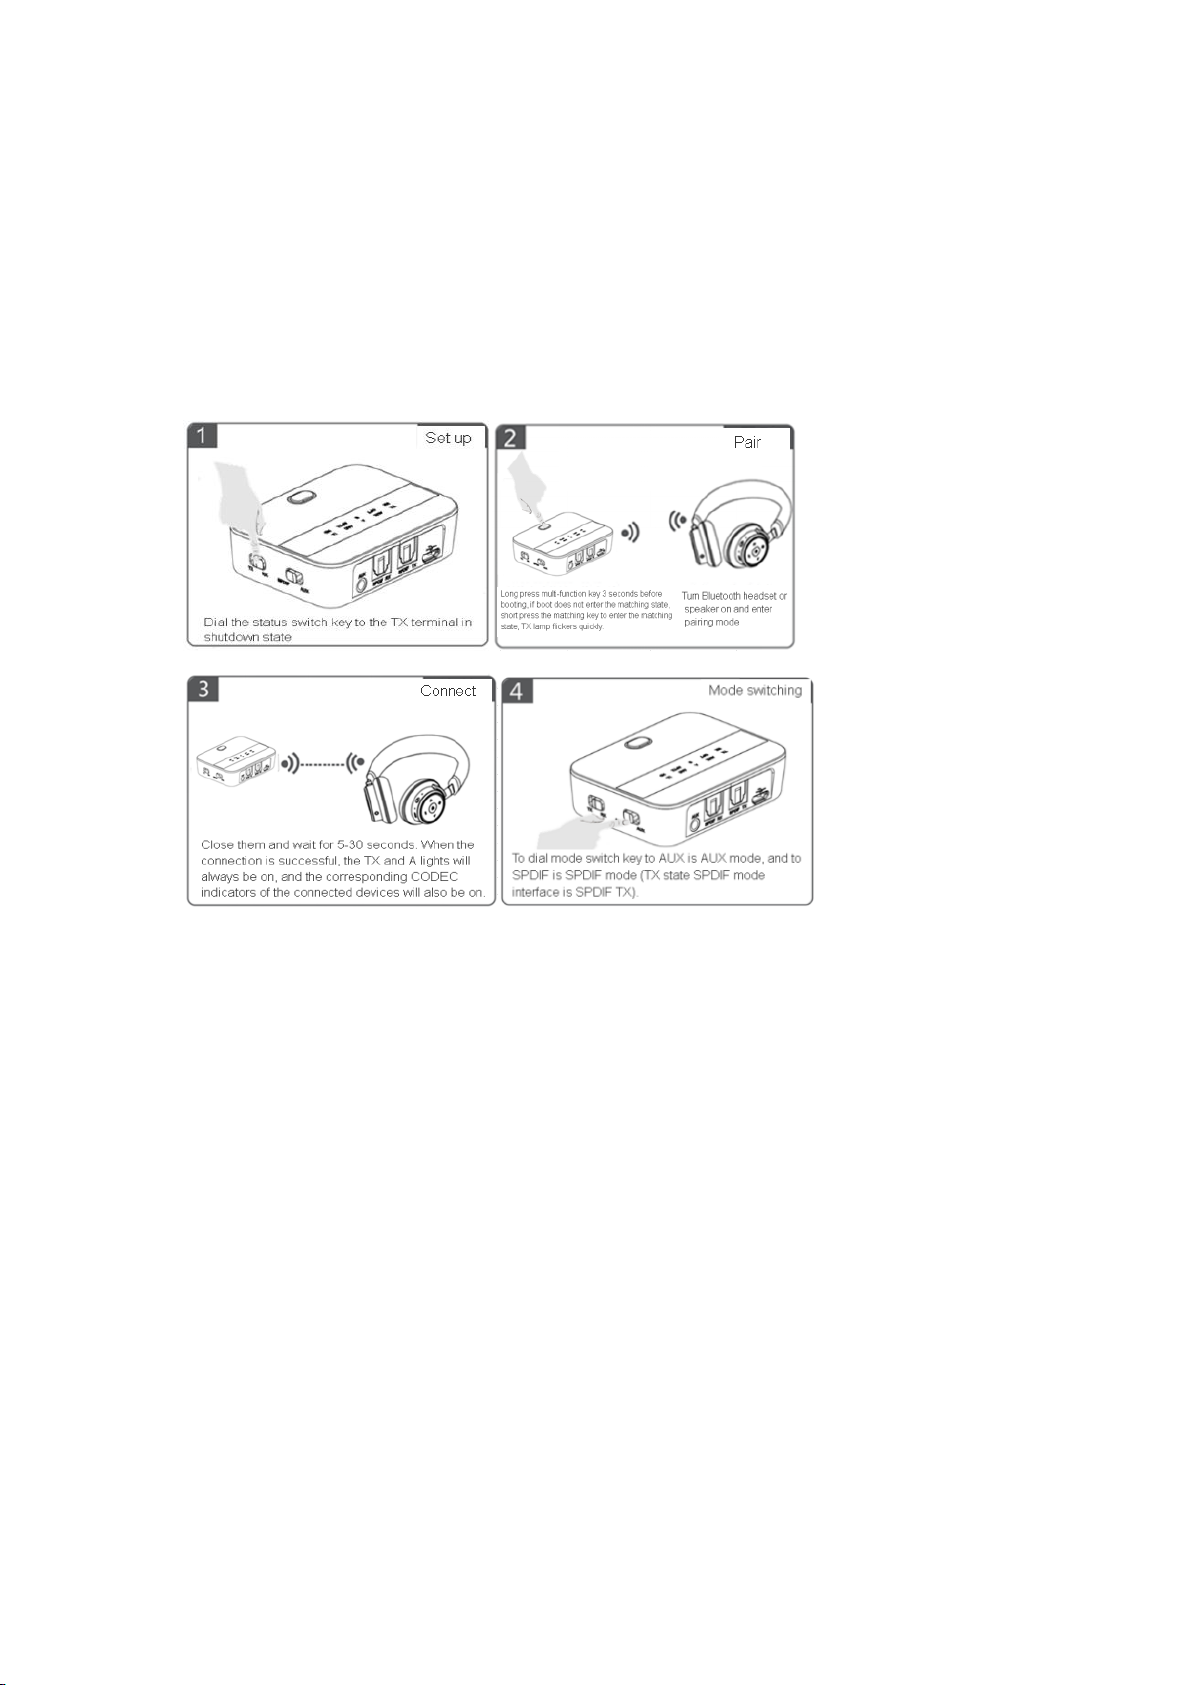
1 Setting Under power off, switch working status to TX side.
2 Pairing Long press MFB for 3 seconds to power on, short press pair button to enter pairing mode with
TX LED fast flash if doesn’t enter when power on. Power on the bluetooth headphone or speaker and
enter pairing mode.
3 Connection place I2 and your device close and wait for 5-30 seconds. TX, “A”and CODEC LED will turn
on after connected.
4 Audio mode switch Switch audio mode to AUX side means AUX mode, SPDIF side means SPDIF mode
(TX status is SPDIF TX)
3.2 Multi Point Connection
A. Follow 3.1 to connect with the first device, short press pair button to enter pairing
mode with TX LED fast flash.
B. Power on the second device (bluetooth headphone, speaker or receiver) and enter
pairing mode. Place them close and wait 5-30 seconds, I2 will connect two device
with “A”and “B”LED turn on.
Page 5

Note:
*Pls turn off I2 and turn on again, and try to reconnect or repair with two devices, when it could not
connected with two devices at the first time.
*Multi point connection could compatible with most of the chipset solution at the market, except
less of them.
*Single connection priority support aptX™ HD (connected device also support aptX™ HD). Two
connections priority support aptX™ HD (connected devices also support aptX™ HD). Two
connections priority support aptX™ low latency (connected devices also support aptX™ low latency).
Two connections priority support aptX™ (connected devices also support aptX™). Two connections
turn to SBC automatically if the CODEC are different.
3.3 TV Connection
Connect I2 and the TV with 3.5mm audio cable or fiber optic cable, and Bluetooth
connect I2 with devices ( Bluetooth headphone or speaker ), and could transmit the
audio from TV to the devices .
Page 6

Notes:
1. Pls test the TV with wired headphone or check the TV's audio settings (Select 3.5mm output ) to
make sure the devices connect in the right way and play audio from the TV.
2. Pls connect the TV and SPDIF TX port with fiber optic cable when select the Toslink connection
mode.
4. How to use as a Bluetooth Receiver (RX)
4.1 Bluetooth pairing and connection
A. Under power off mode, switch to RX side and long press MFB for 3 seconds to power
on (Or power on then switch RX side).
B. Short press pair button to enter pairing mode with RX LED fast flash if doesn’t enter
when power on.
C. Place I2 and your phone (pc, tablet) close, turn on the bluetooth function of the
phone and connect “Boltune I2”.
D. TX and “A” LED turn on after connected, the speaker can be played music from phone
(PC or tablet) with 3.5mm audio cable or fiber optic cable.
Page 7

1 Setting Under power off, switch working status to RX side.
2 Pairing Long press MFB for 2 seconds to power on, short press pair button to enter pairing mode with
RX LED fast flash if doesn’t enter when power on. Power on the bluetooth headphone or speaker and
enter pairing mode.
3 Connection Turn on the bluetooth function of the phone, search and connect “Boltune I2”. RX and “A”
will turn on after connected.
4 Audio mode switch Switch audio mode to AUX side means AUX mode, SPDIF side means SPDIF mode
(RX status is SPDIF RX)
4.2 Multi Point Connection
A. Connect the first phone (pc, tablet).
B. Short press pair button to enter pairing mode with RX LED fast flash.
C. Turn on the bluetooth function of the second phone, search and connect “Boltune
I2”. Multi point connection is working with RX, “A” and “B” LED turn on.
Note
Page 8

*Only could play music from one phone when with two connections. Need to stop the
first one’s music then to play the other one’s music.
*Priority support aptX™ HD for one connection(the connected device also support aptX
™ HD), support CODEC according to the phone which playing music for two connections.
4.3 Speaker Connection
Connect I2 and Speaker with 3.5 mm audio cable or fiber optic cable, and bluetooth
connect with phone (PC, laptop), play music from your phone to speaker.
Notes:
1.Pls test the speaker with 3.5 mm audio cable (connect phone) to see if workable, if could not play
when connect with I2.
2. Pls insert to SPDIF RX port for Toslink connection.
5. Charging
Pls charging I2 when low battery with Red LED flash. LED turn off when full charged
(about 2 hours ).
Connection for charge
Page 9

Connect I2 and power supply (charger , car charger , computer USB etc ) with Micro
USB cable.
Charging with Micro USB Charging with PC
Notes:
1. Pls charge the I2 at least once every 2 months if without use.
2. Pls press “MFB” and connect with power supply to reset the item, when it dead during use.
6. LED Indicator
Status
LED Indicator
Power on/off
TX LED flash twice (TX status)
RX LED flash twice (RX status)
Pairing
TX LED fast flash (TX status)
RX LED fast flash (RX status)
Disconnected
standby
Blue LED flash once every second (TX status)
Blue LED flash twice every 3 seconds (RX status)
Connected standby
Solid blue LED (RX status)
Connected working
TX LED on when SBC mode, APTX LED on when aptx™ mode, LL LED
on when aptx™low latency mode, HD LED on when aptx™ HD mode
Page 10

(TX status)
RX LED on when SBC or AAC mode, APTX LED on when aptx™ mode,
LL LED on when aptx™low latency mode, HD LED on when aptx™ HD
mode, AAC LED on when AAC mode (RX status)
AUX
AUX LED on (TX/RX status)
SPDIF
OPT LED on (TX/RX status)
aptx™ HD on
TX flash once (TX status)
RX flash once (RX status)
aptx™ HD off
TX flash twice (TX status)
RX flash twice (RX status)
Connected with once
device
Solid A LED (TX/RX status)
Multi Point
Connection
Solid A and B LED (TX/RX status)
Delete pairing record
TX and low voltage LED flash twice (TX status)
low voltage
Red LED flash
Charging
Solid Red LED
Full charged
Red LED off
7. Product Specification
Bluetooth version
V5.0
Frequency range
2.402-2.480GHz
Bluetooth chipset
CSR 8675
Operation range
Class Ⅱ, 10 meters
Bluetooth profile
A2DP, AVRCP
CODEC
RX: aptX™ HD, aptX™ low latency, aptX™, SBC, AAC
Page 11

TX: aptX™ HD, aptX™ low latency,, aptX™, SBC
Battery capacity
3.7V, 620mAh lithium polymer battery
Charging time
About 2 hours
Standby time
RX status: about 60 hours
Working time
AUX
RX
About 20 hours
TX
About 23 hours
SPDIF
RX
About 19 hours
TX
About 25 hours
Operating temperature
-10-55℃
Net weight
About 42g
Dimension
69.6*51.9*19.6mm
Notes:
1. Working time will be different depend on different working environment and CODEC.
2. Standby time will be same as working time on TX mode, as it will be working once connected.
3. CODEC depend on the connected devices and follow the turns as mention.
8. Attention and Q & A
Q.Power off automatically?
A: Without connect with any devices for more than 10 minutes the item will power off
automatically in RX mode, except in TX mode.
Q.How to reconnect?
A: I2 will reconnect with paired devices when power on. If not , pls follow the 3.1 or
4.1 to pair & connect again.
Q . Password for connect?
A: Pls enter “0000” (four zero), “8888” (four eight), ”1111” (four one), or “1234”
(one, two, three, four) for some devices which need password to connect .
Q. Could not power on or dead when connect?
Page 12

A: Press MFB and connect with power supply to reset the item, and repower for use.
Q. Charging power supply?
A: Charging power supply: 5V, ≥500 mA. (Charger, car charger , computer USB etc).
NOTE: This equipment has been tested and found to comply with the limits for a Class B digital
device, pursuant to part 15 of the FCC Rules. These limits are designed to provide reasonable
protection against harmful interference in a residential installation. This equipment generates
uses and can radiate radio frequency energy and, if not installed and used in accordance with the
instructions, may cause harmful interference to radio communications. However, there is no
guarantee that interference will not occur in a particular installation. If this equipment does cause
harmful interference to radio or television reception, which can be determined by turning the
equipment off and on, the user is encouraged to try to correct the interference by one or more of
the following measures:
- Reorient or relocate the receiving antenna.
- Increase the separation between the equipment and receiver.
-Connect the equipment into an outlet on a circuit different from that to which the receiver is
connected.
-Consult the dealer or an experienced radio/TV technician for help
Changes or modifications not expressly approved by the party responsible for compliance could
void the user's authority to operate the equipment.
This device complies with Part 15 of the FCC Rules. Operation is subject to the following two
conditions:
(1) this device may not cause harmful interference, and
(2) this device must accept any interference received, including interference that may cause
undesired operation.
 Loading...