

Page 1
INSTRUCTION MANUAL
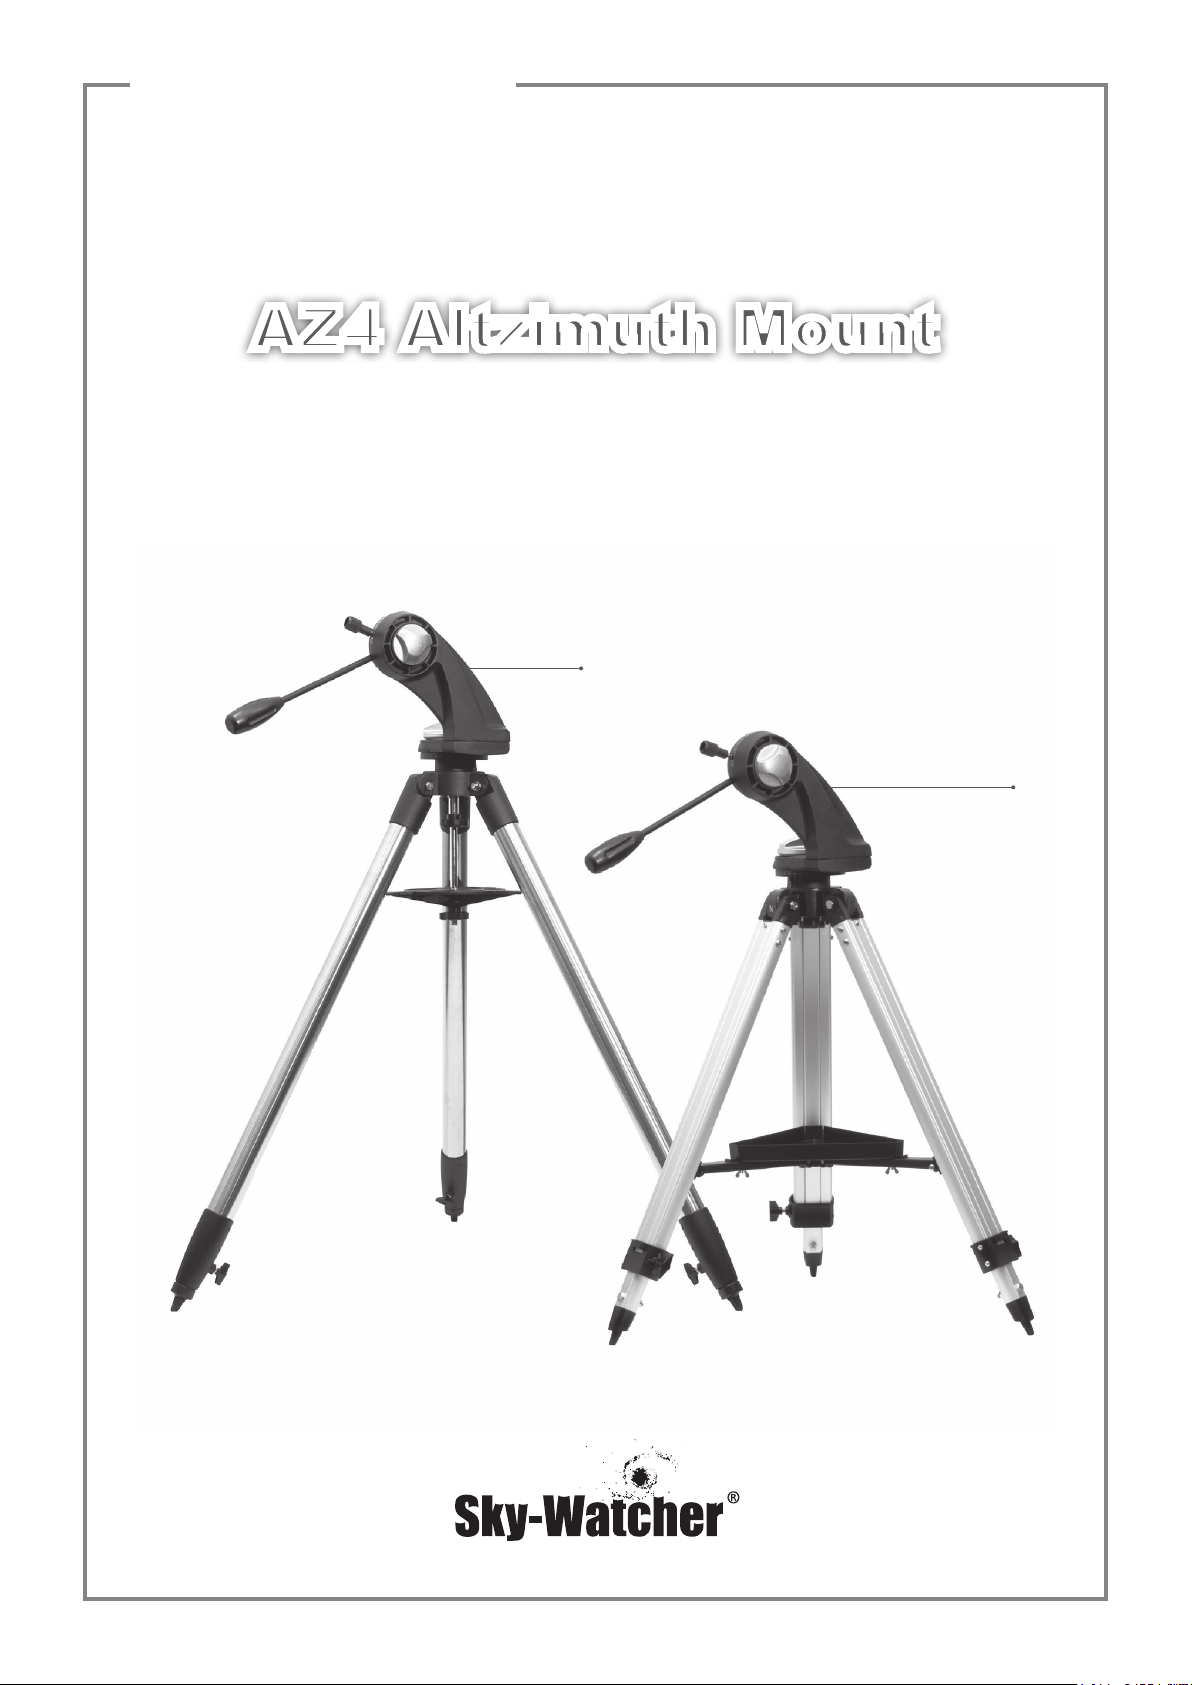
AZ4 Altzimuth Mount
Steel
Aluminum
100412V1
Page 2
AZ4
Altzimuth Mount
Steel
2
Page 3
AZ4
Altzimuth Mount
Aluminum
3
Page 4

Thank you for choosing our Sky-
Watcher product as part of your
sky watching adventure. The AZ4
Alt-azimuth Mount is an excellent
observing platform for small telescopes, binoculars, spotting scopes
and even cameras. Its simple design allows for easy set up and
usage. Teon bearing surfaces
for both axes of motion ensure
buttery-smooth movements allowing telescopes to be manipulated
with effortless precision. With such
a user-friendly design, you will enjoy spending quality time observing
and exploring the wondrous day and
night skies with the AZ4 mount.
The following instructions will assist you in
how to set-up, properly use, and care for your
mount. Please make sure to read them over
carefully before getting started.
1. Assembly
Please open all the boxes in the shipping container carefully. Make sure to check that all the
parts listed in the Parts List are present. In the
case that you need to return the mount, you
must use the original packaging, so be sure to
save the boxes and packaging material.
The mount is mostly pre-assembled at the factory, which makes the initial assembly of the
mount an easy task. Simply install the head
onto the tripod and attach the accessory tray.
Before beginning, you should unpack all of the
parts and place them out in your workspace.
The bolts should all be tightened rmly to
avoid exing and wobbling, but do not overtighten the bolts or the threads may strip. As
you assemble, please refer to Figure 1.
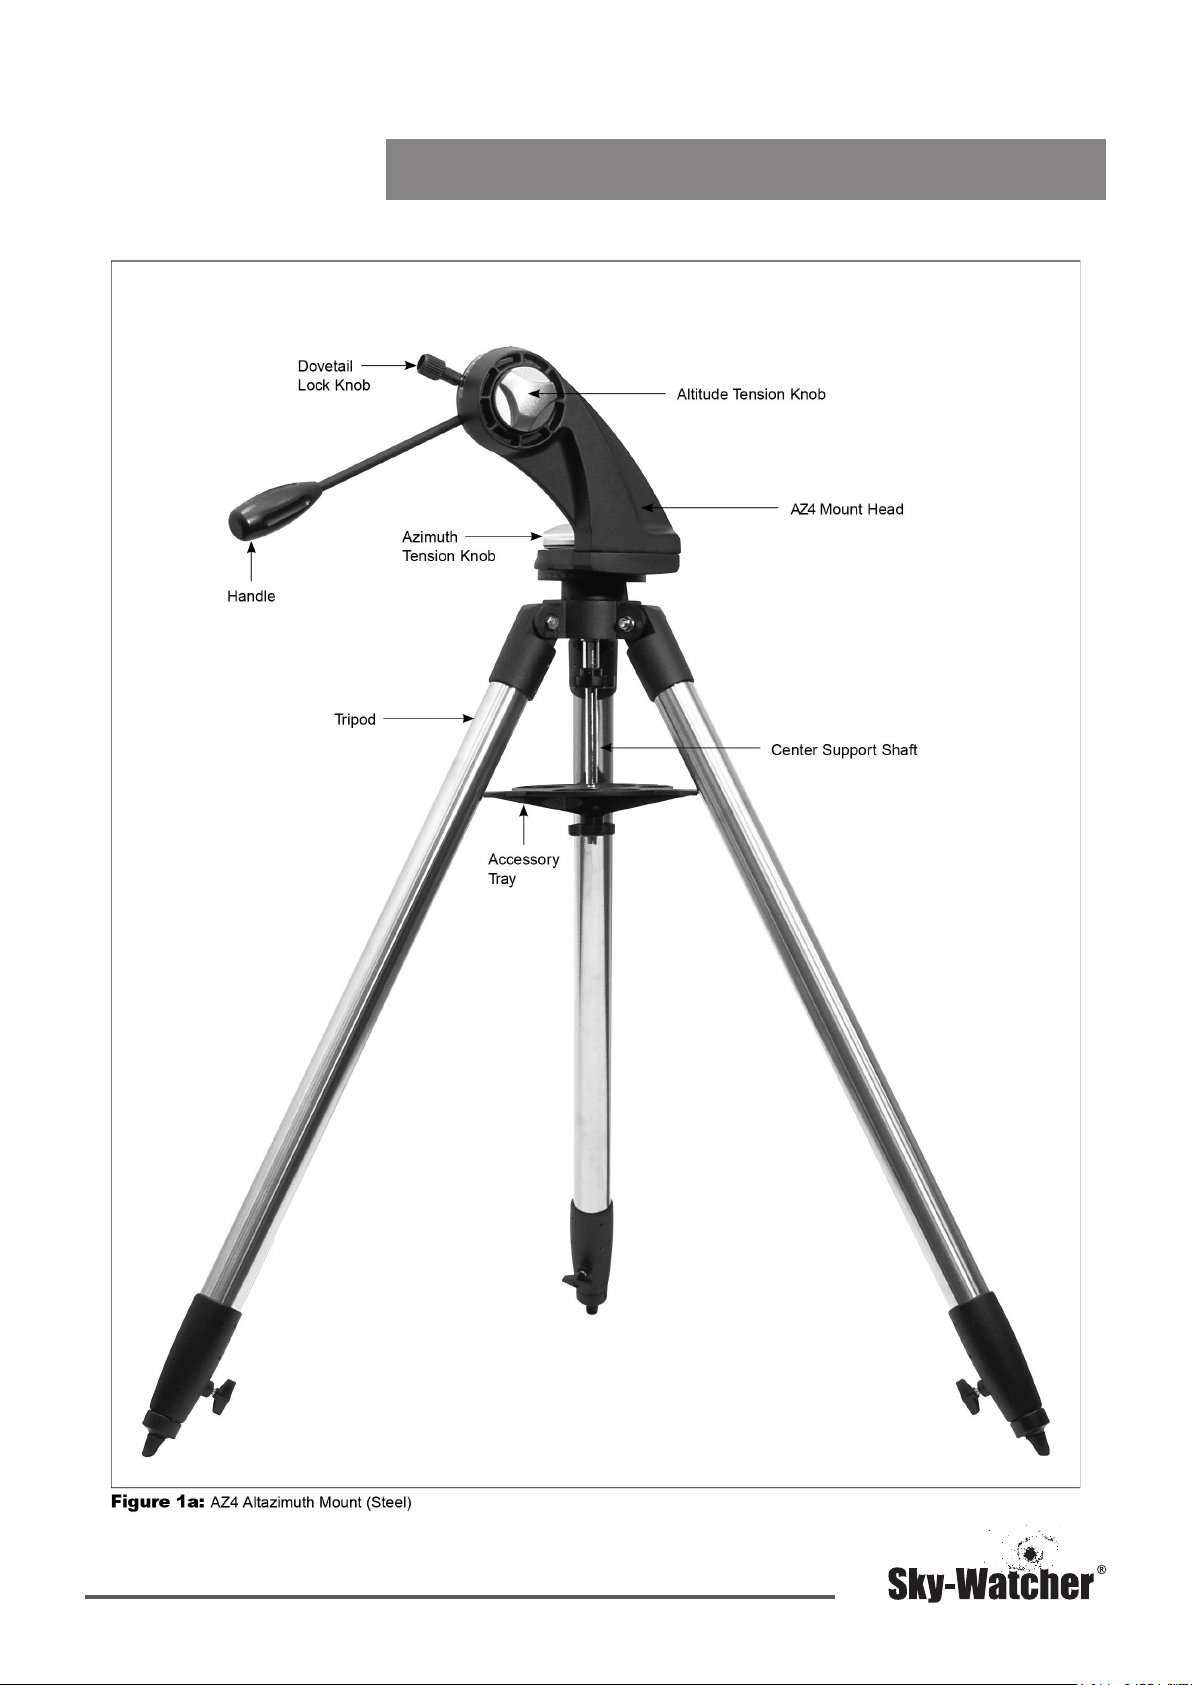
A. AZ4 Mount (Steel)
1. Place the tripod upright and extend the legs
out as far as they can go. For now, keep the
tripod legs at their fully retracted (shortest)
length. After the mount is fully assembled,
you can extend the legs to whatever length
is suitable for you.
2. The center support shaft is already installed
in the tripod, so only the head and
accessory tray needs to be secured.
3. Position the base of the AZ4 head onto the
base of the tripod. Adjust the AZ4 head so
that the post on the base (referencing north)
of the tripod lines up with the notch on the
AZ4 head.
4. Thread the center support shaft into the AZ4
head until tight. Hold the mount head with
one hand while you tighten the lock bolt
with the other. Use caution not to cross
thread when assembling. This process will
secure the AZ4 head to the base of the
tripod.
5. Take away the knob and washer from the
bottom of the center support shaft. Slide the
tripod support tray up from the bottom of the
center support shaft until the three tray arms
are touching the legs of the tripod. The at
side of the accessory tray should be facing
up. Place the knob washer on the center
support shaft against the tray, and follow it
by threading the securing knob all the way
up the center support shaft until it is tight
against the tray. The tripod support tray
provides added stability for the tripod, and
can support up to ve 1.25" eyepieces and
two 2" eyepieces.
6. Thread the handle into the threaded
receptacle of the AZ4 head. The handle will
thread in at a slight angle so as to position
it at a more comfortable angle for use in the
eld. To have the handle in a different
position, simply remove the Phillips-head
screw and thread the handle on the other
side of the lock knob that secures the tele
scope. The Phillips-head screw can then be
used to cover the extra hole.
4
Page 5
Your AZ4 mount is now fully assembled and it
should look like Figure 1a. Please move ahead
to section 3 to read about connecting your
telescope to the mount.
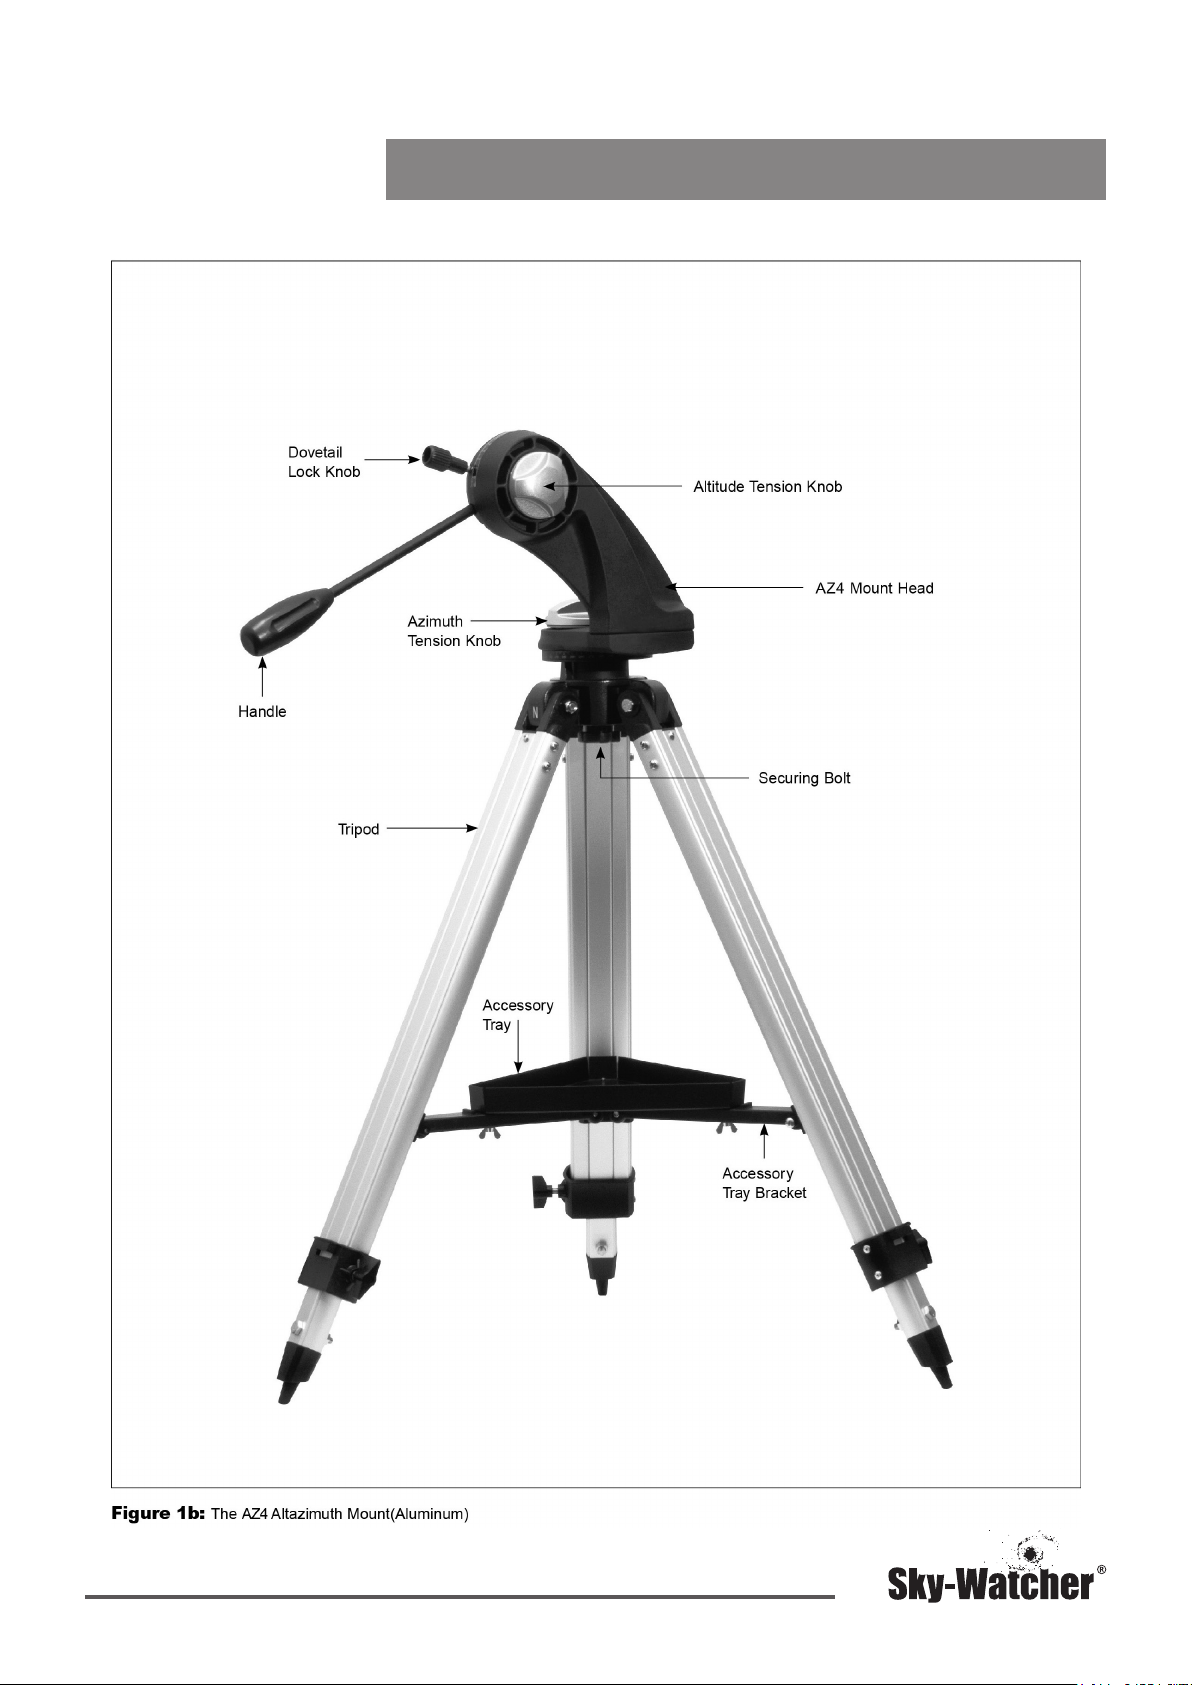
B. AZ4 (Aluminum)
1. Stand the tripod upright and spread the legs
out as far as they can go. For now, keep the
tripod legs at their fully retracted (shortest)
length. After the mount is fully assembled,
you can extend them to a more desirable
length.
2. Attach the accessory tray to the accessory
tray bracket using the three wing screws
already installed in the tray. Remove the
wing screws from the tray and place the tray
on top of the accessory tray bracket
oriented with the at surface against the
accessory tray bracket. Thread the wing
screws from underneath the assembly by
rst placing the wing screw up through the
hole in the bracket and threading into the
tray itself. Do not completely tighten the
wing screws until all three are in place, as
you may need to make minor adjustments
to the tray position in order to align all three
holes.
Your AZ4 mount is now fully assembled, and
should resemble Figure 1b. You can now connect your telescope to the mount.
2. Connecting a Telescope
The AZ4 mount was designed to be compatible with telescopes of apertures 6” or less.
Telescopes exceeding that size will not be able
to point at the horizon (horizontal) or zenith
(vertical). For optimal results, the telescope
optical tube assembly should weigh no more
than around 15 lbs, less for longer optical
tubes, as it may not provide sufcient stability
otherwise.
3. Place the base of the AZ4 head into the
base of the tripod. Orient the AZ4 head so
that the post on the base (referencing north)
of the tripod lines up with the notch on the
AZ4 head. To secure the mount
head to the tripod, there is a captive bolt
located on the underside of the leg casting.
Use the black knob to insert the post into
the threading on the head and turn until
tight. Be careful not to cross thread when
assembling.
4. Thread the handle into the threaded
receptacle of the AZ4 head. The handle will
thread in at a slight angle so as to position it
at a more comfortable angle for use in the
eld. To have the handle in a different
position, you can remove the Phillips-head
screw and thread the handle on the other
side of the thumbscrew that secures the
telescope. The Phillips-head screw can be
used to cover the additional hole.
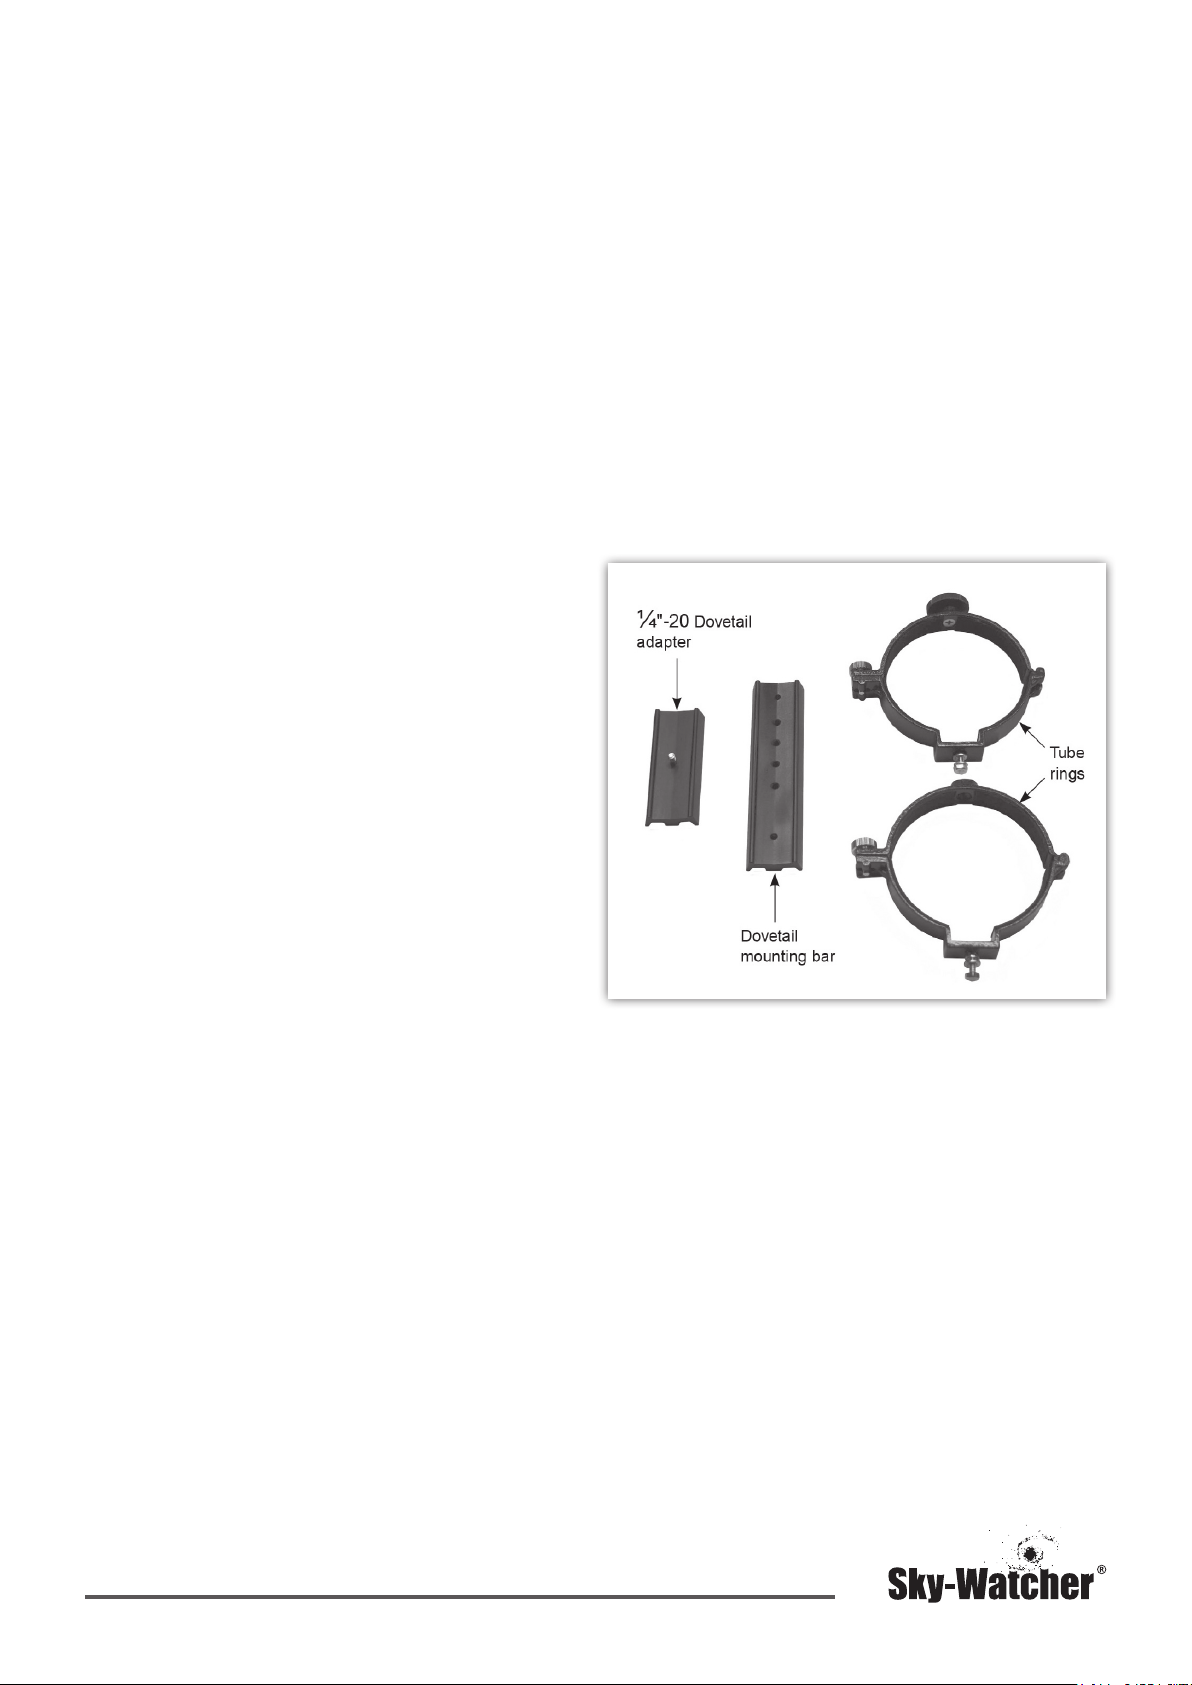
A dovetail mounting bar is required to connect your telescope. If your telescope has this
bar directly attached to the tube already, then
please move on to the next paragraph. For
telescopes that do not have a dovetail bar attached or use a ¼”-20 mounting block, you will
need a set of tube rings to attach a dovetail
bar. These accessories are available through
Sky-Watcher Telescopes. Additionally, if your
telescope has a ¼”-20 threaded mounting
hole, you can use the dovetail “L-bracket” that
has been supplied with this mount to t the
dovetail receptacle of the AZ4 and thread into
this hole.
5
Page 6

It is fairly simple to connect the telescope to
the mount once you have a dovetail mounting
bar on your telescope tube. First, unthread the
knurled black plastic thumbscrew on the AZ4’s
dovetail holder until the tips are ush with the
interior wall of the dovetail holder. Afterwards,
insert the telescope’s dovetail bar into the
mount’s dovetail holder and rmly tighten the
thumbscrew.
Note: Should you have a telescope with a dovetail
mounting bar attached directly to the tube, or if you are
using the 1/4”-20 dovetail adapter, the nderscope may
be oriented in an awkward position when connected to
the AZ4. Usually, this does not cause any problems in
the actual usage other than being a bit awkward. Please
visit us at www.SkyWatcher.com for more product information.
For best up-and-down motion when positioned
horizontally, the telescope needs to be balanced front-to-back. To balance the telescope,
you can loosen the thumbscrew a little, and
move the dovetail bar slightly forward or backward in the dovetail holder. If you are using
tube rings, you can move the telescope tube
forward or backward in the tube rings. You will
have achieved good balance when the telescope does not move up-and-down by itself
when the arm’s tensioning knob is not very
tight.
point a telescope at zenith (straight up).
When pointing a longer telescope tube, like a
refractor, at zenith, lengthening the tripod legs
will help with positioning the eyepiece. For
heavier telescopes, the tripod legs should be
extended in order to give the mount a wider
stance, which will help stabilize the mount and
reduce the chances of it tipping over.
Tracking Celestial Objects
Due to the rotation of the Earth on its polar
axis, celestial objects will appear to move
slowly across the sky. When observing an
object through your telescope, you will see it
drift gradually across the eld of view. To keep
the object centered in the eld, use the handle
to move the AZ4 as needed. For these small,
precise movements, you may need to re-adjust
the axis tensioning knobs. Please note that at
higher magnications, objects will appear to
move faster since the eld of view is narrower.
4. Care and Maintenance
The AZ4 mount will last a lifetime with just
reasonable care. Simply store it in a clean, dry,
dust-free place. Although it can be stored in a
garage or shed, do not store the mount outdoors.
3. Using the AZ4 Mount
The AZ4 mount features separate clutches on
both the altitude (up-and-down) and azimuth
(left-to-right) axes and a panning arm, which
can be xed in two separate positions. Thus,
the AZ4 is an “alt-azimuth” mount.
If the motions of one or both of the axes are
too loose or too tight, the bearing tensioning
can be adjusted by tightening or loosening the
knobs. These knobs should be adjustable so
that even the smallest motions of the mount
are very smooth. If the motion on the altitude
axis is not smooth no matter how the altitude
tensioning knob is adjusted, then the telescope
needs to be better balanced front-to-back.
The AZ4 is one of the most ideal mounts for
astronomical observing as it can be used to
Very little mechanical maintenance is necessary for this mount. It is constructed of steel
and has a black anodized nish that makes it
quite resistant to scratches. Should a scratch
appear, it will not harm the mount. Any dust,
dirt, or moisture should be wiped off the mount
with a soft cloth. A household surface cleaning
uid can be used for more extensive cleaning.
When the mount is being transported to an
observing location, it is recommended that the
handle be removed in order to avoid damage.
If you remove the accessory tray, you can also
fold the tripod legs together. For even easier
portability, the AZ4 mount can be removed entirely from the tripod (simply unthread the knob
under the tripod head).
6
Page 7

5. Specications
AZ4 (Steel) AZ4 (Aluminum)
Mount: Altazimuth Mount: Altazimuth
Material: Die-cast aluminum
black anodized
throughout
Maximum load
capacity:
Maximum tube
diameter:
Bearing surfaces: Teon Bearing surfaces: Teon
Axis tensioning: Via molded plastic,
Pointing handle: Included,
Telescope
connection:
Tripod: Stainless steel, in-
Approximately 15 lbs. Maximum load
Approximately 7.5” (6”
aperture telescope)
triangular-grip knobs
foam grip
via dovetail rail Telescope
cludes accessory tray
Material: Die-cast aluminum
black anodized
throughout
Approximately 15 lbs.
capacity:
Maximum tube
diameter:
Axis tensioning: Via molded plastic,
Pointing handle: Included,
connection:
Tripod: Aluminum, includes
Approximately 7.5” (6”
aperture telescope)
triangular-grip knobs
foam grip
via dovetail rail
accessory tray
Assembled
weight:
Assembled
height:
18.5 lbs. Assembled
weight:
47” (retracted) to 63”
(extended)
Assembled
height:
13 lbs.
41.5” (retracted) to
63” (extended)
7
 Loading...