

Page 1
User’s Manual
Model
______________
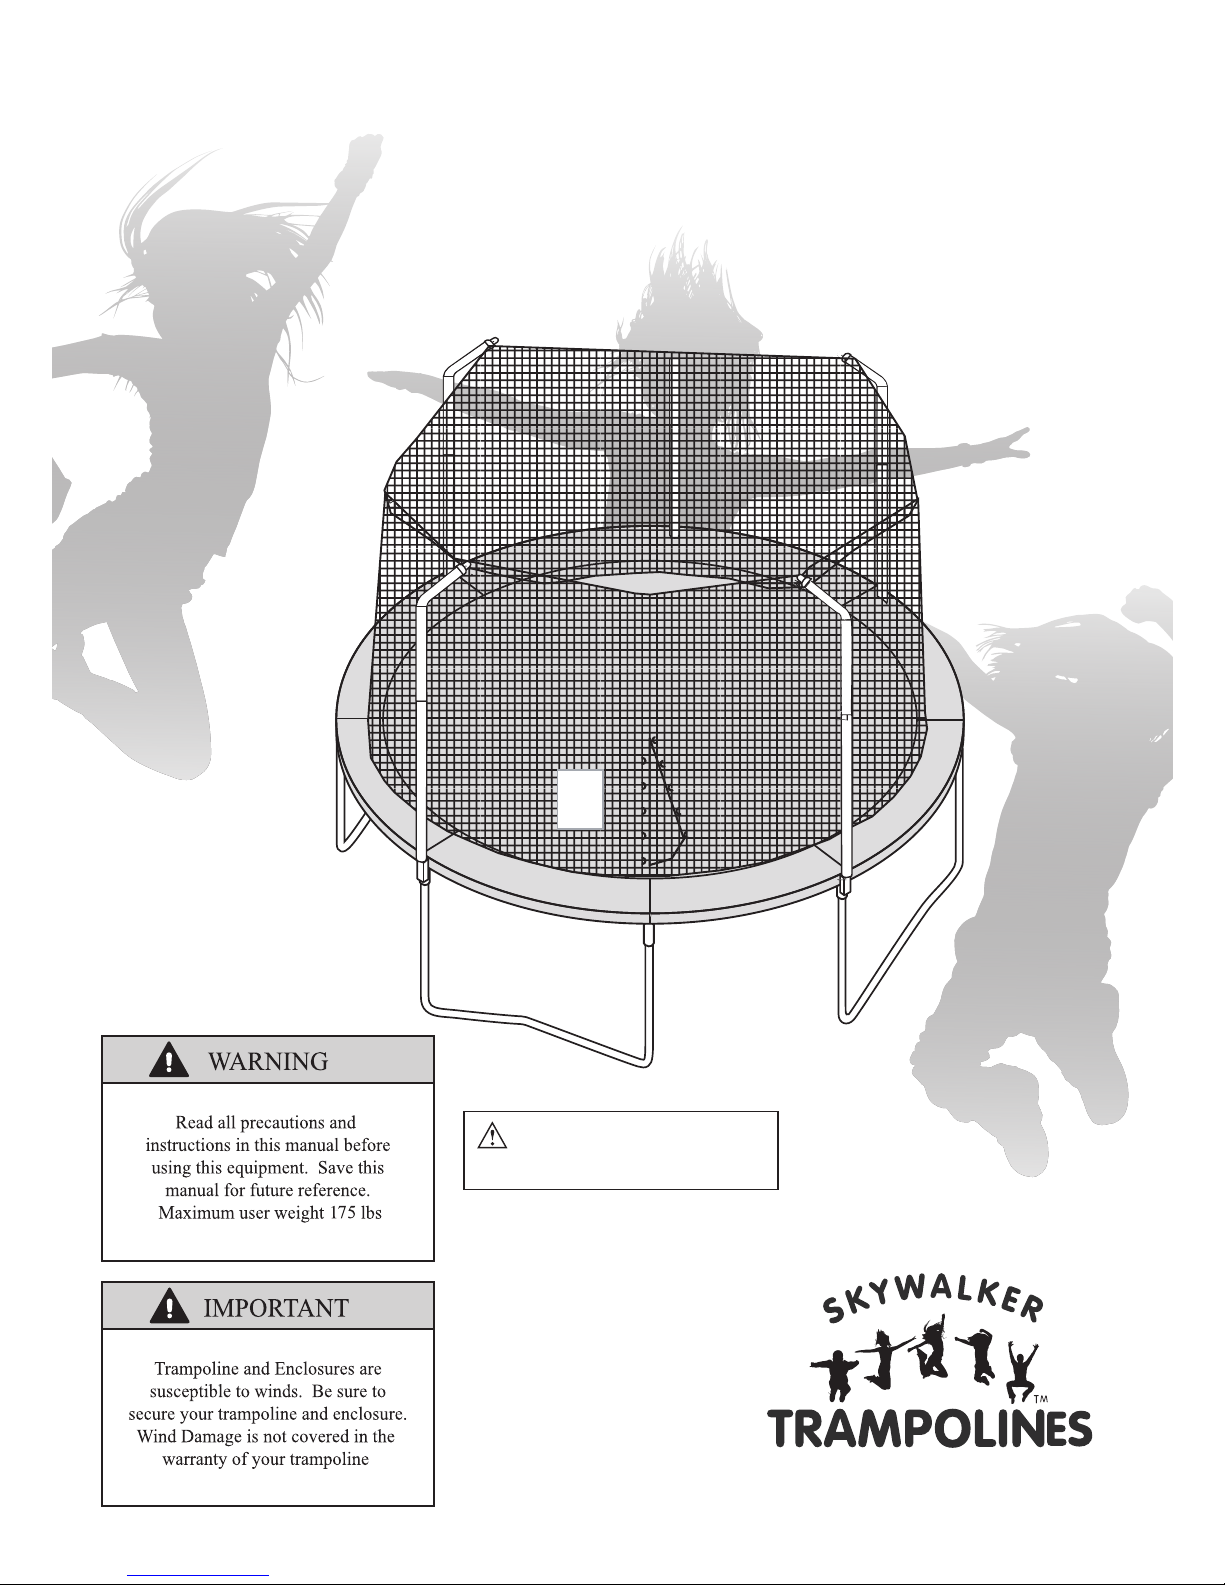
SWTC811
CAUTION: Adult Assembly
Required
Page 2
Model
...........................................3
.....................................4
..................................................4
.............................5
...............................6
...........................7
..............................9
..........10-11
Assembly..............................................................15-23
Care and Maintenance............ 24
Exploded Drawing and Parts List.........................13-14
Ordering Replacement Parts.................................14
Limited Warranty..................................................25
2
........................................
8
.....
Part Identification Chart
SWTC811
..................................... 12
..............................
Page 3
3
11.
12.
13.
14.
15.
Page 4
4
14
round
Page 5
5
Page 6
6
Page 7
7
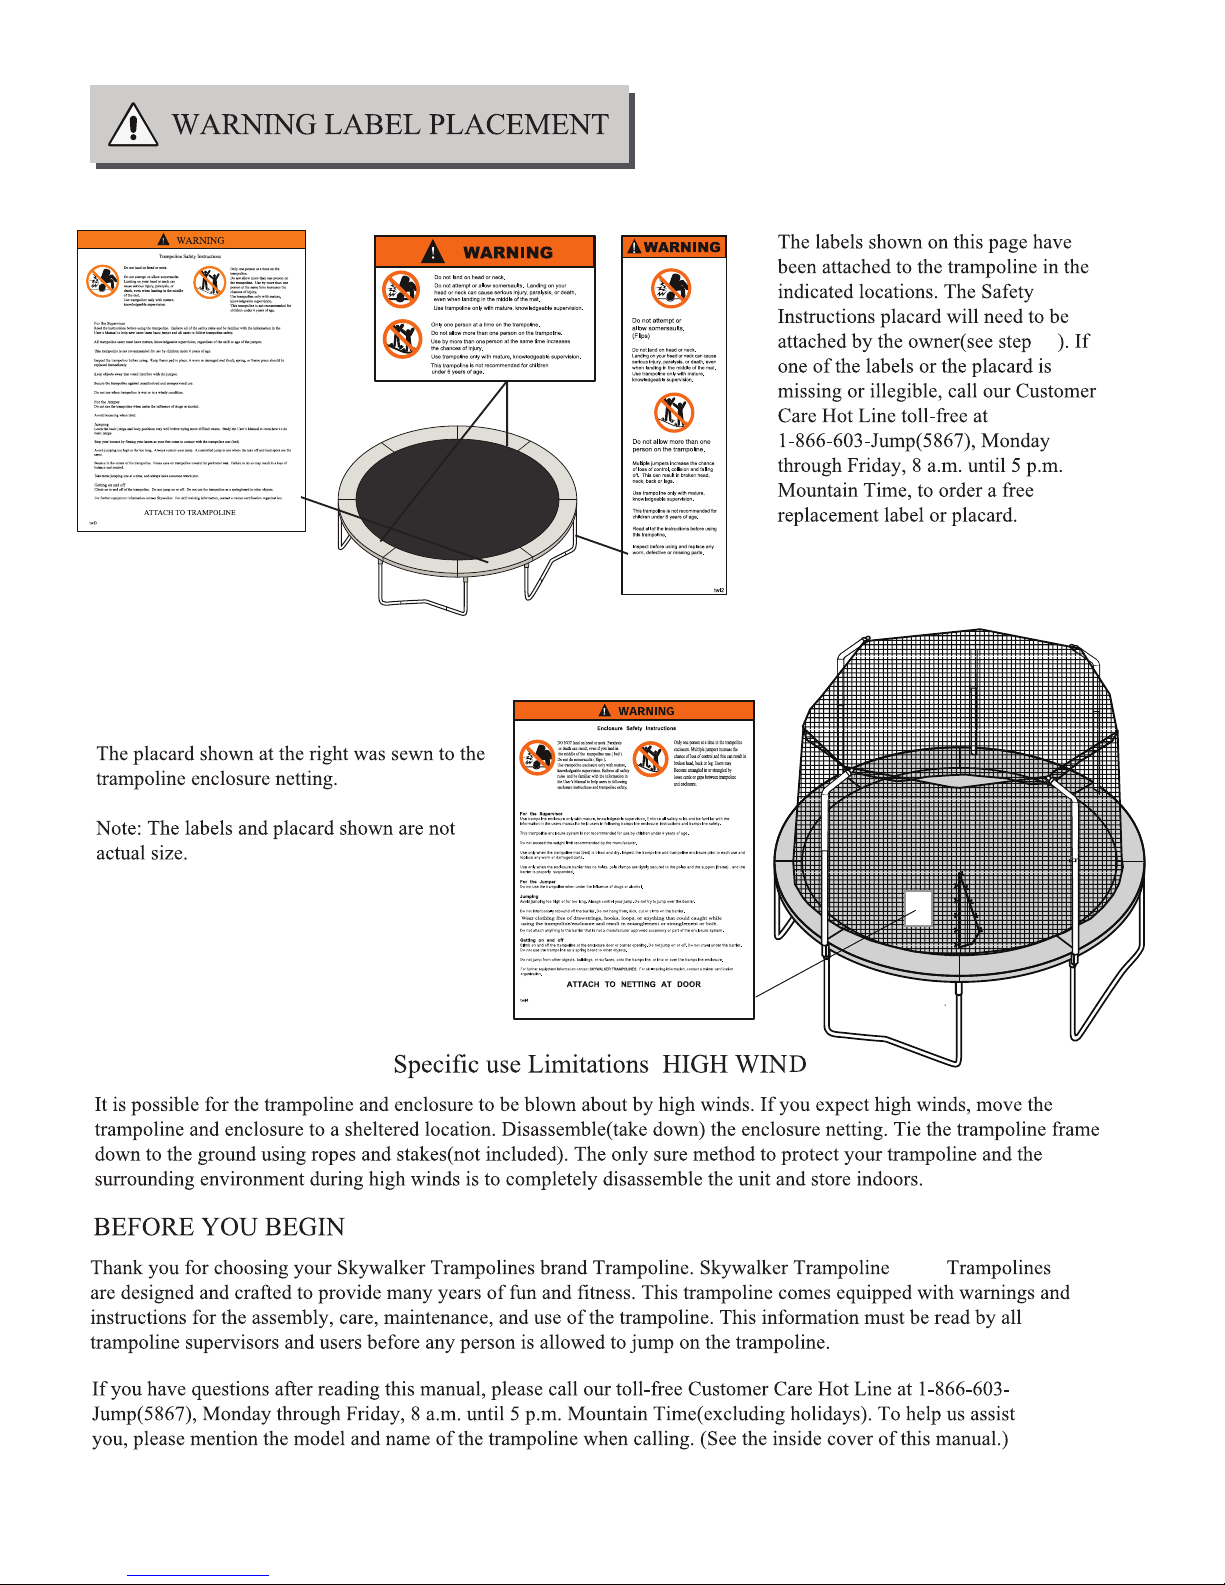
METHODS OF ACCIDENT PREVENTION
4
Page 8
•
•
•
•
8
•
Page 9

R
.
9
0
Page 10

10
Page 11

11
Page 12

1
3
2Top Tube with T-joint (4 pcs) Top Tube with Socket (4 pcs)
5
Jumping mat (1 pc)
6
Frame pad (1 pc)
4
Leg brace (4 pcs)
7
Enclosure net (1 pc)
10 Curved Tube (4 pcs)
13 End Cap (4 pcs)
Spring Tool (1 pc)
Screw Driver (1 pc)
14 M5x50mm Bolt (4 pcs)
M4.8x16mm Self-tapping
Screw(14 pcs), 2 spare parts
11 Foam (8 pcs)
12 Pole Cap (4 pcs)
8
Spring (56 pcs)
9 Straight Tube(4 pcs)
Use below drawings to identify all the parts.
12
15
16
SWTC811
Page 13

2
2
2
2
2
1
1
1
1
6
6
6
6
7
7
7
7
7
7
7
7
9
10
13
14
12
14
14
12
7
7
7
4
3
5
16
15
8
9
9
9
10
10
10
12
11
11
11
11
13
13
13
11
11
7
13
SWTC811
Page 14

Key No. Qty. Description
1 4 Top Tube with T-joint
2 4 Top Tube with Socket
3 1 Jumping mat
4 56 Spring
5 1 Frame pad
6 4 Leg Brace
7 14 M4.8x16mm Self-tapping Screw(2 spare parts)
8 1 Enclosure Net
9 4 Straight Tube
10 4 Curved Tube
11 8 Foam
12 4 Pole Cap
13 4 End Cap
14 4 M5x50mm Bolt
15 1 Spring Driver
16 1 Screw Tool
# 1 User’s Manual and Safety Placard
# 1 Set of ASTM Frame Labels
14
SWTC811
Page 15

r.
• r.
•
1
2
T-joint
Socket
spring holes
face the ground
spring holes
face the ground
1.
Locate the Top tube with T-joint(1) and the Top tube
with Socket(2) as shown.
NOTE:
Make sure all the spring holes are facing ground.
Horizontal square tube
(used to connect the Top tube)
Vertical round tube
(used to connect the Leg Brace)
T-joint
Horizontal square tube
(used to connect the Top tube)
Vertical round tube
(used to connect the Leg Brace)
Vertical square tube
(used to connect Enclosure pole)
Socket
If you don’t assemble in the right order, you will have to
disassemble the entire trampoline in order to attach correctly.
NOTE:
Identify the T-joint and Socket shown in right will
be helpful for you, they are pre-installed on Top tube.
1
15
14
14
Trampoline and Enclouse Assembly with Basketball Hoop
Page 16

2.
Press down on the Leg Brace (6) at the same
time and fully insert them into the T-joint and Socket ,
then tighten by two M4.8x16mm Self-tapping
screws(7).
Repeat above assembly steps until six frame pieces
are completed.
then flip the trampoline frame pieces over so that the
legs are now holding the trampoline frame pieces up.
Locate two frame pieces as shown and then fully
connect them together.
T-joint
Socket
Socket
Repeat above step 3 in the same way, you should
now have a free standing frame as shown.
3.
T-joint
3
2
16
2
6
Push Here
Push Here
1
T-Joint
Socket
7
7
T-joint
Socket
T-joint
T-joint
T-joint
SocketSocket
Socket
Page 17

If the Enclosure net(8) and Jumping mat(3) are not
pre-installed, follow below steps to install.
Place the Jumping mat(8) on clear ground.
Identify the warning label on mat top and the ID
label on mat back as shown.
the first V-ring
clip
zipper loop
the first hole
Enclosure net
Enclosure door
Warning label (on mat top)
ID label (on mat back)
the first V-ring
the first hole
4.1
4.
Place the Enclosure net(8) on the Jumping mat(3),
make sure the first hole and the first V-ring are
aligned as shown.
4.2
Insert the first V-ring into the first hole, and then
insert the remaining V-rings into corresponding
holes in the same way one by one, until the Enclosure
Net(8) and the Jumping mat(3) are fully attached .
4.3
Enclosure door
Warning label (on mat top)
ID label (on mat back)
Warning label (on mat top)
3
8
NOTE:
The first hole refers to the first one that is located just left
of the Enclosure door.
The first V-ring refers to the one that is located just
left of the warning label near the ID label on Jumping
mat.
4
17
Page 18

If the Enclosure net and Jumping mat are pre-installed,
follow below steps to assemble the Jumping mat to frame.
5.1 Inspect the connection of Jumping mat and Enclosure
net, make sure all the V-rings are passed through the
corresponding net holes.
5.2 Place the Jumping mat(3) on clear ground inside the
frame. and then adjust the location of two warning
dacals to align the two T-joint in opposite direction
as shown.
the first V-ring
the first hole
5.3 Attach the first V-ring with a spring to the first spring
hole on left side of T-joint, and then attach the opposite
V-ring to the first spring hole on left side of T-joint.
NOTE:
Count exactly the quantity of V-rings and the spring holes
on frame top, make sure each of them are corresponding.
5.
the first spring hole
T-joint
left side
5
18
3
enclosure door
T-joint
Warning
Decal
Warning
Decal
T-joint
Enclosure
door
the first spring
Page 19

Attach another two lateral V-rings to frame holes in the
same way as 5.2
Now there are 8 V-rings are attached to the Top tube.
And 8 Springs have been used.
V-ring
Frame
3
4
Attach the Spring as follows:
Hook one end of Spring (4) into the V-ring sewn on Jumping
mat (3).
Hook a Spring Tool as shown to the free end of the Spring.
Pull the Spring (4) until it reaches the frame.
There are 56 springs around the edge of Jumping mat(3)
and 56 holes around the top tube.
It is wise to wear leather gloves while attaching the springs.
Be careful where you place your hands as the Springs and
Frame joints can pinch.
A:
B:
C:
Push the end of the Spring (4) into a hole in the frame, then
unlook the Spring Tool
D:
NOTE:
CAUTION:
5.3
NOTE:
Count exactly the quantity of V-rings and the spring holes
on frame top, make sure each of them are corresponding.
Attach other V-rings to frame holes on left side of
T-joint or Socket in the same way as 5.2
5.4
19
3
T-joint
Enclosure door
Page 20

Attach all the remaining V-rings with spring to
Top tube holes correspondlingly.
Enclosure door
Lay the Frame pad(5) on the frame. Adjust it’s
position so that the slits are just above the Sockets
as shown.
Do not use the trampoline without the Frame
Pad(5).The Frame Pad is designed to reduce
the possibility of injuries due to jumpers coming
in contact with the trampoline frame.
If you do not have a Frame Pad,contact your
dealer to obtain one.Properly install the Frame
Pad before using the trampoline.
5.5
T-joint
Socket
slit of pad
CAUTION:
6.
5
5
6
20
Page 21

7. Look underneath the trampoline. Locate the straps
attached to the underside of the Frame pad. Position
each outer strap so that one strap is on each side of
the frame as shown. Tie the outside straps sewn to
the pad Joints to each side of the frame as shown
and attach the inner straps to the near V-rings.
Repeat this step to tie the remaining straps (not shown).
5
7
Strap sewn in the outside of
the Joint for the pad bottom
Inner Straps
Frame
V-ring
Outer Strap
Outer Strap
Inner Straps
7
10
9
Slide the Straight Tube(9) and Curved Tube(10)
into Foams (11) as shown.
Lay one Straight Tube(9) with Foam and one
Curved Tube(10) with Foam on the ground.
Insert the Straight Tube(9) into the Curved
Tube(10). Secure with a M4.8x16mm Self-
tapping screw(7)
Repeat this step to attach the five remaining
Straight Tubes(9) and Curved Tubes(10) together
(not shown).
8.
9.
8
11
9
10
11
9
21
Page 22

Holes
12
8
Strap ring
Strap
10
12
Hole
14
Hole
A
12
Hexagon hole
10.
Make sure the Hexagon hole side of the cap is
against the net, and the holes on both the strap
ring and the caps are aligned.
Hold the pole cap close to a Curved Tube(10), then
Insert the Curved Tube(10) into the Pole Cap(12).
Make sure the holes on the curved tube, pole cap
and strap ring are aligned. then
Insert the M5x50mm
bolt(14)
until it touches the nut in the Hexagon hole
of the pole cap, securing them together.
Repeat this step to assemble the remaining parts in
the same way.
Make sure the bent side of the enclosure poles
are facing toward the center of the trampoline.
The end of the Straight Tubes(9) are sharp.
be careful when assembling.
Repeat this process to assemble the remaining five
poles to the trampoline frame.
9
Leg
Socket
T-joint
Frame PAD
B
C
Follow below steps to attach Curved tube to cap
A.
Identify the hexagon hole on the Pole Cap(12) with
a nut buried inside.
B.
Insert the Pole Cap(12) into one strap ring on the top
edge of net.
C.
11. Start from the Enclosure door, lift one of the
assembled poles and then insert the Straight Tube(9)
into the vertical tube of Socket as shown.
NOTE:
11
Jumping mat
Leg
22
Enclosure door
Poles
T-joint
Socket
9
9
Page 23

13
Socket
Insert the end cap(13) into the bottom hole of the
Socket as shown.
12.
Your trampoline and enclosure are fully assembled now.
Make sure that all parts are securely attached.
Familiarize yourself and all users with the trampoline
and enclosure with the safety precautions, use and
instructional materials, and care and maintenance
instructions in this manual before using the trampoline
and enclosure.
Disassembly
To disassemble the enclosure and trampoline, follow assembly steps 1 through 11 in reverse order.
Replacing the Enclosure net
If your Enclosure net is damaged after using a period of time, you need to replace it by following assembly steps
4-7 and 10-13 in reserve order.
12
13.
10
12
Strap
Strap
Using a ladder, reach to the top of the enclosure
poles and tie the straps around the pole caps as
shown. Make sure to secure the knot tightly.
(Do not stand on the edge of the trampoline to do
this step. It can be dangerous and could damage
the trampoline).
14.
Using the included plastic tie, attach the Safety Placard
to the frame near the point whare jumpers will climb
onto and off the trampoline.
Safety Placard
Frame
23
Page 24

15
3
24
Page 25

25
 Loading...