

Page 1
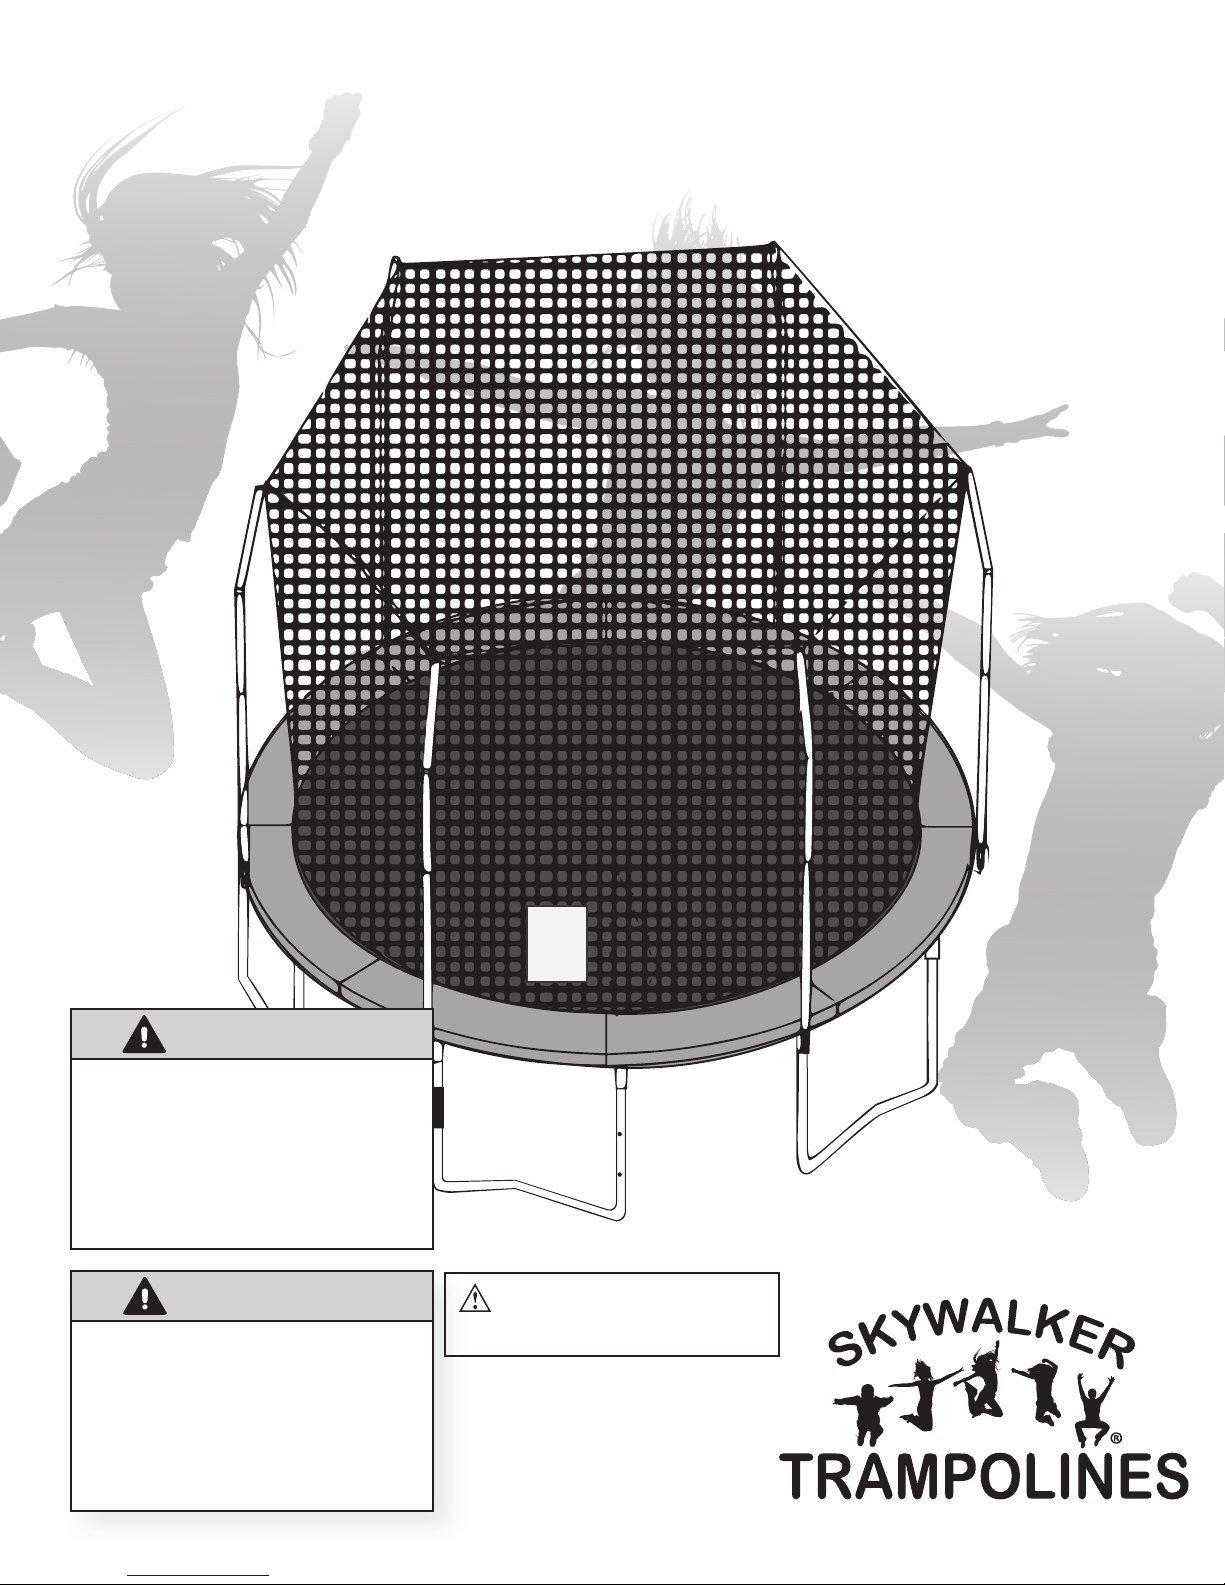
User’s Manual
Model______________SWTC1400WS
WARNING
Read all precautions and
instructions in this manual before
using this equipment. Save this
manual for future reference.
Maximum user weight 200 lbs.
IMPORTANT
Trampoline and Enclosures are
susceptible to winds. Be sure to
secure your trampoline and enclosure.
Wind Damage is not covered in the
warranty of your trampoline
CAUTION: Adult Assembly
Required
Page 2

Model_____________
A serial decal is found on one of the trampoline legs. Model number decal tag is located on the jumping mat.
SWTC1400WS
CONTENTS
Important Precautions...........................................3
Warning Label Placement.....................................4
Before You Begin..................................................4
Trampoline Safety Information.............................5
Enclosure Safety Information...............................6
Methods of Accident Prevention...........................7
Important Warnings...............................................8
Use and Instructional Material..............................9
Instructional Program and Model Lessons ..........10-11
Part Identification Chart.......................................12
Exploded Drawing and Parts List.........................13-14
Ordering Replacement Parts.................................14
Assembly..............................................................15-23
Care and Maintenance..........................................24
Limited Warranty..................................................25
QUESTIONS?
If you have questions after reading this manual, please call our toll-free Customer Care Hot Line. The trained technicians
on our Customer Care Hot Line will provide immediate assistance.
Customer Care Hot Line: 1-866-603-Jump(5867) Monday—Friday, 8a.m.—5p.m. MountainTime
REPLACEMENT PARTS
www.skywalkertrampolines.com
WARNING
Read the assembly, installation, care, maintenance, and use instructions in this manual prior to assembling and
using this trampoline. Save this manual for future reference.
WARNING
IMPORTANT
High Wind: The trampoline can be blown around by high winds. If you expect high winds, the trampoline
should be moved to a sheltered location, taken apart, or tied down to the ground with ropes and stakes (NOT
INCLUDED). At least four ropes and four stakes should be used. Make sure to attach the ropes to the top of the
frame: DO NOT simply secure the legs or the bases to the ground, as they can seperate from the frame sockets.
The top of the stakes should be at ground level so they will not create a tripping hazard. In addition, the top of
the stakes should be covered, if necessary, so that users will not be injured by falling on the stakes. The only
sure method to protect your trampoline and the surrounding environment during high winds is to completely
disassemble the unit and store indoors. The manufactures warranty does not cover any type of wind or weather
damage.
2
Page 3

USE INSTRUCTIONS
WARNING:
instructions in this manual before you use the trampoline enclosure. Warnings and instructions for care, maintenance, and use of this
trampoline and enclosure are included to promote safe, enjoyable use of this equipment.
1.
It is the responsibility of the owner and supervisors of the
trampoline and enclosure to make sure all users obey the safety
instructions given in this manual. The trampoline should only be
used with mature, knowledgeable supervision.
2.
Secure the trampoline and trampoline enclosure against unauthorized and unsupervised use. If you use a ladder to get on and off
the trampoline, be sure to remove it when the trampoline and
enclosure are not being used.
3.
Be sure there is enough clear space above the trampoline and
enclosure before use. It is best to have at least 24 feet (7.3 meters)
of clear space above the ground. This space must be clear of
wires, tree limbs, and any other possible hazards.
4.
Lateral (sidewise) clearance is very important. Do not place the
trampoline and enclosure near walls, buildings, fences, sidewalks,
and other play areas. Always keep a clear space on all sides of the
trampoline and enclosure.
Remove any objects that could interfere with the performer.
5.
Maintain a clear area around and under the trampoline.
Be sure the trampoline and enclosure are on a level surface before use.6.
7.
Always inspect the trampoline and enclosure before each use.
Make sure that the frame, padding, netting, enclosure tubes, and
foam sleeves are correctly and securely positioned. Replace any
worn, defective, or missing parts. (Jumpers may be hurt if the
trampoline and enclosure are used when they are in poor condition.)
To reduce the risk of serious injury, read and follow all of the warnings, precautions, and
Do not attach anything to the enclosure barrier that is not a
16.
manufacturer-approved accessory or part of the enclosure system.
Please remove any jewelry before jumping begins. Jewelry may
17.
get caught in the enclosure netting.
18.
Wear clothing free of drawstrings, hooks, loops, or anything that
could be caught in while using the trampoline/enclosure and
result in entanglement and strangulation, or both.
19.
DO NOT let more than one person inside the trampoline
enclosure at the same time. Two or more people jumping at the
same time can cause serious injury.
DO NOT jump on the trampoline while you have or are holding
20.
any objects, especially something sharp or breakable.
DO NOT use the trampoline and enclosure if you have been
21.
using alcohol or drugs.
22.
DO NOT attempt or allow summersaults (flips) on trampoline.
Landing on the head or neck can cause serious injury, paralysis,
or death, even when landing in the middle of the jumping bed.
23.
Always climb on to and off of the trampoline. It is a dangerous
practice to jump from the trampoline to the floor or ground when
dismounting, or to jump onto the trampoline when mounting.
DO NOT use the trampoline as a springboard to other objects.
8.
Bounce only when the surface of the mat (bed) is dry. There
should be very little or no wind or air movement. The trampoline
and enclosure must not be used in gusty or severe winds.
9.
The trampoline and enclosure frames are made of metal. They are
not grounded and will conduct electricity. For this reason, an
electrocution hazard exists. No lights, electric heaters, extension
cords, or household electrical appliances are to be permitted on
the trampoline or in enclosure at any time.
10.
Use the trampoline and enclosure in an area with lots of light. If
the trampoline and enclosure are indoors or in shady areas you
may need to use artificial (electrical) lighting in the area.
11.
During the winter months the trampoline soft materials will need
to be removed and stored in a dry place. If left up in the winter
months it may cause damage to the springs, jump mat, spring pad
and enclosure. The warranty will be void.
This trampoline and enclosure is made for users who weigh less
12.
than 200 pounds.
Trampoline over 20 in. (51 cm) tall are not recommended for use
13.
for use by children under 6 years of age.
The trampoline enclosure is to be used only with the size of
14.
trampoline for which the enclosure is designed.
Misuse and abuse of the trampoline enclosure is dangerous and
15.
can cause serious injury.
Enter and exit the enclosure only at the enclosure door or barrier
24.
made for that purpose.
DO NOT attempt to crawl under, jump over, intentionally bounce
25.
off of, hang from, climb on, kick, or cut the barrier netting.
While keeping head erect, focus eyes on the trampoline toward
26.
the perimeter. This will help control bounce.
Stop bouncing by flexing knees as feet come in contact with the
27.
trampoline bed. Learn this skill before attempting others.
28.
Avoid bouncing too high. Stay low until bounce control and
repeated landings in the center of the trampoline can be
accomplished control in more important than height.
Avoid bouncing when tired. Keep turns short.29.
30.
Learn Fundamental bounces and body positions thoroughly
before trying more advanced skills. A variety of trampoline
activities can be carried out performing the basic fundamentals in
various series and combinations, performing one fundamental
after another, with or feet bounces between them.
31.
For additional information concerning the trampoline equipment
contact the manufacturer. For information concerning skill
training, contact a certified trampoline instructor.
3
Page 4
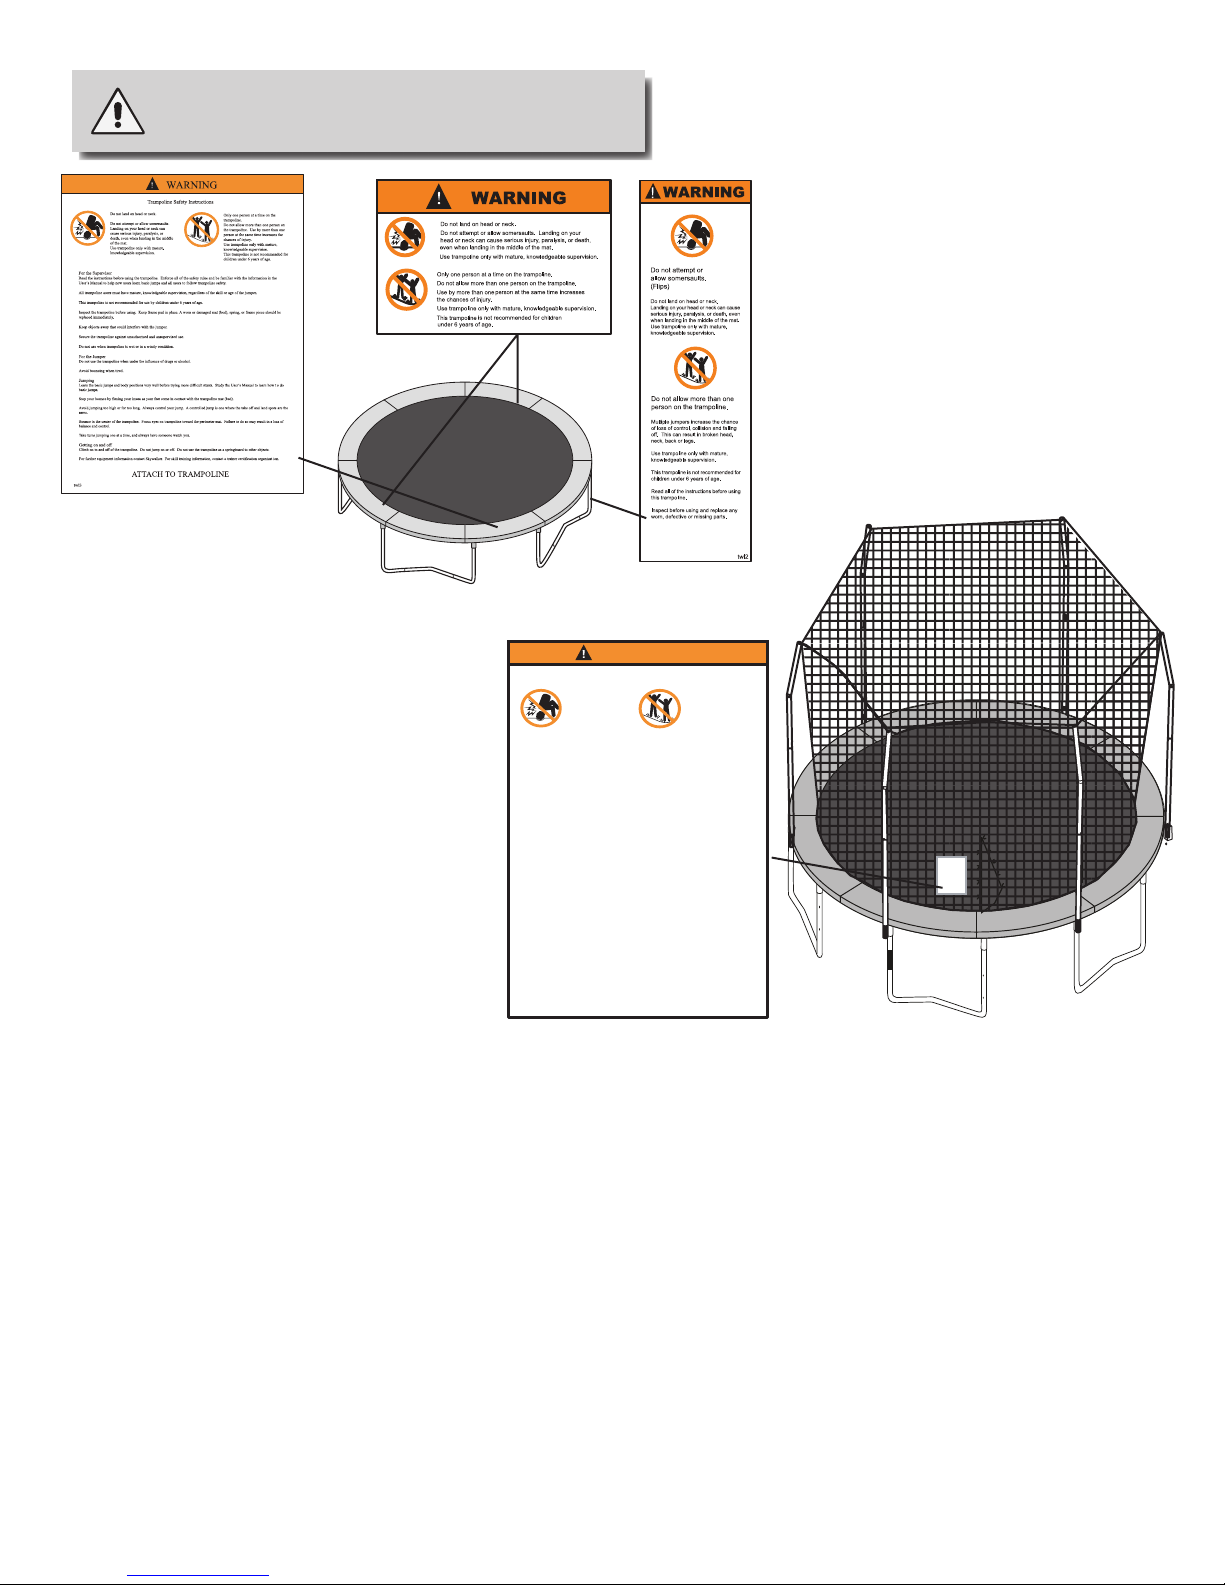
WARNING LABEL PLACEMENT
The labels shown on this page have been
attached to the trampoline in the indicated locations. The Safety Instructions
placard will need to be attached by the
owner (see step 14). If one of the labels
or the placard is missing or illegible, call
our Customer Care Hot Line toll-free at
1-866-603-Jump (5867), Monday
through Friday, 8 a.m. until 5 p.m.
Mountain Time, to order a free replacement label or placard. Attach the label or
placard in the location shown.
WARNING
Enclosure Safety Instructions
DO NOT land on head or neck.
Paralysis or death can result, even if
you land in the middle of the
trampoline mat (bed).
Do not do somersaults (flips).
Use trampoline enclosure only with
mature,knowledgeable supervision.
Enforce all safety rules and be
familiar with the information in the
User’s Manual to help users in
following enclosure instructions and
trampoline safety.
ATTACH TO NETTING AT DOOR
Only one person at a time in the
trampoline enclosure. Multiple
jumpers increase the chance of loss
of control and this can result in a
broken head back or leg. Users may
become entangled in or strangled by
loose cords or gaps between the
trampoline and enclosure.
The placard shown at the right was sewn to the
trampoline enclosure netting.
Note: The labels and placard shown are not
actual size.
-
For the Supervisor
Keep enclosure tightly fastened to the trampoline in accordance with the manufacturer’s
instructions. Failure to properly assemble and maintain a tight, secure trampoline/enclosure
boundary may result in serious injury, strangulation or death.
Do not exceed the weight limit recommended by the manufacturer.
Use only when trampoline mat (bed) is clean and dry. Inspect the trampoline and trampoline
enclosure prior to each use and replace any worn or damaged parts.
Use only when the enclosure barrier has no holes, pole clamps are tightly secured to the poles and
the support (frame), and the barrier is properly suspended.
For the Jumper
Do not use the trampoline when under the influence of drugs or alcohol.
Jumping
Avoid jumping too high or for too long. Always control your jump. Do not try to jump over the
barrier.
Do not intentionally rebound off the barrier. Do not hang from, kick, cut or climb on the barrier.
Wear clothing free of drawstrings, hooks, loops or anything that could get caught while using
trampoline/enclosure and result in entanglement, strangulation or both.
Do not attach anything to the barrier that is not manufacturer approved accessory or part of the
enclosure system.
Getting on and off
Climb on and off the trampoline at the enclosure door or barrier opening. Do not jump on or off.
Do not crawl under the barrier. Do not use the trampoline as a springboard to other objects.
Do not jump form other objects, buildings or surfaces onto the trampoline, or into or over the
trampoline enclosure.
For further equipment information contact SKYWALKER TRAMPOLINES.
For skill training information, contact a trainer certification organization.
twl4
Specic use Limitations HIGH WIND
It is possible for the trampoline and enclosure to be blown about by high winds. If you expect high winds, move the
trampoline and enclosure to a sheltered location. Disassemble (take down) the enclosure netting. Tie the trampoline frame
down to the ground using ropes and stakes (not included).
surrounding environment during high winds is to completely disassemble the unit and store indoors.
The only sure method to protect your trampoline and the
BEFORE YOU BEGIN
Thank you for choosing your Skywalker Trampolines brand Trampoline. Skywalker Trampoline round Trampolines are
designed and crafted to provide many years of fun and fitness. This trampoline comes equipped with warnings and
instructions for the assembly, care, maintenance, and use of the trampoline. This information must be read by all
trampoline supervisors and users before any person is allowed to jump on the trampoline.
If you have questions after reading this manual, please call our toll-free Customer Care Hot Line at 1-866-603Jump (5867), Monday through Friday, 8 a.m. until 5 p.m. Mountain Time (excluding holidays). To help us assist
you, please mention the model and name of the trampoline when calling. (See the inside cover of this manual.)
4
Page 5

TRAMPOLINE SAFETY INFORMATION
In trampoline use, as in all active recreational sports, participants can be injured. However, there are steps that can
be taken to reduce the risk of injury. In this section, primary accident patterns are identified and the responsibilities
of supervisors and jumpers in accident prevention are described.
ACCIDENT CLASSIFICATION
Somersaults (ips): Landing on your head or neck, even in the middle of the trampoline mat, increases the risk of a
broken back or neck, which can result in paralysis or death. Such events can occur when a jumper makes an error
trying to perform a forward or backward somersault (flip). Do not perform somersaults (flips) on this backyard
trampoline.
Multiple Jumpers: More than one jumper at a time on the trampoline increases the chance of a jumper becoming
injured by losing control of his or her jump. Jumpers may collide with one another, fall off of the trampoline, fall
onto or through the springs, or land incorrectly on the mat. The jumper weighing the least is the jumper most likely
to be injured.
Mounting and Dismounting (Getting On and O): The trampoline mat is several feet above ground level. Jumping
from the trampoline to the ground or any other surface may result in injury. Jumping onto the trampoline from a
roof, deck, or other objects also presents a risk of injury. Smaller children may need assistance getting onto or down
from the trampoline. Climb carefully onto and off of the trampoline. Do not step onto the springs or the frame pad.
Do not grasp the frame pad to pull yourself onto the trampoline.
Striking the Frame or the Springs: Injury may result from hitting the frame or falling through the springs while
jumping or getting onto or off of the trampoline. Stay in the center of the mat when jumping. Be sure to
keep the frame pad in place to cover the frame. The frame pad is not made or intended to support the weight of the
trampoline user. Do not step or jump directly onto the frame pad.
Loss of Control: Jumpers who lose control of their jumps may land on the mat incorrectly, land on the frame or
springs, or fall off of the trampoline. A controlled jump is one where the landing is in the same spot as the takeoff.
Before learning a more difficult stunt, you should be able to do one before over and over with control .
Attempting a stunt beyond present skill levels increases the chance of loss of control. To regain control and stop
your jump, bend your knees sharply when you land.
Alcohol or Drug Use: The chance of injury increases when a jumper has consumed alcohol or taken drugs. These
substances impair a person’s reaction time, judgment, and physical coordination.
Encountering Objects: Jumping on a trampoline while other people, pets, or objects are underneath it will increase
the chance of getting hurt. Jumping while holding or having an object on the trampoline, particularly one that is
sharp or breakable, will increase the chance of injury. Placing a trampoline too close to overhead electrical wires,
tree limbs, or other objects can increase the chance of injury.
Poor Maintenance of the Trampoline: Jumpers may be injured if a trampoline is used when it is in poor condition. A
torn mat, bent frame, broken spring, or missing frame pad, for example, should be replaced before anyone is
allowed to jump. Inspect the trampoline before each use.
Weather Conditions: A wet trampoline mat is too slippery for safe jumping. Gusty or high winds can cause jumpers
to lose control. To reduce the chance of injury, use the trampoline only when the weather is good.
Access: To prevent access to the trampoline by unsupervised smaller children, the optional access ladder should
always be taken away and stored in a safe place when the trampoline is not in use.
5
Page 6

ENCLOSURE SAFETY INFORMATION
NEED FOR TRAMPOLINE ENCLOSURE SAFETY
A trampoline enclosure is a recreational product.
The information on this page and on pages 7-9 identify important safety precautions. The precautions are not
all-inclusive, because an enclosure can be used in ways that this manual cannot cover completely.
To prevent pinches and cuts during enclosure use, a frame pad must be installed on the trampoline (See the trampoline
manufacturer’s instructions). The frame pad must be placed on the trampoline before the enclosure is erected. The frame
pad reduces the chance of injury from accidental contact with the springs and frame.
USING THE ENCLOSURE SAFELY
Adult Supervision of Children
Children using a trampoline with a trampoline enclosure must be supervised by adults. Young children must be
supervised constantly. Adults must pay particular attention to:
• things that children bring into the enclosure.
• children’s activities inside the enclosure.
• conditions inside the enclosure while children are using it.
• the way children enter and exit the enclosure.
Additional details of safety enclosure use are described below.
Electrocution Hazard Associated with the Metal Frame of the Trampoline and Enclosure
The trampoline and enclosure frames are made of galvanized steel. They are not grounded and will conduct electricity.
For this reason, an electrocution hazard exists. No lights, electric heaters, extension cords, or household electrical
appliances are to be permitted on the trampoline or in the enclosure at any time.
Hazards Associated with Entering and Leaving the Trampoline Enclosure
A trampoline enclosure installed on a trampoline is raised off the ground. The height of the enclosure increases the risk of
a fall when a jumper is entering or leaving the enclosure. Young children, especially, may have difficulty entering and
exiting the enclosure. To reduce the risk of falling, always help young children to get into and out of the enclosure.
Enter and exit the trampoline enclosure only through the door of the enclosure (the opening in the netting walls). The
trampoline mat (bed) and the netting walls of the enclosure are separate pieces. No jumper, especially young children,
should ever leave the enclosure by going out between the mat and the netting walls. Trying to get out this way creates a
risk of choking from being caught between the trampoline frame and the netting walls.
Darkness increases the chances of a fall when a jumper is entering or leaving the enclosure. Do not use the trampoline
unless there is plenty of lighting provided.
Hazards Associated with Animals, Sharp or Breakable Objects
To avoid damage to the trampoline enclosure and the trampoline, do not allow pets or other animals inside of the
enclosure. The claws and teeth of animals can damage the netting. Do not jump on the trampoline while holding or
wearing a sharp or breakable object.
6
Page 7

METHODS OF ACCIDENT PREVENTION
The Supervisor's Role in Preventing Accidents
It is the responsibility of the supervisors of trampoline users to provide knowledgeable and mature supervision. They need
to know and enforce all of the rules and warnings printed in this manual to minimize the likelihood of accidents and
injuries. They also need to inform users of these rules. During periods of time when supervision is unavailable or inadequate, this may require that the trampoline is taken down, placed in a secure area, or otherwise secured against unauthorized use. Another option that may be considered is covering the trampoline with a heavy tarp that can be secured with
locks and chains. It is the responsibility of the supervisor to make sure that the placard with TRAMPOLINE SAFETY
INSTRUCTIONS (see step 14 in assembly instructions) is kept posted on the trampoline and that jumpers are informed
about these instructions.
The Jumper's Role in Preventing Accidents
Education on the part of the user is a must for safety. Users must first learn a low, controlled bounce and then learn the
basic landing positions and combinations before proceeding to intermediate skills. Jumpers must understand why they
have to master "control" before they can start thinking about other moves. Understanding the proper progression of skills
in jumping on a trampoline must be the first lesson. Review this manual to learn about the basic techniques for using the
trampoline. Follow the rules on the placard with TRAMPOLINE SAFETY INSTRUCTIONS (see step 14 in assembly
instructions). For further information or additional instructional materials, contact a certified trampoline instructor.
TRAMPOLINE SAFETY INSTRUCTIONS
For the Supervisor
Read the instructions before using the trampoline. Enforce all of the safety rules. Become familiar with the information in
this manual so you can help new users learn basic jumps and all users follow trampoline safety. All trampoline users must
have mature, knowledgeable supervision, regardless of their skill or age. This trampoline is not recommended for use by
children under 6 years of age. Inspect the trampoline before using it. Do not use the trampoline without the frame pad
securely in place to cover the frame. Do not use the trampoline in wet or windy conditions. A worn or damaged mat,
spring, or frame piece should be replaced immediately.
JUMPING
Learn fundamental jumps and body positions thoroughly before trying more advanced skills. Know your own limits in
performing each of the trampoline jumps. Study this manual to learn how to do basic jumps.
Stop your bounce by flexing your knees as your feet come in contact with the trampoline mat. Learn this skill before
attempting any others.
WARNING
Hazards Associated with High Winds
A trampoline with an enclosure can be moved or blown over by high winds. Anyone in its path, or inside of the enclosure,
may be injured if this happens. If you expect high winds, take down the enclosure netting and stake the trampoline frame
to the ground (see page 24), or move the trampoline and enclosure to a sheltered location.
protect your trampoline and the surrounding environment during high winds is to completely disassemble the
unit and store indoors.
Damage due to wind or weather is not warranted.
The only sure method to
7
Page 8

WARNING
Storing the Trampoline Enclosure Safely
Specific steps for storing the trampoline enclosure are given later in this manual. There are special safety precautions to
be aware of when storing the enclosure.
Remove the enclosure poles and place them on the ground. Avoid pinching your fingers by wearing gloves and keeping
your fingers away from pinch points near the bracket assembly while you are removing the tubes from the frame.
Placing the Trampoline and Enclosure in a Safe Place
There must be at least 24 feet (7.3 meters) of clear, open space above the ground. Do not place or store anything underneath the trampoline and enclosure. To avoid injury, the trampoline and enclosure must be kept away from objects and
possible hazards including electric power wiring, tree limbs, and fences. Do not place the trampoline and enclosure near
any other recreational devices or structures such as a swimming pool or swing set. The trampoline and enclosure must be
placed on a level surface before use. The area around the trampoline must always have plenty of light.
For the Supervisor
• Be familiar with the information in this manual and enforce all of the safety rules. Help all users to utilize the
trampoline and enclosure safely.
• All trampoline and enclosure users must have someone to supervise them at all times, regardless of the skill or age of
the user.
• Secure the trampoline and enclosure against unauthorized and unsupervised use. Keep the trampoline and enclosure
free of any objects that could interfere with the jumper.
• This trampoline and enclosure is not recommended for use by children under 6 years of age or by anyone weighing
more than 200 pounds.
• Use the trampoline and enclosure only when the trampoline mat (bed) is clean and dry. Inspect the trampoline and
enclosure prior to each use and replace any worn or damaged parts. Use only when the enclosure netting has no holes,
all uprights are tightly bolted into their sockets, and the netting is properly suspended.
• DO NOT attempt or allow somersaults on the trampoline. Landing on the back or neck can cause serious injury,
paralysis, or death, even when landing in the middle of the bed.
For the Jumper
Do not use the trampoline enclosure when under the influence of drugs or alcohol.
JUMPING
• Avoid jumping too high or for too long. Always control your jump.
• Take turns jumping one at a time, and always have someone watch you.
• Do not attempt to jump over the netting. Do not intentionally bounce off of the netting. Do not hang from, kick, cut, or
climb on the netting.
• Wear clothing that does not have drawstrings, hooks, loops or anything else that could get caught while using the
trampoline/enclosure and result in entanglement or strangulation, or both.
• Do not attach anything to the netting that is not a Skywalker Trampolines approved accessory or part of the of the
trampoline enclosure.
8
Page 9

GETTING ON AND OFF THE TRAMPOLINE
Climb onto and off of the trampoline. Do not jump onto or off of it. Do not use the trampoline as a springboard to jump to
other objects or places.
ENTERING AND EXITING THE TRAMPOLINE ENCLOSURE
The Trampoline should be used only under the appropriate adult supervision.
A ZIPPER CLIP IS PROVIDED TO HELP SECURE THE TRAMPOLINE AGAINST UNSUPERVISED USE BY
CHILDREN AND TO KEEP THE ZIPPER IN THE CLOSED POSITION DURING USE. A responsible adult supervisor
should be present to assure that the zipper clip is attached to the D-ring on the jump mat and that the horizontal clips are
attached to the D-rings on the enclosure netting, both during use and after use.
For additional information regarding equipment, contact Skywalker Holding, LLC. For additional information regarding
skill training, contact a trainer certification organization.
USE AND INSTRUCTIONAL MATERIAL
OVERVIEW OF TRAMPOLINE USE
The first periods of trampoline use should focus on learning fundamental body positions and practicing the eight basic
bounces that are described on pages 10 and 11.
During this learning period, jumpers should practice these basic techniques and perfect them. Braking, or checking the
bounce, should be taught first and stressed as a safety measure. Jumpers should brake their jump whenever they start to
lose their balance or control. This is done by simply flexing the knees sharply upon landing and absorbing the upward
thrust of the mat. This allows the jumper to stop suddenly and avoid losing control.
With trampoline use, the takeoff point and landing point of a good, controlled jump are in the same spot. An exercise is
considered learned only when a jumper is able to perform it correctly time after time. Jumpers should never go on to any
advanced stunt until they can perform all previous stunts correctly each time.
Allow each jumper a brief turn on the trampoline. Extended bouncing exposes an overtired user to an increased risk of
injury. Longer turns tend to lessen the interest of others waiting to jump. Clothing should consist of a T-shirt and shorts.
Jumpers should wear regulation gymnastic shoes or heavy socks, or they may jump barefoot. Street shoes or tennis shoes
should not be worn on the trampoline. Beginning jumpers may wish to wear loose-fitting protective clothes, such as a
long-sleeve shirt and pants, until correct landings are mastered. This will reduce the chance of mat (bed) burns from
improper landings on elbows and knees. No hard-sole shoes should be worn, as they cause extra wear on the trampoline mat.
Mounting and dismounting (getting on and off) properly should be a strict rule from the beginning. Users should climb
onto the trampoline by placing their hands on the frame and stepping or rolling up onto the frame, across the springs, and
onto the mat. They should not step directly on the frame pad or hold on to the frame pad when getting onto or off of the
trampoline. Users should always place their hands on the frame while getting on or off. To get off, jumpers should walk to
the side of the mat, bend over and place one hand on the frame, and then step from the mat to the ground. If you have
installed the optional ladder, its rungs can be used to get on or off. Always face the ladder and place your hands on the
frame. Make sure your foot has secure contact with the ladder rung when using it.
Reckless bouncing should not be permitted. All skills should be learned at moderate heights. Control, rather than height,
should be emphasized. Jumpers should be forbidden to practice alone and unsupervised.
9
Page 10
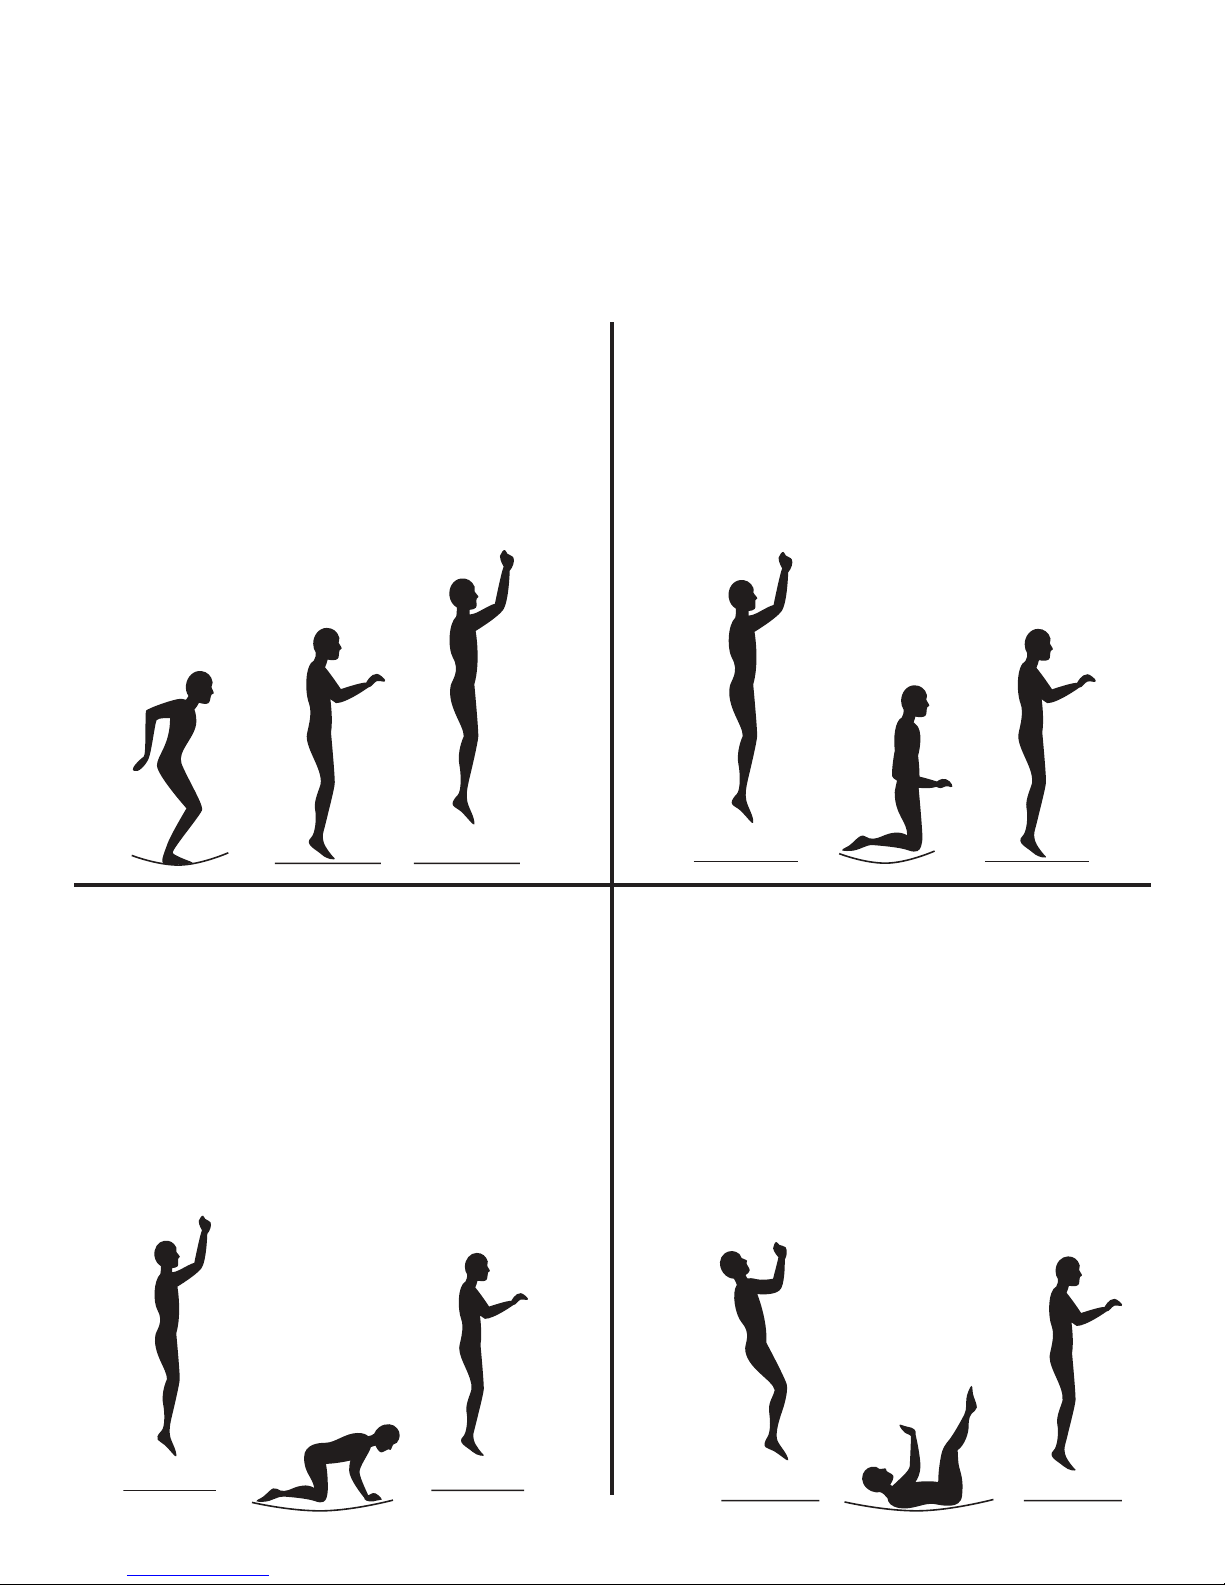
INSTRUCTIONAL PROGRAM AND MODEL LESSONS
The following lessons are examples of an instructional program. They should follow a complete discussion and
demonstration of body mechanics between the supervision and the student(s). See also page 11.
1. Mounting and dismounting (getting on and off)-Demonstration and practice of proper techniques.
2. Fundamental bounce-Demonstration and practice.
3. Braking (stopping the bounce)-Demonstration and practice. Braking on command.
4. Hand and knee drop-Demonstration and practice, stressing four-point landing and alignment.
Lesson 1: Fundamental Bounce
1. Start from a standing position with your head erect
and your eyes on the frame pad.
2. Swing your arms forward and up in a circular motion.
3. Bring your feet together and point your toes
downward while in the air.
4. Keep your feet about 15 inches apart when landing on
the mat.
Lesson 2: Knee Drop
1. Review and practice of skills already learned.
2. Start bouncing from a standing position, keeping your
eyes on the frame pad.
3. Land on your knees, keeping your back straight and
your body erect.
4. Come back up to an erect position
5. Half twist to right, to the left, to the feet, and then to the
knees.
Lesson 3: Hand and Knee Drop
1. Demonstration and practice, stressing four-point landing
and alignment.
2. Start bouncing from a standing position, keeping your
eyes on the frame pad.
3. Land on the mat on your hands and knees.
4. Push with your hands and come back up to an erect
position.
Lesson 4: Back Drop
1. Review and practice skills learned.
2. Start from a low bounce and land on your back.
3. Keep your chin forward on your chest as you land.
4. Kick forward and up with your legs to return to an
erect position.
5. Demonstration, emphasizing the forward thrust of the hips
by arching the body as one leg is brought forward from the
standing (not bouncing) position, and the drop to the back
with the chin held forward to the chest and the eyes forward
on the frame pad. Spotting this skill is most important.
Demonstration of back drop with low bounce and practice of
both techniques.
10
Page 11
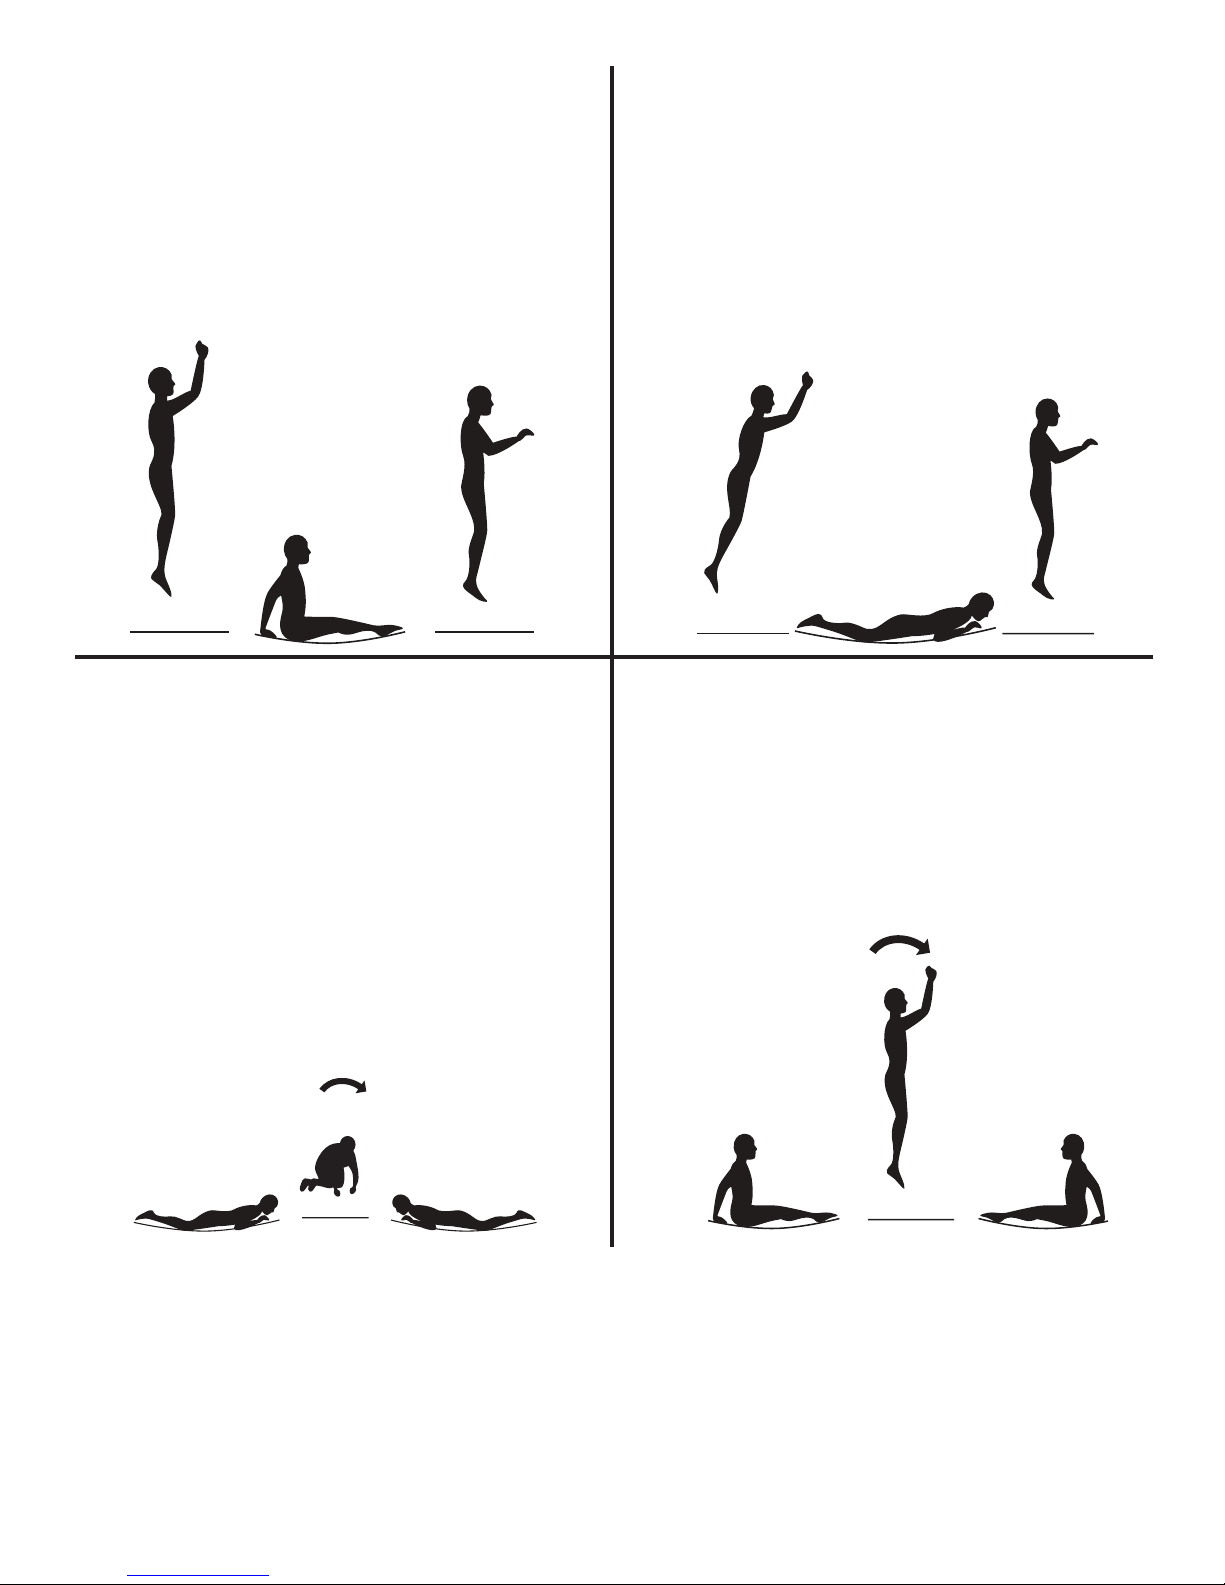
Lesson 5: Seat Drop
Lesson 6: Front Drop
1. Review and practice of skills already learned.
2. Land in a sitting position with your legs parallel to the
mat.
3. Place your hands on the mat beside your hips.
4. Push with your hands to return to an erect position.
5. Half twist to the feet. Seat drop, knee drop, hand and knee
drop, repeat.
Lesson 7: Half Turntable
1. To save time and avoid mat (bed) burns, all students should
be requested to assume the front drop position on the floor
while the instructor checks for faults. Suggested progression:
from hand and knee bounce, the body is extended for the
landing in the front drop position, and the rebound is made to
the feet.
2. Start from a low bounce and land on the mat in a prone
position.
3. Keep your head up and your arms extended forward on the
mat.
4. Push with your arms to return to an erect position.
Lesson 8: Swivel Hips
1. Review and practice of skills already learned.
2. Start from the front drop position and push to the left
or right with your arms to begin turning your body in
the opposite direction.
3. Turn your head and shoulders toward the direction
that your body is turning.
4. Keep your back parallel to the mat and your head up.
5. After completing a half turn, land in the front drop
position.
1. Suggested progression: seat drop, feet, half twist, repeat;
seat drop, half twist to feet, repeat; seat drop, half twist to seat
drop.
2. Start with a seat drop.
3. Turn your head to the left or right and swing your
arms up in the same direction.
4. Turn your hips in the same direction as your head and
arms, completing a twist.
5. Land in the seat drop position.
Lesson 9
Once each of lessons are learned, the student should now be encouraged to design and organize routines, with emphasis on good form. The
instructor may judge or grade students and arrange groupings for further instruction accordingly. To stimulate interest in competition, the
game of “Trampoline Horse” can be introduced. Before the game begins, students must count off. To start the game, student number 1
performs a stunt. Student number 2 then mounts the trampoline, performs the same stunt and adds a second stunt. Student number 3 mounts
and performs stunts 1 and 2 and adds a third stunt. Thus the series of stunts is continuously lengthened. The first person to miss a stunt in the
series assumes the letter “H” and starts a new series with a stunt. If a person misses again, he assumes the letter “O.” When a person
accumulates “H-O-R-S-E,” he or she is eliminated from the game. The last remaining contestant is the winner. Lesson planning from this
point on should be facilitated by contacting a certified trampoline instructor.
11
Page 12
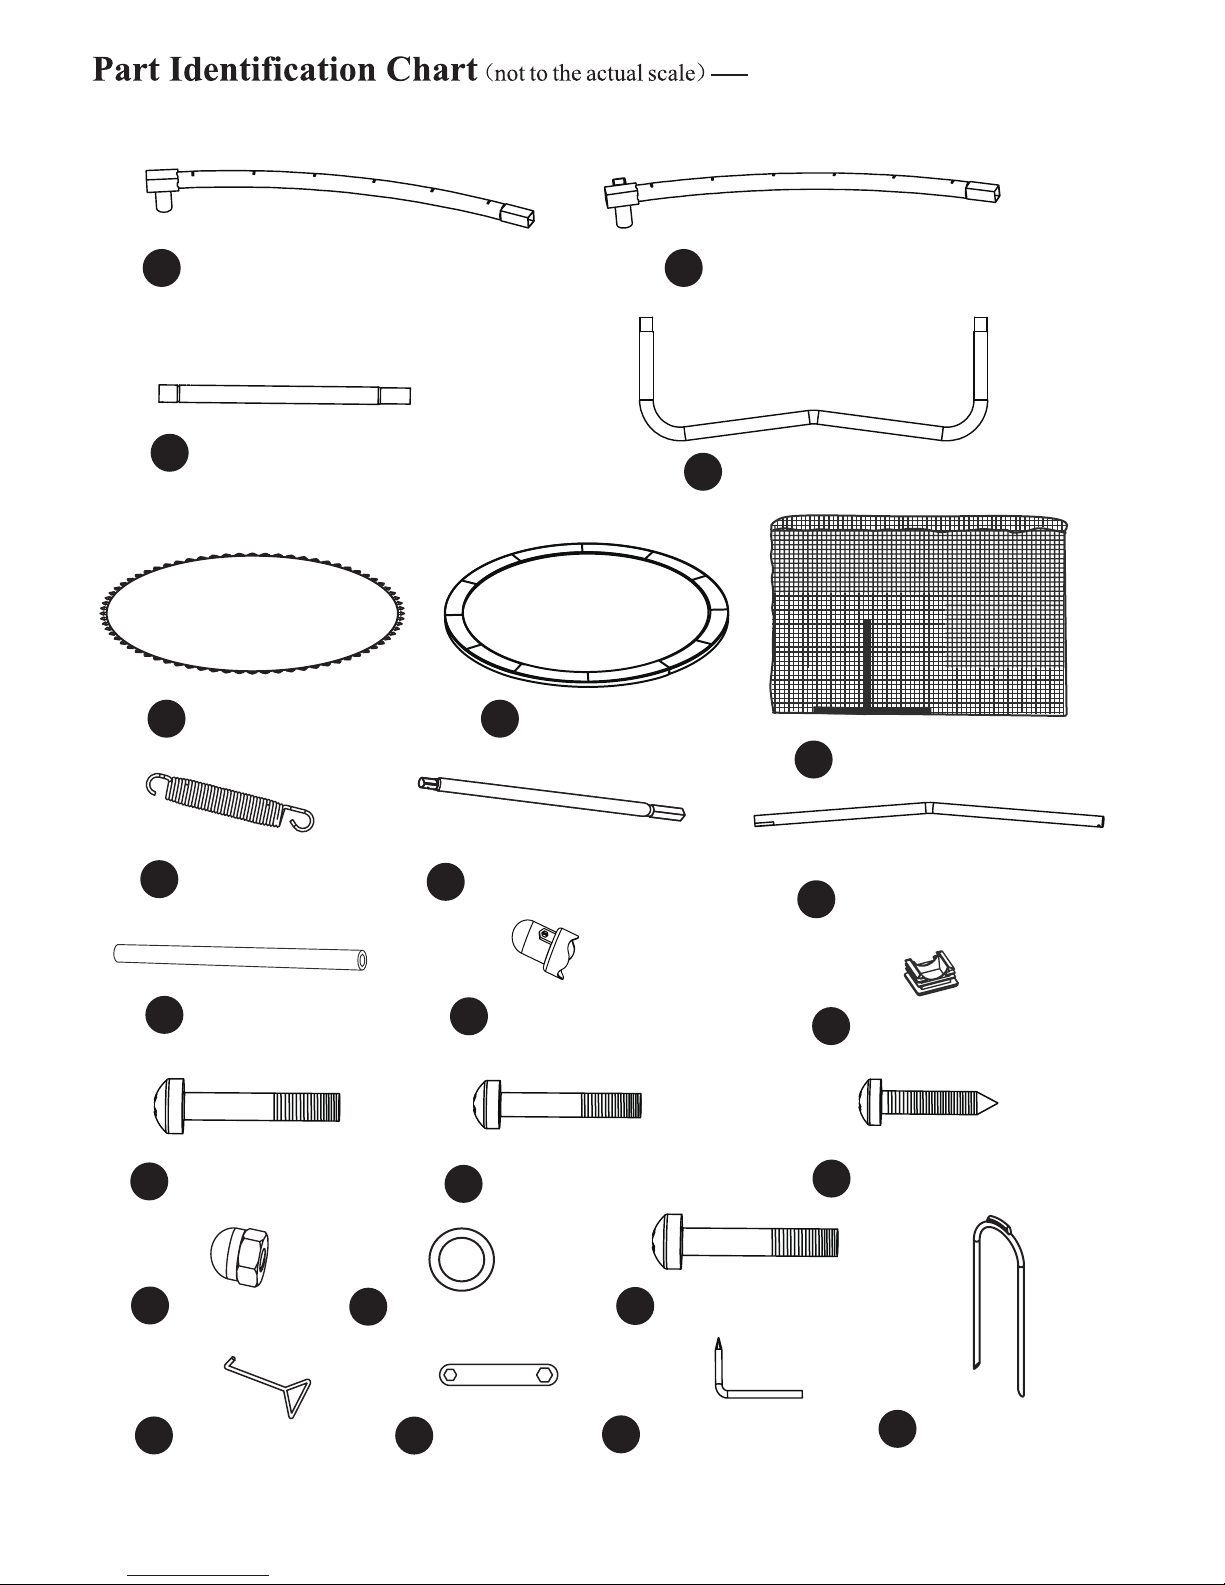
Use below drawings to identify all the parts.
Model No. SWTC1400WS
1
3
Leg extension (12 pcs)
2Top Tube with T-joint (6 pcs) Top Tube with Socket (6 pcs)
5 Jumping mat (1 pc) 6 Frame PAD (1 pc)
4 Leg brace (6 pcs)
7 Enclosure net (1 pc)
8 Spring (84 pcs)
11 Foam (12 pcs)
14 M6x45mm Bolt (12 pcs) M5x44mm Bolt (6 pcs)
17 M6 Nut (24 pcs)
20 Spring Tool (1 pc)
9 Straight Tube(6 pcs)
12 Pole Cap (6 pcs)
15
18 M6 Washer (24 pcs)
Wrench (1 pc)
21
10 Curved Tube (6 pcs)
13 End Cap (6 pcs)
16 Screw (6 pcs)
19 M6x48mm Bolt (12 pcs)
22 Screw Driver (2 pcs)
23 Tie down kit (2 pcs)
12
Page 13
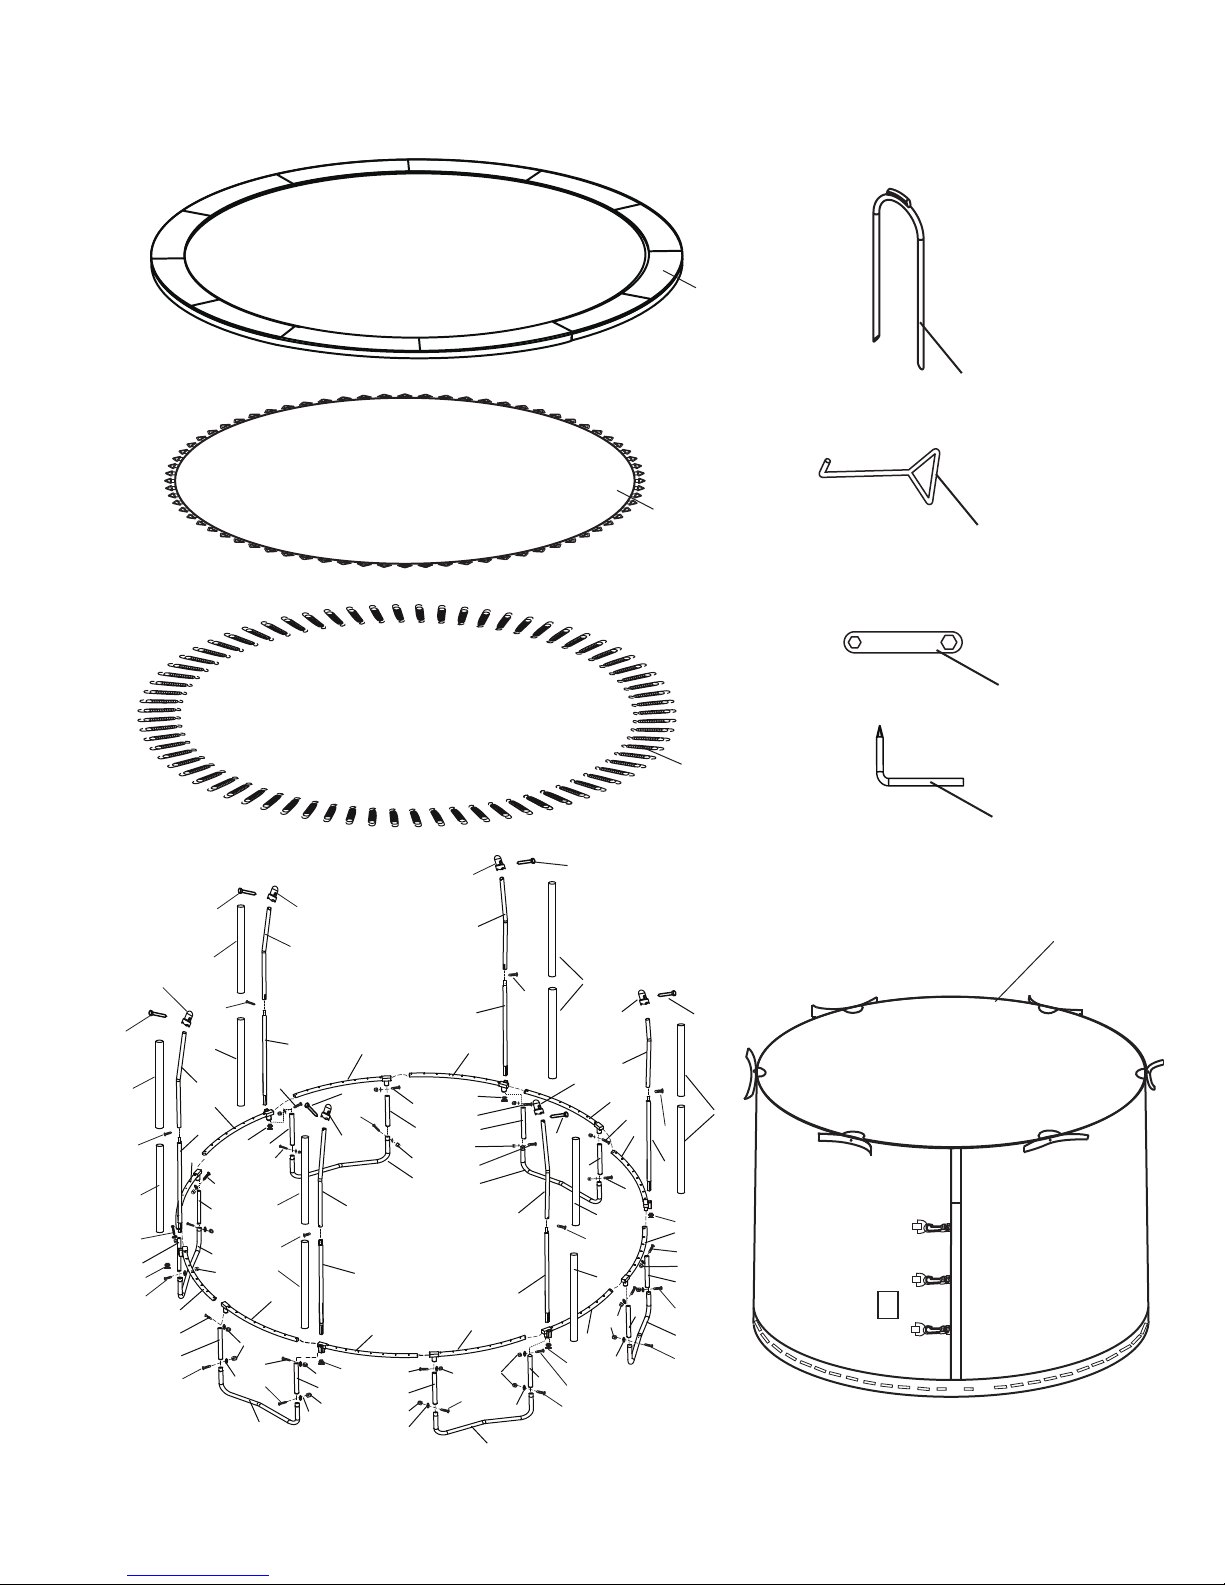
Exploded Drawing----Model No. SWTC1400WS
6
5
23
20
21
22
8
22
22
12
15
11
12
16
15
11
16
11
19
3
13
14
19
14
11
10
2
9
13
1
19
3
14
4
17
2
3
17
18
12
10
9
19
3
14
11
16
11
1
19
14
4
1
15
14
12
10
9
2
19
13
17
3
17
18
17
18
10
9
2
13
19
19
3
3
17
17
14
4
4
10
9
1
17
17
3
14
18
4
15
7
11
16
3
12
10
12
1
19
15
3
14
11
16
11
17
2
18
13
19
14
15
11
16
2
9
13
1
19
17
3
14
3
4
14
13
Page 14

SWTC1400WS
Key No. Qty. Description
1 6 Top Tube with T-joint
2 6 Top Tube with Socket
3 12 Leg extension
4 6 Leg brace
5 1 Jumping mat
6 1 Frame PAD
7 1 Enclosure net
8 84 Spring
9 6 Straight Tube
10 6 Curved Tube
11 12 Foam
12 6 Pole Cap
13 6 End Cap
14 12 M6x45mm Bolt
15 6 M5x44mm
16 6 Screw
17 24 M6 Nut
18 24 M6 Washer
19 12 M6x48mm Bolt
20 1 Spring tool
21 1 Wrench
22 1 Screw Driver
23 2 Tie down kit
# 1 User’s Manual and Safety Placard
# 1 Set of ASTM Frame Labels
ORDERING REPLACEMENT PARTS
To order replacement parts, visit our web site at www.skywalkertrampolines.com or call our toll-free Customer Care
Hot Line at 1-866-603-Jump (5867), Monday through Friday, 8 a.m. until 5 p.m. Mountain Time (excluding holidays).
To help us assist you, please provide the following information when calling:
• the MODEL of the trampoline (see the front cover of this manual)
• the KEY NUMBER and DESCRIPTION of the part (see the PART LIST above)
• the quantity needed
• the desired method of shipping
14
Page 15
ASSEMBLY
ASSEMBLY (PUTTING THE TRAMPOLINE AND ENCLOSURE TOGETHER)
IMPORTANT ASSEMBLY INFORMATION
• Need phillips screw driver (included with trampoline) and 2 adjustable wrenches (for putting the trampoline together). A rubber
mallet is also recommended to make assembly easier.
• Assembly requires two adults. Keep children away from the trampoline and enclosure until they are completely put together.
• Use gloves to protect your hands from pinch points during assembly.
• Make sure that the trampoline is properly put together, with the frame pad correctly laid out, before you put together the trampoline
enclosure.
• The assembly steps refer to parts by their descriptions and key numbers (see the PARTS LIST on page 14 and make sure that all
listed parts are included. If a part is missing, refer to ORDERING REPLACEMENT PARTS at the bottom of page 14).
TRAMPOLINE PLACEMENT
1. Place the trampoline and enclosure on a level surface before you use it.
2. Adequate overhead clearance is essential. A minimum of 24 feet (7.3 meters) from the ground is recommended. Provide clearance
from wires, tree limbs, and other possible hazards. Lateral (sideways) clearance is also essential. Place the trampoline and enclosure
away from walls, structures, fences, and other play areas. Maintain a clear space on all sides of the trampoline and enclosure.
3. Use the trampoline in a well-lighted area. If the trampoline is indoors or in a shady areas you may need to use artificial (electrical)
lighting in the area.
4. Secure the trampoline and enclosure against unauthorized and unsupervised use.
5. Remove any objects from under the trampoline and enclosure.
6. The owner and supervisors of the trampoline are responsible to make all users aware of practices specified in this manual.
7. The trampoline enclosure is only to be used as an enclosure for a specific round trampoline.
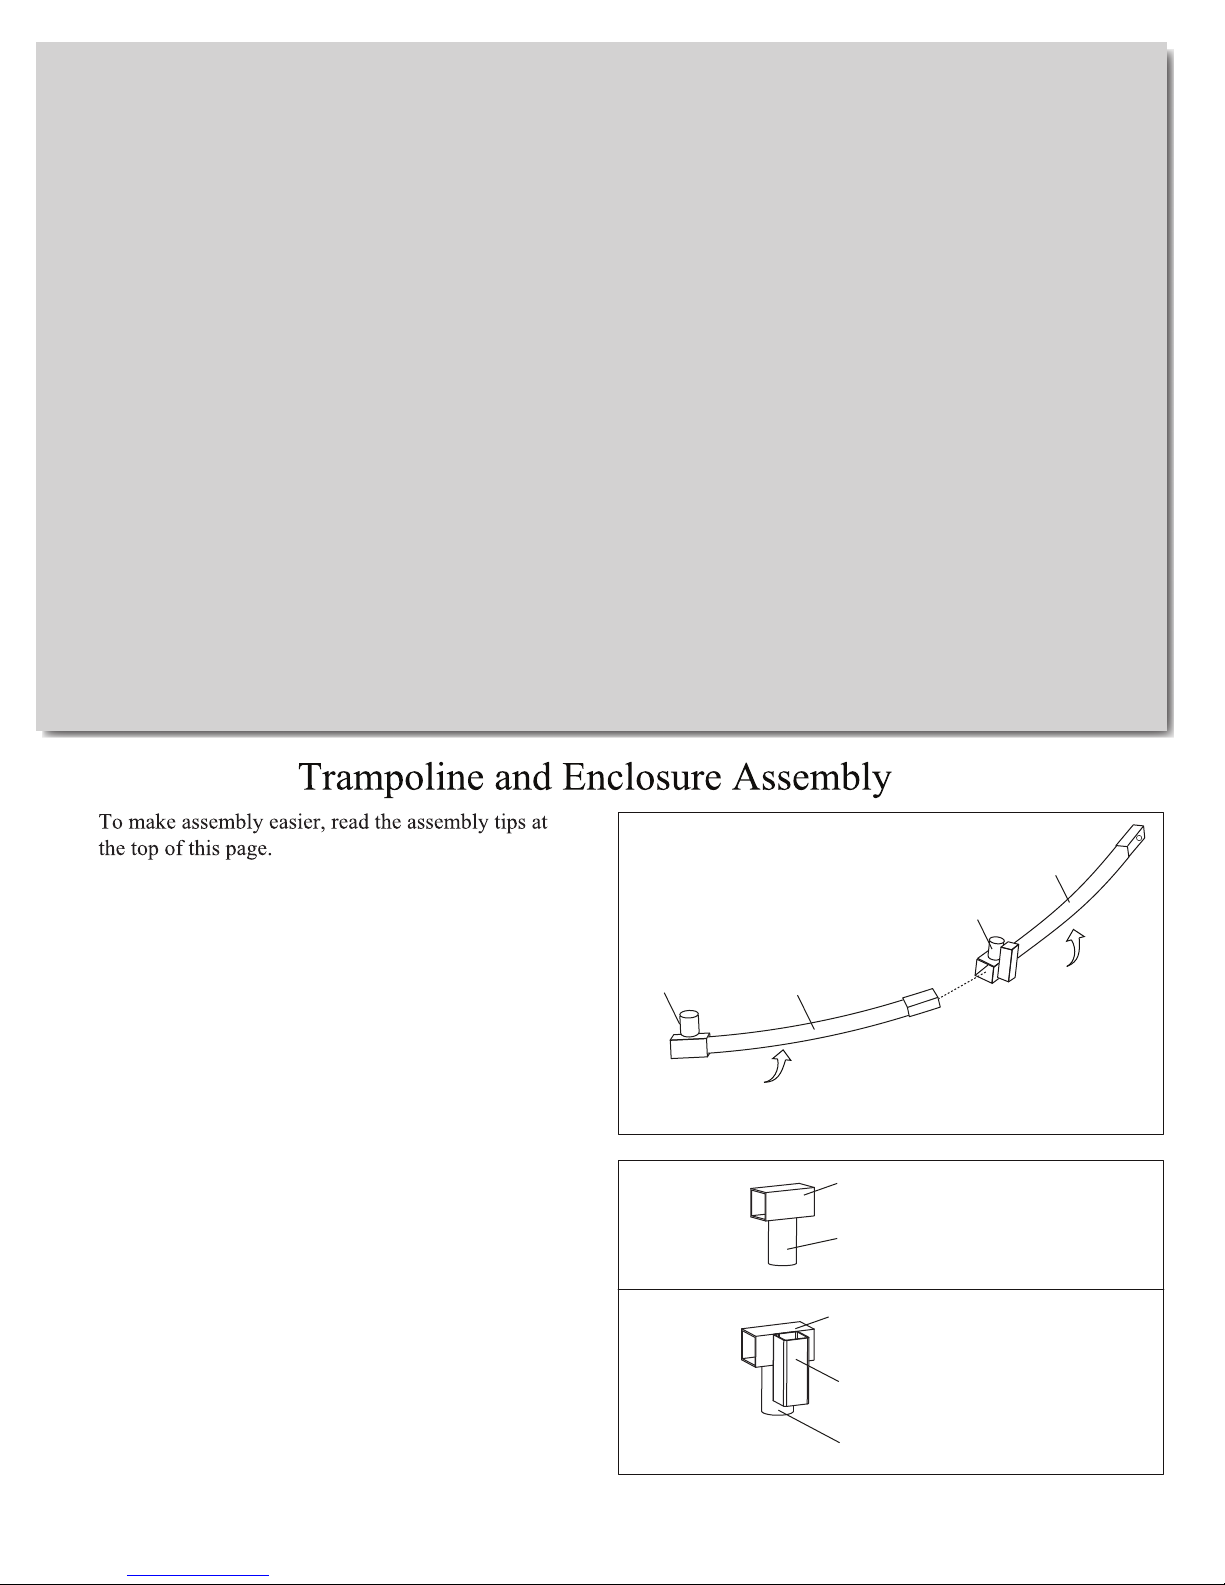
1.
Locate the Top tube with T-joint(1) and the Top tube
with Socket(2) as shown.
NOTE:
Make sure all the spring holes are facing ground.
NOTE:
If you don’t assemble in the right order, you will have to
disassemble the entire trampoline in order to attach
correctly.
Identify the T-joint and Socket shown in right will
be helpful for you, they are pre-installed on Top tube.
1
2
Socket
T-joint
T-joint
Socket
1
spring holes
face the ground
Horizontal square tube
(used to connect the Top tube)
Vertical round tube
(used to connect the Leg extension)
Horizontal square tube
(used to connect the Top tube)
Vertical square tube
(used to connect Enclosure pole)
spring holes
face the ground
Vertical round tube
(used to connect the Leg extension)
15
Page 16

2. Insert the Leg Brace(4) into two Leg Extensions(3)
as shown, then tighten with M6x45mm Bolts(14),
M6 Washers(18) and M6 Nuts(17).
2
4
Press down on both Leg Extensions(3) at the same
time and fully insert them into the T-joint and Socket,
then tighten by M6x48mm Bolts(19) , M6 Washers(18)
and M6 Nuts(17).
Note: Do not tighten the Nuts yet.
Repeat above assembly steps until six frame pieces
are completed.
then flip the trampoline frame pieces over so that the
legs are now holding the trampoline frame pieces up.
Locate two frame pieces as shown and then fully
3.
connect them together.
17
18
14
3
17
17
18
19
18
14
17
3
18
19
1
3
T-joint
Socket
T-joint
Repeat above step 3 in the same way, you should
now have a free standing frame as shown.
Note: Tighten all the Nuts .
Socket
T-joint
T-joint
Socket
Socket
T-joint
Socket
Socket
T-joint
Socket
T-joint
Socket
T-joint
16
Page 17

4.
If the Enclosure net(7) and Jumping mat(5) are not
pre-installed, follow below steps to install.
4.1
Place the Jumping mat(5) on clear ground.
Identify the warning label on mat top and the ID
label on mat back as shown.
4
7
Place the Enclosure net(7) on the Jumping mat(5),
4.2
make sure the first hole and the first V-ring are
aligned as shown.
Insert the first V-ring into the first hole, and then
4.3
insert the remaining V-rings into corresponding
holes in the same way one by one, until the Enclosure
Net(7) and the Jumping mat(5) are fully attached .
NOTE:
The first hole refers to the first one that is located just left
of the Enclosure door.
The first V-ring refers to the one that is located just
left of the warning label near the ID label on Jumping
mat.
5
the first hole
the first V-ring
Enclosure door
Enclosure net
the first hole
the first V-ring
ID label (on mat back)
Warning label (on mat top)
zipper loop
clip
17
Enclosure door
Warning label (on mat top)
Warning label (on mat top)
ID label (on mat back)
Page 18

5.
If the Enclosure net and Jumping mat are pre-installed,
follow below steps to assemble the Jumping mat to frame.
5
T-joint
5.1 Inspect the connection of Jumping mat and Enclosure
net, make sure all the V-rings are passed through the
corresponding net holes.
5.2 Place the Jumping mat(5) on clear ground inside the
frame, and then adjust the location of the two warning
decals to align to two T-joints in opposite directions
as shown.
5.3 Attach the first V-ring with a spring to the first spring
hole on left side of T-joint, and then attach the opposite
V-ring to the first spring hole on left side of T-joint.
Warning
Decal
5
enclosure door
Warning
Decal
T-joint
NOTE:
Count exactly the quantity of V-rings and the spring holes
on frame top, make sure each of them are corresponding.
Enclosure
door
the first spring
left side
the first spring hole
T-joint
the first hole
the first V-ring
18
Page 19

Attach the Spring as follows:
A:
Hook one end of Spring into the V-ring sewn on Jumping mat.
B:
Hook a Spring Tool as shown to the free end of the Spring.
C:
Pull the Spring until it reaches the frame.
D:
Push the end of the Spring into a hole in the frame, then unlook
the Spring Tool
CAUTION:
It is wise to wear leather gloves while attaching the springs.
Be careful where you place your hands as the Springs and
Frame joints can pinch.
Attach another two lateral V-rings to frame holes in the
5.3
same way as 5.2
NOTE:
Count exactly the quantity of V-rings and the spring holes
on frame top, make sure each of them are corresponding.
5
Frame
V-ring
8
NOTE:
There are 84 springs around the edge of Jumping mat(5)
and 84 holes around the top tube.
Attach other V-rings to frame holes on left side of
5.4
T-joint or Socket in the same way as 5.2
Now there are 12 V-rings are attached to the Top tube.
And 12 Springs have been used.
Enclosure door
T-joint
19
Page 20

Attach all the remaining V-rings with spring to
5.5
Top tube holes correspondlingly.
6.
Lay the Frame Pad(6) on the frame. Adjust it’s
position so that the slits are just above the Sockets
as shown.
Enclosure door
T-joint
6
6
CAUTION:
Do not use the trampoline without the Frame
Pad(6). The Frame Pad is designed to reduce
the possibility of injuries due to jumpers coming
in contact with the trampoline frame.
If you do not have a Frame Pad,contact your
dealer to obtain one.Properly install the Frame
Pad before using the trampoline.
7. Look underneath the trampoline. Locate the straps
attached to the underside of the Frame Pad. Position
each outer strap so that one strap is on each side of
the frame as shown. Tie the outside straps sewn to
the Pad Joints to each side of the frame as shown
and attach the inner straps to the near V-rings.
Repeat this step to tie the remaining straps (not shown).
Socket
6
7
Frame
Inner Straps
Outer Strap
slit of Pad
Strap sewn in the outside of
the Joint for the pad bottom
Inner Straps
6
V-ring
Outer Strap
20
Page 21

8.
Slide the Straight Tube(9) and Curved Tube(10)
into Foams (11) as shown.
8
11
11
9.
Lay one Straight Tube(9) with Foam and one
Curved Tube(10) with Foam on the ground.
Insert the Straight Tube(9) into the Curved
Tube(10). Secure with a Self-tapping screw(16).
Repeat this step to attach the five remaining
Straight Tubes(9) and Curved Tubes(10) together
(not shown).
Note: Make sure pole with two holes at the end
is on top.
10.
Follow below steps to attach Curved tube to cap
A.
Identify the hexagon hole on the Pole Cap(12) with
a nut buried inside.
B.
Insert the Pole Cap(12) into one strap ring on the top
edge of net.
Make sure the Hexagon hole side of the cap is
against the net, and the holes on both the strap
ring and the caps are aligned.
C.
Hold the pole cap close to a Curved Tube(10), then
Insert the Curved Tube(10) into the Pole Cap(12).
Make sure the holes on the curved tube, pole cap
and strap ring are aligned. then
bolt(15)
of the pole cap, securing them together.
until it touches the nut in the Hexagon hole
insert the M5x44mm
9
A
C
Hole
12
9
Hexagon hole
12
14
Strap
Hole
10
10
16
9
B
7
Holes
12
Strap ring
10
Repeat this step to assemble the remaining parts in
the same way.
21
Page 22

11. Start from the Enclosure door, lift one of the
assembled poles and then insert the Straight Tube(9)
into the vertical tube of Socket as shown.
Make sure the bent side of the enclosure poles
are facing toward the center of the trampoline.
NOTE:
The end of the Straight Tubes(9) are sharp.
be careful when assembling.
Repeat this process to assemble the remaining five
poles to the trampoline frame.
11
Enclosure door
9
Socket
Jumping mat
T-joint
9
Insert the end cap(13) into the bottom hole of the
12.
Socket as shown.
13.
Using a ladder, reach to the top of the enclosure
poles and tie the straps around the pole caps as
shown. Make sure to secure the knot tightly.
(Do not stand on the edge of the trampoline to do
this step. It can be dangerous and could damage
the trampoline).
12
13
Leg
T-joint
9
Socket
Frame PAD
Leg
Socket
13
12
Strap
Strap
10
22
Page 23

14. Using the included plastic tie, attach the Safety Placard
to the frame near the point where jumpers will climb
onto and off the trampoline.
15. Insert one Tie down kit(23) into ground as shown.
Then insert the other in the same way in the
opposite side.
14
Frame
Safety Placard
15
Your trampoline and enclosure are fully assembled now.
Make sure that all parts are securely attached.
Familiarize yourself and all users with the trampoline
and enclosure with the safety precautions, use and
instructional materials, and care and maintenance
instructions in this manual before using the trampoline
and enclosure.
23
Disassembly
To disassemble the enclosure and trampoline, follow assembly steps 1 through 11 in reverse order.
Replacing the Enclosure net
If your Enclosure net is damaged after using a period of time, you need to replace it by following assembly steps
4-7 and 10-15 in reserve order.
23
Page 24

WARNING
TRAMPOLINE AND ENCLOSURE CARE AND MAINTENANCE
Care
To avoid damage to the trampoline and enclosure, do not allow pets or animals inside the enclosure.
The trampoline is intended to be used by one person at a time who weighs no more than 200 pounds. The user
should be either barefoot, wearing socks, or wearing gymnastic shoes. Street shoes or tennis shoes should not be
worn on the trampoline. The user should remove all sharp objects from his or her person that may cause injury or
damage to the mat. Heavy, sharp, or pointed hard objects should never touch the mat.
Continued exposure over a long period of time to the sun, especially to ultraviolet rays, will shorten the life of the
enclosure fabric. For longer fabric life, store the enclosure when it is not being used. A dry enclosure, properly
stored, will provide the longest life of the fabric, sewing, and hardware. Remove the enclosure from the trampoline
during harsh weather conditions or during long periods of non-use.
MAINTENANCE
Your trampoline was manufactured using quality materials and crafted to provide you and your family with many
years of enjoyment and exercise. Proper maintenance and care will help to prolong the life of the trampoline and
reduce the possibility of injury. The following guidelines should always be followed.
Inspect the trampoline enclosure before each use, and replace any worn, defective, or missing parts. The following
conditions could represent potential hazards and increase the danger of personal injury:
• missing, improperly positioned, or insecurely attached frame padding, netting, enclosure tubes, or foam sleeves
• punctures, frays, tears, or holes worn in the mat, frame padding, netting or foam sleeves
• deterioration in the stitching or fabric of the mat, frame padding or netting
• ruptured or missing springs
• bent or broken frame, leg or enclosure tubes
• sagging bed or netting
• sharp protrusions on the frame, suspension system or enclosure tubes
If any of these conditions exist, the trampoline and/or enclosure should be
disassembled (taken apart) or otherwise protected from being used until the
condition is fixed.
SPECIAL CONSIDERATIONS
High Wind
It is possible for the trampoline and enclosure to be blown about by high winds. If you expect high winds, move the
trampoline and enclosure to a sheltered location. Disassemble (take down) the enclosure netting. Tie the trampoline
frame down to the ground using ropes and stakes (not included). At least three ropes and three stakes should be
used. Make sure to attach the ropes to the top of the trampoline frame: do not simply secure the legs or the bases to the
ground as they can separate from the frame sockets.The tops of the stakes should be at ground level so that they will not
create a tripping hazard. In addition, the tops of the stakes should be covered, if necessary, so that users will not be hurt by
falling onto the stakes.
The only sure method to protect your trampoline and the surrounding environment during
high winds is to completely disassemble the unit and store indoors.
Moving the Trampoline and Enclosure
If the trampoline and enclosure needs to be moved, it should be moved by two persons, kept horizontal, and lifted slightly.
If necessary, the trampoline and enclosure can be taken apart for moving. To take the trampoline apart, follow the assembly steps in reverse order (see pages 15 to 23). Do not attempt to take the frame sections, legs, or bases apart before the
mat and springs have been removed.
24
Page 25

LIMITED WARRANTY
Skywalker Holdings, LLC warranties its products to be free from defects in material and workmanship under normal use and service conditions. The steel frame is warranted for one (1) year
after the date of purchase. All other parts are warranted for ninety (90) days after the date of
purchase. Wind or weather damage is not warranted.
All warranty coverage extends only to the original retail purchaser from the date of purchase.
Skywalker Holdings, LLC obligation under this Warranty is limited to replacing or repairing, at
Skywalker Holdings, LLC option, the product at one of this authorized service centers. All
products for which a warranty claim is made must be received by Skywalker Holdings, LLC at
one of its authorized locations. Preauthorization may be obtained by calling Skywalker Holding,
LLC Customer Care Hot Line at 1-866-603-Jump(5867). This Warranty does not extend to any
product or damage to a product caused by or attributable to freight damage, abuse, misuse,
improper or abnormal usage, or repair not provided by a Skywalker Holdings, LLC authorized
service center, or to products used for commercial or rental purpose. No other Warranty beyond
that specifically set forth above is authorized by Skywalker Holdings, LLC.
SKYWALKER HOLDINGS, LLC IS NOT RESPONSIBLE OR LIABLE FOR INDIRECT,
SPECIAL OR
CONSEQUENTIAL DAMAGES ARISING OUT OF OR IN CONNECTION WITH THE USE
OR PERFORMANCE OF THE PRODUCT OR OTHER DAMAGES WITH RESPECT TO
ANY ECONOMIC LOSS, LOSS OF PROPERTY, LOSS OF REVENUE OR PROFITS, LOSS
OF ENJOYMENT OR USE, COST OF REMOVAL, INSTALLATION OR OTHER CONSEQUENTIAL DAMAGES. SOME STATES DO NOT ALLOW THE EXCLUSION OR LIMITATION OF INCIDENTAL OR CONSEQUENTIAL DAMAGES. ACCORDINGLY, THE ABOVE
LIMITATION MAY NOT APPLY TO YOU.
THE WARRANTY EXTENDED HEREUNDER IS IN LIEU OF ALL OTHER WARRANTIES
AND ANY IMPLIED WARRANTY OF MERCHANTABILITY OR FITNESS FOR A PARTICULAR PURPOSE IS LIMITED IN ITS SCOPE AND DURATION TO THE TERMS SET
FORTH HEREIN. SOME STATES DO NOT ALLOW LIMITATIONS ON HOW LONG AN
IMPLIED WARRANTY LASTS. ACCORDINGLY, THE ABOVE
LIMITATION MAY NOT APPLY TO YOU. This Warranty gives you specific LEGAL RIGHTS.
You may also have other rights which vary state to state.
THIS WARRANTY IS VALID ONLY IN THE UNITED STATES.
Skywalker Holdings, LLC, PO Box 574, Brigham City, UT 84302 USA.
Printed in China © 2015 Skywalker Holdings, LLC,
25
Page 26

1
ADVERTENCIA
Lea todas las precauciones e instrucciones de este manual antes de utilizar
este producto. Guarde este manual
para consultarlo en el futuro. Peso
máximo del usuario de 200 lb
IMPORTANTE
El trampolín y los cerramientos son
susceptibles a los vientos. Asegúrese de
fijar el trampolín y el cerramiento.
La garantía de su trampolín no cubre los
daños ocasionados por el viento.
Manual del usuario
PRECAUCIÓN: Es necesario que el montaje
lo realice un adulto.
Modelo - SWTC1400WS
Page 27

2
Modelo SWTC1400WS
En una de las patas del trampolín encontrará una etiqueta con el número de serie. La etiqueta con el número del
modelo se ubica en la lona de salto.
CONTENIDO
Precauciones importantes................................................... 3
Colocación de la etiqueta de advertencia........................... 4
Antes de comenzar............................................................. 4
Información de seguridad del trampolín............................ 5
Información de seguridad del cerramiento ........................ 6
Métodos para evitar accidentes.......................................... 7
Advertencias importantes................................................... 8
Material de uso y didáctico................................................ 9
Programa instructivo y lecciones modelo.......................... 10-11
Gráfica de identificación de piezas.................................... 12
Dibujo de despiece y lista de piezas .................................. 13-14
Pedido de piezas de repuesto ............................................. 14
Montaje .............................................................................. 15-23
Cuidado y mantenimiento.................................................. 24
Garantía limitada................................................................ 25
¿PREGUNTAS?
Si tiene dudas después de leer este manual, llame a nuestra línea directa gratuita de Atención al Cliente. Los
técnicos capacitados de nuestra línea directa de Atención al Cliente le proporcionarán asistencia inmediata.
Línea directa de Atención al Cliente: 1-866-603-5867, de lunes a viernes, de 8 a. m. a 5 p. m., Hora de la Montaña
PIEZAS DE REPUESTO
www.skywalkertrampolines.com
ADVERTENCIA
Lea las instrucciones de montaje, instalación, cuidado, mantenimiento y uso en este manual antes de montar
y usar este trampolín. Guarde este manual para consultarlo en el futuro.
Viento fuerte: El trampolín puede volarse con vientos fuertes. Si se esperan vientos fuertes, debe
trasladar el trampolín a un lugar protegido, desarmarlo, o atarlo al suelo con cuerdas y estacas (NO
INCLUIDAS). Debe usar al menos cuatro cuerdas y cuatro estacas. Asegúrese de atar las cuerdas a la
parte superior del armazón: NO fije simplemente las patas o las bases al suelo, ya que pueden separarse de los manguitos del armazón. La parte superior de las estacas debe estar a nivel del suelo para
no causar peligro de tropiezo. Además, la parte superior de las estacas debe cubrirse, de ser necesario, para que los usuarios no se lastimen si se caen sobre estas. La garantía del fabricante no cubre
ningún tipo de daño a causa del viento.
Page 28

3
11.
12.
13.
14.
15.
INSTRUCCIONES DE USO
Para reducir el riesgo de lesiones graves, lea y respete todas las advertencias, precauciones e
instrucciones de este manual antes de usar el cerramiento del trampolín. Se incluyen advertencias e instrucciones de cuidado, mantenimiento y uso de este trampolín y cerramiento para promover el uso seguro y agradable de este equipo.
ADVERTENCIA
Es responsabilidad del propietario y de los supervisores del
trampolín y del cerramiento asegurarse de que todos los
usuarios sigan las instrucciones de seguridad detalladas en este
material. El trampolín debe utilizarse únicamente bajo
supervisión de personas maduras e informadas.
Proteja el trampolín y el cerramiento del trampolín del uso no
autorizado y sin supervisión. Si utiliza una escalera para subir
y bajar del trampolín, asegúrese de quitarla cuando el
trampolín y el cerramiento no se utilicen.
Asegúrese de que haya espacio suficiente por encima del
trampolín y del cerramiento antes de usarlo. Lo ideal es contar
con al menos 24 pies (7.3 metros) de espacio libre por encima
del suelo. En este espacio no debe haber cables, ramas de
árboles ni otro posible peligro.
La separación lateral es muy importante. No coloque el trampolín
ni el cerramiento cerca de paredes, edificios, cercas, aceras y
otras áreas de juego. Asegúrese de que el espacio circundante al
trampolín y al cerramiento esté siempre despejado.
Retire cualquier objeto que pudiera interferir con el uso del
equipo. Mantenga el área de los laterales y de la parte inferior
del trampolín despejada.
Asegúrese de que el trampolín y el cerramiento estén sobre
una superficie nivelada antes de usarlos.
Inspeccione siempre el trampolín y el cerramiento antes de cada
uso. Asegúrese de que el armazón, la almohadilla, la red, los tubos
del cerramiento y las mangas de gomaespuma estén correctamente
colocados. Reemplace cualquier pieza gastada, defectuosa o
faltante. (Los usuarios podrían lastimarse si el trampolín y el
cerramiento se utilizan cuando se encuentran en mal estado).
Salte únicamente cuando la superficie de la lona (cama) esté
seca. Debe haber poco o nada de viento o movimiento de aire.
El trampolín y el cerramiento no deben usarse con vientos
racheados o fuertes.
Los armazones del trampolín y del cerramiento están hechos
de metal. No están conectados a tierra y conducirán la
electricidad. Por este motivo, existe un riesgo de
electrocución. No se permiten luces, calentadores eléctricos,
cables de prolongación o electrodomésticos en el trampolín o
el cerramiento en ningún momento.
Use el trampolín y el cerramiento en una zona bien iluminada.
Si el trampolín y el cerramiento están en interiores o en zonas
con sombra, es probable que tenga que usar iluminación
artificial (eléctrica) en la zona.
Durante los meses de invierno, deberá quitar y guardar los
materiales blandos del trampolín en un lugar seco. Si no los
quita en los meses de invierno, el frío puede causar daños en
los resortes, la lona de salto, la almohadilla y el cerramiento.
La garantía será nula.
Este trampolín y cerramiento están fabricados para usuarios
que pesen menos de 200 libras.
Los trampolines de más de 20 in (51 cm) de alto no se
recomiendan para los niños menores de 6 años de edad.
El cerramiento del trampolín debe usarse solo con el tamaño
de trampolín para el cual está diseñado.
El uso incorrecto y el maltrato del cerramiento del trampolín
son peligrosos y pueden causar lesiones graves.
No coloque nada en la barrera del cerramiento, a menos que sea
un accesorio aprobado por el fabricante o una pieza del sistema
de cerramiento.
Quítese las joyas antes de comenzar a saltar. Las joyas pueden
quedar enganchadas en la red del cerramiento.
Use ropa sin cordones, ganchos, lazos o cualquier cosa que
pudiera quedar enganchada mientras usa el trampolín/cerramiento y pudiera resultar en enredos y estrangulamiento, o
ambas cosas.
NO deje a más de una persona dentro del cerramiento del
trampolín al mismo tiempo. Dos o más personas saltando al
mismo tiempo pueden ocasionarse heridas graves.
NO salte en el trampolín mientras tenga o sostenga objetos,
especialmente algo cortante o frágil.
NO utilice el trampolín ni el cerramiento si ha consumido
alcohol o drogas.
NO intente realizar ni permita que otros realicen volteretas
(saltos mortales) en el trampolín. Si aterriza con la cabeza o el
cuello podría lesionarse gravemente, quedar paralizado o morir,
incluso al aterrizar en el medio de la lona de salto.
Suba y bájese siempre del trampolín. Es muy peligroso intentar
bajarse del trampolín saltando desde el trampolín hasta el suelo
o el piso, o saltar al trampolín para subirse a este.
NO haga rebotar otros objetos en el trampolín. Entre y salga del
cerramiento solo por la puerta o barrera del cerramiento
diseñada para ese propósito.
NO intente arrastrarse por debajo, saltar, intencionalmente
rebotar, colgarse, treparse, patear o cortar la red de la barrera.
Con la cabeza derecha, enfoque los ojos en el trampolín hacia el
perímetro. Esto lo ayudará a controlar el rebote.
Para dejar de rebotar, flexione las rodillas en cuanto sus pies
entren en contacto con la cama del trampolín. Aprenda esta
habilidad antes de intentar otras.
Evite rebotar demasiado alto. Permanezca a una altura baja
hasta lograr el control del rebote y aterrizar varias veces en el
centro del trampolín. El control es más importante que la altura.
Evite rebotar cuando esté cansado. Úselo poco tiempo.
Aprenda cuidadosamente los rebotes y las posiciones corporales
básicos antes de intentar habilidades más avanzadas. Puede
realizar una variedad de actividades en el trampolín combinando los puntos básicos de varias formas, realizando un punto
básico tras otro, con rebotes de pies entre ellos.
Para obtener más información sobre el equipo del trampolín,
comuníquese con el fabricante. Para obtener información sobre
el aprendizaje de habilidades, comuníquese con un instructor de
trampolín certificado.
Page 29

4
COLOCACIÓN DE LA ETIQUETA DE SEGURIDAD
Trampoline Safety Instructions
WARNING
Do not land on head or neck.
Do not attempt or allow somersaults.
Landing on your head or neck can cause
serious injury, paralysis, or death, even
when landing in the middle of th mat.
Use trampoline only with mature,
knowledgeable supervision.
Only one person at a time on the trampoline.
Do not allow more than one person on the
trampoline. Use by more than one person at
the same time increases the chance of injury.
Use trampoline only with mature,
knowledgeable supervision. This trampoline
is not recommended for children under 6
years of age.
Do not land on head or neck.
Do land on head or neck. Paralysis
or death can result, even if you land
in the middle of the trampoline mat
(bed). Do not do somersaults (flips).
Use trampoline enclosure only with
mature, knowledgeable supervision.
Enforce all safety rules and be
familiar with the information in the
User’s manual to help users in
following enclosure instructions and
trampolines safety.
Only one person at a time on the
trampoline. Multiple jumpers
increases the chance of loss of
control and this can result in broken
head, back or leg. Users may
become entangled in or strangled by
loose cards or gaps between
trampoline and enclosure.
For the Supervisor.
Read the instructions before using the trampoline. Enforce all of the safety rules and be familiar with the information in the User’s Manual
to help new users learn basic jumps and all users to follow trampoline safety.
All trampoline users must have mature, knowledgeable supervision, regardless of the skill or age of the jumper.
This trampoline is not recommended for use by children under 6 years of age.
Inspect the trampoline before using. Keep frame pad in place. A worn or damaged mat (bed), spring, or frame piece should be replaced
immediately.
Keep objects away that could interfere with the jumper.
Secure thet rampoline against unauthorized and unsupervised use.
Do not use when trampoline is wet or in a windy condition.
For the Jumper:
Do not use the trampoline when under the influence of drugs or alcohol.
Avoid bouncing when tired.
Jumping:
Learn the basic jumps and body positions very well before trying more difficult stunts. Study the User’s Manual to learn how to do basic
jumps.
Stop your bounce by flexing your knees as your feet come in contact witht the trampoline mat (bed).
Avoid jumping too high or for too long. Always control your jump. A controlled jump is one where the take of and land spots are the same.
Bounce in the center of the trampoline. Focus eyes on trampoline toward the perimeter mat. Failure to do so may result in a loss of balance
and control.
Take turns jumping one at a time, and always have someone watch you.
Getting on and off:
Climb on to and off the trampoline. Do not jump on or off. Do not use the trampoline as a springboard to other objects.
For further equipment information contact Skywalker. For skill training information, contact a trainer certification organization.
ATTACH TO TRAMPOLINE
For the Supervisor.
Use trampoline enclosure only with mature, knowledgeable supervision. Enforce all safety rules and be familiar with the
information in the users manual to help users in following trampoline enclosure instructions and trampoline safety.
This trampoline enclosure system is not recommended for use by children under 6 years of age.
Do not exceed the weight limit recommended by the manufacturer.
Use only when the trampoline mat (bed) is clean and dry. Inspect the trampoline and enclosure prior to each use and replace
any worn or damaged parts.
Use only when enclosure barrier has no holes, pole clamps are tightly secured to the poles, and the support (frame) and the
barrier is properly suspended.
For the Jumper:
Do not use the trampoline when under the influence of drugs or alcohol.
Jumping:
Avoid jumping too high for too long. Always control your jump. Do not try to jump over the barrier.
Do not intentionally rebound of the barrier. Do not hang from, kick, cut or climb on the barrier.
Wear clothing free of drawstrings, hooks, loops, or anything that could get caught while
using the trampoline/enclosure and result in entaglement or stranglement or both.
Getting on and off:
Climb on to and off the trampoline at the enclosure door or barrier opening. Do not jump on or off. Do not crawl under the
barrier. Do not use the trampoline as a springboard to other objects.
Do not jump from other objects, buildings, or surfaces, onto the trampoline, or into or over the trampoline enclosure.
For further equipment information contact SKWYALKER TRAMPOLINES. For skill training information, contact a trainer
certification organization.
ATTACH TO NETTING AT DOOR
Do not land on head or neck.
Do not attempt or allow somersaults. Landing on your head or
neck can cause serious injury, paralysis, or death, even when
landing in the middle of th mat.
Use trampoline only with mature, knowledgeable supervision.
Only one person at a time on the trampoline.
Do not allow more than one person on the trampoline.
Use by more than one person at the same time increases the
chance of injury.
Use trampoline only with mature, knowledgeable supervision.
This trampoline is not recommended for children under 6 years
of age.
WARNING
WARNING
Do not attempt or allow
somersaults.
(Flips)
Do not land on head or neck.
Landing on your head or neck can
cause serious injury, paralysis, or
death, even when landing in the middle
of th mat.
Use trampoline only with mature,
knowledgeable supervision.
Do not allow more than one
person on the trampoline.
Multiple jumpers increase the chance
of loss of control, collision and falling
off. This can result in broken head,
neck, back, or legs.
Use Trampoline only with mature,
knowledgeable supervision.
This trampoline is not recommended
ofor children under 6 years of age.
Read all of the instructions before
using this trampoline.
Inspect before using and replace any
worn, defective or missing parts.
Las etiquetas que se muestran en esta
página se han colocado en el trampolín
en los lugares indicados. El dueño
deberá colocar el letrero con las instrucciones de seguridad (consulte el paso
14). Si alguna de las etiquetas o el
letrero faltan o son ilegibles, llame a
nuestra línea directa gratuita de
Atención al Cliente al 1-866-603-5867,
de lunes a viernes, de 8 a. m. a 5 p. m.,
Hora de la Montaña, para pedir una
etiqueta o un letrero de reemplazo.
Limitaciones específicas de uso VIENTO FUERTE
Es posible que el trampolín y el cerramiento se vuelen con los vientos fuertes. Si se esperan vientos fuertes, debe trasladar
el trampolín y el cerramiento a un lugar protegido. Desmonte (quite) la red del cerramiento. Ate el armazón del trampolín
al suelo con cuerdas y estacas (no incluidas). El único método seguro para proteger su trampolín y el entorno circundante
durante los vientos fuertes es desmontar la unidad por completo y guardarla bajo techo.
ANTES DE COMENZAR
Gracias por elegir los trampolines de marca Skywalker Trampolines. Los trampolines redondos de Skywalker Trampolines
están diseñados y confeccionados para brindar muchos años de diversión y uso. Este trampolín cuenta con las advertencias
e instrucciones para su montaje, cuidado, mantenimiento y uso del trampolín. Todos los supervisores y los usuarios del
trampolín deben leer esta información antes de que cualquier persona pueda saltar en el trampolín.
Si tiene alguna duda después de leer este manual, llame a nuestra línea directa gratuita de Atención al Cliente al
1-866-603-5867, de lunes a viernes, de 8 a. m. a 5 p. m., Hora de la Montaña (excepto días festivos). Para poder ayudarlo,
mencione el modelo y el nombre del trampolín cuando llame. (Consulte la cubierta interior de este manual).
El letrero que se muestra a la derecha se cosió
a la red del cerramiento del trampolín.
Nota: Las etiquetas y el letrero que se muestran no representan su tamaño real.
Page 30

5
INFORMACIÓN DE SEGURIDAD SOBRE EL TRAMPOLÍN
Con el uso del trampolín, como en todos los deportes recreativos activos, los participantes pueden lesionarse. Sin embargo, pueden tomarse medidas para reducir el riesgo de lesión. En esta sección, se identifican los principales patrones de
accidentes y se detallan las responsabilidades de los supervisores y de los usuarios relativas a la prevención de accidentes.
CLASIFICACIÓN DE ACCIDENTES
Volteretas (saltos mortales): Aterrizar con la cabeza o el cuello, incluso en medio de la lona del trampolín, aumenta el
riesgo de que se rompa la espalda o el cuello, lo cual puede dejarlo paralizado o causarle la muerte. Este tipo de
eventos puede ocurrir cuando un usuario comete un error tratando de realizar una voltereta (salto mortal) hacia
adelante o hacia atrás. No realice volteretas (saltos mortales) en este trampolín para patio.
Varios usuarios: Si hay más de una persona a la vez en el trampolín se incrementa la posibilidad de que un usuario se
lesione al perder el control de su salto. Los usuarios pueden chocar entre sí, caerse del trampolín, caer sobre o a través
de los resortes, o aterrizar incorrectamente en la lona. El usuario de menor peso es el más propenso a resultar herido.
Subirse y bajarse del trampolín: La lona del trampolín está a varios pies sobre el nivel del suelo. Saltar del trampolín
al suelo o a cualquier otra superficie puede resultar en lesiones. Saltar al trampolín de una azotea, plataforma u otro
objeto también presenta un riesgo de lesión. Los niños más pequeños quizá necesiten ayuda para subirse o bajarse del
trampolín. Suba y bájese siempre cuidadosamente del trampolín. No pise los resortes ni la almohadilla del armazón.
No se agarre de la almohadilla del armazón para treparse al trampolín.
Golpear el armazón o los resortes: Puede lesionarse como resultado de golpear el armazón o caer a través de los resortes
mientras salta, o se sube o baja del trampolín. Permanezca en el centro de la lona cuando salta. Asegúrese de mantener la
almohadilla del armazón en su lugar para cubrir el armazón. La almohadilla del armazón no está fabricada ni destinada
para soportar el peso del usuario del trampolín. No se pare ni salte directamente sobre la almohadilla del armazón.
Pérdida del control: Los usuarios que pierden control de sus saltos pueden aterrizar incorrectamente en la lona, en el
armazón o en los resortes, o caer fuera del trampolín. Un salto controlado es cuando se aterriza en el mismo lugar
donde saltó. Antes de aprender un truco más difícil, debe poder realizar un truco una y otra vez de forma controlada.
Intentar realizar un truco sin contar con los niveles de habilidades requeridos aumenta la probabilidad de perder el
control. Para recuperar el control y detener el salto, flexione las rodillas pronunciadamente al aterrizar.
Consumo de alcohol o de drogas: La posibilidad de lesión aumenta cuando un usuario ha consumido alcohol o drogas.
Estas sustancias afectan el tiempo de reacción, el juicio y la coordinación física de una persona.
Toparse con objetos: Saltar en un trampolín mientras otras personas, mascotas u objetos estén por debajo de este
aumentará la posibilidad de que alguien resulte herido. Saltar mientras sostiene o tiene un objeto en el trampolín,
especialmente uno que sea cortante o frágil, aumentará la probabilidad de lesiones. Colocar un trampolín demasiado
cerca de cables eléctricos, ramas de árboles u otros objetos puede aumentar la probabilidad de lesiones.
Mal mantenimiento del trampolín: Los usuarios pueden resultar heridos si se utiliza un trampolín cuando está en mal
estado. Una lona rasgada, un armazón doblado, un resorte roto o la falta de una almohadilla del armazón, por ejemplo,
deben reemplazarse antes de permitir que una persona salte. Inspeccione el trampolín antes de cada uso.
Condiciones climáticas: Un trampolín mojado es demasiado resbaloso para saltar de forma segura. Los vientos
racheados o fuertes pueden hacer que los usuarios pierdan el control. Para reducir la posibilidad de lesión, use el
trampolín solo cuando el clima es adecuado.
Acceso: Para evitar el acceso al trampolín de los niños más pequeños sin supervisión, debe quitar siempre la escalera
opcional de acceso y guardarla en un lugar seguro cuando no utilice el trampolín.
Page 31

6
INFORMACIÓN DE SEGURIDAD SOBRE EL CERRAMIENTO
NECESIDAD DE SEGURIDAD EN EL CERRAMIENTO DEL TRAMPOLÍN
Un trampolín con cerramiento es un producto recreativo.
La información de esta página y de las páginas 7-9 identifica las precauciones de seguridad importantes. Las
precauciones no incluyen todas las posibilidades, dado que un cerramiento puede utilizarse de maneras que este
manual no puede cubrir en su totalidad.
Para evitar los pellizcos y los cortes durante el uso del cerramiento, el trampolín debe contar con una almohadilla en el
armazón (consulte las instrucciones del fabricante del trampolín). La almohadilla del armazón debe colocarse sobre el
trampolín antes de montar el cerramiento. La almohadilla del armazón reduce el riesgo de lesiones a causa del
contacto accidental con los resortes y el armazón. Supervisión de niños por parte de un adulto
USAR EL CERRAMIENTO DE FORMA SEGURA
Supervisión de niños por parte de un adulto
Los niños que usen un trampolín con un cerramiento deben ser supervisados por adultos. Los niños más pequeños
deben ser supervisados en todo momento. Los adultos deben prestar especial atención a:
• Las cosas que los niños podrían llevar al cerramiento.
• Las actividades de los niños dentro del cerramiento.
• Las condiciones dentro del cerramiento mientras los niños lo estén usando.
• La forma en que los niños entran y salen del cerramiento.
A continuación se detalla más información sobre el uso seguro del cerramiento.
Peligro de electrocución asociado al armazón metálico del trampolín y del cerramiento
Los armazones del trampolín y del cerramiento están hechos de acero galvanizado. No están conectados a tierra y
conducirán la electricidad. Por este motivo, existe un riesgo de electrocución. No se permiten luces, calentadores
eléctricos, cables de prolongación o electrodomésticos en el trampolín o el cerramiento en ningún momento.
Peligros asociados con la entrada y la salida del cerramiento de trampolín
El cerramiento de un trampolín instalado sobre un trampolín está elevado del suelo. La altura del cerramiento aumenta el
riesgo de una caída cuando un usuario entra o sale del cerramiento. A los niños pequeños, sobre todo, puede costarles entrar
y salir del cerramiento. Para reducir el riesgo de caídas, ayude siempre a los niños pequeños a entrar y salir del cerramiento.
Entre y salga del cerramiento de trampolín solamente por medio de la puerta del cerramiento (la abertura en las paredes
de la red). La lona del trampolín (cama) y las paredes de la red del cerramiento son piezas separadas. Ningún usuario,
especialmente los niños pequeños, debe salir del cerramiento entre la lona y las paredes de la red. Intentar salir de esta
forma genera un riesgo de asfixia al quedar atrapado entre el armazón del trampolín y las paredes de la red.
La oscuridad aumenta el riesgo de una caída cuando un usuario entra o sale del cerramiento. No utilice el trampolín a
menos que haya una iluminación adecuada.
Peligros asociados con animales, objetos cortantes o frágiles
Para evitar que se dañen el cerramiento del trampolín y el trampolín, no permita el ingreso de mascotas u otros
animales en el cerramiento. Las garras y los dientes de los animales pueden dañar la red. No salte en el trampolín
mientras sostiene o usa un objeto cortante o frágil.
Page 32

7
MÉTODOS PARA EVITAR ACCIDENTES
La función del supervisor en la prevención de accidentes
Los supervisores de los usuarios del trampolín tienen la responsabilidad de proporcionar supervisión informada y
madura. Deben conocer y hacer cumplir todas las reglas y advertencias impresas en este manual para minimizar la
probabilidad de accidentes y lesiones. También deben informarles estas reglas a los usuarios. Durante períodos de
tiempo en los que la supervisión no esté disponible o no sea la adecuada, el trampolín debe desarmarse, colocarse en un
área segura o protegerse del uso no autorizado. Otra opción a considerar es cubrir el trampolín con una lona pesada que
pueda asegurase con candados y cadenas. El supervisor tiene la responsabilidad de asegurarse de que el letrero con las
INSTRUCCIONES DE SEGURIDAD DEL TRAMPOLÍN (consulte el paso 14 de las instrucciones de montaje)
permanezca en el trampolín y que los usuarios estén informados acerca de estas instrucciones.
La función del usuario en la prevención de accidentes
La educación del usuario es fundamental para la seguridad. Los usuarios deben primero aprender un rebote bajo y
controlado, y luego aprender las posiciones y combinaciones básicas de aterrizaje antes de pasar a las habilidades
intermedias. Los usuarios deben entender por qué deben lograr "controlar" sus movimientos antes de poder comenzar a
pensar en otros movimientos. Entender la progresión adecuada de las habilidades de saltar en un trampolín debe ser la
primera lección. Revise este manual para conocer las técnicas básicas de uso del trampolín. Siga las reglas del letrero con
las INSTRUCCIONES DE SEGURIDAD DEL TRAMPOLÍN (consulte el paso 14 de las instrucciones de montaje). Para
obtener información u otros materiales instructivos, comuníquese con un instructor de trampolín certificado.
INSTRUCCIONES DE SEGURIDAD DEL TRAMPOLÍN
Para el supervisor
Lea las instrucciones antes de usar el trampolín. Aplique todas las reglas de seguridad. Familiarícese con la información de
este manual para poder ayudar a los nuevos usuarios a aprender los saltos básicos y a todos los usuarios a respetar la seguridad
del trampolín. Todos los usuarios del trampolín deben tener una supervisión madura e informada, más allá de su habilidad o
edad. Este trampolín no se recomienda para los niños menores de 6 años de edad. Inspeccione el trampolín antes de usarlo. No
utilice el trampolín sin la almohadilla del armazón firmemente colocada para cubrir el armazón. No utilice el trampolín
mojado o cuando esté ventoso. Una lona, resorte o pieza del armazón desgastado o dañado debe reemplazarse inmediatamente.
SALTAR
Aprenda cuidadosamente los saltos y las posiciones corporales básicos antes de intentar habilidades más avanzadas.
Conozca sus propios límites a la hora de realizar cada uno de los saltos en el trampolín. Estudie este manual para
aprender a realizar los saltos básicos.
Para dejar de rebotar, flexione las rodillas en cuanto sus pies entren en contacto con la lona del trampolín. Aprenda esta
habilidad antes de intentar otras.
Peligros asociados con los fuertes vientos
Los vientos fuertes pueden desplazar o volar un trampolín con un cerramiento. Si esto sucede, cualquiera que se encuentre en
su camino, o en el interior del cerramiento, puede resultar lesionado. Si se esperan vientos fuertes, desarme la red de
cerramiento y sujete el armazón del trampolín al suelo (consulte la página 24) o lleve el trampolín y el cerramiento a un lugar
protegido. El único método seguro para proteger su trampolín y el entorno circundante durante los vientos fuertes es
desmontar la unidad por completo y guardarla bajo techo. La garantía no cubre los daños ocasionados por el viento o el clima.
ADVERTENCIA
Page 33

8
Guardar el cerramiento del trampolín de forma segura
Más adelante en este manual se proporcionan los pasos específicos para guardar el cerramiento del trampolín. Existen
precauciones especiales que debe tener en cuenta al guardar el cerramiento.
Retire las secciones del arco conectadas como una unidad y colóquelas en el suelo. Separe los tubos una vez que estén en
el suelo. Evite aplastarse los dedos usando guantes y manteniendo sus dedos lejos de los puntos de pellizco, cerca del
montaje del soporte, mientras quita los tubos del armazón.
Colocar el trampolín y el cerramiento en un lugar seguro
Debe haber por lo menos 24 pies (7.3 metros) de espacio abierto y despejado sobre el suelo. No coloque ni guarde nada
debajo del trampolín y del cerramiento. Para evitar lesiones, el trampolín y el cerramiento deben mantenerse alejados de
objetos y posibles peligros, incluido el cableado de energía eléctrica, ramas de árboles y cercas. No coloque el trampolín y
el cerramiento cerca de ningún dispositivo o estructuras recreativas, como una piscina o bañera de hidromasaje. El
trampolín y el cerramiento deben colocarse sobre una superficie nivelada antes de su uso. El área alrededor del trampolín
debe estar siempre bien iluminada.
Para el supervisor
• Familiarícese con la información de este manual y respete todas las normas de seguridad. Ayude a todos los usuarios a
usar el trampolín y el cerramiento de forma segura.
• Todos los usuarios del trampolín deben contar con alguien que los supervise en todo momento, más allá de su
habilidad o edad.
• Proteja el trampolín y el cerramiento del uso no autorizado y sin supervisión. No permita que haya objetos en el
trampolín y el cerramiento que pudieran interferir con el usuario.
• Este trampolín y cerramiento no se recomiendan para niños menores de 6 años de edad o personas que pesen más de
200 libras.
• Utilice el trampolín y el cerramiento solo cuando la lona (cama) del trampolín esté limpia y seca. Inspeccione el
trampolín y el cerramiento antes de cada uso, y reemplace las piezas desgastadas o dañadas. Utilícelo únicamente
cuando la red del cerramiento no tenga agujeros, los montantes estén firmemente atornillados en sus manguitos y la red
esté correctamente suspendida.
• NO intente realizar ni permita que otros realicen volteretas en el trampolín. Si aterriza con la cabeza o el cuello podría
lesionarse gravemente, quedar paralizado o morir, incluso al aterrizar en el medio de la cama.
Para el usuario
No utilice el cerramiento del trampolín si está bajo la influencia de las drogas o del alcohol.
SALTO
• Evite saltar demasiado alto o por demasiado tiempo. Controle siempre su salto.
• Túrnese para saltar de a uno por vez y siempre pídale a alguien que lo mire.
• No intente saltar por encima de la red. No rebote intencionalmente fuera de la red. No se cuelgue, patee, corte ni trepe
la red.
• Use ropa sin cordones, ganchos, lazos o cualquier cosa que pudiera quedar enganchada mientras usa el
trampolín/cerramiento y pudiera resultar en enredos y estrangulamiento, o ambas cosas.
• No coloque nada en la red que no sea un accesorio aprobado por Skywalker Trampolines o parte del cerramiento del
trampolín.
ADVERTENCIA
Page 34

9
SUBIRSE Y BAJARSE DEL TRAMPOLÍN
Súbase y bájese del trampolín. No salte hacia o desde el trampolín. No utilice el trampolín para rebotar hacia otros
objetos o lugares.
ENTRAR Y SALIR DEL CERRAMIENTO DEL TRAMPOLÍN
El trampolín debe utilizarse únicamente bajo la supervisión adulta adecuada.
SE PROPORCIONA UN SUJETADOR DE CREMALLERA PARA AYUDAR A PROTEGER EL TRAMPOLÍN DEL
USO NO SUPERVISADO POR PARTE DE LOS NIÑOS Y PARA MANTENER LA CREMALLERA CERRADA
DURANTE EL USO. Un supervisor adulto responsable debe estar presente para garantizar que el sujetador de la
cremallera se une al anillo en D en la lona de salto y que los sujetadores horizontales se unen a los anillos en D en la red
del cerramiento, tanto durante su uso como después de este.
Para obtener más información sobre el equipo, comuníquese con Skywalker Holding, LLC. Para obtener más
información sobre la formación de habilidades, comuníquese con una organización de instrucción certificada.
MATERIAL DE USO Y DIDÁCTICO
RESUMEN DEL USO DEL TRAMPOLÍN
Los primeros períodos de uso del trampolín deben centrarse en el aprendizaje de las posiciones corporales básicas y la
práctica de los ocho rebotes básicos que se describen en las páginas 10 y 11.
Durante este período de aprendizaje, los usuarios deben practicar estas técnicas básicas y perfeccionarlas. El frenado, o la
verificación del rebote, debe enseñarse en primera instancia y destacarse como medida de seguridad. Los usuarios deben
frenar su salto cuando empiecen a perder el equilibrio o el control. Esto se logra simplemente flexionando las rodillas
pronunciadamente al aterrizar y absorber la impulsión hacia arriba de la lona. Esto permite que el usuario se detenga
repentinamente y evite perder el control.
Con el uso del trampolín, el punto de despegue y el punto de aterrizaje de un salto bueno y controlado son en el mismo
punto. Se considera que se aprendió un ejercicio solamente cuando un usuario logra realizar un salto correctamente una y
otra vez. Los usuarios nunca deben seguir con un truco avanzado hasta que logren realizar todos los trucos anteriores
correctamente en cada intento.
Permita que el usuario use brevemente el trampolín. El rebote en exceso expone un usuario agotado a un mayor riesgo de
lesión. Los turnos más largos tienden a disminuir el interés de los demás a la espera de saltar. La vestimenta debe consistir
en camisetas y pantalones cortos. Los usuarios deben usar zapatos de gimnasia reglamentarios o calcetines gruesos, o
pueden saltar descalzos. No se deben usar zapatos de calle o deportivos en el trampolín. Los usuarios principiantes quizá
deseen usar ropa protectora holgada, como una camisa de manga larga y pantalones, hasta dominar correctamente los
aterrizajes. Esto reducirá la posibilidad de que la lona (cama) cause quemaduras por aterrizar incorrectamente con los
codos y las rodillas. No se deben usar zapatos de suela dura, ya que provocan un mayor desgaste en la lona del trampolín.
Subirse y bajarse correctamente del trampolín debe ser una regla estricta desde el comienzo. Los usuarios deben subir al
trampolín colocando sus manos sobre el armazón y pisando o rodando sobre el armazón, a través de los resortes y sobre la
lona. No deben pisar directamente la almohadilla del armazón, o sujetarse de la almohadilla del armazón al subir o bajar del
trampolín. Los usuarios deben siempre colocar sus manos en el armazón mientras suben o bajan. Para bajarse, los usuarios
deben caminar hacia el borde de la lona, inclinarse y colocar una mano en el armazón y luego bajar de la lona al suelo. Si ha
instalado la escalera opcional, puede usar sus peldaños para subirse o bajarse del trampolín. Mire siempre hacia la escalera y
coloque sus manos en el armazón. Asegúrese de que su pie pise firmemente el peldaño de la escalera al usarla.
No se deben permitir los rebotes imprudentes. Todas las habilidades deben aprenderse a alturas moderadas. Debe
enfatizarse el control, en lugar de la altura. Debe prohibirse que los usuarios practiquen solos y sin supervisión.
Page 35

10
Programa instructivo y lecciones modelo
Las siguientes lecciones son ejemplos de un programa instructivo. Deben presentarse tras un debate y una demostración
completos de la mecánica corporal entre la supervisión y el(los) estudiante(s). Consulte también la página 12.
1. Cómo subirse y bajarse del trampolín, demostración y prácticas de las técnicas adecuadas.
2. Rebote básico, demostración y práctica.
3. Frenado (detención del rebote), demostración y práctica. Frenar tras recibir la indicación.
4. Caída de manos y de rodillas, demostración y práctica, reforzando el aterrizaje y la alineación de cuatro puntos.
Lección 1: Rebote básico
1. Comience parado con la cabeza derecha y los ojos en dirección
a la almohadilla del armazón.
2. Balancee los brazos hacia adelante y hacia arriba en un
movimiento circular.
3. Junte los pies y apunte hacia abajo con los dedos de los pies
mientras está en el aire.
4. Mantenga los pies separados, aproximadamente 15 pulgadas,
cuando esté parado en la lona.
Lección 3: Caída de manos y de rodillas
1. Demostración y práctica, reforzando el aterrizaje y la alineación
de cuatro puntos.
2. Comience a rebotar mientras está parado, mirando hacia la
almohadilla del armazón.
3. Aterrice sobre la lona con sus manos y rodillas.
4. Empújese con las manos y párese.
Lección 2: Caída de rodillas
1. Revise y practique las habilidades que ya ha aprendido.
2. Comience a rebotar mientras está parado, mirando hacia la
almohadilla del armazón.
3. Aterrice sobre sus rodillas, manteniendo la espalda y el
cuerpo derechos.
4. Párese nuevamente
5. Dé medio giro a la derecha, a la izquierda, con los pies y
luego con las rodillas.
Lección 4: Caída de espalda
1. Revise y practique las habilidades que ha aprendido.
2. Comience con un rebote bajo y aterrice de espalda.
3. Incline el mentón hacia su pecho mientras aterriza.
4. Patee hacia adelante y empújese con las piernas para volverse
a parar.
5. Demostración, haciendo hincapié en el impulso hacia arriba que
debe realizar con la cadera arqueando el cuerpo a medida que
levanta una pierna se adelanta desde la posición de parado (no
de rebote) y cae de espalda con el mentón hacia el pecho y los
ojos mirando a la almohadilla del armazón. Es muy importante
que domine esta habilidad. Demostración de la caída de espalda
con un rebote bajo y práctica de ambas técnicas.
Page 36

11
Lección 5: Caída de sentado
1. Revise y practique las habilidades que ya ha aprendido.
2. Aterrice sentado con las piernas paralelas a la lona.
3. Coloque las manos sobre la lona al lado de su cadera.
4. Empújese con las manos para volver a pararse.
5. Dé una media vuelta con los pies. Caiga sentado, de rodillas,
con las manos y de rodillas, y repita todo.
Lección 7: Media vuelta
1. Revise y practique las habilidades que ya ha aprendido.
2. Comience con la posición de caída de frente y empújese hacia
la izquierda o la derecha con los brazos para empezar a girar
su cuerpo en la dirección opuesta.
3. Gire la cabeza y los hombros en la misma dirección que su
cuerpo.
4. Mantenga la espalda paralela a la lona y la cabeza erguida.
5. Después de completar la media vuelta, aterrice de frente.
Lección 6: Caída de frente
1. Para ahorrar tiempo y evitar quemarse con la lona (cama), todos
los estudiantes deben asumir la posición de caída de frente en el
suelo mientras el instructor verifica que no cometan errores.
Progresión sugerida: desde el rebote con las manos y las
rodillas, extienda el cuerpo para aterrizar de frente y párese con
el rebote.
2. Comience con un rebote bajo y aterrice en la lona boca abajo.
3. Mantenga la cabeza erguida y los brazos extendidos hacia la lona.
4. Empújese con los brazos para volver a pararse.
Lección 8: Caderas giratorias
1. Progresión sugerida: caiga sentado, párese, dé medio giro y
repita; caiga sentado, dé medio giro con los pies, repita; caiga
sentado, dé medio giro para caer sentado nuevamente.
2. Comience con una caída de sentado.
3. Gire la cabeza hacia la izquierda o la derecha y balancee los
brazos hacia arriba en la misma dirección.
4. Gire las caderas en la misma dirección que la cabeza y los
brazos, completando un giro.
5. Aterrice en posición sentada.
Lección 9
Una vez que se aprende cada una de las lecciones, se debe estimular al estudiante a que diseñe y organice rutinas, enfatizando la
buena forma. El instructor puede juzgar o calificar a los estudiantes y organizar grupos para profundizar la instrucción en
consecuencia. Para estimular el interés en la competencia, puede presentar el juego "Trampolin Caballo". Antes de que comience el
juego, los estudiantes deben enumerarse. Para comenzar el juego, el estudiante número 1 debe realizar una acrobacia. Luego el
estudiante número 2 se sube al trampolín, realiza la misma acrobacia y agrega una segunda acrobacia. El estudiante número 3 se sube
al trampolín, realiza las acrobacias 1 y 2, y agrega una tercera acrobacia. De este modo, la serie de acrobacias se alarga
continuamente. La primera persona que se olvide de realizar una de las acrobacias de la serie recibe la letra "C" y comienza una
nueva serie con una acrobacia. Si la persona se olvida una acrobacia nuevamente, recibe la letra "A". Cuando una persona acumula
"C-A-B-A-L-L-O", queda eliminada del juego. El último concursante que permanezca en el juego será el ganador. Debe facilitar la
planificación de las lecciones a partir de este punto comunicándose con un instructor de trampolín certificado.
Page 37

DestornilladorHerramienta para el resorte
Tornillo
(6 unidades)
Tapa del extremo
(6 unidades)
Tapa del poste (6 unidades)
Gomaespuma
(12 unidades)
Tubo curvo (6 unidades)
Tubo recto (6 unidades)Resorte (96 unidades)
Red del cerramiento
(1 unidad)
Almohadilla del
armazón (1 unidad)
Lona de salto (1 unidad)
Refuerzo de la pata (6 unidades)
Extensión de la pata
(12 unidades)
Tubo superior con
manguito (6 unidades)
Tubo superior con articulación
en T (6 unidades)
1
3
2
5 6
4
7
10
13
16
Arandela M6 (24 unidades)Tuerca M6 (24 unidades)
14 Perno M6x45mm (12 unidades)
Perno M5x44mm (6 unidades)
15
11
12
8
9
12
Use las siguientes imágenes para identificar todas las piezas.
Gráfica de identificación de piezas (no a escala real) - Modelo SWTC1400WS
Perno M6x48mm (12 unidades)
Llave Inglesa (1 unidad)
17 18
19
16
20 21 22
(1 unidad)
(2 unidades)
23
Estacas de Viento (4 unidades)
Page 38

13
2
2
2
2
2
2
1
1
1
1
1
1
3
3
17
17
17
3
17
17
3
17
3
3
3
4
3
17
3
4
3
3
3
4
4
4
4
14
19
19
14
14
19
14
16
19
14
19
14
16
16
14
19
17
14
19
16
16
16
9
10
13
15
12
11
12
15
15
15
15
12
12
14
19
14
19
14
19
19
17
17
18
20
6
5
8
23
21
7
9
9
9
9
9
10
10
10
10
10
15
12
11
11
11
11
11
11
13
13
13
13
13
11
11
12
14
11
17
18
18
18
18
22
22
22
Dibujo de despiece -- Modelo SWTC1400WS
Page 39

14
Lista de piezas
N.° de ref Cant. Descripción
1 6 Tubo superior con articulación en T
2 6 Tubo superior con manguito
3 12 Extensión de la pata
4 6 Refuerzo de la pata
5 1 Lona de salto
6 1 Almohadilla del armazón
7 1 Red del cerramiento
8 96 Resorte
9 6 Tubo recto
10 6 Tubo curvo
11 12 Gomaespuma
12 6 Tapa del poste
13 6 Tapa del extremo
14 12 Perno M6x45mm
15 6 Perno M5x50mm
16 6 Tornillo
17 24 Tuerca M6
18 24 Arandela M6
20 1 Herramienta para el resorte
19 12 Perno M6x50
21 1 Llave Inglesa
22 2 Destornillador
PEDIDO DE PIEZAS DE REPUESTO
Para pedir piezas de repuesto, ingrese a nuestro sitio web www.skywalkertrampolines.com o llame a nuestra
línea directa gratuita de Atención al Cliente al 1-866-603-5867, de lunes a viernes, de 8 a. m. a 5 p. m., Hora
de la Montaña (excepto días festivos).
Para poder ayudarlo, proporcione la siguiente información cuando llame:
• el MODELO del trampolín (consulte la cubierta de este manual)
• el NÚMERO DE REFERENCIA y la DESCRIPCIÓN de la pieza (consulte la LISTA DE PIEZAS anterior)
#Estas piezas no están ilustradas. Las especificaciones están sujetas a cambio sin previo avisob
23 4 Estacas de Viento
# 1 Manual del usario y letrero de seguridad
# 1 Juego de etiquetas ASTM para el armazón
Page 40

1
2
Articulación
en T
Manguito
agujeros del resorte
del lado del suelo
agujeros del
resorte del lado
del suelo
Tubo cuadrado horizontal (se utiliza
para conectar el tubo superior)
Tubo redondo vertical (se utiliza
para conectar la extensión de la pata)
Articulación
en T
Tubo cuadrado horizontal (se utiliza
para conectar el tubo superior)
Tubo redondo vertical (se utiliza
para conectar la extensión de la pata)
Tubo cuadrado vertical (se utiliza
para conectar el poste del cerramiento)
Manguito
1
15
MONTAJE
MONTAJE (ARMADO DEL TRAMPOLÍN CON EL CERRAMIENTO)
INFORMACIÓN IMPORTANTE SOBRE EL MONTAJE
• Necesita un destornillador Phillips (incluido con el trampolín) y 2 llaves ajustables (para armar el trampolín). También se
recomienda el uso de un mazo de goma para facilitar el montaje.
• Se requieren dos adultos para el montaje. Mantenga a los niños lejos del trampolín y el cerramiento hasta que estén completamente armados.
• Use guantes para proteger sus manos de los puntos de pellizco durante el montaje.
• Asegúrese de que el trampolín esté adecuadamente montado, con la almohadilla del armazón correctamente colocada, antes de armar
el cerramiento del trampolín.
• Las fases del montaje hacen referencia a las piezas según sus descripciones y números de referencia (consulte la LISTA DE PIEZAS
de la página 14 y asegúrese de que todas las piezas enumeradas estén incluidas). Si falta alguna pieza, consulte PEDIDO DE PIEZAS
DE REPUESTO al final de la página 14.
REEMPLAZO DEL TRAMPOLÍN
1. Coloque el trampolín y el cerramiento sobre una superficie nivelada antes de usarlos.
2. Es fundamental contar con el espacio superior adecuado. Se recomienda una elevación mínima de 24 pies (7.3 metros). Asegúrese de
que no haya cables, ramas de árboles ni otros posibles peligros. La separación lateral es también muy importante. Coloque el
trampolín y el cerramiento lejos de paredes, estructuras, cercas y otras áreas de juego. Mantenga el espacio circundante al trampolín y
al cerramiento siempre despejado.
3. Use el trampolín en una zona bien iluminada. Si el trampolín está bajo techo o en zonas con sombra, es probable que tenga que usar
iluminación artificial (eléctrica) en la zona.
4. Proteja el trampolín y el cerramiento del uso no autorizado y sin supervisión.
5. Retire los objetos que se encuentren debajo del trampolín y del cerramiento.
6. El propietario y los supervisores del trampolín son responsables de informarles a todos los usuarios sobre las prácticas especificadas
en este manual.
7. El cerramiento del trampolín solo debe utilizarse como un cerramiento para un trampolín redondo específico.
Montaje del trampolín y del cerramiento
Para facilitar el montaje, lea los consejos para el
montaje en la parte superior de esta página.
1. Localice el tubo superior con articulación en T (1) y el
tubo superior con manguito (2), tal como se muestra.
NOTA:
Asegúrese de que los agujeros de todos los resortes
estén en dirección al suelo.
NOTA:
Si no realiza el montaje en el orden correcto, tendrá que
desarmar todo el trampolín para colocarlo como
corresponde.
NOTA: Le será útil identificar la articulación en T y el
manguito que se muestran a la derecha, ya que vienen
instalados en el tubo superior.
Page 41

2.
14
14
14
18
18
17
17
17
17
14
18
18
Articulación en T
Manguito
Manguito
Manguito
Manguito
Manguito
Manguito
Articulación en T
Articulación en T
Articulación en T
Articulación en T
4
1
3.
Articulación en T
3
3
3
2
16
Inserte el refuerzo de la pata (4) en las dos extensiones de la pata (3), tal como se muestra, y luego
ajuste con dos Pernos M6 x 47 mm (14), Arandelas
M6 (17) y Tuercas M6 (18).
Presione ambas extensiones de la pata (3) al mismo
tiempo e insértelas por completo en la articulación en
T y el manguito, luego ajuste los Pernos M6 x 47 mm
(14) y Tuercas M6 (18).
Repita los pasos anteriores de montaje hasta completar los cuatros piezas del armazón. Luego voltee las
piezas del armazón del trampolín para que las patas
ahora sostengan el armazón del trampolín.
Localice las dos piezas del armazón, tal como se
muestra, y luego conéctelas.
Repita el paso 3 anterior de la misma manera, ahora
debe tener un armazón que se mantenga firme por sí
solo, tal como se muestra
Page 42

el primer anillo en V
sujetador
correa de la cremallera
el primer agujero
Red del cerramiento
Puerta del cerramiento
Etiqueta de advertencia (en la parte superior de la lona)
Etiqueta de identificación
(en la parte posterior de la lona)
el primer anillo en V
el primer agujero
4.1
4.
4.2
4.3
Puerta del cerramiento
Etiqueta de advertencia
(en la parte superior de la lona)
Etiqueta de identificación
(en la parte posterior de la lona)
Etiqueta de advertencia (en la parte superior de la lona)
5
7
4
17
Si la red del cerramiento (7) y la lona de salto (5) no
vienen preinstaladas, siga los siguientes pasos para
instalarlas.
Coloque la lona de salto (5) en un espacio del suelo
despejado. Identifique la etiqueta de advertencia en
la parte superior de la lona de salto y la etiqueta de
identificación en la parte posterior de la lona, tal
como se muestra.
Coloque la red del cerramiento (7) sobre la lona de
salto (5), asegúrese de que el primer agujero y el
primer anillo en V estén alineados tal como se
muestra.
Inserte el primer anillo en V en el primer agujero, y
luego inserte los anillos en V restantes en los
agujeros correspondientes, uno por uno de la misma
manera, hasta que la red del cerramiento (7) y la
lona de salto (5) se unan en su totalidad.
NOTA: El primer agujero corresponde al primer
agujero que se encuentra justo a la izquierda de la
puerta del cerramiento. El primer anillo en V
corresponde al que se encuentra justo a la izquierda
de la etiqueta de advertencia, cerca de la etiqueta de
identificación de la lona de salto.
Page 43

5.1
5.2
5.
Si la red del cerramiento y la lona de salto ya están
preinstaladas, siga los siguientes pasos para montar la
lona de salto al armazón.
Inspeccione la conexión de la lona de salto y la red del
cerramiento, asegúrese de que todos los anillos en V
se pasen por los agujeros de la red correspondientes.
Coloque la lona de salto (3) en un espacio del suelo
despejado dentro del armazón, y luego ajuste la
ubicación de las dos etiquetas de advertencia para
alinear las dos articulaciones en T en la dirección
opuesta, tal como se muestra.
Una el primer anillo en V con un resorte en el primer
agujero del resorte a la izquierda de la articulación en
T, y luego una el anillo en V opuesto al primer agujero
del resorte a la izquierda de la articulación en T.
NOTA: Cuente exactamente la cantidad de anillos en
V y de agujeros de resortes en la parte superior del
armazón, y asegúrese de que se correspondan.
el primer anillo en V
el primer
el primer agujero del resorte
Articulatión en T
lado izquierido
5
18
3
puerta del cerramiento
Articulatión en T
Etiqueta
de advertencia
Etiqueta
de advertencia
Articulatión en T
Puerta del
Cerramiento
el primer resorte
agujero
Page 44

Anillo en V
Armazón
3
4
3
Articulatión en T
Puerta del cerramiento
5.3
5.4
19
Una los resortes del siguiente modo:
A: Enganche un extremo del resorte en el anillo en V cosido en
la lona de salto.
B: Enganche la herramienta para el resorte, tal como se muestra,
en el extremo libre del resorte.
C: Tire del resorte hasta que llegue al armazón.
D: Tire el extremo del resorte hasta el agujero en el armazón y
luego desenganche la herramienta para el resorte.
PRECAUCIÓN:
Es aconsejable el uso de guantes de cuero mientras une los
resortes. Fíjese dónde coloca las manos ya que los resortes y
las articulaciones del armazón podrían pellizcarlo.
Una otros dos anillos en V laterales a los agujeros del armazón
del mismo modo que en el punto 5.2.
NOTA:
Cuente exactamente la cantidad de anillos en V y de agujeros de
resortes en la parte superior del armazón, y asegúrese de que se
correspondan.
NOTA:
Hay 84 resortes alrededor del borde de la lona de salto (5) y 84
agujeros alrededor del tubo superior.
Una otros anillos en V a los agujeros del armazón del lado
izquierdo de la articulación en T o el manguito del mismo modo
que en el punto 5.2.
Ahora hay 12 anillos en V unidos al tubo superior. Y se han
utilizado 12 resortes.
Page 45

Puerta del cerramiento
Articulatión en T
Manguito
Ranura de la almohadilla
6
6
6
5.5
6.
20
Una los anillos en V restantes con resortes
a los agujeros del tubo superior del mismo modo.
Estire la almohadilla del armazón (6) alrededor del
armazón. Ajuste la posición para que las ranuras
queden justo sobre los manguitos, tal como se muestra.
PRECAUCIÓN:
No utilice el trampolín sin la almohadilla del armazón
(6). La almohadilla del armazón está diseñada para
reducir la posibilidad de lesiones en caso de que los
usuarios entren en contacto con el armazón del
trampolín. Si no tiene una almohadilla de armazón,
comuníquese con su distribuidor para adquirir una.
Instale correctamente la almohadilla del armazón antes
de usar el trampolín.
7
Correa cosida en la parte exterior de
la articulación para la parte inferior
de la almohadilla
Correas interiores
Armazón
Anillo en V
Correa exterior
Correa exterior
Correas interiores
Mire debajo del trampolín. Ubique las correas que
se colocaron en la parte inferior de la almohadilla
del armazón. Coloque cada correa exterior de modo
tal que haya una correa de cada lado del armazón,
tal como se muestra. Ate las correas exteriores
cosidas a las articulaciones de la almohadilla a cada
lado del armazón, tal como se muestra, y una las
correas interiores a los anillos en V cercanos.
Repita este paso con todas las correas restantes (no
se muestra).
.
7.
5
Page 46

16
10
9
9.
8
11
9
10
11
9
21
Deslice el tubo recto (9) y el tubo curvo (10) en las
gomaespumas (11), tal como se muestra.
Coloque un tubo recto (9) con gomaespuma y un
tubo curvo (10) con gomaespuma en el suelo.
Inserte el tubo recto (9) en el tubo curvo (10).
Ajústelos con un tornillo autorroscante (16)
Repita este paso para unir los 5 tubos rectos (9) a
los 5 tubos curvos (10) restantes (no se muestra).
8.
Agujeros
12
7
Anillo de
la correa
Correa
10
12
Agujero
14
Agujero
A
12
Agujero hexagonal
10.
B
C
Siga las indicaciones para unir el tubo curvo a la tapa:
A.
Identifique el agujero hexagonal en la tapa del poste
(12) con una tuerca en su interior.
B.
Inserte la tapa del poste (12) en un anillo con correa en
el borde superior de la red. Asegúrese de que el lado
con el agujero hexagonal de la tapa esté contra de la
red, y los agujeros tanto del anillo con correa como de
las tapas estén alineados.
C.
Sostenga la tapa del poste cerca de un tubo curvo (10),
luego inserte el tubo curvo (10) en la tapa del poste
(12). Asegúrese de que los agujeros del tubo curvo, la
tapa del poste y el anillo con correa estén alineados.
Luego inserte el perno M5 x 44 mm (14) hasta que
toque la tuerca del agujero hexagonal de la tapa del
poste, fijándolas juntas.
Repita este paso para montar las piezas restantes del
mismo modo.
Page 47

11.
22
Comience desde la puerta del cerramiento, levante uno
de los postes montados y luego inserte el tubo recto (9)
en el tubo vertical del manguito, tal como se muestra.
Asegúrese de que el lado doblado de los polos
del cerramiento estén orientados hacia el centro
del trampolín.
NOTA:
Los extremos de los tubos rectos (9) son
puntiagudos, tenga cuidado.
Repita este proceso para montar los cinco postes
restantes en el armazón del trampolín.
11
Puerta del
Postes
Articulatión
Manguito
9
9
9
Pata
Manguito
Articulación
en T
Armazón de
la almohadilla
Lona de salto
Pata
cerramiento
en T
13
Manguito
12.
12
13.
10
12
Correa
Correa
Inserte la tapa del extremo (13) en el agujero inferior del
manguito, tal como se muestra.
Con una escalera, llegue hasta la parte superior de los
postes del cerramiento y ate las correas alrededor de las
tapas del poste, tal como se muestra. Asegúrese de fijar
firmemente el nudo. (No se pare en el borde del
trampolín para realizar este paso. Puede ser peligroso y
podría dañar el trampolín).
Page 48

Letrero de seguridad
Armazón
23
Desmontaje
Para desmontar el cerramiento y el trampolín, siga los pasos de montaje 1 a 11 invirtiendo el orden.
Reemplazar la red del cerramiento
Si la red de su cerramiento se daña después de usarla durante un tiempo, deberá reemplazarla siguiendo los
pasos de montaje 4-7 y 10-13 invirtiendo el orden.
14.
Usando el amarre de plástico incluido, coloque el letrero
de seguridad en el armazón cerca del punto por el que
los usuarios subirán y bajarán del trampolín.
.Su trampolín y cerramiento ahora están completamente
montados.
Asegúrese de que todas las piezas se hayan unido de
forma segura. Familiarícese y familiarice a todos los
usuarios con las precauciones de seguridad del
trampolín y del cerramiento, el uso y materiales de
instrucción, y las instrucciones de cuidado y
mantenimiento de este manual antes de usar el
trampolín y el cerramiento.
15
estacas de viento
15. Inserte una estaca de viento (18) en el suelo sobre la
pata de trampolín tal como se muestra. Luego inserte
las otras de la misma manera en las otras tres patas
tal como se muestra.
23
14
Page 49

24
CUIDADO Y MANTENIMIENTO DEL TRAMPOLÍN Y DEL CERRAMIENTO
CUIDADO
Para evitar los daños en el trampolín y el cerramiento, no permita que las mascotas u otros animales se suban al
cerramiento.
El trampolín está diseñado para ser utilizado por una persona a la vez que pese 200 libras como máximo. El usuario
debe estar descalzo, usar medias o zapatos de gimnasia. No se deben usar zapatos de calle o deportivos
en el trampolín. El usuario debe quitarse todos los objetos cortantes que puedan causar lesiones o
dañar la lona. Los objetos duros, pesados, cortantes o puntiagudos nunca deben tocar la lona.
La exposición solar continua durante un largo período, especialmente a los rayos ultravioleta, acortará la vida útil de la
tela del cerramiento. Para prolongar la vida útil de la tela, guarde el cerramiento cuando no lo esté utilizando. La tela,
las costuras y los accesorios de un cerramiento seco y
adecuadamente almacenado tendrán una mayor vida útil. Retire el cerramiento del trampolín
durante condiciones meteorológicas adversas o durante períodos largos de inactividad.
MANTENIMIENTO
Su trampolín fue fabricado con materiales de calidad y diseñado para brindarle a usted y a su familia muchos
años de diversión y ejercicio. El cuidado y el mantenimiento apropiados ayudarán a prolongar la vida útil del trampolín
y a reducir la posibilidad de lesiones. Se deben seguir las siguientes pautas en todo momento.
Inspeccione el cerramiento del trampolín antes de cada uso, y reemplace las piezas desgastadas, defectuosas o
faltantes. Las siguientes condiciones
podrían representar potenciales peligros e incrementar el riesgo de lesión personal:
• almohadillas del armazón, redes, tubos del cerramiento o mangas de gomaespuma
faltantes, mal ubicadas o colocadas de forma poco segura.
• perforaciones, hilos sueltos, desgarros o agujeros en la lona, la almohadilla del
armazón, la red o las mangas de gomaespuma.
• deterioro de la costura de la tela de la lona, la almohadilla del armazón
o la red.
• resortes rotos o faltantes.
• armazón, patas o tubos del cerramiento doblados o rotos.
• cama o red caídas.
• abultamientos cortantes en el armazón, el sistema de suspensión o los tubos
del cerramiento.
Ante cualquiera de estas condiciones, debe desmontar (desarmar) el trampolín y el cerramiento, o protegerlos del uso,
hasta corregir el problema.
CONSIDERACIONES ESPECIALES
Viento fuerte
Es posible que el trampolín y el cerramiento se vuelen con los vientos fuertes. Si se esperan vientos fuertes, debe
trasladar el trampolín y el cerramiento a un lugar protegido. Desmonte (quite) la red del cerramiento. Ate el armazón
del trampolín al suelo con cuerdas y estacas (no incluidas). Debe usar al menos tres cuerdas y tres estacas. Asegúrese
de colocar las cuerdas en la parte superior del armazón del trampolín: no fije las patas o las bases en el suelo ya que
pueden separase de los manguitos del armazón. La parte superior de las estacas debe estar a nivel del suelo para no
causar un peligro de tropiezo. Además, la parte superior de las estacas debe cubrirse, de ser necesario, para que los
usuarios no se lastimen si se caen sobre estas. El único método seguro para proteger su trampolín y el entorno
circundante durante los vientos fuertes es desmontar la unidad por completo y guardarla bajo techo.
Trasladar el trampolín y el cerramiento
Si se debe mover el trampolín y el cerramiento, deben hacerlo dos personas, mantenerlos horizontales y elevarlos
levemente. De ser necesario, el trampolín y el cerramiento pueden desarmarse para trasladarlos. Para desarmar el
trampolín, siga los pasos de montaje invirtiendo el orden (consulte las páginas 15 a 23). No intente desarmar las
secciones del armazón, las patas o las bases antes de haber retirado la lona y los resortes.
ADVERTENCIA
Page 50

25
GARANTÍA LIMITADA
Skywalker Holdings, LLC garantiza que sus productos no tendrán materiales ni mano de obra defectuosos
en condiciones de uso y servicio normales. El armazón de acero tiene una garantía de un (1) año a partir de
la fecha de compra. Las demás piezas tienen una garantía de noventa (90) días a partir de la fecha de
compra. La garantía no cubre los daños ocasionados por el viento o las condiciones climáticas.
Toda la cobertura de la garantía se extiende solo al comprador minorista original a partir de la fecha de
compra. La obligación de Skywalker Holdings, LLC conforme a esta garantía se limita a reemplazar o
reparar el producto, a criterio de Skywalker Holdings, LLC, en uno de sus centros de servicio autorizados.
Skywalker Holdings, LLC debe recibir, en uno de sus sitios autorizados, todos los productos para los cuales
se realice una reclamación de la garantía. Debe obtenerse una autorización previa llamando a la línea directa
de Atención del Cliente de Skywalker Holding, LLC al 1-866-603-5867. Esta garantía no se extiende a
ningún producto o daño de un producto causado por o atribuible a los daños del flete, maltrato, uso incorrecto, uso impropio o anormal, o a la reparación no proporcionada por un centro de servicio autorizado de
Skywalker Holdings, LLC, o a los productos utilizados para fines comerciales o de alquiler. Skywalker
Holdings, LLC no autoriza ninguna otra garantía más allá de lo específicamente establecido anteriormente.
SKYWALKER HOLDINGS, LLC NO ES RESPONSABLE DE LOS DAÑOS INDIRECTOS, ESPECIALES
O CONSECUENTES QUE SURJAN DE O EN RELACIÓN CON EL USO O DESEMPEÑO DEL PRODUCTO O DE OTROS DAÑOS RELATIVOS A CUALQUIER PÉRDIDA ECONÓMICA, PÉRDIDA DE
PROPIEDAD, PÉRDIDA DE INGRESOS O GANANCIAS, PÉRDIDA DEL DISFRUTE O DEL USO,
COSTO DE EXTRACCIÓN, INSTALACIÓN U OTROS DAÑOS CONSECUENTES. ALGUNOS ESTADOS NO PERMITEN LA EXCLUSIÓN O LIMITACIÓN DE LOS DAÑOS INCIDENTALES O CONSECUENTES. POR CONSIGUIENTE, LA LIMITACIÓN ANTERIOR PUEDE NO APLICARSE A SU CASO.
LA GARANTÍA EXTENDIDA POR EL PRESENTE REEMPLAZA A TODA OTRA GARANTÍA Y
CUALQUIER GARANTÍA IMPLÍCITA DE COMERCIABILIDAD O IDONEIDAD PARA UN
PROPÓSITO EN PARTICULAR ESTÁ LIMITADA EN SU ALCANCE Y DURACIÓN A LOS TÉRMINOS ESTABLECIDOS EN EL PRESENTE. ALGUNOS ESTADOS NO PERMITEN QUE HAYA LIMITACIONES RESPECTO DE LA DURACIÓN DE UNA GARANTÍA IMPLÍCITA. POR CONSIGUIENTE, LA LIMITACIÓN ANTERIOR PUEDE NO APLICARSE A SU CASO. Esta garantía le concede
DERECHOS LEGALES específicos. Puede tener otros derechos que varían entre los estados.
ESTA GARANTÍA TIENE VALIDEZ SOLO EN ESTADOS UNIDOS.
Skywalker Holdings, LLC, PO Box 574, Brigham City, UT 84302 EE. UU.
Impreso en China © 2015 Skywalker Holdings, LLC.
 Loading...