

Page 1
ASSEMBLY, MAINTENANCE, &
USER MANUAL
MODEL #SWGM100
WARNING
Read all precautions and instructions in
this manual before using this equipment.
Save this manual for future reference.
Skywalker Holdings LLC
P.O. Box 574, Brigham City, UT 84302
Page 2

TABLE OF CONTENTS
Part List.....................................................................................................................................................................................2
Part Identification..............................................................................................................................................................3
Assembly..........................................................................................................................................................................4-10
Limited Warranty.................................................................................................................................................................11
STOP EVERYTHING YOU'RE DOING AND REGISTER YOUR PRODUCT
Find our warranty registration online by typing in: www.skywalkertrampolines.com/registration/
You'll need to have the following information handy:
• Name • Email address
• Address • Model number
• Phone number • Serial number
• Date of purchase • Retailer the product was purchased from
BEFORE YOU BEGIN
Thanks for choosing Skywalker Trampolines! We’re just as excited as you are to help your family live an active (but
most importantly FUN) lifestyle. This model is one of our favorites, and we’re confident you’ll love it too. To make
things easier for you, we’ve listed important information that you (and your little outdoor adventurers) need to know.
Make sure you brush up on the warnings, instructions, assembly, maintenance, and use of your new product...
because there will be a pop quiz at the end! (Okay, not REALLY, but if you’re still reading this, props to you! You’re
awesome).
SKYWALKER MODELS COMPATIBLE WITH THIS PRODUCT:
• All Skywalker Trampolines 15’ round models
• All Skywalker Trampolines 16’ round models
• All Skywalker Trampolines 16’ oval models
• All Skywalker Trampolines 17’ x 15’ oval models
IMPORTANT
Trampoline/enclosures and game
attachments are susceptible to winds.
WARNING
CHOKING HAZARD- Small
parts not for children
under 3 years.
2
WARNING
Adult assembly required.
Page 3
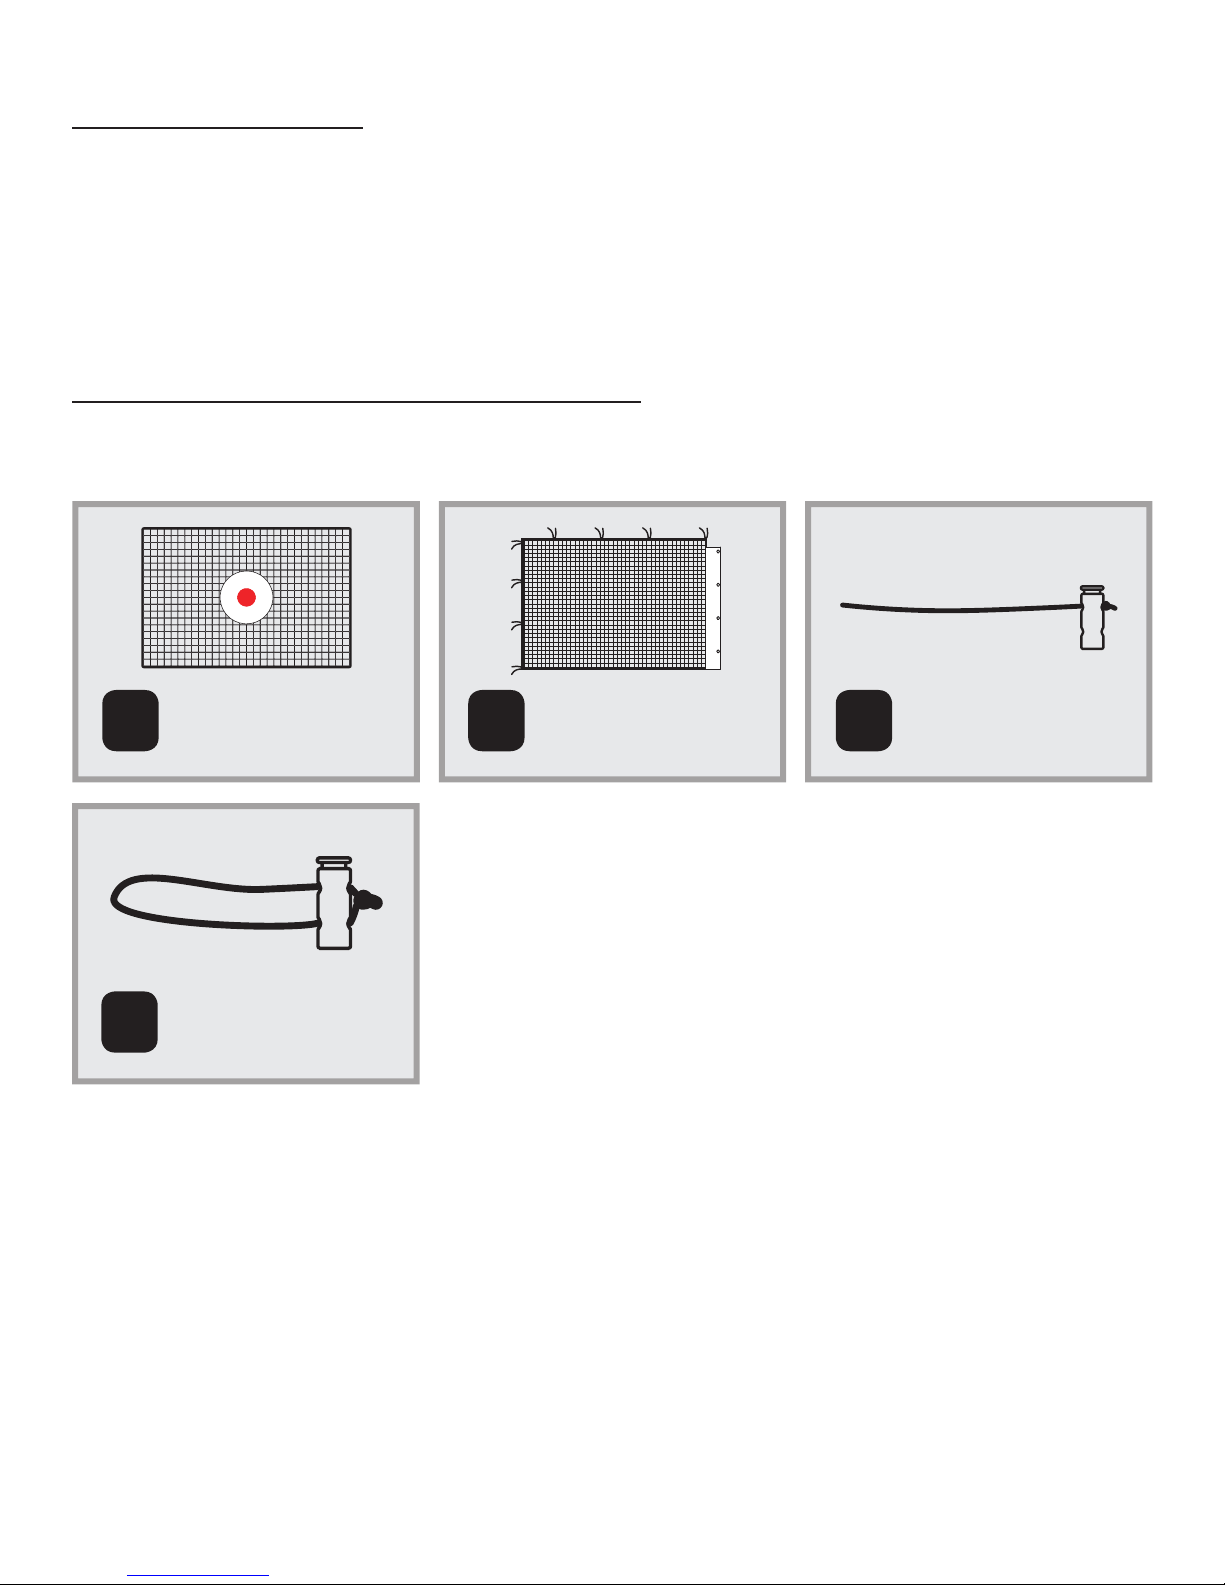
PART LIST
Key No. Qty. Description
1 1 Kick Back Net
2 2 Side Net
3 4 Elastic Cord
4 8 Connected Elastic Cord
PART IDENTIFICATION
Before you begin, take a look at the drawings below to make sure you have all the parts! The numbers in the squares
to the left (key numbers) will help you identify the parts during assembly.
Kick Back Net (x1)
1 2
Connected
4
ORDERING REPLACEMENT PARTS
We get it... sometimes things happen. But the fun shouldn’t stop just because you need a new bolt or screw! To order
replacement parts, check out our website at: www.skywalkertrampolines.com or call our toll-free Customer Care
Hotline at 1-866-603-Jump (5867), Monday - Friday, 8 a.m. until 5 p.m. Mountain Time (excluding holidays).
Our customer service team will ask you a few questions in order to get the replacement part sent out as soon as
possible. We’re not trying to complicate your life, we promise.
Elastic Cord (x8)
Side Net (x2)
3
Elastic Cord (x4)
When calling, make sure to have the following information ready:
• The model # of the product (see the front cover of this manual)
• The key # and description of the part (see the part list on the next page)
• The quantity needed (only you know the answer to that one!)
3
Page 4
ASSEMBLY
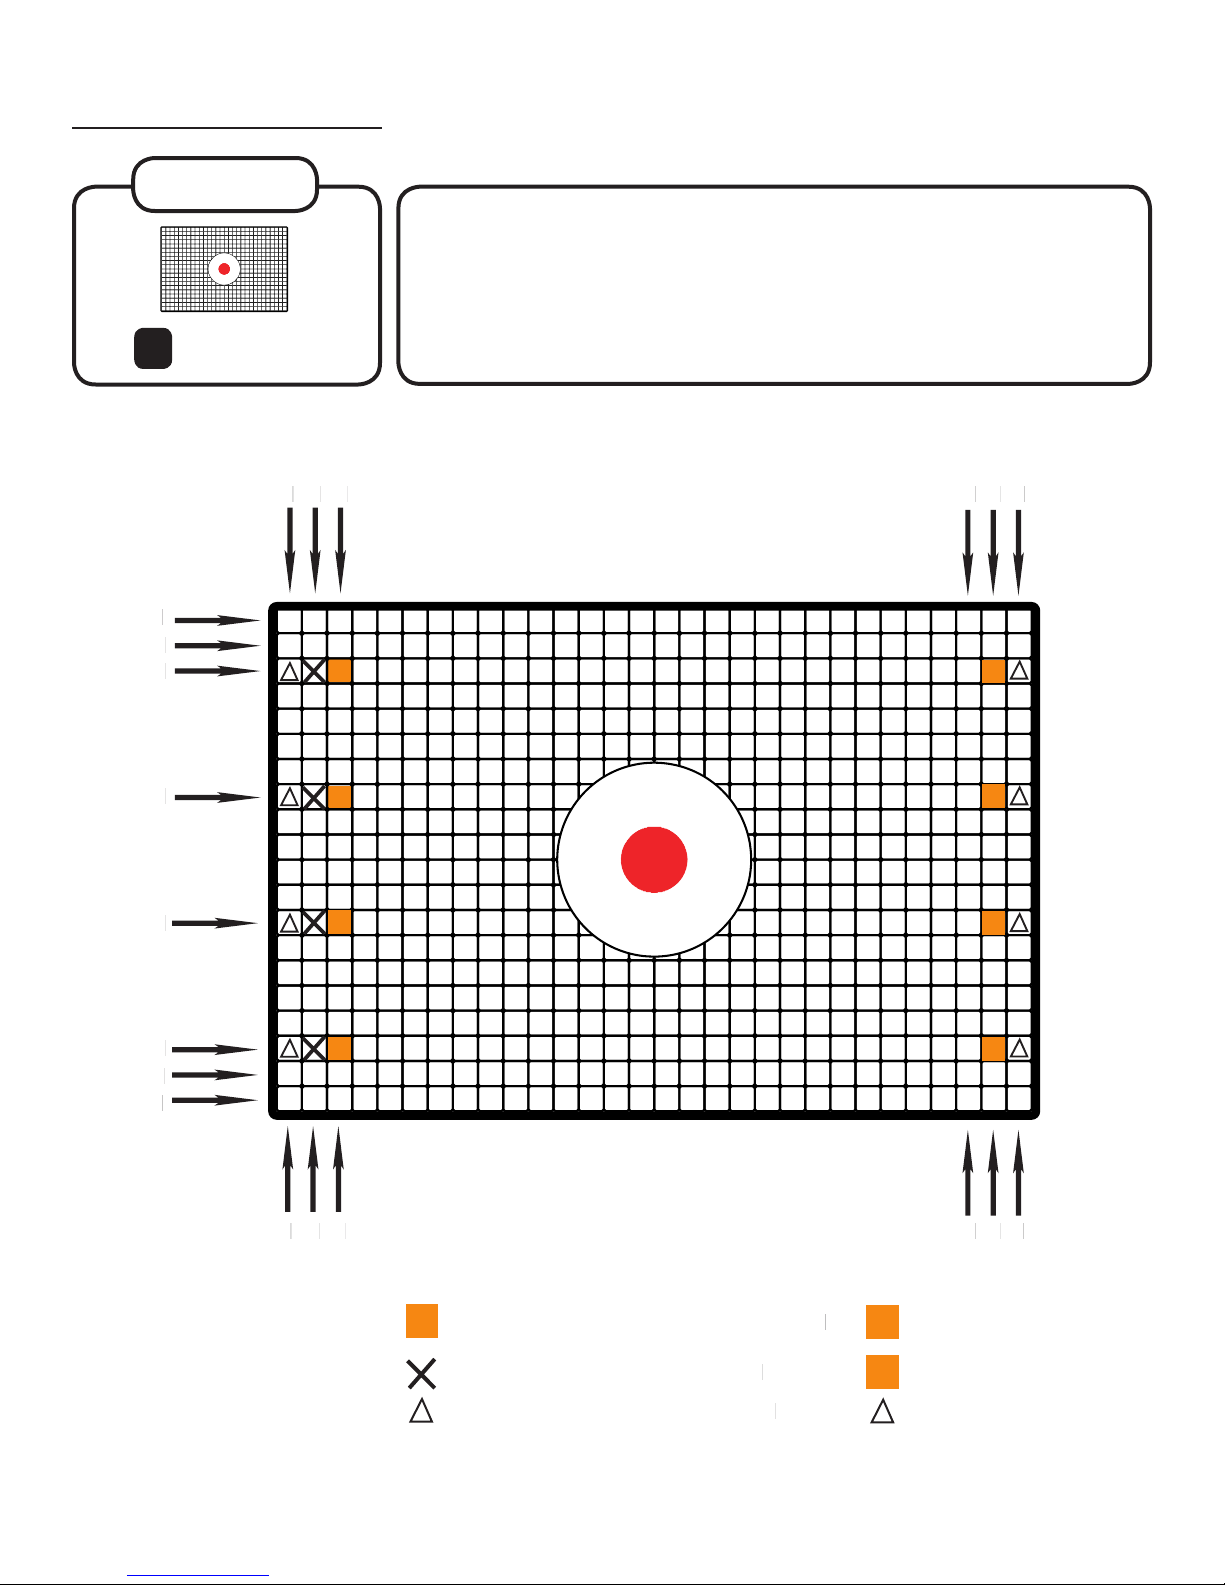
STEP 1
Kick Back Net (x1)
1
1
2
1
2
3
The kick back net accessory fits all different trampoline sizes! Use the
picture below to locate the correct holes to attach the kick back net to
your trampoline. The key at the bottom will tell you which holes to use! The
numbers along the sides are there to help you count and find the exact
hole that you need. (Not that we doubt your stellar counting abilities or
anything...)
3
3 2 1
8
8
3
2
1
1 32 23 1
15’ round & 16’ x 14’ oval trampoline holes
16’ round trampoline holes
17’ x 15’ oval trampoline holes
4
Page 5

2
STEP 2
Side Net (x1)
Elastic Cord (x1)
3
When assembling, make sure the bullseye part of the net is
centered on a leg piece (not between 2 legs). It might be best
to assemble on the leg section furthest from the enclosure
door. Wrap the PVC section of a side net (2) around the left leg
of the trampoline leg section as shown. Then, insert an elastic
cord (3) into the top grommet on the back of the PVC panel.
STEP 3
Kick Back Net (x1)
1
Then, insert the same elastic cord (3) into the correct hole on the kick back
net (1). Refer to step 1 to find the correct hole on the net!
Next, thread the elastic cord through the top grommet on the front of the
PVC panel, and then thread the cord through the second grommet on the
front of the PVC panel as shown.
1st hole
2nd hole
3rd hole
5
Page 6

ASSEMBLY
STEP 4
Next, thread the same elastic cord back through the 8th hole on the kick back net as shown.
Then, insert the elastic cord into the second grommet on the back of the PVC panel.
3rd hole
8th hole
STEP 5
To secure in place, insert the free end of the elastic cord into the button and pull tight.
Make sure to refer to the chart on step 1 to identify the correct holes on the kick back net.
6
Page 7

STEP 6
Elastic Cord (x1)
3
To secure the bottom of the side net, insert an elastic cord (3) into the
bottom grommet on the back of the PVC panel.
Then, insert the same elastic cord (3) into the 3rd hole from the bottom on
the kick back net.
3rd hole
STEP 7
Next, thread the elastic cord through the bottom grommet on the front of the PVC panel, and then thread the
cord through the 3rd grommet on the front of the PVC panel as shown.
7
Page 8

ASSEMBLY
STEP 8
Next, thread the same elastic cord back through the 8th hole from the bottom of the kick back net as shown.
Then, insert the elastic cord into the 3rd grommet on the back of the PVC panel. To secure in place, insert the
free end of the elastic cord into the button and pull tight.
8th hole
3rd hole
STEP 9
Repeat steps 1-8 to secure the other side net on the right leg of the trampoline leg section.
8
Page 9

STEP 10
If you want, take a snack break because you’re MORE THAN HALFWAY DONE, and you deserve it. Now, tie the
side nets to legs of your trampoline with the attached straps. If you have a 17’ x 15’ oval trampoline, the net
should just reach the legs. If you have a different sized trampoline, you may need to wrap the net around the
legs. Make sure the net is tight!
15ft round trampoline:
17’ x 15’ oval trampoline:
16ft round trampoline:
16’ x 14’ oval trampoline:
STEP 11
Now it’s time for the easiest step in this manual! Just tie the side nets to the top of the frame with the attached
straps. Piece of cake.
9
Page 10

ASSEMBLY
STEP 12
Connected Elastic Cord (x8)
4
LAST STEP YOU’RE IN THE FINAL HOME STRETCH. Attach the kick back
net (1) to the lower leg and upper frame of the trampoline by using the
connected elastic cords (4). Simply wrap the cord through the net, around
the frame, and secure by looping the elastic over the button.
Now give yourself a high-five because YOU’RE DONE!
STEP 13
Congratulations on setting up your new kick back net! So here comes the real question... are you satisfied
with this product? If you are, go ahead and write a review on the retailer’s site you bought it from. We’d really
appreciate it... and if we could, we’d give you a gold star. Are you completely frustrated and have some choice
words for us? Contact us directly! We’re not trying to ruin your life, we promise. And we’ll do everything we can
to make it right again. See contact info on page 2-3.
10
Page 11

LIMITED WARRANTY
Skywalker Holdings, LLC warranties its products to be free from defects in material and workmanship under normal
use and service conditions. The steel frame is warranted for one (1) year after the date of purchase. All other parts
are warranted for ninety (90) days after the date of purchase. Wind or weather damage is not warranted.
All warranty coverage extends only to the original retail purchaser from the date of purchase. Skywalker Holdings,
LLC obligation under this warranty is limited to replacing or repairing, at Skywalker Holdings, LLC option, the product
at one of this authorized service centers. All products for which a warranty claim is made must be received by
Skywalker Holdings, LLC at one of its authorized locations. Preauthorization may be obtained by calling Skywalker
Holding, LLC Customer Care Hot Line at 1-866-603-Jump (5867).
This warranty does not extend to any product or damage to a product caused by or attributable to freight damage,
abuse, misuse, improper or abnormal usage, or repair not provided by a Skywalker Holdings, LLC authorized service
center, or to products used for commercial or rental purpose. No other warranty beyond that specifically set forth
above is authorized by Skywalker Holdings, LLC.
Skywalker Holdings, LLC is not responsible or liable for indirect, special, or consequential damages arising out of or
in connection with the use or performance of the product or other damages with respect to any economic loss, loss
of property, loss of revenue or profits, loss of enjoyment or use, cost of removal, installation or other consequential
damages. Some states do not allow the exclusion or limitation of incidental or consequential damages. Accordingly,
the above limitation may not apply to you.
The warranty extended hereunder is in lieu of all other warranties and any implied warranty of merchantability or
fitness for a particular purpose is limited in its scope and duration to the terms set forth herein. Some states do not
allow limitations on how long an implied warranty lasts. Accordingly, the above limitation may not apply to you. This
Warranty gives you specific legal rights. You may also have other rights which vary state to state.
This warranty is valid only in the United States.
Skywalker Holdings, LLC, PO Box 574, Brigham City, UT 84302 USA.
Printed in China © 2018 Skywalker Holdings, LLC
11
 Loading...