

Page 1
ASSEMBLY
ASSEMBLY (PUTTING THE TRAMPOLINE AND ENCLOSURE TOGETHER)
IMPORTANT ASSEMBLY INFORMATION
• Need phillips screw driver (included with trampoline) and 2 adjustable wrenches (for putting the trampoline together). A rubber
mallet is also recommended to make assembly easier.
• Assembly requires two adults. Keep children away from the trampoline and enclosure until they are completely put together.
• Use gloves to protect your hands from pinch points during assembly.
• Make sure that the trampoline is properly put together, with the frame pad correctly laid out, before you put together the trampoline
enclosure.
• The assembly steps refer to parts by their descriptions and key numbers (see the PARTS LIST on page 13 and make sure that all
listed parts are included. If a part is missing, refer to ORDERING REPLACEMENT PARTS at the bottom of page 13.
T R A MPOLINE PLACEMENT
1. Place the trampoline and enclosure on a level surface before you use it.
2. Adequate overhead clearance is essential. A minimum of 24 feet (7.3 meters) from the ground is recommended. Provide clearance
from wires, tree limbs, and other possible hazards. Lateral (sideways) clearance is also essential. Place the trampoline and enclosure
away from walls, structures, fences, and other play areas. Maintain a clear space on all sides of the trampoline and enclosure.
3. Use the trampoline in a well-lighted area. If the trampoline is indoors or in a shady areas you may need to use artificial (electrical)
lighting in the area.
4. Secure the trampoline and enclosure against unauthorized and unsupervised use.
5. Remove any objects from under the trampoline and enclosure.
6. The owner and supervisors of the trampoline are responsible to make all users aware of practices specified in this manual.
7. The trampoline enclosure is only to be used as an enclosure for a specific round trampoline.
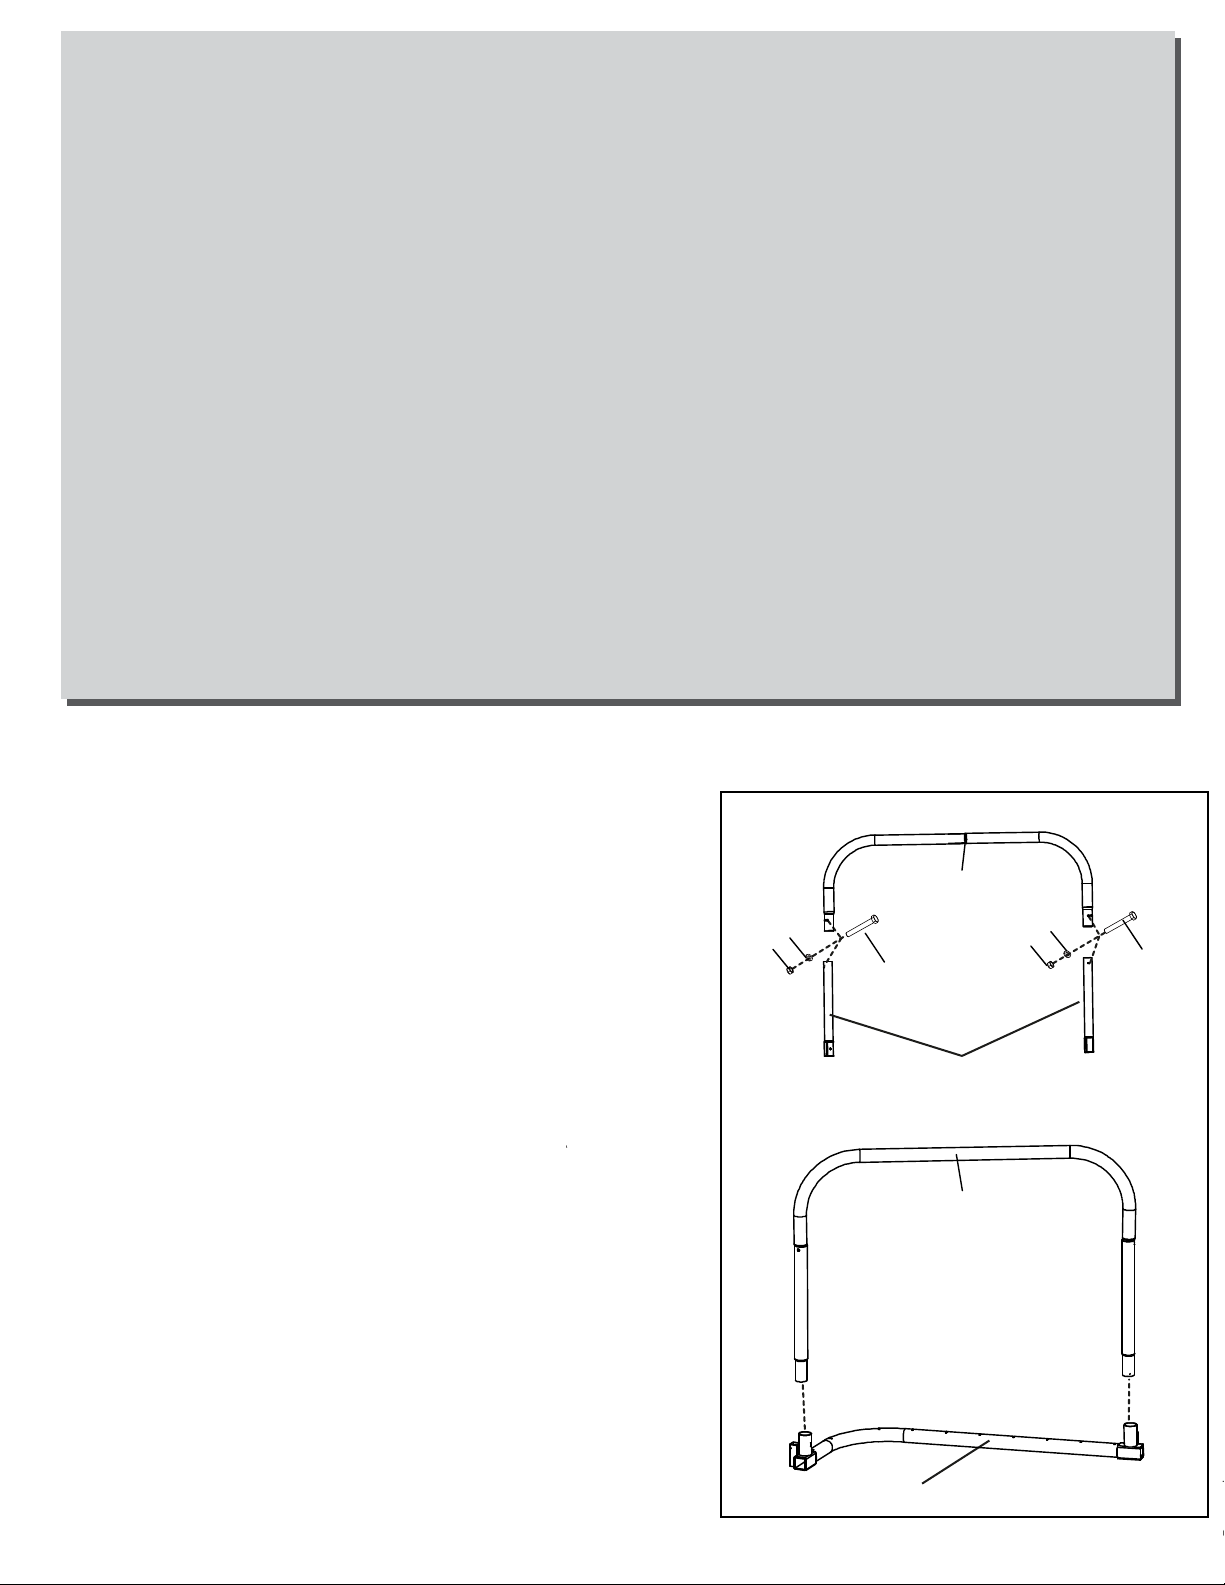
Trampoline Assembly
1, Insert the two ends of the leg(1) into the Leg extension(2) secure with
M6X55mm Bolt(3) , M6 Nut(5) and M6 Washer(4) as shown, the unit A will be
completed
Notice: Do not tighten the Nuts
Insert the two ends of the unit A into the Socket of the Left corner tube(6)
1
1
4
5
3
2
A
4
5
3
6
13
Page 2
2
2, Attach the unit A and Middle tube(7B) together as shown
Repeat this process until two Leg extension will be completed
3, Insert the two ends of the leg(1) into the Leg extension(2) secure with
M6X55mm Bolt(3) , M6 Nut(5) and M6 Washer(4) as shown, the unit A will be
completed
Notice: Do not tighten the Nuts
A
7(B)
B
3
1
4
5
3
4
5
3
2
A
Insert the two ends of the unit A into the Socket of the Right corner tube(8)
as shown
4, Attach the unit A and Middle tube(7A) together as shown
Repeat this process until two Right Leg extension will be completed
Stand two leg sections and hold them in the positions
5,
shown. Slide the large end of one of the remaining Top
Tubes onto the small end of the indicated Top Tube
on one of the leg sections. Insert the small end of the Top
Tube into the indicated Top Tube with Socket on the
other leg section. Repeat this step until all four leg sections
are connected. When this step is completed,
will be fully assembled and freestanding.
the frame
8
4
A
7(A)
hole
A
small end
7(A)
7(B)
large end
7(A)
7(B)
5
14
Page 3
6. Lay the jump Mat (9) on the ground inside the assembled
frame. Make sure that the two warning decals are on
top of the Mat
.
Put the Enclosure Net on the Jump Mat, make sure the first
net hole on the left of enclsoure door and the V- ring with pothook
on the mat are aligned, insert the V-ring with the pothook into the
the first net hole . Continue this process to attach other V-rings to
the “buttonhole” incisions on the bottom edge of the net one by one
Make certain that each of the V-rings on the trampoline
mat is threaded through the corresponding
‘buttonhole’ in the Enclosure Net
6
the first net hole
Warning label
Opening of
the enclosure
Mat
Note: There are 68 V-rings and 4 rectangle-rings around the edge of the Bed
(Mat) (7) and 76 holes around the top of the frame.
In step 7
you will attach the Bed (Mat) (7 ) to the frame, using 76 springs(10)
7, Attach two springs(10) to the each corner of the mat(9) and corner of
the frame, There will be a total of 8 springs attahced.
Continue to attach the remaining springs until all Springs
are attached.
Note:The spring has a large hook which attaches to the
frame and a small hook which attaches to the mat V-ring.
zipper clip
the first V- ring
pothook
7
not shown the net
Spring
Attach the Spring(10) as follows: Hook one end of a spring(10)
into a V-ring/rectangle-ring sewn on the jump mat. hook a Spring tool
shown as the inset drawing into the free end of the Spring. pull
it by the Spring tool until it reach the frame. push the end of the
Spring into a hole in the frame. unhook the Spring tool
Notice: tighten all the Nuts
15
rectangle-ring
spring
9
V-ring
mat
spring
10
corner tube
Frame
Page 4
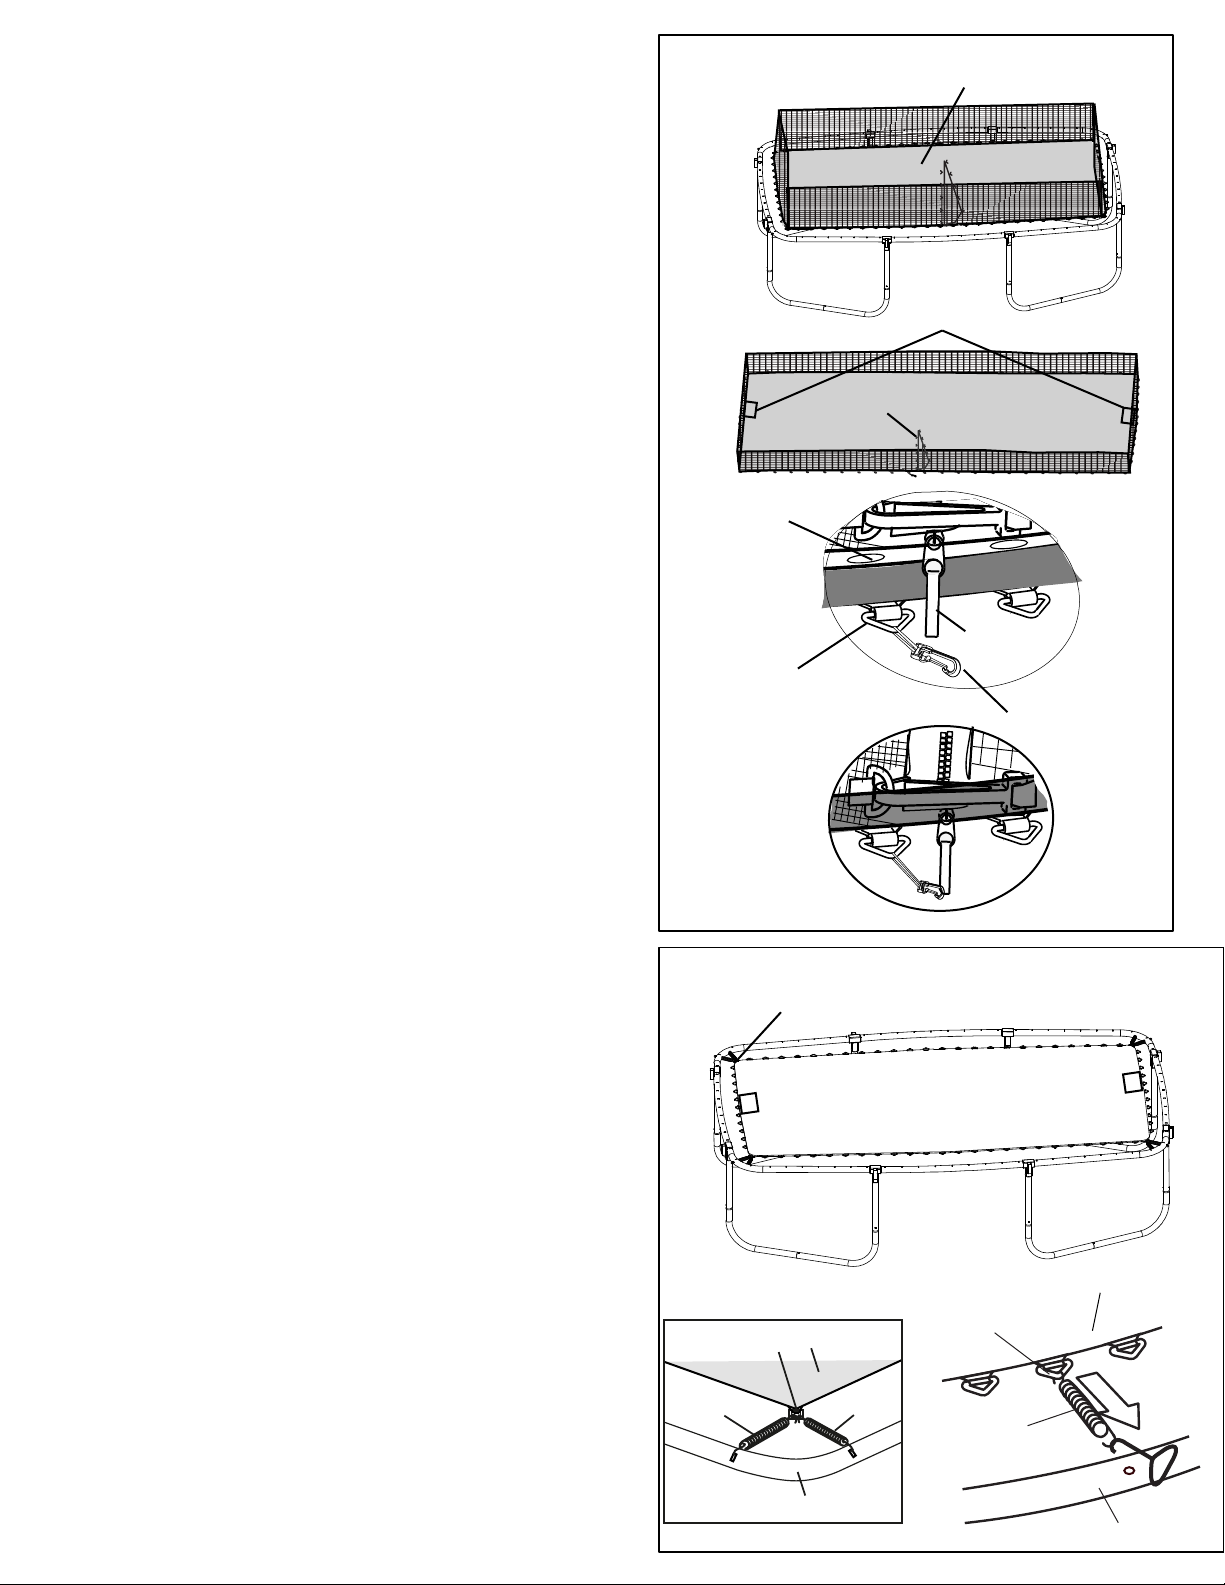
Lay one of the frame Pad (11) on the frame.
8.
Adjust the position of the Frame Pad so that the slits are
directly above the Socket
Safety Note: Do not use the trampoline without the Frame Pad.
Frame Pad is designed to reduce the possibility of injuries due to
jumpers coming in contact with the trampoline frame. If
you do not have a Frame Pad, contact your dealer to
obtain one. Properly install the Frame Pad before using
the trampoline.
8.
Secure the corners of the Frame Pads to the frame
using the attached straps. Hook the straps to the Rectangle-rings
at each corner.
Attach all the remaining straps(not shown)
9
. Using the included plastic tie, attach the Safety Placard
to the frame near the enclosure opening.
The trampoline is now fully assembled. Make sure that
all parts are securely attached. Familiarize yourself and
all users of the trampoline with the safety precautions,
use and instructional materials, and care and maintenance
instructions in this manual before using the trampoline.
9.
16
Page 5

ENCLOSURE ASSEMBLY
Make sure that you understand the information in the
box at the top of page 13.
1. Lay one Straight Tube (5) with foam and one Curved
Tube (6) with foam (8) on the ground, insert the Straight
Tube(5) into the curved tube(6), secure with the screw(4).
Repeat this step to attach the seven remaining Straight
Tubes(5) and Curved tubes(6) together (not shown).
1
5
6
4
2,Inspect the attachments of the enclosure Netting to the
trampoline mat (bed). Make certain each of the V/rectangle-rings on
the trampoline mat (bed) is threaded through the
corresponding “buttonhole” in the Netting.
2
17
Page 6

3. Attach the Jump Mat to the trampoline frame by refer to steps 6-7 in the trampoline assembly
Attach the Frame Pad to the trampoline frame. Refer to
step 8 in your trampoline assembly for further instruction
3
4
4, Note: There is a Hexagon hole on the pole cap (1) with a nut
inside as shown A. Insert the pole cap(1) though one strap
ring on the top edge of the enclosure mesh(7) as shown in
Inset Drawing B. Make sure the Hexagon hole side of the
cap is against the mesh, and the holes on both the strap ring
and the caps are aligned.
Hold the pole cap close to a curved tube (6) with foam as shown
in Inset Drawing C. Insert the curved tube(6) into the pole
cap. Make sure the holes on the curved tube,pole cap
and strap ring are aligned. Insert the M5x50mm bolt(2)
until it touches the nut in the Hexagon hole of the pole cap,
securing them together.
Repeat this
process to assemble the rest of the pole caps(1)
to the curved tubes(6) with foam by the same manner.
Hexagon hole
1
A
7
Holes
Strap ring
B
Hole
1
1
2
Strap
Hole
6
Inset drawing
C
18
Page 7

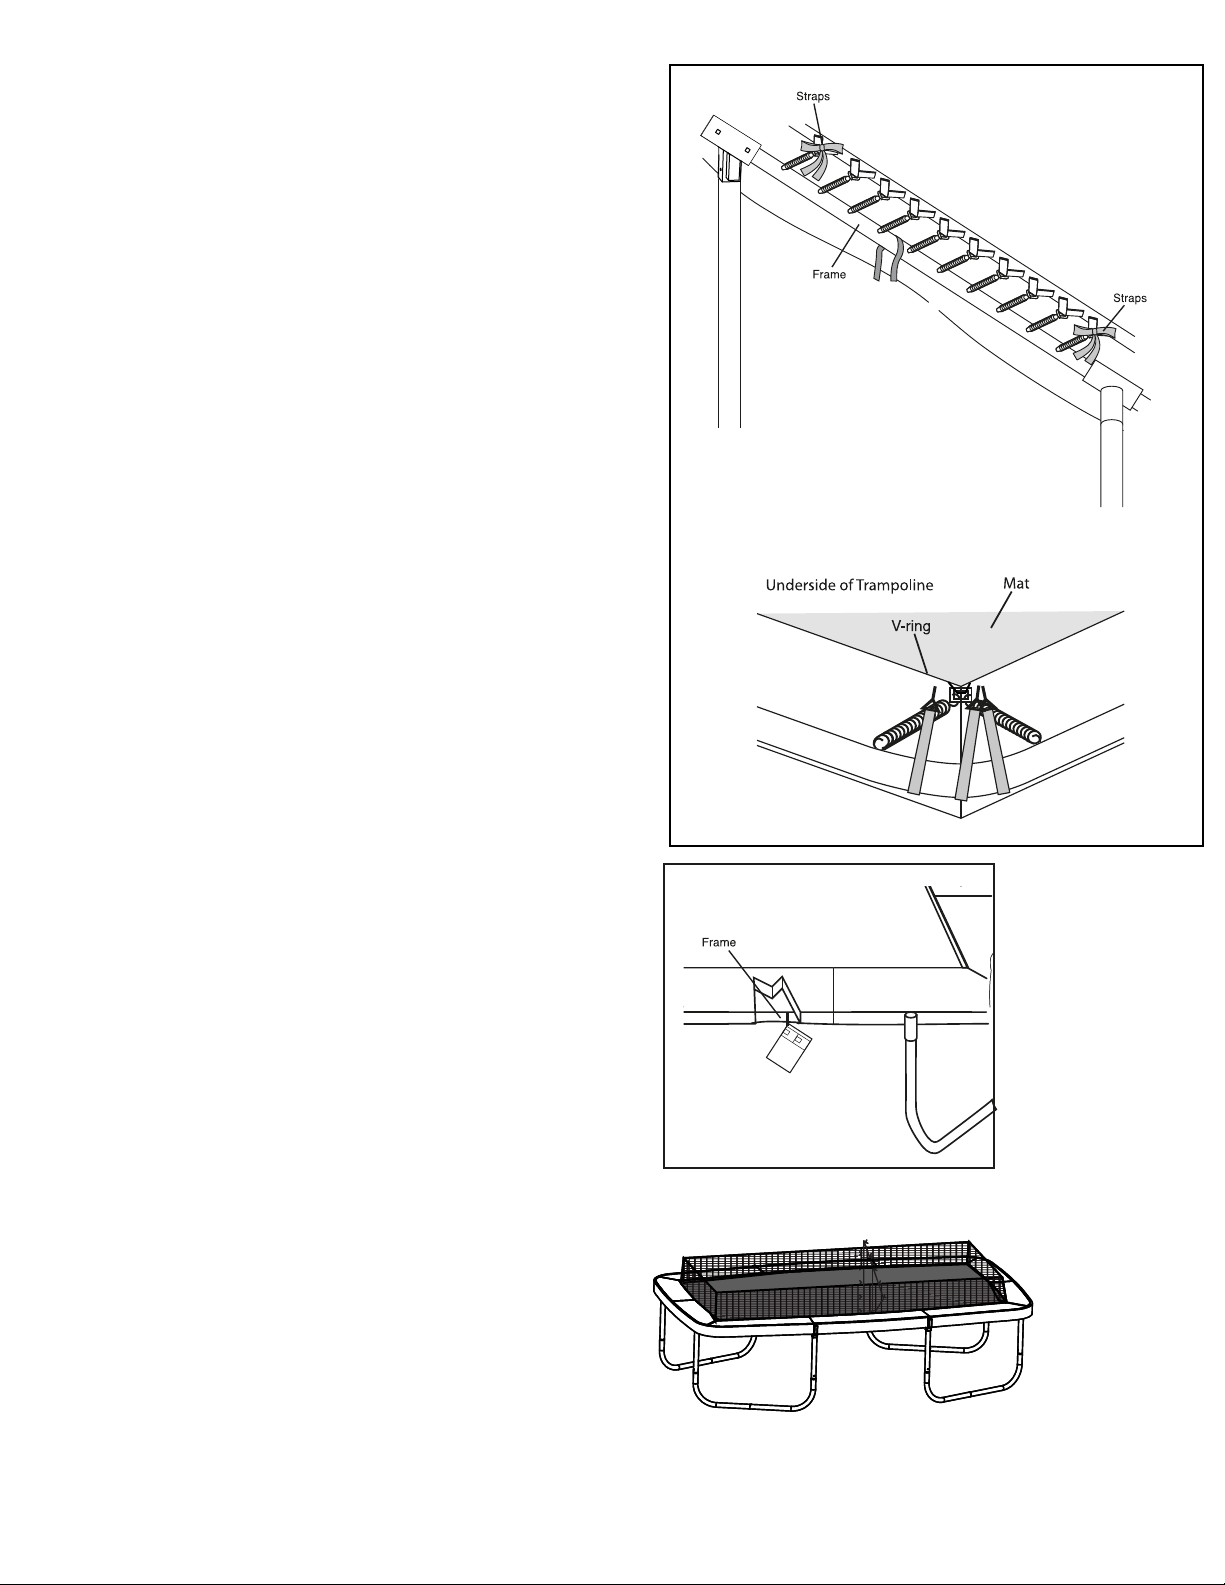
5.
Note: In Step 5 you will secure the enclosure poles
to the frame of the trampoline.
5.
Inset drawing
Start from the enclosure door, lift one of the poles assembled
in Step 1, see the insert drawing. Insert the Straight Tube(5)
through frame pad into the top hole of the Square Socket on
trampoline frame as shown. Make sure the bent side of the
enclosure poles are facing toward the center of the trampoline.
Note: The end of the straight tubes(5) are sharp. Use
caution when assembling.
Repeat this process to assemble the remaining seven poles
to the trampoline frame.
6.
Jump Mat
5
Leg
A
1
Strap
1
6
Frame Pad
Socket
Strap
6. Tie the straps that are sewn on the edge of the enclosure mesh around the outside of the cap. Make sure to
secure the knot tightly, see insert drawing A..
Note: The enclosure poles are high, be careful when
you attach the straps. If needed, please use a ladder.
19
Page 8

. Insert the end cap(3) into the bottom hole of the Socket.
Insert end cap (3) into end of Socket
7
8. Your trampoline enclosure is now fully assembled
(put together). Make sure that all parts are securely
attached. Familiarize yourself and all users with the
trampoline and enclosure with the safety precautions,
use and instructional materials, and care and maintenance instructions in this manual before using the
trampoline and enclosure.
7
8
DISASSEMBLY (TAKING THE ENCLOSURE APART)
To disassemble the trampoline enclosure (take it apart), follow assembly steps 1 through 8 in reverse order.
20
Page 9

ANIMAL TOSS GAME
Attach the Animal Game(10) between two enclosure poles. the ball storage pocket is at the bottom of the game.
Adjust according for the user's height. Tension the straps so the game does not sag or slip down the enclosure poles.
Do not over tighten and damage the straps or the netting material.
Warning
All users should be behind the one who is playing the game. Do not allow other users to be to the side
or in front of the game net while the game is in play.
The Game pieces are not to be used other than for the game.
Do not throw Game pieces at anyone or anything other than the game.
Caution
Remove the game while not in use or in the case of high wind or snow.
10
21
Page 10

PARTS LIST FOR TRAMPOLINE
Key
No. Qty. Description
1 4 leg
2 8 Leg extension
3 8 M6X55mm Bolt
4 8 M6 Washer
5 8 M6 Nut
6 2 Left corner tube
* These parts are not illustrated.
Specifications are subject to change without notice.
2
21
1
21
Key
No. Qty. Description
7 4 Middle tube(include A and B)
8 2 Right corner tube
9 1 Mat
10 76 Spring
11 1 Pad
* 1set Tool
3
21
21
21
4
7
(B)
5
8
21
216
hole
219
21
7
(A)
tool
10
11
23
Page 11

PARTS LIST FOR ENCLOSURE
yeK yeK
noitpircseD.ytQ.oNnoitpircseD.ytQ.oN
1 8 Pole Cap
M5x50mm Bolt82
3 8 End Cap
wercS gnippat-fleS84
ebuT thgiartS85
6
# These parts are not illustrated.
Specifications are subject to change without notice
1
ebuT devruC8
2
7
9 1 Screw Driver
10 1 Animal Toss Game( include 9 sand bags)
#
1
1
Mesh with straps
maoF168
launaM s’resU
4
3
5
6
9
10
8
7
ORDERING REPLACEMENT PARTS
To order replacement parts, visit our web site at www.skywalkertrampolines.com or call our toll-free Customer Care
Hot Line at 1-866-603-Jump (5867), Monday through Friday, 8 a.m. until 5 p.m. Mountain Time (excluding holidays).
To help us assist you, please provide the following information when calling:
• the MODEL of the trampoline (see the front cover of this manual)
• the KEY NUMBER and DESCRIPTION of the part (see the PART LIST above)
• the quantity needed
• the desired method of shipping
24
 Loading...