

Page 1
ASSEMBLY, MAINTENANCE, &
USER MANUAL
MODEL #SSASN100
WARNING
Read all precautions and instructions in
this manual before using this equipment.
Save this manual for future reference.
Skywalker Trampolines Patent: US RE45,182 E
US 7,481,740 B2
Skywalker Holdings LLC
P.O. Box 574, Brigham City, UT 84302
Page 2

TABLE OF CONTENTS
Part List.....................................................................................................................................................................................3
Part Identification........................................................................................................................................................4-5
Exploded Drawing.............................................................................................................................................................6
Assembly...........................................................................................................................................................................7-14
Limited Warranty.............................................................................................................................................................15
STOP EVERYTHING YOU'RE DOING AND REGISTER YOUR PRODUCT
Find our warranty registration online by typing in: www.skywalkertrampolines.com/registration/
You'll need to have the following information handy:
• Name • Email address
• Address • Product model number
• Phone number • Product serial number
• Date of purchase • Retailer the product was purchased from
HEY WE'VE GOT SOMETHING REALLY IMPORTANT TO SAY
And that is... check us out online! We've got assembly videos (for those of you who prefer movies over books), FAQs
(in case you have a question that someone else has already asked), fascinating blog posts (did you know jumping
burns more calories than running?), and most importantly... find us on social media! Because we want to be your
friend. We'd love to hear from you, friend.
Website: skywalkertrampolines.com
Facebook: facebook.com/skywalkertrampolines
YouTube: youtube.com/c/SkywalkerTrampolines
Pinterest: pinterest.com/swtrampolines
Twitter: twitter.com/swtrampolines
Instagram: instagram.com/skywalker_trampolines
IMPORTANT
Trampolines and enclosures are susceptible
to winds. Be sure to secure your trampoline
and enclosure. Wind damage is not covered
in the warranty of your trampoline.
WARNING
CHOKING HAZARD- Small
parts not for children
under 3 years.
2
WARNING
Adult assembly required.
Page 3

PART LIST
Key No.
1
2
3
4
5
6
7
8
9
10
11
12
13
14
15
16
17
18
19
20
21
Qty.
2
2
2
2
1
1
1
2
8
4
4
4
2
4
2
6
2
2
2
2
1
Description
Connect tube
Front tube
Corner socket
Straight tube
Middle tube
Net
Target
Cinch with cord
Screw (2 spare parts)
M8x35mm Bolt
M8 Wing Nut
Bolt cap
M8x50mm Bolt
M8 Washer
M8 Nut
Metal stake
End Cap
Foam
Cap
Wrench
Screw driver
ORDERING REPLACEMENT PARTS
We get it... sometimes things happen. But the fun shouldn’t stop just because you need a new bolt or screw! To order
replacement parts, check out our website at: www.skywalkertrampolines.com or call our toll-free Customer Care
Hot-line at 1-866-603-Jump (5867), Monday - Friday, 8 a.m. until 5 p.m. Mountain Time (excluding holidays).
Our customer service team will ask you a few questions in order to get the replacement part sent out as soon as
possible. We’re not trying to complicate your life, we promise.
When calling, make sure to have the following information ready:
• The model # of the product (see the front cover of this manual)
• The key # and description of the part (see the part list above)
• The quantity needed (only you know the answer to that one!)
BEFORE YOU BEGIN
Thanks for choosing Skywalker Trampolines! We’re just as excited as you are to help your family live an active (but
most importantly FUN) lifestyle. This model is one of our favorites, and we’re confident you’ll love it too. To make
things easier for you, we’ve listed important information that you (and your little outdoor adventurers) need to know.
Make sure you brush up on the warnings, instructions, assembly, maintenance, and use of your new product...
because there will be a pop quiz at the end! (Okay, not REALLY, but if you’re still reading this, props to you! You’re
awesome).
3
Page 4
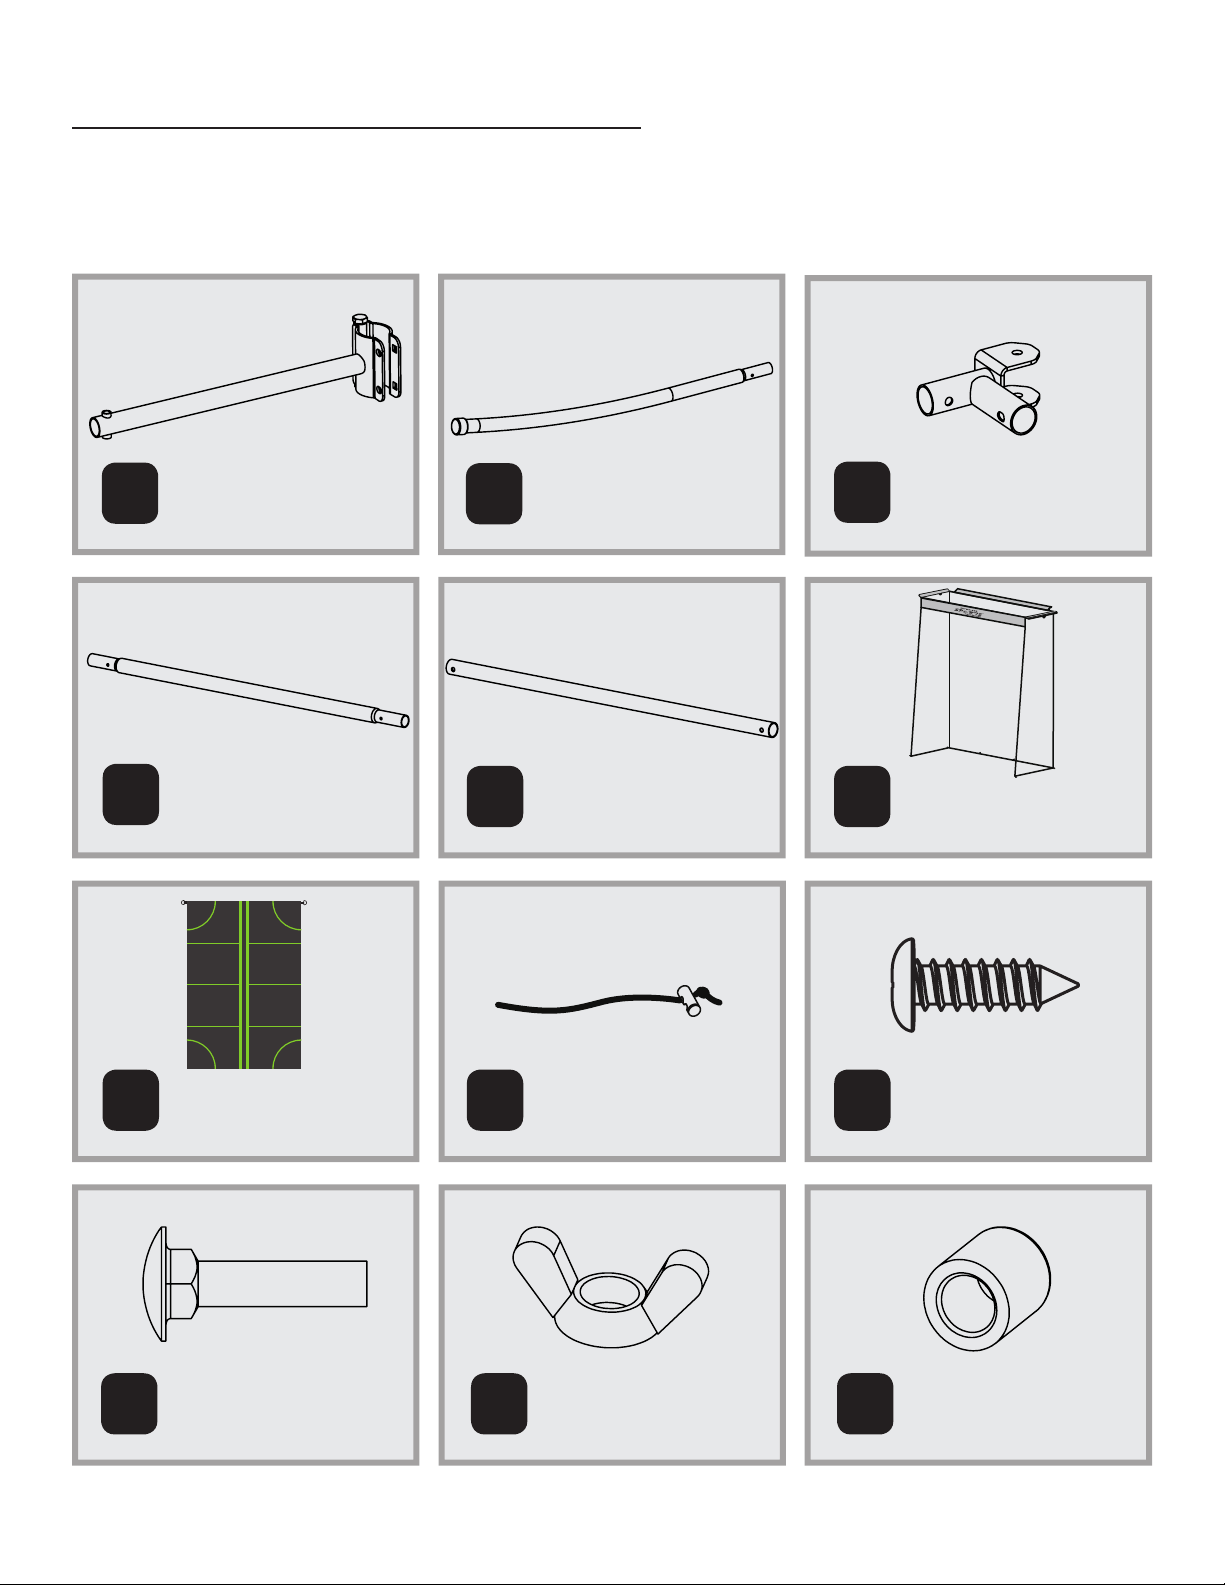
PART IDENTIFICATION
Before you begin, take a look at the drawings below to make sure you have all the parts! The numbers in the squares
to the left (key numbers) will help you identify the parts during assembly.
1
4
Connect tube (x2)
Straight tube (x2)
2
5
Front tube (x2)
Middle tube (x1)
3
6
Corner socket (x2)
Net (x1)
7
10
Target (x1)
M8x35mm Bolt (x4)
8
11
Cinch with cord
(x2)
M8 Wing Nut
(x4)
4
9
12
Screw (x8)
2 spare parts
Bolt cap (x4)
Page 5
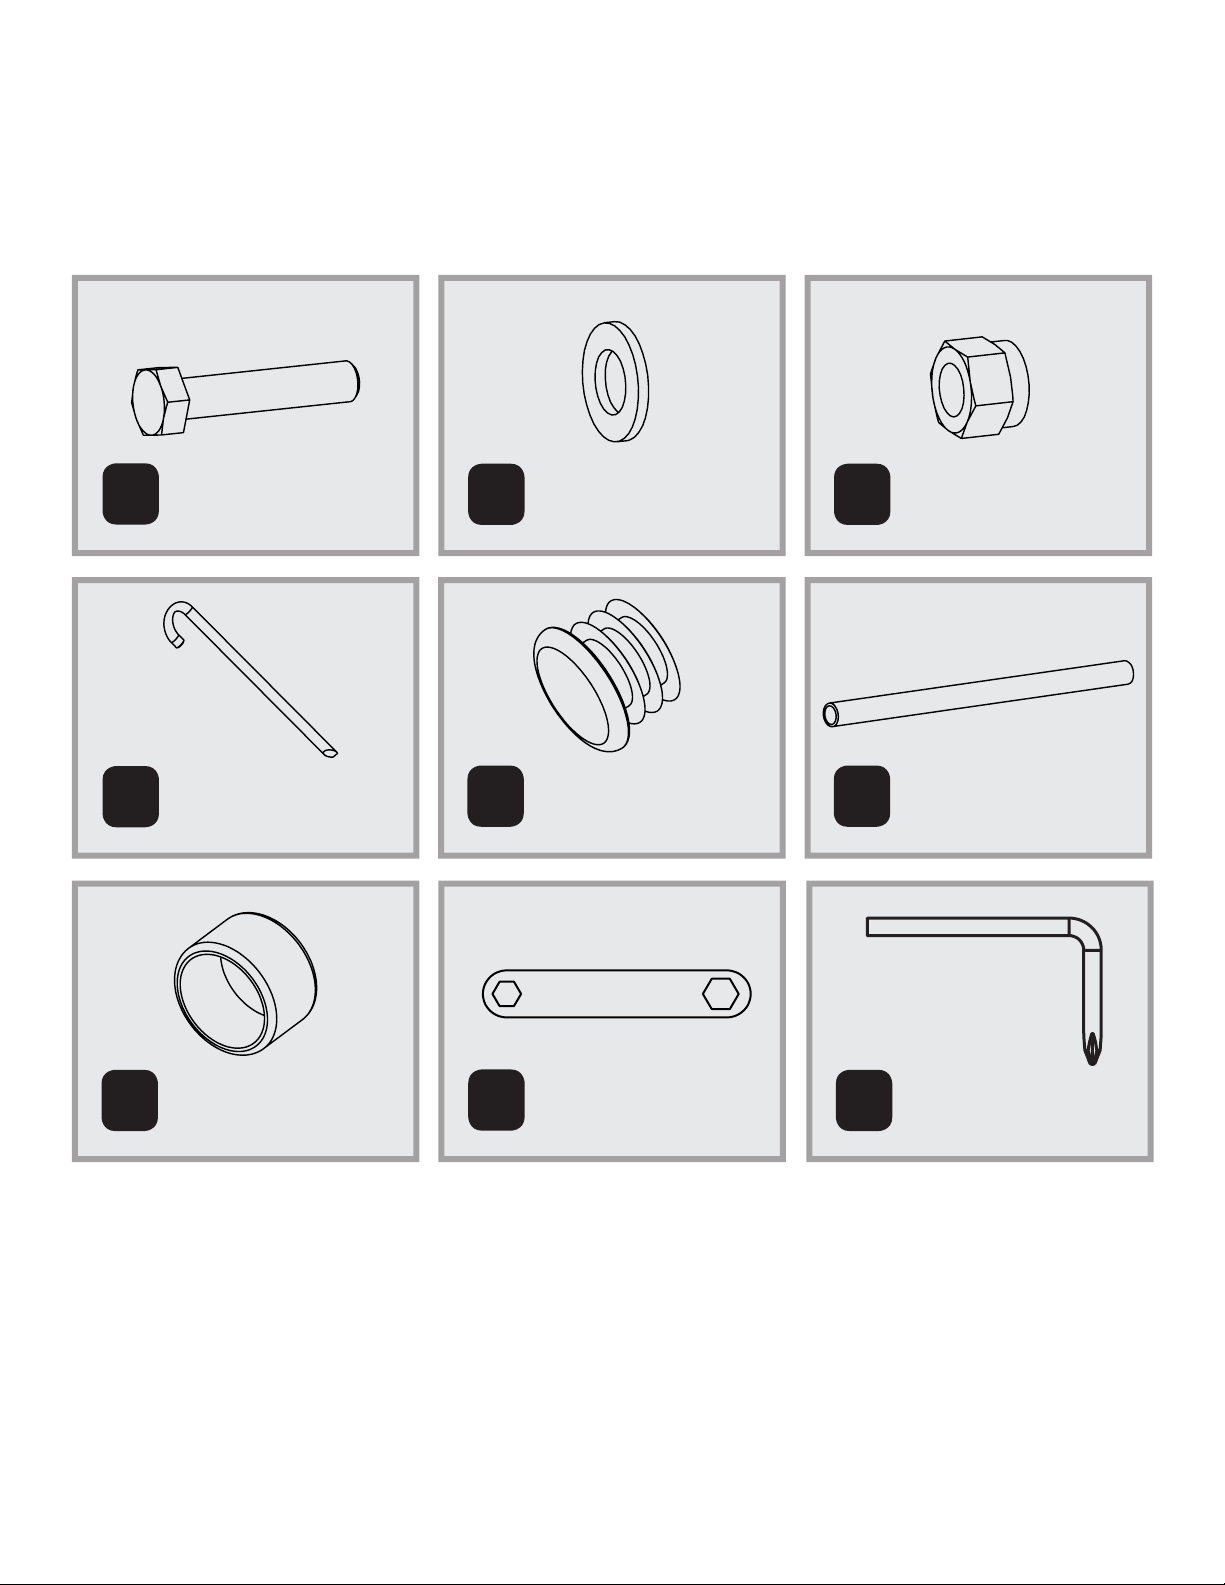
13
M8x50mm Bolt (x2)
14
15
M8 Nut (x2)M8 Washer (x4)
16 17
19
Metal stake (x6)
Cap (x2)
Pre-installed
20
End cap (x2)
Pre-installed
Wrench (x2)
18
21
Foam (x2)
Pre-installed
Screw Driver (x1)
5
Page 6

EXPLODED DRAWING
(8)
(4)
(9)
(5)
(9)
(19)
(4)
(9)
(2)
(3)
(9)
(13)
(14)
(14)
(15)
(1)
(11) (10)
(12)
(16)
(6)
(7)
6
Page 7

ASSEMBLY
READ THIS BEFORE YOU BEGIN
• We’ve provided a Phillip’s screw driver to help with assembly, but you’re more than welcome to use your own
tools.
• Use gloves to protect your hands from pinch points during assembly. Plus, it’s an up-and-coming fashion trend.
• The assembly steps refer to parts by their descriptions and key numbers (see the part list on page 3).
• The assembly steps are written in a specific order, and if you don’t follow them exactly... you may end up having to
start all over again.
• Most importantly... YOU’VE GOT THIS. YOU’RE THE BEST ASSEMBLER AROUND. This may not be the easiest thing
you’ve ever done... but it will be worth it. Trust us.
And if you’re a visual learner, check out our assembly videos!
Visit: youtube.com/c/SkywalkerTrampolines
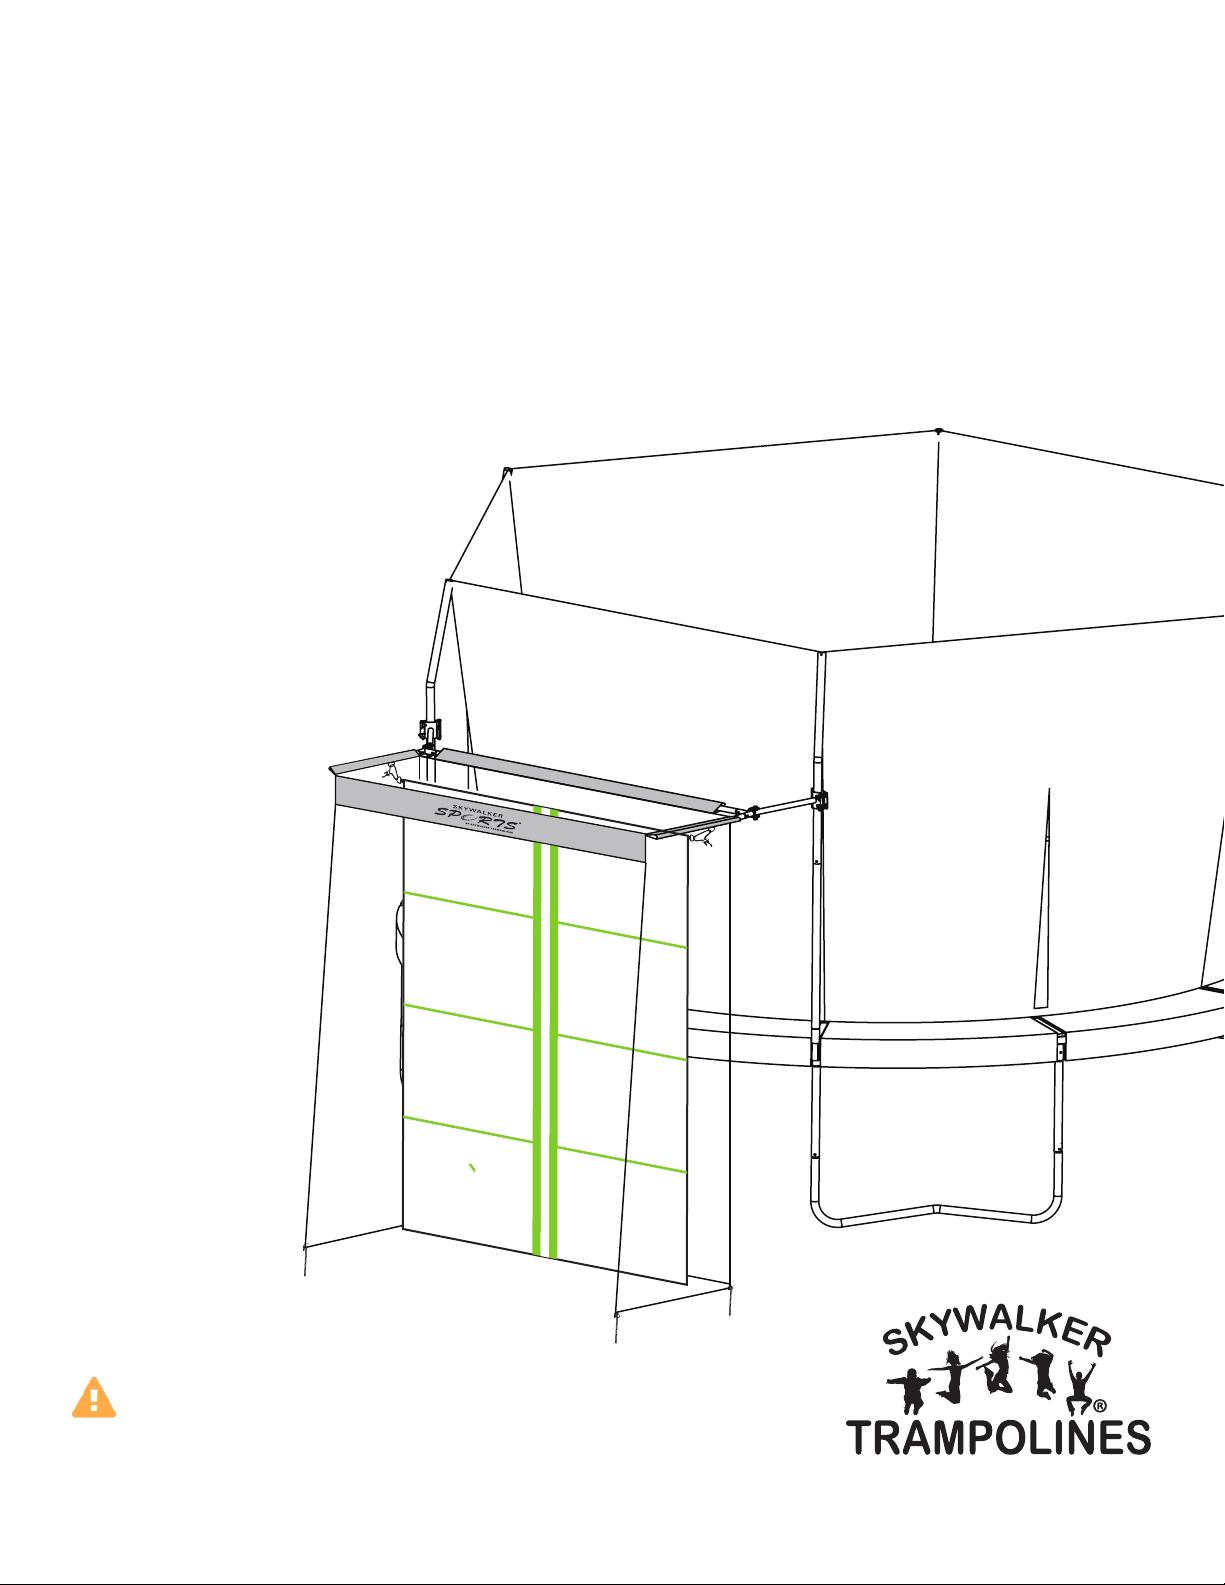
STEP 1
Register your Sports Net! For info on warranty registration, see page 2.
STEP 2
Attach one connect tube (1) to one enclosure
pole, approximately 1900mm (6.2 ft) from the
ground, secure with two bolts (11), and M8
wing nuts (12). Then place the Bolt cap (13)
Connect tube (x1)
1
11
M8x35mm
Bolt (x2)
12
M8 Wing
Nut (x2)
13
Bolt cap
(x2)
onto the end of the bolt.
(12)
(12)
(13)
(13)
(11)
Height: 1900mm
7
Page 8
ASSEMBLY
STEP 3
Connect tube (x1)
1
(12)
(11)
(12)
11
M8x35mm
Bolt (x2)
12
M8 Wing
Nut (x2)
13
Bolt cap
(x2)
Attach another connect tube (1) to the
next enclosure pole, making the height
1900mm(6.2 ft) from the ground as well.
Secure with two bolts (11), & M8 wing nuts
(12). Then put the Bolt cap (13) onto the end
(13)
(13)
STEP 4
Adjust the distance between the two connect tubes to 2030mm (6.7 ft).
Note: Tighten all four bolts.
Length: 2030mm
Length: 2030mm
8
Page 9

STEP 5
Insert the front tube (2) into corner socket(3), secure with screw
(9).
Front tube (x1) Corner socket (x1) Screw (x1)
2
3
9
(2)
STEP 6
(3)
(9)
Attach two Straight tubes (4) to the
ends of the Middle tube (5) as shown,
secure with screws (9).
Straight tube (x2) Middle tube (x1)
4 5
(4)
(9)
9
(5)
9
Screw (x2)
(9)
(4)
Page 10

ASSEMBLY
STEP 7
Net (x1)
6
Insert the front tube (from step 5) into the side sleeve on net as shown.
STEP 8
Screw (x1)
9
Insert the straight tube (from step 6) into the rear sleeve on net as shown,
then secure the corner socket and straight tube with screw.
10
Page 11

STEP 9
Corner socket (x1) Screw (x1)
3
9
Place the remaining corner socket(3) onto opposite end and
secure with screw (9).
STEP 10
Front tube (x1)
2
9
Now insert the other front tube into remaining side
sleeve on net as shown, then secure the corner
socket (3) and front tube (2) with screw (9).
Screw (x1)
11
Page 12

ASSEMBLY
STEP 11
Attach the assembled net to the connect tube
(from steps 3 & 4) with M8x50mm Bolt (13), M8
Washers (14) and M8 Nut (15).
M8x50mm Bolt
13
(x2)
STEP 12
M8 Washer (x4)
14 15
Identify the Target (7), there are two sides. Choose whichever side will
work best for you!
M8 Nut (x2)
7
Target (x1)
Side 1 Side 2
STRIKE
ZONE
12
Page 13

STEP 13
Cinch with cord (x2)
8
1 2
Attach the Target (7) to Net (6) with the provided Cinch with cord (8) as
shown.
Note: Press the ends of the cinch to open the hole and slide the cord through.
34
STEP 14
L stake (x6)
14
Straighten the net, then insert Stakes (14) into the ground to secure.
13
Page 14

ASSEMBLY
STEP 15
That’s it you’re done! Congratulations, your sports net has been fully assembled.
14
Page 15

LIMITED WARRANTY
Skywalker Holdings, LLC warrants its products to be free from defects in material and workmanship under normal
use and service conditions. The steel frame is warranted for three (3) years after the date of purchase. All other
parts are warranted for one (1) year after the date of purchase. Warranty coverage extends only to the original retail
purchaser from the date of original purchase. This warranty is only valid concerning products used for residential
use. Products used for commercial use, such as schools and daycares, will not be covered.
WHAT IS NOT COVERED?
Weather Damage: The warranty does not cover damage due to the effects or acts of nature, such as
earthquakes, wind, hurricanes, tornadoes, lightening, rain, fire, snow, excessive heat and cold conditions
and/or sun damage. During the winter months the trampoline soft materials will need to be removed and
stored in a dry place out of the snow. If left unprotected in the winter months, some components such as
springs, jump mat, spring pad and enclosure, may become damaged, voiding this warranty.
Fading and Rust: Our products are fully galvanized. Skywalker does not warranty against rust or
corrosion. Some areas may have higher air salt content, higher humidity, heavier rain and heavier snow.
Skywalker does not warranty against fading. We suggests customers use a UV protectant on the frame
pad to extend the life of the product.
Loss or damage to Product Due to: Loss or damage caused during shipping or caused by abuse, misuse,
improper or abnormal usage or authorized repair are not covered by this warranty and may also void the
warranty.
Unauthorized Replacement Parts: The warranty will become void if any defects or damages are
associated with the use of unauthorized replacement parts. All replacement parts must be obtained from
an authorized agent.
Assembly Service: The warranty does not cover acts or omissions provided by a third-party assembly
service. It is the customer’s responsibility to check all boxes and confirm all components are included and
in their proper condition before installation occurs.
INSPECTION AND REPLACEMENT PARTS:
Your product SHOULD BE INSPECTED UPON UNPACKING AND SET UP AND THEREAFTER ON A REGULAR BASIS.
1.
WORN, DAMAGED OR BROKEN PARTS SHOULD BE REPLACED IMMEDIATELY AND BEFORE USE.
Call the Skywalker Trampoline Customer Service Department at 1-866-603-5867 to file a warranty claim. Be
2.
prepared to provide the following information: name, shipping address, a copy of your original sales receipt, a brief
description of the problem and cause, trampoline model number and serial number. We may also ask for photos of
the damaged/defective parts.
After reviewing your information and examining your photos, Skywalker Trampolines will make the determination if
3.
this part is covered by this warranty. If so, a replacement part will be sent to you.
NOTE: All requested information must be provided in order to review your warranty claim.
To order replacement parts for your product please visit www.skywalkertrampolines.com
Skywalker Holdings, LLC, PO Box 574, Brigham City, UT 84302 USA.
Printed in China © 2018 Skywalker Holdings, LLC
15
Page 16

NOTE: SKYWALKER HOLDINGS, LLC IS NOT RESPONSIBLE OR LIABLE FOR INDIRECT, SPECIAL OR CONSEQUENTIAL
DAMAGES ARISING OUT OF OR IN CONNECTION WITH THE USE OR PERFORMANCE OF THE PRODUCT OR OTHER
DAMAGES WITH RESPECT TO ANY ECONOMIC LOSS, LOSS OF PROPERTY, LOSS OF REVENUE OR PROFITS, LOSS OF
ENJOYMENT OR USE, COST OF REMOVAL, INSTALLATION OR OTHER CONSEQUENTIAL DAMAGES. SOME STATES DO
NOT ALLOW THE EXCLUSION OR LIMITATION OF INCIDENTAL OR CONSEQUENTIAL DAMAGES. ACCORDINGLY, THE ABOVE
LIMITATION MAY NOT APPLY TO YOU.
THE WARRANTY EXTENDED HEREUNDER IS IN LIEU OF ALL OTHER WARRANTIES AND ANY IMPLIED WARRANTY OF
MERCHANTABILITY OR FITNESS FOR A PARTICULAR PURPOSE IS LIMITED IN ITS SCOPE AND DURATION TO THE TERMS
SET FORTH HEREIN. SOME STATES OR COUNTRIES DO NOT ALLOW LIMITATIONS ON HOW LONG AN IMPLIED WARRANTY
LASTS. ACCORDINGLY, THE ABOVE LIMITATION MAY NOT APPLY TO YOU. THIS WARRANTY GIVES YOU SPECIFIC LEGAL
RIGHTS. YOU MAY ALSO HAVE OTHER RIGHTS WHICH VARY STATE TO STATE OR COUNTRY TO COUNTRY.
THIS WARRANTY IS VALID ONLY IN THE COUNTRY THE PRODUCT WAS PURCHASED.
 Loading...