

Page 1
SkyboardMini
Electric Skateboard
www.skywalkers.com.au
Quick Start Guide
Page 2
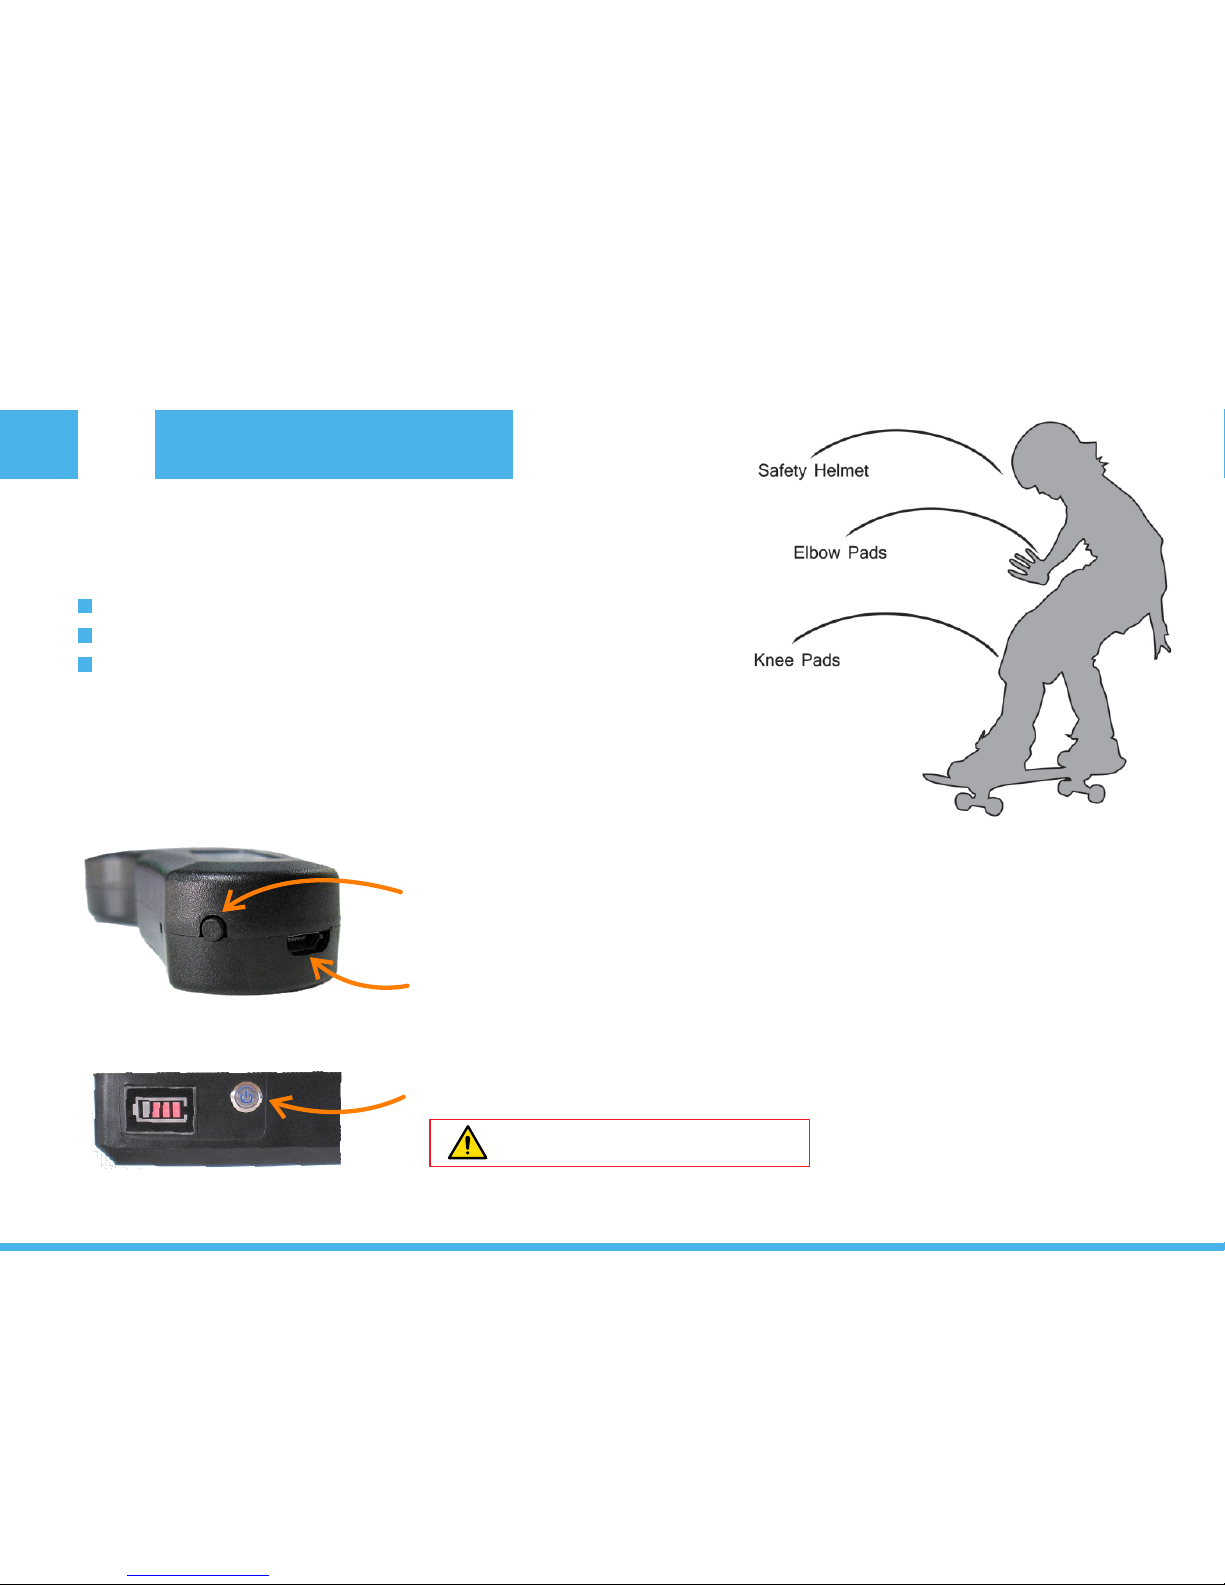
Wear safety gear and read this paper carefully before driving.
In low battery state, it will automatically switch to cruise mode.
No high speed and high acceleration in low battery status.
01
Quick Start Guide
Preparation
Turn the switch left/right to power
off/on the remote controller
Power off/on
Charge port
Press the power button to power on/off
Don’t move board until the beeps end
(In first 5 seconds after the boot).
Page 3
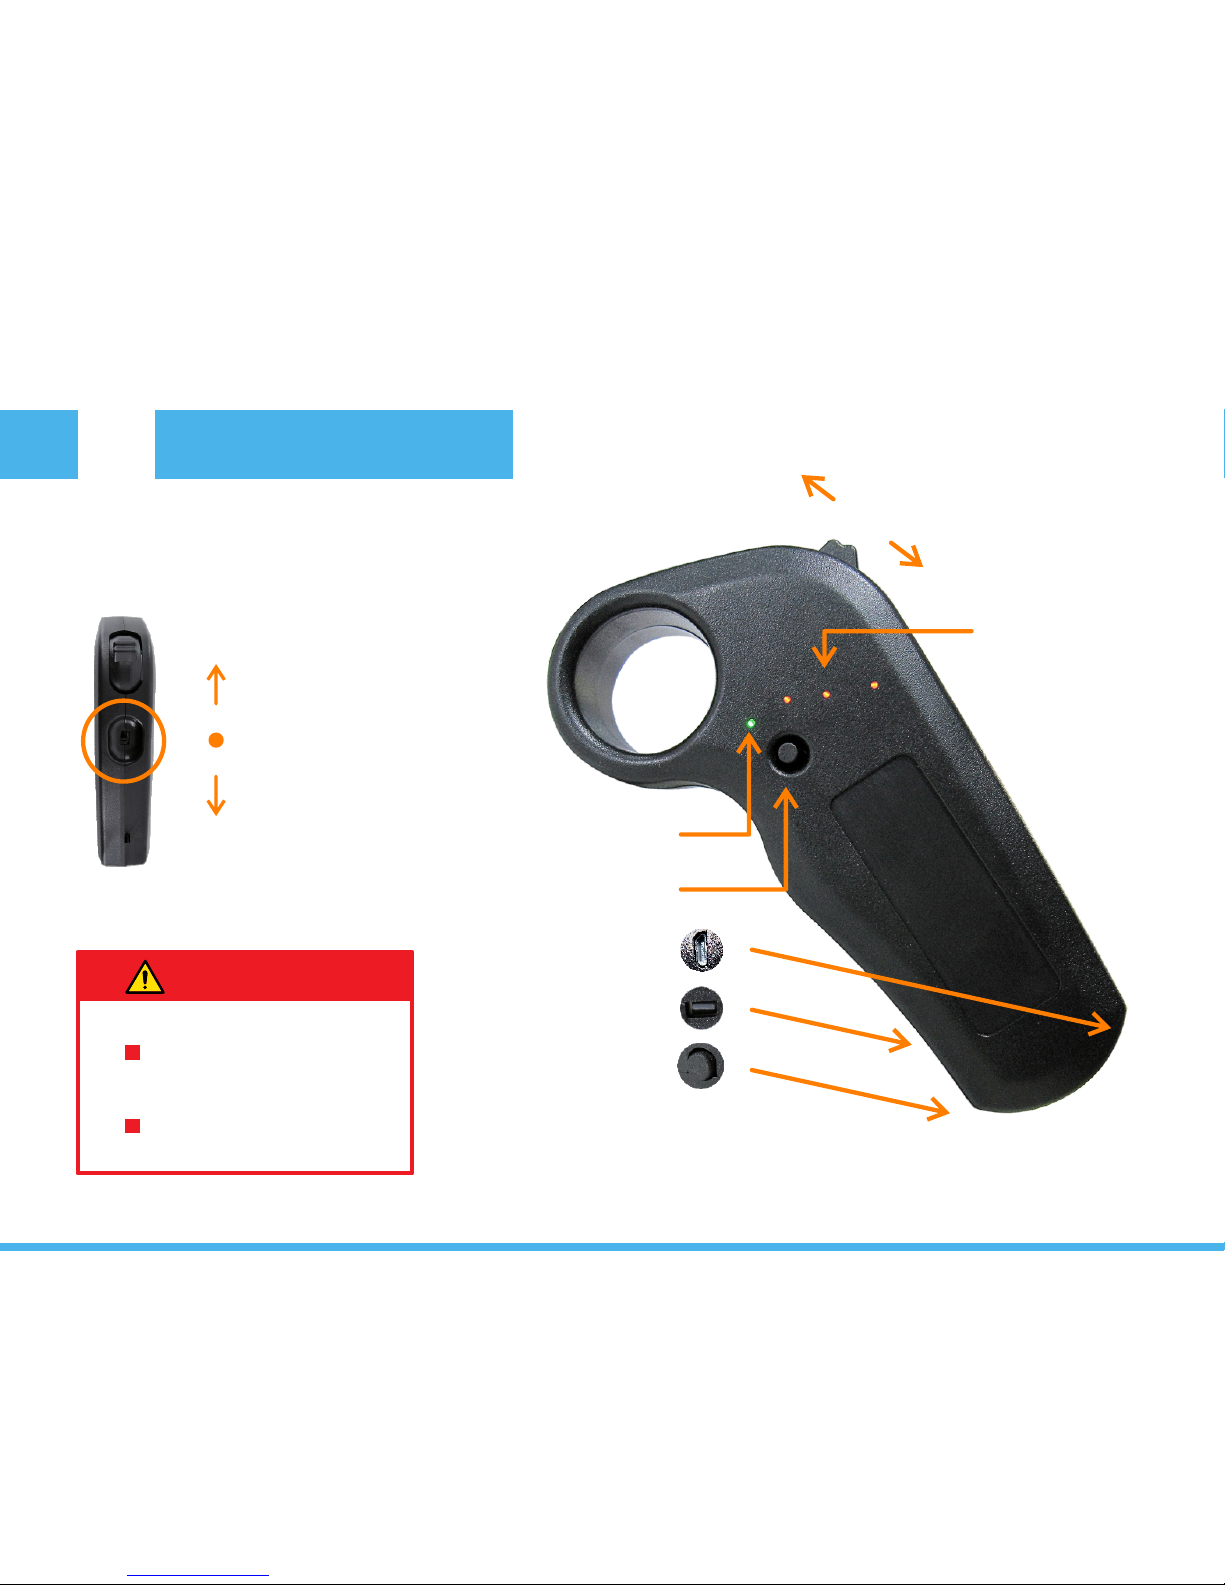
02
Quick Start Guide
Drive, Brake & Reverse
Low speed
Medium speed
High speed
Signal Indicator
Charging port
Binding button
Power switch
Reverse button
GO forward
Brake
Battery Indicator
10%
50%
100%
Change speed more
before you move joystick.
Don’t reverse while driving.
WARNING
Page 4

03
Getting Started
Thank you for purchasing an electric skateboard.
Do note that an electric skateboard is not a toy, and takes time to learn.
Please take the time to read this manual carefully, particularly the safety instruction pages.
We hope you will enjoy using this product and have lots of fun riding the skateboard of the future!
Before You Ride
Ensure equipment is charged.
Wear appropriate safety gear
Be aware of your surroundings.
Ride in a safe area
Abide by local laws and regulations
Have fun and ride safe!
Page 5

04
Charging
The board and controller need to be fully charged prior to first use.
Ensure that both the board and controller are powered off when charging.
Only use the supplied adaptor with the unit.
Power off the skateboard if it is on.
Plug the supplied power adaptor into the power socket on the skateboard.
The light on the charger will turn red while charging, and green when fully charged.
Unplug the unit once the charge is completed.
It typically takes about 3 hours to fully charge the skateboard batteries from empty.
Notice:
Using any other charger may cause damage to the control board or batteries, and will void your warranty.
Charging the Skateboard
The controller uses a standard micro USB cable to charge.
Insert the supplied USB charge cable into the bottom of the remote controller.
Make sure that the cable is oriented correctly when inserting into the controller.
Plug the other end of the USB cable into the charger, and plug into a power socket.
It typically takes about 2 hours to fully charge the remote.
Charging the Remote Controller
Page 6

05
Pairing
1. Turn on the board
On very first use, the board and controller need to be paired together.
Before starting the process, ensure that the controller and board are powered off.
2. Press and hold the button
let the lights slowly flashing
3. Turn on the remote controller
press binding button
4. Signal indicator and button lights are
both flashing, that means pairing ok
Both flashing
Testing Pairing
You can test pairing by placing the skateboard on
its side, and pushing up on the motion controller
until the wheel motors engage and the wheels
start spinning. Push backwards on the motion
controller to stop the spinning.
The boards is now ready to use.
Page 7

06
Before You Ride
Prior to use perform a quick visual check that the board looks ok and equipment is undamaged.
Ensure that you have appropriate safety gear.
Find a safe environment to use the skateboard in.
Power up the unit and check that everything is running smoothly.
Engage the brake by pressing downwards on the motion joystick.
Step onto the board, find your balance, and gently push up on the joystick until the board.
First Ride
The more you push up on the joystick, the faster you will travel.
Pushing downward on the joystick will engage the brakes.
Practice going forward slowly until you feel comfortable, then try turning.
We suggest learning with a friend initially, so that you have support in case you fall.
Most users will be able to ride competently within a short period of time. It’s easier than you think.
Starts Rolling
Page 8

07
Before You Ride
Remember to press down on the joystick to engage the brake. This makes mounting
the skateboard a lot easier for beginners.
You should place the foot that you kick with to the rear of the board, and your other
foot to the front of the board.
Keep to a pace that you are comfortable with until you are experienced using the board.
Learn to turn by gently leaning your feet forwards to turn left, and backwards to turn
right whilst moving forwards.
Remember, Practice makes PERFECT!
Basic Riding Tips
Page 9

08
FAQs
Possible Reasons Solution
Issue
Failed to starting up
Battery runs out
Electric skateboard: Please charge immediately.
It generally takes 3 to 4 hours.
Remote Controller: Please charge
immediately. It generally takes 2 hours.
Cruise duration
gets shorter
Battery are not fully charged
Remote fully charge the battery. It generally
takes 3 to 4 hours.
Battery doesn’t
accept charge
Make sure power flow to the wall outlet is on.
Plug gets loose.
Check if the socket is available.
Socket is not available.
The average of rechargeable battery life is 1 to 2
years depending on condition and use. Replace
only with electric skateboard replacement batteries.
Battery need to be replaced.
Start up electric skateboard.
Binding indicator was not light up.
No connection to electric.
Electric skateboard
doesn’t run
Restart electric skateboard and remote controller.
If blinding indicator still light off, please turn off
them and consult dealer or manufacturer.
Binding indicator flashing on remote
controller indicates a fault in electric
skateboard.
Please consult dealer or manufacturer.
Indicator on electric skateboard
flashing (no match code) indicates a
fault in electric skateboard.
Please charge immediately.
Charge indicator flashing.
Please charge immediately.
Battery runs out.
Start it up.
It will auto power-on without any
operation on electric skateboard.
Auto power-off
Page 10

09
Specifications
Mileage
Capability
10 Km 15 Km
TYPE 1
TYPE 2
Low speed 1
10 Km/h
10 Km/h
Medium speed
15 Km/h 15 Km/h
Top speed 2
20 Km/h 20 Km/h
N.W.
Entire Board
3.5 Kg 3.5 Kg
Size
740mm x 215mm x140 740mm x 215mm x 140
Max load
60 Kg 60 Kg
MaterialBoard
7 layers maple 7 layers maple
Capacity
Battery
2200 mAh 4400 mAh
Type
29.4V Lithium battery 29.4V Lithium battery
Weight
400 g 600 g
Charging Time
1.5 hours 2 hours
Cycle life
Above 500 times Above 500 times
Type
Motor
70mm Hub Motor 70mm Hub Motor
Power
Single-motor 350 W Single-motor 350 W
MaterialWheel
PU PU
Size
Remote
70mm x 51mm 70mm x 51mm
Hardness
80 A 80 A
Distance
14 m 14 m
Frequency
2.4 GHz 2.4 GHz
Charge time
2 hours 2 hours
Size
Package
800mm x 280 x 200mm 800mm x 280 x 200mm
G.W
5.9 Kg 6.9 Kg
Page 11

10
Component Parts
Deck
1
Normal skateboard truck set
2
Power truck set
3
Battery case
4
Controller
5
USB charging port
6
Power button
7
Battery display
8
2
1
4
5
6
3
7
8
Board
Page 12

11
Component Parts
Hub motor
1
Gasket
2
Gasket ring
3
Truckbolt
4
Spring washer
5
Holder
6
Bearing
7
Nut
8
Power Truck Set
Truck
9
Nut
10
Gasket ring
11
Spring washer
12
1
2
3
4
5
6
10
13
11
12
7
8
9
Wheel
1
Gasket
2
Gasket ring
3
Truckbolt
4
Spring washer
5
Holder
6
Bearing
7
Nut
8
Unpowered Truck Set
Truck
9
Nut
10
Gasket ring
11
Spring washer
12
10
5
1
3
11
48762
9
Page 13

12
Remote Control
Low speed
Medium speed
High speed
Signal Indicator
Charging port
Binding button
Power switch
Reverse button
GO forward
Brake
Battery Indicator
10%
50%
100%
Speed Control Joystick
High and Low Speed
Switch
Page 14

13
Safety Instructions
An electric skateboard is not a toy, and should be treated with appropriate care. Always practice safety
first as it is possible to lose balance and cause a collision or fall, ensure that you use the board in a safe
appropriate environment, and you always wear appropriate safety gear.
Safety Gear - we recommend that you wear full safety gear when riding. Please wear a suitable skateboard
helmet, elbow pads, knee pads, and gloves. Wear suitable attire when skateboarding to protect you from
scrapes if you fall. Wear shoes - flipflops or similar loose footwear are not suitable riding wear.
The board is designed for use by responsible riders of the ages 13 and up.
Only one person can ride a Skateboard at a time
The maximum carrying weight supported by the boards is 60kg/130lbs. Exceeding this weight will affect
the skateboard balance and functionality, and may cause the board to fail, act inappropriately or
otherwise break.
Please observe your local traffic laws and regulations.
The board is designed to be ridden on flat and paved surfaces. Avoid driving on sand, gravel, mud,
rugged or open ground. Do not drive on slippery ground, such as snow, ice or wet ground.
Page 15

14
Safety Instructions
Keep a safe distance from other people and stationary objects while riding.
Do not drive in crowded spaces - you could be a danger to yourself and other people.
Do not ride at night or in dart unit locations.
Always be aware of your surroundings.
Please pay attention when riding aboard and always be on the lookout for other road users or dangers.
Avoid listening to music when riding, as other road users may not be heard until too late.
Perform a basic safety check of the board before riding to avoid accidents or equipment damage.
Check the bolts and trucks are tightly fastened.
Check electrical connections are firmly connected.
Ensure the drive belts are undamaged and the chassis is clean of obstructions.
Please don’t place any items on top of the board when riding.
When the board is low on power, please stop using the board and recharge the battery
as soon as possible.
 Loading...