


Ultralight Competition Harness – LTF 91/09
RANGE X-ALPS2

EN
Introduction 3332 Content
CONTENT
Introduction 33
Description 34
Features 36
Safety Notice 42
Initial Set Up 42
Mounting the Reser ve Parachute 44
Set-Up and Adjustments 48
Flying Safe 50
Miscellaneous 52
Maintenance, Care 53
Repairs 55
Disposal 55
Maintenance Check 55
Homologation 56
Technical Data 56
Nature and Environmental Friendly Behavior 57
Closing Words 57
Test Protocol 58
1
2
3
4
5
6
7
8
9
10
11
12
13
14
15
16
17
19
1 INTRODUCTION
Welcome to skywalk!
Congratulations on the purchase of your new RANGE X-ALPS and thank you for your trust
in us and in our products. In this manual you will find information that will help you quickly
get to know your new harness to ensure your fun for a long time.
At skywalk we are enthusiastic about wind spor ts and innovative technologies. When we
founded sky walk in 2001, our goal was to make paragliders and kites that offer new solutions to set new impulses, and to provide customers with a maximum of user friendliness.
Today we are one of the most successful paraglider manufacturers in the world.
For this we are thankful for our curiosity about everything that flies, sails and surfs, as well
as our interest in a variety of outdoor sports. It’s this “big picture” view that allows us to
continuously set new accents in paragliding.
We are always open for questions, comments or critique and are happy to provide
you at any time with further information!
Your skywalk Team
PURE PASSION FOR FLYING
Edition 2 / 02_2018
The lates t version of t he manual c an be found o n
www.skywalk.info

34 Description Description 35
2 DESCRIPTION
The RANGE X-ALPS2 is the first choice for Hike & Fly athletes and XC pilots who want
to go to the limit in competitions or who insist on extremely light gear. It’s detailed design
is tailor-made for pilots looking for the ultimate, safe and amazingly comfortable harness
for XC- and bivouac flights, where every gram counts.
The RANGE X-ALPS was designed by the skywalk development team as a paraglider
harness for paragliding. Base jumping, skydiving or other uses of the RA NGE X-ALPS as
a climbing harness with all associated varieties are prohibited and are not the intended
use. The harness is suitable for all pilots who focus on aerodynamic flying and Hike&Fly
adventures.
The geometry of this harness supports the pilot from the first moment in the air while
constantly giving direct feedback to the wing. The leg and chest straps are equipped with
the so-called “get-up safety system” that prevents the pilot from falling out of the harness. The R ANGE X-ALPS can be flow n with all paragliders as long as the paraglider manufacturer doesn’t require a special harness. Please consult your paraglider manual to see
if this is the case.
CAUTION
TO ENSURE A LONG LIFE, THE MATERIALS USED REQUIRE
CAREFUL, PROFESSIONAL TREATMENT!
CAUTION
THE FIRST FLIGHT MUST BE CARRIED OUT BY A QUALIFIED EXPERT.
THE TYPE CERTIFICATE AND THE DATE OF THE FACTORY INSPECTION CAN BE
FOUND IN THE INSIDE POCKET OF THE HARNESS. SHOULD THIS BE MISSING,
ASSUME THAT THIS HARNESS IS A PROTOTYPE THAT HAS NOT BEEN TESTED.
SCOPE OF DELIVERY
The following components are standard equipment in the R ANGE X-ALPS:
- EN/LTF certified PermAir protector (LTF 91/09)
- Speed system
- Carbon Sandwich Footplate
- 2 aluminum main carabiners
- Reserve chute V-line and release handle
- Inflation bag
EN

36 Features
EN
FEATURES
1 - Power Frame
2 - Reserve parachute V-line channel
3 - Front rescue system with integrated cockpit
4 - Car b on Sandwich Footplate
5 - Ram-air nose
6 - Storage compartment »seat«
7 - Storage compartment »back«
8 - Lycra inside pocket
9 - Pole Pocket
10 - Aerodynamic ram-air rear fairing
11 - RECCO® reflector
12 - Protector with PermAir technology (18cm thick | 32G)
13 - Easy Access Line
14 - Drinking tube
15 - Inflation Bag
Labelled opening for the hydration system.
The hydration bladder is mounted in the back
compartment.
The Inflation Bag serves as packaging and pump.
To fill the protector, proceed as follows:
1. Blow gently into the opening of the Inflation Bag,
while pressing the two plastic strips together slightly.
2. Then pull the two plastic strips together quickly
and start like a roll-top backpack to close the inflation
bag. Push the Inflation Bag downwards constantly and
with little force. The air is now being compressed into
the PermAir protector.
3. Repeat the process until the protector is filled.
The Easy Access Line simplifies the entry
into the cocoon. The leg bag will no longer
be blown behind the pilot during the take off,
thus ensuring safe access.
3
1
3
9
8
10
7 11
4
2
612
5
15
13
14

PROTECTOR
The RANGE X-ALPS is a harness with permanent-airbag protector. The protector is
approved according to the rigorous criteria of LTF91/09 and meets these requirements
when installed. Due to its construction, the PermAir protector also extends over the
critical lumbar area.
The protector can be removed by unzipping the pocket located behind the storage compartment under the seat. The protector must be checked for damage and leaks after a
hard landing,
1 PermAir protector LTF (91/09) certified
CAUTION
PROPER USE OF AN LTF09 CERTIFIED PROTECTOR IS OBLIGATORY IN GERMANY A ND IS A REQUIREMENT FOR VALID INSURANCE COVERAGE OF THE
PILOT! REMOVING THE AIR-PROTECTOR IS DONE SO AT YOUR OWN RISK
AND IS THE FULL RESPONSIBILITY OF THE PILOT! DOING SO INVALIDATES
THE CERTIFICATION!
Features 3938 Features
POWER FR AME
The skywalk-designed power frame provides perfect back support in flight.
It replaces the conventional seat board. Unlike other harnesses, the force is not
applied at a single point to the straps, but rather is distributed evenly over the entire
frame. As a result, there are no uncomfortable pressure points, ensuring an optimal
back support without buckling. Furthermore, the legs can be angled during the launch
phase or in turbulence and may not be fully stretched. This increases safety and the
pilot can effectively focus on flying.
EN
1

Features 4140 Features
EN
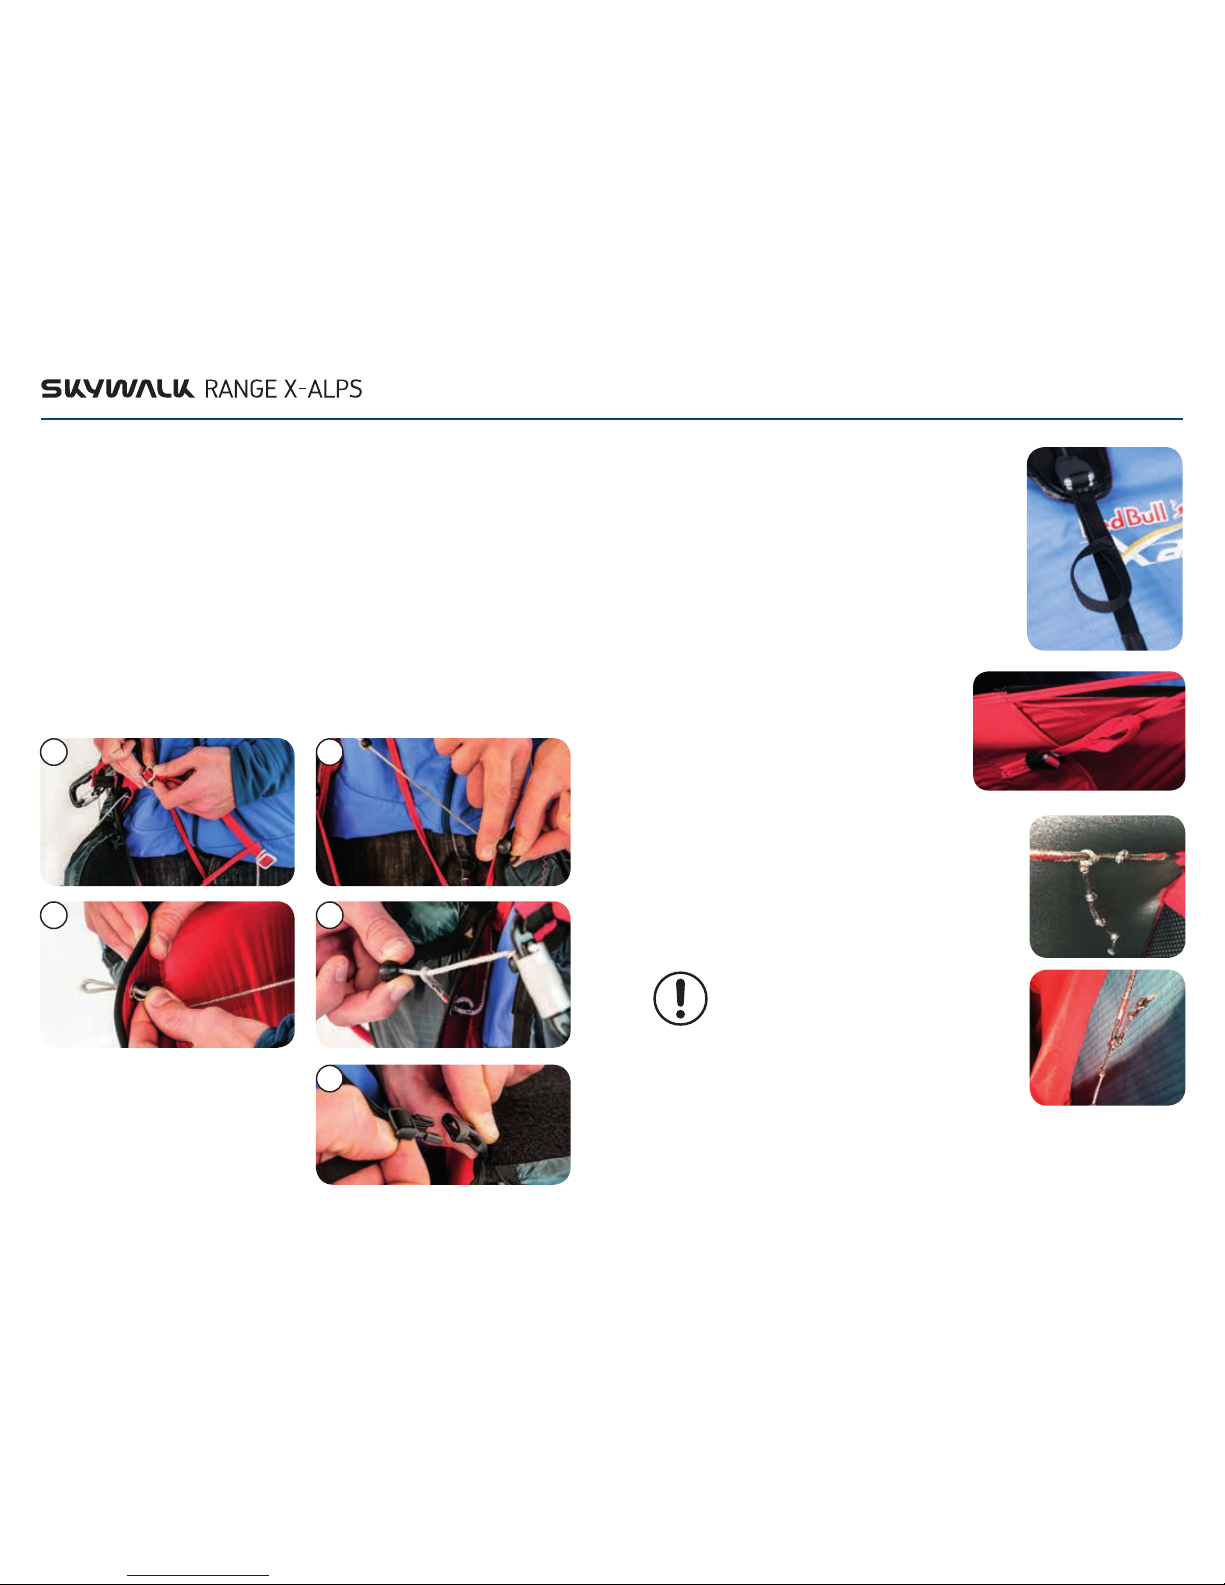
To fill the protector:
1. Lay the harness lengthwise sideways on the ground.
2. Make sure that no heavy objects or weights are lying on the protector. That would make
filling more difficult.
3. Connect the tube from the rear storage compartment with the inflation bag and keep
inflating the protector until it can´t take any more air (pic 1+2).
4. Make sure that the protector is correctly positioned in its compartment and has not
slipped during inflation. It might be necessary to reposition it to make sure it is properly
seated in its intended compartment.
5. Separate the inflation bag from the protector. Kink the hose first, do not pull on the
inflation bag and grab directly to the valve, other wise the valve can tear out (pic 3).
6. Press the bent hose into the designated sleeve, making sure that no further air escapes
from the protector during the process, the bent end sits firmly in the sleeve
and the yellow plug seals the hose (pic 4+5).
CAUTION
THE PROTECTOR MUST BE SEALED AF TER INFLATION WITHIN 3 SECONDS
TO ENSURE THE FUNCTIONALITY ACCORDING TO LTF 91/09. IF THIS IS NOT
DONE, PROTECTION WILL BE INSUFFICIENT!
After landing, just pull the end of the tube out of the sleeve and remove the yellow plug
to let the air out of the protector. Leave the tube open when packing the harness in the
rucksack. This will squeeze the remaining air out by compressing it. Always make sure that
no sharp objects, such as poles, come into contact with the harness.
CAUTION
THE PROTECTOR MUST BE INFLATED ONLY WITH THE INFLATION BAG
OR MOUTH!! PUMPS OR ANY KIND OF EXTERNAL INFLATION IS EXPRESSLY FORBIDDEN!
3
5
4
2
1

Initial Set Up 4342 Safety Noti ce | Initial S et Up
4 SAFETY NOTICE
With the purchase of this equipment, you assume the full responsibility and accept
all risks associated with the use of paragliding equipment, including injury and death.
Improper use of paragliding equipment increases this risk. To fly a paraglider, you
must be in possession of the required license or permit for the country in which
you are flying.
Neither sky walk nor the seller nor the importer of this product can be made liable
in case of personal injury or damage caused to a third party.
5 INITIAL SET UP
The RANGE X-ALPS should initially be setup
and inspected together with your dealer.
In particular, a compatibility test must be
carried out when the reser ve chute is installed
for the first time.
Then perform the basic set up yourself while
sitting in a harness simulator. Insert the main
carabiners through the two loops that are
connected directly to the seat and the back
support. At the front of the seat are metal rings on the left and right that are used as
guides for the speed system.
When installing the speed system for the first
time a new installation, first guide the speed
system line through the metal ring (pic 1),
then through the pulley (pic 2) and finally
through the opening on the cover (pic 3).
Then tie the line to the brummel hook with a
bowline knot and attach the speed system to
the foot plate with the elastic band (position
left or right possible).
EN
1
3
2
Mounting the Reserve Parachute 4544 Mounting the Reserve Parachute
6 MOUNTING THE RESERVE PARACHUTE
The RANGE X-ALPS can be combined with most compact reser ve parachutes available
in the market. The initial installation should be carried out by a certified compatibility checker who will verify that your reserve parachute deploys properly and will certify its
compatibility in the reserve’s packing certificate. It is important for the pilot to perform
the test deployment of the reserve parachute himself while sitting in the harness in a
simulator because the results of the test are affected by body size and strength. Before
installation, ensure that the rescue parachute has been packed recently. The pack interval
is normally ever y six months, but verify this by reading the information in the user manual of the rescue parachute.
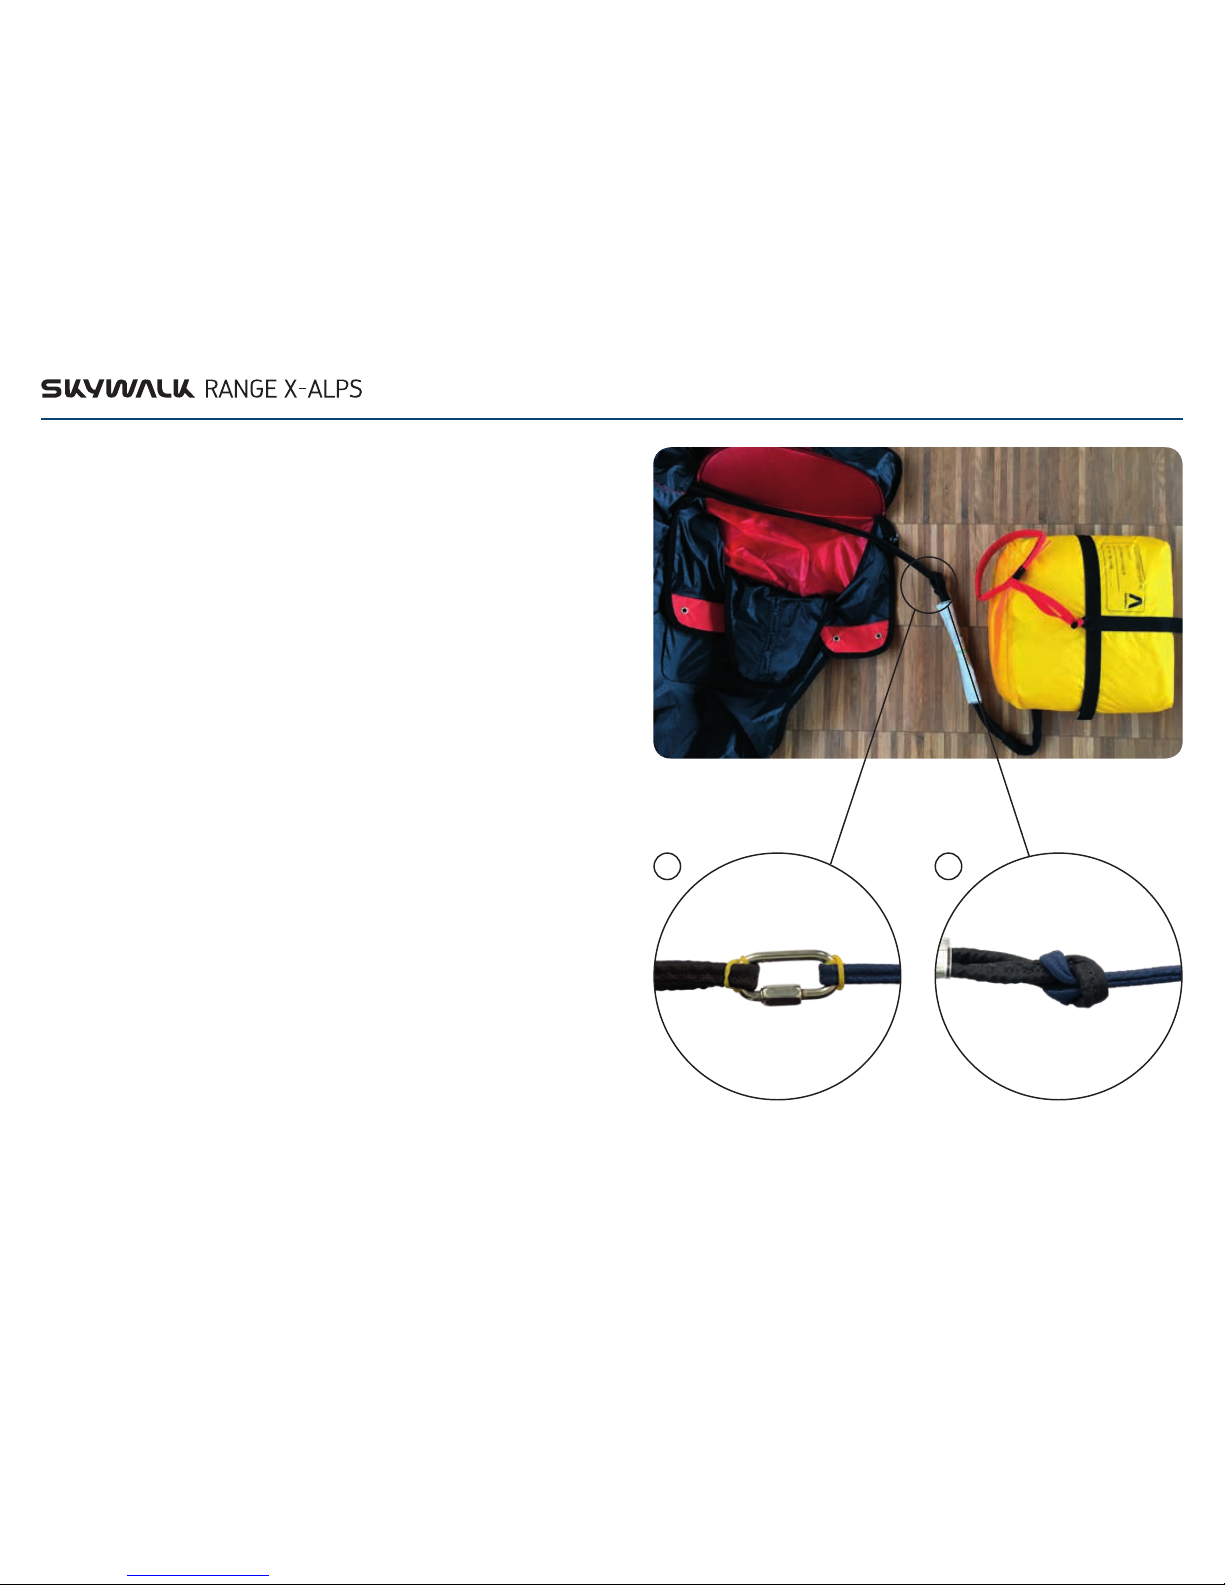
CONNECTING THE RESERVE CHUTE TO THE HARNESS
1. Connect the rescue handle with the inner container of your rescue chute. Use the loop
in the middle of your inner container.
2. Connect the V-line of the RANGE X-ALPS to the connection line of your rescue system.
To connect the reserve chute to the V-line, you must use a screw shackle with at least
240 0 daN strength. The lines have to be connected on both sides of the screw shackle
and must be secured with rubber bands by means of Larks Head knot (pic 1).
As an alternative, you can connect the two lines with softlinks if the size of the loop
on the reserve chute allows this (pic 2).
3. Pack your rescue system into the front container of the RANGE X-ALPS. If you are
uncertain, you should consult a specialist or contact your local skywalk dealer.
EN
1
2

Compatibility Test 4746 Mounting the Reserve Parachute
INSTALLATION OF THE RESERVE CHUTE
1. Place the reserve chute deployment bag with the handle pointing upwards into
the reserve chute compartment of the RANGE X-ALPS and lay the V-connection cord
untwisted next to it.
2. Guide the V-line through the side channel and up to the shoulder straps.
3. After the reserve chute has been properly installed in the harness, it must be closed
using the splints on the rescue handle. For this you need two short lengths of para chute line (because of the low friction we recommend unsheathed, not too thin
paraglider lines), which you thread through the two loops on the bottom flap
of the outer container.
4. Close the upper flap (pic 1).
5. Close the left flap (in flight direction) (pic 2).
6. Close the right flap (in flight direction) (pic 3).
7. Guide the lower cotter pin of the rescue handle through the lower loop and the upper
cotter pin through the upper loop (pic 4).
8. Remove the parachute lines carefully and slowly.
9. Guide the cover flap through the rescuer handle and insert it into the left compartment
(in flight direction) (pic 5).
EN
1
4
2
5
3
COMPATIBILITY TEST
The correct installation of the reserve chute should now be verified with a test deployment.
To do this, put on the harness, close the leg straps and hang the main carabiners in a harness simulator. Then pull out the reserve chute by the handle. For this test, it is not enough
to deploy the reser ve chute without sitting in the harness. It must be possible for you to
reach and pull the handle with no problem from the flying position, in accordance with the
instructions of this manual. If you are not sure, consult a specialist or contact your local
skywalk dealer. The reserve chute must be deployed with the correct throwing technique
by pulling it in a sideways direction. Failure to do so can make deployment more difficult.
A reserve chute deployment can be made more difficult by the following factors:
> The reserve chute is too large or too bulky for the compartment or the deployment bag.
> The reserve chute is not packed in the shape of the deployment bag.
> The reserve chute is not thrown with the appropriate throwing technique (the reserve
chute must be extracted with a pull to the side).
> The reserve chute has too much volume after repacking.
> Because arm length is crucial for a successful reserve chute deployment, smaller
persons with short arms may not be able to deploy the reserve chute. In emergency
situations, high G-loading can occur, which can make deployment even more
CAUTON
BEFORE EACH FLIGHT, CHECK TO SEE IF THE RESCUE HANDLE IS IN THE
RIGHT POSITION AND WHETHER THE SPLINTS OF THE HANDLE ARE SITTING
CORRECTLY. REACHING FOR THE RELEASE HANDLE TO TEST ITS POSITION
EVERY FLIGHT C AN HELP YOU MEMORIZE THE POSITION SUBCONSCIOUSLY.
Set Up and Adjustment s 4948 Set Up and Adjustme nts
SHOULDER STRAPS
The optimal setting of the shoulder straps depends on
the pilot’s body size. First, the height of the shoulder strap
position must be defined. Depending on the size of the
pilot, it should be set so that the starting point of the
shoulder straps is below the cervical vertebra.
Now, sit upright with the harness on and the chest/leg
straps closed, and tighten the shoulder straps symmetrically to the point where they begin to tension. During
flight, the straps should lie on the shoulders. To shorten the adjustment, pull on the buckle in the direction of
flight, and to open it, push the buckle upwards.
SIDE ADJUSTMENT STRAPS
On both sides of the RANGE X-ALPS you’ll find
a main adjustment strap for the back, a knotted
line for the fine adjustment of the lumbar area,
and another knotted line for the forward seat
area.
POD
The length of the pod can be adjusted by means of a knotted
line at four points on the foot plate. The Lycra insert in the
front part of the pod provides enough clearance.
For each knotted line, three length are possible. The top
line leads to the upper loop on the footplate, the bottom
and diagonal lines lead to the lower loop. The diagonal lines
assist as additional support.
WARNING
TO PREVENT UNNECESSARY WEAR AND TEAR OF
THE LYCRA, IT IS PROHIBITED TO LENGTHEN IT BEYOND THE RANGE OF THE KNOTTED LINE.
EN
7 SET-UP AND ADJUSTMENTS
The RANGE X-ALPS is available in sizes S, M and L and should be set up and adjusted exactly to match your needs. Before your first flight, you should carry out the set-up in a sitting position with the harness hanging in a simulator. The individual adjustments depend
on the shape of your body, your personal preferences, and your flying style. Finer adjustments can be made gradually after a few flights. Naturally the reserve parachute must be
installed before making the adjustments.
Follow these steps to put on the harness:
1. Put your arms through the shoulder straps.
2. Close the Get Up system (pic 1).
3. Lead the right ball through the left loop on the cocoon. (pic 2).
4. Guide the safety line through the right eyelet on the cocoon and lead the left ball
through the loop of the safety line (pic 3+4).
5. Attach the cockpit with the plastic clips (pic 5).
1
4
2
5
3

Flying Safe 5150 Flying Safe
8 FLYING SAFE
PREFLIGHT CHECK AND MAINTENANCE
It is important to check all paragliding equipment thoroughly before every flight to see
if it has any defects. Also check the paraglider after long flights and after long storage.
Check thoroughly that:
> no visible damage to the harness or carabiners is present that can affect airworthiness.
> the protector is filled and properly closed.
> the reserve parachute container is correctly closed and is connected to the harness, and
that the splints are threaded completely through the loops, and that the rescue handle
is correctly mounted.
> all buckles, straps and zippers are shut and secured. Give each strap a light tug to verify
this. If snow or sand is present, then pay especially close attention.
> the paraglider is correctly hooked to the harness and that both carabiners are correctly
closed and secure.
> the speedbar is properly hooked into the speed system of the risers.
> all pockets are closed and that no loose items are hanging around.
> again, all leg and chest straps are closed before you launch!
CAUTION
DO NOT LAUNCH IF YOU FIND ANY DEFECTS, EVEN SMALL ONES! IF YOU FIND
ANY SIGNS OF DAMAGE OR ABNORMAL WEAR AND TEAR, CONTACT YOUR FLIGHT
SCHOOL OR SKYWALK DIRECTLY.
BEHAVIOR IN THE EVENT OF A RESERVE CHUTE DEPLOYMENT
> Locate the rescue handle and hold it tightly with one hand.
> Pull the handle firmly out and to the side to extract the reserve chute from the container
of the harness.
> Make sure that you throw the reser ve chute in the deployment bag into free airspace.
> If possible, throw it in the opposite direction of any rotational movement and let go of
the handle!
> Once the reserve chute is open, try to keep it from tangling and swinging. It is best use
the B-, C- or D-lines or the brake lines to pull the glider symmetrically toward you.
> When you land, straighten up as much as possible and use the parachute landing fall
(PLF) technique to minimize the risk of injury.
WHAT TO DO IN EMERGENCY SITUATIONS AND EXTREME FLIGHT CONDITIONS
Disturbances of the paraglider that are caused by thermal lift or turbulence are transmitted perceptibly via the harness mounts to the seatboard. To avoid getting tipped to the
side, make sure that you are always sitting in the middle of the seatshell. Also make sure
that you don’t lose your grip on the brake handles so that you can react quickly and without
delay to extreme flight conditions. Read about the behavior of your glider in extreme flight
conditions in the appropriate manual. Should you fly into an object or land in a tree, be calm
and notify the authorities.
FLYING ON BAR
The speed bar should be secured to the harness prior to launch. To use the speed bar, you
will need to make some effort. This can affect the sitting position in the harness. Therefore,
we recommend an upright position in the harness. Adjust the harness before your first
attempt of flying on bar. We remind you to only fly in wind conditions that don’t require
constant use of the speed bar. To reach the maximum speed, press the speed bar firmly until both pulleys on the A-risers touch each other. As soon as you apply the speed bar,
the angle of attack will be reduced and the speed increases, but the paraglider becomes
less stable and can collapse more easily. For this reason, always use the speed bar with
adequate altitude over the ground and distance from obstacles and other aircraft.
Avoid adjusting the speed bar too short. It is important to avoid unintentionally activing
the speed system due to a setting that is too short. Collapses on bar are normally more
impulsive and demand fast reactions.
CAUTION
NEVER FLY ON BAR IN TURBULENT AIR.
NEVER FLY ON BAR NEAR THE GROUND.
EN
Maintenance, Care 5352 Miscellaneous
10 MAINTENANCE, CARE
The selected materials used in the RANGE X-ALPS make it necessary to treat them carefully and in a professional manner. Make an effort to take care of your harness and keep it
clean to preserve its airworthiness over the longest possible time.
> Avoid dragging your harness over stony ground and always try to land standing up. Don’t
leave your harness lying in the sun unnecessarily long. UV radiation is very damaging to
the material.
> Keep your harness in a paraglider rucksack when not using it.
> Store your paragliding equipment loosely packed in a cool and dry place. If it gets wet,
always dry out your equipment before packing it.
> To clean it, just use a brush or a damp cloth. Use mild soap to clean it only when absolutely
necessary. If you do, first remove other parts like the reser ve parachute. The coating of
the material can be damaged by brushing or rubbing.
> Let the harness dry in a well-ventilated, shady place if it was wet. If the reser ve
parachute gets wet, (e.g. during a water landing), then it is necessary to open it up,
let it dry, and pack it again.
> After a hard landing, check the protector for damage. A tear or a broken seam in the
protector can ruin the protector’s functionality! In such a case, the protector must
be repaired before the next use of the harness.
> Zippers should be treated with silicon spray once a year.
MATERIALS
The skywalk RA NGE X-ALPS is manufactured from the highest quality materials. skywalk
has selected the best possible combination of materials with regard to resilience, performance and longevity. We are aware that the durability of the harness is a deciding factor
in the pilot’s satisfaction.
CAUTION
TO ENSURE A LONG LIFE, THE MATERIA LS USED REQUIRE CAREFUL,
PROFESSIONAL TREATMENT.
9 MISCELLANEOUS
WINCH-TOWING
The RA NGE X-ALPS is suitable for winch-towing launches. There are no special attachments
for this type of launch. The tow release is attached either to the main carabiners or evenbetter to a tow adapter that extends beyond the ends of the risers before these are hooked
to the carabiners. Follow the instructions of the tow release and the tow adapter or ask a
flight instructor who is experienced with paraglider towing.
TANDEM FLIGHT
The RA NGE X-ALPS is not a suitable harness for tandem flight.
SAFETY TRAINING AND FLYING OVER WATER
We do not recommend using the R ANGE X-ALPS for flying over water or for safety
training. It is possible that the Air-protector of the harness could force the pilot under
water after a water landing.
CAUTION
BE CAREFUL WHEN FLYING OVER WATER!
EN
Repairs | Disposal | M aintenance Check 5554 Maintenance Checklist
MAINTENANCE CHECKLIST
In addition to your normal preflight procedure, you should also take a close look at your
RANGE X-ALPS after the reserve parachute has been packed and re-installed – normally
every six months but no later than every twelve months. Naturally, it’s important to also
check your harness closely after unusual circumstances, for example after a hard landing
or a tree landing, or if the harness shows above-average wear and tear. When in doubt, always consult an expert.
Here is what to check:
> Check all straps and buckles for wear and tear and damage.
> The stitching of all seams should be checked and, if in doubt, should be repaired to keep
problems from propagating.
> Special attention should be given to the installation of the rescue parachute, in particular
the splints.
> Check the protector for leaks. To do this, inflate the protector according to the instruc tions and leave it at a constant temperature for 12 hours. Check the fill level, it must be
the same as at the beginning.
> Both aluminum carabiners should be renewed after no more than five years or maximum
500 flight hours. Impact to the carabiners can result in invisible damage that could lead
to failure during use. The documentation for service work should be entered on page 58
with the name of the repair person, stamp and signature.
STORAGE
Ideal is a dry, dark place with a constant temperature. Moisture is an old enemy of the durability of all paragliders. For this reason, always dry your equipment before you store it,
preferably in a heated and well ventilated room, so that moisture can evaporate.
EN
11 REPAIRS
Repairs should only be carried out by the manufacturer or by an authorized skywalk service center. Exceptions include the repair of small cuts (up to about 5 cm that don’t
affect a seam)
CHANGES TO THE HARNESS
Your skywalk RANGE X-ALPS is manufactured within the regulated parameters of tolerance.
These parameters are very narrow and must not be altered under any circumstance.
CAUTION
UNAUTHORIZED CHANGES INVALIDATE THE TYPE APPROVAL AND ALL LIABILITY CLAIMS AGAINST THE MANUFACTURER ARE INVALIDATED.
12 DISPOSAL
When choosing materials, skywalk places high value on environmental compatibility and the
highest quality control. Should your harness someday no longer be flyable, remove all metal parts such as carabiner, etc. and remove all foams. All remaining parts can be turned in
at a recycling center. The metallic parts can be turned in at a metals recycling center. The
best solution is to send your retired sk ywalk harness directly to us. We will then take care
of recycling it.
13 MAINTENANCE CHECK
According to LTF regulations your harness will have to undergo a maintenance check after
24 months. The maintenance check has to be carried out by the manufacturer or its
representative.
CAUTION
IF THE HARNESS IS SUBJECTED TO ABOVE AVERAGE WEAR AND TEAR
(EXTREME FLIGHT MANEUVERS, FORBIDDEN ACROBAT FLIGHT MANEUVERS)
IT SHOULD BE INSPECTED EARLIER OR SHOULD UNDERGO AN ADDITIONAL
INSPECTION!

M LS
Naure And E nvironm ental Com patible B ehavio ur | Closing Words 5756 Homologation | Technical Data
GmbH & Co. KG
WINDEC KST R. 4
83250 M ARQU ARTS TEIN Fon: +49 (0) 8641 - 69 48 40 www.skywalk.inf o
GERMA NY Fax: +49 (0) 8641 - 69 48 11 info@sky walk.info
EN
14 HOMOLOGATION
The RANGE X-ALPS is certified to LTF 91/09. The RANGE X-ALPS is defined as a lightweight
sport aircraft with an empty weight of less than 100kg in the paraglider category. The many
homologation tests are the last hurdle in the development of a skywalk paraglider.
The homologation tests only take place when the test team is completely happy with
the harness development.
15 TECHNICAL DATA
Pilot height (cm) 160 - 176 173 - 184 183 - 200
Suspension points height (cm) 45 46 47
Chest strap width (cm) 36 38 40
Harness weight (g) * incl. everythi ng 1700 1800 1900
Harness weight (g) *excl. protector 1360 1460 1560
Harness certification EN 1651
Main protector certification LTF 91/09
Maximum load (daN) 100
Reserve container integrated Frontcontainer
Volume of frontcontainer (cm³) 2500 - 4300
Certification: R ANGE X-ALPS2 Harness | PH_196.2017
MATERIALS:
Cloth of the harness: ROBIC 100D Nylon, 32g double ripstop Nylon, 70D Nylon,
Webbing: 7 mm Dyneema webbing, 10mm PA, 20mm PP
Ropes: LIROS DC 500, D-PRO 5MM, DR2 500
Ot h er:
RONSTAN ORBIT 20 BB pulleys, Carbon footplate, 2,5mm spring steel pole,
brummel hook Finsterwalder Titanal, carabiner Edelrid Alias, webbing buckle Edelrid SB
16 NATURE AND ENVIRONMENTALLY COMPATIBLE BEHAVIOR
We have taken the first step towards ecological awareness with our nature-friendly sport.
Especially with our mountain climbers who prefer to climb to the launch site.
Nevertheless, we plan on continuing in the same vein. This means specifically: clean up your
trash, stay on marked trails and don’t cause unnecessary noise. Please help to maintain
the balance of nature and to respect animals in their territory.
17 CLOSING WORDS
In terms of safety, comfort and innovation, the skywalk R ANGE X-ALPS is at the absolute
leading edge of development in the market for competition harnesses. It cost us a lot of
time to develop this harness, but it was also a lot of fun. In this development we recognize
the challenge of making the right product for every area and individual taste.
We are pleased if you notice this during your first flight and if you feel a certain unity
with your glider from the very beginning.
The RANGE X-ALPS will provide you with plenty of joy over many years if you treat it and
care for it properly. Respect for the demands and dangers of our sport are essential for
successful and beautiful flights.
Even the safest paraglider or harness can be dangerous due to misjudgments of
meteorological conditions or pilot error. Always remember that flying sports are potentially
risky and that you are responsible for your own safety. We advise you to fly carefully and
to respect laws in the interest of our sport, because every pilot always flies at his or her
own risk!
WE WISH YOU A LOT OF FUN WITH YOUR NEW HARNE SS
AND ALWAYS HAPPY LANDINGS!
Your skywalk Team

EN
Test Protocol 5958 Test Protocol
Denseness test:
Result: [+/–]: defects: suggestion:
inflate the protector,
check level after 12h
Rescuesystem:
Result: [+/–]: defects: suggestions:
Rescue handle:
(check cotter pins & Loops)
V-Line:
(no damage/ no excessive wear)
Frontcontainer:
(check connections and seams)
Condition: new
very good condition
good condition
used
very used, still within certification, check within shorter periods
not usable anymore, doesn’t meet certification
Repairs:
Signature of checker: Date:
Name of checker: Company stamp:
+
+
+
-
-
-
TEST PROTOCOL
Date:
Customer, Name:
Adress: Tel. Nr:
Product type: Size: Serialnumber:
certification number.: last service:
Manufacturing date::
Checklist: Result [+/–]: defects: suggestion:
Main suspension:
Carabiner-Cover:
(no abrasion/ Webbing must be fully covered)
Carabiner:
(edelrid Aluminium Carabiner
max. 5 years / 500 h
Check specifications of other carabiners)
Main suspension:
(no damage/ no excessive wear)
Webbing at mainseat
(abrasion/damage?)
Get Up / legstraps:
(no damage/ no excessive wear)
Safetybuckles
(100% functionality)
Seams:
Mainprotector:
(no damage/ no excessive wear)
Mainsuspension:
(no damage/ no excessive wear)
Rescueloops:
(no damage/ no excessive wear)
V-Lline:
(no damage/ no excessive wear)
Rescuehandle
(no damage/ no excessive wear)
+
+
+
+
+
+
+
+
+
+
-
-
-
-
-
-
-
-
-
-
+
-
18
+
-

SAMARX200
Skywalk GmbH & Co. KG
Windeckstr. 4 | 83250 Marquartstein
+49 (0) 8641/69 48 40
info@skywalk.info | www.skywalk.info
 Loading...