

Page 1
37
MANUAL/SERVICE
Page 2
38
CONTENT
Introduction Page 39
Description Page 40
Line System Page 41
Technical Data Page 43
Acceleration System Page 44
Harness Page 45
Fllight Techniques Page 46
Descent Techniques Page 52
Extreme Flight Manoeuvers Page 56
Materials Page 60
Maintenance Page 61
2-Year-Check Page 64
Certification Page 65
Conclusion Page 65
Line Plans Page 66
Risers Page 67
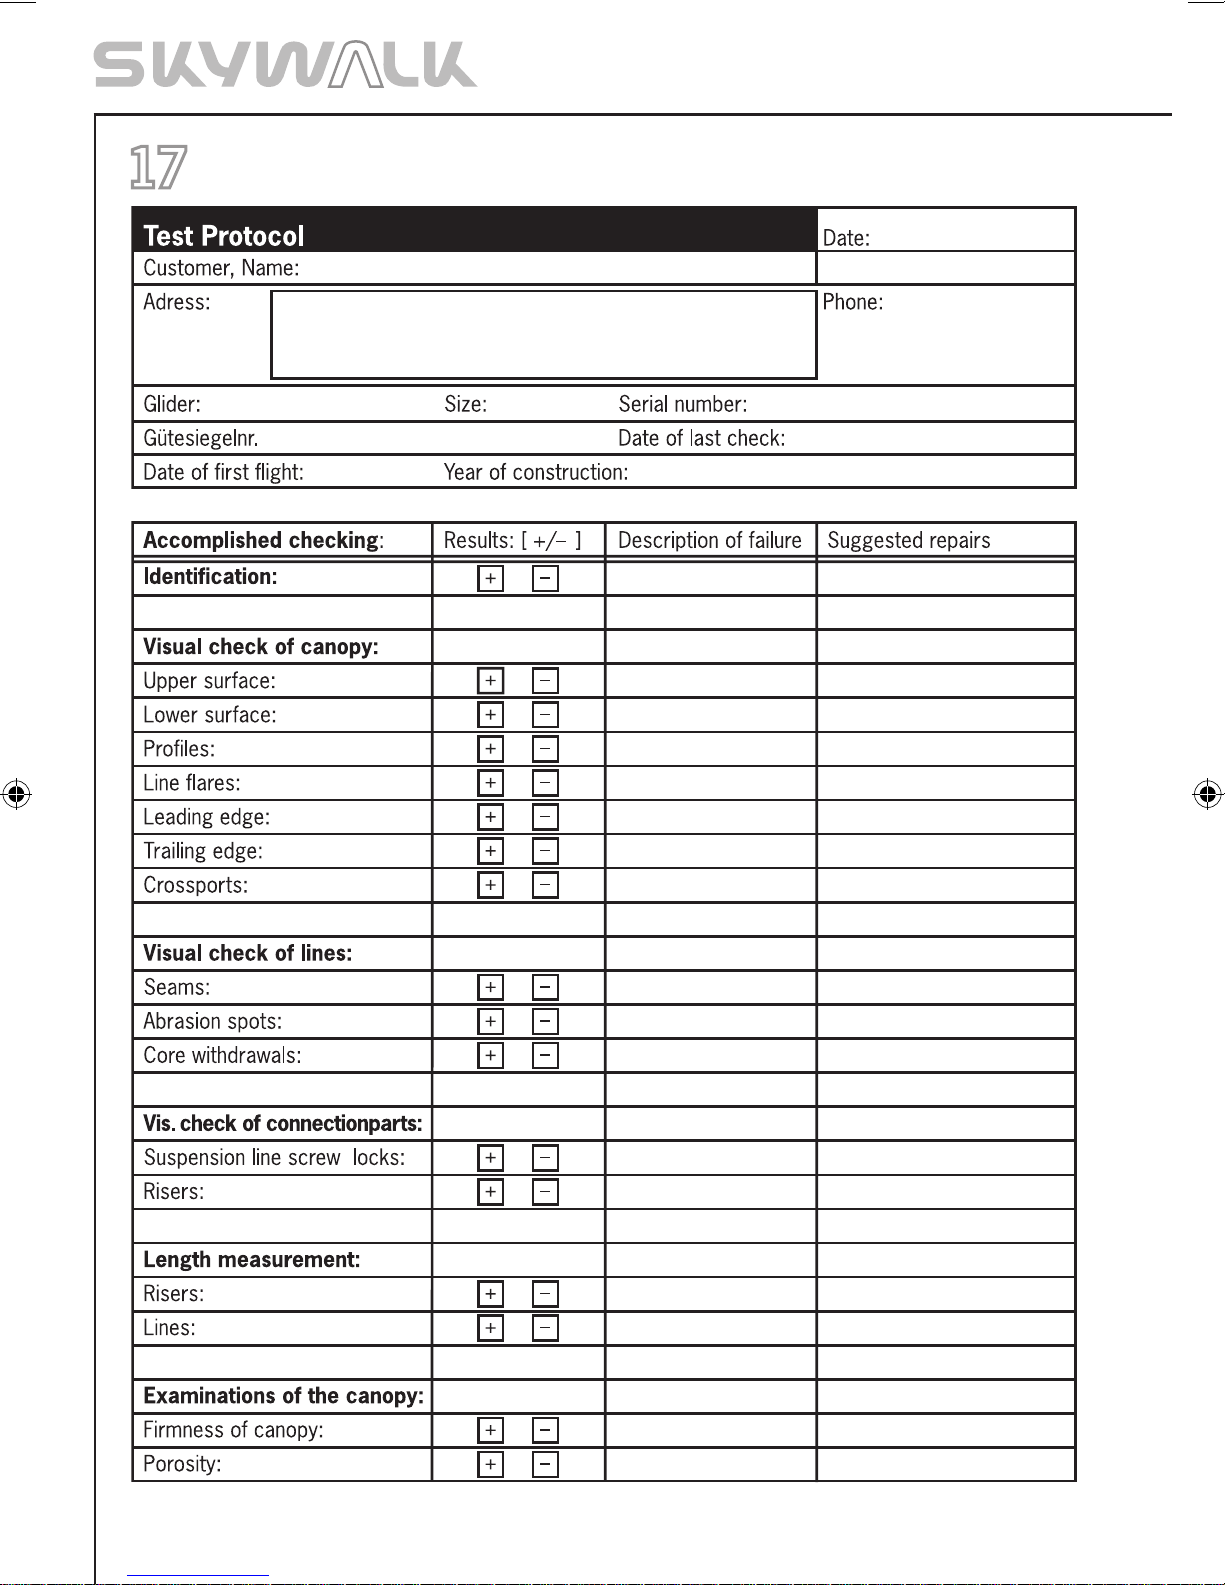
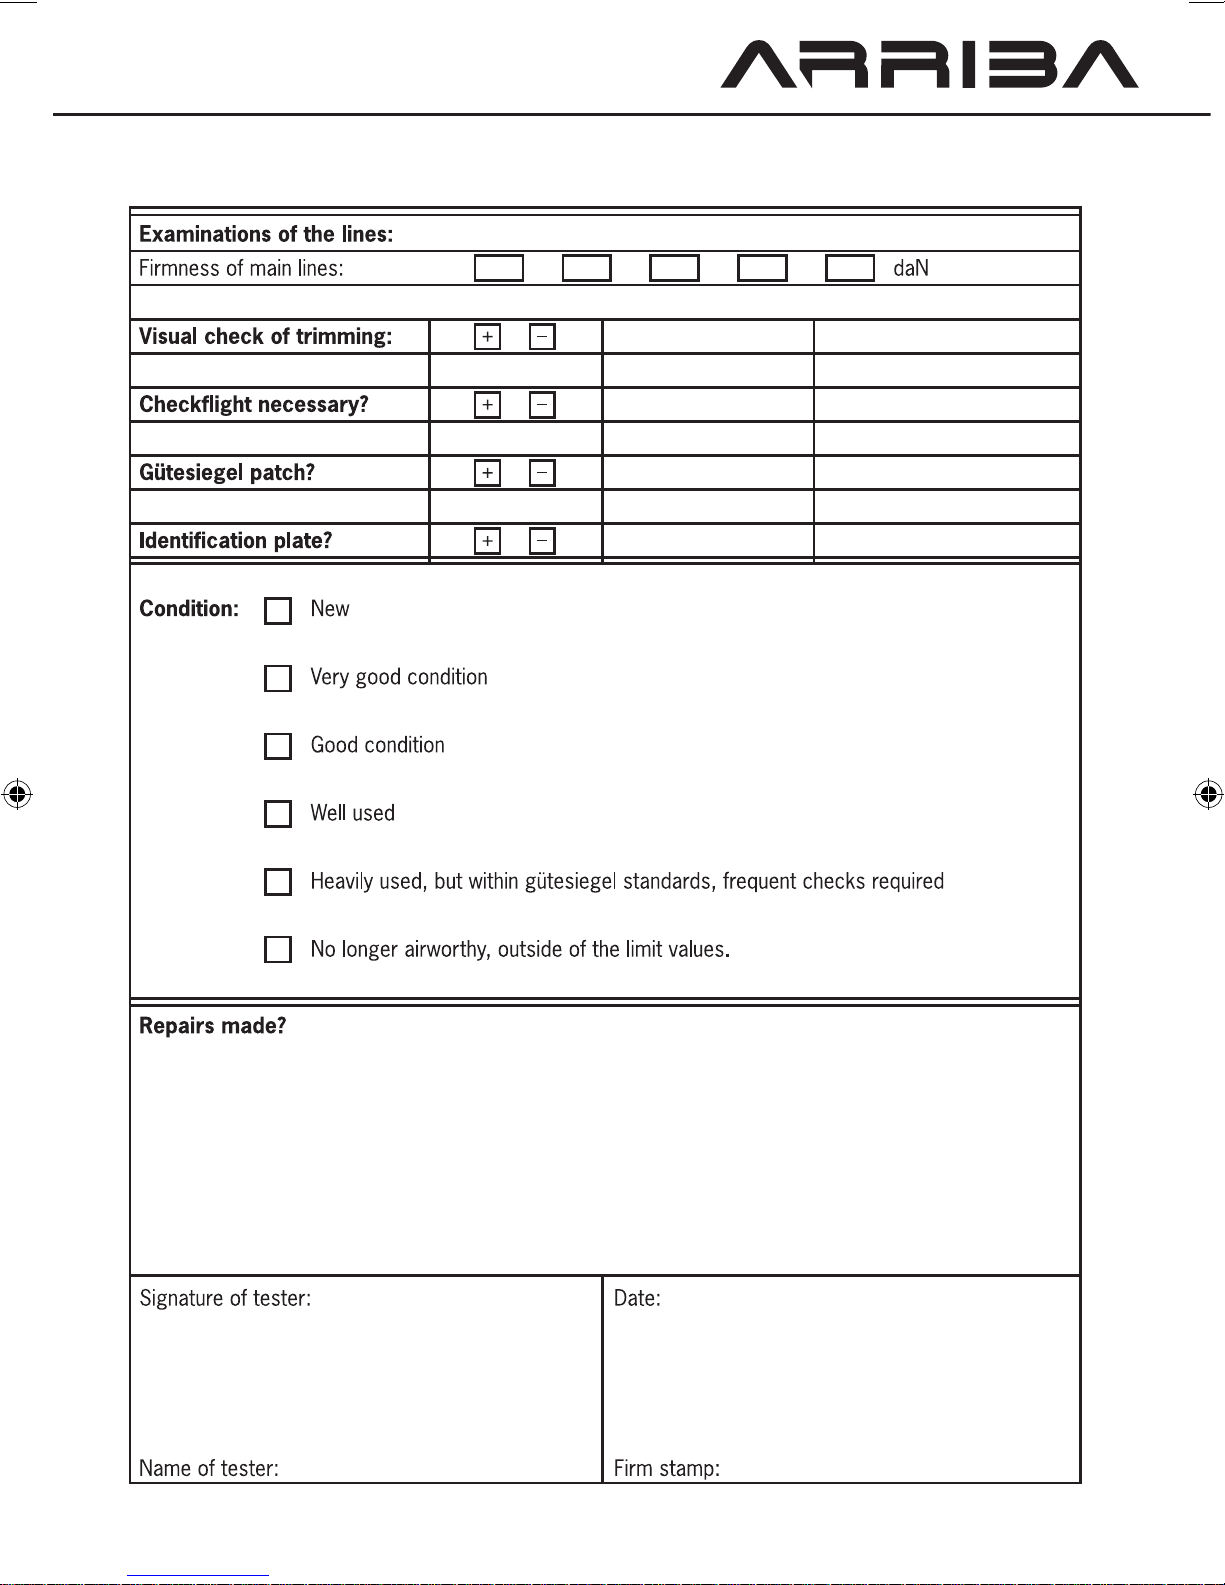
Test Protocol Page 70
Page 3
INTRODUCTION
Thank you for choosing a skywalk Paraglider! We are sure that your trust will be rewarded with many hours of flying pleasure. So that you will feel comfortable with your
glider from the very beginning, we recommend that you read this manual carefully. This
way you can thoroughly and quickly acquaint yourself with your skywalk ARRIBA.
This operating manual will give you tips for safe and confident flight, so that you will
enjoy many flying hours with your ARRIBA. For helpful suggestions, questions or critic,
please call or send us an e-mail. We are gladly at your disposal.
THE SKYWALK TEAM
39
Page 4
40
DESCRIPTION
The successful Tequila 2 is a paraglider which set new standards in all respects. Therefore, it made sense to develop a glider derived from the Tequila 2, suitable for everyday
use, called the ARRIBA.
The new ARRIBA combines the very good properties of the T2 with additional advantages such as low weight and small pack dimensions.
Naturally, the ARRIBA is also equipped with groundbreaking JET FLAP technology.
JET FLAPs have since become solidly established in the past years. Along with facilitating low landing speeds and high safety potential, they provide optimal climbing performance. Extensive testing and optimization, and the newest CAD Software have, with
the ARRIBA, made it possible to develop a product that is suitable for almost any purpose.
The ARRIBA is an intermediate glider that combines reliability and performance exceptionally well, and subsequently guarantees long and relaxed flying. That the ARRIBA is
also light and easily packed, offers yet another advantage, when heading off into the
mountains or traveling.
In principle, only every second cell of the ARRIBA is suspended, similar to the Tequila
2, saving meters of line and minimizing drag. Additionally, the ARRIBA has a hybrid line
system with both covered lines and uncovered competition lines. Along with the lines,
the thin risers as well as the Rigifoil Max System from Gin are visible contributors to the
weight- and drag-optimisation and account for the extremely good performance of the
ARRIBA.
Diagonal- and Compression-Bands in each cell provide for equal load distribution. A
clever stress distribution on and inside of the canopy increases stability and eliminates
undesired deformations.
The outer wing was designed so that only minimal load is needed to achieve balanced
turning properties.
Large equalisation openings in the profile ribs provide for effective aeration and ventilation of all wing parts, without affecting the profile accuracy. Velcro strips have been attached on the outer wings, to facilitate the removal of sand.
Page 5
41
LINE SYSTEM
The lines of the ARRIBA show high stability at a very small diameter, thanks to
extensive testing. The control of the lines, as well as the effective use of the accelerator was a priority issue for us.
All of our reflections and calculations have safety at the forefront. This is why Hybrid
lines with sleeved Dyneema lines and non sleeved TECNORA-lines come into play.
The skywalk ARRIBA has 3 A-, 3 B-, 3 C- as well as 2 D-main lines and 1 Stabiliser
line. The last cell has a A and B Top line which together with the stabiliser top line, are
joined at the stabiliser main line. These go directly to the C-Riser.
The Brake Lines are non-carrying and lead from the back of the canopy (trailing edge)
over the main brake line through the pulley on the D-Riser to the brake handles.
There is a mark on the main brake line indicating the position of the handle attachment.
This adjustment mustn’t be altered in order to provide enough brake feedback for
landing and in extreme flight situations yet enough slack not to continuously brake the
glider in normal flight.
For better identification purposes, the both inner A-lines and A-risers are red, and the
both inner B-lines and brake lines are yellow and all other lines are unsleeved.
The shackels are specially developed and fit perfectly on the thin risers, a plastic ring
prevents the looped-in lines from slipping.
The skywalk ARRIBA has five risers on each side. The two inner A-main lines are
attached to the front A-Riser, the outer A-main line attaches to the second A-Riser.
The B-main lines lead to the B-Riser. >
The C-main lines and the stabiliser line lead to the C-Riser. >
The D-main lines lead to the D-Riser. >
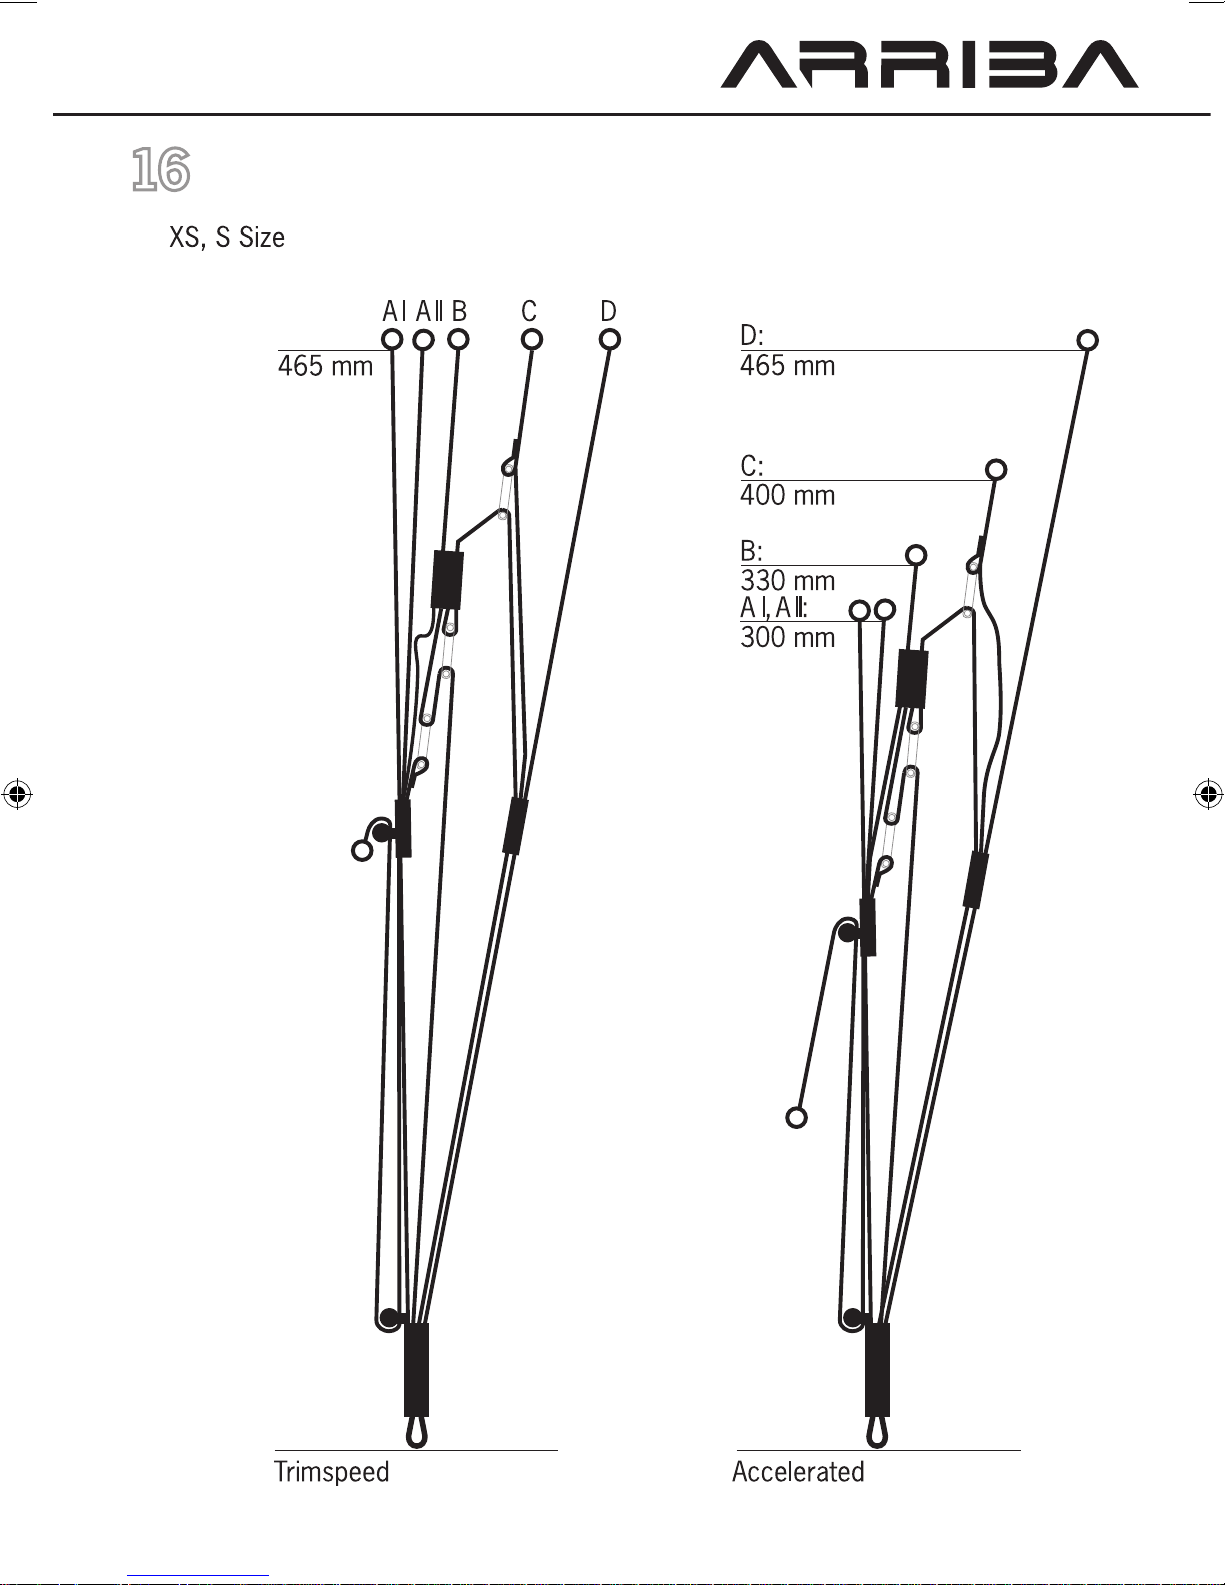
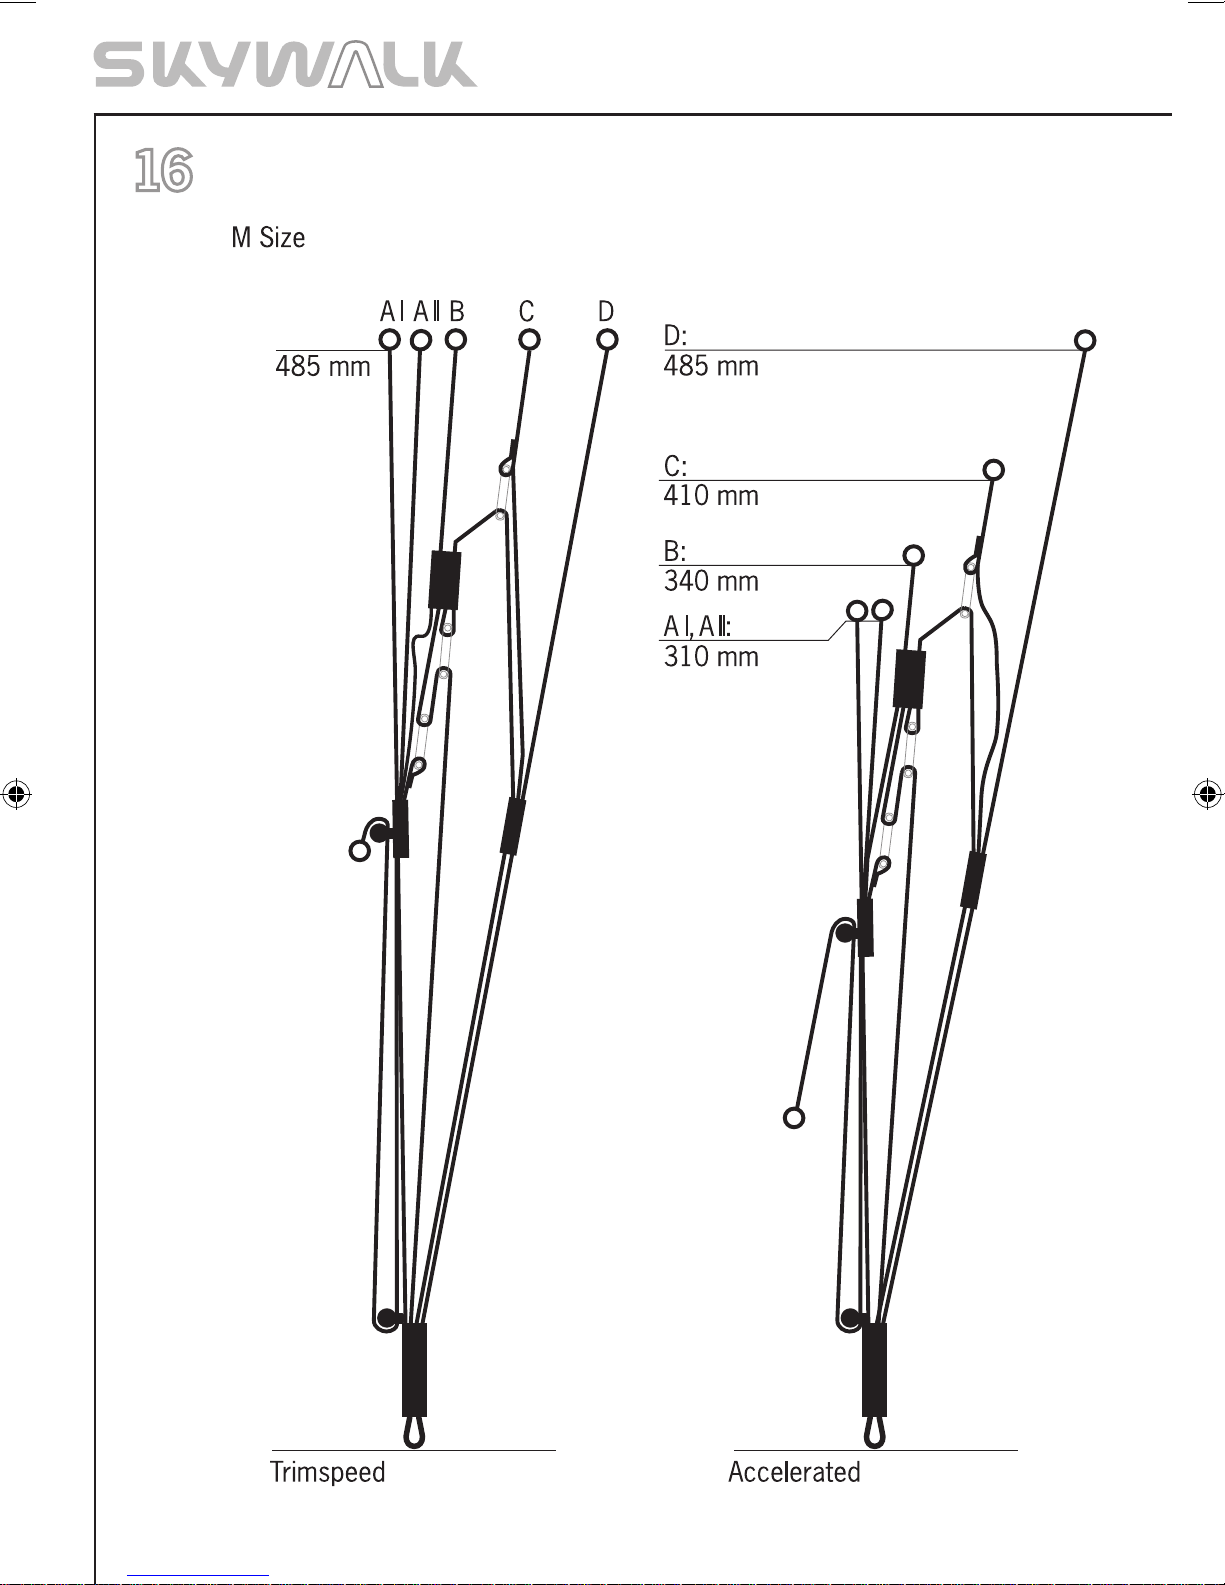
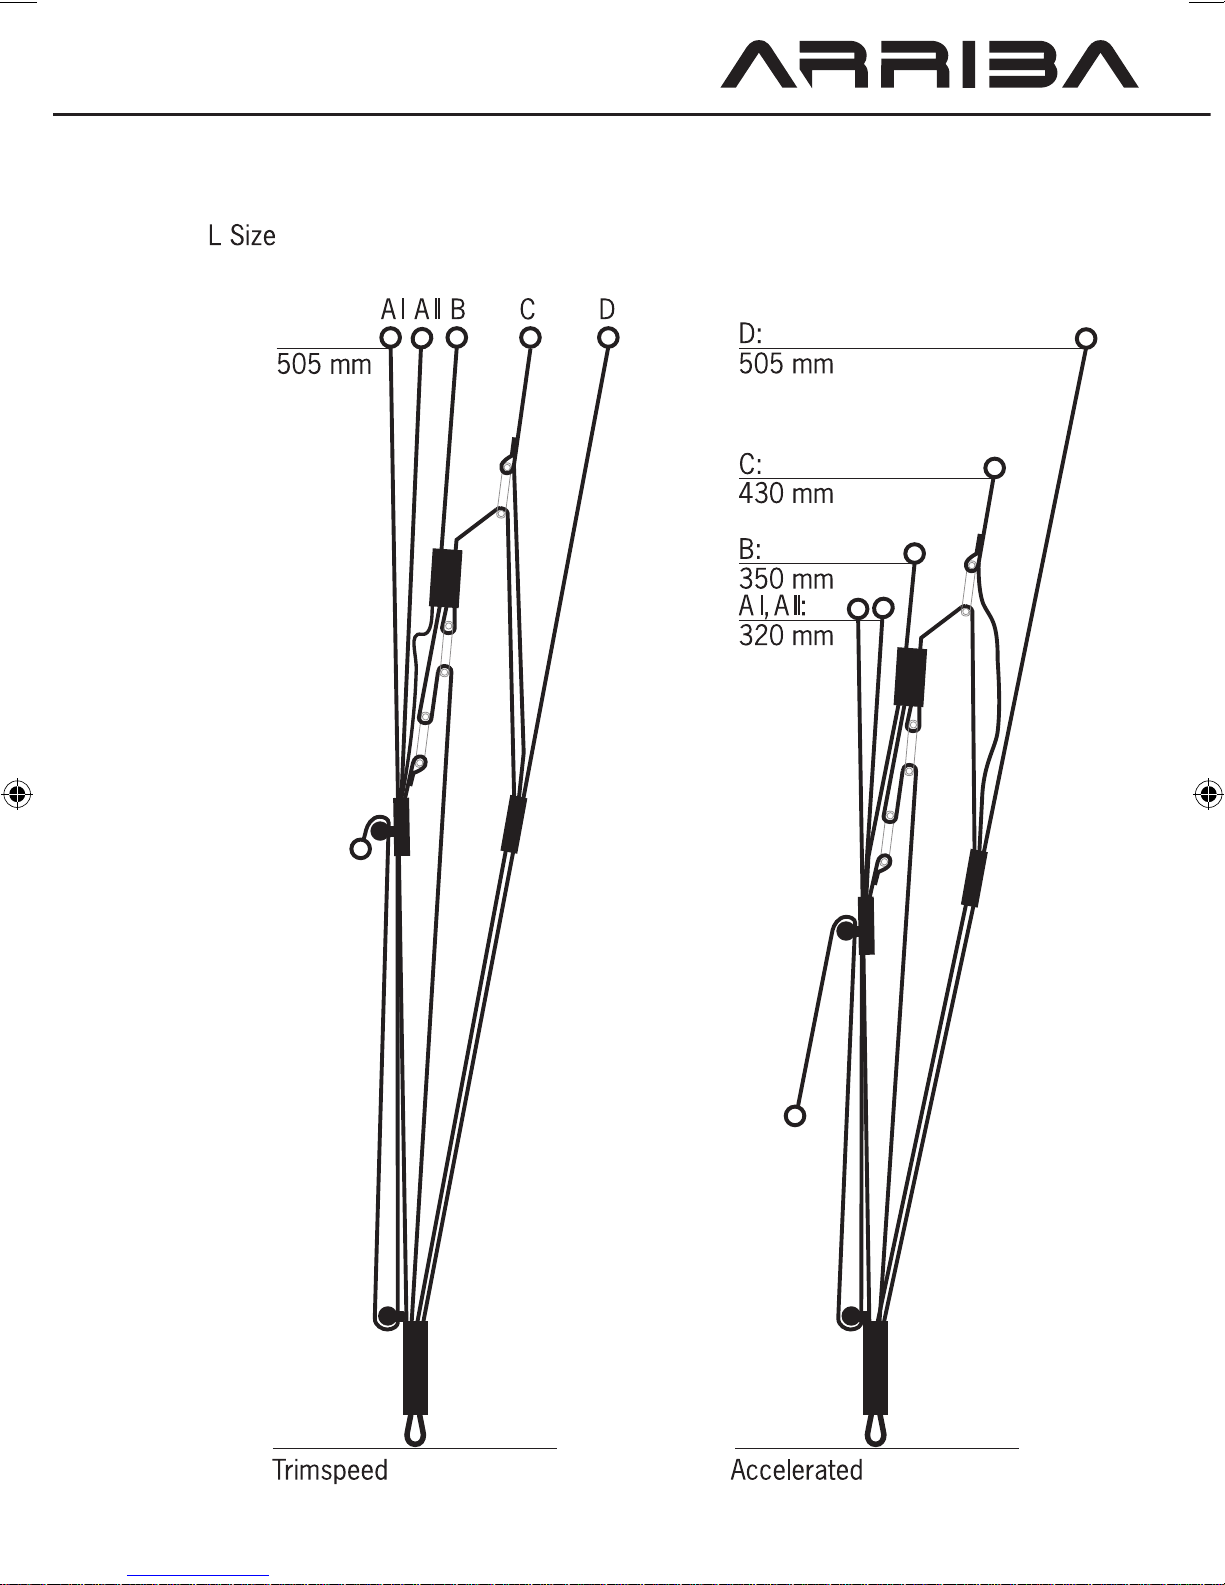
Riser Illustration page 66-68.
Page 6
42
IMPORTANT SAFETY WARNING:
FLYING A PARAGLIDER REQUIRES MAXIMUM CAUTION AT ALL TIMES.
BE AWARE THAT FLYING A PARAGLIDER IS ALWAYS DONE AT YOUR OWN RISK.
AS A PILOT YOU HAVE TO GUARANTEE THE FLYING CAPABILITY OF YOUR PARAGLIDER BEFORE EVERY SINGLE FLIGHT.
Don’t use your skywalk ARRIBA:
Outside the certified take-off weight. >
With any engine, except if there is a certification from the DULV or DMSV. >
In rainy, snowy and extremely turbulent weather conditions or high winds. >
In fog or clouds. >
With insufficient experience or training. >
Every pilot is responsible for his own safety and will have to ensure that his aircraft
(paraglider) has been checked and serviced for its airworthiness before flying.
You can only fly your skywalk ARRIBA with a valid flying license and in accordance with
local rules and regulations.
During its production your skywalk ARRIBA has passed thorough quality controls. More
spot checks were performed before its delivery.
Page 7
43
TECHNICAL DATA
TYP XS S M L
Number of cells 44 44 44 44
Area [qm] 22,57 24,76 27,06 29,36
Wingspan [m] 10,66 11,16 11,67 12,16
Aspect Ratio 5,03 5,03 5,03 5,03
Area projected[qm] 19,6 21,7 23,5 25,5
Wingspan projected [m] 8,55 9 9,37 9,76
Aspect ratio projected 3,73 3,73 3,73 3,73
average line length* [cm] 620 653 680 707
line diameter [mm] 1/1,2/1,8 1/1,2/1,8 1/1,2/1,8 1/1,2/1,8
cord max. [cm] 263 277 289 300
cord min. [cm] 60 63 66 69
canopy weight [kg] 4,1 4,5 4,9 5,3
take-off weight* [kg] 60-80 75-95 85-105 100-120
Pilot + 13 kg equipment
This paraglider meets the demands of the regulations of german hanggliding assciation, LTF, or the EN norm at the time of distribution.
Further details of the construction and the measurements are described in the type
sheet of the respective homologation association, which is part of this manual. The
measurements of the line elements are listed in the type sheet or in the lineplans. The
DHV measures with 5 kg weight from the line carabiner to the bottom sail.
Page 8
ACCELERATION SYSTEM
The skywalk ARRIBA can be equipped with a foot-operated Acceleration-System.
ATTENTION:
THE DHV RATING OF SOME GLIDER SIZES CAN CHANGE DURING THE USE
OF THE ACCELERATION SYSTEM IN FLIGHT. TO DETERMINE WHICH SIZES
ARE AFFECTED PLEASE CHECK THE TYPE SHEET.
The Acceleration-system effects the A-, B- und C-Risers. Originally, all the Risers have
the same length.
During full operation of the acceleration-system, the A-, B- and C-Riser is shortened in a
certain ratio. The D-Riser retains its original length.
This way the perfect shape of the canopy is maintained even during accelerated flight.
See exact riser drawings on page 66-68.
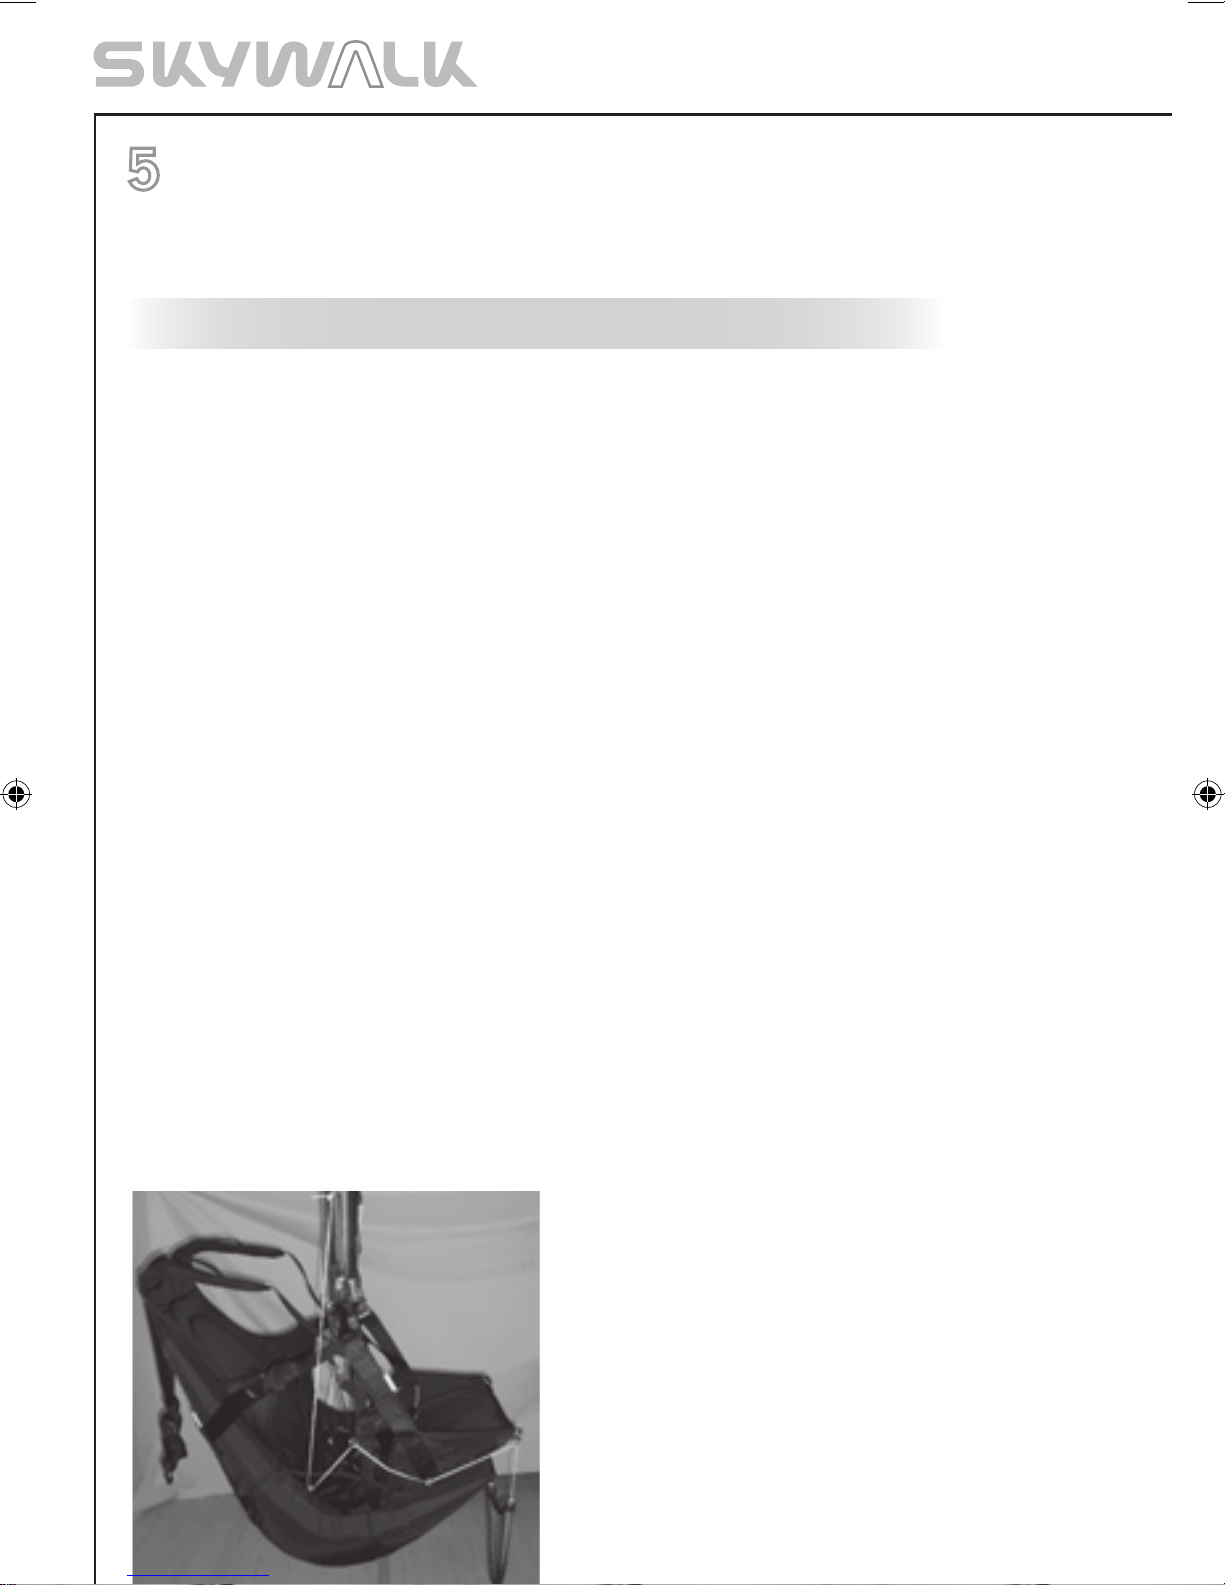
Installing the accelerator equipment:
Most commonly used harnesses have pulleys for the acceleration-system already
attached. The acceleration line runs from the front through the pulleys at the harness
to the top. They are tied to the ”Brummel-hooks” at the right length.
With the right adjustment of the acceleration lines, the foot-bar can be reached easily
with angled legs during flight. By straightening the legs, the whole acceleration range
can be used.
Prior to flying, the connection hooks of the footoperated accelerator and the
acceleration -system have to be connected to each other (Brummel-hooks). Check that
the acceleration line runs freely.
Function:
By using the foot-operated accelerator the pilot
reduces the force via a pulley-system by half
and shortens the A-, B- and C- risers.
Accelerated risers illustrated on page 67-69.
44
Page 9
HARNESS
The skywalk ARRIBA is licensed for all certified harnesses of the GH type (harnesses
without solid cross-bracing). Be aware that the level of suspension changes the relative
braking distance.
CAUTION:
FULLY CROSS-BRACED HARNESSES EFFECT THE HANDLING DRASTICALLY
AND DO NOT LEAD TO HIGHER SAFETY!
45
Page 10
46
FLIGHT TECHNIQUES AND CHARACTERISTICS
PREFLIGHT CHECK AND MAINTENANCE
It is important to check all paragliding equipment thoroughly before every flight to see if it
has any defects. Also check the paraglider after long flights and after long storage.
CHECK THOROUGHLY:
All seams of the harness, of the risers and of the reserve bridle. >
That all connecting parts, maillons and carabiners are closed. >
The brake-line knots on both sides and follow the brake-line to the top. >
All the other lines from riser to canopy. >
All the line attachment points at the canopy. >
If the top or bottom of the wing are damaged or perished. >
The ribs and crossports from inside. >
DO NOT TAKE-OFF IF YOU DETECT ANY DEFECTS, EVEN IF THEY ARE MINOR!
If you find any damage or excessive wear and tear please get in touch with your flying school.
LAYING OUT THE GLIDER
If you use your paraglider for the first time we recommend that you practise some inflations and try some simple flights at a training site. This way you are able to get used to your
s k y w a l k A R R I B A .
Layout the canopy so that the leading edge is slightly arched. The middle of the canopy should
form the deepest point of the paraglider. This way the A-lines are tensioned first in the middle
whilst inflating. The paraglider inflates evenly which ensures a stable and straight take off.
Separate A, B, C, D-lines and risers and put in order. Make sure that the brake lines run freely
through the pulleys to the trailing edge of the paraglider.
All lines have to run freely without any knots and twists from the risers to the canopy. During
flight, tied or crossed over lines can often not be released or untangled!
The brake-lines are lying directly on the ground, so please pay attention that they do not become entangled during launch. There shouldn’t be any lines beneath the canopy during takeoff. Line-overs can have fatal consequences!
In rare cases, a Rigifoil Stick can be bent inwards. This is very easy to recognize
during launch preparations from the conspicuous dent on the opening. Please simply turn the stick outwards. This can be done quite simply, because the stick practically turns by itself when touched.
Page 11
47
CAUTION:
DUE TO THE THIN, DRAG-OPTIMISED HYBRID LINES, IT IS NECESSARY DURING LAUNCH PREPARATIONS TO CHECK MORE CAREFULLY FOR THE FORMATION OF KNOTS. FOR THIS REASON, THE ARRIBA IS NOT RECOMMENDED
FOR INSTRUCTION PURPOSES.
TAKE-OFF
The skywalk ARRIBA is in cause of the light weigth extremely easy to launch.
Hold the two A-risers and the brake handles in your hands. For a better identification,
the A-lines and covers at the A-risers are coloured red. The brake lines are coloured
yellow and the brake handles are black.
Hold your arms slightly sideways and backwards like an extension of the A-risers.
Before launching check the laid out glider. Further check the wind direction and the
airspace! Pull rapidly and the canopy of the skywalk ARRIBA will launch and rise above
your head. The canopy will inflate fast and reliably.
Keep the paraglider straight above your head and run forward. Slow down a little as
soon as the upward pull decreases. You can open any collapsed cells by pumping the
affected side. Changes of directions that are necessary can be carried out now. Look
and feel that the wing is properly inflated.
Don’t make your final decision to accelerate or to take-off until you are absolutely
sure that the wing is properly and evenly inflated. Otherwise, stop the take-off
procedure immediately!
During reverse launches and in strong winds, it is possible that the paraglider surges
forward and inflates faster than intended. You can counteract this by running towards
the glider. We recommend practicing this demanding launch technique on a flat slope!
If you reverse launch it is advisable to only use the inside A-risers. This way the glider
opens a bit more slowly and in strong winds you don’t have to deal with the full pressure at once.
The ARRIBA is also equipped with the innovative JET FLAP System.
Air is conducted from the bottom sail (pressure area) to the top sail (low-pressure area)
and is blown out there with higher speed. The connection is established through jet
shaped channels, which are located in the rear section of the wing.
When increasing the angle-of-attack the danger of airflow interruption and subsequent
stall is minimized.
Page 12
48
Results: the constant airflow even at great angles-of-attack delays the stall, the flyable
minimum speed is lowered and the pilot has a higher incidence range. This is of great
importance, especially during take-off and landing. Of course, the JET FLAPS are no
reason for uncontrolled braking, but the slow flight characteristics of the ARRIBA profit immensely. You don’t need any special knowledge to have control of the flap system,
the use of a JET FLAP paraglider is the same as a conventional glider.
TURNING
The skywalk ARRIBA is very manoeuvrable and reacts to steering inputs directly
and without delay. Simple weight shift enables you to fly very flat turns with minimal
altitude loss. Combined steering technique: Weight shifting and pulling of the inside
brake line allow extra tight turns. During turning you can control the speed, the curve
radius and banking by additional use of the outer brake. Counter braking or releasing
the brake lines can change these parameters most effectively.
CAUTION:
PULLING THE BRAKE LINES TO0 FAR AND TOO FAST CAN CAUSE
A FULLSTALL!
You will recognise a flat spin through high steering pressure and a slight backwards
folding of the outer wing section. If this happens you have to release the inside brake
immediately.
EMERGENCY STEERING:
In case one or both brake lines break you are able to steer and land the skywalk
ARRIBA with the aid of the D-risers.
ACTIVE FLYING:
Active flying means flying in harmony with your Paraglider. Anticipate the behaviour of
your skywalk ARRIBA in flight, especially in turbulent and thermal conditions and react
accordingly. In calm air necessary corrections will be minimal, but turbulence demands
permanent attention and the use of brakes and weight shifting with the
harness.
Page 13
49
Good pilots have instinctive reactions. It is important that you always have direct contact to the canopy by slight pressure on the brakes in order to feel the stored energy
of the glider. This way you will recognise a loss of pressure in your canopy and subsequent collapse early and are able to react in time. ARRIBA is featured with a profile that
mitigates turbulences. This provides high resistance against collapses, however it can
happen without a pilots reaction.
EXAMPLES:
When flying into strong thermals, you have to release the brakes. When flying into falling airstream, pull the brakes. This way you can avoid extensive changes in the angle
of attack.
In turbulent air, you feel the release in pressure on parts of the glider through the feedback from your brakes. You can balance this by quickly pulling the brake a little more
until the pressure returns. Always apply brakes softly and progressively. Don’t slow
down your glider too fast as this can increase the danger of stalling!
By active flying you can avoid almost all deformations of the glider in advance.
ACCELERATED FLYING:
To use the acceleration-system you will need to make some effort. This can affect the
sitting position in the harness. Therefore we recommend an upright position in the harness. Adjust the harness before your first attempt of accelerated flight.
We remind you to only fly in wind conditions that don’t require constant use of the acceleration-system.
To reach the maximum speed press the acceleration-system firmly until both pulleys on
the A-risers touch each other. As soon as you apply the acceleration-system the angle
of attack will be reduced, the speed increases, but the paraglider becomes less stable
and can collapse more easily. Therefore always use the acceleration-system with adequate altitude from the ground, obstacles and other aircraft.
Avoid flying with too short brake lines. Accelerated collapses are normally more impulsive and demand fast reactions.
NEVER ACCELERATE IN TURBULENT AIR!
NEVER ACCELERATE NEAR THE GROUND
NEVER LET GO OF THE BRAKE HANDLES!
Page 14
50
In case the glider collapses you will have to release the acceleration-system
immediately to stabilise and reopen your paraglider.
LANDING:
The skywalk ARRIBA can be landed easily. Make your final approach against the wind
and let the glider slow down at its own rate. Further reduce the speed by applying the
brakes lightly and evenly. At about 1m above the ground you increase the angle of
attack by slowing down more and eventually completely flare out the glider. When you
have reached the minimal speed apply full brake. In strong head winds, slow down carefully. When you have reached the ground safely, stall the glider warily. Avoid turning
sharply before your final approach. This increases the danger of pendulum effect!
WINCHTOWING:
The skywalk ARRIBA is suitable for winchtowing. Make sure you climb from the ground
at a flat angle.
> Pilot must be instructed in towing.
> Pilot must use a certified winch.
> Winch driver must be instructed in towing. When towing please steer carefully, do not
over-brake, the glider will fly with an increased angle of approach.
MOTORISED FLIGHT:
The ARRIBA is, as of January 2009, not recommended for Motorized Flying.
For Motorized Flying, we have special gliders in our Motorizer Program specifically authorised for this purpose.
Page 15
51
CAREFULLY PACKING YOUR PARAGLIDER WILL INCREASE ITS LONGEVITY.
Empty the glider from all debris such as leaves, twigs, grass, sand etc. >
Sort out your lines and spread them evenly on the glider. >
Make sure the glider is dry when storing it for a longer period of time. >
Fold the glider starting in the middle and working your way to the outside always >
folding 2 cells, so that the leading edge is folded cleanly.
Fold the cells, starting from the second cell from the middle, so that the Rigifoil Max >
sticks of the cell openings are on top of each other, do the same at the lower longedge of the glider. This folding method is best done together with a friend, but you
should be able to do the same on your own after some practice.
Then press the air out of the folded glider starting at the bottom and working your >
way to the top.
Fold the whole row once toward the middle, do exactly the same on the other side. >
Then fold one half onto the other half and make sure the sticks at the leading edge >
are clearly on top of each other.
Start wrapping up the glider from its lower end. The wraps should be approx. 1ft. >
wide.
The leading edge can be folded inwards once, but is not necessary. >
The left over air should be pressed out of the glider and not through the material >
(this can increase the porosity of your glider).
Now attach the compression band around the packed wing, at right angles to the cell >
openings, then slide the glider into the light nylon bag.
This helps to protect the cloth from being damaged by sharp edges or zippers from >
your harness.
Open the backpack and place your glider on the inside edge. >
The soft wing on your back will make transportation much more comfortable. >
Place the harness with the seat board facing up on top of your glider and close the >
zippers.
Put the rest of your equipment (helmet, overall, instruments etc.) under the hood of >
your backpack.
skywalk now offers a special Packsack in which the glider can be gently packed cell >
upon cell.
Page 16
52
DESCENT TECHNIQUES
The ARRIBA manual is not a textbook for learning how to paraglide.
According to the local rules and regulations, instruction and training must be carried
out in licensed schools. The following information enables you to get the most out of
your skywalk ARRIBA.
SPIRAL DIVE:
You can initiate the spiral dive by carefully increasing the pull on one of the brakes and
simultaneously shifting your weight to the inside of the turn. If the glider doesn’t bank
up and the sink rate doesn’t increase, then try again. Don’t just apply more and more
brake without sensitivity.
The skywalk ARRIBA enters the spiral dive with a high bank angle and makes a fast
steep turn. The banking and sinking can be controlled by dosed pulling resp. loosening
the inner brakeline. Smooth braking of the outer wingtip not only helps to avoid collapses, the pilot is also more easily able to control the rate of sink.
The spiral is the most effective tool in losing altitude. This is advantage and disadvantage at the same time, the pilot needs to be able to handle the resulting high sink rates.
CAUTION:
THE HIGH SINK RATE CAUSES HIGH PHYSICAL STRAIN DUE TO THE
INCREASING CENTRIFUGAL FORCES AND MAY CAUSE BLACKOUTS!
Tensing the stomach muscles during the spiral dive can be helpful. At the first signs of
dizziness or feeling faint exit the spiral dive immediately.
Because of the extreme loss of altitude experienced during a spiral dive always ensure
you have enough altitude above ground.
To avoid a strong surge when exiting the spiral dive you have to release the inside
brake while applying the outer brake slightly.
Page 17
53
The skywalk ARRIBA has no tendency for locking into a spiral dive. In case it keeps
turning under unfavourable circumstances (e.g. unintended asymmetry of the cross
brace harness) you will have to actively finish the spiral dive. In this case shift your
weight to the outside of the turn and simultaneously apply more outside brake. Applying both brakes will also take the paraglider out of the spiral dive but the glider can
front tuck and you should dampen the exit with the brakes.
Remember: Compared to regular flight manoeuvers the steering forces in a spiral dive
are a lot higher!
B-LINE STALL:
The B-lines are pulled down symmetrically (20cm). Keep the brake handles in the
respective hands. The airflow on top of the profile largely detaches and the paraglider
descends without flying forward. By pulling the B-lines stronger the canopy surface
decreases and the descent increases. You can exit the stall by quick and symmetric
release of the B-lines. The paraglider will pitch forward and pick up speed. At no time
you may use the brakes in this case! You must exit the B-line stall immediately if the
canopy starts to form a forward facing semi-circle. If the wing doesn’t reopen you may
speed up the opening process by gently braking.
BIG EARS:
In contrast to the spiral dive and B-line stall, Big Ears result in an increase of forward
speed in relation to the gliders sink rate. Big Ears is used to avoid or exit dangerous
areas in a horizontal direction.
EXAMPLES:
In strong winds or below a thundercloud at low altitude it is possible that neither B- >
line stall or spiral dive will help.
Big Ears are the easy way out, if the pilot is stuck in strong lift and needs to look for >
sink, it is advisable to exit the lift band with the use of Big Ears.
To fold the outer wingtip you only need to pull the outer A-lines symetrically. In doing >
so it make sense to grap the lines as far up as possible for folding maximum area.
The skywalk ARRIBA will enter now a stable sink flight. >
Page 18
54
The brake handles remain in your hands together with the outer A-risers. Braking and >
weight shift enables you to steer your paraglider.
In order to increase the sink and forward speed you can optimise this manoeuvre by >
using the acceleration-system.
The risk of canopy destabilisation in turbulent air is clearly reduced when using >
Big Ears.
To exit Big Ears release the A-lines. The canopy will unfold automatically. You may >
brake a little to support the unfolding.
It is advisable to pump out one side at a time to reduce the risk of detaching airflow. >
ATTENTION:
WHILE THE GLIDER TILTS BACKWARD DO NOT RELEASE THE C-RISERS,
OTHERWISE THE GLIDER WILL SHOOT FORWARD STRONGLY.
BY C-STALL, DO NOT CONFUSE THE C-RISER WITH THE D-RISER.
Page 19
CAUTION:
ALL DESCENT TECHNIQUES SHOULD BE TRAINED IN CALM AIR AND WITH
SUFFICIENT ALTITUDE BEFORE USING THEM IN EMERGENCY SITUATIONS
AND IN TURBULENT AIR.
Any extreme flight manoeuver and descent technique demands:
Training, either with an instructor in a paragliding school or during a safety training >
course.
Double-checking that before entering a manoeuver you have sufficient altitude and >
clear air space below.
Permanent visual contact with the canopy. >
55
Page 20
56
EXTREME FLIGHT MANOEUVERS
ASYMETRIC TUCK:
In strong turbulence, the canopy may collapse. The skywalk ARRIBA will re-open
automatically even after bigger collapses. The turning towards the collapsed wing section can be minimised by braking on the remaining open side of the canopy. In case of
a big collapse you will have to brake with caution in order to avoid a stall. In case the
canopy still doesn’t recover you can accelerate the opening process by pumping the
brake on the tucked side.
CRAVAT/LINE OVER:
This type of instability never occurred during any of our test flights with the skywalk
ARRIBA. Still, in extremely turbulent air or during exceptional piloting errors it is
possible that the folded wing section might get tangled in the lines. The pilot may then
stabilise the paraglider by careful counter-braking. Without immediate intervention of
the pilot a cravated paraglider will turn into a strong spiral dive.
There are several possibilities to untangle the paraglider:
Pumping on the folded side. >
Pulling the stabiliser-lines (tip-lines). >
In case none of these manoeuvers have any success you can try to unfold the
paraglider by performing a Fullstall. Only experienced pilots, with a lot of flight
experience should attempt this manoeuver. Make sure you have enough altitude
to recover the Fullstall in time.
IF NONE OF THESE MANOEUVERS ARE SUCCESSFUL OR THE PILOT FEELS
OVERWHELMED BY THE SITUATION THE RESERVE PARACHUTE SHOULD BE DEPLOYED IMMEDIATELY!
FRONT TUCK:
The paraglider can be front tucked by a strong pull on the A-risers or when encountering
strong sink. The leading edge will fold forward along the whole length of the wing.
Light braking will reduce the forward surge and will help to speed up the opening of the
canopy. The skywalk ARRIBA will normally recover from a Front Tuck automatically and
without pilot input.
Page 21
THE PARACHUTAL STALL:
The paraglider has no forward speed and a greatly increased descent rate. The Parachutal Stall may follow a too passively released B-line Stall. Porous canopy fabric (excessive UV-degradation) or frequent, strong towing (stretched A-lines) results in an increased risk of a Parachutal Stall. The pilot can recover from the Parachutal Stall by
slightly pushing the A-risers forward at the mallions or by using the accelerator. The
skywalk ARRIBA usually exits the Parachutal Stall automatically.
CAUTION:
AS SOON AS YOU APPLY THE BRAKES DURING A PARACHUTAL STALL THE
PARAGLIDER WILL IMMEDIATELY ENTER A FULLSTALL.
IF STILL IN A PARACHUTAL STALL CLOSE TO THE GROUND DO NOT ATTEMPT
TO RECOVER BUT STRAIGHTEN UP YOUR POSITION IN THE HARNESS AND
PREPARE FOR A PARACHUTE LANDING ROLL.
57
Page 22
FULLSTALL:
In order to Fullstall your paraglider take a wrap on both brake handles and pull strongly
and symmetrically until the airflow breaks away from the canopy.
The canopy will drop backwards. Despite this violent reaction keep the brakes fully
depressed until the canopy stabilises above your head.
In a Fullstall the skywalk ARRIBA flies backwards but doesn’t always form a forward facing semi-circle. This semi-circle can be achieved by a slower entry into the Fullstall. In
order to exit a Fullstall the pilot will have to release the brakes slowly and symmetrically
(Recovery time >= 1 sec).
The glider opens and surges forward to pick up speed. Brake gently to dampen the
forward surge of the skywalk ARRIBA and to counteract a possible Front Tuck.
CAUTION:
IN CASE THE FULLSTALL IS RELEASED TOO EARLY, TOO FAST OR WITH THE
WRONG TECHNIQUE THE CANOPY MAY SHOOT FORWARD STRONGLY!
58
Page 23
59
NEGATIVE SPINS:
A paraglider spins negative if the airflow disconnects over one half of the wing. The
canopy turns around the vertical axis and the turnpoint is inside the gilder. The inner
part of the wing is in a reverse flight.
There are two reasons for the Negative Spin:
One brake is pulled too far and too hard (e.g. when entering a spiral dive) >
One brake is pulled too hard when flying slow (e.g. in thermal flying). >
The skywalk ARRIBA usually re-enters normal flight immediately after the brake is
released without any great altitude loss. Simply release the excessively induced brake
until the airflow re-connects to the inside wing.
After a long lasting spin it is possible that when releasing the brake the canopy might
shoot forward and collapse. Cross-braced harnesses that are too narrow increase the
tendency to spin on most paragliders.
WINGOVER:
Alternating left/right turns lead to an increased banking of the canopy. The load on
the outside wing tip to a minimum (the tip starts to feel light). Further turns and higher
banking is not recommended at this stage as the canopy might collapse on the inside
wing section.
CAUTION:
FULLSTALL, NEGATIVE SPIN AND WINGOVERS (ABOVE 90°) ARE ILLEGAL
ACROBATIC FLIGHT MANOEUVERS AND ARE NOT PERMITTED IN REGULAR AIR
TRAFFIC. WRONG OR EXCESSIVE STEERING IN THESE SITUATIONS MAY HAVE
FATAL CONSEQUENCES INDEPENDENT OF THE TYPE OF PARAGLIDER USED!
Page 24
60
MATERIALS
The skywalk ARRIBA is manufactured from the highest quality materials. It was most
important to minimize weight without losing durability and suitability for daily use. We
know that the product life span of a paraglider is one of the decisive factors of customer satisfaction. The aluminum-coated cloth on the leading edge should be handled with
care in order to guarantee the perfect UV-protection. . Tips are included below.
WING AND RIBS:
Top Sail skywalk AEROFABRIX [AL]29, TSF SC 39 Nylon,
Porcher Marine 9017E68A
Bottom Sail skywalk TSF SC 39 Nylon
Ribs and Bands skywalk TSF SC 39 Nylon
Leading Edge Reinforcement Rigifoil Max by Gin
Suspension Reinforcement Dacron
LINES:
LIROS has been the world’s leading producer of paragliding lines for quite some time.
We chose the TSL lines because of their minimum stretch and the high consistency in
length.
Top- and Brake Lines Edelrid 8000-80,8000-65,8000-45 mit
Midlines Edelrid 8000-120, 8000-80
Main Lines AI, AII, BI, BII LIROS PPSL 200
Main Lines AIII, BIII, CI, CII, DI, DII Edelrid 8000-160
Main Line CIII, Stabilizer Edelrid 8000-120
Main Brake Line LIROS DFLP 200/32
RISERS:
The risers have been manufactured from 12,5 mm Polyester webbing with Kevlar inserts by Cousin Freres. Strain values, rigidity and stability of the webbing is noted on
the top of the webbing product.
Page 25
61
MAINTENANCE
With proper maintenance, your skywalk ARRIBA will be in an airworthy condition for
several years. A well cared-for paraglider lasts a lot longer than one which is packed in
its bag carelessly after use.
Always remember: Your life depends on your paraglider!
STORAGE:
Store your paraglider in a dry location, protected from light and away from chemicals!
Dampness is a natural enemy for any paraglider. Therefore, always make sure your paragliding equipment is dry before packing it away. Dry if necessary in a heated room.
CLEANING:
Rubbing and cleaning leads to faster deterioration of your paraglider. The PU and Aluminum-coated cloth of the ARRIBA protects it well from pollution. If you still think that
your paraglider needs to be cleaned, then use a soft and wet towel or sponge. Don’t
use any soap or detergents. Never use flammable products.
REPAIR:
All repairs must be carried out by the manufacturer or by an authorised
skywalk-Service-Centre. Amateur repairs can cause more harm than good.
WEAR:
The skywalk ARRIBA mainly consists of Nylon fabric that loses strength and shows
an increase in porosity under the influence of UV-radiation. Only unfold the paraglider
shortly before starting and pack away immediately after landing to avoid any unnecessary sun exposure.
LINE-REPAIRS:
The lines of the skywalk ARRIBA consist of a Dyneema-core and a Polyester-cover or
unsleeved TECNORA core. Avoid heavy loads on single lines, as excessive stretch may
be irreversible.
Repeated folding or kinking of lines at the same spot reduces their strength even if it’s
just a little.
Page 26
62
Any visual damage of a line, even if it is only the line coating, requires a replacement.
Only acquire new lines from the manufacturer or from an authorised
skywalk-Service-Centre. Your flying school or your dealer will assist you to change a defective line. Check the correct length of the line before replacing it. Compare with its
counterpart on the opposite side of your glider. After the exchange a line-check will be
necessary. The best way to this is by unfolding the glider on the ground!
GENERAL INFORMATION:
When unfolding the paraglider insure that neither the canopy nor the lines become >
dirty as dirt particles in the fibres can damage the material and lines.
If the lines get tangled on the ground they may be over-stretched or break during >
take-off.
Do not step on the lines and/or canopy. >
Make sure that no sand, stones or snow get inside the canopy as the extra weight >
collected in the trailing edge may slow down or even stall the glider.
Sharp edges damage the canopy. >
Uncontrolled inflation attempts in strong winds may result in the glider impacting into >
the ground at high speed.
This can cause rips, damage on lines and/or fabric. >
Make sure not to land your canopy leading edge first as this may cause permanent >
damage to this area of your paraglider.
After landings in trees or on water you should check the length of the lines. >
After contact with salt water thoroughly rinse the equipment with fresh water! >
TIPS AND TRICKS FOR MATERIAL HANDLING:
The aerofabríx
[AI]
29 is metallised with an extremely thin coating of aluminium, in order
to reflect UV-rays and subsequently slow-down the ageing of the glider.
Careful handling of the glider and the high-performance cloth is essential, in order to
maintain the optimal properties.
For this purpose, please review the following instructions:
1. Avoid unnecessary exposure to the sun or weathering, pack the glider immediately
after use, do not leave it laid out at launch site unnecessarily.
2. Friction can highly damage the thin cloth, so avoid dragging the cloth on the ground.
3. Lay the glider cell upon cell, do not roll it up tightly, and avoid sharp bends. For
this purpose, we offer since 2009 the special Packsack in which the glider can be
Page 27
63
packed gently cell upon cell.
4. Always store the risers in the provided protective cover.
5. Never let the cloth come into contact with saltwater, the metallic properties can lead
to corrosion. If the glider does come into contact with saltwater (e.g. landing in saltwater) then generously clean with fresh water (e.g. in bathtub) and then carefully and
thoroughly dry it.
6. Never pack your glider in wet condition! If this is unavoidable, then dry it completely
as soon as possible.
7. After flying in air which contains salt, carefully dry your glider - do not pack it when
still moist!
8. If the glider will not be flown for extended periods of time, we recommend that you
store it in the special storage bag from skywalk. Store in dry condition and away
from light.
9. Never leave your glider inside a vehicle, when it is parked in the sun. The resulting
high temperatures can generally cause damage to the cloth.
10. Stains can be easily removed with a soft cloth and handwarm water, if necessary.
Afterwards, dry thoroughly. Tears cam be taped easily with ripstop adhesive tape, larger damage must be repaired by an authorised dealer.
CAUTION:
THE AEROFABRIX
[AL]
29 ALUMINIUM CLOTH REACTS WITH AN UNSIGHTLY STAIN
TO VARIOUS FORMS OF ANIMAL EXCREMENT (COW DUNG, SHEEP EXCREMENT). THESE STAINS ARE TECHNICALLY HARMLESS, I.E. THEY WILL NOT AFFECT AIR PERMEABILITY, BUT ARE OF COURSE, OPTICALLY UNATTRACTIVE.
WE RECOMMEND SELECTING YOUR LAUNCH SITE CAREFULLY AND TAKING
CARE WHEN PACKING UP YOUR GLIDER. MOREOVER, THIS APPLIES AS WELL
TO CONVENTIONAL CLOTHS, WHICH ALSO STAIN WHEN THEY COME INTO DIRECT CONTACT WITH ANIMAL EXCREMENT. RESIDUE SHOULD BE REMOVED
AS QUICKLY AS POSSIBLE WITH HANDWARM WATER.
Page 28
64
2-YEAR-CHECK / CERTIFICATION
According to LTF regulations your glider will have to undergo a maintenance check
after 24 months. According to these regulations the Two-Year-Check has to be carried
out by the manufacturer, its representative or by the owner himself. The check will
have to be confirmed by a official stamp (ex. DHV-stamp). Missing this deadline or if the
check is carried out by an unauthorised company will lead to immediate loss of your
skywalk ARRIBA model certification and all warranty and liability claims.
CHANGES TO THE PARAGLIDER:
Your skywalk ARRIBA is manufactured within the regulated parameters of tolerance.
These parameters are very narrow and must not be altered under any circumstance.
Only this way the optimum balance between performance, handling and safety can be
guaranteed!
UNAUTHORISED CHANGES CAUSE AN IMMEDIATE EXPIRATION OF THE
OPERATING LICENSE! ANY LIABILITY CLAIM TOWARDS THE MANUFACTURER
AND ITS DEALERS IS EXCLUDED!
Page 29
65
CERTIFICATION
The final polish is the official certification. Our obligation was to create five sizes in LTF
class 1-2, in trim speed and accelerated: These classifications depend on the ability of
the pilot of that category. The many certification tests are the last hurdle in the development of a skywalk paraglider. The certifying test flights will only take place when the
test-team is completely happy with the glider in question.
We remark that the certification results will differ during flight in thermic or turbulent
air. The certification solely informs about a paragliders performance in provoked extreme flight manoeuvers during stable air conditions. These provoked extreme-flightmanoeuvers during the certification process should thus in a complex interrelationship
with other factors not be overrated.
CLOSING WORDS
Paragliding is a fascinating sport. With the skywalk ARRIBA, you now have a glider
which represents the very top of glider technology today.
This glider will bring you years of enjoyment when you treat it with care.
Respect for the challenges and dangers of flying is a pre-requisite for successful,
awe-inspiring flights. Even the safest paraglider can be dangerous when you secondguess weather information or experience pilot error. Please be reminded that every
airsport is potentially risky and that your safety largely depends upon your own level
of awareness.
We recommend that you fly with caution and to respect the legal requirements.
EACH PILOT FLYS AT HIS OWN RISK!
Your skywalk Team
www.skywalk.info
[email protected]
Fon: +49 (0) 8641 -6948 40
Fax: +49 (0) 8641 - 69 48 11
GmbH &Co. KG
Bahnhofstraße 110
83224 GRASSAU
GERMANY
Page 30
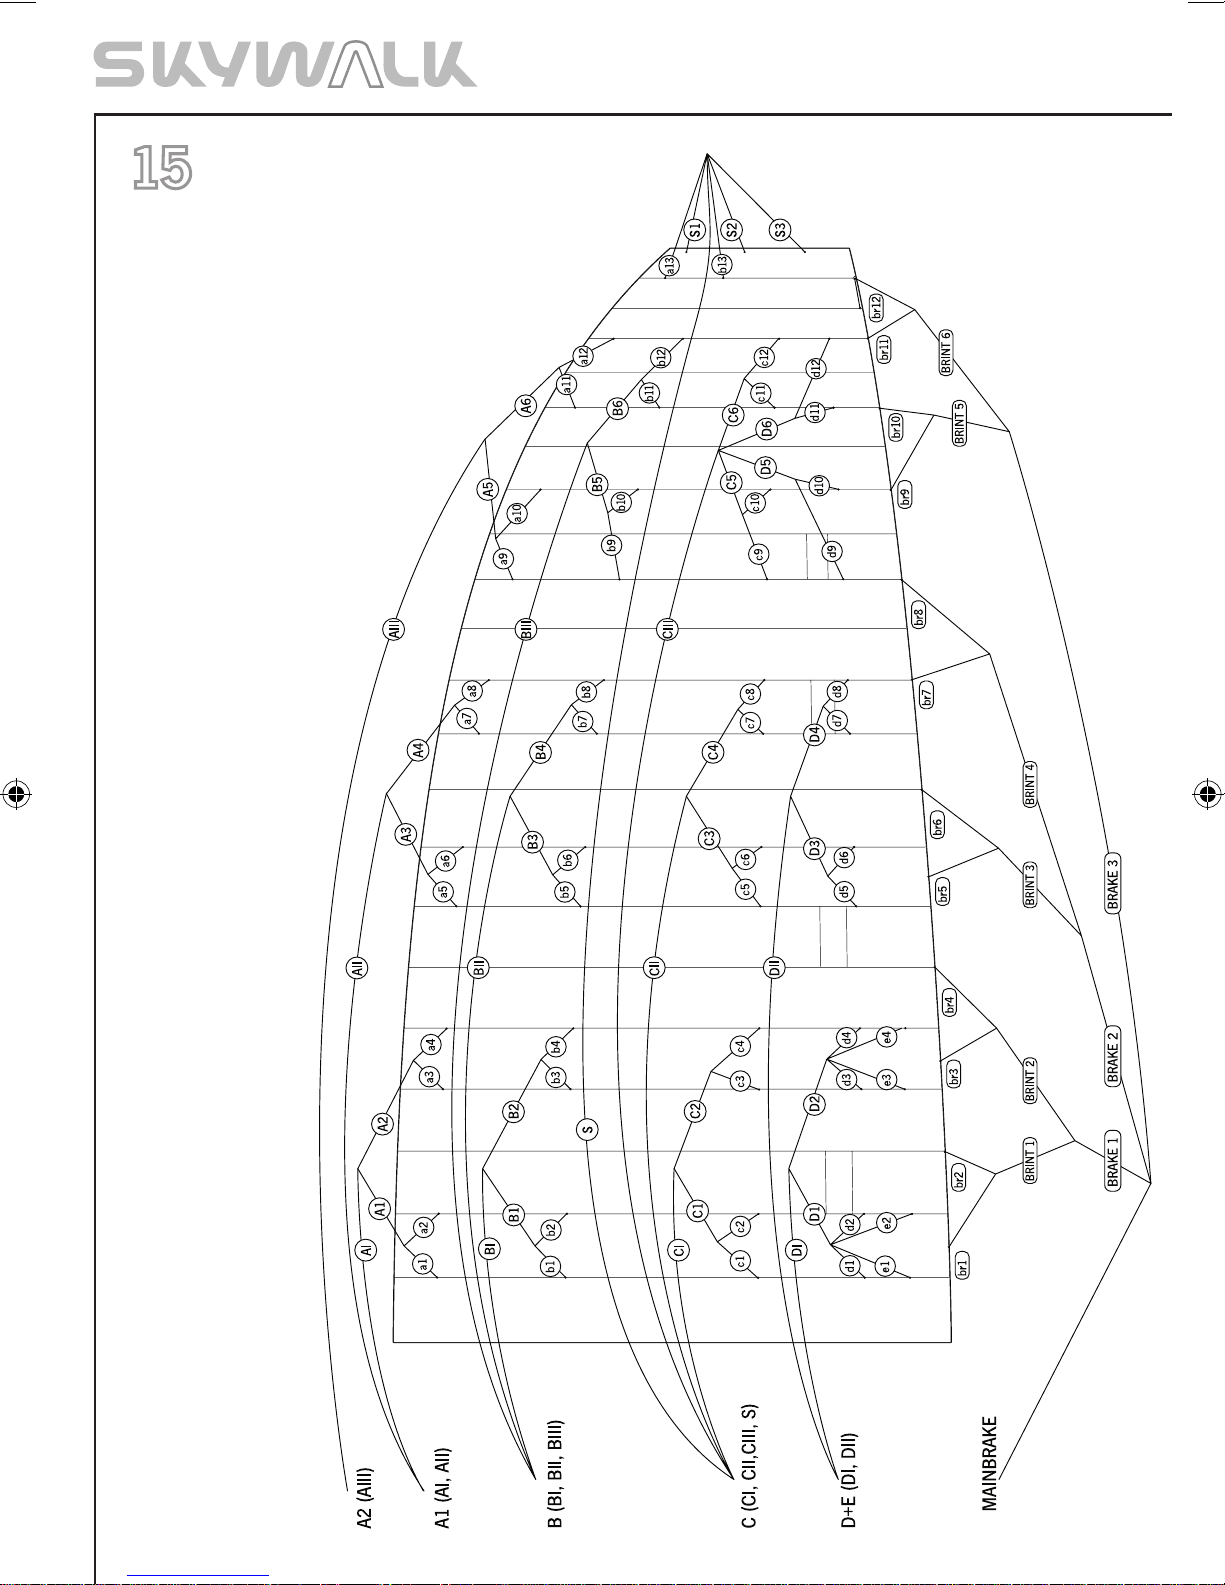
LINE PLAN
The displayed line plan
of the skywalk ARRIBA is
only for demonstration
purposes of the line configuration. Plans for other
sizes can be aquired via
flight schools, importers
or directly from skywalk.
66
Page 31
67
RISERS
Page 32
68
RISERS
Page 33
69
RISERS
Page 34
70
TEST PROTOCOL
Page 35
71
Page 36
www.skywalk.info
[email protected]
Fon: +49 (0) 8641 -6948 40
Fax: +49 (0) 8641 - 69 48 11
GmbH &Co. KG
Bahnhofstraße 110
83224 GRASSAU
GERMANY
 Loading...