

Page 1
21B-2L, 429 - 1 Nonhyun-Dong, Namdong-Gu, Incheon, Korea
T. +82-32-821-4731~5 , F. +82-32-821-4736 , E-MAIL. [email protected]
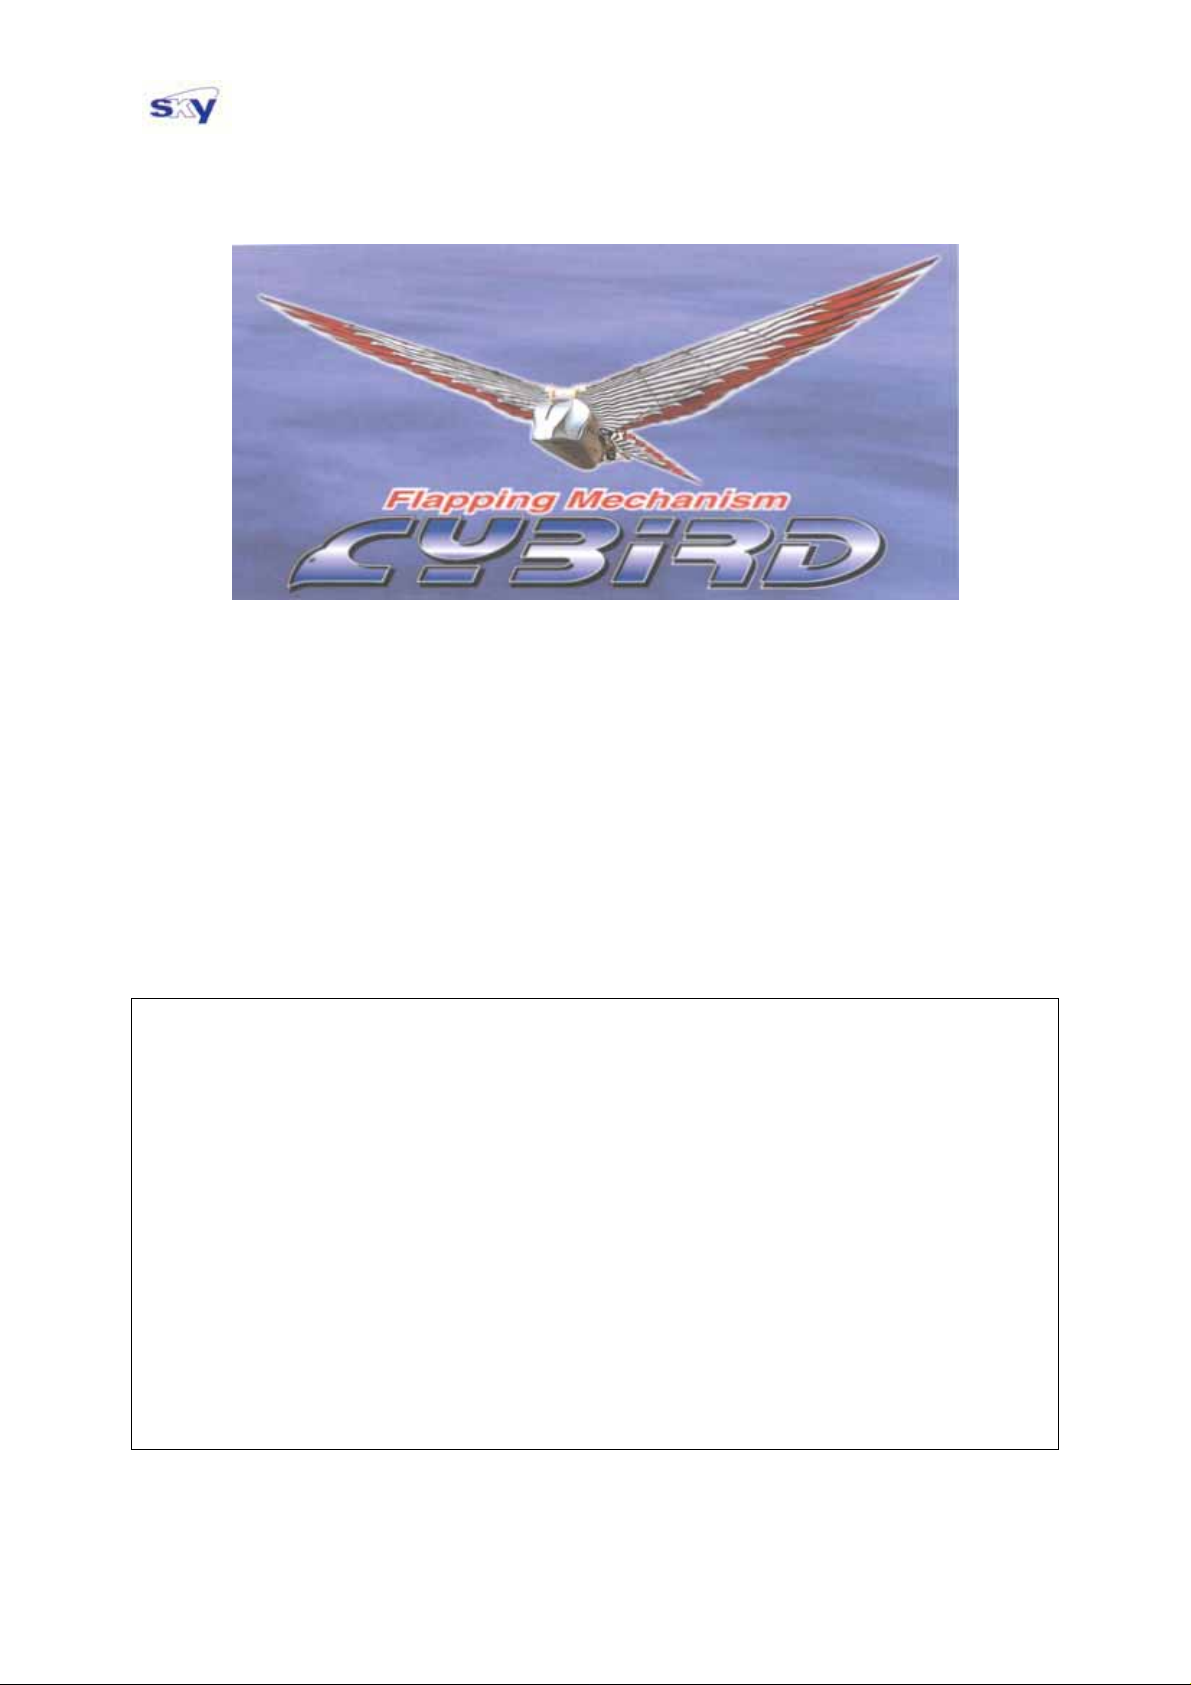
Flying Robot,
Cybird
Electric R/C Ornithopter
Instruction Manual
READ THIS BEFORE ASSEMBLING YOUR CYBIRD !!!
Skytech International Co., Ltd. warrants this product to be free from original manufacturing
defects upon purchase by the consumer. Skytech makes no express or implied claims
regarding this product once it has been assembled and flown. This warranty does not cover
damage from intentional misuse, abuse, fire, flood, or other damage unrelated to the use of
this product for the purpose of which such products are normally intended. This warranty
does not cover damage from products used with this item that are not approved for use with
this product. The purchaser of this product acknowledges and understands that they alone
assume all risk and liability for personal or property damage and/or injury resulting from the
buyer’s use of this product. Under no circumstances shall Skytech’ limits of liability from use
of this product exceed the original purchaser’s cost of the item. The express warranties
contained above are in lieu of all other warranties, expressed or implied, including but not
limited to the warranty of merchantability and/or fitness for a particular purpose, nor shall
Neuros, its divisions or assigns be liable for any incidental or consequential damages, costs
or expenses incurred by the purchaser of this product.
Page 2
21B-2L, 429 - 1 Nonhyun-Dong, Namdong-Gu, Incheon, Korea
T. +82-32-821-4731~5 , F. +82-32-821-4736 , E-MAIL. [email protected]
FOR SAFETY
Pay special attention to the safety at the parts of this manual that are indicated by the
following marks.
Mark Meaning
Procedures which may lead to a dangerous condition or cause
WARNING
CAUTION
death or serious injury to the user if not carried out properly, or
procedures where the probability of superficial injury or physical
damage is high.
Procedures where the possibility of serious injury to the user is
small, but there is a danger of injury, or physical damage, if not
carried out properly.
Prohibited
Mandatory
2
Page 3
21B-2L, 429 - 1 Nonhyun-Dong, Namdong-Gu, Incheon, Korea
T. +82-32-821-4731~5 , F. +82-32-821-4736 , E-MAIL. [email protected]
PRECAUTION DURING THE FLIGHT
WARNING!
Do not fly simultaneously on the same frequency.
Interference may cause a crash. Use of the same frequency will cause interference even
if the modulation method (AM, FM, PCM) is different.
Do not fly on rainy days.
Water will penetrate into the electronic part and cause faulty operation, or loss of control,
and cause a crash.
Do not fly in the following places:
- Near other radio control flying field
- Near people or cars on the ground, or objects in the air
- Near homes, schools, apartment complex or other places where there is a lot of people
- Near high tension lines, or communication facilities
- Near high buildings and/or trees where there is air turbulence
Extend the antenna to its full length.
If the antenna is too short, the effective range of the radio waves will become shorter.
Always check whether the transmitter and receiver works properly.
Before flying Cybird, check that the direction of operation of each servo matches the
operation of its control stick. If the servo does not move in the proper direction, or
operation is abnormal, do not fly the bird and resolve the problem first!
WARNING!
You alone are responsible for your safety and the safety of other people when flying your
Cybird. Follow these safety guidelines at all times!
1. Fly only in calm wind conditions. Any wind over 5 ~7 MPH may make it difficult to
control your bird. Avoid gusty conditions since it has a kite like wing and it can be
caught by the wind!
2. Make certain that you have adequate room to safely fly the bird.
3. Be sure that the transmitter and receiver are both turned off and the battery pack is
disconnected when not flying.
4. If you are flying Cybird at a place where other people are flying R/C planes, never turn
on your transmitter before checking with other pilots about the frequencies (radio
channels) in use.
3
Page 4
21B-2L, 429 - 1 Nonhyun-Dong, Namdong-Gu, Incheon, Korea
T. +82-32-821-4731~5 , F. +82-32-821-4736 , E-MAIL. [email protected]
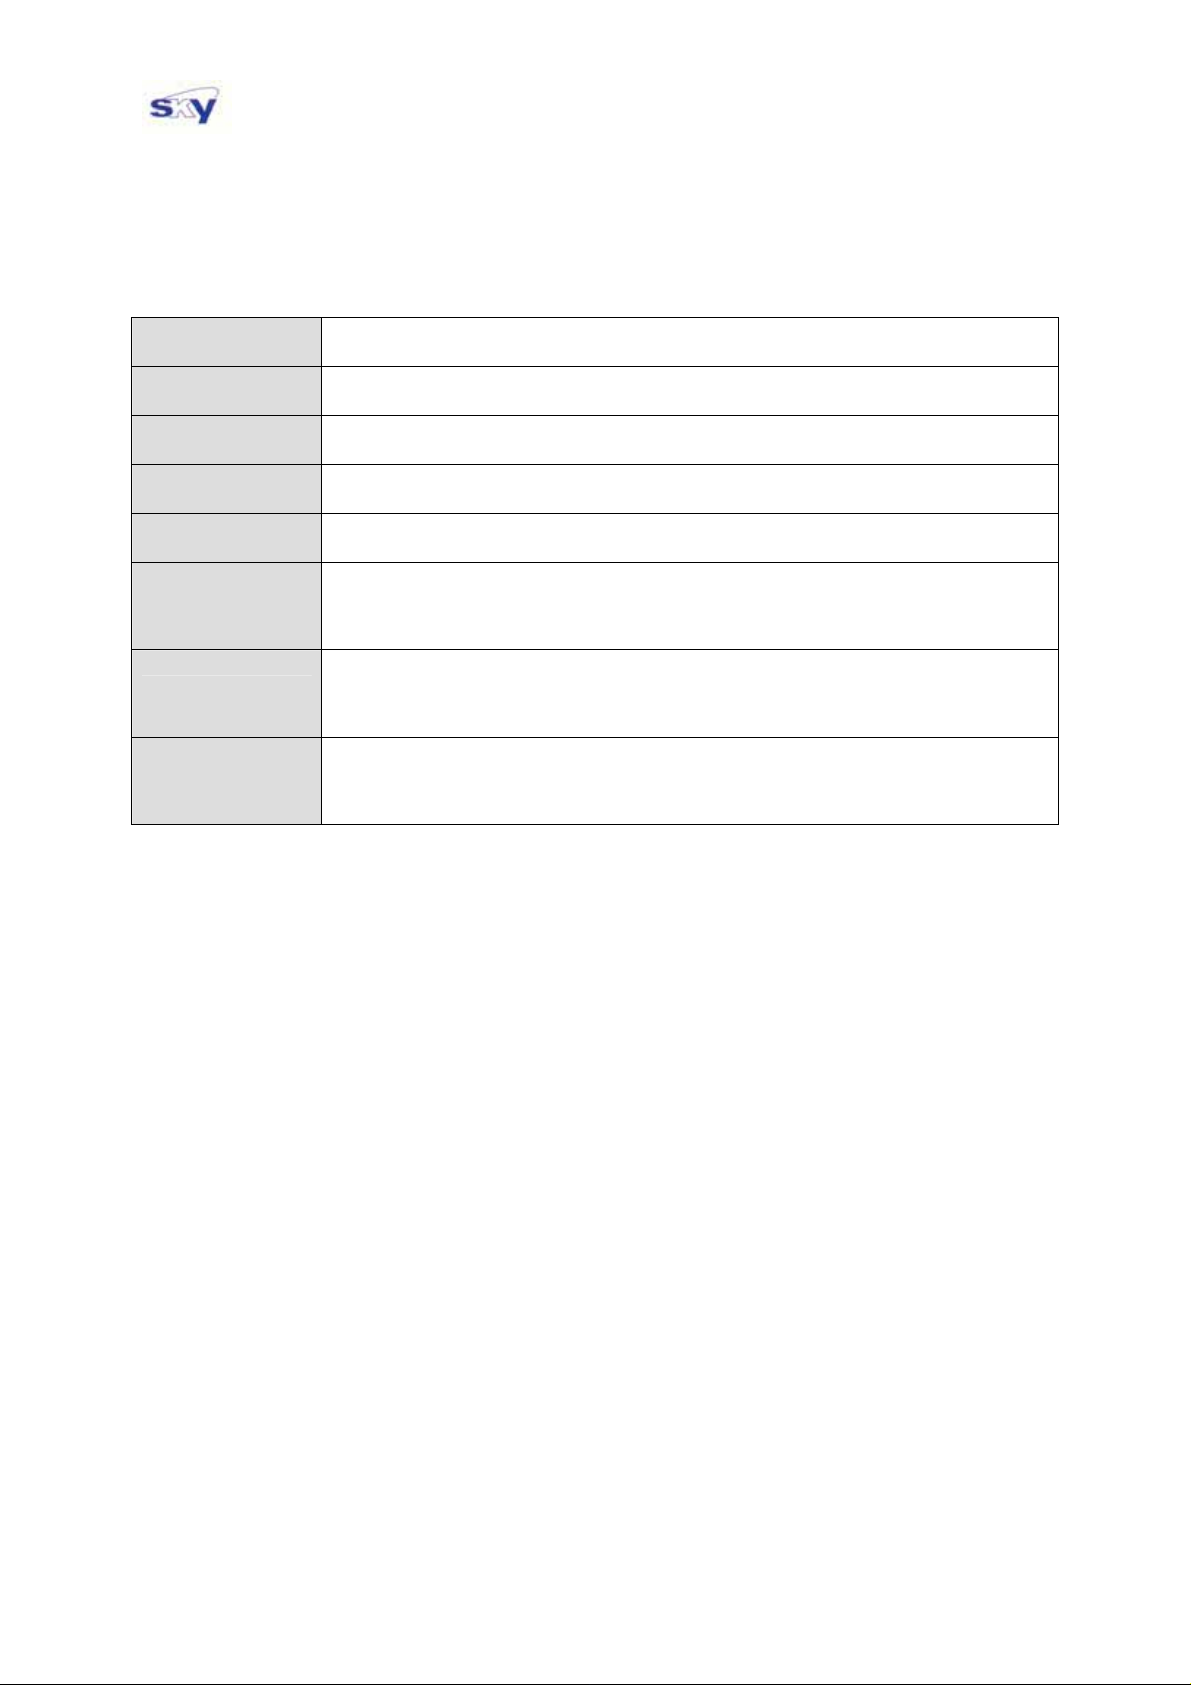
Cybird Specs :
Aircraft type
Wingspan
Body length
Weigh
Motor
Battery
Flight duration
Transmitter
※ In winter or cold days, it is normal that the power of the battery and motor is dropped.
※ The specifications may be changed for the purpose of performance improvement.
Radio Control (R/C) Ornithopter
~ 29 in.
~ 15 in.
~ 7.1 oz.
Speed 300 class DC motor
2-cell, 800mAh, Li-Polymer, nominal: 7.4V, fully charged: 8.4V
(※ Optional : 1,200mAh Li-Polymer battery)
8~10 minutes depending on power use and flying skill
(※ up to 20 minutes when optional 1200mAh battery is used)
Button type, FM radio control
Power : 9.0 V (6 Alkaline batteries required)
4
Page 5
21B-2L, 429 - 1 Nonhyun-Dong, Namdong-Gu, Incheon, Korea
T. +82-32-821-4731~5 , F. +82-32-821-4736 , E-MAIL. [email protected]
PART CONTENTS
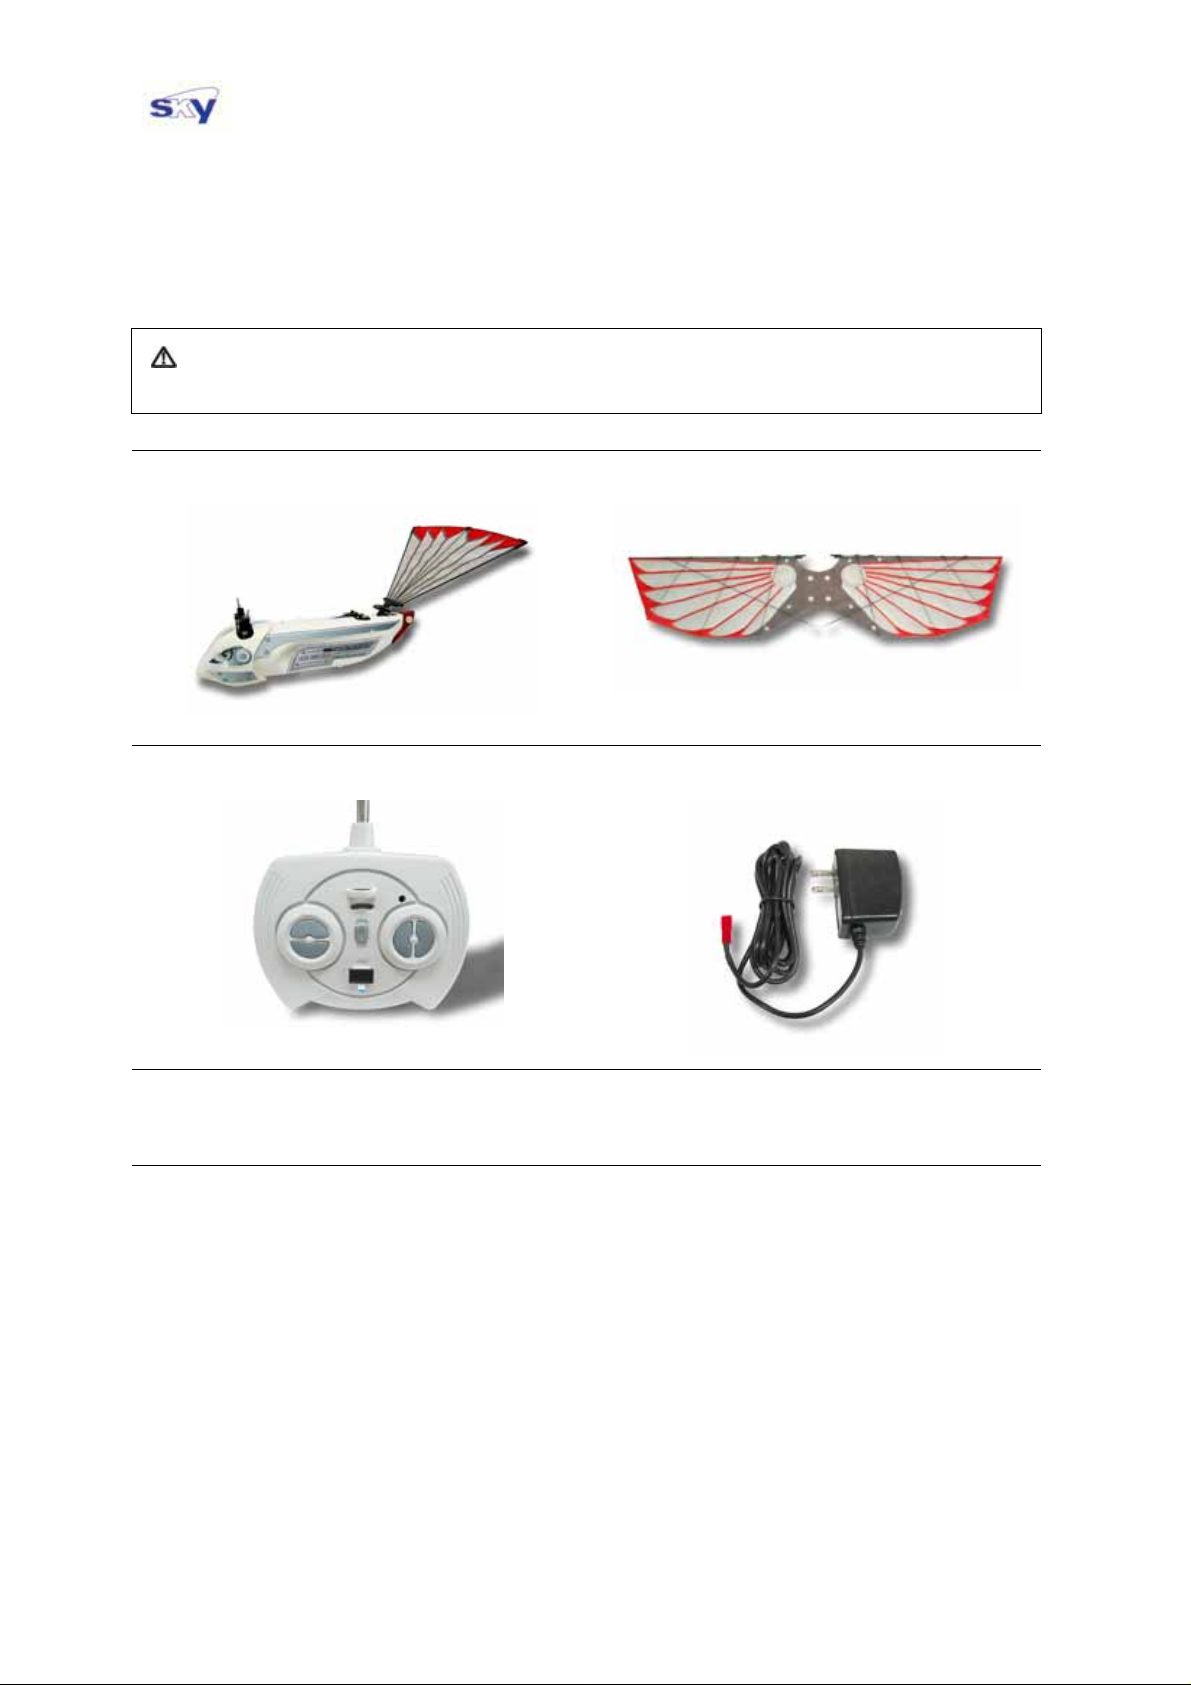
After opening the box, first check if the following items are provided.
Caution : When you handle Cybird, be careful not to break the gear inside the servo by moving
or rotating the tail wing with excessive force.
● Body
● Transmitter
(6 Alkaline batteries required)
● Main Wing
● Charger
● Instruction Manual, Neck strap, Instruction CD-ROM
● Extra parts : Velcro tape, bolts, some plastic parts, plastic pins for body shell installation
▦ If the set contents are incomplete, or if you have any questions, please contact the dealer.
5
Page 6
21B-2L, 429 - 1 Nonhyun-Dong, Namdong-Gu, Incheon, Korea
T. +82-32-821-4731~5 , F. +82-32-821-4736 , E-MAIL. [email protected]
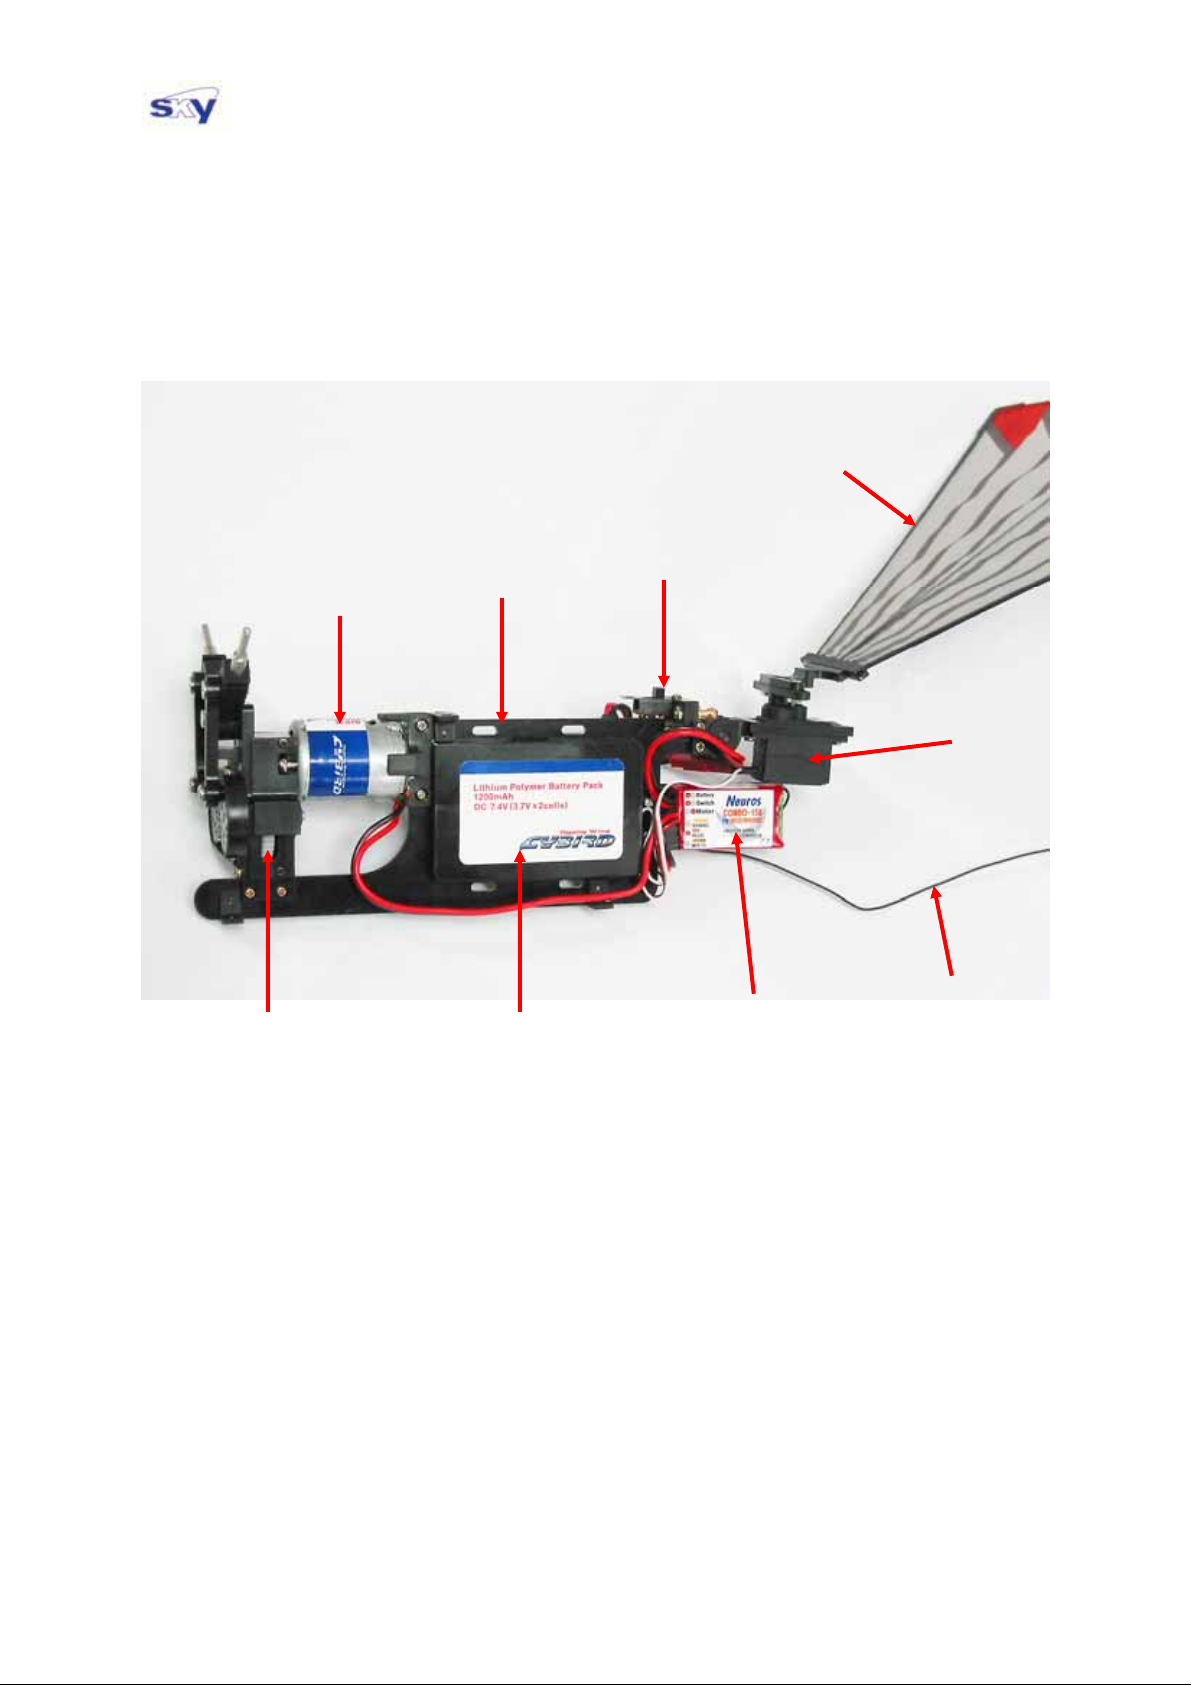
MAIN BODY
Motor
Gearbox
Body Frame
Battery
Tail Wing
Switch
Receiver/Controller
(**)
Servo
Antenna
(*)
(*) Some metal gears are used inside the servo to make it more durable
(**) Combined receiver and electric speed controller
6
Page 7
21B-2L, 429 - 1 Nonhyun-Dong, Namdong-Gu, Incheon, Korea
T. +82-32-821-4731~5 , F. +82-32-821-4736 , E-MAIL. [email protected]
ASSEMBLY
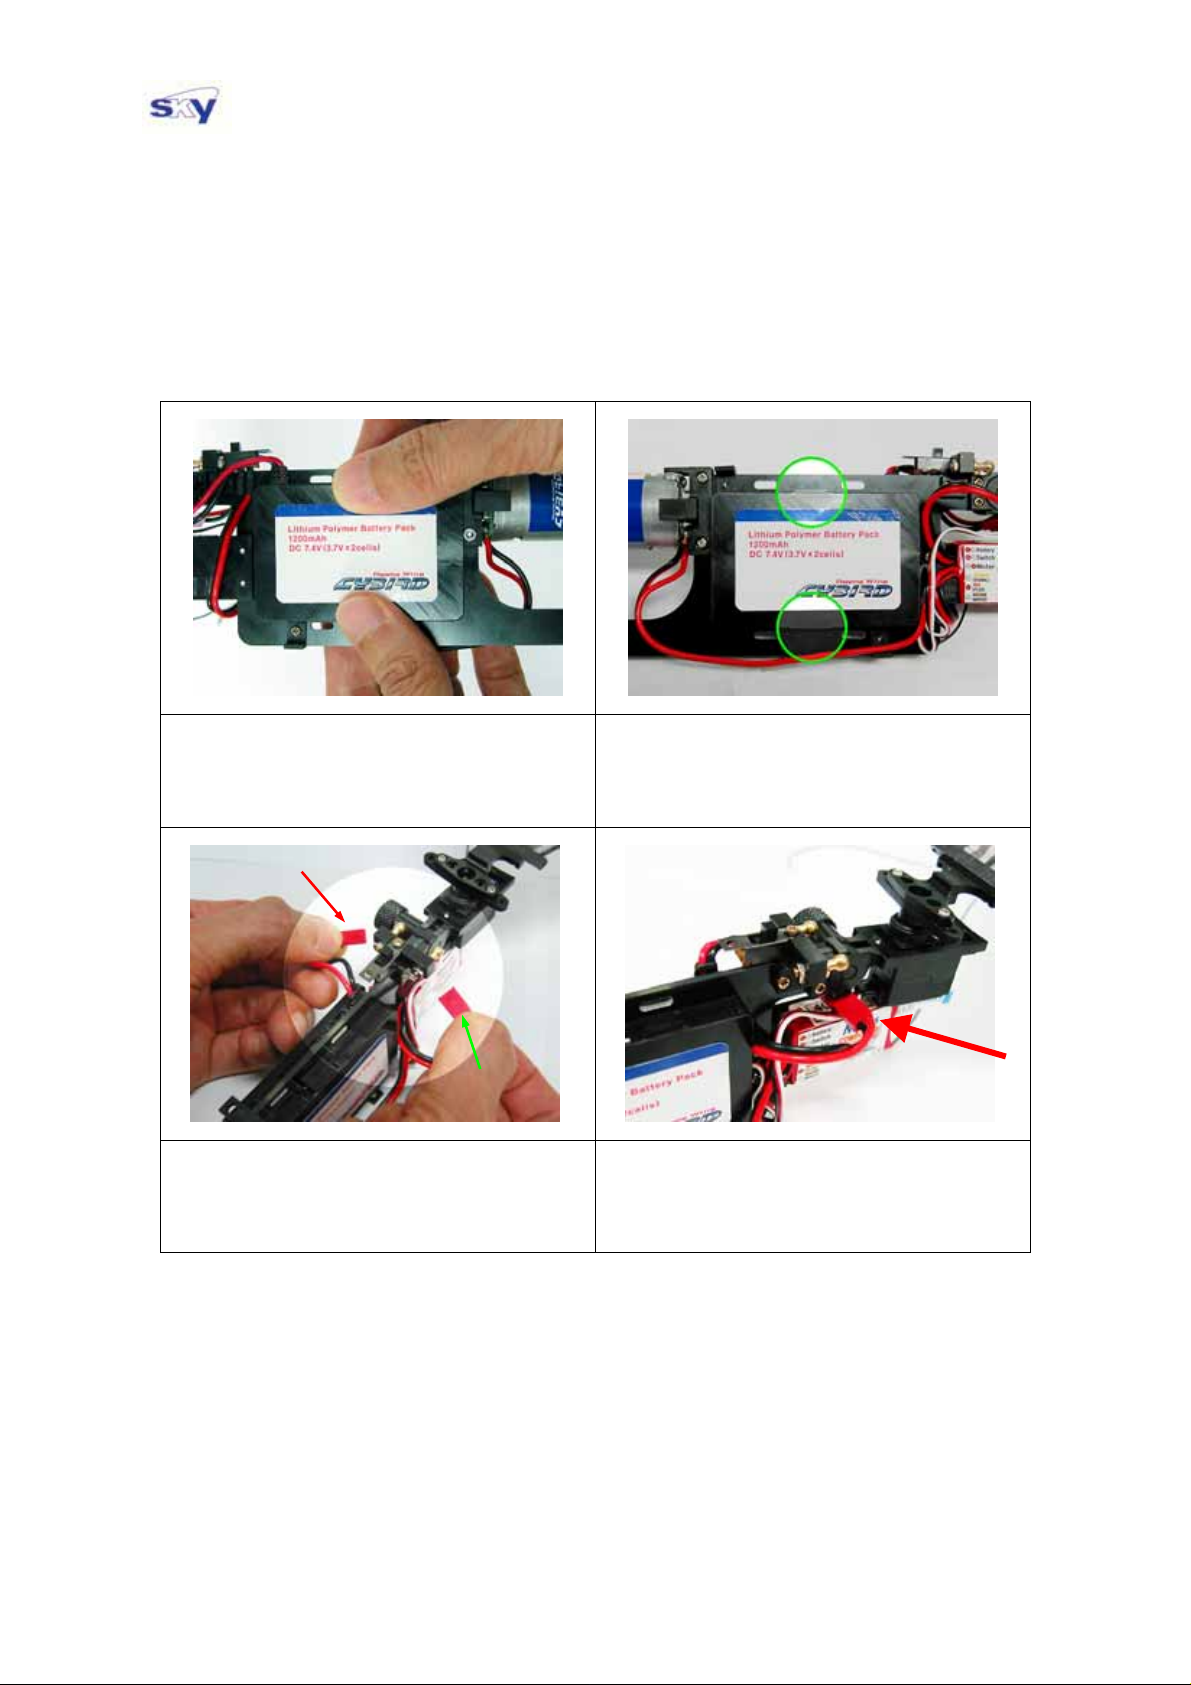
BATTERY PACK
Be sure to install the battery pack as follows;
Insert and press the battery pack from
the RIGHT side of the fuselage.
Battery
Receiver
Connect the battery cable to the
receiver/controller as indicated in the
above picture.
Make sure that both extruded parts
marked in the picture firmly fix the
battery pack onto the fuselage.
Let the electric cable be laid UNDER
the body so that the cable may not be
protruded out of the body shell.
7
Page 8
21B-2L, 429 - 1 Nonhyun-Dong, Namdong-Gu, Incheon, Korea
T. +82-32-821-4731~5 , F. +82-32-821-4736 , E-MAIL. [email protected]
BATTERY CHARGING
Warning!
1. Never charge the enclosed Li-Polymer battery pack with any other type of chargers
other than the special charger included with the Cybird. Attempting to charge with any
other type of chargers may cause FIRE or EXPLOSION!
2. The battery charger included with the Cybird is designed specifically for the battery pack
in the Cybird, and will not charge any other type of battery pack! Attempting to charge a
battery pack other than the type included with the Cybird will result in damage to both
the charger and the battery.
3. Always keep the followings in order to prevent FIRE, inflation of battery pack or leakage
of electrolyte!
- Do not drop or apply strong shock to battery pack.
- Do not short the battery connector terminals.
- Do not heat the battery pack.
- Do not immerse the battery pack in water.
4. Always keep the followings for safety
- Do not leave the battery pack within the reach of small children.
- Do not lick the battery pack.
- Do not disassemble the battery pack.
● The
● When
● Always fly Cybird with fully charged battery pack.
CAUTION : For longer life of motor and battery, we reco mmend that you do not let the
battery charger consists of charger circuit board which is combined in wall adaptor.
The charger operates from 110~220VAC source.
you charge the battery pack, plug the wall adaptor(charger) into 110V/220V wall
outlet. Attach the battery pack to the charger and the charger will automatically enter the
charge mode, indicated by the red LED. When the battery is fully charged, the LED
turns green. It takes about an hour to fully charge the battery pack. In general, it takes
thirty more minutes for a battery pack to be fully charged after the lamp is turned green.
accumulated flight time exceed 10 minutes per each charge. If the power of Cybird
is noticeably dropped, it is desirable to land Cybird and recharge the battery
before next flight.
In case, the battery pack inflates or the electric power is abnormally low, do not use or
disassemble the battery pack, but discard it in a proper way.
● The battery protection circuit is installed in the battery pack to keep the battery from the
damage by excessive charge or discharge.
8
Page 9
21B-2L, 429 - 1 Nonhyun-Dong, Namdong-Gu, Incheon, Korea
T. +82-32-821-4731~5 , F. +82-32-821-4736 , E-MAIL. [email protected]
ASSEMBLY
RECEIVER / ESC (electric speed controller)
Caution: The crystal (X’tal) determines the radio frequency on whi ch Cybi rd is controlled.
The crystal included in the Cybird may not be compatible with other products.
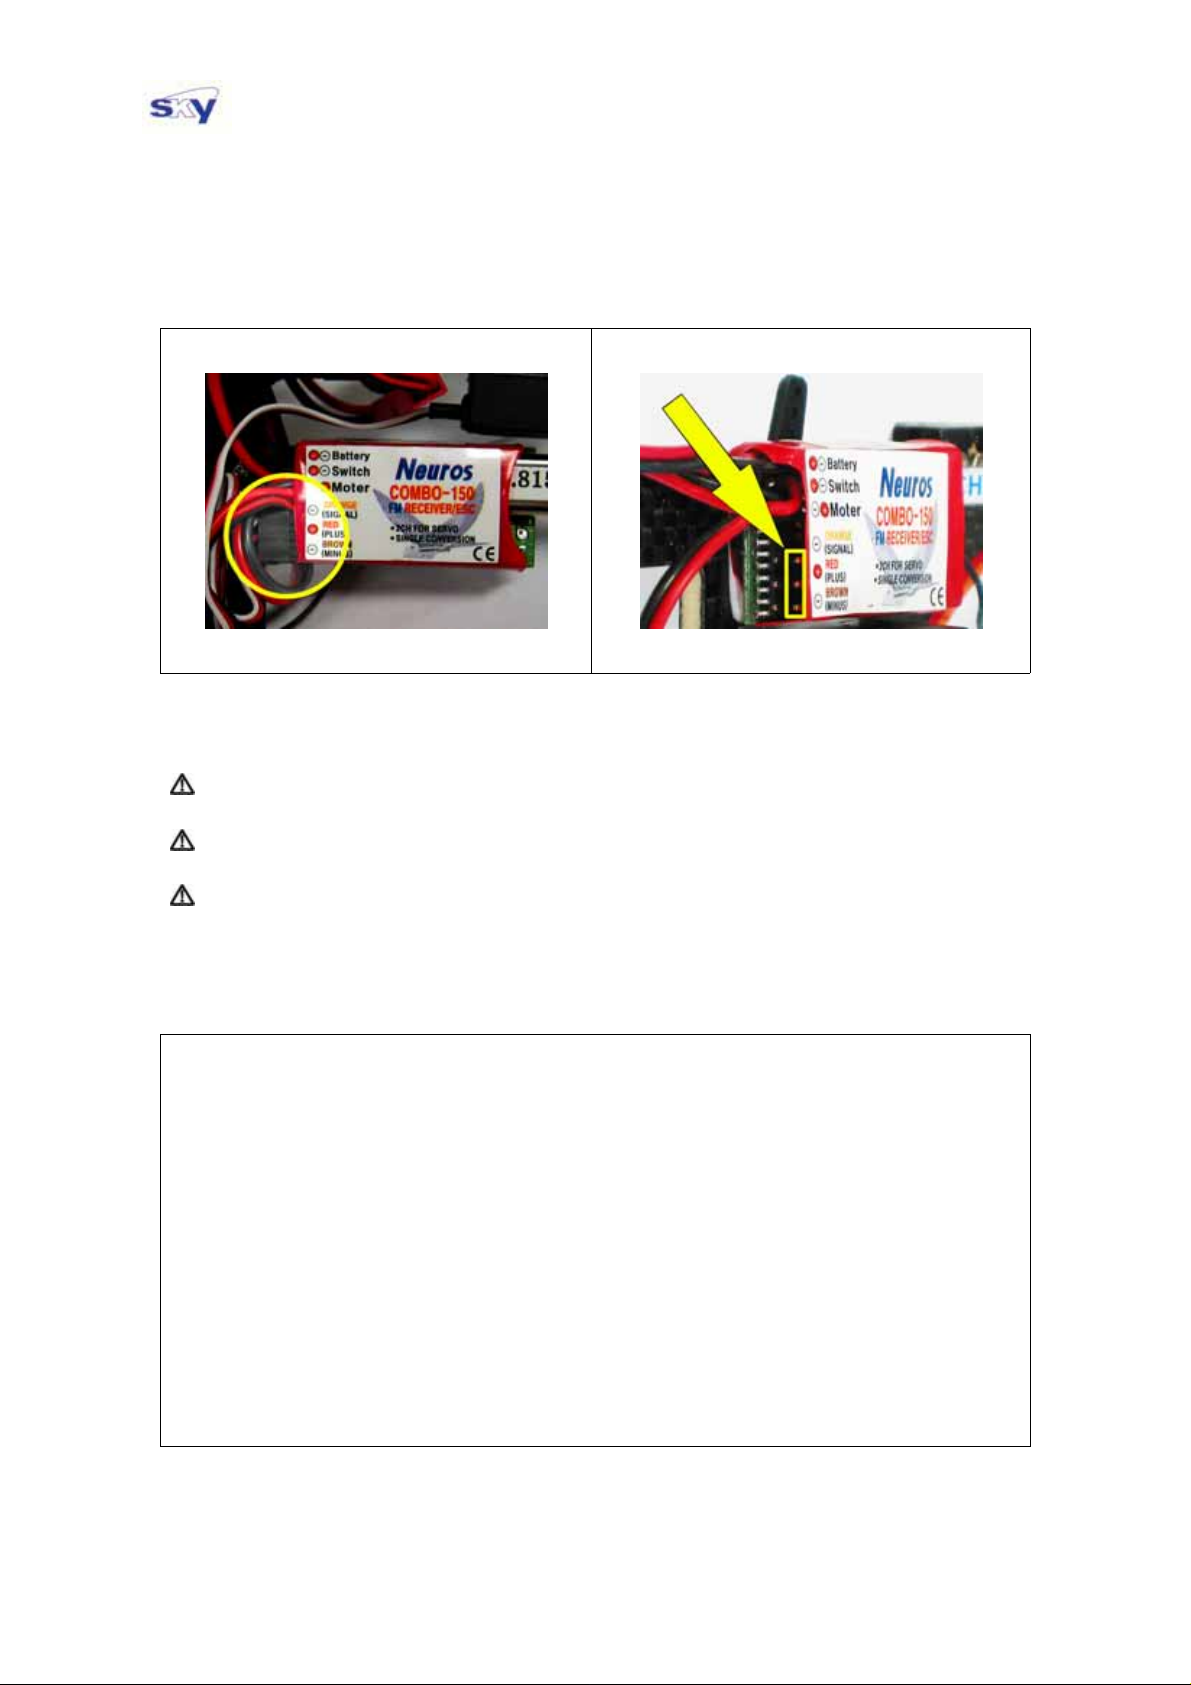
Caution: When you are to connect the servo cable to the receiver, make sure that the cable
be connected to the marked position. (Refer to the Upper Right picture)
Caution: When you connect the servo cable to the receiver, make sure that the colors of the
cable matched as indicated on the receiver cover.. (Refer to the LEFT picture)
● In order to prevent a crash due to over discharge of the battery, a spe cial function is
programmed into the combined Receiver/ESC. If the output voltage of the battery is
dropped down to certain level, the wing flapping speed is gradually slowed down
automatically so that you can land Cybird safely.
9
Page 10
21B-2L, 429 - 1 Nonhyun-Dong, Namdong-Gu, Incheon, Korea
T. +82-32-821-4731~5 , F. +82-32-821-4736 , E-MAIL. [email protected]
ASSEMBLY
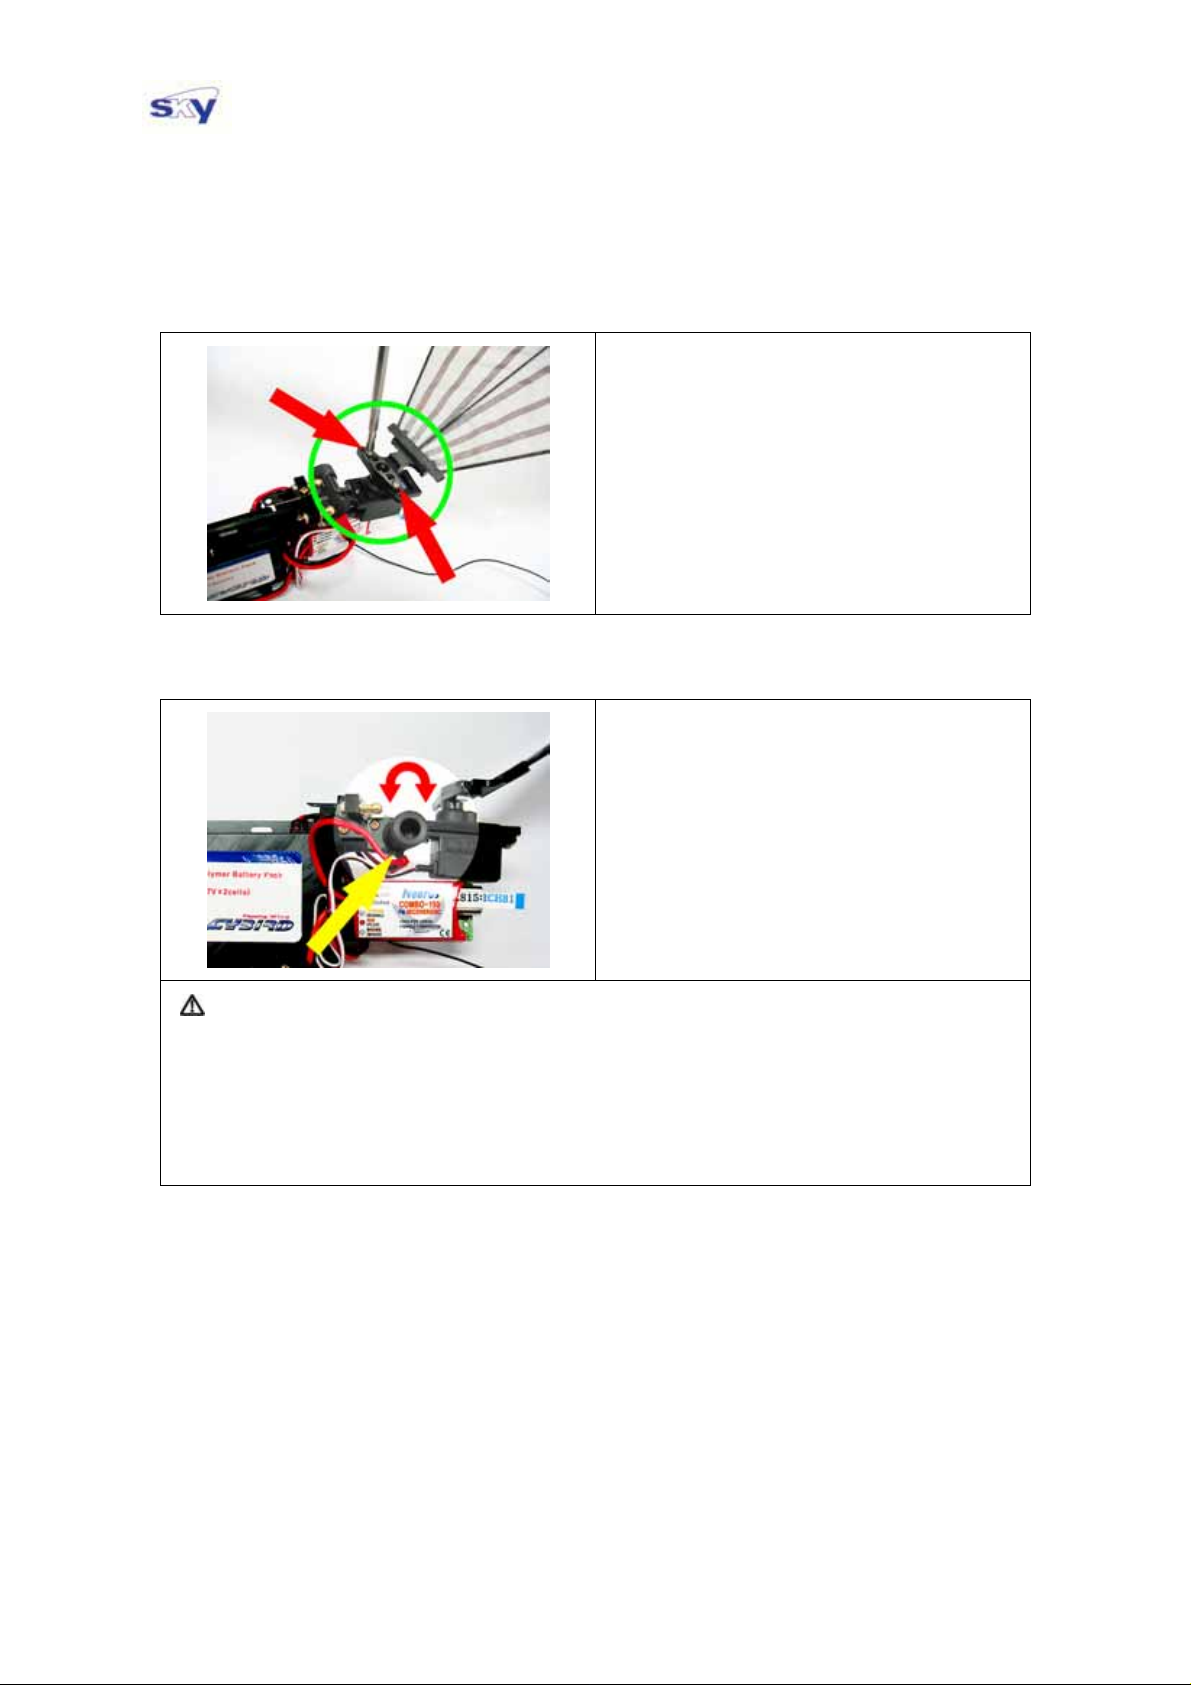
TAIL WING
By fastening and unfastening the two
bolts (marked), you can assemble and
disassemble the tail wing.
CAUTION
1. Tail angle HIGH: Good for beginners, since Cybird flies relatively slow and its
climbing rate is relatively low with higher tail angle.
2. Tail angle LOW: Good for those who are good at flying Cybird, since Cybird flies
relatively fast and its climbing rate is relatively high with lower
tail angle.
You can adjust the tail angle after you
turn the knob counter clockwise and
loosen the joint.
Flight characteristic is affected by the
tail angle. (Refer to below)
Make sure the joint is securely fastened
after tail angle adjustment.
10
Page 11
21B-2L, 429 - 1 Nonhyun-Dong, Namdong-Gu, Incheon, Korea
T. +82-32-821-4731~5 , F. +82-32-821-4736 , E-MAIL. [email protected]
ASSEMBLY
BODY SHELL
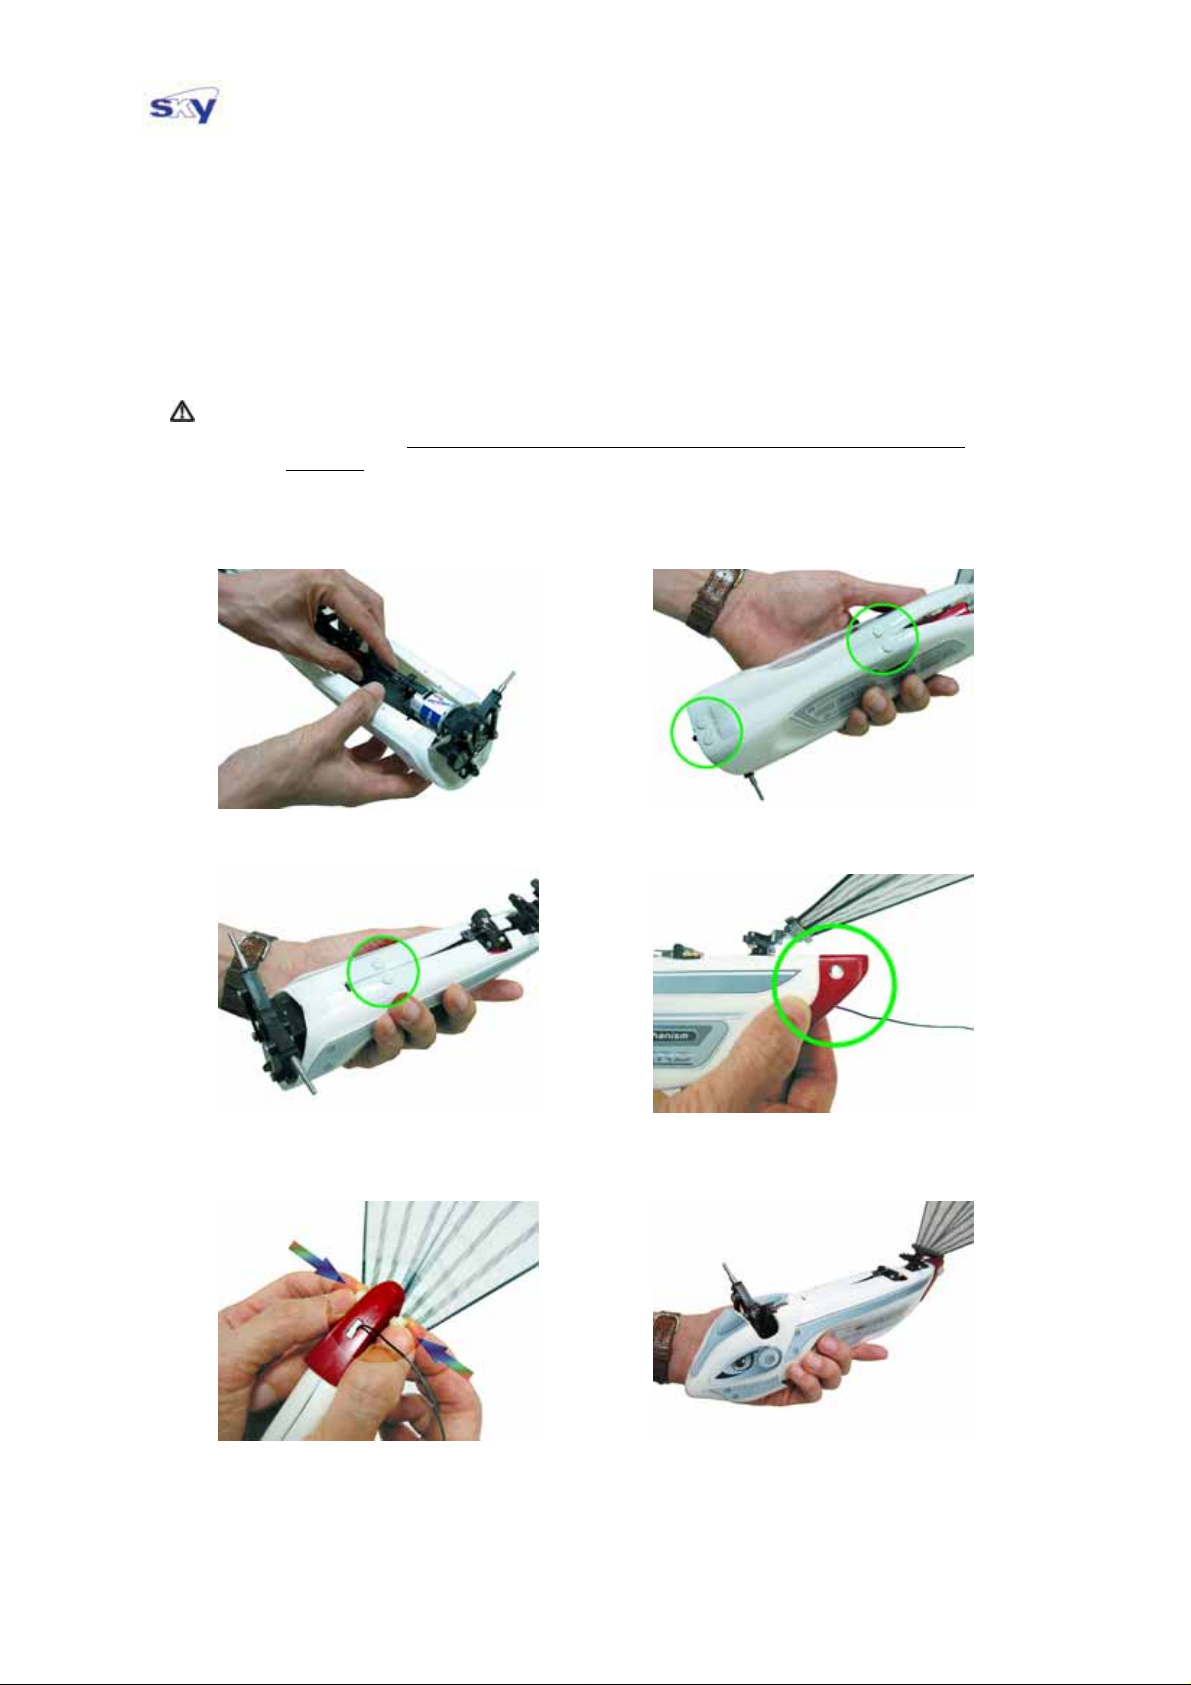
Body shell installation procedure:
(You can remove the body shell in the reverse order)
Caution : The body shell plays the role of absorbing and minimizing shock from crash or
hard landing.
installed. If you fly the bird without body shell, the body frame and other pa rts, such
as servo or gearbox, may be damaged by crash or hard landing. Also, when the
body shell is installed in place properly, the body shell will minimize the possibility
of serious injury to people by the crash.
We strongly recommend that you fly Cybird with the body shell
Insert the body into the body shell
①
③
Fix the body shell with plastic pins
Fix the body shell with plastic pins
②
④
Insert the tail cap
(Pay attention to the antenna wire)
⑤
Fix the tail cap with plastic bolt & nut
11
⑥
Head cover is fixed
Page 12
21B-2L, 429 - 1 Nonhyun-Dong, Namdong-Gu, Incheon, Korea
T. +82-32-821-4731~5 , F. +82-32-821-4736 , E-MAIL. [email protected]
ASSEMBLY
MAIN WING
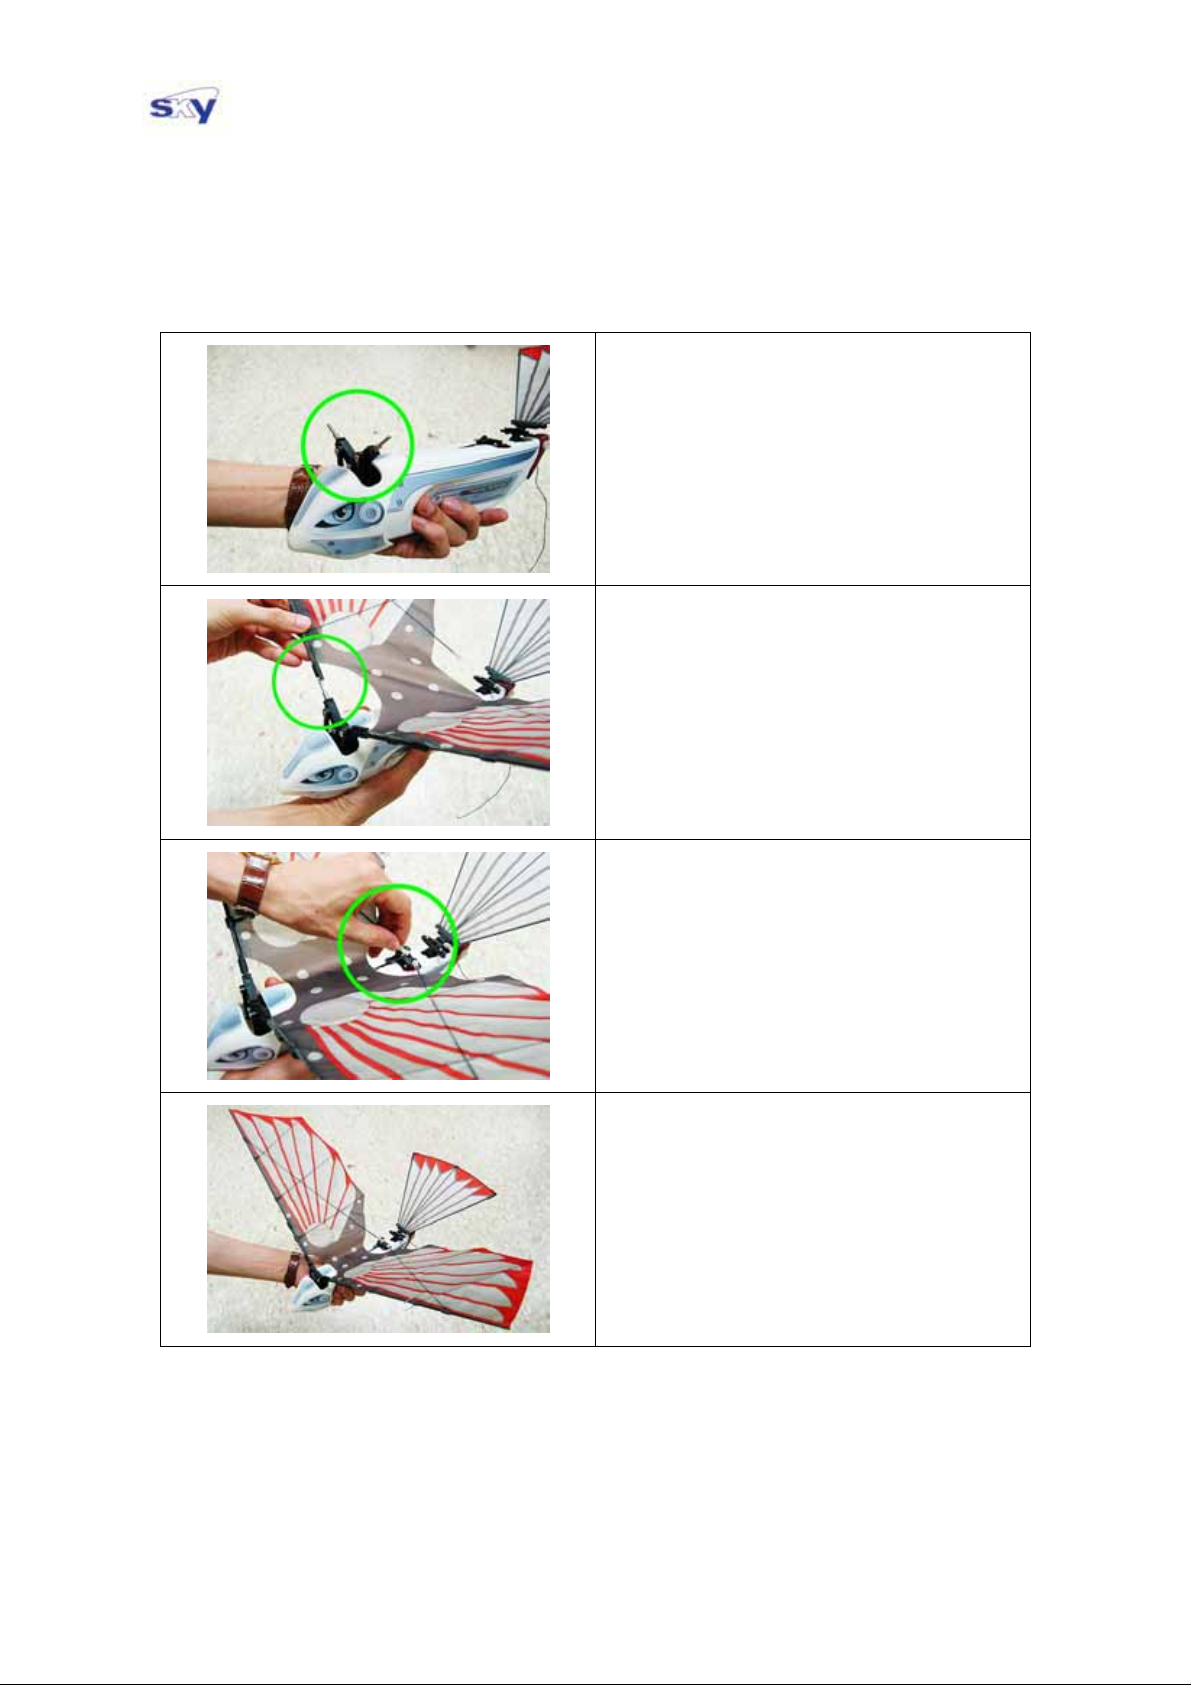
For easy wing installation, move the
metallic shoulder stems to the top
position looks like “V”.
Insert the metallic shoulder stems into
the carbon tubes (leading edge) of the
main wing one by one.
(※ Make sure that carbon rods are on
lower surface of main wing.)
Fix the main wing by inserting and
pressing ball joints to the ball socket on
the rear part of the main wing.
Main wing is successfully installed.
12
Page 13
21B-2L, 429 - 1 Nonhyun-Dong, Namdong-Gu, Incheon, Korea
T. +82-32-821-4731~5 , F. +82-32-821-4736 , E-MAIL. [email protected]
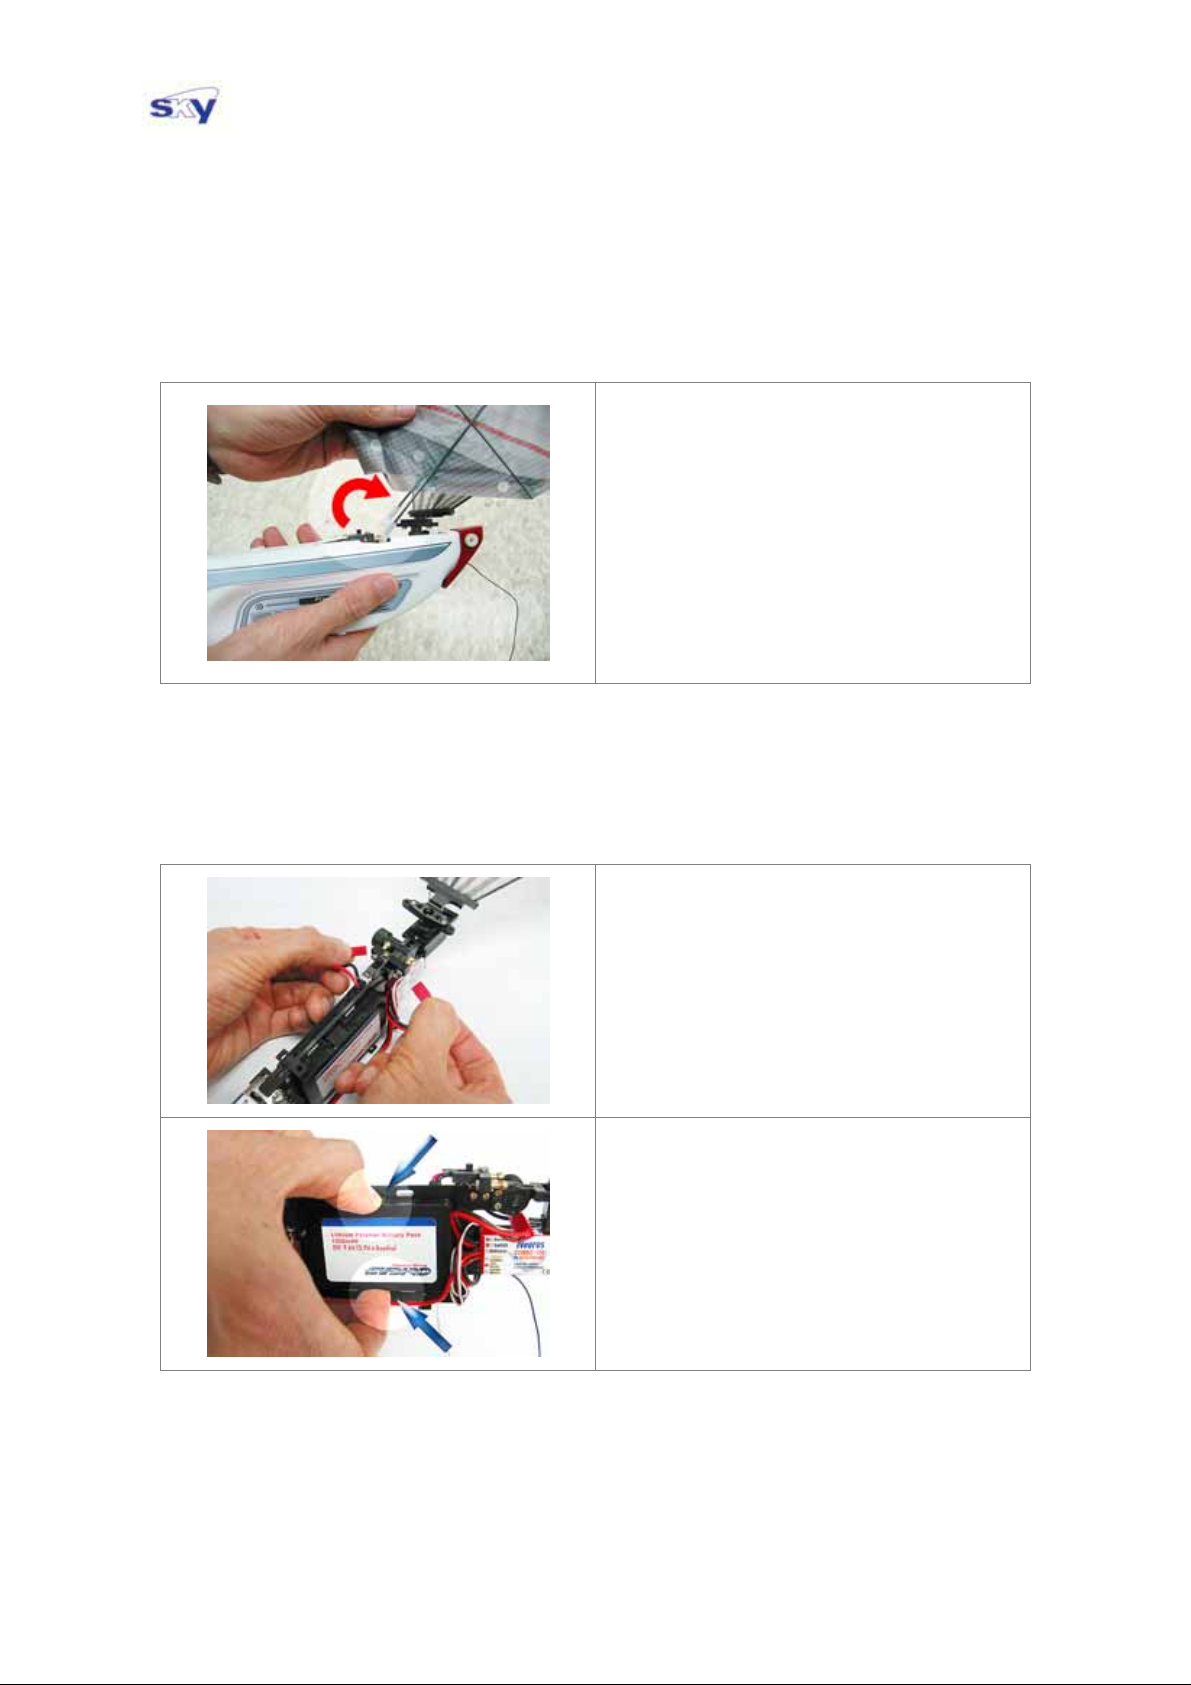
DISASSEMBLY (If required)
MAIN WING
1) For easy disassembling, move the main
wing to the top position looks like “V”.
2) Pull the carbon tubes (leading edges) of
the main wing out of the shoulder stems
one by one.
3) Push the main wing as directed in the
left picture and you can easily remove
the main wing.
BATTERY PACK
1) Disconnect the battery pack from the
speed controller.
2) Disassemble the battery pack out of the
body by pressing the stop-holders on
top and bottom of the battery pack.
13
Page 14
21B-2L, 429 - 1 Nonhyun-Dong, Namdong-Gu, Incheon, Korea
T. +82-32-821-4731~5 , F. +82-32-821-4736 , E-MAIL. [email protected]
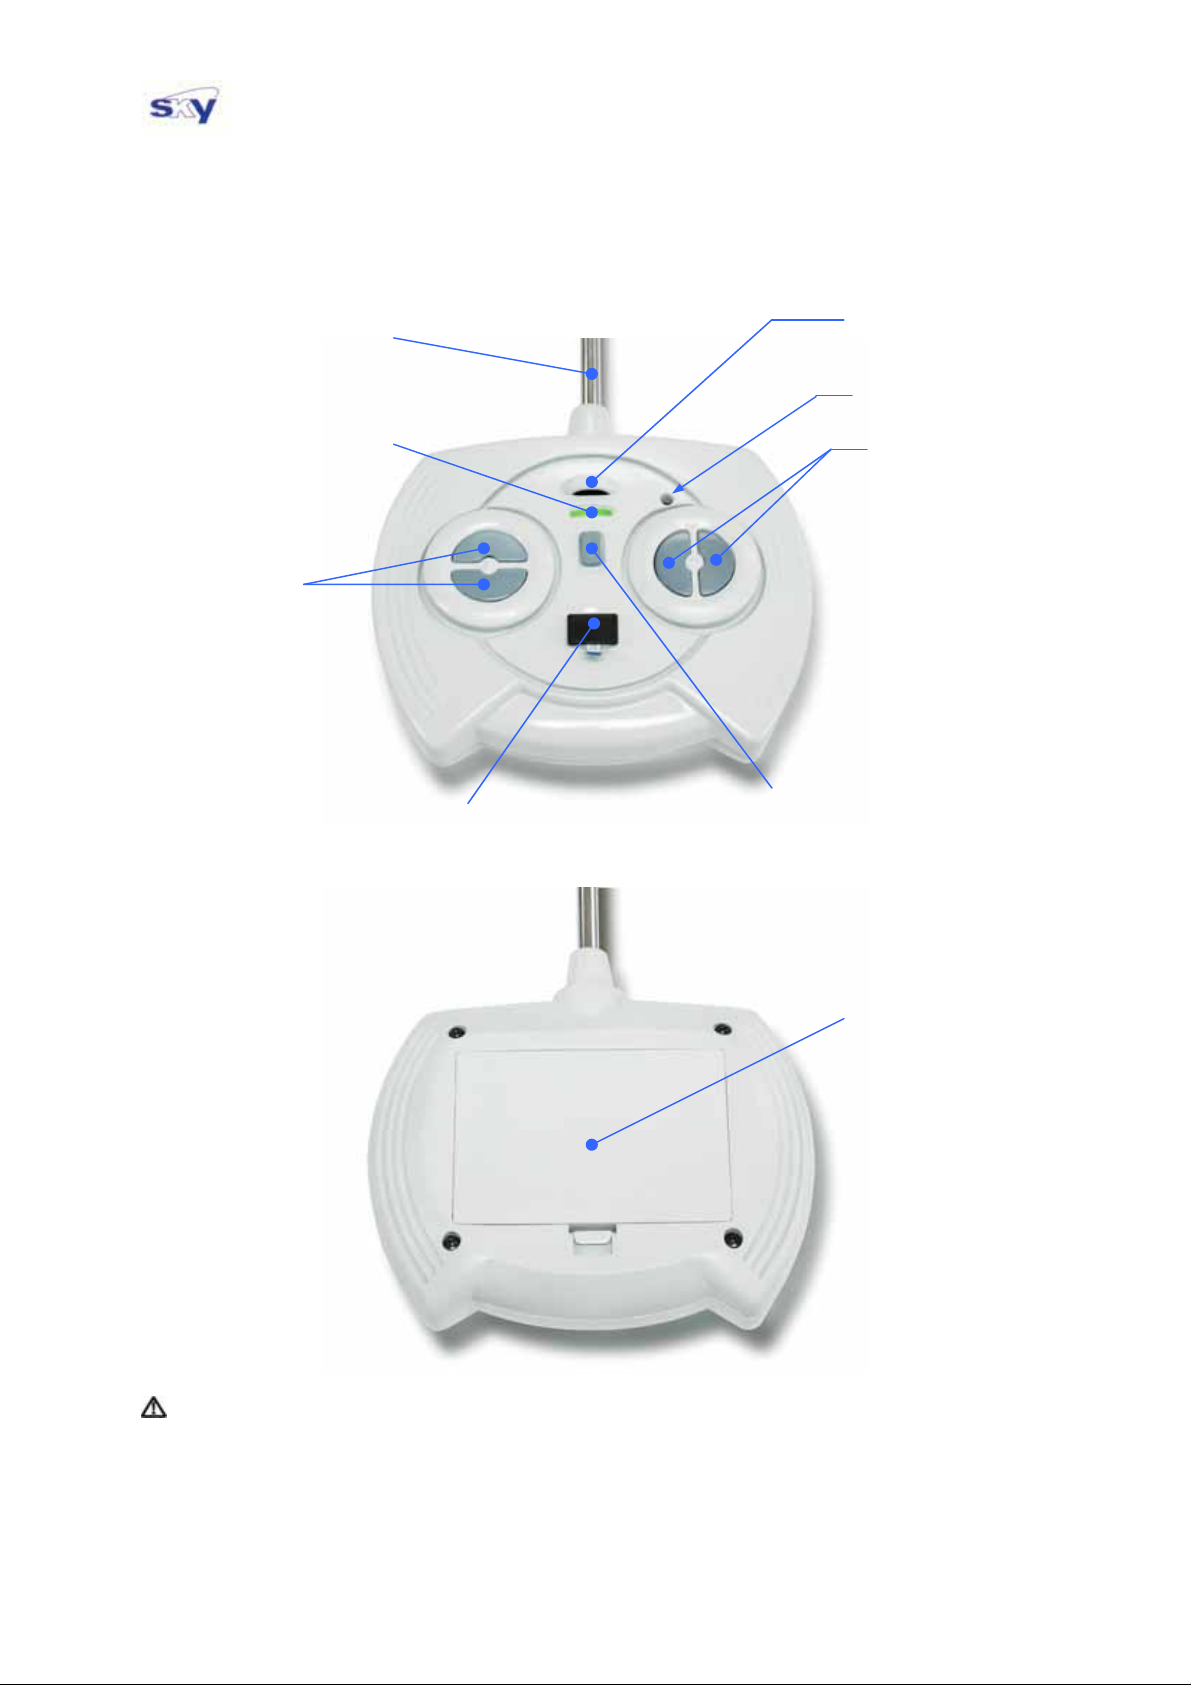
TRANSMITTER
Power Lamp
Speed control
button
Antenna
Crystal
(frequency generator)
Neck-strap holder
Neutral position
adjuster
Direction control
button
Power Switch
Battery cover
CAUTION
- Do not pull out the antenna with excessive force, or antenna may be damaged.
- If the antenna is broken, the effective range of the radio waves will become shorter.
- If the color of the power lamp turns red, replace the batteries.
14
Page 15
21B-2L, 429 - 1 Nonhyun-Dong, Namdong-Gu, Incheon, Korea
T. +82-32-821-4731~5 , F. +82-32-821-4736 , E-MAIL. [email protected]
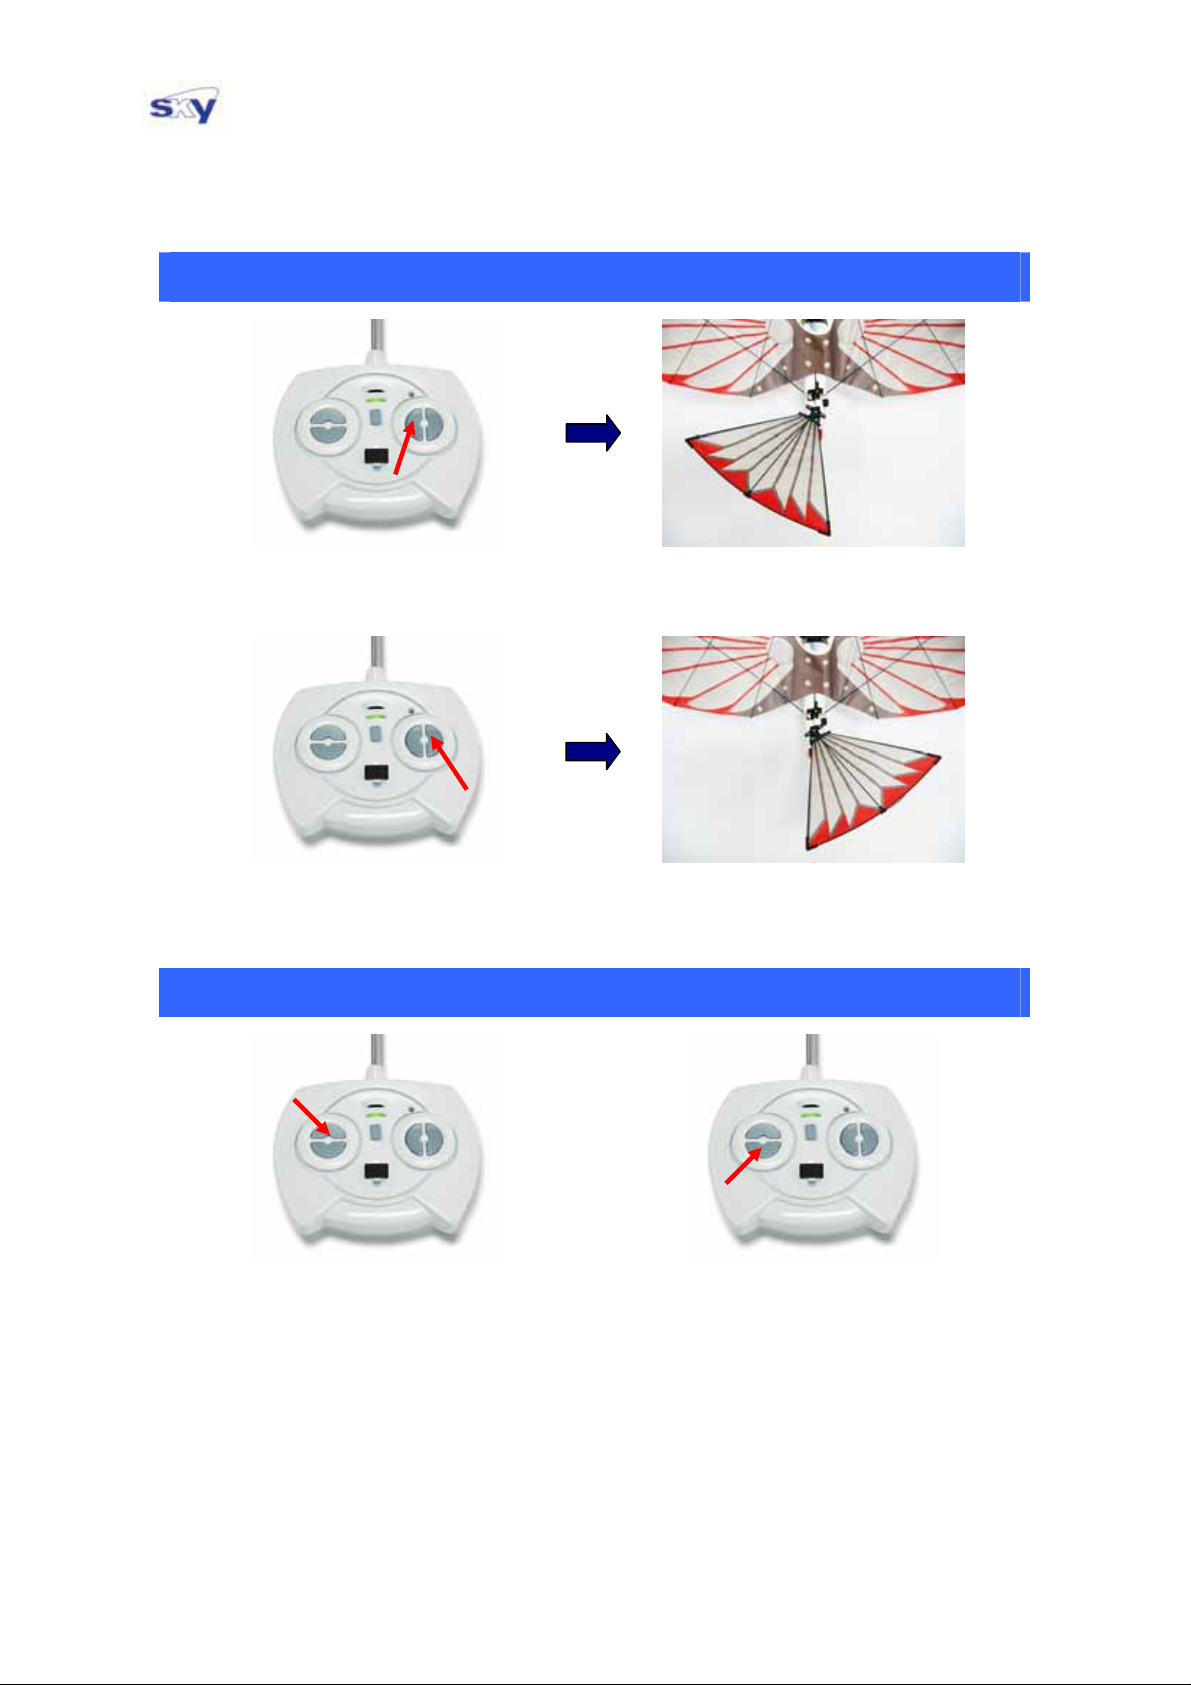
How to Match Controls on Cybird and Transmitter
DIRECTION CONTROL
Push the left button
Push the right button
FLAPPING SPEED CONTROL
Tail wing moves to the left
Tail wing moves to the right
Push the UP button : Speed increases
▶ You ca n adjust the flapping speed gradually if you push the speed control button for a
very short time. (less than a second)
▶ If you push the UP button for one second, Cybird will flap its wings at maximum speed.
▶ If you push the DOWN button for one second, Cybird will stop flapping instantly.
Push the DOWN button : Speed decreases
15
Page 16
21B-2L, 429 - 1 Nonhyun-Dong, Namdong-Gu, Incheon, Korea
T. +82-32-821-4731~5 , F. +82-32-821-4736 , E-MAIL. [email protected]
FLYING INSTRUCTION
Warning!
The moving part of the gearbox on this bird can be dangerous! Use extreme care when
testing your bird. Do not allow your hands, fingers or any article of clothing to get near
the gearbox.
Power on, Adjustments, and Check Points
1. Turn on the transmitter.
CAUTION: Before you turn on the transmitter, please make sure that Cybird is off.
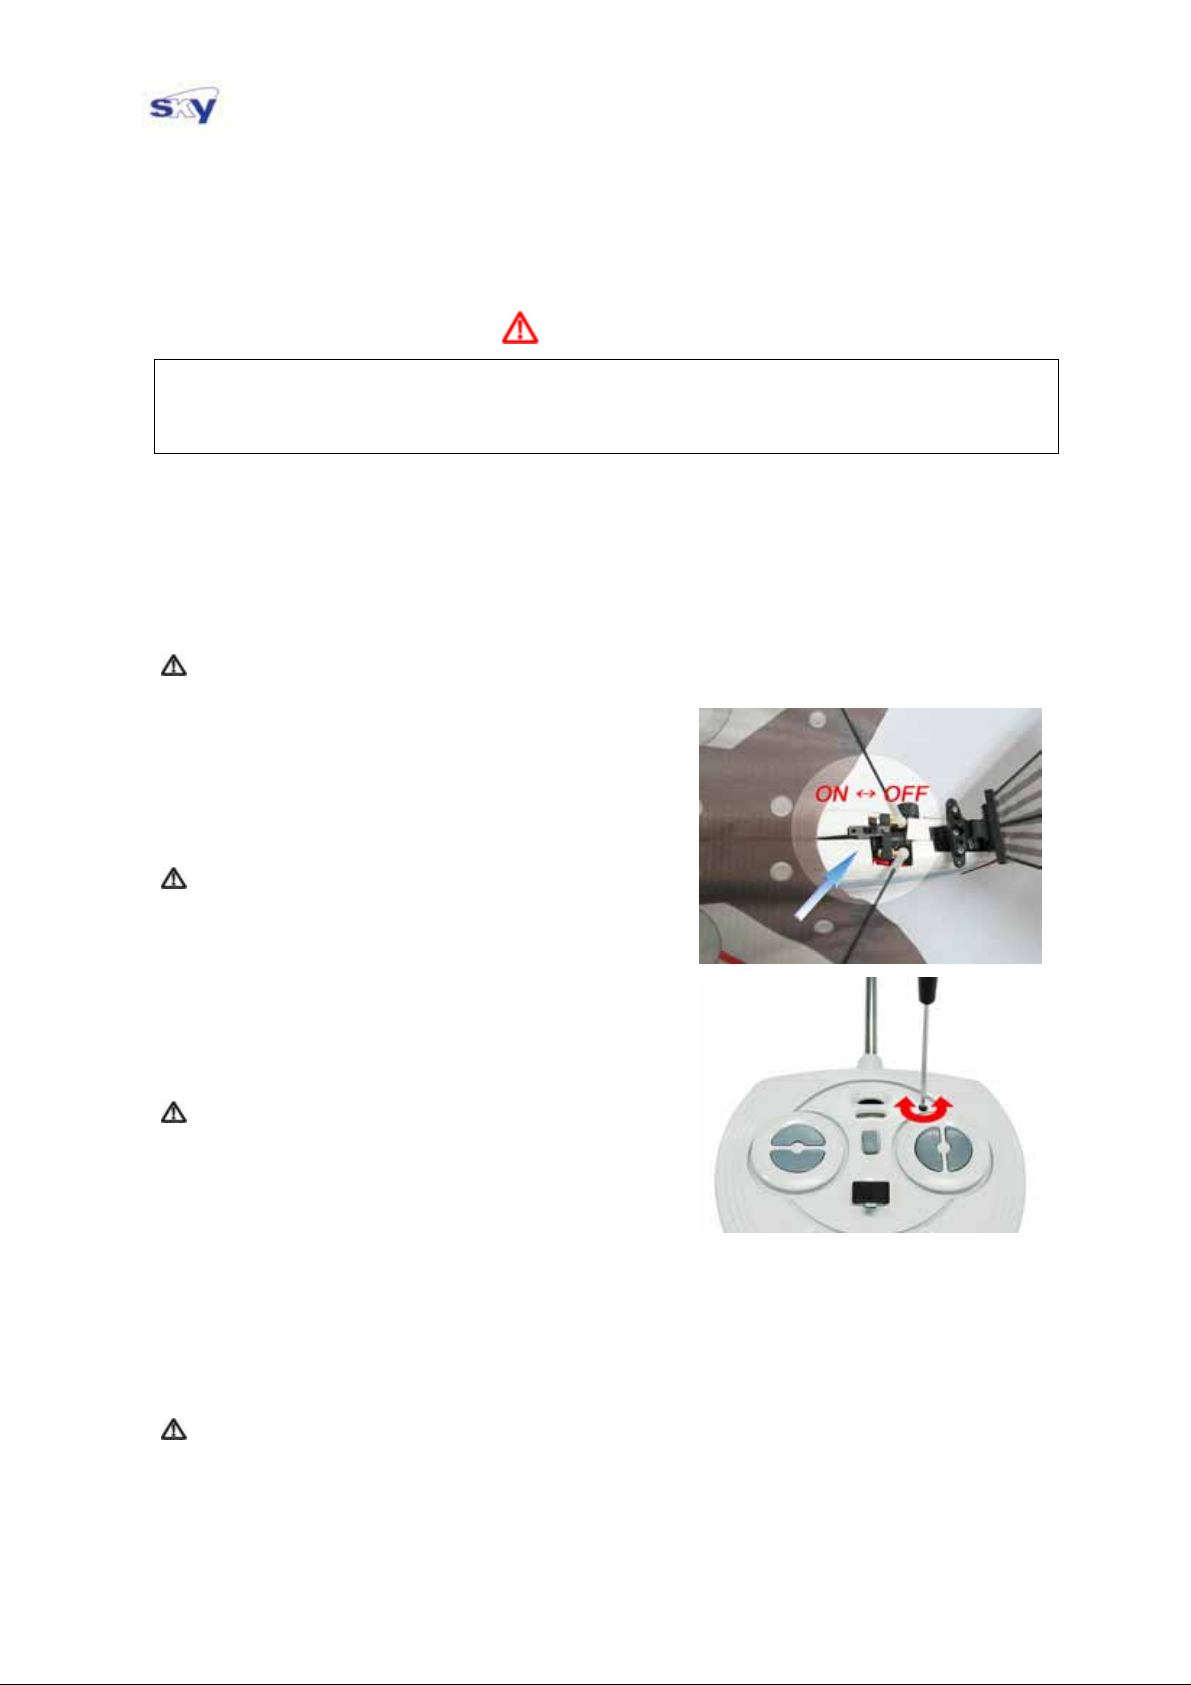
2. Turn on the switch on the Cybird body and you will
hear a BEEP sound. Press the UP button and
Cybird will BEEP two times. Finally, press the
DOWN button and the tail wing will move to neutral
position. Now setting procedure is completed.
CAUTION: Before setting procedure is completed,
Cybird will not respond to transmitter button
controls.
3. In case, the tail wing is not aligned correctly after
setting procedure, adjust the tail wing position by
rotating neutral position adjuster with screw driver.
(Refer to the right picture)
CAUTION: If the tail wing is not aligned correctly
Cybird cannot fly normally.
4. Firmly grasp the Cybird body and slowly move the
throttle up to full power position to make certain the
wings are flapping properly. Move the throttle to the maximum and minimum power
position few times to check how it works.
5. Push the LEFT and RIGHT button and check if the tail wing moves to the left and right
correctly. When you push the RIGHT button, the tail wing should move to the right when
looked at from behind the bird.
CAUTION: Always make sure before launching that the tail wing moves as you wa nt.
16
Page 17
21B-2L, 429 - 1 Nonhyun-Dong, Namdong-Gu, Incheon, Korea
T. +82-32-821-4731~5 , F. +82-32-821-4736 , E-MAIL. [email protected]
Warning!
This model is designed to fly well in calm conditions (wind speed of 5~7 MPH or less). If
you fly your bird in windy day, Cybird may crash or go away beyond your sight!!!
LAUNCHING
1. Stand in the direction such that you face the wind, with Cybird on your left (or right) hand
and the transmitter on the other hand. Always launch the bird into the wind.
CAUTION: If it is the first time you fly Cybird or you are not good at flying Cybird, we strongly
recommend that the launch should be done by an assistant and you just concentrate
on flying the bird!
2. Push the UP button and let Cybird flap at maximum speed. Check if everything is O.K.
3. Now launch your Cybird to the sky with its nose slightly upward and let the bird climb out
up to sufficient altitude by flying the bird along a large circle.
4. Once the bird reaches to the sufficient altitude, you may decrease the wing flapping speed.
CAUTION: If Cybird does not fly straight, please refer to page 20. Just check the turn tendency
and let Cybird land before you complete the tuning procedure.
CAUTION: If the motor speed is slowly decreased in flight beyond a certain point, the wing
flapping becomes so slow that Cybird will become unstable and can even crash. If
you sense the unstable motion (nose up & down) you can correct this in flight by
increasing the wing flapping speed quickly.
TURNING
It is very important to maintain stable flight attitude when you fly Cybird. Especially, Cybird
may crash when it is inclined to either side too much or its nose is inclined toward ground
during turning. If you are not good at flying Cybird, you have to use extreme care when you
make the bird change direction, since the flight characteristics of Cybird is different from
those of airplanes or helicopters.
1. Push the RIGHT [LEFT] button and Cybird will turn to the RIGHT [LEFT].
2. If you push the direction control button and keep it pressed, Cybird may be inclined to
either side too much and may crash. Push the RIGHT or LEFT button for a short time.
CAUTION: If Cybird tilts during turning to either side too much, its flight may become unstable
and it may crash. In case, Cybird tilts to RIGHT [LEFT] too much, push LEFT
[RIGHT] button so that Cybird recover stable flight attitude.
CAUTION: You should always keep in mind that Cybird reacts in flight less sensitively than other
R/C aircraft. There is always a bit of delay between commands and the reaction of
the bird.
CAUTION: A sudden turn may cause an unstable flight. If you are a novice, let Cybird turn gently
along a large circle and try to get familiar with the flight characteristics of the bird.
17
Page 18
21B-2L, 429 - 1 Nonhyun-Dong, Namdong-Gu, Incheon, Korea
T. +82-32-821-4731~5 , F. +82-32-821-4736 , E-MAIL. [email protected]
LANDING
1. For safe landing, always attempt landing against wind.
2. Fly Cybird gently down to the ground by slowly decreasing wing flapping speed.
3. Stop flapping just before Cybird touches the ground.
4. After flight, turn off the switch on the body first, then the transmitter.
CAUTION: Hard landing may damage the servos. Try to let the bird touch down as gently as
possible. If you are not good at flying the bird, we recommend that you land the bird
on the GRASS. You or your assistant may catch the bird in order to avoid the
possible damage.
CAUTION: After flight, the motor may be hot. Be careful not to touch the motor. If the motor is
hot, it is better to relax the bird for a few minutes before next flight for longer life of
the motor and battery.
Warning!
In any case, you have to stop wing flapping before Cybird touches the ground in order to
prevent from wing damage.
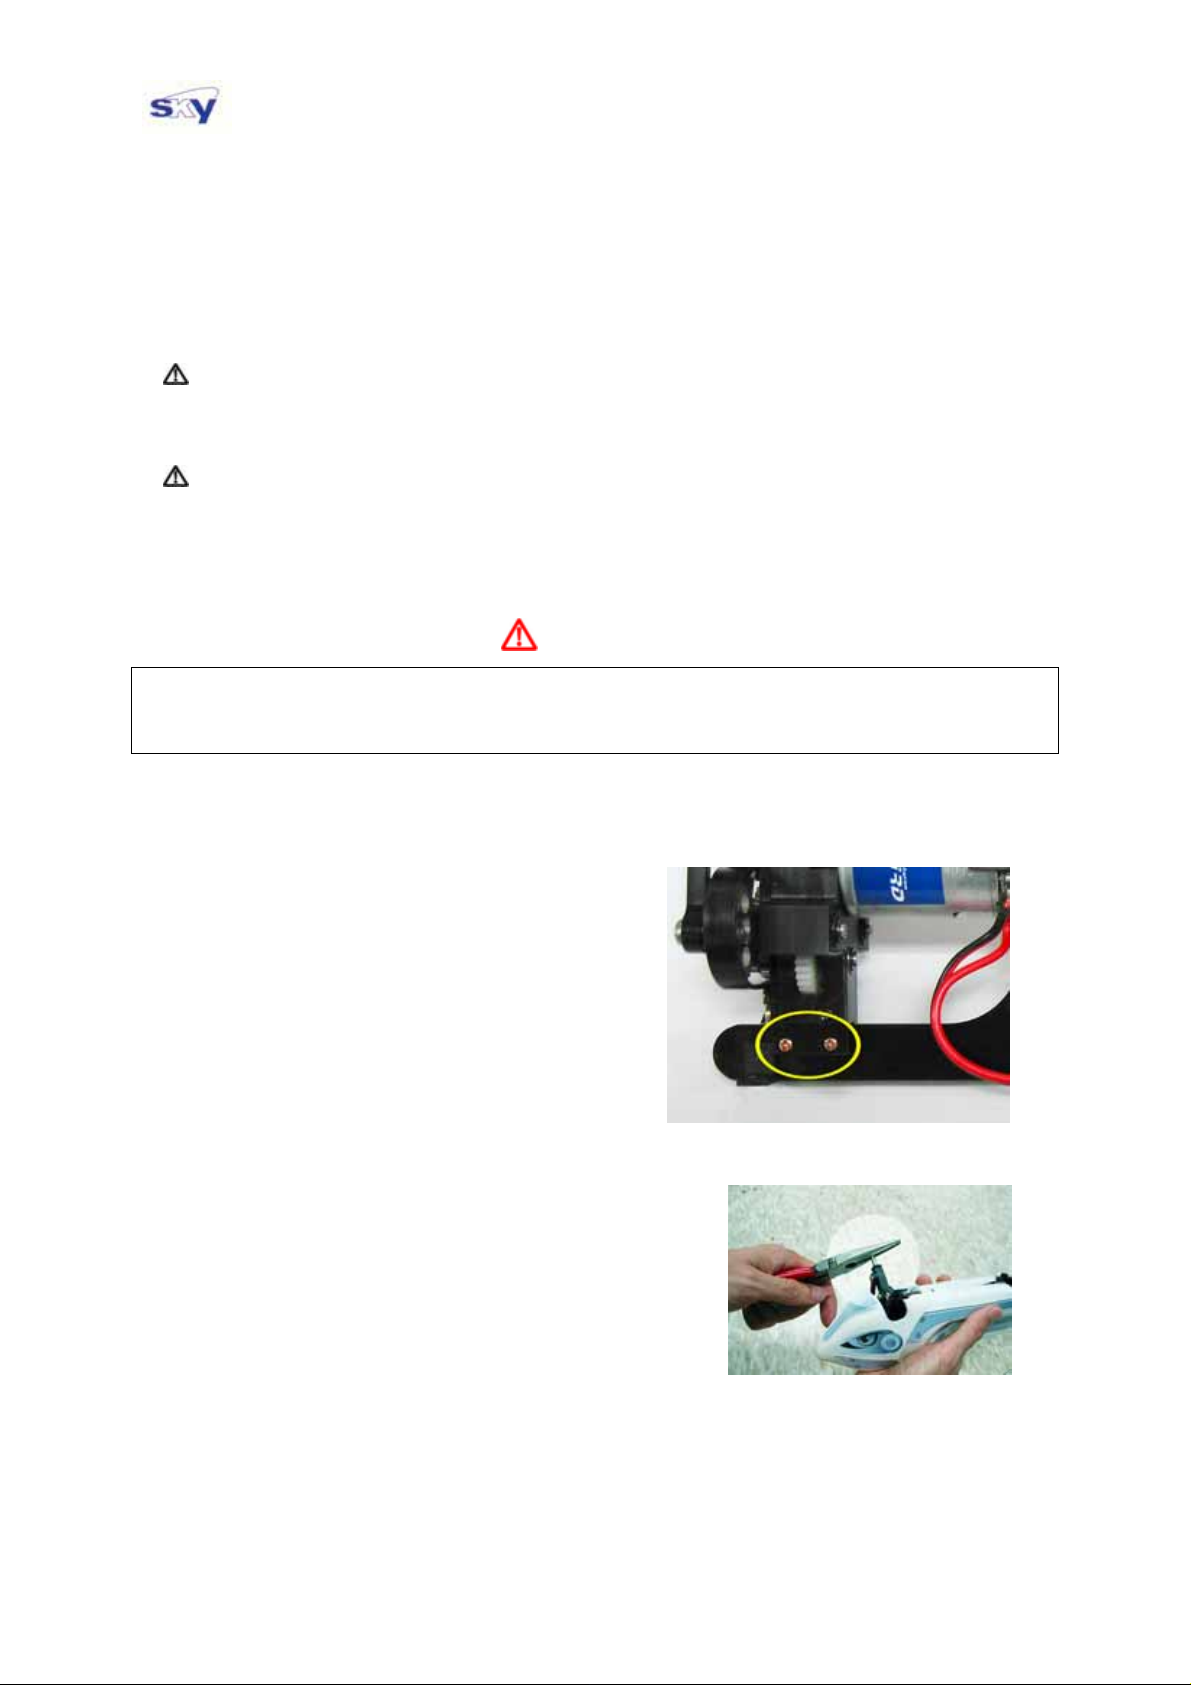
[ TIP ]
After hard crash, the motor supporting frame
may be broken or the motor may be moved out
of its supporting frame.
In this case, unfasten the bolts (marked in the
picture), put the motor inside the supporting
frame, and fasten the bolts again.
[ TIP ]
The metallic shoulder stems may be bent due to crash
or other impact. If you fly Cybird with a bent shoulder,
it will show a excessive turn tendency to either
direction. Always check before flight whether both
shoulder stems are straight.
18
Page 19
21B-2L, 429 - 1 Nonhyun-Dong, Namdong-Gu, Incheon, Korea
T. +82-32-821-4731~5 , F. +82-32-821-4736 , E-MAIL. [email protected]
Useful Tips
─────────────────────────────────────────
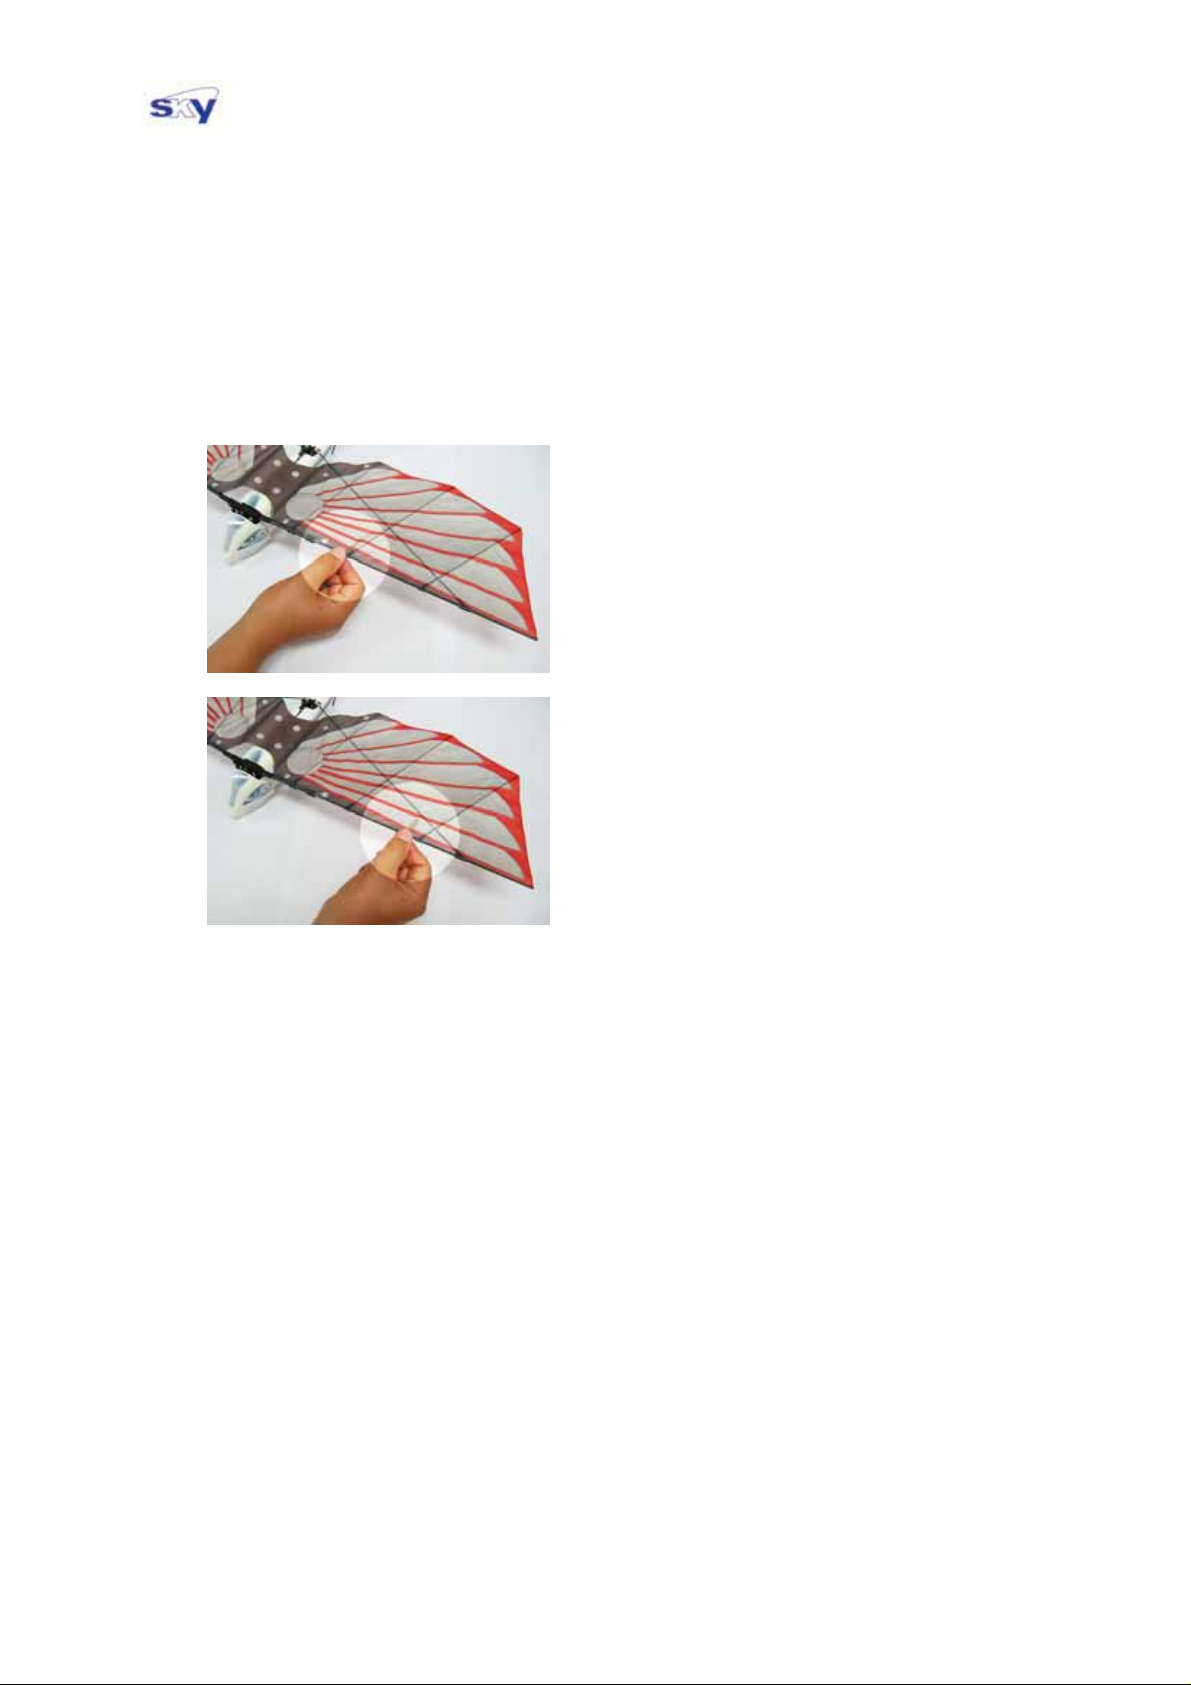
■ Cybird may have a noticeable left or right turn tendency though its tail wing is in the
neutral position. In this case, you can lessen the turn tendency by following instructions.
You can obtain the best flight performance when you minimize the turn tendency.
① In case, Cybird has a RIGHT [LEFT]
turn tendency, attach a clip on the
middle of the leading edge of LEFT
[RIGHT] wing and fly it again.
② In case, Cybird still shows RIGHT
[LEFT] turn tendency move the clip
outward. On the contrary, if Cybird
shows LEFT [RIGHT] turn tendency
move the clip inward and fly it again.
─────────────────────────────────────────
A battery protection circuit is installed in the battery
Battery Protection
suddenly due to the battery protection circuit. Once the battery protection circuit
works, Cybird will not operate at all until you recharge the battery pack. The battery
pack will work normally after recharging.
─────────────────────────────────────────
Lubrication
pack in order to prevent the over discharging. In case
you fly Cybird for a very long time, Cybird may stop
For longer life of Cybird lubricate the gearbox with
grease. Please check before flight if the gearbox is
stained with dust or any other impurities in it.
Clean the gearbox and add some lubricating grease to
the gearbox, if necessary.
─────────────────────────────────────────
19
Page 20
21B-2L, 429 - 1 Nonhyun-Dong, Namdong-Gu, Incheon, Korea
T. +82-32-821-4731~5 , F. +82-32-821-4736 , E-MAIL. [email protected]
Trouble Shooting
The tail wing does not move at all when you turn on the switch of the body.
- Check if the battery pack is connected correctly
- Check if the servo cable is connected to receiver correctly
- Battery protection circuit may be out of order due to short circuit, etc.
☞ Call for dealer
- If the problem is not resolved after you check above things, it is probable that the
electronic speed controller is out of order
☞ Call for dealer
When you turn on the switch of the body, the tail wing quickly moves to certain
position but No BEEP sound and you cannot fulfill the setting procedure.
- Check if the transmitter is turned on
- Check if the batteries in the transmitter have enough power
- Check if the antenna is extended to its full length
- Check if the crystals are the same frequency band on both receiver and transmitter
- Check if both crystals are compatible to the receiver and transmitter
- Check if the motor and Receiver/ESC are connected correctly
- Check if the electric cable is securely welded to the motor back side
- If the problem is not resolved after you check above things, it is probable that the
crystal in the receiver is damaged.
The wing flapping frequency is lower than normal.
- Check if the battery is fully charged (Fully charged : ~8.4V)
- Check if the gearbox is damaged or deformed due to crash or other impacts
- Check if you can rotate the gears smoothly with your hand
- Check if the gearbox is stained with dust or any other foreign objects
20
Page 21
21B-2L, 429 - 1 Nonhyun-Dong, Namdong-Gu, Incheon, Korea
T. +82-32-821-4731~5 , F. +82-32-821-4736 , E-MAIL. [email protected]
Wing flapping stops irregularly during flight
- Check the connections of the electronic wires on the back of the motor
- Check if the antenna wire is connected to the receiver correctly
Although you do not move the aileron stick at all, Cybird shows turn tendency to
either direction
- Adjust the turn tendency using paper clip (Refer to page 20)
- Check if the paper clip is moved from its original position
- Check if the metallic shoulder stem is bent (Refer to page 19)
- Check if the battery pack is fixed to the fuselage correctly (Refer to page 8)
Cybird stops suddenly and does not work at all although you turn on & off
- Check if the battery protection circuit is working (Refer to page 20)
☞ Recharge the battery pack
- Check the electric connections
21
Page 22
21B-2L, 429 - 1 Nonhyun-Dong, Namdong-Gu, Incheon, Korea
T. +82-32-821-4731~5 , F. +82-32-821-4736 , E-MAIL. [email protected]
 Loading...