

Page 1
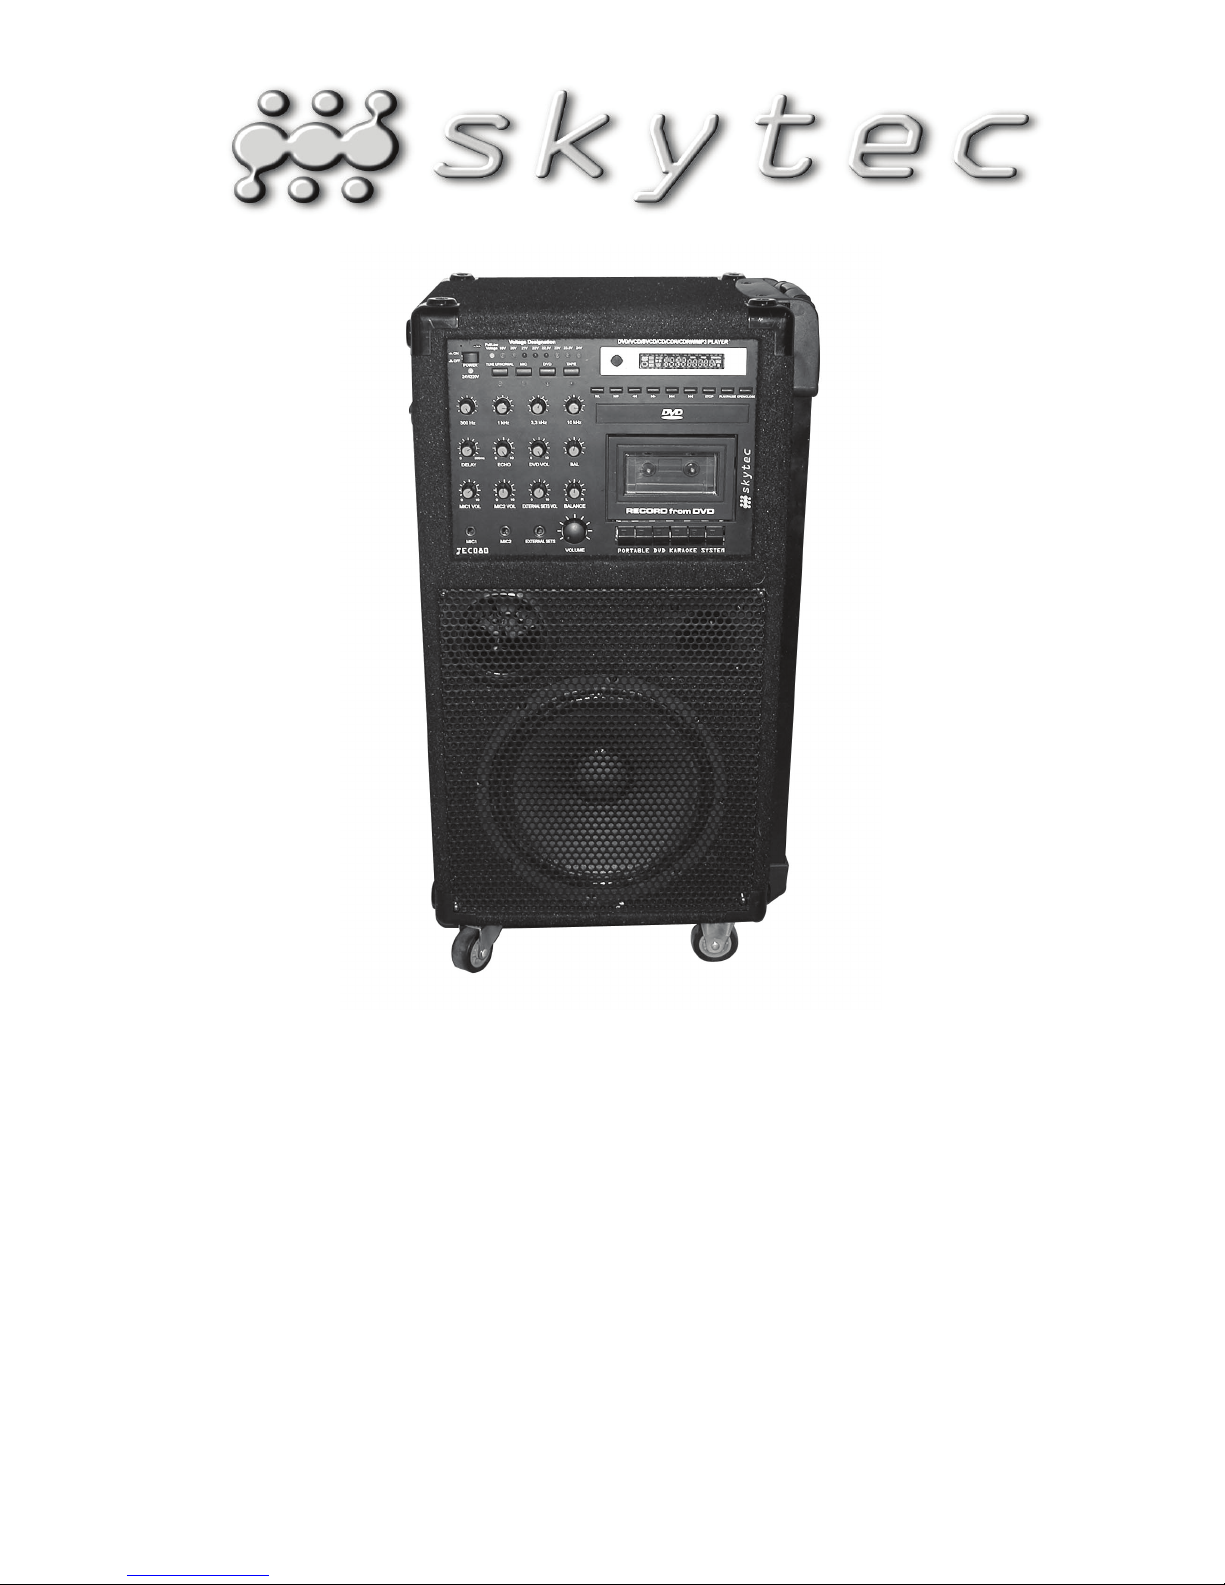
TEC080 PORTABLE DVD KARAOKE SYSTEM
170.109
Instruction Manual
Gebruiksaanwijzing
Mode d’Emploi
Gebrauchsanleitung
Brugsanvisning
Page 2
GB
Congratulations on the purchase of this SkyTec Karaoke set.
Please read this manual carefully prior to using the unit.
Warning:
- Read the manual prior to using the unit.
- Keep the manual for future reference.
- Keep the packaging for safer transport in its original packaging
- For indoor use only.
- Prior to the first use, have the unit checked by a qualified person.
- The unit contains voltage carrying parts. DO NOT open the unit.
- When you unplug the unit from the mains always pull the plug, never the lead.
- Never plug or unplug the unit with wet hands.
- If the plug and/or mains lead are damaged, they need to be repaired by a qualified
technician.
- If the unit is damaged to an extent that you can see internal parts, do not plug the unit
into a mains outlet.
- Repairs have to be carried out by a qualified technician.
- Only connect this unit to an earthed mains outlet of 230Vac/50Hz and 10-16A.
- Do no place the unit near heat sources.
- Always unplug the unit during a thunderstorm or when it is not in use.
- If the unit has not been used for a longer period of time, condensation can occur
inside the housing. Please let the unit reach room temperature prior to use.
- To avoid accidents in public premises, the legal requirements must be fulfilled and
instructions/warnings must be adhered to.
- Keep out of the reach of children.
- All volume controls must be set to zero prior to switching the unit on.
- Set the volume controls slowly. Fast variation can overload the speakers.
- The amplifier must always be switched on at last and switched off at first
- Do not use cleaning sprays for the slider controls. The residues of these spray cause
dust deposits in the controls. If a problem occurs, please consult a specialist.
- Always handle CDs with clean hands. Do not insert a damaged CD.
- Always close the CD tray to keep the laser eye clean.
- Do not clean the unit with chemical solutions. This might damage the finish. Only use
a dry cloth for cleaning.
Page 3
Prior to use
Check if all parts listed below are included in the package:
Karaoke amplifier
Manual
Remote control
Mains lead
The remote control is powered by 2 ‘AA’ batteries. Observe the correct polarity when placing the
batteries into the compartment.
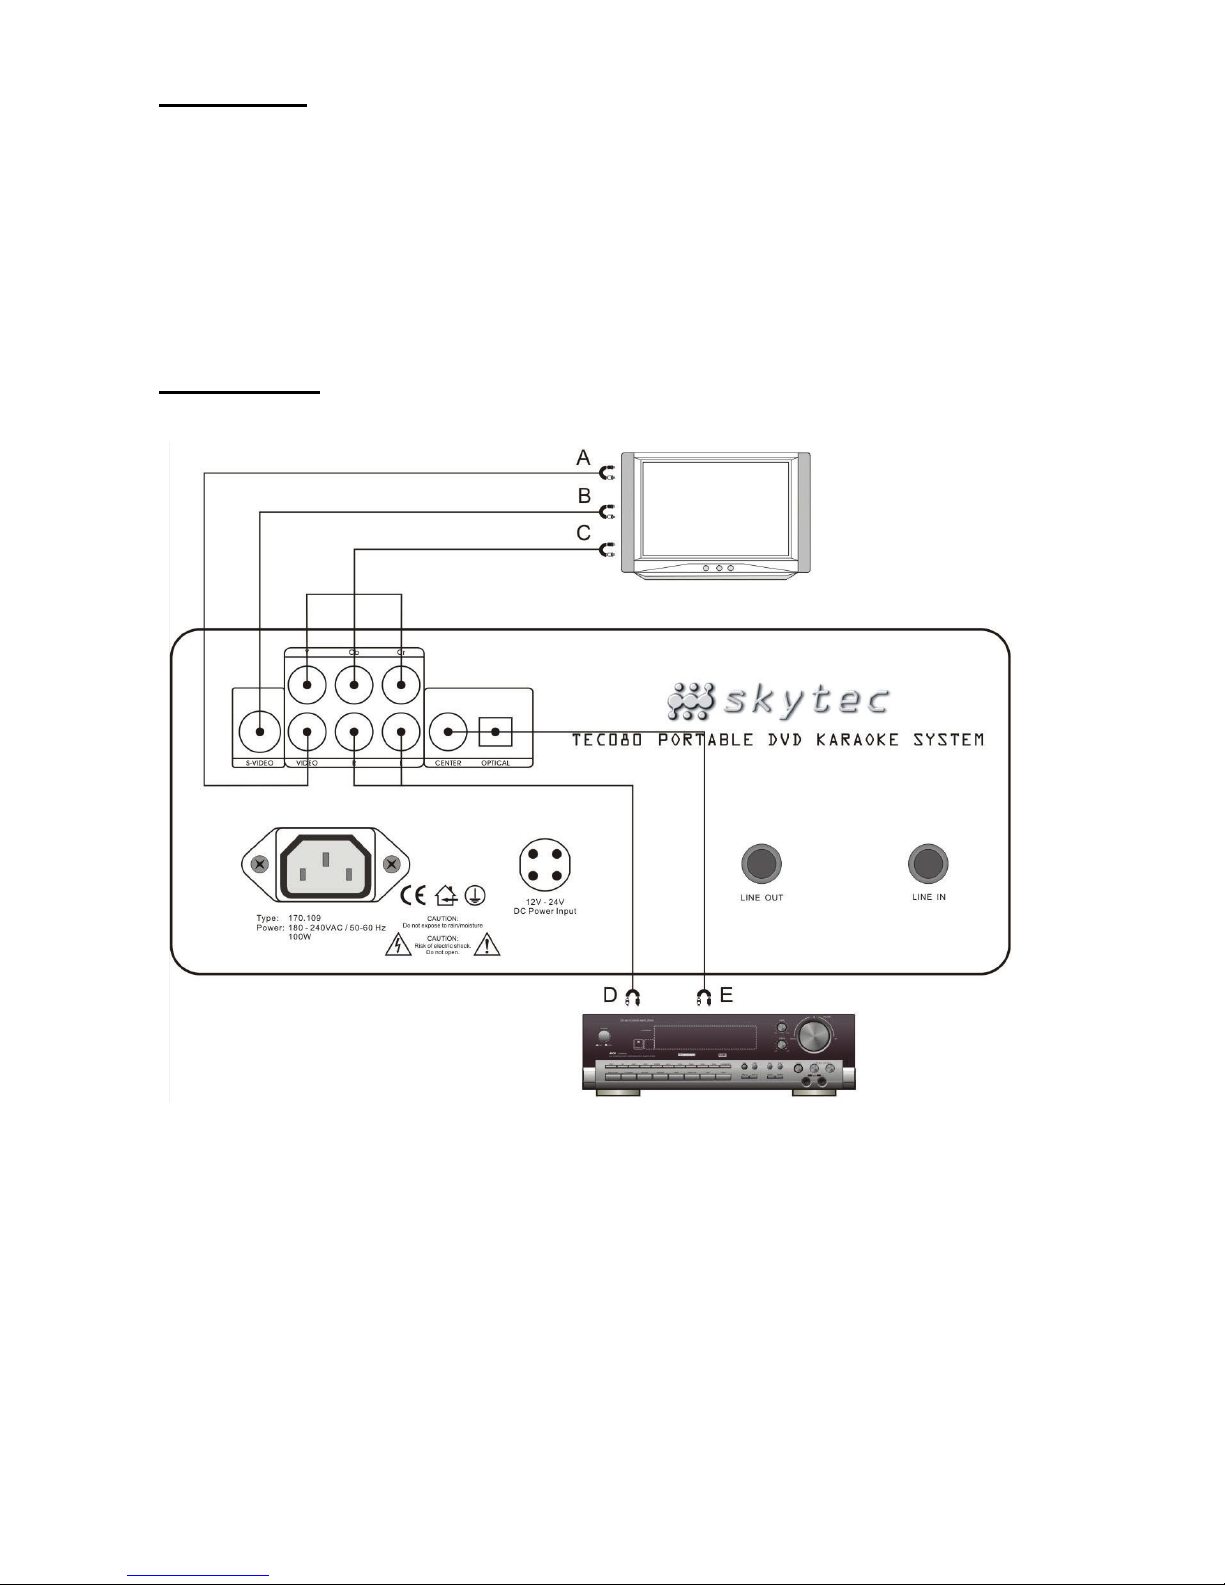
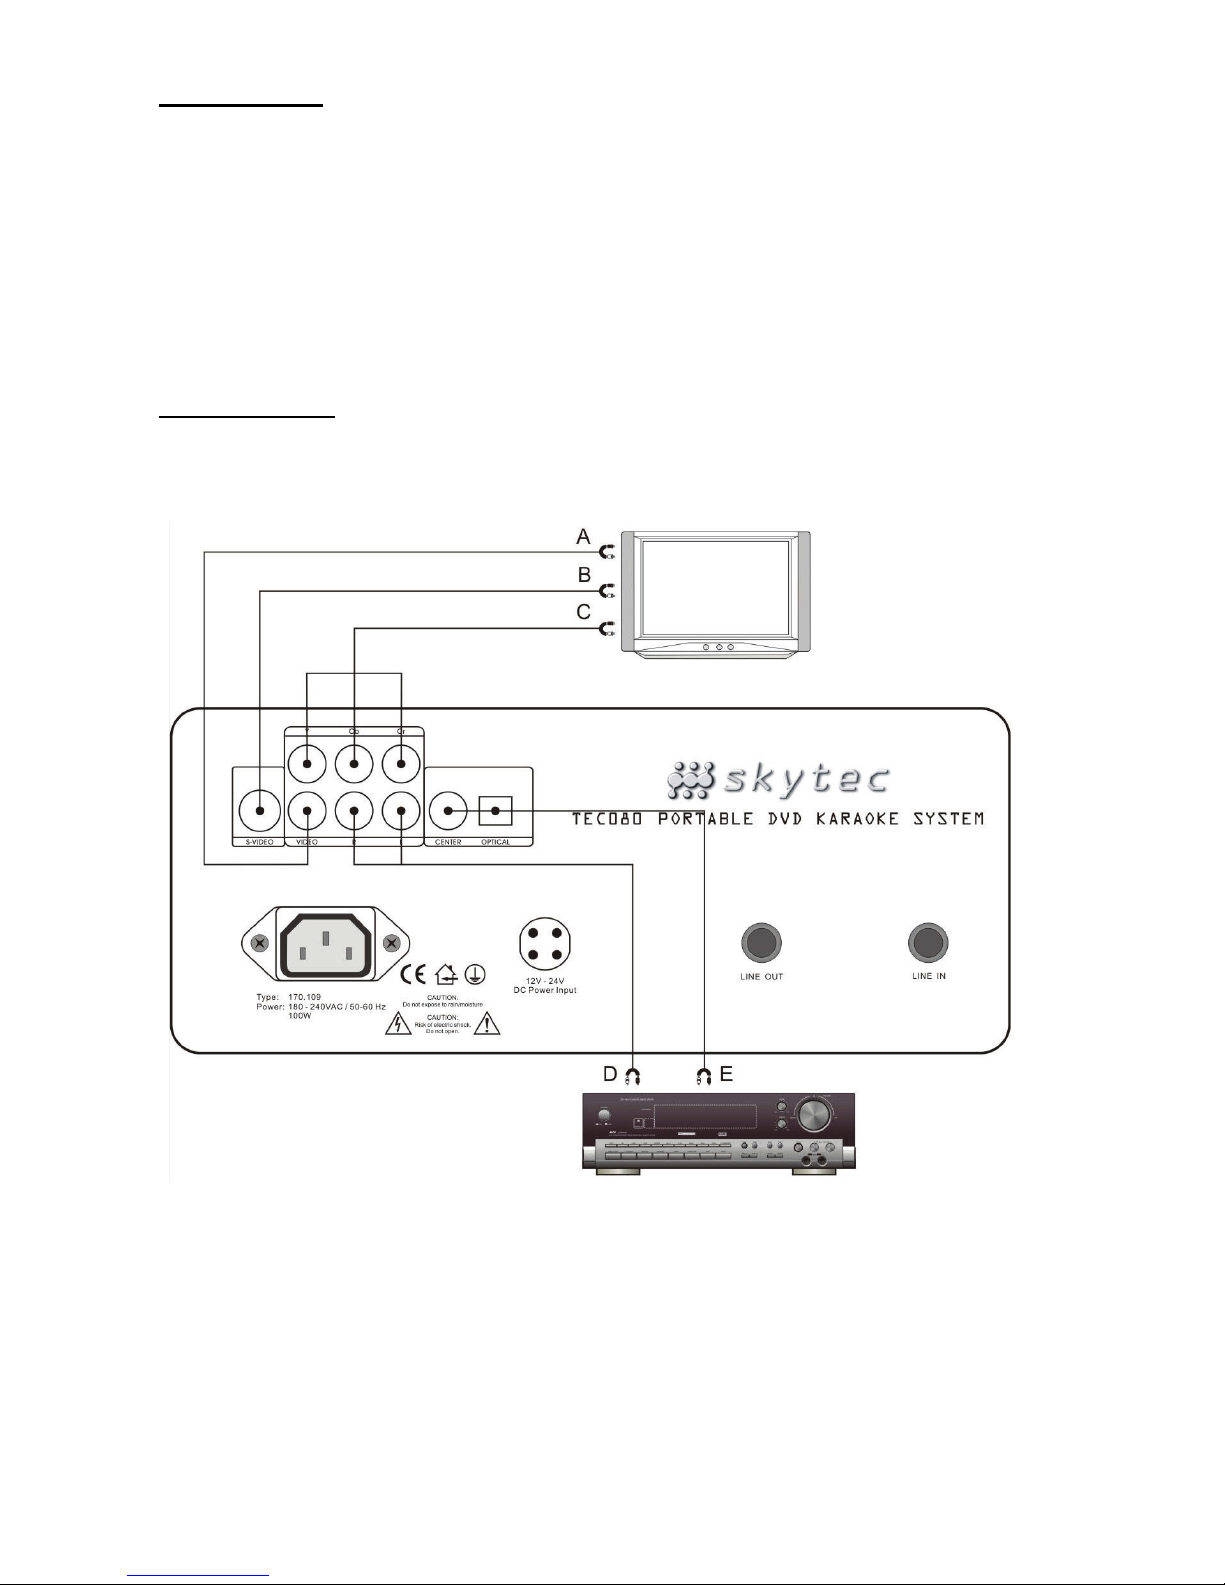
Connections
When making the connections, ensure that all units are switched off.
The figure below shows the various connection possibilities.
A= Audio input monitor/TV D= S-video input monitor/TV
B= YUV video input monitor/TV E= Coax or optical input amplifier
C= Video input monitor/TV
Page 4
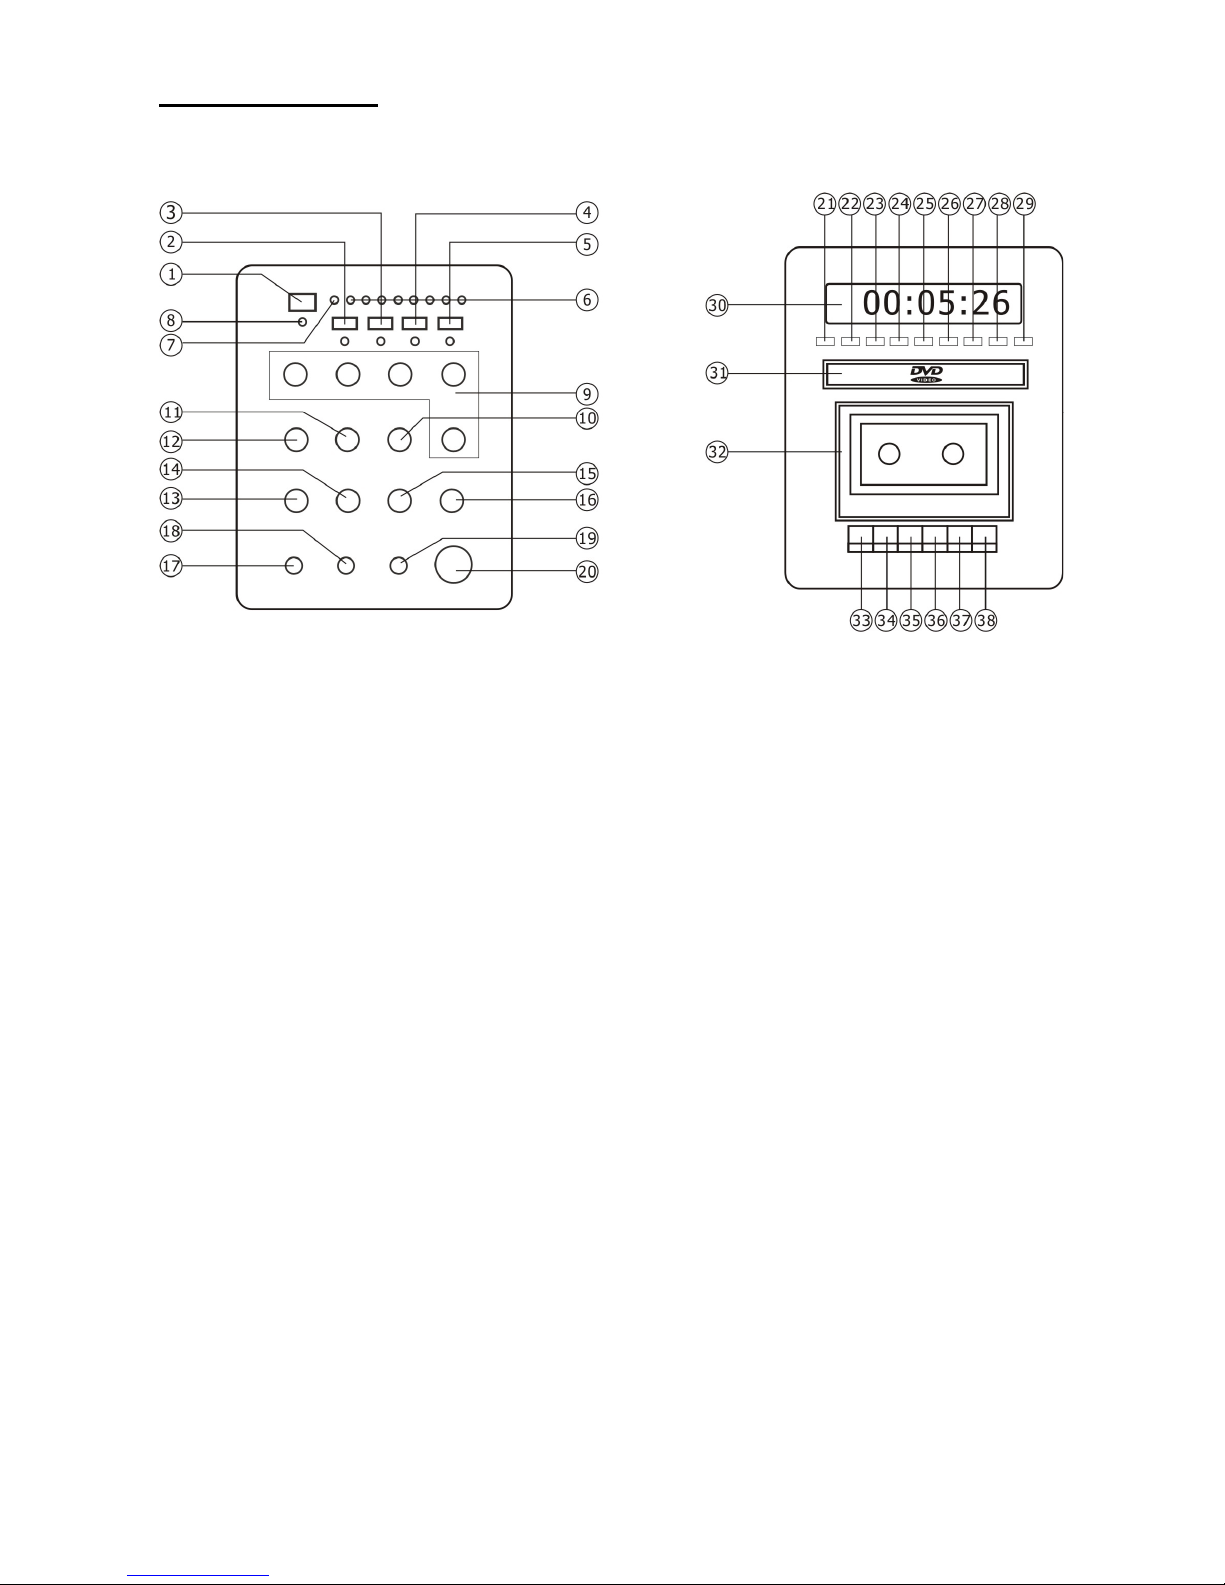
Controls / Layout
Front panel
1. On/Off switch with LED-indicator
#7
2. Equalizer on/off switch with LEDindicator
3. Microphone on/off switch with LEDindicator
4. DVD on/off switch with LEDindicator
5. Cassette on/off switch with LEDindicator
6. Battery voltage (7 LED’s)
7. Charge indicator (LED) two colours
a. Green: Battery fully charged
b. Red: Error, overheating or
discharged battery
8. Voltage indicator (LED) two colours
a. Green: Switched on battery
power
b. Orange: switched on external
power supply
9. 4-band tone control and balance
(L/R)
10. DVD volume
11. ECHO control
12. DELAY control
13. Volume control for MIC1 #17
14. Volume control for MIC2 #18
15. Volume control for MIC3 #19
16. Volume control LINE IN
17. Jack socket for Mic 1
18. Jack socket for Mic 2
19. Jack socket for Mic 3
20. Master volume
DVD section
21. DVD channel selection L/R
22. N(tsc)/P(al) mode
23. Fast reverse
24. Fast forward
25. Previous
26. Next
27. Stop
28. Play / Pause
29. Tray Open / Close
30. DVD Display
31. DVD tray
CASSETTE section
32. Cassette deck
33. Record
34. Play
35. Fast rewind
36. Fast forward
37. Stop / reset
38. Pause
Page 5

Rear panel
1. YUV output
2. S-Video output
3. Video output
4. 2 CH L/R output
5. Coaxial output
6. Optical output
7. Mains connector
8. 12/24 VDC input (optional)
9. Line output
10. Line input
For the video output of the DVD player, you can use the S-VHS socket (2). You can also
connect one or two monitors to the video outputs.
If you wish to send the sound e.g. to a monitor, you can send the stereo audio signal to the
stereo RCA sockets (4)
The connectors on the rear side allow you to send the 5.1 audio signal of the DVD player to an
external amplifier. This signal can be fed through the optical output (6), the coaxial output (5).
The selected connection depends on your personal taste and the facilities of your amplifier.
The 6.35mm jack sockets LINE IN (10) and LINE OUT (9) are for connection to external units.
Operation (front side)
1. After switching the unit on, it carries out a self test. The LED indicators 7 & 8 should
flash 3 times at the same time to indicate this process. The LED row #6 displays the
voltage of the built-in battery.
2. Press the EQ switch (2) to switch the equalizer on or off. The LED lights up when the
equalizer is switched on.
3. If you wish to use one or more microphones, you have to switch this option on via the
button (3). The LED lights up when the microphone is activated.
4. If you wish to use the DVD player, you need to switch this option on via the switch (4).
The LED lights up when the DVD player is activated.
5. If you wish to use the cassette player, you need to switch this option on via the switch
(5). The LED lights up when the cassette player is activated.
Page 6

6. The row of LED indicators (6) displays the voltage supplied by the battery. Every LED
shows a value from 18 to 24V.
7. The LED for the status of charge (7) can light up in 2 colours:
a. Green if the battery is fully charged
b. Red if the battery is empty or the unit is overheated.
In the latter case, the unit switches immediately off and should only be switched on
again if the defect is removed.
8. The LED for the power supply (8) can also light up in 2 colours:
a. Green indicates that the unit is switched on and powered by the built-in battery.
b. Orange indicates that the 220Vac lead is connected and the battery is charged.
9. The 4-band tone control and the balance control (9) are used to set the sound
reproduction and the split over the speakers. These controls have no function when the
equalizer function is switched off.
10. The DVD control (10) sets the volume of the DVD sound.
11. The ECHO control (11) sets the number of echoes of the microphone.
12. The DELAY control (12) sets the delay of the microphone sound.
13. The volume controls (13-15) set the volume of each individual microphone. Take into
account the following;
a. Set the volume to the minimum if the microphone is not used
b. Never set the volume to the maximum in order to ensure an optimal sound
reproduction
c. When setting the volume, always start at the minimum and increase gradually.
d. When you don’t use the microphone any more, set the volume down to zero.
14. The volume button for the LINE signal (16) sets the volume of the audio source that is
connected to the LINE IN socket on the rear panel.
15. The jack sockets (17 – 19) are for connection of microphones.
16. The volume control (20) sets the general volume.
The functions of the DVD player and the cassette deck are in most cases self-explanatory. The
remote control for the DVD player with its extensive control options is explained further down
the manual.
The L/R button (21) in the DVD section switches the sound reproduction to left, right or both
(VCD option).
The N/P button (22) switches the picture format between NTSC and PAL. If you notice that the
picture is not sharp enough and doesn’t fill the screen, you can switch via this button to the
correct setting.
Page 7
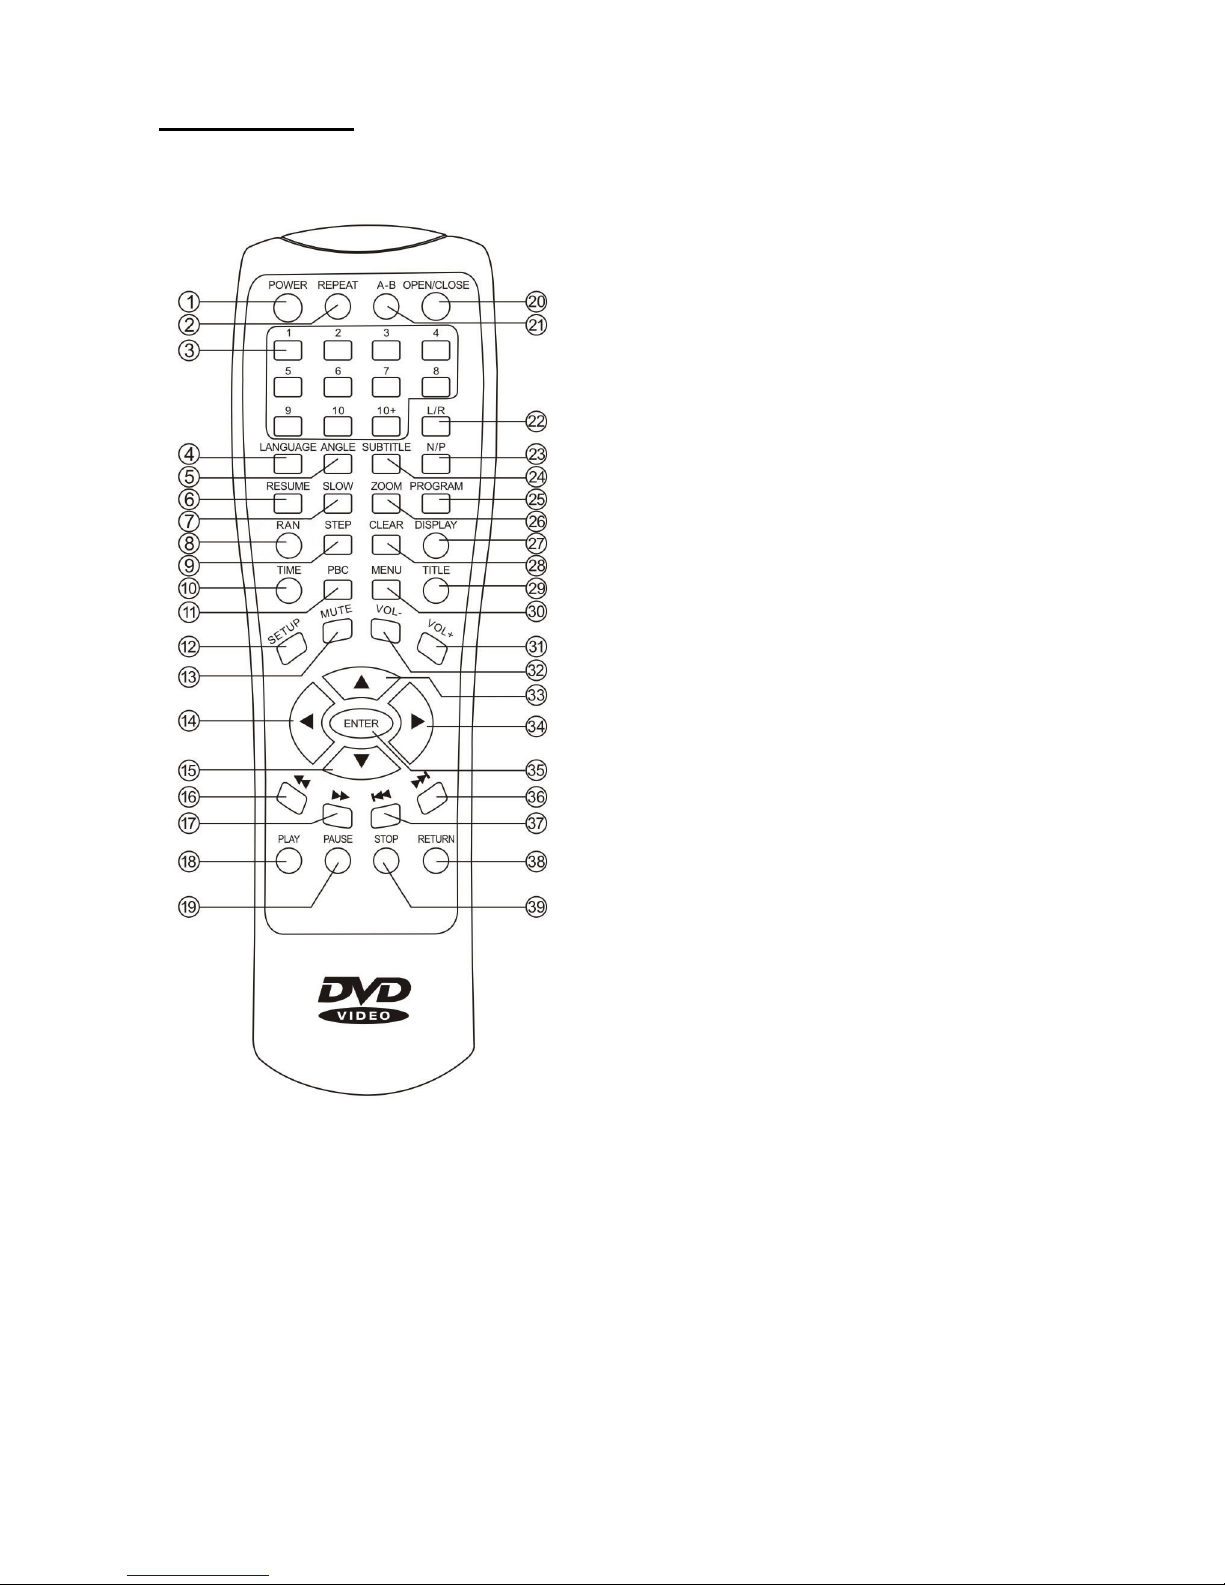
Remote control
The use of the buttons on the remote control depends also on the functions that are preprogrammed on the DVD.
1. Stand-by: DVD player On/Off
2. Repeat
3. Number keys: select tracks on
numbers
4. Language
5. Angle: camera angle
6. Karaoke: karaoke option on/off
7. Slow: Slow motion play
8. RAN: Random play mode
9. Single step: frame by frame play
10. Time: time display
11. PBC: PBC on/off
12. Setup: opens the set up menu
13. Mute: temporary sound cut
14. Left : go left (in the menu)
15. Down: go down (for the menu)
16. Back : rewind
17. Fast: fast forward
18. Play
19. Pause
20. Open/Close: opens/closes the tray
21. Clip repeat: To set the start and the
end of a section for repeated play
22. L/R: switches the audio to left, right
or both (VCD)
23. N/P: switches between NTSC and
PAL
24. Subtitle: language selection for
subtitles
25. Program: programming mode
26. Zoom
27. Display: displays info about the
selected source
28. Clear: cancels the selection
29. Title: back to main screen
30. Menu: opens the DVD menu
31. Volume +: increases the volume
32. Volume –: reduces the volume
33. Up: upwards (for the menu)
34. Right: go right (in the menu)
35. Enter: confirms the choice
36. Next: go to following track
37. Previous: go to previous track
38. Return: back to main menu
39. Stop: to stop play
Page 8

System settings DVD player
If you press the “SETUP” button on the remote control, the On Screen Display (OSD) opens and
the settings for the DVD player appear.
The SETUP screen is subdivided in 5 different sub-sections: General Setup, Audio Setup, Dolby
Setup, Video Setup, and Preference Setup.
General Setup
TV Type Screen size (4:3 PS, 4:3 LB, 16:9 Wide)
Angel Mark Angel mark On/Off
OSD Language Language setup for OSD
Captions Captions On/Off
Screen Saver Screen saver on/off
HDCDH Select bitrate for HDCD
Audio Setup
Downmix Selection of connected boxes (LT/RT, Stereo)
Spdif Output Selection of audio reproduction (SPDIF OFF/RAW/PCM)
Dolby Setup
Dual Mono Setting of sound reproduction (Stereo, Mono L/R, Mix Mono)
Dynamic Setting of dynamic range
Video Setup
Component YUV setting (Off/Yuv)
Tv Mode Tv mode setting
Sharpness Sharpness setting
Brightness Brightness setting
Contrast Contrast setting
Preference Setup
TV Type Selection of system format (NTSC, PAL, PAL60 of AUTO)
Audio Language of spoken text
Subtitle Language of the subtitles
Parental Setting of protection level for some types of DVDs
Password Password setting for setup
Default Back to default settings
Page 9

Specifications
Reproduction ....................................................................................NTSC / PAL / PAL60 / AUTO
Compatibility ........................................................... DVD(R) / (S)VCD / CD (R/RW) / MP3 / JPEG
Resolution......................................................................................................................... 500 lines
SNR (video) ........................................................................................................................> 56 dB
Frequency range ........................................................................................45 Hz – 18 kHz (-1 dB)
SNR (audio)........................................................................................................................ > 90 dB
Audio switching digital/analogue ........................................................................... 192 kHz / 24 bit
Video output .................................................................................................................1 V p-p (75)
S-Video output...............................................................................Y: 1V p-p (75), C: 0,3V p-p (75)
Audio output ...................................................................................................... 2,0 V ± 0,0 / 1,0 V
Digital output........................................................................................................... coaxial / optical
Power supply ........................................................................................................230 VAC / 50 Hz
Battery life time.......................................................................................................................... 2 h
Battery voltage......................................................................................................................... 24 V
Built-in battery........................................................................................................... 2 x 12 V, 7 Ah
Output power ........................................................................................................................ 100 W
SNR amplifier...................................................................................................................... >90 dB
Dimensions (hxwxd) ...................................................................................... 730 x 400 x 310 mm
Weight..................................................................................................................................26.7 kg
Do not attempt to make any repairs yourself. This would invalid your warranty.
Do not make any changes to the unit. This would also invalid your warranty.
The warranty is not applicable in case of accidents or damages caused by inappropriate use or
disrespect of the warnings contained in this manual.
SkyTronic UK cannot be held responsible for personal injuries caused by a disrespect of the
safety recommendations and warnings. This is also applicable to all damages in whatever form.
Page 10

NL
Hartelijk dank voor de aanschaf van dit SkyTec karaoke set. Lees deze gebruiksaanwijzing
aandachtig door alvorens het apparaat in bedrijf te stellen.
WAARSCHUWING
- Lees altijd eerst de gebruiksaanwijzing voordat u een apparaat gaat gebruiken.
- Bewaar de handleiding zodat elke gebruiker hem eerst kan doorlezen.
- Bewaar de verpakking zodat u indien het apparaat defect is, dit in de originele verpakking
kunt opsturen om beschadigingen te voorkomen.
- Alleen voor gebruik binnenshuis.
- Voordat het apparaat in werking wordt gesteld, altijd eerst een deskundige raadplegen.
- In het apparaat bevinden zich onder spanning staande onderdelen; open daarom NOOIT
dit apparaat.
- Bij het verwijderen van de stekker uit het stopcontact nooit aan het netsnoer trekken.
- Verwijder of plaats een stekker nooit met natte handen resp. uit en in het stopcontact.
- Indien de stekker en/of netsnoer als snoeringang in het apparaat beschadigd zijn dient dit
door een vakman hersteld te worden.
- Indien het apparaat zo beschadigd is dat inwendige (onder)delen zichtbaar zijn mag de
stekker NOOIT in het stopcontact worden geplaatst én het apparaat NOOIT worden
ingeschakeld. Neem in dit geval contact op met SkyTronic BV.
- Reparatie aan het apparaat dient te geschieden door resp. een vakman of een
deskundige.
- Sluit het apparaat alléén aan op een 230VAC / 50Hz geaard stopcontact, verbonden met
een 10-16A meterkastgroep.
- Toestel niet opstellen in de buurt van warmte bronnen zoals verwarming etc.
- Bij onweer altijd de stekker uit het stopcontact halen, zo ook wanneer het apparaat voor
een langere tijd niet gebruikt wordt.
- Als u het apparaat lang niet gebruikt heeft en het weer wil gebruiken kan er
condensatiewater ontstaan; laat het apparaat eerst op kamertemperatuur komen alvorens
het weer in werking te stellen.
- Om ongevallen in bedrijven te voorkomen moét rekening worden gehouden met de
daarvoor geldende richtlijnen en moeten de aanwijzingen/waarschuwingen worden
gevolgd.
- Het apparaat buiten bereik van kinderen houden.
- Zorg er altijd voor dat wanneer het apparaat wordt ingeschakeld dat alle regelaars en het
mastervolume op minimaal staan.
- Regel het kanaalschuiven met beleid, snelle variatie kan voor overbelasting zorgen met
beschadiging van uw luidsprekers als gevolg.
- Schakel een versterker altijd als laatste aan en schakelt hem als eerste uit.
- Gebruik geen schoonmaakspray om de regelaars te reinigen. Restanten van deze spray
zorgen ervoor dat smeer en stof ophopen in de regelaars. Raadpleeg bij storing te allen
tijde een deskundige.
- Zorg dat uw handen schoon zijn tijdens het plaatsen van de compact discs. Plaats nooit
een compact disc met beschadigingen.
- Gebruik geen overmatige kracht bij het bedienen van de schakelaars en knoppen.
- Om de laser schoon te houden, altijd de disclade sluiten.
- Tracht niet het apparaat schoon te maken met chemische oplossingen. Dit kan de lak
beschadigen. Gebruik een droge doek om schoon te maken.
Page 11
Voor gebruik
Controleer of alle onderstaande onderdelen in de doos aanwezig zijn en dat deze onbeschadigd
zijn:
Karaokeversterker
Handleiding
Afstandsbediening
Voedingskabel
De afstandsbediening werkt op 2 stuks AA-batterijen, let bij het plaatsen van de batterijen altijd
goed op de polariteitaanduiding op batterijen en in het batterijvak.
Aansluitingen
Zorg ervoor wanneer het één en ander aangesloten gaat worden dan in alle gevallen de te
verbinden apparaten uitgeschakeld zijn.
In onderstaande tekening staan de verschillende aansluitmogelijkheden weergegeven.
A= Audio ingang monitor/tv D= S-video ingang monitor/tv
B= YUV ingang monitor/TV E= Coax of optical ingang versterker
C= Video ingang monitor/tv
Page 12

Knoppen / Layout
Voorzijde
1. Aan/uit schakelaar met LED-indicator
#7
2. Equalizerschakelaar (aan/uit) met
LED-indicator
3. Microfoonschakelaar (aan/uit) met
LED-indicator
4. DVD schakelaar (aan/uit) met LED-
indicator
5. Cassette schakelaar (aan/uit) met
LED-indicator
6. Accuspanning (7 LED’s)
7. Laadindicator (LED) tweekleurig
a. Groen: Accu volledig
opgeladen
b. Rood: Foutmelding; oververhitting
of lege accu
8. Spanningsindicator (LED) tweekleurig
a. Groen: Ingeschakeld op
accuspanning
b. Oranje: Ingeschakeld op externe
voeding
9. 4-bands toonregeling en balans (L/R)
10. DVD volume
11. ECHO instelling
12. DELAY instelling (vertraging)
13. Volume-instelling voor MIC1 #17
14. Volume-instelling voor MIC2 #18
15. Volume-instelling voor MIC3 #19
16. Volumeregeling LINE IN
17. Jackaansluiting voor mic 1
18. Jackaansluiting voor mic 2
19. Jackaansluiting voor mic 3
20. Algemeen weergavevolume
DVD sectie
21. DVD kanaalkeuze L/R
22. N(tsc)/P(al) modus
23. Versneld terugspoelen
24. Versneld vooruit spoelen
25. Vorige
26. Volgende
27. Stop
28. Afspelen / Pauze
29. Lade Open / Dicht
30. DVD Display
31. DVD Lade
CASSETTE sectie
32. Cassettedeck
33. Opname
34. Afspelen
35. Terugspoelen
36. Vooruit spoelen
37. Stop / reset
38. Pauze
Page 13

Achterzijde
1. YUV uitgang
2. S-Video uitgang
3. Video-uitgang
4. 2CH L/R uitgang
5. Coaxiale uitgang
6. Optische uitgang
7. Netspanningsaansluiting
8. 12/24 VDC ingang (optie)
9. Line uitgang
10. Line ingang
Voor de weergave van het beeld van de DVD-speler kunt u gebruik maken van de S-VHS
aansluiting (2). U kunt ook één of twee monitoren aansluiten via de video-uitgangen.
Als u het geluid van de set wilt doorsturen aan bijv. een monitor dan kunt u een stereo
geluidssignaal doorsturen door het gebruik van de stereo tulpuitgangen (4).
De aansluitingen aan de achterzijde bieden u tevens de mogelijkheid om het 5.1-geluidssignaal
van de set (DVD) door te sturen naar een externe versterker. Dit signaal kan worden
aangeleverd via de optische uitgang (6) de coaxiale uitgang (5). De te kiezen aansluiting is
afhankelijk van uw persoonlijke voorkeuren en de mogelijkheden van uw versterker.
De LINE IN (10) en LINE OUT (9) zijn 6,35 mm jackaansluitingen voor het aansluiten van
externe apparaten.
Bediening (voorzijde)
1. Na het inschakelen voert het apparaat een zelfcontrole uit. De LED-indicators #7 & #8
zullen 3 keer gelijktijdig knipperen ter indicatie van dit proces. De rij LED’s #6 geven het
vermogen van de ingebouwde accu weer.
Noot: Activeer geen onderdelen die niet worden gebruikt om de gebruiksduur van de
accu te verlengen en de ruis tot een minimum te beperken.
2. Met het indrukken van de EQ-schakelaar #2, wordt de equalizer van het apparaat
in/uitgeschakeld. De LED-indicator licht op als de equalizer is ingeschakeld.
3. Om gebruik te maken van één of meerdere microfoons, dient deze optie te worden
ingeschakeld door het indrukken van de betreffende schakelaar (3). De LED-indicator
licht op als microfoongebruik is ingeschakeld.
Page 14

4. Om de DVD-speler te kunnen gebruiken moet deze functie worden ingeschakeld, dit
geschiedt door de DVD schakelaar #4 in te drukken. De LED-indicator licht op als de
DVD-speler is ingeschakeld.
5. De optie om de cassette te af te spelen, dient de betreffende schakelaar #5 te worden
omgezet. De LED-indicator licht op bij inschakeling.
6. De reeks LED-indicators #6 voor de accuspanning geven aan welke spanning de accu
levert. Bij elke LED staat een waarde aangegeven oplopend van 18V tot 24V.
7. De LED voor de laadstatus #7 kan in twee kleuren oplichten:
a. Bij volle belading van de accu licht deze groen op
b. Bij oververhitting of geen accuspanning (lege of geen accu) licht deze rood op.
Het apparaat zal direct hierna automatisch uitschakelen en dient pas weer te worden
ingeschakeld als de geconstateerde fout is verholpen.
8. De LED van de voedingsspanning #8 kan eveneens in twee kleuren oplichten:
a. Groen geeft aan dat het apparaat is ingeschakeld en gebruik maakt van de spanning
van de ingebouwde accu.
b. Oranje indiceert dat de 220 VAC kabel is aangesloten en de accu wordt opgeladen.
9. De 4-bands toonregeling en de balans #9 kunnen worden gebruikt voor het bijstellen
van het weergegeven geluid en de spreiding over de speakers. Deze knoppen hebben
geen functie als de equalizerfunctie is uitgeschakeld.
10. De DVD-volume knop #10 regelt het weergavevolume van het DVD-geluid.
11. Met de ECHO #11 kunt u de mate van het nagalmen van het microfoongeluid bijstellen.
12. Met de DELAY #12 kunt u de vertraging van de weergave van het microfoongeluid
bijstellen.
13. De volumeknoppen voor de microfoons #13-15 stellen het individuele volume van elk
van de microfoons in. Houdt hierbij rekening met het volgende;
a. Het volume tot het minimum te regelen als de microfoonfunctie niet wordt gebruikt
b. Het volume nooit tot maximaal te regelen om een optimale geluidsweergave te
garanderen
c. Bij het instellen van het volume altijd bij het minimum te beginnen en langzaam
omhoog regelen.
d. Indien u stopt met het gebruiken van uw microfoon altijd het volume terug te regelen
tot het minimum
14. De volumeknop voor het lijnsignaal #16 regelt het weergavevolume van de, op de LINE
IN (achterzijde) aangesloten geluidsbron.
15. De jackaansluitingen #17-19 zijn te gebruiken voor het aansluiten van microfoons.
16. Met de volumeregelaar #20 kunt u het algemene weergavevolume van het geluid
instellen.
Bij de DVD-speler en het cassettedeck spreken de functies van het merendeel van de knoppen
voor zich. De afstandbediening met de uitgebreide instellingsmogelijkheden voor de DVDweergave vindt u in een aparte paragraaf verderop in de gebruiksaanwijzing.
De L/R knop #21 bij de DVD-sectie, schakelt de weergave naar links, rechts of beide (VCD
optie).
De N/P knop #22 schakelt de beeldweergave om tussen NTSC en PAL. Merkt u dat het
weergegeven beeld niet scherp en schermvullend is, dan kunt u met deze knop schakelen naar
de juiste instelling.
Page 15

Afstandsbediening
De bruikbaarheid van de toetsen op de afstandsbediening kan afhankelijk zijn van de functies
die op de DVD zijn voorgeprogrammeerd.
1. Stand-by: in/uitschakelen DVDspeler
2. Repeat: herhaaldelijk afspelen
3. Nummertoetsen: aankiezen
tracks op nummer
4. Language: taalinstelling
5. Angle: camerahoek
6. Karaoke: karaoke-optie
in/uitschakelen
7. Slow: vertraagd afspelen
8. RAN: Random play mode
9. Single step: frame voor frame
afspelen
10. Time: weergave tijd
11. PBC: PBC aan/uit
12. Setup: open instellingenmenu
13. Mute: tijdelijk uitschakelen geluid
14. Left : naar links (voor in menu’s)
15. Down: naar beneden (voor in
menu’s)
16. Back : terugspoelen
17. Fast: vooruit spoelen
18. Play: start afspelen
19. Pause: pauzeer afspelen
20. Open/Close: lade open/dicht
21. Clip repeat: Vastleggen begin en
eind te herhalen sectie
22. L/R: schakelt weergave naar
links, rechts of beide (VCD)
23. N/P: schakelen tussen NTSC en
PAL
24. Subtitle: taalkeuze ondertiteling
25. Program: programmeren
26. Zoom: inzoomen
27. Display: toont info over het
geplaatste medium
28. Clear: annuleer keuze
29. Title: terug naar hoofdscherm
30. Menu: open DVD-menu
31. Volume +: geluid harder
32. Volume –: geluid zachter
33. Up: naar boven (voor in menu’s)
34. Right: naar rechts (voor in
menu’s)
35. Enter: bevestig keuze
36. Next: naar volgende track
37. Previous: naar vorige track
38. Return: terug naar hoofdmenu
39. Stop: stoppen met afspelen
Page 16

Systeem instellingen DVD-speler
Als u de “SETUP” knop op de afstandsbediening indrukt, wordt het On Screen Display (OSD)
geopend waarin de instellingen van de DVD-speler staan weergegeven en desgewenst kunnen
worden aangepast.
De SETUP is onderverdeeld in 5 verschillende schermen; General Setup, Audio Setup, Dolby
Setup, Video Setup, en Preference Setup.
General Setup
TV Type Screen size (4:3 PS, 4:3 LB, 16:9 Wide)
Angel Mark Angel mark On/Off
OSD Language Language setup for OSD
Captions Captions On/Off
Screen Saver Screen saver on/off
HDCDH Select bitrate for HDCD
Audio Setup
Downmix Selection of connected boxes (LT/RT, Stereo)
Spdif Output Selection of audio reproduction (SPDIF OFF/RAW/PCM)
Dolby Setup
Dual Mono Setting of sound reproduction (Stereo, Mono L/R, Mix Mono)
Dynamic Setting of dynamic range
Video Setup
Component YUV setting (Off/Yuv)
Tv Mode Tv mode setting
Sharpness Sharpness setting
Brightness Brightness setting
Contrast Contrast setting
Preference Setup
TV Type Selection of system format (NTSC, PAL, PAL60 of AUTO)
Audio Language of spoken text
Subtitle Language of the subtitles
Parental Setting of protection level for some types of DVDs
Password Password setting for setup
Default Back to default settings
Page 17

Specificaties
Weergave .........................................................................................NTSC / PAL / PAL60 / AUTO
Compatibiliteit ......................................................... DVD(R) / (S)VCD / CD (R/RW) / MP3 / JPEG
Resolutie.......................................................................................................................... 500 lijnen
Signaal-ruisverhouding (video)........................................................................................... > 56 dB
Frequentiebereik.........................................................................................45 Hz – 18 kHz (-1 dB)
Signaal-ruisverhouding (audio)........................................................................................... > 90 dB
Audioschakeling digitaal/analoog .......................................................................... 192 kHz / 24 bit
Video uitgang................................................................................................................1 V p-p (75)
S-Video uitgang .............................................................................Y: 1V p-p (75), C: 0,3V p-p (75)
Audio uitgang..................................................................................................... 2,0 V ± 0,0 / 1,0 V
Digitale uitgang.................................................................................................... coaxiaal / optisch
AC-3 uitgang................................................................................................................. 5.1 kanaals
Aansluitspanning ..................................................................................................230 VAC / 50 Hz
Levensduur Accu....................................................................................................................... 2 h
Accuspanning .......................................................................................................................... 24 V
Ingebouwde Accu .....................................................................................................2 x 12 V, 7 Ah
Uitgangsvermogen ............................................................................................................... 100 W
Signaal-ruisverhouding versterker...................................................................................... >90 dB
Afmetingen (hxbxd) ....................................................................................... 730 x 400 x 310 mm
Gewicht................................................................................................................................26,7 kg
Voer zelf geen reparaties uit aan het apparaat; in élk geval vervalt de totale garantie.
Ook mag het apparaat niet eigenmachtig worden gemodificeerd, ook in dit geval vervalt de
totale garantie. Ook vervalt de garantie bij ongevallen en beschadigingen in élke vorm t.g.v.
onoordeelkundig gebruik en het niet in achtnemen van de waarschuwingen in het algemeen en
gestelde in deze gebruiksaanwijzing. Tevens aanvaardt SkyTronic BV geen enkele
aansprakelijkheid in geval van persoonlijke ongelukken als gevolg van het niet naleven van
veiligheidsinstructies en waarschuwingen. Dit geldt ook voor gevolgschade in wélke vorm dan
ook.
Page 18

F
Nous vous remercions pour l’achat de cet ensemble karaoké SkyTec.
Lisez attentivement ce manuel avant la première mise en service.
Consignes de sécurité:
- Lire le mode d’emploi avant la première mise en service.
- Conservez le mode d’emploi pour référence ultérieure.
- Conservez l’emballage d’origine afin de pouvoir transporter l’appareil en toute
sécurité.
- Uniquement pour utilisation à l’intérieur.
- Ne pas ouvrir le boîtier. Il contient des pièces sous tension.
- Pour débrancher, tirer toujours sur la fiche, jamais sur le cordon.
- Ne pas brancher ou débrancher l’appareil avec des mains mouillées.
- Si l’appareil est endommagé, ne le branchez pas sur une prise secteur et ne le
mettez pas sous tension.
- Si la fiche et/ou le cordon secteur sont endommagés, faites-les remplacer par un
spécialiste.
- Branchez l’appareil uniquement sur une prise de terre de 230Vac/50Hz d’une
intensité de 10-16A.
- Ne pas placer l’appareil à proximité d’une source de chaleur.
- Pendant un orage ou en cas de non utilisation, débranchez toujours l’appareil du
secteur.
- Après une période de non utilisation prolongée, de l’eau de condensation a pu se
former. Attendez que l’appareil ait atteinte la température ambiante.
- Pour éviter des accidents dans les lieux publics, il faut tenir compte de la
règlementation en vigueur et respecter les consignes.
- Tenir hors de la portée des enfants.
- Lors de la mise sous tension, veillez à ce que tous les canaux et le volume général
soient réglés sur le minimum.
- Manipulez les contrôles de volume avec précaution. Une variation rapide risque
d’endommager les haut-parleurs.
- Mettez l’amplificateur sous tension en dernier, et éteignez-le en premier.
- N’utilisez pas de sprays pour nettoyer les potentiomètres. Les résidus de ces sprays
provoquent des dépôts de poussière et de graisse. Consultez un spécialiste en cas
de problème.
- Manipulez les CD avec des mains propres. Ne pas insérer un CD endommagé.
- Ne pas forcer les commutateurs et boutons.
- Tenir le tiroir CD fermé afin de garder la lentille laser propre.
- Ne pas nettoyer l’appareil avec des solutions chimiques. Elles endommageraient la
finition. Utilisez uniquement un chiffon sec.
Page 19

Avant l’utilisation
Vérifiez que les articles ci-dessous se trouvent dans l’emballage et sont intactes:
Amplificateur karaoké
Mode d’emploi
Télécommande
Cordon d’alimentation
La télécommande nécessite 2 piles LR6. Respectez la bonne polarité lorsque vous insérez les
piles dans le compartiment.
Connexions
Pendant les connexions, veillez à ce que tous les appareils à brancher soient débranchés du
secteur.
La figure ci-dessous indique les différentes possibilités de branchement.
A= Entrée Audio monitor/tv D= Entrée S-vidéo monitor/tv
B= Entrée YUV(ideo) monitor/tv E= Entrée amplificateur coaxiale ou optique
C= Entrée Video monitor/tv
Page 20

Disposition des réglages
Façade
1. Interrupteur M/A avec indicateur à
LED (7)
2. M/A de l’égaliseur avec indicateur à
LED
3. M/A du microphone avec indicateur à
LED
4. M/A DVD avec indicateur à LED
5. M/A cassette avec indicateur à LED
6. Tension de la batterie (7 LED)
7. Indicateur de charge bicolore :
a. Vert : batterie chargée
b. Rouge : Erreur, surchauffe ou
batterie vide
8. Indicateur de tension bicolore
a. Vert : Alimenté par la batterie
b. Orange:Alimentation externe
9. Réglage de tonalité à 4 bandes et
balance G/D
10. Volume DVD
11. Réglage ECHO
12. Réglage DELAY (temporisation)
13. Réglage de volume Micro 1 (17)
14. Réglage de volume Micro 2 (18)
15. Réglage de volume Micro 3 (19)
16. Réglage de volume LINE IN
17. Fiche jack pour micro 1
18. Fiche jack pour micro 2
19. Fiche jack pour micro 3
20. Volume général
Section DVD
21. Sélection canal G/D DVD
22. Mode N(tsc)/P(al)
23. Retour rapide
24. Avance rapide
25. Précédent
26. Suivant
27. Stop
28. Lecture / Pause
29. Tiroir ouvert/fermé
30. Afficheur DVD
31. Tiroir DVD
Section CASSETTE
32. Lecteur de cassettes
33. Enregistrement
34. Lecture
35. Retour rapide
36. Avance rapide
37. Stop / reset
38. Pause
Page 21

Arrière
1. Sortie YUV
2. Sortie S-Vidéo
3. Sortie vidéo
4. Sortie 2CH L/R
5. Sortie coaxiale
6. Sortie optique
7. Alimentation secteur
8. Entrée 12/24 VDC (option)
9. Sortie ligne
10. Entrée ligne
Pour profiter de l’image du lecteur DVD, vous pouvez utiliser la fiche S-VHS (2). Vous pouvez
également connecter un ou deux moniteurs sur les sorties vidéo.
Si vous souhaitez acheminer le son stéréo de l’ensemble p.ex. vers un moniteur, utilisez les
sorties RCA stéréo (4).
Les connecteurs à l’arrière vous permettent d’acheminer le signal 5.1 du DVD vers un
amplificateur externe. Ce signal peut passer par la sortie optique (6), la sortie coaxiale (5). La
connexion dépend de vos choix personnels et des possibilités de votre amplificateur.
Les fiches LINE IN (10) et LINE OUT (9) sont des fiches jack 6,35mm pour la connexion
d’appareils externes.
Fonctionnement (Façade)
1. Après la mise sous tension, l’appareil effectue un auto-test. Les LED 7 et 8 clignotent 3
fois simultanément pour indiquer ce processus. La rangée de LED (6) indique la
puissance de la batterie intégrée.
Note : Ne pas activer des parties qui ne sont pas nécessaires afin d’augmenter la durée
d’utilisation de la batterie et de réduire le bruit à un minimum.
2. Appuyez sur l’interrupteur EQ (2) pour la mise sous tension/arrêt de l’égaliseur. La LED
s’allume lorsque l’égaliseur est sous tension.
3. Pour pouvoir utiliser un ou plusieurs microphones, vous devez activer cette option en
appuyant sur le commutateur correspondant (3). La LED s’allume lorsque le microphone
est activé.
4. Pour pouvoir utiliser le lecteur DVD, vous devez activer cette option en appuyant sur le
commutateur (4). La LED s’allume lorsque le DVD est activé.
Page 22

5. Pour pouvoir utiliser le lecteur de cassettes, vous devez activer cette option en
appuyant sur le commutateur correspondant (5). La LED s’allume lorsque le lecteur de
cassettes est activé.
6. La rangée de LED (6) pour la tension de la batterie indique la tension délivrée par la
batterie. Chaque LED correspond à une valeur de 18V à 24V.
7. La LED pour l’état de charge (7) peut s’allumer de deux couleurs :
a. Si la batterie est chargée, elle s’allume en vert.
b. En cas de surchauffe ou si la batterie est déchargée, elle s’allume en rouge.
Dans ce dernier cas, l’appareil se coupe automatiquement et ne doit être remis sous
tension que lorsque le défaut constaté a été réparé.
8. La LED pour l’alimentation (8) peut également s’allumer en deux couleurs :
a. Vert indique que l’appareil est sous tension et alimenté par la batterie.
b. Orange indique que le cordon de 220Vac est connecté et que la batterie se charge.
9. Le réglage de tonalité à 4 bandes et la balance (9) ne sont actifs que lorsque l’égaliseur
est sous tension.
10. Le bouton de volume DVD (10) règle le volume du son provenant du DVD.
11. Réglez l’écho du microphone via le réglage ECHO (11).
12. Réglez la temporisation du microphone via le réglage DELAY (12).
13. Les touches de volume (13-15) pour les microphones règlent le volume de chaque
microphone. Prenez en considération ceci :
a. Réglez le volume au minimum lorsque le microphone n’est pas utilisé
b. Afin de garantir un son optimal, ne pas régler le volume au maximum.
c. Lorsque vous réglez le volume, commencez toujours au minimum et augmentez
progressivement.
d. Lorsque vous n’utilisez plus le microphone, baissez complètement son volume.
14. La touche de volume pour le signal de ligne (16) règle le volume de la source connectée
sur l’entrée LINE IN (à l’arrière).
15. Les fiches jack (17-19) sont utilisées pour le branchement des microphones.
16. Le réglage de volume (20) permet de régler le volume général.
Sur les lecteurs DVD et de cassettes, la plupart des fonctions s’expliquent d’elles-mêmes. La
télécommande qui offre de nombreuses possibilités de réglage fait l’objet d’un chapitre séparé
dans ce manuel.
La touche L/R (21) sur la section DVD commute le son sur la gauche, la droite ou sur les deux
côtés (option VCD).
Le bouton N/P (22) commute le standard d’image entre NTSC et PAL. Si vous remarquez que
l’image n’est pas nette ou ne couvre pas tout l’écran, vous pouvez corriger le réglage avec cette
touche.
Page 23

Télécommande
L’utilisation des touches sur la télécommande dépend aussi des fonctions qui sont
préprogrammées sur votre DVD.
1. Stand-by: M/A du lecteur DVD
2. Repeat: Lecture répétée
3. Touches numérotées : Sélection
des titres en entrant leur numéro
4. Language: Choix de la langue
5. Angle: Angle de prise de vue
6. Karaoke: M/A des options
Karaoké
7. Slow: Lecture au ralenti
8. RAN: Random play
9. Step: Lecture trame par trame
10. Time: Affichage du temps
11. PBC: PBC M/A
12. Setup: Ouvre le menu des
réglages
13. Mute: Coupure du son
14. Déplacement vers la gauche
(dans les menus)
15. Déplacement vers le bas (dans
les menus)
16. Retour rapide
17. Avance rapide
18. Play: Lecture
19. Pause: Pause de lecture
20. Open/Close:
Ouverture/fermeture du tiroir
21. A-B : Marque le début et la fin
d’une section à répéter
22. L/R: commute le son vers la
gauche, la droite ou les deux
(VCD)
23. N/P: Commute entre NTSC et
PAL
24. Subtitle: Langue des sous-titres
25. Program: Programmation
26. Zoom: Agrandissement
27. Display: Affichage des
informations sur le support utilisé
28. Clear: Effacement de la
sélection
29. Title: Retour vers l’écran
principal
30. Menu: Ouverture du menu DVD
31. Volume +: Augmentation du
volume
32. Volume –: Réduction du volume
33. Déplacement vers le haut (dans
les menus)
34. Déplacement vers la droite
(dans les menus)
35. Enter: Confirme la sélection
36. Titre suivant
37. Titre précédent
38. Return: Retour au menu
principal
39. Stop: Arrête la lecture
Page 24

Réglage de système du lecteur DVD
Lorsque vous appuyez sur la touche « SETUP » sur la télécommande, le menu sur l’écran
(OSD) s’ouvre qui indique les réglages actuels du lecteur DVD que vous pouvez modifier.
Le menue SETUP est subdivisé en 5 écrans différents; General Setup, Audio Setup, Dolby
Setup, Video Setup, en Preference Setup.
General Setup
TV Type Screen size (4:3 PS, 4:3 LB, 16:9 Wide)
Angel Mark Angel mark On/Off
OSD Language Language setup for OSD
Captions Captions On/Off
Screen Saver Screen saver on/off
HDCDH Select bitrate for HDCD
Audio Setup
Downmix Selection of connected boxes (LT/RT, Stereo)
Spdif Output Selection of audio reproduction (SPDIF OFF/RAW/PCM)
Dolby Setup
Dual Mono Setting of sound reproduction (Stereo, Mono L/R, Mix Mono)
Dynamic Setting of dynamic range
Video Setup
Component YUV setting (Off/Yuv)
Tv Mode Tv mode setting
Sharpness Sharpness setting
Brightness Brightness setting
Contrast Contrast setting
Preference Setup
TV Type Selection of system format (NTSC, PAL, PAL60 of AUTO)
Audio Language of spoken text
Subtitle Language of the subtitles
Parental Setting of protection level for some types of DVDs
Password Password setting for setup
Default Back to default settings
Page 25

Caractéristiques techniques
Standard ........................................................................................... NTSC / PAL / PAL60 / AUTO
Compatibilité........................................................... DVD(R) / (S)VCD / CD (R/RW) / MP3 / JPEG
Résolution....................................................................................................................... 500 lignes
Rapport signal/bruit (vidéo) ................................................................................................> 56 dB
Bande passante.......................................................................................... 45 Hz – 18 kHz (-1 dB)
Rapport signal/bruit (audio) ................................................................................................ > 90 dB
Circuit audio digital/analogique.............................................................................. 192 kHz / 24 bit
Sortie Vidéo ................................................................................................................... 1 V cc (75)
Sortie S-Vidéo ..................................................................................Y: 1V cc (75), C: 0,3V cc (75)
Sortie Audio ....................................................................................................... 2,0 V ± 0,0 / 1,0 V
Sortie Digitale ....................................................................................................... coaxial / optique
Sortie AC-3 ....................................................................................................................5.1 canaux
Alimentation..........................................................................................................230 VAC / 50 Hz
Autonomie de la batterie............................................................................................................ 2 h
Tension de la batterie .............................................................................................................. 24 V
Batterie ....................................................................................................................2 x 12 V, 7 Ah
Puissance de sortie .............................................................................................................. 100 W
Rapport signal/bruit de l’amplificateur ................................................................................ >90 dB
Dimension (hxlxp).......................................................................................... 730 x 400 x 310 mm
Poids....................................................................................................................................26,7 kg
N’effectuez jamais de réparations vous-même et n’apportez jamais de modifications sous peine
d’invalider la garantie.
La garantie ne s’applique pas dans le cas de dommages sous quelque forme que ce soit, qui
ont été provoqués suite à une mauvaise utilisation et le non-respect des avertissements et
consignes de sécurité contenus dans ce manuel.
SkyTronic décline toute responsabilité en cas de dommages corporels suite au non-respect des
consignes de sécurité et des avertissements. Ceci s’applique aussi aux préjudices ultérieurs
éventuels.
Page 26

D
Herzlichen Glückwunsch zum Kauf dieses SkyTec Karaoke Sets.
Bitte lesen Sie diese Anleitung sorgfältig vor der Inbetriebnahme durch.
Sicherheitsvorschriften:
- Bedienungsanleitung vor Inbetriebnahme sorgfältig durchlesen.
- Für spätere Bezugnahme aufbewahren.
- Originalverpackung für späteren Transport aufbewahren.
- Nur für Innengebrauch.
- Niemals das Gehäuse öffnen; Reparaturen nur von einem Fachmann ausführen lassen.
- Beim Abziehen des Steckers immer am Stecker ziehen, niemals an der Netzschnur.
- Stecker niemals mit nassen Händen anfassen.
- Sollten Stecker und/oder Netzschnur, sowie der Kabeleingang zum Gerät beschädigt sein,
müssen diese durch einen Fachmann ersetzt werden.
- Wenn das Gerät sichtbare Schäden aufweist, darf es NICHT an eine Steckdose
angeschlossen und NICHT eingeschaltet werden. Benachrichtigen sie in diesem Fall
SkyTronic BV.
- Das Gerät nur an eine geerdete 230V AC/50Hz Netzsteckdose mit 10-16A Leistung
anschließen.
- Nicht in der Nähe von Wärmequellen aufstellen.
- Bei Unwetter sowie Nichtgebrauch das Netzgerät aus der Steckdose ziehen.
- Nach längerem Nichtgebrauch kann sich Kondenswasser im Gehäuse gebildet haben.
Lassen Sie das Gerät erst auf Raumtemperatur kommen.
- Um Unfälle in öffentlichen Gebäuden zu vermieden, müssen die geltenden Richtlinien
befolgt werden.
- Vor dem Einschalten alle Lautstärkeregler ganz herunterfahren.
- Die Lautstärkeregler vorsichtig handhaben. Eine zu schnelle Veränderung kann die
Lautsprecher beschädigen.
- Den Verstärker immer als letztes einschalten und zuerst wieder ausschalten.
- Die Lautsprecher niemals über einen längeren Zeitraum voll belasten.
- Keine Reinigungssprays für die Schieberegler verwenden. Die Rückstände verursachen
Schmier- und Staubansammlungen in den Reglern. Im Problemfall einen Fachmann
fragen.
- CDs nur mit sauberen Händen anfassen. Keine beschädigten CDs einlegen.
- Die Regler nicht mit Gewalt bedienen.
- Um den Laser sauber zu halten, immer die Lade geschlossen halten.
- Niemals das Gerät mit chemischen Reinigungsmitteln säubern, die den Lack
beschädigen. Das Gerät nur mit einem trockenen Tuch abwischen.
Page 27

Vor der Inbetriebnahme
Prüfen Sie, ob alle nachstehenden Teile in der Verpackung enthalten und unbeschädigt sind:
Karaoke Verstärker
Anleitung
Fernbedienung
Netzkabel
Die Fernbedienung benötigt zwei AA Batterien. Achten sie beim Einlegen der Batterien auf die
richtige Polung, die im Batteriefach angegeben ist.
Anschlüsse
Beim Anschließen der verschiedenen Geräte müssen alle Geräte ausgeschaltet sein.
Die nachstehende Abbildung zeigt die verschiedenen Anschlussmöglichkeiten.
A= Audio Eingang Monitor/TV D= S-Video Eingang Monitor/TV
B= YUV Eingang Monitor/TV E= Koaxial oder optischer Verstärkereingang
C= Video Eingang Monitor/TV
Page 28

Regler / Bedienelemente
Vorderseite
1. Ein/Aus Schalter mit LED Anzeige (7)
2. Equalizerschalter (Ein/Aus) mit LED
Anzeige
3. Mikrofonschalter (Ein/Aus) mit LED
Anzeige
4. DVD Schalter (Ein/Aus) mit LED
Anzeige
5. Kassettenschalter (Ein/Aus) mit LED
Anzeige
6. Batteriespannung (7 LEDs)
7. Zweifarbige Ladeanzeige (LED)
a. Grün: Batterie voll aufgeladen
b. Rot: Fehlermeldung,
Überhitzung oder Batterie leer
8. Zweifarbige Spannungsanzeige
(LED)
a. Grün: Batteriebetrieb
b. Orange: Externe Versorgung
9. 4-Band Klangregler und Balance
(L/R)
10. DVD Lautstärke
11. ECHO Einstellung
12. DELAY Einstellung (Verzögerung)
13. Lautstärkeregelung für Mikro1 (17)
14. Lautstärkeregelung für Mikro 2 (18)
15. Lautstärkeregelung für Mikro 3 (19)
16. Lautstärkereinstellung LINE IN
17. Klinkenbuchse für Mikro 1
18. Klinkenbuchse für Mikro 2
19. Klinkenbuchse für Mikro 3
20. Allgemeine Lautstärke
DVD Teil
21. DVD Kanalwahl L/R
22. N(tsc)/P(al) Standard
23. Schnelles Rückwärtsspulen
24. Schnelles Vorwärtsspulen
25. Voriger Titel
26. Folgender Titel
27. Stopp
28. Abspielen / Pause
29. Lade Auf/Zu
30. DVD Display
31. DVD Lade
KASSETTENTEIL
32. Kassettendeck
33. Aufnahme
34. Abspielen
35. Zurückspulen
36. Vorwärtsspulen
37. Stopp / Reset
38. Pause
Page 29

Rückseite
1. YUV Ausgang
2. S-Video Ausgang
3. Video- Ausgang
4. 2CH L/R Ausgang
5. Koaxialer Ausgang
6. Optischer Ausgang
7. Netzanschluss
8. 12/24 VDC Eingang (Option)
9. Line Ausgang
10. Line Eingang
Für die Bildwiedergabe des DVD Spielers können Sie den S-VHS Anschluss (2) benutzen. Sie
können auch ein oder zwei Monitore an die Videoausgänge anschließen.
Wenn Sie den Stereoton des Sets z.B. zu einem Monitor leiten möchten, können Sie das über
die Cinch Ausgänge (4).
Die Anschlüsse auf der Rückseite ermöglichen Ihnen, das 5.1 Audiosignal des DVD Spielers in
einen externen Verstärker zu leiten. Dieses Signal kann über den optischen Ausgang (6), den
Koaxialausgang (5). Der Anschluss ist von Ihrer persönlichen Wahl und den Möglichkeiten Ihres
Verstärkers abhängig.
Die LINE IN (10) und die LINE OUT (9) Buchsen sind 6,35mm Klinkenbuchsen zum Anschluss
von externen Geräten.
Bedienung (Vorderseite)
1. Nach Einschalten des Geräts führt es einen Selbsttest durch. Die LED Anzeigen 7 & 8
blinken dabei 3-mal gleichzeitig auf. Die LED Reihe (6) zeigt die Spannung der
eingebauten Batterie an.
Hinweis: Keine Geräte einschalten, die nicht gebraucht werden, um die Batterie nicht
unnötig zu belasten und die Geräusche auf ein Mindestmass zu beschränken.
2. Mit dem EQ-Schalter (2) wird der Equalizer ein- und ausgeschaltet. Die LED leuchtet,
wenn er eingeschaltet ist.
Page 30

3. Um die Mikrofone zu benutzen, muss diese Funktion eingeschaltet werden, indem der
betreffende Schalter (3) gedrückt wird. Die LED leuchtet, wenn die Mikrofonfunktion
eingeschaltet ist.
4. Um den DVD Spieler zu benutzen, muss diese Funktion eingeschaltet werden, indem
der betreffende Schalter (4) gedrückt wird. Die LED leuchtet, wenn der DVD Spieler
eingeschaltet ist.
5. Um den Kassettenspieler zu benutzen, muss diese Funktion eingeschaltet werden,
indem der betreffende Schalter (5) gedrückt wird. Die LED leuchtet, wenn der
Kassettenspieler eingeschaltet ist.
6. Die LED Reihe (6) zeigt die Spannung von 18V bis 24V an, die die Batterie liefert.
7. Die LED für den Ladezustand (7) kann in zwei Farben leuchten:
a. Bei voll aufgeladener Batterie leuchtet sie grün
b. Bei Überhitzung oder leerer Batterie leuchtet sie rot. Das Gerät schaltet sich dabei
automatisch aus und darf erst wieder eingeschaltet werden, wenn der Fehler behoben
ist.
8. Die LED für die Versorgungsspannung (8) kann ebenfalls in zwei Farben leuchten:
a. Grün bedeutet, dass das Gerät eingeschaltet ist und auf Batteriespannung läuft.
b. Orange bedeutet, dass das 220VAC Netzkabel angeschlossen ist und die Batterie
aufgeladen wird.
9. Die 4-Band Klangregler und der Balance Regler (9) dienen zur Einstellung der
Klangwiedergabe und der Verteilung über die Lautsprecher. Diese Regler haben keine
Funktion, wenn der Equalizer ausgeschaltet ist.
10. Der DVD Lautstärkeregler (10) stellt die Lautstärke des DVD Spielers ein.
11. Der ECHO Regler (11) stellt das Nachhallen des Mikrofons ein.
12. Der DELAY Regler (12) regelt die Verzögerung des Mikrofonklangs.
13. Die Lautstärkeregler für die Mikrofone (13 – 15) stellen die Lautstärke jedes einzelnen
Mikrofons ein. Beachten Sie hierbei folgendes;
a. Die Lautstärkeregler ganz herunterfahren, wenn das Mikrofon nicht benutzt wird
b. Die Lautstärke nie ganz hoch einstellen, um eine optimale Klangwiedergabe zu
gewährleisten
c. Beim Einstellen der Lautstärke immer ganz leise anfangen und langsam hochfahren.
d. Wenn Sie das Mikrofon nicht mehr benutzen, muss der Lautstärkeregler ganz
heruntergefahren werden
14. Der Lautstärkeregler für das Linesignal (16) regelt die Lautstärke des an den LINE IN
Eingang (Rückseite) angeschlossenen Geräts.
15. Die Klinkenbuchsen (17-19) dienen zum Anschluss der Mikrofone.
16. Mit dem Lautstärkeregler (20) wird die allgemeine Lautstärke des Sets eingestellt.
Bei dem DVD Spieler und dem Kassettendeck verstehen sich die meisten Regler von selbst.
Die Fernbedienung mit den zahlreichen Einstellmöglichkeiten für den DVD Spieler wird in einem
anderen Kapital separat behandelt.
Der L/R Regler (21) auf dem DVD Teil schaltet den Klang nach rechts, links oder zu beiden
Seiten (VCD Option).
Die N/P Taste (22) schaltet zwischen NTSC und PAL um. Wenn das Bild nicht scharf ist und
den Bildschirm nicht ausfüllt, können Sie mit dieser Taste auf den richtigen Standard
umschalten.
Page 31

Fernbedienung
Die Funktionsfähigkeit der Tasten auf der Fernbedienung hängt von den Funktionen ab, die auf
der DVD vorprogrammiert sind.
1. Stand-by: Ein/Ausschalten des
DVD Spielers
2. Repeat: Wiederholtes Abspielen
3. Nummerntasten: Direkteingabe
der Titelnummer
4. Language: Sprachwahl
5. Angle: Aufnahmewinkel der
Kamera
6. Karaoke: Ein/Aus der Karaoke
Funktion
7. Slow: Zeitlupe
8. Ran: Random play
9. Step: Schrittweises Abspielen
10. Time: Zeitanzeige
11. PBC: PBC Ein/Aus
12. Setup: Öffnen des Einstellmenüs
13. Mute: Tonstopp
14. Nach links im Menü
15. Abwärts im Menü
16. Zurückspulen
17. Vorwärtsspulen
18. Play: Abspielen
19. Pause: Abspielpause
20. Open/Close: Lade auf/zu
21. A-B: Wiederholtes Abspielen
eines Stücks
22. L/R: Audiowiedergabe rechts,
links oder beide Seiten (VCD)
23. N/P: Umschaltung zwischen
NTSC und PAL
24. Subtitle: Sprachwahl für die
Untertitel
25. Program: Programmieren
26. Zoom: Einzoomen ins Bild
27. Display: Gibt Informationen über
das aktive Medium an
28. Clear: Löschen der Wahl
29. Title: Zurück zum Hauptschirm
30. Menu: Öffnet das DVD Menü
31. Volume +: lauter
32. Volume –: leiser
33. Aufwärts im Menü
34. Nach rechts im Menü
35. Enter: Bestätigen
36. Zum nächsten Titel
37. Zum vorigen Titel
38. Return: Zurück zum Hauptmenü
39. Stop: Abspielstopp
Page 32

Systemeinstellungen DVD-Spieler
Wenn die SETUP Taste auf der Fernbedienung gedrückt wird, erscheint folgender Bildschirm
(OSD = On Screen Menu), der die Einstellmöglichkeiten des DVD Spieler anzeigt.
Das SETUP Menü ist in folgende 5 Menüs unterteilt: General Setup, Audio Setup, Dolby Setup,
Video Setup, en Preference Setup.
General Setup
TV Type Screen size (4:3 PS, 4:3 LB, 16:9 Wide)
Angel Mark Angel mark On/Off
OSD Language Language setup for OSD
Captions Captions On/Off
Screen Saver Screen saver on/off
HDCDH Select bitrate for HDCD
Audio Setup
Downmix Selection of connected boxes (LT/RT, Stereo)
Spdif Output Selection of audio reproduction (SPDIF OFF/RAW/PCM)
Dolby Setup
Dual Mono Setting of sound reproduction (Stereo, Mono L/R, Mix Mono)
Dynamic Setting of dynamic range
Video Setup
Component YUV setting (Off/Yuv)
Tv Mode Tv mode setting
Sharpness Sharpness setting
Brightness Brightness setting
Contrast Contrast setting
Preference Setup
TV Type Selection of system format (NTSC, PAL, PAL60 of AUTO)
Audio Language of spoken text
Subtitle Language of the subtitles
Parental Setting of protection level for some types of DVDs
Password Password setting for setup
Default Back to default settings
Page 33

Technische Daten
Bildstandard...................................................................................... NTSC / PAL / PAL60 / AUTO
Kompatibilität .......................................................... DVD(R) / (S)VCD / CD (R/RW) / MP3 / JPEG
Auflösung........................................................................................................................500 Zeilen
Signal/Rauschabstand (Video) ........................................................................................... > 56 dB
Frequenzbereich......................................................................................... 45 Hz – 18 kHz (-1 dB)
Signal/Rauschabstand (Audio) ........................................................................................... > 90 dB
Audioschaltung digital/analog................................................................................ 192 kHz / 24 bit
Video Ausgang .............................................................................................................1 V p-p (75)
S-Video Ausgang...........................................................................Y: 1V p-p (75), C: 0,3V p-p (75)
Audio Ausgang .................................................................................................. 2,0 V ± 0,0 / 1,0 V
Digital Ausgang .....................................................................................................koaxial / optisch
AC-3 Ausgang ................................................................................................................. 5.1 Kanal
Versorgung ...........................................................................................................230 VAC / 50 Hz
Batteriedauer ........................................................................................................................ 2 Std.
Batteriespannung .................................................................................................................... 24 V
Eingebaute Batterie ..................................................................................................2 x 12 V, 7 Ah
Ausgangsleistung ................................................................................................................. 100 W
Signal/Rauschabstand Verstärker ...................................................................................... >90 dB
Abmessungen (HxBxT) ................................................................................. 730 x 400 x 310 mm
Gewicht................................................................................................................................26,7 kg
Reparieren Sie das Gerät niemals selbst und nehmen Sie niemals eigenmächtig
Veränderungen am Gerät vor. Sie verlieren dadurch den Garantieanspruch.
Der Garantieanspruch verfällt ebenfalls bei Unfällen und Schäden in jeglicher Form, die durch
unsachgemäßen Gebrauch und Nichtbeachtung der Warnungen und Sicherheitshinweise in
dieser Anleitung entstanden sind.
SkyTronic BV ist in keinem Fall verantwortlich für persönliche Schäden in Folge von
Nichtbeachtung der Sicherheitsvorschriften und Warnungen. Dies gilt auch für Folgeschäden
jeglicher Form.
Page 34

DK
VIGTIGT
- Læs hele denne vejledning før ibrugtagning og gem den for senere brug.
- Apparatet er kun beregnet til indendørs brug og må ikke udsættes for fugt/vand.
- Tilslut ikke apparatet hvis der er synlige skader på netstik, kabel eller kabinet.
- Forsøg ikke at adskille apparatet, en hver reparation bør foretages af autoriseret
personale.
- Placer ikke apparatet i direkte sollys, eller tæt på anden varmekilde.
- Tag altid netstikket ud af stikkontakten, når apparatet ikke er i brug.
- Ved temperatursvingninger (f.eks. ved transport) kan der dannes kondens, derfor bør
apparatet først tændes når det har opnået samme temperatur som omgivelserne.
- Sørg altid for at der er skruet helt ned for volumen før apparatet tændes.
- Skru altid langsomt op for volumen, kraftige udsving kan ødelægge højttaleren.
- Isæt ikke beskidte eller ridsede DVD/CD plader, da dette kan beskadige laseren
- Ved rengøring brug kun en fnugfri(evt. let fugtig) klud og aldrig
rengørings/opløsningsmidler.
Page 35

FØR BRUG
Kontroller at alle nedenstående dele er med i kassen, samt er ubeskadigede.
Karaokeforstærker
Brugervejledning
Fjernbetjening
Netkabel
Fjernbetjeningen bruger 2 stk. AA batterier. Sørg for at disse polariseres(+/-) korrekt i henhold til
mærkningen i batterirummet.
TILSLUTNING
Sørg altid for at alle apparater er slukkede mens der tilsluttes kabler.
På tegningen herunder vises de forskellige tilslutningsmuligheder.
A= Audio indgang monitor/tv D= S-video indgang monitor/tv
B= YUV indgang monitor/tv E= Coax eller optisk indgang på ext. forst
C= Video indgang monitor/tv
Page 36

BETJENING
FRONT
1. Tænd/sluk kontakt(on/off)
2. Equalizer omskifter (til/fra) med
LED-indikator
3. Mikrofon omskifter (til/fra) med
LED-indikator
4. DVD omskifter (til/fra) med LEDindikator
5. Kassette omskifter (til/fra) med
LED-indikator
6. Indikator for batterikapacitet (7
LED’s)
7. Ladeindikator (LED) to-farvet
a. Grøn: Batteri fuldt opladet
b. Rød: Fejl-melding;
overophedet eller batteri
afladet
8. Spændingsindikator (LED) tofarvet
a. Grøn: Tilkoblet internt batteri
b. Orange: Tilkoblet
extern forsyningsspænding
9. 4-bånds tonekontrol og
balancekontrol (L/R)
10. DVD volume
11. ECHO volume
12. DELAY (efterklang) regulering
13. Volume for MIC1 #17
14. Volume for MIC2 #18
15. Volume for MIC3 #19
16. Volume for linieindgang (LINE
IN)
17. Jack-bøsning til MIC 1
18. Jack-bøsning til MIC 2
19. Jack-bøsning til MIC 3
20. Regulering af samlet lydstyrke i
højttaler(master volume)
DVD sektion
21. DVD kanal-valg L/R
22. N(tsc)/P(al) Valg af TV-system
23. Søgning tilbage
24. Søgning frem
25. Vælger forrige track
26. Vælger næste track
27. Stop
28. Play/Pause
29. Skuffe åbner/lukker
30. DVD Display
31. DVD Skuffe
KASSETTE sektion
32. Kassette-låge
33. Optage (REC)
34. Afspille (PLAY)
35. Spoling tilbage
36. Spoling frem
37. Stop
38. Pause
Page 37

BAGSIDE
1. YUV video udgnag
2. S-Video udgang
3. Video-udgang
4. 2CH L/R udgang
5. Koaxial udgang
6. Optisk udgang
7. Netspændings-tilslutning(230V
AC)
8. Tilslutning for 12/24 VDC
9. Line udgang
10. Line indgang
Tilslutningerne (1) bruges kun hvis den indbyggede DVD-afspiller skal bruges til Surround via
extern forstærker eller evt. aktive højttalere.
BEMÆRK! Når apparatet tændes udføres en selvtest. Lysdioderene (2) blinker samtidigt 3
gange for at indikere dette og først derefter er apparatet klar til brug.
FJERNBETJENING
Den medfølgende fjernbetjening er kun til DVD-afspillerens funktioner. Da samtlige knapper er
mærket med “standard” udtryk er den ikke omtalt nærmere her, men der findes en oversigt til
knapperne i den engelske del af vejledningen. Blot skal det lige nævnes at visse funktioner
(f.eks. ANGLE/valg af kameravinkler) kun virker hvis de forefindes på den DVD der er lagt i
afspillleren.
OPSÆTNING AF DVD-AFSPILLER
Hvis der trykkes på knappen “SETUP” på fjernbetjeningen kommer DVD-afspillerens
opsætnings-menu til syne på skærmen.
Menuen indeholder 5 punkter som her gennemgås kortfattet.
General Setup
TV Type Screen size (4:3 PS, 4:3 LB, 16:9 Wide)
Angel Mark Angel mark On/Off
Page 38

OSD Language Language setup for OSD
Captions Captions On/Off
Screen Saver Screen saver on/off
HDCDH Select bitrate for HDCD
Audio Setup
Downmix Selection of connected boxes (LT/RT, Stereo)
Spdif Output Selection of audio reproduction (SPDIF OFF/RAW/PCM)
Dolby Setup
Dual Mono Setting of sound reproduction (Stereo, Mono L/R, Mix Mono)
Dynamic Setting of dynamic range
Video Setup
Component YUV setting (Off/Yuv)
Tv Mode Tv mode setting
Sharpness Sharpness setting
Brightness Brightness setting
Contrast Contrast setting
Preference Setup
TV Type Selection of system format (NTSC, PAL, PAL60 of AUTO)
Audio Language of spoken text
Subtitle Language of the subtitles
Parental Setting of protection level for some types of DVDs
Password Password setting for setup
Default Back to default settings
SPECIFIKATIONER
System.............................................................................................. NTSC / PAL / PAL60 / AUTO
Medier der kan afsp................................................ DVD(R) / (S)VCD / CD (R/RW) / MP3 / JPEG
Opløsning ........................................................................................................................ 500 lijnen
Signal-støj forhold billede (video) ....................................................................................... > 56 dB
Frekvensområde......................................................................................... 45 Hz – 18 kHz (-1 dB)
Signal-støj forhold lyd (audio)............................................................................................. > 90 dB
Video udgang ...............................................................................................................1 V p-p (75)
S-Video udgang.............................................................................Y: 1V p-p (75), C: 0,3V p-p (75)
Audio udgang .................................................................................................... 2,0 V ± 0,0 / 1,0 V
Digital udgang......................................................................................................... Koaxial / optisk
AC-3 udgang .................................................................................................................. 5.1 kanals
Forsyningsspænding ............................................................................................230 VAC / 50 Hz
Drifttid på indbygget akku .................................................................................................... 2 timer
Batteri-spænding ..................................................................................................................... 24 V
Indbyggede batterier................................................................................................. 2 x 12 V, 7 Ah
Udgangseffekt ...................................................................................................................... 100 W
Signal-støj forhold forstærker ............................................................................................. >90 dB
Dimensioner (hxbxd) ..................................................................................... 730 x 400 x 310 mm
Vægt ....................................................................................................................................26,7 kg
Førsøg ikke at adskille/rep. apparatet selv, da en hver reklamationsret derved bortfalder.
Af samme grund må der heller ikke foretages konstruktive ændringer på apparatet.
Følgeskader eller tab foresaget af fejl på apparatet dækkes ikke.
SkyTronic Scandinavia er ikke ansvarlig for skader som skyldes uagtsomhed,
misvedligeholdelse eller at anvisninger i denne vejledning ikke er fulgt.
 Loading...