

Skytec TEC 075 Owner's Manual
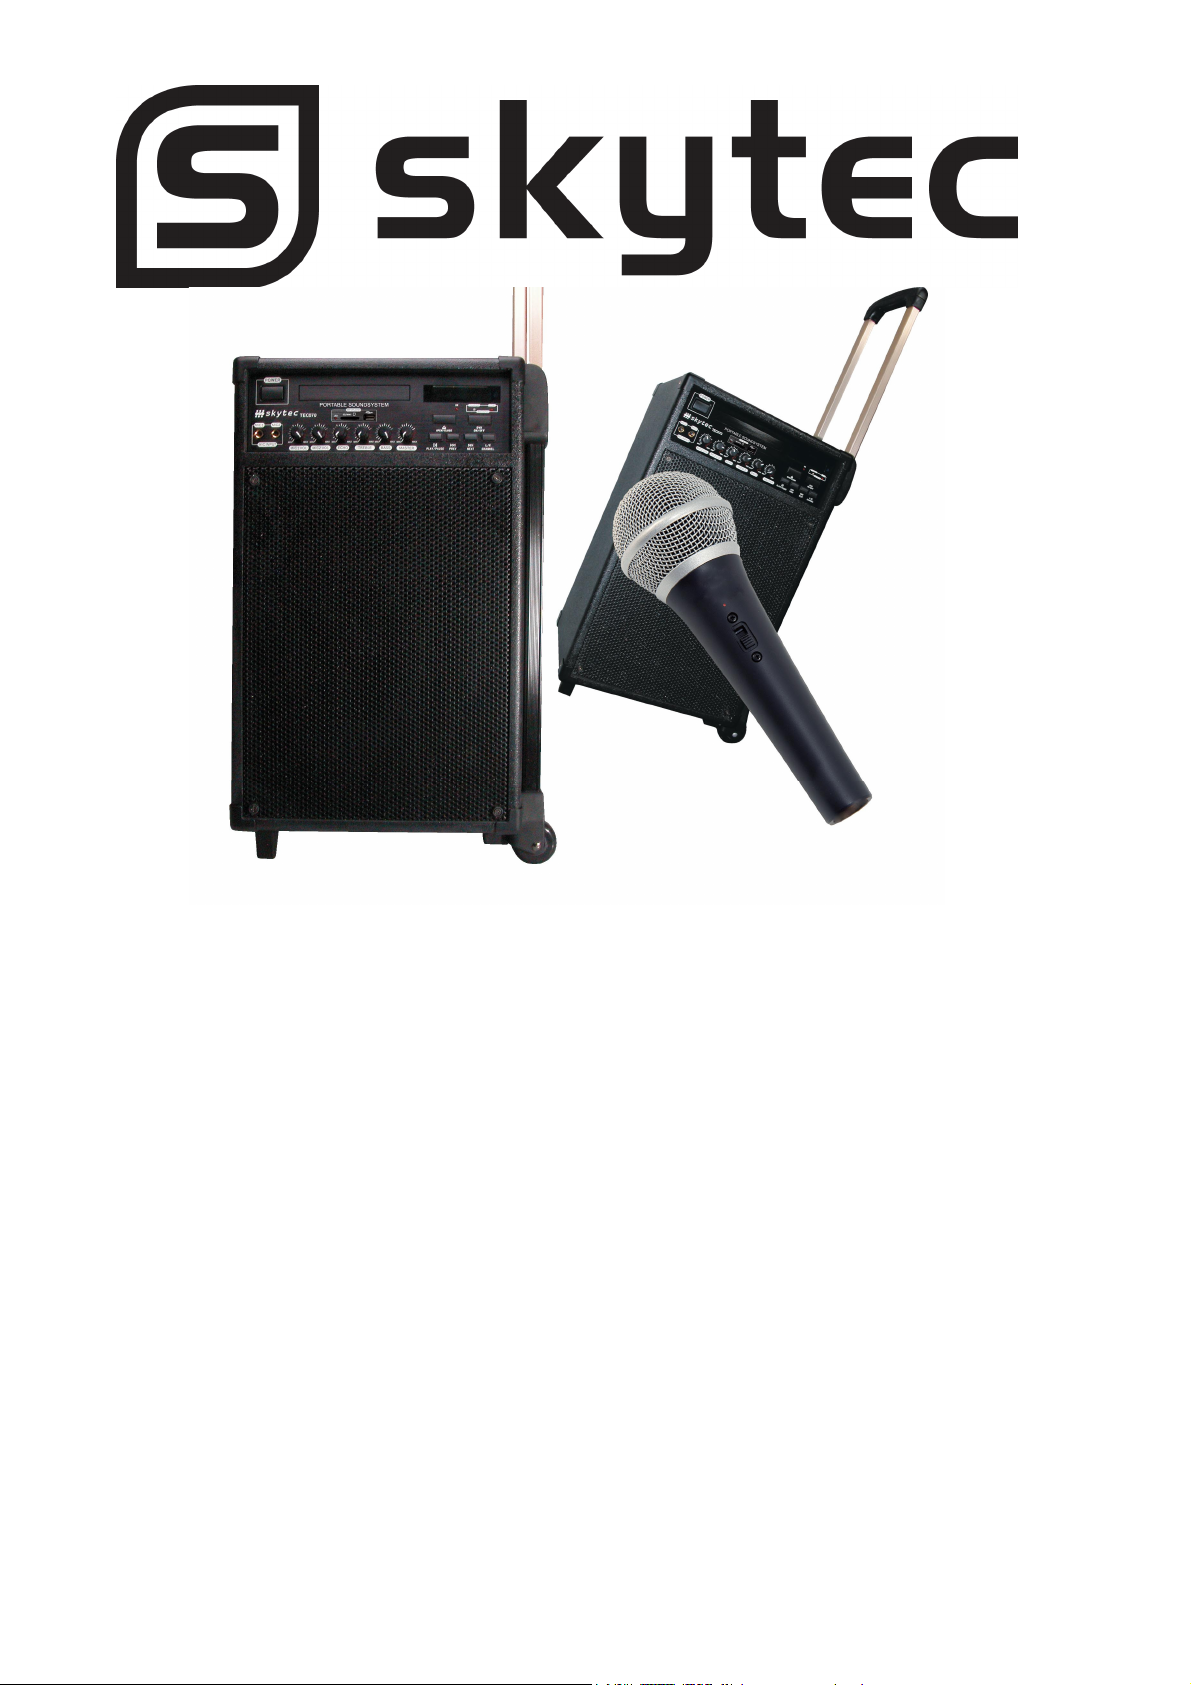
TEC 075
PORTABLE SOUND SET WIRELESS
170.126
Instruction Manual
Gebruiksaanwijzing
Mode d’Emploi
Gebrauchsanleitung
Brugsanvisning
GB
Congratulations on the purchase of this SkyTec Karaoke set.
Please read this manual carefully prior to using the unit.
Warning:
- Read the manual prior to using the unit.
- Keep the manual for future reference.
- Keep the packaging for safer transport in its original packaging
- Prior to the first use, have the unit checked by a qualified person.
- The unit contains voltage carrying parts. DO NOT open the unit.
- When you unplug the unit from the mains always pull the plug, never the lead.
- Never plug or unplug the unit with wet hands.
- If the plug and/or mains lead are damaged, they need to be repaired by a qualified
technician.
- If the unit is damaged to an extent that you can see internal parts, do not plug the
unit into a mains outlet.
- Repairs have to be carried out by a qualified technician.
- Only connect this unit to an earthed mains outlet of 230Vac/50Hz and 10-16A.
- Do no place the unit near heat sources.
- Always unplug the unit during a thunderstorm or when it is not in use.
- If the unit has not been used for a longer period of time, condensation can occur
inside the housing. Please let the unit reach room temperature prior to use.
- To avoid accidents in public premises, the legal requirements must be fulfilled and
instructions/warnings must be adhered to.
- Keep out of the reach of children.
- All volume controls must be set to zero prior to switching the unit on.
- Do not use cleaning sprays for the slider controls. The residues of these spray
cause dust deposits in the controls. If a problem occurs, please consult a specialist.
- Always handle CDs with clean hands. Do not insert a damaged CD.
- Always close the CD tray to keep the laser eye clean.
- Do not clean the unit with chemical solutions. This might damage the finish. Only
use a dry cloth for cleaning.

PARTS DESCRIPTION
Thanks you for choosing our products.
Please take a few moments to read these instructions carefully, as we want you to enjoy
your new products quickly and to the full. The series of amplifier with new design of model
and nice looking, can suit different occasions, especially for office, meeting, exhibition,
outside party, teaching etc. The series is provided with wired, amplifying and amusement;
fully embody high quality, low price, portability and convenience. We believe firmly that the
series of amplifier will become your good assistant and friend because of its advantages.
MAIN FEATURES OF THE AMPLIFIER
• Excellent quality achieved by adopting SANYO dustproof digital chips and intelligent
fan.
• Assemble with advanced wired microphones.
• 70W high power output to make your voice loud and clear.
• With AC-3, DTS etc. surround output.
• With fiber, coaxial, VGA and high distinct image output sockets.
• Function of connecting to outer speakers.
• Distinctive series connection of the system makes it suit for big speech occasion.
• Built-in sound source equipment: DVD
• Built-in AC-DC serving dual purposes power supply system with intelligence: auto
check the capacity of the battery, auto charge the battery, AC auto change to DC, it
makes you more convenient.
• The system can use wired microphone, DVD etc. different sound sources mixedamplifying.
• Special protection circuitry can effectively protect your amplifier.
• Support USB, Car reader function.
SPECIFICATION
MAX Output power: ..................................70W (RMS) / 4 Ω load impedance
T.H.D.: .................................................................................................<0.1%
Frequency Response: ...................................................... 50Hz-20kHz ± 3dB
Input Sound Source: .............DVD / wired mics/ external input sound source
Speaker: .............................. Built-in 8 inch bass speaker and 1 inch tweeter
Car reader memory medium:......................................... MMC Card, SD Card
Power supply: ..AC 220V at 50Hz, auto power source management system,
...................................intelligent battery charger and two pieces of 12V/5AH
...................................................................................rechargeable batteries.
Battery life: ........Voice-amplifying for 10 hours and DVD-playing for 5 hours.
Wired microphone: .................... Match different kinds of wired microphones.
Dimensions: ....................................................................540 x 330 x 290mm
FEATURES OF DVD PLAYER:
• With AC-3, DTS, PCM, MPEG etc. digital audio decoding output.
• With the quality of Hi-Fi, 96kHz/24bit audio digital processing.
• High definition of image details output, it can apply to the future display equipment.
• Fiber / coaxial audio output.
• With high stability and auto correction.
• Compatible with DVD, CD, CD-G, CD-R, MP3, KODAK Picture CD
• USB, Card reader support play form: MP3, WMA
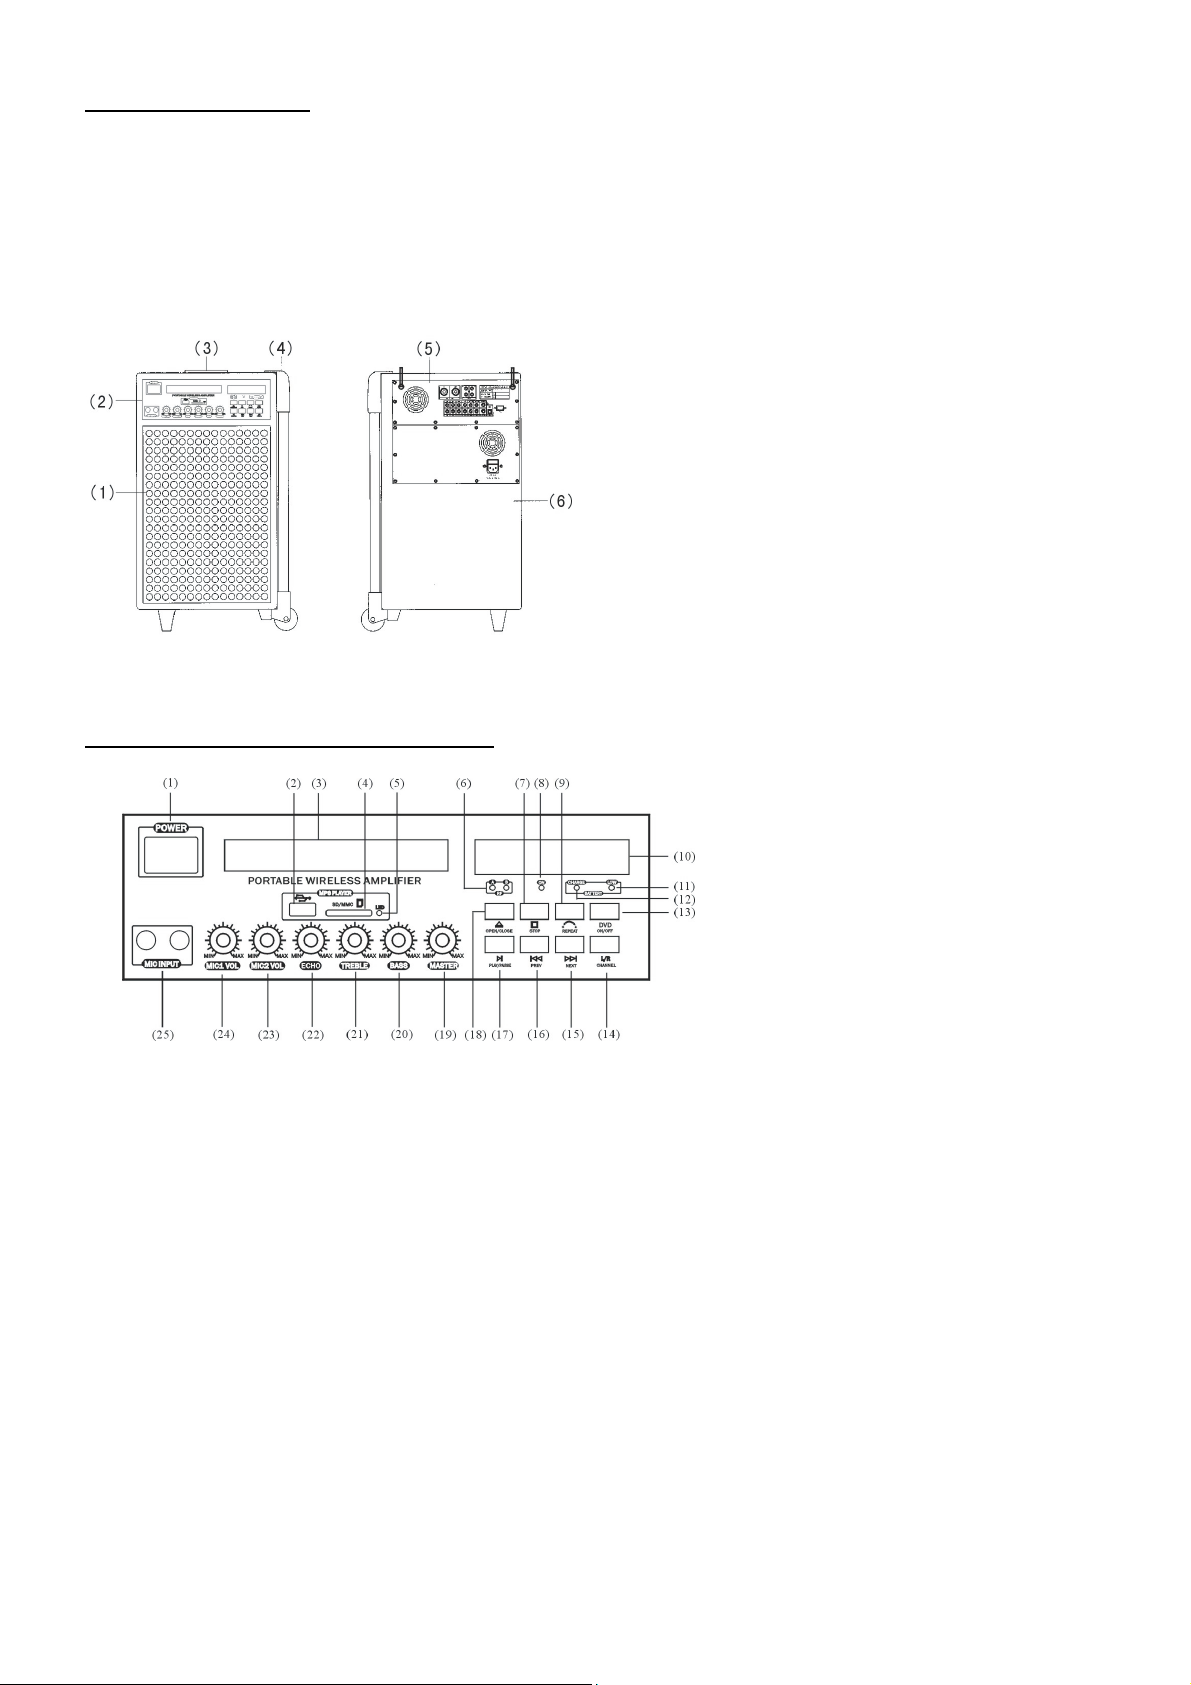
ENTIRETY DESIGN:
1. Protect net
2. Front panel
3. Telescopic Handle
4. Trolley
5. Back Panel
6. Watch Case
FRONT PANEL OF THE AMPLIIFER:
1. Power Switch
2. USB Input
3. DVD room
4. SD/MMC Card Input
5. SD/MMC LED indicator
6. Wireless Microphone Indicator
7. DVD Stop Button
8. Power Source Indicator
9. Repeat Button
10. DVD LCD Display panel
11. Battery Low indicator
12. Battery-charge Indicator
13. DVD ON/OFF
14. DVD channel sound switch
15. Next button
16. Prev button
17. Play/Pause button
18. DVD IN/OUT Button
19. Master Volume control
20. Bass knob
21. Treble knob
22. Echo control knob
23. Wireless Microphone Volume knob
24. Wired Microphone Volume knob
25. Wired Microphone Input Socket
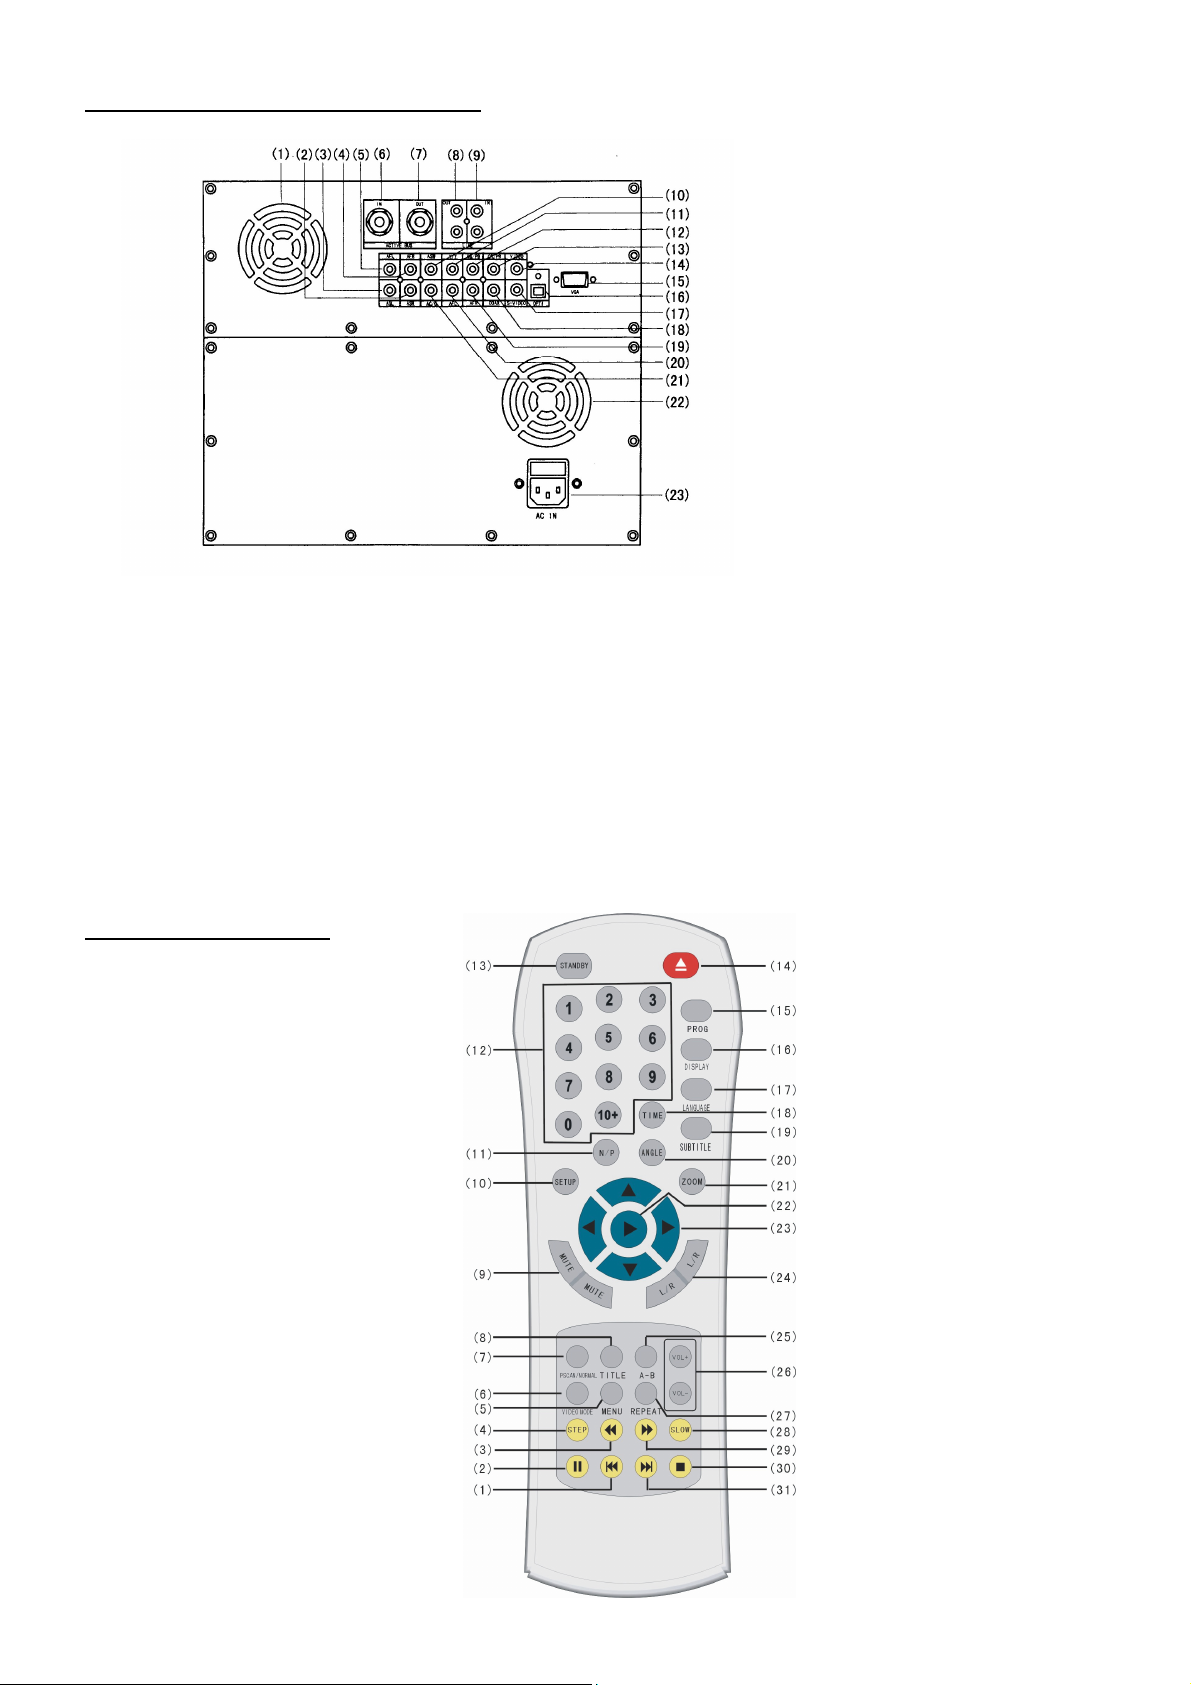
BACK PANEL OF THE AMPLIFIER:
1. Ventilate Holes.
2. Right surround output
3. Left surround output
4. Right pre.
5. Left pre.
6. Diapason connection input.
7. Diapason connection output
8. Audio output
9. Audio input
10. Super Bass output
OPERATION BOARD:
Telecontrol Instrument
1. LAST key
2. PAUSE key
3. BACKWARD key
4. STEP key
5. MENU key
6. VIDEO MODE key
7. PSCAN / NORMAL key
8. TITLE key
9. MUTE key
10. SETUP key
11. SYSTEM TYPE key
12. NUMBER key
13. STANDBY key
14. EJECT key
15. PROG key
16. DISPLAY key
17. LANGUAGE key
18. TIME key
19. SUBTITLE key
20. ANGLE key
21. ZOOM key
11, 12, 13. Video separate output
14. Compound video output
15. VGA output
16. Optical fiber output
17. S-Video output
18. Figures Coaxial output
19. Right mix output
20. Left mix output
21. Midrange output
23. AC power jack.
22. PLAY key
23. DIRECTION key
24. Left / Right Sound Channel
25. A-B key
26. VOLUME key
27. REPEAT key
28. SLOW key
29. FORWARD key
30. STOP key
31. NEXT key
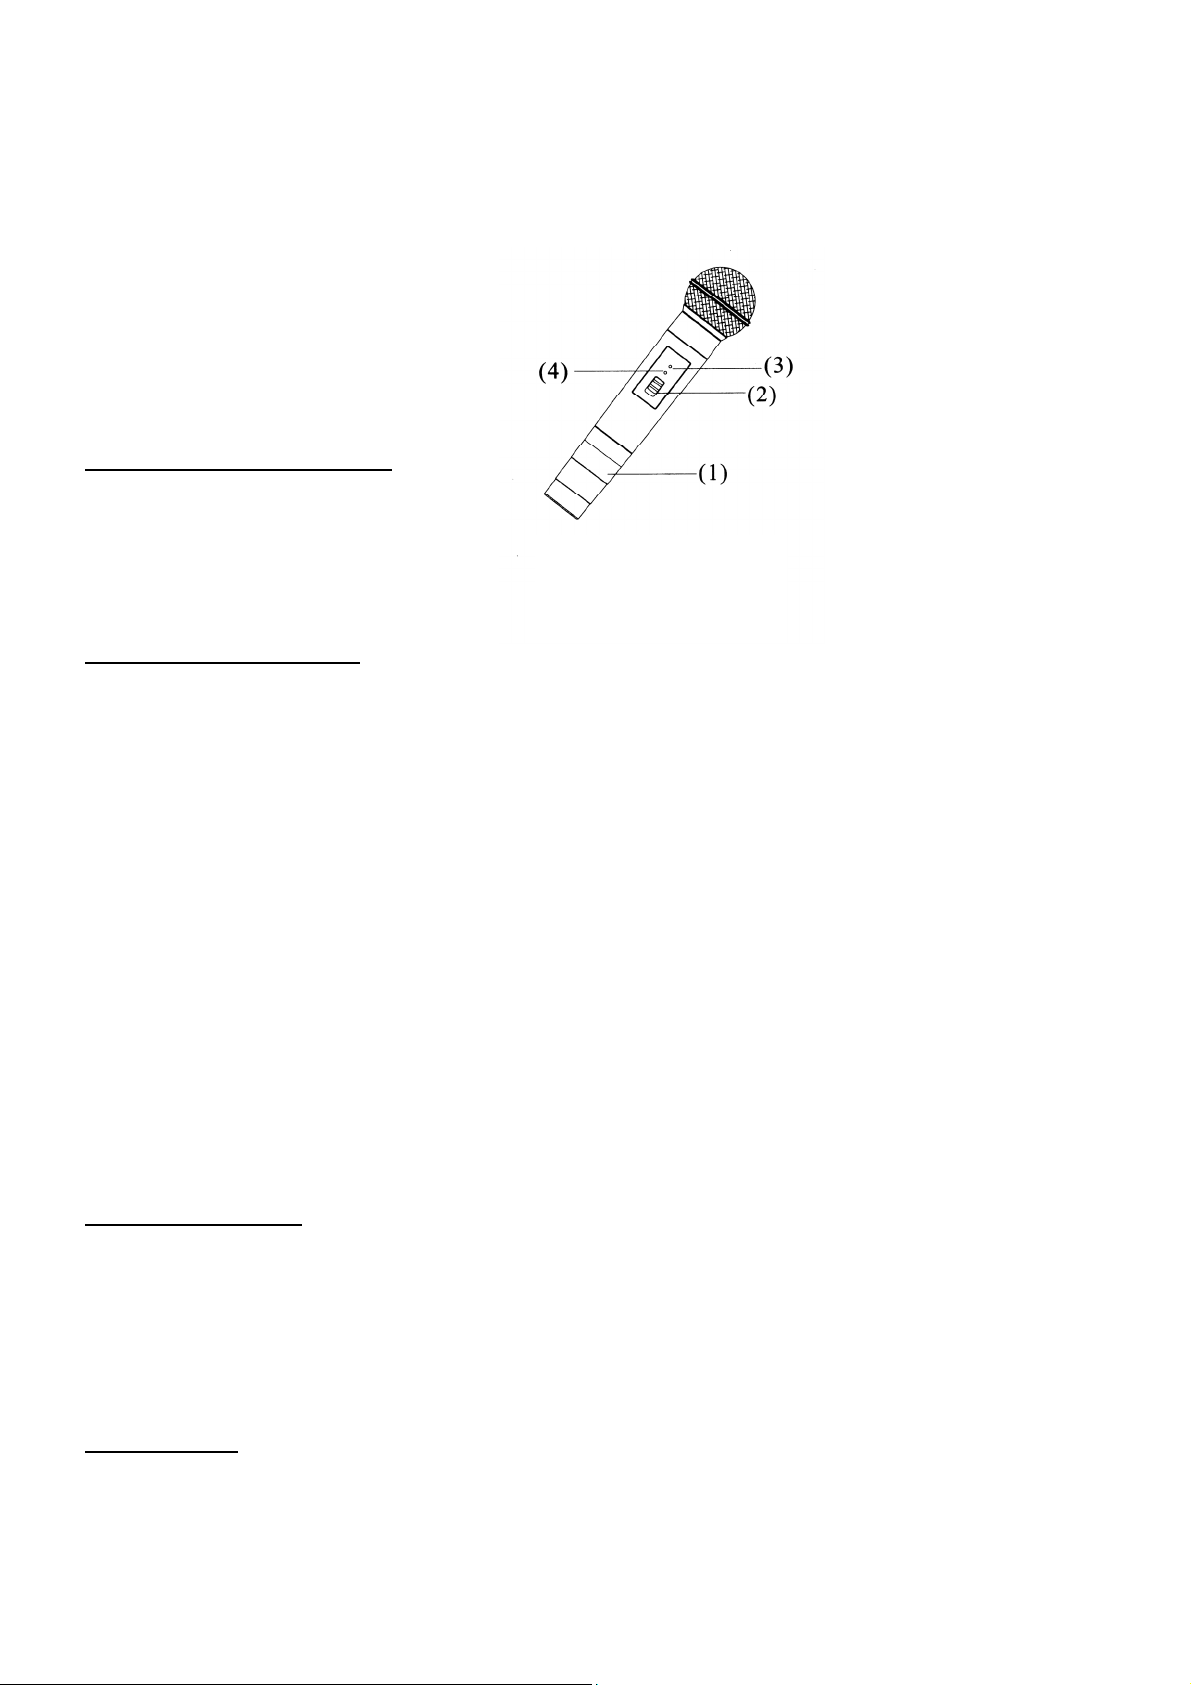
HANDHELD MICROPHONE
1. Battery Compartment/Cover
2. Power Switch
3. Power LED Indicator
4. Low Battery LED Indicator
SYSTEM CONNECTION:
Video Connection:
• The system has five patters on output: standard video, S-Output, VGA socket,
chromatism, and PR PB PY output.
• The video connection is chosen according to the input socket of your TV/monitor.
• Remember that the five patterns of output cannot be connected at the same time, to
avoid affecting result of image output.
Audio Connection:
• The audio output of the system is divided into two kinds: simulated audio and digital
audio. Simulated audio has two sound channels of stereo audio, 5.1 channel audio of
AC-3, digital audio has fiber and coaxial output.
• Chose pattern according to your outer equipment. If your outer equipment is an
ordinary TV, you can only choose stereo output; if your outer equipment is an
amplifier with 5.1 sound channel input, you can watch the effect of AC-3 home
cinema.
• The DVD output has wide dynamic range, so the volume of the amplifier must be
moderate, or the speaker would be destroyed by the sudden produced super high
volume.
SYSTEM SETTING:
• Press the SETUP button, the panel displays the menu.
• Use the direction keys (←↑→↓) to move to corresponding item, then press the SETUP
button again to exit the setup menu.
• Sound / Subtitle / Language setup of disc menu needs support of the disc.
• When you setup the grade of disc play, you need to input the secret code of the system,
the preset of the company is 0000.
BASIC PLAY:
• EJECT: Press the POWER key to put trough the power supply. Press the EJECT key to
open the disc room, put in the disc, and press the EJECT key again to close the DVD
room. When the DVD amplifier finished reading the disc, it will display the disc type on
the TV screen and auto-play.

• PROG key: Press the PROG key and the TV screen displays the program menu. Then
you can use the number keys and the direction keys to adjust the play order of the songs
in the disc.
• SYSTEM TYPE key: According to the system of your TV, use the SYSTEM TYPE key to
adjust the output system type.
• SUBTITLE key: Press the SUBTITLE key, you can choose one kind of subtitle display
from your disc. (Your DVD disc must support this function)
• LANGUAGE key: Use the LANGUAGE key to choose the language you need when
playing multi-language disc.
• ANGLE key: If your DVD disc includes multi-scene taking, you can use the ANGLE key
to change from one angle to another.
• ZOOM key: With the ZOOM key, you can magnify or zoom the picture. You can use the
direction keys to change the position of the picture in the status of magnifying.
• SOUND CHANNEL key: When you are playing multi-channel VCD or CD, you can use
the SOUND CHANNEL key to choose output from the left sound channel or the right
sound channel and select stereo or mixed sound output.
• SLOW key: With the SLOW key, you can watch the slow down motion pictures in the
process of disc playing. But the DVD player mutes when you press the SLOW key.
• STEP key: Press the STEP key, the DVD player plays step by step. Press the PLAY key
to return to normal mode.
• A-B key: When playing DVD, VCD, CD, you can use the A-B key to watch any part in the
discs. When the DVD player is playing a disc, you can press the A-B key to choose the
start point (refer to Point A) of the part you want to repeat and press the A-B key again to
choose the end point (mend by Point B). Then the DVD player repeats the part between
A and B. Press the A-B key for the third time, you can cancel the preset part repeat and
return back to normal play.
• REPEAT key: With the repeat key, you can repeat to play any title, paragraph, song or all
the disc.
• TITLE key: When the DVD player is playing DVD disc, use the TITLE key to return to the
first class title to play.
• MENU key: When the DVD player is playing DVD disc, press the MENU key to change
subordinate menu, and press the MENU key again to return to the main menu.
• PSCAN / NORMAL key: With the PSCAN / NORMAL key, you can adjust the video
output mode in cycle.
• VIDEO MODE key: With this key you can adjust the brightness, contrast, and hue of the
state of your screen. The DVD player provides four states: memory, standard, dynamic
and soft.
• STANDBY key: With the STANDBY key you can control the power switch of the DVD
player.
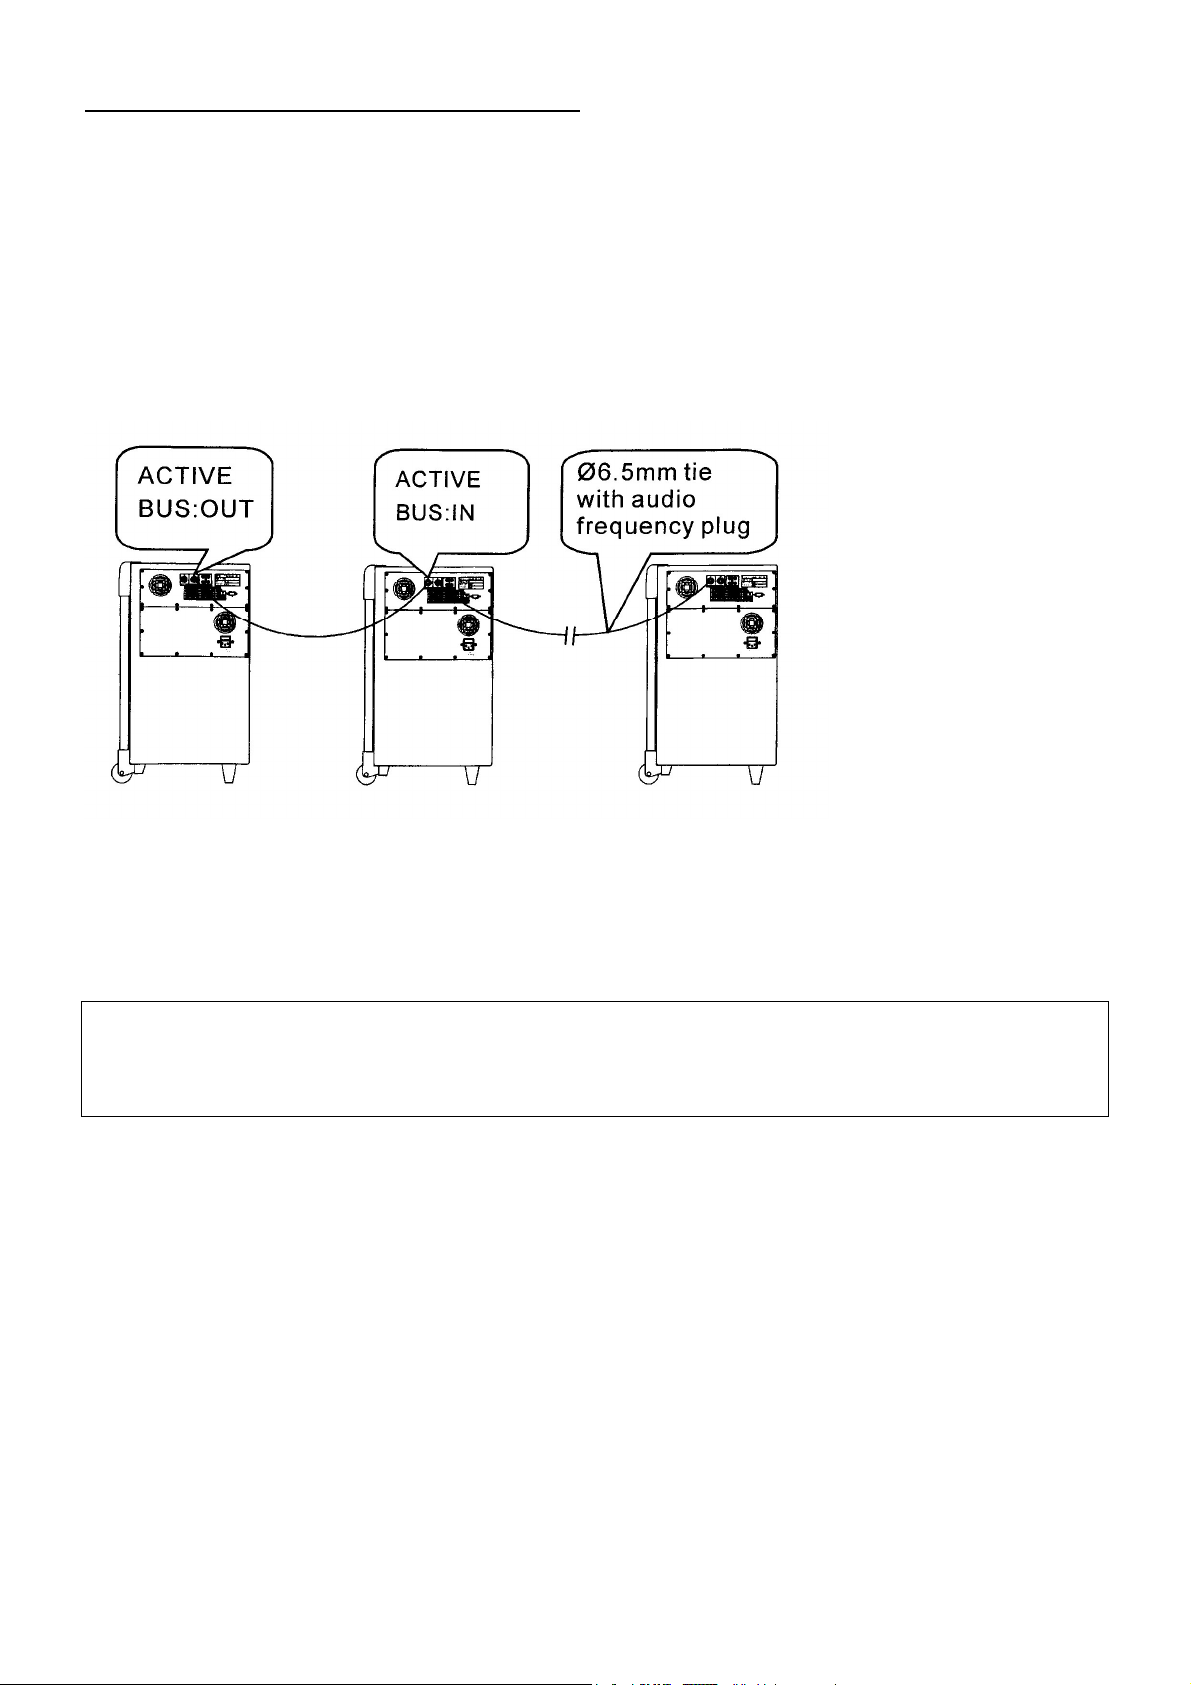
SERIES CONNECTION OF THE AMPLIFIER:
• In order to suit larger area, we can use series connection of the system. The amount of
amplifiers can be up to ten. The connection way is as the attached figure.
• In the attached figure, (1) means the main control amplifier (2~10) mean the controlled
amplifiers. The controlled amplifier’s input sound source, volume and tone are controlled
by the main control amplifier.
• When the system is in series connection, the output power of the main control amplifier
auto reduces to suit for monitoring.
NOTE: When the system is in series connection, you should connect the amplifier correctly, or it
will possibly cause damage to the amplifier.
(1) (2) ~ (10)
Do not attempt to make any repairs yourself. This would invalid your warranty.
Do not make any changes to the unit. This would also invalid your warranty.
The warranty is not applicable in case of accidents or damages caused by inappropriate use or disrespect of the warnings contained in this
manual.
SkyTronic UK cannot be held responsible for personal injuries caused by a disrespect of the safety recommendations and warnings. This is also
applicable to all damages in whatever form.

NL
Hartelijk dank voor de aanschaf van deze SkyTec karaoke set. Lees deze gebruiksaanwijzing
aandachtig door alvorens het apparaat in bedrijf te stellen.
WAARSCHUWING
- Lees altijd eerst de gebruiksaanwijzing voordat u een apparaat gaat gebruiken.
- Bewaar de handleiding zodat elke gebruiker hem eerst kan doorlezen.
- Bewaar de verpakking zodat u indien het apparaat defect is, dit in de originele verpakking
kunt opsturen om beschadigingen te voorkomen.
- Voordat het apparaat in werking wordt gesteld, altijd eerst een deskundige raadplegen.
- In het apparaat bevinden zich onder spanning staande onderdelen; open daarom NOOIT dit
apparaat.
- Bij het verwijderen van de stekker uit het stopcontact nooit aan het netsnoer trekken.
- Verwijder of plaats een stekker nooit met natte handen resp. uit en in het stopcontact.
- Indien de stekker en/of netsnoer als snoeringang in het apparaat beschadigd zijn dient dit
door een vakman hersteld te worden.
- Indien het apparaat zo beschadigd is dat inwendige (onder)delen zichtbaar zijn mag de
stekker NOOIT in het stopcontact worden geplaatst én het apparaat NOOIT worden
ingeschakeld. Neem in dit geval contact op met de dealer.
- Reparatie aan het apparaat dient te geschieden door resp. een vakman of een deskundige.
- Sluit het apparaat alléén aan op een 230VAC / 50Hz (geaard) stopcontact, verbonden met
een 10-16A meterkastgroep.
- Toestel niet opstellen in de buurt van warmte bronnen zoals verwarming etc.
- Bij onweer altijd de stekker uit het stopcontact halen, zo ook wanneer het apparaat voor een
langere tijd niet gebruikt wordt.
- Als u het apparaat lang niet gebruikt heeft en het weer wil gebruiken kan er
condensatiewater ontstaan; laat het apparaat eerst op kamertemperatuur komen alvorens
het weer in werking te stellen.
- Om ongevallen in bedrijven te voorkomen moét rekening worden gehouden met de
daarvoor geldende richtlijnen en moeten de aanwijzingen/waarschuwingen worden gevolgd.
- Het apparaat buiten bereik van kinderen houden.
- Zorg er altijd voor dat wanneer het apparaat wordt ingeschakeld dat alle regelaars en het
mastervolume op minimaal staan.
- Gebruik geen schoonmaakspray om de regelaars te reinigen. Restanten van deze spray
zorgen ervoor dat smeer en stof ophopen in de regelaars. Raadpleeg bij storing te allen
tijde een deskundige.
- Zorg dat uw handen schoon zijn tijdens het plaatsen van de discs. Plaats nooit een disc met
beschadigingen.
- Gebruik geen overmatige kracht bij het bedienen van de schakelaars en knoppen.
- Om de laser schoon te houden, altijd de disclade sluiten.
- Tracht niet het apparaat schoon te maken met chemische oplossingen. Dit kan de lak
beschadigen. Gebruik een droge doek om schoon te maken.
 Loading...