

Skytec STC-55 User Manual
STC-55
(172.832)
PROFESSIONAL DUAL USB/SD PLAYER
USER’S MANUAL
HANDLEIDING
GEBRAUCHSANWEISUNG
MANUAL DE INSTRUCCIONES
IMPORTANT
Use of controls or adjustments or performance of procedures other than those specified herein may
result in hazardous radiation exposure.
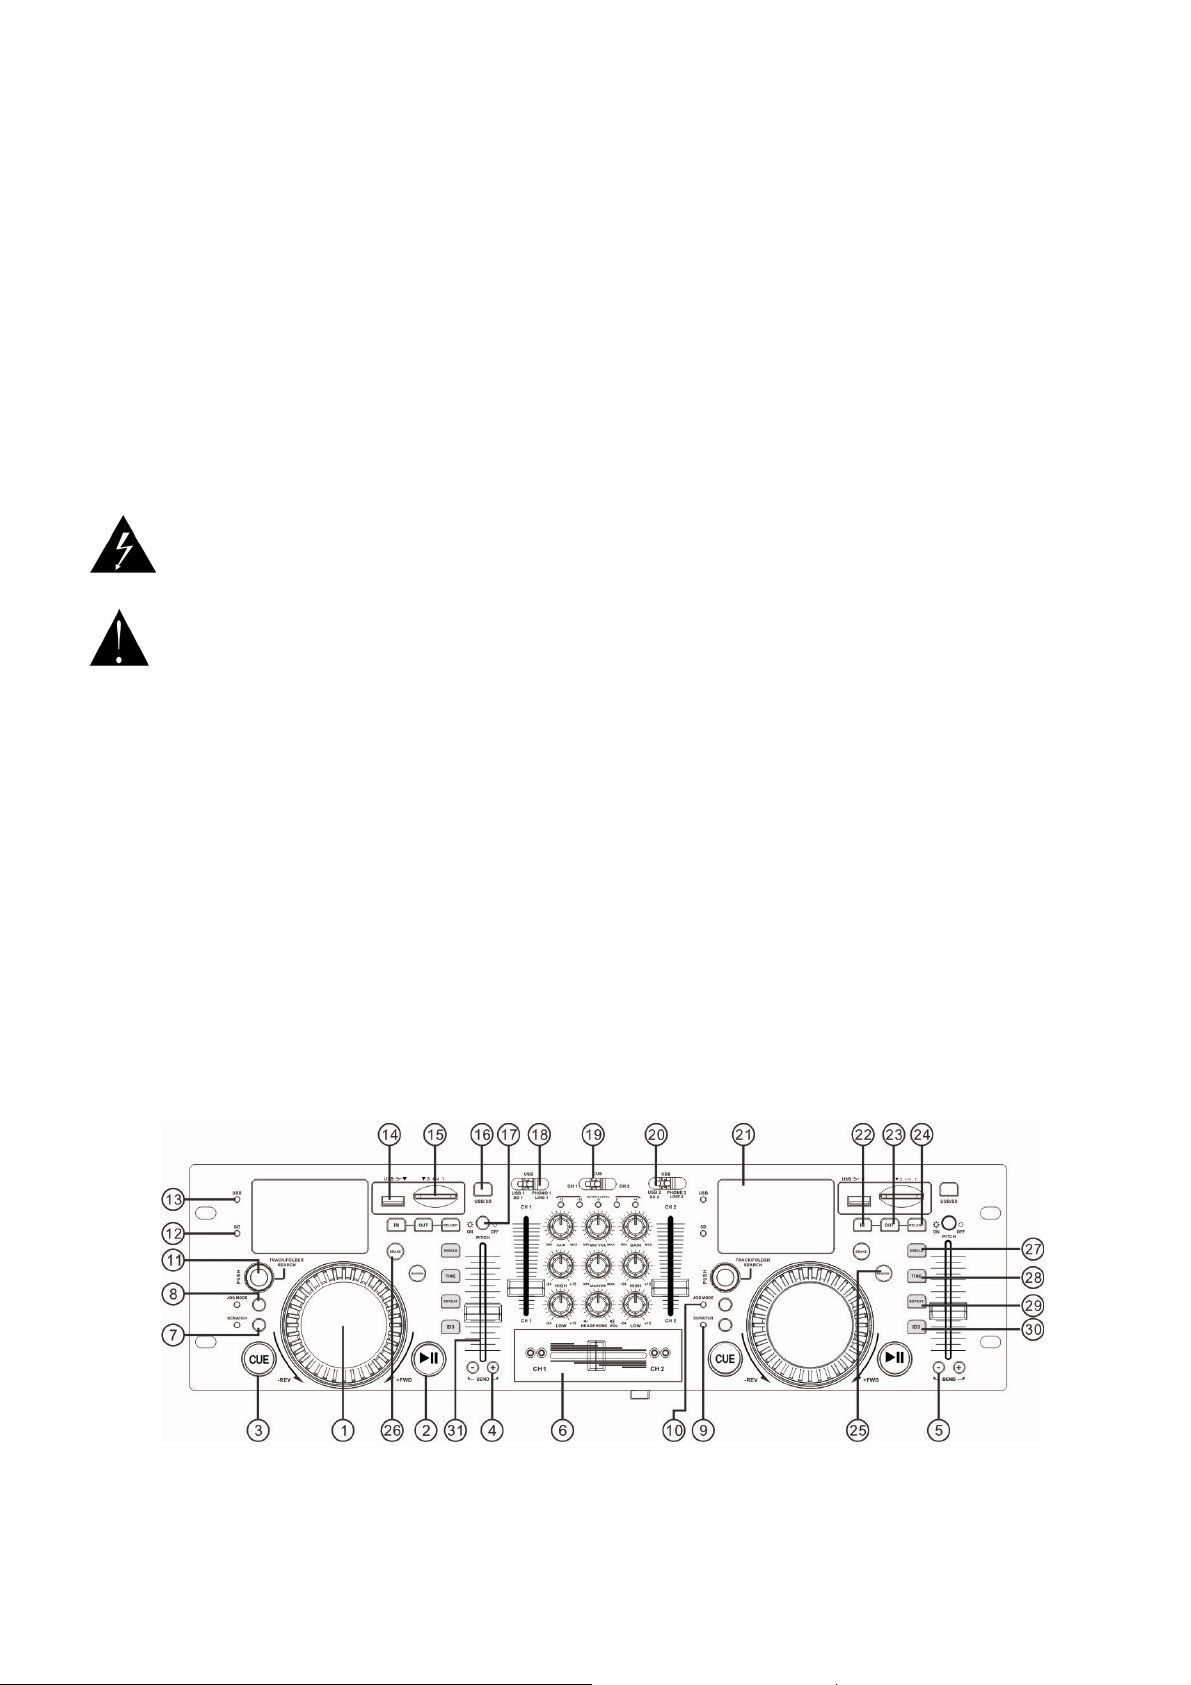
Controller function
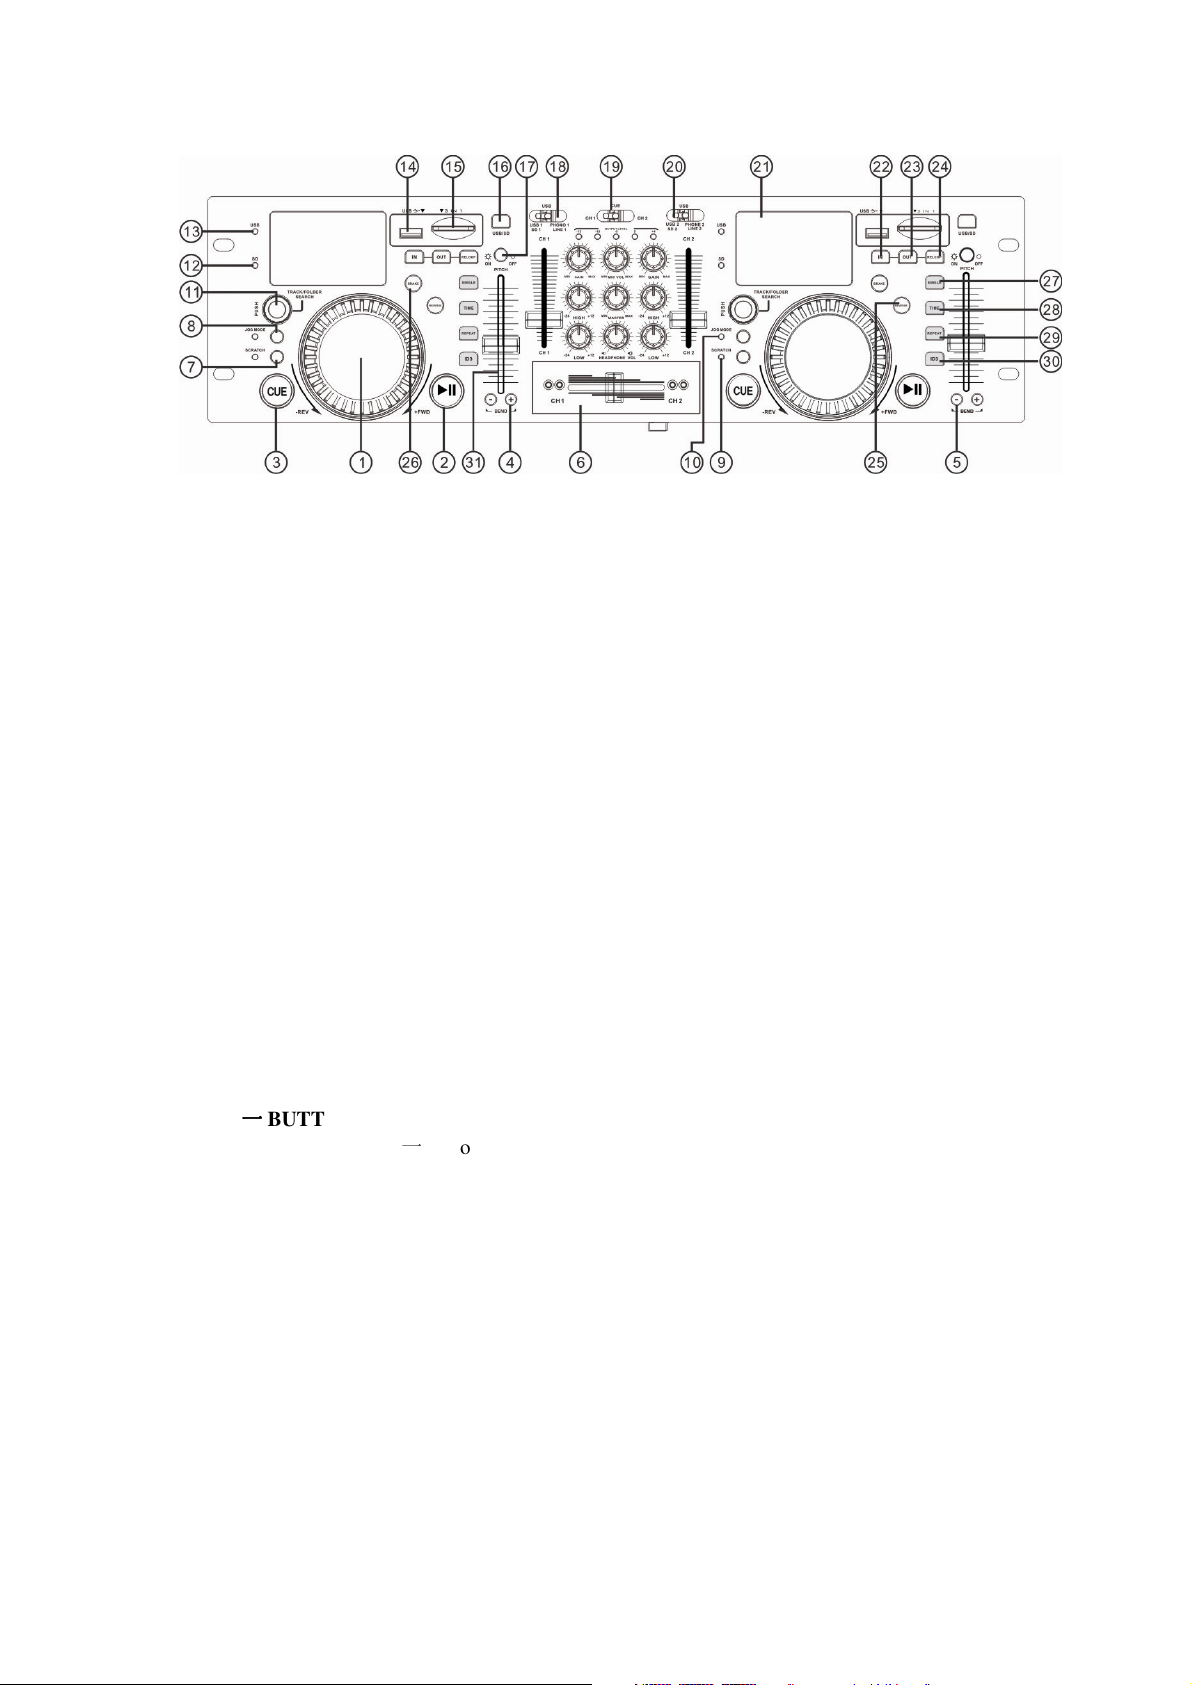
1.JOG&SHUTTLE WHEELS
Search :Touch the dial and rotate it to navigate the track ,Press the jogmode button and the
light is illuminate first.
Pitch: During playing ,rotate the dial to adjust the pitch bend
Cue point: In pause state ,Rotate the dial can navigate the track and once you enter a point
which you desired then press play/pause button and the CUE button light blink three times. Record the point
successfully. Note:(Rotate the dial ,clockwise is forward counterclockwise is backward)
2.PLAY / PAUSE BUTTON
Each time you press the PLAY/PAUSE button, the operation changes from play to pause or from pause to play.
3.CUE BUTTON
To define and record a return point from which playback it again.
4.PITCH BEND+BUTTON
The pitch speeds up when the +button is pressed and re turn to the original pitch when it is
released.
5.PITCH BEND
The pitch will slows down while the一button is pressed and return to the original pitch when it is released.
6. REPLACEABLE CROSSFADER
Achieves clean segues between the two input channels, Hard left selects channel 1."Hard right" selects channel
2.with the crossfader centered, both assigned channel are live Use the crossfader for fast and seamless segues from
one selected channel to the other
7.SCRATCH MODE
When the (10) is illuminated the wheel is in SCRATCH mode, you may press the SCRATCH button to exit
SCRATCH mode.
一一一一
BUTTON

8.JOG MODE
When the (10) is illuminated the wheel is in SCRATCH mode, you may press the SCRATCH button to exit
SCRATCH mode.
9. When you enter into SCRATCH WORK MODE the lamp can light.
10.When you enter into JOG MODE WORK MODE the lamp can light.
11.FOLDER/TRACK SEARCH
Allows you to navigate through folders or tracks similarly in either USB or CD mode. When
navigating a standard CD turn the rotary to the right to advance the selection or turn the rotary
to the left to decrease the selection.
12.when you enter into SD work mode the lamp can light
13.when you enter into USB work mode the lamp can light
14.USB PORT
Allows the connection of any USB memory stick.
15. 3 IN 1 CARD SLOT
Slot for inserting 3 IN 1 card. The contacts of the card must point downwards. The unit cannot
read cards with a capacity of more than 4GB. The unit is not compatible to SDHC cards and only supports the MP3
format.
16.USB/SD
To select audio source between USB storage and SD card.
17.PITCH BUTTON
Pitch on/off switch. the adjustment of the pitch potentiometer is available when at pitch on state
and the light is illuminate.
18. INPUT TOGGLE SWITCH – (USB-SD / USB B / Phono-Line)
Selects which source will be live to that channel based on what you have connected to the rear
panel input section. In USB1 or USB or SD1 position the internal USB2 or USB or SD2 units
are active
19.CUE FOR CH1-2
Selects which source will be live to that channel for CH1 &CH2
20. INPUT TOGGLE SWITCH – (USB-SD / USB B / Phono-Line)
Selects which source will be live to that channel based on what you have connected to the rear
panel input section. In USB2 or USB or SD2 position the internal USB1 or USB or SD1 units
are active
21.DISPLAY
LCD Display Indicate the Track/Numbers//Time/Remain/Pitch/Continue/Single.
22.1N BUTTON
This button sets the beginning point of the loop and the light is illuminate.
23.OUT BUTTON
When you press this button, you set the end point of the seamless loop and you start the loop. To
finish the loop, press again this button.
24.RELOOP BUTTON(LOOP SYSTEM)
This button is used to start the last saved loop. To finish the loop, press the reloop button.
25.DSP/REVERSE
Push the reverse button to play your track in reverse push the reverse button again to cancel this
feature.
《《《《
LOOP SYSTEM)
《《《《
LOOP BUTTON)
26.DSP/BRAKE
In play mode you push the brake button at first and then push play/pause button the operation
changes is slowness from play to pause, push play/pause button again to cancel this feature.
27.SINGLE
Press these to switch between the SINGLE and CONTINUE play mode. The selected mode is
indicated on the LCD. In SINGLE mode, after each track, the unit stops the reading. In
CONTINUOUS mode, the unit read all track and stops.
28. TIME BUTTON
Used this knob to choose the time mode: Elapsed time, remaining time or total remaining time.
29.REPEAT BUTTON
Use this button to repeat one track or all the track of the CD
30.ID3
When you press the ID3 button. To show the name of songs in the led display.
31. PITCH CONTROL
Use this fader to increase or decrease the speed of the track. Slide up to decrease the pitch and
slide down to increase the pitch.
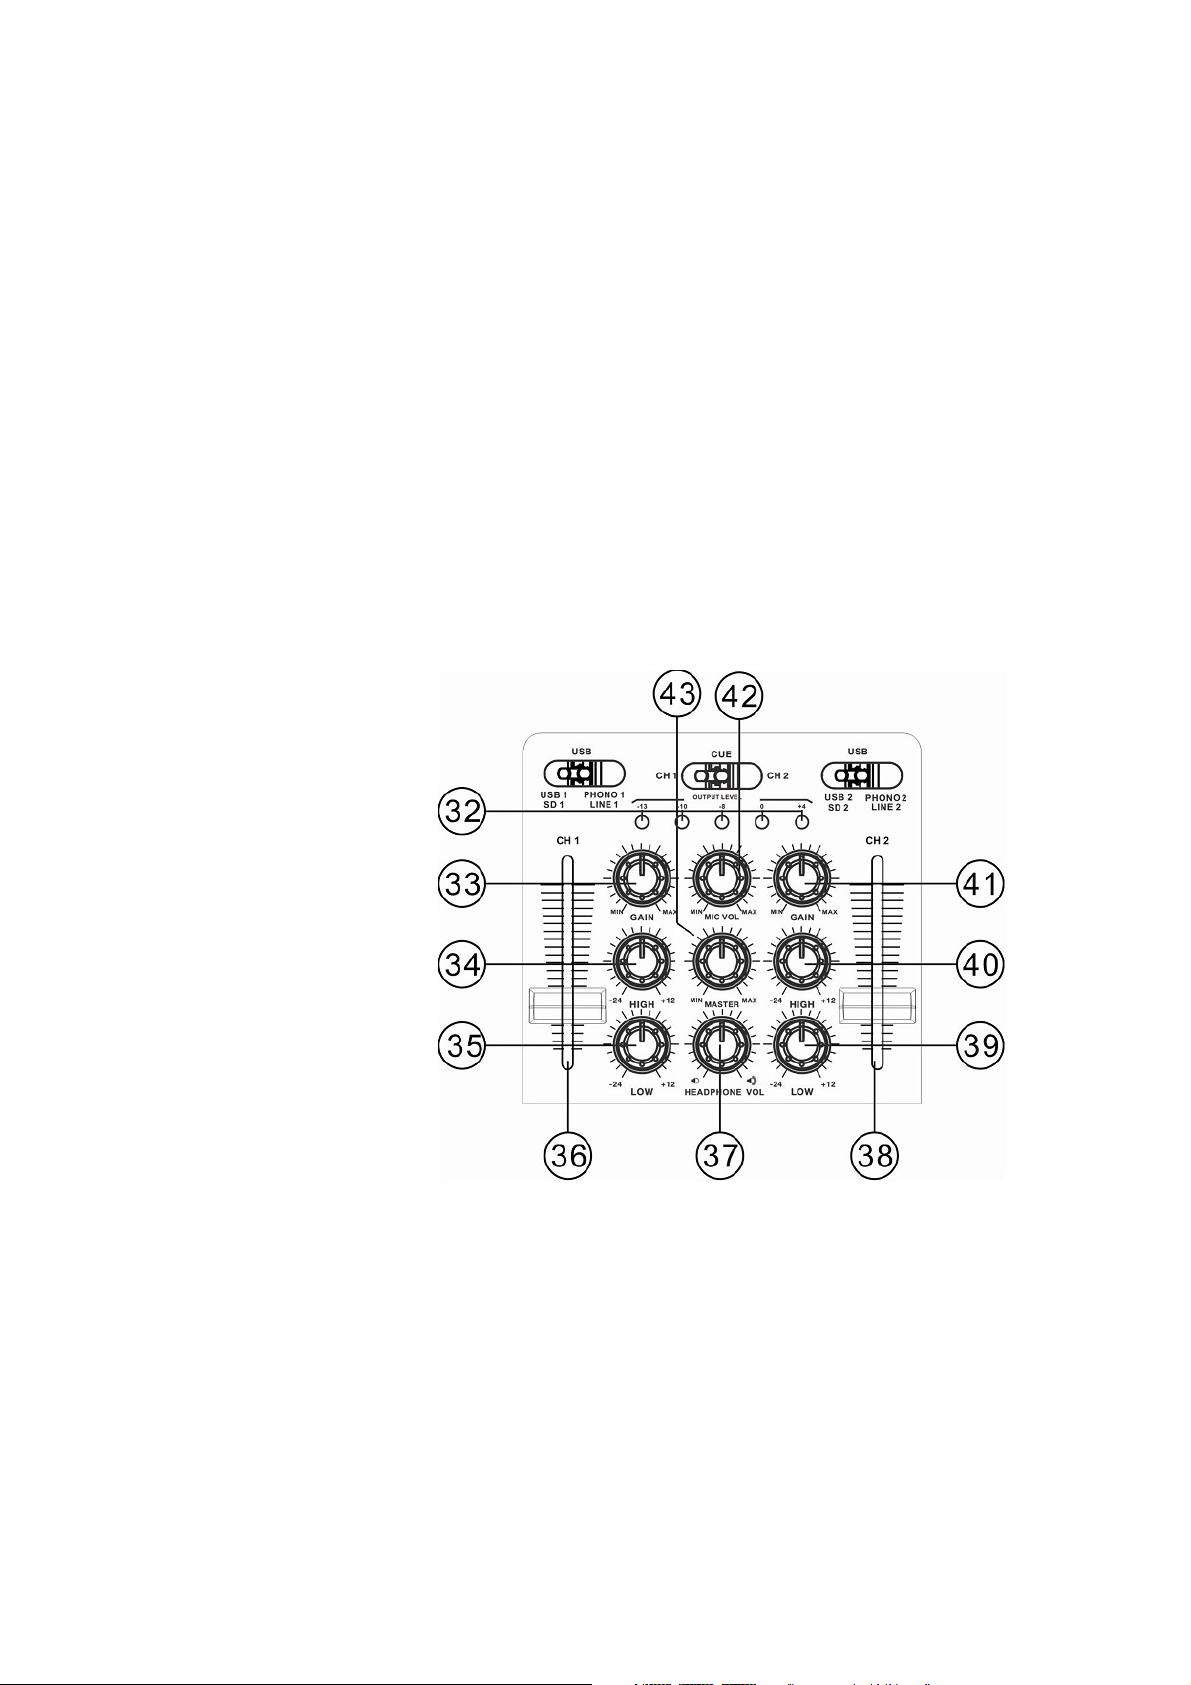
Mixing Console Function:
32. LED METER
Indicates the master output level
33-41. CH1&CH2 GAIN CONTROL
Adjusts CH1&CH2 level
34-40. HIGH FADER 1-2
Adjust CH1&CH2 equalization of high
35-39. LOW FADER 1-2
Adjust CH1&CH2 equalization of low
36-38. INPUT FADER
Controls individual source levels for CH1-2 in the mix
37. HEADPHONE VOL
Adjust headphone level.
42. MIC VOL
Adjust microphone level.
43. MASTER VOL
Adjust master level output
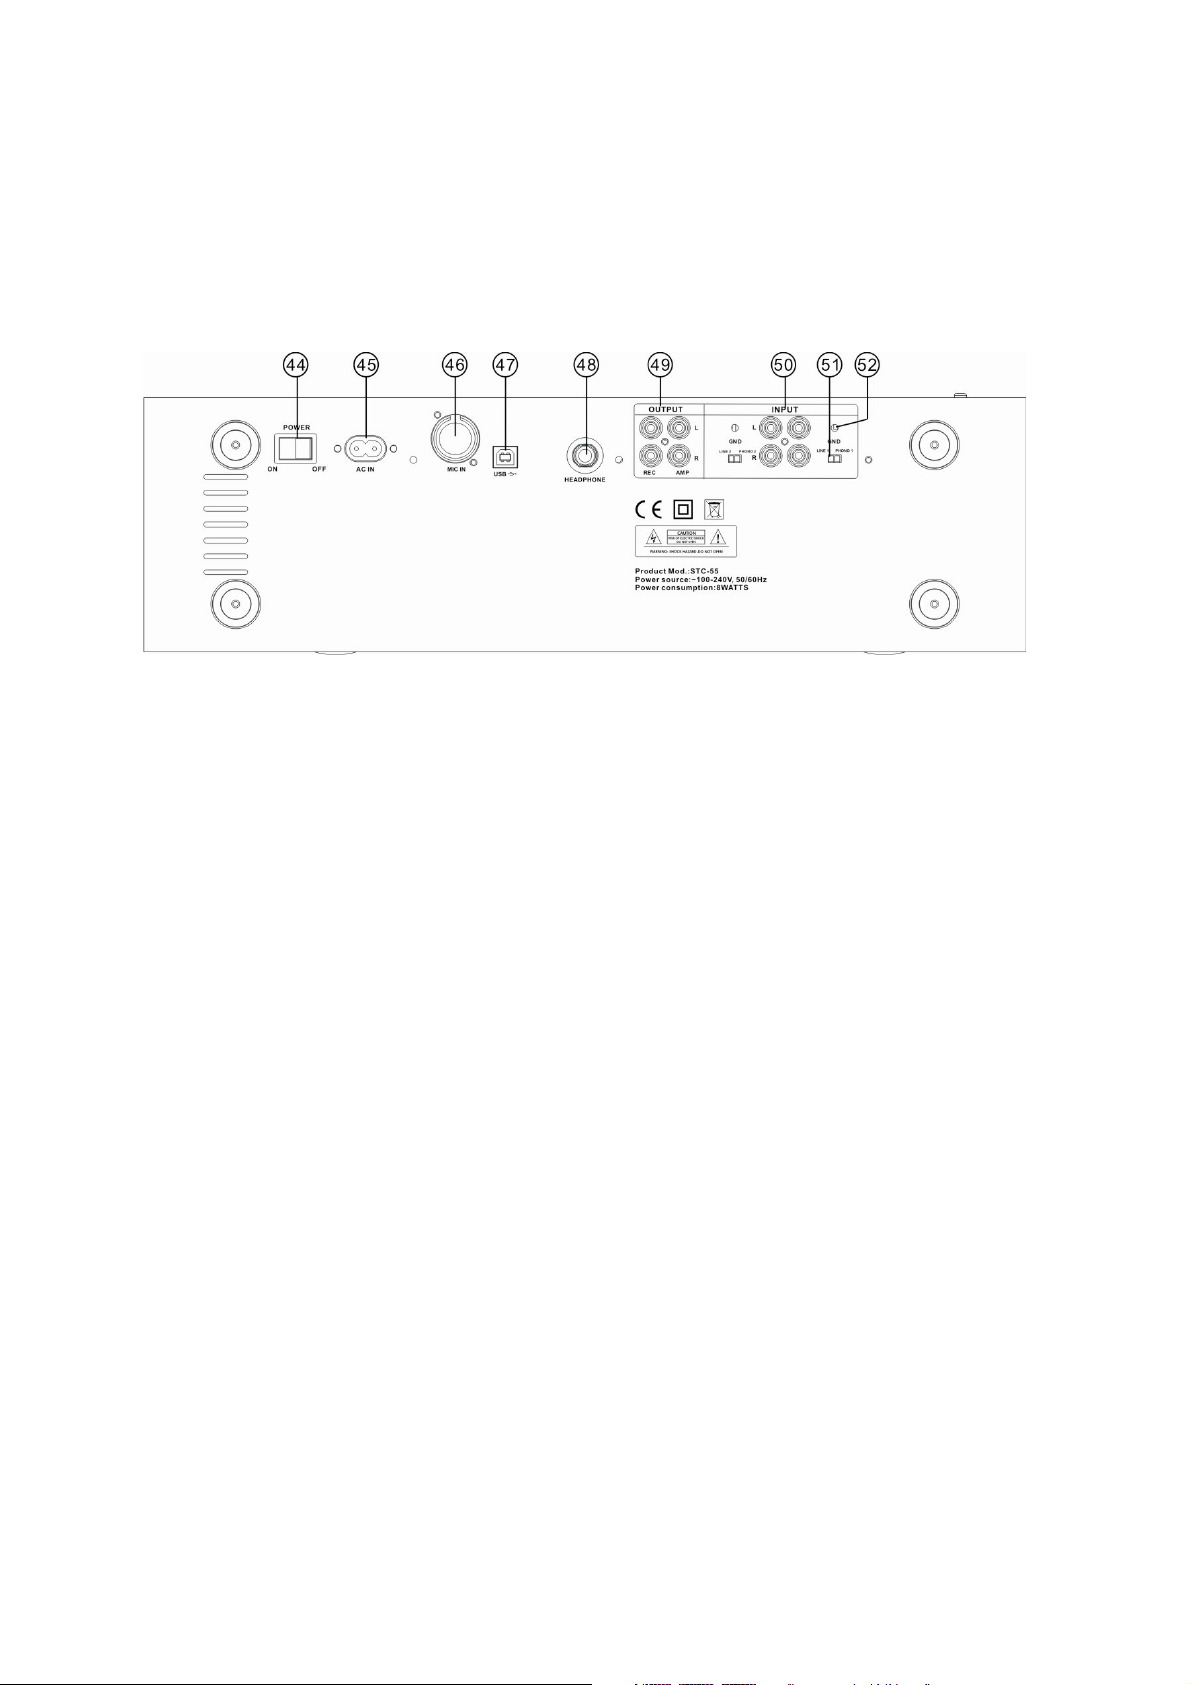
44. POWER BUTTON
Press the power switch to turn the unit on. To switch the POWER off press the POWER switch
again.
45. AC CORD
Used this cable to connect the AC mains power to the unit
46. DJ MIC
Plug XLR type microphone plug in here.
47. USB
Connect with the computer, record the playing music into this computer.
48. HEADPHONE JACKS
Used to connect for audio monitoring with headphones.
49. STEREO MAIN OUTPUT
Unbalanced RCA connectors controlled by the masterfader.
50. INPUT
Plug in the line level device such as tape deck or additional CD player here
51. LINE/PHONO INPUT SWITCH
Use this to allow either line level or phono level equipment to be plugged into your channel inputs. When phono
input is selected, your signal is fed directly to the high-quality RIAA phono pre-amplifiers. Line level sources will
overload the sensitive phono pre-amps and will sound very bad, so always be sure to toggle the line/phono switch
over to line before connection of line sources.
52. GND
Grounding lug for turntable connection. Always use this connection when using turntables.(your
turntable cable should have a grounding wire)

Electric products must not be put into household waste. Please bring them to a recycling centre. Ask your local
authorities or your dealer about the way to proceed.
The specifications are typical. The actual values can slightly change from one unit to the other. Specifications can
be changed without prior notice.
Do not attempt to make any repairs yourself. This would invalid your warranty. Do not make any
changes to the unit. This would also invalid your warranty. The warranty is not applicable in case
of accidents or damages caused by inappropriate use or disrespect of the warnings contained in
this manual. Skytec cannot be held responsible for personal injuries caused by a disrespect of the
safety recommendations and warnings. This is also applicable to all damages in whatever form.
WARRANTY CONDITIONS
Skytec equipment is covered by a 1-year warranty on parts and labour except for
faders(90 days).The follwing rules apply from the day the equipment leaves the factory:
The date on the invoice is considered to be the date the warranty begins.
Only companies approved by Skytec are allowed to work on the equipment.Warranty
becomes void when other service technicians open the equipment.
During warranty period,defective equipment must be sent by pre-paid mail in the original box
Skytec will return the goods by pre-paid mail during the first year of warranty;
thereafter the mailing cost is to be paid by the recipient.
Potentiometers have a limited lifetime and are not covered by the manufacturer for more than
normal use.
For all service enquiries,refer to your local distributor,as he is best able to help you.
SPECIFICATIONS:
Power supply:.................................... 220~240VAC / 50Hz (8 Watt)
Dimensions: ................................. 482 x 134 x 120mm (19" x 3HE)
Weight: ........................................................................................3kg

Nederlands
Hartelijk dank voor de aanschaf van deze dubbele USB/SD speler. Neemt U a.u.b. een paar momenten de tijd om deze
handleiding zorgvuldig te lezen, aangezien wij graag willen dat u onze producten snel en volledig gebruikt.
- Bewaar de verpakking zodat u indien het toestel defect is, dit in de originele verpakking kunt opsturen om
- Voordat het toestel in werking wordt gesteld, altijd eerst een deskundige raadplegen.
- In het toestel bevinden zich onder spanning staande onderdelen; open daarom NOOIT dit toestel.
- Bij het verwijderen van de stekker uit het stopcontact nooit aan het netsnoer trekken.
- Verwijder of plaats een stekker nooit met natte handen resp. uit en in het stopcontact.
- Indien zowel de stekker en/of netsnoer als snoeringang in het toestel beschadigd zijn dient dit door een vakman
- Indien het toestel zo beschadigd is dat inwendige (onder)delen zichtbaar zijn mag de stekker NOOIT in het
- Reparatie aan het toestel dient te geschieden door een vakman of een deskundige.
- Sluit het toestel alléén aan op een 220~240VAC / 50Hz (geaard) stopcontact.
- Toestel niet opstellen in de buurt van warmtebronnen zoals radiatoren etc. en niet op een vibrerende- maar
- Bij onweer altijd de stekker uit het stopcontact halen, zo ook wanneer het toestel een langere tijd niet gebruikt
- Als u het toestel een tijd niet gebruikt heeft en het weer wil gebruiken kan er condens ontstaan; laat het toestel
- Om ongevallen in bedrijven te voorkomen moét rekening worden gehouden met de daarvoor geldende
- Wanneer het toestel aan de muur bevestigd moet worden dient eerst zorgvuldig berekend te worden of het
- Laat ruimte vrij voor een deugdelijke ventilatie.
- Het toestel buiten bereik van kinderen houden. Bovendien mag het toestel nooit onbeheerd gelaten worden.
- Gebruik geen schoonmaakspray om de schakelaars te reinigen. Restanten van deze spray zorgen ervoor dat
- Zorg dat uw handen schoon zijn tijdens het gebruik.
- Gebruik geen overmatige kracht bij het bedienen van het toestel.
- Zorg er voor dat de dubbele usb/sd speler eerst Uit geschakeld wordt alvorens het netsnoer uit het stopcontact
Lees deze handleiding eerst door alvorens het product te gebruiken. Volg de instructies op
anders zou de garantie kunnen vervallen. Neem ook altijd alle veiligheids maatregelen om
brand en/of een elektrische schok te voorkomen. Tevens is het ook raadzaam om reparaties /
modificaties e.d. over te laten aan gekwalificeerd personeel om een elektrische schok te
voorkomen.
beschadigingen te voorkomen.
hersteld te worden.
stopcontact worden geplaatst én het toestel NOOIT worden ingeschakeld. Neem in dit geval contact op met de
dealer. Sluit het toestel nooit op een dimmer aan.
stabiele ondergrond plaatsen. Dek ventilatie-openingen nooit af.
wordt. Stelregel: Bij geen gebruik stekker verwijderen.
eerst op kamertemperatuur komen alvorens het weer in werking te stellen ; toestel nooit in vochtige ruimten en
buiten gebruiken. Plaats geen metalen voorwerpen, vloeistoffen (in bekers etc.) op het product, deze kunnen
onherstelbare schade of een elektrische schok veroorzaken!! wanneer ze het toestel binnendringen.
richtlijnen en moeten de aanwijzingen/waarschuwingen worden gevolgd.
plateau en/of muurbeugels deze wel kunnnen dragen. Kunt u het niet berekenen schakel dan vakbekwaam
personeel in. Het toestel mag alleen bevestigd worden op de manier die de fabrikant /expert aanbeveelt.
smeer en stof ophopen. Raadpleeg bij storing te allen tijde een deskundige.
te verwijderen.
Bewaar deze handleiding ook voor toekomstig gebruik.
172.832
Tracht het toestel niet schoon te maken met chemische oplossingen. Dit kan de lak beschadigen. Gebruik een droge
doek om schoon te maken en doe dit frequent, b.v. maandelijks (afhankelijk van de plaats waar de speler gebruikt
wordt).
Blijf uit de buurt van elektrische/elektronische apparatuur, elektriciteitskabels etc., deze veroorzaken bromstoringen.
Bij reparatie dienen altijd originele onderdelen te worden gebruikt om onherstelbare beschadigingen en/of
ontoelaatbare straling te voorkomen.
Verwijder netsnoer en aansluitsnoeren voordat u dit product gaat verplaatsen. Vervoer de speler eventueel trillingsvrij.
Zorg ervoor dat het netsnoer niet beschadigd/defect kan raken wanneer mensen erover heen lopen. Het netsnoer vóór
ieder gebruik controleren op breuken/defecten! !
In Nederland/Belgie is de netspanning 220 ~ 240Vac/50Hz. Indien u reist (en u neemt het toestel mee) informeer dan
naar de netspanning in het land waar u verblijft.
Deze markering wordt weergegeven om u erop attent te maken dat een levensgevaarlijke spanning in het
product aanwezig is en dat bij aanraking van deze delen een elektrische schok wordt verkregen.
Deze instructiemarkering wordt weergegeven om u erop te wijzen dat de instructie zeer belangrijk is om te
lezen en/of op te volgen.
Belangrijke Veiligheidsinformatie
WAARSCHUWING:
OM BRAND OF ELEKTRISCHE SCHOKKEN TE VOORKOMEN, DIENT U DIT TOESTEL NIET BLOOT TE
STELLEN AAN REGEN OF VOCHT.
LET OP:
• Wees voorzichtig met het netsnoer en beschadig deze niet. Als het snoer kapot of beschadigd is, kan dit leiden tot
electrische schokken of defecten. Als u de stekker uit het stopcontact neemt, trek dan niet aan het snoer, maar aan de
stekker.
• Open de behuizing nooit, dit om elektrische schokken te voorkomen. Als er problemen zijn, neem dan contact op
met uw dealer.
• Plaats geen metalen objecten en mors geen vloeistof in de speler. Dit kan leiden tot elektrische schokken of defecten.
 Loading...