

Skytec ST180,178.871 Instruction Manual
ST180 Mobile Amplifier 10"
(178.871)
Instruction Manual
Gebruiksaanwijzing
Gebrauchsanleitung

GB
Congratulations on the purchase of this SkyTec Karaoke set.
Please read this manual carefully prior to using the unit.
Warning:
- Read the manual prior to using the unit.
- Keep the manual for future reference.
- Keep the packaging for safer transport in its original packaging
- Prior to the first use, have the unit checked by a qualified person.
- The unit contains voltage carrying parts. DO NOT open the unit.
- Never plug or unplug the unit with wet hands.
- If the plug and/or mains lead are damaged, they need to be repaired by a qualified
technician.
- If the unit is damaged to an extent that you can see internal parts, do not plug the unit
into a mains outlet.
- Repairs have to be carried out by a qualified technician.
- Only connect this unit to an earthed mains outlet of 220-240Vac/50Hz and 10-16A.
- Do no place the unit near heat sources.
- Don't pull the power cord while you pull out the plug. Hold the plug tightly to pull it out.
- Always unplug the unit during a thunderstorm or when it is not in use.
- If the unit has not been used for a longer period of time, condensation can occur inside
the housing. Please let the unit reach room temperature prior to use.
- To avoid accidents in public premises, the legal requirements must be fulfilled and
instructions/warnings must be adhered to.
- Keep out of the reach of children.
- All volume controls must be set to zero prior to switching the unit on.
- Do not use cleaning sprays for the slider controls. The residues of these spray cause
dust deposits in the controls. If a problem occurs, please consult a specialist.
- Always handle CDs with clean hands. Do not insert a damaged CD.
- Always close the CD tray to keep the laser eye clean.
- Do not clean the unit with chemical solutions. This might damage the finish. Only use a
dry cloth for cleaning.
- This unit is with speaker inside which can cause magnetic field. Keep this unit at least
60cm away from computer or TV.
- This unit is with built-in lead-acid rechargeable battery. Please recharge the battery every
3 months if you are not going to use the unit for a long period of time. Or the battery may
be damaged.
- If the battery is damaged please replace with same specifications battery. And dispose
the damaged battery environment friendly.
- Free from high temperature. Don't expose the device to the hot equipment.
- Don't place the device in the environment of humidity and dirt’s.
- Place the device in the ventilated environment.
- Pull out the AC power if you will not use the device for a long time.

FEATURES
With CD player, can play CD
With USB port and SD/MMC card slot
which can connect flash drive,MP3
player,SD/MMC card to play MP3 music.
Built-in 2×12V/12A rechargeable battery
Built-in two channels wireless microphone
and one 6.35mm MIC input jack to
connect wired dynamic MIC. Three
persons can speak or sing at the same
time.
One RCA line input can be connected to
CD player or other such sound source.
MIC Echo/Tone/Volume and music
Bass/Treble/Volume controls. Suitable for
karaoke.
Powered externally with 220-240VAC,DC
12V or internally with built-in rechargeable
battery. Suitable for both indoor and
outdoor use.
Ideal for many applications, including use
in classrooms, conference / meeting
rooms, churches, health clubs and small
auditoriums.
PARTS DESCRIPTION
ST180 Front Panel introduction
1. Power Indicating Light
2. Previous Indicating Light
3. Charge Indicating Light
4. Full Charged Indicating Light
5. Wireless Signal Indicating Light
6. Wired Mic Working Indicating Light
7. Music Volume Controller
8. Music Treble Controller
9. Music Bass Controller
10. Microphone Echo Controller
11. Microphone Bass/Treble Controller
12. Microphone Volume Controller
13. CD player door
14. Play/Pause key
15. Previous Key
16. Next Key
17. Display Screen
18. Open/Close Key
19. Power Switch
20. SD/MMC card jack
21. USB Jack
22. Wired Mic Jack
23. Wired Mic Jack
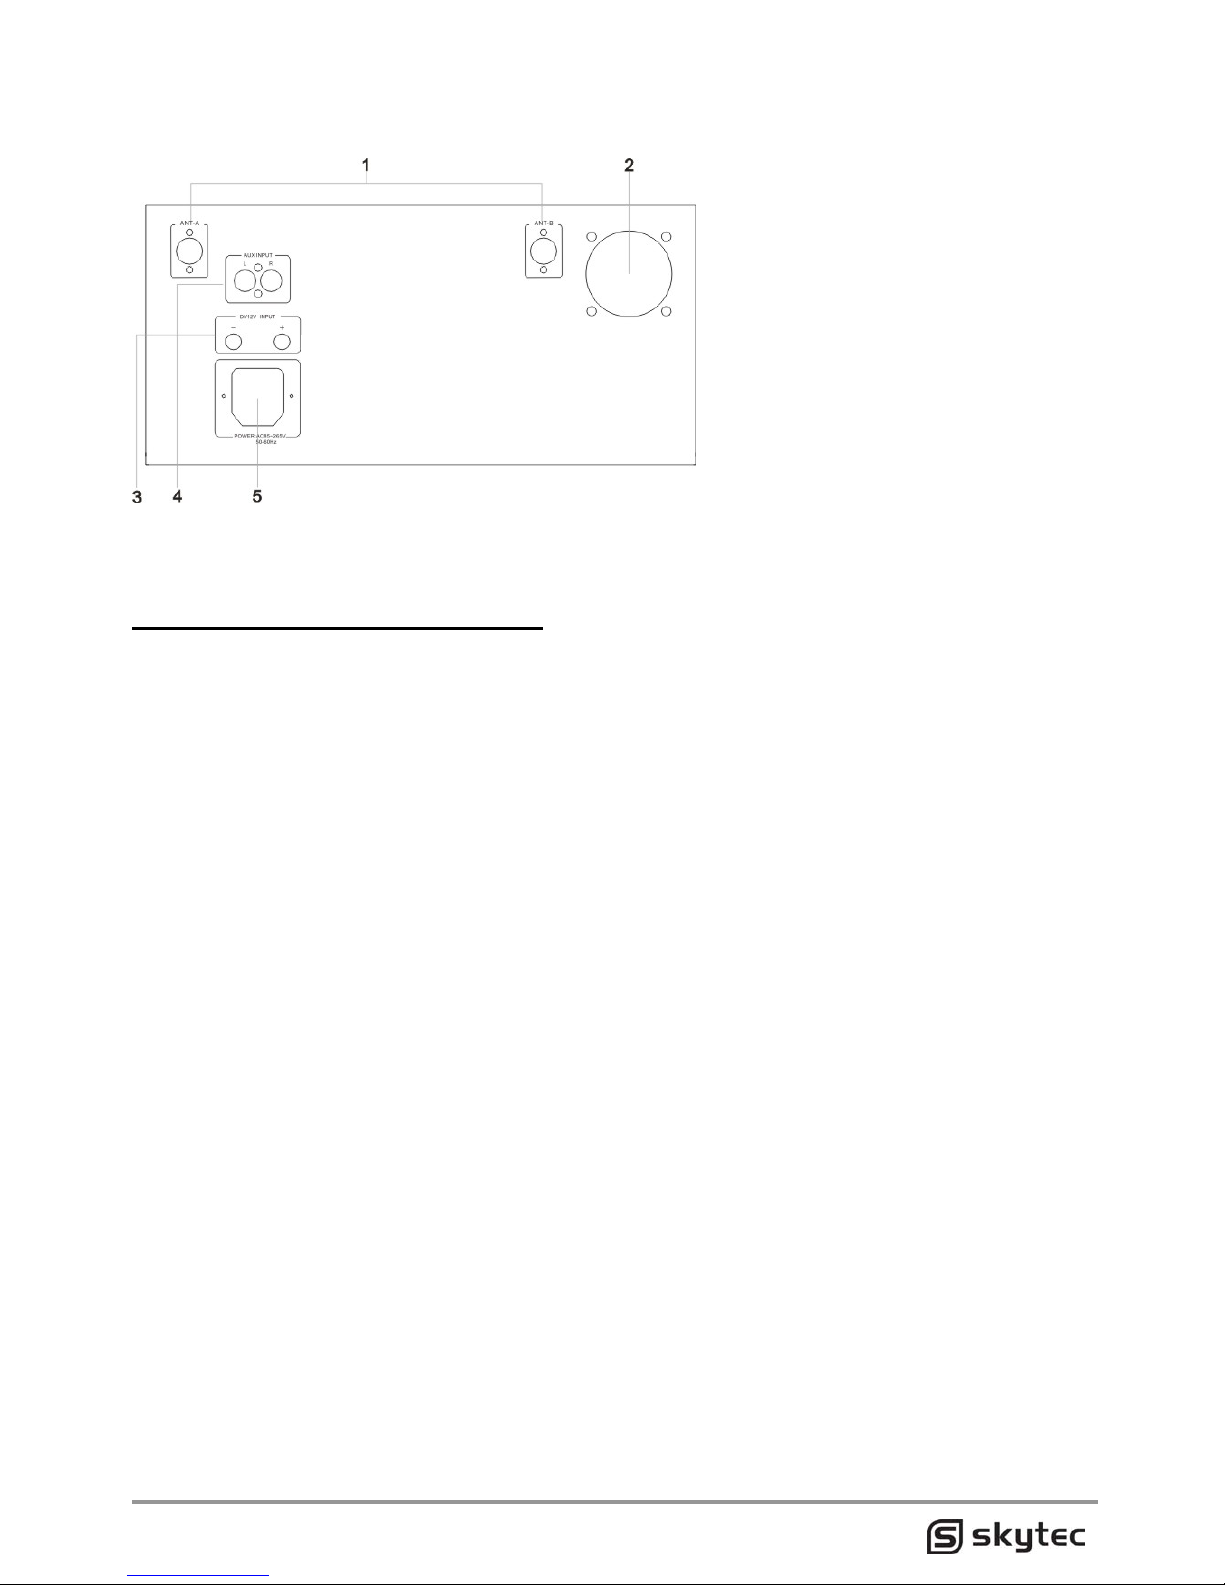
ST180 Back Panel introduction
1. Wireless microphone antenna
jack
2. Heat dissipation fanning
3. External DC12V battery input
4. AUX input
5. AC power input
OPERATION INSTRUCTIONS
POWERING THE UNIT
External AC
Plug one end of the AC cord provided into the AC input jack on rear side of the amplifier. Then
plug the other end of the AC cord into AC power outlet. Turn on the unit using the main power
switch.
External DC
This unit can be powered also using external 12V DC power. Connect external 12V DC power
to DC input jack on rear side of the amplifier. Observe the correct polarity.
Rechargeable Battery
This unit can be powered internally using the built-in rechargeable battery. When AC power is
connected, CHARGE LED indicator will light red. The rechargeable battery is being charged. If
FULL LED indicator light green, the battery is fully charged and ready to power the unit alone.
Shut off the power switch and disconnect the AC power. Turn the unit back ”ON” and the
rechargeable battery will power the unit alone.
Note: Turning off the unit power switch will allow the battery to be charged more quickly.
ATTENTION:
If feedback(howling sound) occurs, try first turning down the treble control. If feedback still is
present, try turning down the volume or repositioning this unit with respect to the wired or
wireless MIC being used.

OPERATION OF REMOTE CONTROL
1. STANDBY
2. OPEN
3. DISC
4. 1~9 Number button
5. REV
6. FWD
7. PREV
8. PLAYPAUS
9. REPEAT
10. MUTE
11. CARD
12. USB
13. 0/10
14. STOP
15. NEXT
16. PROGRAM
17. VOLUME+
18. VOLUME-
REMOTE CONTROL INTRODUCTION
1. STANDBY:CD player power button
2. OPEN: Press this button to make the CD
player door in or out, when put a disc,
the disc shiny side should be down
3. DISC: press this button to switch to CD
player mode
4. 1-9 Number buttons:
press these buttons to switch 10 the
track that you want to choose, such as if
you want to choose the "15" track,
should press "1" and "5".
5. REV: Fast Backward
6. FWD: Fast Forward
7. PREV: Previous track
8. PLAYPAUS: play/pause
9. REPEAT: repeat play, Press once for the
single cycle, press twice for whole cycle
10. MUTE: mute
11. CARD: press this button to switch to CD
card mode
12. USB: press this button to switch to USB
card mode
13. 0/10: If only press this button, it is for the
10 track, If Press 1-9 number button, then
press this button, it is for the
10,20,30,40,50,60,70,80,90 track
14. STOP: stop playing
15. NEXT: next track
16. PROGRAM: no function
17. VOLUME+: Increase the volume
18. VOLUME-: Decrease the volume
OPERATION OF WIRELESS RECEIVER
This unit contains two channels built-in high quality quartz-locked, fixed frequency VHF wireless
receivers precisely matched to the transmitters supplied. After the amplifier has been turned on
by the main power switch, turn microphone volume control clockwise slightly. Extend antenna at
rear side of amplifier fully for best reception. Switch on the wireless microphone and the IR
receiving indicator will light up indicating normal reception.
Note: This unit is supplied with two wireless microphones, (handheld and/or body pack)in two
different frequencies which can be used simultaneously.
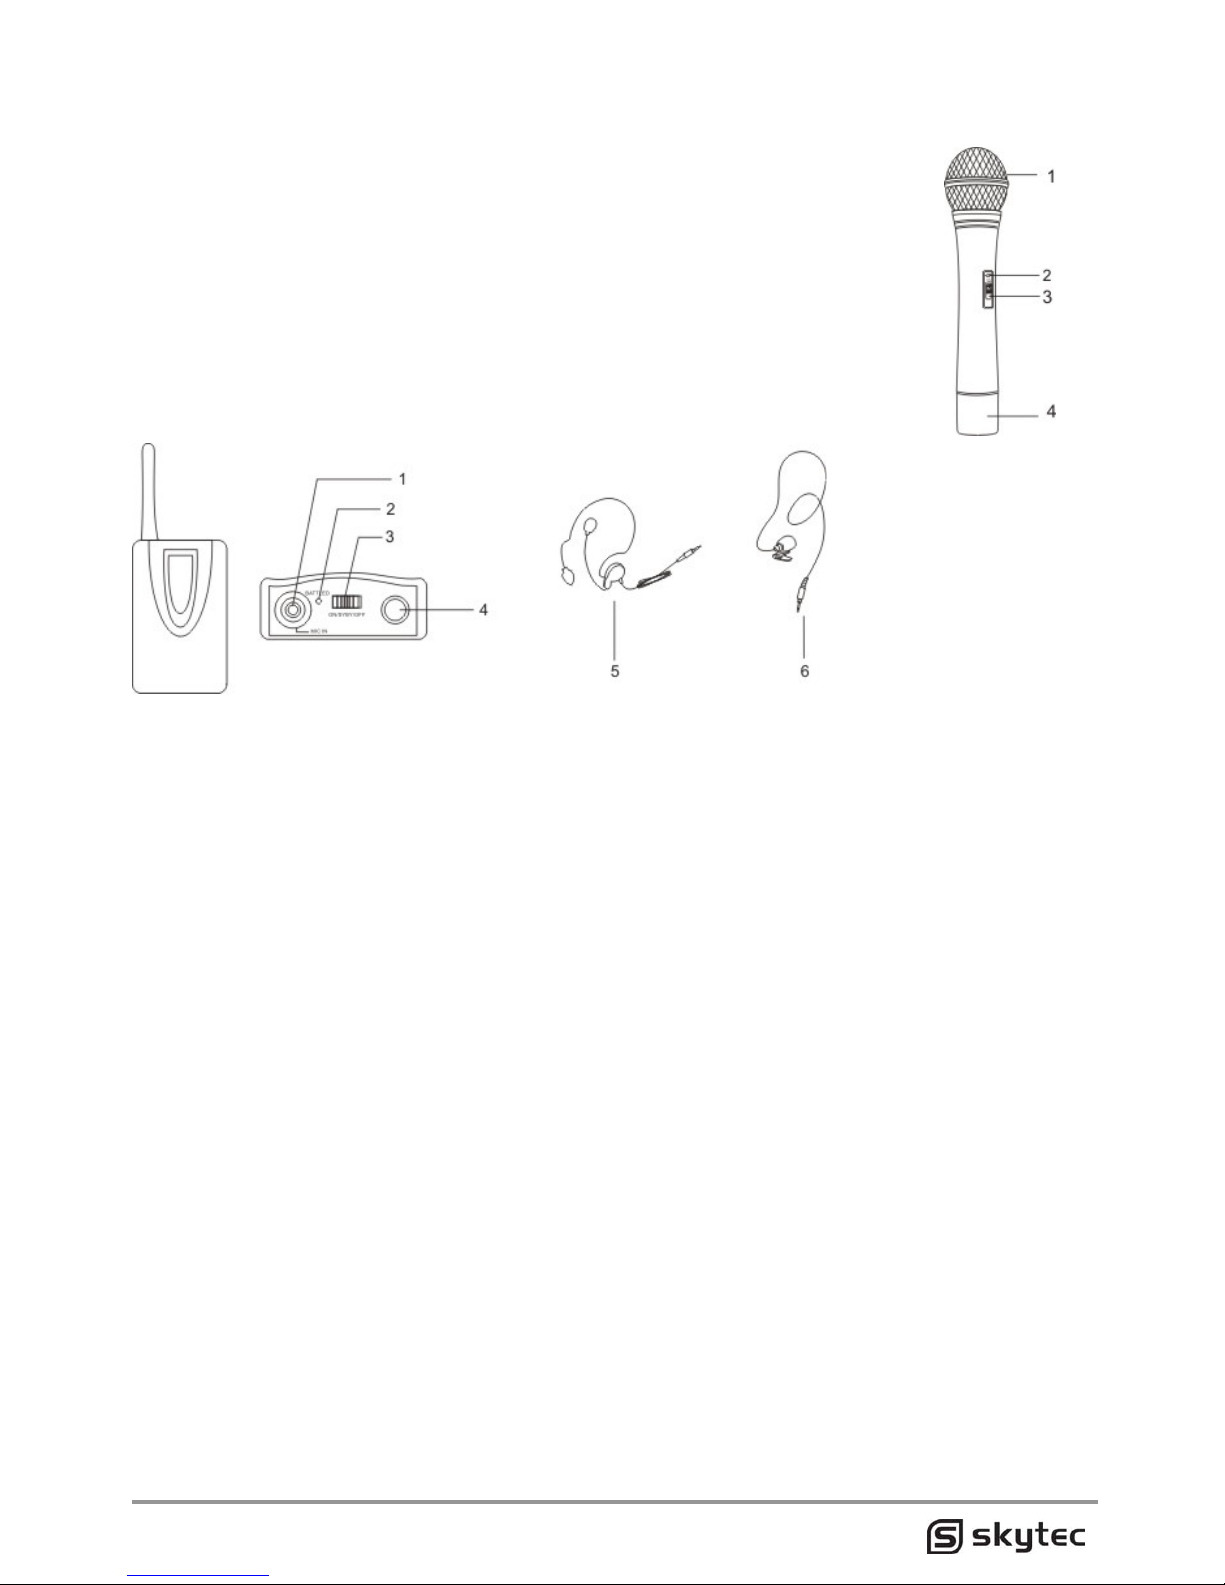
OPERATION OF WIRELESS TRANSMITTER
Handheld MIC
Unscrew the battery compartment cover end cap (4) end remove, exposing the
battery compartment. Insert a fresh 9V battery, observing polarity. Re-attach
the battery cover. Turn on the microphone by sliding the power switch (3) to ON
position. The battery LED indicator (2) will light green, indicating full battery
strength. In the case of a low or dead battery, the battery LED will extinguish,
indicating that the battery should be replaced with a fresh one. The IR indicator
in the amplifier should now be it. To preserve battery life, turn the microphone
off when not in use. If you are not going to use the microphone for a long period
of time, take out the battery from microphone to avoid possible battery leakage
to damage the microphone.
Body Pack Transmitter (option)
Open the battery cover and insert a fresh 9V battery, observing the correct polarity. And then
close the cover. Plug in either the clip-on or the headset microphone supplied. To use the clipon MIC, attach it at chest level. Do not place too close to the mouth-a distance of about six
inches usually works best. To use the headset MIC, place it on the head and adjust the MIC
boom so that the MIC is about one inch to the side of the front of the mouth.
(Note: The clip-on or headset MIC wire is also the transmitting antenna. Rolling up or shortening
the wire may during use and keep it as straight as possible.)
Turn on the transmitter by sliding the power switch to ON position. The battery LED indicator will
light red shortly and of a low or dead battery, the battery LED will not light at all, indicating that
the battery should be replaced with a fresh one. The IR indicator on the amplifier should now be
it.
OPERATION OF WIRED MICROPHONE
Connect wired dynamic MIC to MIC in jack and turn on MIC.
NOTE:
Wired- and wireless microphone input volume can be adjusted through microphone volume
control. Adjust echo and bass/treble controls of the amplifier to a comfortable listening level as
desired.
OPERATION OF MP3 PLAYER
Press MP3 button repeatedly until MP3 indicator light.
Insert flash drive into USB port or SD/MMC card into D/MMC card slot, it will play the
music in flash drive or M/MMC card automatically. Mp3 play indicator will light.
Press PREV button to go to last track. Press and hold the button to fast backward.
Press NEXT button to go to next track, Press and hold the button to fast forward.
Press PLAY/PAUSE button to pause playing.
Press REPEAT button repeatedly to select REPEAT ONE or REPEAT ALL. REPEAT
ONE or REPEAT ALL indicator will light.
1. MIC in jack
2. Battery LED
3. Power Switch
4. Antenna
5. Headset MIC
6. Clip-on MIC

OPERATION OF OTHER SOUND SOURCE
Connect other sound source such as CD player to LINE input jack (AUX), on Back Panel, to
amplify the sound.
NOTE:
MP3 and line input volume can be adjusted through MUSIC volume control. Adjust MUSIC
bass, treble controls of the amplifier to a comfortable listening level as desired.
SPECIFICATIONS
AMPLIFIER
Speaker: ................................................ 1×10” full range speaker
................................................................................ 1×3” tweeter
Output Power: ............................................................ 450W max
Frequency Response: ............................................. 60Hz~15kHz
S/N ratio: ............................................................................. 60dB
Power Supply: ............................................... 220-240VAC/50Hz
.................................................................................... DC in 12V
........................................................ Built-in rechargeable battery
Battery charging time: ............................................... 8~10 hours
Battery working time:................................................... 3~5 hours
Frequency Range: ............................ 200.175MHZ, 201.400MHz
Operating Range: .................................. 50M(line and sight area)
Dimensions(W×D×H): .................................... 400×340×650mm
Weight: ................................................................................. 25kg
TRANSMITTER
Frequency Range: ............................ 200.175MHZ, 201.400MHz
Dynamic Range: ................................................................. 80dB
Frequency Response: ........................................... 100Hz~10kHz
Working Temperature: ............................................. -10°C~45°C
Power Supply: ............................................................. 9V battery
Battery life: ... Battery using time can reach 3 hours(play music),
........................... can reach 5 hours when speak by microphone
This appliance should not be put into the domestic garbage at the end of its useful life, but must
be disposed of at a central point for recycling of electric and electronic domestic appliances. This
symbol on appliance, instruction manual and packaging puts your attention to this important
issue. The materials used in this appliance can be recycled. By recycling used domestic
appliances you contribute an important push to the protection of our environment. Ask your local
authorities for information regarding the point of recollection.
CE2200
Netherlands, Germany
This product should only be used in Germany and the Netherlands (and in Spain / Switzerland with restrictions). In
Germany, the end-user must apply for an individual assignment in a locally relevant branch of the Federal Network
Agency (BNetzA).
 Loading...