

Skytec ST140, 178.867 Instruction Manual
ST140 Mobile Amplifier 8"
(178.867)
Instruction Manual
Gebruiksaanwijzing
Gebrauchsanleitung

GB
Congratulations on the purchase of this SkyTec Karaoke set.
Please read this manual carefully prior to using the unit.
Warning:
- Read the manual prior to using the unit.
- Keep the manual for future reference.
- Keep the packaging for safer transport in its original packaging
- Prior to the first use, have the unit checked by a qualified person.
- The unit contains voltage carrying parts. DO NOT open the unit.
- Never plug or unplug the unit with wet hands.
- If the plug and/or mains lead are damaged, they need to be repaired by a qualified
technician.
- If the unit is damaged to an extent that you can see internal parts, do not plug the unit
into a mains outlet.
- Repairs have to be carried out by a qualified technician.
- Only connect this unit to an earthed mains outlet of 230Vac/50Hz and 10-16A.
- Do no place the unit near heat sources.
- Don't pull the power cord while you pull out the plug. Hold the plug tightly to pull it out.
- Always unplug the unit during a thunderstorm or when it is not in use.
- If the unit has not been used for a longer period of time, condensation can occur inside
the housing. Please let the unit reach room temperature prior to use.
- To avoid accidents in public premises, the legal requirements must be fulfilled and
instructions/warnings must be adhered to.
- Keep out of the reach of children.
- All volume controls must be set to zero prior to switching the unit on.
- Do not use cleaning sprays for the slider controls. The residues of these spray cause
dust deposits in the controls. If a problem occurs, please consult a specialist.
- Always handle CDs with clean hands. Do not insert a damaged CD.
- Always close the CD tray to keep the laser eye clean.
- Do not clean the unit with chemical solutions. This might damage the finish. Only use a
dry cloth for cleaning.
- This unit is with speaker inside which can cause magnetic field. Keep this unit at least
60cm away from computer or TV.
- This unit is with built-in lead-acid rechargeable battery. Please recharge the battery every
3 months if you are not going to use the unit for a long period of time. Or the battery may
be damaged.
- If the battery is damaged please replace with same specifications battery. And dispose
the damaged battery environment friendly.
- Free from high temperature. Don't expose the device to the hot equipment.
- Don't place the device in the environment of humidity and dirt’s.
- Place the device in the ventilated environment.
- Pull out the AC power if you will not use the device for a long time.
Notes:
Since this machine is controlled by the built-in microcomputer, if the function button cannot work
or appears error or no-indication due to thunder and lighting, static or other disturbance, such
situation doesn't belong to trouble. The solution is to turn off the power for more than the power
for more than several seconds, then turn on the switch to recover it.
FEATURES
• One 3.5mm AUX input can be connected
to a computer or MP3 player or other such
sounds source.
• With MP3 record- and playback function.
• With DVD player, can play DVD & CD
• With USB port and SD/MMC card slot
which can connect flash drive,MP3
player,SD/MMC card to play MP3 music.
• Built-in 1×12V/12A rechargeable battery
• Built-in two channels wireless microphone
and one 6.35mm MIC input jack to
connect wired dynamic MIC. Three
persons can speak or sing at the same
time.
• One RCA line input can be connected to
CD player or other such sound source.
• One 6.35mm guitar input can be
connected to guitar.
• MIC Echo/Tone/Volume and music
Bass/Treble/Volume controls. Suitable for
karaoke.
• Powered externally with AC,DC 12V or
internally with built-in rechargeable battery.
Suitable for both indoor and outdoor use.
• Ideal for many applications, including use
in classrooms, conference / meeting
rooms, churches, health clubs and small
auditoriums.
PARTS DESCRIPTION
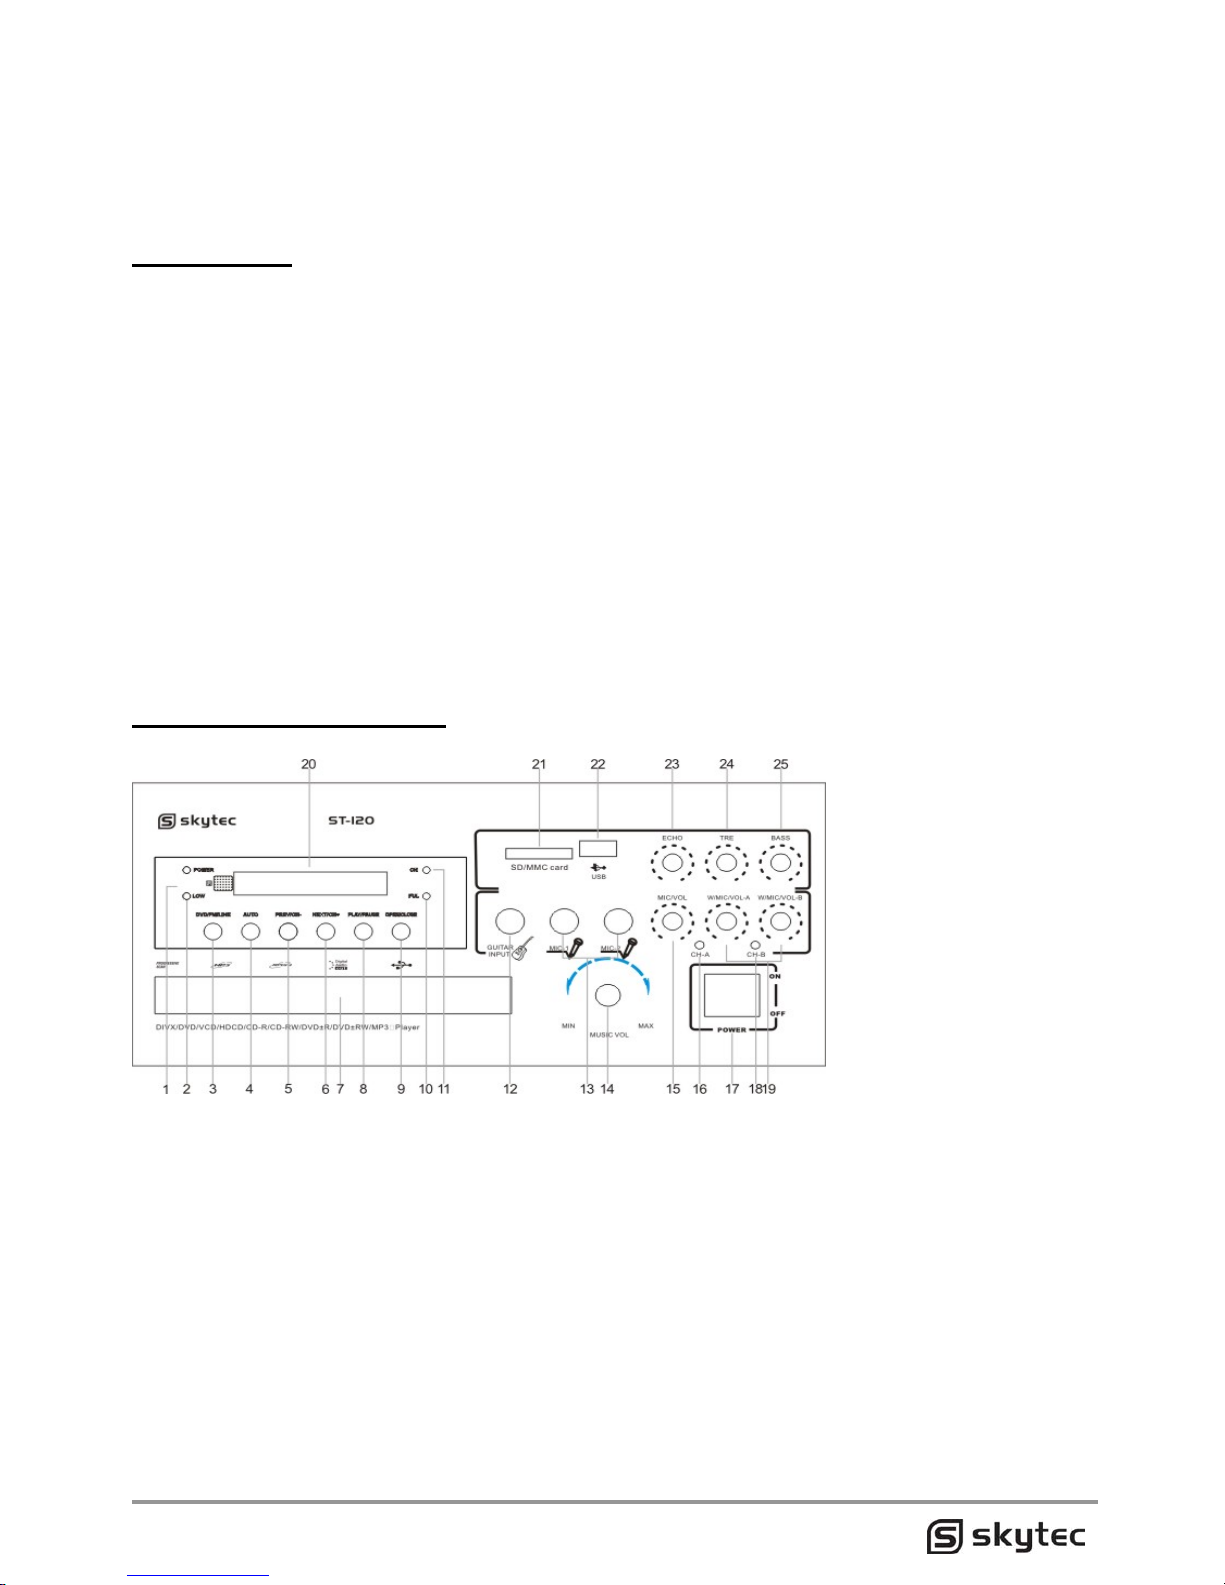
ST140 Front Pane introduction
1. Power indicate light
2. Low power indicate
3. DVD/FM/LINE
4. Automatically search
5. Prevous button
6. Next button
7. Tray door
8. Playback/pause
9. Open/close
10. Full charge
11. Charging
12. Guitar input
13. Wired microphone inputs
14. Master volume
15. Wired microphone volume
16. Wireless microphone indicator
17. Power switch
18. Wireless microphone indicator
19. Wireless microphone volume
20. Display screen
21. SD
22. USB
23. Echo
24. Microphone treble
25. Microphone bass

ST140 Back Pane introduction
1. Wireless microphone antenna
2. Power input socket
3. Green color difference
4. Front right
5. Blue color difference
6. Front left
7. Red color difference
8. Coaxial digital output
9. Video output
10. S-video terminal
11. Optical output
12. Wireless MIC/FM antenna
13. Fan
14. Outdoor battery input
15. Outdoor speaker box terminal
16. Aux input, output
17. VGA Output
System connection
CAUTION
(This player has no inside DTS decoder, if you play the disc with pure DTS, Analog output
terminal of the player will has no sound, you must press the setup key on the remote controller
to select audio for SPDIF/SOURCE Code, then recover sound by digital decode power amplifier
or digital decoder; if you play the disc with two format for DTS or Dolby AC-3, when there is no
sound output, you can press language key to convert to Dolby status).
Before finishing the connection, please do not pull on power plug.
Connection with TV set (AV input)
There is one set of AV cable in the standard packing
• Connect the AV output terminal of this player with AV input terminal of Tv set (Video:
yellow jack)
• Connect the mix audio output terminal of this player with audio input terminal of TV set
(left sound channel: white, and right sound channel: red)
• Please refer to the relevant TV use manual when connecting.
• When there is no AV port on your TV, please connect the outdoor radio frequency box
with this player's RF interface and TV antenna build-in end. And you can adjust the
channel and frequency rangelo make sure the image and voice to reach the best state.
• When you are watching the disc in the different mode, please adjust this DVD player into
the relevant mode (PAL, PAL60, NTSC and AUTO)
S-Video terminal connected to TV set
• The S-video connection line is the optional item, not including in the standard packing of
the DVD player.
• Once the TV set available for S-video input, please connect the S-video output with the
S-video input terminal via the terminal cable for the belter quality of picture.
• Connect the mix audio output terminal of this player with audio input terminal of TV set
(left sound channel:white,and right sound channel:red),when connecting, Please refer to
the relevant TV manual.
Connection with the TV of color differential signal input
• The color differential connection line is the optional item,not including in the standard
packing of the DVD player
• Once the TV set available for color deferential video input, please connect the color
deferential video output with the color deferential video input terminal( Y.Pb/Cb.Pr/Cr),
via the terminal cable for the better quality of picture.
• Connect the mix audio output terminal of this player with audio input terminal of TV set
(left sound channel: white, and right sound channel: red),when connecting, Please refer
to the relevant TV manual.
Connection with AC-3 or DTS power amplifier
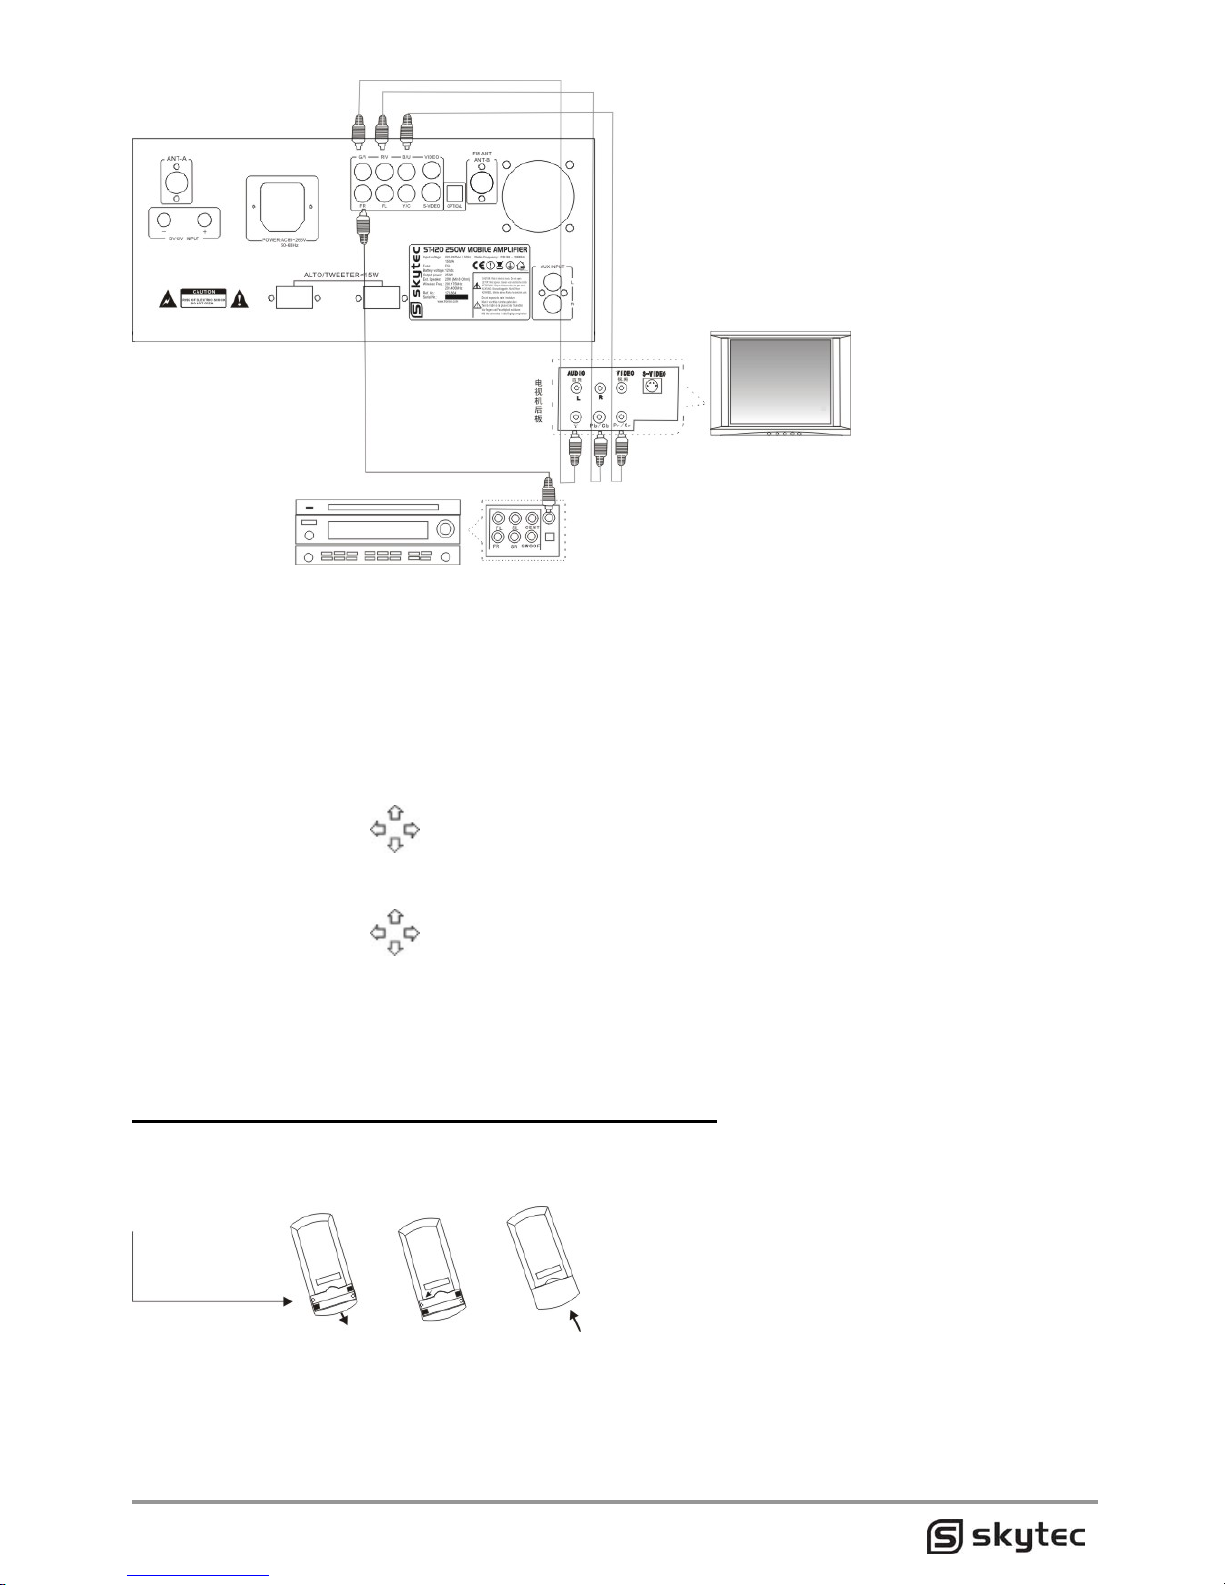
• Connect the video terminal with the video input terminal of TV set (Video, S-Video or
YfCbfCr terminal)
• Connect the digital output terminal of this machine (optical or coaxial interface) with the
AC-3 or dts decoder via the optical or coaxial.
• Press the "Enter" key on the remote control to enter, then press the "set up" to exit the
function menu, and finish the sel.
• Press the Setup key on the remote control to enter (Function menu) .
• Press the Enter key on the remote control to confirm, then press the setup key to exit the
function menu, thus the selling is completed.
• Press the cursor key on the remote control to select the Audio Setting, then press
the cursor key on the remote control to select the digital output then Press the '-'Enter"
key to the next menu.
• Press the cursor key on the remote control to select the SPDIF/code resource or
SPDIF/PCM output mode.
• Press the "Enter" key on the remote control to enter, then press the "set up' to exit the
function menu, and finish the set.
lnstall the battery into the remote control
Open battery compartment cover of the remote control,as shown by the following diagram.
lnsert two UM-4 or AAA batteries or batteries of same kind and ensure consistence between,
battery polarity and its marking. Close the cover as per the opposite direction of its opening.
Caution:
• Don't use any battery as mixed in new/old or with the different brands.
• Don't charge the battery or short connect it.
• Don't remove the battery or heat and burn it.

• Once the liquid is leaked out from the battery, please clean the Battery compartment
prior to install the new battery.
• Once the machine is unable to be operated although the remote control is so closely,
Please replace the new battery.
• Don't let the strong light is directly on the remote control or the ultra-red head on the
panel for connection so as to avoid any inference to the remote signal.
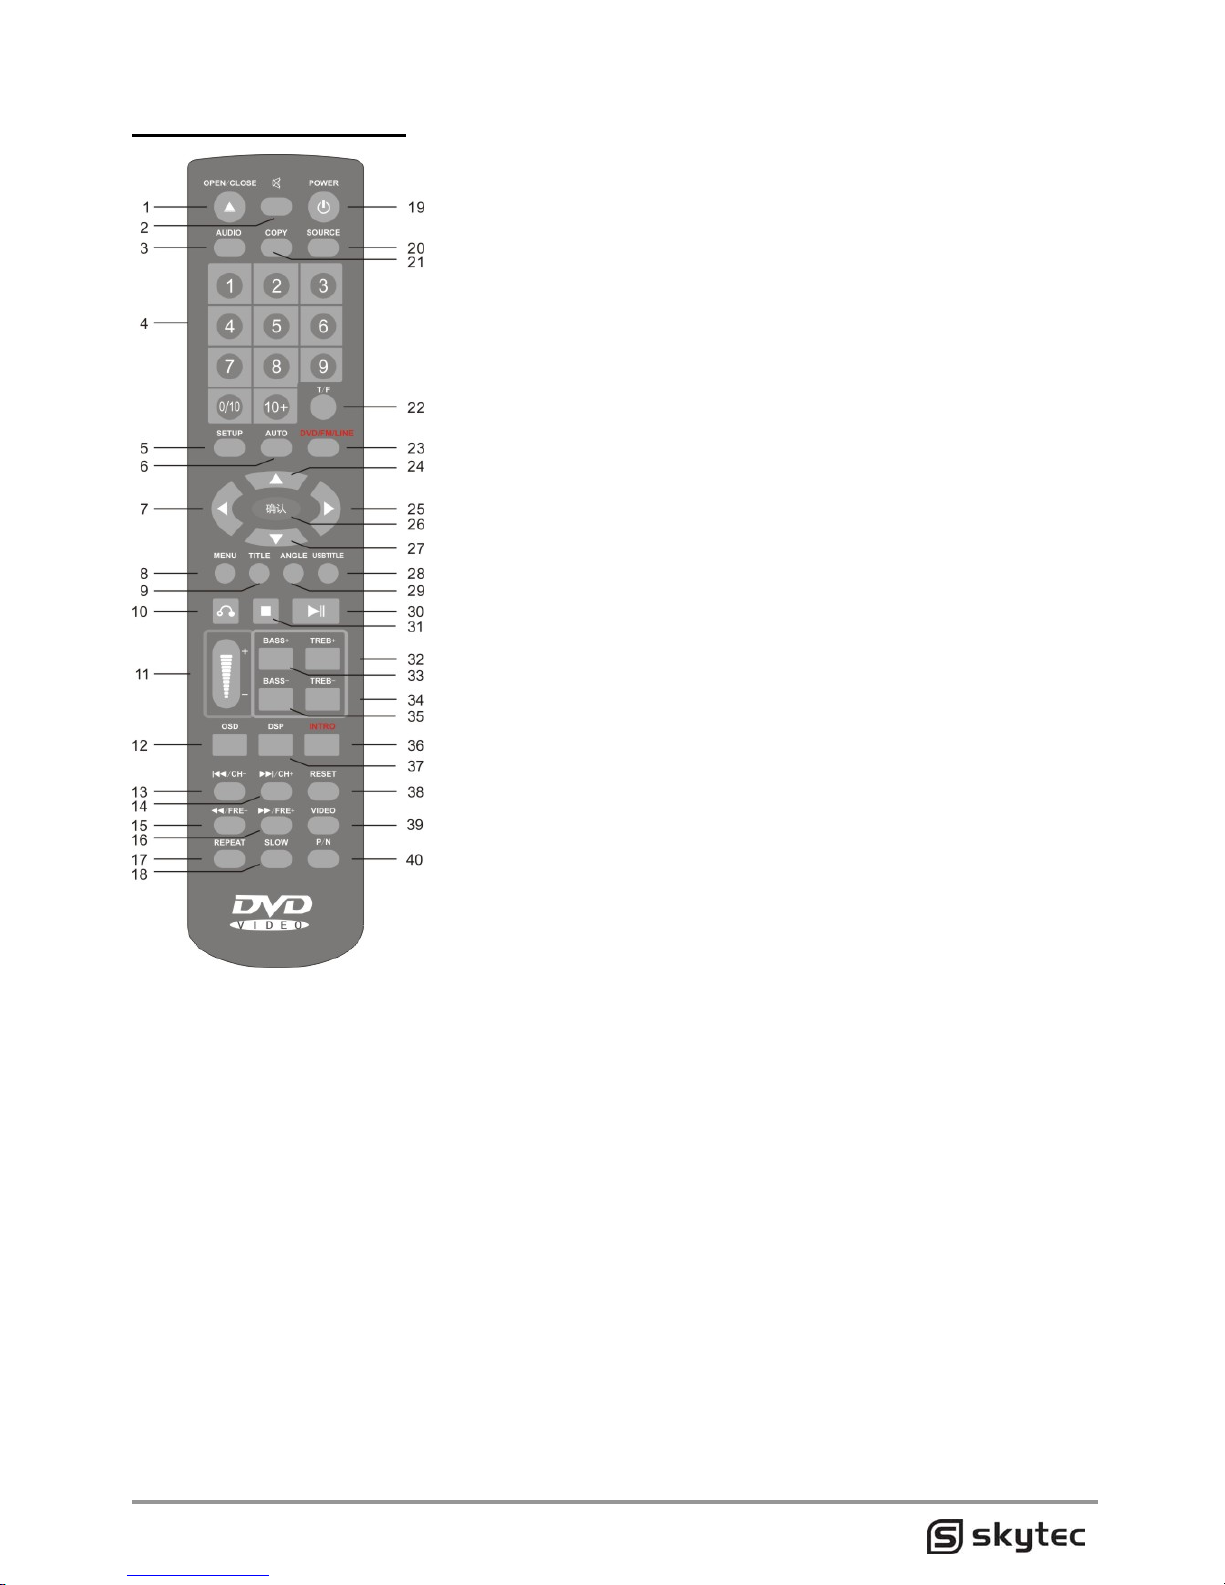
Remote instruction
1. open/close button
2. mute button
3. language l/r button
4. numeric button
5. setup button
6. automatically search
radio button
7. direction left button
8. menu button
9. title button
10. stop/return button
11. volume button
12. osd button
13. previous/radio- button
14. next/radio+ button
15. backward button
16. forward button
17. repeat button
18. slow button
19. DVD power button
20. source
button(dvd/usb)
21. record button
22. search frequency and
time button
23. DVD/FM/LINE
24. direction upper button
25. direction right button
26. enter button
27. direction lower button
28. usb title button
29. angle button
30. play/pause button
31. stop button
32. treble+ button
33. bass+ button
34. treble- button
35. bass- button
36. intro button
37. sound mode button
38. reset button
39. video mode button
40. pal/ntsc button
Remote button instruction
• Open/close button, Press to make the doors out of or into the disc player, so you put the disc
or show disc (disc shiny side down).
• Mute button, Press to enable the drive, an external input, the recorder's sound volume to 0
• Language l/r button, Press to switch channels
• Numeric button, This series of number buttons can help you jump to your desired track
• Setup button, Press to enter the system menu settings
• Automatically search radio button, Enter search radio mode, press this button to
automatically scan, and then automatically stored the channels with signal, "CH+", "CH -"
button can help you choose the next or previous channel.
• Direction left button, Function is as same as the "24", "25", "27" button, as in DVD playback
mode, enter the "menu" or "title" state, the four buttons can help you select the program, the
program selected was Yellow
• Menu button, When playing DVD, press the button to enter the menu
• Title button, When playing DVD, press the button to enter the title
• Return button, When playing DVD, press the button to stop playback and return to program
menu

• Volume button, The button to adjust the sound volume
• Osd button, This button is displayed broadcast information on the television.
(In DVD mode) After the "Screen Display" button is pressed for the first time, the unit will
show the current number of play captions (chapters) and number of total captions (total
chapters) on the disc as well as play time of current music. When the key is pressed a
second time, the unit will show the remaining time of a chapter, and another press will close
the display.
(In VCD mode) After the "Screen Display" key is pressed for the first time, the unit will show
the play time of single music, and the remaining time of single music appears once the key
is pressed a second time; the third press is 10 show the play time of Ihe entire disc, the
fourth press is to show the remaining lime of the entire disc, and another press will cancel
the display.
• Power button, This button can be shut or open disc player
• Source button(dvd/usb), At boot time, media, Play the media's priority is: disc →USB→SD
can also be forced to switch
• Record button, When playing VCD, while stuck in a USB or SD card, press the button to
record the currently playing song and microphone voice to a USB or SD card. If you want to
only record the microphone voice,please use the remote control to mute the voice (press the
Mute button),enclosed a VCD disc, convenient for you to record.(Note: must be recorded
with the VCD disc,other kind disc without this function),When playing CD discs, this button
can copy the disc’s information to the USB disk or SD card
• Search frequency and time button, Press to display playing information on TV
• DVD/FM/LINE, The button to switch DVD, radio, tape (external signal)
• Enter button, Used in conjunction with the direction buttons.
• Play/pause button, This button is responsible for switch between “play” and “pause”
• Stop button, Press one time of this button to stop playing, Continue to play from the break,
also will continue to play from the break even after take out of the disc.
• Intro button, Press this button, each song will be played the first 10 seconds
• Sound field mode button, a total of 5 modes to choose from 0: acoustic; 1: Treble; 2: full
frequency; 3:medium; 4: Bass
• Video mode button, Through this setup, you can get the best picture quality.
Video Component: when using the Y, Cb, Cr, video connection to connect the TV, select
this button TV-RGB: when using S terminal or Composite video output, select this button
P-SCAN YPBPR: when using the Y, Cb, Cr, video connection to connect the TV, Switching
TV to progressive scan, can select this button
• Pal/ntsc button, PAL-NTSC selection:select automatic when TV Video output format is
automatic, select NTSC when TV video output format is NTSC, select PAL when TV video
output format is PAL.
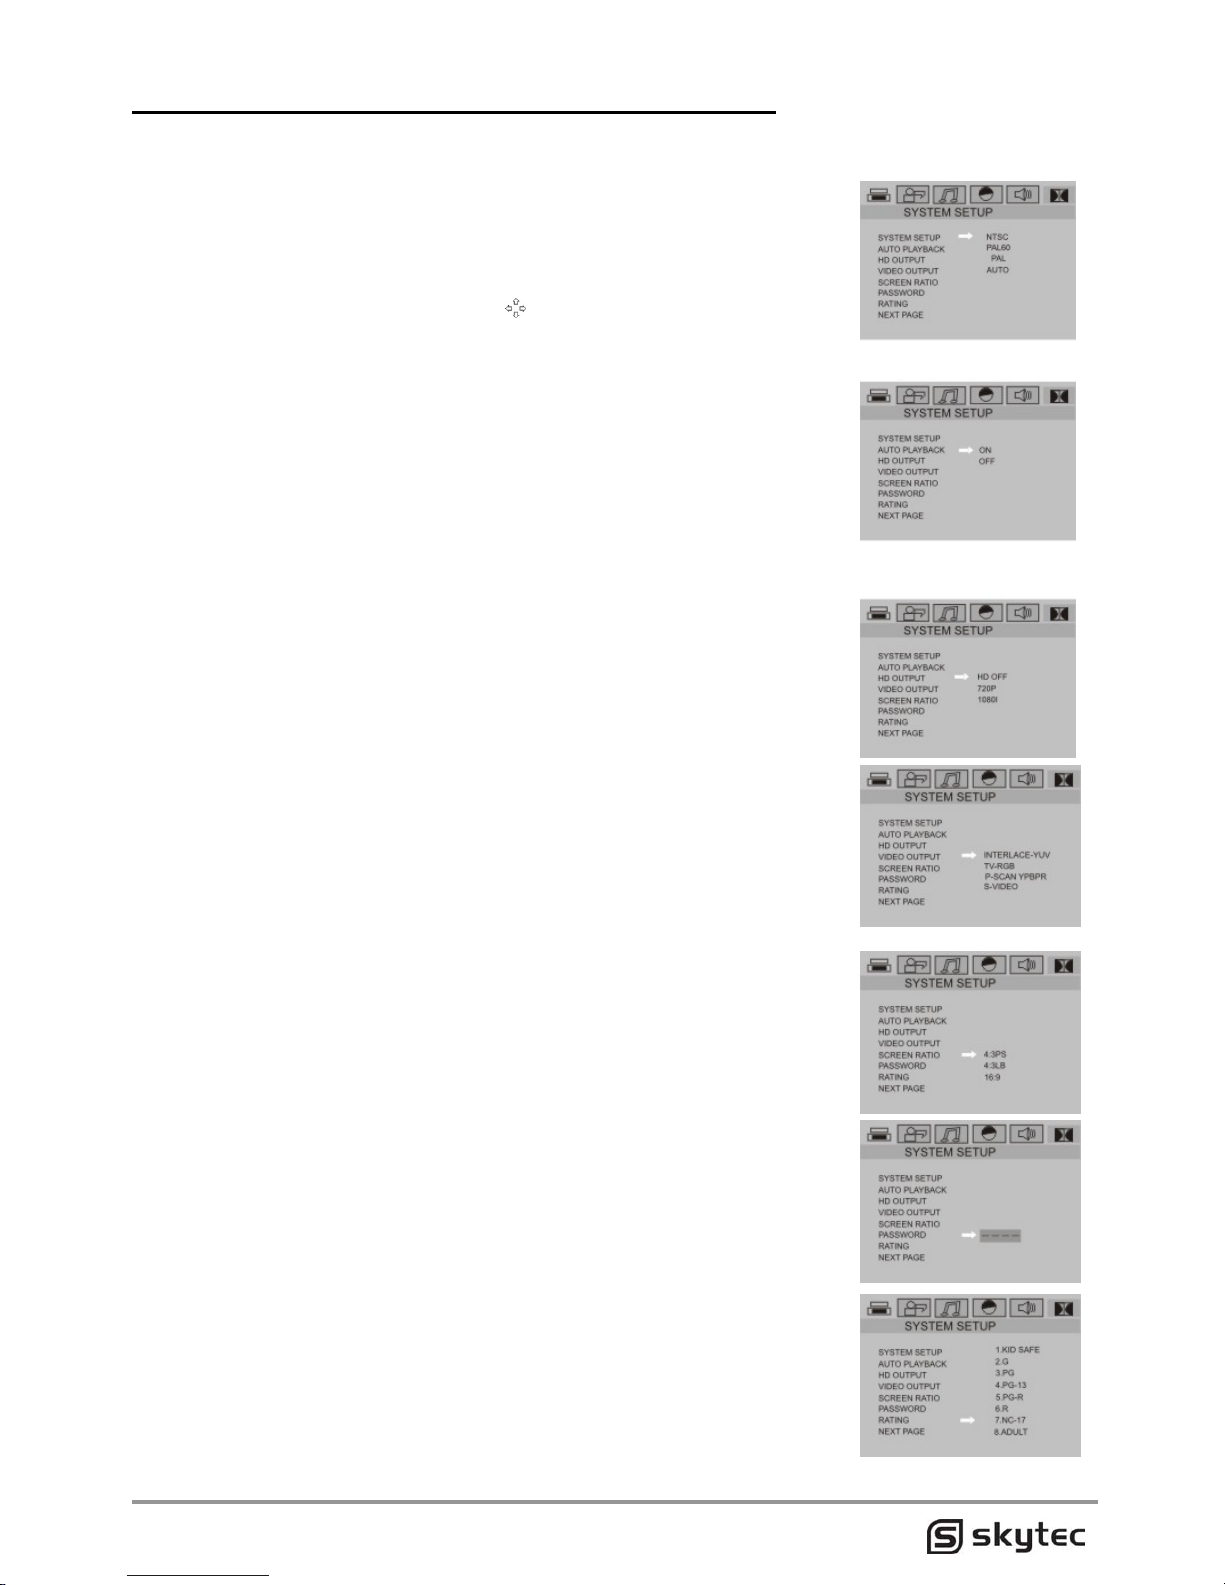
Operation to functional menu (System setup)
Press setup button 10 enter into the General Setting Page, then press the direction button 10
select the relevant items as any high lighted item means the selection. Press Enter button 10
confirm current operation,
GENERAL SETUP
Select the setting key to enter into general setup page, the left is the
basic directory and the right is the sub-directory. Change the directory
and Sub-director by the direction key and press the Enter key for
operation.
TV SYSTEM SETUP
Select the TV system 10 enter into the next menu via the direction key.
Fix the TV system on connection for NTSC, PAl60, PAL and automatic.
SETUP AUTOMATICALLY PLAYBACK
When play disks with head adventure and warning
ON: directly jumped. OFF: no jumping.
SETUP HIGH DEFINITION OUTPUT
Select HD output optional, press the direct key to select, optional as
below:
HD OFF,720P,1080I, HD OFF: High definition OFF.
720P:connect with 720P TV Set by colour differential output terminal.
1080I:connect with 1080I TV Set by colour differential output terminal.
VIDEO OUTPUT SETUP
INTERLACE·YUV: This item may selected as the disc is connected to
the TV set in Y, Cb and Cr video video lines.
TV·RGB: This item may selected to connected to the TV set video
lines.
P·SCAN YPBPR: Available for the DVD player is connected with TV
set in Y, Pb and Pr video lines and change the TV to linear scanning.
TV TYPE SETUP (PICTURE RATIO)
4:3 PS: Select normal/panorama, the TV would be in full screen
display, while the partial pictures at four corners would be lost.
4:3 LB: Select normal/mailbox, the TV would be in full picture display.
16:9: Select the wide screen, the TV would be in full screen display,
while the partial pictures at both left and right sides would be lost.
PASSWORD SETUP
The primary setting is at password locking, while the Grade is unable
to be selected and the password is unable to be changed. Once the
Grade is to be set, you shall press the digital key and enter the digital
password of 0000 to enter.
RATING(GRADE)
When playing the disc with locking function, you may select the
available age control grade as per the disc grades and your actual
needs in the following grades: 1. KID SAFE, 2.G, 3. PG,4.PG13 ,5.PGR,6.R,7.NC-17, 8.ADULT. This function is only available for the disc
with the grade limitation, which to be realized by setting the password
once the password lock is opened.

NEXTPAGE
Press enter button to enter into next page menu setup, next page content
as: default value, picture select, recover playback, previous page.
DEFAULT VALUE
when select this item, DVD player will recover to parameter of
ex-work status
PICTURE SELECT
when select this item for picture selection.
Default: picture of player starting was recovered to factory picture
Costume picture: make use of capture function.
RECOVERED PLAYBACK
when select this item, DVD player will has memory function
ON: have memory.
OFF: no memory.
PREVIOUS PAGE
when select this item to press enter key to jump to previous page.
LANGUAGE SETUP
setup picture display language
English: display screen display English.
Chinese: display screen display Chinese.
SETTING AUDIO LANGUAGE
The language is relevant to the disc. Only the disc is in support of the
language format, the audio language selling is valid. For example, where
the disc has two formats of English and Chinese, you may select either
English or Chinese. There are 8 language modes of this machine: Chinese,
English, Japanese, French, Spanish, Portuguese, German and Latin.
SETTING THE LANGUAGE OF SUBTITLE
The subtitle in disc playing is in relevant to the disc Same as the language
setting, only the disc is in support of the function of subtitle, the setting of
subtitle is valid. There are 7 language modes of this machine: Chinese,
English, Japanese, French, Spanish, Portuguese, German.
SETTING THE LANGUAGE OF DISC MENU
The language in disc menu is also relevant to the disc. Enter into the menu
language selling and select the menu language via the direction keys. There
are 8 language modes of this machine: Chinese, English, Japanese,
French, Spanish, Portuguese, German and Latin.
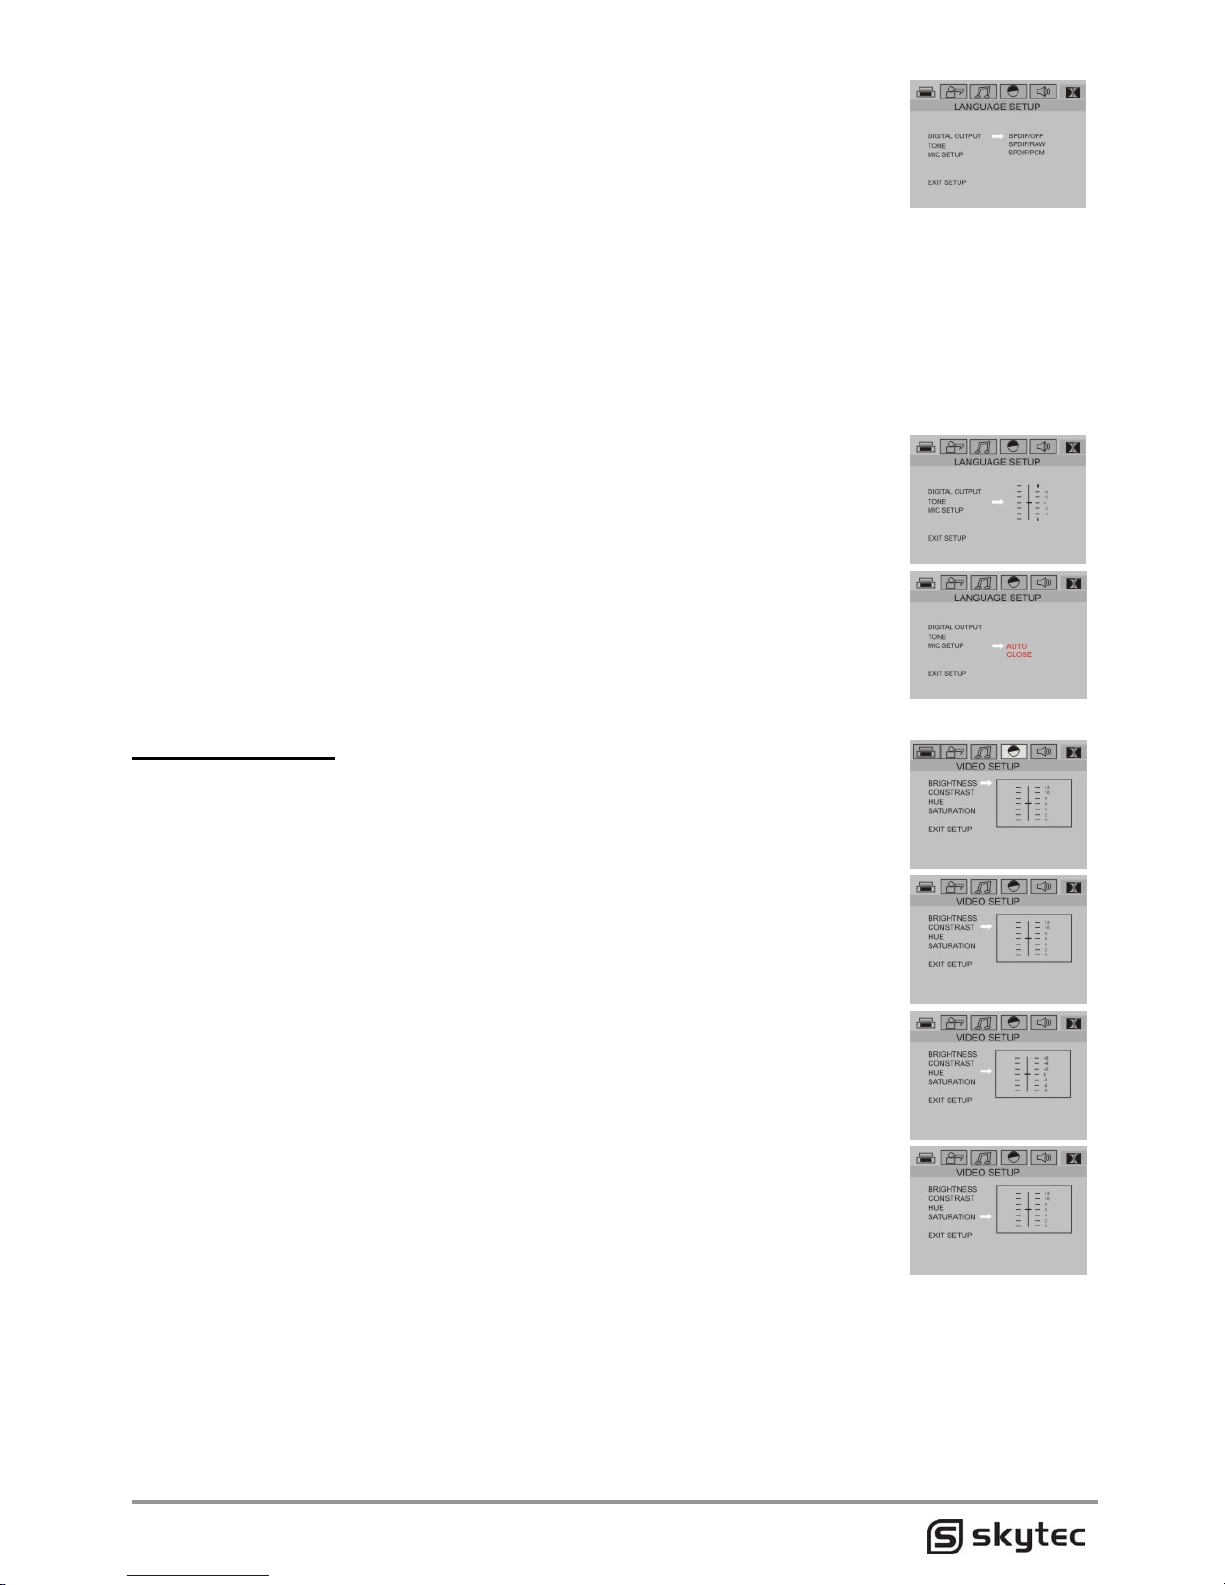
AUDIO SETUP
Select the audio setting at the main menu of setting, then press the direction
key to enter into the sub-menu and press Enter to the operation interface.
AUDIO OUTPUT SETUP
SPDIF/close: As the default selling. The audio output is in the simulative format. Once the audio
is in this channel, it must be selected, while the coaxial and optical fiber have no output.
SPDIF/resource code: When the digital audio output is connected to the power amplifier with
Dolby decoder, please select this item. When playing the disc with Dolby digital, DTS, PCM and
recording system, Coaxial or optical output terminal of this player would be in the relevant digital
signal (resource code format), while the power amplifier as connected must have the decoding
functions of Dolby digital, DTS and PCM.
SPDIF/PCM: Once the 2-channel digital stereo power amplifier is connected, please select this.
When playing the disc with Dolby digital and PCM recording
KEY (TONE) SETUP
Select the KEY setting and slide the direction button for tone setting.
MIC (Microphone) setup
selected microphone setup optional, make use of up and down moving the
cursor.
Note: have echo setup with echo function, please real object as standard.
VIDEO SETUP
BRIGHTNESS SETUP
Select the brightness setting and slide the up and down keys to set
brightness.
CONTRAST SETTlNG
Select the contrast setting and slide the up and down keys to set contrast.
HUE SETUP
Select the HUE setting and slide the up and down keys to set hue.
SATURATION SETUP
Select the saturation setting and slide the up and down keys to set the
saturation for video output.
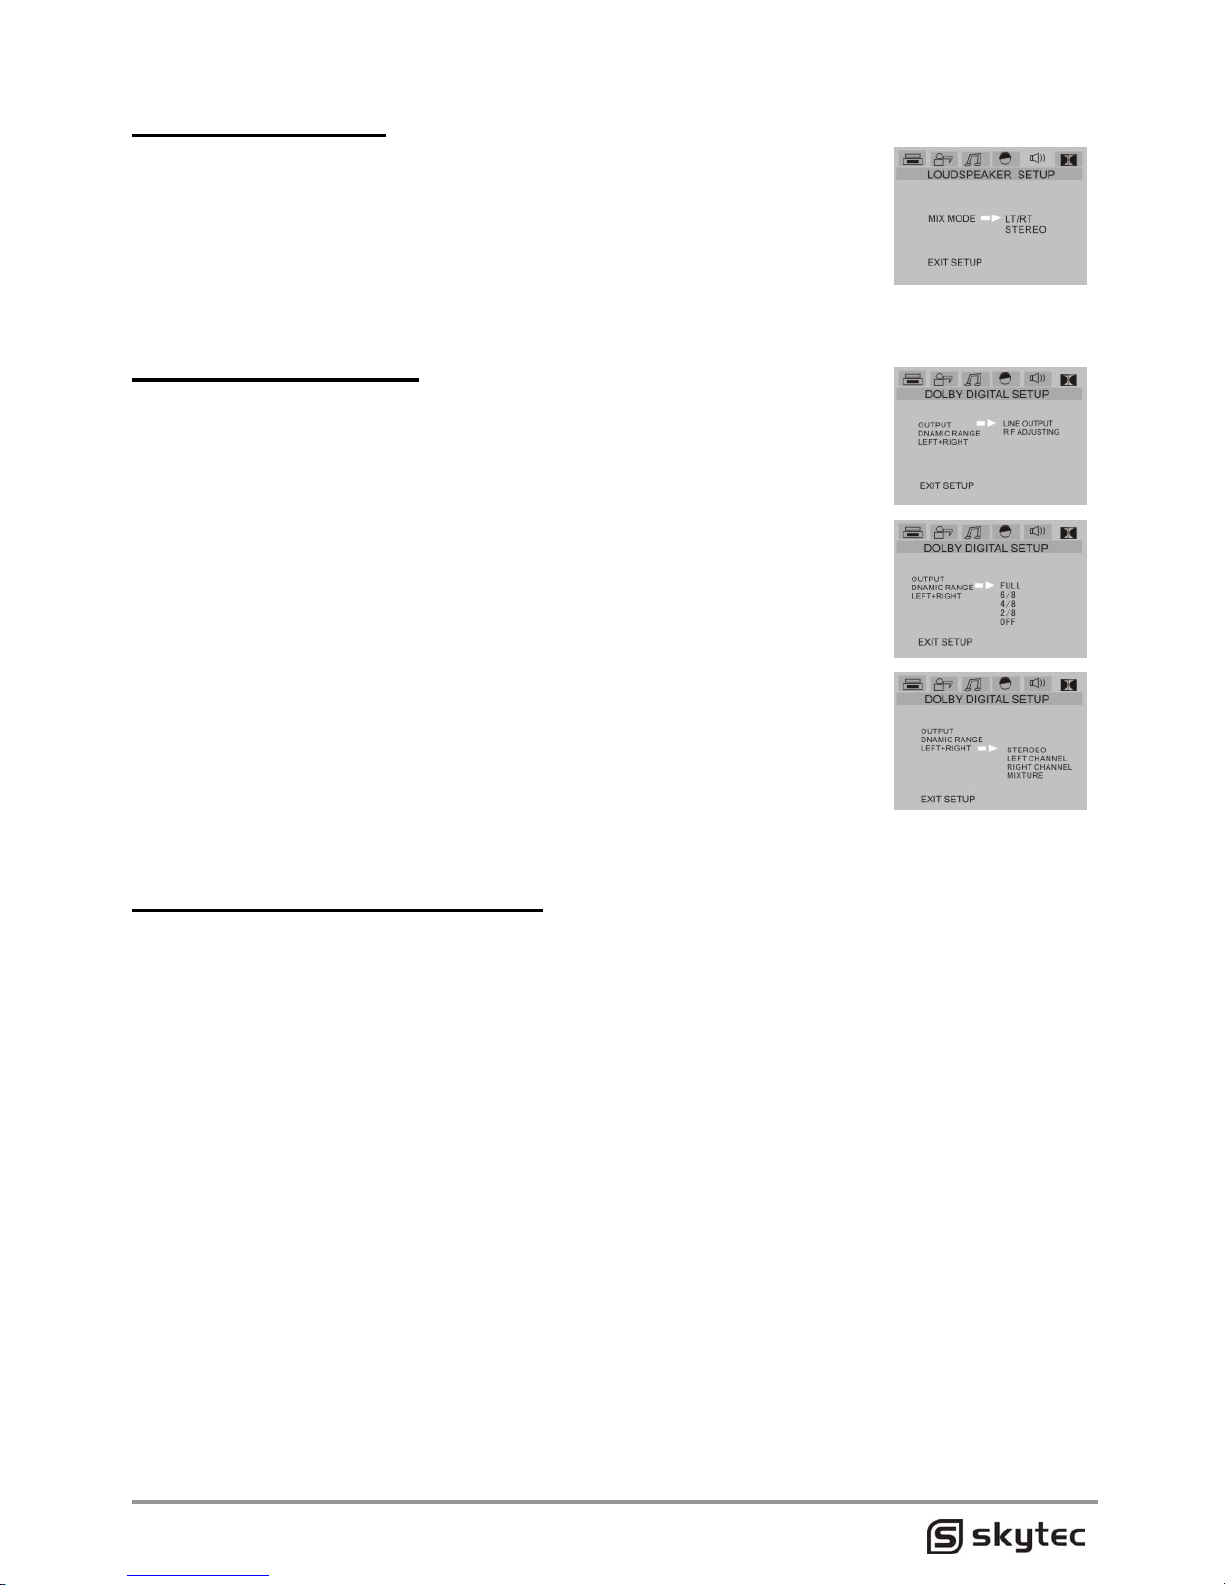
SPEAKER SETUP
MIX (downmlx)MODE
LT/RT: Once the disc you played has the Dolby Stereo effects, please
select this menu,while the disc signal may realize the real theater effect
following the decoding system within the DVD.
Stereo: For output from two channels, select the general signal for audio
output, and only the signal of two channels would be for output.
Dolby digital setting
OUTPUT MODE SETUP
Line output: To compress the input signal in line al the small volume,
suitable for the night.
Therefore adjustment: The large volume, suitable for the day.
DYNAMIC RANGE SETUP
Once selected the line output, this item may be used to adjust the linear
compression ratio to receive the compressed effects for the different
signals. Once selected the FULL, the peak-peak value for the audio
signals is ar least, and once selected OFF, the value is at most (Only
available once the mixed mode within the loudspeaker setting is at OFF).
DUAL MONO SETUP
This item is the output mode for setting the L and R signals for audio
output, including 4 modes: Stereo, Left Channel, Right Channel and Mixed
Channel. It is mainly involved in Karaoke mode for AC-3.
OPERATION INSTRUCTIONS
POWERING THE UNIT
External AC
Plug one end of the AC cord provided into the AC input jack on rear side of the amplifier. Then
plug the other end of AC cord into AC power outlet. Turn on the unit using the main power
switch.
External DC
This unit can be powered also using external 12V DC power. Connect external 12V DC power
to DC input jack on rear side of the amplifier. Observe the correct polarity.
Rechargeable Battery
This unit can be powered internally using the built-in rechargeable 12V battery. When AC power
is connected, CHARGE LED indicator will light red. The rechargeable battery is being charged.
If FULL LED indicator light green, the battery is fully charged and ready to power the unit alone.
Shut off the power switch and disconnect the AC power. Turn the unit back ”ON” and the
rechargeable battery will power the unit alone.
Note: Turning off the unit power switch will allow the battery to be charged more quickly.
ATTENTION:
If feedback(howling sound) occurs, try first turning down the treble control. If feedback still is
present, try turning down the volume or repositioning this unit with respect to the wired or
wireless MIC being used.
Maintenance of DVD disc
Caution
The individual function of this machine is relevant to the OVO disc, once the disc has no support
of these functions or it shall be specially set, the functions would not be played. please check
these functions before playing or operate it as per the instruction on the screen.
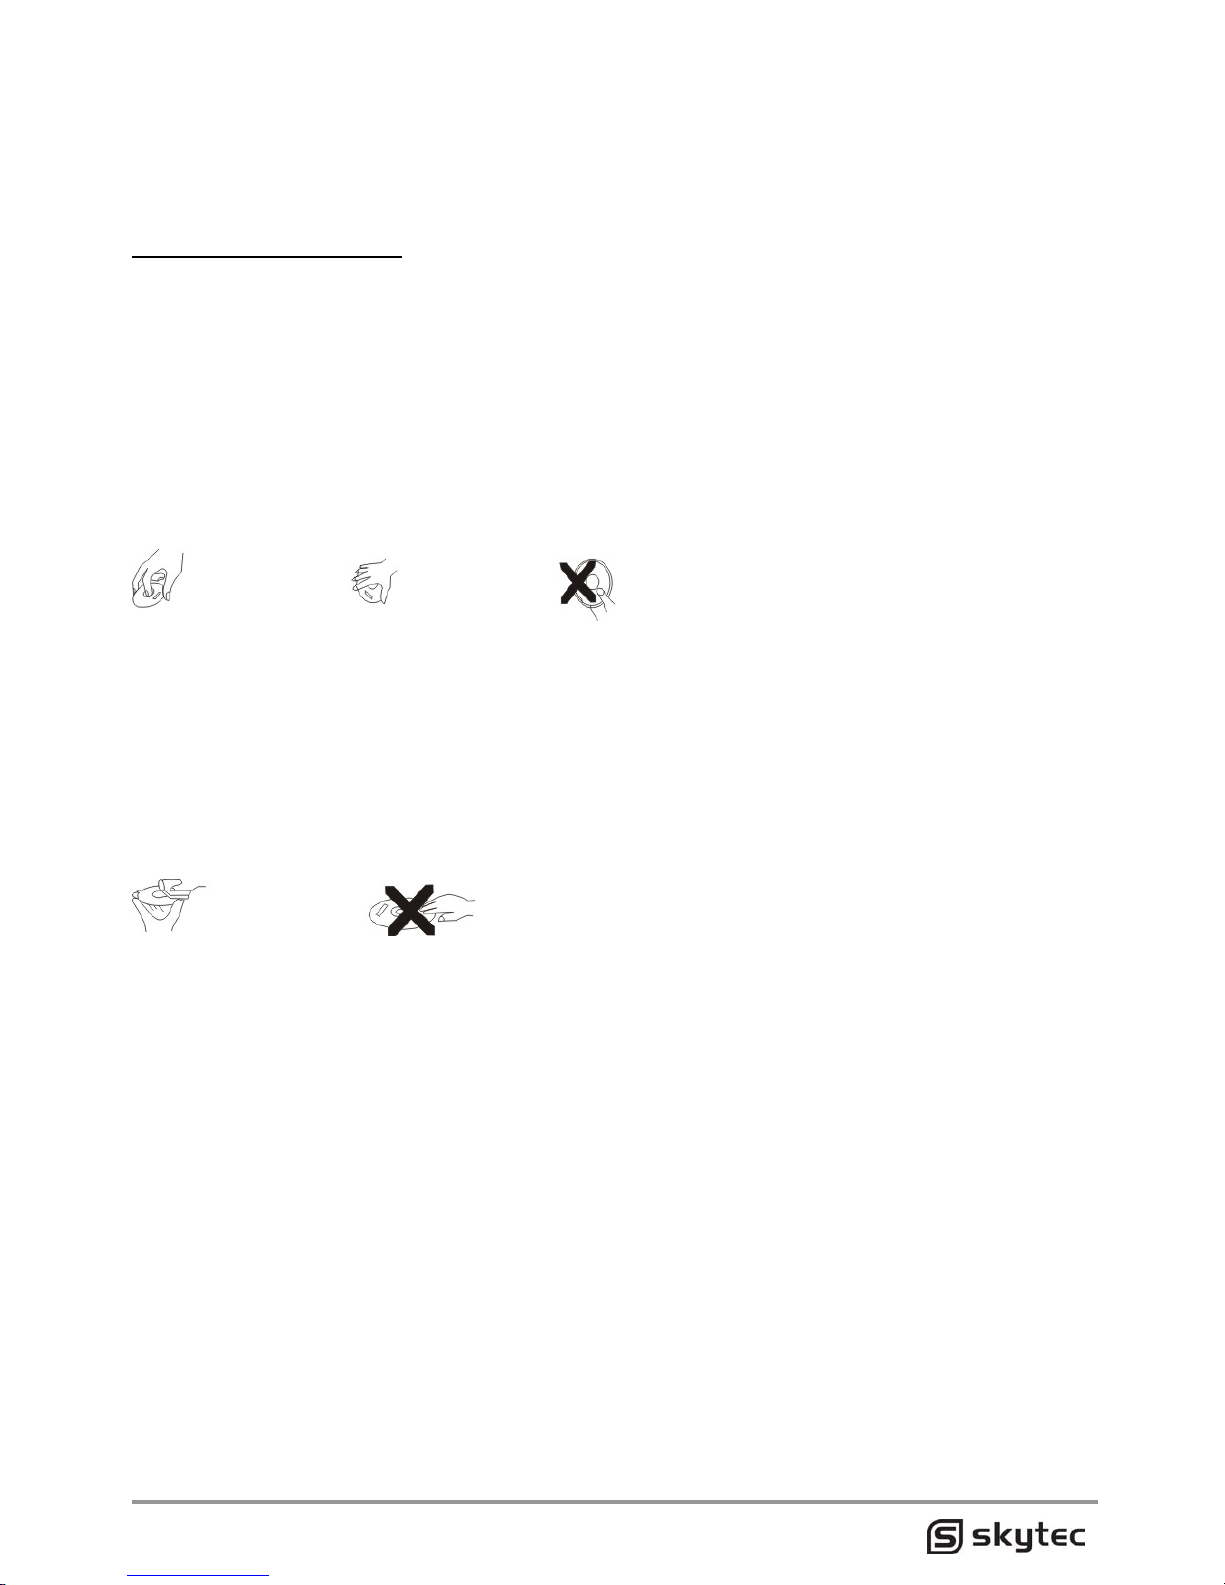
How to take the disc
Pass the forefinger into the small central hole at the disc,while the thumb and Other fingers
shall take the edge of disc lightly, The palm shall be faced to the print side of the disc and 5
other fingers shall hold the edge of disc lightly. Don't wrap the no-print side of the disc with your
fingers and any other solid.
Storage of disc
The disc shall not be placed at any place of high temperature, strong lighting and moisture. It
shall not be twisted. Once the disc is played to the end, the disc shall be taken out from the
original packing or any other boxes.
Surface cleaning of disc
Before Using, a clean and soft cloth may be used to wipe the disc surface from inside to
outside, any volatile grease, diluents or any other general cleaning agent shall not be used
Any fingerprint, dirt or any other adhesive paper and tape shall not be left on the disc surface
How to play MP3 disc
MP3 is fully named as "MPEG Audio Layer - 3" ,which is a format as compressed to the sound
signal via the third MPEG layer audio compression mode under the international standard.
Once you adopted this format, a disc may record about the music of 15 hours or over 170 songs
at the similar sound quality as CD.
Process to play MP3 disc(lt is suitable for playing Mp4 disc)
• Press the Open/close key to open the compartment door and place the MP3 disc into the
compartment with the face upper and press the open/close key again to close the
compartment door.
• Once the machine read the disc info and display "CDrom" ,it would automatically play
and TV would display the menu MP3.
introduction to play MP3 disc
• Press the up and down keys to select anyone of the left directory and Enter to play this
one and you may directly select it via the digital key.
• Press the right direction key to enter into the play menu of this directory and press the
up/down key to select. Press Enter to confirm or press Numeric key directly to play.
• During playing, press the last or Next key to select the last or next song.
•

• Press the Repeat key continuously, you may change between the single-song repeat,
directory repeat, the whole disc and the repeat off.
• During playing, press the Pause button to pause and press it again to recover playing.
• During playing, press the Stop button to enter into the Pre-stop and press the Play button
to continue to play at the stop point.
E-album
Are you regret of one photo taken in childhood being old and are you regret of one precious
photo being lost? And now, you don't need to worry about it. This machine has the strong
functions of e-album, It may clone the photo into the disc and you may browse any photo on the
player. Then you may enjoy your life without any trouble back at the damage and loss of any
photo.
Play JPEG disc
• Place into the JPEG disc. Once the directory search is completed, it would stop at the
first picture within the first directory.
• Press the up and down keys to select between the JPEG files, and press Play key to play
it from the current picture.
• Press the up and down keys to select between the files, and you may Enter to see this
picture in full screen and then the picture is in a still condition.
• Once the picture is in still condition, press the right direction to turn around the pictures
by clockwise rotation, and press the left direction to turn around the pictures by inverting.
• Once the picture is in still condition, press the Next or last to see the last or next picture.
• Press the Play key to play the pictures in order.
• This system has a MP3 record- and play back function.
NB: Several JPEG pictures are unable to be enlarged as the different format of picture.
JPEG is the current picture compressed saving mode as most widely used. It once adopted the
high effective compressed algorithm. thus the original picture is compressed of 15·20 times in
the best effects of small data and flexible application. It is in the support of many picture
software. very suitable for photo saving .
 Loading...