

Skytec 173.018 Owner's Manual

173.018
ELECTRONIC KEYBOARD
OWNERS’S MANUAL
Do not open the instrument or attempt to disassemble the internal parts or modify them in any
way. The instrument contains no user-serviceable parts. If it should appear to be malfunctioning,
discontinue use immediately and have it inspected by qualified service personnel.
Do not expose the instrument to rain, use near water or in damp or wet conditions, or place
containers on it containing liquids that might spill into any opening.
If the AC adapter cord or plug becomes frayed or damaged, or if there is a sudden loss of sound
during use of the instrument, or if any unusual smells or smoke appear to be caused by it,
immediately turn off the power switch, disconnect the adaptor plug from the outlet, and have the
instrument inspected by qualified service personnel.
Use the specified adaptor only. Using the wrong adapter can result in damage to the instrument or
overheating.
using the instrument nplug the AC power
adapter , or doing electrical storms.
Before cleaning the instrument, always remove the electric plug from the outlet. Never insert or
remove an electric plug with wet hands. Check the electric plug periodically and remove any dirt
or dust, which may have accumulated on it.
Do not place the AC adapter cord near heat sources such as heaters or radiators, and do not
excessively bend or otherwise damage the cord, place heavy objects on it, or place it in a position
where anyone could walk on, trip on, or roll anything over it.
Do not plug the instrument into a multiple socket because it might result in a deteriorated tone as
well as a socket overheating.
Use a dry and soft cloth to clean the . Using liquid like paint, organic solvent, or
chemical steep is strictly forbidden. Besides, putting ethane plastic materials on the piano may
also cause the fading of the colour of the panel or of the keyboard.
Never play the piano long to the maximum volume, which might cause a permanent hearing
disorder.
Remember to turn off the power when not , and u
Before connecting the instrument to other electronic components, turn off the power for all
components. Before turning the power on or off for all components, set all volume levels to
minimum.
Do not use the instrument near other electrical products such as televisions, radios, or speakers,
since this might cause interference which can affect proper operation of the other products.
Do not place the instrument in an unstable position where it might accidentally fall over.
instrument
Do not rest your weight on, or place heavy objects on the instrument, and do not use excessive
force on the buttons, switches and connectors.
Please obey the announcements to avoid the possibility of physical injury or damage to
instrument or other property Announcements as follows ,
but not only be limited by this.
before you use the electronic keyboard.
WARNING
PRECAUTIONS
PLEASE READ CAREFULLY BEFORE PROCEEDING
Please keep these precautions in a safe place for future reference.
. Panel control & Terminals
. Preparation for Performance
1. Using AC/DC adapter
2. Installation Of Batteries
3. Headphone/Speaker Output
4. MIDI IN/OUT Jacks
5. LCD Display Indicators
. Preparation for Performance
1.
2. Timbres Selection
3. Play Percussions
4. Demonstration Songs
. Rhythmic Accompaniment
1. Rhythms selection
2. Accompaniment control
3. Auto Metronome
4. Tempo Control
. Auto Bass Chord
1. Single Finger Auto Bass Chord
2. Multi-finger Auto Bass Chord
3. Full Chords
4. Chords Off
. Effect Control
1. Pitch Bend
2. Transposition
3. Tuning
4. Vibrato
5. Sustain
6. Touch Sensitive
7. Keyboard Split
. Status Register
. Record and Playback
. Program
. Intelligent Teaching Function
1. One Key
2. Follow Me
3. Ensemble
. Appendix
Volume Adjustment
..................................................................................................................
..................................................................................................................
..................................................................................................................
..................................................................................................................
..................................................................................................................
..................................................................................................................
..................................................................................................................
..................................................................................................................
..................................................................................................................
..................................................................................................................
..................................................................................................................
..................................................................................................................
..................................................................................................................
..................................................................................................................
..................................................................................................................
..................................................................................................................
..................................................................................................................
..................................................................................................................
..................................................................................................................
..................................................................................................................
..................................................................................................................
..................................................................................................................
..................................................................................................................
..................................................................................................................
..................................................................................................................
..................................................................................................................
..................................................................................................................
..................................................................................................................
..................................................................................................................
..................................................................................................................
..................................................................................................................
..................................................................................................................
..................................................................................................................
...........................................................................................................
..................................................................................................................
..................................................................................................................
..................................................................................................................
..................................................................................................................
CONTENTS
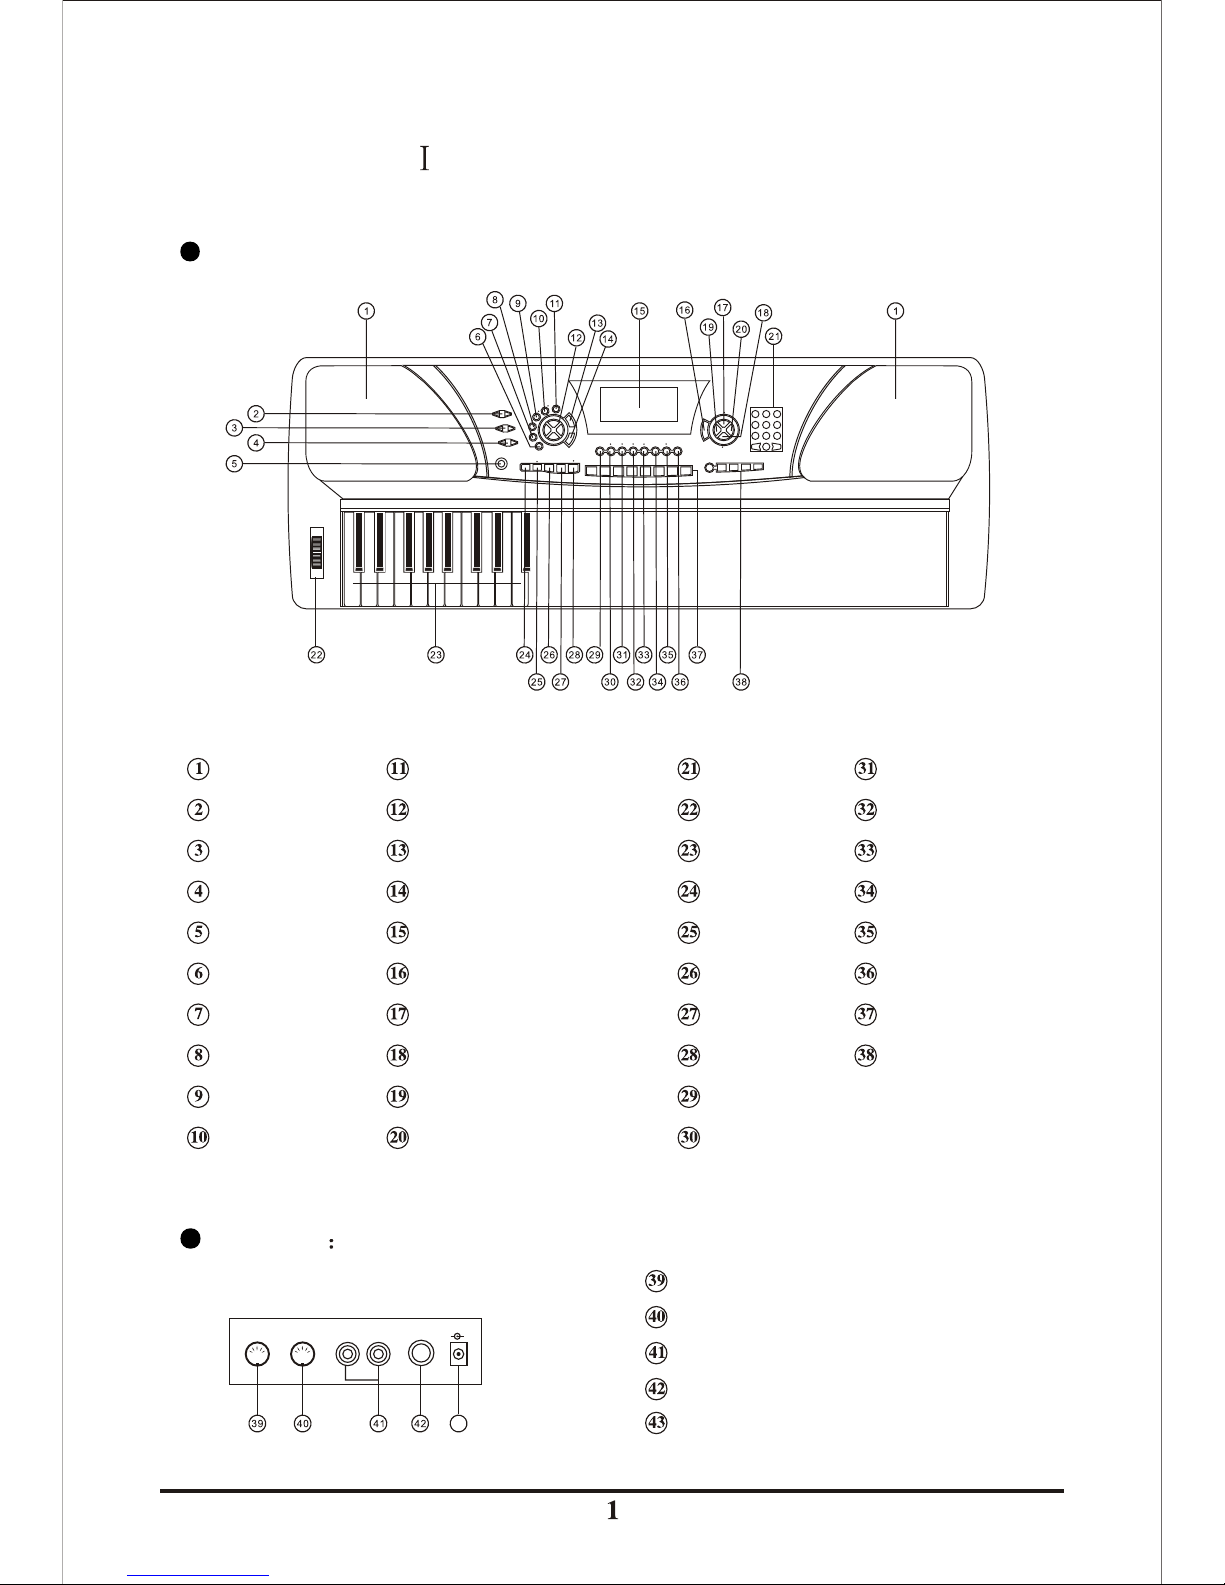
-
+
DC-12V
4343
Split
Speakers
Power Switch
Accom Volume
Master Volume
Tempo
Single
Fingered
Chords off
Full Chords
Tuning/Transpose control
Rhythm
Timbre
Song
Vibrato
Sustain
Touch
Keyboard Percussion
LCD display
Metronome
Ensemble
Follow Me
Record
Play
Program
Null-Play
Memory
Percussion Keys
Demo Song
Pitch Bend
Start / Stop
Chord Keys
One Key
Intro/Ending
Fill In 1
Sync
Digital Keys
Fill In 2
Headphone Jack
DC 12V Jack
Audio Output L/R
MIDI Input Jack
MIDI Output Jack
Front Panel:
Rear Panel
. Panel control & Terminals
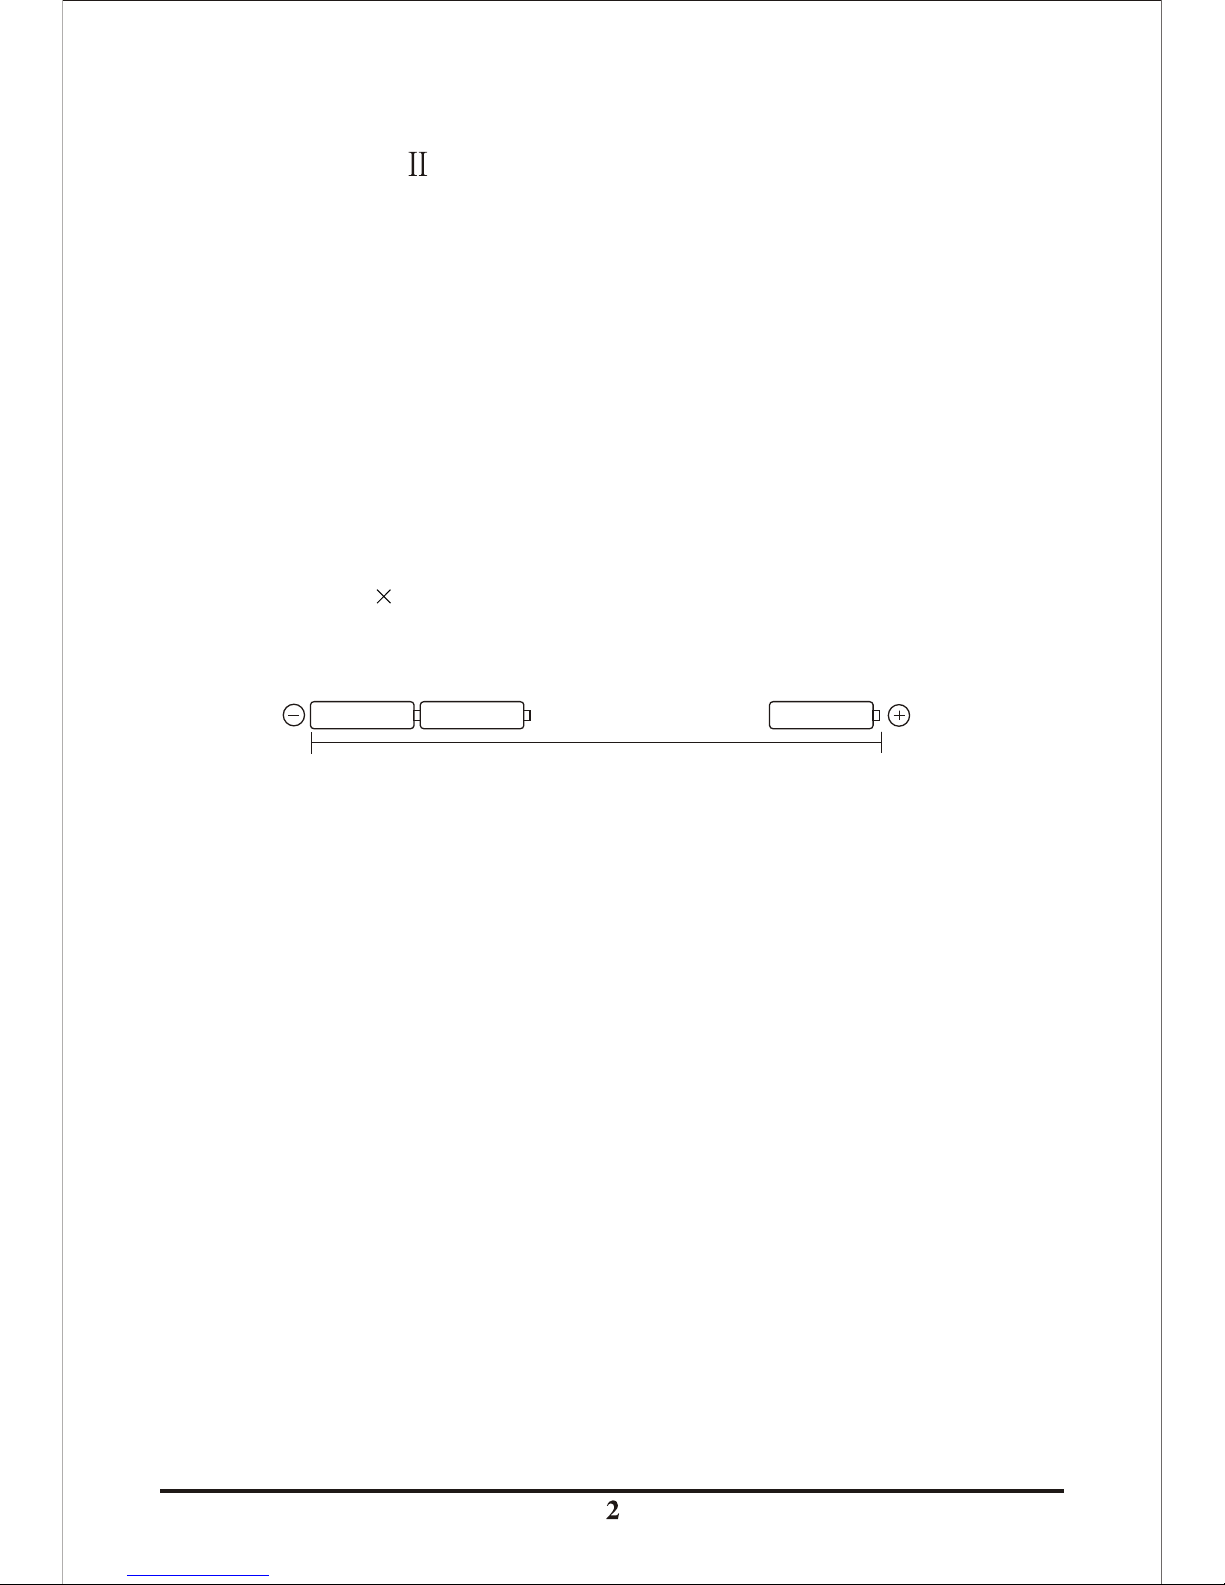
Total of eight batteries
1.5V 1.5V
1.5V
. Preparation for Performance
1. Using AC/DC Adapter
In case of using external AC Power, assure yourself applying a converter (from AC to DC)
specially provided by manufacturer or a converter which output voltage is DC 12V, output
current over 12A and positive pole at center.
Pull out the AC power converter from the power outlet when the unit unused so as to avoid
damaging the instruments or causing other accidents.
2. Installation Of Batteries
Notes: If voltage drops too low
a complete set of eight new batteries. Do not use new
batteries with old ones together and do not mix battery types too.
3. Headphone/Speaker Output
4. MIDI IN/OUT Jacks
MIDI is abbreviation of "Musical Instrument Digital Interface", and is a world-standard
communication interface that allows MIDI compatible with other instruments and computer
to play, compose and edit music etc.
Please put one side of the power converter into the
power supply socket on the back panel and the other side into city-electricity network.(The
input voltage of the converter must be the same as the city-electricity voltage.)
This unit uses 8 "D" size batteries. Open the battery compartment cover located on the
instrument's bottom panel. Insert the batteries following the polarity markings outside the
compartment , then replace the compartment cover and make sure it locks firmly in place.
the batteries , the digital display may be not light, the
volume may be reduced, the sound may be distorted, and other problems may occur. When this
happens, turn the power off and replace
If the instrument is not to be
used for a long time, remove all batteries in order to prevent batteries fluid leakage.
(1) The headphone is located at the back of electronic keyboard . It is used to play the electronic
keyboard without disturbing others. When you connect stereo headphone to the
headphone jack, the inner loudspeaker will be cut off automatically.
(2) Insert the plug of external speaker into the speaker jack(L/R) and the playing effect and
atmosphere will be enhanced.
Using the jacks to connect the computer to compose, or
connect to other MIDI.
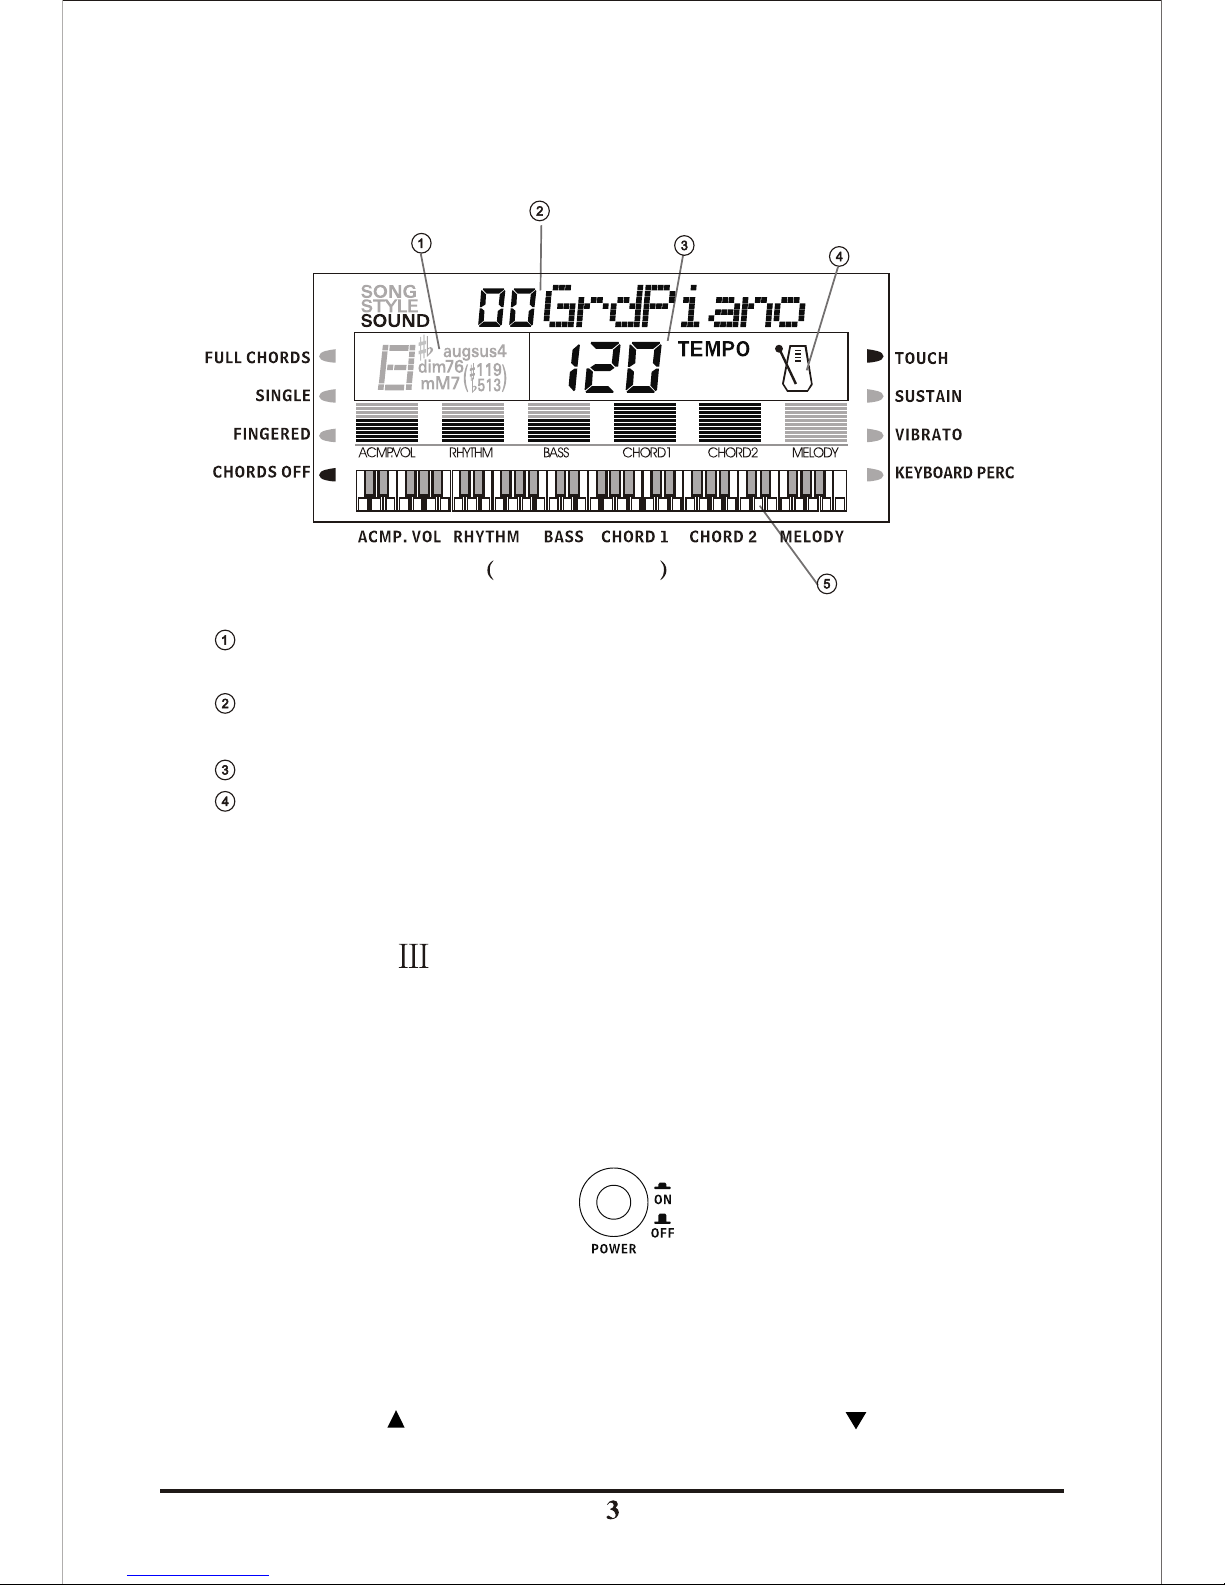
5. LCD Display Indicators
Default Message
. Basic Method of Performance
1.
1) Master Volume Adjustment
The master volume is divided into 16 levels ranging from 1 - 16 with the default level
pre-set at 11. Press button to increase the master volume or press button to decrease
Press "POWER" button to "on" position and the LCD display will show the default message
with the timbre and dynamic indicator on, at this moment, the system is in the standby state.
Press "POWER" button to "off " position ,the power of the count will be shut off.
Volume Adjustment
""" "
" " " "
Display the current chord name during auto accompaniment or song record/playback of
accompaniment
This shows the menu of each function of the keyboard. It also display the relevant message
for the current operation
Shows the current tempo or song playback
Flashes at the current tempo and indicates the current beat during the accompaniment and
song playback
Chord
Menu/message display
Tempo
Beat indicator
Graphics Keyboard
 Loading...