

6 CHANNEL MUSIC MIXER
172.558
8 CHANNEL MUSIC MIXER
172.561
Instruction Manual
Gebruiksaanwijzing
Mode d’Emploi
Gebrauchsanleitung

Brugsanvisning
GB
Congratulations on the purchase of this SkyTec mixer.
Please read this manual carefully prior to using the unit.
Warning:
-
- Read the manual prior to using the unit.
- Keep the manual for future reference.
- Keep the packaging for safer transport in its original packaging
- For indoor use only.
- Prior to the first use, have the unit checked by a qualified person.
- The unit contains voltage carrying parts. DO NOT open the mixer.
- When you unplug the unit from the mains always pull the plug, never the lead.
- Never plug or unplug the unit with wet hands.
- If the plug and/or mains lead are damaged, they need to be repaired by a qualified technician.
- If the unit is damaged to an extent that you can see internal parts, do not plug the unit into a
mains outlet.
- Repairs and lamp replacement has to be carried out by a qualified technician.
- Only connect this unit to an earthed mains outlet of 230Vac/50Hz and 10-16A.
- Do no place the unit near heat sources.
- Always unplug the unit during a thunderstorm or when it is not in use.
- If the unit has not been used for a longer period of time, condensation can occur inside the
housing. Please let the unit reach room temperature prior to use.
- Keep out of the reach of children.
- All channel controls and the master volume control must be set to zero prior to switching the
unit on.
- Set the channel slider controls slowly. Fast variation can overload the speakers.
- To prevent clipping of the amplifier do not set the volume level too high.
- Switch the amplifier on at latest and switch it off at first.
- Do not use cleaning sprays for the slider controls. The residues of these spray cause dust
deposits in the controls. If a problem occurs, please consult a specialist.
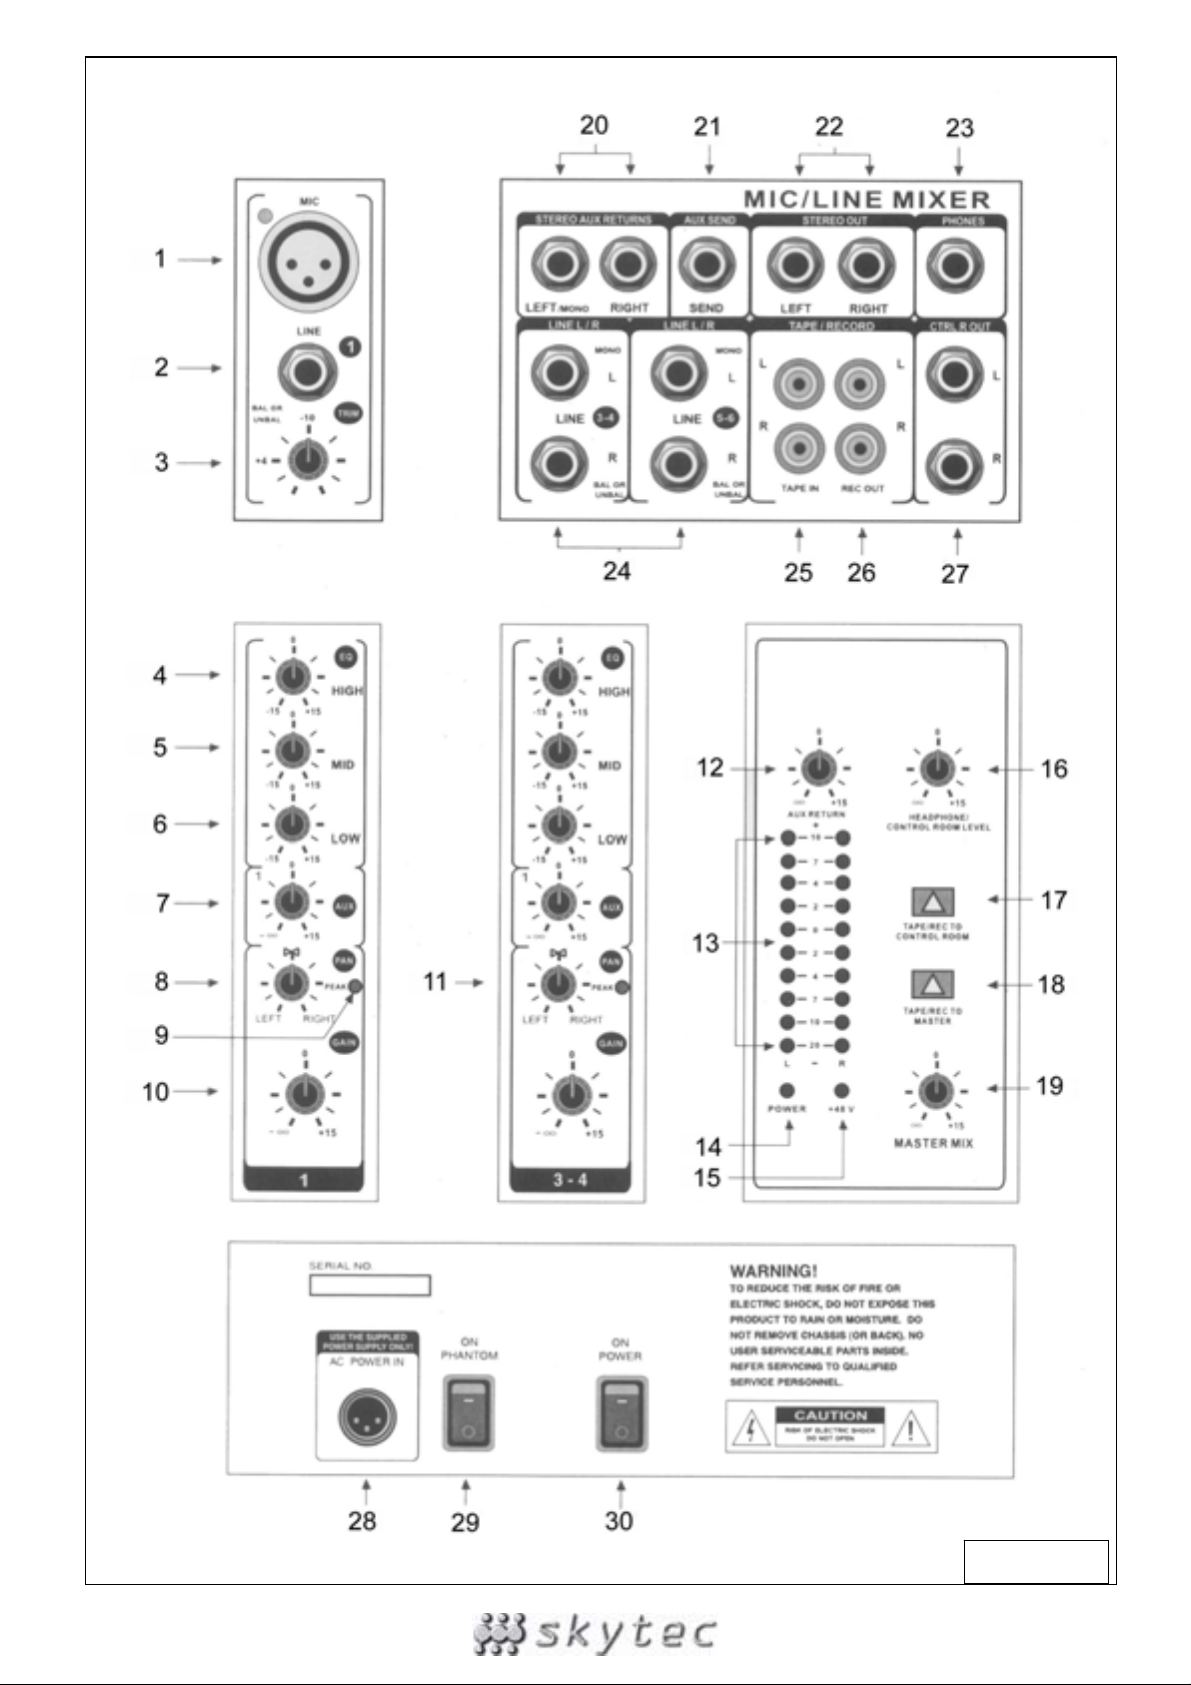
FIGURE 1

INTRODUCTION
Channels 1-2 (172.558) / 1-4 (172.561) are mono channels. They are fitted with balance d and
unbalanced Mic/Line inputs. The 4 other channels are stere o channels. They are convenient for MIDI
signals and signals from electronic instruments. The AUX Send function of this mixer is post-fader.
The AUX Return function has 2 outputs that can be linked to a MIDI receiver or an electronic
instrument. All numbers below in brackets refer to figure 1.
MONO INPUT CHANNELS
Every mono channel is fitted with an XLR microphone input (1) and a balanced 6.3mm line input (2).
Phantom power can be switched on at the rear panel (29). The trim circuit features a large range from
-10dB to +60dB.
Set the strength of the mic input signal via the trim control (3). Every channel is fitted with a PEAK LED
(9). If it flashes or lights up, you have to reduce the signal otherwise the channel will be overloaded.
Watch this LED especially if you use very heavy EQ settings (these LEDs show the post EQ signal).
Every mono input channel has its own 3 band EQ. The high button (4) sets the high frequencies (“0”
value is 12 kHz), the Mid button (5) the medium frequencies (peak response via the EQ on 2 octaves,
“0” value of 2.5 kHz) and the Low button (6) the low frequencies (“0” value is 80 Hz). All three bands
have a cut and boost up to 15 dB and a center position of “0”.
The AUX Send (7) on both units (172.558 and 172.561) is post-fader. This button controls the signal
strength to the AUX terminal. The gain to the master is set via the channel volume button (10).
The channel Pan (8) sets the position of the stereo output. Whatever the position may be, there should
be no difference in the volume level.
STEREO INPUT CHANNELS
Every stereo channel has two 6.3mm balanced inputs for a stereo line input signal. As only the left
input is connected, this channel will work exactly as a mono channel.
The stereo inputs are designed for any line input signal. Most line sources such as MIDI in struments
and FS units have their own output level control. The units without output level control such as CD
players have an output level which is within the range of the 172.558 and 175.561. If the channel and
master faders are set to the same level, the Vu-meters will display a value between -4 and -7 dB.
The only difference with the mono EQ is that a stereo channel includes no low-cut filter as this
equalizer is stereo and not mono.
The AUX Send function on a stereo channel works exactly as on a mono channel. The stereo signal
should be bridged to a mono signal.
The only difference with a mono channel is the implementation of a balance/pan button (11). This
button determines the balance between the left and right signal that is sent to the right and left master
output. If a stereo channel is used in mono mode (only the right input is connected), the balance
button operates as a pan control in mono mode.
MASTER SECTION
The AUX Send signal is applied to unbalanced 6.3mm jacks (21). Set the input level of the effect unit
to the output level of the mixer. If your effect unit is not fitted with a gain control, you can amplify the
signal via the AUX Send button (7) up to 15 dB.
There is an additional stereo input (AUX Return) on your mixer. The level of this input can be set via
the AUX Return button (12). This input is permanently affected to the master output. If a connector is
plugged into this input, the AUX Return function works with a mono signal. This input allows you to
create a ‘wet mix’.
The output level of the master section is displayed via a 10 LED bargraph vu-meter (13). Two other
LEDs give you an indication about ON/OFF (14) and phantom power ON/OFF (15).
Peaks are shown on the vu-meter around the 0 level. If the vu-meter displays over a longer period of
time +10dB for the signal, the master volume and/or the channel volume must be reduced. If this is not
sufficient, you can still reduce the gain of that channel and/or the output level of the instrument of
effect unit.
The RCA inputs are for connection of a CD player or a turntable. You can now route the signal via the
“tape/rec to control room level” push button (17) to the studio monitors or to the master routes via the
push button “tape / rec to master” (18). Make sure however that the push button (17) is in the up
position otherwise the signal will be input twice.
Connect the mixer to an amplifier via the balanced “stereo out” sockets (22). Use 2 6.3mm mono jacks
for this connection. The total output volume is set via the master volume button (19).
The mixer is fitted with a separate headphone output (23). The signal is the same as from the control
room output (27). The volume control (16) sends the signal to the headphones and the monitors. The
L/R meters are the same as the master output
INSTALLATION
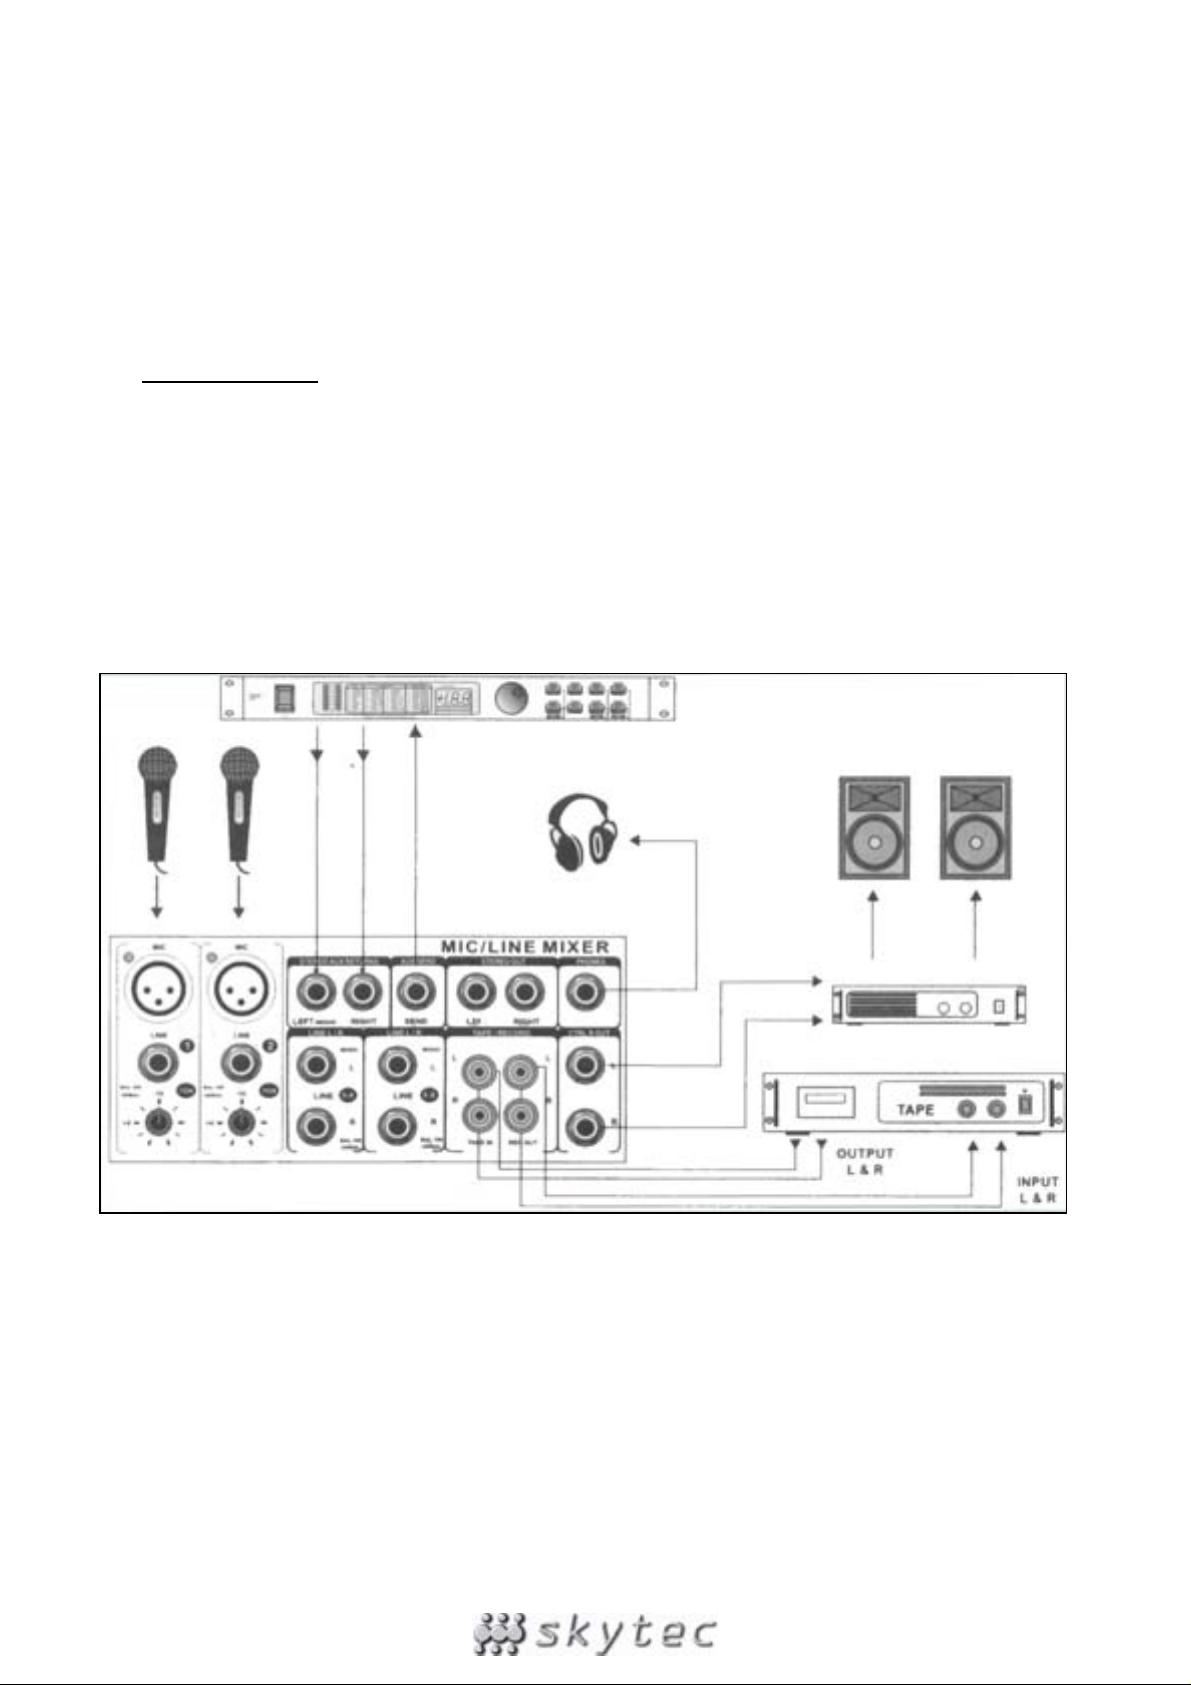
Do not mix up the cable in order to avoid wrong connections. Connect the leads one by one and not all
leads on one side first and then all on the other side. In the worst case, you might permanently
damage the unit. Figure 2 shows an example of possible connections.
Prior to connecting the mixer, set all controls to “0”. You can connect microphone or line units to the
mono channels, all kinds of line units to the stereo channels and effect units to the AUX Return. You
can also connect Midi instruments to the AUX Return.
If you connect a microphone, make sure that the phantom power is switched OFF. DO NOT use
unbalanced units when the phantom power is switched on. Do not short-circuit the 48V ci rcuit of the
phantom power to the ground. You might heavily damage the unit.
FIGUUR 2
If you record something on a DAT or ADAT recorder, do not set the maximum level. If your recorder
can support a level of 96 dB, record at a maximum level of 86 – 91 dB. The peak level must always be
5 – 10 dB lower that the maximum level of your recorder.
CONNECTIONS
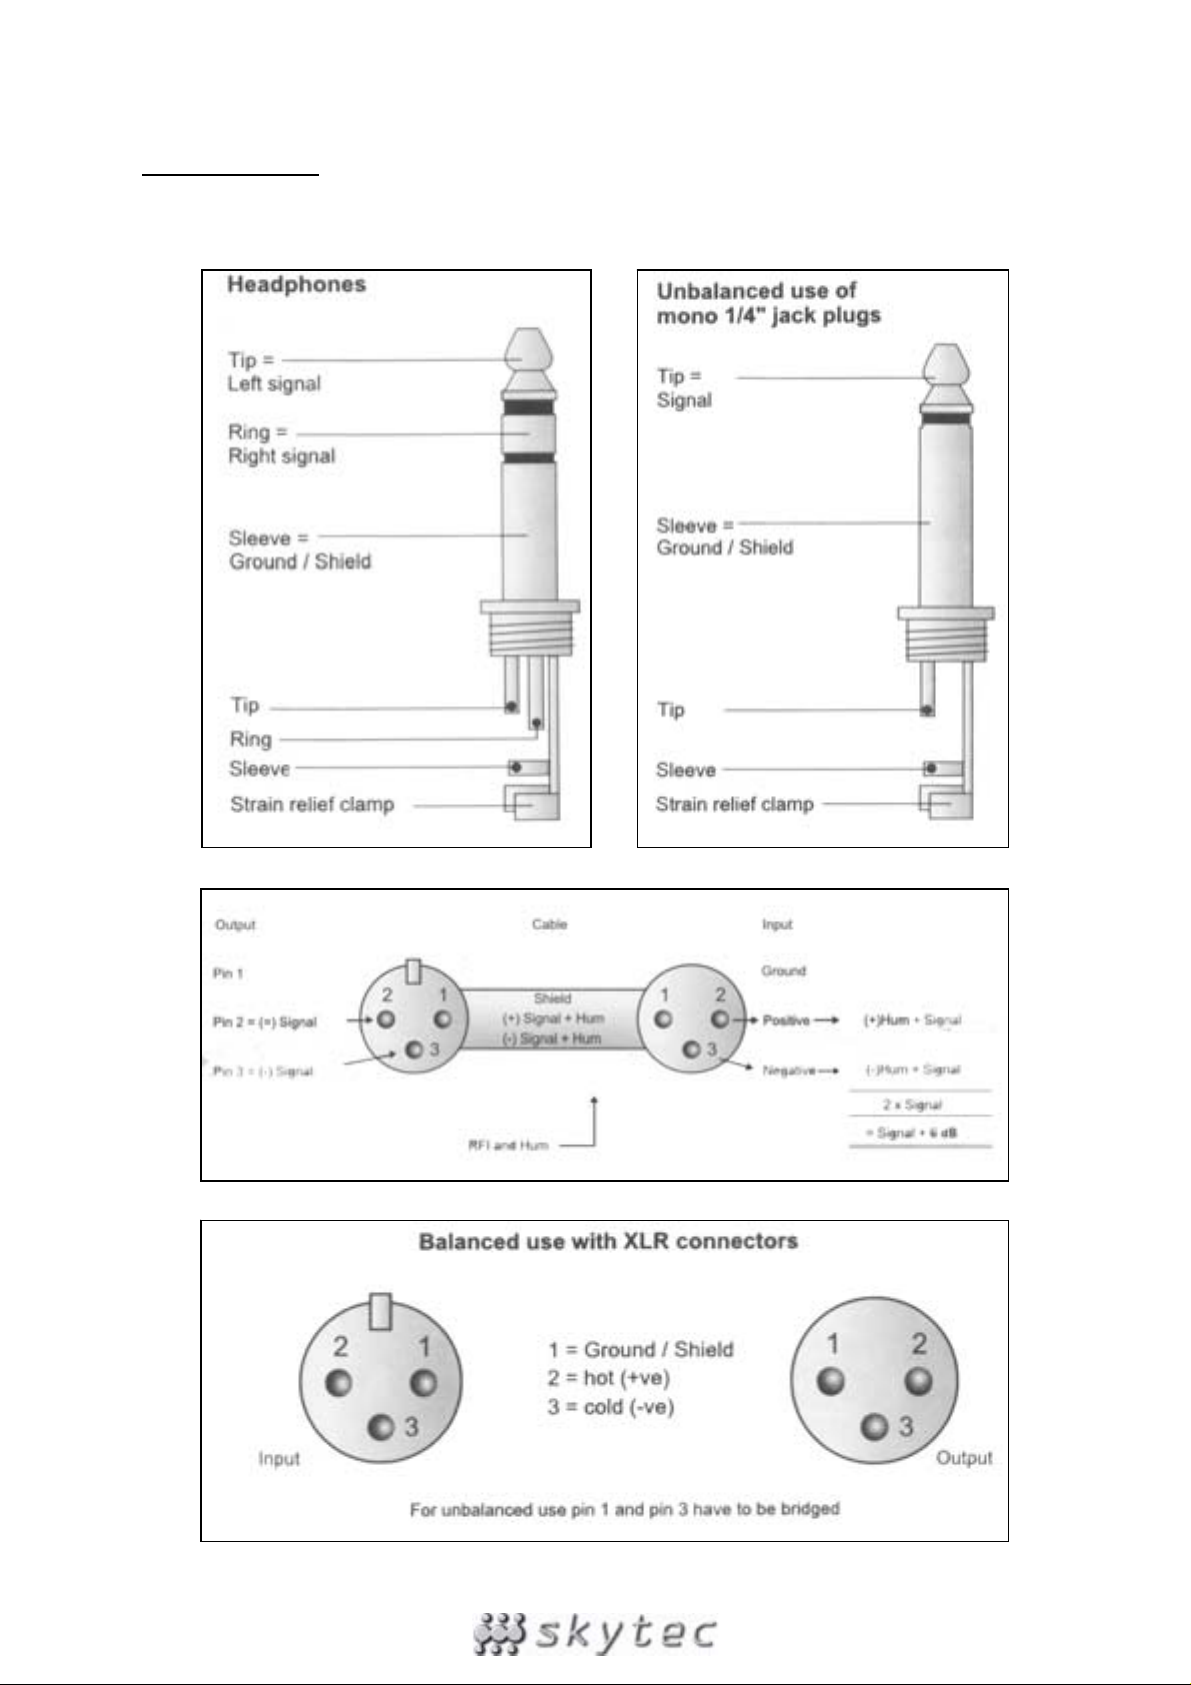
On a balanced in/output, always use balanced equipment. You can use either balanced or unbalan ced
equipment on an unbalanced in/output. See the drawings below for the equipment that you can use:
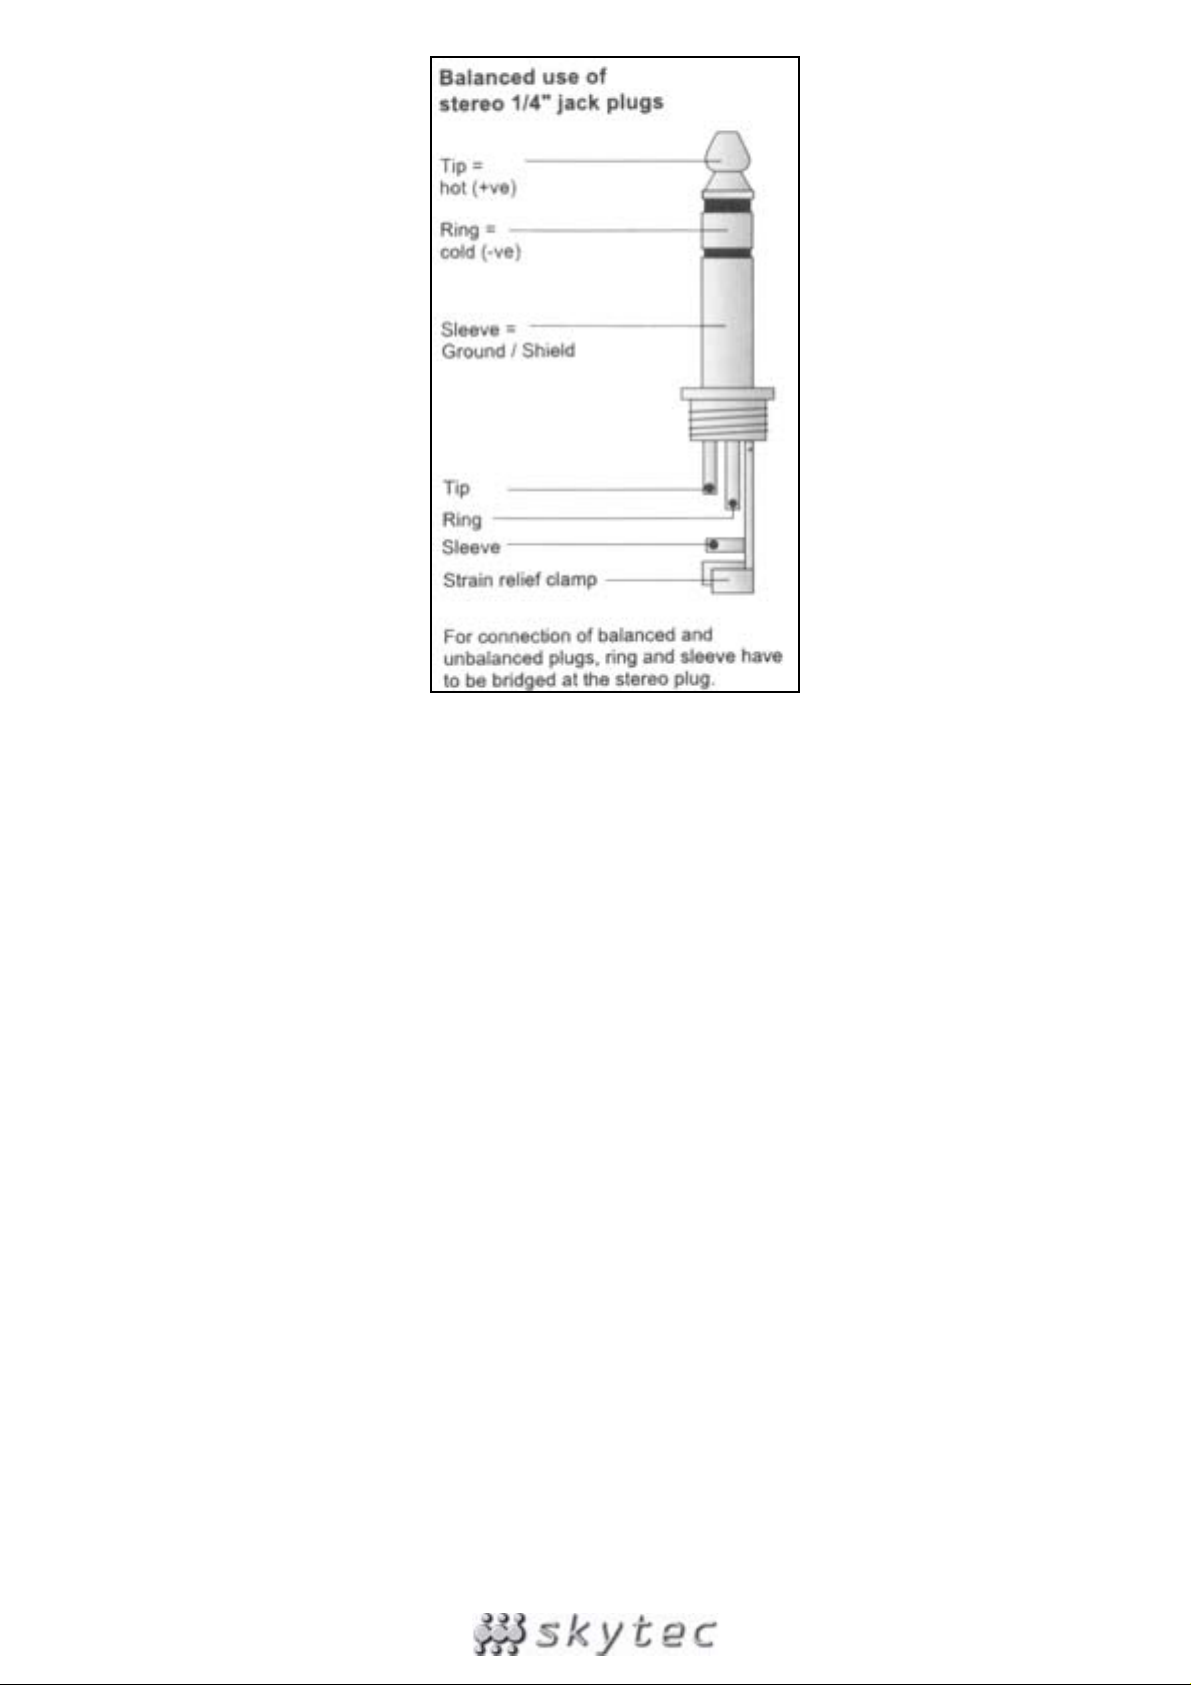
If possible, connect the balanced outputs to other balanced units to avoid interference.

SPECIFICATIONS
Mono inputs
Mic input: ..................................electronically balanced, discrete input configuration
Frequency response: ...........................................................10 Hz – 20 kHz (± 3 dB)
Distortion: ........................................................................0.01% @ +4 dBu (± 1 kHz)
Input impedance: ..................................................................150 Ohms @ -129.5 dB
Line input: .............................................................................. electronically balanced
Frequency response: ...........................................................10 Hz – 20 kHz (± 3 dB)
Distortion: ........................................................................0.01% @ +4 dBu (± 1 kHz)
Equalizer: ....................................................................................................................
High: .............................................................................................. 12 kHz (± -15 dB)
Mid: .............................................................................................. 2.5 kHz (± -15 dB)
Low: ................................................................................................. 80 Hz (± -15 dB)
Stereo inputs
Line input: ................................................................................................ unbalanced
Frequency response: ...........................................................10 Hz – 20 kHz (± 3 dB)
Distortion: ........................................................................0.01% @ +4 dBu (± 1 kHz)
Equalizer: ....................................................................................................................
High: .............................................................................................. 12 kHz (± -15 dB)
Mid: .............................................................................................. 2.5 kHz (± -15 dB)
Low: ................................................................................................. 80 Hz (± -15 dB)
Master section
Max output level: ........................................................................ + 22 dBu, balanced
AUX Send max output level: ..................................................... +22 dBu unbalanced
Control room output level: ........................................................ +22 dBu unbalanced
Signal/noise ratio: ......................................................................................... >112 dB
General
Power supply: ...................................................................................220 VAC, 50 Hz
Dimensions (hxwxd): .................................................. 70 x 176 x 230 mm (172.558)
Dimensions (hxwxd): .................................................. 70 x 230 x 230 mm (172.561)
Weight: ............................................................................................. 2.4 kg (172.558)
Weight: ............................................................................................. 3.0 kg (172.561)
•
Specifications and design subject to changes without prior notice.
Do not attempt to make any repairs yourself. This would invalid your warranty.
Do not make any changes to the unit. This would also invalid your warranty.
The warranty is not applicable in case of accidents or damages caused by inappropriate use or disrespect of the warnings
contained in this manual.
SkyTronic UK cannot be held responsible for personal injuries caused by a disrespect of the safety recommendations and
warnings. This is also applicable to all damages in whatever form.

NL
Hartelijk dank voor de aanschaf van dit SkyTec mengpaneel. Lees deze gebruiksaanwijzing
aandachtig door alvorens het apparaat in bedrijf te stellen.
WAARSCHUWING
- Lees altijd eerst de gebruiksaanwijzing voordat u een apparaat gaa t gebruiken.
- Bewaar de handleiding zodat elke gebruiker hem eerst kan doorlezen.
- Bewaar de verpakking zodat u indien het apparaat defect is, dit in de originele verpakking kunt
opsturen om beschadigingen te voorkomen.
- Alleen voor gebruik binnenshuis.
- Voordat het apparaat in werking wordt gesteld, altijd eerst een deskundige raadplegen.
- In het apparaat bevinden zich onder spanning staande onderdelen; open daarom NOOIT dit
apparaat.
- Bij het verwijderen van de stekker uit het stopcontact nooit aan het netsnoer trekken.
- Verwijder of plaats een stekker nooit met natte handen resp. uit en in het stopcontact.
- Indien de stekker en/of netsnoer als snoeringang in het apparaat beschadigd zijn dient dit door
een vakman hersteld te worden.
- Indien het apparaat zo beschadigd is dat inwendige (onder)delen zichtbaar zijn mag de stekker
NOOIT in het stopcontact worden geplaatst én het apparaat NOOIT worden ingeschakeld. Neem
in dit geval contact op met SkyTronic BV.
- Reparatie aan het apparaat dient te geschieden door resp. een vakman of een deskundige.
- Sluit het apparaat alléén aan op een 230VAC / 50Hz geaard stopcontact, verbonden met een 1016A meterkastgroep.
- Toestel niet opstellen in de buurt van warmte bronnen zoals verwarming etc.
- Bij onweer altijd de stekker uit het stopcontact halen, zo ook wanneer het apparaat voor een
langere tijd niet gebruikt wordt.
- Als u het apparaat lang niet gebruikt heeft en het weer wil gebruiken kan er condensatiewater
ontstaan; laat het apparaat eerst op kamertemperatuur komen alvorens het weer in werking te
stellen.
- Om ongevallen in bedrijven te voorkomen moét rekening worden gehouden met de daarvoor
geldende richtlijnen en moeten de aanwijzingen/waarschuwingen worden gevolgd.
- Het apparaat buiten bereik van kinderen houden.
- Zorg er altijd voor dat wanneer het apparaat wordt ingeschakeld dat alle kanaalschuiven en het
mastervolume op minimaal staan.
- Regel de kanaalschuiven met beleid, snelle variatie kan voor overbelasting zorgen met
beschadiging van uw luidsprekers als gevolg.
- Zorg ervoor dat de versterker nooit gaat clippen: Dit gebeurt wanneer de clip leds, meestal op het
front van de versterker, opgaan lichten. Regel het volume dusdanig dat dit niet gebeurt.
- Schakel een versterker altijd als laatste aan en schakelt hem als eerste uit.
- Gebruik geen schoonmaakspray om de schuifregelaars te reinigen. Resta nten van deze spray
zorgen ervoor dat smeer en stof ophopen in de regelaars. Raadpleeg bij storing te allen tijde een
deskundige.

FIGUUR 1

INTRODUCTIE
De kanalen 1-2 (172.558) / 1-4 (172.561) zijn mono kanalen. Deze kanalen zijn alle voorzien van
gebalanceerde en ongebalanceerde Mic / Line ingangen. De andere 4 kanalen zijn stereo kanalen.
Deze zijn zeer geschikt voor het verwerken van MIDI signalen en voor het verwerken van signalen van
elektronische instrumenten. Er is een AUX send functie op deze mixer uitgevoerd, deze is post-fader.
De AUX return functie heeft 2 uitgangen die bijvoorbeeld weer verbonden kunnen worden met een
MIDI ontvanger of een elektronisch instrument. Alle getallen tussen de haakjes hieronder verwijzen
naar figuur 1.
MONO INGANGSKANALEN
Elk mono kanaal heeft een XLR microfoon ingang (1) en een gebalanceerde 6,3 mm Line ingang (2 ).
Fantoom voeding is schakelbaar vanaf het achterpaneel (29). Het trim circuit heeft een breed bereik
van +10 dB tot +60 dB.
De sterkte van het microfoon ingangssignaal bepaald u met de trim (3) regelaar. Elk kanaal heeft ook
een PEAK LED (9). Gaat deze knipperen / branden, dan dient u het signaal naar beneden te regelen,
doet u dit niet, dan kan het kanaal overbelasten en buiten gebruik raken. Let vooral op deze LED als u
zeer zware EQ instellingen gebruikt. (deze LEDs lezen het signaal post-EQ af)
Elk mono ingangskanaal heeft zijn eigen 3-bands EQ. De high draaiknop (4) is voor het regelen van
de hoge frequenties (“0-waarde“ van 12 kHz), de mid draaiknop (5) voor de middentonen (peak
response met de EQ op 2 octaven, “0-waarde“ van 2,5 kHz) en de low draaiknop (6) is voor het
regelen van de lage frequenties (“0-waarde“ van 80 Hz). Alle drie banden hebben tot 15 dB cut en
boost en een centrale positie “0”.
De AUX send (7) op zowel de 172.558 en de 172.561 is post-fader. Met deze draaiknop reguleert u de
sterkte van het signaal dat naar de AUX bus word gestuurd. De gain naar de master word bepaald
met de kanaalvolume draaiknop (10)
De kanaal pan (8) is er voor om de positie van de stereo output in te stellen. Waar u de positie ook op
instelt, er zal nooit een verschil in het volumeniveau optreden.
STEREO INGANGSKANALEN
Elk stereo kanaal heeft twee 6,3 mm gebalanceerde ingangen voor een stereo Line ingang ssignaal.
Als alleen de linker ingang is verbonden zal dit kanaal netzo werken als een mono kanaal.
De stereo ingangen zijn ontworpen voor elk Line ingangssignaal. De meeste Li ne bronnen zoals MIDI
instrumenten en FS units hebben hun eigen uitgangsniveau regeling. De units die dat niet hebben,
zoals CD-Spelers, hebben allemaal een uitgangsniveau binnen het bereik van de 172.558 en 172.561.
Als zowel de kanaal als master fader worden ingesteld op hetzelfde niveau, zullen de VU meters een
waarde aangeven tussen de -4 en -7 dB.
Het enige verschil met de mono EQ is dat een stereo kanaal geen Low-Cut filter bevat. En deze
equalizer is stereo, geen mono.
De AUX send op een stereo kanaal werkt op dezelfde wijze als die op een mono kanaal. Let erop dat
er een mono som van het stereo signaal word genomen.
Het enige verschil met een mono kanaal is de implementatie van de balans/pan draaiknop (11). Met
deze knop bepaald u de relatieve balans tussen het linker en rechter signaal dat word verzonden na ar
respectievelijk de linker en rechter master bus. Als een stereo kanaal word gebruikt in mono-modes
(met alleen de rechter ingang verbonden), zal de balans draaiknop werken als een pan in mono
modes.
MASTER SECTIE
De AUX send word geleverd op 6,3 mm ongebalanceerde Jacks (21). Regel het ingangsniveau van
de effect apparatuur gelijk met het uitgangsniveau van de mixer. Als uw effect apparatuur niet over
een gain instelling beschikt, kunt u het signaal alsnog versterken met de AUX send draaiknop (7), dit
kan tot 15 dB.
Er is nog een extra stereo ingang (AUX return) op uw mixer uitgevoerd. Het niveau van deze ingang
kan worden aangepast met de AUX return draaiknop (12). Deze ingang is permanent toegewezen aan

de master uitgang. Als er maar één connector is verbonden met deze ingang zal de AUX return
opereren met een mono signaal. Met deze ingang kunt u een ‘wet mix’ creëren.
Het uitgangsniveau van de master sectie word weergegeven met een 10-delige VU meter (13)
(bargraph) van LED’s. Twee andere LED’s geven u een indicatie van aan/uit (14) en fantoomspanning
aan/uit (15).
De VU meter mag bij pieken rond het 0 niveau aangeven. Geeft de VU meter langdurig weer dat het
signaal +10 dB bedraagt, dient u het master volume en/of het kanaal volume omlaag te regelen. Is dit
nog niet afdoende, dan kunt u altijd nog de gain van het kanaal en/of het uitgangsniveau van
instrument of effect apparatuur omlaag regelen.
Met de Tulp ingangen (RCA) kunt u bijvoorbeeld een CD-Speler of een Pick-up aansluiten. U kunt nu
met de “tape / rec to control room level” drukknop (17) het signaal naar de studio monitors routen. U
kunt ook het signaal naar de master routen via de drukknop “tape / rec to master” (18). Zorg er dan
wel voor dat de vorig genoemde drukknop (17) uitstaat, anders word het signaal dubbel ingeleze n.
U verbind de mixer met een versterker d.m.v. de gebalanceerde “stereo out” (22). Dit geschied met 2
6,3 mm mono Jacks. U regelt het uiteindelijke uitgangsvolume met de master volume draaiknop (19).
De mixer heeft een aparte hoofdtelefoon uitgang (23). Dit signaal is hetzelfde als die van de control
room uitgang (27). Een enkele volume bediening (16) stuurt het signaal naar de hoofdtelefoon en de
hoofd monitoren. De L/R meters zijn hetzelfde als de master uitgang.
INSTALLATIE
Zorg ervoor dat u de kabels niet verward, dit kan fouten bij het inpluggen voorkomen. Zorg dus voor
dat u kabel voor kabel aansluit, dus niet eerst alle kabels aan de ene zijde, dan alle aan de andere
zijde. In het ergste geval kunnen er storingen of zelfs blijvende schade aan uw apparatuur optreden.
Een voorbeeld van aansluitingen die mogelijk zijn ziet u in figuur 2.
Voordat u de mixer aansluit dient u alle regelaars op de “0” stand te zetten. Op de mono kanalen kunt
u mic of line apparatuur aansluiten, op de stereo kanalen kunt u elk soort line apparatuur aansluiten
en op de AUX return kunt u effect apparatuur aansluiten. Ook kunt u op de AUX return midi
instrumenten aansluiten.
Als u een microfoon aansluit, zorg er dan voor dat de fantoom voeding UIT staat. Gebruik NOOIT
ongebalanceerde apparatuur als de fantoom voeding aan staat. Sluit het 48V circuit va n de fantoom
spanning nooit kort met aarde, er kan dan zware schade optreden.
FIGUUR 2

Zorg ervoor dat als u iets opneemt op bijvoorbeeld een DAT of ADAT recorder, dit nooit op het
maximale niveau doet. Dus als uw recorder een niveau van 96 dB aankan, neem dan op met een
piekniveau van maximaal 86 - 91 dB. Dus, het piekniveau dient altijd 5 - 10 dB lager te zijn dan het
maximale niveau van uw recorder.
VERBINDINGEN
Gebruik voor een gebalanceerde uit/ingang altijd gebalanceerd materiaal. Voor een ongebalan cee rde
uit/ingang kunt u zowel ongebalanceerde en gebalanceerde materi aal gebruiken. Zie de schema’s
hieronder voor het materiaal dat u kunt gebruiken:

Indien mogelijk, verbind gebalanceerde uitgangen met andere gebalanceerde apparatuur. Dit
reduceert storingen tot een minimum.

SPECIFICATIES
Mono ingangen
Mic ingang: ....................... elektronisch gebalanceerd, discrete ingangsconfiguratie
Frequentiebereik: .................................................................10 Hz – 60 kHz (± 3 dB)
Vervorming: .....................................................................0,01% @ +4 dBu (± 1 kHz)
Ingangsimpedantie: ............................................................... 150 Ohm @ -129,5 dB
Line ingang: ..................................................................... elektronisch gebalanceerd
Frequentiebereik: .................................................................10 Hz – 60 kHz (± 3 dB)
Vervorming: .....................................................................0,01% @ +4 dBu (± 1 kHz)
Equalizer: ....................................................................................................................
High: .............................................................................................. 12 kHz (± -15 dB)
Mid: .............................................................................................. 2,5 kHz (± -15 dB)
Low: ................................................................................................. 80 Hz (± -15 dB)
Stereo ingangen
Line ingang: ......................................................................................ongebalanceerd
Frequentiebereik: .................................................................10 Hz – 55 kHz (± 3 dB)
Vervorming: .....................................................................0,01% @ +4 dBu (± 1 kHz)
Equalizer: ....................................................................................................................
High: .............................................................................................. 12 kHz (± -15 dB)
Mid: .............................................................................................. 2,5 kHz (± -15 dB)
Low: ................................................................................................. 80 Hz (± -15 dB)
Master sectie
Max uitgangsniveau: ............................................................+ 22 dBu, gebalanceerd
AUX send max uitgangsniveau: ........................................ +22 dBu ongebalanceerd
Control room uitgangsniveau: ........................................... +22 dBu ongebalanceerd
Signaal/Ruisverhouding: .................................................................................112 dB
Algemeen
Aansluitspanning: .............................................................................220 VAC, 50 Hz
Afmetingen (hxbxd): ................................................... 70 x 176 x 230 mm (172.558)
Afmetingen (hxbxd): ................................................... 70 x 230 x 230 mm (172.561)
Gewicht: ...........................................................................................2,4 kg (172.558)
Gewicht: ...........................................................................................3,0 kg (172.561)
•
Specificaties en ontwerp zijn onderworpen aan veranderingen zonder dat deze vooraf aangekondigd zijn.
Voer zelf geen reparaties uit aan het apparaat; in élk geval vervalt de totale garantie. Ook mag het apparaat niet
eigenmachtig worden gemodificeerd , ook in dit geval vervalt de totale garantie. Ook vervalt de garantie bij ongevallen en
beschadigingen in élke vorm t.g.v. onoordeelkundig gebruik en het niet in achtnemen van de waarschuwingen in het
algemeen en gestelde in deze gebruiksaanwijzing. Tevens aanvaardt SkyTronic B.V. geen enkele aansprakelijkheid in
geval van persoonlijke ongelukken als gevolg van het niet naleven van veiligheidsinstructies en waarschuwingen .Dit geldt
ook voor gevolgschade in wélke vorm dan ook.

F
Nous vous remercions pour l’achat de cette table de mixage SkyTec
Lisez attentivement ce manuel avant la première mise en service.
Consignes de sécurité:
- Lire le mode d’emploi avant la première mise en service.
- Conservez le mode d’emploi pour référence ultérieure.
- Conservez l’emballage d’origine afin de pouvoir transporter l’appareil en toute sécurité.
- Uniquement pour utilisation à l’intérieur.
- Ne pas ouvrir le boîtier. Il contient des pièces sous tension.
- Pour débrancher, tirer toujours sur la fiche, jamais sur le cordon.
- Ne pas brancher ou débrancher l’appareil avec des mains mouillées.
- Si la table de mixage est endommagée, ne la branchez pas sur une prise secteur et ne la
mettez pas sous tension.
- Si la fiche et/ou le cordon secteur sont endommagés, faites-les remplacer par un spécialiste.
- Branchez la table de mixage uniquement sur une prise de terre de 230Vac/50Hz d’une
intensité de 10-16A.
- Ne pas placer la table de mixage à proximité d’une source de chaleur.
- Pendant un orage ou en cas de non-utilisation, débranchez toujours l’appareil du secteur.
- Après une période de non-utilisation prolongée, de l’eau de condensation a pu se former.
Attendez que la table de mixage ait atteinte la température ambiante.
- Tenir hors de la portée des enfants.
- Lorsque la table est mise sous tension, veillez à ce que tous les canaux et le volume général
soient réglés sur le minimum.
- Manipulez les contrôles de canaux avec précaution. Une variation rapide risque
d’endommager les haut-parleurs suite à un clipping de l’amplificateur.
- Eviter un clipping de l’amplificateur. Ceci se produit lorsque les LED de clipping sur
l’amplificateur s’allument. Réglez le volume de façon à ce que ceci ne puisse pas se produire.
- Allumez l’amplificateur toujours en dernier et éteignez-le en premier.
- N’utilisez pas de sprays pour nettoyer les potentiomètres. Les résidus de ces sprays
provoquent des dépôts de poussière et de graisse. Consultez un spécialiste en cas de
problème.

FIG. 1

INTRODUCTION
Les canaux 1-2 (172.558) / 1-4 (172.561) sont mono et équipés d’entrées micro et ligne symétriques
et asymétriques. Les 4 autres canaux sont stéréo. Ils conviennent particulièrement au traitement de
signaux MIDI et provenant d’instruments électroniques. La fonction AUX Send est post-fader. La
fonction AUX Return possède 2 sorties qui peuvent être connectées à un récepteur MIDI ou un
instrument électronique. Tous les chiffres entre parenthèses renvoient à la figure 1.
CANAUX D’ENTREE MONO
Chaque canal mono possède une entrée micro XLR (1) et une entrée symétrique 6,3mm (2) de niveau
ligne. L’alimentation fantôme est commutable sur le panneau arrière (29). Le circuit trim offre une
large bande de +10dB à +60 dB.
Le contrôle Trim (3) détermine la force du signal d’entrée microphone. Chaque can al est équipé d’une
LED de crête (9) qui clignote ou s’allume lorsque le canal est surchargé. Dans ce cas, il convient de
baisser le niveau du signal. Surveillez cette LED lorsque vous utilisez des réglages EQ très fortes (ces
LEDs lisent le signal post-EQ).
Chaque canal d’entrée mono a son propre égalise ur à 3 bandes. Le bouton HIGH (4) règle les hautes
fréquences (valeur « 0 » à 12 kHz), le bouton MIDI (5) les fréquences moyennes (réponse crête avec
l’égaliseur sur 2 octaves, valeur « 0 » de 2,5 kHz) et le bouton LOW (6) les basses fréquences (valeur
« 0 » de 80 Hz). Les trois bandes offrent un cut et boost jusqu’à 15dB avec une position ce ntrale
« 0 ».
Le bouton AUX Send (7) sur le 172.558 et 172.561 est post-fader. Ce bouton règle la force du signal
qui est envoyé à la fiche AUX. Le gain vers le master est réglé au moyen du bouton de volume canal
(10).
Le canal Pan (8) permet de régler la position de la sortie stéréo. Quelque soit la position choisie, il n’y
aura pas de différence dans le niveau de volume.
CANAUX D’ENTREE STEREO
Chaque canal stéréo possède deux entrées symétriques 6,3mm pour un signal d’entrée stéréo de
niveau ligne. Lorsque seule l’entrée gauche est connectée, ce canal fonctionne exacteme nt comme
un canal mono.
Les entrées stéréo sont conçues pour tous les signaux d’entrée ligne. La plupart des source s de
niveau ligne tels que des instruments MIDI possèdent leur propre réglage de niveau. Les entrées qui
ne l’ont pas tels que des lecteurs CD, ont un niveau de sortie qui se situe dans la plage de ces tables
de mixage. Lorsque le fader canal et le fader master sont réglés sur le même niveau, les vu-mètres
indiquent une valeur entre -4 et -7 dB.
La seule différence avec l’égaliseur mono est qu’un canal stéréo ne comprend pas d e filtre low-cut.
Cet égaliseur est stéréo et non pas mono.
La fonction AUX Send sur un canal stéréo fonctionne de la même façon qu’un sur un canal mono.
Notez que le signal stéréo s’additionne en mono.
La seule différence avec un canal mono est la fonction du bouton Balance/Pan (11). Ce bouton
détermine la balance entre le signal de gauche et le signal de droite qui est envoyé respectivement
vers la sortie master gauche et droite. Lorsqu’un canal stéréo est utilisé en mode mono (uniquement
l’entrée droite est connectée), le bouton Balance fonctionne en mode mono comme un réglage Pan.
SECTION MASTER
Le signal AUX Send est appliqué à des jacks 6,3mm asymétriques (21). Réglez le niveau d’entrée de
l’appareil à effets sur le même niveau que le niveau de sortie de la table de mixage. Si votre appareil à
effets ne dispose pas d’un réglage de gain, vous pouvez amplifier le signal au moyen du bouton AUX
Send (7) jusqu’à 15dB.
Votre table de mixage possède encore une entrée stéréo supplémentaire (AUX Return). Le niveau de
cette entrée se règle avec le bouton AUX Return (12). Cette entrée est affectée en permanence à la
sortie master. Lorsqu’un connecteur est branché sur cette entrée, le AUX Return fonctionnera avec un
signal mono. Cette entrée permet de créer des ‘wet mix’.

Le niveau de sortie de la section master est affichée par un bargraph à 10 LEDs (13). Deux autres
LEDs indiquent la mise sous tension/arrêt (14) de la table de mixage et la mise sous tension/arrêt de
l’alimentation fantôme (15).
Le vu-mètre doit indiquer des crêtes vers le niveau 0. Si le signal affiche +10dB pendant une durée
prolongée, vous devez baisser le volume master et/ou du canal. Si cela ne suffit pas, vous pouvez
encore baisser le gain du canal et/ou du niveau de sortie de l’instrument ou de l’appareil à effets.
Vous pouvez brancher un lecteur CD ou une platine disques sur les entrées RCA. Maintenant vous
pouvez envoyer le signal vers les monitors au moyen du bouton-poussoir « tape / rec to control room
level » (17) ou vers le master au moyen du bouton poussoir « tape / rec to master » (18). Veillez à ce
que le bouton-poussoir (17) soit en position sortie sinon le signal sera injecté deux fois.
Branchez la table de mixage sur un amplificateur au moyen de la sortie symétrique Stereo Out (22).
Ceci se fait par 2 jacks mono 6,3mm. Réglez le volume de sortie global au moyen du bouton de
volume master (19).
La table de mixage possède une sortie casque séparée (23). Ce signal est le même que celui de la
sortie « control room » (27). Un seul réglage de volume (16) envoie le signal vers le casque et les
moniteurs. Les vu-mètres G/D sont les mêmes que pour la sortie master.
INSTALLATION
Ne mélangez pas les cordons de façon à ne pas vous tromper lors des branchements. Branchez
cordon par cordon et non pas tous les cordons d’abo rd d’un côté et ensuite tous de l’autre. Dans le
pire des cas, il peut y avoir des interférences voire un endommagement sérieux de votre appareil. La
figure 2 montre un exemple des connexions possibles.
Avant de brancher la table de mixage, vous devez régler tous les contrôles sur « 0 ». Sur les canaux
mono, vous pouvez brancher des microphones ou des appareils de niveau ligne, sur les canaux
stéréo, vous pouvez relier toutes sortes d’appareils de ligne et sur le AUX Return des appareils à
effets. Vous pouvez également connecter des instruments Midi sur le AUX Return
Lorsque vous branchez un microphone, veillez à ce que l’alimentation fantôme soit ETEINTE. NE
JAMAIS utiliser des appareils asymétriques lorsque l’alimentation fantôme est sous tension. Ne jam ais
court-circuiter le circuit 48Vde l’alimentation fantôme avec la terre. L’appareil sera gravement
endommagé.
FIG. 2

Si vous faites un enregistrement sur un lecteur DAT ou ADAT, ne le faites pas avec le niveau réglé au
maximum. Ainsi, si votre enregistreur supporte un niveau de 96dB, enregistrez avec un niveau crête
de 86 – 91 dB. Ainsi, le niveau de crête doit toujours être de 5 – 10 dB inférieur au niveau maximum
de votre enregistreur.
CONNEXIONS
Utilisez uniquement des connecteurs symétriques sur une entrée/sortie symétrique. Pour une
entrée/sortie asymétrique, vous pouvez utiliser aussi bien des connecteurs symétriques
qu’asymétriques. Voir les schémas ci-dessus pour la connectique que vous pouvez utiliser :

Si possible, branchez les sorties symétriques sur des connecteurs symétriques afin de réduire les
interférences au minimum.

CARACTERISTIQUES TECHNIQUES
des avertissements. Ceci s’applique aussi aux préjudices ultérieurs éventuels
Entrées Mono
Entrée Micro: .............électroniquement symétrique, configuration d’entrée discrète
Bande passante: ..................................................................10 Hz – 60 kHz (± 3 dB)
Distorsion: ........................................................................0,01% @ +4 dBu (± 1 kHz)
Impédance d’entrée: .............................................................150 Ohms @ -129,5 dB
Entrée ligne .................................................................électroniquement symétrique
Bande passante: ..................................................................10 Hz – 60 kHz (± 3 dB)
Distorsion: ........................................................................0,01% @ +4 dBu (± 1 kHz)
Equalizer: ....................................................................................................................
High: .............................................................................................. 12 kHz (± -15 dB)
Mid: .............................................................................................. 2,5 kHz (± -15 dB)
Low: ................................................................................................. 80 Hz (± -15 dB)
Entrées Stéréo
Entrée ligne: ...........................................................................................asymétrique
Bande passante: ..................................................................10 Hz – 55 kHz (± 3 dB)
Distorsion: ........................................................................0,01% @ +4 dBu (± 1 kHz)
Equalizer: ....................................................................................................................
High: .............................................................................................. 12 kHz (± -15 dB)
Mid: .............................................................................................. 2,5 kHz (± -15 dB)
Low: ................................................................................................. 80 Hz (± -15 dB)
Section Master
Niveau de sortie max.: ............................................................. + 22 dBu, symétrique
Niveau de sortie max. AUX Send: ........................................... +22 dBu asymétrique
Niveau de sortie salle de contrôle: .......................................... +22 dBu asymétrique
Rapport signal/bruit: ....................................................................................... 112 dB
Généralités
Alimentation: .....................................................................................220 VAC, 50 Hz
Dimensions (hxlxp): .................................................... 70 x 176 x 230 mm (172.558)
Dimensions (hxlxp): .................................................... 70 x 230 x 230 mm (172.561)
Poids: ............................................................................................... 2,4 kg (172.558)
Poids: ............................................................................................... 3,0 kg (172.561)
•
Sous réserve de modifications de design et techniques sans préavis.
N’effectuez jamais de réparations vous-même et n’apportez jamais de modifications sous peine d’invalider la garantie.
La garantie ne s’applique pas dans le cas de dommages sous quelque forme que ce soit, qui ont été provoqués suite à une
mauvaise utilisation et le non-respect des avertissements et consignes de sécurité contenus dans ce manuel.
SkyTronic décline toute responsabilité en cas de dommages corporels suite au non-respect des consignes de sécurité et
.

D
Herzlichen Glückwunsch zum Kauf dieses SkyTec Mischpults.
Bitte lesen Sie diese Anleitung sorgfältig vor der Inbetriebnahme durch.
Sicherheitsvorschriften:
- Bedienungsanleitung vor Inbetriebnahme sorgfältig durchlesen.
- Für spätere Bezugnahme aufbewahren.
- Originalverpackung für späteren Transport aufbewahren.
- Nur für Innengebrauch.
- Niemals das Gehäuse öffnen; Reparaturen nur von einem Fachmann ausführen lassen.
- Beim Abziehen des Steckers immer am Stecker ziehen, niemals an der Netzschnur.
- Stecker niemals mit nassen Händen anfassen.
- Sollten Stecker und/oder Netzschnur, sowie der Kabeleingang zum Gerät beschädigt sein,
müssen diese durch einen Fachmann ersetzt werden.
- Wenn das Gerät sichtbare Schäden aufweist, darf es NICHT an eine Steckdose angeschlossen
und NICHT eingeschaltet werden. Benachrichtigen sie in diesem Fall SkyTronic BV.
- Das Gerät nur an eine geerdete 230V AC/50Hz Netzsteckdose mit 10-16A Leistung anschließen.
- Nicht in der Nähe von Wärmequellen aufstellen.
- Bei Unwetter sowie Nichtgebrauch das Netzgerät aus der Steckdose ziehen.
- Nach längerem Nichtgebrauch kann sich Kondenswasser im Gehäuse gebildet haben. Lassen Sie
das Gerät erst auf Raumtemperatur kommen.
- Vor Kindern schützen.
- Vor dem Einschalten alle Kanalschieberegler, sowie den Master Lautstärkeregler ganz
herunterfahren.
- Die Schieberegler vorsichtig behandeln. Eine zu schnelle Veränderung kann die Lautsprecher
beschädigen, weil der Verstärker überfordert ist.
- Den Verstärker nicht überfordern (Clipping). Wenn die Clip LEDS am Verstärker aufleuchten, ist
die Lautstärke zu hoch eingestellt. Sofort die Lautstärke auf einen niedrigern Pegel einstellen.
- Den Verstärker immer zuletzt einschalten und zuerst ausschalten.
- Keine Reinigungssprays für die Schieberegler verwenden. Die Rückstände verursachen Schmier-
und Staubansammlungen in den Reglern. Im Problemfall einen Fachmann fragen.

ABB. 1

EINLEITUNG
Die Kanäle 1-2 (172.558 / 1-4 (172.561) sind Mono Kanäle, die alle mit symmetrischen und
asymmetrischen Mikrofon / Line Eingängen versehen sind. Die anderen 4 Kanäle sind Stereo Kanäle.
Diese eignen sich besonders zum Bearbeiten von MIDI Signalen und Signalen elektronischer
Instrumente. Das Mischpult umfasst ebenfalls eine Post-Fader AUX Send Funktion. Die AUX Return
Funktion besitzt 2 Ausgänge die z.B. mit einem MIDI Empfänger oder einem elektronischen
Instrument verbunden werden können. Die nachstehenden Zahlen in Klammern verweisen auf die
Abb. 1.
MONO EINGANGSKANÄLE
Jeder Monokanal verfügt über einen XLR Mikrofon Eingang (1) und einen symmetrischen 6,3mm Line
Eingang (2). Die Phantomspeisung wird auf der Rückplatte ein- und ausgeschal tet (29). Der Trim
Regler besitzt einen weiten Regelbereich von +10 dB bis +60 dB.
Die Stärke des Mikrofoneingangssignals wird mit dem Trim Regler (3) bestimmt. Jeder Kanal besitzt
auch eine Spitzen LED (9). Wenn diese LED blinkt oder leuchtet, muss das Signal heruntergef ahren
werden, weil der Kanal überlastet ist. Achten Sie vor allem auf diese LED, wenn Sie mit sehr
schweren EQ Einstellungen arbeiten (diese LEDs lesen das Post-EQ Signal ab).
Jeder Mono Eingangskanal hat seinen eigenen 3-Band EQ. Der HIGH Regler (4) regelt die hohen
Frequenzen („0“ Wert von 12 kHz), der MID Regler (5) die mittleren Frequenzen (Spitzenreaktion mit
dem EQ auf 2 Oktaven, „0“ Wert von 2,5 kHz) und der LOW Regler (6) die tiefen Frequenzen („0“ Wert
von 80 Hz). Alle 3 Regelbereiche bieten bis zu 15dB Cut and Boost, sowie eine Mittelstellung von „0“.
Der AUX Send Regler, sowohl auf dem 172.558 wie auf dem 172.561 ist Post-Fader. Dieser Knopf
bestimmt die Signalstärke, die zur AUX Buchse geführt wird. Das Gain zum Master wir mit dem
Kanallautstärkeregler (10) bestimmt.
Mit dem Kanal PAN Regler (8) wird die Position des Stereoausgangs eingestellt. In keiner Position
darf ein Unterschied im Lautstärkepegel eintreten.
STEREO EINGANGSKANÄLE
Jeder Stereo Kanal besitzt zwei symmetrische 6,3mm Eingänge für ein Stereo Line Eingangssignal.
Wenn nur der linke Eingang angeschlossen wird, arbeitet dieser Kanal genauso wie ein Mon o Kanal.
Die Stereo Eingänge sind für jede Art Line Eingangssignal ausgelegt. Die meisten Line Geräte wie
MIDI Instrumente und FS Geräte haben eine eigene Ausgangspegelregelung. Geräte, die das nicht
haben, wie z.B. CD Spieler, besitzen einen Ausgangspegel, der sich innerhalb des Bereichs des
Mischpults befindet. Wenn die Kanal und die Master Fader auf denselben Pegel eingestellt sind, liegt
die Vu-Meter Anzeige zwischen -4 en -7 dB.
Der einzige Unterschied zu dem Mono EQ ist, das ein Stereo Kanal keinen Trittschallfilter enthält.
Dieser EQ ist Stereo und nicht Mono.
Die AUX Send Funktion auf einem Stereo Kanal arbeitet auf dieselbe Weise wie auf einem Mono
Kanal. Das Stereo Signal wird zu einer Mono Summe addiert.
Der einzige Unterschied zu einem Mono Kanal ist die Funktion des BALANCE/PAN Reglers (11).
Dieser Regler steuert die Balance zwischen dem rechten und dem linken Kanalsignal, das zum linken
und rechten Master Ausgang geleitet wird. Wenn ein Stereokanal im Mono Betrieb benutzt wird (nur
der rechte Eingang ist angeschlossen), arbeitet der Balance Regler im Mono Betrieb wie ein PAN
Regler.
MASTER TEIL
Das AUX Send Signal wird zu asymmetrischen 6,3mm Klinkenverbindern (21) geleitet. Stellen Sie den
Eingangspegel des Effektgeräts auf genau denselben Ausgangspegel wie das Mischpult. Wenn Ihr
Effektgerät über keinen Gain Regler verfügt, können Sie das Signal mit dem AUX Send Drehregler (7)
um bis zu 15 dB verstärken.
Das Mischpult verfügt auch noch über einen zusätzlichen Stereo Eingang (AUX Return). Der Pegel
dieses Eingangs kann über den AUX Return Regler (12) eingestellt werden. Dieser Eingang ist immer
an den Master Ausgang angeschlossen. Wenn nur ein Verbinder and diesen Eingang angeschlossen

ist, arbeitet die AUX Return Funktion mit einem Mono Signal. Mit diesem Eingang können Sie einen
‚Wet Mix’ schaffen.
Der Ausgangspegel des Masterteils wird von einem 10-stelli gen VU-Meter (13) mit LED-Leiter
angezeigt. Zwei weitere LEDs zeigen an, ob das Gerät ein- oder ausgeschaltet ist (14), und ob die
Phantomspeisung ein- oder ausgeschaltet ist (15).
Bei Spitzenwerten zeigt das VU-Meter den Pegel 0 an. Wenn der Signalpegel längerfristig +10 dB
beträgt, muss die Master Lautstärke und/oder die Kanallautstärke verringert werden. Wenn das nicht
ausreicht, können Sie noch das Gain des Kanals und/oder den Ausgang spegel des Instruments oder
Effektgeräts verringern.
An die Cinch Eingängen können ein CD Spieler oder ein Plattendeck angeschlossen werden. Sie
können nun mit der „Tape / Rec to control room level“ Taste (17) das Signal zu den Studiomonitoren
leiten oder zum Master Ausgang über die Taste „Tape / Rec to Master“ (18). Achten Sie in dem
letzteren Fall darauf, dass die Taste (17) in der erhobenen Stellung steht, da sonst das Signal doppelt
eingelesen wird.
Schließen Sie das Mischpult über den symmetrischen Ausgang „Stereo Out“ (22) an einen Verstärker
an. Dies geschieht über zwei 6,3mm Mono Klinkenverbinder. Stellen Sie die endgültige
Ausgangslautstärke mit dem Master Volume Regler (19) ein.
Das Mischpult besitzt einen separaten Kopfhörerausgang (23). Dieses Signal ist dasselbe wie das
vom Kontrollraumausgang (27). Ein einziger Lautstärkeregler (16) steuert das Signal zum Kopfhörer
und zum Kontrollraum. Die L/R Messer sind dieselben wie vom Master Ausgang.
AUFBAU
Verwechseln Sie die Kabel nicht, um Fehler beim Anschließen zu vermeiden. Schließen Sie ein Kabel
nach dem anderen an und nicht erst alle Kabel auf einer Seite und dann alle auf der anderen. Im
schlimmsten Fall können Störungen und bleibende Schäden am Gerät auftreten. In Abb. 2 sehen Sie
Anschlussbeispiele.
Bevor sie das Mischpult anschließen, müssen Sie alle Regler auf „0“ stellen. An die Mono Kanäle
können Mikrofon- und Line Geräte angeschlossen werden, an die Stereo Kanälen können Sie alle
Arten von Line Geräten und auf die AUX Return Verbinder Effektgeräte anschließen.
Wenn sie ein Mikrofon anschließen, achten Sie darauf, dass die Phantomspeisung auf AUS geschaltet
ist. NIEMALS symmetrische Geräte benutzen, wenn die Phantomspeisung eingeschaltet ist.
Schließen Sie die 48V Schaltung der Phantomspeisung niemals mit der Erde kurz. Es können
schwere Schäden auftreten.
Abb. 2

Bei Aufnahmen auf einem DAT oder ADAT Rekorder darauf achten, dass dies niemals bei maximalem
Pegel geschieht. Wenn Ihre Rekorder z.B. einen Pegel von 96 dB verkraftet, nehmen Sie dann mit
einem Spitzenpegel von maximal 86 – 91 dB auf. Der Spitzenpegel muss immer 5-10 dB unter dem
maximalen Pegel des Rekorders liegen.
ANSCHLÜSSE
Für einen symmetrischen Ein-/Ausgang nur symmetrische Verbinder ben utzen. Auf einem
asymmetrischen Ein-/Ausgang können sowohl symmetrische als auch asymmetrische Verbinder
benutzt werden. Siehe unten stehende Verbinder, die Sie benutzen können.

Wenn möglich, symmetrische Ausgänge mit anderen symmetrischen Geräten verbinden, um
Störungen auf ein Mindestmass zu reduzieren.

TECHNISCHE DATEN
Mono Eingänge
Mikrofoneingang: ............elektronisch symmetrisch, diskrete Eingangskonfiguration
Frequenzbereich: .................................................................10 Hz – 60 kHz (± 3 dB)
Verzerrung: ......................................................................0,01% @ +4 dBu (± 1 kHz)
Eingangsimpedanz: ............................................................... 150 Ohm @ -129,5 dB
Line Eingang: .....................................................................elektronisch symmetrisch
Frequenzbereich: .................................................................10 Hz – 60 kHz (± 3 dB)
Verzerrung: ......................................................................0,01% @ +4 dBu (± 1 kHz)
Equalizer: ....................................................................................................................
High: .............................................................................................. 12 kHz (± -15 dB)
Mid: .............................................................................................. 2,5 kHz (± -15 dB)
Low: ................................................................................................. 80 Hz (± -15 dB)
Stereo Eingänge
Line Eingang: ....................................................................................... asymmetrisch
Frequenzbereich: .................................................................10 Hz – 55 kHz (± 3 dB)
Verzerrung: ......................................................................0,01% @ +4 dBu (± 1 kHz)
Equalizer: ....................................................................................................................
High: .............................................................................................. 12 kHz (± -15 dB)
Mid: .............................................................................................. 2,5 kHz (± -15 dB)
Low: ................................................................................................. 80 Hz (± -15 dB)
Master Teil
Max Ausgangspegel: .............................................................+ 22 dBu, symmetrisch
AUX send max. Ausgangspegel: ...........................................+22 dBu asymmetrisch
Kontrollraum Ausgangspegel: ...............................................+22 dBu asymmetrisch
Signal/Rauschabstand: ...................................................................................112 dB
Allgemeines
Versorgungsspannung: ....................................................................220 VAC, 50 Hz
Abmessungen (HxBxT): ............................................. 70 x 176 x 230 mm (172.558)
Abmessungen (HxBxT): ............................................. 70 x 230 x 230 mm (172.561)
Gewicht: ...........................................................................................2,4 kg (172.558)
Gewicht: ...........................................................................................3,0 kg (172.561)
•
Technische und Designänderungen ohne Voranmeldung vorbehalten.
Reparieren Sie das Gerät niemals selbst und nehmen Sie niemals eigenmächtig Veränderungen am Gerät vor. Sie verlieren
dadurch den Garantieanspruch.
Der Garantieanspruch verfällt ebenfalls bei Unfällen und Schäden in jeglicher Form, die durch unsachgemäßen Gebrauch
und Nichtbeachtung der Warnungen und Sicherheitshinweise in dieser Anleitung entstanden sind.
SkyTronic BV ist in keinem Fall verantwortlich für persönliche Schäden in Folge von Nichtbeachtung der
Sicherheitsvorschriften und Warnungen. Dies gilt auch für Folgeschäden jeglicher Form.

Block Diagram
 Loading...