

CUE
TRACK FMS PITCH
TRACK SKIP
AUTO CUE
SINGLE
+10
CONT.
SEARCH
TIME
PITCH
PITCH BEND
SPEED
-16
0
LINE/
PHONO
MIN MAX
MIC
10
CD 1
GAIN
STOP
+
MASTER
10
10
0
0
LINE/
PHONO
CD 2
POWER
GAIN
CUE
CH2
CH1
MIN
CH1+CH2
MAX
TRACK SKIP
+10
TRACK M
SF PITCH
AUTO CUE
SINGLE
CONT.
SEARCH
TIME
PITCH
PITCH BEND
SPEED
-16
STOP
+
CUE
+16
PITCH
CONTROL
CD 1
CH 1 CH 2
CH 1 CH 2
MIC
PHONE
CUE
+16
PITCH
CONTROL
CD 1
170.112
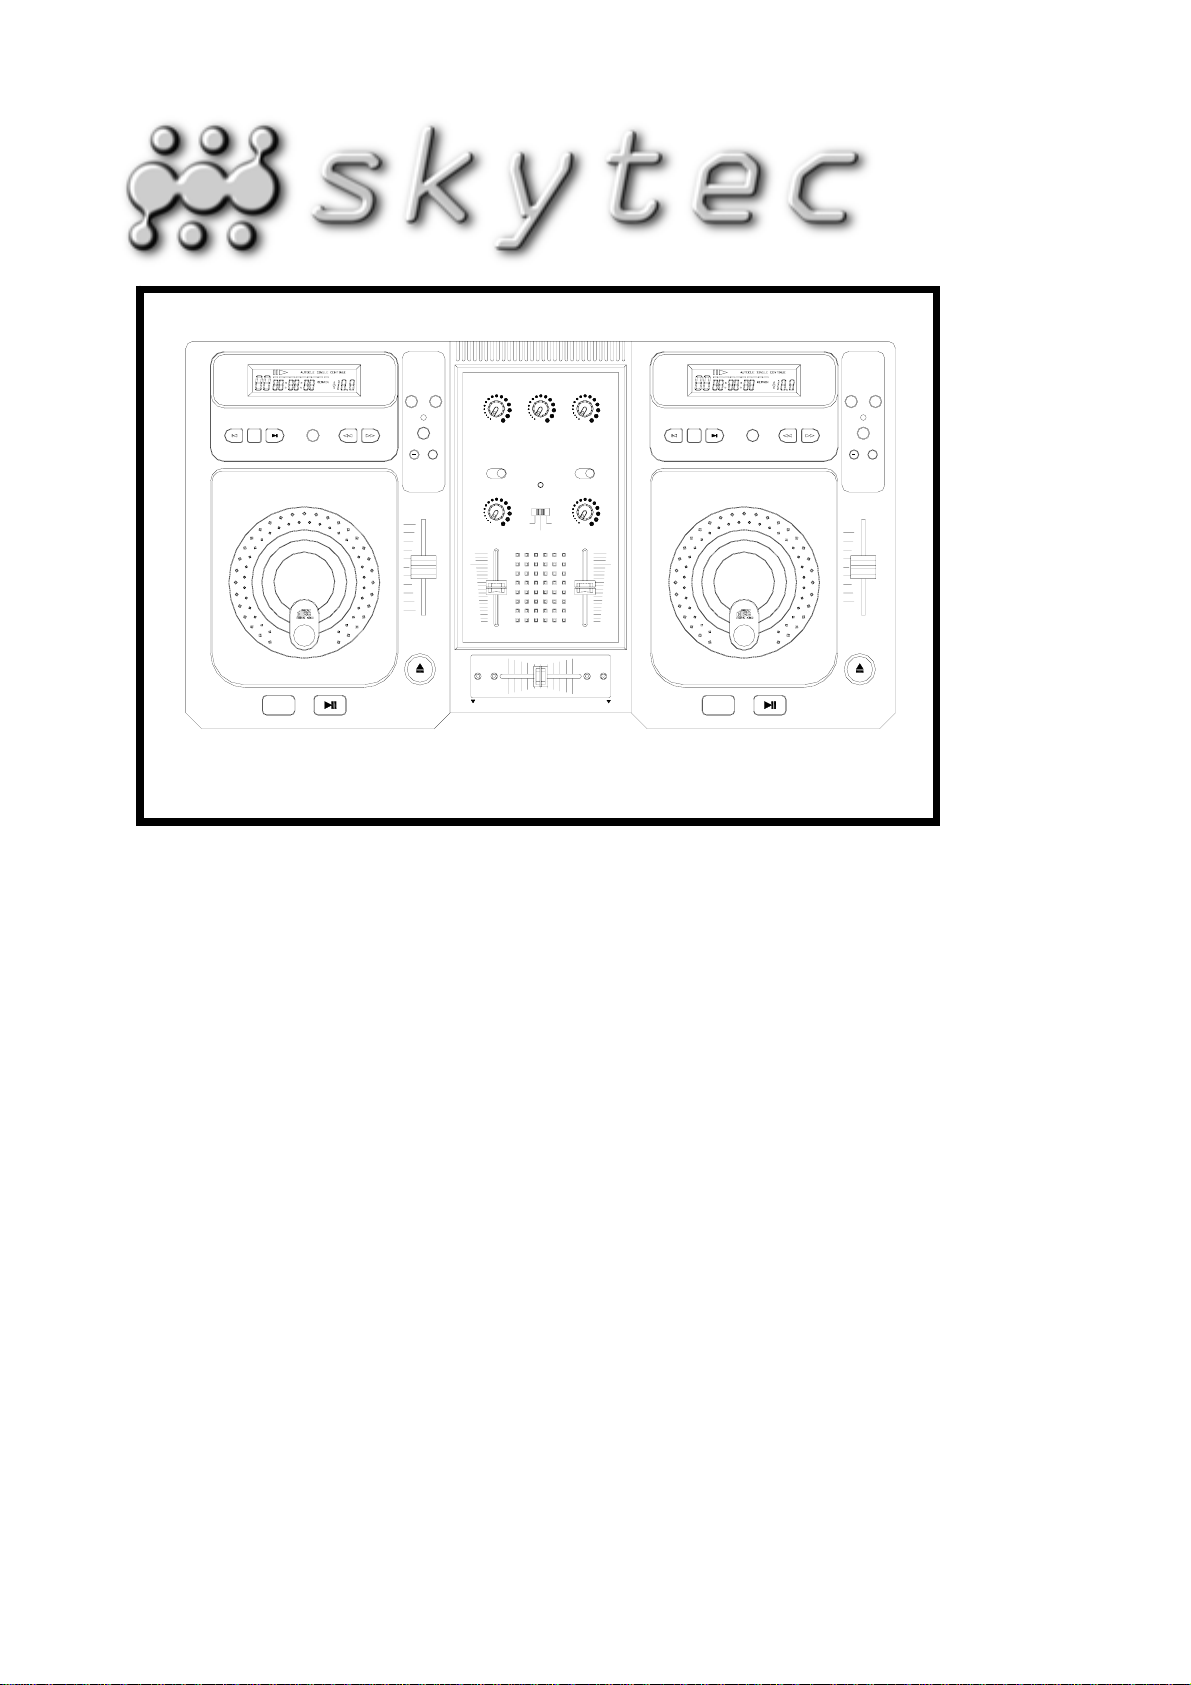
PROFESSIONAL DOUBLE CD PLAYER WITH MIXER
Instruction Manual
Gebruiksaanwijzing
Brugsanvisning
Gebrauchsanleitung
Mode d'Emploi

UK
NOTE ON USE
BE CA REFUL OF HIGH TEMPERA-
TURE
TO AVOID DUST & MOISTURE TO AVOID PLACING ON UN-
STABLE LOCATION
DO NOT USE CHEMICALS
IF OUT OF WORK, CONTACT
SALES AGENCY IMMEDIATELY
KEEP AWAY FROM TV &
MAGNETISM
DO NOT OPEN THE CASE CARE WITH THE POWER CORD
For Safe and Efficient Operation
• Select the installation location of your unit carefully. Avoid
placing it in direct sunlight. Also avoid locations subject to
vibration and excessive dust, heat, cold or moisture. Keep away
from sources of hum such as transformers or motors.
• The apparatus shall not be exposed to dripping or splashing
and that no objects filled with liquids, such as vases, shall be
placed on the apparatus.
• The MAINS plug is used as the disconnected device, the
disconnect device shall remain readily operable.
• WARNING: The user shall not place this apparatus in the
confined area during he operation so th at the mains switch can
be easily accessible.
• Do not use this compact disc player where there are extremes
in temperature ( below 41
• Do not open the cabinet as this might result in damage to the
set or electrical shock.
• Be sure your hands are clean when handing discs. Never insert
a disc which has a crack on its surface.
• If the unit is damaged to an extent that you can see internal
parts, do not plug the unit into a mains outlet.
• Do not use cleaning sprays for the slider controls. The
residues of these spray cause dust deposits in the controls. If
a problem occurs, please consult a specialist
• When disconnecting the power cord from the AC outlet, always
grasp it by the plug. Never pull the cord.
• Do not use force when operating the switches and buttons.
• Before moving the set, be sure to disconnect the power cord
and all connecting cables.
• To keep the laser pickup clean, do not forget to close the disc
tray.
• If the plug and/or mains lead are damaged, they need to be
repaired by a qualified technician.
• Do not attempt to clean the unit with chemical solvents as this
o
F/5 o C or exceeding 95 o F/35 o C ).
might damage the finish. Use a clean, dry cloth.
• Keep this manual in a safe place for future reference.
• All channel controls and the master volume control must be
set to zero prior to switching the unit on.
• To prevent clipping of the amplifier do not set the volume
level too high.
SAFETY CERTIFICATION
Laser Diode Properties
Material: Ga.-Al-As
Wavelength: 755-815 nm (25
o
C)
Laser Output: Continuous Wave max. 0.5mW
CAUTION:
USE OF CONTROLS OR ADJUSTMENTS OR
PERFORMANCE OF PROCEDURES OTHER THAN
THOSE SPECIFIED HEREIN MAY RESULT IN
HAZARDOUS RADIATIO EXPOSURE.
To prevent electric shock do not remove cover (or
bottom screws). No user serviceable parts inside
refer servicing to qualified servicing personnel.

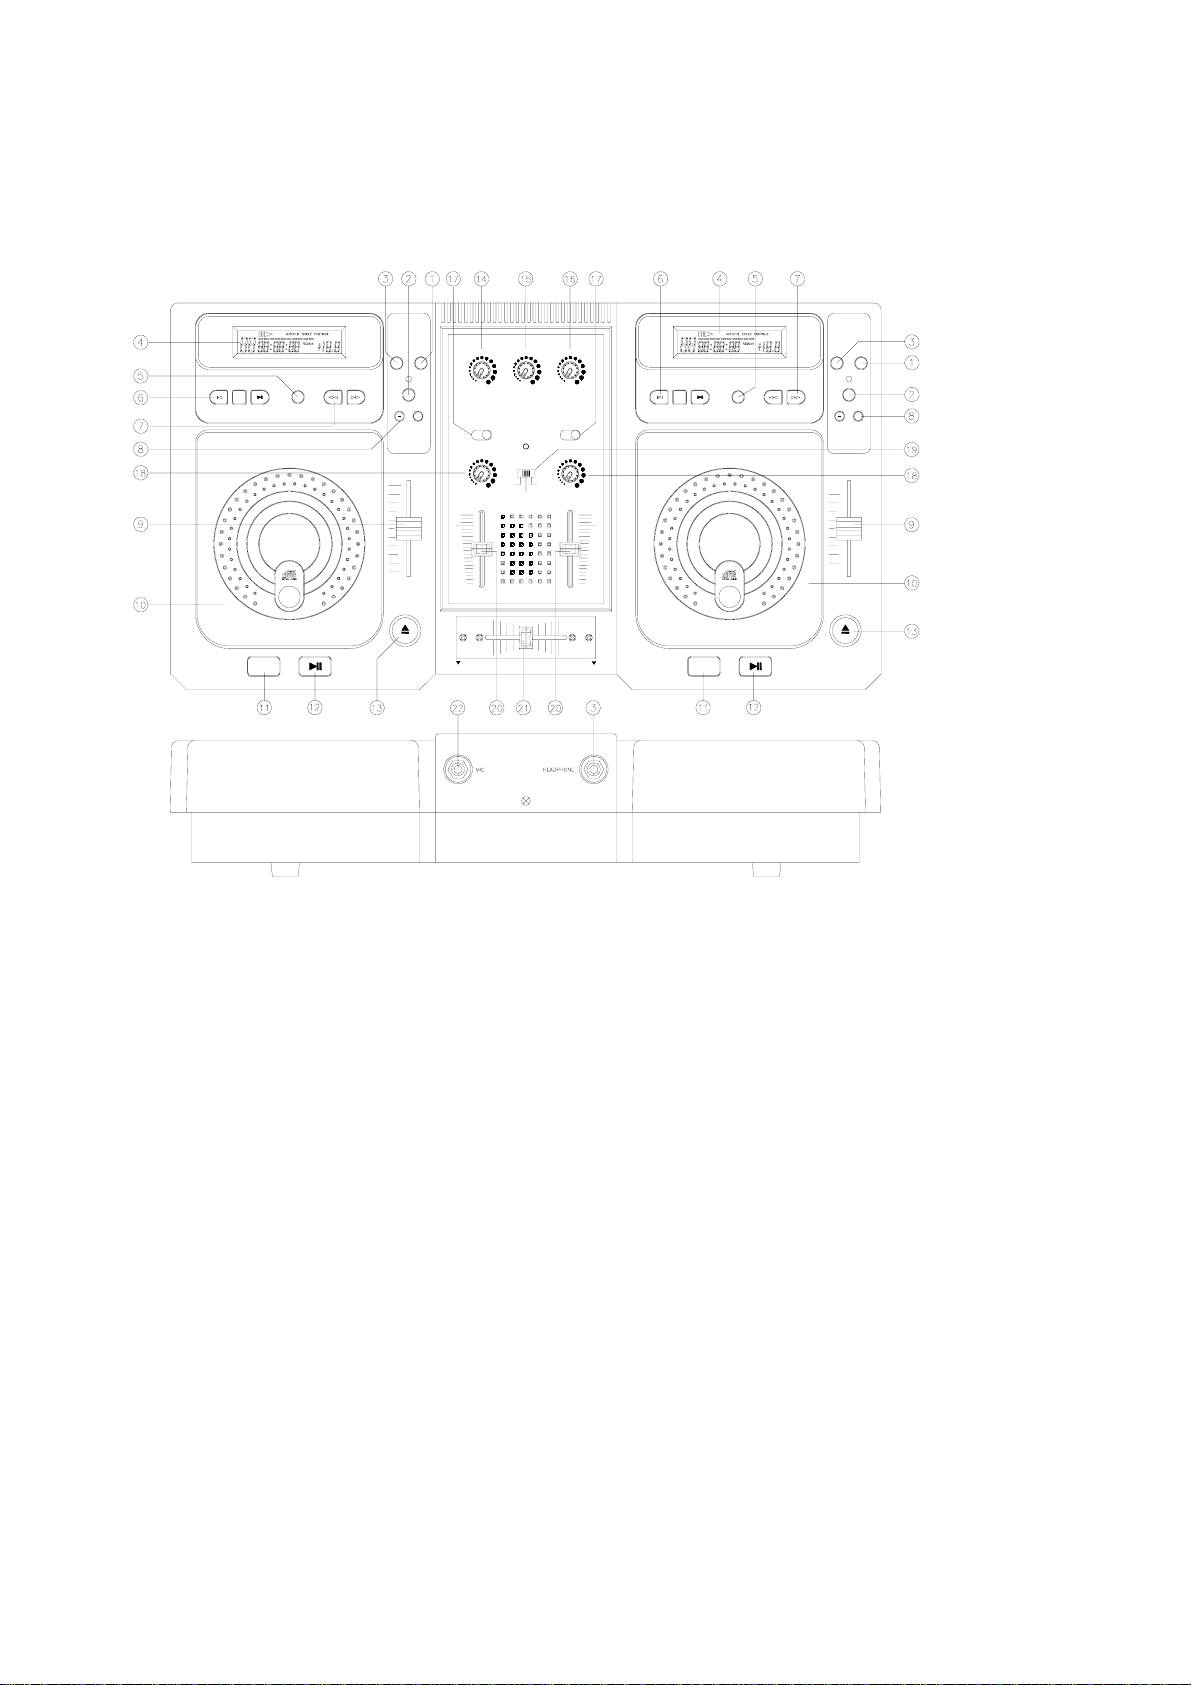
DESCRIPTION OF THE FUNCTIONS
TRACK SKIP
+10
FSMPITCHTRACK
AUTO CUE
SINGLE
CONT.
SEARCH
TIME
PITCH
PITCH BEND
SPEED
CUE MASTER
STOP
+
-16
MIC
10
10
10
0
0
0
LINE/
PHONO
CD 1
GAIN
MIN
MAX
LINE/
PHONO
CD 2
POWER
GAIN
CUE
CH1
CH2
MIN
CH1+CH2
MAX
TRACK SKIP
+10
AUTO CUE
SINGLE
CONT.
PITCHFSMTRACK
SEARCH
TIME
PITCH
PITCH BEND
SPEED
STOP
+
-16
+16
CUE
PITCH
CONTROL
CD 1
CD 1
MIC
CH 1
CH 2
CD 2
PHONE
CUE
CDM 100 CD PACK
Function of the CD Units
1. STOP
Press this button to stop the operation of the unit.
2. PITCH
This button changes the play speed.
Press PITCH button (the PITCH LED is lit) to enable the PITCH CONTROL SLIDER to increase or
decrease the playing speed. When the PITCH is off, the speed automatically backs to normal.
The pitch can be changed up to ±16% by moving the slider up and down.
NOTE:
(1) The pitch slider will not function if the PITCH LED is off.
(2) This pitch button will not have effects on PITCH bend.
3. TIME/OUTRO
This button switches the time display between each Remaining time, Elapsed playing time, and Total
remaining time; it also switches on and off the OUTRO function. When the display shows OUTRO, the
player only plays the last 30 seconds of each track
4. L.C.D.
This liquid crystal displays (L.C.D.) indicates the track numbers, time (minutes, seconds, frames), pitch
speed, also other modes as Single/Autocue and Continue.
+16
PITCH
CONTROL
CD 1

5. CONTINUE/SINGLE (AUTO CUE)
Press this button to switch between the SINGLE and CONTINUE play modes. When SINGLE/AUTOCUE
mode is selected, it indicates as PLAY 1 on the LCD. After each track, it enables the unit to pause at the
beginning sound of the next track.
6. TRACK SKIP
This button selects a specific track to be played.
7. SEARCH
Use this button to quickly forward or reverse to change the start position of a playing. It also can be used
for changing the sound speed.
8. PITCH BEND
Press the button for quick speed up and slow down.
9. PITCH CONTROL SLIDER
By moving the pitch control slider, you can achieve the playback speed you want between MINIMUN (up
side) & MAXIMUN (down side).
10. DISC COMPARTMENT
For placing the CD disc inside on the tray.
11. CUE
The CUE function allows the CD to be played from a setup point any number of times.
Press the PLAY/PAUSE button to pause a playing song, the CUE LED will blink; press the CUE button to
set up a position where the play can be returned after the CUE button is hit again.
12. PLAY/PAUSE
Each press of this button causes the operation to change between PLAY and PAUSE modes.
13. OPEN
Press this button to open the disc compartment door, push the door in to close.
Function of the Mixer Unit
14. MIC Level-
Adjust the volume of microphone input
15. CUE:
Adjust the volume level of headphone, which connect to the headphone jack.
16. Master:
Adjust the volume level of master output.
17. Input Source Selector (Line/Phono, CD )
To select the input source between Phono (Line) and CD for each channel
z For connecting a turntable, set this switch to left side (LINE/PHONO) , and noted the LINE/PHONO
selector on the rear panel also set to PHONO.
z For connecting an external CD or other line level unit, set this switch to left side (LINE/PHONO), but the
LINE/PHONO selector on the rear panel should be set to LINE
z To assign the CD1 (or CD2) as input source, switch it to right side (CD)
18. Gain Control
Adjust the level of input signal.
19. CUE selector:
Sliding the switch to left“ CH 1” to monitor left channel 1, Sliding the switch to right “CH 2” to monitor right
channel 2, and sliding to middle “CH1 +CH2” to monitor 2 channels together.
20. Channel fader:
Adjust the channel volume
21. Crossfader slider:
Use it to adjust the master output fading between channel 1 and channel 2.
22. Microphone jack:
6.3mm jack to connect Microphone.
23. Headphone jack:
6.3mm jack to connect Headphone

Connections
MASTER
OUTPUT
1. LINE/PHONO SELECTOR
Set to LINE position for the input jacks connecting to CD player, MD player or tape deck.
Set to PHONO position for connecting to turntable that is with MM cartridge.
2. PHONO/LINE INPUT
Connects to audio output devices in corresponding to LINE/PHONO SELECTOR (1)
When the LINE/PHONO selector (1) is set at “PHONO” position, the input must NOT be connected with
line level player.
3. GROUND TERMINAL
When the input jack is connecting with turntable, be sure to connect turntable ground wire to this
terminal
4. MASTER OUT
This output is connecting to an amplifier.
5. POWER SWITCH
Turns the machine ON/OFF
6. AC POWER CORD
Connect it to a power outlet.
PHONO
PHONO
LINE LINE
OFF
L
R
INPUT
CH 1CH 2
ON
POWER

BASIC OPERATION
1. Loading and ejecting the disc
a. Press the “OPEN” button to open the disc compartment door.
b. Load disc
Correctly place a disc in the center of disc compartment with the label side up
Do not place more than one disc.
z Push the door in to close it.
z Press the PLAY/PAUSE button to start the play/pause.

2. TRACK SKIP
Use the TRACK SKIP control to advance ( ) or reverse ( ) to desired track.
3. FRAME SEARCH
Press the search control ( or ) in pause mode to move by one frame per press;
Keep pressing the control, it will move rapidly with sound until you get the precise position.
4. PLAY/PAUSE
Press this button to start the playback from your desired point, and press it again to pause it. The LED
is lit during playback, and blinking in pause mode.
5. Set a CUE point
Press this button while the unit is paused to memorize the point. Each time the CUE button is pressed,
the playback will return and pause at this point.
6. PITCH CONTROL SLIDER
Move the cap toward +16 direction, the playback gets fast; move it toward -16 direction,
the playback become slow.
TROUBLESHOOTING
Symptom Cause Remedy
Door can not be opened when the
OPEN button is pressed.
When playback is started, stops or
pauses immediately.
No sound
Sound is distorted
Hum
Power plug is not connected properly.
* Disc is loaded upside down.
* Dust or dirt on the disc.
* Output cables connected unproperly.
* Audio mixer operated unproperly.
* Pin plugs or amplifier terminals are
dirty.
* Player is in pause mode.
* Incorrect connection.
* Pin plugs or amplifier terminals are
dirty.
Cable connected unproperly.
Correctly connect the plug.
* Load the disc with lable side up.
* Clean the disc and load it again.
* Connect the cable properly.
* Check the setting of audio mixer.
* Press the PLAY/PAUSE button.
* Connection with audio mixer to the
LINE INPUT terminals.
* Clean away the dirt.
* Firmly connect all audio plugs.
NL
LEZEN VOOR GEBRUIK
NIET BLOOTSTELLEN AAN HOGE
TEMPERATUREN
VOORKOM BLOOTSTELLEN AAN STOF
EN VUIL
NIET BLOOTSTELLEN AAN
MAGNETISCHE VELDEN
PLAATS HET PROD UCT OP EEN
STABIELE ONDERGROND
GEBRUIK GEEN CHEMICALIËN INDIEN DEFECT, NEEM DIRECT
CONTACT OP MET REPARAT EUR
BEHUIZING DIENT NIET GEOPEND
TE WORDEN
WEES VOORZICHTIG MET DE
NETSPANNING
Voor veilig en efficiënt gebruik
• Kies de installatieplaats nauwkeurig uit. Plaats niet in direct
zonlicht, mijdt ook stoffige, hete, koude, natte omgevingen. Niet
blootstellen aan vibraties. Installeer niet bij bronnen die storingen
kunnen opleveren zoals transformatoren of motoren.
• Gebruik deze CD speler niet in omgevingen met extreme
temperaturen. (toegestane gebruikstemperatuur: 41
o
F / 35
C ).
• Open de behuizing niet, dit kan resulteren in schade aan het
apparaat en in elektrische schokken.
• Behandel CD’s zorgvuldig en met schone handen. Laadt dit
apparaat nooit met een kapotte CD.
• Verwijder het apparaat nooit via het koord uit het stopcontact.
Pak altijd de stekker vast.
• Gebruik geen brute kracht als u de schakelaars, regelaars en
knoppen van dit apparaat bedient.
• Haal alle kabels uit het apparaat en het stopcontact voordat u
dit apparaat verplaatst.
• Houdt de laser schoon door de lade zo kort mogelijk open te
houden.
• Gebruik geen oplosmiddelen om het apparaat schoon te
maken, dit kan de behuizing beschadigen. Gebruik een droge
schone doek.
• Houdt deze handleiding binnen bereik voor toekomstige
raadpleging
• Indien de stekker en/of netsnoe r a ls snoeringang in het
apparaat beschadigd zijn dient dit door een vakman hersteld
te worden.
• Indien het apparaat zo beschadigd is dat inwendige
(onder)delen zichtbaar zijn mag de stekker NOOIT in het
stopcontact worden geplaatst én het apparaat NOOIT worden
ingeschakeld. Neem in dit geval contact op met SkyTronic BV.
• Bewaar de originele verpakking voor het geval dat u het
apparaat moet opsturen ter reparatie.
o
F / 5 o - 95o
• Zorg er altijd voor dat wanneer het apparaat wordt
ingeschakeld dat alle kanaalschuiven en het mastervolume op
minimaal staan.
• Regel de kanaalschuiven met beleid, snelle variatie
kunnen de luidsprekers beschadigen doorat de versterker
gaat clippen.
• Zorg ervoor dat de versterker nooit gaat clippen: Dit
gebeurt wanneer de clip leds, meestal op het front van de
versterker, opgaan lichten. Regel het volume dusdanig in dat
dit niet gebeurt.
• Gebruik geen schoonmaak spray om de schuifregelaars te
reinigen. Restanten van deze spray veroorzaken dat smeer en
stof ophopen in de regelaars.
• Bij storing raadpleeg een deskundige.
Veiligheidscertificering
Laser Diode Eigenschappen
Materiaal: Ga.-Al-As
Golflengte: 755-815 nm (25
Laser Uitgang: Continu Wave max. 0.5mW
PAS OP:
HET GEBRUIK VAN FUNCTIES OF HET BEDIENEN VAN
HET APPARAAT OP EEN ANDERE MANIER ALS I N DEZE
HANDLEIDING GENOEMD WORDT, KAN RESULTEREN
TOT SCHADE AAN UW GEZONDHEID EN STRALING.
Om elektrische schokken te voorkomen mag u de behuizing niet verwijderen. Er zijn
geen vervangbare onderdelen aanwezig, voor onderhoud dient u contact op te
nemen met een gekwalificeerde reparateur.
o
C)
Met opmaak:
opsommingstekens en
nummering
BESCHRIJVING VAN FUNCTIES
CUE MASTER
TRACK SKIP
+10
FSMPITCHTRACK
AUTO CUE
SINGLE
CONT.
SEARCH
TIME
PITCH
PITCH BEND
SPEED
STOP
+
-16
MIC
10
10
10
0
0
0
LINE/
PHONO
CD 1
GAIN
MIN
MAX
LINE/
PHONO
CD 2
POWER
GAIN
CUE
CH1
CH2
MIN
CH1+CH2
MAX
TRACK SKIP
+10
AUTO CUE
SINGLE
CONT.
PITCHFSMTRACK
SEARCH
TIME
PITCH
PITCH BEND
SPEED
STOP
+
-16
+16
CUE
PITCH
CONTROL
CD 1
CD 1
MIC
CH 1
CH 2
CD 2
PHONE
CUE
CDM 100 CD PACK
Functies van de CD spelers
1. STOP
Druk op deze knop om het afspelen te beëindigen.
2. PITCH
Deze knop verandert de afspeelsnelheid.
Druk op de PITCH knop (de PITCH LED licht op) om de PITCH CONTROL SCHUIFKNOP te activeren en
de afspeelsnelheid te laten toenemen of aannemen. Als de PITCH uitstaat zal de afspeelsnelheid weer
naar normaal niveau terugkeren. De pitch kan worden aangepast tot ±16% van normaal niveau.
N.B.:
(1) De PITCH SCHUIFKNOP zal niet reageren als de PITCH LED niet brand.
(2) Deze PITCH KNOP heeft geen effect op de PITCH BEND.
3. TIME/OUTRO
Deze knop laat de tijdsdisplay schakelen tussen overgebleven, verstreken en totaal overgebleven tijd. Ook
schakelt deze knop de OUTRO functie aan en uit. Als de display OUTRO weergeeft, zal de speler alleen
de laatste 30 seconden van een nummer afspelen.
4. LCD
Deze LCD display geeft de tracknummers, tijd (minuten, seconden, frames), pitch snelheid en andere
modes zoals single/autocue en continu weer.
+16
PITCH
CONTROL
CD 1

5. CONTINU/SINGLE (AUTO CUE)
Druk op deze knop om te schakelen tussen ENKEL (single) en CONTINU afspelen. Als de
SINGLE/AUTOCUE mode geselecteerd is word het als PLAY 1 weergegeven op de display. Na elk
nummer zal de speler op PAUSE vliegen zodat u kunt kiezen wanneer het volgende nummer wordt
afgespeeld.
6. TRACK SKIP
Deze functie selecteert een bepaald nummer om af te spelen.
7. SEARCH
Gebruik deze knop om snel vooruit of achteruit te zoeken. Deze knoppen kunnen ook gebruikt worden om
de afspeelsnelheid te wijzigen.
8. PITCH BEND
Gebruik deze knop om snel de afspeelsnelheid te versnellen of te verminderen.
9. PITCH CONTROL SLIDER
Als u deze schuifregelaar verschuift kunt u de afspeelsnelheid wijzigen tussen het MAXIMUM en MINIMUM.
10. CD COMPARTIMENT
Voor het laden van CD’s in de speler.
11. CUE
De CUE functie geeft u de mogelijkheid om vanaf een bepaald punt af te spelen. Druk op de PLAY/PAUSE
knop om een spelende CD op pauze te zetten. Het CUE LED zal nu knipperen; druk op de CUE knop om
aan te geven waar de CD moet worden afgespeeld als u onder het afspelen op de CUE knop drukt.
12. PLAY/PAUSE
Elke druk op deze knop schakelt tussen PAUSE en PLAY.
13. OPEN
Druk op deze knop om het CD compartiment te openen. Druk tegen de lade aan om het weer te sluiten.
Functies van de Mixer
14. MIC Level
Pas het volumeniveau van de microfoon ingang aan.
15. CUE:
Pas het volumeniveau van de hoofdtelefoon die verbonden is met de hoofdtelefoon uitgang aan.
16. Master:
Pas het volumeniveau van de master uitgang aan.
17. Input Source Selector (Line/Phono, CD)
Selecteer de ingangsbron voor elk kanaal.
z Voor het verbinden met een draaitafel, schakel naar links (LINE/PHONO) en schakel de
selectieschakelaar aan de achterzijde van het apparaat op PHONO.
z Voor het verbinden met een externe CD speler, schakel naar links (LINE/PHONO) en schakel de
selectieschakelaar aan de achterzijde van het apparaat op LINE.
z Kies een van de beide CD spelers voor het signaal, schakel naar rechts (CD).
18. Gain Control
Pas het niveau van het ingangssignaal aan.
19. CUE selector:
Schakel naar links “CH1” om kanaal 1 op de monitor te zetten, naar rechts “CH2” om kanaal 2 op de
monitor te zetten en laat deze centraal “CH1+CH2” staan om beide kanalen op de monitor te zetten.
20. Channel fader:
Pas het kanaalvolume aan.
21. Crossfader slider:
Pas hiermee de master uitgang fade aan tussen kanaal 1 en kanaal 2.
22. Microphone jack:
6.3mm jack voor het aansluiten van een Microfoon.
23. Headphone jack:
6.3mm jack voor het aansluiten van een Hoofdtelefoon.

Aansluitingen
PHONO
PHONO
MASTER
OUTPUT
1. LINE/PHONO SELECTOR
Schakel naar LINE signaal voor het verbinden van CD spelers, MD spelers of tape decks.
Schakel naar PHONO signaal voor het verbinden van platenspelers met MM cartridges.
2. PHONO/LINE INGANG
Deze uitgang correspondeert met de stand van de LINE/PHONO selector (1). Als deze op PHONO
staat, verbind deze ingang dan NIET met een LINE applicatie.
3. GROUND TERMINAL
Als er een platenspeler met dit apparaat verbonden wordt, verbind dan de aarde draad van de draaitafel met
deze terminal.
4. MASTER OUT
Deze uitgang verbindt u met een versterker.
5. POWER SWITCH
Zet het apparaat aan en uit.
6. AC POWER CORD
Verbind deze ingang met een stopcontact.
LINE LINE
OFF
L
R
INPUT
CH 1CH 2
ON
POWER

STANDAARD OPERATIES
1. Het laden en uitwerpen van een CD
z Druk op de open knop om de CD lade te openen.
z Laden van CD
Laad de CD met de data-kant aan de onderzijde, plaats de CD centraal in de lade. Laad niet
meer dan 1 CD in een lade.
z Druk op de deur om de lade te sluiten.
z Druk op de PLAY/PAUSE knop (12) om te beginnen met afspelen.

2. Wisselen van nummer
Gebruik de TRACK SKIP knoppen (6) om verder te gaan ( ) of terug ( ) het kies het door u
gewenste nummer aan.
3. Frame zoeken
Druk op de search control knoppen ( of ) in pauze modes om per frame te
zoeken. Blijf deze knop indrukken om snel te zoeken.
4. PLAY/PAUSE
Druk deze knop in om het afspelen te starten of te pauzeren. De LED zal oplichten onder
afspeel modes en knipperen onder pauze modes.
5. Stel een CUE punt in
Druk de CUE knop (11) in als de speler in pauze modes verkeert. U stelt nu het beginpunt van de CUE
in. Elke keer dat u op de CUE knop drukt onder het afspelen, zal het afspelen beginnen bij het
ingestelde punt.
6. Pitch control schuifregelaar
Schuif deze regelaar richting de +16 en de afspeelsnelheid zal toenemen, schuif hem richting de -16
en de afspeelsnelheid zal afnemen.
HULP BIJ PROBLEMEN
Symptoom Reden Oplossing
De lade kan niet geopend worden als er op
de open knop wordt gedrukt.
Als er word afgespeeld pauseerd of stopt het
apparaat meteen het afspelen
Geen geluid
Geluid stoort
Ruis / zoem
• Het apparaat is niet juist
voorzien van stroom
• CD op de kop geladen
• Er zit stof of vuil op de CD
• Uitgangskabels verkeerd
verbonden
• Audio mixer verkeerd
bediend
• RCA plugs of versterker
plugs zijn vuil
• Player verkeerd in pause
modes
• Verkeerde verbindingen
gelegd
• RCA plugs of versterker
terminals zijn vuil
• Kabel niet juist verbonden • Verbind alle audio plugs stevig
• Verbind de stroomtoevoer op de
juiste manier
• Laad de CD met de juiste zijde
naar beneden
• Maak de CD schoon en probeer
het opnieuw
• Verbind de kabels op de juiste
manier
• Check de instellingen van de
audio miser
• Druk op de PLAY/PAUSE knop
• Verbind de audio mixer met de
LINE INGANG terminals
• Verwijder het vuil

F
CONSEILS D’UTILISATION
TENIR A L’ABRI DE LA CHALEUR EVITER LA POUSSIERE ET
L’HUMIDITE
N E PA S PL ACE R SUR UNE
SURFACE INSTABLE
NE PAS UTILISER DE PRODUITS
CHIMIQUES
EN CAS DE DEFAILLANCE ,
CONTACTEZ VOTRE REVENDEUR
TENIR LOIN DU TELEVISEUR ET
D’OBJETS AIMANTES
NE PAS OUVRIR LE BOITIER MANIPULEZ LE CORDON SECTEUR
AVEC PRECAUTION
Consignes de Sécurité
• Sélectionnez soigneusement l’emplacement de votre
appareil. Ne pas placer au soleil. Evitez des endroits
soumis à des vibrations, la poussière, la chaleur, le
froid ou l’humidité. Ne pas placer à côté de sources
de parasites telles que moteurs ou transformateurs.
• Ne pas utiliser le lecteur à des températures extrêmes
(inférieures à 5°C ou supérieures à 35°C).
• Ne pas ouvrir le boîtier sous peine d’endommager
l’appareil ou d’électrocution.
• Manipulez les CD avec des mains propres. Ne pas
insérer un CD endommagé.
• Si l’appareil est endommagé, ne le branchez pas sur
le secteur.
• Lorsque l’appareil est mis sous tension, veillez à ce
que tous les canaux et le volume général soient
réglés sur le minimum.
• N’utilisez pas de sprays pour nettoyer les
potentiomètres. Les résidus de ces sprays
provoquent des dépôts de poussière et de graisse.
Consultez un spécialiste en cas de problème.
• Veillez à ce que l’appareil soit éteint lorsque vous
CERTIFICATION DE SECURITE
Propriétés de la diode laser
Materiau: Ga-Al-As
Longueur d’onde: 755-815 nm (25
o
C)
Sortie laser: Onde continue max. 0.5mW
ATTENTION:
NE PAS EFFECTUER D’AUTRES
MANIPULATIONS, REGLAGES OU
AJUSTEMENTS QUE CEUX SPECIFIES DANS CE
MANUEL. VOUS RISQUEZ DE VOUS EXPOSER A
DES RADIATIONS DANGEREUSES
.
DANGER
effectuez ou changez des branchements. Ne pas
utiliser d’aérosols pour nettoyer les curseurs.
• Pour débrancher l’appareil, tirer toujours sur la fiche,
jamais sur le cordon.
• Ne pas forcer les commutateurs et boutons.
• Avant de déplacer le lecteur, débranchez-le du
secteur et des autres équipements.
• Fermez toujours le tiroir CD pour éviter de salir la tête
de lecture laser.
Pour éviter une électrocution, ne pas ouvrir
le boîtier (ni retirer les vis au fond).
L’appareil ne contient pas de pièces
remplaçables par l’utilisateur. Confiez les
réparations à un technicien qualifié.
• Gardez ce mode d’emploi pour référence ultérieure.

DESCRIPTION DES FONCTIONS
STOP
TRACK SKIP
+10
FSMPITCHTRACK
AUTO CUE
SINGLE
CONT.
SEARCH
TIME
PITCH
PITCH BEND
SPEED
+
-16
CUE MASTER
MIC
10
10
0
LINE/
PHONO
CD 1
GAIN
CH1
MIN
MAX
0
POWER
CH1+CH2
10
0
LINE/
PHONO
CD 2
GAIN
CUE
CH2
MIN
MAX
TRACK SKIP
+10
AUTO CUE
SINGLE
CONT.
PITCHFSMTRACK
SEARCH
TIME
PITCH
PITCH BEND
SPEED
STOP
+
-16
+16
CUE
PITCH
CONTROL
CD 1
CD 1
MIC
CH 1
CH 2
CD 2
PHONE
CUE
CDM 100 CD PACK
Fonction des lecteurs CD
1. STOP
Ce bouton arrête le fonctionnement du lecteur.
2. PITCH
Lorsque le bouton PITCH est appuyé (la LED Pitch est allumée), le déplacement du fader modifie la vitesse
de lecture par ±16%. Lorsque le PITCH est désactivé, la vitesse revient automatiquement à la normale.
NOTE:
(1) Le curseur PITCH ne fonctionnera pas lorsque la LED PITCH est éteinte.
(2) La touche PITCH n’a aucun effet sur le PITCH Bend.
3. TIME/OUTRO
Ce bouton bascule l’afficheur de durée entre le temps de lecture écoulé, durée restante individuelle et
totale. Il active/désactive également la fonction ″Outro″. Lorsque OUTRO s’affiche, le lecteur passe
seulement les 30 dernières secondes de chaque titre.
4. L.C.D.
Les afficheurs à cristaux liquides indiquent les numéros des titres et la durée (minutes, secondes, trames)
ainsi que d’autres fonctions telles que Single/Autocue et Continue.
5. CONTINUE/SINGLE (AUTO CUE)
Appuyez sur cette touche pour basculer entre les modes de lecture unique et continue. Lorsque le mode
SINGLE/AUTOCUE est sélectionné, ‘PLAY1 s’affiche. Après chaque titre, le lecteur se met en pause au
début du prochain titre.
6. SAUT DE TITRE
Cette touche sélectionne le titre à écouter.
+16
PITCH
CONTROL
CD 1

7. SEARCH
Ces boutons permettent de changer avec précision les positions où la lecture commencera. Il permet également de
changer la vitesse de lecture.
8. PITCH BEND
Appuyez sur cette touche pour une accélération ou décélération rapides.
9. POTENTIOMETRE PITCH CONTROL
En déplaçant le potentiomètre, vous pouvez régler la vitesse voulue entre le MINIMUM (haut) et le
MAXIMUM (bas).
10. COMPARTIMENT CD
Placez le CD dans ce tiroir.
11. CUE
La fonction CUE permet de lire le CD à partir d’un point désigné un nombre illimité de fois
Appuyez sur la touche PLAY/PAUSE pour mettre le titre en pause. La LED CUE clignotera. Appuyez sur la
touche CUE pour fixer une position où la lecture reprendra lorsque la touche CUE a de nouveau été
appuyée.
12. PLAY/PAUSE
A chaque pression, le lecteur bascule entre le mode de lecture et de pause.
13. OPEN
Appuyez sur cette touche pour ouvrir le compartiment à CD ou poussez sur le tiroir pour fermer.
Fonctions de la section Mixage
14. Niveau MICRO
Réglage de volume de l’entrée microphone
15. CUE:
Réglage de volume du casque qui est connecté sur la fiche jack.
16. Master:
Réglage de volume de la sortie générale.
17. Sélecteur de source d’entrée (Line/Phono, CD)
Sélection de la source d’entrée entre Phono (ligne) et CD pour chaque canal
z Pour brancher une platine disques, mettez ce commutateur sur la gauche (LINE/PHONO). Le sélecteur
LINE/PHONO au dos doit également être réglé sur PHONO.
z Pour brancher un lecteur CD externe ou un autre appareil de niveau ligne, poussez ce commutateur
sur la gauche (LINE/PHONO) mais le sélecteur LINE/PHONO au dos doit être placé sur LINE.
z Pour assigner le lecteur CD1 (ou CD2) comme source d’entrée, poussez le commutateur sur la droite
(CD)
18. Contrôle de Gain
Réglage de niveau du signal d’entrée.
19. Sélecteur CUE:
Poussez le sélecteur vers la gauche sur ‘CH1 » pour pré-écouter le canal 1 ou vers la gauche pour préécouter le canal 2. En position centrale, vous pré-écoutez les 2 canaux ensemble.
20. Fader canal:
Réglage de volume du canal
21. Crossfader:
Permet de régler le fondu sur la sortie générale entre canal 1 et 2.
22. Fiche Microphone:
Jack 6.3mm pour connecter un microphone.
23. Jack pour casque:
Jack 6.3mm pour connecter un casque.

Connexions
PHONO
PHONO
MASTER
OUTPUT
1. SELECTEUR LIGNE/PHONO
Réglez sur la position LINE si les fiches d’entrée sont connectées sur un lecteur CD, MD ou cassettes.
Réglez sur PHONO si vous avez branché une platine disques avec cellule magnétique.
2. ENTREE PHONO/LIGNE
Elle se branche sur la sortie d’un appareil audio qui sera sélectionné par le sélecteur LINE/PHONO (1).
Lorsque le sélecteur LINE/PHONO (1) est réglé sur PHONO, cette entrée NE DOIT PAS être branchée sur
un appareil de niveau ligne.
3. FICHE DE MASSE
Lorsque la fiche d’entrée est branchée sur une platine disques, vous devez connecter le fil de masse de la
platine sur cette fiche.
4. MASTER OUT
Branchez cette sortie sur un amplificateur.
5. POWER
Marche/Arrêt de l’appareil
6. CORDON SECTEUR
A brancher sur une prise secteur.
LINE LINE
OFF
L
R
INPUT
CH 1CH 2
ON
POWER

FONCTIONNEMENT DE BASE
1. Charger et éjecter le disque
a. Appuyez sur OPEN pour ouvrir le compartiment CD.
b. Chargez le CD
Placez correctement le CD au centre du compartiment avec l’étiquette vers le haut. Ne pas
insérer plus qu’un CD.
z Rabattez le capot pour le fermer.
z Appuyez sur PLAY/PAUSE pour démarrer la lecture/pause.

2. SAUT DE TITRE
Utilisez les touches de saut pour avancer ( ) ou reculer ( ) vers le titre désiré.
3. RECHERCHE PAR TRAME
Appuyez sur la touche de recherche ( ou ) en mode pause pour vous déplacer d’une
trame à chaque pression. Maintenez la touche enfoncée pour vous déplacer rapidement avec le son
jusqu’à ce que vous trouviez l’emplacement souhaité.
4. PLAY/PAUSE
Appuyez sur cette touche pour commencer la lecture à partir d’un point souhaité et appuyez à
nouveau pour mettre le lecteur en pause. La LED est allumée pendant la lecture et clignote pendant la
pause.
5. Fixer un point CUE
Appuyez sur cette touche pendant que le lecteur est en mode pause pour mémoriser le point. A
chaque fois que vous appuyiez sur la touche CUE, le lecteur revient sur ce point et se met en pause.
6. POTENTIOMETRE PITCH CONTROL
Poussez le curseur vers +16 et la vitesse de lecture augmente ; poussez le curseur vers -16 et la
vitesse diminue.
DIAGNOSTIC DE DEFAILLANCE
Symptôme Cause Solution
Le compartiment ne s’ouvre pas
lorsque la touche OPEN est
appuyée
Lorsque la lecture commence, elle
s’arrête immédiatement ou se met
en pause
Pas de son * Cordons de sortie mal banchés
Son déformé * Mauvais branchement
Bruit Câbles mal branchés Enfoncez fermement toutes les
La fiche secteur n’est pas
correctement branchée
* Le CD est chargé à l’envers
* CD sale
* Table de mixage mal réglée
* Fiches ou borniers sales
* Le lecteur est en pause
* Fiches ou borniers sales
Branchez la fiche sur le secteur.
* Chargez le CD avec l’étiquette
vers le haut
* Nettoyez le CD et essayez à
nouveau
* Branchez les cordons
correctement
* Vérifiez le réglage de la table de
mixage
* Appuyez sur la touche
PLAY/PAUSE
* Branchez la table de mixage sur
les entrées LIGNE
* Nettoyez les fiches
fiches audio

D
SICHERHEITSHINWEISE
VOR HITZE SCHÜTZEN VOR STAUB UND SCHMUTZ
SCHÜTZEN
NICHT IN DIE NÄHE VON
MAGNETFELDERN KOMMEN
DAS GERÄT AUF EINE EBENE FLÄCHE
STELLEN
KEINE CHEMISCHEN
REINIGUNGSMITTEL BENUT ZE N
IM PROBLEMFALL IHREN
FACHHÄNDLER FRAGEN
NIEMALS DAS GEHÄUSE ÖFFNEN NETZSTROM – VORSICHT
STROMSCHLAGGEFAHR
Sicherheitshinweise
• Wählen Sie sorgfältig den Aufstellungsort des Geräts
aus. Nicht in die Sonne stellen. Vor Erschütterungen,
Staub, Hitze, Kälte oder Feuchtigkeit schützen. Nicht
in der Nähe von Trafos und Motoren aufstellen.
• Das Gerät nicht unter extremen Temperaturen
benutzen.
• Niemals das Gehäuse öffnen.
• CDs nur mit sauberen Händen anfassen. Keine
beschädigten CDs einlegen.
• Beim Ausziehen des Steckers nur am Stecker
anfassen, nie am Kabel ziehen.
• Niemals die Bedienteile mit Gewalt betätigen.
• Vor Platzwechsel des Geräts erst den Netzstecker
und alle anderen Anschlüsse abziehen.
• Stets die CD Lade schließen, um den Laserkopf
sauber zu halten.
SICHERHEITSBESCHEINIGUNG
Eigenschaften der Laserdiode
Material: Ga-Al-As
Wellenlänge: 755-815 nm (25
o
C)
Laser Ausgang: Dauerwelle max. 0.5mW
VORSICHT:
KEINE ANDEREN EINSTELLUNGEN ODER
ARBEITEN AUSFÜHREN ALS DIE, DIE
AUSDRÜCKLICH IN DIESER ANLEITUNG
VORGESEHEN SIND. ES BESTEHT
STRAHLUNGSGEFAHR
VORSICHT
• Niemals das Gerät mit chemischen Reinigungsmitteln
reinigen. Nur ein sauberes, trockenes Tuch
verwenden.
• Diese Anleitung muss für spätere Bezugnahme
aufbewahrt werden.
NIEMALS DAS GEHÄUSE ÖFFNEN.
STROMSCHLAGGEFAHR ! DAS GERÄT
ENTHÄLT KEINE VOM BEDIENER
AUSWECHSELBAREN TEILE. REPARATUREN
NUR VOM FACHMANN DURCHFÜHREN
LASSEN
.

BESCHREIBUNG DER BEDIENELEMENTE
CUE MASTER
MIC
10
10
0
0
0
LINE/
PHONO
CD 1
GAIN
MIN
MAX
LINE/
PHONO
POWER
GAIN
CUE
CH1
CH2
MIN
CH1+CH2
TRACK SKIP
+10
FSMPITCHTRACK
AUTO CUE
SINGLE
CONT.
SEARCH
TIME
PITCH
PITCH BEND
SPEED
STOP
+
-16
STOP
SEARCH
TIME
PITCH
PITCH BEND
SPEED
+
-16
PITCHFSMTRACK
10
CD 2
MAX
TRACK SKIP
AUTO CUE
SINGLE
+10
CONT.
+16
CUE
PITCH
CONTROL
CD 1
CD 1
MIC
CH 1
CH 2
CD 2
PHONE
CUE
CDM 100 CD PACK
BEDIENUNG DER CD SPIELER
1. STOP
Auf diese Taste drücken, um den Spieler zu stoppen.
2. PITCH
Diese Taste ändert die Abspielgeschwindigkeit.
Auf die PITCH Taste drücken (die PITCH LED leuchtet auf), um mit dem PITCH CONTROL Schieberegler
die Abspielgeschwindigkeit zu erhöhen oder zu verlangsamen. Wenn die PITCH Funktion ausgeschaltet ist,
geht die Abspielgeschwindigkeit automatisch wieder auf die normale Geschwindigkeit zurück.
Die Abspielgeschwindigkeit kann bis zu +/- 16% verändert werden.
N.B.:
(1) Der PITCH Schieberegler reagiert nicht, wenn die PITCH LED ausgeschaltet ist.
(2) Dieser PITCH Regler hat keinen Einfluss auf die PITCH BEND Funktion.
3. TIME/OUTRO
Mit dieser Taste schaltet das Display zwischen Restzeit, Spielzeit und insgesamt verbleibender Spielzeit
um. Sie schaltet auch die OUTRO Funktion ein und aus. Wenn OUTRO auf dem Display erscheint, werden
nur die letzten 30 Sekunden jedes Titels abgespielt.
4. LCD
Auf dem Display erscheinen die Titelnummern, die Zeit (Minuten, Sekunden, Frames),
Abspielgeschwindigkeit (Pitch), sowie andere Betriebsinformationen wie Single/Autocue und Continue
+16
PITCH
CONTROL
CD 1

5. CONTINUE/SINGLE (AUTO CUE)
Mit dieser Taste zwischen den Abspielarten SINGLE und CONTINUE umschalten. Wenn die Betriebsart
SINGLE/AUTOCUE gewählt ist, erscheint dies als PLAY 1 auf dem Display. Nach jedem Titel geht der
Spieler am Anfang des folgenden Titels in Pausenbetrieb.
6. TRACK SKIP
Mit diesen Tasten wird eine bestimmte Titelnummer gewählt.
7. SEARCH
Mit diesen Tasten bis zur gewünschten Stelle vorwärts oder rückwärts spulen. Die Tasten können auch
zum Ändern der Abspielgeschwindigkeit benutzt werden.
8. PITCH BEND
Mit dieser Taste wird die Abspielgeschwindigkeit sofort erhöht oder vermindert.
9. PITCH CONTROL SCHIEBEREGLER
Mi diesem Schieberegler kann die Abspielgeschwindigkeit zwischen dem MINIMUM (oben) und MAXIMUM
(unten) eingestellt werden.
10. CD FACH
Zum Einlegen der CDs in den Spieler.
11. CUE
Mit der CUE Funktion kann die CD ab einer bestimmten Stelle eine beliebige Anzahl von Malen abgespielt
werden. An der gewünschten Stelle während des Abspielbetriebs auf die PAUSE Taste drücken
PLAY/PAUSE Taste drücken. Die CUE LED blinkt. Die CUE Taste drücken, um die Stelle zu speichern,
von der der Spieler abspielt, wenn die CUE Taste erneut gedrückt wird.
12. PLAY/PAUSE
Bei jedem Druck auf diese Taste schaltet der Betrieb zwischen Abspielen und Pause um.
13. OPEN
Diese Taste drücken, um die CD Lade zu öffnen. Zum Schließen die Lade eindrücken.
BEDIENELEMENTE DES MISCHPULTS
14. MIC Pegel
Einstellung des Lautstärkepegels des Mikrofoneingangs.
15. CUE:
Einstellung der Kopfhörerlautstärke.
16. Master:
Einstellung der Masterlautstärke.
17. Eingangswahlschalter (Line/Phono, CD)
Wählt die Eingangsquelle für jeden Kanal zwischen Phono (Line) und CD.
z Zum Anschluss eines Plattenspielers diesen Schalter nach links auf LINE/PHONO schieben und den
LINE/PHONO Schalter auf der Rückseite des Geräts ebenfalls auf PHONO stellen.
z Zum Anschluss eines externen CD Spielers oder eines anderen Geräts mit Line Pegel muss dieser
Schalter nach links auf LINE/PHONO geschoben werden, der Wahlschalter LINE/PHONO auf der
Rückseite muss jedoch auf LINE gestellt werden.
z Um CD1 (bzw. CD2) als Eingangsquelle anzugeben, den Schalter nach rechts (CD) schieben.
18. Gain Regler
Einstellung des Eingangspegels.
19. CUE Wahlschalter:
Den Schalter nach links auf “CH1” stellen, um den linken Kanal 1, bzw. nach rechts auf „CD 2“, um den
rechten Kanal 2 vorzuhören. In der mittleren Stellung „CH1 + CH2“ werden beide Kanäle zusammen
vorgehört.
20. Kanalfader:
Einstellen der Kanallautstärke.
21. Crossfader:
Umblenden zwischen Kanal 1 und 2.
22. Mikrophonbuchse:
6.3mm Buchse zum Anschluss eines Mikrofons.
23. Kopfhörerbuchse:
6.3mm Buchse zum Anschluss eines Kopfhörers.

Anschlüsse
PHONO
PHONO
MASTER
OUTPUT
1. LINE/PHONO WAHLSCHALTER
Auf LINE stellen, wenn die Eingangsbuchsen an einen CD Spieler, MD Spieler oder Kassettenrekorder
angeschlossen sind. Auf PHONO stellen, wenn ein Plattenspieler mit magnetischem Tonabnehmer
angeschlossen ist.
2. PHONO/LINE EINGANG
Zum Anschluss an Audioausgangsgeräte. Diese Buchsen werden gemäß der Stellung des LINE/PHONO
Wahlschalters (1) angeschlossen. Wenn dieser Schalter auf PHONO steht, darf der Eingang AUF KEINEN
FALL an ein Line Pegelgerät angeschlossen werden.
3. MASSEKLEMME
Wenn die Eingangsbuchse an einen Plattenspieler angeschlossen wird, muss das Massekabel hier geerdet
werden.
4. MASTER AUSGANG
Diesen Ausgang an einen Verstärker anschließen.
5. POWER
Zum Ein- und Ausschalten des Geräts.
6. NETZKABEL
Diesen Eingang ans Stromnetz anschließen.
LINE LINE
OFF
L
R
INPUT
CH 1CH 2
ON
POWER

GRUNDBEGRIFFE
1. Einlegen und Auswerfen einer CD
z Mit der OPEN Taste das Fach öffnen.
z CD einlegen
Eine CD genau in die Mitte des Fachs einlegen mit dem Etikett nach oben. Nie mehr als eine CD
einlegen.
z Zum Schließen des Fachs die Klappe herunterdrücken.
z Auf PLAY/PAUSE drücken, um die CD abzuspielen.

2. Titelsprung
Mit den TRACK SKIP Tasten zum gewünschten Titel vorwärts ( ) oder rückwärts ( ) gehen.
3. Frame Suchlauf
Im Pausenbetrieb auf die SEARCH Tasten ( oder ) drücken, um bei jedem Druck einen
Frame weiterzugehen. Die Taste niedergedrückt halten, um die CD mit Ton vorwärts oder rückwärts
zu durchlaufen.
4. PLAY/PAUSE
Auf diese Taste drücken, um von einer gewünschten Stelle an die CD abzuspielen. Erneut Drücken,
um in Pausenbetrieb zu schalten. Im Abspielbetrieb leuchtet die LED, im Pausenbetrieb blinkt sie.
5. Festlegen eines CUE Punktes
Im Pausenbetrieb auf diese Taste drücken, um die Stelle zu speichern. Jedes Mal wenn danach die
CUE Taste gedrückt wird, geht der Spieler zu dieser Stelle und schaltet in Pausenbetrieb.
6. Pitch Control Schieberegler
Den Reger in Richtung +16 schieben, um die Abspielgeschwindigkeit zu erhöhen, bzw. in Richtung -16,
um sie zu verringern.
Fehlerdiagnose
Symptom Ursache Lösung
Das Fach öffnet sich nicht, wenn die
OPEN Taste gedrückt wird
Beim Abspielen pausiert oder stoppt
der Spieler
Kein Ton
Tonstörungen
Brummgeräusche
• Das Gerät ist nicht an den
Strom angeschlossen.
• CD verkehrt herum eingelegt
• Verschmutze CD
• Ausgangskabel fasch
angeschlossen
• Audio Mischpult falsch
eingestellt
• Verschmutzte Cinch Stecker
oder Verstärkeranschlüsse
• Spieler befindet sich im
Pausenbetrieb
• Falsche Anschlüsse
• Verschmutzte Cinch Stecker
oder Verstärkeranschlüsse
• Kabel falsch angeschlossen • Alle Audiostecker fest einstecken
• Das Netzkabel richtig anschließen
• Die CD mit dem Etikett nach oben
legen
• CD reinigen und erneut probieren
• Die Kabel richtig anschließen.
• Einstellung des Audio Mischpults
prüfen
• Auf die PLAY/PAUSE Taste
drücken
• Das Audiomischpult an die LINE
Eingangsbuchsen anschließen.
• Stecker reinigen

DK
Læs hele denne vejledning før ibrugtagning og gem den for senere brug.
VIGTIGT!
Må ikke placeres i direkte sollys, eller
tæt på anden varmekilde.
Ved rengøring brug kun en tør klud
og ikke rengørings/opløsningsmidler
Er beregnet til indendørs brug og m å ikke
udsættes for fugt/vand
Hvis apparatet ikke virker skal det altid
indleveres til autoriseret reparatør
Bør ikke placeres tæt på fjernsyn eller
magnetfelter(f.eks. en højttaler).
Forsøg aldrig at adskille apparatet Tilslut ikke apparatet hvis der er
Ved temperatursvingnin ger kan der
dannes kondens som giver drift-probl emer
skader på netkabel, stik eller kabinet
SIKKERHEDS CERTIFIKATION
Laser Diode beskrivelse
Materiale : Ga.-Al-As
Bølgelængde : 755-815 nm (25
Laser Output: Continuous Wave max. 0.5mW
o
C)
For at undgå elektrisk stød må apparatet ikke
adskilles, netspændingen bør desuden altid
afbrydes når apparatet ikke er i brug.

FUNKTIONS-BESKRIVELSE
FSMPITCHTRACK
TRACK SKIP
AUTO CUE
SINGLE
+10
CONT.
SEARCH
TIME
PITCH
PITCH BEND
SPEED
CUE MASTER
STOP
+
-16
MIC
10
0
LINE/
PHONO
CD 1
GAIN
MIN
MAX
0
0
LINE/
PHONO
CD 2
POWER
GAIN
CUE
CH2
CH1
MIN
CH1+CH2
MAX
10
10
TRACK SKIP
+10
AUTO CUE
SINGLE
CONT.
PITCHFSMTRACK
SEARCH
TIME
PITCH
PITCH BEND
SPEED
STOP
+
-16
+16
CUE
PITCH
CONTROL
CD 1
CD 1
MIC
CH 1
CH 2
CD 2
PHONE
CUE
CDM 100 CD PACK
CD-AFSPILLER
1. STOP
Stopper afspilning.
2. PITCH
Knappen slår variabel hastighed til og fra (tilkoblet når lysdioden er tændt).
3. TIME/OUTRO
Denne knap vælger forskellige udlæsninger af tiden i displayet og styrer også OUTRO-funktionen.
Når der står OUTRO i displayet spilles de sidste 30 sek. af hvert track på pladen.
4. L.C.D.
Display som viser oplysninger om track, tid, pitch procent osv.
5. CONTINUE/SINGLE (AUTO CUE)
Skifter mellem de to forskellige afspille-måder.
CONTINUE afspiller hele pladen i track-nr. rækkefølge.
SINGLE/AUTO CUE betyder at efter afspilning af et track, går afspilleren på PAUSE ved starten af næste
track.
6. TRACK SKIP
Vælger det track man ønsker at afspille.
7. SEARCH
Søgning frem og tilbage i det aktuelle track.
8. PITCH BEND
Kortvarig ændring af hastighed (kun mens knapperne holdes nede).
+16
PITCH
CONTROL
CD 1

9. PITCH CONTROL SLIDER
Skydeknap som varierer hastigheden trinløst +/- 16%. Virker kun hvis funktionen slås til på PITCH(2)
10. DISC COMPARTMENT
CD-drevenes låg.
11. CUE
CUE funktionen gør det muligt at markere et punkt på cd-pladen hvorfra afspilningen startes.
Under afspilning trykkes først på PLAY/PAUSE og derefter på CUE button. Punktet er nu markeret og der
vendes tilbage til det hver gang der trykkes på CUE.
12. PLAY/PAUSE
Hver gang der trykkes på denne knap skiftes mellem PLAY og PAUSE.
13. OPEN
Åbner cd-drevets låg. Låget lukkes igen ved blot at trykke det ned.
MIXER
14. MIC Level-
Volume til mikrofon
15. CUE:
Volume til hovedtlf.
16. Master:
Volume på mixerens udgang.
17. Input Source Selector (Line/Phono, CD )
Vælger om signalet på hver kanal skal komme fra de interne cd-drev eller fra en extern signalkilde.
z Hvis det externe signal kommer fra en pladespiller sættes knappen på LINE/PHONO, og den lille
omskifter på bagsiden sættes på PHONO.
z Hvis det externe signal kommer fra en cd-afspiller eller andet linie-signal sættes knappen også på
LINE/PHONO, men omskifteren bagpå skal sættes på LINE.
z For at vælge de indbyggede cd-drev sættes knappen på CD.
18. Gain Control
Justere indgangs-signalet.
19. CUE selector:
Sættes på “ CH 1” for at høre lyd fra kanal 1 i hovedtlf. Sættes på “CH 2” for at høre lyd fra kanal 2 i
hovedtlf. Hvis knappen stilles i midten høres lyden fra begge kanaler samtidig.
20. Channel fader:
Volume på de to kanaler.
21. Crossfader slider:
Skyde-knap til betjening af ”CROSSFADE-funktion”
22. Microphone jack:
6.3mm jackbøsning for tilslutning af mikrofon.
23. Headphone jack:
6.3mm jackbøsning for tilslutning af hovedtlf.

TILSLUTNINGER
PHONO
PHONO
MASTER
OUTPUT
1. LINE/PHONO SELECTOR
Sættes i stilling LINE hvis indgangene(2) skal bruges til CD,MD eller båndoptager.
Sættes i stilling PHONO hvis indgangene skal bruges til plade-spiller.
2. PHONO/LINE INPUT
Phono-bøsninger for tilslutning af externe signalkilder
3. GROUND TERMINAL
Hvis der tilsluttes pladespiller, forbindes dennes stel-ledning til denne terminal.
4. MASTER OUT
Mixerens udgang som tilsluttes en forstærker (phonostik)
5. POWER SWITCH
Tænd/sluk (ON/OFF)
6. AC POWER CORD
Tilsluttes en stikkontakt (230VAC).
LINE LINE
L
R
INPUT
CH 1CH 2
OFF
ON
POWER

ISÆTNING OG UDTAGNING AF CD
a. Tryk på knappen “OPEN” for at åbne låget.
b. Læg Cden i
Cden skal placeres centreret og med tekstsiden opad.
Læg aldrig mere end en CD i afspilleren ad gangen.
z Tryk på selve låget for at lukke det.
z Tryk på PLAY/PAUSE for at starte afspilning.
 Loading...