

DMX LED Scanner 48
151.557
Triton
Instruction Manual
Gebruiksaanwijzing
Mode d’Emploi
Gebrauchsanleitung
Please read this user manual before using this product.
Warning:
- Read the manual prior to using the unit.
- Keep the manual for further reference.
- Keep the packaging so that you can
transport the unit in its original
packaging in order to avoid damage.
- The SkyTec light effect contains a high
light intensity LED. Do not look into the
LED’s. This might damage seriously your eyes.
- For indoor use only.
- Don’t cover any ventilation opening.
- Do not shake the device and avoid brute force when installing or operating the device.
- During installation, nobody should stand beneath the mounting area.
- Installation point/area must be enough for loading 10 times the device’s weight.
- The light effect must be placed at least 50 cm away from inflammable materials such as curtains, books,
etc. Make sure that the housing cannot be touched by accident.
- Prior to the first use, have the unit checked by a qualified person.
- The unit contains voltage carrying parts. DO NOT open the light effect.
- Unplug the unit from the mains prior to repairs, maintenance and replacement of the lamp.
- Never plug or unplug the unit with wet hands.
- Disconnect the unit from the mains prior to replacing the fuse.
- If the plug and/or mains lead are damaged, they need to be repaired by a qualified technician.
- If the unit is damaged to an extent that you can see internal parts, do not plug the unit into a mains
outlet.
- Repairs has to be carried out by a qualified technician.
- Only connect this unit to an earthed mains outlet of 230Vac/50Hz~.
- Always unplug the unit during a thunderstorm or when it is not in use.
- If the unit has not been used for a longer period of time, condensation can occur inside the housing.
Please let the unit reach room temperature prior to use.
- When you unplug the unit from the mains always pull the plug, never the lead.
- In order to prevent dropping of the unit, a safety fastening needs to be installed. This can be a solid
chain, a steel cable, etc. which has to be fastened separately from the mounting bracket.
- Use only certificated safety cables which can hold 12 times the weight of the device.
- The maximum drop distance must never exceed 20cm.
- The supplied bracket is the main fixing and must be used to solidly mount the light effect.
- In order to avoid accidents in public premises, the local legal requirements and safety
regulations/warnings must be fulfilled.
- Keep out of the reach of children.
- Never leave this device running unattended.
- The operator has to make sure that safety relating and machine technical installations are approved by
a skilled person regular.
2

General
Thank you for choosing Triton. This products meets the requirement of the European guidelines (CE). The
Triton are designed to produce effect lighting for use in light show systems in bars, clubs, schools, on
stages etc.
Features
- 4 Operation modes:
- Sound active from built-in programs
- Gobo rotation via LED matrix
- Strobe effect with adjustable speed
- Long life LED light source - no light bulbs to replace
- Razor sharp beams, Colors don’t fade in time
- Very little heat production
- Very low power consumption
- Lightweight
Automatic running, DMX, Sound Active, Master/Slave up to 4 slaves
Operation instruction:
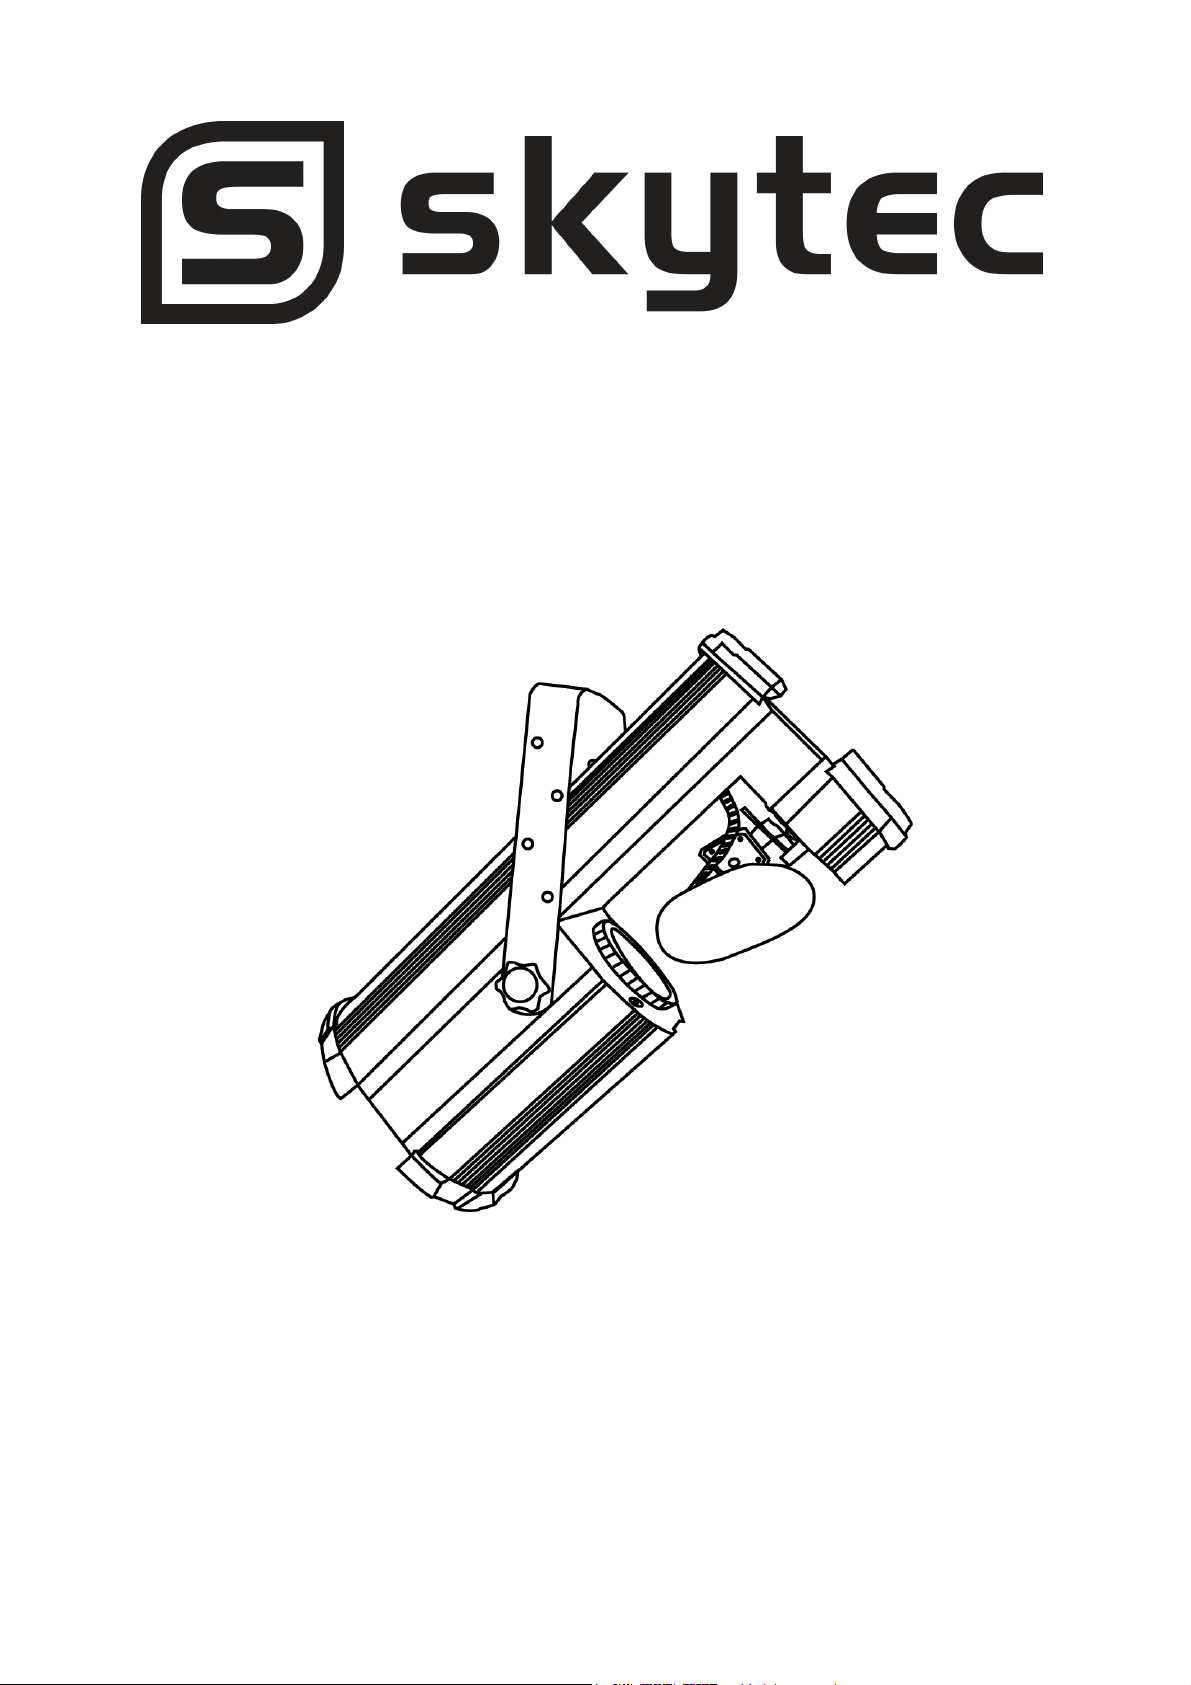
1. Mounting bracket
2. Fixation screw
3. Focus
4. Mirror
5. Housing cover
6. DMX-Out socket
7. Remote Control socket (optional)
8. Power socket / Fuse holder
9. DMX-In socket
3

10. Microphone
11. Mode button
12. Enter button
13. Up button
14. Down button
15. LED display
After you connected the Triton scanner to the mains (8) and switch on the unit the Triton LED scanner starts
running. During the reset the motors are trimmed and the device is ready for use afterwards.
The Triton has 3 operations modes. It can be operated in
DMX, Slave or master mode. The mode can be selected
by pressing the mode button (11).
Master-Slave Operation:
This function will allow you to link up to 4 units together
and operate without a controller. The units will be sound
activated. In Master-Slave operation one unit will act as
the controlling unit and the others will react to the
controlling units programs. Any unit can act as a Master or
as a Slave. Using standard XLR 2 core screened
microphone cables, daisy chain your units together via the
XLR connector on the rear of the units. Remember the
Male XLR connector is the input and the Female XLR
connector is the output. The first Triton scanner (master)
will use the female XLR connector only, the last use the
male XLR connector only and a terminator (see DMX
setting).
On the Master unit set your desired show with the mode (11) and Up/Down (13/14) buttons and set that show
by pressing the ENTER (12) button. On the slave units set the respective slave-mode for all slave devices. The
slave units will now follow the Master unit.
Please note
The function G-3 is only meant for service purposes. Please do only use this function if you want to set the unit
shortly into standby mode.
4

DMX mode:
Addressing
The control board allows you to design the DMX address, which is defined as the first channel fro which the
Triton LED scanner will respond to the DMX controller. Please be sure that you don’t have any overlapping
channels in order to control each Triton LED scanner correctly and independently from any other fixture on the
DMX data link. If two, three or more Triton LED scanners are addressed similarly, they will work similarly.
For address setting, press the Mode button (11) until the display (15) shows “A001” and set the desired
address via the Up (13) and Down (14) button.
After having addressed the Triton scanner you may now start operating these via your DMX lighting controller.
DMX-protocol
DMX channel Function
CH 1 Strobe
CH 2 Gobo
CH 3 Gobo Rotation
CH 4 Pan
CH 5 Tilt
DMX channel DMX scale Detail function
CH 1
CH 2
DMX XLR-connection
DMX IN
1
core screened cable, with each core having at least a 0.5mm diameter. The XLR's are connected as shown in
the table above. Note, care should be taken to ensure that none of the connections touch the body of the plug
or each other. The body of the plug is not connected in any way. The Triton accepts digital control signals in
standard DMX512 (1990) format. Connect the controller’s output to the first fixture’s input, and connect the first
fixture’s output to the second fixture’s input. The rest may be deduced by analogy. Eventually connect the last
fixture’s output to a DMX terminator.
2
3
0 7 Closed
8 247 Strobe quick slow
248 255 Open
0 7 Gobo 1
8 15 Gobo 2
16 23 Gobo 3
………………………. ……….
0 127 Rot. forwards slow quick CH 3
128 255 Rot. backwards quick slow
DMX OUT
2
3
DMX 512
1
PIN FUNCTION
1
GND
2
DATA -
3
DATA +
Connection between controller and the
LED light effect and between another
DMX light effect must be made with 2
The Triton LED scanner uses 3-pin XLR plug / socket. If your controller uses 5-pin XLR plug / socket, you
should use a conversion cable from 5-pin to 3-pin as shown bellow.
5 PIN SOCKET
Pin 1: GND (Screen)
Pin 2: Signal (data -)
Pin 3: Signal (data +)
Pin 4: N/C
Pin 5: N/C
3 PIN PLUG
Pin 1: GND (Screen)
Pin 2: Signal (data -)
Pin 3: Signal (data +)
5 PIN PLUG
Pin 1: GND (Screen)
Pin 2: Signal (data -)
Pin 3: Signal (data +)
Pin 4: N/C
Pin 5: N/C
3 PIN SOCKET
Pin 1: GND (Screen)
Pin 2: Signal (data -)
Pin 3: Signal (data +)
5

DMX Terminator
At the last fixture in the chain, the DMX output has to be connected with a DMX terminator. This prevents
electrical noise from disturbing and corrupting the DMX control signals. The DMX terminator is simply an XLR
connector with a 120 Ohm resistor connected across pins 2 and 3, which is then plugged into the output socket
on the last projector in the chain. The connections are illustrated below.
PIN 3
PIN 2
Set Up:
PAN Reverse
With this function you can reverse the Pan-movement.
TILT Reverse
With this function you can reverse the Tilt-movement.
Display on/off
With this function you can shut off the LED display (15)
6
Cleaning and Maintenance:
The Triton LED scanner requires almost no maintenance. However we recommend a frequent cleaning of the
device otherwise the light output will be reduced. Disconnect the mains power supply and wipe the cover with a
damp cloth. Do not immerse in liquid. Never use alcohol or solvents!
The objective lens will require weekly cleaning as smoke tends to building up residues, reducing the light
output very quickly.
There are no serviceable parts inside the triton scanner. Maintenance and service operations are only to be
carried out by authorized dealers
Replacing a fuse:
Unplug the unit from the main power source. Insert a flat-head screwdriver into a slot of the fuse cover (8).
Gently pry up the fuse cover, the fuse will come out. Remove the fuse and insert the replacement fuse into the
holder. Be sure to use a fuse of the same type and specification. Place the fuse cover back into the IEC socket
(8).
Specification:
Power: ................................................................................................ 230V / 50Hz ~
Power consumption: ...........................................................................................25W
LEDs: ............................................................................... 24 Red, 12 Green, 12 Blue
DMX Channels:......................................................................................................... 5
Weight:............................................................................................................... 3.2kg
Size (LxWxH): ..............................................................................400 x 190 x 175mm
Maximum ambient Temperature Ta:.................................................................... 45°C
Fuse: .....................................................................................................................F1A
• Specifications and design are subject to change without prior notice.
Do not attempt to make any repairs yourself. This would invalid your warranty. Do not make any changes to
the unit. This would also invalid your warranty. The warranty is not applicable in case of accidents or
damages caused by inappropriate use or disrespect of the warnings contained in this manual. SkyTronic
cannot be held responsible for personal injuries caused by a disrespect of the safety recommendations and
warnings. This is also applicable to all damages in whatever form.
7

VEILIGHEIDSVOORSCHRIFTEN :
Lees deze handleiding eerst door alvorens het product te gebruiken. Volg de instructies op anders zou de
garantie wel eens kunnen vervallen. Neem ook altijd alle veiligheids maatregelen om brand en/of een
electrische schok te voorkomen.
Tevens is het ook raadzaam om reparaties / modificaties e.d. over te laten aan gekwalificeerd
personeel om een electrische schok te voorkomen.
Bewaar deze handleiding ook voor toekomstig gebruik.
- Bewaar de verpakking zodat u indien het apparaat defect is, dit in de originele verpakking kunt
opsturen om beschadigingen te voorkomen.
- Voordat het apparaat in werking wordt gesteld, altijd eerst een deskundige raadplegen.
- In het apparaat bevinden zich onder spanning staande onderdelen; open daarom NOOIT dit apparaat.
- Bij het verwijderen van de stekker uit het stopcontact nooit aan het netsnoer trekken.
- Verwijder of plaats een stekker nooit met natte handen resp. uit en in het stopcontact.
- Indien zowel de stekker en/of netsnoer als snoeringang in het apparaat beschadigd zijn dient dit door
een vakman hersteld te worden.
- Indien het apparaat zo beschadigd is dat inwendige (onder)delen zichtbaar zijn mag de stekker NOOIT
in het stopcontact worden geplaatst én het apparaat NOOIT worden ingeschakeld. Neem in dit geval
contact op met de dealer.
- Reparatie aan het apparaat dient te geschieden door een vakman of een deskundige.
- Sluit het apparaat alléén aan op een 230VAC / 50Hz geaard stopcontact, verbonden met een 10-16A
meterkastgroep.
- Toestel niet opstellen in de buurt van warmte bronnen zoals radiatoren etc. en niet op een vibrerende
ondergrond plaatsen. Dek ventilatie-openingen nooit af.
- Bij onweer altijd de stekker uit het stopcontact halen, zo ook wanneer het apparaat voor een langere
tijd niet gebruikt wordt.
- Als u het apparaat lang niet gebruikt heeft en het weer wil gebruiken kan er condens ontstaan; laat het
apparaat eerst op kamertemperatuur komen alvorens het weer in werking te stellen ; apparaat nooit in
vochtige ruimten en buiten gebruiken.
- Om ongevallen in bedrijven te voorkomen moét rekening worden gehouden met de daarvoor geldende
richtlijnen en moeten de aanwijzingen/waarschuwingen worden gevolgd.
- Zorg voor een extra veiligheidsketting als het apparaat op hoogte wordt gehangen. Ga nooit onder het
apparaat staan bij ophanging. Monteer het product minimaal 50 cm van brandbare objecten.
- Dit apparaat bezit een high light intensity LED; kijk nooit in de LED om oogbeschadigingen te
voorkomen.
- Het apparaat buiten bereik van kinderen houden.
- Gebruik geen schoonmaakspray om de schakelaars te reinigen. Restanten van deze spray zorgen
ervoor dat smeer en stof ophopen. Raadpleeg bij storing te allen tijde een deskundige.
- Zorg dat uw handen schoon zijn tijdens het gebruik.
- Gebruik geen overmatige kracht bij het bedienen van het apparaat.
- Tracht het apparaat niet schoon te maken met chemische oplossingen. Dit kan de lak beschadigen.
Gebruik een droge doek om schoon te maken.
- Blijf uit de buurt van elektronische apparatuur die bromstoringen zouden kunnen veroorzaken.
- Bij reparatie dienen altijd originele onderdelen te worden gebruikt om onherstelbare beschadigingen
en/of ontoelaatbare straling te voorkomen.
- Schakel eerst het toestel uit voordat u het netsnoer en/of aansluitsnoeren verwijdert. Verwijder
netsnoer en aansluitsnoeren voordat u dit product gaat verplaatsen.
- Zorg ervoor dat het netsnoer niet beschadigd/defect kan raken wanneer mensen erover heen lopen. In
Nederland/Belgie is de netspanning 230Vac/50Hz. Indien u reist (en u neemt het apparaat mee)
informeer dan naar de netspanning in het land waar u verblijft.
Deze markering wordt weergegeven om u erop attent te maken dat een levensgevaarlijke spanning in
het product aanwezig is en dat bij aanraking van deze delen een electrische schok wordt verkregen.
Deze instructiemarkering wordt weergegeven om u erop te wijzen dat de instructie zeer belangrijk is
om te lezen en/of op te volgen.
Dit apparaat is CE-goedgekeurd ; er mogen géén veranderingen/modificaties worden doorgevoerd ; deze
kunnen de CE status te niet doen met alle gevolgen van dien. Tevens vervalt de garantie!
8

KENMERKEN
Dank u voor de aankoop van de Triton. Dit product is geconstrueerd om lichteffecten te produceren en te
gebruiken in bars, disco’s, scholen en op podia. Ook geschikt om thuis te gebruiken.
• 4 Bedieningsmodes : Automatisch lopen (running), Muziekgestuurd, DMX en Master/Slave
• Muziekgestuurde (preset) programma’s
• Strobe effect met regelbare snelheid
• Gobo draait via LED matrix
• High light intensity LED
• Messcherpe lichtstralen waarvan de kleurintensiteit niet afneemt
• Minimale warmte afgifte
• Energie zuinig
• Laag gewicht
BEDIENING
1. Bevestigingsbeugel
2. Bevestigingsmoer
3. Focus
4. Spiegel
5. Behuizing
6. DMX-uit aansluiting
7. Ingang afstandsbediening (optie)
8. Netentree
9. DMX-in aansluiting
10. Microfoon
11. Mode knop
12. Enter knop
13. UP knop
14. DOWN knop
15. LED Display
9

Wanneer de Triton wordt aangezet begint de spiegel naar de 0-positie te draaien en worden de motoren
gepositioneerd. Dit gebeurt ook wanneer een reset plaats vindt. De Triton heeft 3 modes : DMX , Slave of
Master. De keuze kan worden gemaakt met de Mode knop (11).
MASTER / SLAVE FUNCTIE
M.b.v. deze functie kunnen 4 units met elkaar worden
verbonden en zijn muziekgestuurd, deze functie werkt
zonder controller. De units kunnen in serie worden
verbonden m.b.v. een 2 aderige afgeschermde
microfoonkabel met XLR connector. De XLR-plug is de
ingang en de contra is de uitgang ; de laatste unit moet
worden afgesloten met een afsluitweerstand (zie
verderop in de handleiding). Units kunnen zowel als
Master of als Slave gebruikt worden.
Het gewenste effect kan m.b.v. knop 11, 13 en 14 op
de master-unit worden bewerkstelligd , als de keuze is
gemaakt moet de programmering worden afgesloten door op Enter (12) te drukken. Op de Slave-units
moet de Slave mode worden geselecteerd. Deze units volgen nu de Master-unit.
N.B. Functie G-3 is bedoeld voor servicedoeleinden. Gebruik deze functie alléén wanneer een unit heel
even in de stand-by moet worden gezet
DMX MODE
Wanneer de adressen moeten worden geprogrammeerd druk op Mode-knop 11 tot A001 in de display
verschijnt. “Set” het gewenste adres met de knoppen 13 en 14 .
Let op : Als dezelfde adressen aan meerdere units worden toegekend zullen ze ook hetzelfde effect tonen.
Als de units zijn geadresseerd kunnen ze worden gestart via de controller.
10

DMX-protocol
DMX channel Function
CH 1 Strobe
CH 2 Gobo
CH 3 Gobo Rotation
CH 4 Pan
CH 5 Tilt
DMX
channel
CH 1
CH 2
DMX scale Detail function
0 7 Closed
8 247 Strobe quick slow
248 255 Open
0 7 Gobo 1
8 15 Gobo 2
16 23 Gobo 3
………………………. ……….
0 127 Rot. forwards slow quick CH 3
128 255 Rot. backwards quick slow
DMX XLR-AANSLUITING
DMX IN
1
2
3
De 2 draden van de afgeschermde kabel die gebruikt wordt dienen een minimale diameter van 0.5 mmø
te hebben. De XLR-aansluitingen moeten zoals in de figuur is weergegeven worden uitgevoerd. De Triton
werkt volgens het DMX512 protocol.
DMX OUT
2
3
DMX 512
1
PIN FUNCTION
1
GND
2
DATA -
3
DATA +
5 PIN SOCKET
Pin 1: GND (Screen)
Pin 2: Signal (data -)
Pin 3: Signal (data +)
Pin 4: N/C
Pin 5: N/C
3 PIN PLUG
Pin 1: GND (Screen)
Pin 2: Signal (data -)
Pin 3: Signal (data +)
5 PIN PLUG
Pin 1: GND (Screen)
Pin 2: Signal (data -)
Pin 3: Signal (data +)
Pin 4: N/C
Pin 5: N/C
3 PIN SOCKET
Pin 1: GND (Screen)
Pin 2: Signal (data -)
Pin 3: Signal (data +)
Indien een 5p XLR plug dient te worden gebruikt moet deze volgens bovenstaande figuur worden
aangesloten.
11

DMX AFSLUITWEERSTAND
Indien meerdere Slave-units worden gebruikt dient de laatste Slave-unit te worden voorzien van een
afsluitweerstand. Dit voorkomt een bromstoring op de DMX-signalen. Deze weerstand heeft de waarde
van 120 Ohm ( zie hieronder ) die over aansluiting 2 en 3 van de XLR-plug moet worden gesoldeerd. Deze
plug wordt dan in de uitgang van de laatste Slave-unit geplaatst.
PIN 3
PIN 2
Instellingen:
Display Aan / Uit
Met deze functie kan de display worden “uit” en “aan” gezet.
Pan reverse
Met deze functie kan de horizontale beweging (Pan) worden omgedraaid.
Tilt reverse
Met deze functie kan de verticale beweging (Tilt) worden omgedraaid.
ONDERHOUD:
De Triton heeft bijna geen onderhoud nodig, toch moet deze af en toe met een licht vochtige doek worden
schoongemaakt. Trek voordat u dit doet de stekker uit de wandcontactdoos.
Gebruik geen alcohol en/of chemische reinigingsmiddelen anders kan de Triton worden aangetast.
De lens moet ook regelmatig worden schoongemaakt omdat zich hier veel stof ed opstapelt.
Open de behuizing nooit, er bevinden zich geen onderdelen in de Triton die voor u van toepassing kunnen
zijn. Laat reparaties ook over aan gekwalificeerde personen of stuur de unit terug naar uw dealer.
12

Zekering vervangen :
Trek altijd eerst de stekker uit de wandcontactdoos en verwijder de zekeringhouder (8) met een platte
schroevendraaier. Vervang altijd de zekering door dezelfde waarde ( F1A ) als de originele anders zou de
unit onherstelbaar kunnen worden beschadigd.
SPECIFICATIE:
Aansluitspanning: ...............................................................................230V / 50Hz ~
Opgenomen vermogen: ..................................................................................... 25W
LEDs:........................................................................... 24 Rood, 12 Groen, 12 Blauw
DMX Kanalen: ...........................................................................................................5
Gewicht:.............................................................................................................. 3.2kg
Afmeting (LxBxH): .......................................................................400 x 190 x 175mm
Maximum Temperatuur Ta: ..................................................................................45°C
Zekering:............................................................................................................... F1A
• Specificaties en ontwerp kunnen worden veranderd zonder dat er een mededeling over wordt gedaan.
Garantie
het product door derden worden uitgevoerd. Het repareren dient door een gekwalificeerd persoon te
worden uitgevoerd . Tevens kan Skytronic BV niet aansprakelijk worden gesteld wanneer niet aan de
veiligheidsvoorschriften wordt voldaan en/of wanneer de informatie in de handleiding niet wordt
opgevolgd.
vervalt indien niet aan de veiligheidsvoorschriften wordt voldaan en/of als veranderingen aan
13

Lire attentivement ce manuel avant la première mise en service.
Avertissements:
- Lire le mode d’emploi avant utilisation.
- Conserver le mode d’emploi pour
référence ultérieure.
- Conserver l’emballage afin de pouvoir
transporter l’appareil en toute sécurité.
- L’effet de lumière SkyTec contient des
LED de haute intensité. Ne pas regarder
dans les LED. Vous risquez d’abîmer vos yeux.
- Uniquement pour utilisation à l’intérieur.
- Ne pas couvrir les ouvertures de ventilation.
- Ne pas secouer l’appareil ni user de force lors de l’installation ou de l’utilisation.
- Pendant l’installation, personne ne doit se trouver en-dessous de la zone de montage.
- L’endroit d’installation doit pouvoir supporter au moins 10 fois le poids de l’appareil.
- L’effet de lumière doit être placé à une distance minimale de 50cm de matériaux inflammables tels que
rideaux, livres, etc. Assurez-vous que le boîtier ne peut pas être touché par accident.
- Avant la première mise en service, faites vérifier l’installation par un professionnel.
- L’appareil contient des pièces sous tension. NE PAS ouvrir l’effet de lumière.
- Débranchez l’appareil du secteur avant d’effectuer des réparations, de la maintenance ou de remplacer
l’ampoule.
- Ne jamais brancher ou débrancher l’appareil avec les mains mouillées.
- Débranchez l’appareil du secteur avant de remplacer le fusible.
- Si la fiche et/ou le cordon secteur sont endommagés, il faut les remplacer.
- Si l’appareil est endommagé au point que des pièces internes deviennent visibles, ne le branchez pas
sur le secteur.
- Toutes les réparations doivent être effectuées par un technicien qualifié.
- Branchez l’appareil sur une prise secteur avec terre de 230Vac/50Hz~.
- Débranchez l’appareil pendant un orage ou en cas de non-utilisation prolongée.
- Si l’appareil n’a pas été utilisée pendant un lapse de temps prolongée, de l’eau de condensation a pu
se former à l’intérieur.
- Lorsque vous débranchez l’appareil du secteur, tirez toujours sur la fiche, jamais sur le cordon.
- Afin d’éviter une chute de l’appareil, vous devez installer une fixation de sécurité. Cela peut être une
chaîne solide, un câble d’acier, etc. qui doit être fixé séparément de l’étrier de montage.
- Utilisez uniquement un câble homologué qui peut porter 12 fois le poids de l’appareil.
- La distance de chute maximale ne doit pas dépasser 20cm.
- L’étrier fourni est la fixation principale et doit être solidement monté sur l’effet.
- Afin d’éviter des accidents dans des endroits publics, vous devez respecter les normes et règlements
de sécurité en vigueur.
- Tenir hors de la portée des enfants.
- Ne jamais faire fonctionner cet appareil sans surveillance.
- L’utilisateur doit s’assurer que les installations techniques relatives à la sécurité sont régulièrement
homologuées par un spécialiste.
14

Généralités
Nous vous remercions pour l’achat de Triton . Cet appareil est conforme aux normes européennes (CE).
Le Triton est conçu pour générer des effets de lumière dans un système de spectacle de lumière dans des
bars, clubs, écoles, sur scène, etc.
Caractéristiques
- 4 modes de fonctionnement:
Automatique, DMX, activé par la musique, Maître/Esclave jusqu’à 4 esclaves
- Activé par le son en suivant des programmes intégrés
- Rotation des gobos via une matrice à LED
- Stroboscope à vitesse réglable
- LED lumineuses longue durée – pas d’ampoules à remplacer
- Des rayons bien délimités. Les couleurs ne fanent pas dans le temps
- Faible production de chaleur
- Faible consommation d’énergie
- Léger
Fonctionnement:
1. Etrier de montage
2. Vis de fixation
3. Mise au point
4. Miroir
5. Boîtier
6. Sortie DMX
7. Prise pour télécommande (en option)
8. Fiche d’alimentation/Porte-fusible
9. Entrée DMX
15

10. Microphone
11. Touche de Mode
12. Touche d’entrée
13. Touche vers le haut
14. Touche vers le bas
15. Affichage à LED
Après avoir branché le scanner Triton sur le secteur (8) et l’avoir mis sous tension, le scanner à LED
commence à fonctionner. Pendant la remise à zéro, les moteurs sont alignés et l’appareil est préparé à
l’emploi.
Le Triton possède 3 modes de fonctionnement : DMX,
esclave ou maître. Le mode est sélectionné à l’aide de la
touche Mode (11).
Fonctionnement Maître - Esclave:
Cette fonction permet de relier jusqu’à 4 appareils sans
avoir besoin d’une commande. Les appareils seront
activés par le son. Le premier appareil réagit en maître et
les autres le suivent en esclave. Chaque appareil peut
être désigné comme maître ou esclave. Vous pouvez
relier les appareils en branchant un câble de microphone blindé XLR à 2 conducteurs sur les fiches XLR
au dos de l’appareil. Notez que la fiche XLR mâle est l’entrée et la fiche XLR femelle est la sortie. Le
premier scanner Triton (maître) utilisera seulement la fiche XLR femelle. Le dernier utilisera uniquement la
fiche XLR mâle et un bouchon de fin (voir réglage DMX).
Réglez la séquence désirée à l’aide de la touche Mode (11) et des touches haut et bas (13/14) sur
l’appareil maître et confirmez avec la touche Entrée (12). Sur les appareils esclave, réglez le mode
esclave approprié. Les esclaves suivent maintenant le maître.
Veuillez noter :
vous voulez mettre l’appareil brièvement en mode veille.
La fonction G-3 est uniquement pour la maintenance. Utilisez cette fonction uniquement si
16

Mode DMX:
Adressage
Le panneau de commande vous permet de régler l’adresse DMX qui est définie comme étant le premier
canal sur lequel le scanner Triton réagira à la commande DMX. Assurez-vous que les canaux ne se
chevauchent pas afin de commander chaque scanner Triton correctement et indépendamment de tout
autre appareil relié. Si un, deux ou plusieurs Tritons ont une adresse similaire, ils vont fonctionner d’une
manière similaire.
Pour régler l’adresse, appuyez sur la touche Mode (11) jusqu’à ce que l’afficheur (15) montre « A001 » et
réglez l’adresse souhaitée au moyen des touches Up 13) et Down (14).
Après avoir réglé les adresses des scanners, vous pouvez commencer à les commander par une console
de commande DMX.
Protocole DMX
Canal DMX Fonction
CH 1 Stroboscope
CH 2 Gobo
CH 3 Rotation Gobo
CH 4 Pan
CH 5 Tilt
Canal DMX Echelle DMX Fonction
CH 1
CH 2
0 7 Fermé
8 247 Stroboscope rapide lent
248 255 Ouvert
0 7 Gobo 1
8 15 Gobo 2
16 23 Gobo 3
………………………. ……….
0 127 Rot. avant lent rapide CH 3
128 255 Rot. arrière rapide lent
Connexion DMX par XLR
DMX IN
1
2
3
La connexion entre la commande et l’effet de lumière à LED et un autre effet de lumière DMX doit être
effectué au moyen d’un câble blindé à 2 conducteurs qui doivent avoir un diamètre d’au moins 0,5mm. Les
fiches XLR sont connectées comme indiqué dans le tableau ci-dessus. Veillez à ce qu’aucune des
connexions ne touche le corps de la fiche ou se touchent mutuellement.
DMX OUT
2
3
DMX 512
1
PIN FUNCTION
1
GND
2
DATA -
3
DATA +
17

Le corps de la fiche n’est pas connecté. Le Triton accepte des signaux numériques au format standard
DMX512 (1990). Branchez la sortie de la commande à l’entrée du premier appareil et la sortie du premier
appareil à l’entrée du second appareil et ainsi de suite. Branchez la sortie du dernier appareil de la chaîne
sur une résistance de fin de ligne DMX.
L’effet de lumière à LED Triton est équipé de fiches XLR à 3 broches. Si votre commande utilise des fiches
XLR à 5 contacts, vous devez utiliser un cordon adaptateur comme indiqué ci-dessous
.
5 PIN SOCKET
Pin 1: GND (Screen)
Pin 2: Signal (data -)
Pin 3: Signal (data +)
Pin 4: N/C
Pin 5: N/C
3 PIN PLUG
Pin 1: GND (Screen)
Pin 2: Signal (data -)
Pin 3: Signal (data +)
5 PIN PLUG
Pin 1: GND (Screen)
Pin 2: Signal (data -)
Pin 3: Signal (data +)
Pin 4: N/C
Pin 5: N/C
3 PIN SOCKET
Pin 1: GND (Screen)
Pin 2: Signal (data -)
Pin 3: Signal (data +)
Résistance de fin de ligne DMX
Au dernier appareil de la chaîne, la sortie DMX doit être connectée sur une résistance de fin de ligne DMX
afin d’éviter que des parasites électriques perturbent et détériorent les signaux de la commande DMX.
Une résistance de fin de ligne est simplement une fiche XLR équipée d’une résistance de 120 Ohms qui
est connectée en parallèle sur les broches 2 et 3. Cette fiche est ensuite branchée sur la fiche de sortie du
dernier appareil de la chaîne. Les connexions sont illustrées ci-dessous :
PIN 3
PIN 2
Configuration:
PAN Reverse
Cette fonction inverse le mouvement Pan.
TILT Reverse
Cette fonction inverse le mouvement Tilt.
Afficheur M/A
Permet d’éteindre l’afficheur à LED (15)
18

Nettoyage et Maintenance:
Le scanner à LED Triton ne nécessite presque pas de maintenance. Toutefois, nous vous recommandons
de nettoyer l’appareil fréquemment afin de maintenir la puissance lumineuse. Débranchez l’alimentation et
essuyez le boîtier avec un chiffon humide. Ne pas immerger dans du liquide. Ne jamais utiliser d’alcool
ni de solvants !
L’objectif nécessite un nettoyage hebdomadaire puisque la fumée a tendance à former des résidus qui
diminuent rapidement la sortie lumineuse.
L’appareil ne contient aucune pièce remplaçable par l’utilisateur. Des travaux de maintenance et des
réparations doivent être effectués par des revendeurs agrées.
Remplacement d’un fusible:
Débranchez l’appareil du secteur. Insérez un tournevis à lame plate dans une fente du couvercle du
fusible (8). Soulevez doucement le couvercle et le fusible sortira. Retirez le fusible et insérez le fusible de
remplacement dans le support. Utilisez un fusible du même type et avec les mêmes caractéristiques
techniques. Remettez le couvercle en place sur la fiche IEC (8).
Caractéristiques techniques:
Power: .................................................................................................230V / 50Hz ~
Consommation: .................................................................................................. 25W
LEDs:........................................................................ 24 rouges, 12 vertes, 12 bleues
Canaux DMX: ............................................................................................................5
Poids:.................................................................................................................. 3.2kg
Dim. (LxlxH):................................................................................400 x 190 x 175mm
Température ambiante max.:...............................................................................45°C
Fusible: ................................................................................................................. F1A
• Sous réserve de modifications techniques et esthétiques sans préavis.
N’effectuez jamais aucune réparation vous-même sous peine d’invalider la garantie. Ne pas modifier
l’appareil ce qui invaliderait également la garantie. Le droit de garantie ne s’applique pas en cas
d’accidents ou dommages causés par une utilisation inappropriée ou le non-respect des avertissements
contenus dans ce manuel. SkyTronic n’est pas responsable des blessures causées par le non-respect
des conseils et avertissements de sécurité.
19

Vor der ersten Inbetriebnahme bitte sorgfältig die Anleitung durchlesen.
Warnhinweise:
- Vor Inbetriebnahme die Anleitung durchlesen.
- Anleitung für spätere Einsicht aufbewahren.
- Originalverpackung für späteren Transport aufbewahren.
- Der SkyTec Lichteffekt enthält sehr lichtintensive LEDs.
Nicht in die Lichtquelle blicken. Sie können Ihre Augen
schwer beschädigen.
- Nur für Innen.
- Nicht die Belüftungsschlitze abdecken.
- Das Gerät nicht schütteln und keine Gewalt bei der Installation oder Bedienung anwenden.
- Während der Installation darf sich niemand unter dem Montagebereich aufhalten.
- Die Montagestelle muss 10 mal das Gewicht des Geräts tragen können.
- Das Effektgerät muss mindestens 50cm entfernt von brennbaren Stoffen wie Gardinen, Büchern usw.
installiert werden. Achten Sie darauf, dass das Gehäuse nicht versehentlich berührt werden kann.
- Vor der ersten Inbetriebnahme muss das Gerät von einem Fachmann geprüft werden.
- Das Gehäuse enthält spannungsführende Teile. NICHT das Gehäuse öffnen.
- Vor Reparatur- und Wartungsarbeiten und vor dem Auswechseln des Leuchtmittels den Netzstecker
abziehen.
- Niemals den Netzstecker mit nassen Händen anfassen.
- Vor Auswechseln der Sicherung den Netzstecker abziehen.
- Wenn Stecker und/oder Netzkabel Schäden aufweisen, müssen Sie sofort von einem Fachmann
ersetzt werden.
- Wenn das Gerät so beschädigt ist, dass innere Teile sichtbar sind, darf das Gerät nicht ans Netz
angeschlossen und eingeschaltet werden.
- Reparaturen nur von einem Fachmann ausführen lassen.
- Nur an eine geerdete 230Vac/50Hz~ Netzsteckdose anschließen.
- Bei Gewitter oder längerem Nichtgebrauch Netzstecker abziehen.
- Bei längerem Nichtgebrauch kann sich Kondenswasser im Gehäuse gebildet haben. Gerät erst auf
Zimmertemperatur kommen lassen.
- Beim Abziehen des Netzsteckers immer am Stecker anfassen, niemals am Kabel ziehen.
- Zur Sicherheit muss eine zusätzliche Befestigung angebracht werden. Dabei kann es sich um eine
starke Kette, ein Stahlkabel o.ä. handeln, das unabhängig von dem Montagebügel angebracht werden
muss.
- Nur geprüfte Sicherheitskabel benutzen, die mindestens 12 mal das Gewicht des Geräts tragen können
müssen.
- Das Gerät darf nicht mehr als 20cm fallen.
- Der mitgelieferte Halter ist die Hauptbefestigung des Geräts und muss fest und sicher am Gerät
angebracht werden.
- Um Unfälle in der Öffentlichkeit zu vermeiden, müssen alle geltenden Sicherheitsvorschriften
eingehalten werden.
- Vor Kindern schützen.
- Das Gerät niemals ohne Aufsicht betreiben.
20

- Alle sicherheits- und maschinentechnischen Installationen müssen regelmäßig von einer Fachperson
geprüft werden.
Allgemeines
Wir danken Ihnen für den Kauf von Triton. Das Gerät entspricht den EC Bestimmungen und dient zur
Erzeugung von Lichteffekten in Lichtshow Anlagen in Bars, Clubs, Schulen, auf der Bühne usw..
Merkmale
- 4 Betriebsarten:
Automatik, DMX, Musikaktiviert, Master/Slave bis zu 4 Slave Geräten
- Musiksteuerung mit eingebauten Programmen
- Gobodrehung über LED Matrix
- Stroboskopfunktion mit regelbarer Geschwindigkeit
- Longlife LEDs – kein Auswechseln von Leuchtmitteln mehr nötig
- Rasiermesserscharfe Strahlen, Farben verblassen nicht mit der Zeit
- Geringe Wärmeentwicklung
- Sehr geringer Energieverbrauch
- Leicht
Bedienung:
1. Montagebügel
2. Befestigungsschraube
3. Scharfeinstellung
4. Spiegel
5. Gehäuse
6. DMX-Ausgangsbuchse
7. Buchse für Fernbedienung (optional)
8. Netzbuchse / Sicherungshalter
9. DMX Eingangsbùchse
21

10. Mikrofon
11. Mode Taste
12. Enter Taste
13. Up Taste
14. Down Taste
15. LED Display
Nach Anschluss des Triton Scanners ans Netz (8) und Einschalten des Geräts, beginnt der LED
Scanner zu arbeiten. Während des Reset werden die Motoren ausgerichtet und das Gerät
geht in Betriebsbereitschaft.
Der Triton besitzt 3 Betriebsarten. Er kann über DMX betrieben werden oder im Master oder Slave Betrieb
arbeiten. Die Betriebsart wird durch Drücken der Mode Taste (11) gewählt.
Master-Slave Betrieb:
Bei dieser Funktion können bis zu 4 Geräte
zusammengeschlossen werden und ohne Steuerpult
arbeiten. Die Geräte sind musikaktiviert. Im Master-Slave
Betrieb arbeitet ein Gerät als Steuerpult und die anderen
reagieren auf das Programm des Steuergeräts. Jedes
Gerät kann als Master oder Slave eingestellt werden. Die
Geräte müssen mit einem 2-adrigen abgeschirmten
Mikrofonkabel mit XLR Verbinder über die XLR Armaturen
auf der Rückseite aneinander geschlossen werden. Dabei
ist der XLR Stecker immer der Eingang und die XLR
Buchse immer der Ausgang. Der erste Triton (Master)
benutzt nur die XLR Buchse. Das letzte Gerät verwendet
nur den XLR Stecker, sowie ein Abschlussstück (s. DMX Einstellung).
Das gewünschte Programm auf dem Master Gerät mit den Tasten Mode (11) und Up/Down (13/14)
einstellen und mit Enter (12) bestätigen. Auf den Slave Geräten den jeweiligen Slave Betrieb für alle
22

Geräte einstellen. Die Slaves folgen nun dem Master.
Hinweis:
Gerät kurzzeitig in Betriebsbereitschaft schalten möchten.
Die G-3 Funktion ist nur für Wartungszwecke. Diese Funktion bitte nur benutzen, wenn Sie das
DMX Betrieb:
Adressierung
Auf dem Bedienfeld kann die DMX Adresse eingestellt werden, die als erster Kanal definiert wird, von dem
aus der Triton auf das DMX Steuergerät reagiert. Achten Sie bitte darauf, dass sich keine Kanäle
überlappen, um jeden Triton Scanner richtig zu steuern, unabhängig von den anderen Geräten in der DMX
Kette. Wenn zwei, drei oder mehr Scanner eine ähnliche Adresse haben, funktionieren sie auch ähnlich.
Zum Einstellen der Adresse die Mode Taste (11) drücken bis „A001“ auf dem Display (15) erscheint. Dann
die gewünschte Adresse mit den Up (13) und Down (14) Tasten einstellen.
Nach Einstellen der Adresse kann der Triton über das DMX Steuerpult gesteuert werden.
DMX Protokoll
DMX Kanal Funktion
CH 1 Strobe
CH 2 Gobo
CH 3 Gobo Drehung
CH 4 Pan
CH 5 Tilt
DMX Kanal DMX Skala Funktion
CH 1
CH 2
CH 3
0 7 Geschlossen
8 247 Strobe Schnell langsam
248 255 Offen
0 7 Gobo 1
8 15 Gobo 2
16 23 Gobo 3
………………………. ……….
0 127 Drehung vorwärts
langsam schnell
128 255 Drehung rückwärts
Schnell langsam
23

DMX XLR-Anschluss
DMX IN
1
2
3
Der Anschluss zwischen Controller und dem LED Lichteffektgerät und anderen DMX Lichteffektgeräten
muss über ein 2-adriges, abgeschirmtes Kabel erfolgen, wobei jede Ader mindestens 0,5mm
Durchmesser aufweisen muss. Die XLR Verbinder werden wie oben abgebildet angeschlossen. Achten
Sie darauf, dass sich keiner der Anschlüsse gegenseitig oder das Gehäuse des Steckers berührt. Die
Steckerhülse ist nirgendwo angeschlossen. Der Triton bearbeitet digitale Steuersignale im DMX512
Standard Format
(1990). Schließen Sie den Ausgang des Controllers an den Eingang des ersten Geräts und den Ausgang
des ersten Geräts an den Eingang des zweiten usw. an. Der Ausgang des letzten Geräts muss an ein
DMX Abschlussstück angeschlossen werden.
Der Triton LED Effekt ist mit 3-pol. XLR Armaturen bestückt. Wenn Ihr Controller 5-pol. XLR Verbinder
erfordert, müssen Sie ein Adapterkabel von 5-pol. auf 3-pol. benutzen
DMX OUT
2
3
DMX 512
1
PIN FUNCTION
1
GND
2
DATA -
3
DATA +
5 PIN SOCKET
Pin 1: GND (Screen)
Pin 2: Signal (data -)
Pin 3: Signal (data +)
Pin 4: N/C
Pin 5: N/C
3 PIN PLUG
Pin 1: GND (Screen)
Pin 2: Signal (data -)
Pin 3: Signal (data +)
5 PIN PLUG
Pin 1: GND (Screen)
Pin 2: Signal (data -)
Pin 3: Signal (data +)
Pin 4: N/C
Pin 5: N/C
3 PIN SOCKET
Pin 1: GND (Screen)
Pin 2: Signal (data -)
Pin 3: Signal (data +)
DMX Abschlußstück
Der DMX Ausgang des letzten Geräts in der Kette muss an ein DMX Abschlußstück angeschlossen
werden, damit die elektrischen Geräusche nicht die DMX Steuersignale stören. Das DMX Abschlußstück
ist einfach ein XLR Verbinder mit einem 120 Ohm Widerstand, der parallel an die Stifte 2 und 3
angeschlossen ist. Dieser wird dann in die Ausgangsbuchse des letzten Geräts gesteckt. Die Anschlüsse
sind nachstehend abgebildet.
PIN 3
PIN 2
24

Einstellung:
PAN Reverse
Umkehrung der Pan Bewegung.
TILT Reverse
Umkehrung der Tilt Bewegung
Display Ein/Aus
Schaltet das LED Display (15) aus
Reinigung und Pflege:
Der Triton Scanner ist fast wartungsfrei. Wir empfehlen jedoch eine regelmäßige Reinigung des Geräts,
um die Lichtintensität zu erhalten. Ziehen Sie den Netzstecker ab und wischen Sie das Gehäuse mit
einem feuchten Tuch ab. Nicht in Flüssigkeiten tauchen. Niemals Alkohol oder Lösungsmittel benutzen.
Die Objektivlinse muss wöchentlich gereinigt werden, da Rauch Rückstände hinterlässt, die sehr schnell
die Lichtintensität vermindern.
Das Gerät enthält keine vom Bediener auswechselbaren Teile. Wartung und Reparaturen dürfen nur von
zugelassenen Fachhändlern vorgenommen werden.
Auswechseln der Sicherung:
Den Netzstecker abziehen. Einen flachen Schraubendreher in einen Schlitz des Sicherungsfachs stecken
(8). Vorsichtig das Fach öffnen. Die Sicherung springt heraus. Nehmen Sie die Sicherung heraus und
stecken Sie die Ersatzsicherung in den Halter. Benutzen Sie eine Sicherung desselben Typs und mit
denselben technischen Eigenschaften. Die Abdeckung wieder auf die IEC Buchse (8) setzen.
Technische Daten:
Versorgung: ........................................................................................230V / 50Hz ~
Verbrauch: ......................................................................................................... 25W
LEDs:............................................................................... 24 rote, 12 grüne, 12 blaue
DMX Kanäle: .............................................................................................................5
Gewicht:.............................................................................................................. 3.2kg
Größe (LxBxH): ...........................................................................400 x 190 x 175mm
Höchstzul. Raumtemperatur:...............................................................................45°C
Sicherung: ............................................................................................................ F1A
• Änderungen ohne Vorankündigung vorbehalten.
Führen Sie keine Reparaturen selbst aus und nehmen Sie keine Veränderungen am Gerät vor, da sonst
jeglicher Garantieanspruch verfällt. Die Garantie gilt nicht für Unfälle oder Schäden, die durch
unsachgemäßen Gebrauch oder Missachtung der Warnhinweise in dieser Anleitung entstanden sind.
SkyTronic übernimmt keine Haftung für Personen- und Sachschäden, die durch Missachtung der
Sicherheits- und Warnhinweise entstanden sind. Dies gilt für alle Schäden in jeglicher Form.
25

26
 Loading...