

Skyrocket Toys 01943RX24G User Manual
FURY
1R2
2
1
STUNT DRONE
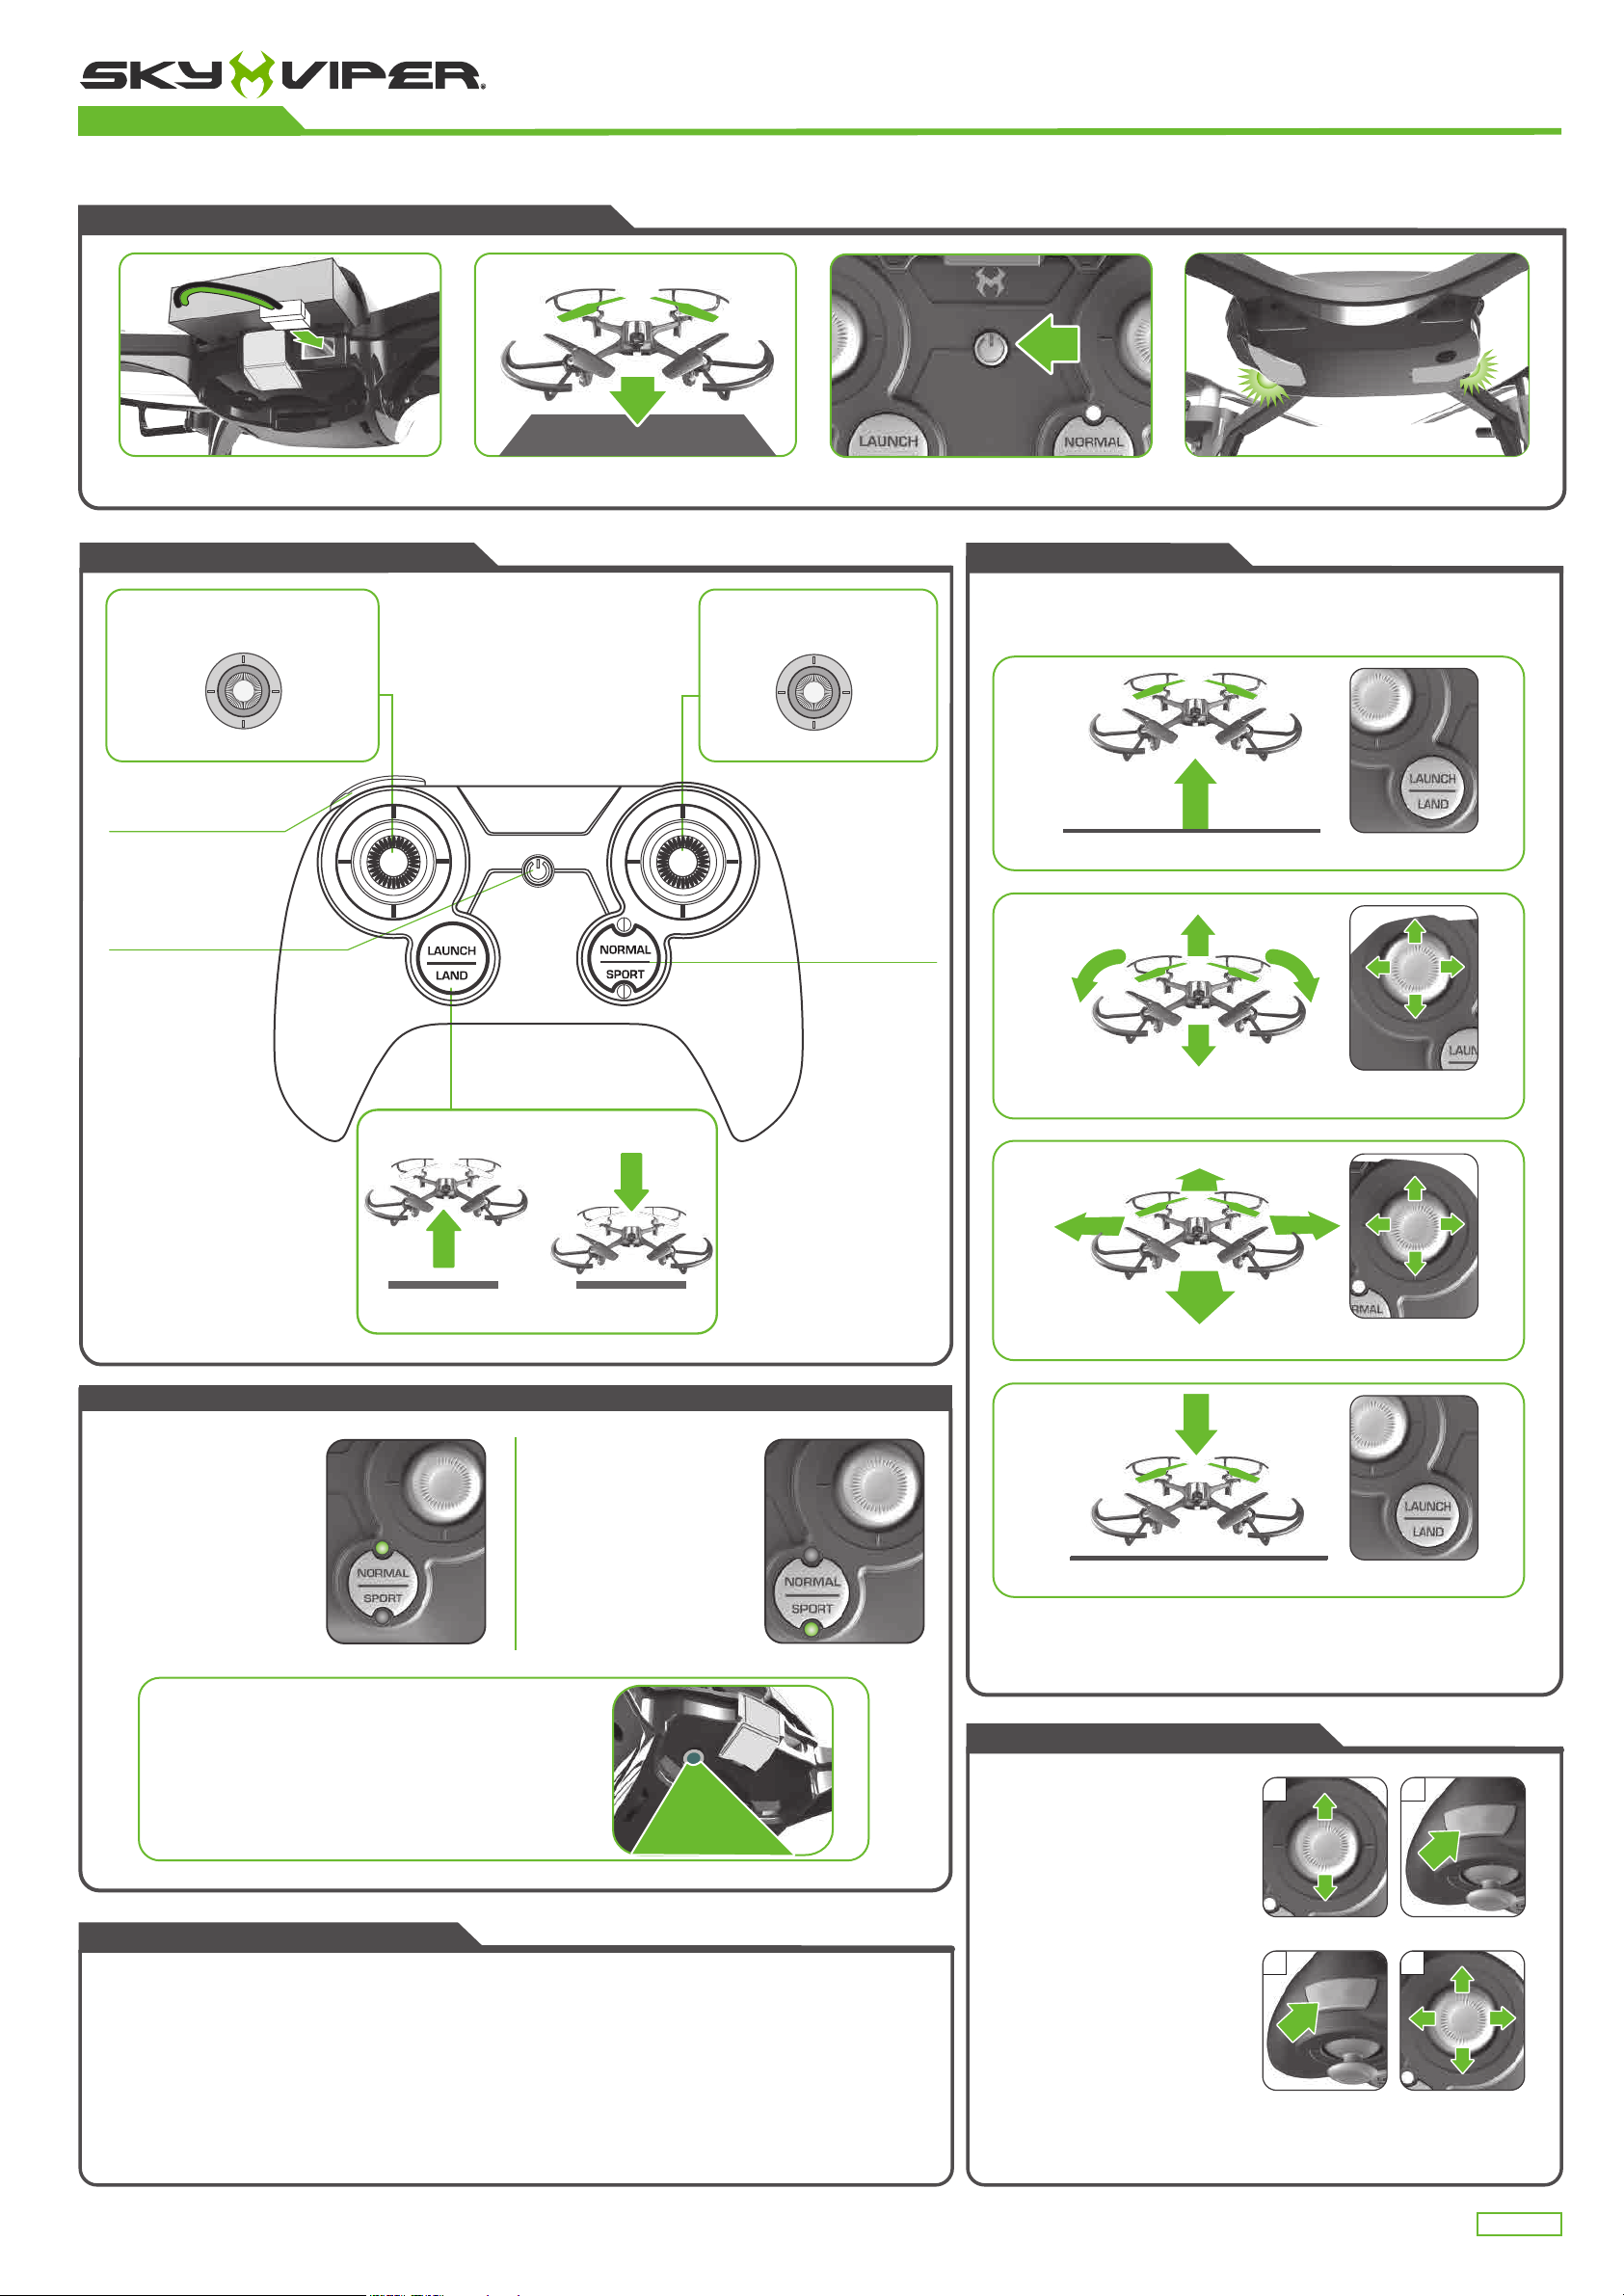
POWERING UP AND PAIRING REMOTE
LiPo BATTERY
FLYING GUIDE
FLIGHT CONTROL S
THROTTLE STICK DIRECTIONAL STICK
Up
Rotate
Left
Down
Stunt Button
Power Button
• If for any reason
you need to
immediately stop
the drone, press the
Power button to
initiate an
emergency disarm,
cutting power to the
motors.
Rotate
Right
LAUNCH/LAND BUTTON
Fly For ward
Fly Back ward
Flight Mode Button
Turn on controller. Place the drone on level surface.Insert fully charged LiPo battery.
Once blink ing lights turn solid, drone is
ready to fly.
FLIGHT BASICS
To make flying easier, place the drone on the ground in front of you with the
drone facing away from you (green blades forward). You should be facing
the same way the drone is facing.
Fly RightFly Left
Press L AUNCH to automatically launch a few feet off the ground.
Move Throttle thumbstick up or down to make drone fly higher or
lower and left or right to rotate.
L
L
FLIGHT MODES
NORMAL mode is best
for new pilots or those
who want a casual flying
experience. In NORMAL
mode, the drone reacts
smoothly to the pilot’s
input for easy control.
POSITION HOLD is active in both NORMAL and
SPORT modes. Simply let go of the control sticks
and the Surface Scan sensor will keep the drone
in a steady hover and will not drift away.
Ensure the Surface Scan view port on the underside of
the drone is free from obstruction.
PRESS TO
LAUNCH
R
PRESS TO
LAND
SPORT mode allows
for experienced pilots
to perform more
aggressive maneuvers.
The drone's response
rate to pilot input is
much higher for
sharper turns and
more speed.
R
R
Use Directional thumbstick to fly forwar d, backward, left or right.
L
Press L AND to au tomatically land.
You can also manually land the drone by holding throttle in the down
position to descend. Continue holding down once the drone reaches the
ground. When the drone recognizes it has landed, the controller will play
two beeps and the propellers will stop spinning.
ONE TOUCH STUNTS
BARREL R OLL LEFT
OR RIGHT
While flying forward (or reverse), tap
the STUNT button.
STUNT
TROUBLESHOOTING
FLIP IN 4 DIREC TIONS
While hovering, hold the STUNT button
If drone does not function properly, please check and add new batteries in the controller.
and tap the direction stick in the
direc tion you want the drone to flip.
If your drone won’t launch, you may need to calibrate the sensors.
• Power on drone and place on a level sur face. Power on controller.
• When controller is paired with drone, hold the Stunt and Flight Mode but tons for 2 seconds.
• Controller will play two beeps when the sensor s have been calibrated.
CAUTION!
The drone should be fly ing at least 10 feet in the air with a minimum clearance of
10 feet in all directions before attempting stunt functions.
STUNT
R
01943 - G2
+ AAA/LR03/ R03 1.5V –
+ AAA/LR03/ R03 1.5V –
– AAA/LR03/ R03 1.5V +
FURY
STUNT DRONE
MAINTENANCE
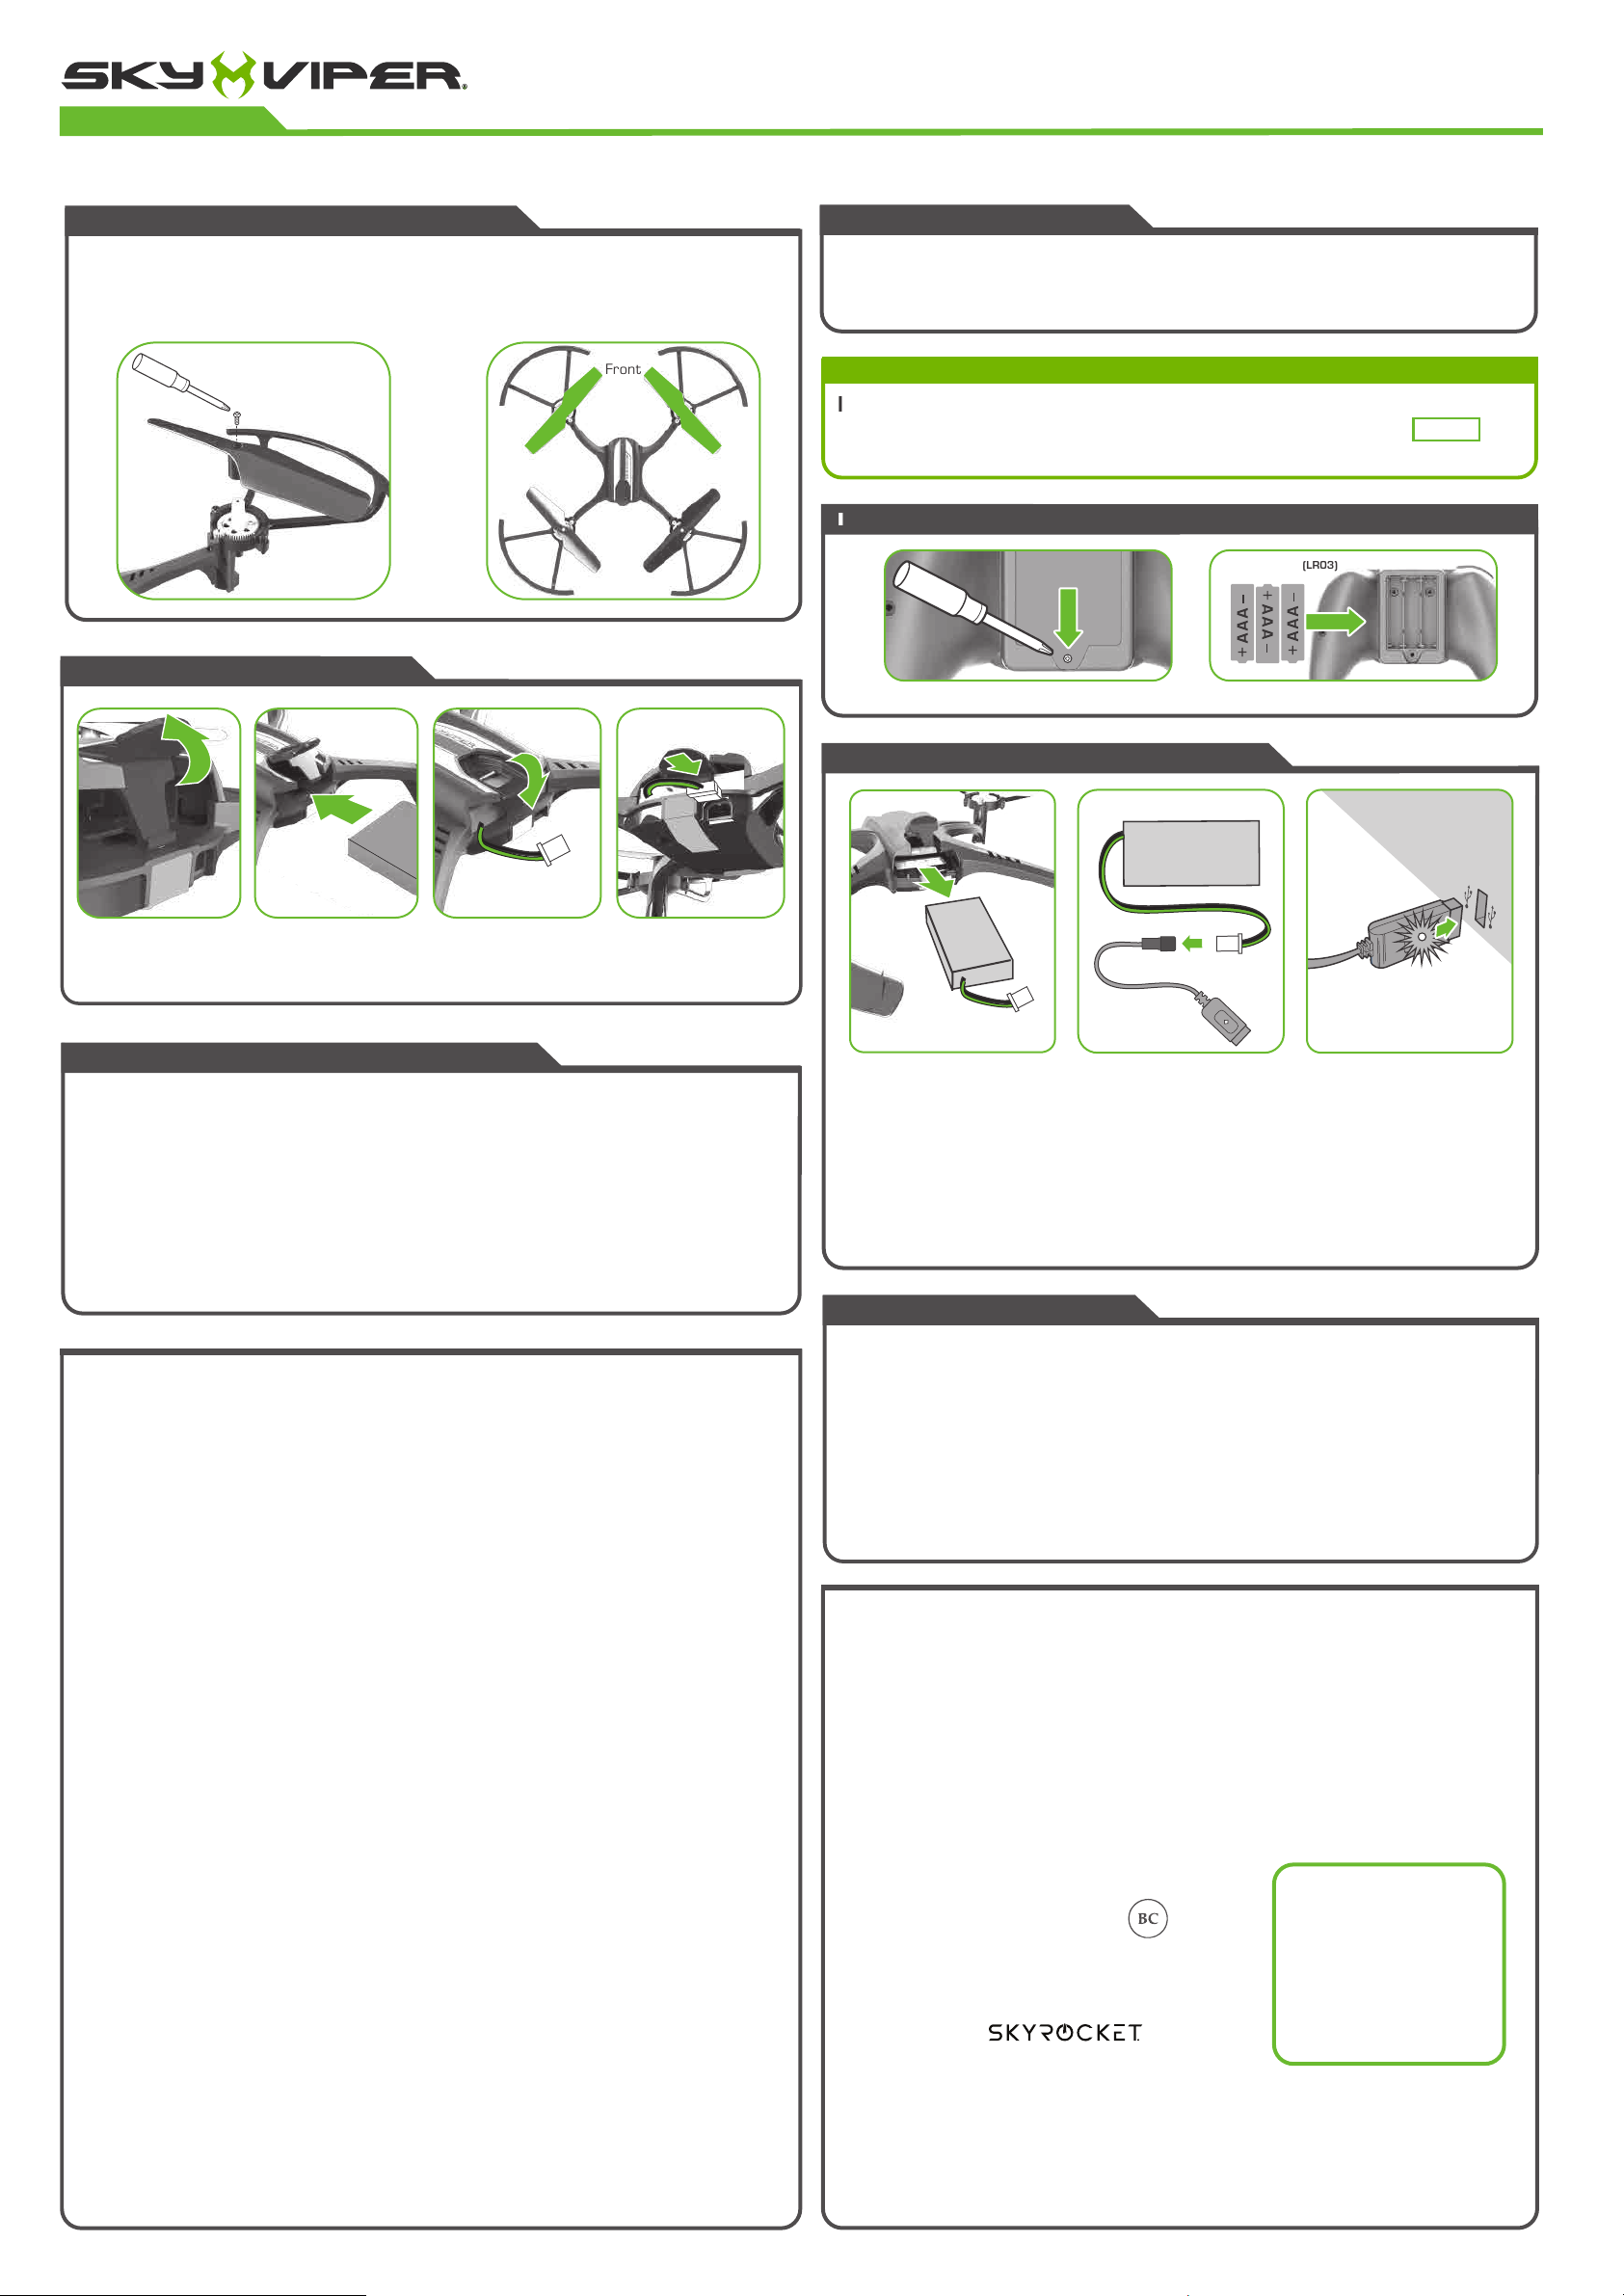
REPLACING DAMAGED BL ADES
Use the included screwdriver to unscrew the propeller, then pull up on propeller
to detach. Match A propellers to A legs and B propellers to B legs. Replace
screws and tighten.
A
B
CONNECTING BATTERY
Front
Front
CONTENTS
• Stunt Drone
• USB Charging Cable
• Rechargeable 3.7V 650 mAH LiPo Battery
• Controller
B
REPLACEMENT BATTERY AVAILABLE
• 4 Replacement Blades
• 4 Blade Guards
• Screwdriver & Extra Screws
Increase your flying time with an additional battery!
Details of how to purchase additional or replacement battery packs
available at SKYVIPER.COM
INSTALLING BATTERIES IN THE CONTROLLER
A
3 x1.5 V AAA (LR03)
*Batteries not included.
CHARGING T HE LiPo BATTERY
#01846
LiPo BATTERY
Insert batteryOpen the battery latch
(Press back of lat ch and
li f t u p)
Close the bat ter y latc h
Connect the battery
ADULT SUPERVISION REQUIRED
Befor e each use, an adult should check this product and the LiPo battery to ensure no damage or hazards
exist. Drone has rotating blades that move at high speed, posing danger of damage and injury. Use of
included blade guards strongly recommended. Pilots are responsible for any actions that result in damage
or injury from the improper operation of drone. Adequate fly ing space is required. Avoid fl ying near interior
fans and/or vents as they may make flying difficult to control. Keep a safe distance away f rom streets,
public thoroughfar es and power lines. Never att empt t o retrieve drone from any location higher than your
reach (such as rooftops or trees) or from any location that poses a safety hazard. Never fly drone at night.
Keep drone in sight at all times during operation. Discontinue operation immediately if drone flies out of
your field of view. Do not fly near spectators or animals. Keep spinning rot ors away from fingers, hair, eyes
and other body part s. Always launch from a flat surface. Never leave drone unattended while it is turned
on. Read all enclosed infor mation before operating.
THIS PRODUCT CONTAINS A LITHIUM-POLYMER BATTERY3.7V 650mAh:
LiPo batteries have a severe risk of fire and injury if they are improperly handled or misused. They may
explode, overheat or ignite.Read all following precautions and instructions regarding the care and use
of LiPo batteries.
The LiPo battery is only to be used with the drone and charger included with this product.
• Keep away from flammable materials.
• Do not expose to direct sunlight.
• Do not place in fire or leave in hot places.
• Do not drop or make subject to strong impact.
• Keep dry and away from water.
• Remove exhausted battery as soon as possible and discard properly.
• Remove battery from the compartment if toy is not used for a long period of time.
• The supply terminals are not to be short circuited.
• Never throw battery in a fire or attempt to open outer casing.
• Do not leave battery connected to drone when not in use.
• Do not stress, press or drop the battery.
• Never charge battery unattended. When charging battery you should always remain in constant
observation to monitor the charging process and react to potential problems that may occur.
• Disconnect with the charging wire if the battery is fully charged.
• Never store or charge battery inside the car in extreme temperatures, since extreme temperature could
ignite fire.
• Use caution to avoid puncture of the battery. Puncture of battery may cause a fire.
LiPo Battery Disposal: LiPo batteries must be recycled or disposed of properly. They should not be
disposed of with other household waste. Check your local laws and regulations for correct recycling
and/or battery disposal.
AAA BATTERY CAUTIONS
• Do not use rechargeable batteries.
• Non-rechargeable batteries are not to be recharged.
• Do not mix old and new batteries and Do not mix alkaline, standard (carbon-zinc) or rechargeable (ni-cad,
ni-mh, etc.) batteries.
• Batteries are to be inserted using correct polarity.
• Remove exhausted batteries as soon as possible and discard properly.
• Remove all batteries from compartment if toy is not used for a long period of time.
• The supply terminals are not to be short circuited.
• Batteries should be replaced by an adult.
• Never throw batteries in a fire or attempt to open the outer casing.
WARNING:Batteries are harmful if swallowed. Please keep away from children.
Battery Disposal: Dispose of batteries according to the local laws and regulations of your region. Some
batteries may be recycled, and may be accepted for disposal at your local recycling center. If you are not
able to identify the applicable rules in your area, please check the instructions of the battery manufacturer.
Computer or
charging block.
LiPo BATTERY
Li Po BAT TER Y
Red light = charging
Green light = fully charged
Remove LiPo battery from
compar tmen t and unplug cable
CHARGING PRECAUTIONS:
• After use, allow batter y to cool down to room temperature before charging again.
• Charge battery in an isolated area, away from excessive heat or moisture.
• If you suspect that the batt ery is damaged or swelling, discard the bat ter y in accordance with
your country’s recycling laws.
• Do not modify, heat, or wet the battery in any way. Only recharge with pr ovided charger.
FAILSAFE GUIDE
• When the drone turns upside down, the motors will stop spinning.
• When the drone goes out of range of t he controller, it will automatically land itself in i ts current
position. If the controller comes back in to range befor e the dr one lands, press up on throt tle t o
cancel landing.
• When the drone's bat tery is low, the LEDs on the drone will begin to blink rapidly, and a t one is
played continuousl y on the controller. The drone will begin t o land. Press up on throttle to cancel
landing.
• When the drone's bat tery is deplet ed, the drone will aut omaticall y land itself in it s curr ent
position. This automatic landing cannot be interrupted with t he controller.
• When the propeller is jammed or blocked by an obstacle switch off the controller immediately to
prevent possible or further damage.
This devi ce complies with PART 15 of the FCC Ru les. Operati on is subject to the f ollowing two co nditions. (1) This de vice may not cause
harmful i nterference, a nd (2) this device m ust accept any inter ference recei ved, including i nterference th at may cause undesi red operation .
CAUTIO N: Changes or mo dificatio ns to this unit not exp ressly approved b y the party res ponsible
for compl iance could void the u ser’s authorit y to operate the e quipment.
NOTE: T his equipment ha s been tested and f ound to comply wit h the limits for a Cla ss B digital devic e, pursuant to Par t 15 of the FCC Rul es.
These limits are designed to provide reasonable protection against harmful interference in a residential installation. This equipment
generat es, uses and can ra diate radio freq uency energ y and, if not instal led and used in acco rdance with the ins tructions, m ay cause harmful
interf erence to radio com munications. H owever, there is no guar antee that inter ference will not o ccur in a particul ar installatio n. If this
equipm ent does cause har mful interfer ence to radio or tel evision recepti on, which can be de termined by tur ning the equipme nt off and on,
the user is e ncouraged to tr y to correct the in terference by o ne or more of the fol lowing measures : Reorient or r elocate the rece iving
antenna - In crease the separ ation betwe en the equipment a nd receiver - Conn ect the equipm ent into an outlet on a c ircuit diffe rent from
that to whic h the receiver is conn ected - Consult t he dealer or an exp erienced rad io/TV te chnician for hel p.
This equi pment complies w ith FCC radiation ex posure limits s et forth for an un controlled envi ronment.
This trans mitter must not b e co-locate d or operating in co njunction wit h any other antenna or t ransmitter.
For Drone:This equipmen t should be insta lled and opera ted with minimum di stance 20cm bet ween the radiat or& your body.
Remove all p ackaging att achments befor e giving the toy to a chil d.
Not suita ble for children u nder 3 years due to sma ll parts that coul d be swallowed.
Conforms t o product safe ty standards A STM F963.
Keep instructions for future reference. Do not discard.
©2018 Skyrocket L LC, Los Angeles CA 9 0066 USA. All Ri ghts Reserved . Sky
Viper an d Skyrocket and t heir respect ive logos are trad emarks and/or
registe red trademark s of Skyrocket L LC. All other trad emarks, logos a nd
copyrig hts are the proper ty of their resp ective owner s, and there is no
relationship express or implied with Skyrocket LLC.
MADE IN CHI NA.
Googl e Play and the Google P lay logo are tradem arks of Googl e Inc.
Apple and t he Apple logo are t rademarks of A pple Inc., regi stered in the U.S.
and other co untries. App Stor e is a service mark o f Apple Inc., reg istered in the
U.S. and other countries.
The sof tware included in this pr oduct cont ains copyrighted sof tware that is licensed under the
GPLv3. A copy of that license is included in our website at the URL below. You may obtain the
complete Corresponding Source code from us for a period of thr ee years af ter our last shipment of
this product and/or spare parts theref or, which will be no earlier than 05-01-2021, on our website at
http://www.sky viper.com/opensource
Plug bat ter y int o USB
charging cable
Insert charging cable into USB
charging block or comput er.
Charge until light tur ns green
then unplug.
WE’RE HERE TO HELP
For questions about
this product:
Online: skyviper.com/support
Phone:
1-888-674-5650
M-F 9am to 6pm PST
 Loading...